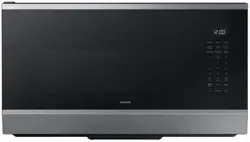

Microwave Oven
User manual
ME90H1780RAA
• For detailed instructions on installation and cleaning of the appliances, visit the Samsung website
(http://www.samsung.com), go to Support > Support home, and then enter the model name.
• To check the product’s model name, see the label enclosed with the product or attached to the product.
• Open a QR code scanner app and scan the QR code image attached to the product.
You can access ‘Product registration’, ‘Manual’, and ‘Customer support’.
• Figures and illustrations are provided for reference only and may differ from the actual product appear-
ance. Product design and specifications may change without notice.

2
English
Contents
Safety Information 4
Important Safety Information 4
Important safety symbols 4
What You Need To Know About Safety Instructions 4
Precautions To Avoid Possible Exposure To Excessive Microwave Energy 4
Important Safety Symbols And Precautions 6
Grounding Instructions 7
Use Of Extension Cords 8
Critical Installation Warnings 8
Installation Cautions 9
Critical Usage Warnings 9
Usage Cautions 11
Critical Cleaning Instructions 12
State Of California Proposition 65Warning 13
At a Glance 14
Setting up your new microwave oven 14
Checking the parts 14
Setting up your microwave oven 15
Checking the control panel 16
Clock Settings 17
Child Lock 17
Eco mode 17
Smart Control 18
Voice Control 19
Auto Connectivity 22
My settings 22
Smart Features 24
Operations 24
Kitchen Timer 24
Vent Fan (High/Mid/Low/Off) 24
Cooktop Lamp (High/Low/Off) 25
Turntable 25
Stop/Eco button 25
+30sec button 25
Accessory Combination Guide 26
Popcorn 27
Defrost 28
Air Fry Max Manual/Auto 30
Example for Air Fry Max Auto operation 32
Sensor Reheat/Cook 34
Sensor Reheat/Cook Cooking Guide 34
Auto Cook 36
Example for Auto Cook operation 37

3
English
Steam Cook 43
Pure steam cooking guide 43
Example for Steam Cook operation 45
Microwave 47
Convection Bake/Roast 48
Speed Bake/Roast 49
Cookware for cooking with speed bake/roast 49
Food suitable for speed bake/roast 50
Speed Bake/Roast Cooking Guide 50
Grill 52
Keep Warm 52
Steam Clean 53
Cookware guide 54
Recommended cooking utensils 54
Limited use items 54
Not recommended 54
Testing utensils 54
Cooking guide 55
Cooking techniques 55
Recommended cooking utensils 56
Guide for cooking eggs in your microwave 56
Guide for cooking vegetables in your microwave 56
Cleaning and Maintenance 57
Cleaning and maintaining your microwave oven 57
Cleaning the exterior 57
Cleaning under your microwave oven 57
Cleaning the control panel 57
Cleaning the door and door seals 57
Cleaning the interior 57
Cleaning the turntable and roller rings 58
Storing and repairing your microwave oven 58
Replacing the cooktop/night light 58
Replacing the oven light 59
Cleaning the grease filter 59
Replacing the charcoal filter 60
Troubleshooting 61
Information codes 66
Appendix 67
Appendix 67
Specifications 67
Warranty 68
Samsung MICROWAVE OVEN 68
4
English
Safety Information
• Congratulations on your new Samsung appliances. This manual contains important information on the
installation, use, and care of your appliances. Read this manual thoroughly before using the appliances
to ensure that you know how to safely and efficiently operate the features and functions that your new
appliances offers.
Important safety symbols
What the icons and signs in this user manual mean:
WARNING
Hazards or unsafe practices that may result in severe personal injury, death and/or property damage.
CAUTION
Hazards or unsafe practices that may result in minor personal injury and/or property damage.
Read the instructions
After reading this manual, store it in a safe place for future reference.
Read all instructions before using the appliance.
NOTE
Supplementary information that may be useful.
Congratulations on your new Samsung microwave oven. This manual contains important information on the
installation, use and care of your appliance. Please take time to read this manual to take full advantage of your
microwave oven’s many benefits and features.
WHAT YOU NEED TO KNOW ABOUT SAFETY INSTRUCTIONS
Warnings and Important Safety Instructions in this manual do not cover all possible conditions and situations
that may occur. It is your responsibility to use common sense, caution, and care when installing, maintaining,
and operating your microwave oven.
PRECAUTIONS TO AVOID POSSIBLE EXPOSURE TO EXCESSIVE
MICROWAVE ENERGY
A. Do not attempt to operate this oven with the door open since open-door operation can result in harmful
exposure to microwave energy. It is important not to defeat or tamper with the safety interlocks.
B. Do not place any object between the oven front face and the door or allow soil or cleaner residue to
accumulate on the sealing surface.
IMPORTANT SAFETY INFORMATION
Safety Information

5
English
Safety Information
C. Do not operate the oven if it is damaged. It is particularly important that the oven door close properly and
that there is no damage to the:
1. Door (bent),
2. Hinges and latches, (broken or loosened),
3. Door seals and sealing surface.
D. Only properly qualified service personnel should adjust or repair the oven. Do not attempt to adjust or
repair the oven yourself.
When using any electrical appliance, basic safety precautions should be followed, including the following:
WARNING
To reduce risk of burns, electric shock, fire, personal injury or exposure to excessive microwave energy:
1. Read all safety instructions before using the appliance.
2. Read and follow the specific "Precautions to avoid possible exposure to excessive microwave energy" on
page 4.
3. This appliance must be grounded. Connect only to properly grounded outlets. See Important "Grounding
instructions" on page 8 of this manual.
4. Install or locate this appliance only in accordance with the provided installation instructions.
5. Some products such as whole eggs and sealed containers (for example, closed glass jars) can explode if
heated rapidly. Never heat them in a microwave oven.
6. Do not use this appliance for other purposes than cooking. Drying of clothing and heating of warming
pads, slippers, sponges, damp cloth and similar may lead to risk of injury, ignition or fire. Use this appliance
only for its intended use as described in the manual. Do not put corrosive chemicals or vapors in or on
this appliance. This type of oven is specifically designed to heat, cook, or dry food. It is not designed for
industrial or laboratory use.
7. HOT CONTENTS CAN CAUSE SEVERE BURNS. DO NOT ALLOW CHILDREN TO USE THE MICROWAVE.
8. Do not operate this appliance if it has a damaged cord or plug, if it is not working properly, or if it has been
damaged or dropped.
9. This appliance should be repaired or serviced only by qualified service personnel. Contact the nearest
authorized service facility for examination, repair, or adjustment.
10. Do not cover or block any openings on the appliance.
11. Do not tamper with or make any adjustments or repairs to the door.
12. Do not store this appliance outdoors. Do not use this product near water, for example, near a kitchen sink,
in a wet basement, near a swimming pool, or similar locations.
13. Do not immerse the cord or plug in water.
14. Keep the cord away from heated surfaces. (including the back of the oven).
15. Do not let the cord hang over edge of table or counter.
16. When cleaning surfaces of the door and oven that come together when the door closes, use only mild,
nonabrasive soaps, or detergents applied with a sponge or soft cloth. Unplug the plug before cleaning.
17. To reduce the risk of fire in the oven cavity:
a. Do not overcook food. Carefully watch appliance when paper, plastic, or other combustible materials
are placed inside the oven to facilitate cooking.
6
English
IMPORTANT SAFETY INFORMATION
Safety Information
b. Remove wire twist-ties from paper or plastic bags before placing the bags in the oven.
c. If materials inside the oven ignite, keep the oven door closed, turn the oven off, and disconnect the
power cord, or shut off the power at the fuse or circuit breaker panel. If the door is opened, the fire may
spread.
d. Do not use the cavity for storage purposes. Do not leave paper products, cooking utensils, or food in the
cavity when not in use.
18. Liquids, such as water, milk, coffee, or tea can be overheated beyond the boiling point without appearing
to be boiling. Visible bubbling or boiling when the container is removed from the microwave oven is
not always present. THIS COULD RESULT IN VERY HOT LIQUIDS SUDDENLY BOILING OVER WHEN THE
CONTAINER IS DISTURBED OR A SPOON OR OTHER UTENSIL IS INSERTED INTO THE LIQUID. To reduce the
risk of injury:
a. Do not overheat liquid.
b. Stir liquid both before and halfway through heating it.
c. Do not use straight-sided containers with narrow necks.
d. After heating, allow the container to stand in the microwave oven for a short time before removing the
container.
e. Use extreme care when inserting a spoon or other utensil into the container.
19. Oversized foods or oversized metal utensils should not be inserted in microwave / toaster oven as they
may create a fire of electric shock.
20. Do not clean with metal scouring pads. Piece can burn off the pad and touch electrical parts involving a
risk of electric shock.
21. Do not use paper products when appliance is operated in toaster mode.
22. Do not store any materials, other than manufacturer’s recommended accessories, in this oven when not in
use.
23. Do not cover racks or any other part of the oven with metal foil . This will cause overheating of the oven.
IMPORTANT SAFETY SYMBOLS AND PRECAUTIONS
What the icons and signs in this user manual mean:
WARNING
Hazards or unsafe practices that may result in severe personal injury or death.
CAUTION
Hazards or unsafe practices that may result in minor personal injury or property damage.
NOTE
To reduce the risk of fire, explosion, electric shock, or personal injury when using your microwave oven, follow
these basic safety precautions.
7
English
Safety Information
Do NOT attempt. Unplug the power plug from the wall socket.
Do NOT disassemble.
Make sure the machine is grounded to prevent
electric shock.
Do NOT touch. Call the service center for help.
Follow directions explicitly. Note
These warning signs are here to prevent injury to you and others. Please follow them explicitly. After reading
this section, keep it in a safe place for future reference.
CAUTION
1. Clean Ventilating Hoods Frequently - Grease should not be allowed to accumulate on the hood of the filter.
2. When flaming foods under the hood, turn the fan on.
3. Use care when cleaning the vent-hood filter. Corrosive cleaning agents, such as lye-based oven cleaner,
may damage the filter.
GROUNDING INSTRUCTIONS
This appliance must be grounded. In the event of an electrical short circuit, grounding reduces the risk of
electric shock by providing an escape wire for the electrical current. This appliance is equipped with a cord
that includes a grounding wire and a grounding plug. The plug must be plugged into an outlet that is properly
installed and grounded.
WARNING
Improper use of the grounding plug can result in a risk of electric shock.
• Plug into a grounded, 3 pronged outlet. Do not remove the third (grounding) prong. Donot use an adaptor
or otherwise thwart the safety function of the grounding plug.
• Consult a qualified electrician or service person if you do not understand the grounding instructions or if
you are not sure if the appliance is properly grounded.
• We do not recommend using an extension cord with this appliance. If the power-supply cord is too short,
have a qualified electrician or serviceman install an outlet near the appliance. However, if it is necessary to
use an extension cord, read and follow the "Use of Extension Cords" section on the next page.

8
English
IMPORTANT SAFETY INFORMATION
Safety Information
USE OF EXTENSION CORDS
A short power-supply cord is provided to reduce the risk of your becoming entangled in or tripping over a
longer cord. Longer cord sets or extension cords are available and you can use them if you exercise care. If you
use a long cord or extension cord:
1. The marked electrical rating of the cord set or extension cord should be at least as great as the electrical
rating of the appliance.
2. The extension cord must be a grounding-type 3-wire cord and it must be plugged into a 3-slot outlet.
3. The longer cord should be arranged so that it will not drape over the counter top or tabletop where it can
be pulled on by children or tripped over accidentally. If you use an extension cord, the interior light may
flicker and the speed of the blower may vary when the microwave oven is on. Cooking times may be longer
too.
CRITICAL INSTALLATION WARNINGS
This appliance must be installed by a qualified technician or service company.
• Failing to have a qualified technician install the oven may result in electric shock, fire, an explosion,
problems with the product, or injury.
Unpack the oven, remove all packaging material and examine the oven for any damage such as dents
on the interior or exterior of the oven, broken door latches, cracks in the door, or a door that is not lined
up correctly. If there is any damage, do not operate the oven and notify your dealer immediately.
Make sure to install your oven in a location with adequate space.
Remove all foreign substances such as dust or water from the power plug terminals and contact points
using a dry cloth on a regular basis.
• Unplug the power plug and clean it with a dry cloth.
• Failing to do so may result in electric shock or fire.
Plug the power cord into a properly grounded 3 pronged outlet. Your oven should be the only appliance
connected to this circuit.
• Sharing a wall socket with other appliances, using a power strip, or extending the power cord may
result in electric shock or fire.
• Do not use an electric transformer. It may result in electric shock or fire.
• Ensure that the voltage, frequency and current provided match the product’s specifications. Failing
to do so may result in electric shock or fire.
Keep all packaging materials out of the reach of children. Children may use them for play.
This appliance must be properly grounded. Read and follow the specific "Grounding instructions"
found in the beginning of this section. Do not ground the appliance to a gas pipe, plastic water pipe, or
telephone line.
• This may result in electric shock, fire, an explosion, or problems with the product.
• Never plug the power cord into a socket that is not grounded correctly and make sure that it is
grounded in accordance with local and national codes.
Do not cut or remove the third (ground) prong from the power cord under any circumstances.
The microwave requires a separate branch circuit single grounded outlet of at least 15A and max of 20A.
9
English
Safety Information
Do not install this appliance in a humid, oily, or dusty location, or in a location exposed to direct sunlight
or water (rain drops).
• This may result in electric shock or fire.
Plug the power plug into the wall socket firmly. Do not use a damaged power plug, damaged power
cord, or loose wall socket.
• This may result in electric shock or fire.
Do not mount over a sink.
Do not pull or excessively bend the power cord.
Do not twist or tie the power cord.
Do not hook the power cord over a metal object, place a heavy object on the power cord, insert the
power cord between objects, or push the power cord into the space behind the appliance.
• This may result in electric shock or fire.
Do not pull the power cord when you unplug the oven.
• Unplug the oven by pulling the plug only.
• Failing to unplug may result in electric shock or fire.
When the power plug or power cord is damaged, contact your nearest service center for a replacement
or repair.
INSTALLATION CAUTIONS
Position the oven so that the plug is easily accessible.
• Failing to do so may result in electric shock or fire due to electric leakage.
Unplug the oven when it is not being used for long periods of time or during a thunder/lightning storm.
• Failing to do so may result in electric shock or fire.
CRITICAL USAGE WARNINGS
If the microwave appliance is flooded, please contact your nearest service center. Failing to do so may
result in electric shock or fire.
Read and follow the specific "Precautions to Avoid Possible Exposure to Excessive Microwave Energy",
found in the beginning of this Safety Information Section.
If the microwave generates a strange noise, a burning smell or smoke, unplug it immediately and
contact your nearest service center.
• Failing to do so may result in electric shock or fire.
In the event of a gas leak (propane gas, LP gas, etc.), ventilate the room immediately. Do not touch the
microwave, power cord, or plug.
• Do not use a ventilating fan.
• A spark may result in an explosion or fire.

10
English
IMPORTANT SAFETY INFORMATION
Safety Information
Take care that the door or any of the other parts do not come into contact with your body while cooking
or just after cooking.
• Failing to do so may result in burns.
In the event of a grease fire on the surface units below the oven, smother the flaming pan on the surface
unit by covering the pan completely with a lid, a cookie sheet, or a flat tray.
Never leave surface units beneath your oven unattended at high heat settings. Boil overs cause smoking
and greasy spillovers that may ignite and spread if the vent fan is operating. To minimize automatic fan
operation, use adequate sized cookware and use high heat on surface units only when necessary.
If materials inside the oven should ignite, keep the oven door closed, turn the oven off and disconnect
the power cord, or shut off power at the fuse or circuit breaker panel. If the door is opened, the fire may
spread.
Use of inadequately sized cookware on top of the stove may result in melting of microwave door or
other damage.
• Always observe safety precautions when using your oven. Never try to repair the oven on your own.
There is dangerous voltage inside. If the oven needs to be repaired, contact an authorized service
center near you.
Do not attempt to repair, disassemble, or modify the appliance yourself.
• Because a high voltage current enters the product chassis during operation, opening the chassis can
result in electric shock or fire.
• You may be exposed to electromagnetic waves.
• When the oven requires repair, contact your nearest service center.
If any foreign substance such as water enters the microwave, unplug it, and then contact your nearest
service center.
• Failing to do so may result in electric shock or fire.
Do not touch the power plug with wet hands.
• This may result in electric shock.
Do not turn the appliance off by unplugging the power plug while the appliance is in operation.
• Plugging the power plug into the wall socket again may cause a spark and result in electric shock or
fire.
Keep all packaging materials well out of the reach of children. Packaging materials can be dangerous to
children.
• If a child places a bag over its head, the child can suffocate.
Do not let children or any person with reduced physical, sensory or mental capabilities use this
appliance unsupervised. Make sure that the appliance is out of the reach of children.
• Failing to do so may result in electric shock, burns, or injury.
Do not touch the inside of the appliance immediately after cooking. The inside of the appliance will be
hot.
• The heat on the inside of the oven can cause burns.
Do not put aluminum foil (except as specifically directed in this manual), metal objects (such as
containers, forks, etc.), or containers with golden or silver rims into the microwave.
• These objects can cause sparks or a fire.

11
English
Safety Information
Do not use or place flammable sprays or objects near the oven.
• Heat from the microwave can cause flammable sprays to explode or burn.
• Failing to do so may result in electric shock or injury.
Do not tamper with or make any adjustments or repairs to the door. Under no circumstances should you
remove the outer cabinet.
Do not store or use the oven outdoors.
USAGE CAUTIONS
If the surface of the microwave is cracked, turn it off.
• Failing to do so may result in electric shock.
Dishes and containers can become hot. Handle with care.
Hot foods and steam can cause burns. Carefully remove container coverings, directing steam away from
your hands and face.
Remove lids from baby food before heating. After heating baby food, stir well to distribute the heat
evenly. Always test the temperature by tasting before feeding the baby. The glass jar or surface of the
food may appear to be cooler than the food in the interior, which can be so hot that it will burn the
infant’s mouth.
Make sure all cookware used in the oven is suitable for microwaving.
Use microwavable cookware in strict compliance with such manufacturer’s recommendations.
Do not stand on top of the microwave or place objects (such as laundry, oven covers, lighted candles,
lighted cigarettes, dishes, chemicals, metal objects, etc.) on the appliance.
• Items, such as a cloth, may get caught in the door.
• This may result in electric shock, fire, problems with the product, or injury.
Do not operate the appliance with wet hands.
• This may result in electric shock.
Do not spray volatile material such as insecticide onto the surface of the appliance.
• As well as being harmful to humans, it may also result in electric shock, fire or problems with the
product.
Do not place the appliance over a fragile object such as a sink or glass object.
• This may result in damage to the sink or glass object.
Do not put your face or body close to the appliance while cooking or when opening the door just after
cooking.
• Take care that children do not come too close to the appliance.
• Failing to do so may result in children burning themselves.
Do not place food or heavy objects over the door when opening the door.
• The food or object may fall and this may result in burns or injury.
Do not abruptly cool the door, the inside of the appliance, or the dish by pouring water over it during or
just after cooking.
• This may result in damage to the appliance. The steam or water spray may result in burns or injury.

12
English
IMPORTANT SAFETY INFORMATION
Safety Information
Do not cook without the glass tray in place on the oven floor. Food will not cook properly without the
tray.
Do not defrost frozen beverages in narrow-necked bottles. The containers can break.
Do not scratch the glass of the oven door with a sharp object.
• This may result in the glass being damaged or broken.
Do not store anything directly on top of the appliance when it is in operation.
Do not use sealed containers. Remove seals and lids before use. Sealed containers can explode due to
buildup of pressure even after the oven has been turned off.
CRITICAL CLEANING INSTRUCTIONS
Do not clean the appliance by spraying water directly onto it.
Do not use benzene, thinner, or alcohol to clean the appliance.
• This may result in discoloration, deformation, damage, electric shock, or fire.
Before cleaning or performing maintenance, unplug the appliance from the wall socket and remove food
waste from the door and cooking compartment.
• Failing to do so may result in electric shock or fire.
Take care not to hurt yourself when cleaning the appliance.
(external/internal)
• You may hurt yourself on the sharp edges of the appliance.
Do not clean the appliance with a steam cleaner.
• This may result in corrosion.
Keep the inside of the oven clean. Food particles or spattered oils stuck to the oven walls or floor can cause
paint damage and reduce the efficiency of the oven.
1. FCC NOTICE
FCC STATEMENT :
This equipment generates and uses ISM frequency energy and if not installed and used properly, that is
in strict accordance with the manufacturer’s instructions, may cause interference to radio and television
reception. It has been type tested and found to comply with limits for ISM Equipment pursuant to part18 of
FCC Rules, which are designed to part 18 of FCC Rules, which are designed to provide residential installation.
However, there is no guarantee that interference will not occur in a particular installation. If this equipment
does cause interference to radio or television reception, which can be determined by turning the equipment
off and on, the user is encouraged to try to correct the interference by one or more of the following:
• Reorient the receiving antenna of the radio or television.
• Relocate the Microwave Oven with respect to the receiver.
• Move the microwave oven away from the receiver.
• Plug the microwave oven into a different outlet so that the microwave oven and the receiver are on
different branch codes.
13
English
Safety Information
The manufacturer is not responsible for any radio of TV interference caused by unauthorized modification to
this microwave oven. It is the responsibility of the user to correct such interference.
This equipment has been tested and found to comply with the limits for a Class B digital device, pursuant
to part 15 of the FCC Rules. These limits are designed to provide reasonable protection against harmful
interference in a residential installation. This equipment generates, uses and can radiate radio frequency
energy and, if not installed and used in accordance with the instructions, may cause harmful interference
to radio communications. However, there is no guarantee that interference will not occur in a particular
installation. If this equipment does cause harmful interference to radio or television reception, which can be
determined by turning the equipment off and on, the user is encouraged to try to correct the interference by
one or more of the following measures:
• Reorient or relocate the receiving antenna.
• Increase the separation between the equipment and receiver.
• Connect the equipment into an outlet on a circuit different from that to which the receiver is connected.
• Consult the dealer or an experienced radio/TV technician for help.
WARNING
Any changes or modifications to this unit not expressly approved by the party responsible for compliance
could void the user’s authority to operate the equipment.
FCC RF Exposure Requirements
This device complies with FCC RF radiation exposure limits set forth for an uncontrolled environment. The
antenna(s) used for this transmitter must not be co-located or operating in conjunction with any other antenna
or transmitter and must be installed to provide a separation distance of at least 20cm from all persons.
2. IC Notice
This device contains licence-exempt transmitter(s)/receiver(s) that comply with Innovation, Science and
Economic Development Canada’s licence-exempt RSS(s). Operation is subject to the following two conditions:
1) This device may not cause interference.
2) This device must accept any interference, including interference that may cause undesired operation of the
device.
• CAN ICES(B)/NMB(B)
IC RADIATION EXPOSURE STATEMENT:
This equipment complies with IC RSS-102 radiation exposure limits set forth for an uncontrolled environment.
This equipment should be installed and operated so there is at least 8inches (20 cm) between the radiator
and your body. This device and its antenna(s) must not be co-located or operated in conjunction with any other
antenna or transmitter.
STATE OF CALIFORNIA PROPOSITION 65WARNING
WARNING : This product contains chemicals known to the State of California to cause cancer and birth defects
or other reproductive harm.
Air Fry Max
Setting up your new microwave oven
14
English
At a Glance
Be sure to follow these instructions closely so that your new microwave oven works properly.
Checking the parts
Carefully unpack your microwave oven, and make sure you’ve received all the parts shown below. If your
microwave oven was damaged during shipping, or if you do not have all the parts, contact the Samsung Call
Center. (Refer to the "Warranty" on page 68.)
Microwave oven
* Ceramic Enamel Tray * Glass Tray * Roller Guide Ring * Grease Filters (2ea)
* Charcoal Filter * Exhaust Adaptor * Hardware Kit
(Screws & Brackets)
Manuals
(User & Installation)
Cooking Guide Manual Templates
(Top & Wall)
* Low Rack * High Rack
Setting up your new microwave oven
At a Glance
15
English
At a Glance
* Pure Steam Bowl * Air Fry Max Tray
(Sold Separately)
NOTE
If you need an accessory marked with an * (asterisk), please contact the Samsung Call Center using the phone
number listed on the last page of this manual or visit our on-line parts web site at
www.samsungparts.com.
Setting up your microwave oven
damp clothdamp cloth
1. Open the door by pulling the handle on the right side of the
door.
2. Wipe the inside of the oven with a damp cloth.
pre-assembled roller ringpre-assembled roller ring
indentationindentation
3. Install the pre-assembled ring into the indentation at the
center of the microwave oven.
glass trayglass tray
couplercoupler
4. Fit the center of the glass tray to the coupler.
Setting up your new microwave oven
16
English
At a Glance
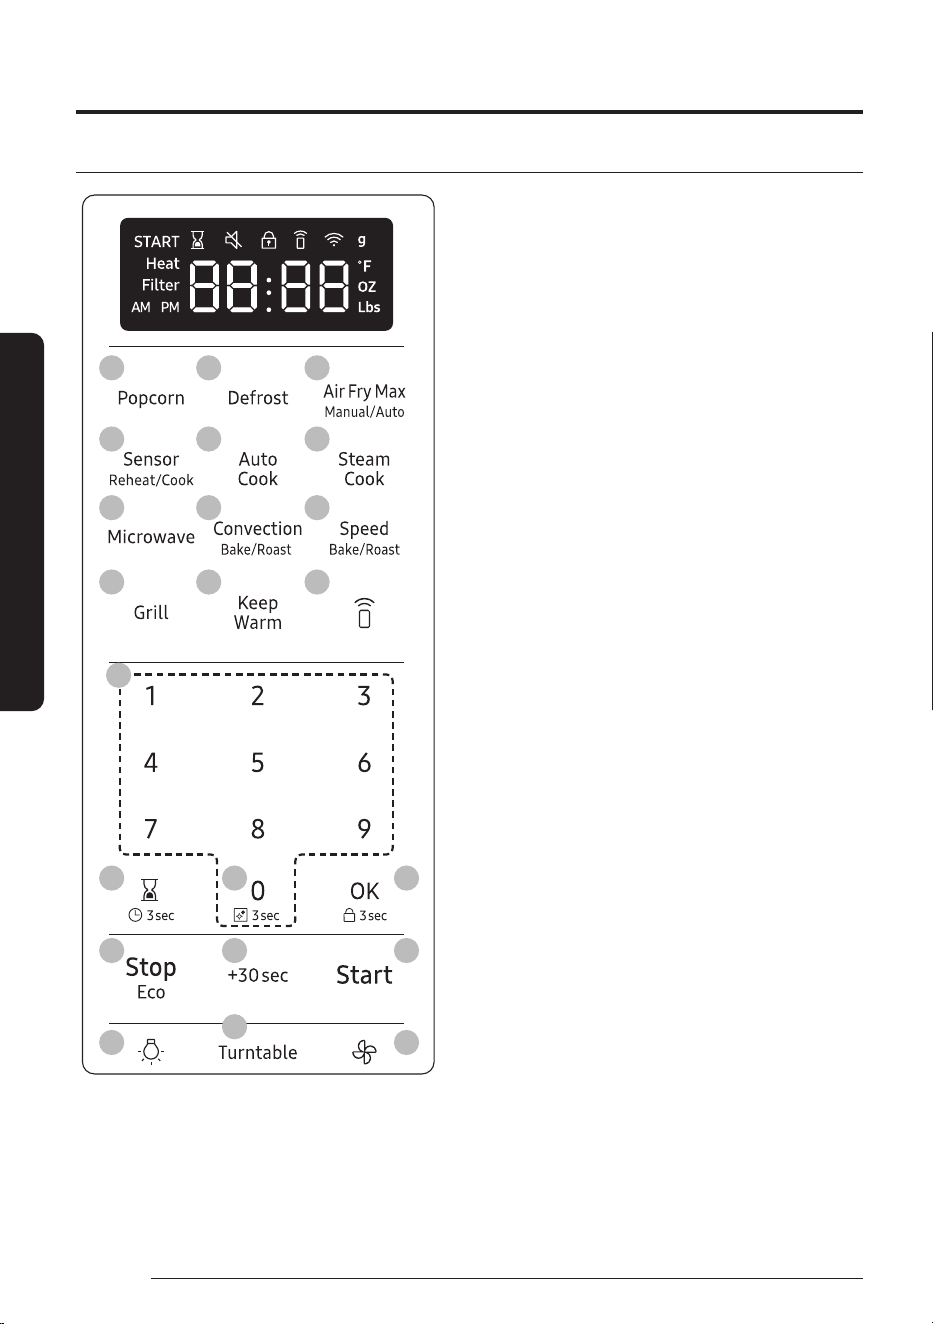
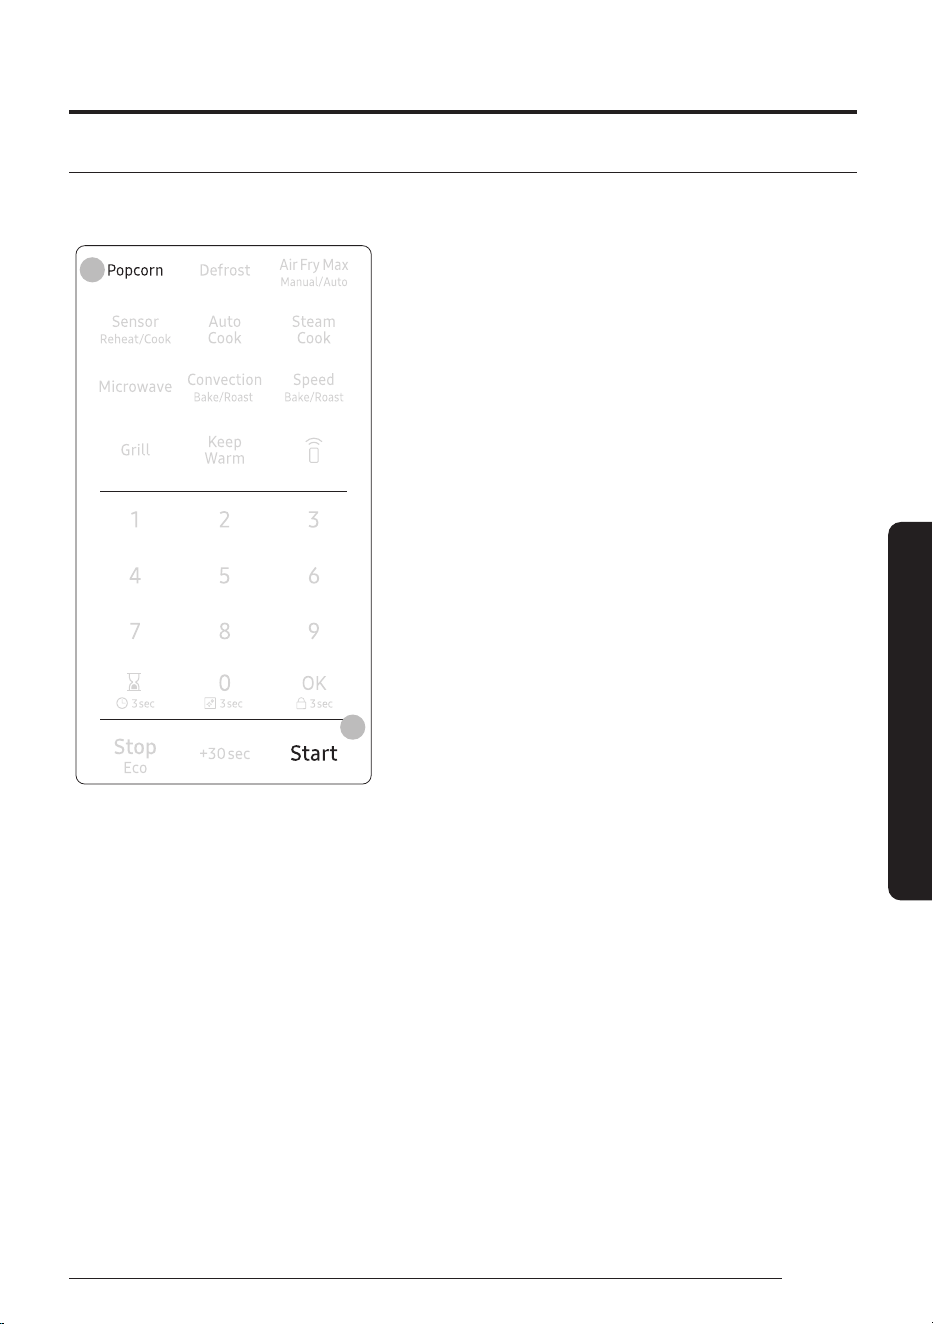
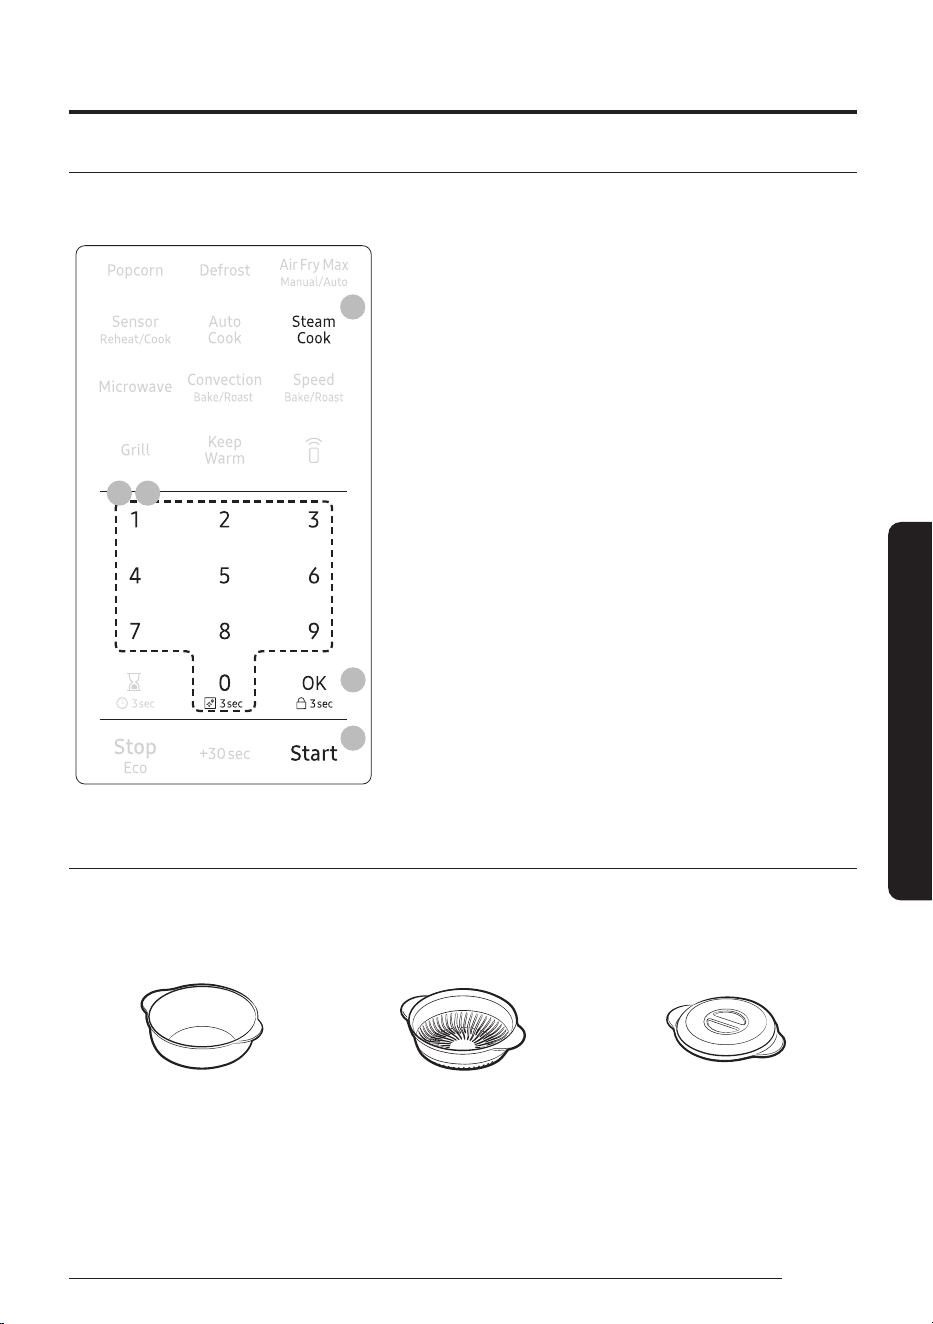
Checking the control panel
01
04
07
10
14
17
20
16
19
22
02
05
08
11
03
06
09
12
13
15
18
21
01 Popcorn
02 Defrost
03 Air Fry Max Manual/Auto
04 Sensor Reheat/Cook
05 Auto Cook
06 Steam Cook
07 Microwave
08 Convection Bake/Roast
09 Speed Bake/Roast
10 Grill
11 Keep Warm
12 Smart Control
13 Number Pad
14 Kitchen Timer/Clock Setting
15 Steam Clean
16 OK/Child Lock
17 Stop/Eco
18 +30sec
19 Start
20 Light (Hi/Low/Off)
21 Turntable
22 Vent (3 Speed & On/Off)
17
English
At a Glance
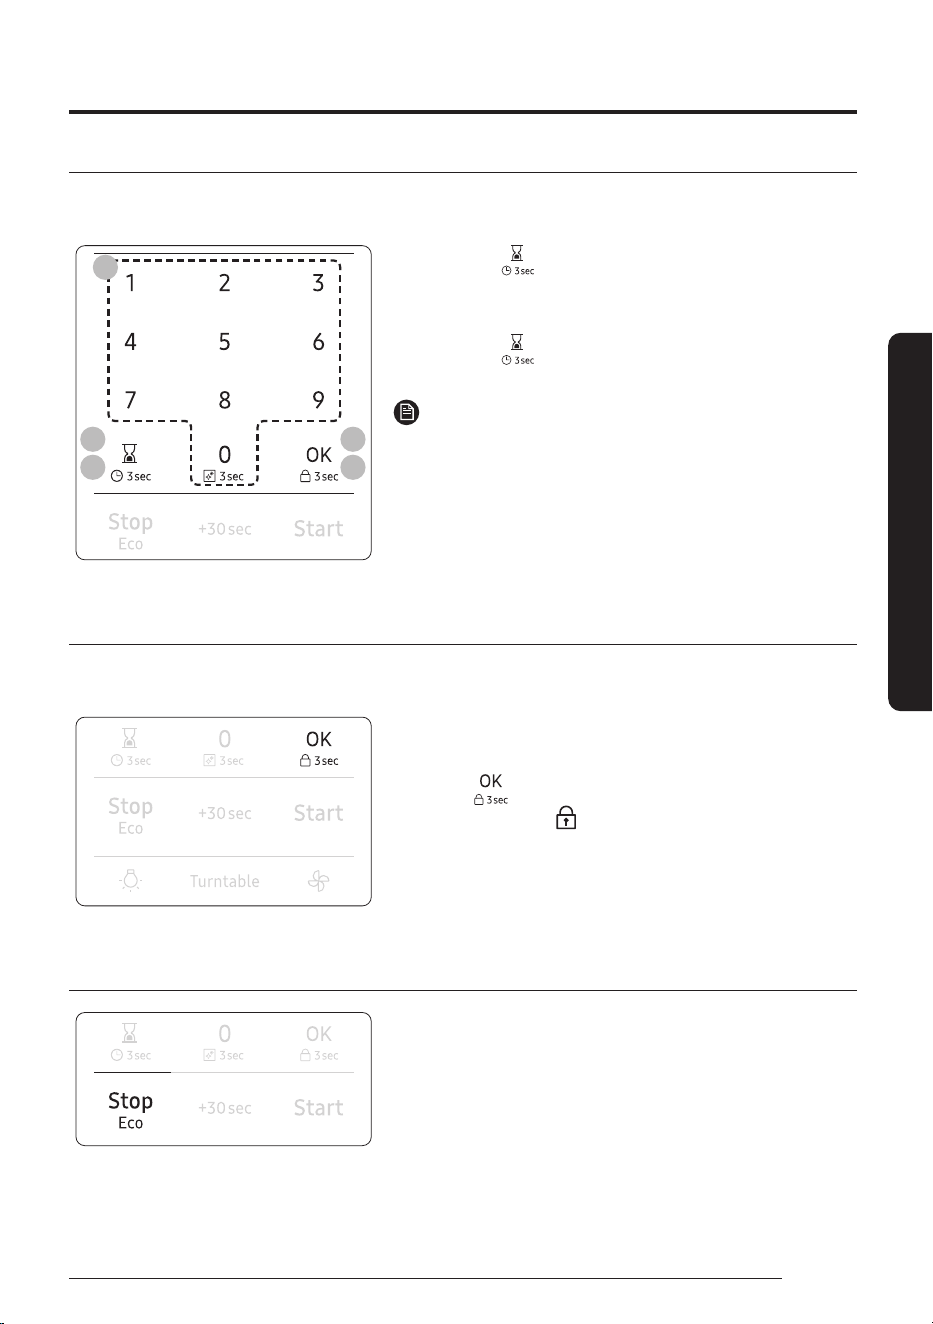
Clock Settings
Your microwave oven is equipped with a built-in clock. Set the clock when first installing your microwave oven
or after a power failure. The time is displayed whenever the microwave oven is not being used.
2
1 3
4 5
1. Touch the button for 3seconds.
2. Use the number pad to enter the time.
3. Touch the OK button.
4. Touch the
button to change AM to PM. (Only for 12hr
mode.)
NOTE
To change the clock display settings (12hr or 24hr mode), refer to
My Settings on page22.
5. Touch the OK button.
Child Lock
The Child Lock function allows you to lock all buttons so that the microwave oven cannot be operated by
children accidentally. The oven can be locked at any time.
Activating / Deactivating
If you want to activate or deactivate the child lock function,
touch the
button for 3seconds.
The display will show ‘ ’ when the oven is locked.
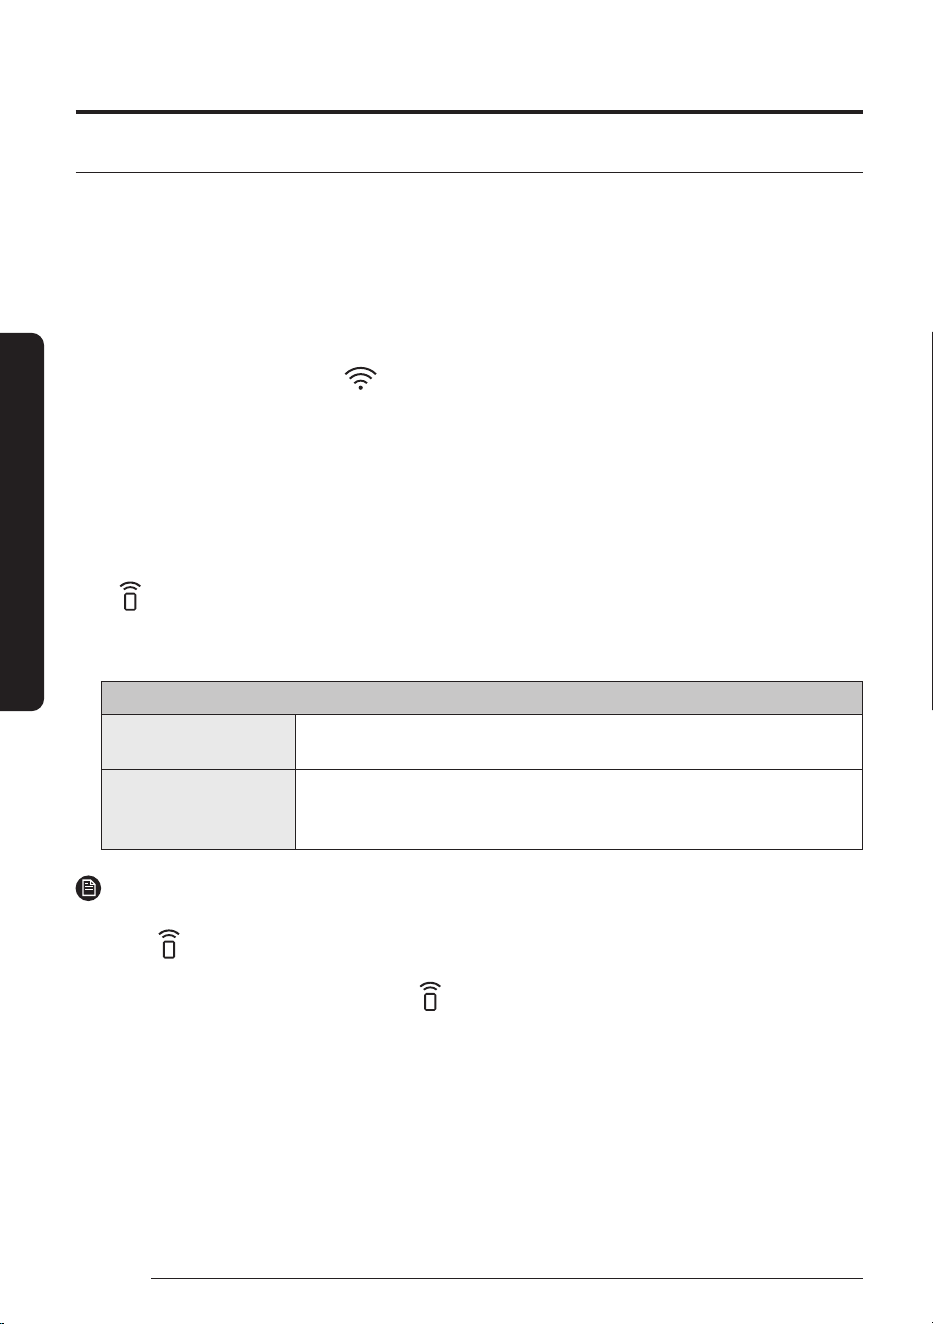
Eco mode
Eco Mode reduces standby power usage. When you touch the
Stop/Eco button once, the display will go out and the microwave
shifts to a mode which minimizes power usage. To cancel the Eco
Mode, touch any other button.
Setting up your new microwave oven
18
English
At a Glance
Smart Control
To use the microwave oven’s Smart Control, you must download the SmartThings app to a mobile device.
Functions operated by the SmartThings app may not work smoothly if communication conditions are poor or
the microwave oven is installed in a place with a weak Wi-Fi signal.
How to connect the microwave oven
1. Download and open the SmartThings app on your smart device.
2. Follow the app’s on-screen instructions to connect your microwave oven.
3. Once the process is complete, the
icon appears on your microwave oven display and the app will
confirm you are connected.
4. If the connection icon does not turn on, follow the instruction on the app to reconnect.
To Start the microwave oven remotely
For safety reasons, This function is only available for convection and grill mode but not in microwave mode
start.
1. After following the above steps, touch Smart Control to use the microwave oven remotely.
2. If
appears on the display, microwave oven can be started and controlled remotely by a connected
mobile device.
3. Select the microwave oven icon on the SmartThings app and if the app is connected to the microwave
oven, you can perform the following functions through the application:
Microwave Oven remote control using the SmartThings app
Microwave Oven
Monitoring
• Check the status of the microwave oven
Microwave Oven Remote
Control
• Control remotely in convection and grill mode but not in microwave mode
start
• Remotely control vent fan speed/cooktop lamp
NOTE
• After enabling Smart Control, if you open the door before cooking starts, Smart Control will be disabled.
• Even If
does not show on the display, you can still monitor the microwave oven’s status and turn the
microwave oven off.
• When oven cooking is finished or cancelled,
will turn off.
• For safety reasons, you cannot turn on the microwave oven remotely and you must specify the cooking
time to enable remote control.
• Smart Control will not work properly if the Wi-Fi Connection is unstable.
19
English
At a Glance
Voice Control
To use the microwave oven’s Voice Control function, you need Bixby / Amazon Alexa App / Google Assistant
App on your mobile device.
• Bixby : Start conversation with Bixby on Samsung mobile by saying "Hi Bixby" or by pressing the side key.
Function OTR Bixby Command Remarks
Start
• Start the microwave in air fry max mode at
350degrees for 30minutes.
• Start the microwave in convection bake mode at
350degrees for 30minutes
• Start the microwave in convection roast mode at
350degrees for 30minutes
• Start the microwave in keep warm mode for
30minutes
• Start the microwave in grill mode for 30minutes
• Set Air fry max mode in the microwave at
350degrees
• Convection bake in the microwave at 350degrees
• Convection roast in the microwave at 350degrees
• Keep warm in the microwave
• Grill in the microwave
• Air Fry Max
350℉(177℃), 375℉(191℃),
400℉(204℃), 425℉(218℃)
• Convection Bake
100°F(38°C), 200°F(93°C),
225°F(107°C), 250°F(121°C),
275°F(135°C), 300°F(149°C),
325°F(163°C), 350°F(177°C),
375°F(191°C), 400°F(204°C),
425°F(218°C)
• Convection Roast
200°F(93°C), 225°F(107°C),
250°F(121°C), 275°F(135°C),
300°F(149°C), 325°F(163°C),
350°F(177°C), 375°F(191°C),
400°F(204°C), 425°F(218°C)
Turn Off/Stop • Cancel the microwave
• Turn off the microwave
-
Check Temp • What is the temperature of the microwave
• Check the microwave temperature
-
Check Time • Check the remaining time of the microwave
• How much time is left on the microwave timer?
-
Check Status • Check the microwave status
• Check the status of the microwave
-
Temp Control • Set the temperature of the microwave to 300
• Increase the temp of the microwave by 20
• Decrease the temp of the microwave by 20
• Turn the microwave temperature up to
100degrees
• Turn the microwave temperature down to
50degrees
-
MW Hood Control
• Turn on/off the microwave hood light
• Trun on/off hood power of microwave
• Turn on/off hood fan of microwave
• Set the microwave hood fan speed to high/mid/low
-
Oven Timer
(Change Cook Time)
• Set the timer on the microwave to 1 hour -

Setting up your new microwave oven
20
English
At a Glance
• Amazon Alexa & Google Assistant : Samsung smart home appliances are supported by SmartThings skill
in Alexa & action in Google Assistant.
Installation Guide
Here’s how to link SmartThings account into Amazon Alexa or Google Assistant. SmartThings App and Alexa
App(or Google Assistant App) Should be installed on your phone.
1. Setup the supported devices to SmartThings.
2. After device setup, tap + button on the screen.
3. Tap ‘Voice assistant’ and link your Samsung account to Amazon Alexa. (or Google Assistant)
4. Check the devices are visible on Amazon Alexa app. Then account linking is complete. (Check the devices
are visible and set the location(home&room) of devices in Google home app. Then account linking is
complete.)
Function "Alexa" "Ok Google"
Start • Set the microwave to Microwave
• Set the microwave to Grill
• Set the microwave to Convection bake
• Set the microwave to Convection roast
• Set the microwave to Keep warm
• Set the microwave to Microwave
• Set the microwave to Convection
bake
• Set the microwave to Convection
roast
• Set the microwave to Keep warm
• Set the microwave to Convection bake for
1hour[Time] at 350degrees[Temp]
• Set the microwave to Convection roast for
1hour[Time] at 350degrees[Temp]
• Convection bake for 1hour[Time] at
350degrees[Temp]
• Convection roast for 1hour[Time] at
350degrees[Temp]
• Set the microwave to Convection bake at
350degrees[Temp]
• Set the microwave to Convection roast at
350degrees[Temp]
• Convection bake at 350degrees[Temp]
• Convection roast at 350degrees[Temp]
• Set the microwave to Microwave for
90seconds[time]
• Set the microwave to Grill for
30minutes[time]
• Set the microwave to Convection bake for
1hour[time]
• Set the microwave to Convection roast for
1hour[time]
• Set the microwave to Keep warm for
1hour[time]

21
English
At a Glance
• If the Smart Control is "ON", it will start remotely.
• If the Smart Control is "OFF", only the setting value can be delivered.
(Microwave mode can only delivered setting value)
Function "Alexa" "Ok Google"
Turn Off/Stop • Turn off the microwave
• Stop the microwave
• Turn off the microwave
• Stop the microwave
Pause • Pause the microwave • Pause the microwave
Resume • Resume the microwave • Resume the microwave
• Restart the microwave
Check Temp • What is the temperature of the
microwave?
• What is the temperature of the
microwave?
Check Time - • What time is left on the microwave?
Check Status • Is the microwave running?
• Is the microwave on?
• Is the microwave running?
• Is the microwave on?
Set Timer • [2minutes] on the microwave
e.g.
– 90seconds on the microwave
(*While running) : Changing cook time
(*Ready) : Set requested time with
microwave mode as default
• Set the microwave to [5minutes]
e.g.
– Set the microwave to 2minutes
(*While running) : Changing cook time
(*Ready) : Set requested time with
microwave mode as default
Adjust timer • Add [10minutes] to the microwave
• [30] more [seconds] to the microwave
e.g.
– 2 moreminutes to the microwave
(*While running) : Adding cook time
(*Ready) : Set requested time with
microwave mode as default
• Add [30seconds] to the microwave
e.g.
– Add 30seconds to the microwave
(*While running) : Adding cook time
(*Ready) : Set requested time with
microwave mode as default
Set temperature • Set microwave to [200 (degrees, Celsius,
Fahrenheit)]
• Set [device name] to [200 (degrees,
Celsius, Fahrenheit)]
• Set the microwave to [200degrees,
Fahrenheit, Celsius]
MW Hood
Control
• Turn on/off the (hood light, hood lamp,
lamp, light) on microwave
• Turn on/off the (hood light, hood lamp)
• Set the microwave (brightness, light level,
lamp level) to [low, high]
• Turn on/off the (hood, fan, hood fan) on
microwave[device name]
• Turn on/off the (hood, hood fan)
• Set the microwave (hood, fan, hood fan)
speed to [low, medium, high]
• Turn on/off the microwave (light,
lamp)
• Turn on/off the (hood light, hood
lamp)
• Set the microwave (brightness, light
level, lamp level) to [low, high]
• Turn on/off the (hood, fan, hood fan)
on microwave
• Turn on/off the (hood, hood fan)
• Set the microwave (hood, fan, hood
fan) speed to [low, medium, high]
Setting up your new microwave oven
22
English
At a Glance
NOTE
• Bixby : Only remote start function is possible. It’s impossible to deliver only setting value. (Unable to
control microwave mode)
• Amazon Alexa & Google Assistant : For safety reasons, you cannot turn on the microwave oven remotely,
only setting value can be delivered.
• If the time or temperature information is not mentioned, it will operate with default time and temperature
setting.
• Smart Control On/Off spec is same as SmartThings app note.
Auto Connectivity
Auto Connectivity function lets you quickly connect the hood via Wi-Fi with a compatible Samsung cooktop
after the hood and cooktop have been paired. To turn the function on, press the Auto Connectivity button in
SmartThings App. To disconnect the hood and cooktop, press the Auto Connectivity button again. While the
hood and cooktop are connected, the hood fan will automatically turn on when you turn on the cooktop.
The hood fan will also turn off automatically when you turn off the cooktop.
NOTE
Auto connectivity function may not work normally when the temperature is set high.
My settings
You can customize your new microwave oven to suit your preferences.
To customize:
1
2
2
1
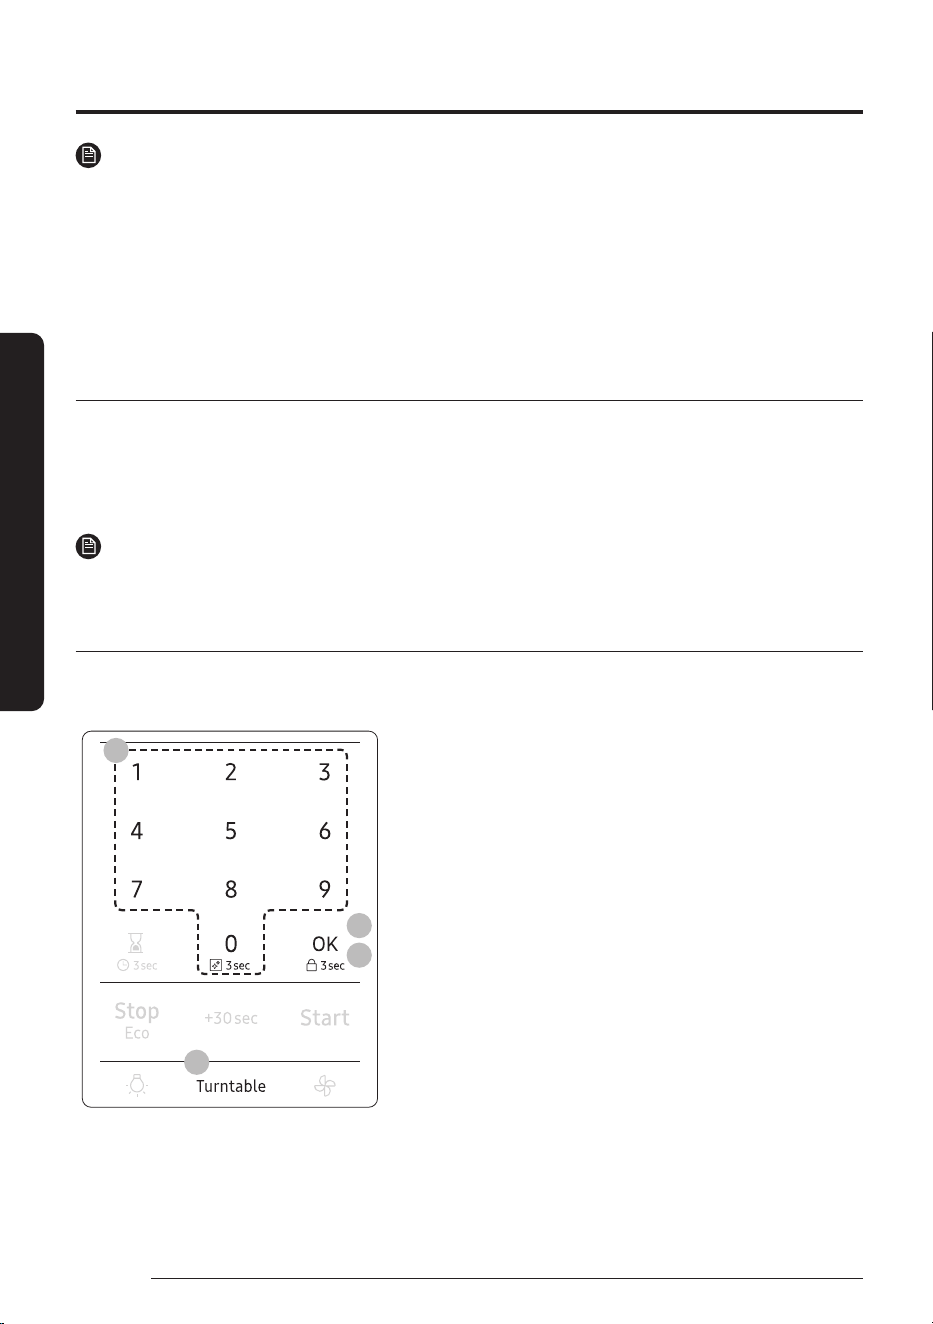
1. Touch the Turntable button for 3seconds.
Touch the number pad to select a function you want to
customize (Refer to the table below.) and then touch OK
button.
2. Touch number 1 or 2 to change the options and then touch
OK. (Number of the options are listed on the table below.)
23
English
At a Glance
Corresponding number for functions and options are listed in the table below.
No. Function Description Options
1 Weight Display Pounds and grams are able for Weight Display
options.
1 lbs
2 g
2 Clock Display The clock can display in either the 12 HR or 24HR
time mode.
1 12 Hr
2 24 Hr
3 Sound Sound can be turned On and Off. 1 ON
2 OFF
4 Remind End Signal The Remind End Signal can be turned On and Off. 1 ON
2 OFF
5 Filter Remind The Filter Remind function can be turned On and
Off.
1 ON
2 OFF
6 Wi-Fi The Wi-Fi function can be turned On and Off. 1 ON
2 OFF
NOTE
• If you change your mind while adjusting a setting, touch the Stop/Eco button to cancel, and then adjust the
setting again.
• If there is a power interruption, you will need to reset ‘Filter Remind’ options.
Filter Reminder
If the Filter Remind function is ON, the microwave will remind you to clean or replace the grease filter every
four months. When it is time to clean or replace the grease filter, the microwave displays the "Filter" message
to remind you to clean or replace the grease filter. To remove the message, touch the number 0 when the
microwave is in standby mode. If you don’t want to receive this message, set the Filter Remind function off in
My settings.

Operations
24
English
Smart Features
Kitchen Timer
Your microwave has a built-in timer function - the Kitchen Timer. Use the Kitchen Timer for timing up to
99minutes, 99seconds.
2
1 3
5
1. Touch the button.
2. Use the number pad to set the time you want the timer to
run. (Max time 99minutes, 99seconds.)
3. Touch the OK button.
4. The display counts down and beeps when the time has
elapsed.
5. To cancel the timer setting :
Touch the Stop/Eco button once.
Vent Fan (High/Mid/Low/Off)
The vent fan removes steam and other vapors that result from cooking on the cooktop below.
Touch the button once for high fan speed, twice for medium
fan speed, and three times for low fan speed. Touch the
button four times to turn the fan off.
On the display 3, 2, 1, OFF will appear instead of High, Mid, Low,
Off.
NOTE
• The exhaust fan’s speed will decrease when the oven’s cooking function is activated.
• The Vent Fan protects the microwave from excess heat rising from the cooktop below it. It automatically
turns on if it senses too much heat. If you have turned the fan on, you may find that you cannot turn it off.
The fan will automatically turn off when the internal parts are cool. It may stay on for 30minutes or more
after the cooktop and microwave controls are turned off.
Smart Features
Operations
25
English
Smart Features
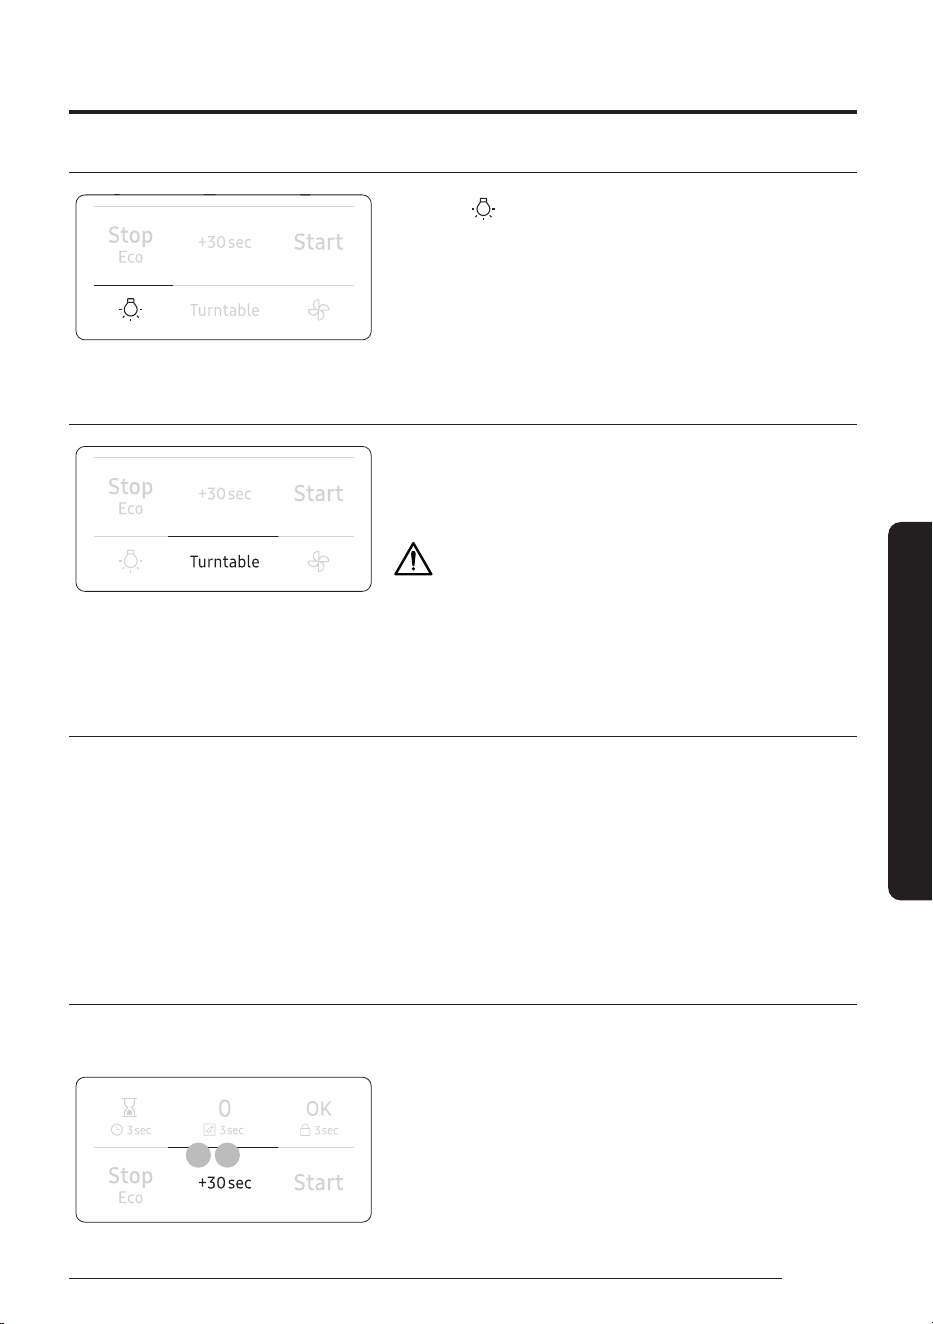
Cooktop Lamp (High/Low/Off)
Touch the button to turn the cooktop lamp on or off. Touch
the button once for high, twice for low, and three times to turn
the cooktop lamp off.
On the display Hi, Lo, OFF will appear instead of High, Low, Off.
Turntable
For best cooking results, leave the turntable on. However, for
large dishes it can be turned off.
Touch the Turntable button to turn the turntable on or off.
CAUTION
The turntable may become too hot to touch.
Use pot holders to handle the turntable during and after
cooking.
Stop/Eco button
The Stop/Eco button allows you to clear instructions you have entered.
It also allows you to pause the oven’s cooking cycle, so that you can check the food.
• To pause the oven during cooking, touch the Stop/Eco button once. To restart, touch the Start button.
• To stop cooking, erase instructions, and return the oven display to the time of day, touch the Stop/Eco
button twice.
• To clear instructions you have just entered, touch the Stop/Eco button once, and then re-enter the
instructions.
• To cancel a kitchen timer setting, touch the Stop/Eco button once.
+30sec button
This feature offers a convenient way to increase cooking time. +30sec feature is only for manual cooking
mode.
1 2
1. In standby mode, touching +30sec button will add
30seconds of microwave mode at 100 % power. (Power level
can not be changed in this way.)
2. If the oven is in manual cooking mode, touching +30sec
button will add cooking time by 30seconds.
Operations
26
English
Smart Features
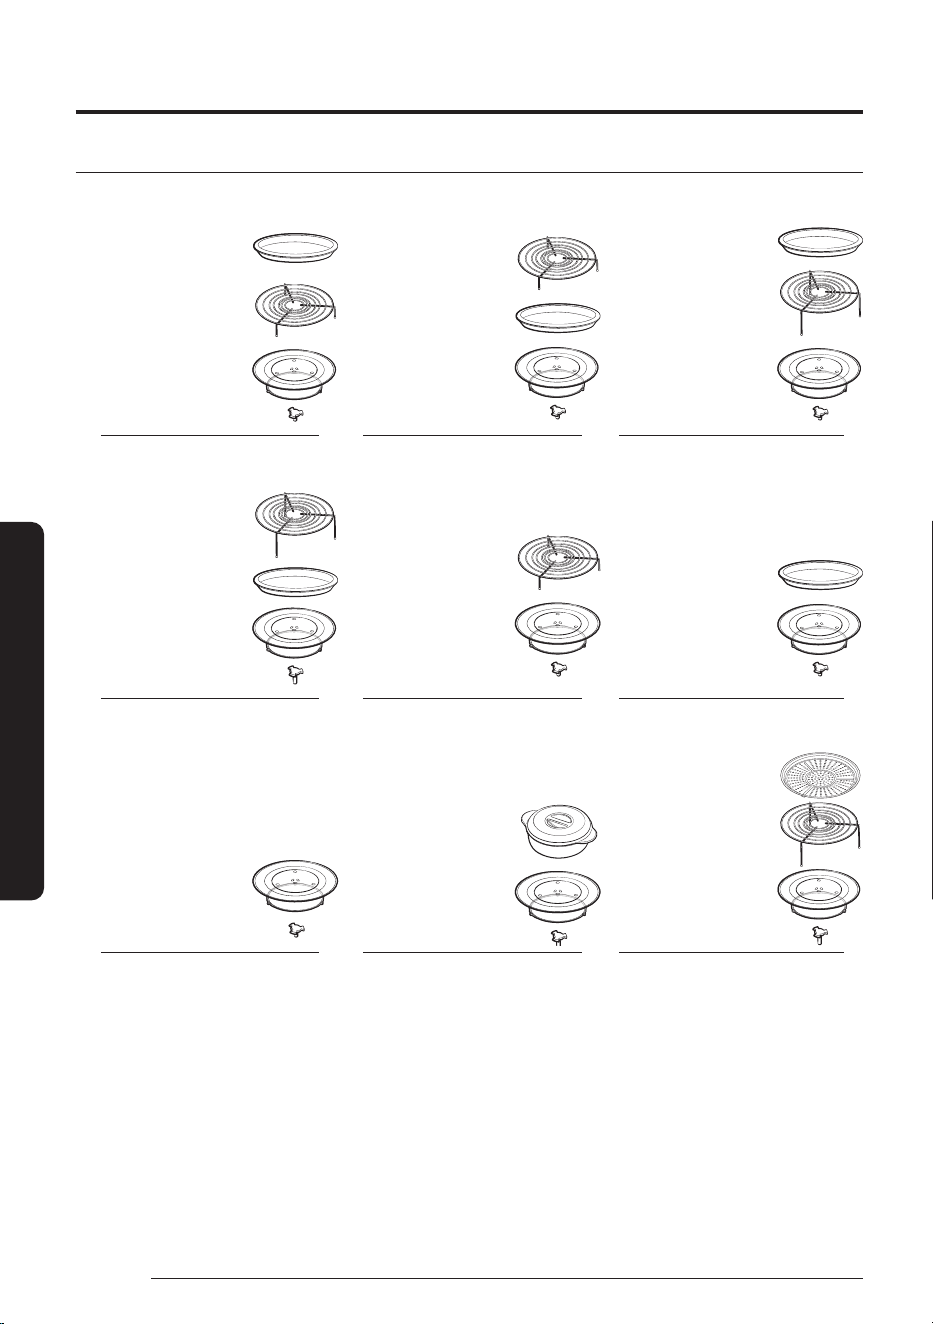
Accessory Combination Guide
A B C
Ceramic
Enamel Tray
Glass Tray
Guide Roller
Low Rack
Coupler
Ceramic
Enamel Tray
Glass Tray
Guide Roller
Low Rack
Coupler
Ceramic
Enamel Tray
Glass Tray
Guide Roller
High Rack
Coupler
D E F
Glass Tray
Guide Roller
High Rack
Coupler
Ceramic
Enamel Tray
Glass Tray
Guide Roller
Low Rack
Coupler
Ceramic
Enamel Tray
Glass Tray
Guide Roller
Coupler
G H I
Glass Tray
Guide Roller
Coupler
Glass Tray
Guide Roller
Pure Steam Bowl
Coupler
High Rack
Glass Tray
Guide Roller
* Air Fry Max Tray
(Sold Separatley)
Coupler
27
English
Smart Features
Popcorn
You can cook popcorn easily using the Popcorn button. You do not need to set either the cooking time or the
power level.
2
3
1. Put a bag of unpopped popcorn on the tray.
2. Touch the Popcorn button.
3. Touch the Start button.
Then the microwave oven will automatically be operated by
sensing the popcorn inside. (2.0 - 3.5 oz.)

Operations
28
English
Smart Features
Defrost
Remove all packaging material before defrosting. Place meat, poultry, fish, bread, etc. on a turntable (glass
tray).
General defrosting instructions:
6
4
3 5
2
1. Place the food on the turntable.
2. Touch the Defrost button.
3. To select the number that corresponds to the food you want
to defrost, touch the number pad.
(Refer to the table on the next page.)
4. Touch the OK button.
5. Enter the weight of the food by touching the number pad.
(Refer to the table on the next page to see the weights you
can enter.)
6. Touch the Start button.
The microwave oven will automatically operate for the pre-
programmed time.
29
English
Smart Features
For specific instructions for different kinds of food, see the table below.
Cook No. Food Amount Directions
1 Meat 0.1 - 6.0 lb
100 - 2700g
Shield the edges with aluminium foil. Flip the meat when the
oven beeps. This program is suitable for lamb, pork, steaks,
chops, and ground meat. For ground meat, place the meat
directly on the turntable tray on wax paper. Do not use an extra
tray. Let stand, covered with foil, for 5 – 10minutes.
2 Poultry 0.1 - 6.0 lb
100 - 2700g
Shield the leg and wing tips with aluminium foil. Flip the
poultry when the oven beeps. This program is suitable for whole
chicken as well as for chicken portions.
3 Fish 0.1 - 6.0 lb
100 - 2700g
Shield the tail of a whole fish with aluminium foil. Flip the fish
when the oven beeps. This program is suitable for whole fish as
well as for fish fillets.
4 Bread 0.1 - 2.0 lb
100 - 900g
Put bread on a paper towel or place cake on a ceramic plate
and if possible, flip as soon as the oven beeps. (The oven
keeps operating and stops only when you open the door.) This
program is suitable for all kinds of bread, sliced or whole, as
well as for bread rolls and baguettes. Arrange bread rolls in a
circle.
NOTE
Check food when the oven signals. After the final stage, small sections may still be icy. Let them stand to
continue thawing. Food is not fully defrosted until all ice crystals have thawed. Shielding roasts and steaks
with small pieces of foil prevents the edges from cooking before the center of the food has defrosted. Use
narrow, flat, smooth strips of aluminum foil to cover the edges and thinner sections of the food.
Operations
30
English
Smart Features
Air Fry Max Manual/Auto
The Air Fry Max mode uses hot air for crispier and healthier frozen foods without oil.
The microwave mode is not used.
You can set the temperature as required, in a range varying from 350°F to 425°F.
7
3
5
4 6
2
Manual Mode
1. Place the food on the tray or the rack. (See Accessory
Combination Guide on page 26)
2. Touch the Air Fry Max Manual/Auto button once for Manual
mode.
3. Touch the OK button.
4. To set the temperature, touch numberpad. (350°F, 375°F,
400°F and 425°F are available.)
5. Touch the OK button.
6. Use the number pad to set a cooking time.
7. Touch the Start button to begin Air Fry Max cooking. If you
want to add 30seconds of cooking time, touch +30sec
button. You can adjust the cooking time while the microwave
oven in operation.
NOTE
• To maintain a constant temperature, keep the oven door closed while the food is cooking. Open as
infrequently as possible.
• While operation the oven, if you want to change the temperature setting, touch the OK button, touch the
number pad and then touch the OK button.
31
English
Smart Features
7
3
5
4 6
2
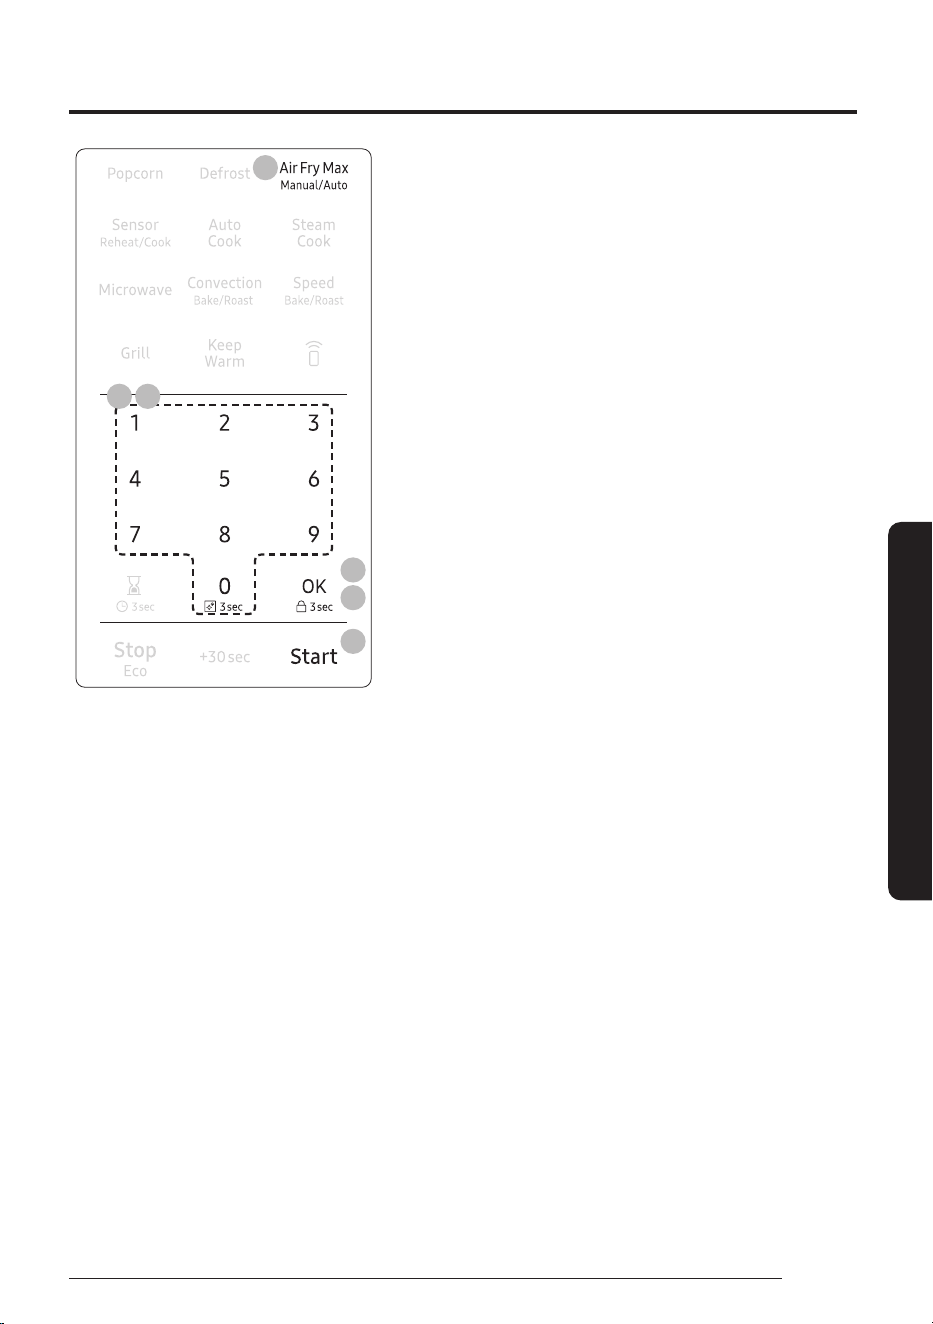
Auto Mode
1. Place the food on the tray or the rack. (See Accessory
Combination Guide on page 26)
2. Touch the Air Fry Max Manual/Auto button twice for Auto
mode.
3. Touch the OK button.
4. Use the number pad to select the number that corresponds
to the food. (refer to the table on page 33.)
5. Touch the OK button.
6. Enter the amount of food by touching the number pad (1 or
2). (Refer to the table on page 33.)
7. Touch the Start button. The microwave oven will
automatically operate for the pre-programmed time and
temperature.

Operations
32
English
Smart Features
Example for Air Fry Max Auto operation
To set F2-4. Frozen tator tots with 2 servings for example, follow the instructions below.
Touch Display shows
2
2
3
6
6
Time counting down
33
English
Smart Features
Cook
No.
Food Amount Directions
Accessory
Type
1 Frozen
french fries
1 2 servings :
8 oz Place frozen french fries on greased ceramic
enamel tray. Put tray on high rack.
C / I
2 4 servings :
16 oz
2 Frozen
hash brown
patteis
1 2 servings : 4 ea Place frozen hash brown patties on greased
ceramic enamel tray. Put tray on high rack.
C / I
2 4 servings :
8 ea
3 Frozen
potato
wedges
1 2 servings : 8 oz Place frozen potato wedges on greased
ceramic enamel tray. Put tray on high rack.
C / I
2 4 servings :
16 oz
4 Frozen tator
tots
1 2 servings : 8 oz Place frozen tator tots on greased ceramic
enamel tray. Put tray on high rack.
C / I
2 4 servings :
16 oz
5 Frozen
chicken
nuggets
1 1 serving : 8 oz Place frozen chicken nuggets on greased
ceramic enamel tray. Put tray on high rack.
C / I
2 2 servings :
16 oz
6 Frozen
shrimp
(breaded)
1 2 servings : 8 oz Place frozen shrimp(breaded) on greased
ceramic enamel tray. Put tray on high rack.
C / I
2 4 servings :
16 oz
7 Frozen
chicken
wings
1 1 serving : 8 oz Place frozen chicken wings on greased
ceramic enamel tray. Put tray on high rack.
C / I
2 2 servings :
16 oz
8 Drumsticks 1 1 serving : 12 oz Place drumsticks on greased ceramic enamel
tray. Put tray on high rack.
C / I
2 2 servings :
24 oz
9 Frozen onion
rings
1 2 servings : 6 oz Place frozen onion rings on greased ceramic
enamel tray. Put tray on high rack.
C / I
2 4 servings :
12 oz
Operations
34
English
Smart Features
Sensor Reheat/Cook
The Sensor Cook mode lets you reheat and cook your favorite food using preset power levels and times. If the
food is not thoroughly cooked after using the Sensor Cook feature, completer the cooking process by cooking
the food for an additional amount of time.
4
3
2
1. Place the food on the tray or the rack. (See Accessory
Combination Guide on page 26)
2. Touch the Sensor Reheat/Cook button once for REHEAT.
Touch the Sensor Reheat/Cook button twice for COOK.
3. Use the number pad to select the number that corresponds
to the food item. (refer to the table on page 38.)
4. Touch the Start button. The microwave oven will
automatically operate for the pre-programmed time and
temperature.
Sensor Reheat/Cook Cooking Guide
For specific instructions for different kinds of food, see the table below.
Sensor Reheat
Cook
No.
Food Amount Directions
Accessory
Type
1 Beverage
1
/
2
- 2cup Use a measuringcup or mug and do not cover. Place the
beverage in the microwave oven. After heating, stir well.
Let the oven cool for at least 5 minutes before using it
again.
G

35
English
Smart Features
Cook
No.
Food Amount Directions
Accessory
Type
2 Sauce/soup 1 - 4 servings
*
1
/
2
cup for
1serving
Cover the plate with a lid or vented plastic wrap. If the
food is not as hot as you would like after using the
Sensor Cooking Reheat function, continue heating
using additional time and power. Stir the food once
before serving. Let the microwave oven cool for at least
5minutes before using it again.
G
3 Casserole 1 - 4 servings
* 8oz for
1serving
Cover the plate with a lid or vented plastic wrap. If the
food is not as hot as you would like after using the
Sensor Cooking Reheat function, continue heating
using additional time and power. Stir the food once
before serving. Let the microwave oven cool for at least
5minutes before using it again. Contents: Casserole,
refrigerated foods.
G
4 Pizza 1 - 4 slices Place 1 - 4 pizza slices on a microwavesafe plate with the
wide ends of the slices towards the outside edge of the
plate. Do not let the slices overlap. Do not cover. Let the
microwave oven cool for at least 5 minutes before using
it again.
G
Sensor cook
Cook
No.
Food Amount Directions
Accessory
Type
1 Potato 1 - 6 ea
* 8 - 10oz for
1ea
Pierce each potato several times with a fork. Place on
the turntable in a spoke-like fashion. After cooking, let
the potatoes stand for 3 - 5 minutes. Let the microwave
oven cool for at least 5 minutes before using it again.
G
2 Fresh
vegetable
1 - 4 servings
*
1
/
2
cup for
1serving
Place the fresh vegetables in a microwavesafe ceramic,
glass, or plastic dish and add 2 - 4tbs. of water. Cover
with a lid or vented plastic wrap. Stir before letting
stand. Let the microwave oven cool for at least 5 minutes
before using it again.
G
3 Frozen
vegetable
1 - 4 servings
*
1
/
2
cup for
1serving
Place the frozen vegetables in a microwave-safe
ceramic, glass, or plastic dish and add 2 - 4tbs. of water.
Cover with a lid or vented plastic wrap to cook. Stir
before letting stand for 3 - 5 minutes. Let the microwave
oven cool for at least 5 minutes before using it again.
G
4 Chicken
pieces
1
/
2
- 2 lb Pierce the chicken pieces a few times with a knife. Place
the chicken breasts on a microwave safe plate not
overlap and cover with vented plastic wrap. Cook to an
internal temperature of 165 °F. Let stand for 5 minutes.
G
Operations
36
English
Smart Features
Auto Cook
The Auto Cook menu contains pre-set cooking programs for 41 different items. You do not need to set the
cooking times or the power level..
8
4
6
3 5 7
2
1. Place the food on the tray or the rack. (See Accessory
Combination Guide on page 26)
2. Touch the Auto Cook button.
3. To select the number that corresponds to the category,
touch the number pad. (Refer to the table that begins on
page38.)
4. Touch the OK button.
5. To select the number that corresponds to the food, touch
the number pad. (Refer to the table that begins on page
38.) After selecting the food, if you do not need to set
the amount, touch the Startbutton. If you need to set the
amount, go to Step 6.
6. Touch the OK button.
7. Enter the amount of food by touching the number pad. (Refer
to the table that begins on page 38.)
8. Touch the Start button. The microwave will automatically
operate for the pre-programmed time.
37
English
Smart Features
Example for Auto Cook operation
To set A2-3. Green Beans with 3 servings for example, follow the instructions below.
Touch Display shows
2
3
4
5
6
7
8
Time counting down
Operations
38
English
Smart Features
Category
Cook
No.
Food Amount Directions
Accessory
Type
1. Snacks 1 Macaroni and
cheese
1 1 serving:
1
/
2
cupflake, 1cup
water
Use over 2 L microwave-safe bowl
or cup with lid. Put hot water into
microwave-safe bowl, add a pinch of
salt and stir well. Cook covered.
G
2 2 servings:
1cup
flake, 2cups water
2 Frozen waffle 1 1 serving: 3ea Place the waffle on the metal tray,
then place the tray on the high rack.
C
2 2 servings:
6ea
3 Fish sticks 1 1 serving: 8oz,
227g
Place the fish sticks on the high rack,
then place the rack on the metal
tray. Brush the fish stick with melted
butter/oil.
D
2 2 servings:
16oz,
454g
4 Hot dogs 1 2ea Pierce the hot dogs 3 times with a
fork and place on a microwave-safe
plate.
G
2 4ea
2. Fresh
vegetable
1 Broccoli 1 1 serving:
1
/
2
cup Rinse and clean fresh broccoli
and cut it into florets. Place the
broccoli in a microwave safe bowl.
Add 1-4 Tbsp of water (1Tbsp per
serving). Cover with vented (1inch
vent) plastic wrap while cooking.
After heating, Stir well and stand for
2-3minutes.
G
2 2 servings:
1cup
3 3 servings:
1.5cups
4 4 servings : 2cups
2 Carrots 1 1 serving:
1
/
2
cup Rinse and clean fresh carrots and
cut into 1inch slices. Place the
carrots in a microwave safe bowl.
Add 1-4 Tbsp of water (1Tbsp per
serving). Cover with vented (1inch
vent) plastic wrap while cooking.
After heating, Stir well and stand for
2-3minutes.
G
2 2 servings:
1cup
3 3 servings:
1.5cups
4 4 servings : 2cups
3 Green beans 1 1 serving:
1
/
2
cup Rinse and clean green beans. Place
the green beans in a microwave safe
bowl. Add 1-4 Tbsp of water (1Tbsp
per serving). Cover with vented
(1inch vent) plastic wrap while
cooking. After heating, Stir well and
stand for 2-3minutes.
G
2 2 servings:
1cup
3 3 servings:
1.5cups
4 4 servings: 2cups
4 Zucchini 1 2 serving: 1cup Rinse and clean fresh zucchini and
cut into 1inch slices. Place the
zucchini in a microwave safe bowl.
Add 1-2 tsp of water (1 tsp per
serving). Cover with vented (1inch
vent) plastic wrap while cooking.
After heating, Stir well and stand for
2-3minutes.
G
2 4 servings:
2cups
39
English
Smart Features
Category
Cook
No.
Food Amount Directions
Accessory
Type
3. Frozen
vegetable
1 Broccoli 1 1 serving:
1
/
2
cup Place the frozen broccoli in a
microwave-safe bowl and add
1-4Tbsp water. Cover with vented
(1inch vent) plastic wrap while
cooking. After heating, Stir well and
stand for 2-3minutes.
G
2 2 servings:
1cup
3 3 servings:
1.5cups
4 4 servings: 2cups
2 Carrots 1 1 serving:
1
/
2
cup Place the frozen carrots in a
microwave-safe bowl and add
1-4Tbsp water. Cover with
vented(1inch vent) plastic wrap
while cooking. After heating, Stir well
and stand for 2-3minutes.
G
2 2 servings:
1cup
3 3 servings:
1.5cups
4 4 servings: 2cups
3 Green beans 1 1 serving:
1
/
2
cup Place the frozen green beans
in a microwave-safe bowl and
add 1-4Tbsp water. Cover with
vented(1inch vent) plastic wrap
while cooking. After heating, Stir well
and stand for 2-3minutes.
G
2 2 servings:
1cup
3 3 servings:
1.5cups
4 4 servings: 2cups
4 Peas 1 1 serving:
1
/
2
cup Place the frozen peas in a
microwave-safe bowl and add
1-4Tbsp water. Cover with
vented(1inch vent) plastic wrap
while cooking. After heating, Stir well
and stand for 2-3minutes.
G
2 2 servings:
1cup
3 3 servings:
1.5cups
4 4 servings: 2cups
4. Meal 1 Frozen dinner - 1 serving
* 150g mashed
potato
* 100g vegetable
* 200g meat
Remove the food from its wrapping
and follow the instructions on the
box for covering and letting stand.
G
2 Oatmeal 1 1pack:
28g oatmeal,
160ml water
Follow the package directions for
the recommended amount of water
needed. Place the oatmeal in the
microwave-safe bowl. Cover with
vented(1inch vent) plastic wrap
while cooking. After heating, Stir well
and stand for 2-3minutes.
G
2 2 packs:
56g oatmeal,
320ml water
3 Rice 1 2 servings: 78g
rice, 180ml water
Place the rice and water in a
microwave-safe bowl. Cover with
vented(1inch vent) plastic wrap
while cooking. After heating, Stir well
and stand for 2-3minutes.
G
2 4 servings:
156g
rice, 360ml water
Operations
40
English
Smart Features
Category
Cook
No.
Food Amount Directions
Accessory
Type
4. Meal 4 Quinoa 1 2 servings:
170g quinoa, 425ml
water
Place the quinoa and water in a
microwave-safe bowl. Cover with
vented(1inch vent) plastic wrap
while cooking. After heating, Stir well
and stand for 2-3minutes.
G
2 4 servings:
340g quinoa,
850ml water
5 Bacon
(pre-cooked)
1 2 servings Place paper towels on plate and
arrange bacon on towels. Do not
overlap.
G
2 4 servings
3 6 servings
5. Pizza /
Bread
1 Frozen pizza
(individual
6inch)
- 6inch Place the pizza on the metal tray,
then place the tray on the high rack.
C
2 Frozen pizza
(regular
12inch)
- 12inch Place the pizza on the metal tray,
then place the tray on the high rack.
C
3 Biscuits
(refrigerated)
- 10ea Place the biscuits on the greased
metal tray, then place the tray on the
low rack.
A
4 Box cake mix -
1
/
2
package: cake
mix 440-460g
Follow the package directions for the
recommended amount of water and
another ingredients needed. Pour the
batter into 2 - 8inch microwave-safe
round cake pans, then place the pan
on the low rack.
A
5 Brownie mix - 1 package:
1box(520g)
brownie mix,
1
/
2
cup
butter,
1
/
2
cup water,
2eggs
Follow the package directions for the
recommended amount of water and
another ingredients needed. Pour
the batter into microwave-safe glass
brownie pan, then place the pan on
the low rack.
A
6 Frozen
cookies
- 5ea Place 5 cookies on the greased metal
tray, then place the tray on low rack.
A
7 Frozen
French toast
1 2 servings Place the frozen french toast on the
high rack.
D
2 4 servings
6. Melt /
Soften
1 Melt butter 1 1 stick Remove the wrapping and cut the
butter in half vertically. Place the
butter into microwave-safecup
and cover with wax paper. Stir well
after finishing and let stand for
1-2minutes.
G
2 2 sticks
2 Soften butter 1 1 stick Remove the wrapping and cut the
butter in half vertically. Place the
butter into microwave-safecup
and cover with wax paper. Stir well
after finishing and let stand for
1-2minutes.
G
2 2 sticks

41
English
Smart Features
Category
Cook
No.
Food Amount Directions
Accessory
Type
6. Melt /
Soften
3 Melt
chocolate
- 1cup Place the chocolate chips or squares
in a microwave-safe bowl. Stir well
after finishing and let stand for
1-2minutes.
G
4 Soften ice
cream
1 1 pint Remove the lid of carton. Place
the carton in the center of the
microwave.
G
2 4 pints
5 Soften cream
cheese
- 1 package
(8oz) Unwrap the cream cheese and place
on a microwave-safe container.
G
6 Melt cheese - 1cup Place the cheese in a microwave-safe
bowl and cover with wax paper. Stir
well after finishing and let stand for
1-2minutes.
G
7
Melt
marshmallows
- 10oz Place the marshmallows in a
microwave-safe bowl. Stir well
after finishing and let stand for
1-2minutes.
G
7. Poultry /
Seafood
1 Chicken
breast
1 2ea
(6oz/each) Place the chicken breasts on the
high rack, then place the rack on the
metal tray. When the oven beeps, flip
chicken and restart the oven.
D
2 4ea
(6oz/each)
2 Whole
chicken
- 1ea (2.5-3 lb) Fold the wings under the chicken.
Place the chicken on the low rack,
then place the rack on the metal tray.
Brush the whole chicken with melted
butter or oil and seasonings.
B
3 White fish
fillet
1 2ea
(4oz/each) Spray the high rack with non stick
spray. Place the fillets(cod, pollack
etc) on the high rack, then place the
rack on the metal tray.
D
2 4ea
(4oz/each)
4 Salmon fillet 1 2ea (4oz/each) Spray the high rack with non stick
spray. Place the salmon fillets on the
high rack, then place the rack on the
metal tray.
D
2 4ea
(4oz/each)
5 Shrimp
(fresh)
1
1
/
2
lb Place the shrimp on the metal tray,
then place the tray on the high rack.
When the oven beeps, turn over the
shrimp and restart the oven.
C
2 1 lb

Operations
42
English
Smart Features
Category
Cook
No.
Food Amount Directions
Accessory
Type
8. Meat 1 Roast beef 1 2 lb Brush the beef with melted butter or
oil and seasonings. Place the beef on
the low rack, then place the rack on
the metal tray. When the oven beeps,
flip beef and restart the oven.
B
2 3 lb
2 Ground beef 1
1
/
2
lb Place the ground beef in a
microwave-safe dish. When the oven
beeps, stir and restart the oven.
G
2 1 lb
3 Pork ribs 1 1 lb Brush the pork ribs with melted
butter or oil and seasonings. Place
the pork ribs on the high rack, then
place the rack on the metal tray.
When the oven beeps, flip pork ribs
and restart the oven.
D
2 2 lb
4 Boneless
pork chops
1
1
/
2
lb Brush the boneless pork chops with
melted butter or oil and seasonings.
Place the boneless pork chops on
the high rack, then place the rack on
the metal tray. When the oven beeps,
flip boneless pork chops and restart
the oven.
D
2 1 lb
5 Pork
tenderloin
1 1 lb Brush the pork tenderloin with
melted butter or oil and seasonings.
Place the pork tenderloin on the
low rack, then place the rack on the
metal tray. When the oven beeps, flip
pork tenderloin and restart the oven.
B
2 2 lb
43
English
Smart Features
Steam Cook
The Steam Cook menu contains pre-set cooking programs for 7 different items. You do not need to set the
cooking times or the power level.
6
4
3 5
2
1. Add 1 cup (200 ml) of water to the Steamer. Place the food on
the tray. (See Accessory Combination Guide on page 26)
2. Touch the Steam Cook button.
3. Use the number pad to select the number that corresponds
to the food. (refer to the table on page 38.) If you do not
need to set the amount, press the Start button.
4. Touch the OK button.
5. Enter the amount of food by touching the number pad (1 or
2). (Refer to the table on page 38.)
6. Touch the Start button. The microwave oven will
automatically operate for the pre-programmed time and
temperature.
Pure steam cooking guide
The Pure Steamer is based on the principle of steam cooking, and is designed for fast, healthy cooking in your
Samsung Microwave oven.
This accessory is ideal for cooking rice, pasta, vegetables, etc. in record time, while preserving their nutritional
values. The Pure Steamer set is made up of 3 items:
Bowl Insert tray Lid
All parts withstand temperatures from -10 °C to 130 °C.
Suitable for freezer storage. Can also be used separately or together.
Operations
44
English
Smart Features
Conditions of use
• Do not use:
to cook foods with a high sugar or fat content, with the grill or rotating heat function or on a hob.
• Wash all parts well in soapy water before first use.
• To find out cooking times, please refer to the instructions in the table on next page.
Maintenance
• Your steamer can be washed in a dishwasher.
• When washing by hand, use hot water and washing-up liquid. Do not use abrasive pads.
• Some foods (such as tomato) may discolour the plastic. This is normal and not a manufacturing fault.
Defrosting
Place the frozen food in the steam bowl without the lid. The liquid will remain in the bottom of the pot and
will not harm the food.
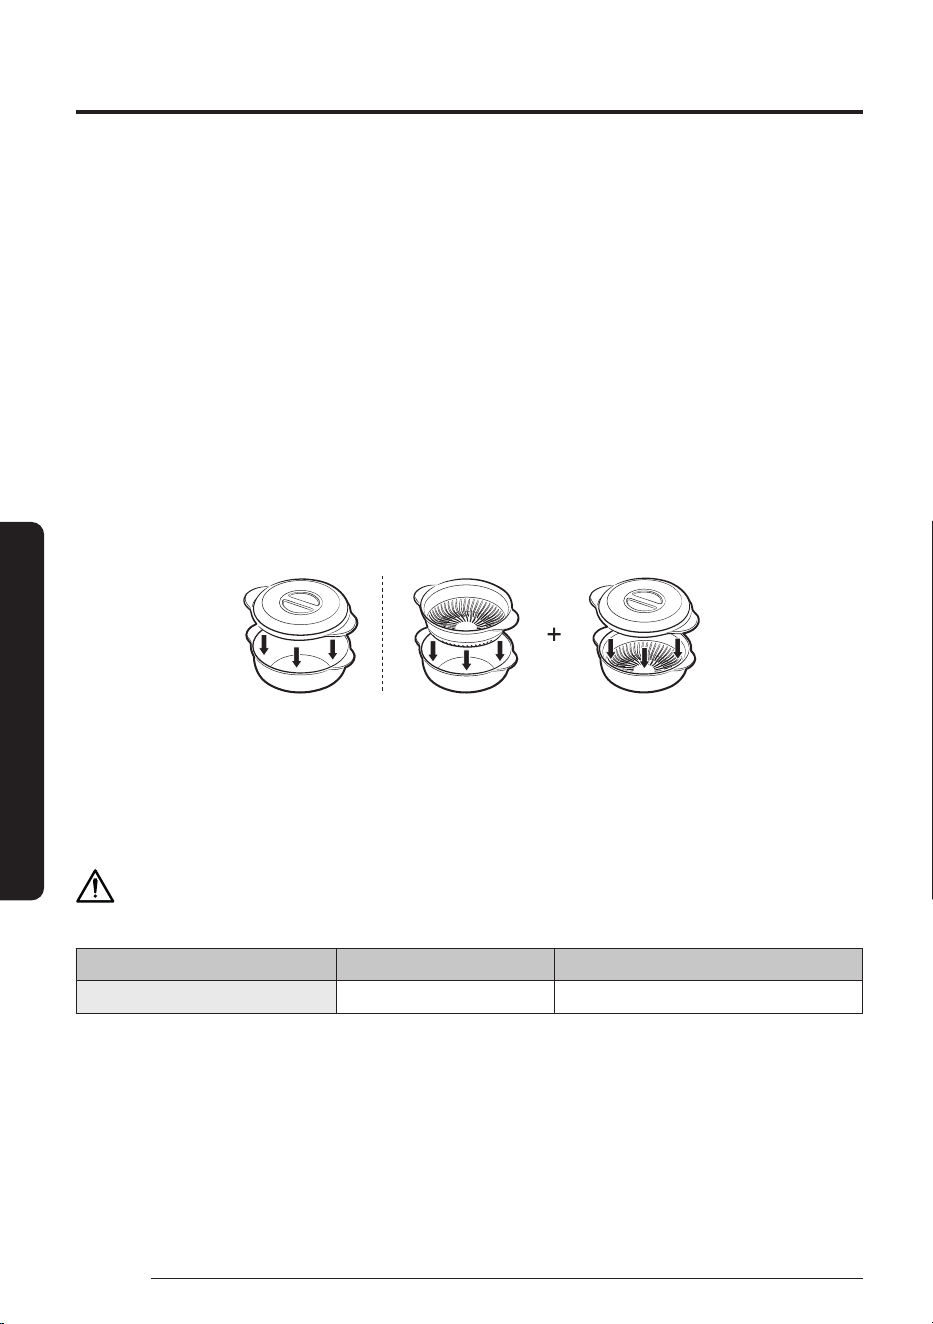
Handling of Pure Steamer
Bowl + Lid Bowl with insert tray + Lid
Precautions
• Take special care when opening the lid of your steamer, because the steam escaping may be very hot.
• Use oven gloves when handling after cooking.
CAUTION
Do not operate the Grill and Combi mode with Pure Steamer.
Operation Mode Microwave Grill / Combi
Pure Steamer O X

45
English
Smart Features
Example for Steam Cook operation
To set St-2 Carrots with 2 servings for example, follow the instructions below.
Touch Display shows
2
3
4
5
6
Time counting down
Operations
46
English
Smart Features
Category
Cook
No.
Food Amount Directions
Accessory
Type
Steam
Cook
1 Broccoli 1 1 serving
(6 oz)
Rinse and clean fresh broccoli and cut it into
florets. Add 200ml water into steam bowl.
Put the broccoli on the insert tray and place
the steam bowl. Cover the lid. After cooking,
stand for 2-3minutes.
H
2 2 servings
(12 oz)
2 Carrots 1 1 serving
(6 oz)
Rinse and clean fresh carrots cut it into inch
slices. Add 200ml water into steam bowl.
Put the carrots on the insert tray and place
the steam bowl. Cover lid. After cooking,
stand for 2-3minutes.
H
2 2 servings
(12 oz)
3 Cauliflowers 1 1 serving
(6 oz)
Rinse and clean fresh cauliflowers and cut
it into florets. Add 200ml water into steam
bowl. Put the cauliflowers on the insert tray
and place the steam bowl. Cover the lid. After
cooking, stand for 2-3minutes.
H
2 2 servings
(12 oz)
4 Spinach 1 1 serving
(3 oz)
Rinse and clean fresh spinach. Add 200ml
water into steam bowl. Put the spinach
on the insert tray and place the steam
bowl. Cover the lid. After cooking, stand for
2-3minutes.
H
2 2 servings
(6 oz)
5 Squash 1 1 serving
(14 oz)
Weigh the fresh squash wash and cut into
similar size or half. Add 200ml water into
steam bowl. Put the squash on the insert tray
and place the steam bowl. Cover the lid. After
cooking, stand for 2-3minutes.
H
2 2 servings
(28 oz)
6 White fish
fillet
1 1 serving
(130 g)
Rinse and clean fresh fillet. Add 200ml
water into steam bowl. Put the white fish
fillet on the insert tray and place the steam
bowl. Cover the lid. After cooking, stand for
2-3minutes.
H
2 2 servings
(260 g)
7 Salmon fillet 1 1 serving
(130 g)
Rinse and clean fresh fillet. Add 200ml water
into steam bowl. Put the salmon fillet on the
insert tray and place the steam bowl. Cover
the lid. After cooking, stand for 2-3minutes.
H
2 2 servings
(260 g)
8 Shrimp 1 2 servings
(8 oz)
Rinse and clean fresh shrimp. Add 200ml
water into steam bowl. Put the shrimp on the
insert tray and place the steam bowl. Cover
the lid. After cooking, stand for 2-3minutes.
H
2 4 servings
(16 oz)
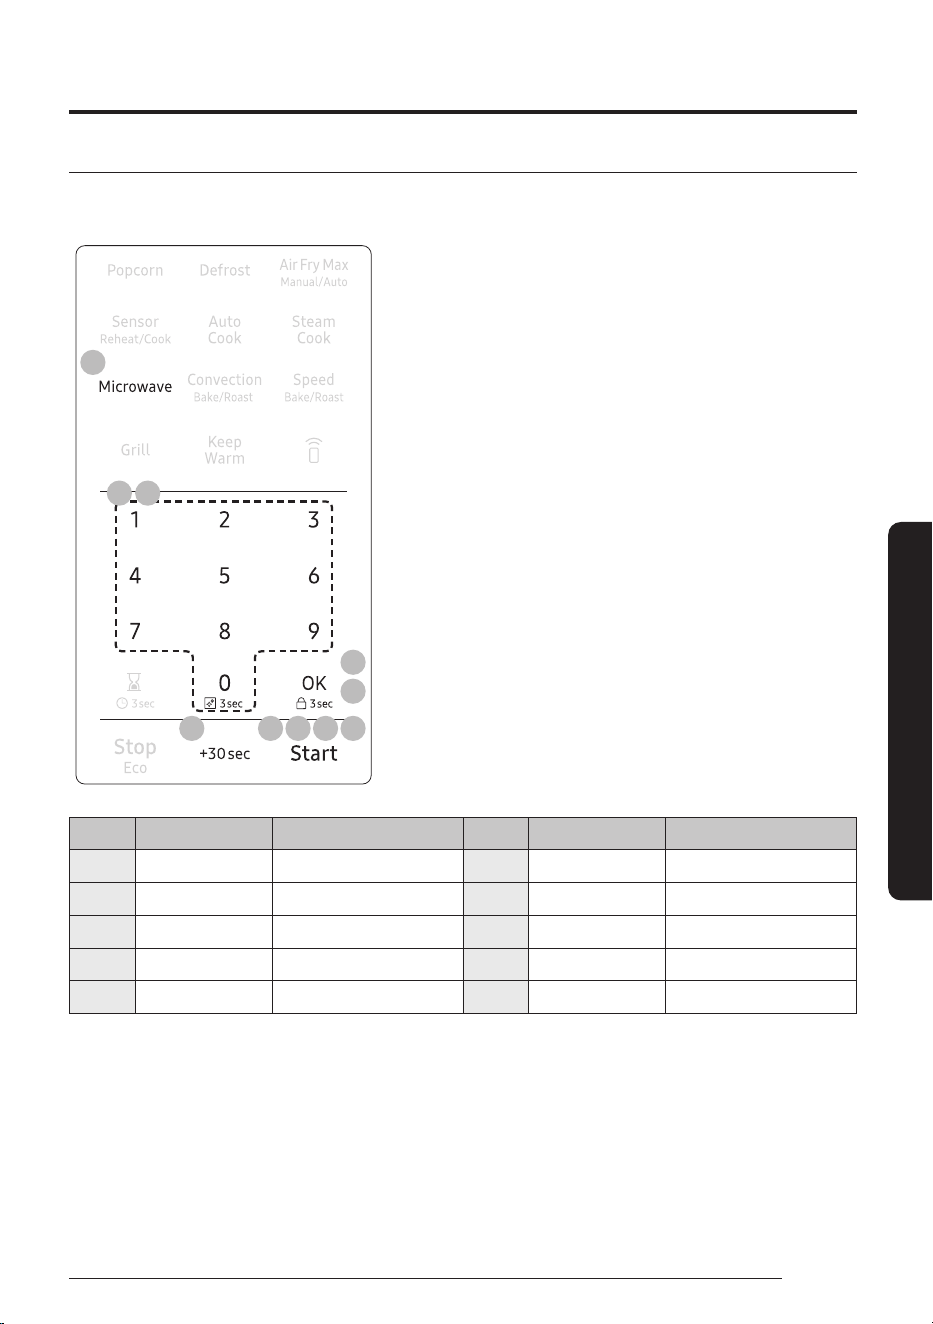
47
English
Smart Features
Microwave
Microwave mode can operate with One-stage cooking mode and Multi-stage cooking mode (maximum of
2stages). You can also change power level (10-100) if needed.
28 5 6 7
3
6
2 4
1
1. Touch the Microwave button.
(You can skip this step and start at the next step.)
2. Use the number pad to set a cooking time. You can enter a
time from one second to 99minutes and 99seconds. (For
example, to set a cooking time of 20minutes, enter 2, 0, 0,
0.) If you do not need to set the power level, just touch the
Start button. The microwave will automatically operate at
the High power level. If you want to change the power level,
go to Step 3.
3. If you want to set the power level to a level other than High,
touch the OK button.
4. Touch the number pad that corresponds to the power level
(Refer to the table below).
5. Touch the Start button to operate One-stage cooking mode.
If you want to use Multi-stage cooking, go to step6.
6. To use Multi-stage cooking mode, touch OK, enter cooking
time for 2nd stage and then touch Start if you do not need to
set 2nd stage power level.
7. If you want to set the power level of 2nd stage, follow steps
3and4. Touch the Start button to start cooking.
8. If you want to add 30seconds of cooking time, touch +30sec
button. You can adjust the cooking time while the microwave
oven is operating.
No. Power Level Description No. Power Level Description
1 10 Warm 6 60 Simmer
2 20 Low 7 70 Medium high
3 30 Defrost 8 80 Reheat
4 40 Medium low 9 90 Sauté
5 50 Medium 10 100 High

Operations
48
English
Smart Features
Convection Bake/Roast
The Convection Bake/Roast mode uses dry heat to cook and brown food. A high speed fan circulates hot air
inside the oven to heat food quickly and evenly. When you cook using convection, you would generally use the
low rack.
4
6
6
1
4
2
3 5
1. Touch the Convection Bake/Roast button once for BAKE.
Touch the Convection Bake/Roast button twice for ROAST.
2. Touch the OK button.
3. To set the temperature, touch the number pad. (Refer to the
temperature table below.)
Bake Roast
100 °F -
200 °F 200 °F
225 °F 225 °F
250 °F 250 °F
275 °F 275 °F
300 °F 300 °F
325 °F 325 °F
350 °F 350 °F
375 °F 375 °F
400 °F 400 °F
425 °F 425 °F
4. Touch the OK button. If you want to preheat the oven, touch the Start button without setting cook time.
NOTE
If there is no action within 60minutes after preheating the oven, the oven will turn off automatically.
5. Use the number pad to set a cooking time.
6. Touch the Start button to begin convection cooking. If you want to add 30seconds of cooking time, touch
+30secbutton. You can adjust the cooking time while the microwave oven is operating.
NOTE
• If the oven reaches the temperature setting, ‘Beep’ sound will occur in both preheat and cooking mode.
• To maintain a constant temperature, keep the oven door closed while the food is cooking. Open as
infrequently as possible.
• While operating the oven, if you want to change the temperature setting, touch the OK button, touch the
number pad and then touch the OK button.

49
English
Smart Features
Speed Bake/Roast
The combination cooking feature allows you to cycle automatically between microwave and Bake/Roast
cooking. The food will be moist as well as crisp and brown. This type of cooking is ideal for large food that
requires long cooking times when prepared in a conventional oven (such as large roasts, whole chickens, etc.).
When combination cooking, use the low rack to allow air to circulate completely around the dish.
To use combination cooking:
3
6
6
1
3 5
4
2
1. Touch the Speed Bake/Roast button once for SPEED BAKE.
Touch the Speed Bake/Roast button twice for SPEED ROAST.
2. Touch the OK button.
3. Use the number pad to set a cooking time.
If you do not need to set the power level, just touch
the Startbutton. The Microwave will operate at a pre-
programmed power level. If you want to adjust the power
level, go to Step 3.
4. Touch the OK button.
5. To set the power level, touch the numberpad refer to the
table on page 50. (default : 2)
No. 1 2 3 4
Power level 10 30 50 70
6. Touch the Start button. If you want to add 30seconds of
cooking time, touch
+30secbutton. You can adjust the cooking time while the
microwave oven is operating.
NOTE
• This mode combines microwave energy with hot air. This combination reduces the cooking time while
giving the food a brown and crispy surface.
• The vent fan operates at low speed while the oven operates in Speed Bake/Roast mode.
Cookware for cooking with speed bake/roast
Use only cookware that is specially manufactured for microwave ovens. Do not use metal cookware with this
combination mode. Do not use any type of plastic cookware, as it can melt.

Operations
50
English
Smart Features
Food suitable for speed bake/roast
Other food suitable for this combination mode cooking include all kinds of previously cooked food which needs
reheating and browning (e.g. baked pasta), as well as food which requires a short cooking time to brown the
top of the food. This mode can also be used for thick food portions that benefit from a browned and crispy top
(e.g. chicken pieces, which you turn over half way through cooking). Other food suitable for this cooking mode
include a variety of meats and poultry as well as frozen snacks and pizza.
Speed Bake/Roast Cooking Guide
Use the cooking mode, power levels, and times in this table as guides for speed cooking.
NOTE
Always use oven gloves when taking the food out of the microwave oven.
Type Food Amount Mode Time (Min) Directions
Pizza Frozen pizza
(individual)
6 inch Speed Bake 30 % 12 - 16 Place the pizza on the low
rack, then place the rack on
the ceramic enamel tray.
Frozen pizza
(regular)
12 inch Speed Bake 30 % 15 - 21 Place the pizza on the low
rack, then place the rack on
the ceramic enamel tray.
Meat Roast beef
(medium)
2 - 3 lb
900 - 1400 g
1
st
Speed Roast 30 %
2
nd
Convection Roast
325 °F
1
st
25 - 40
2
nd
25 - 40
Brush beef/lamb with oil and
spice it with pepper, salt and
paprika. Place the roast on
the low rack, then place the
rack on the ceramic enamel
tray. After cooking, wrap in
aluminium foil and let it stand
for 10 - 15minutes.
Steaks 0.5 - 1.0 lb
200 - 500 g
1
st
Speed Roast 30 %
2
nd
Speed Roast 10 %
1
st
7 - 13
2
nd
10 - 15
Place the steak on the high
rack, then place the rack on
the ceramic enamel tray. After
cooking, Let the steak rest for
5minutes before slicing.
Pork
tenderloin
0.5 - 1.0 lb
200 - 500 g
1
st
Speed Roast 30 %
2
nd
Speed Roast 10 %
1
st
12 - 18
2
nd
10 - 16
Place the pork on the low
rack, then place the rack on
the ceramic enamel tray. After
cooking, Let the steak rest for
5minutes before slicing.

51
English
Smart Features
Type Food Amount Mode Time (Min) Directions
Meat Roast
chicken
3 – 4 lb
1400 -
1800g
1
st
Speed Roast 50 %
2
nd
Speed Roast 30 %
1
st
25 - 40
2
nd
15 - 30
Fold the wings under the
chicken. Place the chicken on
the low rack, then place the
rack on the ceramic enamel
tray. Brush the chicken
with melted butter/oil and
seasonings. Put chicken
breast side down for the 1st,
then breast side up for the
2nd.
Bone-in
chicken
pieces
2 - 4 pieces 1
st
Speed Roast 50 %
2
nd
Grill
1
st
12 - 18
2
nd
10 - 20
Place the chicken pieces on
the high rack, then place the
rack on the ceramic enamel
tray. Put chicken skin side
down for the 1st, then skin
side up for the 2nd.
Snack
(Frozen)
Chicken
nuggets
5 - 10 ea Speed Roast 30 % 5 - 10 Place the chicken nuggets
on the ceramic enamel tray,
then place the tray on the
high rack.
Chicken
wings
10 - 20 ea Speed Roast 50 % 12 - 17 Place the chicken wings on
the high rack, then place the
rack on the ceramic enamel
tray.
French fries 6 - 12 oz
170 - 340 g
Speed Bake 10 % 10 - 15 Place the french fries on the
ceramic enamel tray, then
place the tray on the high
rack.
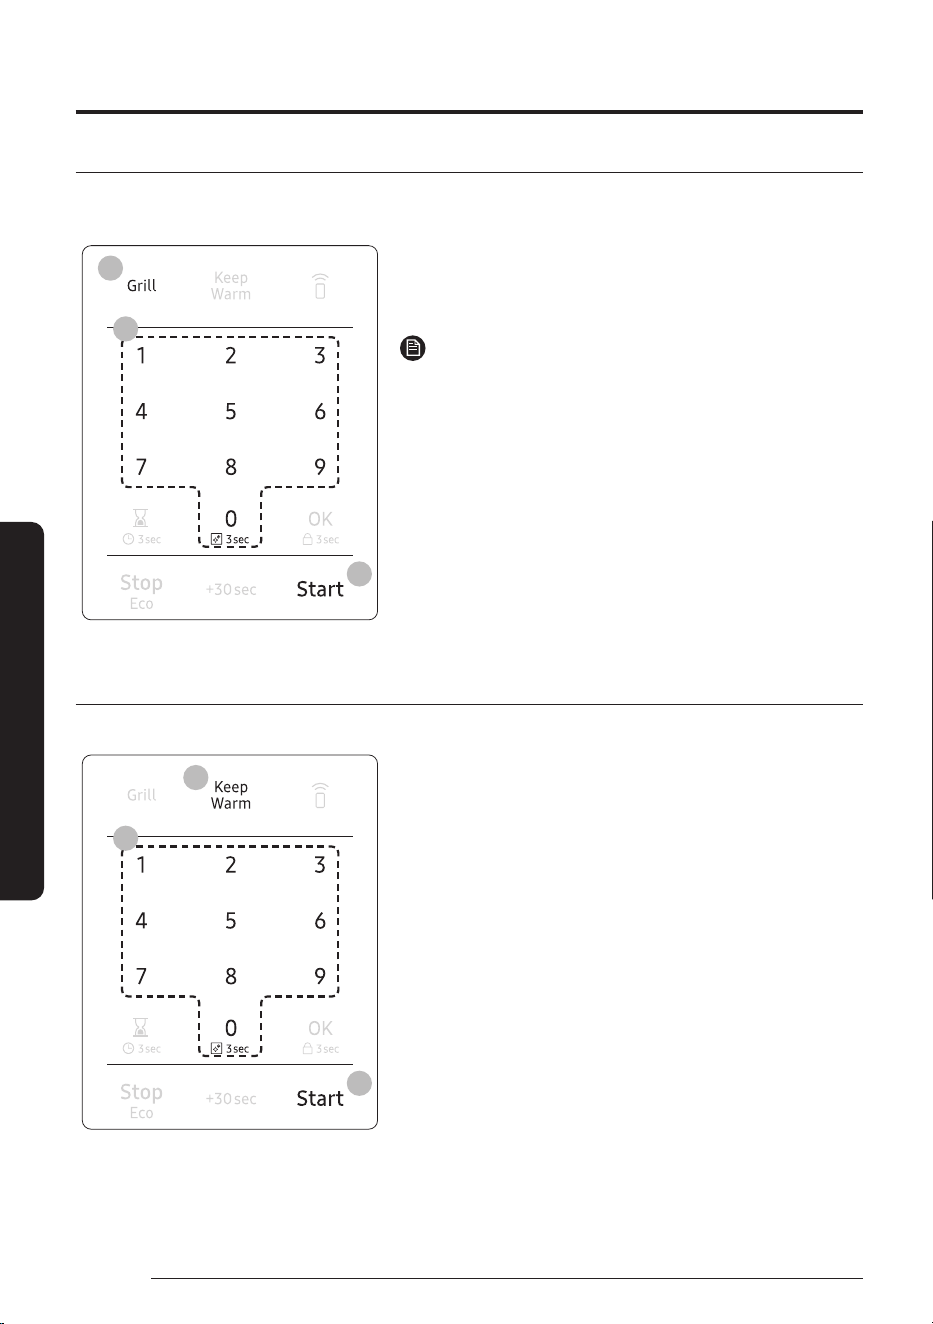
Operations
52
English
Smart Features
Grill
Grill mode adds texture and taste to your food. When grilling, use the low or high rack accessory. Use the low
rack when the height of food is such that the food would touch the upper heater if placed on the high rack.
3
2
1
1. Touch the Grill button.
2. Use the number pad to set a cooking time.
3. Touch the Start button to begin Grilling.
NOTE
The vent fan operates at low speed while the oven operates in
Grill mode.
Keep Warm
You can keep cooked food warm in your microwave oven for up to 99minutes and 99seconds.
3
2
1
1. Touch the Keep Warm button.
2. Enter the time by touching the number pad. If you
don’t set the cook time, your oven will maintain the
Keep Warmfunction for 99minutes.
3. Touch the Start button.
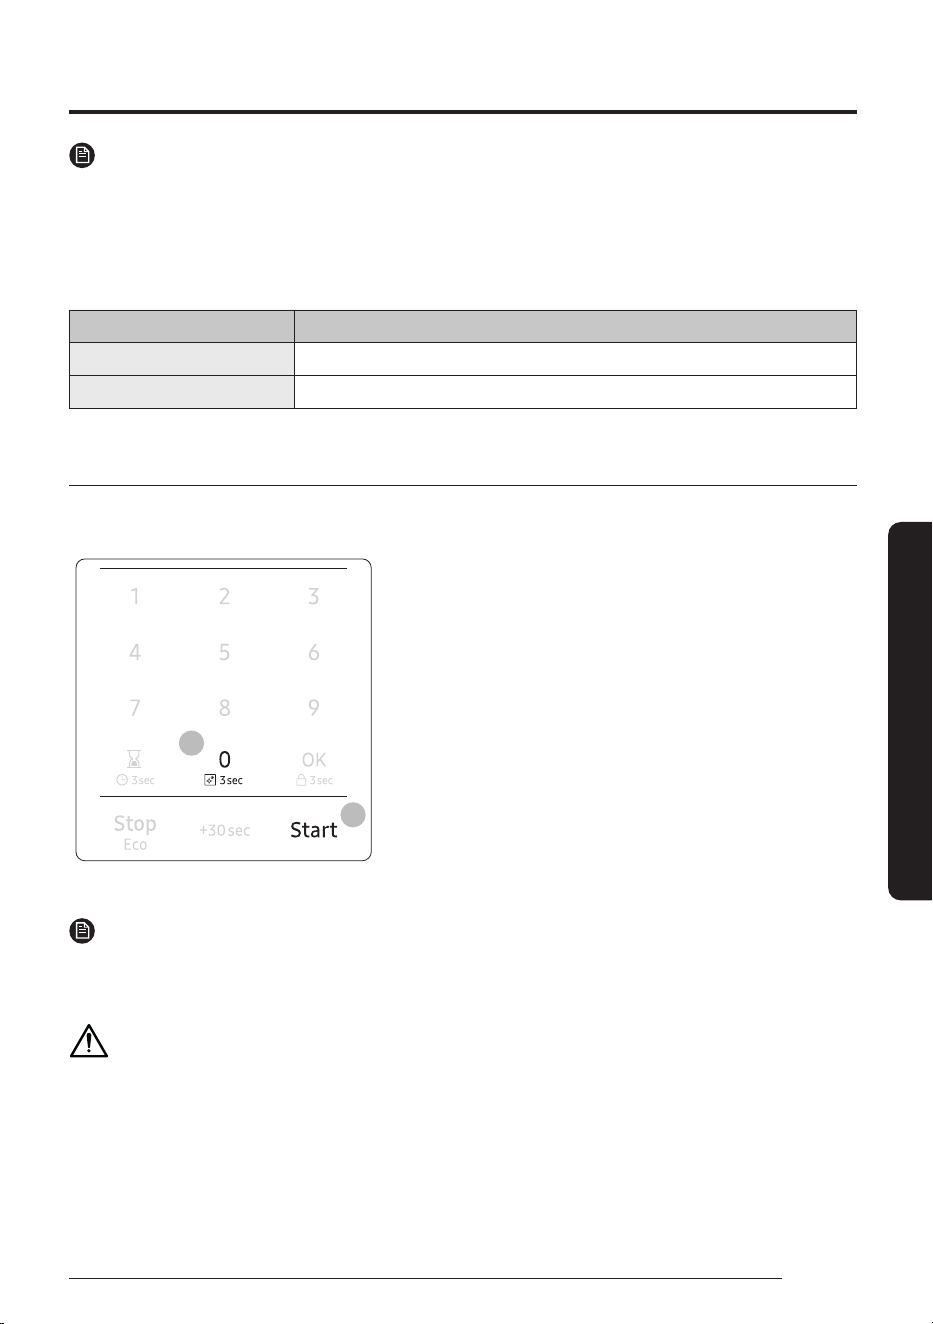
53
English
Smart Features
NOTE
• Keep Warm operates for up to 99minutes and 99seconds.
• Food that is cooked covered should also be covered during Keep Warm.
• Pastry items (pies, turnovers, etc.) should be uncovered during Keep Warm.
• Complete meals kept warm on a dinner plate can be covered during Keep Warm.
Below are the amounts of food we recommend by Food Type when you use Keep Warm function.
Food Type Recommended Quantity
Liquid 1 - 2 cups
Dry 5 - 10 oz.
Steam Clean
The steam provided by the steam clean system will soak the cavity surface. After using the steam clean
function, you can easily clean the cavity of the oven.
6
5
1. Open the door.
2. Carefully pour about 2fl.oz. of water into a wide plate.
3. Place the plate on the tray of the microwave oven.
4. Close the door.
5. Touch the 0 button for 3seconds.
6. Touch the Start button. Steam clean will operate for
6minutes and 30seconds. The length of time cannot be
modified.
7. When the cleaning time is over, the oven will beep. Open the
door.
8. Clean the cavity of the oven with a dry dishtowel. Remove
the turntable and wipe under the rack with a piece of paper
towel.
NOTE
• Use this function only after the oven has completely cooled.
• Use normal tap water only. Do not use distilled water.
CAUTION
The water in the oven will be very hot due to the steam cleaning function. Wipe up carefully.
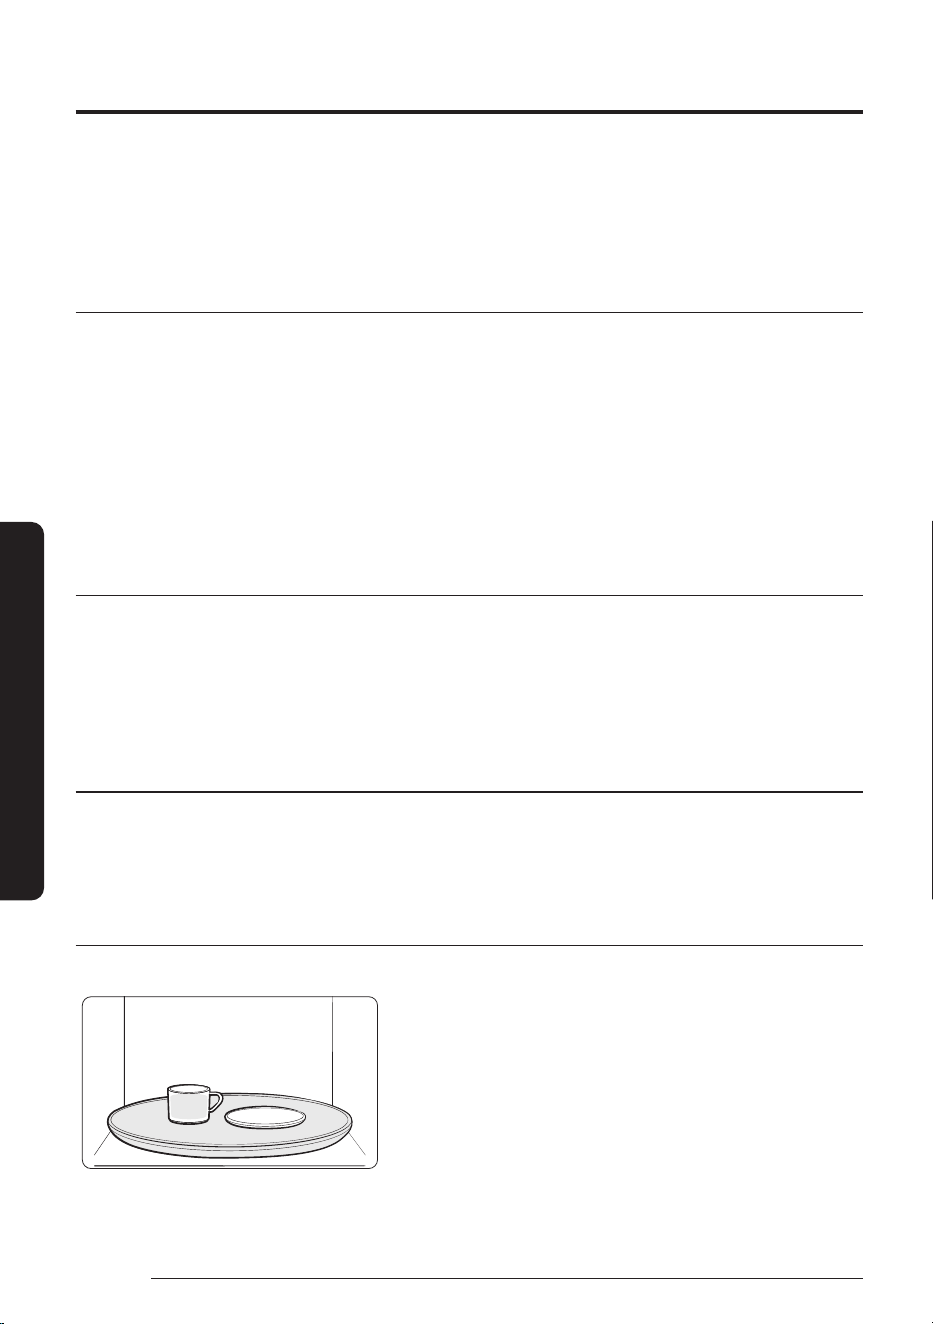
54
English
Smart Features
Cookware guide
To cook food in your microwave oven, microwaves must be able to penetrate the food without being reflected
or absorbed by the dish.
It is important to choose the correct cookware, therefore look for cookware that is marked microwave-safe.
The following table lists various types of cookware and indicates if and how they should be used in a
microwave oven.
Recommended cooking utensils
• Glass and glass-ceramic bowls and dishes — Use for heating or cooking.
• Microwavable plastic wrap — Use to cover. Leave a small opening for steam to escape and avoid placing it
directly on the food.
• Wax paper — Use as a cover to prevent spattering.
• Paper towels and napkins — Use for short-term heating and covering. They absorb excess moisture and
prevent spattering. Do not use recycled paper towels, which may contain metal and can catch fire.
• Paper plates and cups — Use for short-term heating at low temperatures. Do not use recycled paper, which
may contain metal and can catch fire.
• Thermometers — Use only those labeled "Microwave Safe" and follow all directions. Check the food in
several places. Conventional thermometers may be used once the food has been removed from the oven.
Limited use items
• Aluminum foil — Use narrow strips of foil to prevent overcooking of exposed areas. Using too much foil
can damage your oven, so be careful.
• Ceramic, porcelain, and stoneware — Use these if they are labeled "Microwave Safe". If they are not
labeled, test them to make sure they can be used safely. Never use dishes with metallic trim.
• Plastic — Use only if labeled "Microwave Safe". Other plastics can melt.
• Straw, wicker, and wood — Use only for short-term heating, as they are flammable.
Not recommended
• Glass jars and bottles — Regular glass is too thin to be used in a microwave and can shatter.
• Paper bags — These are a fire hazard, except for popcorn bags that are designed for microwave use.
• Styrofoam plates and cups — These can melt and leave an unhealthy residue on food.
• Plastic storage and food containers — Containers such as margarine tubs can melt in the microwave.
Testing utensils
If you are not sure whether a dish is microwave-safe or not, you can perform this test:
1. Fill a 1 cup glass measuring cup with water and put it inside
your oven, next to the dish you want to test.
2. Set the microwave to 1 minute using the number pad, and
then touch the Start button. This will heat the glass and dish
for one minute at High power.
oooWhen the microwave stops, the water should be warm and
the dish you are testing should be cool.
If the dish is warm, then it is absorbing microwave energy and is
not acceptable for use in the microwave.

55
English
Smart Features
Cooking guide
Microwave energy actually penetrates food and is attracted to and absorbed by the water, fat, and sugar
molecules in the food. The microwaves cause the molecules in the food to move rapidly. The rapid movement
of these molecules creates friction and the resulting heat cooks the food.
Cooking techniques
Stirring
Stir foods such as casseroles and vegetables while cooking to distribute heat evenly. Food at the outside of the
dish absorbs more energy and heats more quickly, so stir from the outside to the center. The oven will turn off
when you open the door to stir your food.
Arrangement
Arrange unevenly shaped foods, such as chicken pieces or chops, with the thicker, meatier parts toward the
outside of the turntable where they receive more microwave energy. To prevent overcooking, place thin or
delicate parts toward the center of the turntable.
Shielding
Shield food with narrow strips of aluminum foil to prevent overcooking. Areas that need shielding include
poultry wing-tips, the ends of poultry legs, and the corners of square baking dishes. Use only small amounts
of aluminum foil. Larger amounts can damage your oven.
Turning
Turn foods over midway through cooking to expose all parts to microwave energy. This is especially important
with large items such as roasts.
Standing
Food cooked in the microwave builds up internal heat and continues to cook for a fewminutes after the oven
stops. Let food stand to complete cooking, especially food such as roasts and whole vegetables. Roasts need
this time to complete cooking in the center without overcooking the outer areas. All liquids, such as soup
or hot chocolate, should be shaken or stirred when cooking is complete. Let liquids stand a moment before
serving. When heating baby food, stir well and test the temperature before serving.
Adding Moisture
Microwave energy is attracted to water molecules. Food that is uneven in moisture content should be covered
or allowed to stand so that the heat disperses evenly. Add a small amount of water to dry food to help it cook.
Venting
After covering a dish with plastic wrap, vent the plastic wrap by turning back one corner so excess steam can
escape.

Cooking guide
56
English
Smart Features
Recommended cooking utensils
• Dense foods, such as potatoes, take longer to heat than lighter foods. Food with a delicate texture should
be heated at a low power level to prevent it from becoming tough.
• Altitude and the type of cookware you are using can affect cooking time. When trying a new recipe, use the
minimum cooking time and check the food occasionally to prevent overcooking.
• Food with a non-porous skin such as potatoes or hot dogs should be pierced to prevent bursting.
• Frying with oil or fat is not recommended. Fat and oil can suddenly boil over and cause severe burns.
• Some ingredients heat faster than others. For example, the jelly inside a jelly doughnut will be hotter than
the dough. Keep this in mind to avoid burns.
• Home canning in the microwave oven is not recommended because all harmful bacteria may not be
destroyed by the microwave heating process.
• Although microwaves do not heat the cookware, the heat from the food is often transferred to the
cookware. Always use pot holders when removing food from the microwave and instruct children to do the
same.
• Making candy in the microwave is not recommended as candy can heat to very high temperatures. Keep
this in mind to avoid injury.
Guide for cooking eggs in your microwave
• Never cook eggs in the shell and never warm hard-cooked eggs in the shell. They can explode.
• Always pierce whole eggs to keep them from bursting.
• Cook eggs just until set. They become tough if overcooked.
Guide for cooking vegetables in your microwave
• Vegetables should be washed just before cooking. Often, no extra water is needed. If you are cooking
dense vegetables such as cubed potatoes, carrots, or green beans, add about ¼ cup water.
• Small vegetables (sliced carrots, peas, lima beans, etc.) will cook faster than larger ones.
• Whole vegetables, such as potatoes, acorn squash, or corn on the cob, should be arranged in a circle on the
turntable before cooking. They will cook more evenly if turned over after half the cooking time.
• Always place vegetables like asparagus and broccoli with the stem ends pointing towards the edge of the
dish and the tips toward the center.
• When cooking cut vegetables, always cover the dish with a lid or vented microwavable plastic wrap.
• Whole, unpeeled vegetables such as potatoes, squash, eggplant, etc., should have their skin pricked in
several spots before cooking to prevent them from bursting.
• For more even cooking, stir or rearrange whole vegetables halfway through the cooking time.
• Generally, the denser the food, the longer the standing time. (Standing time refers to the time necessary
for dense, large foods and vegetables to finish cooking after they come out of the oven.) A baked potato
can stand on the counter for five minutes before cooking is completed, while a dish of peas can be served
immediately.
57
English
Cleaning and Maintenance
Cleaning and maintaining your microwave oven
Keeping your microwave oven clean improves its performance, wards off unnecessary repairs, and lengthens
its life.
Cleaning the exterior
It’s best to clean spills on the outside of your microwave oven as they occur. Use a soft cloth and warm, soapy
water. Rinse and dry.
CAUTION
Do not get water into the vents. Never use abrasive products or chemical solvents such as ammonia or alcohol
as they can damage the appearance of your microwave.
WARNING
Unplug the microwave before cleaning.
Cleaning under your microwave oven
Regularly clean grease and dust from the bottom of your microwave using a solution of warm water and soap.
Cleaning the control panel
Wipe with a damp cloth and dry thoroughly. Do not use cleaning sprays, large amounts of soap and water,
abrasives, or sharp objects on the panel as it is easily damaged.
Cleaning the door and door seals
Always ensure that the door seals are clean and that the door closes properly. Take particular care when
cleaning the door seals to ensure that no particles accumulate and prevent the door from closing correctly.
Wash the glass door with very mild soap and water. Be sure to use a soft cloth to avoid scratching.
NOTE
If steam accumulates inside or outside the oven door, wipe with a soft cloth. Steam can accumulate when you
operate the oven when humidity is high and in no way indicates microwave leakage.
Cleaning the interior
CAUTION
To avoid injury, ensure that the microwave oven has cooled down before cleaning it.
Cleaning and Maintenance
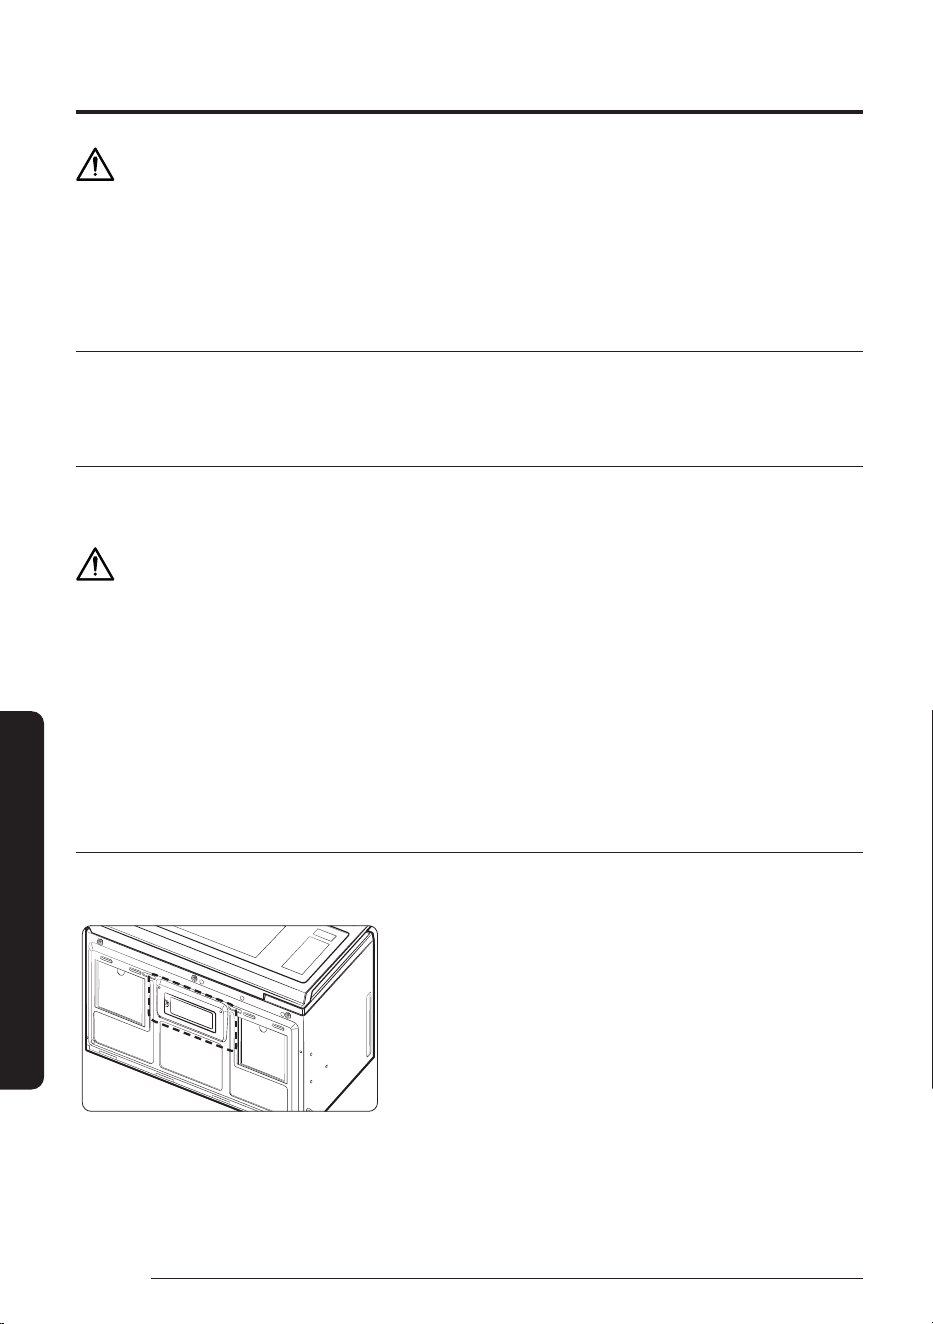
Cleaning and maintaining your microwave oven
58
English
Cleaning and Maintenance
CAUTION
Remove the glass tray from the oven when cleaning the oven or tray. To prevent the tray from breaking,
handle it with care and do not put it in water immediately after cooking. Wash the tray carefully in warm sudsy
water or in the dishwasher.
See the Steam Clean section on page 53.
Cleaning the turntable and roller rings
Clean the roller rings periodically and wash the turntable as required. The turntable can be washed safely in
your dishwasher.
Storing and repairing your microwave oven
If you need to store your microwave oven for a short or extended period of time, choose a dust-free, dry
location. Dust and dampness may adversely affect the functionality of the microwave parts.
WARNING
Do not repair, replace, or service any part of your microwave oven yourself. Allow only a qualified service
technician to perform repairs. If the oven is faulty and needs servicing, or you are in doubt about its condition,
unplug the oven from the power outlet and contact your nearest service center.
Do not use the oven if the microwave oven is damaged, in particular, if the door or door seals are damaged
or the door does not close properly. This can be caused by a broken hinge, a worn out seal or distorted/bent
casing.
Do not remove the oven from its casing.
This microwave oven is for home use only and is not intended for commercial use.
Replacing the cooktop/night light
When replacing the cooktop/night light, make sure that you are wearing gloves to avoid injury from the heat
of the bulb.
1. Unplug the oven or turn off the power at the main power
supply.
2. Remove the screw from the light cover and lower the cover.
3. Disconnect the wire connectors.
4. Remove the screw securing the LED lamp board.
5. Replace the LED lamp board.

59
English
Cleaning and Maintenance
Replacing the oven light
When replacing the oven light, make sure that you are wearing gloves to avoid injury from the heat of the bulb.
1. Unplug the oven or turn off the power at the main power
supply.
2. Open the door.
3. Press the hook above the grille to open the front of it.
4. Remove the charcoal filter, if present.
5. Remove the screw securing the lamp cover.
6. Remove the bulb by pulling it out gently.
7. Replace the bulb with a 20 watt halogen bulb.
8. Replace the bulb holder.
9. Close the grille front.
10. Plug the oven in or turn on the power at the main power
supply. Reset the clock.
Cleaning the grease filter
Your microwave oven has two metal reusable grease filters. The grease filters should be removed and cleaned
at least once every four months or as required.
NOTE
Your microwave oven has a filter reminder function. See page 23 for details.
WARNING
To avoid risk of personal injury or property damage, do not operate the oven hood without the filters in place.
1. To remove the filter, slide it to the left (or right) using the tab.
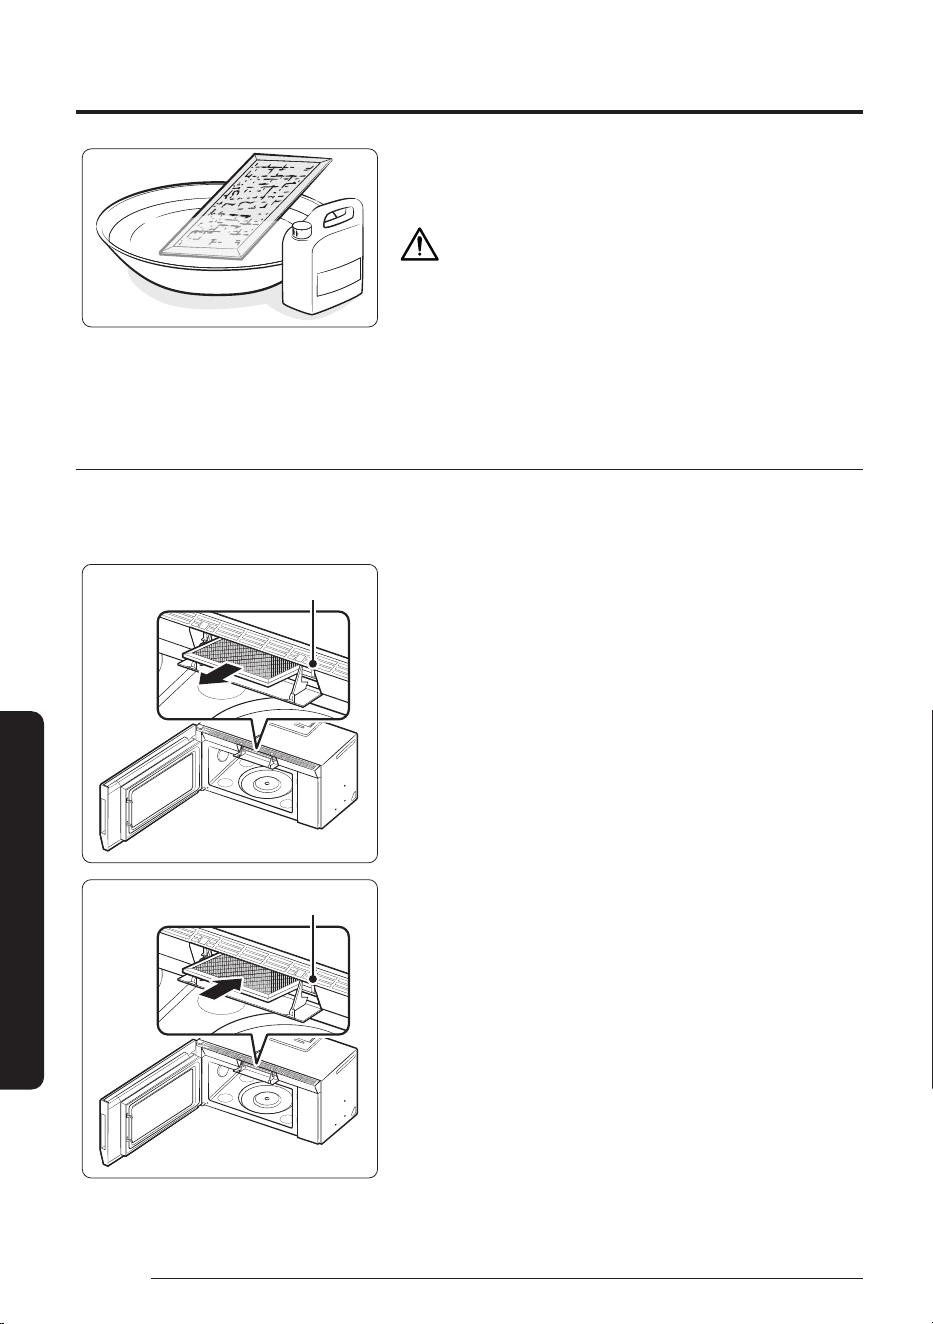
Cleaning and maintaining your microwave oven
60
English
Cleaning and Maintenance
2. Soak the grease filter in hot water and a mild soap. Rinse
well and shake to dry. Brushing the filter lightly can remove
embedded dirt.
WARNING
Do not use ammonia or put the grease filter in the microwave
oven. The aluminum will darken.
3. To re-install the filter, slide it into the frame slot on the left
(or right), and then push it upwards and to the right (or left)
to lock it.
Replacing the charcoal filter
If your oven is vented to the inside, the charcoal filter should be replaced every 6 to 12 months and more
often if necessary. The charcoal filter cannot be cleaned. To order a new charcoal filter, contact the Parts
Department at 1-800-627-4368 or your Samsung dealer. You can also order online at www.samsungparts.com
The filter angleThe filter angle
1. Unplug the oven or turn off the power at the main power
supply.
2. Open the door.
3. Press the hook above the grille to open the front of it.
4. Push the hook and remove the old filter.
The filter angleThe filter angle
5. Slide a new charcoal filter into place. The filter should rest at
the angle shown.
6. Close the grille front. Plug the oven in or turn on the power
at the main power supply. Reset the clock.
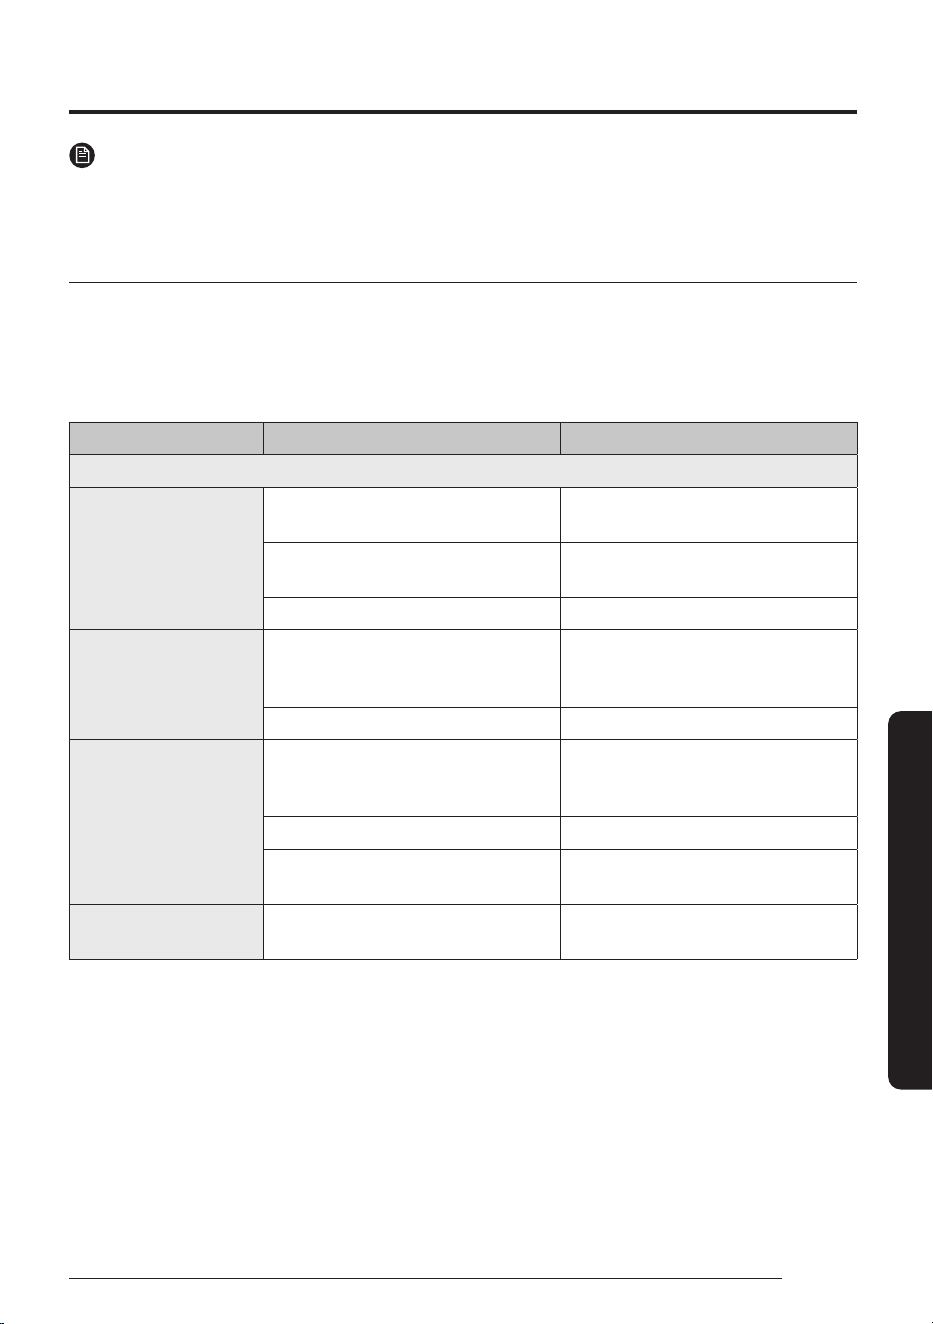
61
English
Cleaning and Maintenance
NOTE
Please be advised that the Samsung warranty does NOT cover service calls to explain product operation,
correct improper installation, or perform normal cleaning or maintenance.
Troubleshooting
If you encounter a problem with your oven, first check the table below and try the recommendations.
If a problem persists, or if an information code keeps appearing on the display, contact a local Samsung
service center.
Installation
Problem Possible cause Solution
General
The buttons cannot be
touched properly.
Foreign matter may be caught between
the buttons.
Remove the foreign matter and try
again.
For touch models: Moisture is on the
exterior.
Wipe the moisture from the exterior.
Child Lock is activated. Deactivate Child Lock.
The time is not displayed. Power is not supplied. Make sure power is supplied. Confirm
the microwave is plugged in. Check your
fuses or circuit breakers.
The Eco (power-saving) function is set. Turn off the Eco function.
The oven does not work. Power is not supplied. Make sure power is supplied. Confirm
the microwave is plugged in. Check your
fuses or circuit breakers.
The door is open. Close the door and try again.
The door open safety mechanisms are
covered by foreign matter.
Remove the foreign matter and try
again.
The oven stops while in
operation.
The user has opened the door to turn
food over.
After turning the food over, touch the
Start button again to start operation.

Cleaning and maintaining your microwave oven
62
English
Cleaning and Maintenance
Problem Possible cause Solution
The power turns off
during operation.
The oven has been cooking for an
extended period of time.
After the oven has cooked for an
extended period of time, let the oven
cool.
The cooling fan is not working. Listen for the sound of the cooling fan.
Trying to operate the oven without food
inside.
Put food in the oven.
There is not enough ventilation space
around the oven.
There are intake/exhaust outlets on
the front and rear of the oven for
ventilation. Check the installation guide
and make sure that the microwave is far
enough away from walls and cabinets
for proper ventilation.
Several appliances or devices are
plugged into the same outlet.
Unplug all other appliances or devices
from the outlet.
There is no power to the
oven.
Power is not supplied. Make sure power is supplied. Confirm
the microwave is plugged in. Check your
fuses or circuit breakers.
There is a popping sound
during operation.
Cooking food in a sealed container or
using a container with a a tight lid may
cause popping sounds.
Do not cook food in sealed containers or
in containers with tight lids. Expanding
steam from the cooking food can cause
the containers to burst or the lids to
pop off.
The oven exterior gets
too hot during operation.
There is not enough ventilation space
around the oven.
There are intake/exhaust outlets on
the front and rear of the oven for
ventilation. Check the installation guide
and make sure that the microwave is far
enough away from walls and cabinets
for proper ventilation.
Objects are on top of the oven. Remove all objects on the top of the
oven.
The door cannot be
opened properly.
Food residue is stuck between the door
and oven interior.
Clean the oven and then open the door.
The oven does not heat. The oven may not work if too much food
is being cooked or improper cookware is
being used.
To test the oven, put one cup of water
in a microwave-safe container, put the
container in the oven, and then run the
microwave for 1-2minutes to check
whether the water is heated. If the
water is heated, reduce the amount of
food and start the function again. Use a
cooking container with a flat bottom.

63
English
Cleaning and Maintenance
Problem Possible cause Solution
Heating is weak or slow. The oven may not work if too much food
is being cooked or improper cookware is
being used.
To test the oven, put one cup of water
in a microwave-safe container, put the
container in the oven, and then run the
microwave for 1-2minutes to check
whether the water is heated. If the
water is heated, reduce the amount of
food and start the function again. Use a
cooking container with a flat bottom.
The warm function does
not work.
The oven may not work if too much food
is being warmed or improper cookware
is being used.
To test the oven, put one cup of water
in a microwave-safe container, put the
container in the oven, and then run the
microwave for 1-2minutes to check
whether the water is heated. If the
water is heated, reduce the amount of
food and start the function again. Use a
cooking container with a flat bottom.
The thaw function does
not work.
The oven may not work if too much food
is being thawed or improper cookware
is being used.
To test the oven, put one cup of water
in a microwave-safe container, put the
container in the oven, and then run the
microwave for 1-2minutes to check
whether the water is heated. If the
water is heated, reduce the amount of
food and start the function again. Use a
cooking container with a flat bottom.
The interior light is dim or
does not turn on.
The door has been left open for a long
time.
The interior light may automatically
turn off when the Eco function operates.
Close and reopen the door or touch the
Stop/Ecobutton.
The interior light is covered by foreign
matter.
Clean the inside of the oven and check
again.
A beeping sound occurs
during cooking.
If the Auto Cook function is being used,
this beeping sound means it's time to
flip the food.
After turning over the food, touch the
Start button again to restart operation.
The oven is not level. The oven is installed on an uneven
surface.
Make sure the oven is installed on flat,
stable surface.
There are sparks during
cooking.
Metal containers are used during
cooking or thawing.
Do not use metal containers.
When power is
connected, the oven
immediately starts to
work.
The door is not properly closed. Close the door and check again.

Cleaning and maintaining your microwave oven
64
English
Cleaning and Maintenance
Problem Possible cause Solution
There is electricity
coming from the oven.
The power source or power outlet is not
properly grounded.
Make sure the power source and power
outlet are properly grounded.
There is water dripping. Water or steam may be generated
by the cooking or defrosting process,
depending on the food. This is not an
oven malfunction.
Let the oven cool and then wipe with a
dry dish towel.
There is steam through a
crack in the door.
Water or steam may be generated
by the cooking or defrosting process,
depending on the food. This is not an
oven malfunction.
Let the oven cool and then wipe with a
dry dish towel.
There is water left in the
oven.
Water or steam may be generated
by the cooking or defrosting process,
depending on the food. This is not an
oven malfunction.
Let the oven cool and then wipe with a
dry dish towel.
The brightness inside the
oven varies.
Brightness changes depending on
power output changes according to
function.
Power output changes during cooking
are not malfunctions. This is not an
oven malfunction.
Cooking is finished, but
the cooling fan is still
running.
To ventilate the oven, the cooling fan
continues to run for about 3minutes
after cooking is complete.
This is not an oven malfunction.
Touching the Startbutton
operates the oven.
This happens when the oven was not
operating.
The microwave oven is designed to start
operating when you touch the Start
button if it was not operating.
Turntable
While turning, the
turntable comes out of
place or stops turning.
There is no roller ring, or the roller ring
is not properly in place.
Install the roller ring and then try again.
The turn table drags
while turning.
The roller ring is not properly in place,
there is too much food, or the container
is too large and touches the inside of
the microwave.
Adjust the amount of food. Do not use
containers that are too large.
The turn table rattles
while turning and is
noisy.
Food residue is stuck to the bottom of
the oven.
Remove any food residue stuck to the
bottom of the oven.

65
English
Cleaning and Maintenance
Problem Possible cause Solution
Grill
Smoke comes out during
operation.
During initial operation, smoke may
come from the heating elements when
you first use the oven.
This is not a malfunction. After you run
the oven 2-3 times, it should stop.
Food is on the heating elements. Let the oven cool and then remove the
food from the heating elements.
Food is too close to the grill. Put the food a suitable distance away
while cooking.
Food is not properly prepared and/or
arranged.
Make sure food is properly prepared
and arranged.
Oven
The oven does not heat. The door is open. Close the door and try again.
Smoke comes out during
preheating.
During initial operation, smoke may
come from the heating elements when
you first use the oven.
This is not a malfunction. After you run
the oven 2-3 times, it should stop.
Food is on the heating elements. Let the oven cool and then remove the
food from the heating elements.
There is a burning smell
or a burnt plastic smell
when using the oven.
Plastic or non-heat resistant cookware
is used.
Use glass cookware suitable for high
temperatures.
There is a bad smell
coming from inside the
oven.
Food residue or plastic has melted and
stuck to the interior.
Use the steam function and then wipe
the interior of the microwave with a
dry cloth. You can put a measuring cup
containing a cup of water and a lemon
slice inside and run the oven to remove
the odor more quickly.
The oven does not cook
properly.
The oven door is frequently opened
during cooking.
Do not open the door frequently unless
you are cooking things that need to be
turned. If you open the door often, the
interior temperature will be lowered
and this may affect the results of your
cooking.
The oven controls are not correctly set. Set the oven controls correctly and try
again.
The grill or other accessories are not
correctly inserted.
Insert the accessories correctly.
The wrong type or size of cookware is
used.
Reset the oven controls or use suitable
cookware with flat bottoms.

Cleaning and maintaining your microwave oven
66
English
Cleaning and Maintenance
Information codes
If the oven fails to operate, you may see an information code on the display. Check the table below for the
code, and then follow the directions.
Code Description Action
C-20 The temperature sensor read the
temperature incorrectly.
Touch the Stop/Eco button and operate
again. If it appears again, turn off the
microwave oven, let it sit for more than
30seconds, and then try setting again.
If this code re-appears, call your local
Samsung Customer Care Center.
C-21 Temperature sensor detects a higher
temperature than the
set temperature.
Turn off the microwave oven and let it
cool, then try the setting again.
If this code re-appears, call your local
Samsung Customer Care Center.
C-F0 The microwave has sensed an internal
communications failure.
Unplug the power cord of the oven, and
contact a local Samsung Customer Care
Center.
C-A1 The oven has failed to sense the
opening or closing of the damper for
1minute.
C-F1 Only occurs when EEPROM Read or
Write is not working.
C-d0 Control buttons are touched over
10seconds.
Clean the keys and check if there is
water on the surface around key. If it
appears again, turn off the microwave
oven, let it sit for more than 30seconds,
and then try setting again. If this code
re-appears, call your local Samsung
Customer Care Center.
C-F2 There is a button malfunction. Stop the oven and then try again. If
this code re-appears, call your local
Samsung Customer Care Center.
67
English
Appendix
Appendix
Specifications
Model ME90H1780RAA
Oven Cavity 1.7 cu ft
Controls 10 power levels, including Defrost
Timer 99minutes, 99seconds
Power Source 120 VAC, 60 Hz
Power Consumption 1700 Watt Microwave / 1800 Watt Heater
Microwave Power Output 950 Watts
Cook Top Light LED lamp ( 2 EA )
Oven Light 20 Watt halogen lamp
Oven Cavity Dimensions (inches) 20
1
/
8
" (W) x 10
5
/
16
" (H) x 14" (D)
Outside Dimensions (inches) 29
7
/
8
" (W) × 17
1
/
16
" (H) × 16
11
/
16
" (D)
Shipping Dimensions (inches) 33
3
/
8
" (W) × 20
11
/
16
" (H) × 19
3
/
8
" (D)
Net/Shipping Weight 78.8 lbs / 90.3 lbs (34.86 kg / 40.96 kg)
Appendix

68
English
Appendix
Warranty
Samsung MICROWAVE OVEN
LIMITED WARRANTY TO ORIGINAL PURCHASER WITH PROOF OF PURCHASE
This Samsung brand product, as supplied and distributed by Samsung ELECTRONICS AMERICA, INC.
(Samsung) and delivered new, in the original carton to the original consumer purchaser, is warranted by
Samsung against manufacturing defects in materials or workmanship for the limited warranty period, starting
on the date of delivery to the original consumer purchaser, of:
One (1) Year Parts and Labor
Ten (10) Years Magnetron Part (Part Only)
This limited warranty is valid only on products purchased and used in the United States that have been
installed, operated, and maintained according to the instructions attached to or furnished with the product.
To receive warranty service, the purchaser must contact Samsung at the address or phone number provided
below for problem determination and service procedures. Warranty service can only be performed by a
Samsung authorized service center. The original dated bill of sale and/or proof of delivery must be presented
upon request as proof of purchase to Samsung or Samsung’s authorized service center to receive warranty
service.
Samsung will provide in-home service within the contiguous United States during the warranty period at
no charge, subject to availability of Samsung authorized servicers within the customer’s geographic area. If
in-home service is not available, Samsung may elect, at its option, to provide transportation of the product
to and from an authorized service center. If the product is located in an area where service by a Samsung
authorized servicer is not available, you may be responsible for a trip charge or required to bring the product
to a Samsung authorized service center for service.
To receive in-home service, product must be unobstructed and accessible to the service agent.
During the applicable warranty period, a product will be repaired, replaced, or the purchase price refunded, at
the sole option of Samsung. Samsung may use new or reconditioned parts in repairing a product, or replace
the product with a new or reconditioned product. Replacement parts and products are warranted for the
remaining portion of the original product’s warranty or ninety (90) days, whichever is longer. All replaced parts
and products are the property of Samsung and you must return them to Samsung.
This limited warranty covers manufacturing defects in materials or workmanship encountered in normal
household, noncommercial use of this product and shall not cover the following: damage that occurs
in shipment, delivery, installation, and uses for which this product was not intended; damage caused by
unauthorized modification or alteration of the product; product where the original factory serial numbers have
been removed, defaced, changed in any way, or cannot be readily determined; cosmetic damage including
scratches, dents, chips, and other damage to the product’s finishes; damage caused by abuse, misuse,
overheating due to overcooking, glass tray or turntable, pest infestations, accident, fire, floods, or other
acts of nature or God; damage caused by use of equipment, utilities, services, parts, supplies, accessories,
applications, installations, repairs, external wiring or connectors not supplied or authorized by Samsung;
damage caused by incorrect electrical line current, voltage, fluctuations and surges; damage caused by
failure to operate and maintain the product according to instructions; in-home instruction on how to use
your product; service to correct installation not in accordance with electrical or plumbing codes or correction
of household electrical or plumbing (i.e., house wiring, fuses, or water inlet hoses); and reduced magnetron
power output related to normal aging.

69
English
Appendix
The cost of repair or replacement under these excluded circumstances shall be the customer’s responsibility.
Visits by an authorized servicer to explain product functions, maintenance or installation are not covered by
this limited warranty. Please contact Samsung at the number below for assistance with any of these issues.
Samsung will charge a repair fee for replacing an accessory or repairing cosmetic damage if the damage to the
unit and/or damage to or loss of the accessory was caused by the customer. Items this covers include:
• Dented, scratched, or broken door, handle, out-panel, or control panel
• Broken or lost tray, guide roller, coupler, filter, or wire rack
Parts that Samsung has determined can be replaced by the user may be sent to the customer for installation.
In Samsung’s discretion, an authorized servicer can be dispatched to perform such installation.
EXCLUSION OF IMPLIED WARRANTIES
IMPLIED WARRANTIES, INCLUDING THE IMPLIED WARRANTIES OF MERCHANTABILITY OR FITNESS FOR A
PARTICULAR PURPOSE, ARE LIMITED TO ONE YEAR OR THE SHORTEST PERIOD ALLOWED BY LAW. Some
states do not allow limitations on how long an implied warranty lasts, so the above limitations or exclusions
may not apply to you. This warranty gives you specific rights, and you may also have other rights, which vary
from state to state.
LIMITATION OF REMEDIES
YOUR SOLE AND EXCLUSIVE REMEDY IS PRODUCT REPAIR, PRODUCT REPLACEMENT, OR REFUND OF THE
PURCHASE PRICE AT Samsung’s OPTION, AS PROVIDED IN THIS LIMITED WARRANTY. Samsung SHALL NOT
BE LIABLE FOR SPECIAL, INCIDENTAL OR CONSEQUENTIAL DAMAGES, INCLUDING BUT NOT LIMITED TO TIME
WAY FROM WORK, HOTELS AND/OR RESTAURANT MEALS, REMODELING EXPENSES, LOSS OF REVENUE
OR PROFITS, FAILURE TO REALIZE SAVINGS OR OTHER BENEFITS REGARDLESS OF THE LEGAL THEORY ON
WHICH THE CLAIM IS BASED, AND EVEN IF Samsung HAS BEEN ADVISED OF THE POSSIBILITY OF SUCH
DAMAGES. Some states do not allow exclusion or limitation of incidental or consequential damages, so the
above limitations or exclusions may not apply to you. This warranty gives you specific rights, and you may also
have other rights, which vary from state to state.
Samsung does not warrant uninterrupted or error-free operation of the product. No warranty or guarantee
given by any other person, firm, or corporation with respect to this product shall be binding on Samsung.
To obtain warranty service, please contact Samsung at:
Samsung Electronics America, Inc.
700 Sylvan Ave, Englewood Cliffs, NJ 07632
1-800-SAMSUNG (726-7864) and www.samsung.com

ME90H1780RAA-00
COUNTRY CONTACT CENTER WEB SITE
U.S.A
Consumer Electronics
1-800-SAMSUNG (726-7864) www.samsung.com/us/support
CANADA 1-800-SAMSUNG (726-7864)
www.samsung.com/ca/support (English)
www.samsung.com/ca_fr/support (French)
Scan this with your smartphone
Scan the QR code* or visit
www.samsung.com/spsn
to view our helpful
How-to Videos and Live Shows
* Requires reader to be installed on your
smartphone
