USER MANUAL
1-Zone WiFi Water Timer
Model No. HTV145FRF
Email
seice@rainpointonline.com
WhatsApp
+1 626-780-5952
Free Hotline
US: +1 833-381-5659 (EN)
DE:+49 800-182-0576 (DE, EN)
UK: +44 800-808-5337(EN)
Save the user manual for future reference.
If you have any questions, please contact
us to get suppo.


EN
CONTENT
INTRODUCTION ····················································
1.1 Contents in the Box ··············································
1.2 Product Oveiew ················································
1.3 Specication·····················································
1.4 Feature Oveiew ················································
INSTALLATION AND CONNECTION ··································
2.1 Install App On your Phone ········································
2.2 Connect the Timer to the Gateway ·································
2.3 Install the Timer to the Faucet ·····································
2.4 Activate the Timer Before Use ·····································
APP INTRODUCTION ···············································
3.1 Timer Homepage ················································
3.2 Basic Setting ····················································
3.3 Plan Setting ·····················································
3.4 Manual Water Setting ············································
3.5 Built-in Water Flow Meter & Cha ·································
3.6 Device Status Record & Event ·····································
3.7 Rain Delay·······················································
3.8 Sma Scene·····················································
3.9 Weather Conditions & Devices' Next Plan Time ······················
3.10 Plan Oveiew & Setting ·········································
3.11 Home Management ·············································
3.12 Google Assistant/Alexa Voice Control ·····························
RESET THE DEVICE ·················································
THE MEANING OF LED LIGHT ·······································
TROUBLESHOOTING ···············································
LIMITED WARRANTY ···············································
CUSTOMER SERVICE ···············································
1.
2.
3.
4.
5.
6.
7.
8.
01
01
02
03
04
06
06
07
12
13
14
14
16
19
24
26
27
28
29
34
35
36
37
38
39
40
41
42
EN
1. INTRODUCTION
-01-
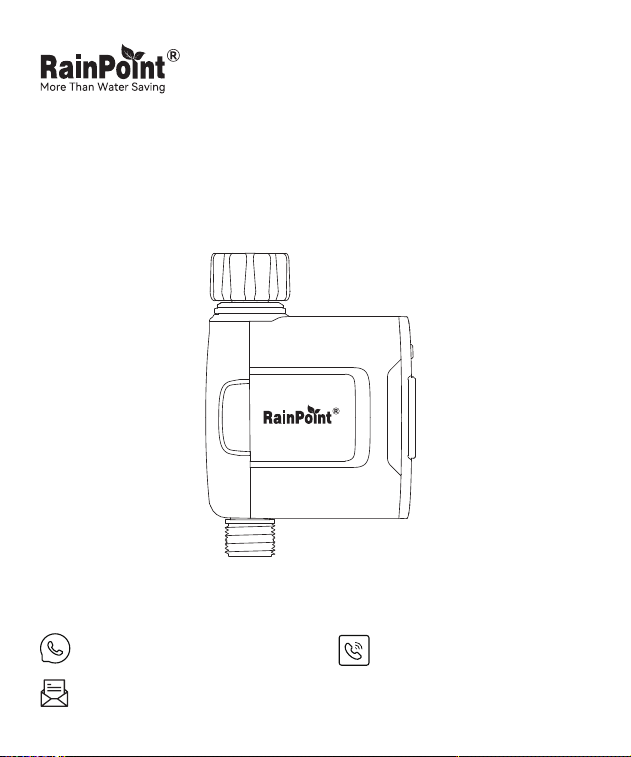
1.1 Contents in the Box
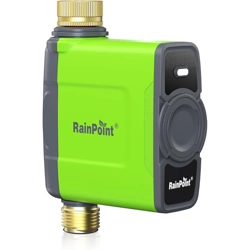
1× HTV145FRF 1-ZONE WiFi WATER TIMER
1× Quick Guide
1× User Manual
1.
2.
3.
1
2
3
EN
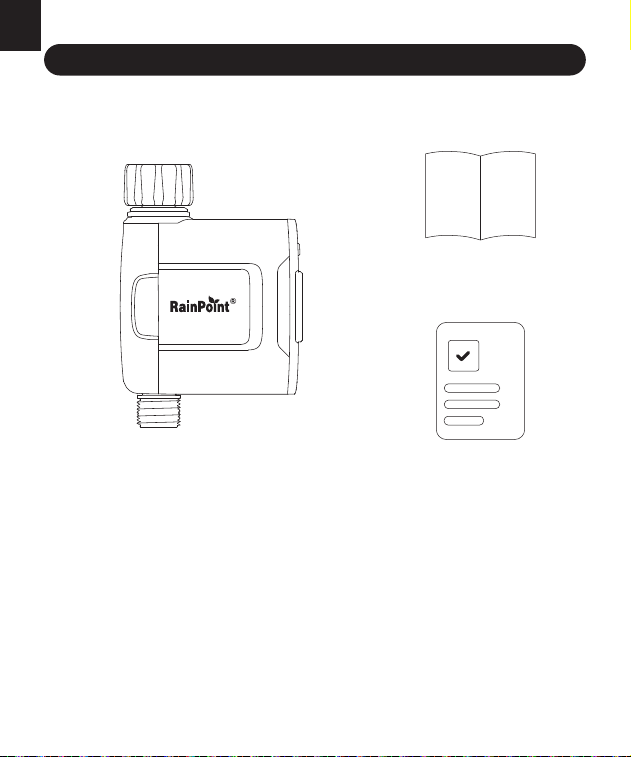
1.2 Product Oveiew
-02-
Water Inlet
Zone Button
Light
Indicator
Batte
Compament
Water Outlet
-03-
EN
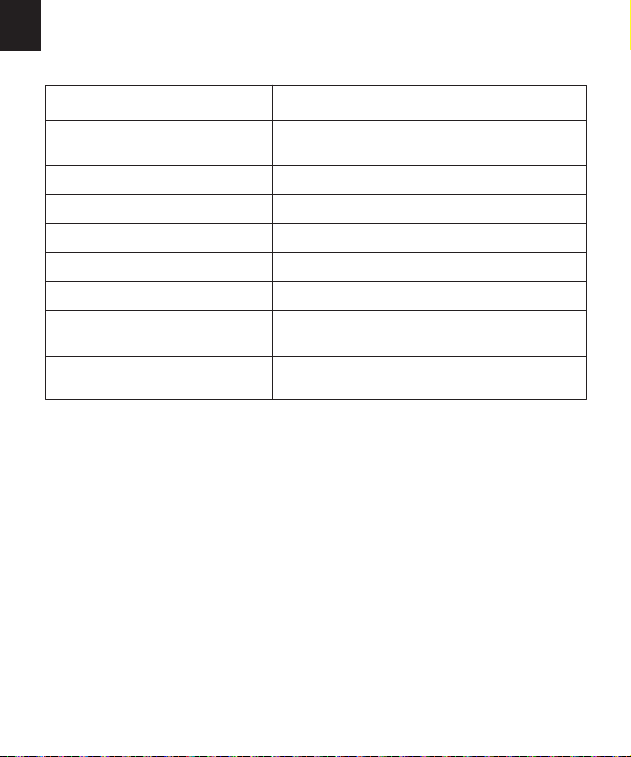
Working Water Pressure
Water Flow Rate
Working Temperature Range
Powered By
Waterproof Level
0.5 bar to 8 bar(7.25-116PSI)
5-35 L/Min (1.32-9.25GAL/Min)
3℃-50℃(37.4°F-122°F)
4 * AA alkaline batteries (not included)
IP 65
SPECIFICATIONITEM
1.3 Specication
NH (US) for 3/4” faucets
BSP (EU) for 3/4” or 1” faucets
For 3/4” standard garden hose
An open distance up to 250m/820ft
Range Between
Gateway And Timer
Water Outlet
Water Inlet

EN
*The package only contains the 1-zone WiFi water timer, not the gateway.
1.4 Feature Oveiew
WiFi Remote Control: Connect with 2.4GHz WiFi, set and check
irrigation schedules by APP.
Scheduled Watering: The timer can set up to 6 separate watering plans
for all three dierent modes.
Manual Watering: Manually turn on/o watering and set watering
duration for three dierent modes.
Automatic Watering: When the WiFi timer is paired with the WiFi soil
sensor(not included), it can automatically irrigate or stop watering
according to the soil temperature and humidity data; when you locate
the home address for the timer, the APP will automatically synchronize
the local weather information, and the timer can be automatically
executed according to the weather trigger conditions you set.
Rain Delay: Manual rain delay and automatic rain delay can be set.
Water Flow Meter: Built-in water ow meter to track water usage in
the last 30 days or the last year.
1.
2.
3.
4.
5.
6.
1.4 Feature Oveiew
WiFi
RF
CLOUD
ROUTER
2.4GHz
WiFi
RF
-04-

EN
-05-
Only applicable to 2.4GHz WiFi.
*
Three watering modes: Normal Irrigation; Inteal Irrigation; Cycle &
Soak.
Comanagement with family: Home management allows you to add
family members and give them premissions to manage the irrigation of
your home garden together.
Low Batte, Water Shoage, Valve Failure (leakage) Alarm: APP will
send you ale messages when low batte, water shoage or valve
failure.
One WiFi gateway can pair with maximum 4 WiFi water timers.
7.
8.
9.
10.
1)
2)
EN
2. INSTALLATION AND CONNECTION
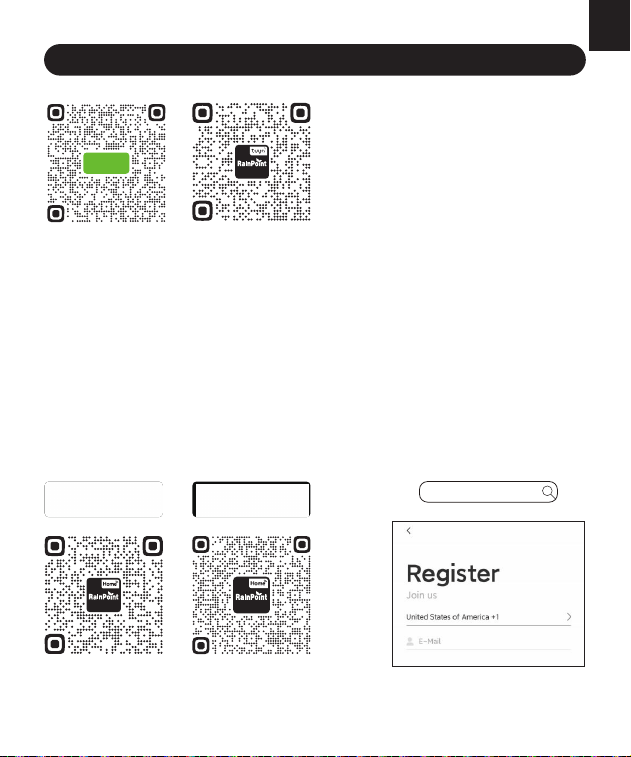
2.1 Install App On your Phone
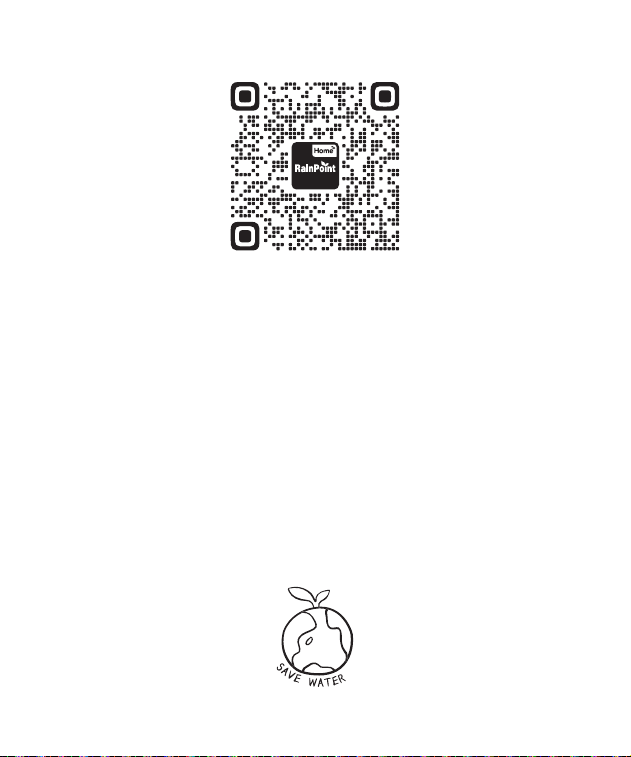
RainPoint Home
Download the RainPoint Home App
Search for ''RainPoint Home'' on Google Play or App Store or scan the
QR code to download the RainPoint Home APP.
Register your RainPoint Home account
Open your RainPoint Home APP, select Register. Follow the prompts
to register a RainPoint Home account with your email.
Customer Suppo
AndroidiOS
Tips: Please scan the QR code or
search the link for setup video
or customer suppo to install
the device quickly.
Setup Video:
www.youtube.com/@rainpoint
Customer Suppo:
www.rainpointonline.com/
pages/suppo
Setup Video
HTV145
-06-
-07-
EN
To remotely control and manage irrigation schedules, the timer needs to be
paired with the gateway. Please refer to the gateway user manual to
connect the gateway to a WiFi network.
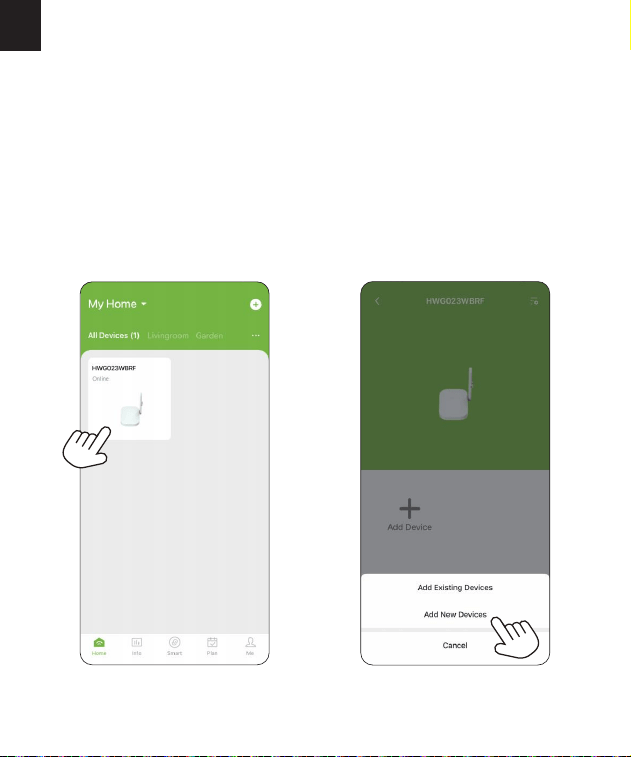
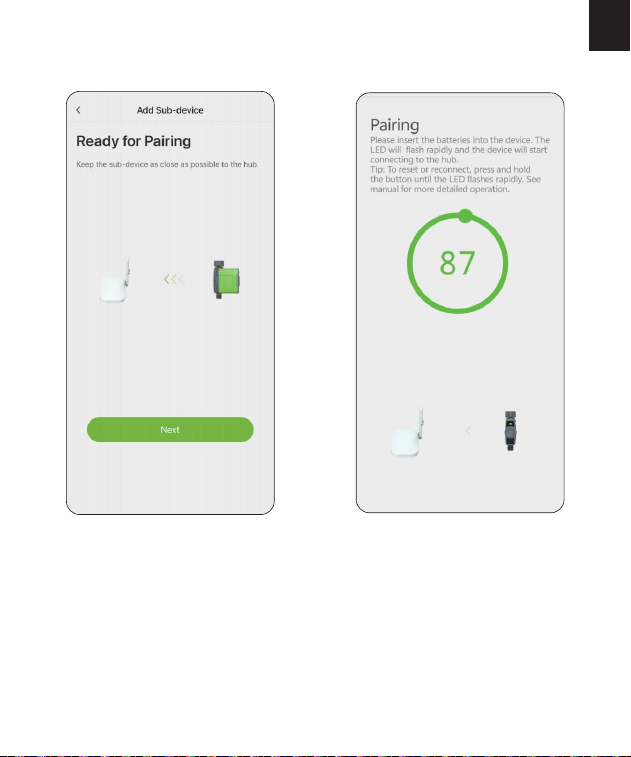
2.2 Connect the Timer to the Gateway
a.
After successfully connecting to the gateway, tap the gateway icon on
the app homepage to go to the gateway's homepage, tap “Add
Device” and then tap "Add New Devices" to add the timer to the
gateway's sub-device.
-08-
EN
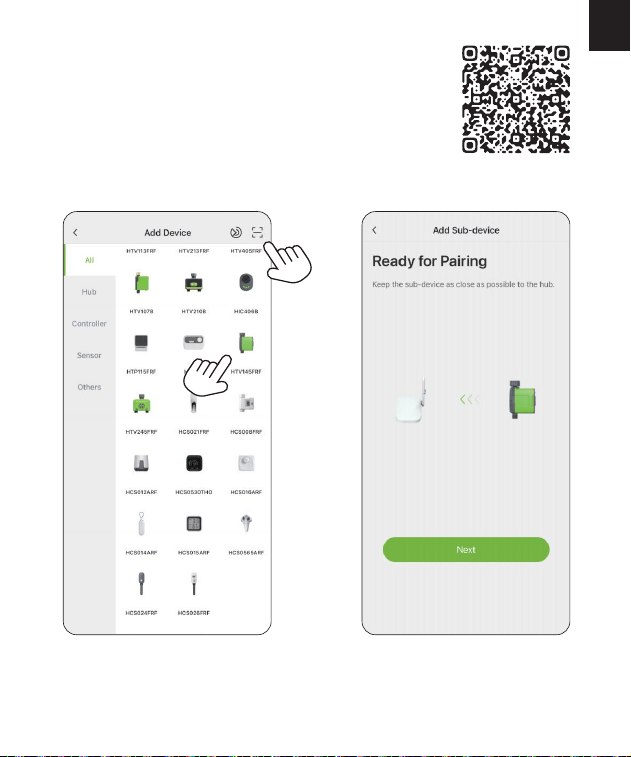
b. Find and select “HTV145FRF” to add it, or click
the icon in the top right corner to add a device
via QR code scanning or by entering the serial
number. And it will enter the device pairing
preparation page.
0220145300
-09-
EN
c. Install the batteries in the timer, then press
and hold the device button until the RED
light ashes rapidly, indicating that the
device is in pairing mode.
Open the batte compament
cover of the timer.
Inse 4 new AA (1.5V) alkaline
batteries (not included).
Close the batte compament
cover and press down rmly to
ensure it is fully sealed.
Attention:
·
·
·
·
·
After installing the batteries, securely attach the batte cover to ensure
waterproong.
If the timer will not be used for an extended period, please remove the
batteries and dispose of them properly.
Replace the batteries when the low batte indicator appears on the
display.
Do not throw batteries into re, as they may explode or leak.
To ensure longer life, use 4 new AA alkaline batteries (not included). Do
not mix new and old alkaline batteries, standard batteries (carbon zinc),
or rechargeable batteries.
1)
2)
3)
-10-
EN
d. Click "Next" and it will sta pairing the timer automatically.
-11-
EN
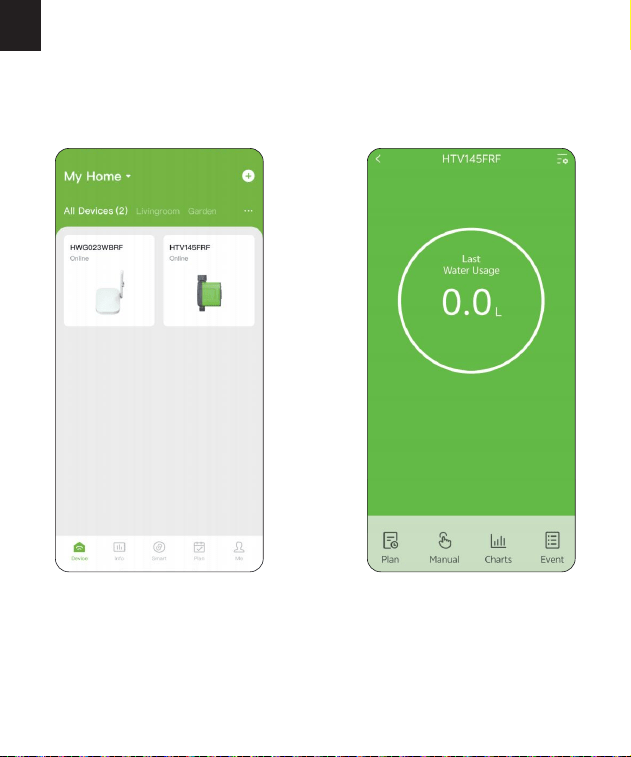
e. After the device is successfully connected in the app, the timer icon
will display on the app homepage. You can click the timer icon on the
app homepage to enter the timer homepage for more settings of the
device.
NOTE: Ensure that your gateway and timer remain close during the pairing
process. If you need to re-pair or restore facto settings at any time, press
and hold the operation button until the red indicator light ashes quickly to
manually activate pairing mode.
-12-
EN
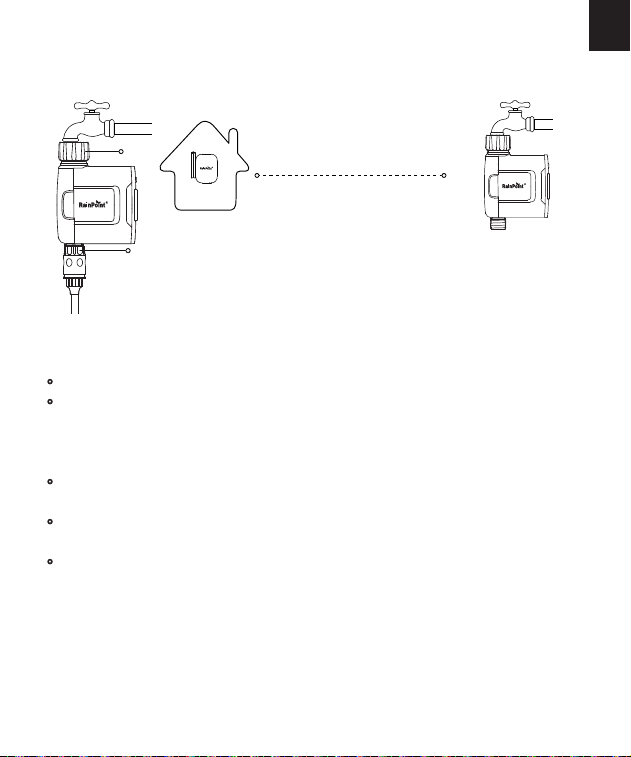
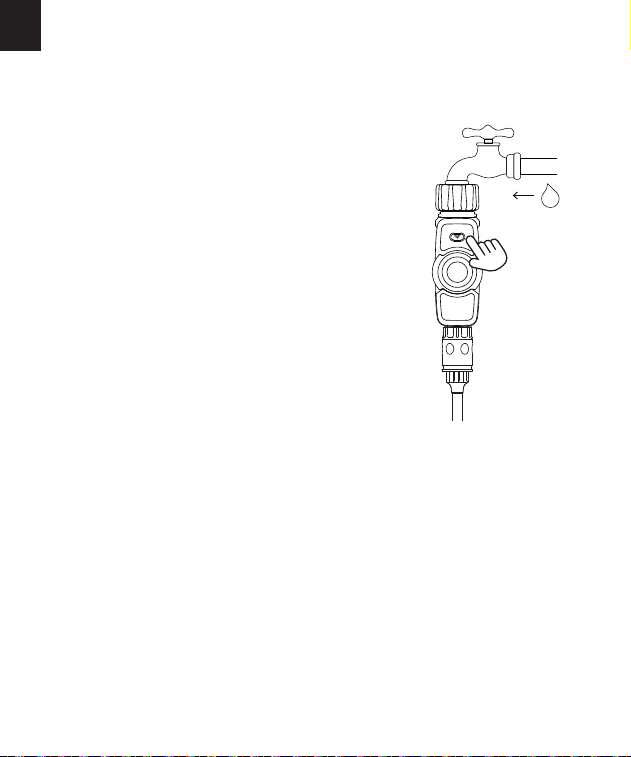
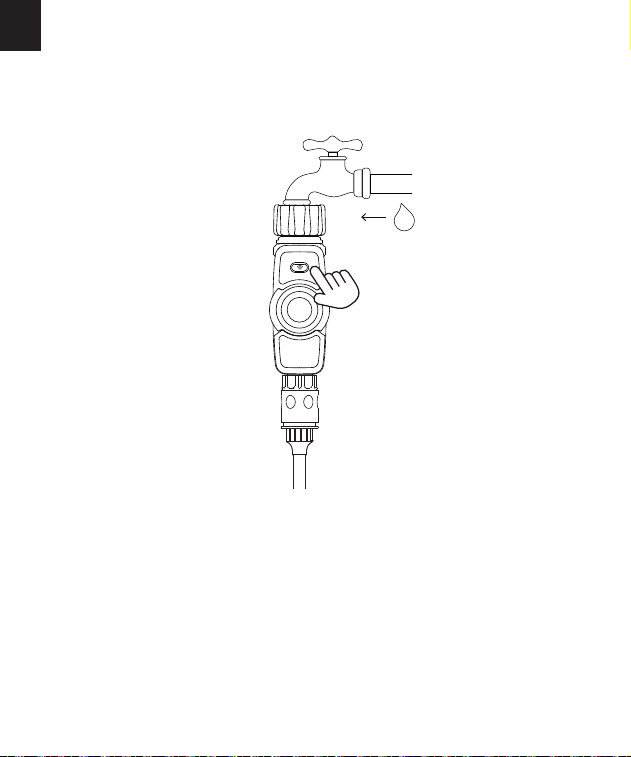
2.3 Install the Timer to the Faucet
·
·
·
·
·
The WiFi timer can only be used for cold water.
The WiFi timer uses a 433mHz RF connection to communicate with the
WiFi Hub, and must be within a 820ft range, line of sight, of the WiFi
Hub. lf there are walls, iron gates or bushes blocking, please shoen
the distance between them to better receive the signal.
Soil will absorb WiFi and RF signals, the best location of the timer is on
the faucet 4 to 8 feet (1.2 to 2.4 meters ) above the ground.
Do not place the WiFi timer in an underground valve box or anywhere
your WiFi and RF signal will be obstructed.
Under freezing weather, the water timer should be removed from the
tap and placed properly indoor to avoid any danger of freezing.
Warning:
Attach the timer inlet parallel to the outdoor
faucet/spigot and hand tighten only. From the timer
outlet connect a drip irrigation system or a garden hose.
Less than 820 feets
(No bushes, walls blocking)
Inlet
Outlet
-13-
EN
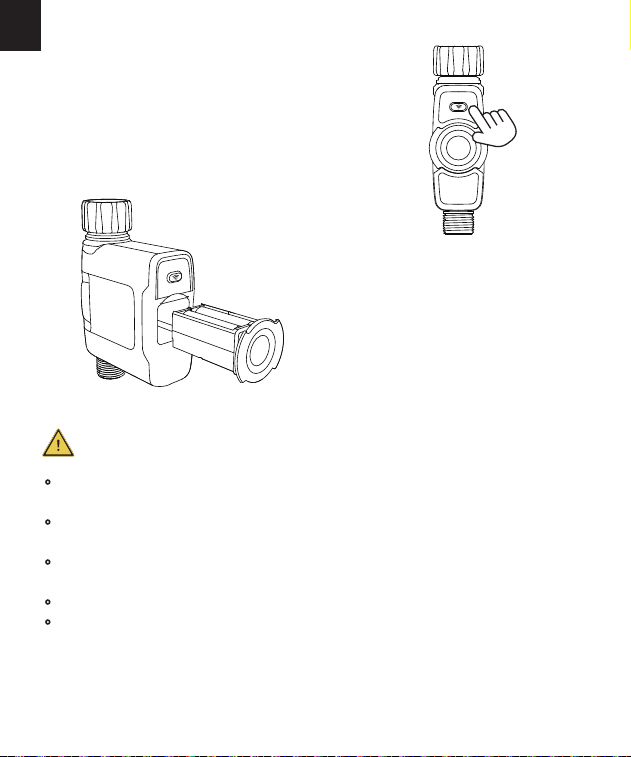
2.4 Activate the Timer Before Use
1)
2)
3)
4)
NOTE: When testing, please keep away from the water timer outlet to avoid
being splashed and wet.
Please active the valves when getting the timer for the rst time, or it's been
a long time since your last time to use it.
Pulling out the batte box and install
4*AA batteries.
Keep the faucet closed.
Press the button and you can hear a click
sound indicating that the valve is open
for manual watering. After a few
seconds, press the button again and you
will hear a click sound indicating that the
valve is closed.
Test: Turn on the faucet a little bit. Press
the button to check if the water ows out
or shuts o as expected.
If yes, the timer valve is activated successfully, please use the timer with
condence.
If not, please repeat the step 2~4 for several times, or contact us immedi-
ately for suppo.

-14-
EN
3. APP INTRODUCTION
3.1 Timer Homepage
1.
2.
3.
Setting
Tap the setting icon on the top right corner, you will enter the page for
device setting, pair with soil sensor and customize the device watering.
Last Water Usage
The WiFi water timer has a built-in water ow meter, it will calculate
the water usage and display the last time irrigation water usage here.
Soil Moisture
If you have paired a soil sensor with the timer, it will display the soil
moisture here.
2
3
4
1
6
5
7

-15-
EN
4.
5.
6.
7.
Plan
Tap "Plan" and you will enter the plan set page, up to 6 plans are
available. You can choose from "Normal Irrigation" "Inteal Irrigation"
"Cycle & Soak" to set your irrigation plans according to your irrigation
needs. You can also set "Rain Delay" for rainy days by 24/48/72H and
set seasonal adjustment to adjust the working time according to the
moisture dierence of dierent seasons. Tap the calendar icon to
check your plans.
Manual
Tap "Manual" and choose "Normal Irrigation" to set the watering time
from 1min to 12h for one-time manual watering, and then tap
"Conrm" to sta watering. While the manual watering is running, tap
"Manual" and then tap "Conrm" to stop watering. You can also
choose "Inteal Irrigation" or "Cycle & Soak" to set inteal watering
to set water time and inteal time for 1s to 60mins or 1min to 12h
according to your irrigation needs.
Cha
Tap "Cha" to check the last 30 days or the last year's water usage.
Event
Tap "Event" to check the online/oine status and irrigation records.
-16-
EN
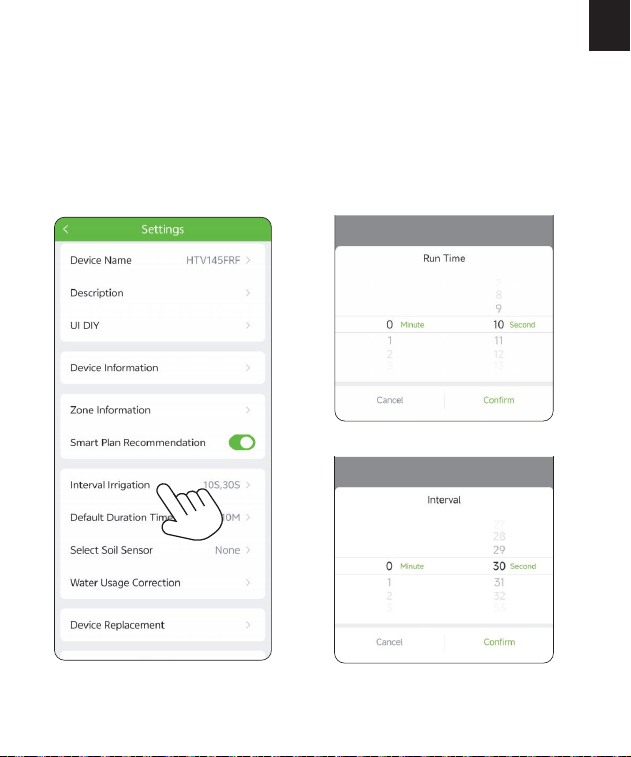
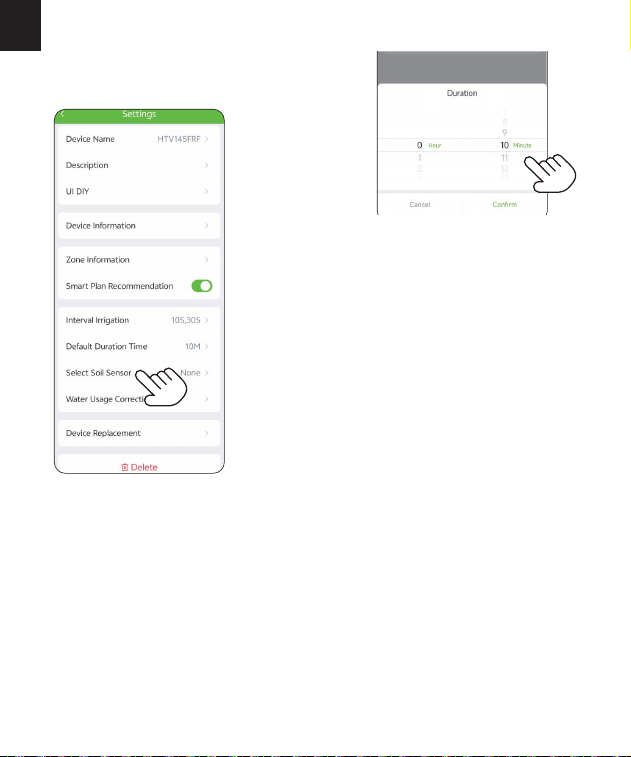
3.2 Basic setting
Find the icon in the top right corner of the app's homepage to access the
"Setting" page. You can view and manage the timer's basic information,
and you can also set some advanced settings for specic functions.
Inteal Irrigation: You can set for the water time and inteal time for both
the left and right zones from 1s-60mins.
-17-
EN
Default Duration Time: You can set the
default duration time from 1min-12h.
Soil sensor:If you have a WiFi soil sensor,
you can pair the soil sensor to the timer here.
It will display the soil moisture on the timer's
homepage and stop the plan automatically
when the moisture reaches to the set value
for irrigation delay.
NOTE: The soil sensor is not included, if you need one, please contact us to
know more information of the soil sensor that can pair with the timer.
UStoll free: +1 833-381-5659(Mon-Fri: 9:30 AM-5:30 PM PST)
DEtollfree: +49 800-182-0576(Mon-Fri: 9:00 AM-5:00 PM CET)
UKtollfree: +44 800-808-5337(Mon-Fri: 9:00 AM-5:00 PM CET)
Email: se[email protected]
WhatsApp: +1 626-780-5952
-18-
EN
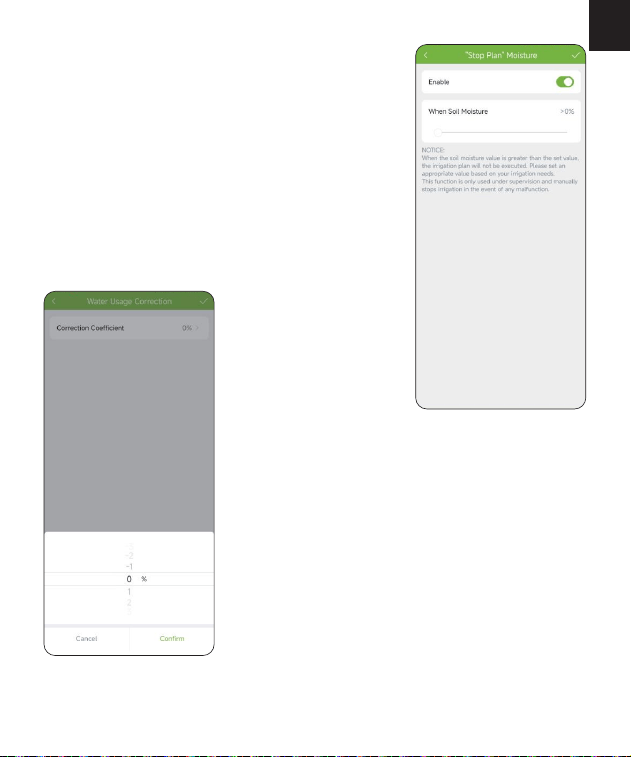
"Stop Plan" Moisture: After pairing a WiFi
soil sensor, you can set the "Stop Plan"
moisture value for soil moisture to prevent
overwatering of plants. Once the soil moisture
exceeds this value, all scheduled plans will
stop, and they will resume when the moisture
drops below this value.
Water Usage Correction: When the water
usage record is incorrect, you can calibrate
the record here from -20% to 20%.
-19-
EN
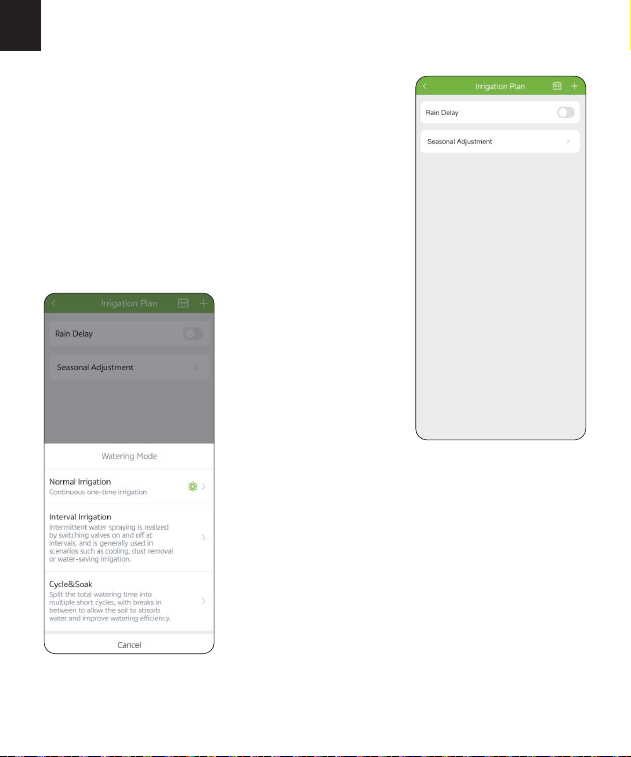
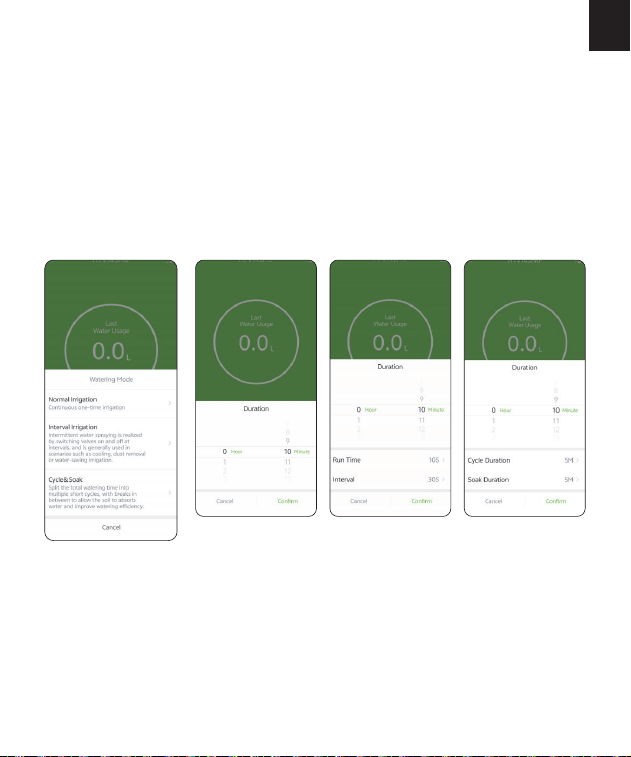
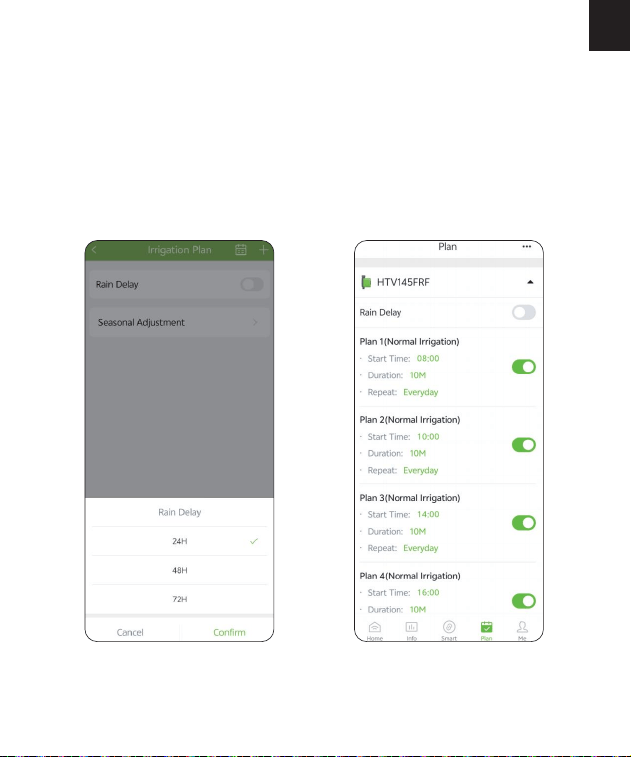
3.3 Plan Setting
First tap the "+" icon on the top right
corner of the "Irrigation Plan" page to
choose your desired irrigation mode from
"Normal Irrigation" "Inteal Irrigation"
"Cycle & Soak".
Tap "Plan" at the bottom left corner of the
timer's homepage to set the irrigation plans.
Up to 6 plans can be set.
-20-
EN
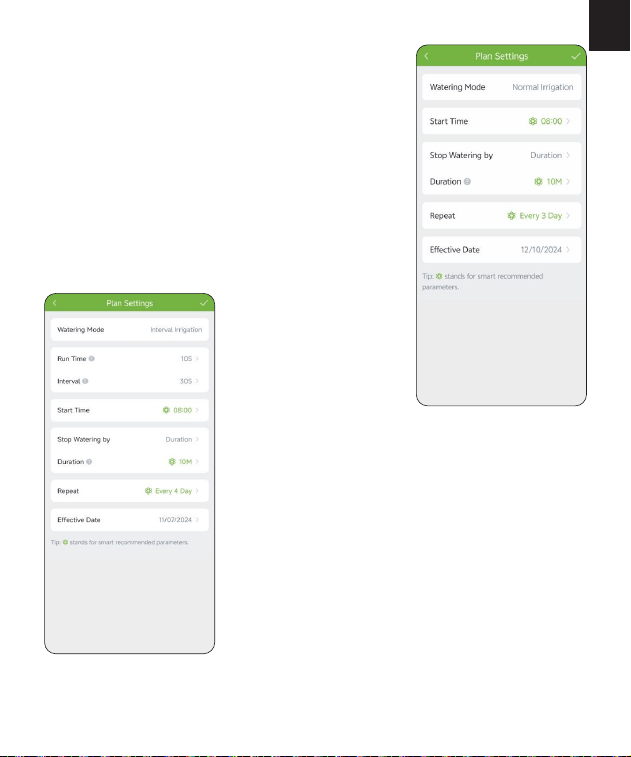
Normal irrigation:Set the sta time, stop
watering method, duration, frequency, and
eective date.
Inteal irrigation:Set the run time for
watering, inteal time, sta time, stop
watering method, duration, frequency, and
eective date. You can set the run time and
inteal time from 1s-60mins.
-21-
EN
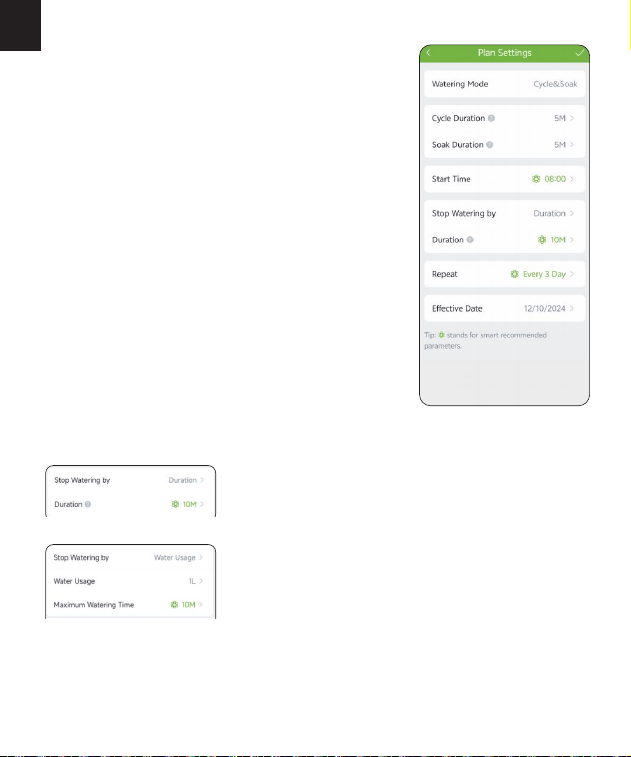
Cycle & Soak:Set the water cycle duration,
soak duration, sta time, stop watering
method, duration, frequency, and eective
date. You can set the cycle and soak
duration from 1min to 12h.
Two Methods to Stop Watering: Duration
of operation or water usage.

-22-
EN
Water Frequency: Set the watering
frequency for your schedule with ve
options: eveday, odd days, even days,
inteal, and custom.
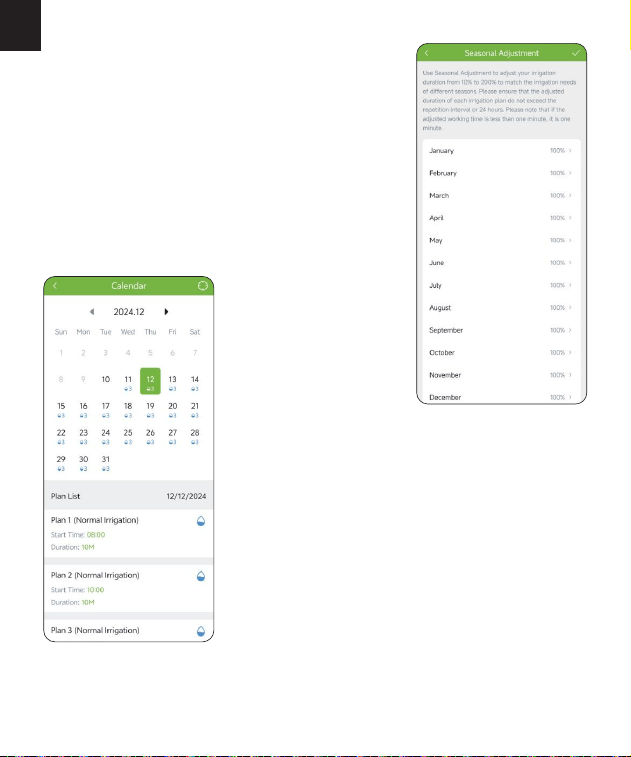
Save and Delete A Plan: After completing the
settings, press the "√" in the top right corner
to save your plan. You will see a plan oveiew
displayed in the list on the "Irrigation Plan"
page. If you need to delete a plan, click on the
plan to enter the plan details page, then click
the delete button to remove it.
-23-
EN
Seasonal Adjustment:You can set the
seasonal adjustment value from 10%-200%
for dierent seasons to adjust the actual
watering time for the timer according to the
dierent moisture in dierent seasons.
Calendar:Tap the calendar icon on the top
right corner on the "Irrigation Plan" page,
and you can check the oveiew of all your
watering shedules.
-24-
EN
3.4 Manual Water Setting
Select "Manual" at the bottom of the timer's homepage to choose the type
of manual irrigation: Normal Irrigation; Inteal Irrigation; Cycle & Soak.
Default watering is 10mins. You can sta the manual watering by 2
methods:
Method 1: Timer Homepage
On the timer's homepage, click "Manual" to select the manual watering
mode and time to sta and stop the manual watering automatically.
Normal
Irrigation
Inteal
Irrigation
Cycle & Soak
-25-
EN
NOTE: When you sta manual watering, if there is an existing schedule
currently running or if a schedule is set to sta during your manual
watering time, that scheduled plan will be skipped.
Method 2: Timer Button
Press the button on the timer to open the valve for manual watering; press
again to close the valve.
-26-
EN
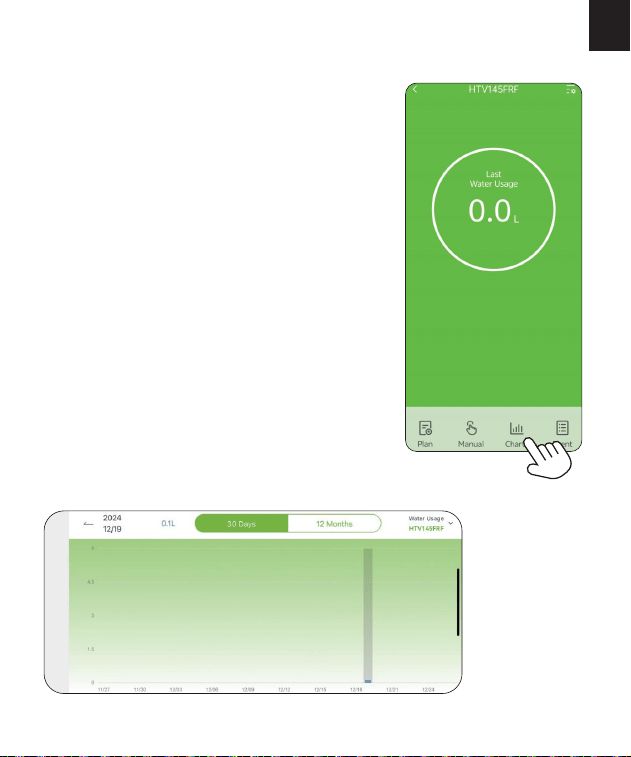
3.5 Built-in Water Flow Meter & Cha
The timer is designed with a built-in water
ow meter, it will record the water usage for
the irrigation. You can tap "Cha" at the
bottom of the timer's homepage to check the
last 30 days or the last year's water usage
records.
-27-
EN
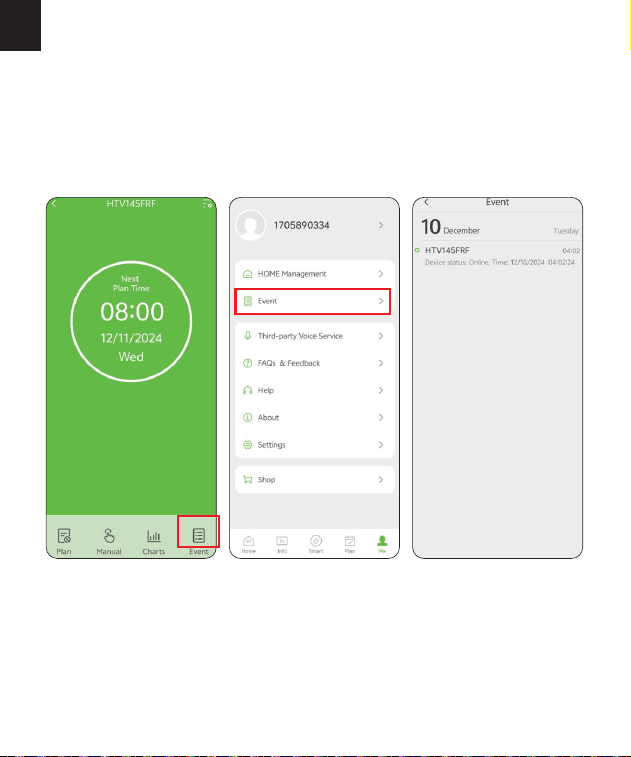
3.6 Device Status Record & Event
Tap "Event" on the bottom of the timer's homepage to check the
online/oine status and irrigation records. You can select to view the
events of the zone. You can also enter "Event" page through the steps
below: Me - Event.
-28-
EN
3.7 Rain Delay
You can set the "Rain Delay" time on the "Irrigation Plan" page by tapping
"Plan" on the bottom of the timer's homepage, or you can set it on the
"Plan" page below. Rain delay is applicable on rainy days or during other
weather conditions that cause high soil moisture. During the rain delay, the
timer will stop watering. Once the rain delay ends, the timer will proceed
according to the next scheduled watering plan. The timer can be set for a
rain delay of 24, 48, or 72 hours.
-29-
EN
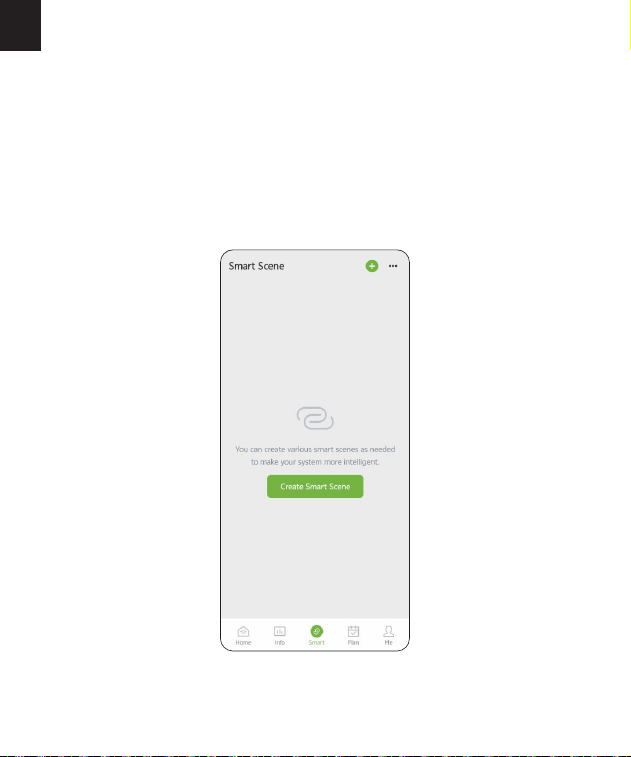
3.8 Sma Scene
The Sma Scene function allows you to set schedules for the devices
execute automatically according to the set conditions such as device status,
time and weather. For example, RAINPOINT HOME APP can obtain weather
forecast information of your home location. When you set the condition for
immediately delaying the watering plan when it rains, the timer will
automatically execute the watering delay when it rains in your local area.
You don't need to wor about whether it is raining at home when you are
traveling.
-30-
EN
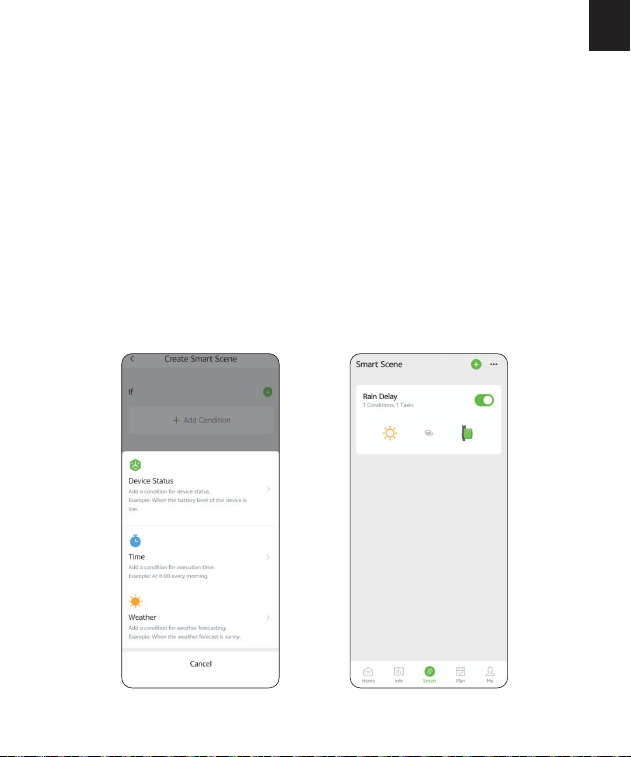
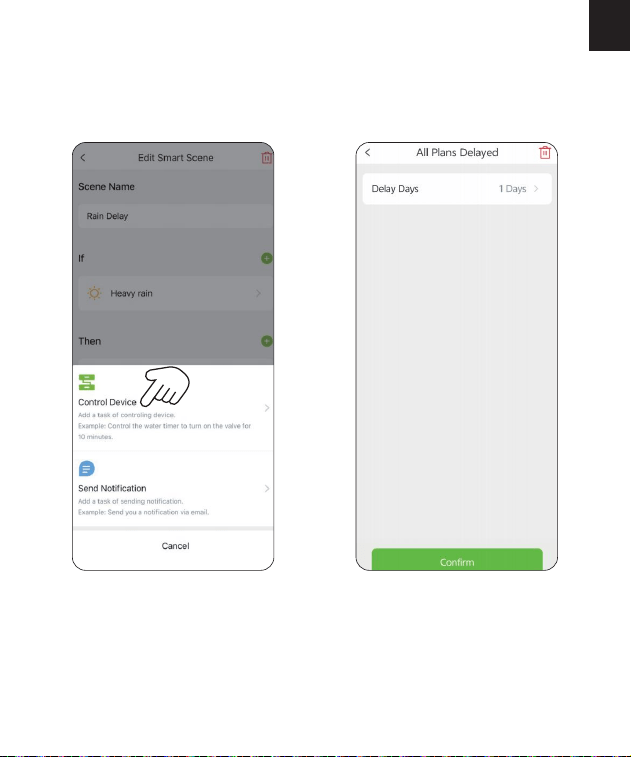
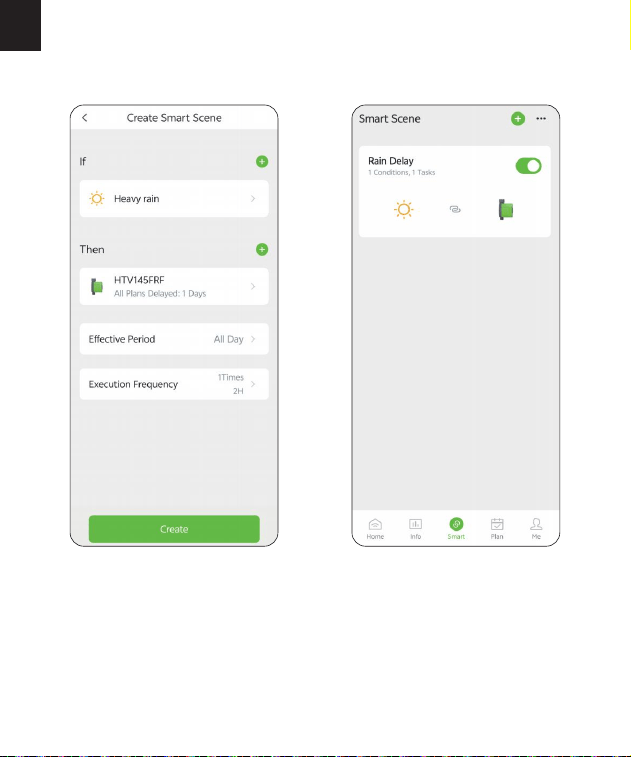
Create Sma Scene: Go to the "Sma" page, tap "Create Sma Scene" or
the "+" icon on the top right corner to add an automation task.
Add Condition: Set the conditions that the device needs to peorm when
the conditions are met.
Add Task: Set the tasks for the device to peorm when the set conditons are
met.
Eective Period: Customize the time for the device to peorm the sma
schedule.
Execution Frequency: Set the frequency for the device to run the sma
schedule cyclically daily.
Save the Sma Scene Schedule: Click "Conrm" and enter the name for the
schedule and then click "Conrm" to save the setting for the sma scene.
The device will automatically execute the sma schedule according to what
you set. You can check the sma scenes you set on the "Sma" page.
1)
2)
3)
4)
5)
6)
Steps to Set Sma Scene
-31-
EN
Tap "Sma" at the bottom of the APP home screen.
Tap "Create Sma Scene" or the "+" icon on the top right corner to add an
automation task.
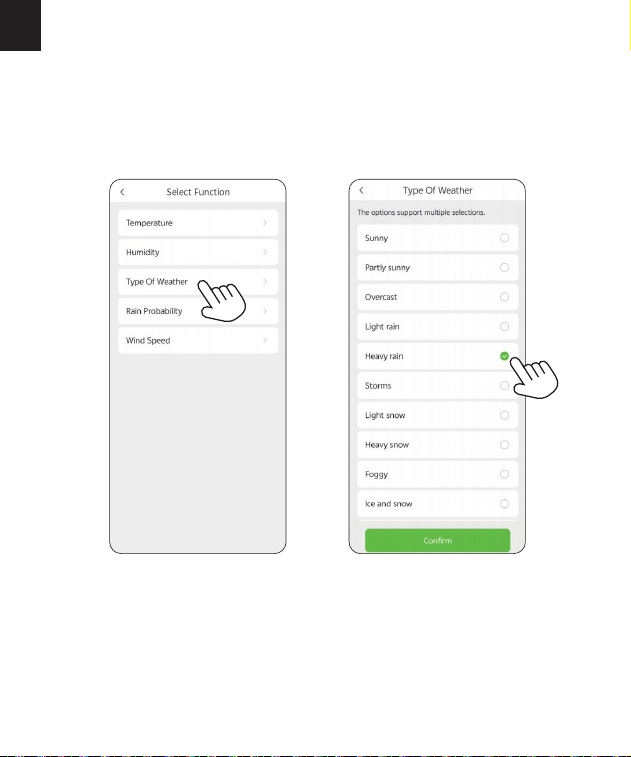
Tap "Add Condition", then select "Weather" ; locate the city, select "Type Of
Weather" and then select "Heavy rain"; tap "Conrm" to continue.
Note: Please accurately locate the city where your home is located. The APP
will automatically obtain weather forecast data based on the city you locate.
When the weather forecast turns to heavy rain, the conditions for execution
will be triggered.
How to set automatic rain delay?
1)
2)
3)
-32-
EN
Tap "Add Task", select "Control Device" to set up a task about the device
operation.
Select "HTV145FRF".
Tap "All Plans Delayed" to select the delay days and tap "Conrm".
Note: For the task peormed by the device, select "Control Device".
4)
5)
6)
-33-
7)
8)
EN
Check your execution conditions and tasks.
Tap "Create" to save your settings.
For example: The picture on the left shows that when the weather in New
York is heavy rain, the left and right valves of the HTV145FRF WiFi irrigation
timer will be automatically closed, and watering will be delayed for one day.
-34-
EN
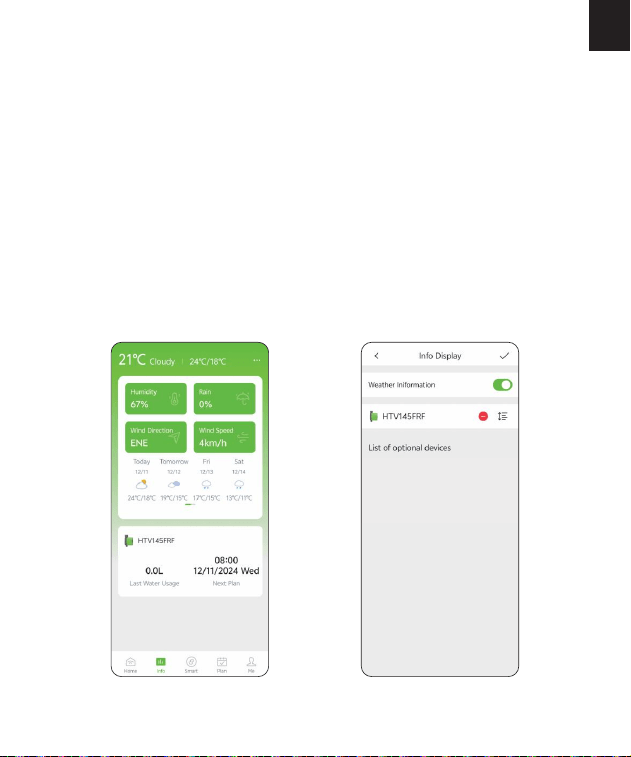
3.9 Weather Conditions & Devices' Next Plan Time
In the Info screen, you can check for the weather conditions, last water
usage and next watering time of each valve of the timer. For the rst time,
you need to tap "Get Location" and then tap "Save" to save your location
information, and the Info screen will display the weather conditions of the
day, including temperature, humidity, rain forecast, wind direction and wind
speed, as well as the next 7-days' weather conditions. You can also correct
your location information as follows: Me - HOME Management - My Home
- Location - Get Location - Save. The weather information can help you
with decisions of whether to adjust your watering schedules according to
the weather. Tap the icon on the top right corner of Info screen to turn
on/o weather display, or add/delete valves' last water usage and next plan
time display of the devices.
-35-
EN
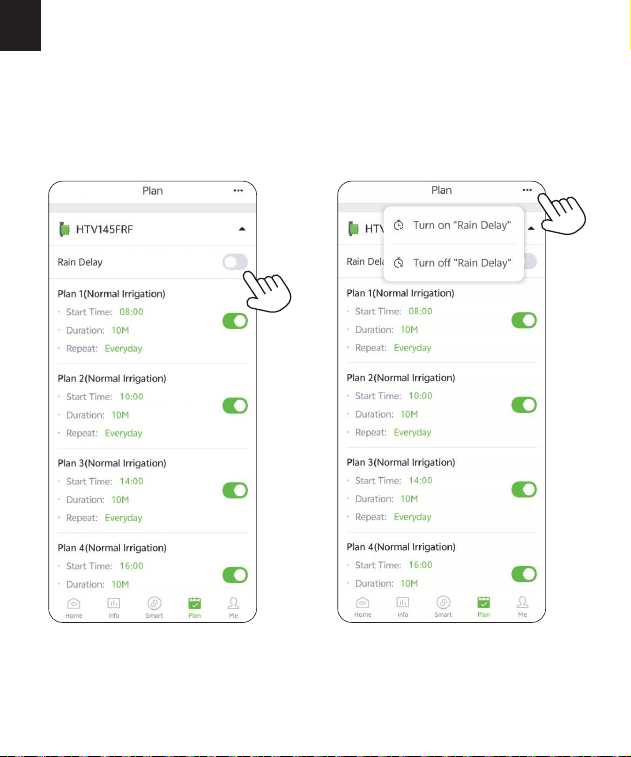
3.10 Plan Oveiew & Setting
In the Plan screen, you can check the plan you set of all your connected
devices and adjust each plan here conveniently. You can also set the Rain
Delay by 24/48/72H easily or turn o the Rain Delay schedule through the
button on the right or the icon on the top right corner.
-36-
EN
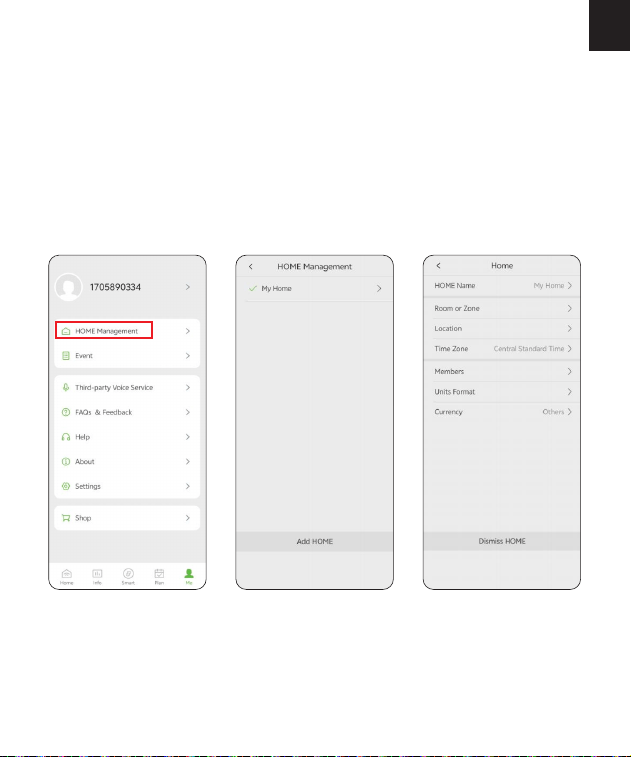
3.11 Home Management
Rainpoint suppos adding family members and sharing your home device
to achieve co-manage the home irrigation system with your family.
Tap Me at the bottom of the APP home screen.
Select HOME Management. You can set the current home or create a
new home.
Set your HOME Name, Room or Zone, Location, Time Zone,
Members, Units Format and Currency.
1)
2)
3)
-37-
EN
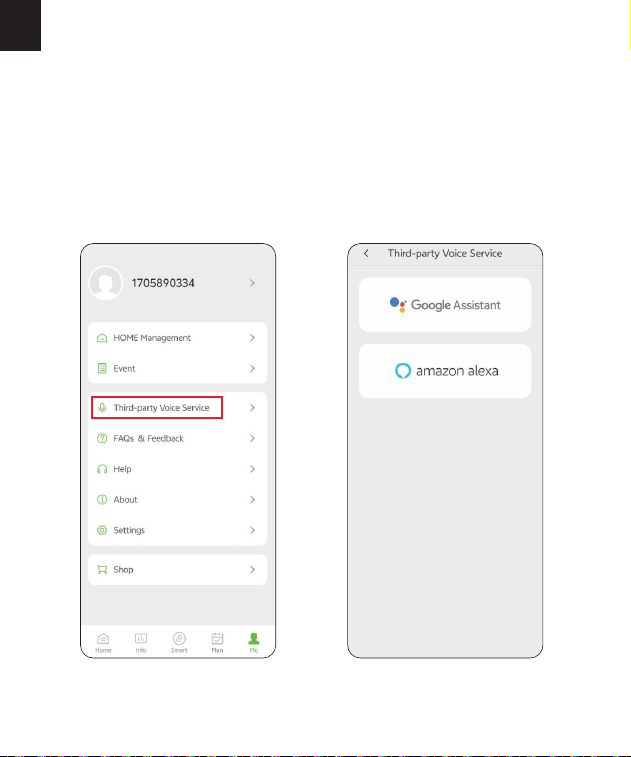
3.12 Google Assistant/Alexa Voice Control
If you have a Google Assistant or Amazon Alexa, please tap "Third-pay
Voice Seice" in "Me" page, and then tap "Google Assistant" or "Amazon
Alexa" to check the operation guide to connect your WiFi water timer to
the voice control device. After successfully connecting, you can control the
WiFi water timer by voice.
How to get third-pay control / voice control?
-38-
EN
4. RESET THE DEVICE
How to reset the WiFi timer?
Step 1. Remove all batteries from the batte compament.
Step 2. After 10 seconds, inse 4 fresh AA alkaline batteries into the
batte compament of the timer.
Step 3. While installing the batte, press and hold the button on the timer
without releasing the button until the LED indicator ashes RED quickly(2
times per second), then the WiFi timer is restored successfully.
NOTE: The WiFi water timer can only peorm simple voice commands, such
as "turn on" or "turn o " and the commands should be English only. If
you have any questions or suggestions about this feature, please feel free
to contact us.
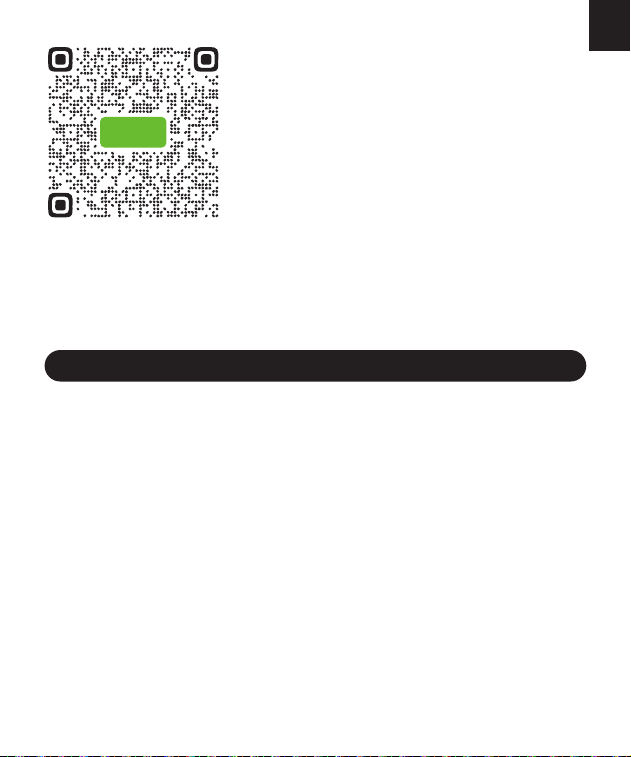
*Please scan the QR code to check the video
of how to connect your WiFi water timer to
the voice control device.
HTV145

-39-
EN
5. THE MEANING OF LED LIGHT
Sho press the button: Open/close the valve; the white light ashes
once.
Power on the timer: Red and white lights turn on simultaneously for 1
second; the red LED blinks rapidly (on for 0.2 seconds, o for 0.2
seconds in a cycle).
Network connection indication: The red LED blinks rapidly (on for 0.2
seconds, o for 0.2 seconds in a cycle); successful pairing: white light
stays on for 2 seconds; failed pairing: red light stays on for 2 seconds.
Long press the button to resta and enter pairing mode: The red
indicator light stays on for 2 seconds, then both white and red LEDs
illuminate for 1 second, followed by rapid blinking of the red LED to
indicate ent into pairing mode.
Normal irrigation mode: The white light ashes once eve 4 seconds.
Inteal irrigation mode: The white light ashes twice eve 4 seconds.
Cycle & Soak mode: When the valve is open, the white light ashes
twice eve 4 seconds; when the valve is closed (soaking), the white
LED ashes once eve 10 seconds.
Low batte indication: When in a low batte state, the red LED
ashes once eve 3 seconds, on for 0.1 seconds.
1)
2)
3)
4)
5)
6)
7)
8)
The Meaning of the LED Light of the WiFi Timer
-40-
EN
6. TROUBLESHOOTING
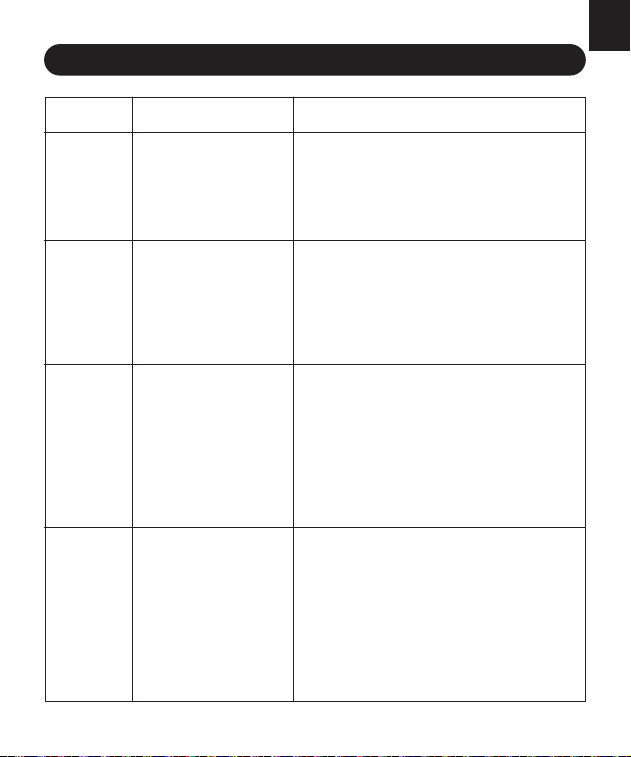
Data is inaccurate due
to an angled
installation.
Low or unstable water
pressure from the
faucet.
WiFi network is
unstable.
Too far from the
gateway.
Timer is not in pairing
mode.
The water timer should be installed
veically to the ground; it is recommended
not to install it at any angle to avoid
aecting the water volume recording.
The normal error value for water counting
is ±5%.
Please check whether the WiFi network
environment is functioning properly.
When connecting to the irrigation timer,
stay close to the gateway and router.
Re-pair the timer: press and hold the timer
button until the red light ashes quickly,
indicating pairing (or remove the device
from the homepage and reconnect).
SOLUTION
ISSUE POSSIBLE CAUSE
Low batte.
Debris in the inlet.
Unstable network or
response delay.
Replace with new batteries.
Regularly clean the debris in the lter to
avoid inteerence with use.
Wait a moment and t opening the valve
again.
Unable to
open the
valve.
Flow meter
is
inaccurate.
Timer
cannot
connect.
Impurities in the water
have entered the lter.
Rain delay has been
set.
In low power mode,
the timer enters low
power protection
mode and does not
execute the schedule.
Impurities in the inlet need to be regularly
cleared to prevent them from clogging and
inteering with the irrigation program.
Check if the rain delay has been set.
Replace with new batteries.
Not
executing
as
scheduled.
·
·
·
·
·
·
·
·
·
·
·
·
·
·
·
·
·
·
·
·
·
·

-41-
EN
We provide a 12-month limited warranty period for the original purchas-
er/user, which stas from the date of original purchase. The warranty
covers any defect in material or workmanship. During the warranty period,
we will fulll its warranty obligations by repairing or replacing the pas or
the entire unit covered by the warranty free of charge according to the
actual situation.
However, the warranty does not apply to problems caused by: Normal wear
and tear; Failure to follow the accompanying operating instructions;
Products malfunction resulting from negligence, accident, improper use,
maintenance or storage; Products that have been modied or repaired
without authorization (including, but not limited to, modications through
the use of unauthorized pas or accessories).
If you contact us to register the warranty, we'll extend the warranty to 5
YEARS free of charge. To activate and extend the warranty to 5 years,
please contact us for warranty registration upon receipt of the package.
7. LIMITED WARRANTY

-42-
EN
If you still having trouble with setup, please search for "RainPoint" on
YouTube for installation videos!
If the user manual doesn't have what you're looking for or you need
assistance, please contact us for help before returning the product to the
store.
Our local professional customer seice team guarantees hassle-free
solutions within 24 hours on working days. If you have any problems with
this product or during use, please do not hesitate to contact us, we will t
our best to solve it and oer you satisfacto seice including replacement
or refund.
In order to see you better, please remember to provide us with your order
number, LOT NO. of your device and fault description of the product and
contact us by:
UStoll free: +1 833-381-5659(Mon-Fri: 9:30 AM-5:30 PM PST)
DEtollfree: +49 800-182-0576(Mon-Fri: 9:00 AM-5:00 PM CET)
UKtollfree: +44 800-808-5337(Mon-Fri: 9:00 AM-5:00 PM CET)
Email: se[email protected]
WhatsApp: +1 626-780-5952
NOTE: Please note that the app may be updated or modied, which could
result in changes to ceain pages or names. For the most accurate
information, please refer to the actual pages within the app. If you need
assistance, please feel free to contact us.
8. CUSTOMER SERVICE

FCC STATEMENT
(FCC ID: 2AWDBHTV145FRF)
This device complies with Pa 15 of the FCC Rules. Operation is subject to the
following two conditions:
1) This device may not cause harmful inteerence.
2) This device must accept any inteerence received, including inteerence that
may cause undesired operation.
FCC Warning: Any changes or modications not expressly approved by the pay
responsible for compliance could void the user's authority to operate this
equipment.
Note: This equipment has been tested and found to comply with the limits for a
Class B digital device, pursuant to Pa 15 of the FCC Rules. These limits are
designed to provide reasonable protection against harmful inteerence in a
residential installation. This equipment generates, uses, and can radiate radio
frequency energy, if not installed and used in accordance with the instructions,
may cause harmful inteerence to radio communications.
However, there is no guarantee that inteerence will not occur in a paicular
installation. If this equipment does cause harmful inteerence to radio or
television reception, which can be determined by turning the equipment o and
on, the user is encouraged to t to correct the inteerence by one of the
following measures:
· Reorient or relocate the receiving antenna.
· Increase the separation between the equipment and the receiver.
· Connect the equipment into an outlet on a circuit dierent from that to
which the receiver is connected.
· Consult the dealer or an experienced radio/TV technician for help.
Note: The manufacturer is not responsible for any radio or TV inteerence
caused by unauthorized modications to this equipment. Such modications
could void the user's authority to operate the equipment.
Manufacturer/Hersteller/Fabricant/Produttore/Fabricante:
FUJIAN BALDR TECHNOLOGY CO.,LTD
ADDRESS/ADRESSE/ADRESSE/INDIRIZZO/DIRECCIÓN:
Floor 3, Building 2, No.71 Yangqi Road, Fuwan Industrial Area,
Cangshan District, Fuzhou, China. 350008
EMAlL:se[email protected]
EC REP
NAME: VIAJE ELECTRONIC COMPANY LIMITED
ADDRESS: E588, 13 ADELAIDE ROAD, DUBLIN, D02 P950, IRELAND
EMAIL: [email protected]
UK REP
NAME: SUJE ELECTRONIC COMPANY LIMITED
ADDRESS: S211 92a Bu Old Road, Manchester, England, M45 6TQ
EMAIL: [email protected]
Made in China
Need Help?
Scan the QR code to
get fast suppo
Please contact us
US toll free: +1 833-381-5659
(Mon-Fri: 9:30 AM-5:30 PM PST)
DE toll free: +49 800-182-0576
(Mon-Fri: 9:00 AM-5:00 PM CET)
UK toll free: +44 800-808-5337
(Mon-Fri: 9:00 AM-5:00 PM CET)
Email: seice@rainpointonline.com
WhatsApp: +1 626-780-5952
