
AUTO DARKENING WELDING GOGGLES
SHADE 9-13
MODEL NO: SSP102
Thank you for purchasing a Sealey product. Manufactured to a high standard, this product will, if used according to these
instructions, and properly maintained, give you years of trouble free performance.
IMPORTANT: PLEASE READ THESE INSTRUCTIONS CAREFULLY. NOTE THE SAFE OPERATIONAL REQUIREMENTS, WARNINGS & CAUTIONS. USE
THE PRODUCT CORRECTLY AND WITH CARE FOR THE PURPOSE FOR WHICH IT IS INTENDED. FAILURE TO DO SO MAY CAUSE DAMAGE AND/OR
PERSONAL INJURY AND WILL INVALIDATE THE WARRANTY. KEEP THESE INSTRUCTIONS SAFE FOR FUTURE USE.
1. SAFETY
WARNING! The goggles is not suitable for use with laser welding or CUTTING or for overhead welding applications.
9 Ensure all workshop safety rules, regulations and conditions are complied with when using welding equipment. The goggles will not
oer protection against misuse of workshop tools, equipment, or accessories.
9 Maintain the goggles in good condition and protect cartridge from liquid and dirt contact. Regularly replace the protective lens and
replace any damaged or worn parts. Use genuine parts only. Unauthorised parts may be dangerous and will invalidate the warranty.
9 Ensure the front cover window is securely in place before use.
9 Fit the goggles and adjust the head band so the goggles will sit as low and near to your face as possible.
9 Use goggles only in temperatures ranging from -10°C to 60°C.
9 Remove ill tting clothing, remove ties, watches, rings and other loose jewellery. Wear appropriate PPE to avoid spatter and burns.
9 Maintain correct balance and footing.
9 Ensure the oor is clear from obstructions, not slippery and wear non-slip shoes.
9 Keep children and unauthorised persons away from the working area.
WARNING! The goggles will only protect the eyes and face from radiation and sparks. It will not protect against explosive devices or
corrosive liquids. Ensure goggles are sealing against light before use.
8 DO NOT use goggles for any purpose for which it is not designed.
8 DO NOT use goggles unless you have been instructed in its use by a qualied person.
8 DO NOT open or tamper with the shade cartridge.
8 DO NOT get the goggles wet or use in damp or wet locations.
8 DO NOT leave work place with goggles in lowered position, as bright light source may darken cartridge unexpectedly.
8 DO NOT place the goggles on a hot surface.
8 DO NOT use goggles without front cover window tted. To do so will invalidate your warranty.
9 Clean goggles (see section 6) and store the goggles in a safe, dry, childproof location.
WARNING! Before welding always inspect the goggles to ensure they are not damaged. To test the goggles prior to welding, direct the
front of the goggles to a bright light source which will cause the lens to darken. Then using your hand rapidly cover and uncover the
sensor. The goggles should lighten momentarily then return to a dark state.
WARNING! DO NOT use the goggles if damaged or you suspect they may be faulty.
DANGER! DO NOT USE if, at any time, the face plate in the goggles FAILS to darken when exposed to a welding spark. Remove and
return to your Sealey stockist for checking.
▲ DANGER! Continued use of the product knowing that the auto darkening feature is NOT FUNCTIONING may DAMAGE YOUR EYES
and CAUSE BLINDNESS.
9 Avoid working in wrong position that could expose unprotected areas of the body to spark, spatter or reected radiation and use
adequate protection if it cannot be avoided.
9 The recommended operating temperature range for welding lens is -5° C to 55°C (14 °F-131 °F ). DO NOT use this device beyond
these temperature limits.
9 Never place these welding goggles on a hot surface.
8 DO NOT use any solvents on any lens or mask components.
9 Be sure that the dark shade of the welding lens in the welding goggles is the correct shade number for your application.
9 Inspect all operating parts before each use for signs of wear or damage. Any scratched, cracked, or pitted parts should be replaced
immediately.
9 Check the inside & outside protection plates are clean and that no dirt is covering the sensors on the front of the goggles.
9 Please ensure goggles are sealing against light before use.
8 DO NOT use any replacement parts other than those specied in this manual. Unauthorized modications and replacement parts will
void the warranty and expose the user to the risk of personal injury.
9 Check the battery state before use.
NOTE: The material which may come into contact with the wearer’s skin can cause allergic reactions in some circumstances.
Seek medical advice if so aected.
NOTE: Eye protector shall only be used against high-speed particles at room temp erature.
Original Language Version
© Jack Sealey Limited
Refer to
instructions
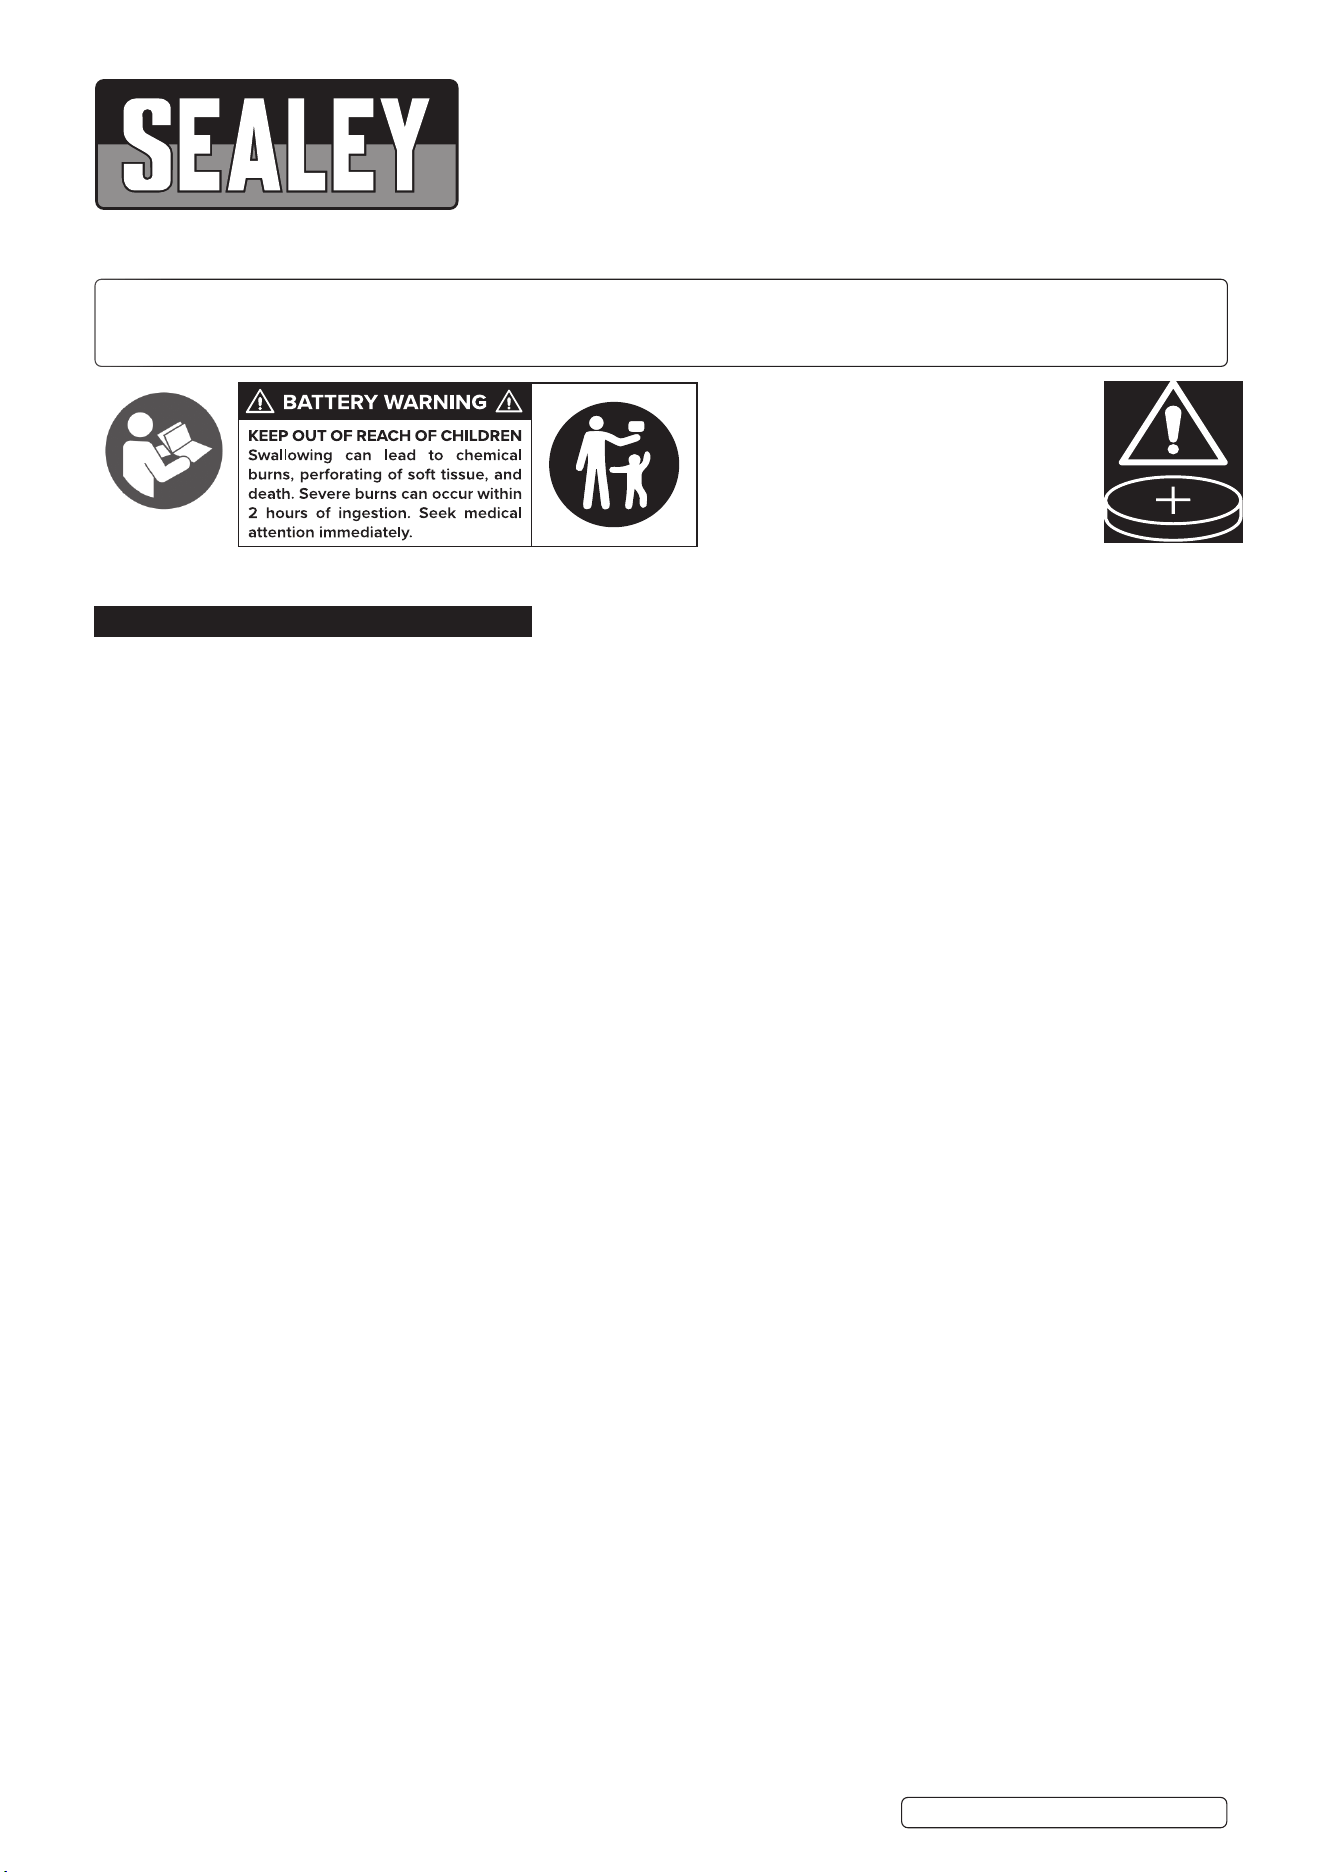
If the battery compartment does not close
securely, stop using the product and keep
it away from children.
Refer to Section 8 for Battery Safety
information.
SSP102 Issue 1 07/04/25
Warning:
Contains Lithium
battery
2. INTRODUCTION
Compact design allows user to weld in tight spaces where traditional helmets would not allow. Benet from precise visual clarity and optimal
protection as you weld, thanks to the seamlessly adjustable shade control between 9-13. Suitable for MIG, TIG, arc/MMA and gas welding.
Also features sensitivity and delay controls for fully automatic switching from light to dark on striking arc. Eyes remain rmly protected with an
instant operating time between light and dark standing at 0.3ms. Shade is selected by the digital screen on the side of the goggles. Goggles
are supplied with a face shield as well as a safety hood to oer maximum protection from arc rays and light splatter.
3. SPECIFICATION
MODEL: .................................................................... SSP102
Grinding Function: ............................................................Yes
Nett Weight: ................................................................ 0.46kg
Operating Temperature: ................................... -5
o
C to +55
o
C
Operating Time Light/Dark: .......................................... 0.3ms
Power: .....................................................Lithium Cell Battery
PPE Category: ......................................................................I
Shade Active: ..............................................5-8/9-13 Variable
Shade Inactive: .................................................................... 3
Viewing Area: ...................................................... 111 x 39mm
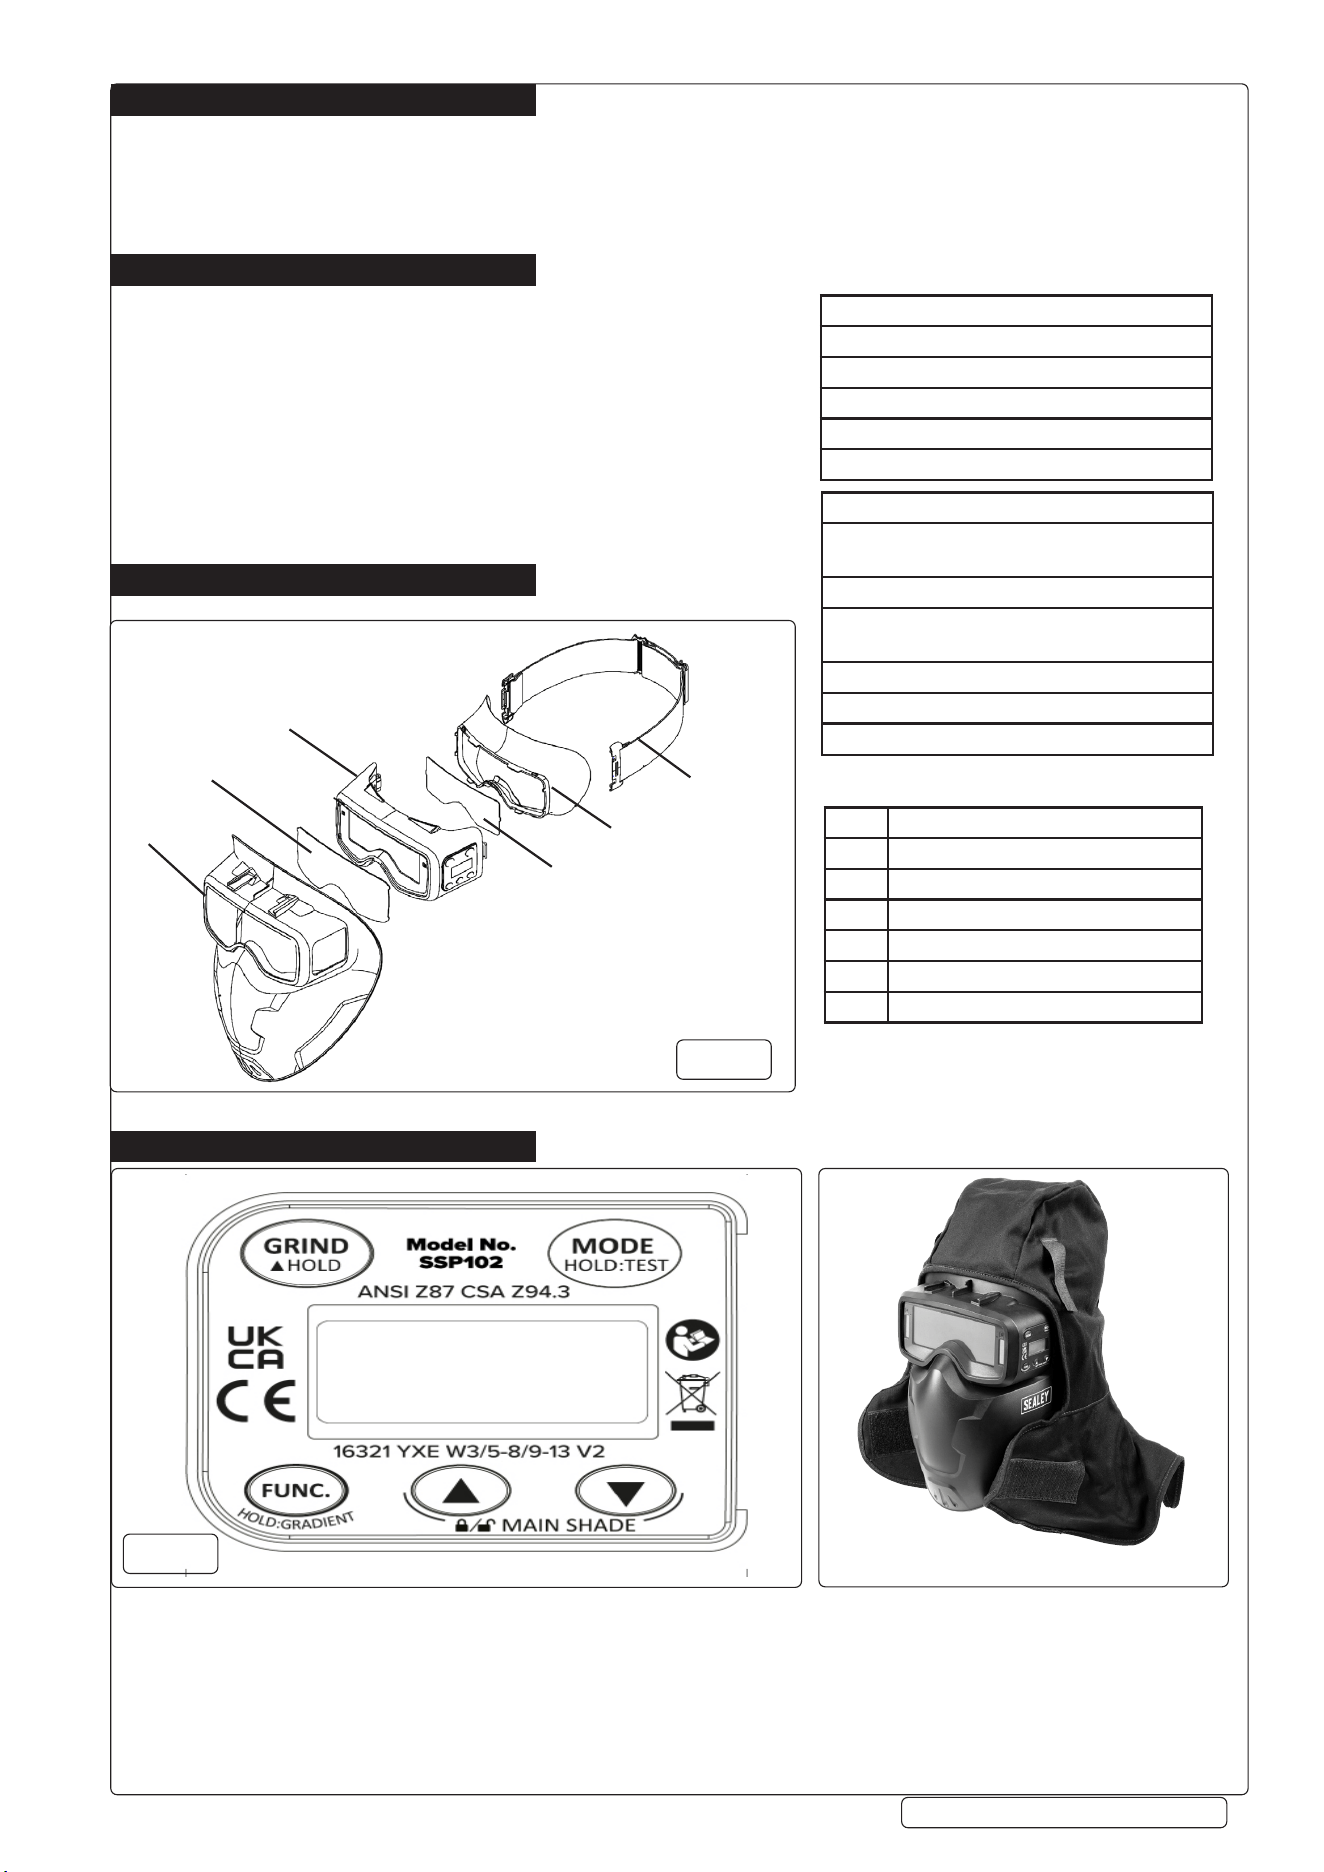
4. COMPONENTS
5. OPERATION
NOTE: We recommend a usage period of 4 years. The period depends on various factors such as use, cleaning, storage and maintenance.
5.1. Ensure the protective lms on all lenses are removed before use.
5.2. The goggles are powered by a replaceable battery, CR*2450. Battery icon (LED Light) will twinkle when the power is low
with 1 bar illuminated and a replacement is needed. Remove the battery cover, take the old battery out and replace with a new one.
See Maintenance section for instructions. Perform visual inspection prior to each use.
5.3. MODES
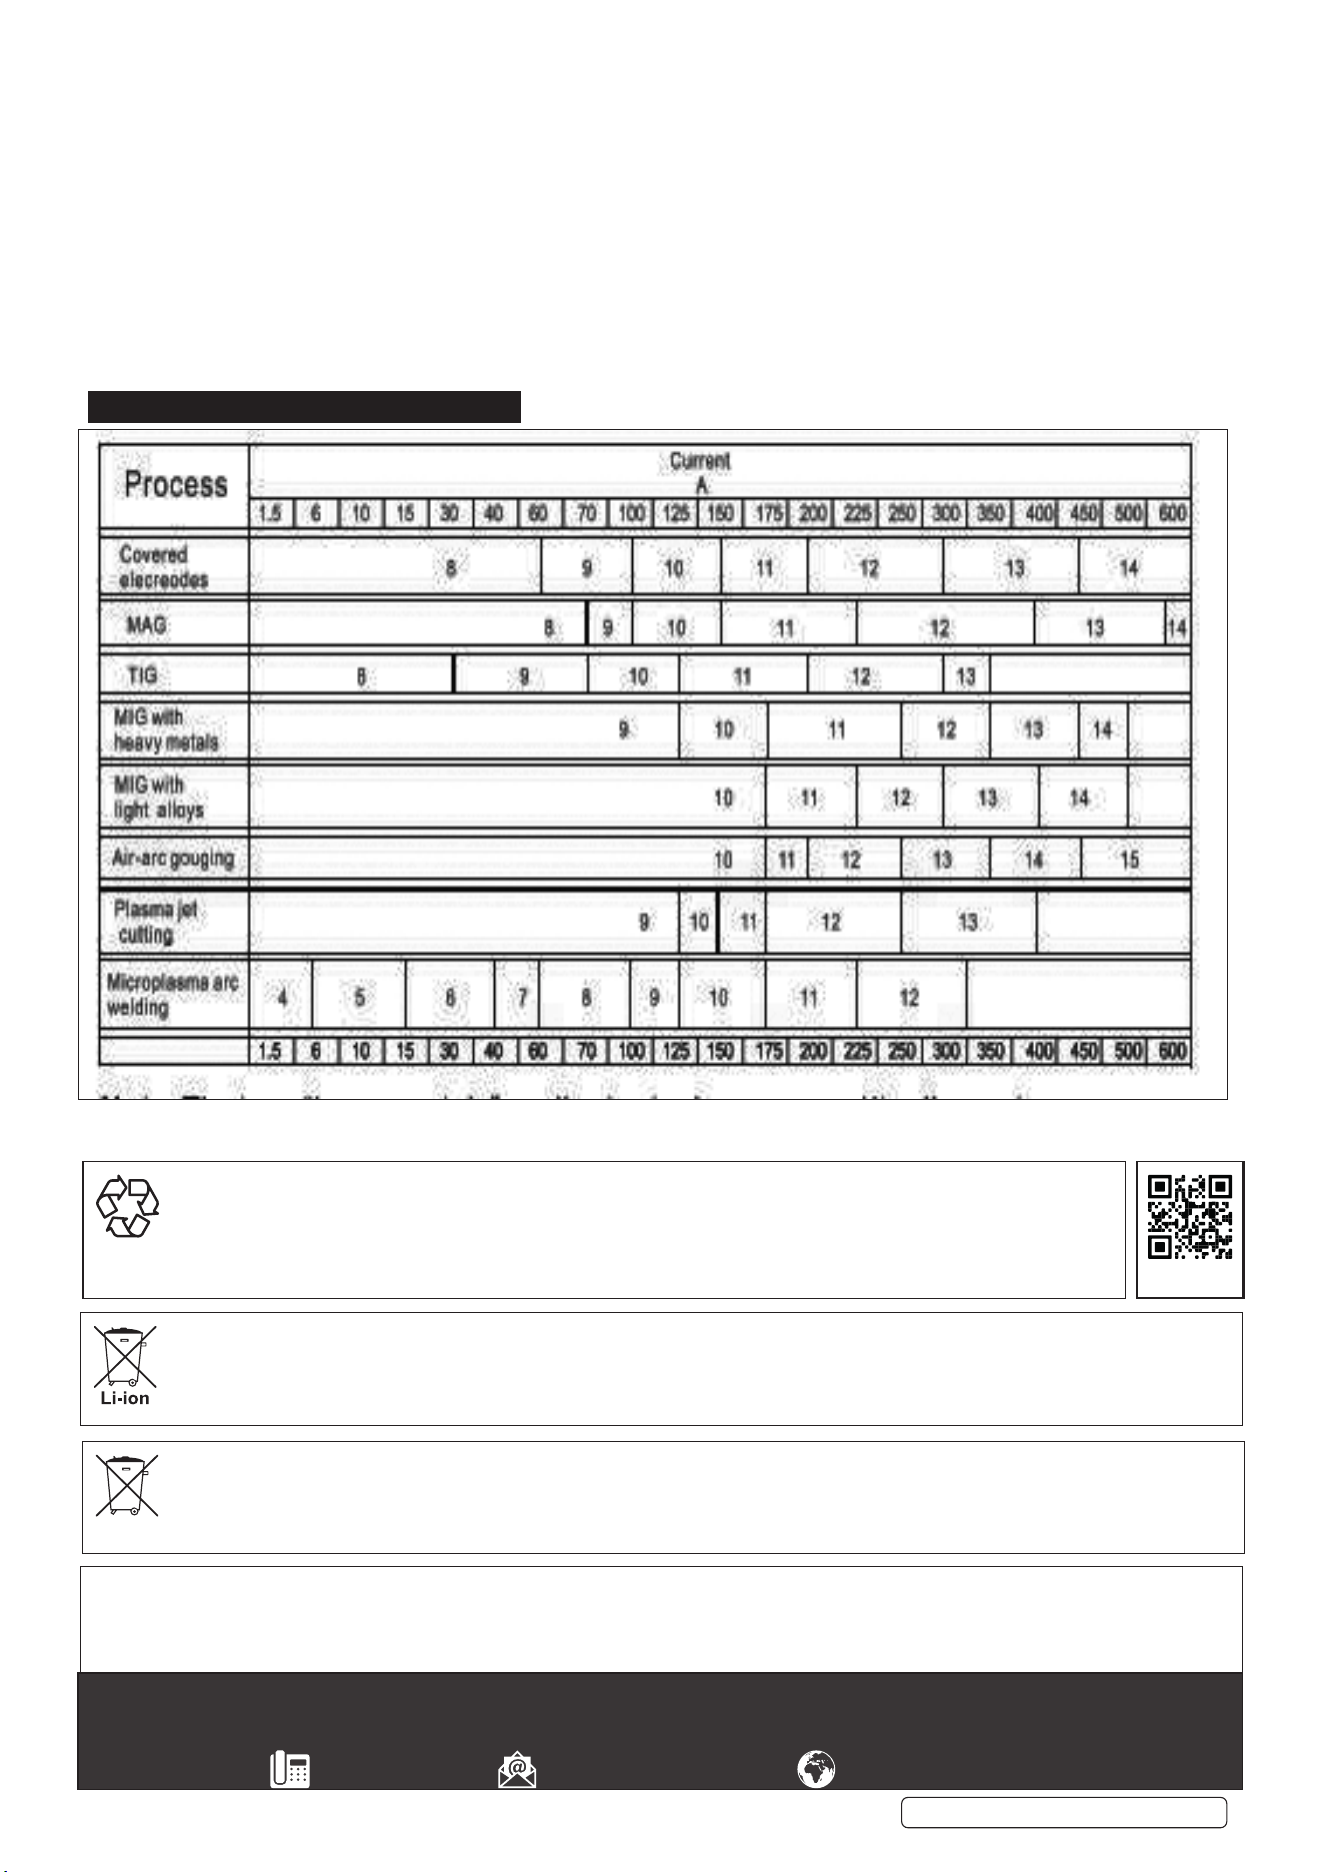
5.3.1. Welding Mode (Shade range 9-13). See Section 9 for Shade Guide.
5.3.2. Cutting Mode (Shade range 5-8). See Section 9 for Shade Guide.
ITEM DESCRIPTION
1 Auto Darkening Goggles Shell
2 Outer Protection Plates
3 Goggles
4 Inner Protection Plates
5 Silicone Skirt
6 Elastic Headband
1
2
3
4
5
6
g.1
g.2
Original Language Version
© Jack Sealey Limited
SSP102 Issue 1 07/04/25
Goggles With Hood Fitted
Welding Helmet Shell:
16321 YXEW131-M
16321 indicates Document Name of Standard
YXE indicates Manufacturer’s identication
13 indicates Darkest State
1-M indicates Headform Size
Automatic welding lters:
G3016321 YXE W3/5-8/9-13 V2;
G2016321 YXE W3/5-8/9-13 V2
G30/G20 indicates Model Name
3 indicates Light State
5-8/9-13 indicates dark states
YXE indicates Manufacturer’s identication
V2 indicates Angle dependence class
16321 indicates Document Name of Standard
MARKING KEY
FIG.1 KEY
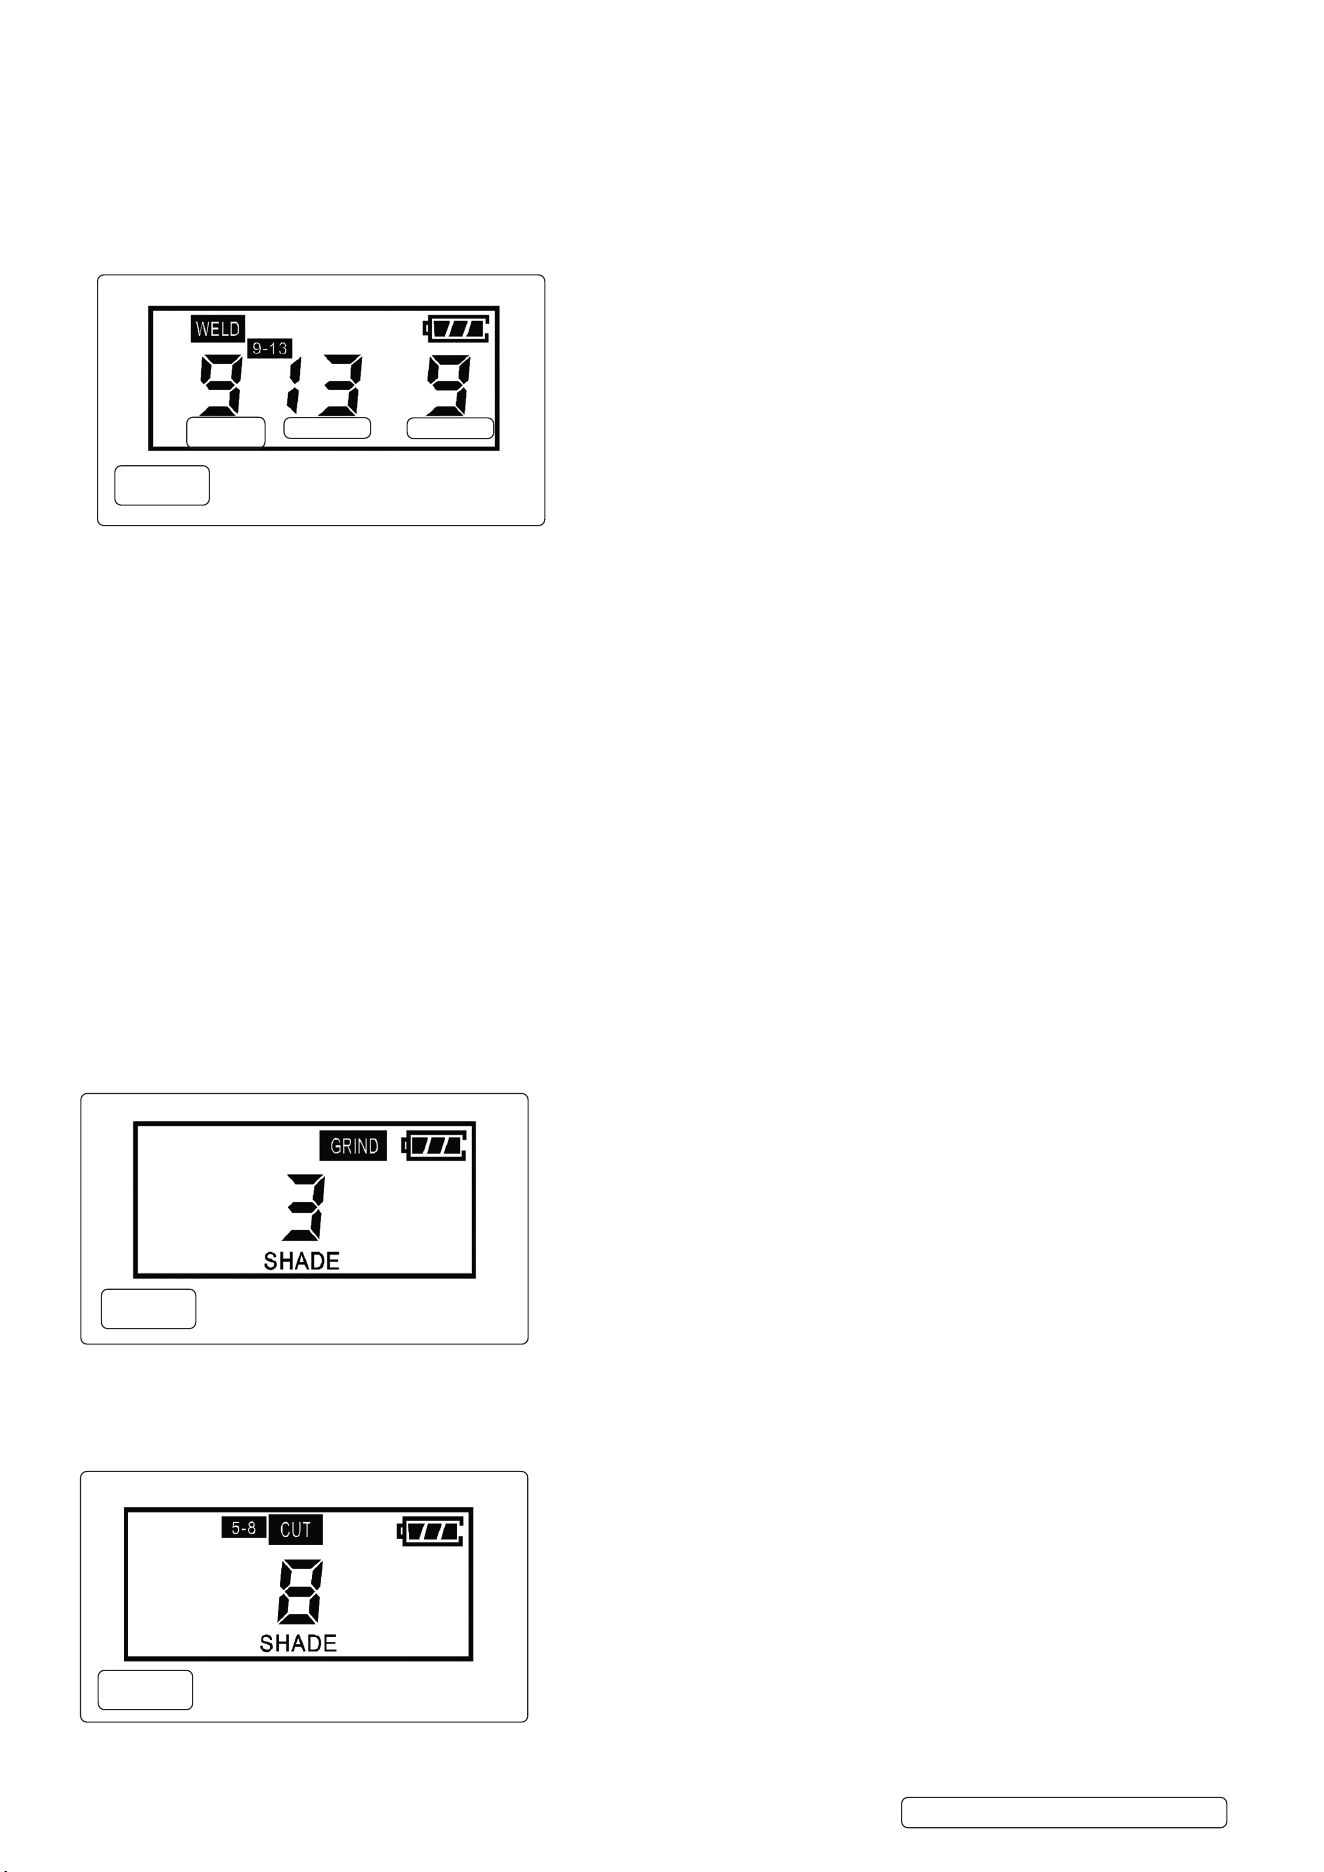
5.3.3. Grinding Mode
5.3.4. Press the MODE button (g.2) to cycle through Weld, Cut and Grind options.
5.4. VARIABLE SHADE CONTROL
5.4.1. WELD Mode 9-13 (g.3)
5.4.2. Press the MODE button and FUNC.button at the same time. The SHADE icon will be ashing and you will then be able to adjust the
shade value by pressing UP/DOWN and the number will go from 9-13.
5.4.3. To change the shade in welding and cutting modes, press MODE button.
5.4.4. NOTE: Refer to Shade Guide Table Section 9 to determine shade value required if necessary.
5.5. SENSITIVITY CONTROL (g.3)
5.5.1. The sensitivity can be set within 0-9 LEVELS by pressing the FUNC. and UP/DOWN button on the digital control panel and the number
will be indicated in the left corner of the digital display.
5.5.2. Sensitivity. 0: (Low) Suitable for high amp. welding and welding in bright light conditions (lamplight or sun light).
5.5.3. Sensitivity. 9: (High ) Suitable for low amp. welding and welding in poor light conditions and suitable for welding with steady arc
process such as TIG welding.
5.6. DELAY CONTROL (g.3)
5.6.1. Delay Time can be adjusted from 0-9 Ievels (0.04-2.0s) .The time delay is for protection of welder’s eyes from strong residual rays
after welding.
5.6.2. The recovery time intervals are recommended extended when the shade increased.
5.6.3. Short pressing FUNC. Button, when the DELAY is ashing, you can adjust it by pressing UP/DOWN to increase or decrease the delay
time.
5.6.4. Level 9: Longest delay time is 2.0s. which is suitable for most welding application, especially for high amperage current application and
longer welding intervals. Longer delay can also be used in low current TIG welding in order to prevent the lter opening when the light
path to sensor is temporarily obstructed by a hand, torch, neighbouring welders’ arc.
5.6.5. Level 0: Short delay time digital version is 0.04s,and it is for spot welding application.
5.7. GRIND MODE (g.4)
5.7.1. Set the MODE to GRIND or hold the GRIND button and GRIND & SHADE will appear on the LCD screen.
8 DO NOT weld in GRIND mode because the goggles will not turn dark.
5.8. CUT MODE (g.5)
5.8.1. Press the MODE button to cycle into the CUT mode.
5.8.2. You can change the shade number by pressing UP/DOWN buttons through the dierent shades (shade 5-8).
9 NOTE: Restrict period of use to ensure concentration and safe working are at highest level.
SENSI
SHADE
DELAY
WELD Mode (9-13)
g.3
GRIND Mode (3)
g.4
CUT Mode (5-8)
g.5
Original Language Version
© Jack Sealey Limited
SSP102 Issue 1 07/04/25
6. MAINTENANCE
NOTE: The Welding Goggles need little maintenance. Use a clean, soft piece of cloth, moistened with soap/commercial disinfectant to
wipe the inside/out-side of the goggles then dry. But the FILTER lens should ONLY be cleaned with dry, soft cloth.
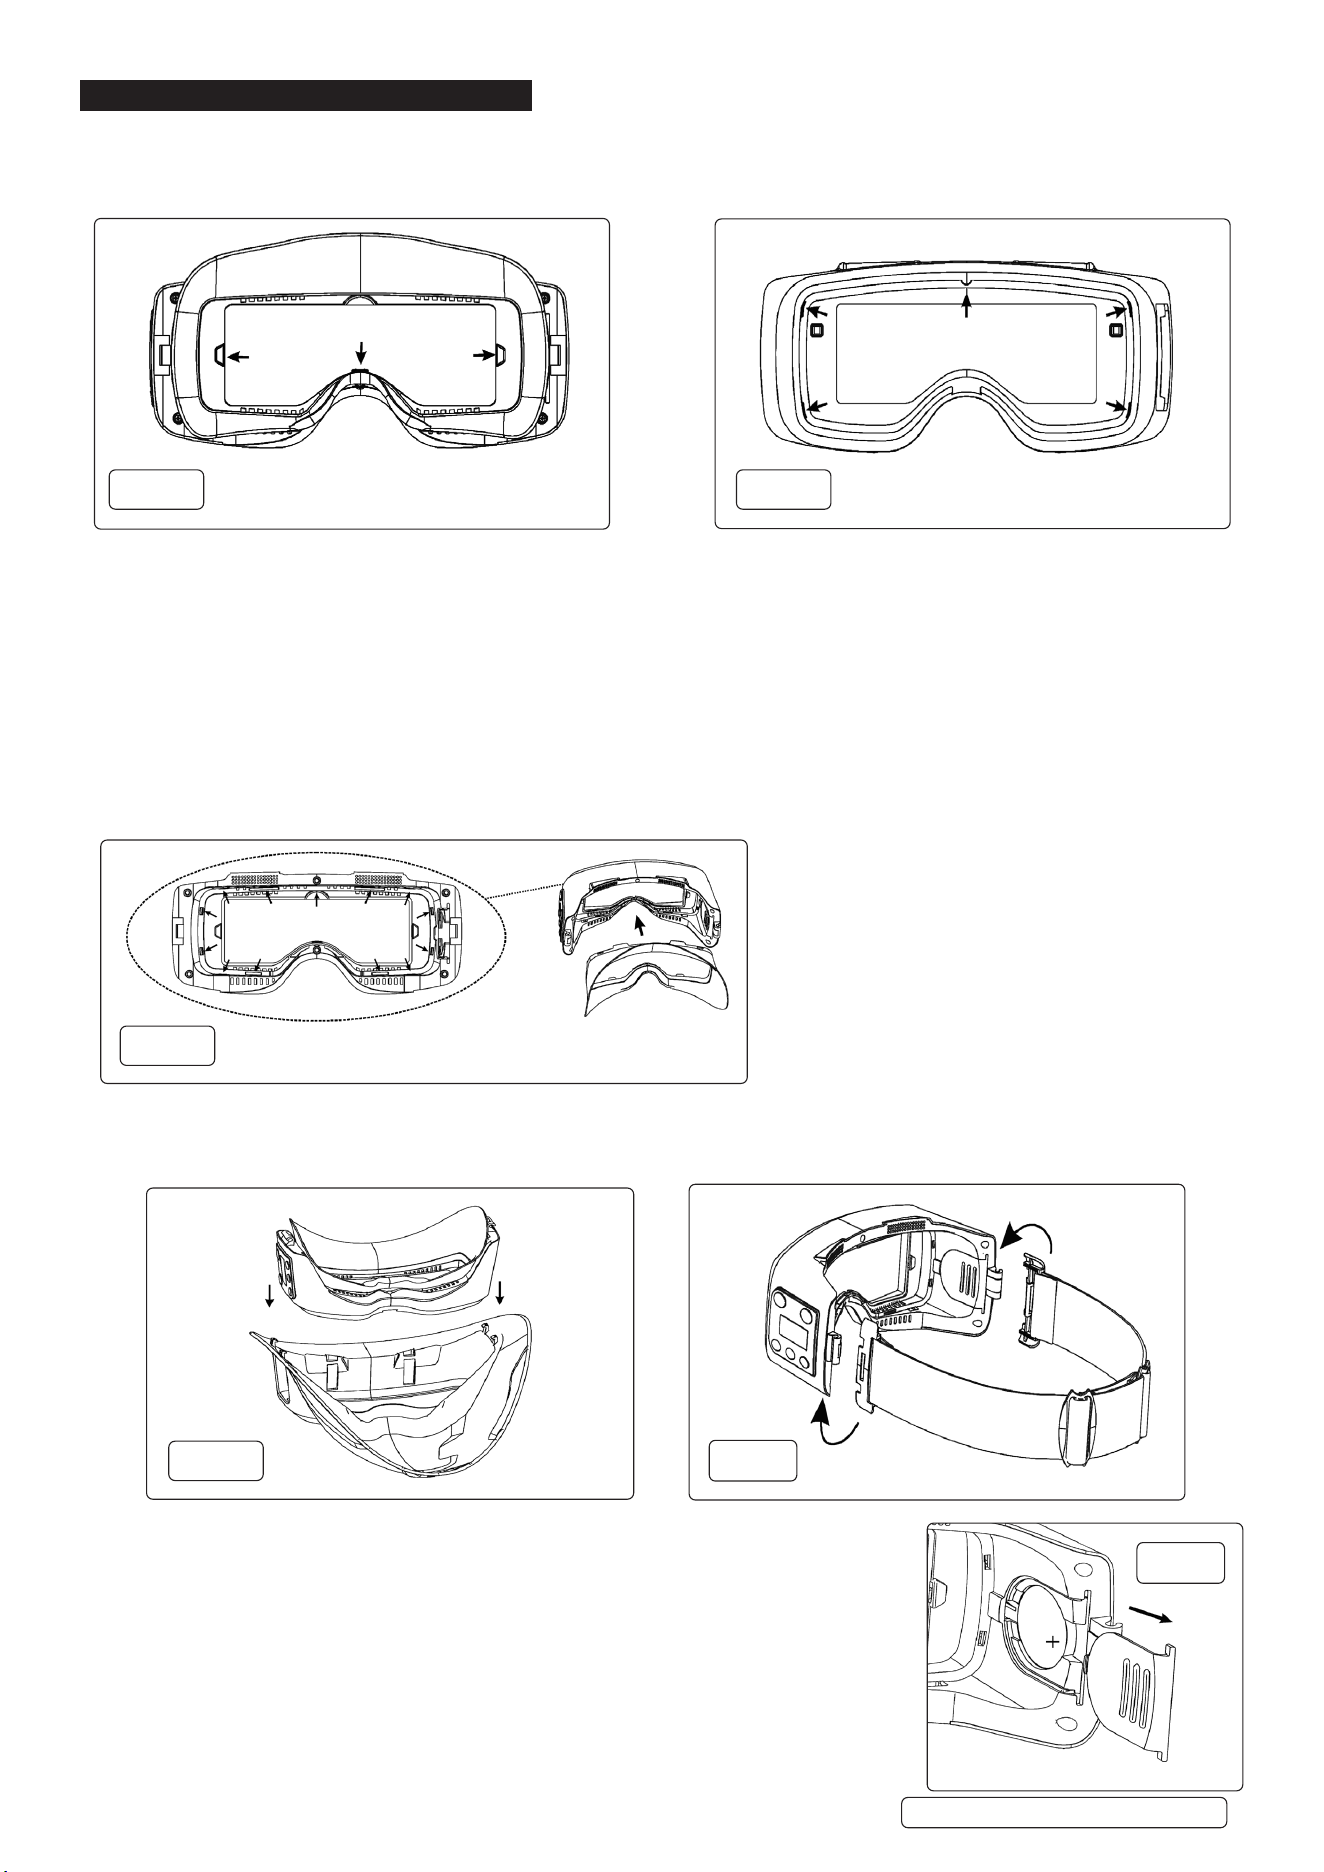
6.1. REPLACING PROTECTION PLATES (g.1.2, g.1.4, g.6, g.7) Only replace with genuine certied parts.
6.1.1. If protection screens (g.1.2, g.1.4) are in any way damaged, covered with welding spatter or broken, they must be immediately
replaced.
6.1.2. Use a thin bladed screw driver or similar to pry the lenses out on the ADF and pull outwards to fully remove. Insert new lenses
ensuring that they are securely fastened in the housing slots.
6.1.3. There are 5 slots on the outer cover lens, and 3 slots on the inner cover lens.
6.2. REPLACING SILICONE SKIRT (g.8)
6.2.1. The silicone skirt needs to be replaced if broken, damaged or covered with welding spatter.
6.2.2. Pull the silicone skirt upward in four positions to remove it.
6.2.3. Insert a new silicone skirt into the goggles ensuring it is securely tted. Be sure 13 tabs are put in the slots.
9 IMPORTANT! User must always make sure that the silicone skirt is tted properly before each use.
6.3. REMOVING THE GOGGLES FROM THE MASK (g.1.3, g.9)
6.3.1. Press the buckles in the direction showed in the g 9. And at the same time, push goggles up separate.
6.4. ADJUSTING / REPLACING THE ELASTIC HEAD BAND (g.1.6, g.9)
6.4.1. Pull the hinge clips up in the direction shown on g. 10. to separate them from the goggles
and replace the band.
6.4.2. Headband t and tightness can be adjusted by the buckle on the band.
6.5. BATTERY REPLACEMENT (g.11)
6.5.1. Slide battery cover from inside of goggles (g.11) and remove the battery.
Dispose of battery in accordance with local, regional and national guidelines.
9 Replace with new battery and securely ret the battery cover.
NOTE: Refer to section 8 of these instructions labelled BATTERY SAFETY.
g.6 g.7
FRONT VIEW
REAR VIEW
g.8
g.9
g.10
g.11
Original Language Version
© Jack Sealey Limited
SSP102 Issue 1 07/04/25
6.6. STORAGE AND TRANSPORT
6.6.1. Store in original packaging in clean, dry environment at temperature between -20
o
C to 70
o
C.
6.6.2. Transport unit in original packaging.
7. TROUBLESHOOTING
NOTE: Make sure the sensors are clean and facing the area with angles of 45°or more will limit the light reaching the sensors.
8. BATTERY SAFETY
8.1. BATTERY INGESTION
8.1.1. If someone swallows a button battery, symptoms may not appear immediately, but serious damage can occur within hours. Here are
common symptoms to watch for:
8.1.2. Unfortunately, it is not obvious when a button or coin battery is stuck in a child’s oesophagus (food pipe). There are no specic
symptoms associated with this. Common symptoms might be as below.
8.1.3. Cough, gag or drool a lot;
8.1.4. Appear to have a stomach upset or a virus;
8.1.5. Be sick;
8.1.6. Point to their throat or stomach;
8.1.7. Have a pain in their abdomen, chest or throat;
8.1.8. Be tired or lethargic;
8.1.9. Be quieter or more clingy than usual or otherwise “not themselves”;
8.1.10. Lose their appetite or have a reduced appetite; and not want to eat solid food/ be unable to eat solid food.
8.1.11. These sorts of symptoms vary or uctuate, with the pain increasing and then subsiding.
8.1.12. A specic symptom to button and coin battery ingestion is vomiting fresh (bright red) blood. If the child does this seek immediate
medical help.
8.1.13. The lack of clear symptoms is why it is important to be vigilant with “at” or spare button or coin batteries in the home and the products
that contain them.
8.2. WHAT TO DO IF A BUTTON BATTERY IS SWALLOWED?
8.2.1. Go to the Accident and Emergency department immediately – This is a medical emergency.
8.2.2. DO NOT induce vomiting.
8.2.3. DO NOT let the person eat or drink until assessed by a doctor.
8.2.4. Give honey (if advised by medical professionals) – For children over 12 months, giving honey (10ml every 10 minutes, up to 6 doses)
may help reduce oesophageal damage while getting to the hospital.
8.2.5. NOTE: Fast medical attention is crucial! Even if the person looks ne, internal damage can happen quickly.
SYMPTOM ACTION REQUIRED
Goggles not darkening. Stop welding or cutting immediately.
Check the mode is on WELD or CUT but not on Grind.
Check the battery, is tted and is LED shows charge. Replace if not.
Change the lens if there is welding spatter cover the arc sensors.
Check the sensitivity, adjust according to recommended value for the operation.
The goggles are ickering. Check the power, if it is on, then follow the next step.
Check the sensitivity, adjust it to required level.
Clean lens covers and sensors of any obstruction.
The goggles remain dark after completing a weld . Check the sensitivity, adjust it to a required level.
If the work place is extremely bright, reduce the surrounding light level.
Slow Response. Operate Temperature too low. DO NOT use at temperature below-10°C or 14 °F.
Poor Vision. Change the cover lens/clean lter.
Ensure ambient light is not too low.
Ensure the shade number is correctly set.
Original Language Version
© Jack Sealey Limited
SSP102 Issue 1 07/04/25
BATTERY REMOVAL
Under the Waste Batteries and Accumulators Regulations 2009, Jack Sealey Ltd are required to inform potential purchasers of products
containing batteries (as defined within these regulations), that they are registered with Valpak’s registered compliance scheme. Jack
Sealey Ltd Batteries Producer Registration Number (BPRN) is BPRN00705.
Note: It is our policy to continually improve products and as such we reserve the right to alter data, specifications and component parts without prior
notice.
Important: No Liability is accepted for incorrect use of this product.
Warranty: Guarantee is 12 months from purchase date, proof of which is required for any claim.
BATTERY REMOVAL
Under the Waste Batteries and Accumulators Regulations 2009, Jack Sealey Ltd are required to inform potential purchasers of products
containing batteries (as defined within these regulations), that they are registered with Valpak’s registered compliance scheme. Jack
Sealey Ltd’s Batteries Producer Registration Number (BPRN) is BPRN00705.
SSP102 Issue 1 07/04/25
Original Language Version
© Jack Sealey Limited
9. SHADE GUIDE TABLE
EU | Sealey EU Ltd, Farney Street, Carrickmacross, Co. Monaghan, A81 PK68 Ireland
UK | Sealey Group, Kempson Way, Suffolk Business Park, Bury St Edmunds, Suffolk. IP32 7AR
01284 757500 sales@sealey.co.uk www.sealey.co.uk
ENVIRONMENT PROTECTION
Recycle unwanted materials instead of disposing of them as waste. All tools, accessories and packaging should be sorted,
taken to a recycling centre and disposed of in a manner which is compatible with the environment. When the product
becomes completely unserviceable and requires disposal, drain any fluids (if applicable) into approved containers and
dispose of the product and fluids according to local regulations.
REGISTER YOUR
PURCHASE HERE
