

Technical Support and E-Warranty Certificate
www.vevor.com/support
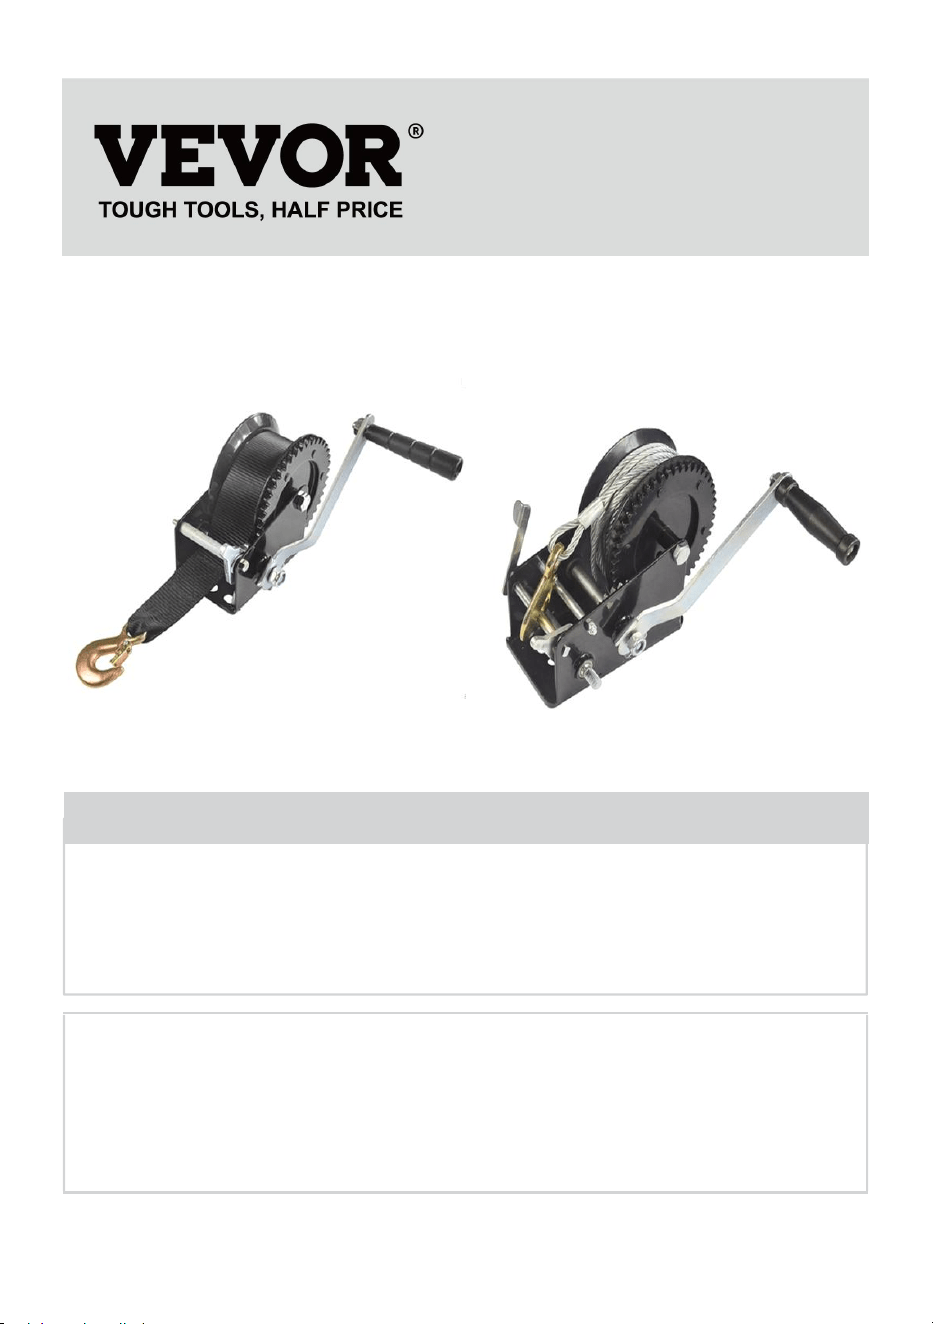
HAND WINCH
USER'S MANUAL
Model: KW1200, KW1600, KW2000B,
KW3500, KC800, KC3500
We continue to be committed to provide you tools with competitive price.
"Save Half", "Half Price" or any other similar expressions used by us only represents an
estimate of savings you might benefit from buying certain tools with us compared to the major
top brands and does not necessarily mean to cover all categories of tools offered by us. You
are kindly reminded to verify carefully when you are placing an order with us if you are
actually saving half in comparison with the top major brands.

- 1 -
Have product questions? Need technical support? Please feel free to
contact us:
Technical Support and E-Warranty Certificate
www.vevor.com/support
NEED HELP? CONTACT US!
This is the original instruction, please read all manual instructions
carefully before operating. VEVOR reserves a clear interpretation of our
user manual. The appearance of the product shall be subject to the
product you received. Please forgive us that we won't inform you again if
there are any technology or software updates on our product.
HAND WINCH

- 2 -
GENERAL SAFETY RULES
Please read this user manual carefully!
1. Never overload!
2. This winch is designed for pulling, not for lifting!
3. Never put your hand or anything else near the gear, rim and rolling
cable. Always wear gloves when using the winch
4. Never try to repair or disassemble the winch when there is a problem.
Ask a machinist or specialist for help.
5. When replacing the cable, make sure that the end of the cable comes
through the 4 holes on the side of the rim, and tie a knob or weld the tip
of cable, to prevent the cable from coming out.
6. Use grease for axis and gears before depositing for a long time
7. Do not allow minors to use and operate this product
8. Do not use the product when you are tired, or while under the influence
of alcohol, prescription medicines or drugs.
9. Safety at work
- Use both hands when transporting the product.
- Use proper protective equipment according to the work
environment.
- Keep proper footing at all times and balance.
- Do not attempt to pull stationary or fix loads.
- Do not apply any side force on the load.
- Not for lifting loads and Never transporting persons.
10. Avoid starting the product unintentionally .The ratchet switch
should always be fully engaged.
CAUTION: Carefully read instructions and procedures for safe operations.
SAVE THESE INSTRUCTIONS

- 3 -
MODEL AND PARAMETERS
Model
KW1200
KW1600
KW2000B
KW3500
KC800
KC3500
Maximum
Load
Capacity
1200lbs
1600lbs
2000lbs
3500lbs
800lbs
3500lbs
Gear
Ratio
4:1
4:1
4:1
4:1 and
8:1
3.1:1
4:1 and
8:1
Way/
Speed
2Way /
1Speed
2Way /
1Speed
2Way /
1Speed
2Way /
2Speed
2Way /
1Speed
2Way /
2Speed
Rope
Type
Polyester
Strap
Polyester
Strap
Polyester
Strap
Polyester
Strap
Steel
Cable
Steel
Cable
Rope
Length
7M
10M
7M
10M
10M
10M
Color(s)
Black
Black
Black
Black
Black
Black
- 4 -
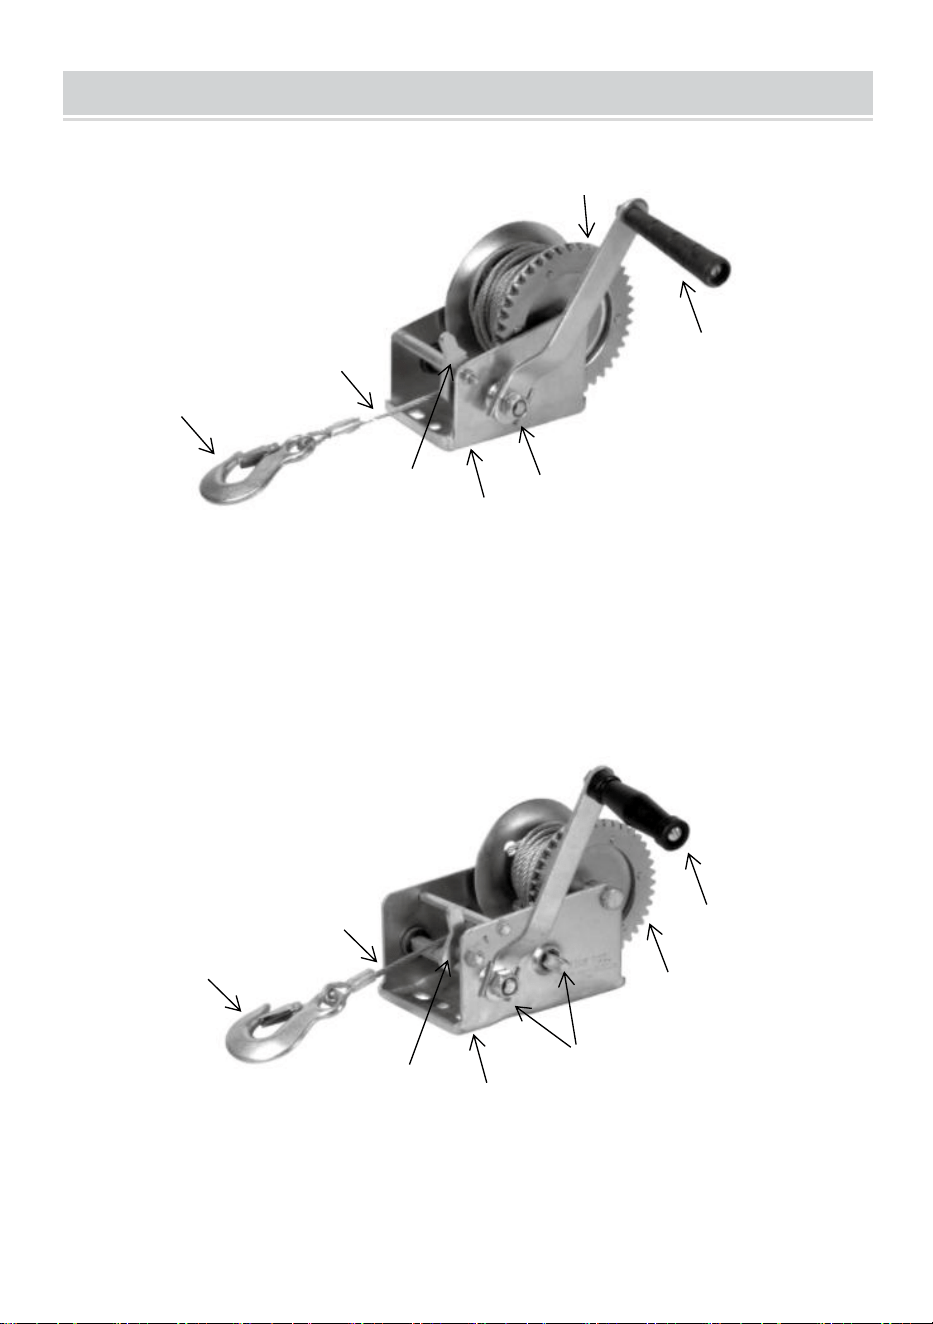
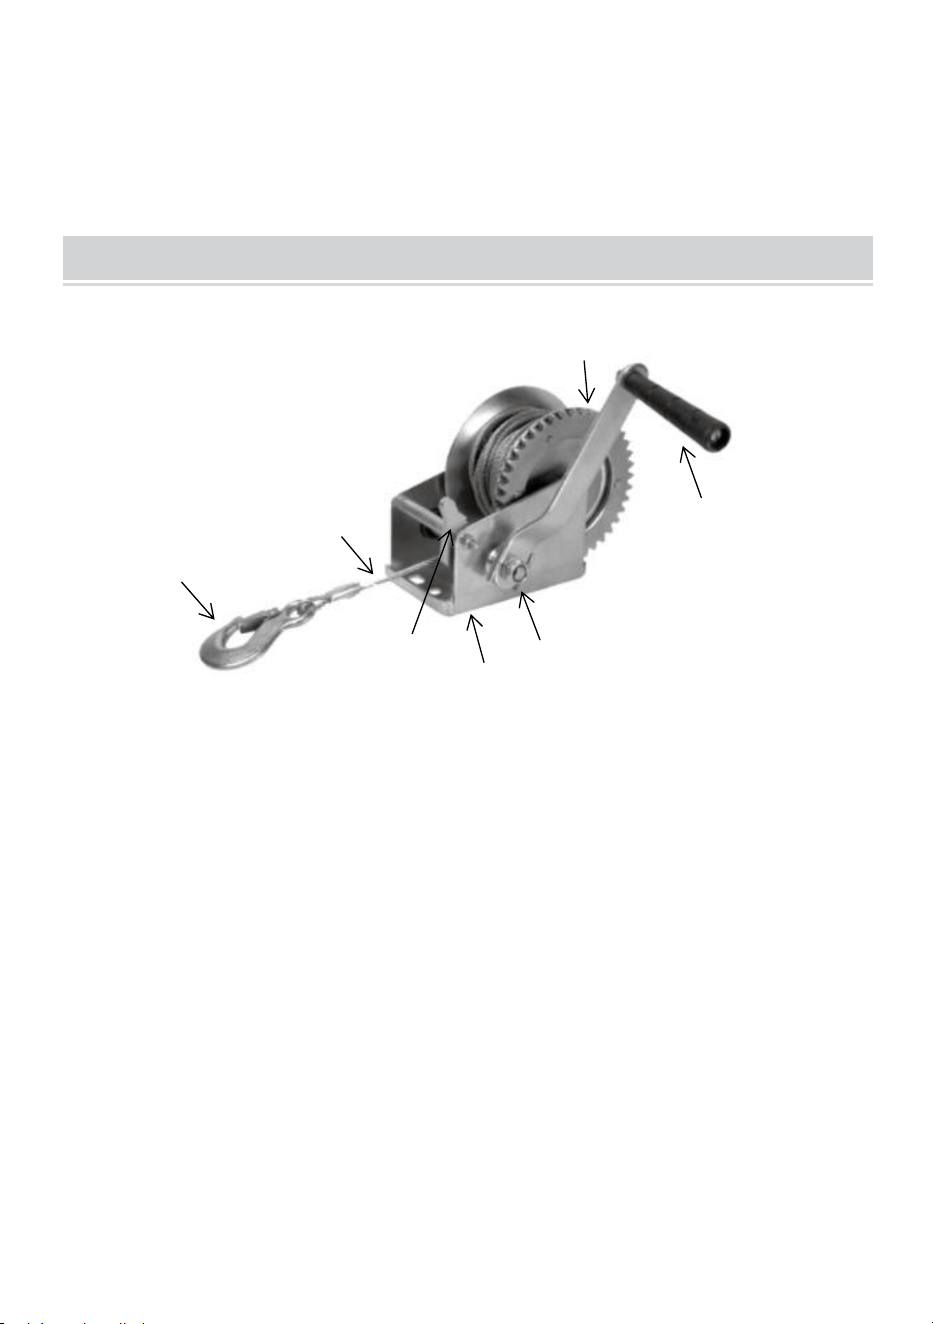
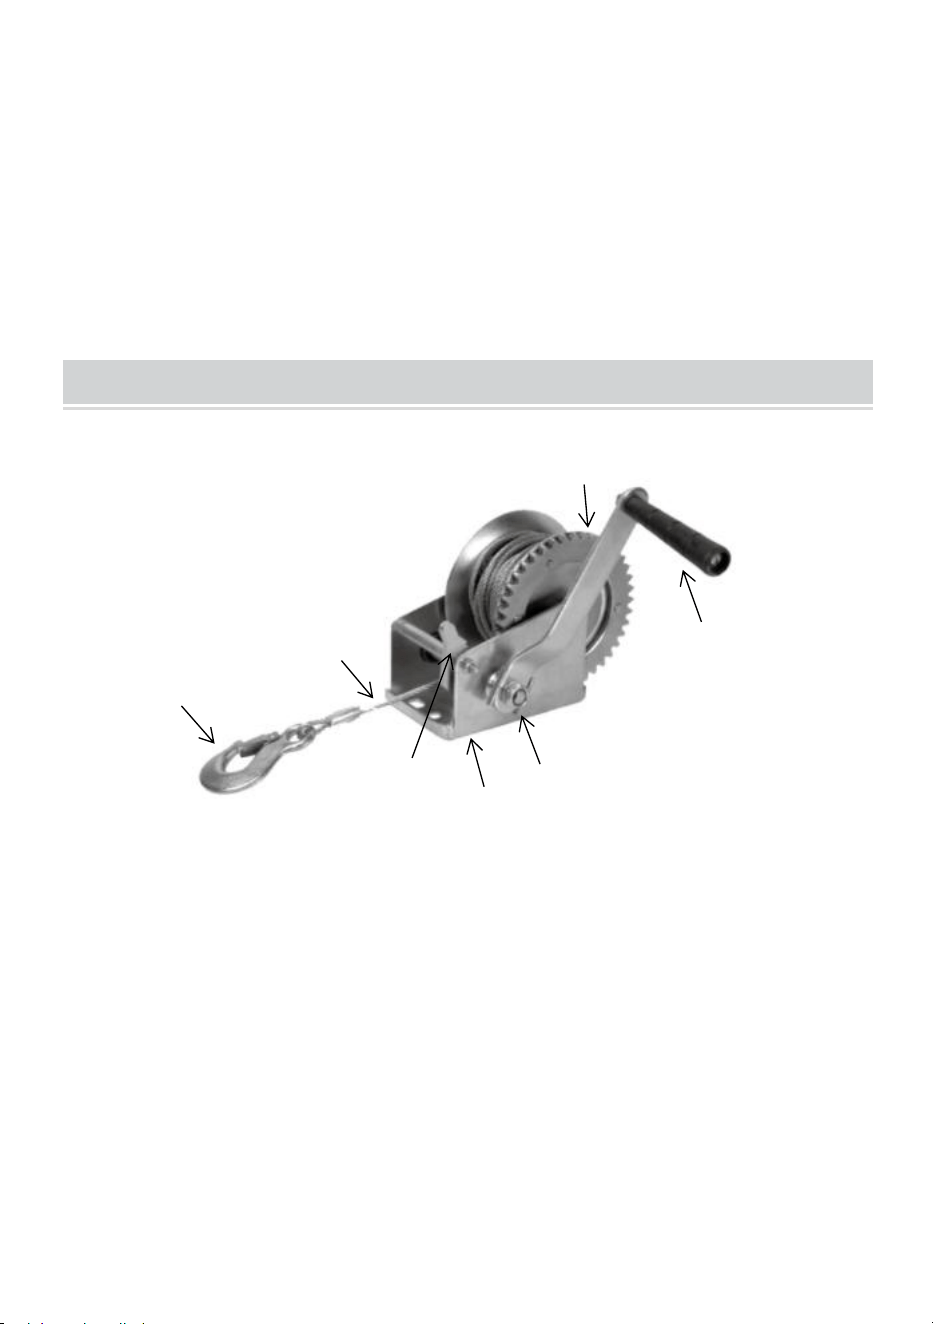
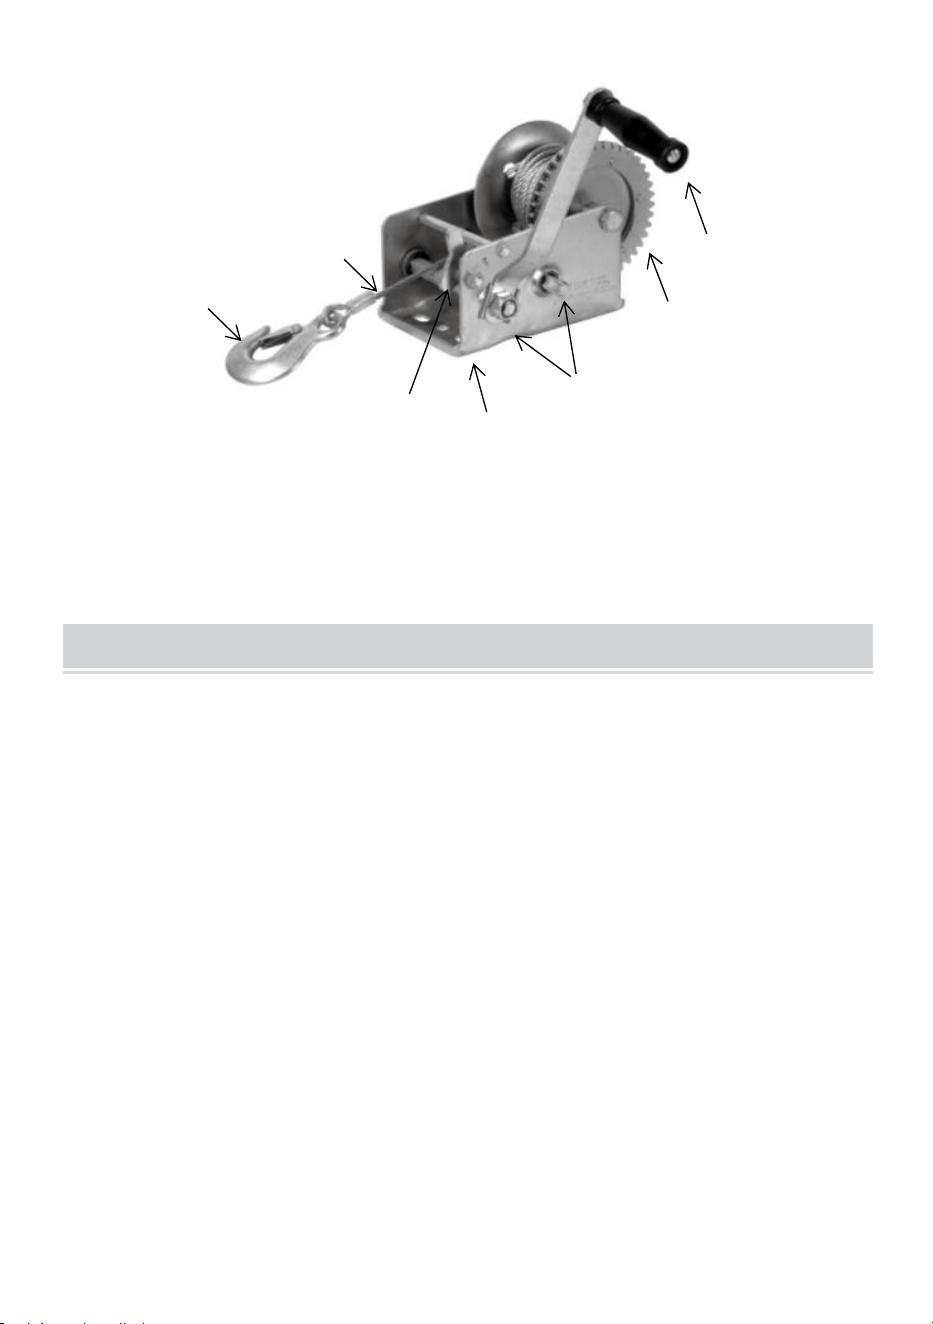
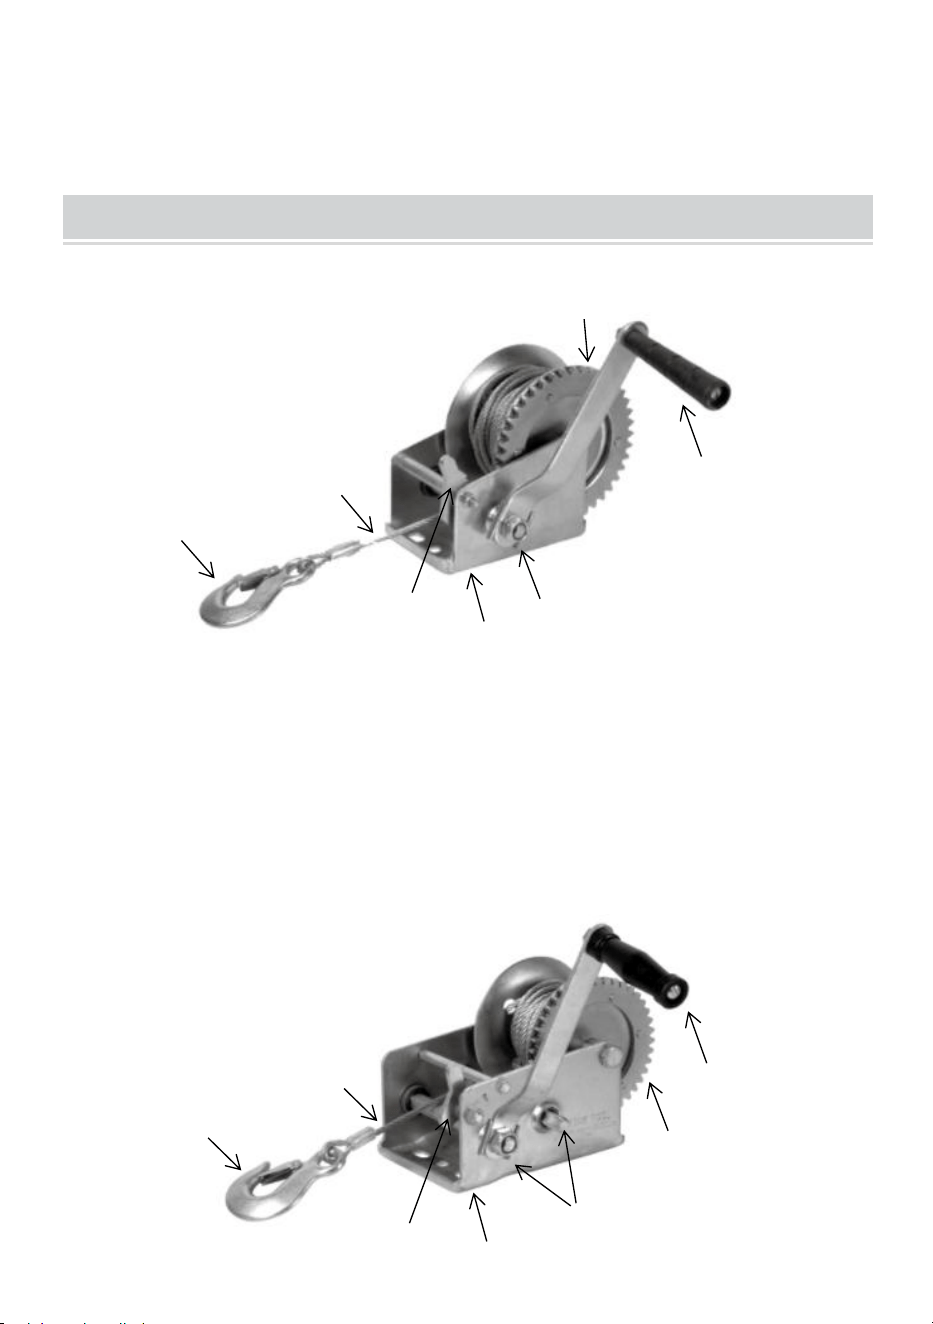
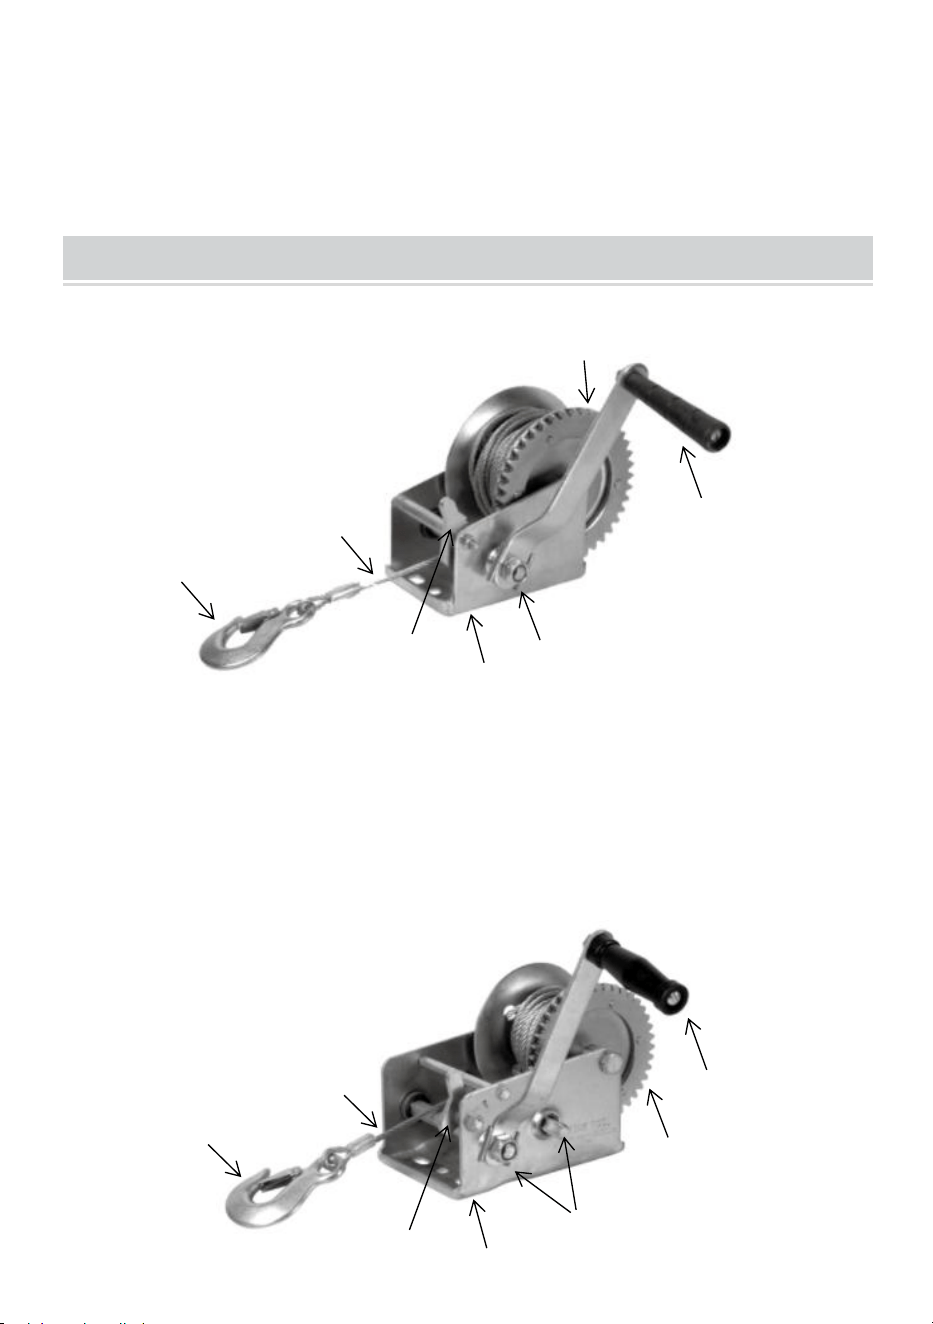
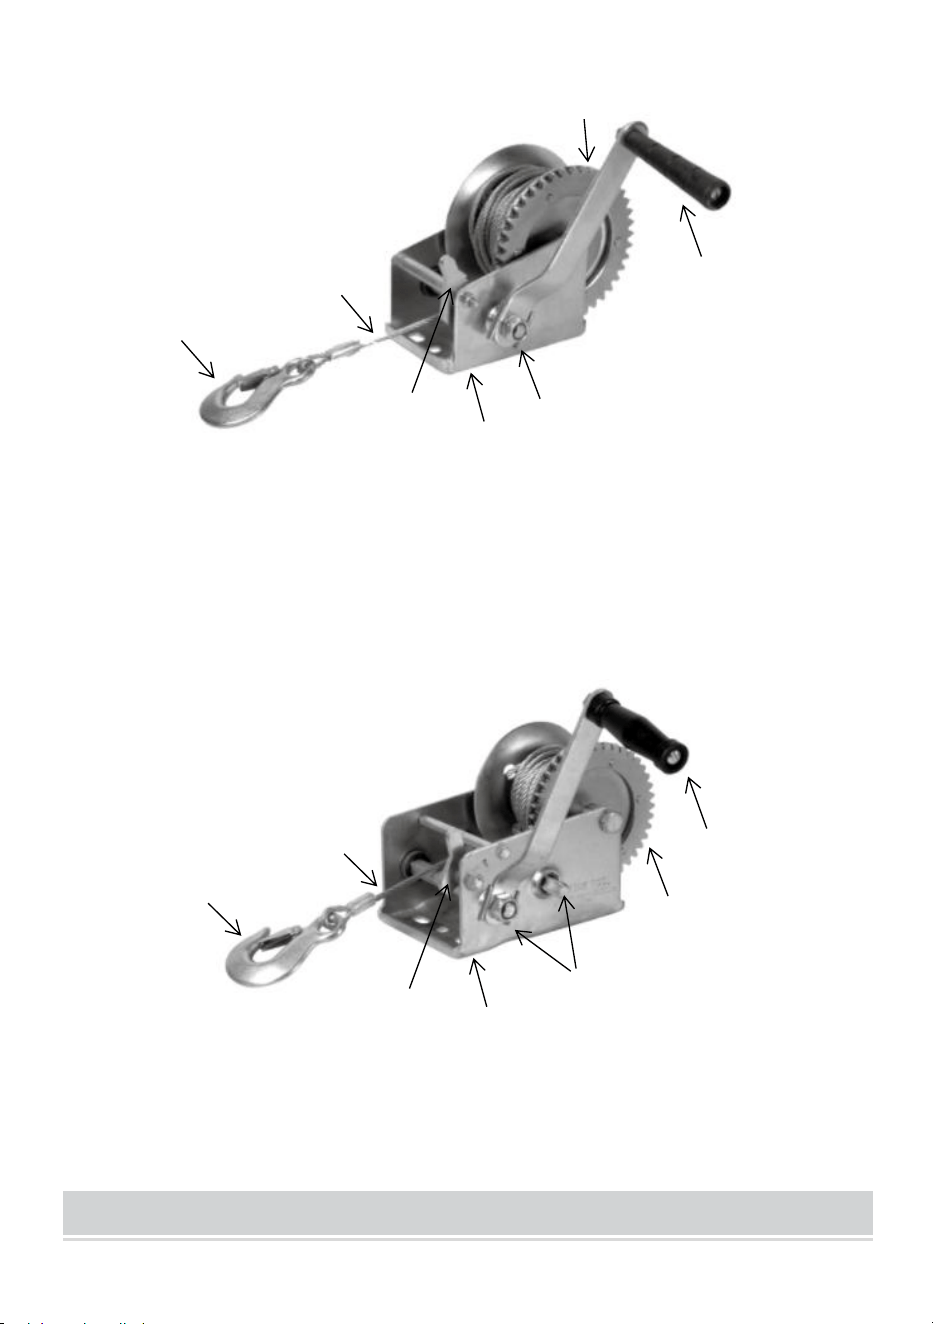
STRUCTURE DIAGRAM
1. Hook 2. Rope 3. Rim 4.Crank 5.Axis Bolt 6. Base 7.Ratchet Switch
1.Hook 2. Rope 3. Rim 4.Crank 5.Axis Bolt 6. Base 7.Ratchet Switch
1
2
3
4
5
6
7
5
3
4
6
7
1
2
- 5 -
OPERATING INSTRUCTION
Installation Preparation:
1. Please prepare a carpet or mat to protect your floor. You need to spread
out all the accessories.
2. Please prepare gloves to avoid being scratched by sharp parts that may
occur during installation.
3. Please open all the boxes to check that the accessories are complete
and in good condition.
4. If you need to use power tools to install this product, please set the
speed to low speed in advance.
5. When installing, please align all the holes and do not tighten all the
screws first ; otherwise, it may make the installation difficult.
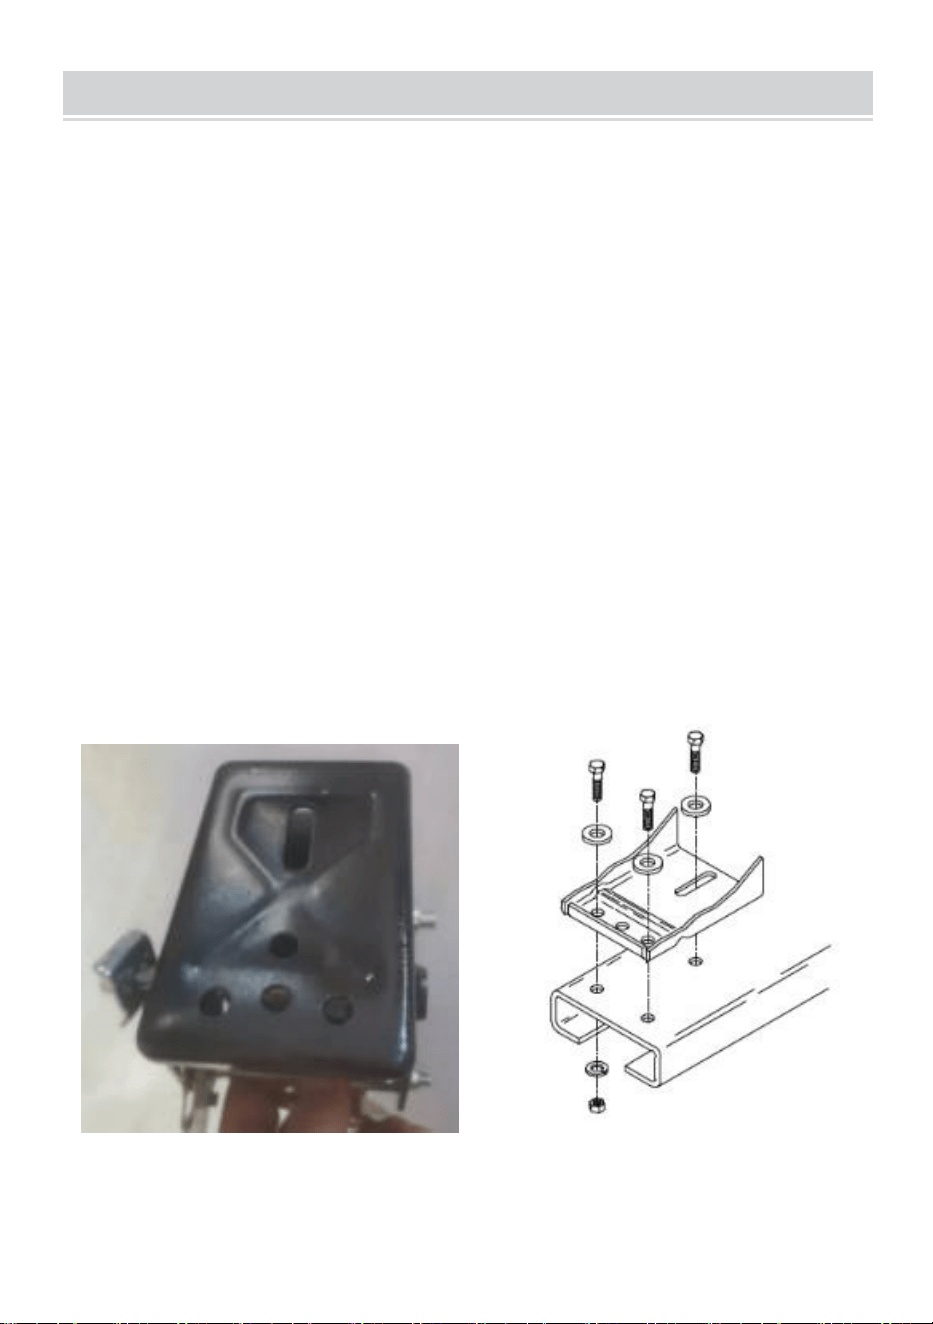
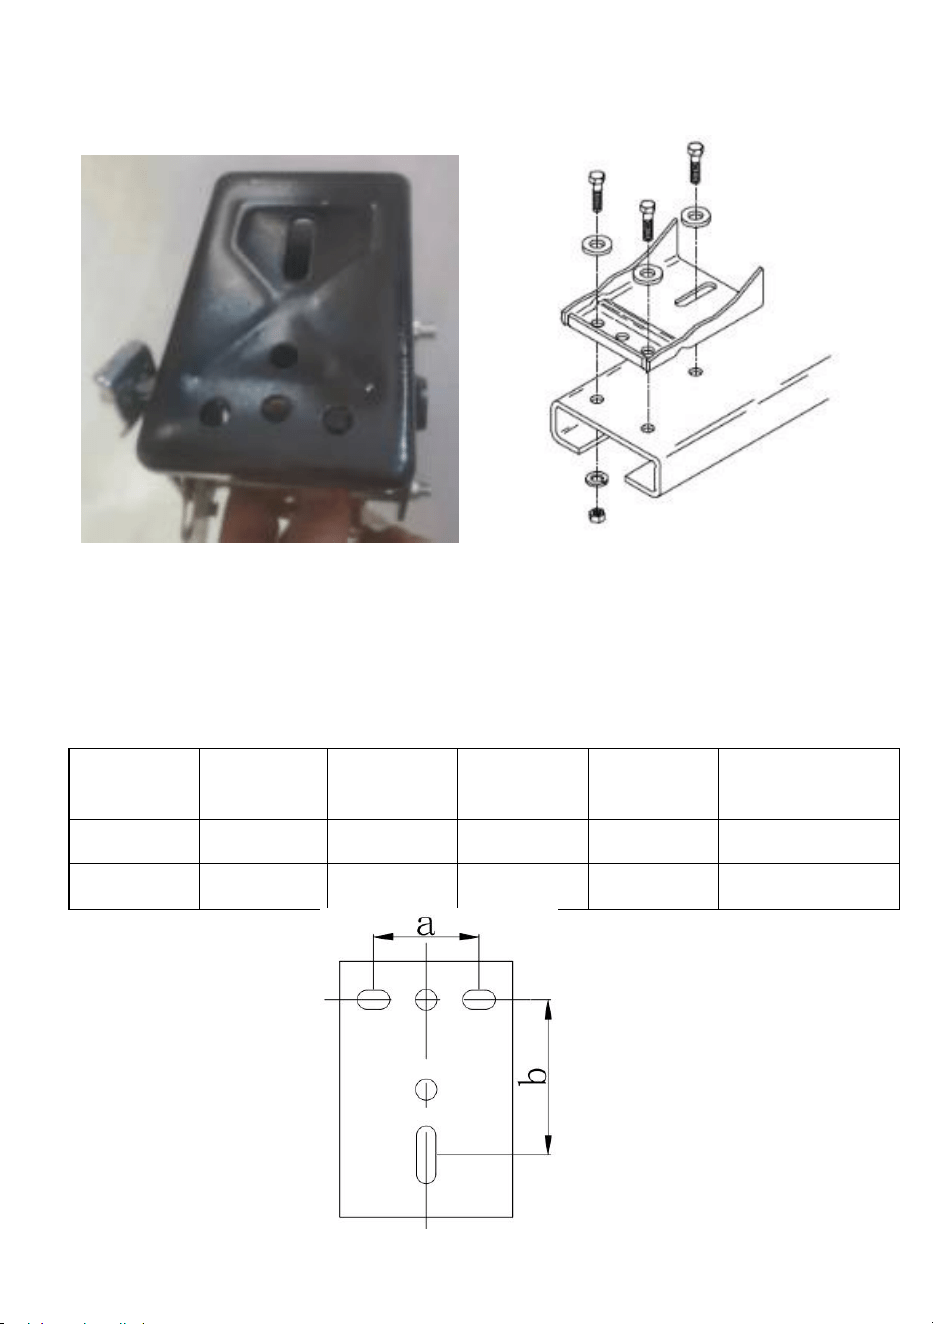
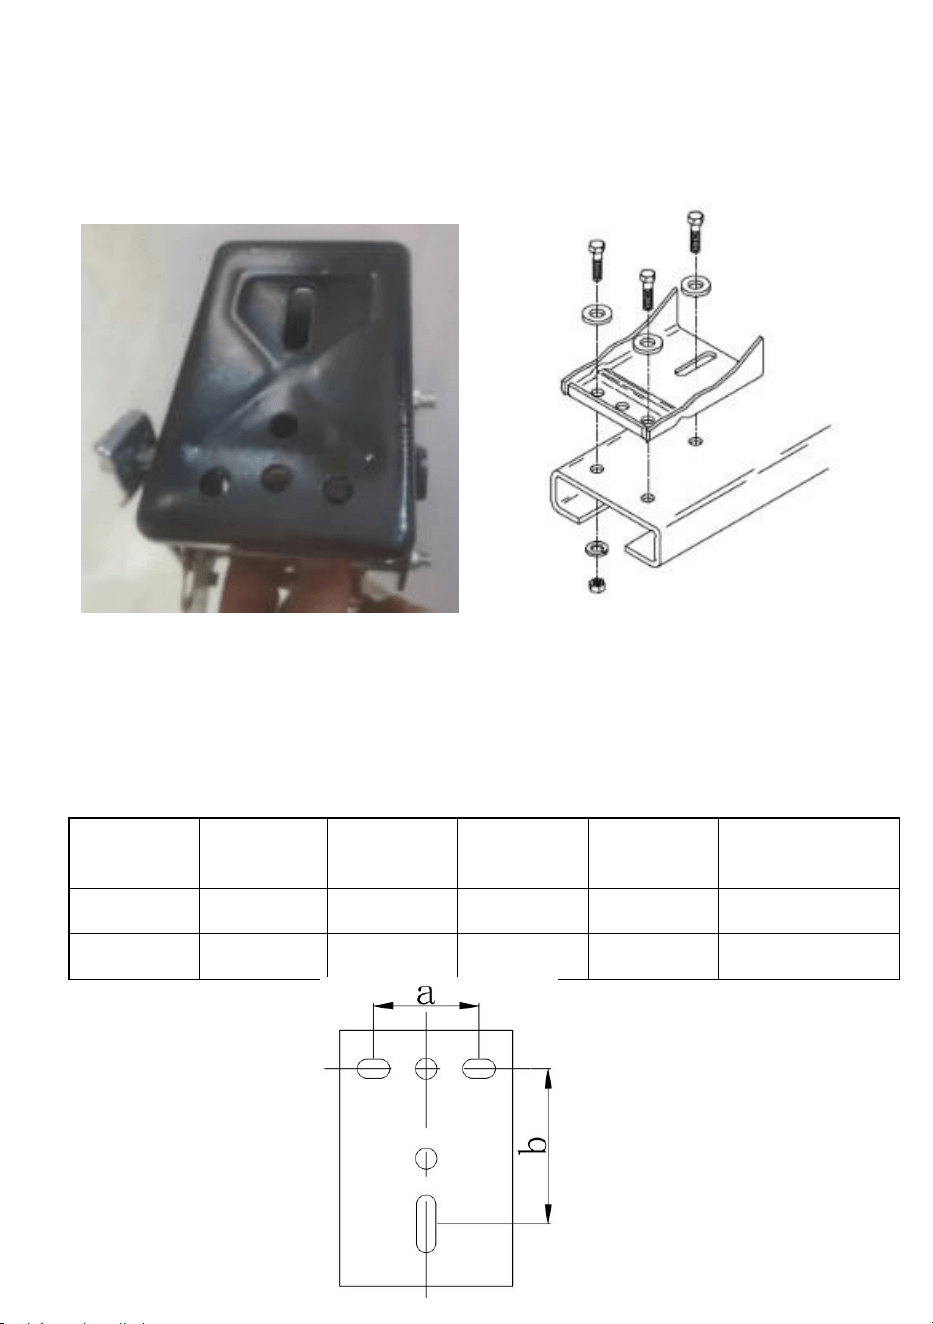
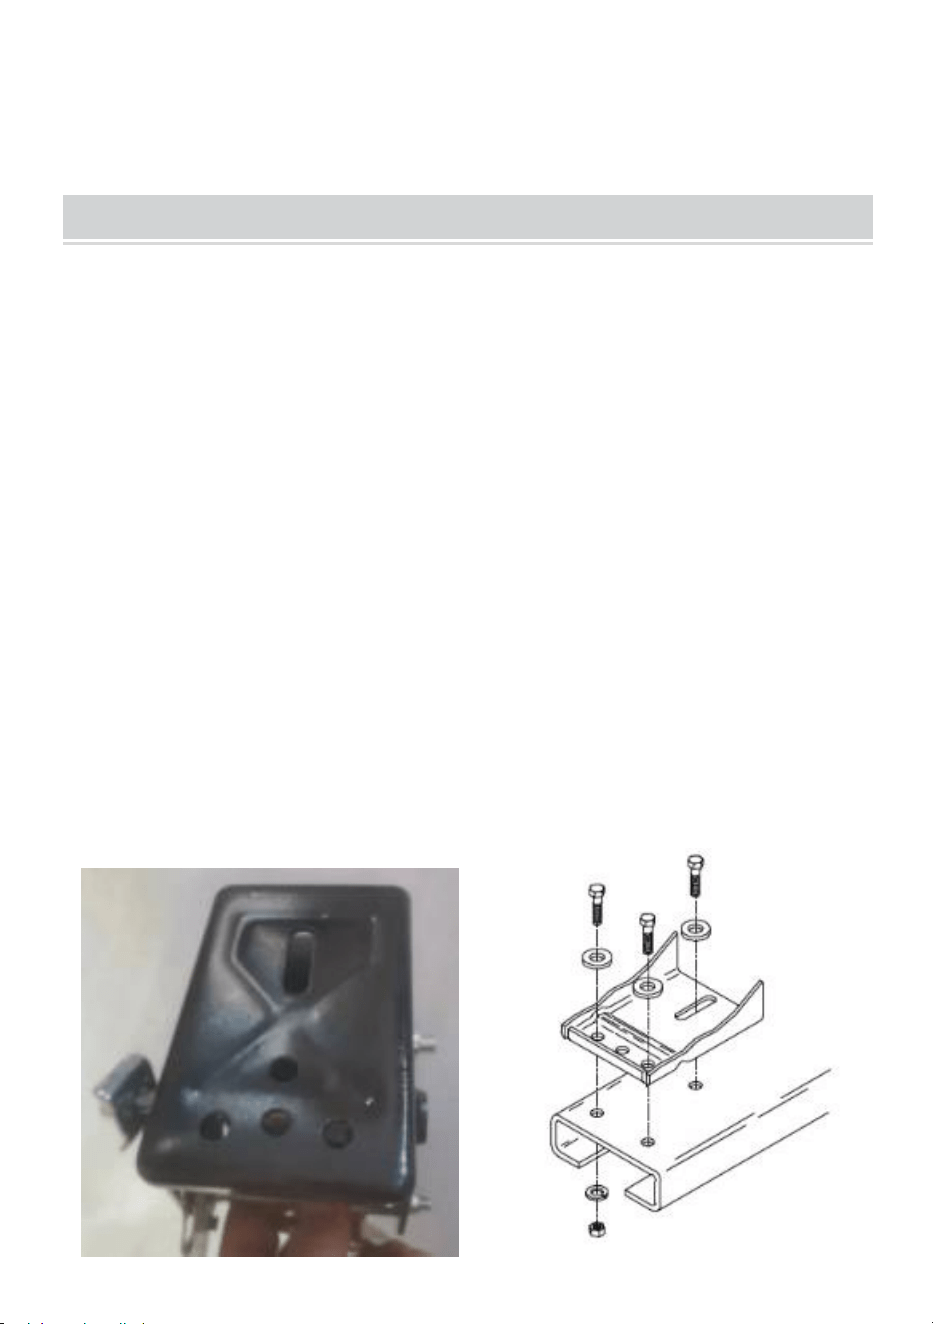
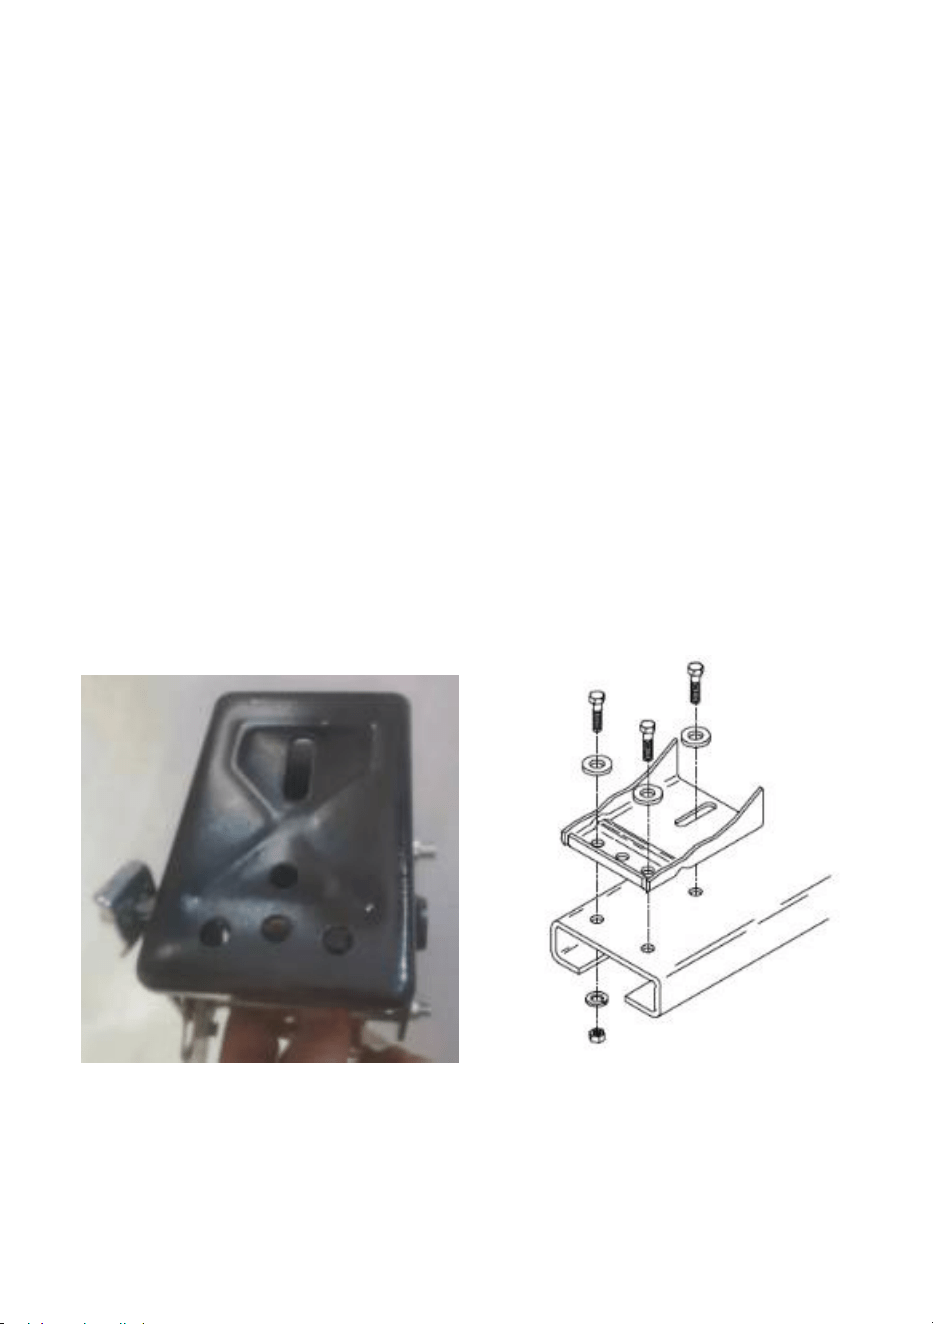
Installation:
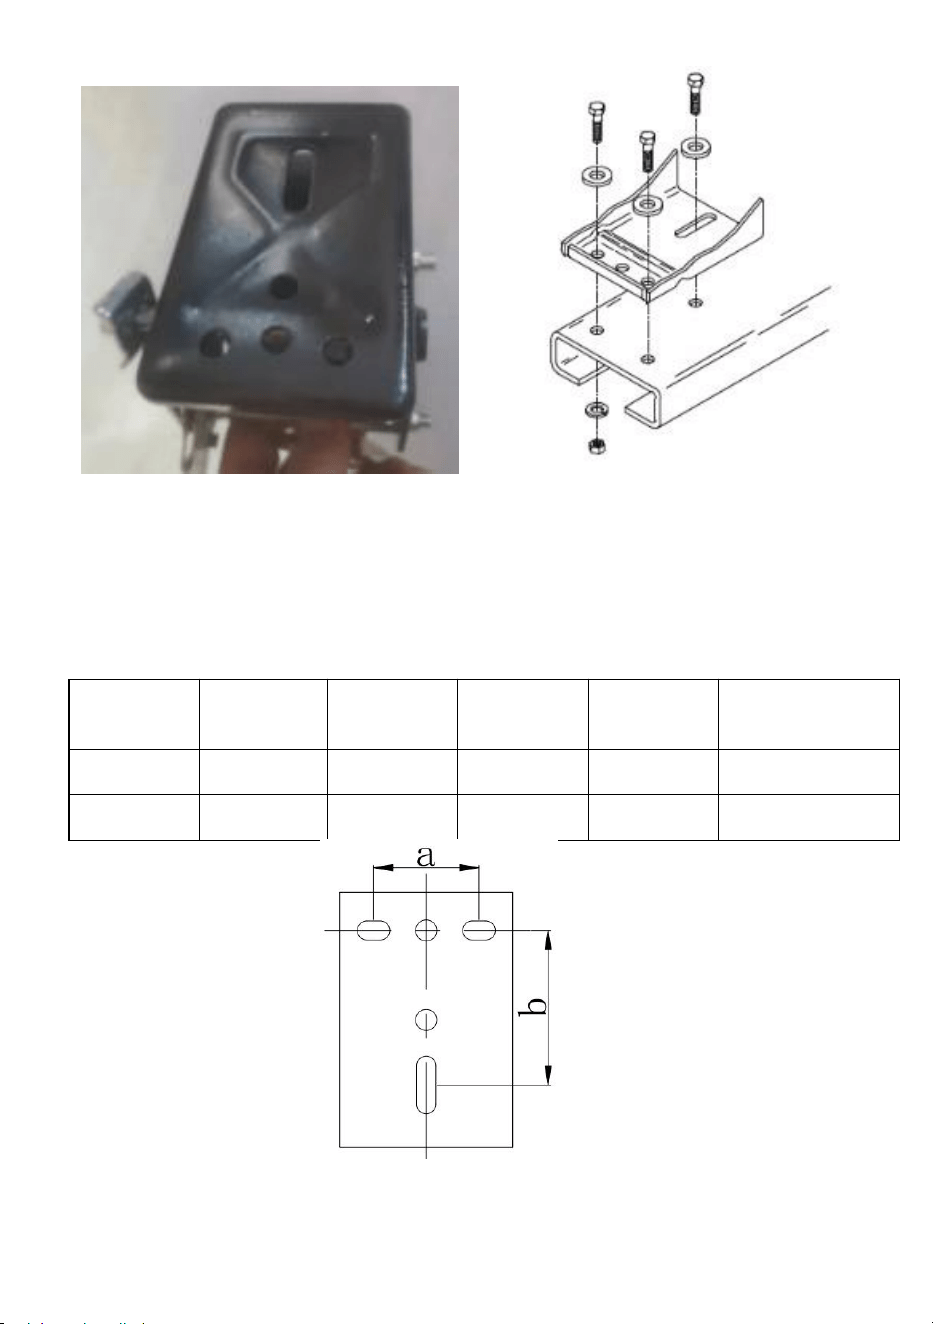
Step1. Drill holes (Ф11mm) in the brackets to be installed, according
to the winch base dimensions.
Install the winch on the brackets and lock it with bolts and nuts.
- 6 -
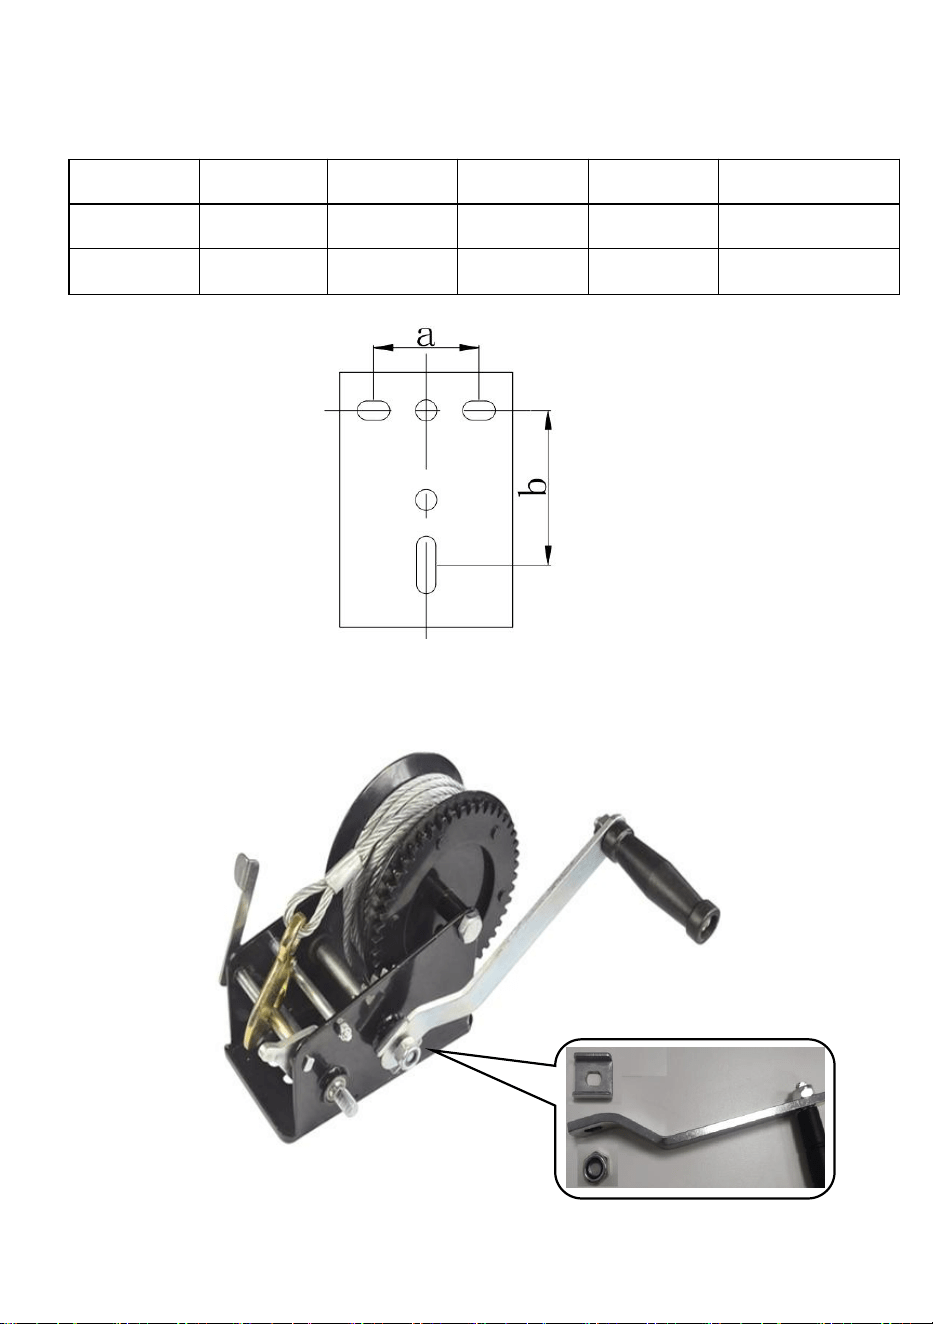
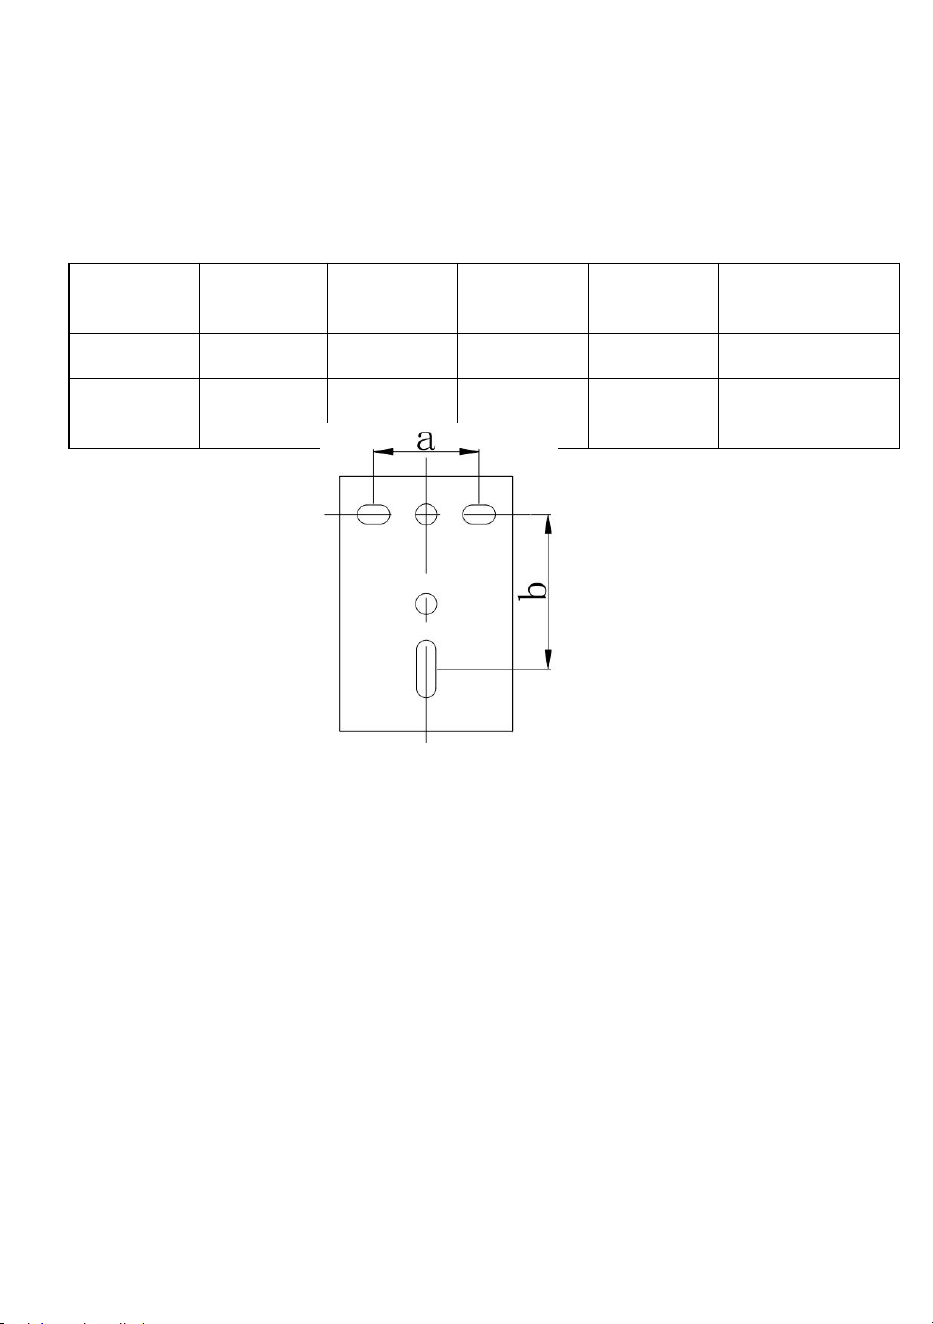
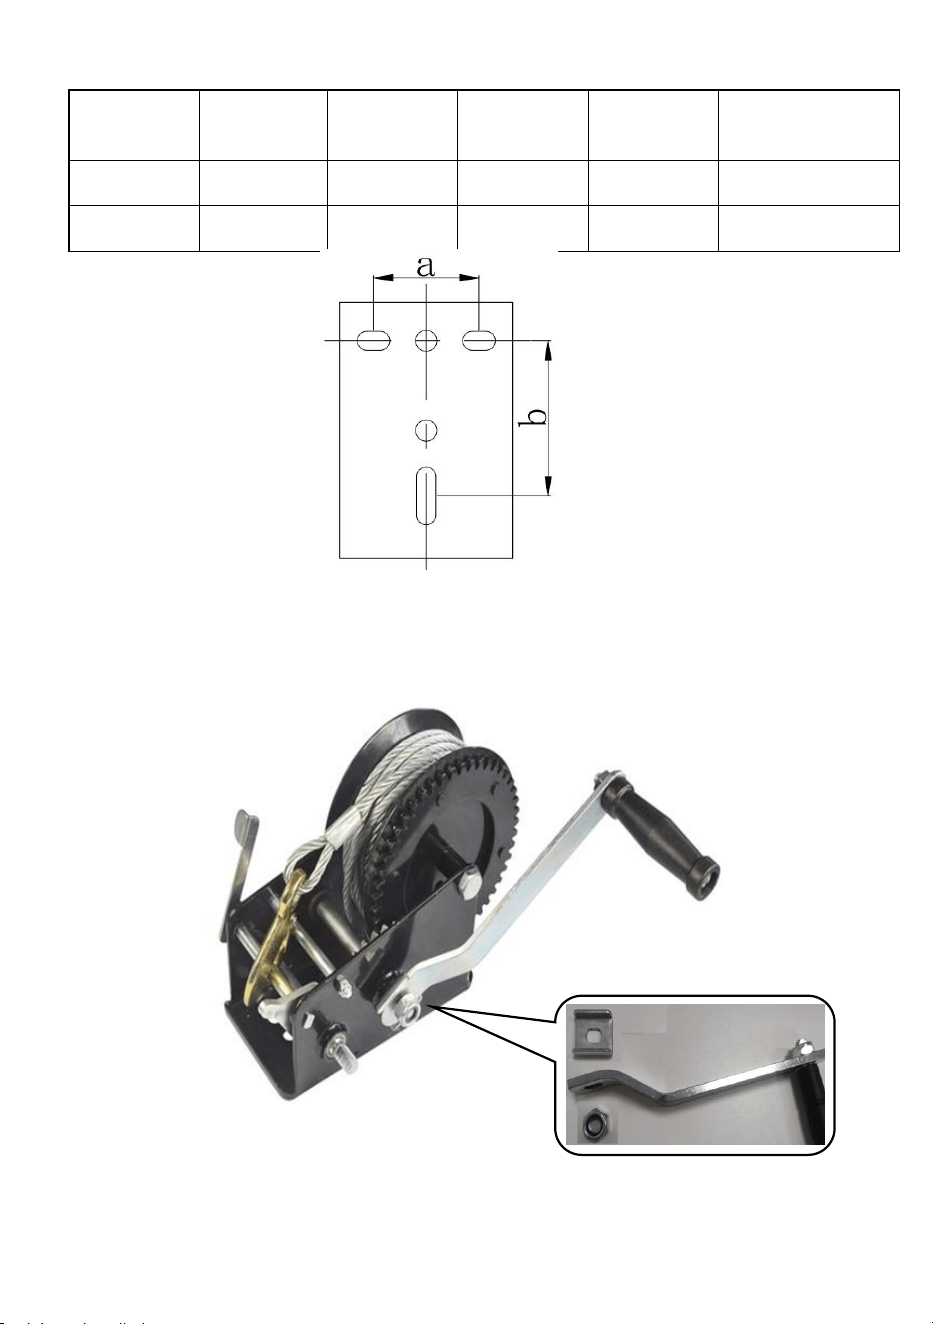
Winch Base Dimension:
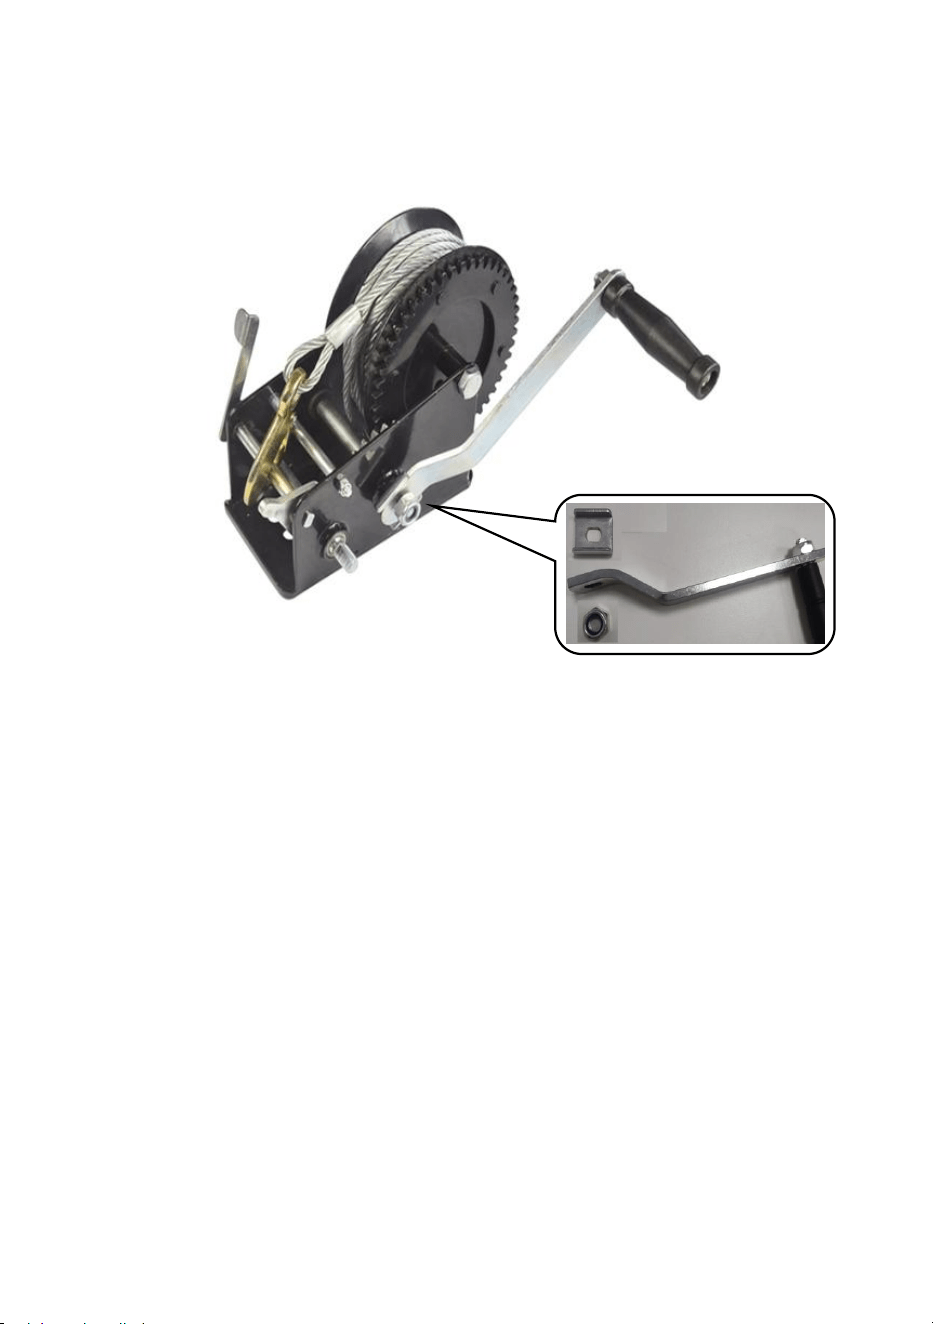
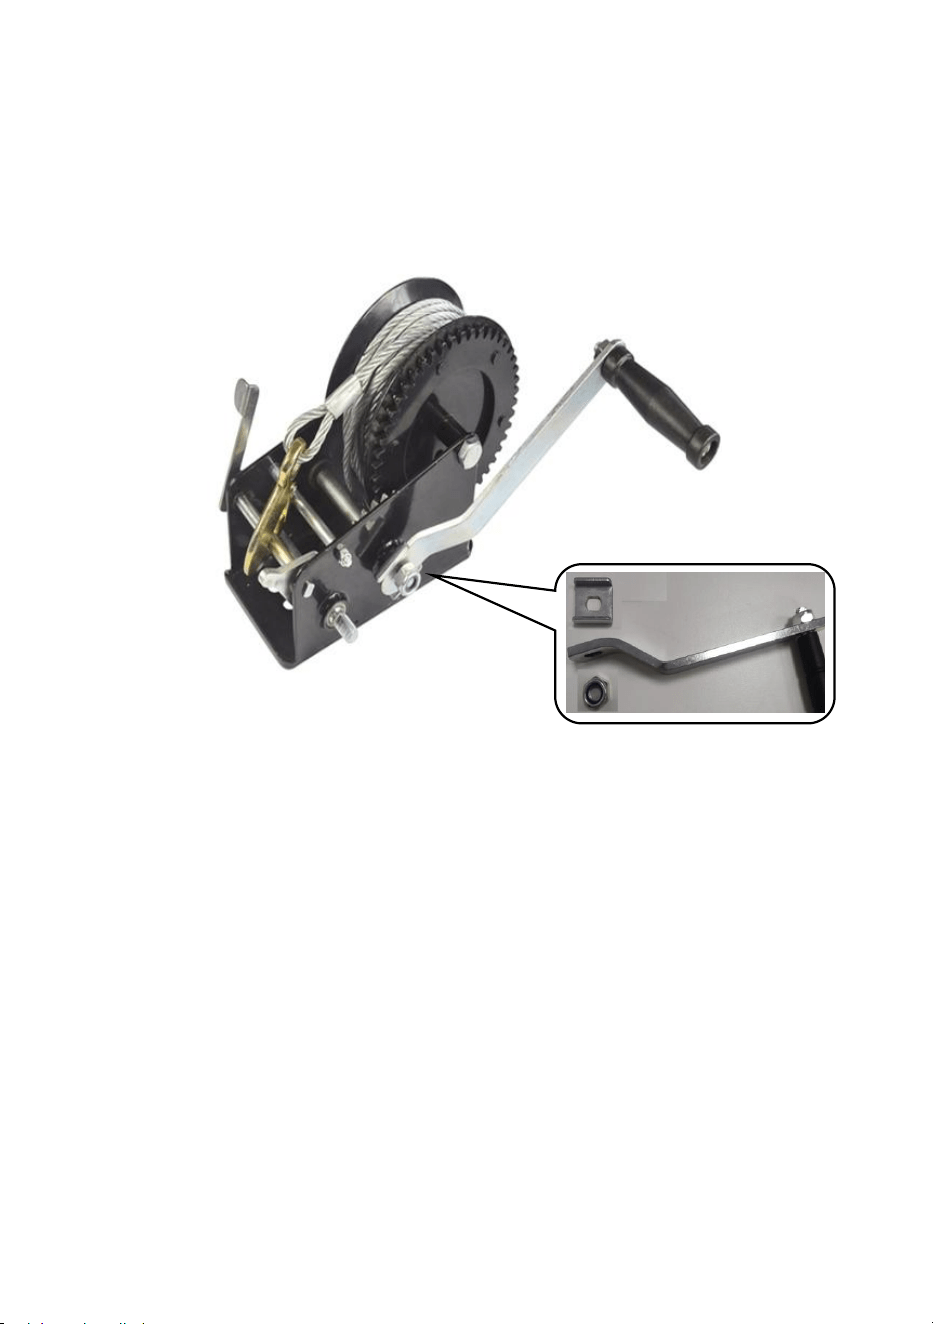
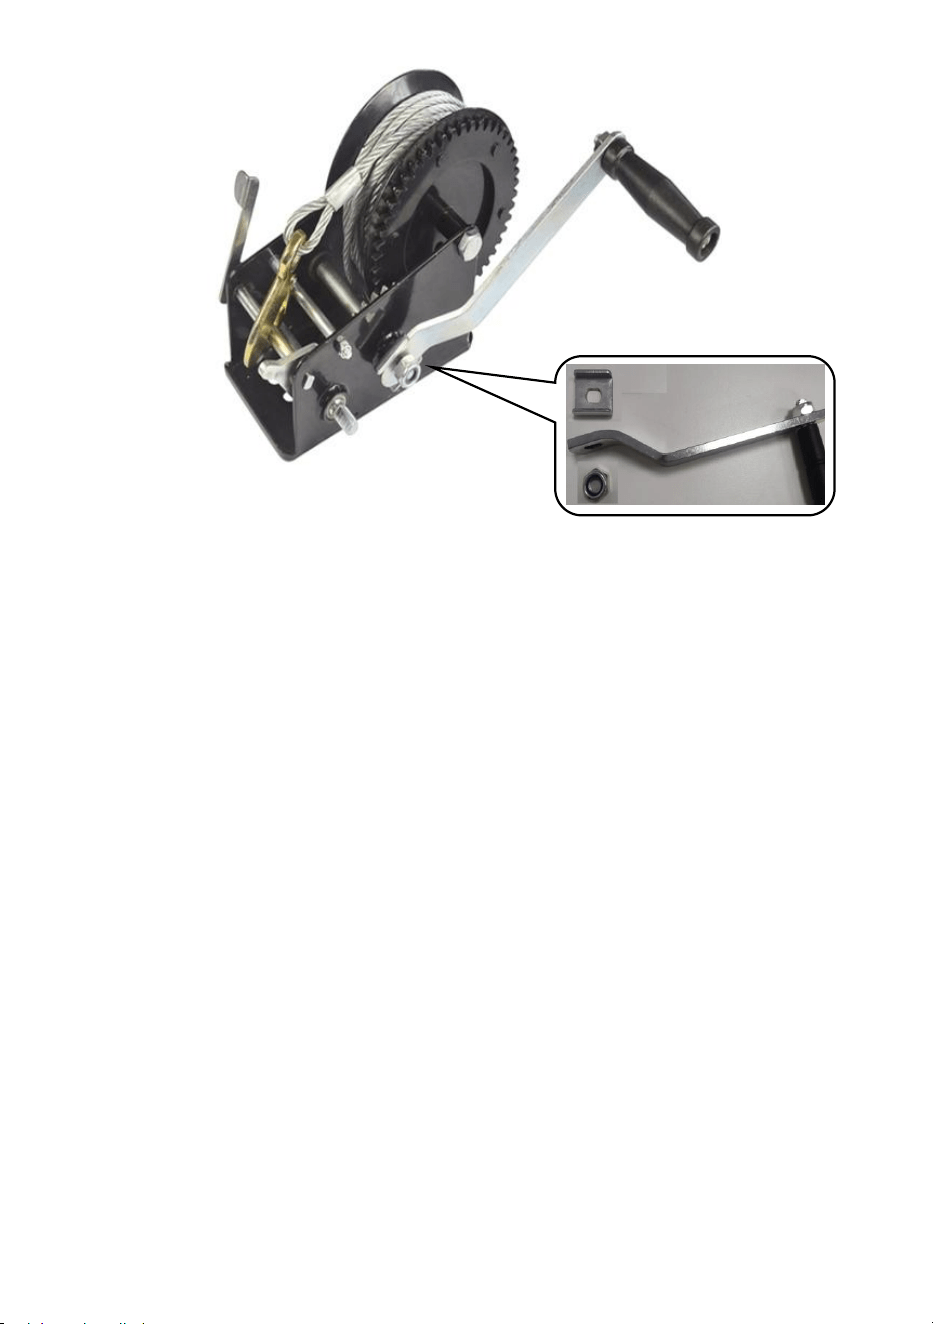
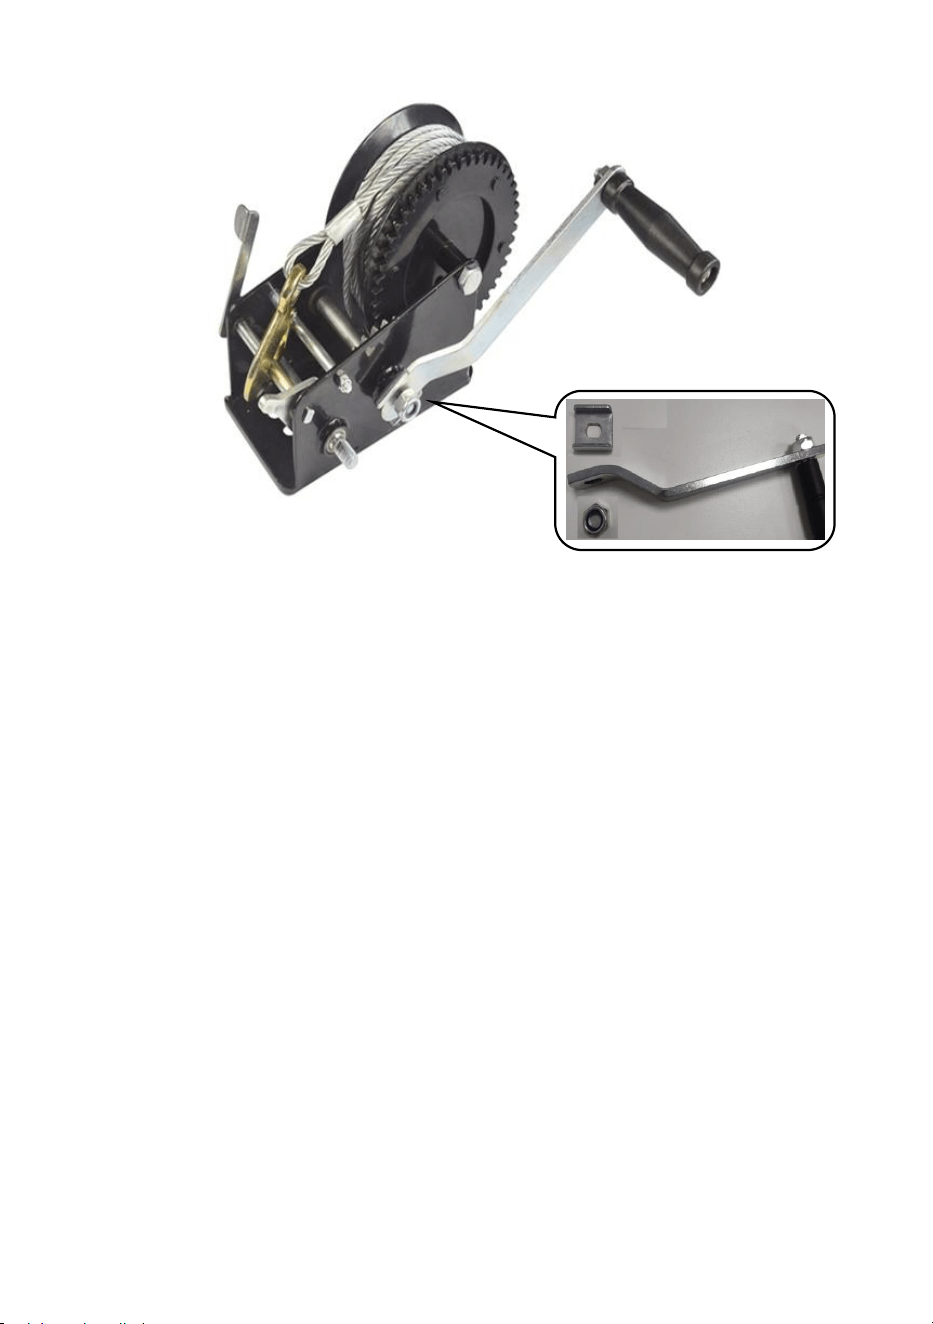
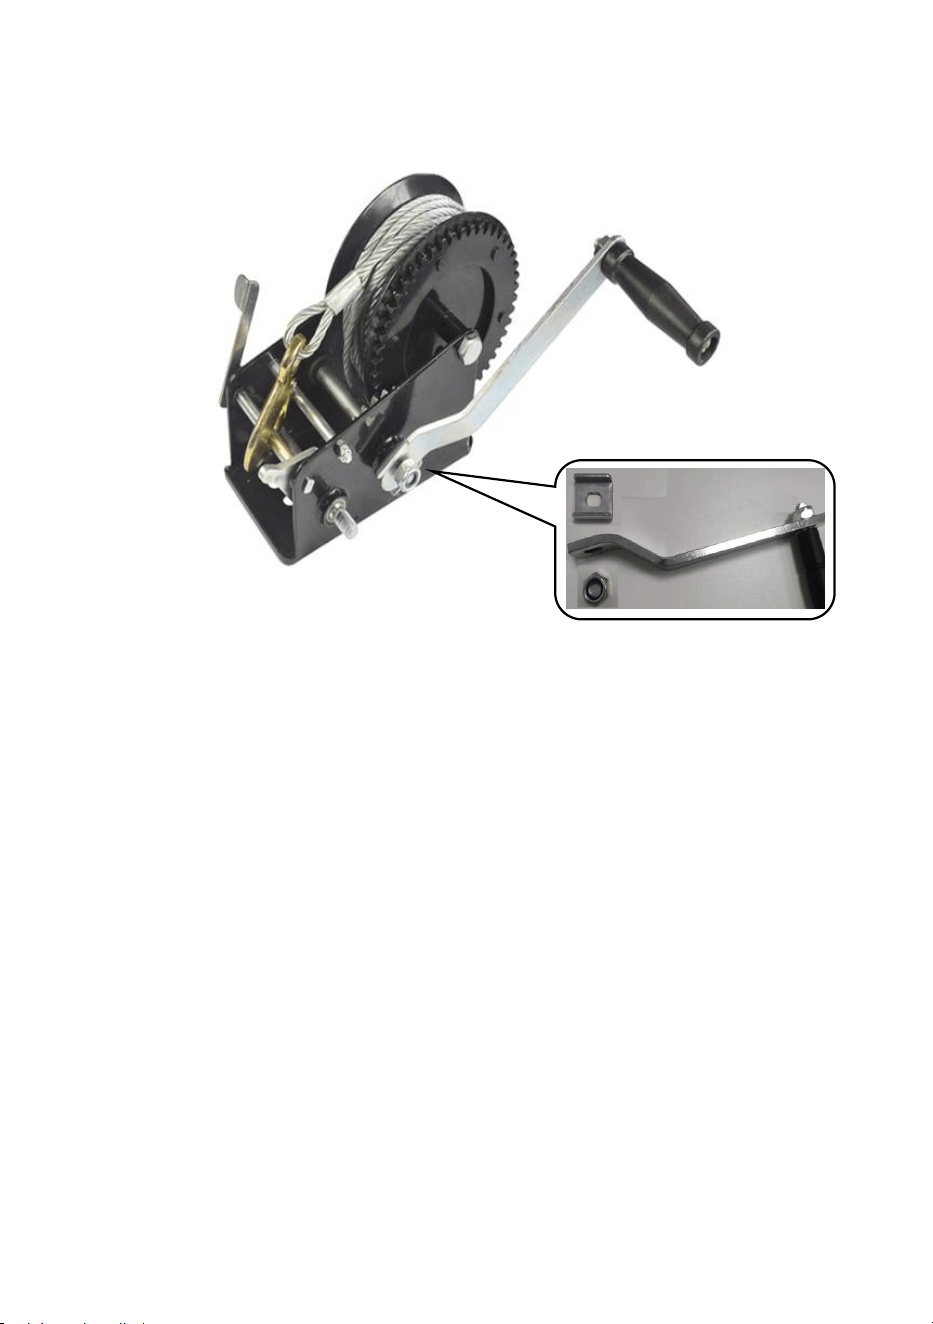
Step2. Install the handle on the shaft and lock the nut, as shown.
Model
KW1200
KW1600
KW2000B
KC800
KW3500/KC3500
a (mm)
50
44
50
44.5
44
b (mm)
85
79
85
74
104
- 7 -
Note: Model KW3500 and KC3500 are fast handles, just plug it in.
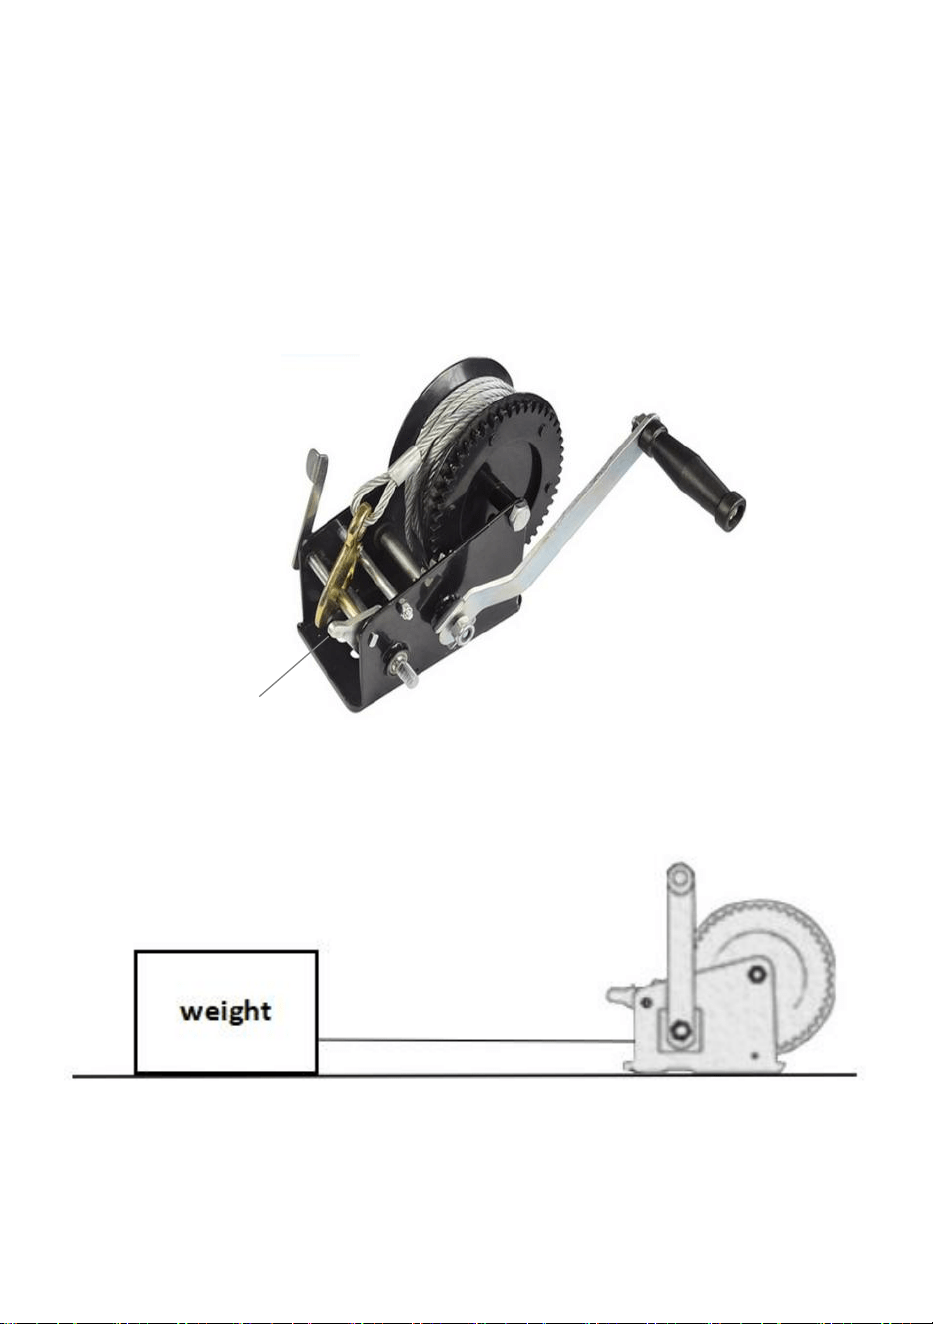
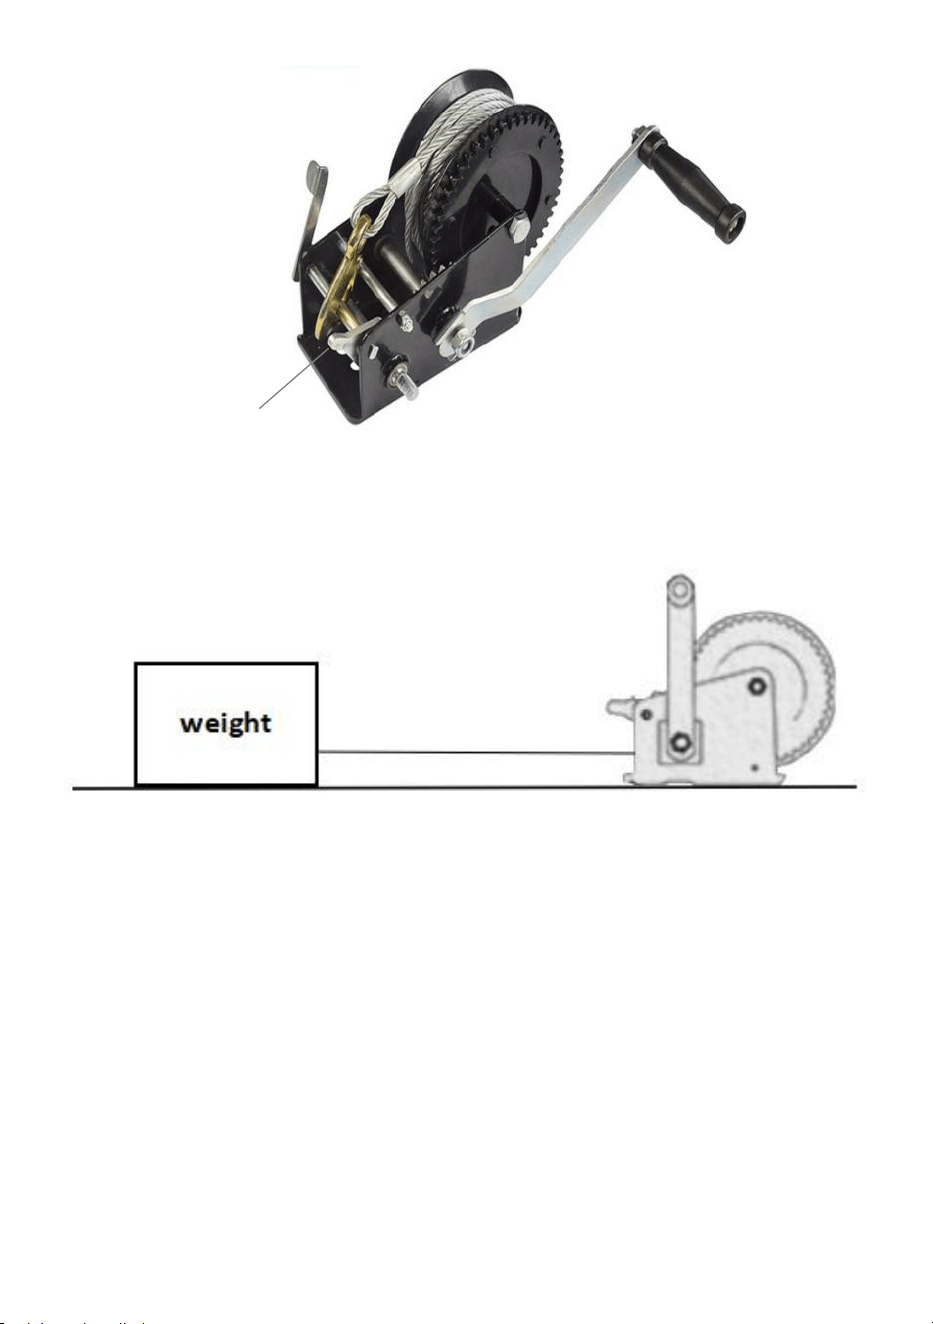
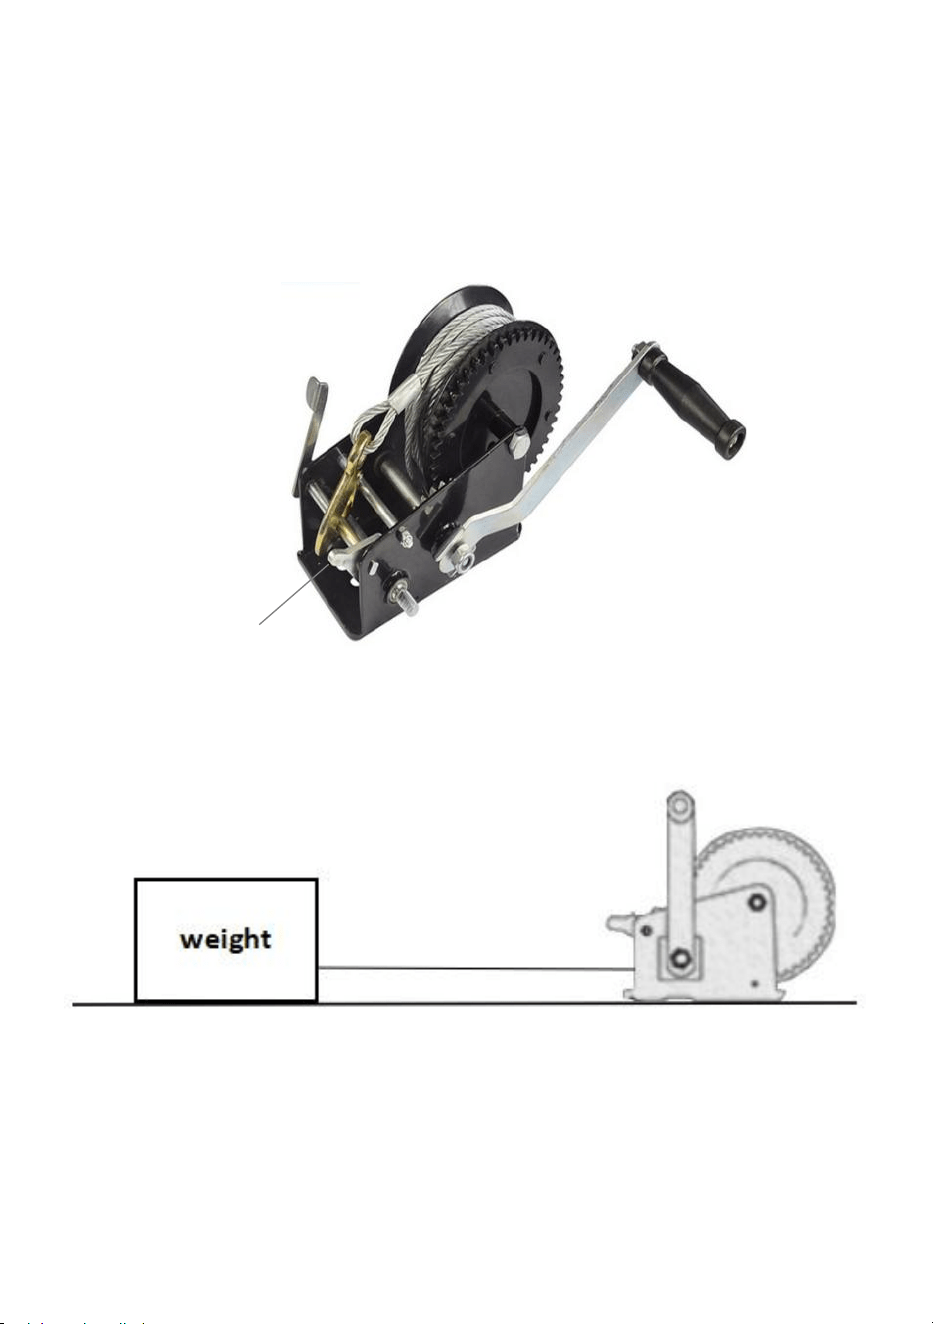
Step3. Set the ratchet switch to the middle position,Pull out the hook
and catch the weight.
Then turn the ratchet switch to a high position, Turn the handle
slowly clockwise. Pull the weight to the desired position.
Note: The ratchet switch operation is described below.
Ratchet Switch

- 8 -
Winding/unwinding the cable without load
1. Place the ratchet lever in the center position.
2. The cable reel now moves freely in both directions.
3. Pull the cable at the fixed hook until the hook can be attached to
the load to be moved.
4. Wind back the excessive cable by turning the crank clockwise.
Winding up the cable under load (towing, loading)
1.Hold the crank firmly and push gently to relieve the ratchet lever
2.Place the ratchet lever in position.
3.Turn the crank clockwise to evenly wind up the steel cable.
Unwinding the cable under load (lowering, unloading)
1.Hold the crank firmly and push gently to relieve the ratchet lever.
2.Place the ratchet lever in position.
3.The cable should be fully retracted again after use
Ratchet switch
1.There are 3 positions for the ratchet switch: The higher position is for
pulling, the lower position is for releasing, and the middle position is for
both pulling and releasing, but it can only be used when the winch is
loaded. Hold the crank handle tightly if you want to change the switch
position.
2.Before using, install the winch on a firm and flat surface. To install it, put
the ratchet switch in the middle position and pull the cable out until the
holes on the bottom of the base are visible. Then use at least 3 sets of 3/8
inch bolts and locking nuts, in a triangular pattern, to affix the base to the
surface. Use an extra metal or hardwood board when necessary.
3. Then install the crank handle to the axis bolt with nut.
4. Put the ratchet switch in the higher position and turn the crank handle
clockwise to pull. Place the ratchet switch in the lower position and turn the
crank handle counterclockwise to release.

- 9 -
5. When finished, attach the hook to the paw bushing。
MAINTENANCE
1. Follow the instructions for lubricating periodically
Lubricate the cable and hook regularly with slight grease.
Grease the gears every 6 months. Use any good quality waterproof
grease.
2. Inspect periodically all parts, steel cables, accessories and replace them
if damaged or used.
3. Have damaged parts replaced by an authorized service center.
4. Check the nuts periodically and tighten them if they are loose.
5. Product must be stored in a dry location. Always lock up product and
keep them out of reach of children.
6. Keep the product properly maintained and clean for a better and safer
performance.
7. Keep handles dry, clean and free from oil and grease.

- 10 -
Address: Baoshanqu Shuangchenglu 803long 11hao 1602A-1609shi
Shanghai
Imported to AUS: SIHAO PTY LTD, 1 ROKEVA STREETEASTWOOD
NSW 2122 Australia
Imported to USA: Sanven Technology Ltd, Suite 250, 9166 Anaheim
Place, Rancho Cucamonga, CA 91730
REP
EC
SHUNSHUN GmbH
Römeräcker 9 Z2021, 76351
Linkenheim-Hochstetten, Germany
REP
UK
Pooledas Group Ltd
Unit 5 Albert Edward House, The
Pavilions Preston, United Kingdom
Made In China


- 12 -
Technique Assistance et certificat de garantie électronique
www.vevor.com/support
TREUIL MAIN
MANUEL D'UTILISATION
Modèle : KW1200, KW1600, KW2000B,
KW3500, KC800, KC3500
We continue to be committed to provide you tools with competitive price.
"Save Half", "Half Price" or any other similar expressions used by us only represents an
estimate of savings you might benefit from buying certain tools with us compared to the major
top brands and does not necessarily mean to cover all categories of tools offered by us. You
are kindly reminded to verify carefully when you are placing an order with us if you are
actually saving half in comparison with the top major brands.

- 1 -
Have product questions? Need technical support? Please feel free to
contact us:
Technical Support and E-Warranty Certificate
www.vevor.com/support
NEED HELP? CONTACT US!
This is the original instruction, please read all manual instructions
carefully before operating. VEVOR reserves a clear interpretation of our
user manual. The appearance of the product shall be subject to the
product you received. Please forgive us that we won't inform you again if
there are any technology or software updates on our product.
HAND WINCH

- 2 -
GENERAL SAFETY RULES
Veuillez lire attentivement ce manuel
d'utilisation !
9. Ne surchargez jamais !
10. Ce treuil est conçu pour tirer, pas pour soulever !
11. Ne placez jamais votre main ou quoi que ce soit d'autre à proximité du
pignon, de la jante et du câble roulant. Portez toujours des gants
lorsque vous utilisez le treuil
12. N'essayez jamais de réparer ou de démonter le treuil en cas de
problème. Demandez de l'aide à un machiniste ou à un spécialiste.
13. Lors du remplacement du câble, assurez-vous que l'extrémité du câble
passe par les 4 trous sur le côté de la jante, et attachez un bouton ou
soudez l'extrémité du câble, pour éviter que le câble ne sorte.
14. Utiliser de la graisse pour axes et engrenages avant de déposer
longuement
15. Ne laissez pas les mineurs utiliser et faire fonctionner ce produit
16. N'utilisez pas le produit lorsque vous êtes fatigué ou sous l'influence
de l'alcool, de médicaments sur ordonnance ou de drogues.
9 . Sécurité au travail
- Utilisez vos deux mains pour transporter le produit.
- Utiliser un équipement de protection approprié selon
l'environnement de travail.
- Gardez toujours une bonne position et un bon équilibre.
- N'essayez pas de tirer des charges stationnaires ou de les
fixer.
- N'appliquez aucune force latérale sur la charge .
- Ne convient pas au levage de charges et ne transporte jamais
de personnes .
10 . Évitez de démarrer le produit par inadvertance . L'interrupteur à
cliquet doit toujours être complètement engagé.

- 3 -
PRUDENCE: Lisez attentivement les instructions et les procédures pour
des opérations en toute sécurité.
CONSERVEZ CES INSTRUCTIONS
MODEL AND PARAMETERS
Modèle
KW1200
KW1600
KW2000B
KW3500
KC800
KC3500
Capacité
de charge
maximale
1200
livres
1600
livres
2000
livres
3500
livres
800 livres
3500
livres
Rapport
de
démultipli
cation
4:1
4:1
4:1
4:1 et 8:1
3.1:1
4:1 et
8:1
Voie/Vites
se
2 voies _ /
1Vitesse
2 voies _ /
1Vitesse
2 voies _ /
1Vitesse
2 voies _ /
2 vitesses
2 voies _ /
1Vitesse
2 voies _
/ 2
vitesses
Type de
corde
Piège à
sangle en
polyester
Piège à
sangle en
polyester
Piège à
sangle en
polyester
Piège à
sangle en
polyester
Câble en
acier
Câble en
acier
Longueur
de corde
7M
10M
7M
10M
10M
10M
Couleurs)
Noir
Noir
Noir
Noir
Noir
Noir
- 4 -
STRUCTURE DIAGRAM
2. Crochet 2. Corde 3. Jante 4. Manivelle 5. Boulon d'axe 6. Base 7.
Interrupteur à cliquet
1
2
3
4
5
6
7

- 5 -
1. Crochet 2. Corde 3. Jante 4. Manivelle 5. Boulon d'axe 6. Base 7.
Interrupteur à cliquet
OPERATING INSTRUCTION
Préparation de l'installation :
6. Veuillez préparer un tapis ou un tapis pour protéger votre sol. Vous
devez répartir tous les accessoires.
7. Veuillez préparer des gants pour éviter d'être rayé par des pièces
pointues qui pourraient survenir lors de l'installation.
8. Merci d'ouvrir tous les cartons pour vérifier que les accessoires sont
complets et en bon état.
9. Si vous devez utiliser des outils électriques pour installer ce produit,
veuillez régler la vitesse sur basse vitesse à l'avance.
10. Lors de l'installation , veuillez aligner tous les trous et ne serrez pas
toutes les vis en premier ; sinon, cela pourrait rendre l’installation difficile.
Installation:
Étape 1. Percez des trous (Ф 11 mm ) dans les supports à installer,
en fonction des dimensions de la base du treuil s.
5
3
4
6
7
1
2
- 6 -
Installez le treuil sur les supports et verrouillez-le avec des boulons
et des écrous.
Dimension de la base du treuil :
Modèle
KW1200
KW1600
KW2000B
KC800
KW3500 /
KC3500
une (mm)
50
44
50
44,5
44
b (mm)
85
79
85
74
104
- 7 -
Étape 2. Installez la poignée sur l'arbre et verrouillez l'écrou, comme
illustré.
Remarque : les modèles KW3500 et KC3500 sont des poignées
rapides , il suffit de les brancher.
Étape 3. Réglez l'interrupteur à cliquet en position médiane, retirez le
crochet et attrapez le poids.
ensuite l'interrupteur à cliquet en position haute. Tournez lentement
la poignée dans le sens des aiguilles d'une montre . Tirez le poids
jusqu'à la position souhaitée .
Remarque : Le fonctionnement du commutateur à cliquet est décrit
ci-dessous .
- 8 -
Enrouler/dérouler le câble sans charge
5. Placez le levier à cliquet en position centrale.
6. L'enrouleur de câble se déplace désormais librement dans les
deux sens.
7. Tirez le câble au niveau du crochet fixe jusqu'à ce que le crochet
puisse être attaché à la charge à déplacer.
8. Enroulez l'excédent de câble en tournant la manivelle dans le sens
des aiguilles d'une montre.
Ratchet Switch

- 9 -
Enroulement du câble sous charge (remorquage, chargement)
1. Tenez fermement la manivelle et poussez doucement pour soulager
le levier à cliquet.
2.Placez le levier à cliquet en position.
3. Tournez la manivelle dans le sens des aiguilles d'une montre pour
enrouler uniformément le câble en acier.
Déroulage du câble sous charge (descente, déchargement)
1. Tenez fermement la manivelle et poussez doucement pour soulager
le levier à cliquet.
2.Placez le levier à cliquet en position.
3. Le câble doit être complètement rétracté après utilisation.
Interrupteur à cliquet
1. Il y a 3 positions pour l'interrupteur à cliquet : la position supérieure est
pour tirer, la position inférieure est pour relâcher et la position médiane est
pour tirer et relâcher, mais elle ne peut être utilisée que lorsque le treuil est
chargé. Tenez fermement la manivelle si vous souhaitez modifier la
position du commutateur.
2. Avant utilisation, installez le treuil sur une surface ferme et plane. Pour
l'installer, placez l'interrupteur à cliquet en position médiane et tirez le
câble jusqu'à ce que les trous au bas de la base soient visibles. Utilisez
ensuite au moins 3 jeux de boulons et d'écrous de blocage de 3/8 de
pouce, selon un motif triangulaire, pour fixer la base à la surface. Utilisez
une planche supplémentaire en métal ou en bois dur si nécessaire.
3. Installez ensuite la manivelle sur le boulon d'axe avec l'écrou.
4. Mettez l'interrupteur à cliquet en position haute et tournez la manivelle
dans le sens des aiguilles d'une montre pour tirer. Placez l'interrupteur à
cliquet en position inférieure et tournez la manivelle dans le sens inverse
des aiguilles d'une montre pour la relâcher.
5. Une fois terminé, fixez le crochet à la douille de patte.

- 10 -
MAINTENANCE
1. Suivez les instructions de lubrification périodiquement
Lubrifiez régulièrement le câble et le crochet avec une légère graisse.
Graissez les engrenages tous les 6 mois. Utilisez n’importe quelle graisse
imperméable de bonne qualité.
2. Inspectez périodiquement toutes les pièces, câbles en acier et
accessoires et remplacez-les s'ils sont endommagés ou utilisés.
3. Faites remplacer les pièces endommagées par un centre de service
agréé.
4. Vérifiez périodiquement les écrous et serrez-les s'ils sont desserrés.
5. Le produit doit être stocké dans un endroit sec. Conservez toujours les
produits sous clé et gardez -les hors de portée des enfants.
6. Gardez le produit correctement entretenu et propre pour une
performance meilleure et plus sûre.
7. Gardez les poignées sèches, propres et exemptes d'huile et de graisse.

- 11 -
Adresse : Baoshanqu Shuangchenglu 803long 11hao 1602A-1609shi
Shanghai
Importé en Australie : SIHAO PTY LTD, 1 ROKEVA STREETASTWOOD
NSW 2122 Australie
Importé aux États-Unis : Sanven Technology Ltd, Suite 250, 9166
Anaheim Place, Rancho Cucamonga, CA 91730
REP
EC
SHUNSHUN GmbH
Römeräcker 9 Z2021, 76351
Linkenheim-Hochstetten, Germany
REP
UK
Pooledas Group Ltd
Unit 5 Albert Edward House, The
Pavilions Preston, United Kingdom
Fabriqué en Chine


- 13 -
Technisch Support- und E-Garantiezertifikat
www.vevor.com/support
HANDWINDE
HANDBUCH
Modell: KW1200, KW1600, KW2000B,
KW3500, KC800, KC3500
We continue to be committed to provide you tools with competitive price.
"Save Half", "Half Price" or any other similar expressions used by us only represents an
estimate of savings you might benefit from buying certain tools with us compared to the major
top brands and does not necessarily mean to cover all categories of tools offered by us. You
are kindly reminded to verify carefully when you are placing an order with us if you are
actually saving half in comparison with the top major brands.

- 1 -
Have product questions? Need technical support? Please feel free to
contact us:
Technical Support and E-Warranty Certificate
www.vevor.com/support
NEED HELP? CONTACT US!
This is the original instruction, please read all manual instructions
carefully before operating. VEVOR reserves a clear interpretation of our
user manual. The appearance of the product shall be subject to the
product you received. Please forgive us that we won't inform you again if
there are any technology or software updates on our product.
HAND WINCH

- 2 -
GENERAL SAFETY RULES
Bitte lesen Sie diese Bedienungsanleitung
sorgfältig durch !
17. Niemals überlasten!
18. Diese Winde ist zum Ziehen gedacht, nicht zum Heben!
19. Halten Sie niemals Ihre Hand oder andere Gegenstände in die Nähe
des Zahnrads, der Felge und des Rollkabels. Tragen Sie bei der
Verwendung der Winde immer Handschuhe
20. Versuchen Sie niemals, die Winde zu reparieren oder zu zerlegen,
wenn ein Problem vorliegt. Bitten Sie einen Maschinisten oder
Fachmann um Hilfe.
21. Stellen Sie beim Ersetzen des Kabels sicher, dass das Ende des
Kabels durch die 4 Löcher an der Seite der Felge kommt , und
befestigen Sie einen Knopf oder schweißen Sie die Spitze des Kabels
an, um zu verhindern, dass das Kabel herauskommt.
22. Vor längerer Lagerung Fett für Achse und Getriebe verwenden
23. Erlauben Sie Minderjährigen nicht, dieses Produkt zu verwenden und
zu bedienen
24. Verwenden Sie das Produkt nicht, wenn Sie müde sind oder unter dem
Einfluss von Alkohol, verschreibungspflichtigen Medikamenten oder
Drogen stehen.
9 . Sicherheit bei der Arbeit
- Benutzen Sie beim Transport des Produkts beide Hände.
- Verwenden Sie entsprechend der Arbeitsumgebung geeignete
Schutzausrüstung.
- Achten Sie stets auf einen sicheren Stand und das
Gleichgewicht.
- Versuchen Sie nicht, stationäre Lasten zu ziehen oder zu
befestigen.
- Üben Sie keine seitliche Kraft auf die Last aus .
- Nicht zum Heben von Lasten und niemals zum Transport von

- 3 -
Personen geeignet .
10 . Vermeiden Sie ein unbeabsichtigtes Starten des Produkts . Der
Ratschenschalter sollte immer vollständig eingerastet sein.
VORSICHT: Lesen Sie die Anweisungen und Verfahren für einen sicheren
Betrieb sorgfältig durch.
ANLEITUNG AUFBEWAHREN
MODEL AND PARAMETERS
Modell
KW1200
KW1600
KW2000B
KW3500
KC800
KC3500
Maximale
Tragfähig
keit
1200
Pfund
1600
Pfund
2000
Pfund
3500
Pfund
800 Pfund
3500
Pfund
Übersetzu
ngsverhält
nis
4:1
4:1
4:1
4:1 und
8:1
3,1:1
4:1 und
8:1
Weg/Ges
chwindigk
eit
2 Wege _
/
1Geschwi
ndigkeit
2 Wege _
/
1Geschwi
ndigkeit
2 Wege _
/
1Geschwi
ndigkeit
2 Wege _
/ 2
Geschwin
digkeit
2 Wege _
/
1Geschwi
ndigkeit
2 Wege
_ / 2
Geschwi
ndigkeit
Seiltyp
Polyester
- S -Falle
Polyester
- S -Falle
Polyester
- S -Falle
Polyester
- S -Falle
Stahlkabel
Stahlkab
el
Seillänge
7M
10M
7M
10M
10M
10M
Farben)
Schwarz
Schwarz
Schwarz
Schwarz
Schwarz
Schwarz
- 4 -
STRUCTURE DIAGRAM
3. Haken 2. Seil 3. Felge 4. Kurbel 5. Achsbolzen 6. Basis 7.
Ratschenschalter
1
2
3
4
5
6
7
- 5 -
1. Haken 2. Seil 3. Felge 4. Kurbel 5. Achsbolzen 6. Basis 7.
Ratschenschalter
OPERATING INSTRUCTION
Installationsvorbereitung:
11. Bitte bereiten Sie einen Teppich oder eine Matte vor, um Ihren Boden
zu schützen. Sie müssen das gesamte Zubehör verteilen.
12. Bitte halten Sie Handschuhe bereit, um Kratzer durch scharfe Teile zu
vermeiden, die während der Installation auftreten können.
13. Bitte öffnen Sie alle Kartons, um zu überprüfen, ob das Zubehör
vollständig und in gutem Zustand ist.
14. Wenn Sie für die Installation dieses Produkts Elektrowerkzeuge
verwenden müssen, stellen Sie die Geschwindigkeit bitte im Voraus auf
eine niedrige Geschwindigkeit ein.
15. bei der Installation bitte alle Löcher aus und ziehen Sie nicht alle
Schrauben zuerst fest. Andernfalls kann die Installation erschwert werden.
Installation:
5
3
4
6
7
1
2
- 6 -
Schritt 1. Bohren Sie Löcher (Ö 11 mm ) in die zu installierenden
Halterungen, entsprechend den Abmessungen der Windenbasis .
Montieren Sie die Winde an den Halterungen und befestigen Sie sie
mit Schrauben und Muttern.
Abmessungen der Windenbasis:
Modell
KW1200
KW1600
KW2000B
KC800
KW3500 /
KC3500
a (mm)
50
44
50
44,5
44
b (mm)
85
79
85
74
104
- 7 -
Schritt 2. Bringen Sie den Griff am Schaft an und kontern Sie die
Mutter wie abgebildet.
Hinweis: Bei den Modellen KW3500 und KC3500 handelt es sich um
Schnellgriffe , die einfach angeschlossen werden müssen.
Schritt 3. Stellen Sie den Ratschenschalter auf die mittlere Position,
ziehen Sie den Haken heraus und fangen Sie das Gewicht auf.
dann den Ratschenschalter in eine hohe Position und drehen Sie
den Griff langsam im Uhrzeigersinn . Ziehen Sie das Gewicht in die
gewünschte Position .
Hinweis: Die Funktionsweise des Ratschenschalters wird
nachstehend beschrieben .

- 8 -
Auf-/Abwickeln des Kabels ohne Last
9. Bringen Sie den Ratschenhebel in die mittlere Position.
10. Die Kabeltrommel bewegt sich nun frei in beide Richtungen.
11. Ziehen Sie am Seil am festen Haken, bis der Haken an der zu
bewegenden Last befestigt werden kann.
12. Wickeln Sie das überschüssige Kabel zurück, indem Sie die
Kurbel im Uhrzeigersinn drehen.
Ratchet Switch

- 9 -
Aufwickeln des Kabels unter Last (Abschleppen, Laden)
1. Halten Sie die Kurbel fest und drücken Sie leicht, um den
Ratschenhebel zu entlasten
2. Bringen Sie den Ratschenhebel in Position.
3.Drehen Sie die Kurbel im Uhrzeigersinn, um das Stahlseil
gleichmäßig aufzuwickeln.
Abwickeln des Kabels unter Last (Absenken, Entladen)
1. Halten Sie die Kurbel fest und drücken Sie leicht, um den
Ratschenhebel zu entlasten.
2. Bringen Sie den Ratschenhebel in Position.
3. Das Kabel sollte nach Gebrauch wieder vollständig eingezogen
werden
Ratschenschalter
1. Es gibt 3 Positionen für den Ratschenschalter: Die höhere Position dient
zum Ziehen, die niedrigere Position zum Lösen und die mittlere Position
dient sowohl zum Ziehen als auch zum Lösen, kann jedoch nur verwendet
werden, wenn die Winde belastet ist. Halten Sie die Kurbel fest, wenn Sie
die Schaltposition ändern möchten.
2. Installieren Sie die Winde vor der Verwendung auf einer festen und
ebenen Oberfläche. Um es zu installieren, stellen Sie den
Ratschenschalter in die mittlere Position und ziehen Sie das Kabel heraus,
bis die Löcher an der Unterseite der Basis sichtbar sind. Verwenden Sie
dann mindestens drei Sätze 3/8-Zoll-Schrauben und Sicherungsmuttern in
einem dreieckigen Muster, um die Basis an der Oberfläche zu befestigen.
Verwenden Sie bei Bedarf ein zusätzliches Metall- oder Hartholzbrett.
3. Befestigen Sie dann die Kurbel mit der Mutter an der Achsschraube.
4. Stellen Sie den Ratschenschalter in die höhere Position und drehen Sie
die Kurbel im Uhrzeigersinn, um zu ziehen. Bringen Sie den
Ratschenschalter in die untere Position und drehen Sie die Kurbel zum
Lösen gegen den Uhrzeigersinn.

- 10 -
5. Wenn Sie fertig sind, befestigen Sie den Haken an der Pfotenbuchse.
MAINTENANCE
1. Befolgen Sie die Anweisungen zum regelmäßigen Schmieren
Schmieren Sie das Kabel und den Haken regelmäßig mit leichtem Fett.
Schmieren Sie die Zahnräder alle 6 Monate. Verwenden Sie wasserfestes
Fett von guter Qualität.
2. Überprüfen Sie regelmäßig alle Teile, Stahlkabel und Zubehörteile und
ersetzen Sie diese, wenn sie beschädigt oder abgenutzt sind.
3. Lassen Sie beschädigte Teile von einem autorisierten Servicecenter
ersetzen.
4. Überprüfen Sie die Muttern regelmäßig und ziehen Sie sie fest, wenn sie
locker sind.
5. Das Produkt muss an einem trockenen Ort gelagert werden. Schließen
Sie das Produkt immer ab und bewahren Sie es außerhalb der Reichweite
von Kindern auf.
6. Halten Sie das Produkt ordnungsgemäß gewartet und sauber, um eine
bessere und sicherere Leistung zu erzielen.
7. Halten Sie die Griffe trocken, sauber und frei von Öl und Fett.

- 11 -
Adresse: Baoshanqu Shuangchenglu 803long 11hao 1602A-1609shi
Shanghai
Importiert nach AUS: SIHAO PTY LTD, 1 ROKEVA STREETEASTWOOD
NSW 2122 Australien
In die USA importiert: Sanven Technology Ltd, Suite 250, 9166 Anaheim
Place, Rancho Cucamonga, CA 91730
REP
EC
SHUNSHUN GmbH
Römeräcker 9 Z2021, 76351
Linkenheim-Hochstetten, Germany
REP
UK
Pooledas Group Ltd
Unit 5 Albert Edward House, The
Pavilions Preston, United Kingdom
In China hergestellt


- 13 -
Tecnico Supporto e certificato di garanzia elettronica
www.vevor.com/support
VERRICELLO A MANO
MANUALE UTENTE
Modello: KW1200, KW1600, KW2000B,
KW3500, KC800, KC3500
We continue to be committed to provide you tools with competitive price.
"Save Half", "Half Price" or any other similar expressions used by us only represents an
estimate of savings you might benefit from buying certain tools with us compared to the major
top brands and does not necessarily mean to cover all categories of tools offered by us. You
are kindly reminded to verify carefully when you are placing an order with us if you are
actually saving half in comparison with the top major brands.

- 1 -
Have product questions? Need technical support? Please feel free to
contact us:
Technical Support and E-Warranty Certificate
www.vevor.com/support
NEED HELP? CONTACT US!
This is the original instruction, please read all manual instructions
carefully before operating. VEVOR reserves a clear interpretation of our
user manual. The appearance of the product shall be subject to the
product you received. Please forgive us that we won't inform you again if
there are any technology or software updates on our product.
HAND WINCH

- 2 -
GENERAL SAFETY RULES
Si prega di leggere attentamente questo manuale
utente !
25. Non sovraccaricare mai!
26. Questo argano è progettato per tirare, non per sollevare!
27. Non avvicinare mai le mani o qualsiasi altra cosa all'ingranaggio, al
cerchio e al cavo avvolgibile. Indossare sempre i guanti quando si
utilizza il verricello
28. Non tentare mai di riparare o smontare il verricello in caso di problemi.
Chiedi aiuto a un macchinista o a uno specialista.
29. Quando si sostituisce il cavo, assicurarsi che l'estremità del cavo passi
attraverso i 4 fori sul lato del cerchio e legare un pomello o saldare la
punta del cavo, per evitare che il cavo fuoriesca.
30. Utilizzare grasso per assi e ingranaggi prima di depositarli per lungo
tempo
31. Non consentire ai minori di utilizzare e utilizzare questo prodotto
32. Non utilizzare il prodotto quando si è stanchi o sotto l'effetto di alcol,
medicinali o droghe.
9 . Sicurezza sul lavoro
- Utilizzare entrambe le mani durante il trasporto del prodotto.
- Utilizzare dispositivi di protezione adeguati in base all'ambiente
di lavoro.
- Mantenere sempre la posizione corretta e l'equilibrio.
- Non tentare di tirare o fissare carichi fissi.
- Non applicare alcuna forza laterale sul carico .
- Non adatto al sollevamento di carichi e mai al trasporto di
persone .
10 . Evitare di avviare il prodotto involontariamente . L'interruttore a
cricchetto deve essere sempre completamente inserito.
ATTENZIONE: Leggere attentamente le istruzioni e le procedure per

- 3 -
operare in sicurezza.
CONSERVA QUESTE ISTRUZIONI
MODEL AND PARAMETERS
Modello
KW1200
KW1600
KW2000B
KW3500
KC800
KC3500
Capacità
di carico
massima
1200
libbre
1600
libbre
2000
libbre
3500
libbre
800 libbre
3500
libbre
Rapporto
di cambio
4:1
4:1
4:1
4:1 e 8:1
3.1:1
4:1 e 8:1
Modo/Vel
ocità
2 vie _ / 1
velocità
2 vie _ / 1
velocità
2 vie _ / 1
velocità
2 vie _ / 2
velocità
2 vie _ / 1
velocità
2 vie _ /
2
velocità
Tipo di
corda
Trappola
in
poliestere
S
Trappola
in
poliestere
S
Trappola
in
poliestere
S
Trappola
in
poliestere
S
Cavo
d'acciaio
Cavo
d'acciaio
Lunghezz
a della
corda
7M
10 milioni
7M
10 milioni
10 milioni
10
milioni
Colori)
Nero
Nero
Nero
Nero
Nero
Nero
- 4 -
STRUCTURE DIAGRAM
4. Gancio 2. Corda 3. Cerchio 4. Manovella 5. Bullone dell'asse 6.
Base 7. Interruttore a cricchetto
1
2
3
4
5
6
7
5
3
4
6
7
1
2

- 5 -
1. Gancio 2. Corda 3. Cerchio 4. Manovella 5. Bullone dell'asse 6.
Base 7. Interruttore a cricchetto
OPERATING INSTRUCTION
Preparazione all'installazione:
16. Si prega di preparare un tappeto o un tappetino per proteggere il
pavimento. Devi distribuire tutti gli accessori.
17. Si prega di preparare i guanti per evitare di graffiarsi con parti taglienti
che potrebbero verificarsi durante l'installazione.
18. Si prega di aprire tutte le scatole per verificare che gli accessori siano
completi e in buone condizioni.
19. Se è necessario utilizzare utensili elettrici per installare questo
prodotto, impostare anticipatamente la velocità su bassa velocità.
20. Durante l'installazione , allineare tutti i fori e non serrare prima tutte le
viti; in caso contrario, potrebbe rendere difficile l'installazione.
Installazione:
Passo 1. Praticare dei fori (Ф 11mm ) nelle staffe da installare, in
base alla dimensione della base dell'argano .
Installare l'argano sulle staffe e bloccarlo con bulloni e dadi.

- 6 -
Dimensione base dell'argano:
Modello
KW1200
KW1600
KW2000B
KC800
KW3500 /
KC3500
un (mm)
50
44
50
44.5
44
b (mm)
85
79
85
74
104

- 7 -
Passo 2. Installare la maniglia sull'albero e bloccare il dado, come
mostrato.
Nota: i modelli KW3500 e KC3500 sono impugnature veloci , basta
collegarli.
Passaggio 3. Impostare l'interruttore a cricchetto in posizione
centrale, estrarre il gancio e afferrare il peso.
Quindi ruotare l'interruttore a cricchetto in posizione alta, ruotare
lentamente la maniglia in senso orario . Tirare il peso nella posizione
desiderata .
Nota: il funzionamento dell'interruttore a cricchetto è descritto di
seguito .

- 8 -
Avvolgere/svolgere il cavo senza carico
13. Posizionare la leva del cricchetto in posizione centrale.
14. L'avvolgicavo ora si muove liberamente in entrambe le direzioni.
15. Tirare il cavo in corrispondenza del gancio fisso fino a quando è
possibile agganciare il gancio al carico da spostare.
16. Riavvolgere il cavo in eccesso ruotando la manovella in senso
orario.
Ratchet Switch

- 9 -
Avvolgimento del cavo sotto carico (traino, carico)
1.Tenere saldamente la manovella e spingere delicatamente per
rilasciare la leva del cricchetto
2.Posizionare la leva del cricchetto in posizione.
3.Ruotare la manovella in senso orario per avvolgere uniformemente il
cavo d'acciaio.
Svolgimento del cavo sotto carico (abbassamento, scarico)
1.Tenere saldamente la manovella e spingere delicatamente per
rilasciare la leva del cricchetto.
2.Posizionare la leva del cricchetto in posizione.
3.Il cavo deve essere completamente retratto dopo l'uso
Interruttore a cricchetto
1. Sono disponibili 3 posizioni per l'interruttore a cricchetto: la posizione più
alta serve per tirare, la posizione più bassa è per rilasciare e la posizione
centrale serve sia per tirare che per rilasciare, ma può essere utilizzata
solo quando l'argano è carico. Tenere saldamente la manovella se si
desidera modificare la posizione dell'interruttore.
2. Prima dell'uso, installare il verricello su una superficie solida e piana.
Per installarlo, posizionare l'interruttore a cricchetto in posizione centrale
ed estrarre il cavo finché non sono visibili i fori sul fondo della base. Quindi
utilizzare almeno 3 set di bulloni da 3/8 di pollice e dadi di bloccaggio,
secondo uno schema triangolare, per fissare la base alla superficie. Usa
una tavola extra di metallo o legno duro quando necessario.
3. Quindi installare la manovella sul bullone dell'asse con il dado.
4. Posizionare l'interruttore a cricchetto nella posizione più alta e ruotare la
manovella in senso orario per tirare. Posizionare l'interruttore a cricchetto
nella posizione inferiore e ruotare la manovella in senso antiorario per
rilasciarlo.
5. Al termine, collegare il gancio alla boccola della zampa.

- 10 -
MAINTENANCE
1. Seguire periodicamente le istruzioni per la lubrificazione
Lubrificare regolarmente il cavo e il gancio con un leggero grasso.
Ingrassare gli ingranaggi ogni 6 mesi. Utilizzare qualsiasi grasso
impermeabile di buona qualità.
2. Ispezionare periodicamente tutte le parti, i cavi in acciaio , gli accessori
e sostituirli se danneggiati o utilizzati.
3. Far sostituire le parti danneggiate da un centro di assistenza
autorizzato.
4. Controllare periodicamente i dadi e serrarli se sono allentati.
5. Il prodotto deve essere conservato in un luogo asciutto. Chiudere
sempre il prodotto e tenerlo fuori dalla portata dei bambini.
6. Mantenere il prodotto adeguatamente mantenuto e pulito per prestazioni
migliori e più sicure.
7. Mantenere le maniglie asciutte, pulite e prive di olio e grasso.

- 11 -
Indirizzo: Baoshanqu Shuangchenglu 803long 11hao 1602A-1609shi
Shanghai
Importato in AUS: SIHAO PTY LTD, 1 ROKEVA STREETEASTWOOD
NSW 2122 Australia
Importato negli Stati Uniti: Sanven Technology Ltd, Suite 250, 9166
Anaheim Place, Rancho Cucamonga, CA 91730
REP
EC
SHUNSHUN GmbH
Römeräcker 9 Z2021, 76351
Linkenheim-Hochstetten, Germany
REP
UK
Pooledas Group Ltd
Unit 5 Albert Edward House, The
Pavilions Preston, United Kingdom
Made in China


- 13 -
Técnico Certificado de soporte y garantía electrónica
www.vevor.com/support
CABRESTANTE DE MANO
MANUAL DE USUARIO
Modelo: KW1200, KW1600, KW2000B,
KW3500, KC800, KC3500
We continue to be committed to provide you tools with competitive price.
"Save Half", "Half Price" or any other similar expressions used by us only represents an
estimate of savings you might benefit from buying certain tools with us compared to the major
top brands and does not necessarily mean to cover all categories of tools offered by us. You
are kindly reminded to verify carefully when you are placing an order with us if you are
actually saving half in comparison with the top major brands.
- 1 -
Have product questions? Need technical support? Please feel free to
contact us:
Technical Support and E-Warranty Certificate
www.vevor.com/support
NEED HELP? CONTACT US!
This is the original instruction, please read all manual instructions
carefully before operating. VEVOR reserves a clear interpretation of our
user manual. The appearance of the product shall be subject to the
product you received. Please forgive us that we won't inform you again if
there are any technology or software updates on our product.
HAND WINCH

- 2 -
GENERAL SAFETY RULES
¡Lea atentamente este manual de usuario !
33. ¡Nunca sobrecargues!
34. ¡Este cabrestante está diseñado para tirar, no para levantar!
35. Nunca acerque la mano ni ningún otro objeto al engranaje, a la llanta
ni al cable rodante. Utilice siempre guantes cuando utilice el
cabrestante.
36. Nunca intente reparar o desmontar el cabrestante cuando haya un
problema. Pida ayuda a un maquinista o especialista.
37. Al reemplazar el cable, asegúrese de que el extremo del cable pase
por los 4 orificios en el costado del borde y ate una perilla o suelde la
punta del cable para evitar que el cable se salga.
38. Utilice grasa para ejes y engranajes antes de depositar por mucho
tiempo.
39. No permita que menores usen y operen este producto.
40. No utilice el producto cuando esté cansado o bajo la influencia del
alcohol, medicamentos recetados o drogas.
9 . Seguridad en el trabajo
- Utilice ambas manos al transportar el producto.
- Utilizar equipos de protección adecuados según el entorno de
trabajo.
- Mantener en todo momento el equilibrio y el equilibrio.
- No intentar tirar de cargas estacionarias o fijarlas.
- No aplicar ninguna fuerza lateral sobre la carga .
- No para levantar cargas y nunca para transportar personas .
10 . Evite poner en marcha el producto sin querer . El interruptor de
trinquete siempre debe estar completamente activado.
PRECAUCIÓN: Lea atentamente las instrucciones y procedimientos para
operaciones seguras.
GUARDA ESTAS INSTRUCCIONES

- 3 -
MODEL AND PARAMETERS
Modelo
KW1200
KW1600
KW2000B
KW3500
KC800
KC3500
Capacida
d de
carga
máxima
1200
libras
1600
libras
2000
libras
3500
libras
800 libras
3500
libras
Relación
de
transmisió
n
4:1
4:1
4:1
4:1 y 8:1
3.1:1
4:1 y 8:1
Camino/V
elocidad
2 vías _ /
1
velocidad
2 vías _ /
1
velocidad
2 vías _ /
1
velocidad
2 vías _ /
2
velocidad
es
2 vías _ /
1
velocidad
2 vías _ /
2
velocida
des
Tipo de
cuerda
Trampa S
de
poliéster
Trampa S
de
poliéster
Trampa S
de
poliéster
Trampa S
de
poliéster
Cable de
acero
Cable de
acero
Longitud
de la
cuerda
7M
10M
7M
10M
10M
10M
Colores)
Negro
Negro
Negro
Negro
Negro
Negro

- 4 -
STRUCTURE DIAGRAM
5. Gancho 2. Cuerda 3. Borde 4.Manivela 5.Perno del eje 6. Base
7.Interruptor de trinquete
1.Gancho 2. Cuerda 3. Borde 4.Manivela 5.Perno del eje 6. Base
1
2
3
4
5
6
7
5
3
4
6
7
1
2
- 5 -
7.Interruptor de trinquete
OPERATING INSTRUCTION
Preparación de la instalación:
21. Prepare una alfombra o tapete para proteger su piso. Necesitas
distribuir todos los accesorios.
22. Prepare guantes para evitar rayarse con piezas afiladas que puedan
ocurrir durante la instalación.
23. Por favor abra todas las cajas para comprobar que los accesorios
están completos y en buen estado.
24. Si necesita utilizar herramientas eléctricas para instalar este producto,
configure la velocidad en baja de antemano.
25. Al realizar la instalación , alinee todos los orificios y no apriete todos
los tornillos primero; de lo contrario, podría dificultar la instalación.
Instalación:
Paso 1. Taladre orificios (Ф 11 mm ) en los soportes a instalar, de
acuerdo con las dimensiones de la base del cabrestante s.
Instale el cabrestante en los soportes y fíjelo con pernos y tuercas.
- 6 -
Dimensión de la base del cabrestante:
Paso 2. Instale la manija en el eje y bloquee la tuerca, como se
muestra.
Modelo
KW1200
KW1600
KW2000B
KC800
KW3500 /
KC3500
un (mm)
50
44
50
44,5
44
segundo
(mm)
85
79
85
74
104
- 7 -
Nota: Los modelos KW3500 y KC3500 son mangos rápidos ,
simplemente conéctelos.
Paso 3. Coloque el interruptor de trinquete en la posición media,
saque el gancho y atrape el peso.
Luego gire el interruptor de trinquete a una posición alta. Gire la
manija lentamente en el sentido de las agujas del reloj . Tire del
peso hasta la posición deseada .
Nota: El funcionamiento del interruptor de trinquete se describe a
continuación .

- 8 -
Enrollar/desenrollar el cable sin carga
17. Coloque la palanca del trinquete en la posición central.
18. El carrete de cable ahora se mueve libremente en ambas
direcciones.
19. Tire del cable por el gancho fijo hasta que el gancho pueda fijarse
a la carga que se va a mover.
20. Enrolle el cable sobrante girando la manivela en el sentido de las
agujas del reloj.
Ratchet Switch

- 9 -
Enrollar el cable bajo carga (remolcar, cargar)
1. Sostenga la manivela firmemente y empuje suavemente para
aliviar la palanca del trinquete.
2.Coloque la palanca del trinquete en su posición.
3.Gire la manivela en el sentido de las agujas del reloj para enrollar
uniformemente el cable de acero.
Desenrollar el cable bajo carga (bajar, descargar)
1.Sostenga la manivela firmemente y empuje suavemente para aliviar
la palanca del trinquete.
2.Coloque la palanca del trinquete en su posición.
3. El cable debe retraerse completamente nuevamente después de su
uso.
interruptor de trinquete
1.Hay 3 posiciones para el interruptor de trinquete: la posición más alta es
para tirar, la posición más baja es para soltar y la posición media es para
tirar y soltar, pero solo se puede usar cuando el cabrestante está cargado.
Sujete firmemente la manivela si desea cambiar la posición del interruptor.
2.Antes de usarlo, instale el cabrestante en una superficie firme y plana.
Para instalarlo, coloque el interruptor de trinquete en la posición media y
extraiga el cable hasta que los orificios en la parte inferior de la base sean
visibles. Luego use al menos 3 juegos de pernos de 3/8 de pulgada y
tuercas de seguridad, en un patrón triangular, para fijar la base a la
superficie. Utilice una tabla adicional de metal o madera cuando sea
necesario.
3. Luego instale la manivela en el perno del eje con tuerca.
4. Coloque el interruptor de trinquete en la posición más alta y gire la
manivela en el sentido de las agujas del reloj para tirar. Coloque el
interruptor de trinquete en la posición inferior y gire la manivela en sentido
antihorario para soltarlo.

- 10 -
5. Cuando termine, fije el gancho al casquillo de la pata.
MAINTENANCE
1. Siga las instrucciones para lubricar periódicamente.
Lubrique el cable y el gancho periódicamente con un poco de grasa.
Engrase los engranajes cada 6 meses. Utilice cualquier grasa
impermeable de buena calidad.
2. Inspeccione periódicamente todas las piezas, cables de acero y
accesorios y reemplácelos si están dañados o usados.
3. Haga reemplazar las piezas dañadas por un centro de servicio
autorizado.
4. Revise las tuercas periódicamente y apriételas si están flojas.
5. El producto debe almacenarse en un lugar seco. Guarde siempre el
producto bajo llave y manténgalo fuera del alcance de los niños.
6. Mantenga el producto correctamente mantenido y limpio para un mejor
y más seguro rendimiento.
7. Mantenga los mangos secos, limpios y libres de aceite y grasa.

- 11 -
Dirección: Baoshanqu Shuangchenglu 803long 11hao 1602A-1609shi
Shanghai
Importado a AUS: SIHAO PTY LTD, 1 ROKEVA STREETEASTWOOD
NSW 2122 Australia
Importado a EE. UU.: Sanven Technology Ltd, Suite 250, 9166 Anaheim
Place, Rancho Cucamonga, CA 91730
REP
EC
SHUNSHUN GmbH
Römeräcker 9 Z2021, 76351
Linkenheim-Hochstetten, Germany
REP
UK
Pooledas Group Ltd
Unit 5 Albert Edward House, The
Pavilions Preston, United Kingdom
Hecho en china


- 13 -
Techniczny Certyfikat wsparcia i e-gwarancji
www.vevor.com/support
WCIĄGARKA RĘCZNA
INSTRUKCJA OBSŁUGI
Model: KW1200, KW1600, KW2000B,
KW3500, KC800, KC3500
We continue to be committed to provide you tools with competitive price.
"Save Half", "Half Price" or any other similar expressions used by us only represents an
estimate of savings you might benefit from buying certain tools with us compared to the major
top brands and does not necessarily mean to cover all categories of tools offered by us. You
are kindly reminded to verify carefully when you are placing an order with us if you are
actually saving half in comparison with the top major brands.

- 1 -
Have product questions? Need technical support? Please feel free to
contact us:
Technical Support and E-Warranty Certificate
www.vevor.com/support
NEED HELP? CONTACT US!
This is the original instruction, please read all manual instructions
carefully before operating. VEVOR reserves a clear interpretation of our
user manual. The appearance of the product shall be subject to the
product you received. Please forgive us that we won't inform you again if
there are any technology or software updates on our product.
HAND WINCH

- 2 -
GENERAL SAFETY RULES
Przeczytaj uważnie niniejszą instrukcję obsługi !
41. Nigdy nie przeciążaj!
42. Ta wciągarka jest przeznaczona do ciągnięcia, a nie do podnoszenia!
43. Nigdy nie zbliżaj dłoni ani niczego innego do przekładni, obręczy i linki.
Podczas obsługi wyciągarki należy zawsze nosić rękawiczki
44. Nigdy nie próbuj naprawiać ani demontować wciągarki, gdy występuje
problem. Poproś o pomoc mechanika lub specjalistę.
45. Podczas wymiany linki upewnij się, że koniec linki przechodzi przez 4
otwory z boku obręczy i zawiąż gałkę lub przyspawaj końcówkę linki,
aby zapobiec jej wypadaniu.
46. Przed osadzeniem na dłuższy czas należy zastosować smar do osi i
przekładni
47. Nie pozwalaj osobom niepełnoletnim używać i obsługiwać tego
produktu
48. Nie używaj produktu będąc zmęczonym, pod wpływem alkoholu,
leków na receptę lub narkotyków.
9 . Bezpieczeństwo w pracy
- Podczas przenoszenia produktu używaj obu rąk.
- Stosować odpowiedni sprzęt ochronny, dostosowany do
środowiska pracy.
- Zawsze utrzymuj właściwą postawę i równowagę.
- Nie próbuj ciągnąć nieruchomych ładunków ani ich mocować.
- Nie przykładaj żadnej siły bocznej do ładunku .
- Nie do podnoszenia ciężarów i Nigdy nie transportuje osób .
10 . Należy unikać niezamierzonego uruchomienia produktu .
Przełącznik zapadkowy powinien być zawsze całkowicie włączony.
OSTROŻNOŚĆ: Przeczytaj uważnie instrukcje i procedury dotyczące
bezpiecznej obsługi.
ZACHOWAJ TE INSTRUKCJE

- 3 -
MODEL AND PARAMETERS
Model
KW1200
KW1600
KW2000B
KW3500
KC800
KC3500
Maksymal
na
ładownoś
ć
1200
funtów
1600
funtów
2000
funtów
3500
funtów
800
funtów
3500
funtów
Przełożen
ie
4:1
4:1
4:1
4:1 i 8:1
3,1:1
4:1 i 8:1
Sposób/pr
ędkość
2 - sposób
/
1Prędkoś
ć
2 - sposób
/
1Prędkoś
ć
2 - sposób
/
1Prędkoś
ć
2 - sposób
/ 2
Prędkość
2 - sposób
/
1Prędkoś
ć
2 -
sposób /
2
Prędkoś
ć
Typ liny
Pułapka
poliestrow
a S _
Pułapka
poliestrow
a S _
Pułapka
poliestrow
a S _
Pułapka
poliestrow
a S _
Stalowy
kabel
Stalowy
kabel
Długość
liny
7M
10M
7M
10M
10M
10M
Zabarwie
nie)
Czarny
Czarny
Czarny
Czarny
Czarny
Czarny

- 4 -
STRUCTURE DIAGRAM
6. Hak 2. Lina 3. Obręcz 4. Korba 5. Śruba osiowa 6. Podstawa 7.
Przełącznik zapadkowy
1. Hak 2. Lina 3. Obręcz 4. Korba 5. Śruba osiowa 6. Podstawa 7.
1
2
3
4
5
6
7
5
3
4
6
7
1
2

- 5 -
Przełącznik zapadkowy
OPERATING INSTRUCTION
Przygotowanie do instalacji:
26. Przygotuj dywan lub matę, aby zabezpieczyć podłogę. Musisz
rozłożyć wszystkie akcesoria.
27. Należy przygotować rękawice, aby uniknąć zarysowania ostrymi
częściami, które mogą wystąpić podczas montażu.
28. Proszę otworzyć wszystkie pudełka, aby sprawdzić, czy akcesoria są
kompletne i w dobrym stanie.
29. Jeśli do zainstalowania tego produktu konieczne będzie użycie
elektronarzędzi, należy wcześniej ustawić prędkość na niską.
30. Podczas instalacji należy wyrównać wszystkie otwory i nie dokręcać
najpierw wszystkich śrub; w przeciwnym razie może to utrudnić instalację.
Instalacja:
Krok 1. Wywierć otwory (Ф 11 mm ) w montowanych wspornikach,
zgodnie z wymiarem podstawy wciągarki s.
Zamontuj wciągarkę na wspornikach i zabezpiecz ją śrubami i
nakrętkami.
- 6 -
Wymiary podstawy wciągarki:
Krok 2. Zamontuj uchwyt na wale i zablokuj nakrętkę, jak pokazano.
Model
KW1200
KW1600
KW2000B
KC800
KW3500 /
KC3500
a (mm)
50
44
50
44,5
44
b (mm)
85
79
85
74
104
- 7 -
Uwaga: Modele KW3500 i KC3500 to szybkie uchwyty , wystarczy je
podłączyć.
Krok 3. Ustaw przełącznik zapadkowy w pozycji środkowej, wyciągnij
hak i złap ciężarek.
Następnie obróć przełącznik zapadkowy do najwyższej pozycji i
powoli obróć uchwyt w kierunku zgodnym z ruchem wskazówek
zegara . Pociągnij ciężarek do żądanej pozycji .
Uwaga: Poniżej opisano działanie przełącznika zapadkowego .

- 8 -
Zwijanie/odwijanie kabla bez obciążenia
21. Ustawić dźwignię zapadkową w położeniu środkowym.
22. Bęben z kablem porusza się teraz swobodnie w obu kierunkach.
23. Pociągnij linkę za stały hak, aż hak będzie można przymocować
do przenoszonego ładunku.
24. Odwiń nadmiar linki, obracając korbę w kierunku zgodnym z
ruchem wskazówek zegara.
Ratchet Switch

- 9 -
Zwijanie liny pod obciążeniem (holowanie, załadunek)
1.Przytrzymaj mocno korbę i delikatnie popchnij, aby zwolnić dźwignię
zapadkową
2.Ustaw dźwignię zapadkową w odpowiednim położeniu.
3. Obracaj korbą w kierunku zgodnym z ruchem wskazówek zegara,
aby równomiernie nawinąć stalową linkę.
Odwijanie liny pod obciążeniem (opuszczanie, rozładunek)
1.Przytrzymaj mocno korbę i delikatnie popchnij, aby zwolnić dźwignię
zapadkową.
2.Ustaw dźwignię zapadkową w odpowiednim położeniu.
3. Po użyciu kabel powinien być ponownie całkowicie zwinięty
Przełącznik zapadkowy
1. Przełącznik zapadkowy ma trzy pozycje: wyższa pozycja służy do
ciągnięcia, dolna pozycja służy do zwalniania, a środkowa pozycja służy
zarówno do ciągnięcia, jak i zwalniania, ale można go używać tylko wtedy,
gdy wciągarka jest obciążona. Jeśli chcesz zmienić położenie przełącznika,
przytrzymaj mocno korbę.
2. Przed użyciem zamontuj wciągarkę na twardej i płaskiej powierzchni.
Aby go zamontować, należy ustawić przełącznik zapadkowy w pozycji
środkowej i wyciągnąć kabel, aż będą widoczne otwory w dolnej części
podstawy. Następnie użyj co najmniej 3 zestawów śrub 3/8 cala i nakrętek
zabezpieczających, w kształcie trójkąta, aby przymocować podstawę do
powierzchni. W razie potrzeby użyj dodatkowej deski metalowej lub z
twardego drewna.
3. Następnie przymocuj korbę do śruby osi za pomocą nakrętki.
4. Ustaw przełącznik zapadkowy w wyższym położeniu i obróć korbę w
kierunku zgodnym z ruchem wskazówek zegara, aby pociągnąć. Umieścić
przełącznik zapadkowy w dolnym położeniu i obrócić korbę w kierunku
przeciwnym do ruchu wskazówek zegara, aby go zwolnić.
5. Po zakończeniu przymocuj hak do tulei łapy.

- 10 -
MAINTENANCE
1. Postępuj zgodnie z instrukcjami dotyczącymi okresowego smarowania
Regularnie smaruj linkę i hak lekkim smarem.
Smaruj przekładnie co 6 miesięcy. Użyj dowolnego wodoodpornego smaru
dobrej jakości.
2. Okresowo sprawdzaj wszystkie części, liny stalowe , akcesoria i
wymieniaj je, jeśli są uszkodzone lub zużyte.
3. Zleć wymianę uszkodzonych części autoryzowanemu centrum
serwisowemu.
4. Okresowo sprawdzaj nakrętki i dokręcaj je, jeśli są luźne.
5. Produkt należy przechowywać w suchym miejscu. Zawsze zamykaj
produkt i trzymaj go poza zasięgiem dzieci.
6. Aby produkt działał lepiej i bezpieczniej, należy go odpowiednio
konserwować i utrzymywać w czystości.
7. Trzymaj uchwyty suche, czyste i wolne od oleju i smaru.

- 11 -
Adres: Baoshanqu Shuangchenglu 803long 11hao 1602A-1609shi
Szanghaj
Import do AUS: SIHAO PTY LTD, 1 ROKEVA STREETEASTWOOD NSW
2122 Australia
Import do USA: Sanven Technology Ltd, Suite 250, 9166 Anaheim Place,
Rancho Cucamonga, CA 91730
REP
EC
SHUNSHUN GmbH
Römeräcker 9 Z2021, 76351
Linkenheim-Hochstetten, Germany
REP
UK
Pooledas Group Ltd
Unit 5 Albert Edward House, The
Pavilions Preston, United Kingdom
Wyprodukowano w Chinach


- 13 -
Technisch Ondersteuning en e-garantiecertificaat
www.vevor.com/support
HANDLIER
GEBRUIKERSHANDLEIDING
Modellen: KW1200, KW1600, KW2000B,
KW3500, KC800, KC3500
We continue to be committed to provide you tools with competitive price.
"Save Half", "Half Price" or any other similar expressions used by us only represents an
estimate of savings you might benefit from buying certain tools with us compared to the major
top brands and does not necessarily mean to cover all categories of tools offered by us. You
are kindly reminded to verify carefully when you are placing an order with us if you are
actually saving half in comparison with the top major brands.

- 1 -
Have product questions? Need technical support? Please feel free to
contact us:
Technical Support and E-Warranty Certificate
www.vevor.com/support
NEED HELP? CONTACT US!
This is the original instruction, please read all manual instructions
carefully before operating. VEVOR reserves a clear interpretation of our
user manual. The appearance of the product shall be subject to the
product you received. Please forgive us that we won't inform you again if
there are any technology or software updates on our product.
HAND WINCH

- 2 -
GENERAL SAFETY RULES
Lees deze gebruikershandleiding zorgvuldig
door !
49. Nooit overbelasten!
50. Deze lier is ontworpen om te trekken, niet om te heffen!
51. Houd nooit uw hand of iets anders in de buurt van het tandwiel, de
velg en de rolkabel. Draag altijd handschoenen als u de lier gebruikt
52. Probeer nooit de lier te repareren of te demonteren als er een
probleem is. Vraag een machinist of specialist om hulp.
53. Zorg er bij het vervangen van de kabel voor dat het uiteinde van de
kabel door de 4 gaten aan de zijkant van de velg komt en maak een
knop vast of las het uiteinde van de kabel vast om te voorkomen dat
de kabel naar buiten komt.
54. Gebruik vet voor assen en tandwielen voordat u het langdurig
aanbrengt
55. Sta niet toe dat minderjarigen dit product gebruiken en bedienen
56. Gebruik het product niet als u moe bent of onder invloed bent van
alcohol, voorgeschreven medicijnen of drugs.
9 . Veiligheid op het werk
- Gebruik beide handen bij het transporteren van het product.
- Gebruik de juiste beschermingsmiddelen, afhankelijk van de
werkomgeving.
- Zorg ervoor dat u altijd op de juiste voet staat en in evenwicht
blijft.
- Probeer geen stilstaande lasten te trekken of vast te zetten.
- Oefen geen zijwaartse kracht uit op de last .
- Niet voor het heffen van lasten en nooit voor het vervoeren van
personen .
10 . Voorkom dat u het product onbedoeld start . De ratelschakelaar
moet altijd volledig ingeschakeld zijn.

- 3 -
VOORZICHTIGHEID: Lees zorgvuldig de instructies en procedures voor
veilig gebruik.
BEWAAR DEZE INSTRUCTIES
MODEL AND PARAMETERS
Model
KW1200
KW1600
KW2000B
KW3500
KC800
KC3500
Maximaal
laadverm
ogen
1200
pond
1600
pond
2000
pond
3500
pond
800 pond
3500
pond
Overbren
gingsverh
ouding
4:1
4:1
4:1
4:1 en 8:1
3.1:1
4:1 en
8:1
Manier/Sn
elheid
2 W ag /
1Snelheid
2 W ag /
1Snelheid
2 W ag /
1Snelheid
2 W ag / 2
Snelheid
2 W ag /
1Snelheid
2 W ag /
2
Snelheid
Touwtype
Polyester
S - val
Polyester
S - val
Polyester
S - val
Polyester
S - val
Stalen
kabel
Stalen
kabel
Touw
lengte
7M
10M
7M
10M
10M
10M
Kleur(en)
Zwart
Zwart
Zwart
Zwart
Zwart
Zwart
- 4 -
STRUCTURE DIAGRAM
7. Haak 2. Touw 3. Velg 4. Crank 5. Asbout 6. Basis 7. Ratelschakelaar
1
2
3
4
5
6
7
5
3
4
6
7
1
2

- 5 -
1.Haak 2. Touw 3. Velg 4.Crank 5.Asbout 6. Basis 7.Ratelschakelaar
OPERATING INSTRUCTION
Voorbereiding installatie:
31. Zorg voor een tapijt of mat om uw vloer te beschermen. Je moet alle
accessoires spreiden.
32. Zorg ervoor dat u handschoenen draagt om te voorkomen dat u
bekrast raakt door scherpe onderdelen die tijdens de installatie kunnen
ontstaan.
33. Open alle dozen om te controleren of de accessoires compleet en in
goede staat zijn.
34. Als u elektrisch gereedschap nodig heeft om dit product te installeren,
stel de snelheid dan vooraf in op een lage snelheid.
35. bij het installeren alle gaten uit en draai niet eerst alle schroeven vast;
anders kan dit de installatie bemoeilijken.
Installatie:
Stap 1. Boor gaten (Ф 11 mm ) in de te installeren beugels,
afhankelijk van de afmeting s van de lierbasis .
Monteer de lier op de beugels en zet deze vast met bouten en
moeren.

- 6 -
Afmeting lierbasis:
Model
KW1200
KW1600
KW2000B
KC800
KW3500 /
KC3500
een (mm)
50
44
50
44,5
44
b (mm)
85
79
85
74
104
- 7 -
Stap 2. Installeer de hendel op de as en borg de moer, zoals
afgebeeld.
Opmerking: Modellen KW3500 en KC3500 zijn snelle handgrepen ,
u hoeft ze alleen maar aan te sluiten.
Stap 3. Zet de ratelschakelaar in de middelste stand, trek de haak
eruit en vang het gewicht.
vervolgens de ratelschakelaar naar een hoge positie. Draai de
hendel langzaam met de klok mee . Trek het gewicht naar de
gewenste positie .
Opmerking: De werking van de ratelschakelaar wordt hieronder
beschreven .

- 8 -
onbelast op-/afwikkelen van de kabel
25. Zet de ratelhendel in de middenpositie.
26. De kabelhaspel beweegt nu vrij in beide richtingen.
27. Trek de kabel aan de vaste haak totdat de haak aan de te
verplaatsen last kan worden bevestigd.
28. Wikkel de overtollige kabel terug door de slinger met de klok mee
te draaien.
Ratchet Switch

- 9 -
Kabel onder belasting oprollen (slepen, laden)
1.Houd de kruk stevig vast en duw zachtjes om de ratelhendel te
ontlasten
2.Plaats de ratelhendel in positie.
3. Draai de slinger rechtsom om de staalkabel gelijkmatig op te
winden.
Afrollen van de kabel onder belasting (laten zakken, lossen)
1.Houd de kruk stevig vast en duw zachtjes om de ratelhendel te
ontlasten.
2.Plaats de ratelhendel in positie.
3.De kabel moet na gebruik weer volledig worden ingetrokken
Ratelschakelaar
1. Er zijn 3 posities voor de ratelschakelaar: de hogere positie is voor
trekken, de lagere positie is voor loslaten en de middelste positie is voor
zowel trekken als loslaten, maar deze kan alleen worden gebruikt als de
lier is geladen. Houd de slinger stevig vast als u de schakelaarpositie wilt
wijzigen.
2. Installeer de lier vóór gebruik op een stevige en vlakke ondergrond. Om
het te installeren, zet u de ratelschakelaar in de middelste stand en trekt u
de kabel eruit totdat de gaten aan de onderkant van de basis zichtbaar zijn.
Gebruik vervolgens minimaal 3 sets 3/8 inch bouten en borgmoeren, in
een driehoekig patroon, om de basis op het oppervlak te bevestigen.
Gebruik indien nodig een extra metalen of hardhouten plank.
3. Monteer vervolgens de slinger op de asbout met moer.
4. Zet de ratelschakelaar in de hogere stand en draai de slinger met de
klok mee om te trekken. Zet de ratelschakelaar in de onderste stand en
draai de slinger tegen de klok in om hem los te maken.
5. Wanneer u klaar bent, bevestigt u de haak aan de pootbus.
MAINTENANCE

- 10 -
1. Volg de instructies voor periodiek smeren
Smeer de kabel en haak regelmatig met een beetje vet.
Smeer de tandwielen elke 6 maanden. Gebruik een waterdicht vet van
goede kwaliteit.
2. Inspecteer periodiek alle onderdelen, staalkabels , accessoires en
vervang ze indien beschadigd of gebruikt.
3. Laat beschadigde onderdelen vervangen door een erkend
servicecentrum.
4. Controleer de moeren regelmatig en draai ze vast als ze los zitten.
5. Het product moet op een droge plaats worden bewaard. Sluit het
product altijd af en houd het buiten bereik van kinderen.
6. Houd het product goed onderhouden en schoon voor betere en veiligere
prestaties.
7. Houd de handgrepen droog, schoon en vrij van olie en vet.

- 11 -
Adres: Baoshanqu Shuangchenglu 803long 11hao 1602A-1609shi
Shanghai
Geïmporteerd naar AUS: SIHAO PTY LTD, 1 ROKEVA
STREETEASTWOOD NSW 2122 Australië
Geïmporteerd naar de VS: Sanven Technology Ltd, Suite 250, 9166
Anaheim Place, Rancho Cucamonga, CA 91730
REP
EC
SHUNSHUN GmbH
Römeräcker 9 Z2021, 76351
Linkenheim-Hochstetten, Germany
REP
UK
Pooledas Group Ltd
Unit 5 Albert Edward House, The
Pavilions Preston, United Kingdom
Gemaakt in China


- 13 -
Teknisk Support och e-garanticertifikat
www.vevor.com/support
HANDVINSCH
ANVÄNDARMANUAL
Modell: KW1200, KW1600, KW2000B,
KW3500, KC800, KC3500
We continue to be committed to provide you tools with competitive price.
"Save Half", "Half Price" or any other similar expressions used by us only represents an
estimate of savings you might benefit from buying certain tools with us compared to the major
top brands and does not necessarily mean to cover all categories of tools offered by us. You
are kindly reminded to verify carefully when you are placing an order with us if you are
actually saving half in comparison with the top major brands.

- 1 -
Have product questions? Need technical support? Please feel free to
contact us:
Technical Support and E-Warranty Certificate
www.vevor.com/support
NEED HELP? CONTACT US!
This is the original instruction, please read all manual instructions
carefully before operating. VEVOR reserves a clear interpretation of our
user manual. The appearance of the product shall be subject to the
product you received. Please forgive us that we won't inform you again if
there are any technology or software updates on our product.
HAND WINCH

- 2 -
GENERAL SAFETY RULES
Vänligen läs denna bruksanvisning noggrant !
57. Överbelasta aldrig!
58. Denna vinsch är designad för att dra, inte för att lyfta!
59. Placera aldrig din hand eller något annat nära växeln, fälgen och
rullvajern. Använd alltid handskar när du använder vinschen
60. Försök aldrig att reparera eller demontera vinschen när det finns ett
problem. Be en maskinist eller specialist om hjälp.
61. När du byter kabel, se till att änden av kabeln kommer genom de 4
hålen på sidan av fälgen, och knyt en knopp eller svetsa spetsen på
kabeln för att förhindra att kabeln kommer ut.
62. Använd fett för axel och kugghjul innan långtidsavsättning
63. Tillåt inte minderåriga att använda och använda denna produkt
64. Använd inte produkten när du är trött eller under påverkan av alkohol,
receptbelagda läkemedel eller droger.
9 . Säkerhet på jobbet
- Använd båda händerna när du transporterar produkten.
- Använd lämplig skyddsutrustning i enlighet med arbetsmiljön.
- Håll alltid rätt fotfäste och balansera.
- Försök inte att dra stillastående eller fixa laster.
- Applicera ingen sidokraft på lasten .
- Ej för att lyfta laster och aldrig transportera personer .
10 . Undvik att starta produkten oavsiktligt . Spärrbrytaren ska alltid
vara helt inkopplad.
VARNING: Läs noggrant instruktionerna och procedurerna för säker drift.
SPARA DESSA INSTRUKTIONER
MODEL AND PARAMETERS

- 3 -
Modell
KW1200
KW1600
KW2000B
KW3500
KC800
KC3500
Maximal
lastkapaci
tet
1200
pund
1600
pund
2000
pund
3500
pund
800 pund
3500
pund
Utväxlings
förhålland
e
4:1
4:1
4:1
4:1 och
8:1
3,1:1
4:1 och
8:1
Sätt/hasti
ghet
2 väg _ / 1
Hastighet
2 väg _ / 1
Hastighet
2 väg _ / 1
Hastighet
2 väg _ / 2
hastighet
2 väg _ / 1
Hastighet
2 väg _ /
2
hastighe
t
Typ av rep
P olyester
S trap
P olyester
S trap
P olyester
S trap
P olyester
S trap
Stålkabel
Stålkabe
l
Replängd
7M
10M
7M
10M
10M
10M
Färger)
Svart
Svart
Svart
Svart
Svart
Svart
STRUCTURE DIAGRAM
- 4 -
8. Krok 2. Rep 3. Fälg 4. Vev 5. Axelbult 6. Bas 7. Spärrbrytare
1. Krok 2. Rep 3. Fälg 4. Vev 5. Axelbult 6. Bas 7. Spärrbrytare
OPERATING INSTRUCTION
1
2
3
4
5
6
7
5
3
4
6
7
1
2
- 5 -
Installationsförberedelser:
36. Förbered en matta eller matta för att skydda ditt golv. Du måste sprida
ut alla tillbehör.
37. Förbered handskar för att undvika repor av vassa delar som kan
uppstå under installationen.
38. Öppna alla lådor för att kontrollera att tillbehören är kompletta och i
gott skick.
39. Om du behöver använda elverktyg för att installera den här produkten,
ställ in hastigheten på låg hastighet i förväg.
40. När du installerar , vänligen rikta in alla hål och dra inte åt alla skruvar
först. annars kan det försvåra installationen.
Installation:
Steg 1. Borra hål (Ф 11 mm ) i fästena som ska installeras, enligt
vinschens basmått s.
Montera vinschen på fästena och lås den med bultar och muttrar.
Vinschbasdimension:
- 6 -
Steg 2. Montera handtaget på axeln och lås muttern enligt bilden.
Obs: Modell KW3500 och KC3500 är snabba handtag, bara koppla
in den.
Modell
KW1200
KW1600
KW2000B
KC800
KW3500 /
KC3500
a (mm)
50
44
50
44,5
44
b (mm)
85
79
85
74
104
- 7 -
Steg 3. Ställ spärrbrytaren i mittläget, dra ut kroken och fånga vikten.
sedan spärrreglaget till ett högt läge, Vrid handtaget långsamt
medurs . Dra vikten till önskat läge .
Obs: Spärrbrytarens funktion beskrivs nedan .
Lindning/avlindning av kabeln utan belastning
29. Placera spärrspaken i mittläget.
Ratchet Switch

- 8 -
30. Kabelupprullaren rör sig nu fritt i båda riktningarna.
31. Dra i kabeln vid den fasta kroken tills kroken kan fästas på lasten
som ska flyttas.
32. Linda tillbaka den överdrivna kabeln genom att vrida veven
medurs.
Upprullning av kabeln under belastning (bogsering, lastning)
1. Håll veven stadigt och tryck försiktigt för att avlasta spärrspaken
2. Placera spärrspaken på plats.
3. Vrid veven medurs för att linda upp stålvajern jämnt.
Avlindning av kabeln under belastning (sänkning, lossning)
1. Håll veven stadigt och tryck försiktigt för att avlasta spärrspaken.
2. Placera spärrspaken på plats.
3. Kabeln ska dras in helt igen efter användning
Spärrbrytare
1.Det finns 3 lägen för spärrbrytaren: Det högre läget är för att dra, det
nedre läget är för att släppa och det mittersta läget är för att både dra och
släppa, men det kan endast användas när vinschen är laddad. Håll
vevhandtaget hårt om du vill ändra omkopplarens läge.
2.Inför användning, installera vinschen på en stadig och plan yta. För att
installera den, sätt spärrbrytaren i mittläget och dra ut kabeln tills hålen på
botten av basen är synliga. Använd sedan minst 3 uppsättningar 3/8 tums
bultar och låsmuttrar, i ett triangulärt mönster, för att fästa basen på ytan.
Använd en extra metall- eller lövträskiva vid behov.
3. Montera sedan vevhandtaget på axelbulten med mutter.
4. Sätt spärrreglaget i det högre läget och vrid vevhandtaget medurs för att
dra. Placera spärrreglaget i det nedre läget och vrid vevhandtaget moturs
för att släppa.
5. När du är klar, fäst kroken på tassbussningen.

- 9 -
MAINTENANCE
1. Följ instruktionerna för smörjning med jämna mellanrum
Smörj vajern och haka regelbundet med lite fett.
Smörj växlarna var sjätte månad. Använd valfritt vattentätt fett av god
kvalitet.
2. Inspektera regelbundet alla delar, stålkablar, tillbehör och byt ut dem om
de är skadade eller används.
3. Låt ett auktoriserat servicecenter byta ut skadade delar.
4. Kontrollera muttrarna med jämna mellanrum och dra åt dem om de sitter
lösa.
5. Produkten måste förvaras på en torr plats. Lås alltid produkten och
förvara den utom räckhåll för barn.
6. Håll produkten ordentligt underhållen och ren för bättre och säkrare
prestanda.
7. Håll handtagen torra, rena och fria från olja och fett.

- 10 -
Adress: Baoshanqu Shuangchenglu 803long 11hao 1602A-1609shi
Shanghai
Importerad till AUS: SIHAO PTY LTD, 1 ROKEVA STREETEASTWOOD
NSW 2122 Australien
Importerad till USA: Sanven Technology Ltd, Suite 250, 9166 Anaheim
Place, Rancho Cucamonga, CA 91730
REP
EC
SHUNSHUN GmbH
Römeräcker 9 Z2021, 76351
Linkenheim-Hochstetten, Germany
REP
UK
Pooledas Group Ltd
Unit 5 Albert Edward House, The
Pavilions Preston, United Kingdom
Tillverkad i Kina

