

INSTRUCTION MANUAL
Cordless Vacuum Cleaner
VC-D11E1
BEFORE OPERATING THIS PRODUCT, PLEASE READ, UNDERSTAND AND FOLLOW THESE INSTRUCTIONS.
Visit our website www.farberwareVC.com

Important safety instructions
When using an electrical appliance, basic precaution should always READ ALL INSTRUCTIONS
BEFORE USING (THIS APPLIANCE)
1. The vacuum cleaner is an electric appliance. It must be used in accordance with the
operating conditions of the instructions. The instructions should be kept properly for future
reference.
2. Check and confirm that the vacuum cleaner voltage must be consistent with the supply
voltage.
3. It is strictly forbidden to inhale the following objects, otherwise it may damage the vacuum
cleaner or cause fire.
A. Heating objects. Such as carbon fire, etc.
B. Large cuts of sharp fragments, such as glass, etc.
C. Harmful substances or water and liquids (solvents, corrosives, etc.);
D. Flammable and explosive goods, such as gasoline or alcohol products;
4. When cleaning, repairing or temporarily not use the vacuum cleaner, the power supply must
be cut off. When the power supply is cut off, pull the power cord and pull the plug out by holding
the plastic part of the plug by hand.
5. Remember do not immerse the main vacuum cleaner in water, avoid approaching to heating
equipment or exposure to the sun to avoid fire.
6. Don't let children play with vacuum cleaners to avoid accidents.
7. If there is a drop and obvious damage or abnormal operation, please do not continue to use
the vacuum cleaner, and promptly send it to the maintenance department designated by our
company for repair.
8. Avoid running for a long time in the condition of the suction inlet is blocked, to avoid
damage to the motor and heat generation of the vacuum cleaner.
9. To avoid danger, if the adapter is damaged, please purchase the factory-specified charging
adapter.
10. When the vacuum cleaner does not use for a long time, it is recommended to charge it once
every three months. Before the product is scrapped, the battery must be taken out and safely
recycled. Do not discard it.
WARNING:
Only allow to use a dedicated adapter. During charging, it needs to be ventilated and
heat-dissipated. It is strictly prohibited to be placed in a high temperature environment above 50
degrees. It is strictly forbidden to rely on fire source to avoid explosion. The battery pack cannot
be detachable.

Parameter
Item Cordless Vacuum Cleaner Model No.
VC-D11E1
Input 100-240V Power 400W
Output 35VDC,1A Battery Capacity 2500mAh
Parts diagram
濘濿濸濶瀇瀅濼濶澳濹濿瀂瀂瀅澳濵瀅瀈瀆濻
濧濸濿濸瀆濶瀂瀃濼濶澳瀀濸瀇濴濿澳瀇瀈濵濸
濗瀈瀆瀇澳濶瀈瀃
濙濼濿瀇濸瀅澳瀆瀃瀂瀁濺濸
濦瀊濼瀇濶濻澳濵瀈瀇瀇瀂瀁
濠濴濼瀁澳濵瀂濷瀌
濕濴瀇瀇濸瀅瀌澳瀃濴濶濾瀆
濗瀈瀆瀇澳濶瀈瀃澳瀅濸濿濸濴瀆濸澳濵瀈瀇瀇瀂瀁
濟瀂瀁濺澳瀆瀈濶瀇濼瀂瀁澳濻濸濴濷
濅激濼瀁激濄澳濹濿濴瀇澳瀆瀈濶瀇濼瀂瀁
濣瀂瀊濸瀅澳濴濷濴瀃瀇濸瀅
濛濴瀁濺濸瀅
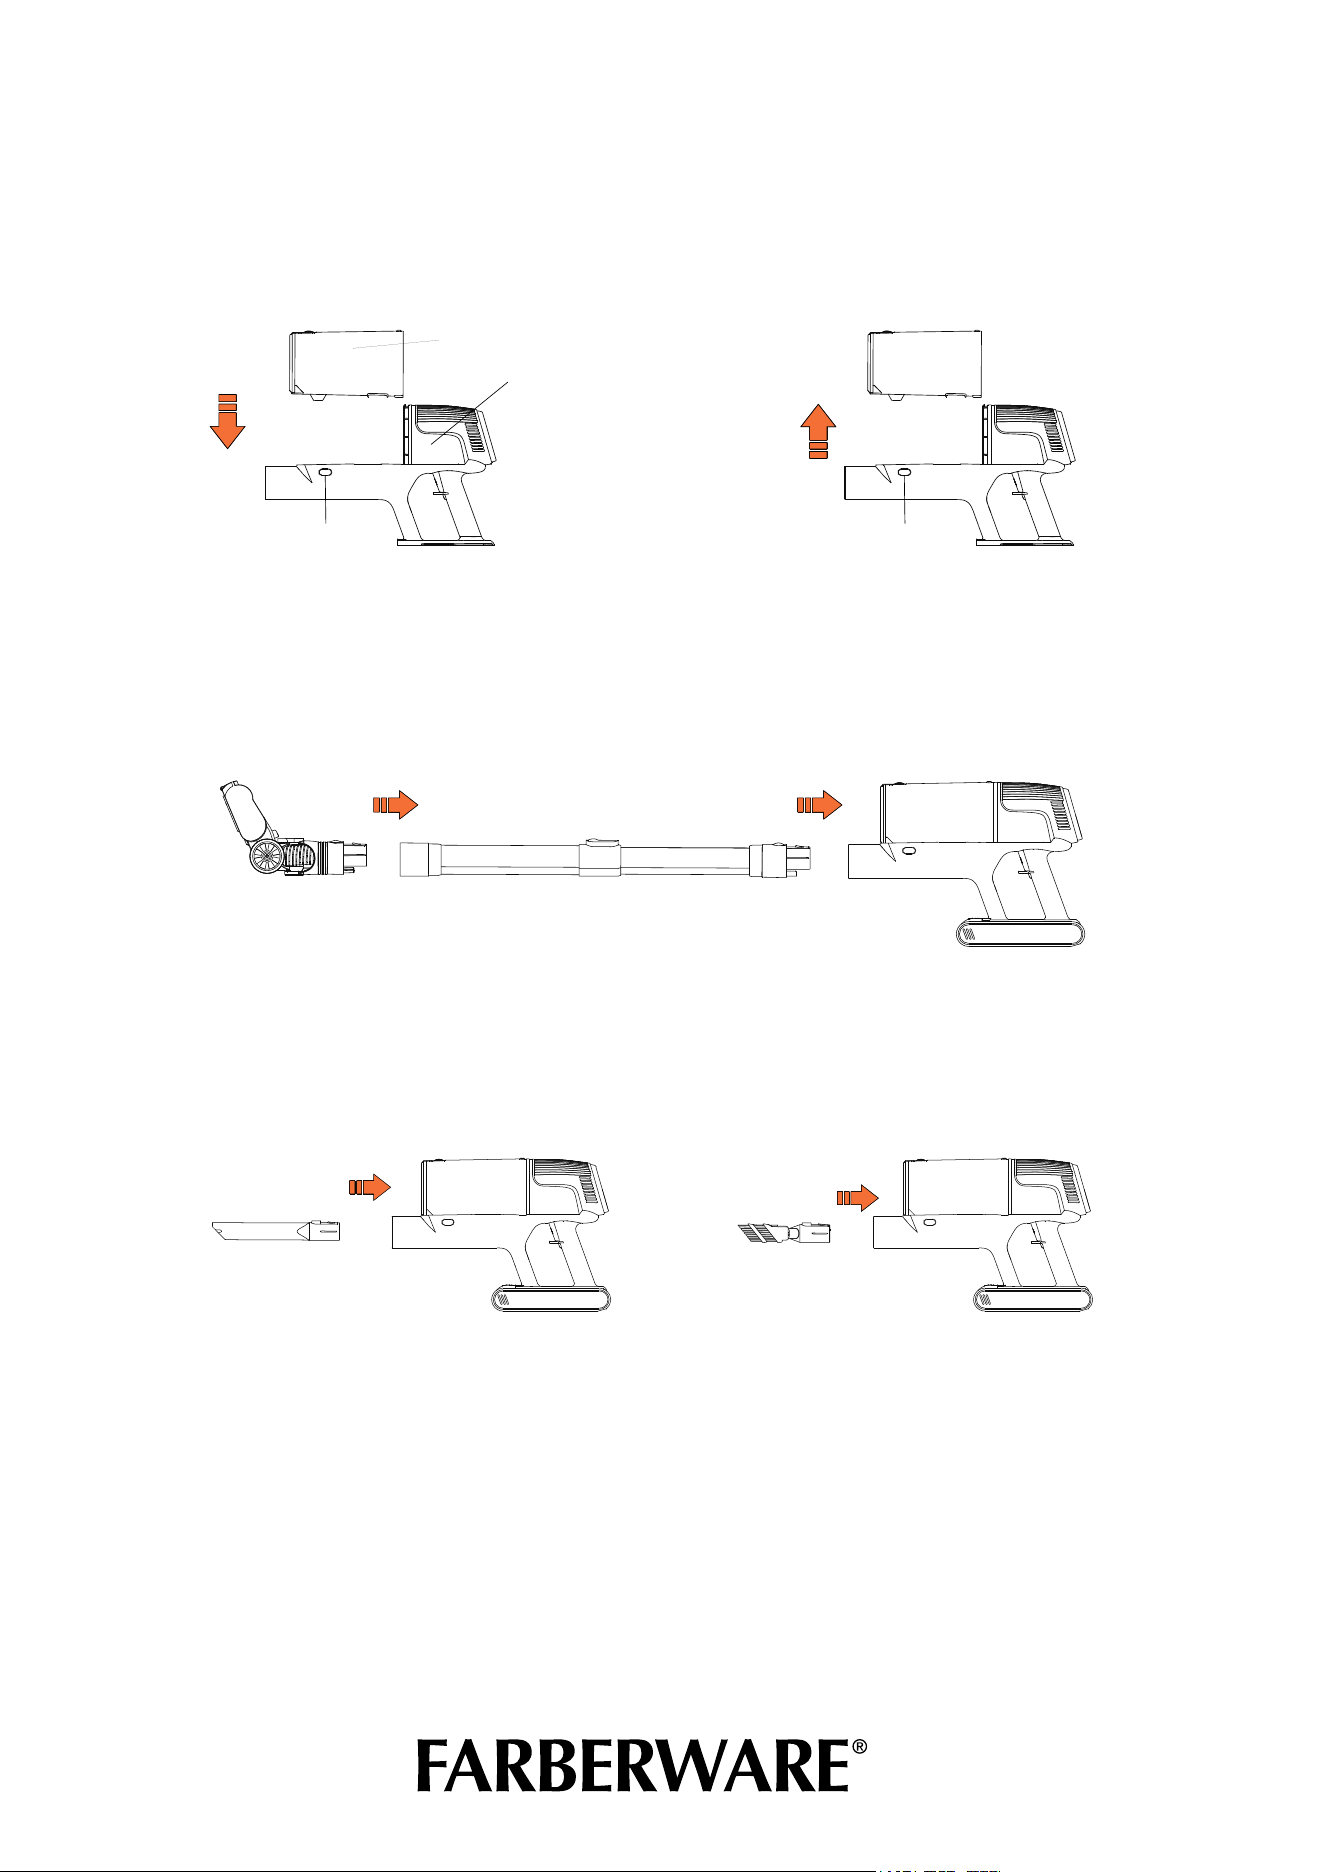
Assembling & Disassembling
1. Attach the dust cup assembly with main frame as shown in figure 1. When hearing the sound
of "click",the main engine is locked.
2. Press the dust cup unloading button, and disassemble the dust cup from the main frame as
shown in figure 2.
1. Insert the metal tube with the connection part of main frame till hearing the sound "click".
2. Connect the floor brush with connection part of metal tube till hearing the sound "click".
1. The 2-in-1 brush and crevice nozzle can be directly connect to the main frame or metal tube
for handheld use.
2. Insert the 2-in-1 brush or crevice nozzle to the connection part of main frame or metal tube,
till hearing the sound "click".
Tips: Long crevice nozzle is suitable for cleaning small crevice like windows, corners, stairs, etc.
2-in-1 brush is suitable for cleaning dust on sofa, cupboard, or desk, etc.
click click
'XVWFXS
0DLQERG\
'XVWFXSUHOHDVHEXWWRQ
'XVWFXSUHOHDVHEXWWRQ
click
click
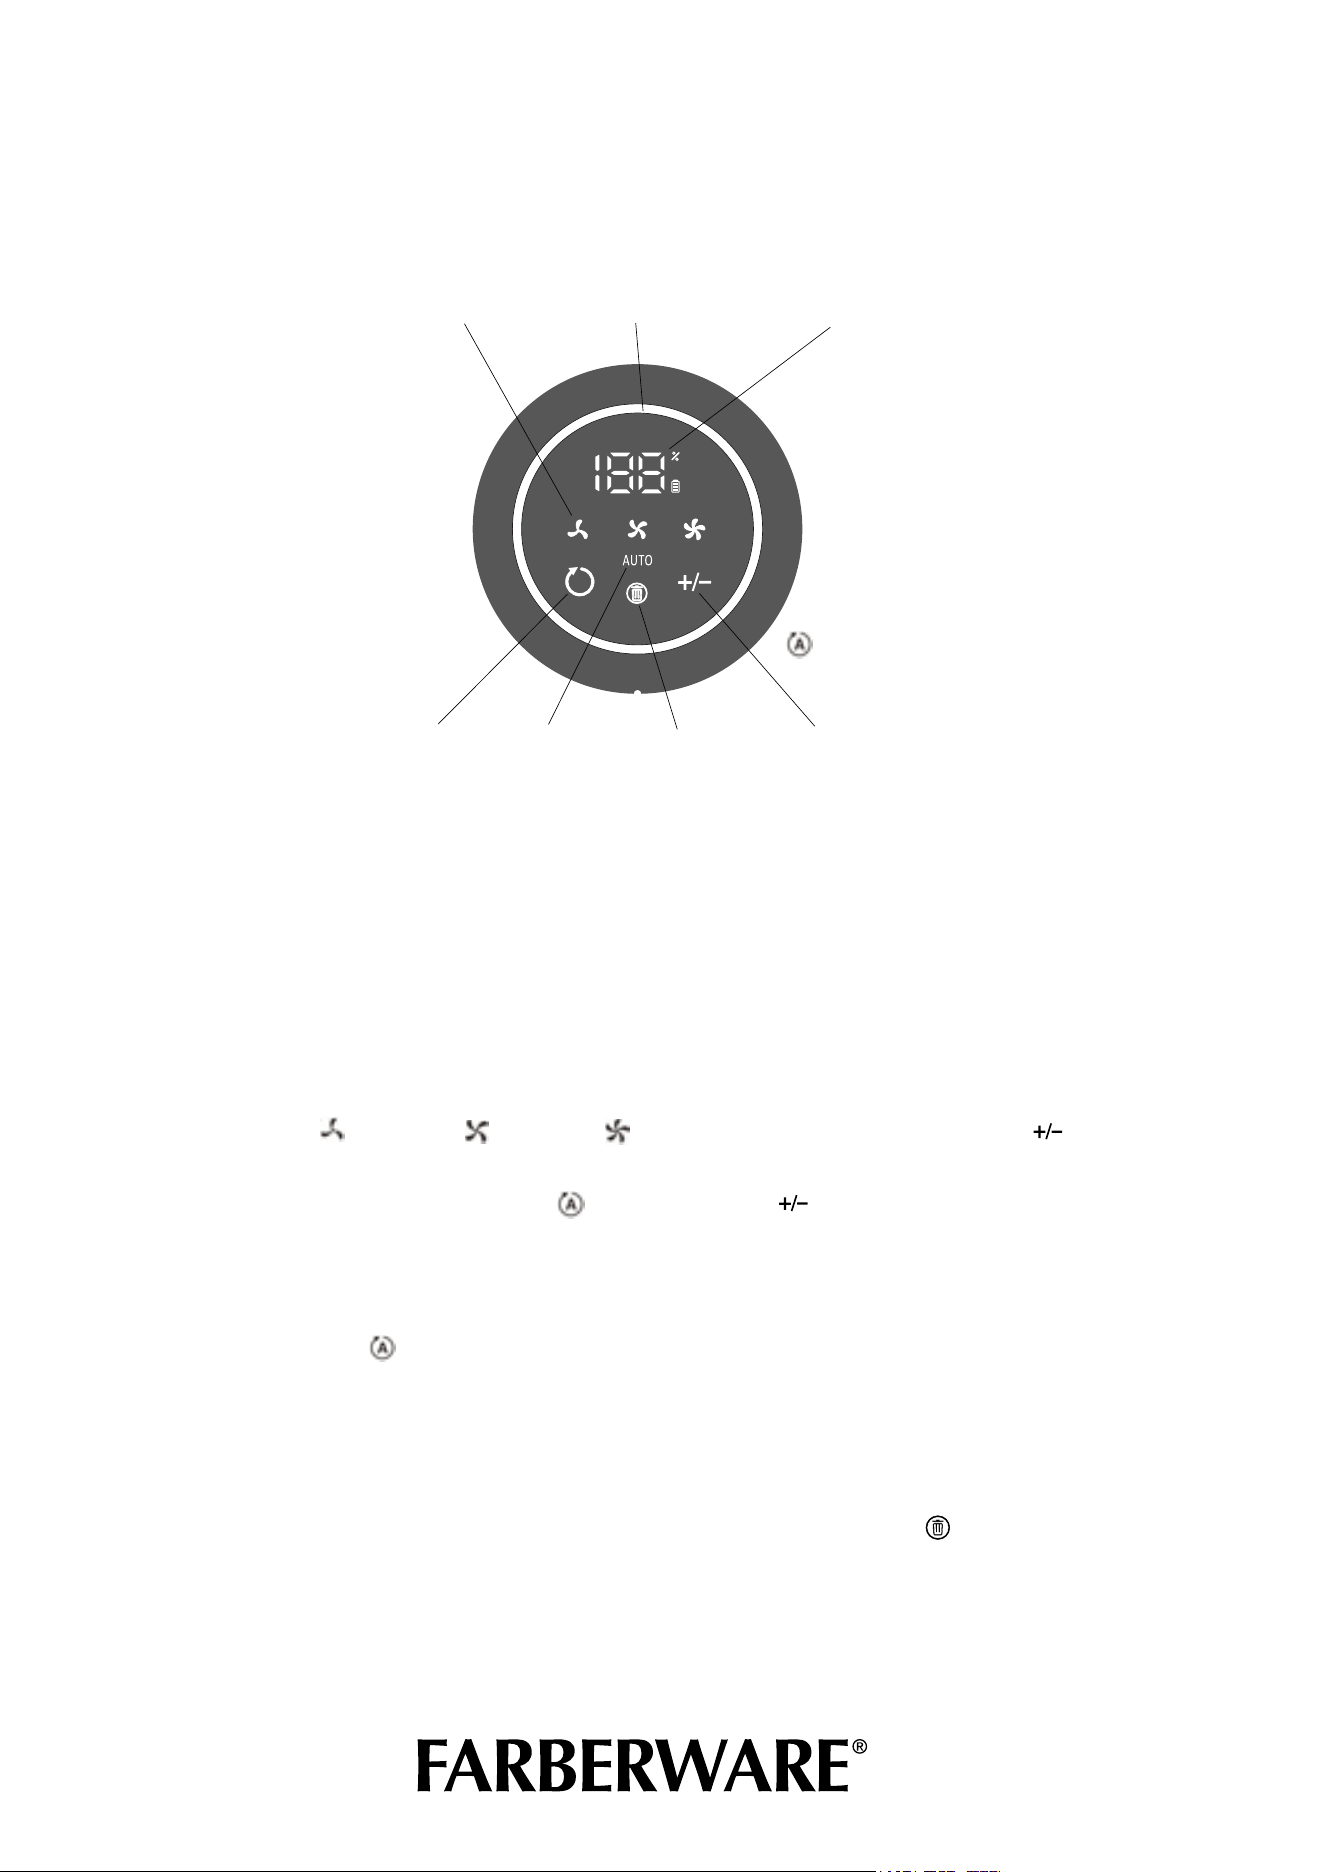
Using
Switching on and off
Press the on/off button on the switchboard and the vacuum cleaner will start working in automatic
mode. The automatic mode means that the mainframe automatically adjusts the suction power
through the feedback of the dust sensor board and the brush motor starts at full power; press the
on/off button again and the vacuum cleaner is turned off.
1. The low " ", medium " " and high " " gears are switched by the touch button " " on
the display control panel. " to switch.
2. Start the default automatic mode " ", the touch button " " is the adjustment button, press
it to switch from automatic mode to low mode, then press it to switch to medium mode, then press
it to switch to high mode in this cycle.
3. 3. The left touch button is the automatic mode.
4. switch button " ", press the automatic mode button to switch to automatic mode when
working in any gear.
Indicator light description
1. During normal operation: The power indicator is constant and the power decreases in 5% order.
2. When the power is switched off: the digital screen goes out.
3. When the dust cup is clogged: the dust full indicator on the digital screen " " flashes red. The
hoover does not stop working normally, you need to empty the dust and restart the machine.
4. When the machine is faulty: the digital screen will show the corresponding fault code.
5. When working in automatic mode; the LED strip on the outer ring senses dust and changes with
the size of the dust rising and falling, the colour red is displayed, no dust colour blue does not
change.
$
Auto mode
button
Full circle LED strip, changing with the dust
sensor module
Power
percentage
Gear change
button
Dust full
indicator
Smart mode
indicator
Three gears
Gear switching
Charging method
1. Before charging, please ensure that the power adapter is well connected to the AC power
supply, the output of the adapter is inserted into the charging port of the hoover host, when
charging the peripheral LDE light flashes green (running light), the digital tube battery mark
flashes until fully charged 100%, the peripheral light stops flashing (constant state, the digital
tube shows 100%). If the adapter is not unplugged after fully charged, the whole screen and LED
light will be off for 12
hours from the start of charging. and LEDs are off.
2. When the battery pack is removed separately for charging, the battery pack breathing light
flashes red until the colour stops flashing blue after a full charge.
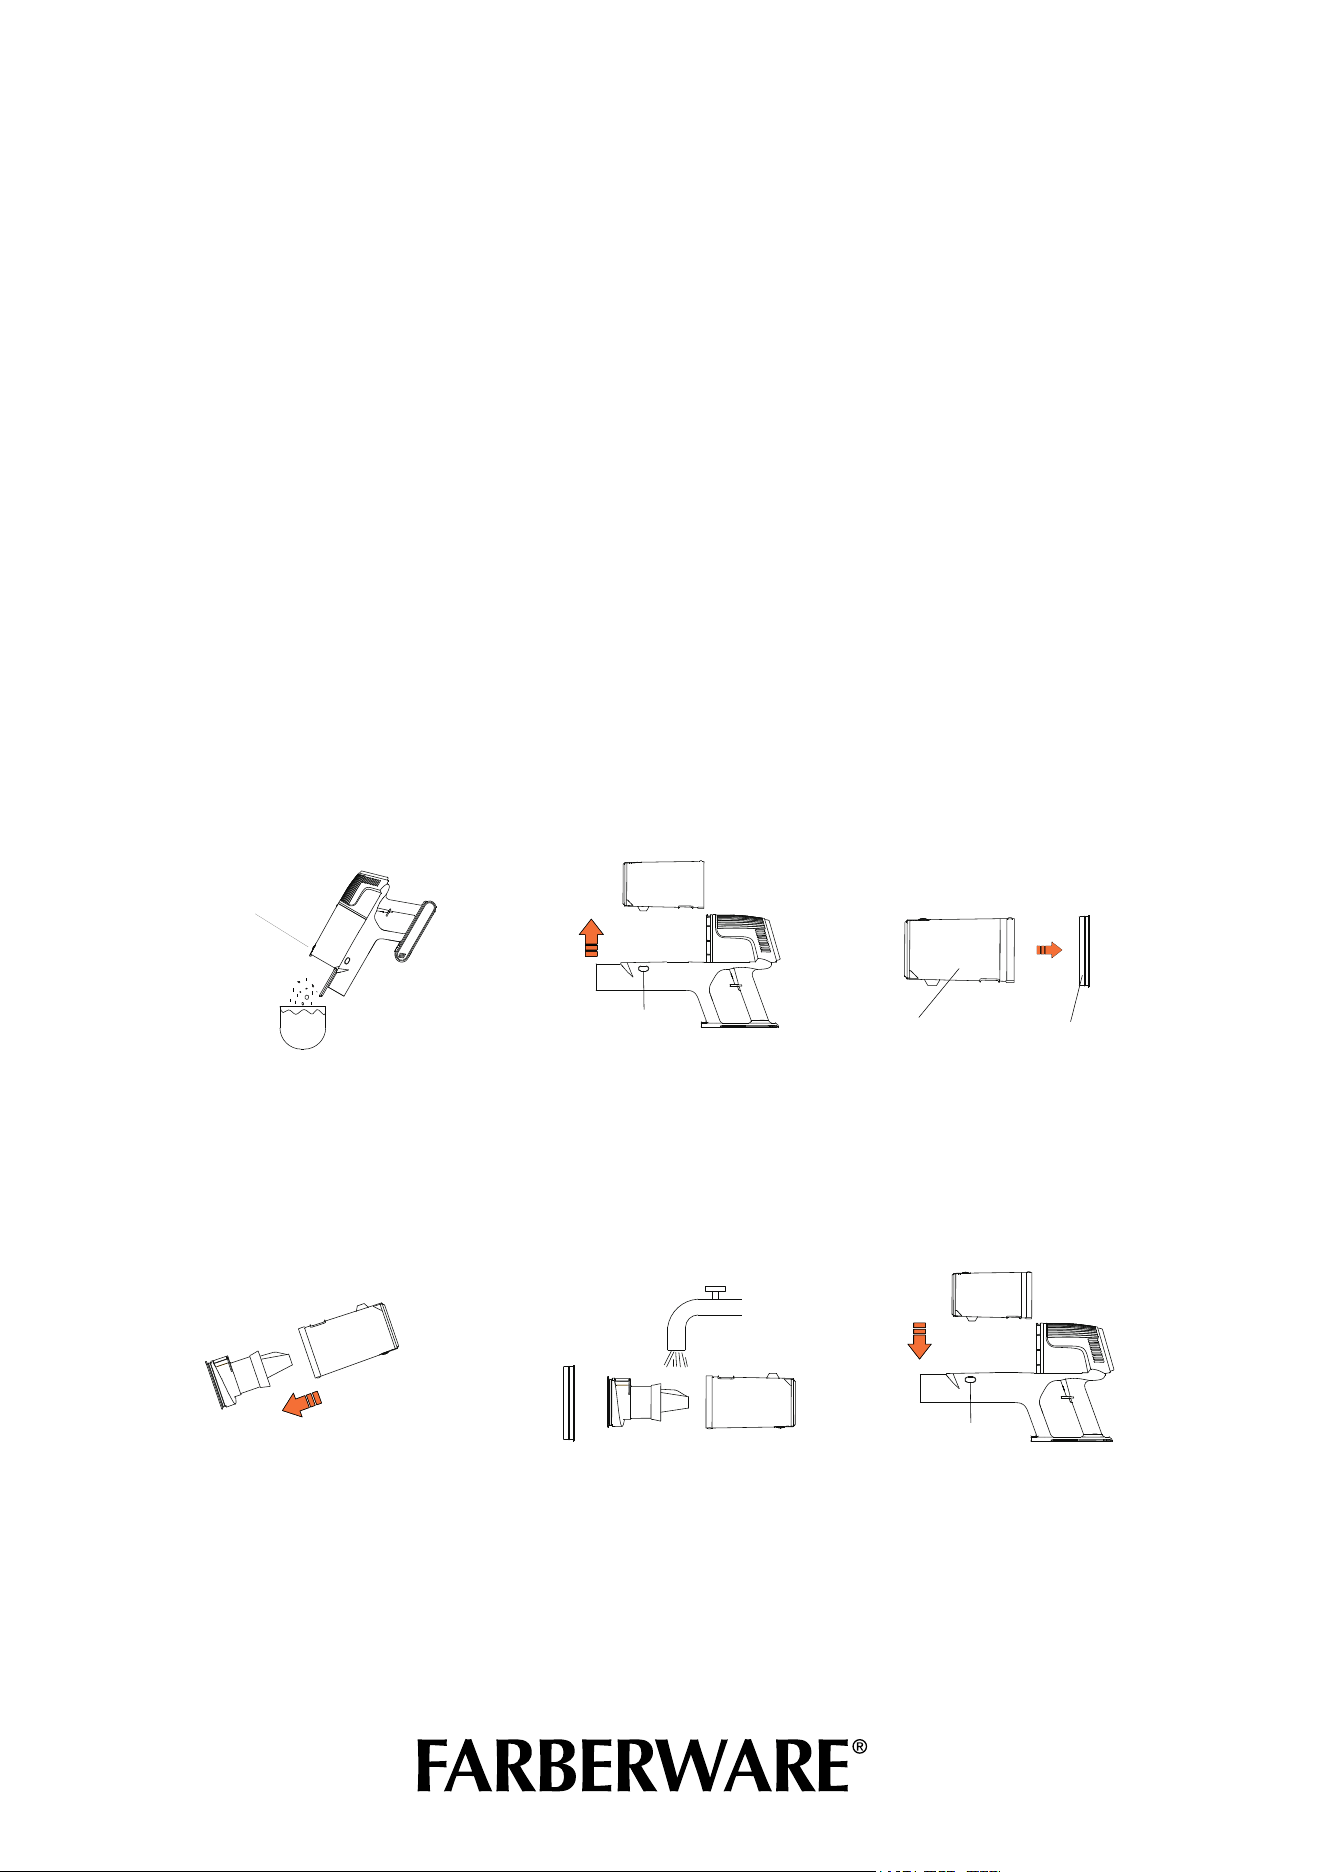
Maintaining:
NNote: Before cleaning and maintaining the vacuum cleaner, please switch it off and remove the
battery pack.
Tip: 1. Clean the dust cup regularly to avoid excessive dust build-up blocking the air ducts and
causing a loss of suction power.
2. When cleaning the dust cup, remove it by pointing it at the dustbin to prevent dust from
falling on thefloor.
1. Press the dust cup release button, drop the dust into the dustbin(as show in fig. 1).
2. Press the dust cup unloading button, and disassemble the dust cup from the main frame as
shown in figure 2.
3. Take out the cotton filter from the dust cup(fig.3).
4. Take out the cyclone separation filter(fig.4).
5. Clean the cotton filter and cyclone filter, air dry them(fig.5).
6. After filter cleaning, install the cyclone and cotton filter back to the dust cup, connect dust cup
to the main frame until hearing the sound of "click",the main engine is locked(fig.6).
Dust cup
release button
)LOWHUVSRQJH
'XVWFXS
)LJXUH )LJXUH
Figure 3
Dust cup cover
button
Figure 4 Figure 6Figure 5
Dust cup
release button
Cleaning the dust cup
Troubleshooting
Problem Solution
Vacuum cleaner doesn't work
Make sure cleaner is fully powered.
Push charger securely into electrical outlet, try another outlet or
check circuit breaker.
Product suction is blocked, clean up the suction inlet.
Charging indicator lights are not lit
while charging
Make sure charger is securely inserted into electrical outlet.
Make sure charging plug is securely inserted into handle.
Indicator lights stop blinking when fully charged.
Not enough suction power
Empty dust cup and clean or change filters. Refer to maintenance
instructions.
Make sure cleaner is fully powered.
Remove clogs that restrict the airflow.
Motor has strange sound when
working
Clean up the blockage.
If it doesn't work, please contact us
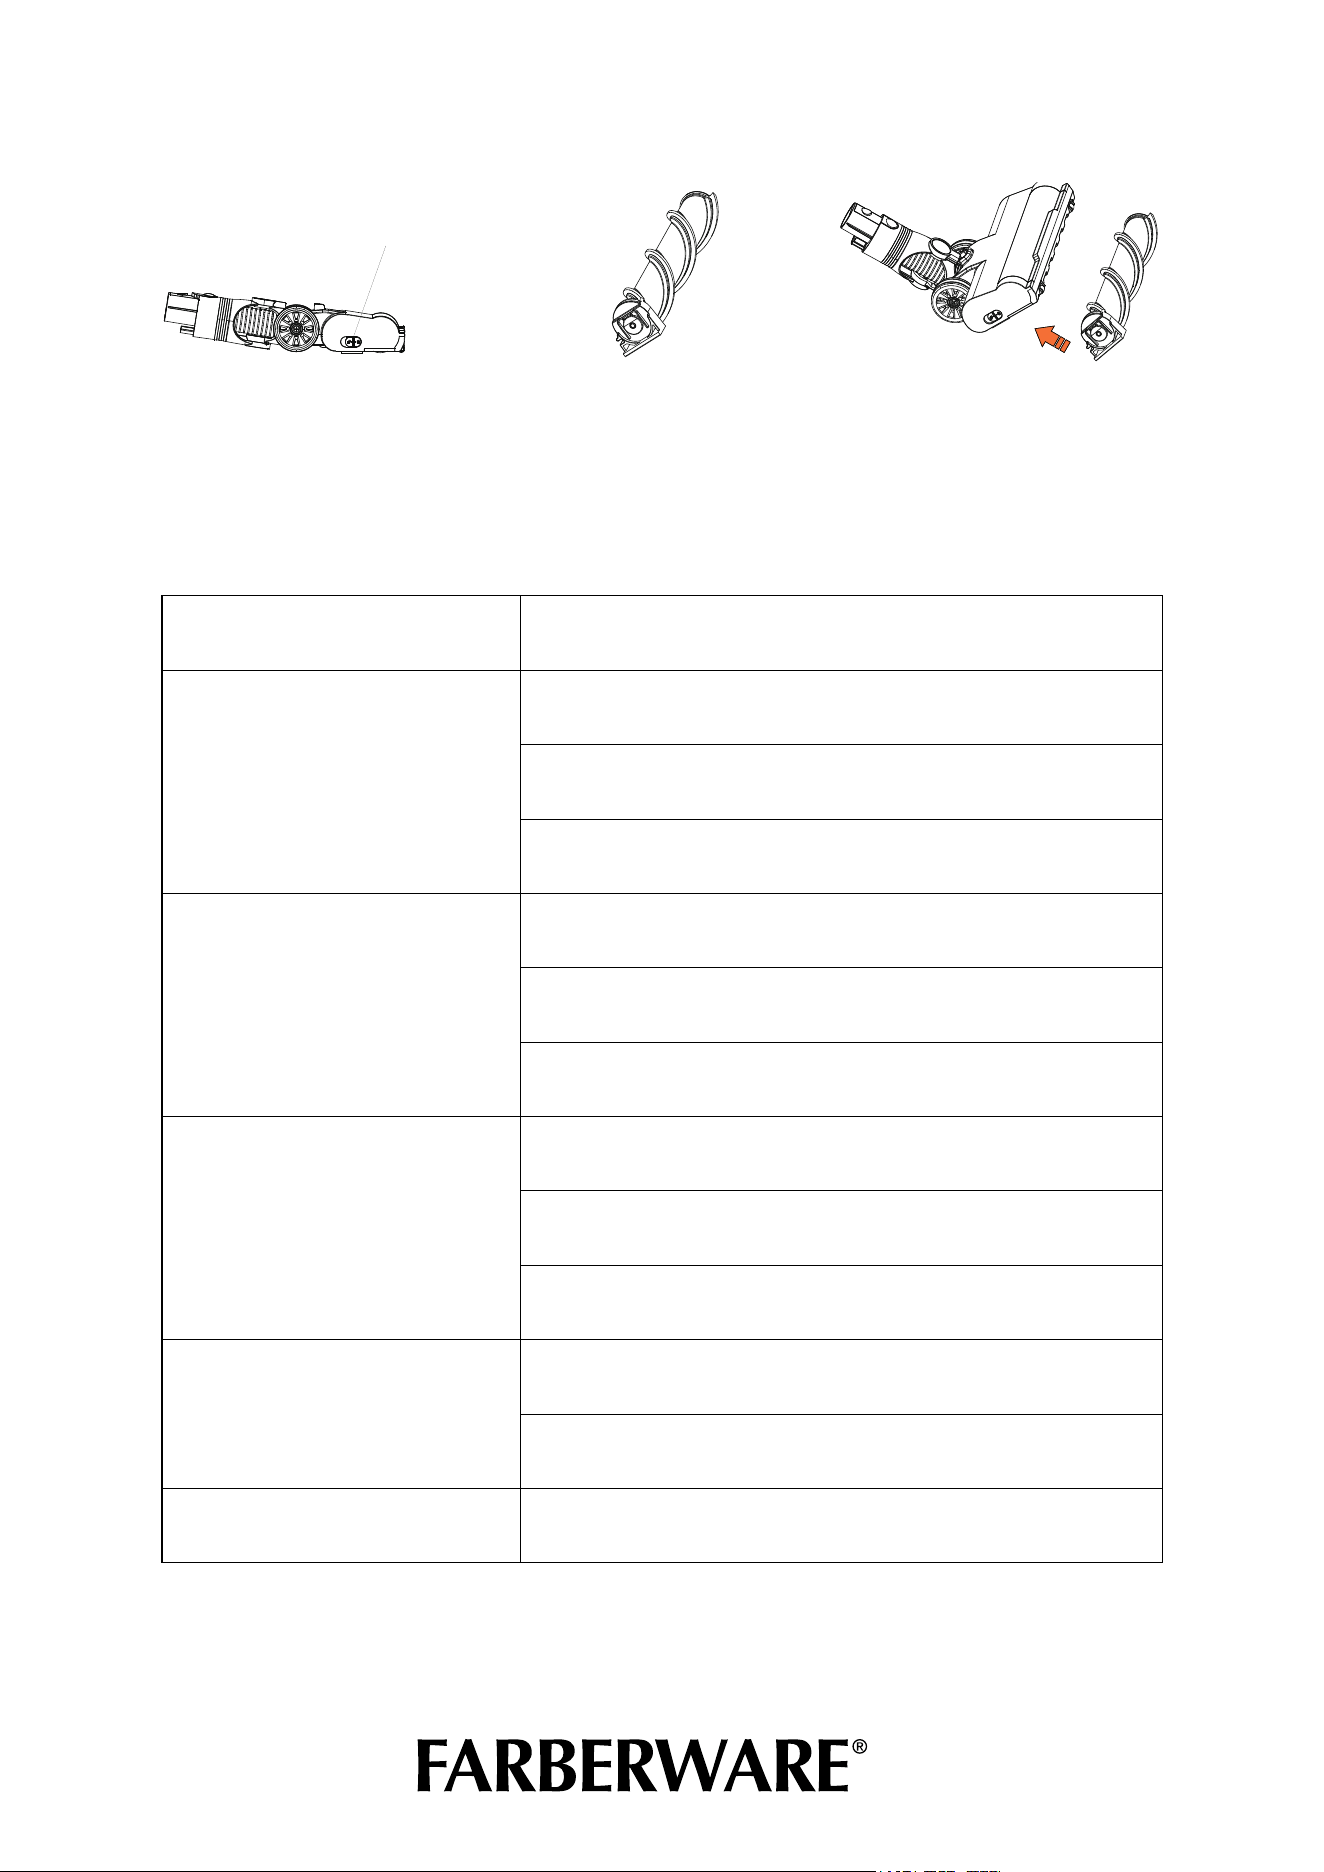
Brush roll will not turn Clean up all hair on the brush.
Roller brush release button
1. Press the release button to
remove the roller brush
2. Clean the hair fur debris from the
roller brush
3. Install the roller brush back in
place

©2024 Farberware Licensing Company, LLC All Rights Reserved
Copyrights and Trademarks of Farberware Licensing Company, LLC
including FARBERWARE™ and FARBERWARE®, are used under license
from Farberware Licensing Company, LLC.
Distributed by Shamrock Industries, Memphis, TN 38118
3-Year Limited Warranty ● [email protected]
For more information go to www.farberwareVC.com
Made in China
