HF1
User Manual
APPLY MANUAL LABEL
HERE

2
1. GETTING TO KNOW YOUR CLEANER
PRODUCT COMPONENTS:
A. On/O Button
B. Mode Button
C. Mode Led
D. Dust Cup
E. Dust Cup Flap Release Button
F. Dust Cup Release Button
G. Dusting Brush
H. Handheld Release Button
I. Tube *
J. Flexi Tube Release Button
K. Flexi Tube *
L. Nozzle Brushbar
M. Nozzle Brushbar Cover
N. Nozzle Brushbar Release Slider
O. Nozzle Release Button
P. Nozzle Front Led Light
Q. Nozzle
R. Mini Power Nozzle Brushbar
S. Fluy Stripe
T. Mini Power Nozzle Brushbar
Release Button
U. Mini Power Nozzle Release Button
V. Crevice Tool
W. Wall Mount Screws
X. Wall Mount
Y. Charger
Z. Battery Charging Socket
AA. Battery Release Button
AB. Battery Charging Indicator
AC. Lithium-ion Battery
AD. Micro Filter
AE. Foam Filter
AF. Exhaust Filter
*Dependant on your model.
B
AE
AC
R
D
E
GB
C
AD
AF
X
V
U
T
S
Y
W
AB
AA
Z
F
G
J
K
Q
L
M
M
O
N
P
I
H
A
3
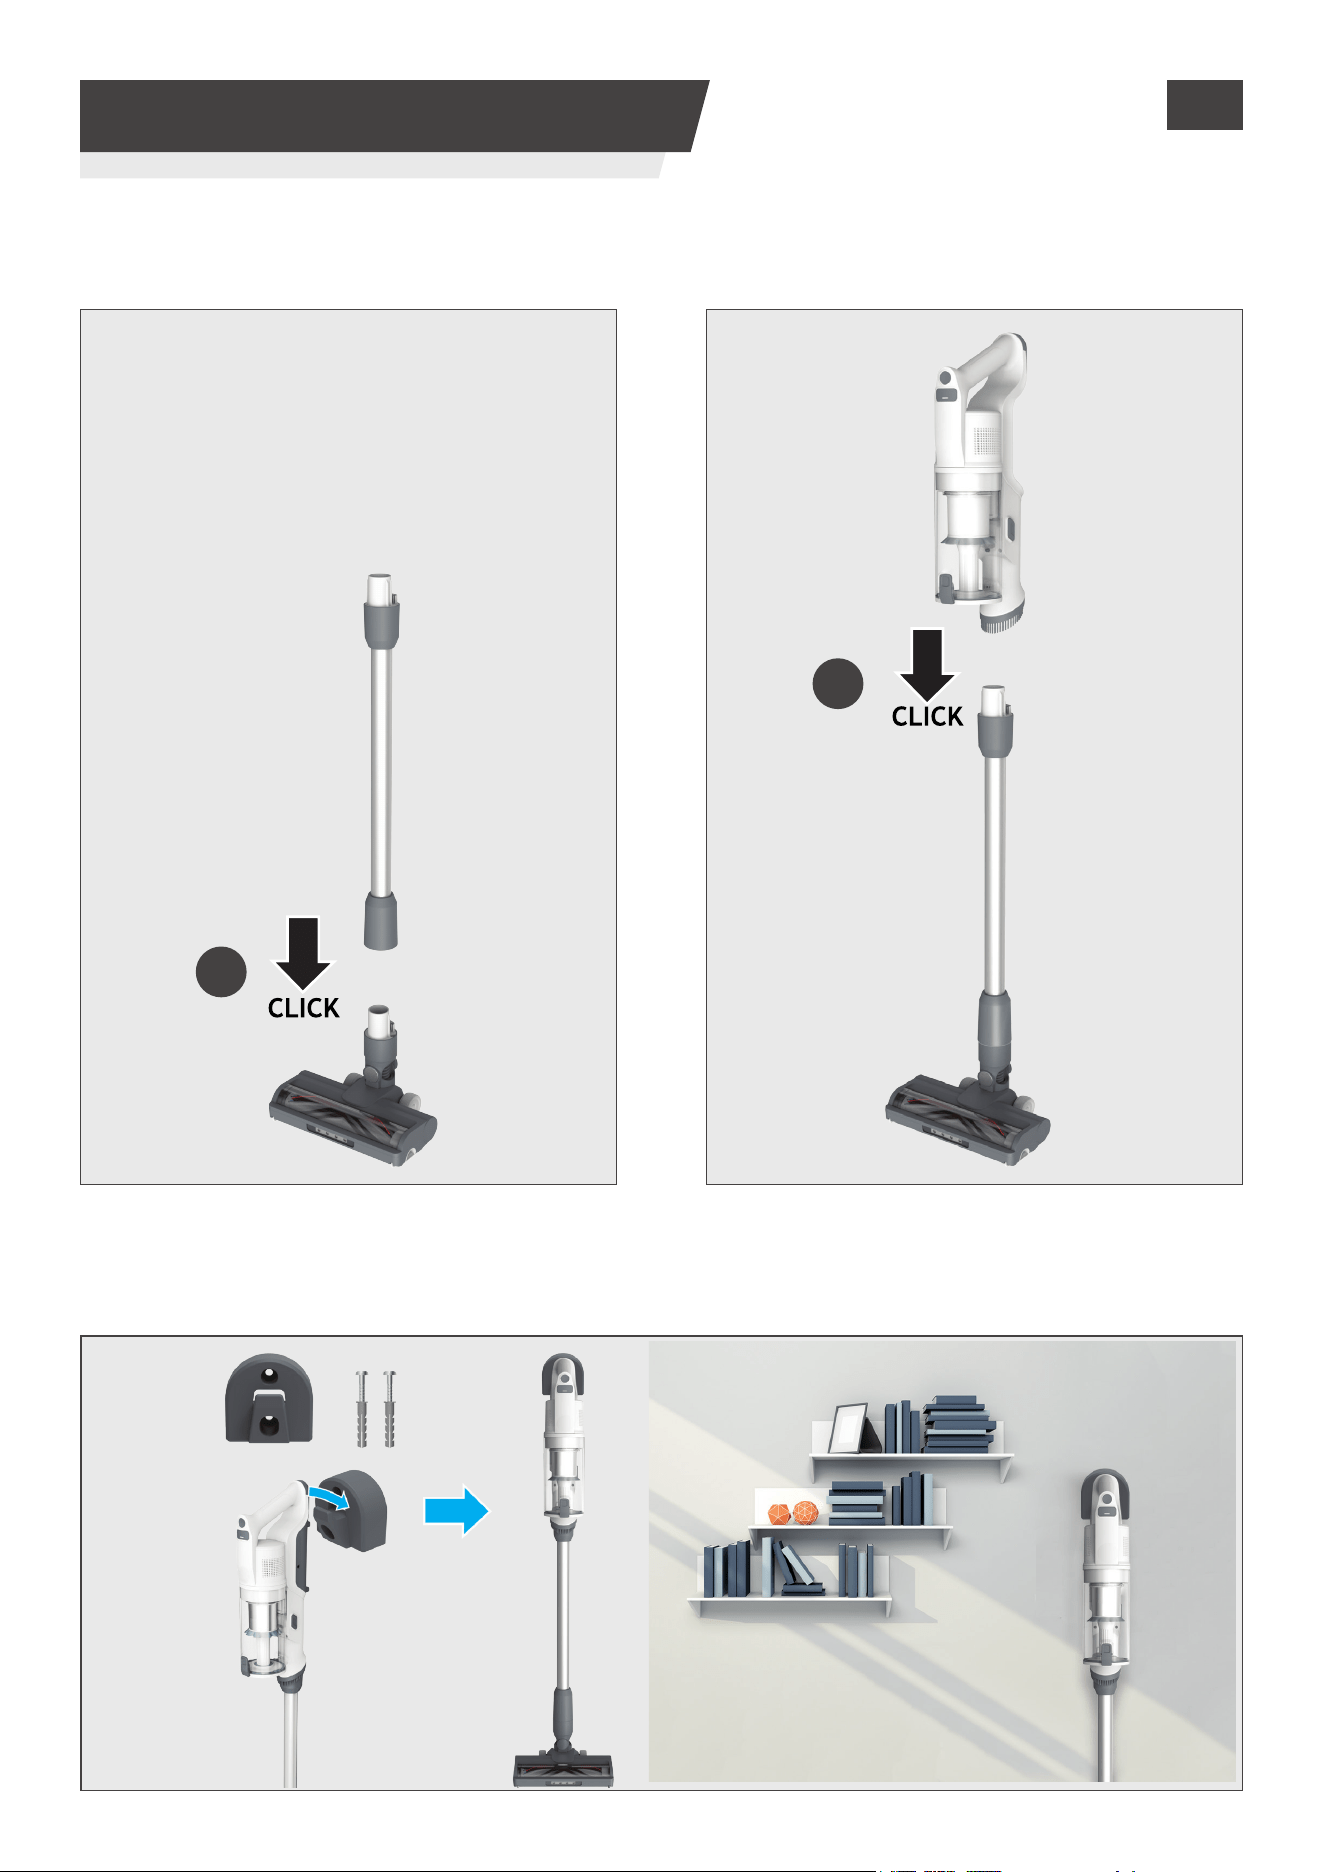
2. PREPARING YOUR CLEANER
STEP 1:
Fit the tube into the oor nozzle. STEP 2: Fit the handheld unit onto the tube.
Remove all product parts from the packaging and assemble your cleaner.
STEP 3: We provide a wall mount for optional storage.
If you wish to use it, x the wall mount to a suitable wall using the screws and xings provided.
2
GB
1

4
4. USING YOUR CLEANER
1 2 3
GB
There are 3 dierent working modes for your cleaner:
1. Stick mode.
2. Above Floor mode.
3. Handheld mode.
The battery of your product does not come fully charged.Before rst use, please charge your product
completely. lt takes around 5 hours.
For your convenience, the battery can be charged in 3 dierent conditions.
1. With the product fully assembled in stick mode or located in the wall mount.
2. With the product in the handheld mode.
3. With the battery removed from the product.
When using your product, the real time charge level of your battery is indicated on the battery pack.
When the remaining run time is reduced to 2 mins, the LED display icons will begin to blink.
It is recommended you switch o your product and recharge the battery.
NOTE: It is normal for the charger to become warm to touch when charging. Use only the charger
supplied with your product.
3. CHARGING THE BATTERY
66% 100%<33%
<5%
‘FLASH’‘FLASH’
1 2 3
TURBO TURBO
STANDARD STANDARD
MODEMODE
TURBO MODETURBO MODE
5
GB
1
2 3
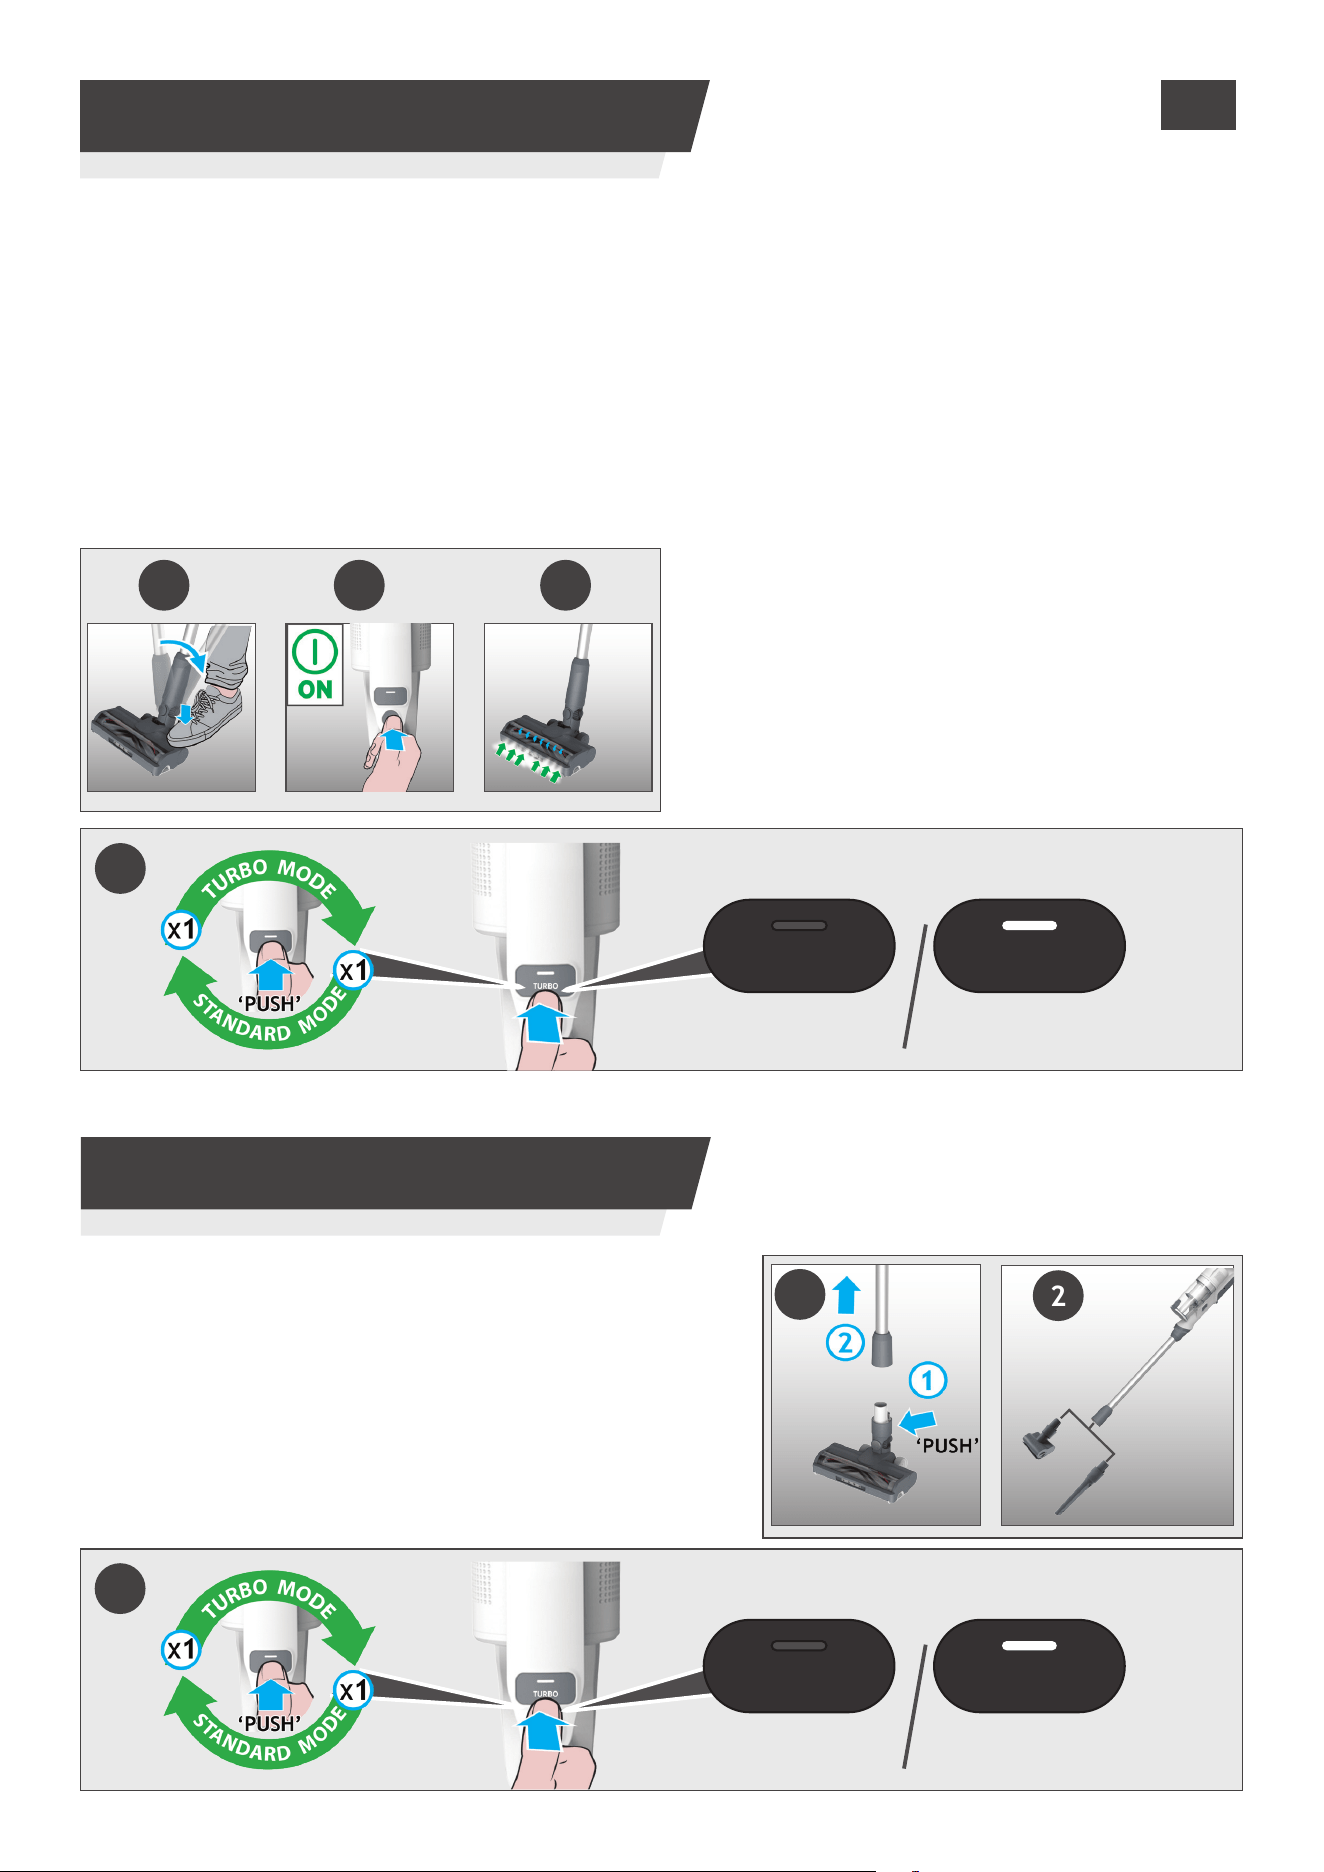
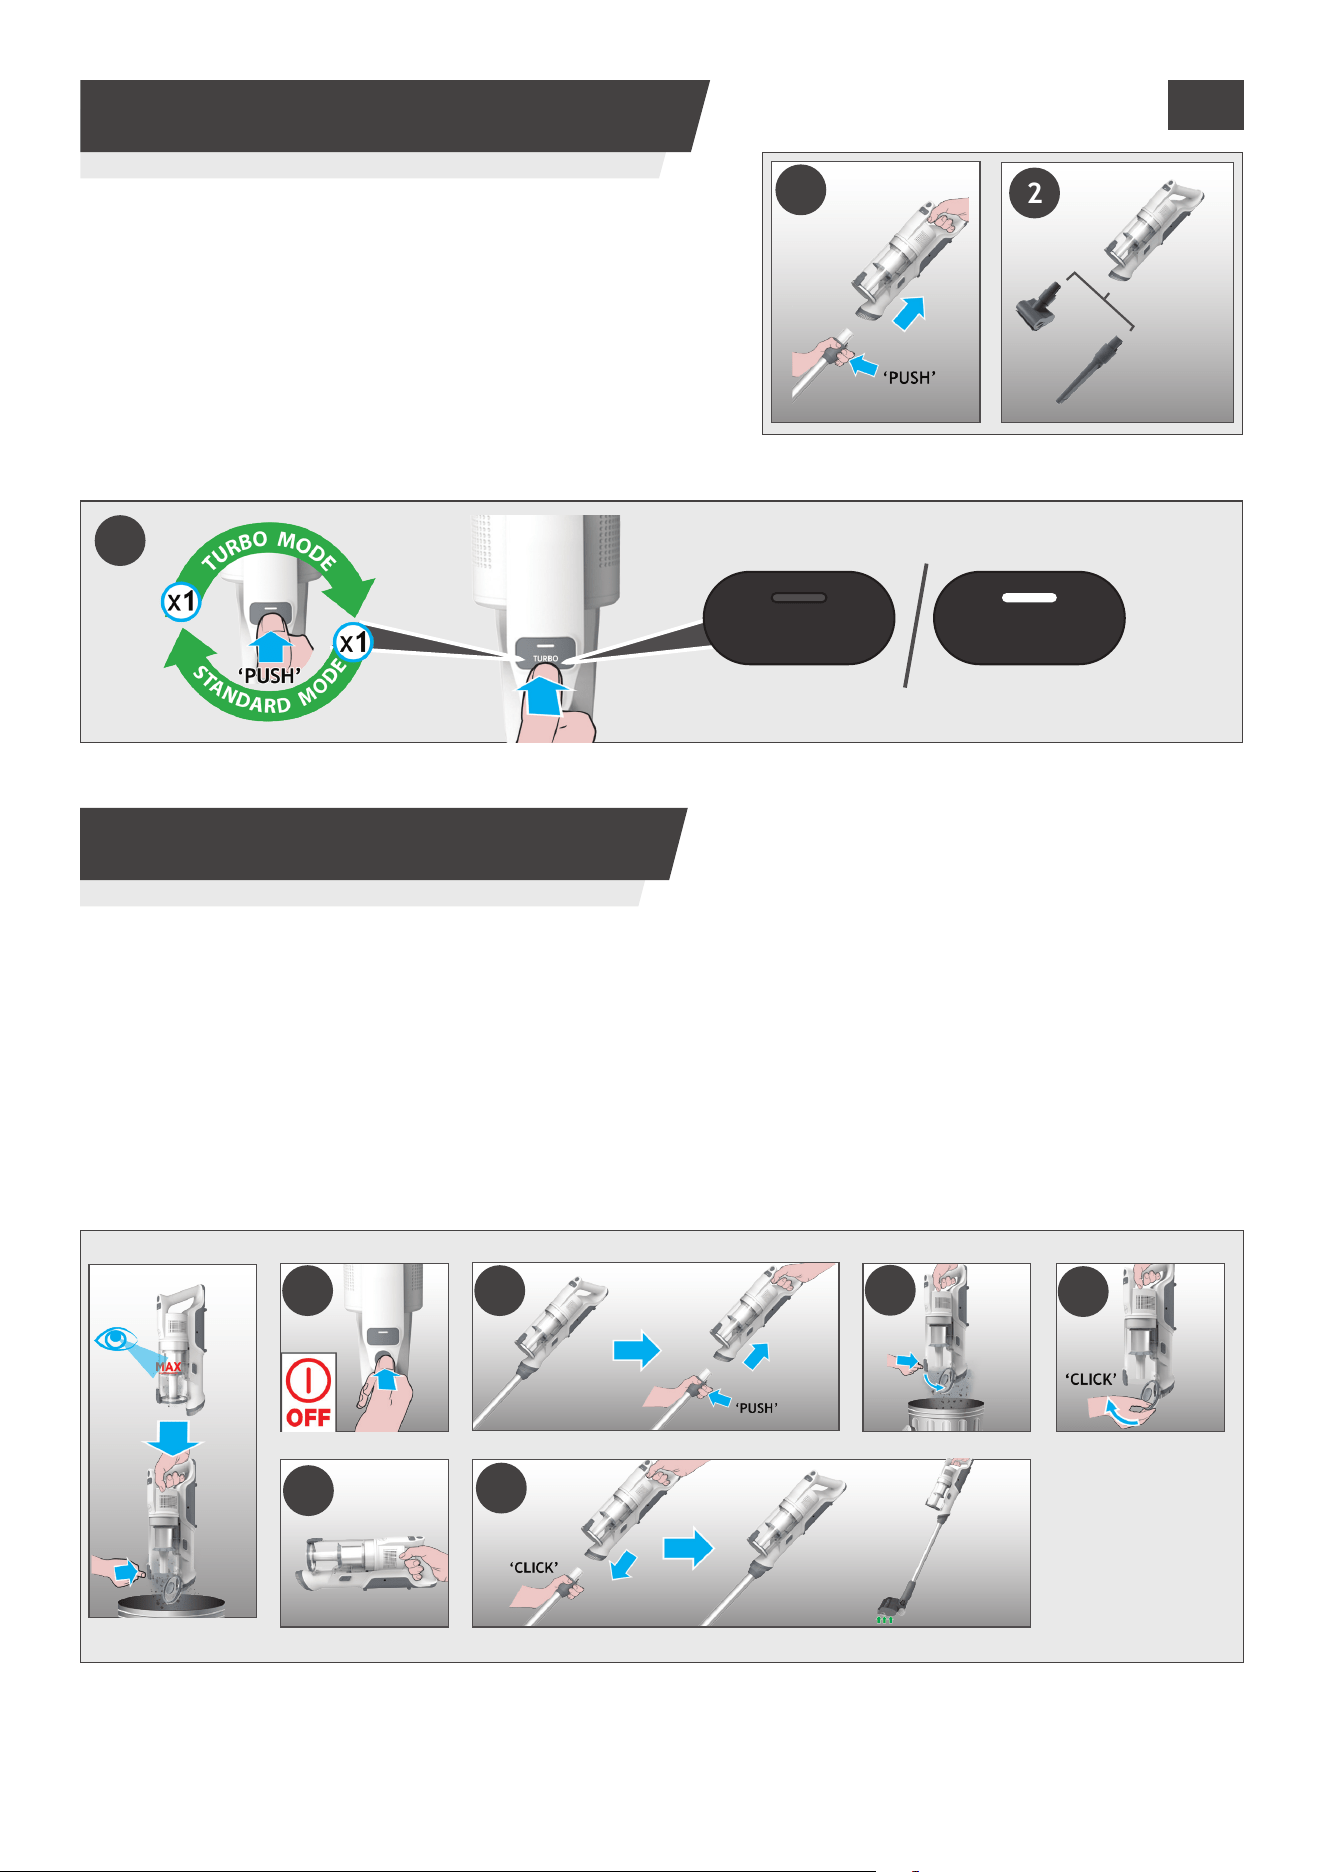
To use your product in Stick mode:
1. Place your foot on the nozzle and pull back to recline the tube.
2. Press the On/O power button to begin cleaning.
NOTE: The nozzle LED lights are always on and the brushbar is always rotating.
If you require a deeper clean when using your product in Stick mode, press the Turbo button to increase
the power.
The turbo icon will illuminate on the LED display to conrm your selection.
Please note this will reduce your battery runtime.
To return to standard mode, press the Turbo button, the icon on the display will turn o.
4.1 STICK MODE
TURBO TURBO
STANDARD STANDARD
MODEMODE
TURBO MODETURBO MODE
3
4.3 ABOVE FLOOR MODE
1
2
3
To use your product in Above Floor mode:
1. Remove the tube from the nozzle by pressing the
nozzle release button and pull the tube from the oor
nozzle.
2. Fit your desired accessory to the end of the tube.
All of your available accessories will t onto the end of
the tube.
3. Press the On/O power button to begin cleaning.
6
5. CLEANER MAINTENANCE
5.1 EMPTYING THE DUST BIN
GB
NOTE: It is recommended to empty the dust cup after each use or when dust is up to the max ll line.
1. Ensure your product is switched o.
2. Press the Handheld release button and disconnect the handheld unit from the tube or Flexi tube.
3. Hold the handheld over a Dust Bin and press the Dust Bin Empty Release Button to open the ap and
release the debris into the trash.
4. Close the dust cup ap,you will hear a click when fully locked.
5. Check that the Dust Bin is back into its original position.
6. Re-Assemble your product.
1 2
3
5
4
6
To use your product in Handheld mode:
1. Remove the Handheld unit from the tube by pressing the
handheld release button and pulling apart.
2. Fit your desired accessory to the end of the handheld
unit.
The oor nozzle and all of your available accessories will
t onto the end of the handheld unit.
3. Press the On/O power button to begin cleaning.
4.4 HANDHELD MODE
1
2
TURBO TURBO
STANDARD STANDARD
MODEMODE
TURBO MODETURBO MODE
3
7
GB
5. CLEANER MAINTENANCE
5.2 DUST CUP AND FILTERS
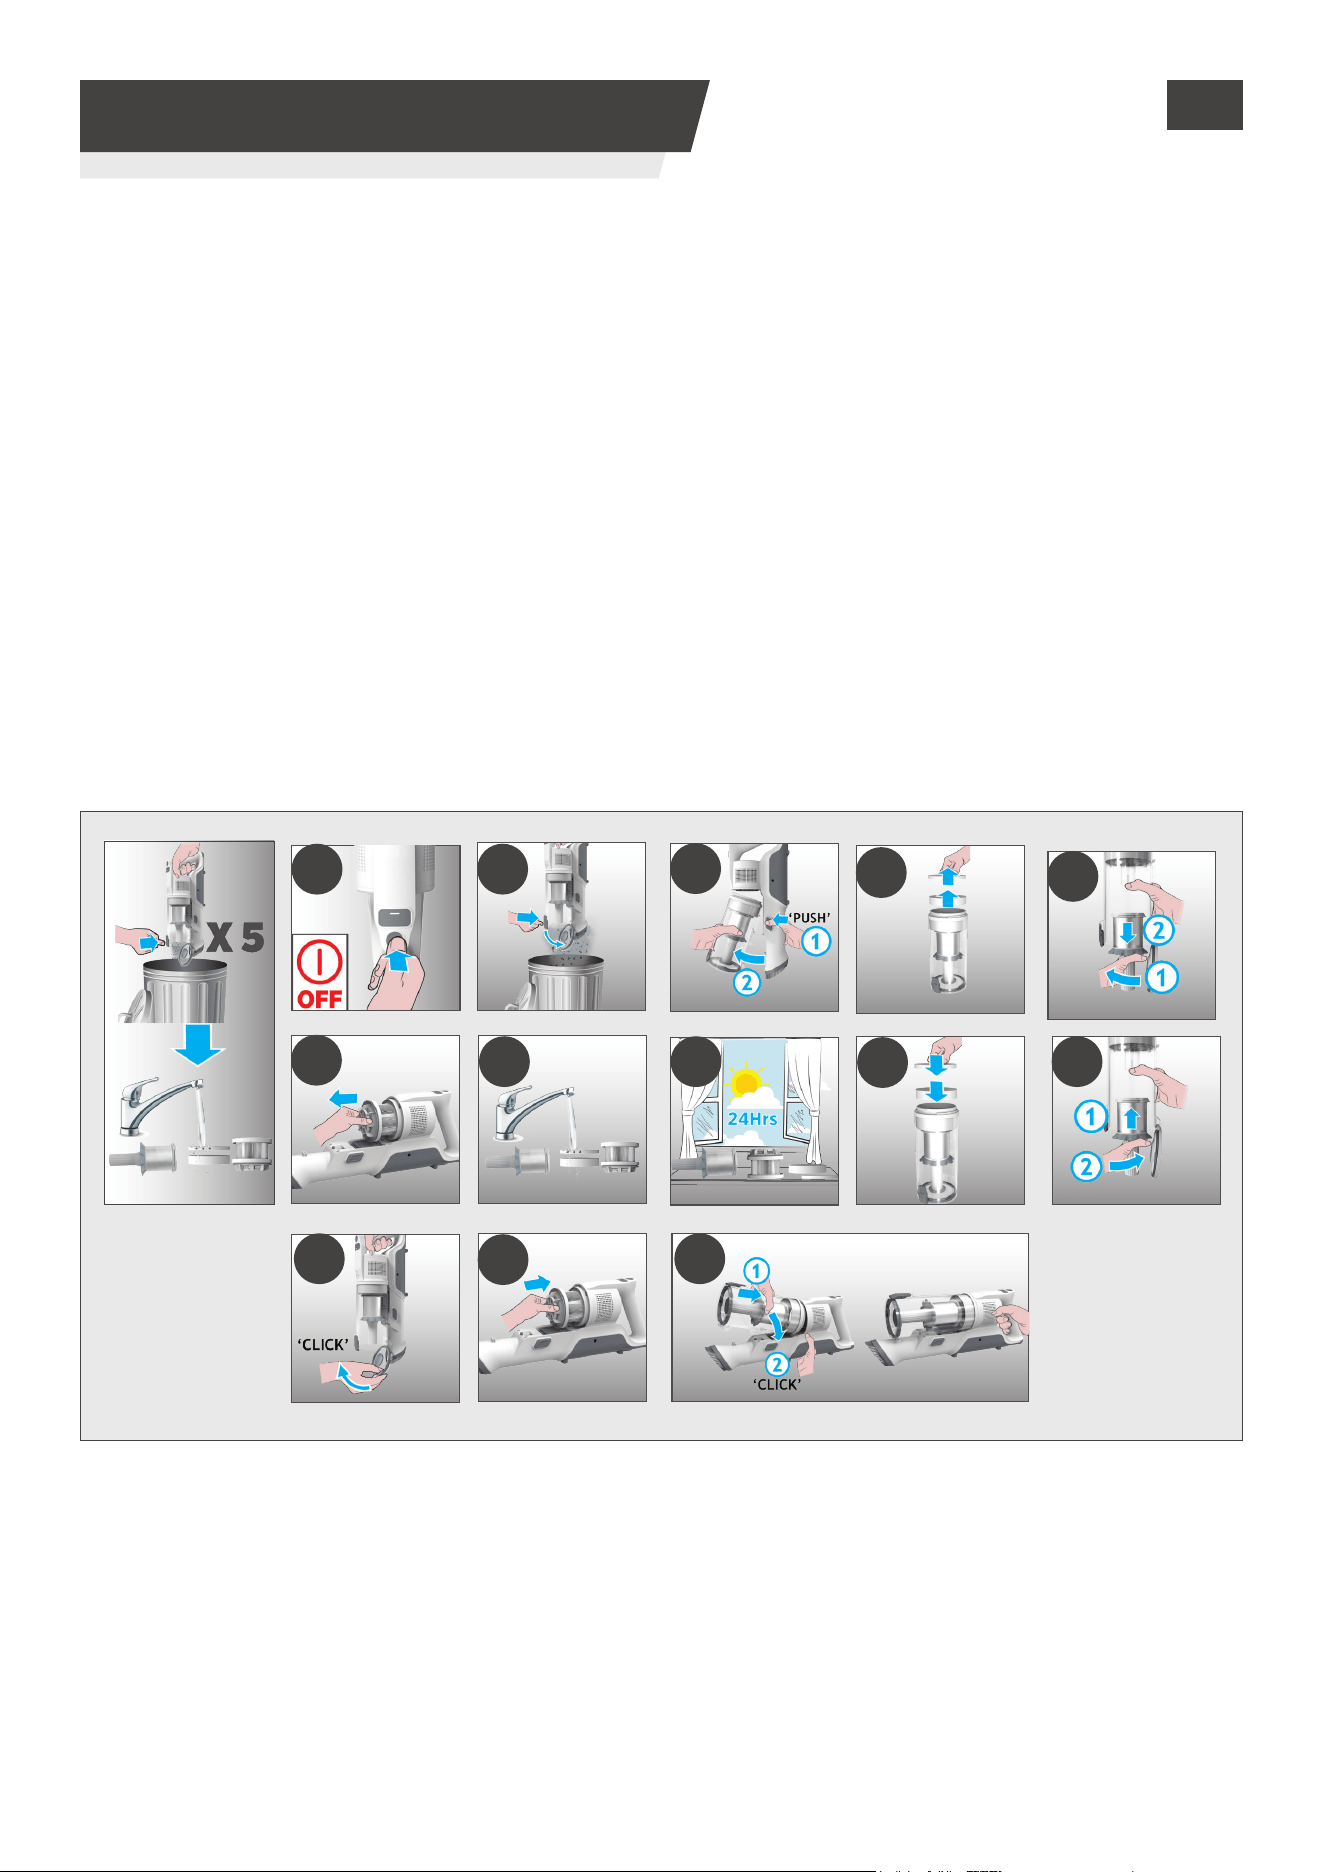
IMPORTANT: For optimum performance, we recommend to wash the lters after every 5 bin
empties.
1. Ensure your product is switched o.
2. Hold the handheld over a Dust Bin and press the Dust Bin Empty Release Button to open the ap and
release the debris into the trash.
3. Press the dust cup release button and disconnect the dust cup from the unit.
4. Pull out the Micro and foam lter from the dust cup.
5. Remove the Metal lter from the Dust Bin by turning it Anti-clockwise and clean.
6. Pull out the exhaust lter from the handheld.
7. Wash the lters and the bin using lukewarm water.
8. Leave them to dry for 24hrs before retting to your product
9. Ret the micro and foam lters back in the the dust cup ensuring they are in the correct positions.
10.Re-assemble the Metal lter back into the Dust bin, insert into position and rotate it clockwise until
you hear a “click” sound.
11. Close the bin ap.
12.
Reinsert the
exhaust lter into the handheld.
13.
Reinsert
the dust cup onto the handheld until you hear a “click” sound.
NOTE: Do not use hot water or detergents when cleaning the Micro and foam lter. In the unlikely event
of the micro and foam lter becoming damaged, t a genuine Hoover replacement.
IMPORTANT: For optimum performance, we recommend that the lters are replaced after 5 washes,
with genuine Hoover parts.
1 2
3
4
8 10
11
5
6
7
13
12
9
8
5. CLEANER MAINTENANCE
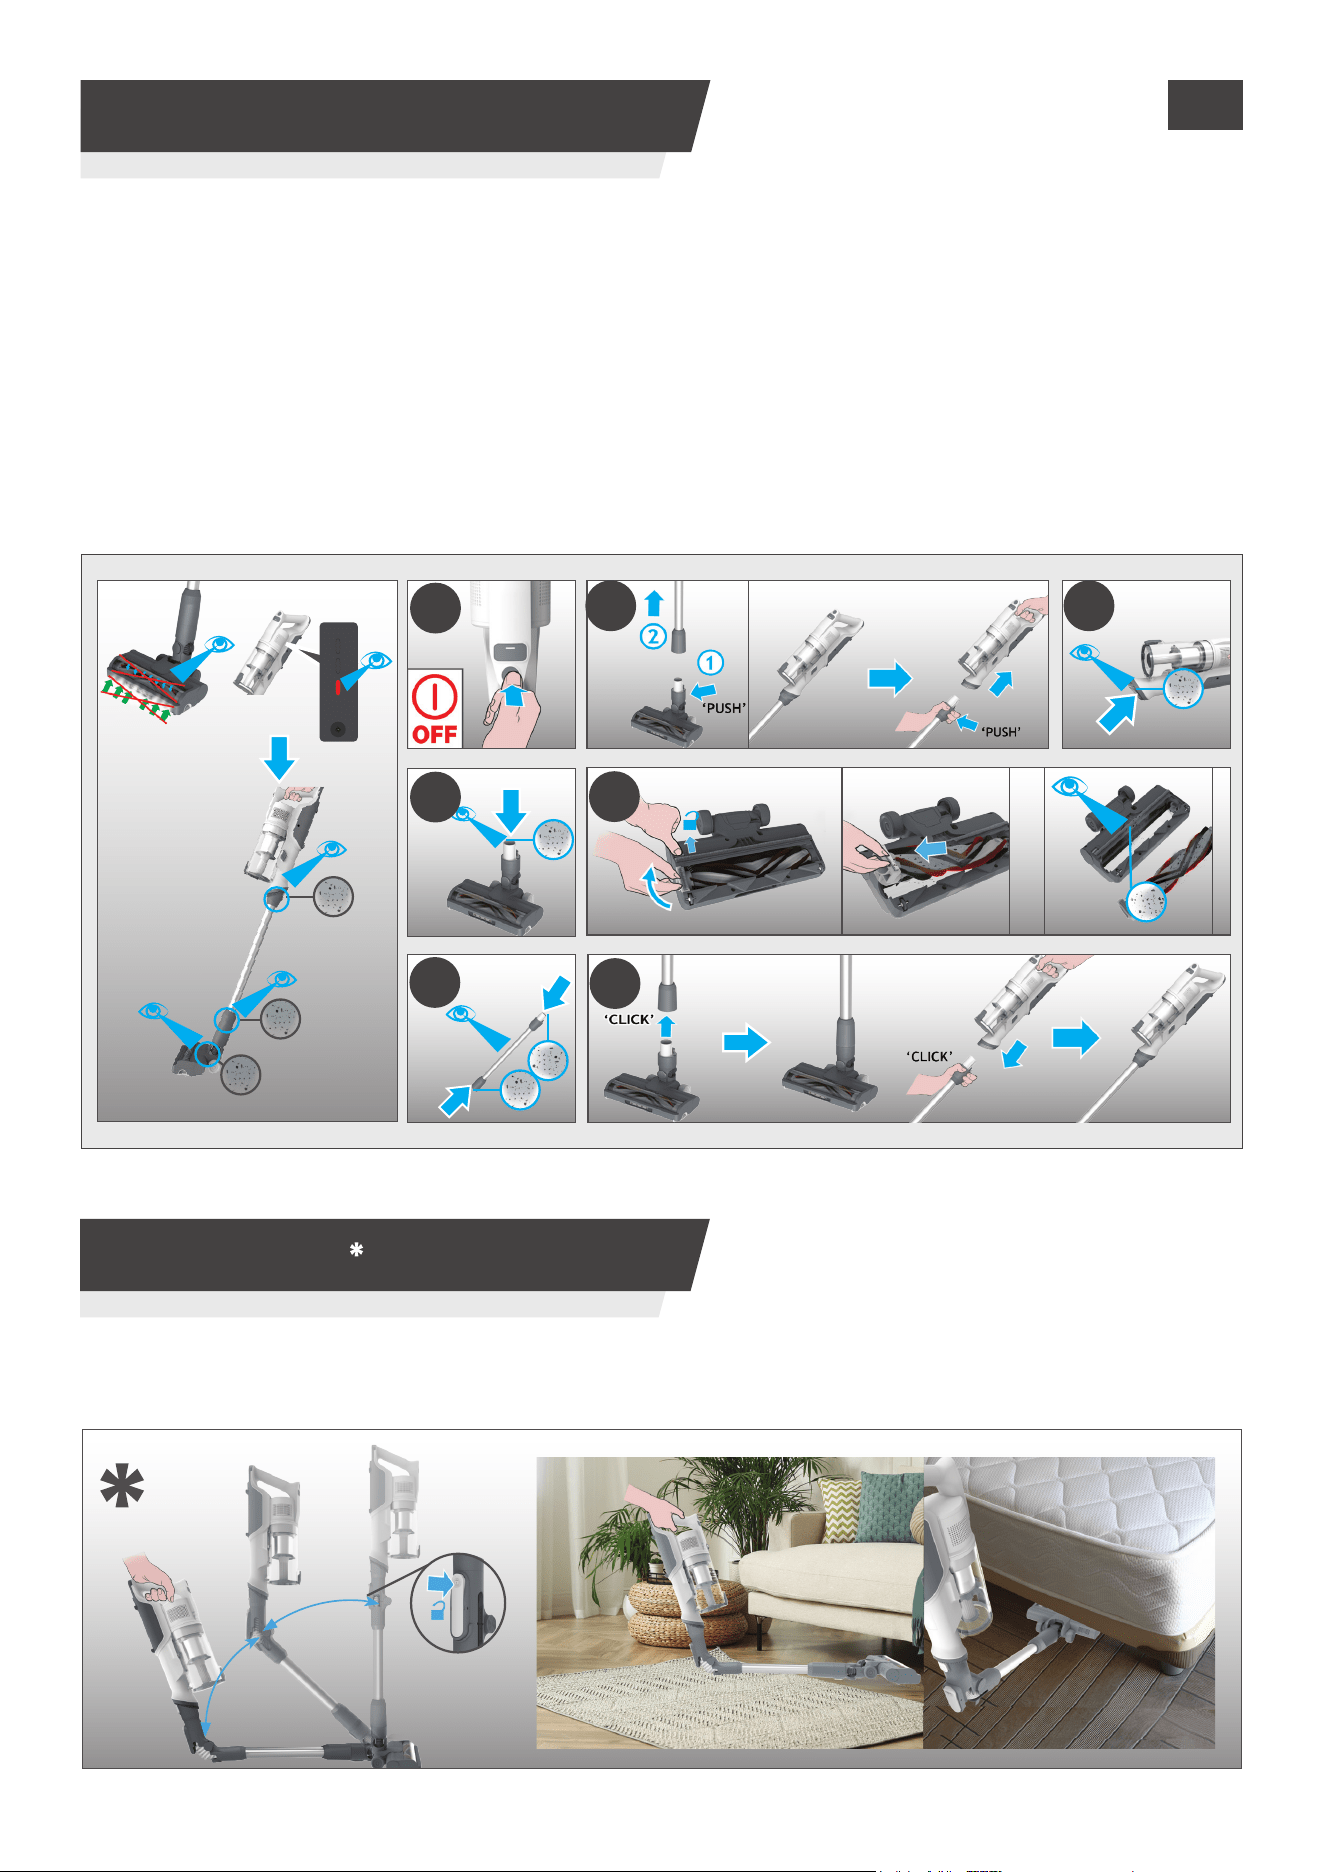
5.3 FLOOR NOZZLE
5. CLEANER MAINTENANCE
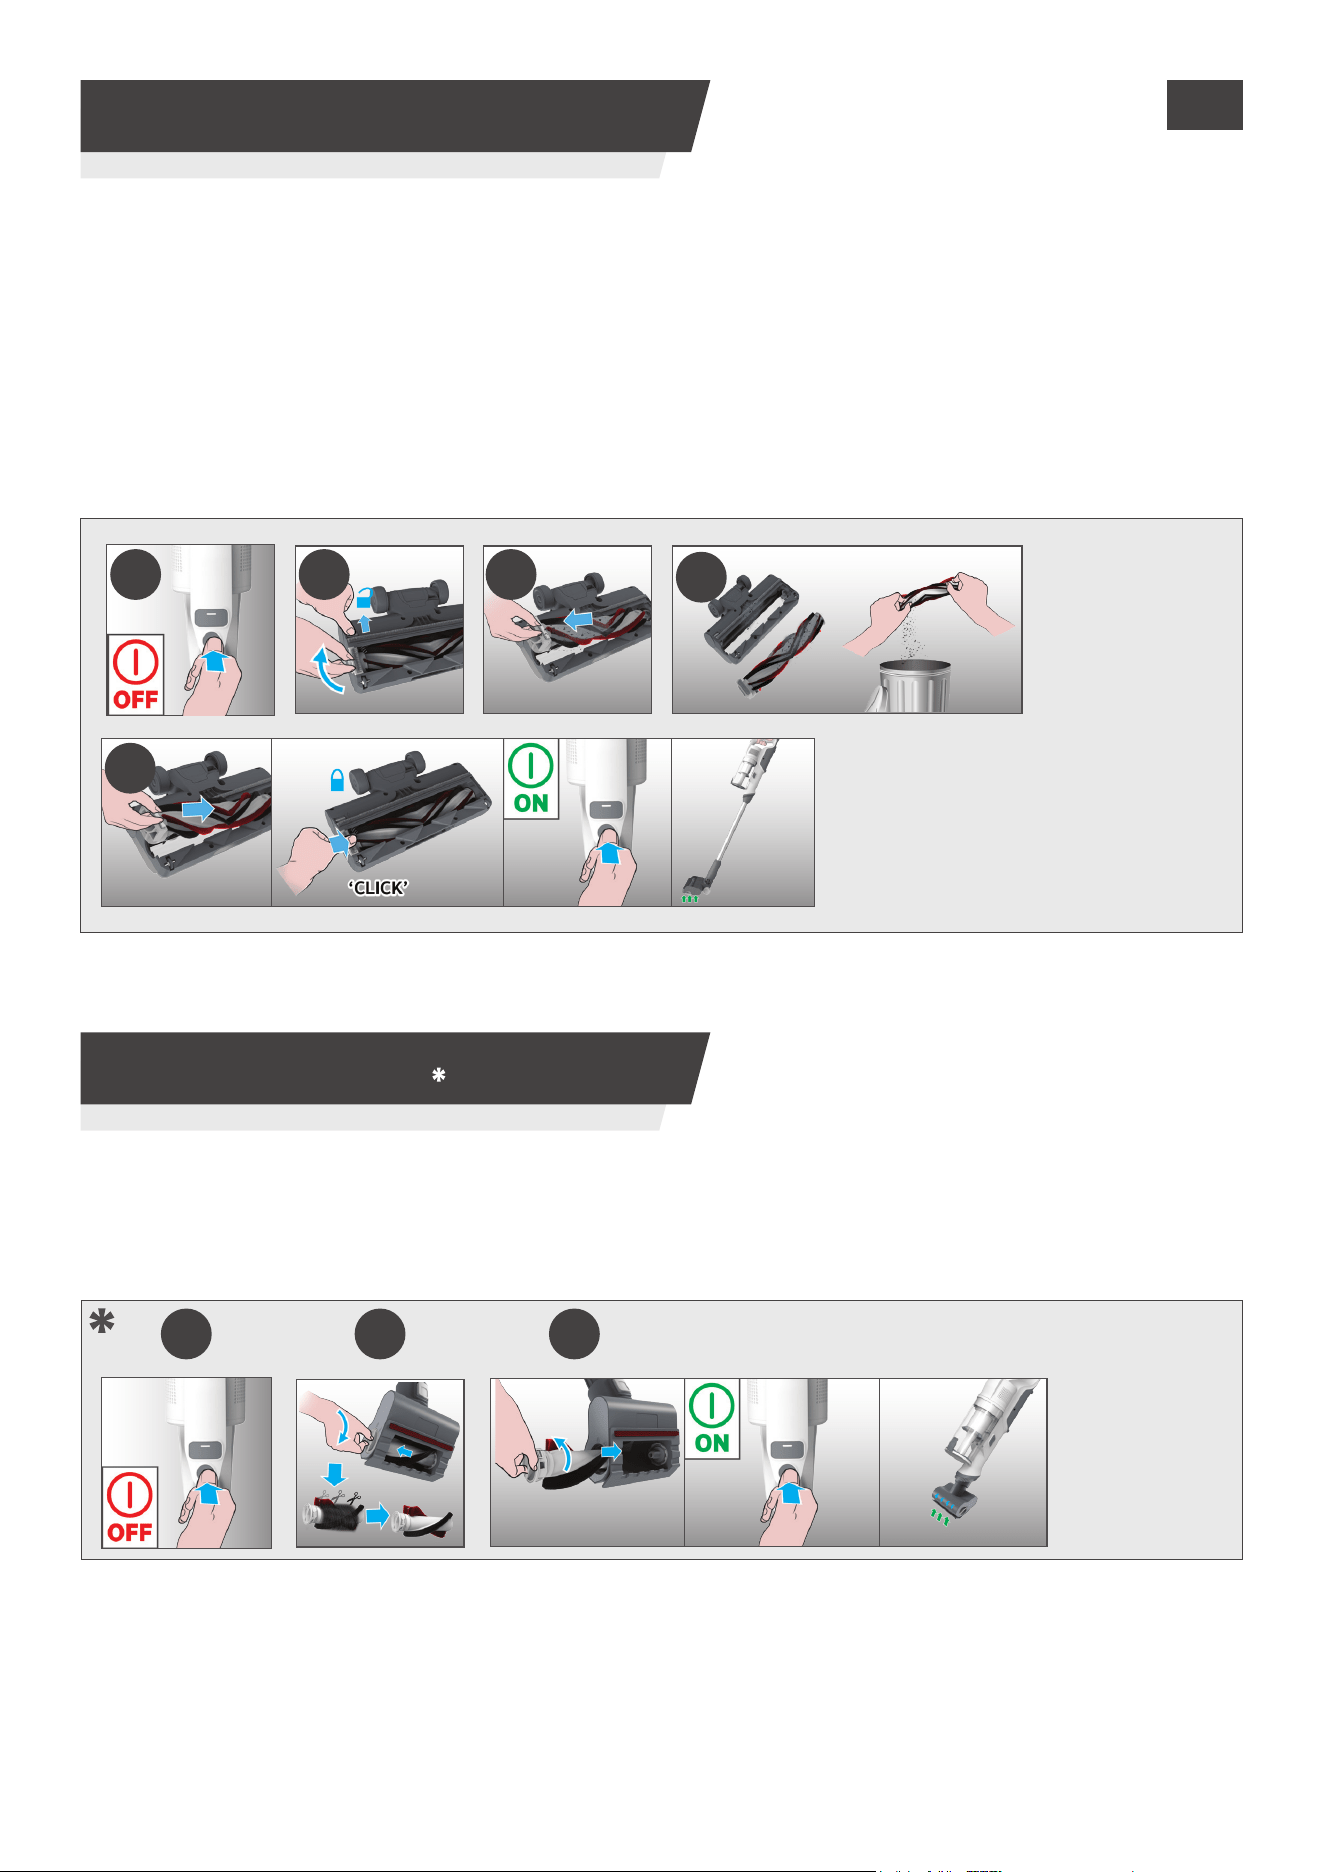
5.4 MINI POWER NOZZLE
Thanks to ANTI-TWIST, your Hoover vacuum features an integrated comb which radially reduces hair wrapping
around the brushbar. However, if your cleaner is not picking up eciently your brushbar may need to be cleaned
or there is large debris needing to be removed from inside the nozzle.
1. Ensure your product is switched o.
2. Slide the Nozzle Brushbar Release Slider on the nozzle and lift Nozzle Brushbar Release Latch.
3. Remove Nozzle Brushbar from the Floor Nozzle.
4. Remove any excess debris from the brushbar. Check for and remove any large debris from inside the nozzle.
5. Re-insert the brushbar into the nozzle ensuring it is in the correct position and push down at the end of the
brushbar until you hear it “CLICK “ to lock in position.
5
2 31
1. Ensure your product is switched o,detach the mini power nozzle from your product.
2. To remove the brushbar, unlock the release latch and using scissors, remove any tangled bres or
debris from the Brushbar.
3. Re-t the brushbar, push and lock the release latch. Look inside the nozzle and remove any debris.
1 2 3
4
GB
*Dependant on your model.
9
GB
5. CLEANER MAINTENANCE
5.5 BLOCKAGES
If you want to easily access hard-to-reach areas under furniture, press the exible tube release
button to position the tube to a lower angle.
If your product is operating but has poor pick up this may be due to a blockage in the nozzle or the tube
or your brushbar is not rotating. If this is the case a solid red light will appear on the Battery charging
indicator. Carry out all maintenance instructions as detailed in sections, 5.1,5.2,5.3,5.4. Along with the
additional areas listed below.
1. Ensure your product is switched o.
2. Detach the nozzle, tube and handheld unit as per previous instructions.
3. Visually check the handheld inlets for any debris or obstructions and clean it.
4. Visually inspect the nozzle joints area for any debris or obstructions and clean it.
5. Remove the brushbar and check the nozzle inlet area for any debris or obstructions and clean it.
6. Visually check both ends of the tube and remove any debris or obstructions.
7. Re-Assemble your product.
1
6
2
5
3
7
4
6. FLEXIBLE MODE

10
7. TROUBLE SHOOTING
GB
Should you have any problem with you cleaner, follow this simple check list before calling the
Hoover Customer Service Centre.
A. Cleaner does not switch on.
Check if the cleaner is charged.
Check if the battery pack is assembled in place.
B. If a solid red light appears the battery charging indicator.
Check if the nozzle stop working and remove any excess debris from the brush bar and any
tangled debris from the comb
C. Cleaner stop working.
Check if there is an obstruction in air inlet or in the tube, clear it and ensure the product is OFF.
Once this is done simply press the on/o button, the product will start working again.
D. The Nozzle status LED light goes o and the warning symbol on battery pack is RED.
There is a blockage in the nozzle or an obstruction to the brush bar. Ensure your product is
switched OFF and remove any debris or obstruction and following cleaner maintenance 5.
E. Batteries cannot be charged.
This may be a result of very long storage periods (over half year).
Contact Hoover customer service to arrange battery replacement.
If the problem persists, contact the Hoover customer service center.
Disposal of the packing material
The Packaging is designed to protect the appliance from damage during transportation. The
packaging materials used are selected from materials which are environmentally friendly for
disposal and should be recycled.
Recycling the packaging reduces the use of raw materials in the manufacturing process and also
reduces the amount of waste in landll sites
Replacing and disposing the Batteries
This cleaner is tted with a rechargeable lithium-ion battery pack which is replaceable.
WARNING: Only use approved replacement parts for your cleaner. Using parts not validated by
hoover are dangerous and will invalidate your guarantee.
WARNING: Do not try to open the battery pack and repair it by yourself.
1. Press the battery release buttons and pull the battery outside.
2. Removed the old battery pack and replace with the new battery pack.
3. Dispose of the batteries safely. Used batteries should be taken to a recycling station and not
disposed of with household waste.
HOOVER SPARES AND CONSUMABLES
Always replace parts with genuine Hoover spares. These are available from your local Hoover
dealer or direct from Hoover.
When ordering parts always quote your model number.
YOUR GUARANTEE
The guarantee conditions for this appliance are as dened by our representative in the country
in which it is sold. Details regarding these conditions can be obtained from the dealer from
whom the appliance was purchased. The bill of sale or receipt must be produced when making
any claim under the terms of this guarantee.
IMPORTANT: the battery in this cleaner is guaranteed for 1 year from the date of purchase.
After 1 year the customer is liable for the cost of a new battery.

11

1212
Printed in P.R.C. Part No. : 48701671/01_Manual
Part No. : 48701585 - UK Guarantee
GUARANTEE CARD
https://www.hooverdirect.co.uk/pages/register-vacuum-warranty
To qualify for under the guarantee, you must be able to provide proof of date of purchase and the appliance must have been supplied, maintained and used in accordance with Hoover Instructions.
The guarantee does not cover accidental damage, loss or damage arising from the breakdown of the product. The guarantee excludes A) Any faults which occur due to defective installation or
misuse of the machine B) Repair of, or interference with, the machine by any person not authorised by the manufacturer C) Any parts which are to the machine which are not original manufacturers
parts D) Nondomestic use of the machine E) Operation at incorrect voltage F) The result of using the machine for any purpose other than those described in the instruction manual. Hoover Service If
your machine needs servicing simply call 03444 995599 and you will be connected to your local service (Lines open: Monday Friday 8.30am-5pm, Saturday 9am-5pm and Sunday 10am-4pm). We may
record your phone calls with our representatives to monitor and improve the quality of service we provide.
Model / Serial number no. -
Fill in the serial number of your appliance, for this refer to service manual -
Name
.....................................................................................................................................................................................................................................
Street
.....................................................................................................................................................................................................................................
Town
.....................................................................................................................................................................................................................................
Date of purchase -
.....................................................................................................................................................................................................................................
Dealer
.....................................................................................................................................................................................................................................
UK/ROI
United Kingdom-ROI
Haier Smart Home UK&I Ltd
www.hoover.co.uk
03444 995599
