
Technical Support and E-Warranty Certificate www.vevor.com/support
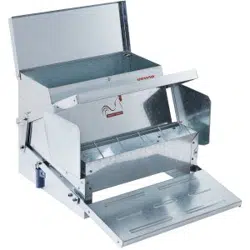
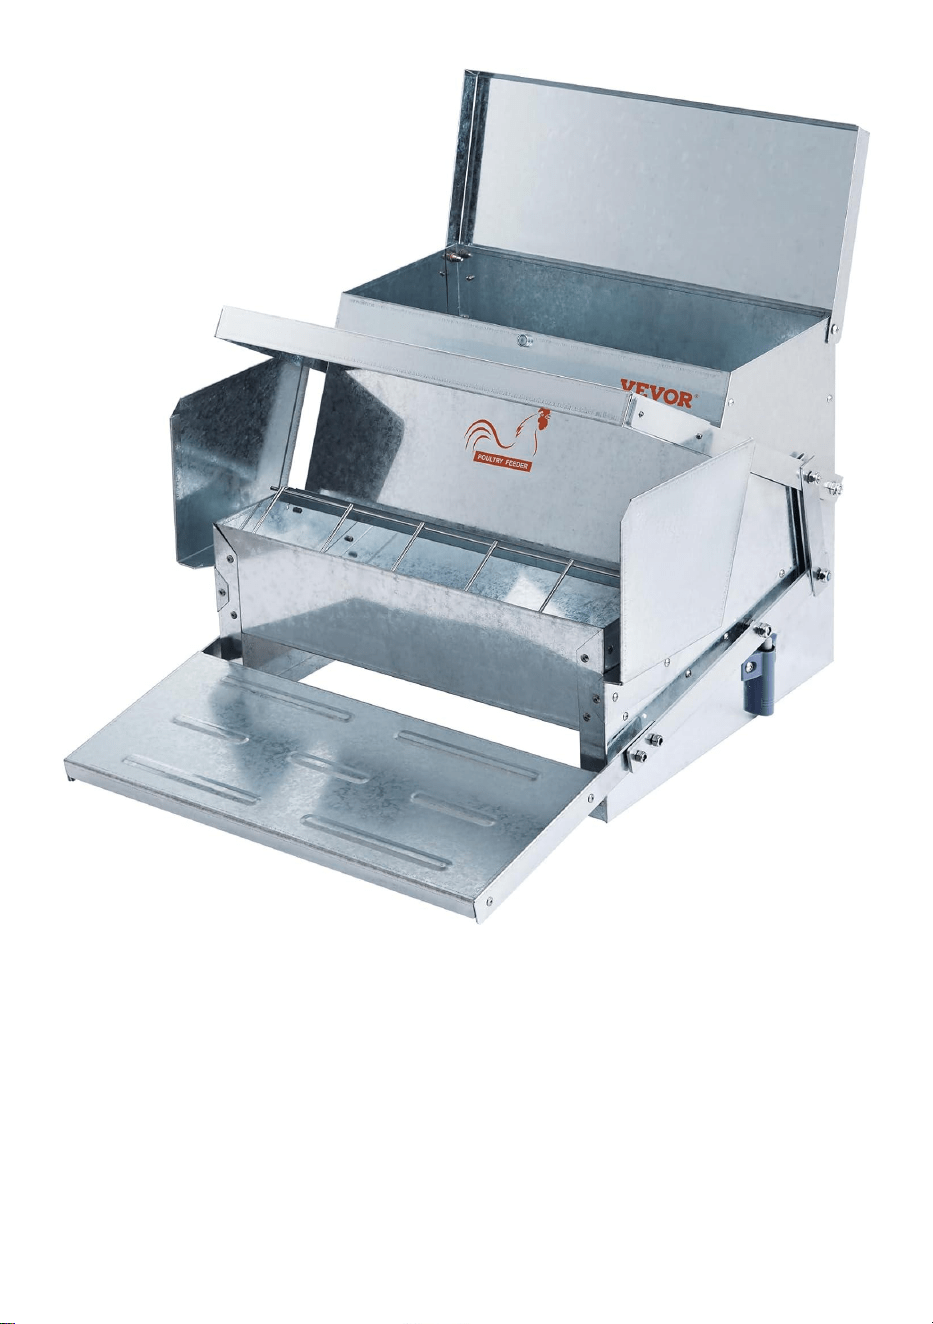
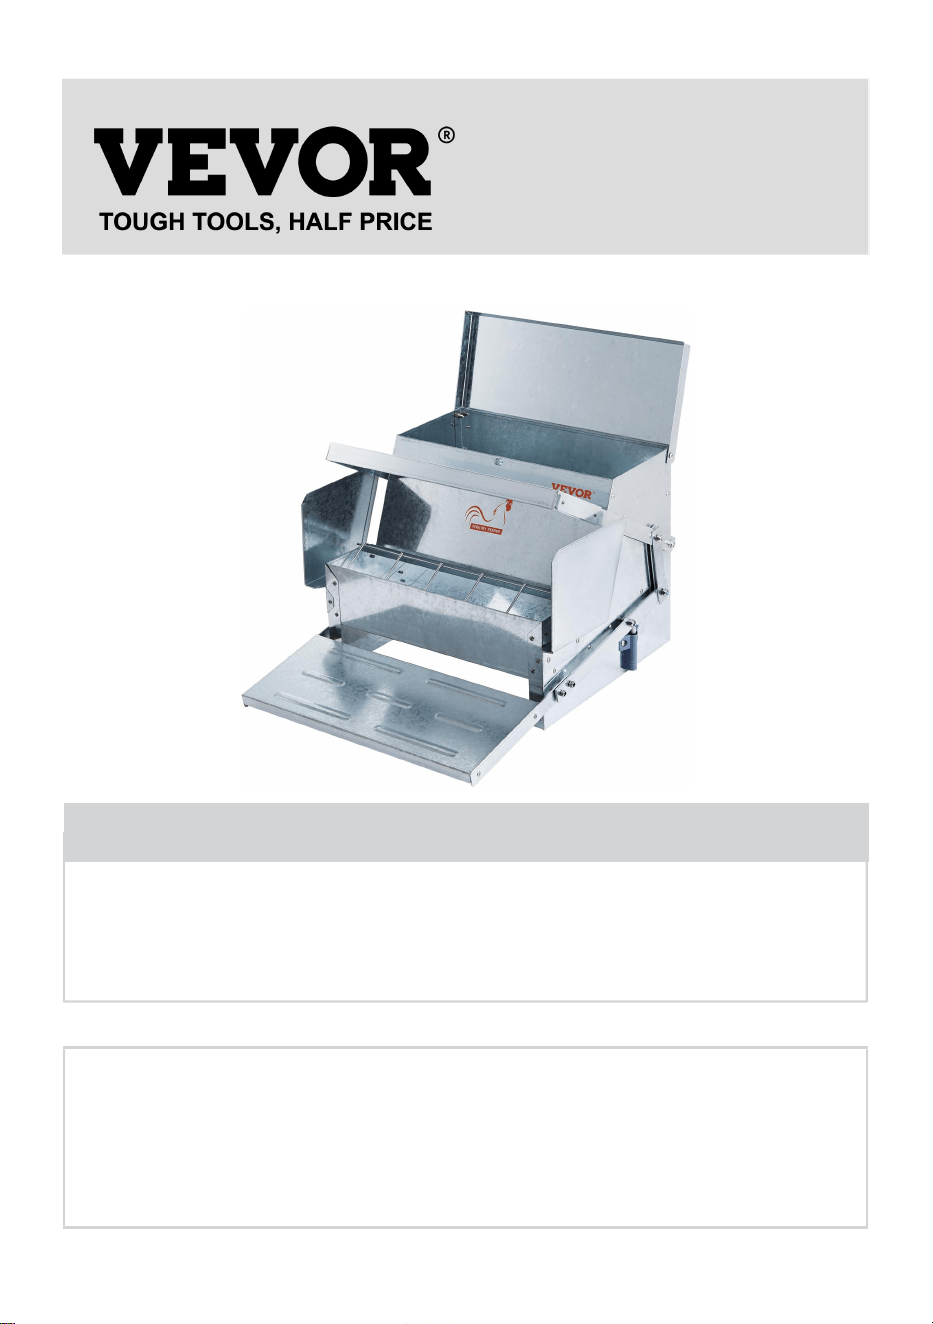
POULTRY FEEDER
USER MANUAL
We continue to be committed to provide you tools with competitive price.
"Save Half", "Half Price" or any other similar expressions used by us only represents an
estimate of savings you might benefit from buying certain tools with us compared to the major
top brands and does not necessarily mean to cover all categories of tools offered by us. You
are kindly reminded to verify carefully when you are placing an order with us if you are
actually saving half in comparison with the top major brands.

- 1 -
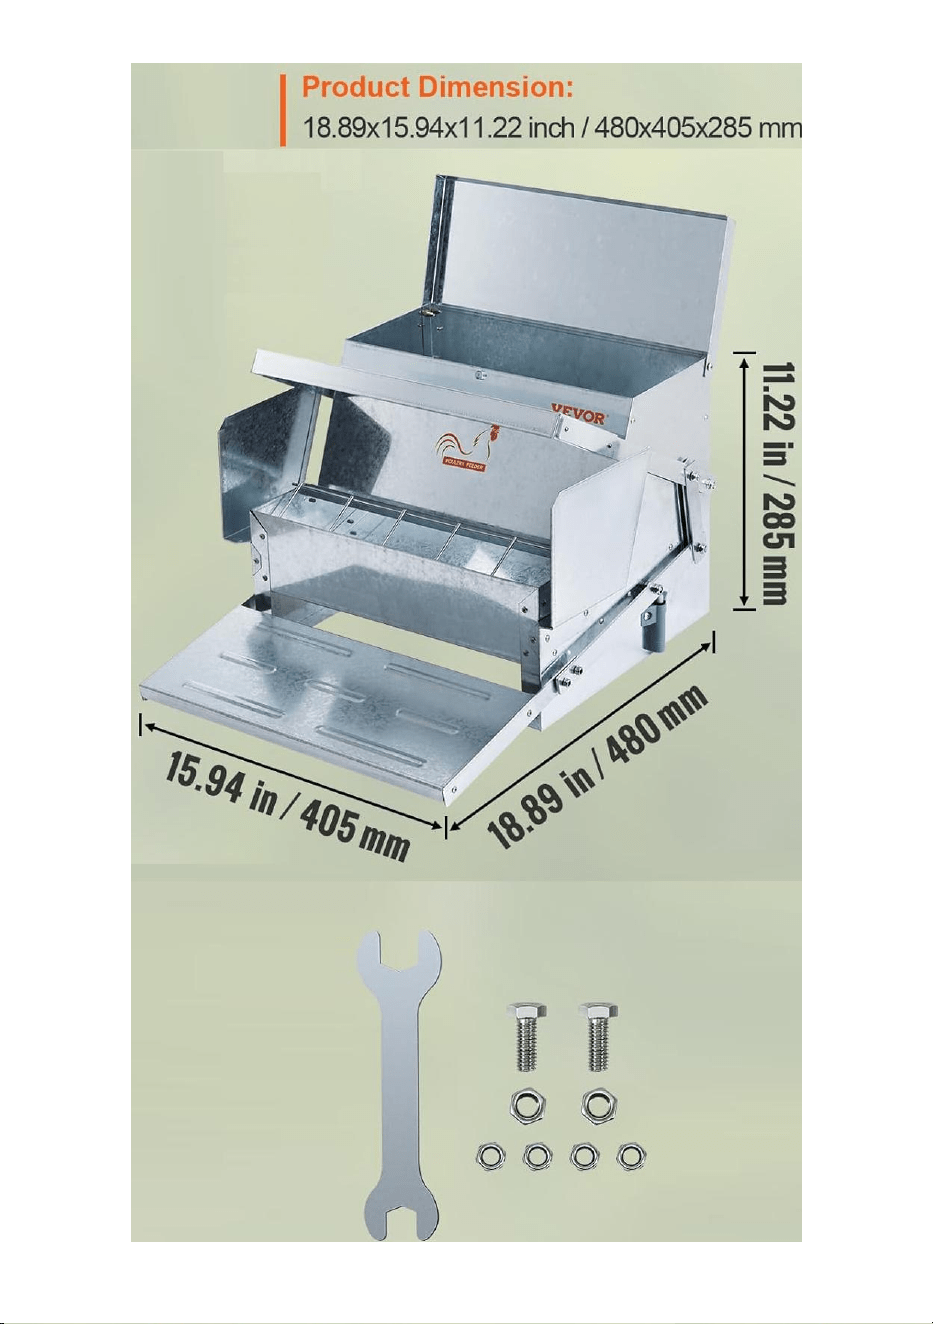
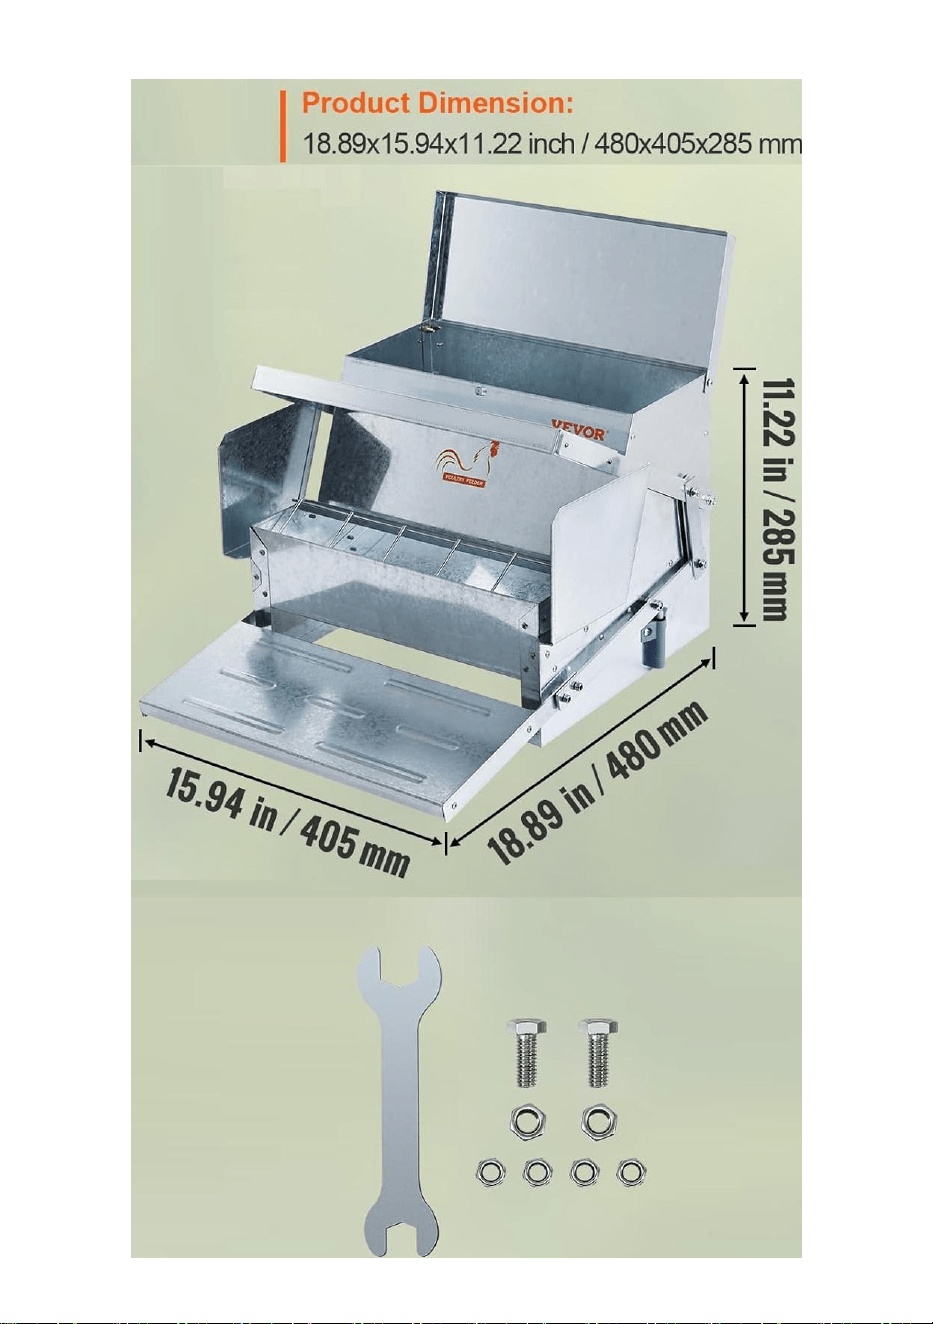
CF-06H
Have product questions? Need technical support? Please feel free to
contact us:
Technical Support and E-Warranty Certificate
www.vevor.com/support
NEED HELP? CONTACT US!
This is the original instruction, please read all manual instructions
carefully before operating. VEVOR reserves a clear interpretation of our
user manual. The appearance of the product shall be subject to the
product you received. Please forgive us that we won't inform you again if
there are any technology or software updates on our product.
POULTRY FEEDER

- 2 -
WARNING:
Read this manual before using this product. Failure to do so can result in
serious injury.
Assembly precautions
1.Assemble only according to these instructions. Improper assembly can
create hazards.
2. Wear ANSI-approved safety goggles and heavy-duty work gloves during
assembly.
3.Keep the assembly area clean and well-lit.
4.Keep bystanders out of the area during assembly.
5.Do not assemble when tired or when under the influence of alcohol,
drugs or medication.
6.Product capabilities apply to properly and completely assembled
products only.
7.Assemble on a flat, level, hard and smooth surface capable of safely
supporting a fully loaded feeder.
8. For additional information regarding the parts listed in the following
pages, please refer to the Assembly Diagram of this manual. Unwrap and
separate all parts in a clean work area.
Use precautions
TO PREVENT SERIOUS INJURY AND DEATH FROM TIPPING:
1. DO NOT SIT, STAND OR CLIMB ON THIS ITEM.
2. This product is not a toy or a toy chest. Do not allow children to play with
this item. Use as intended only. If needed, please supervise the children to
understand step &open rules of the feeder.
3. Empty, close, and lock the feeder before moving.
4. Use only on a flat, level, hard and smooth surface capable of safely
supporting a fully loaded feeder.
- 3 -

- 4 -
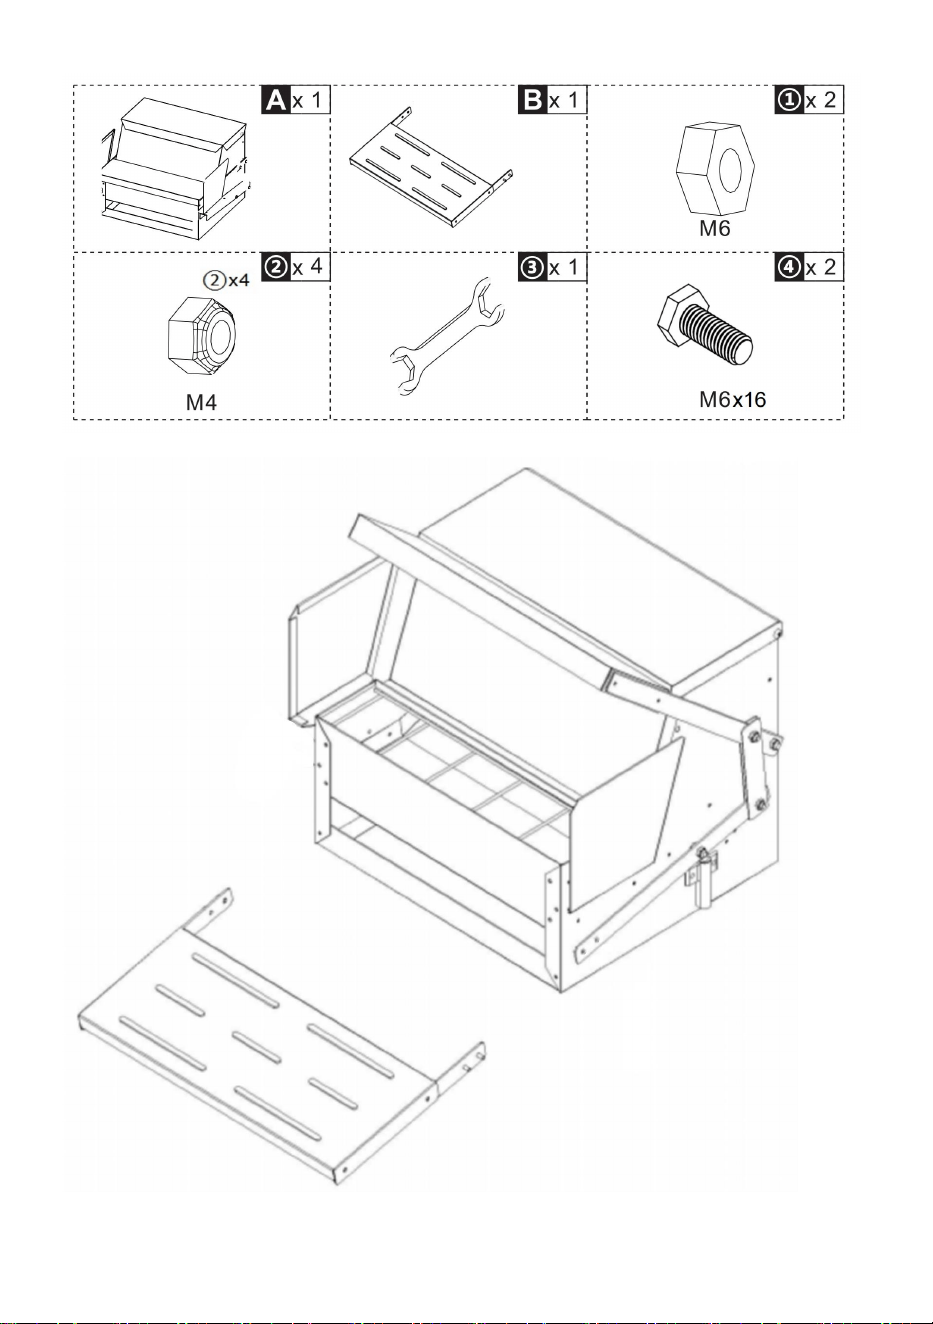
Prepare Body A and Pedal B.

- 5 -
Align the 4 posts of pedal B and the hole positions of
body A to assemble.

- 6 -
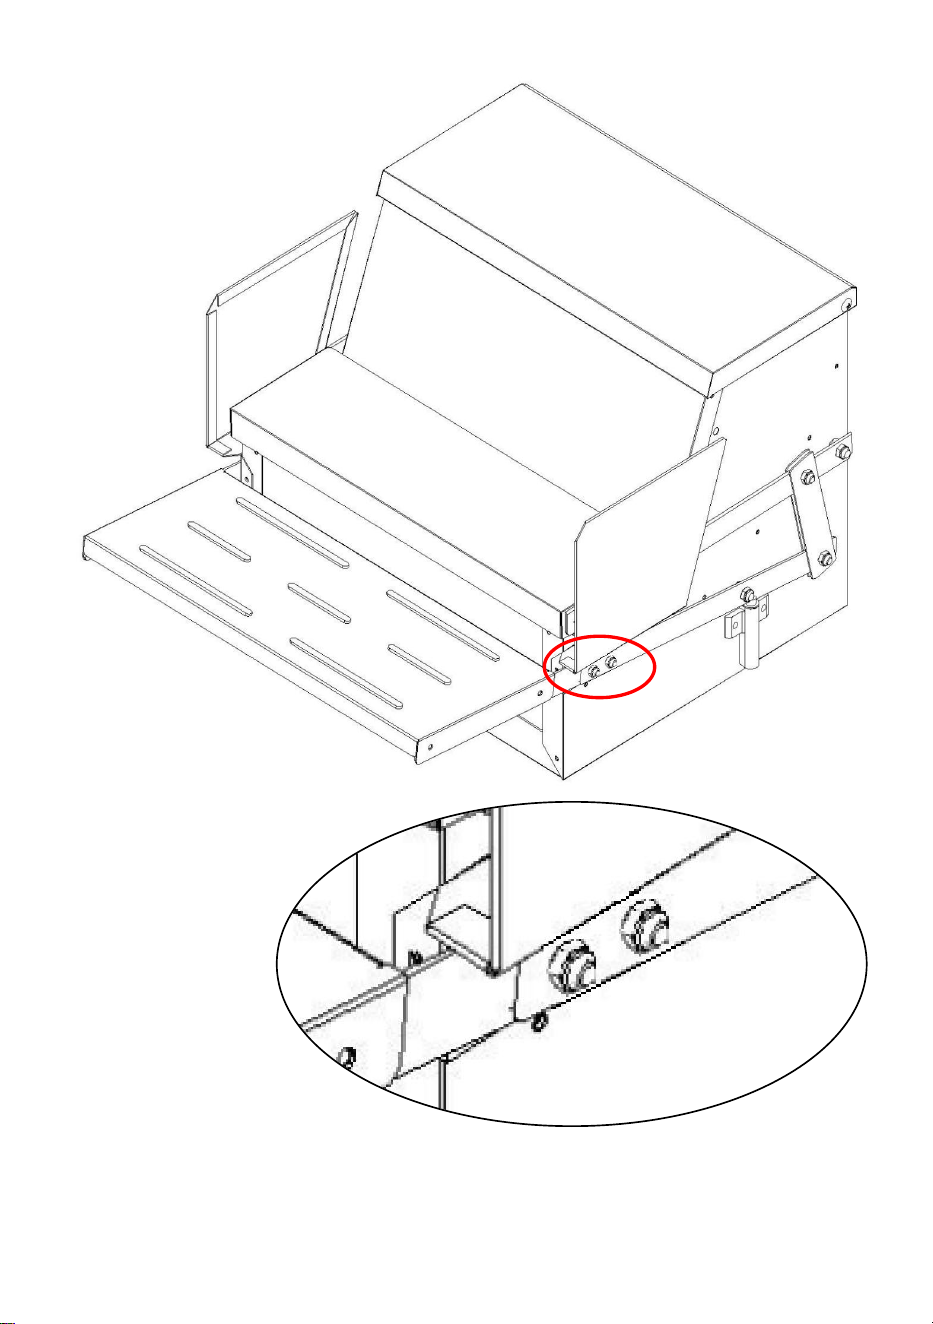
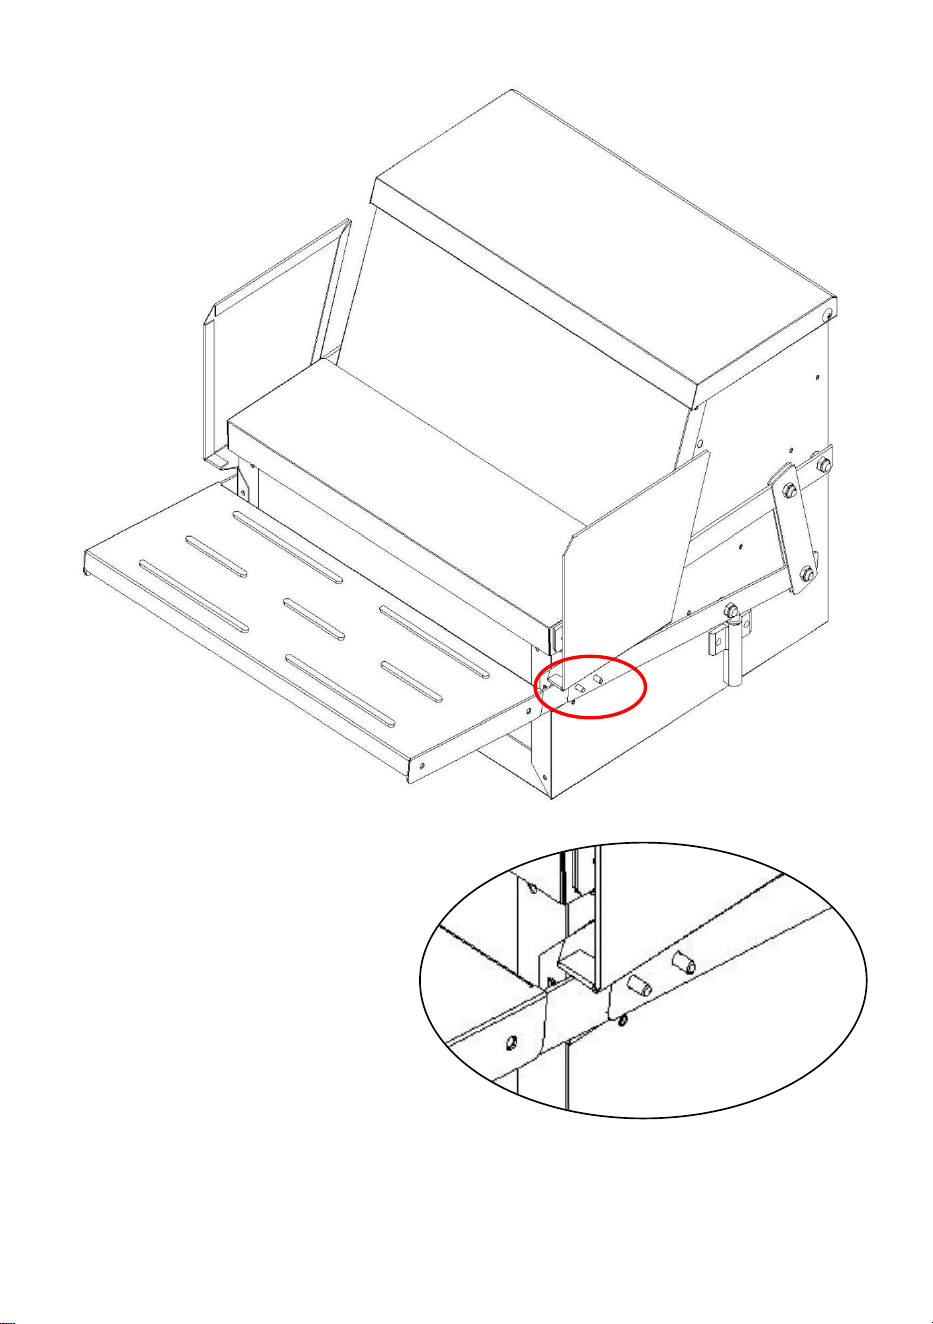
Lock the screws with ②4-M4 nuts.
(The assembly is complete)

- 7 -

- 8 -
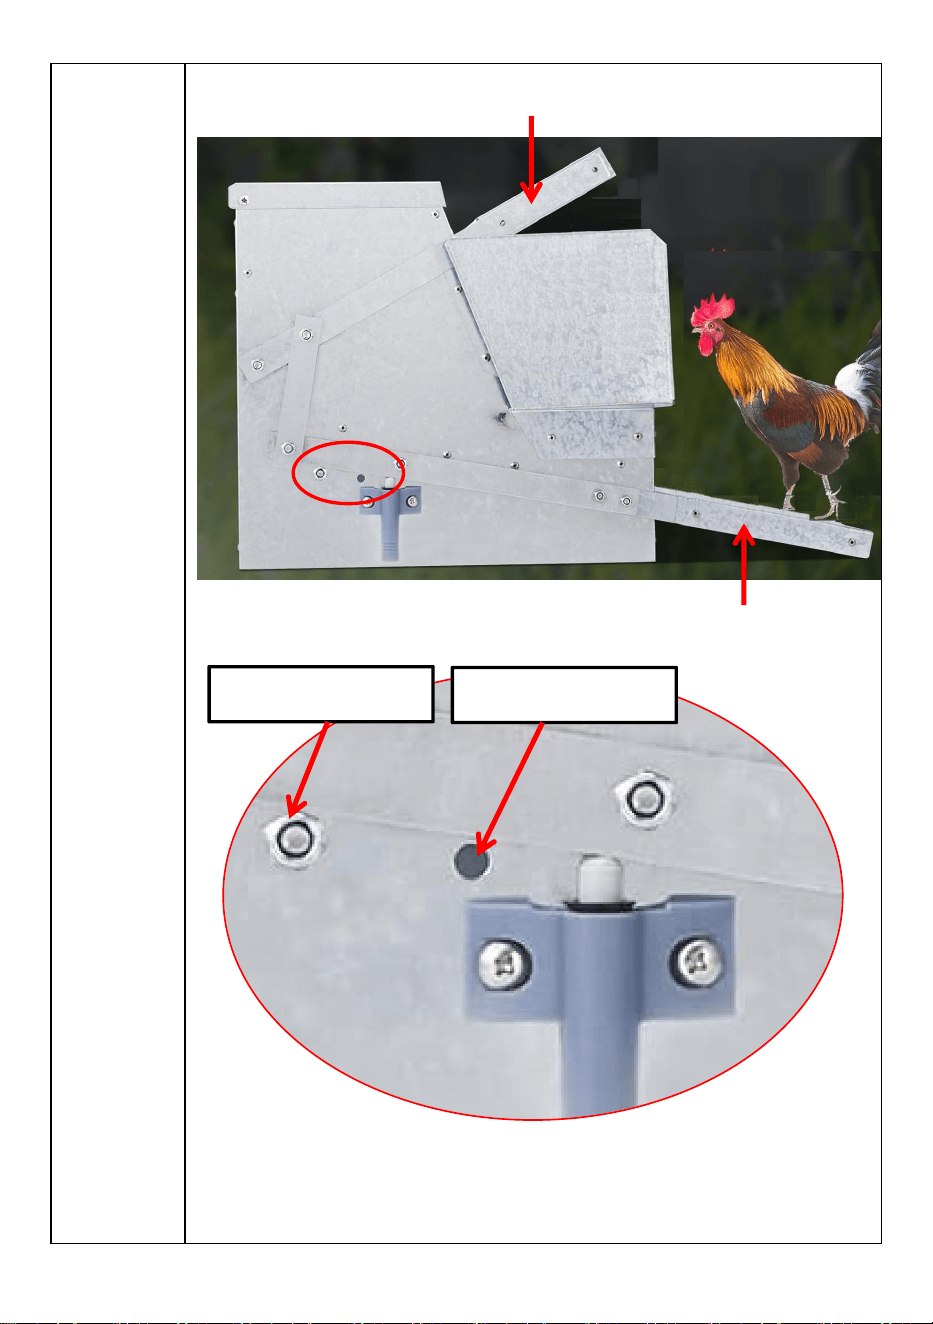
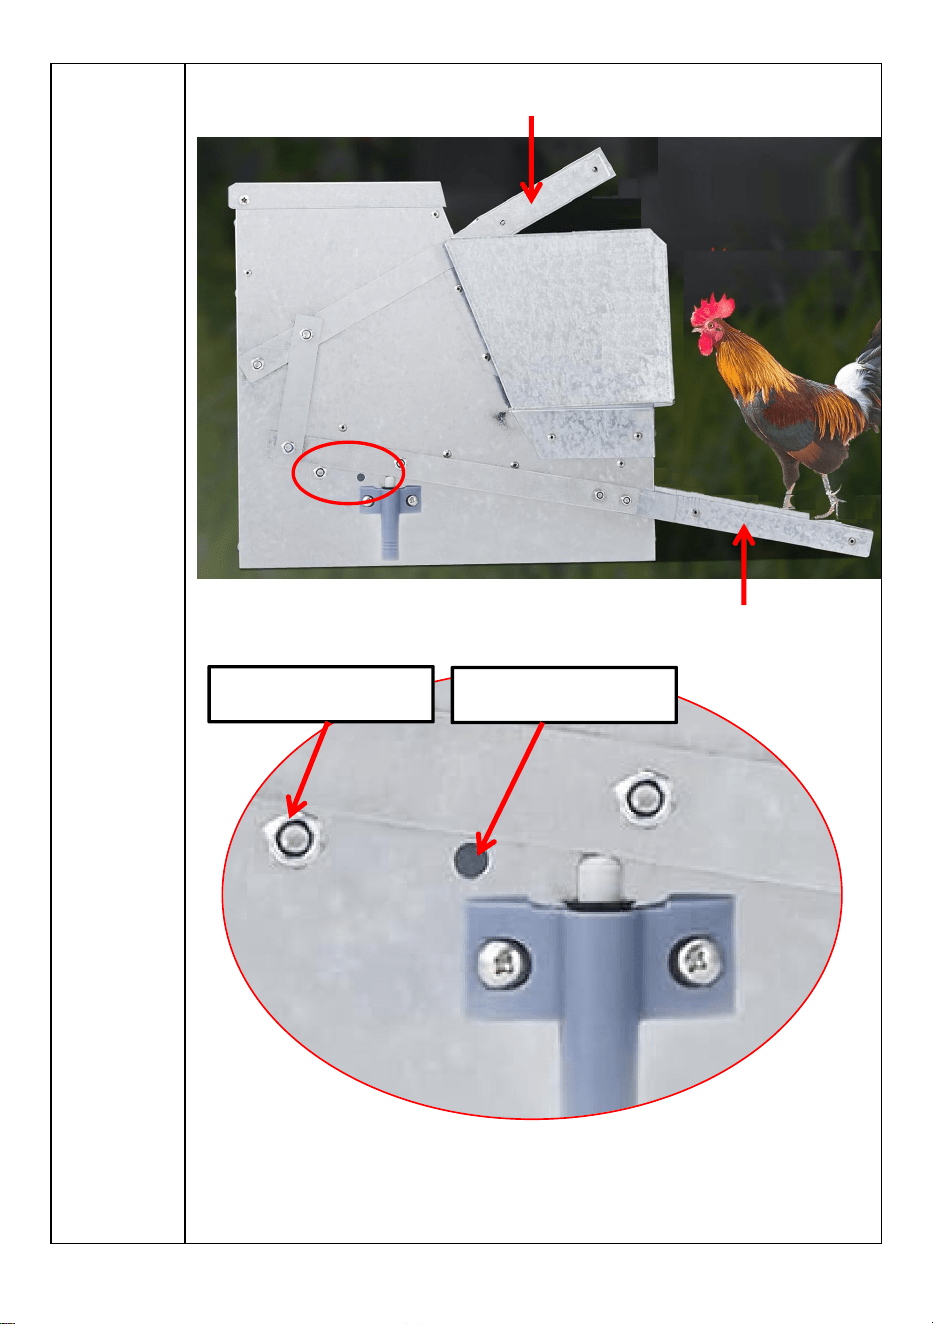
Mode A
Poultry can pedal to open the lid to get the physical
object.
The training hole is not assembled with screws.
- 9 -
Mode B
You can lock the training hole 1 or training hole 2
with the ①M6x6 screw and ④M6 nut to hold the
pedals and cover in place.
The lid is normally open.
The pedal is in a fixed position.
Training hole 2
Training hole 1

- 10 -
Manufacturer:Shanghaimuxinmuyeyouxiangongsi
Address: Shuangchenglu 803nong11hao1602A-1609shi, baoshanqu,
shanghai 200000 CN.
Imported to AUS: SIHAO PTY LTD. 1 ROKEVA STREETEASTWOOD
NSW 2122 Australia
Imported to USA: Sanven Technology Ltd. Suite 250, 9166 Anaheim
Place, Rancho Cucamonga, CA 91730
REP
UK
E-CrossStu GmbH
Mainzer Landstr.69, 60329 Frankfurt am Main.
REP
EC
YH CONSULTING LIMITED.
C/O YH Consulting Limited Office 147, Centurion House,
London Road, Staines-upon-Thames, Surrey, TW18 4AX


- 12 -
Technique Certificat d'assistance et de garantie électronique
www.vevor.com/support
MANGEOIRE POUR VOLAILLE
MANUEL D'UTILISATION
We continue to be committed to provide you tools with competitive price.
"Save Half", "Half Price" or any other similar expressions used by us only represents an
estimate of savings you might benefit from buying certain tools with us compared to the major
top brands and does not necessarily mean to cover all categories of tools offered by us. You
are kindly reminded to verify carefully when you are placing an order with us if you are
actually saving half in comparison with the top major brands.

- 1 -
CF-06H
Have product questions? Need technical support? Please feel free to
contact us:
Technical Support and E-Warranty Certificate
www.vevor.com/support
NEED HELP? CONTACT US!
This is the original instruction, please read all manual instructions
carefully before operating. VEVOR reserves a clear interpretation of our
user manual. The appearance of the product shall be subject to the
product you received. Please forgive us that we won't inform you again if
there are any technology or software updates on our product.
POULTRY FEEDER

- 2 -
AVERTISSEMENT:
Lisez ce manuel avant d'utiliser ce produit. Le non-respect de cette
consigne peut entraîner des blessures graves.
Précautions de montage
1. Assembler uniquement selon ces instructions. Un assemblage incorrect
peut créer des dangers.
2. Portez des lunettes de sécurité approuvées ANSI et des gants de travail
robustes pendant l'assemblage.
3. Gardez la zone de montage propre et bien éclairée .
4. Gardez les spectateurs hors de la zone pendant l’assemblage.
5. Ne montez pas lorsque vous êtes fatigué ou sous l'influence de l'alcool,
de drogues ou de médicaments.
produits correctement et entièrement assemblés .
7. Assemblez sur une surface plane, de niveau, dure et lisse capable de
supporter en toute sécurité une mangeoire entièrement chargée.
8. Pour plus d'informations sur les pièces répertoriées dans les pages
suivantes, reportez-vous au schéma d'assemblage de ce manuel.
Déballez et séparez toutes les pièces dans un espace de travail propre.
Précautions d'emploi
POUR ÉVITER LES BLESSURES GRAVES ET LA MORT RÉSULTANT
DU BASCULEMENT :
1. NE PAS S'ASSEOIR, SE TENIR DEBOUT OU GRIMPER SUR CET
ARTICLE.
2. Ce produit n'est pas un jouet ni un coffre à jouets. Ne laissez pas les
enfants jouer avec cet article. Utilisez-le uniquement comme prévu . Si
nécessaire, veuillez surveiller les enfants pour qu'ils comprennent étape &
règles ouvertes du chargeur .
3. Videz, fermez et verrouillez la mangeoire avant de la déplacer.
4. Utiliser uniquement sur une surface plane, horizontale, dure et lisse
capable de supporter en toute sécurité une mangeoire entièrement
chargée.
- 3 -
- 4 -
Préparez le corps A et la pédale B.

- 5 -
Alignez les 4 montants de la pédale B et les positions
des trous du corps A pour assembler.

- 6 -
Bloquer les vis avec ② 4 écrous M4 .
(L'assemblage est terminé)

- 7 -

- 8 -
Mode A
La volaille peut pédaler pour ouvrir le couvercle afin
d'obtenir l'objet physique.
The training hole is not assembled with screws.

- 9 -
Mode B
Vous pouvez verrouiller le trou d'entraînement 1 ou
le trou d'entraînement 2 avec la vis ① M6x6 et l'écrou
④M6 pour maintenir les pédales et le couvercle en
The lid is normally open.
The pedal is in a fixed position.
Training hole 2
Training hole 1

- 10 -
place.
Fabricant : Shanghaimuxinmuyeyouxiangongsi
Adresse : Shuangchenglu 803nong11hao1602A-1609shi, baoshanqu,
Shanghai 200000 CN.
Importé en Australie : SIHAO PTY LTD. 1 ROKEVA
STREETEASTWOOD NSW 2122 Australie
Importé aux États-Unis : Sanven Technology Ltd. Suite 250, 9166
Anaheim
Lieu, Rancho Cucamonga, CA 91730
REP
UK
E-CrossStu GmbH
Mainzer Landstr.69, 60329 Frankfurt am Main.
REP
EC
YH CONSULTING LIMITED.
C/O YH Consulting Limited Office 147, Centurion House,
London Road, Staines-upon-Thames, Surrey, TW18 4AX


- 12 -
Technisch Support und E-Garantie-Zertifikat www.vevor.com/support
GEFLÜGELFUTTERAUTOMAT
BENUTZERHANDBUCH
We continue to be committed to provide you tools with competitive price.
"Save Half", "Half Price" or any other similar expressions used by us only represents an
estimate of savings you might benefit from buying certain tools with us compared to the major
top brands and does not necessarily mean to cover all categories of tools offered by us. You
are kindly reminded to verify carefully when you are placing an order with us if you are
actually saving half in comparison with the top major brands.

- 1 -
CF-06H
Have product questions? Need technical support? Please feel free to
contact us:
Technical Support and E-Warranty Certificate
www.vevor.com/support
NEED HELP? CONTACT US!
This is the original instruction, please read all manual instructions
carefully before operating. VEVOR reserves a clear interpretation of our
user manual. The appearance of the product shall be subject to the
product you received. Please forgive us that we won't inform you again if
there are any technology or software updates on our product.
POULTRY FEEDER

- 2 -
WARNUNG:
Lesen Sie dieses Handbuch, bevor Sie dieses Produkt verwenden.
Andernfalls kann es zu schweren Verletzungen kommen.
Vorsichtsmaßnahmen bei der Montage
1. Nur gemäß dieser Anleitung zusammenbauen. Unsachgemäße
Montage kann Gefahren verursachen.
2. Tragen Sie während der Montage eine ANSI-geprüfte Schutzbrille und
strapazierfähige Arbeitshandschuhe.
3. Halten Sie den Versammlungsbereich sauber und gut beleuchtet .
4. Halten Sie während der Montage unbeteiligte Zuschauer vom Bereich
fern.
5. Nicht zusammenbauen, wenn Sie müde sind oder unter dem Einfluss
von Alkohol, Drogen oder Medikamenten stehen.
6. Die Produktfunktionen gelten nur für ordnungsgemäß und vollständig
montierte Produkte .
7. Auf einer flachen, ebenen, harten und glatten Oberfläche
zusammenbauen, die einen vollständig beladenen Futterautomaten sicher
tragen kann.
8. Weitere Informationen zu den auf den folgenden Seiten aufgeführten
Teilen finden Sie im Montagediagramm dieses Handbuchs. Packen Sie
alle Teile in einem sauberen Arbeitsbereich aus und trennen Sie sie.
Vorsichtsmaßnahmen treffen
UM SCHWERE VERLETZUNGEN UND TOD DURCH KIPPEN ZU
VERMEIDEN:
klettern Sie nicht auf diesen Gegenstand.
2. Dieses Produkt ist kein Spielzeug und auch keine Spielzeugkiste.
Erlauben Sie Kindern nicht, mit diesem Artikel zu spielen. Verwenden Sie
ihn nur bestimmungsgemäß . Wenn nötig, beaufsichtigen Sie die Kinder,
damit sie verstehen, Schritt &Öffnen Sie die Regeln des Feeders .
den Futtertrog entleeren, schließen und verriegeln .
4. Nur auf einer flachen, ebenen, harten und glatten Oberfläche verwenden,
die einen voll beladenen Futterautomaten sicher tragen kann.

- 3 -

- 4 -

- 5 -
Bereiten Sie Körper A und Pedal B vor.

- 6 -
Richten Sie zum Zusammenbau die 4 Pfosten von
Pedal B und die Lochpositionen von Körper A aus.

- 7 -
Kontern Sie die Schrauben mit ② 4 - M4 Muttern.
(Die Montage ist abgeschlossen)

- 8 -

- 9 -
Modus
A
Das Geflügel kann mit den Pedalen den Deckel
öffnen und an den Gegenstand gelangen.
The training hole is not assembled with screws.

- 10 -
Modus
B
Sie können das Trainingsloch 1 oder Trainingsloch 2
mit der ① M6x6-Schraube und der ④M6-Mutter
verriegeln, um die Pedale und die Abdeckung an
The lid is normally open.
The pedal is in a fixed position.
Training hole 2
Training hole 1

- 11 -
ihrem Platz zu halten.
Hersteller : Shanghaimuxinmuyeyouxiangongsi
Adresse: Shuangchenglu 803nong11hao1602A-1609shi, baoshanqu,
Shanghai 200000 CN.
Nach AUS importiert: SIHAO PTY LTD. 1 ROKEVA
STREETEASTWOOD NSW 2122 Australien
Importiert in die USA: Sanven Technology Ltd. Suite 250, 9166 Anaheim
Ort, Rancho Cucamonga, CA 91730
REP
UK
E-CrossStu GmbH
Mainzer Landstr.69, 60329 Frankfurt am Main.
REP
EC
YH CONSULTING LIMITED.
C/O YH Consulting Limited Office 147, Centurion House,
London Road, Staines-upon-Thames, Surrey, TW18 4AX


- 13 -
Tecnico Supporto e certificato di garanzia elettronica www.vevor.com/support
MANGIATOIA PER POLLAME
MANUALE D'USO
We continue to be committed to provide you tools with competitive price.
"Save Half", "Half Price" or any other similar expressions used by us only represents an
estimate of savings you might benefit from buying certain tools with us compared to the major
top brands and does not necessarily mean to cover all categories of tools offered by us. You
are kindly reminded to verify carefully when you are placing an order with us if you are
actually saving half in comparison with the top major brands.

- 1 -
MODELLO CF-06H
Have product questions? Need technical support? Please feel free to
contact us:
Technical Support and E-Warranty Certificate
www.vevor.com/support
NEED HELP? CONTACT US!
This is the original instruction, please read all manual instructions
carefully before operating. VEVOR reserves a clear interpretation of our
user manual. The appearance of the product shall be subject to the
product you received. Please forgive us that we won't inform you again if
there are any technology or software updates on our product.
POULTRY FEEDER

- 2 -
AVVERTIMENTO:
Leggere questo manuale prima di utilizzare questo prodotto. La mancata
osservanza di questa precauzione può causare gravi lesioni.
Precauzioni di montaggio
1. Assemblare solo secondo queste istruzioni. Un assemblaggio improprio
può creare pericoli.
2. Durante il montaggio, indossare occhiali di sicurezza omologati ANSI e
guanti da lavoro resistenti.
3. Mantenere l' area di assemblaggio pulita e ben illuminata .
4. Tenere gli astanti fuori dall'area durante l'assemblaggio.
5. Non riunirsi quando si è stanchi o sotto l'effetto di alcol, droghe o
farmaci.
prodotti correttamente e completamente assemblati .
7. Montare su una superficie piana, livellata, dura e liscia, in grado di
sostenere in sicurezza un alimentatore completamente carico.
8. Per ulteriori informazioni sulle parti elencate nelle pagine seguenti, fare
riferimento allo schema di montaggio di questo manuale. Disimballare e
separare tutte le parti in un'area di lavoro pulita.
Usare precauzioni
PER PREVENIRE LESIONI GRAVI E MORTALI DOVUTE AL
RIBALTAMENTO:
1. NON SEDERSI, STARE IN PIEDI O ARRAMPICARSI SU QUESTO
ARTICOLO.
2. Questo prodotto non è un giocattolo o un baule portagiochi. Non
permettere ai bambini di giocare con questo articolo. Utilizzare solo come
previsto . Se necessario, sorvegliare i bambini per capire regole di
passaggio e apertura dell'alimentatore .
3. Svuotare, chiudere e bloccare la mangiatoia prima di spostarla.
4. Utilizzare solo su una superficie piana, livellata, dura e liscia, in grado di
sostenere in modo sicuro un alimentatore completamente carico.

- 3 -

- 4 -
Preparare il corpo A e il pedale B.

- 5 -
Allineare i 4 montanti del pedale B e le posizioni dei
fori del corpo A per il montaggio.
- 6 -
Bloccare le viti con ② 4 - dadi M4.
(Il montaggio è completato)

- 7 -

- 8 -
Modalità
A
Il pollame può pedalare per aprire il coperchio e
prendere l'oggetto fisico.
The training hole is not assembled with screws.
- 9 -
Modalità
B
È possibile bloccare il foro di allenamento 1 o il foro
di allenamento 2 con la vite ① M6x6 e il dado ④ M6
per tenere fermi i pedali e la copertura.
The lid is normally open.
The pedal is in a fixed position.
Training hole 2
Training hole 1

- 10 -
Produttore : Shanghaimuxinmuyeyouxiangongsi
Indirizzo: Shuangchenglu 803nong11hao1602A-1609shi, baoshanqu,
shanghai 200000 CN.
Importato in AUS: SIHAO PTY LTD. 1 ROKEVA STREETEASTWOOD
NSW 2122 Australia
Importato negli USA: Sanven Technology Ltd. Suite 250, 9166 Anaheim
Luogo, Rancho Cucamonga, CA 91730
REP
UK
E-CrossStu GmbH
Mainzer Landstr.69, 60329 Frankfurt am Main.
REP
EC
YH CONSULTING LIMITED.
C/O YH Consulting Limited Office 147, Centurion House,
London Road, Staines-upon-Thames, Surrey, TW18 4AX


- 12 -
Técnico Certificado de soporte y garantía electrónica www.vevor.com/support
COMEDERO PARA AVES DE CORRAL
MANUAL DEL USUARIO
We continue to be committed to provide you tools with competitive price.
"Save Half", "Half Price" or any other similar expressions used by us only represents an
estimate of savings you might benefit from buying certain tools with us compared to the major
top brands and does not necessarily mean to cover all categories of tools offered by us. You
are kindly reminded to verify carefully when you are placing an order with us if you are
actually saving half in comparison with the top major brands.

- 1 -
CF-06H
Have product questions? Need technical support? Please feel free to
contact us:
Technical Support and E-Warranty Certificate
www.vevor.com/support
NEED HELP? CONTACT US!
This is the original instruction, please read all manual instructions
carefully before operating. VEVOR reserves a clear interpretation of our
user manual. The appearance of the product shall be subject to the
product you received. Please forgive us that we won't inform you again if
there are any technology or software updates on our product.
POULTRY FEEDER

- 2 -
ADVERTENCIA:
Lea este manual antes de utilizar este producto. No hacerlo puede
provocar lesiones graves.
Precauciones de montaje
1. Realice el montaje únicamente de acuerdo con estas instrucciones. Un
montaje inadecuado puede generar peligros.
2. Use gafas de seguridad aprobadas por ANSI y guantes de trabajo
resistentes durante el montaje.
3. Mantenga el área de montaje limpia y bien iluminada .
4. Mantenga a los transeúntes fuera del área durante el montaje.
5. No realizar el montaje cuando se encuentre cansado o bajo la influencia
de alcohol, drogas o medicamentos.
6. Las capacidades del producto se aplican únicamente a productos
ensamblados correcta y completamente .
7.Monte sobre una superficie plana, nivelada, dura y lisa capaz de
soportar de forma segura un comedero completamente cargado.
8. Para obtener información adicional sobre las piezas que se enumeran
en las páginas siguientes, consulte el diagrama de ensamblaje de este
manual. Desembale y separe todas las piezas en un área de trabajo
limpia.
Tome precauciones
PARA EVITAR LESIONES GRAVES Y LA MUERTE POR VUELCO:
1. NO SE SIENTA, SE PARE NI SE SUBA SOBRE ESTE ARTÍCULO.
2. Este producto no es un juguete ni un baúl de juguetes. No permita que
los niños jueguen con este artículo. Utilícelo únicamente para el fin
previsto . Si es necesario, supervise a los niños para que comprendan
Paso y reglas de apertura del alimentador .
3. Vacíe, cierre y bloquee el comedero antes de moverlo.
4. Úselo únicamente sobre una superficie plana, nivelada, dura y lisa
capaz de soportar de forma segura un comedero completamente cargado.

- 3 -

- 4 -
Prepare el cuerpo A y el pedal B.

- 5 -
Alinee los 4 postes del pedal B y las posiciones de los
orificios del cuerpo A para ensamblar.

- 6 -
Bloquee los tornillos con ② 4 - tuercas M4.
(El montaje está completo)

- 7 -

- 8 -
Modo A
Las aves de corral pueden pedalear para abrir la tapa
y obtener el objeto físico.
The training hole is not assembled with screws.

- 9 -
Modo B
Puede bloquear el orificio de entrenamiento 1 o el
orificio de entrenamiento 2 con el ① tornillo M6x6 y
la ④ tuerca M6 para mantener los pedales y la
The lid is normally open.
The pedal is in a fixed position.
Training hole 2
Training hole 1

- 10 -
cubierta en su lugar.
Fabricante : Shanghaimuxinmuyeyouxiangongsi
Dirección: Shuangchenglu 803nong11hao1602A-1609shi, baoshanqu,
shanghai 200000 CN.
Importado a AUS: SIHAO PTY LTD. 1 ROKEVA STREETEASTWOOD
NSW 2122 Australia
Importado a EE. UU.: Sanven Technology Ltd. Suite 250, 9166 Anaheim
Lugar, Rancho Cucamonga, CA 91730
REP
UK
E-CrossStu GmbH
Mainzer Landstr.69, 60329 Frankfurt am Main.
REP
EC
YH CONSULTING LIMITED.
C/O YH Consulting Limited Office 147, Centurion House,
London Road, Staines-upon-Thames, Surrey, TW18 4AX


- 12 -
Techniczny Wsparcie i certyfikat e-gwarancji www.vevor.com/support
KARMNIK DLA DROBIU
INSTRUKCJA OBSŁUGI
We continue to be committed to provide you tools with competitive price.
"Save Half", "Half Price" or any other similar expressions used by us only represents an
estimate of savings you might benefit from buying certain tools with us compared to the major
top brands and does not necessarily mean to cover all categories of tools offered by us. You
are kindly reminded to verify carefully when you are placing an order with us if you are
actually saving half in comparison with the top major brands.

- 1 -
CF-06H
Have product questions? Need technical support? Please feel free to
contact us:
Technical Support and E-Warranty Certificate
www.vevor.com/support
NEED HELP? CONTACT US!
This is the original instruction, please read all manual instructions
carefully before operating. VEVOR reserves a clear interpretation of our
user manual. The appearance of the product shall be subject to the
product you received. Please forgive us that we won't inform you again if
there are any technology or software updates on our product.
POULTRY FEEDER

- 2 -
OSTRZEŻENIE:
Przeczytaj tę instrukcję przed użyciem tego produktu. Nieprzestrzeganie
jej może spowodować poważne obrażenia.
Środki ostrożności podczas montażu
1. Montaż należy wykonywać wyłącznie zgodnie z niniejszą instrukcją.
Nieprawidłowy montaż może stwarzać zagrożenia.
2. Podczas montażu należy nosić okulary ochronne z atestem ANSI oraz
wytrzymałe rękawice robocze.
3. Utrzymuj miejsce zgromadzenia w czystości i dobrym oświetleniu .
4. Podczas montażu nie dopuszczać osób postronnych na teren montażu.
5. Nie przychodź na spotkania, jeśli jesteś zmęczony lub pod wpływem
alkoholu, narkotyków lub leków.
6. Możliwości produktu odnoszą się wyłącznie do produktów prawidłowo i
kompletnie zmontowanych .
7. Złóż na płaskiej, równej, twardej i gładkiej powierzchni, która będzie w
stanie bezpiecznie utrzymać w pełni załadowany podajnik.
8. Aby uzyskać dodatkowe informacje dotyczące części wymienionych na
kolejnych stronach, zapoznaj się ze schematem montażu w tym
podręczniku. Rozpakuj i oddziel wszystkie części w czystym miejscu pracy.
Stosuj środki ostrożności
ABY ZAPOBIEC POWAŻNYM OBRAŻENIOM I ŚMIERCI
SPOWODOWANEJ PRZEWRÓCENIEM:
1. NIE SIADAJ, NIE STÓJ ANI NIE WSPINAJ SIĘ NA TYM
PRZEDMIOCIE.
2. Ten produkt nie jest zabawką ani skrzynią na zabawki. Nie pozwalaj
dzieciom bawić się tym przedmiotem. Używaj go wyłącznie zgodnie z
przeznaczeniem . W razie potrzeby nadzoruj dzieci, aby zrozumiały krok i
otwórz zasady podajnika .
Przed przeniesieniem karmnika opróżnij go, zamknij i zablokuj .
4. Używać wyłącznie na płaskiej, równej, twardej i gładkiej powierzchni,
która może bezpiecznie utrzymać w pełni załadowany podajnik.

- 3 -

- 4 -
Przygotuj korpus A i pedał B.

- 5 -
Dopasuj 4 słupki pedału B do otworów w korpusie A,
aby dokonać montażu.

- 6 -
Zablokuj śruby za pomocą nakrętek ② 4 - M4.

- 7 -
(Montaż jest ukończony)
- 8 -

- 9 -
Tryb A
Drób może pedałować, aby otworzyć pokrywę i
zdobyć fizyczny przedmiot.
The training hole is not assembled with screws.

- 10 -
Tryb B
Możesz zablokować otwór treningowy 1 lub otwór
treningowy 2 za pomocą śruby ① M6x6 i nakrętki ④
M6, aby przytrzymać pedały i osłonę na miejscu.
The lid is normally open.
The pedal is in a fixed position.
Training hole 2
Training hole 1

- 11 -
Producent : Shanghaimuxinmuyeyouxiangongsi
Adres: Shuangchenglu 803nong11hao1602A-1609shi, baoshanqu,
szanghaj 200000 CN.
Importowane do AUS: SIHAO PTY LTD. 1 ROKEVA
STREETEASTWOOD NSW 2122 Australia
Importowane do USA: Sanven Technology Ltd. Suite 250, 9166 Anaheim
Miejsce, Rancho Cucamonga, CA 91730
REP
UK
E-CrossStu GmbH
Mainzer Landstr.69, 60329 Frankfurt am Main.
REP
EC
YH CONSULTING LIMITED.
C/O YH Consulting Limited Office 147, Centurion House,
London Road, Staines-upon-Thames, Surrey, TW18 4AX


- 13 -
Technisch Ondersteuning en E-garantiecertificaat www.vevor.com/support
VOEDERBAK VOOR PLUIMVEE
GEBRUIKERSHANDLEIDING
We continue to be committed to provide you tools with competitive price.
"Save Half", "Half Price" or any other similar expressions used by us only represents an
estimate of savings you might benefit from buying certain tools with us compared to the major
top brands and does not necessarily mean to cover all categories of tools offered by us. You
are kindly reminded to verify carefully when you are placing an order with us if you are
actually saving half in comparison with the top major brands.
- 1 -
CF-06H
Have product questions? Need technical support? Please feel free to
contact us:
Technical Support and E-Warranty Certificate
www.vevor.com/support
NEED HELP? CONTACT US!
This is the original instruction, please read all manual instructions
carefully before operating. VEVOR reserves a clear interpretation of our
user manual. The appearance of the product shall be subject to the
product you received. Please forgive us that we won't inform you again if
there are any technology or software updates on our product.
POULTRY FEEDER

- 2 -
WAARSCHUWING:
Lees deze handleiding voordat u dit product gebruikt. Als u dit niet doet,
kan dit leiden tot ernstig letsel.
Voorzorgsmaatregelen bij de montage
1. Monteer alleen volgens deze instructies. Onjuiste montage kan gevaren
opleveren.
2. Draag tijdens de montage een ANSI-goedgekeurde veiligheidsbril en
stevige werkhandschoenen.
3. Zorg ervoor dat de montageplek schoon en goed verlicht is .
4. Houd omstanders uit de buurt tijdens de montage.
5. Ga niet in de winkel staan als u moe bent of onder invloed van alcohol,
drugs of medicijnen.
6. De producteigenschappen gelden alleen voor correct en volledig
gemonteerde producten .
7. Monteer de machine op een vlak, egaal, hard en glad oppervlak dat een
volledig gevulde voederbak veilig kan dragen.
8. Voor aanvullende informatie over de onderdelen die op de volgende
pagina's worden vermeld, raadpleegt u het montageschema van deze
handleiding. Pak alle onderdelen uit en scheid ze in een schone
werkruimte.
Neem voorzorgsmaatregelen
OM ERNSTIG LETSEL EN DE DOOD DOOR KANTELEN TE
VOORKOMEN:
1. NIET OP DIT INRICHTING ZITTEN, STAAN OF ER OP HANGEN.
2. Dit product is geen speelgoed of speelgoedkist. Laat kinderen niet met
dit artikel spelen. Gebruik het alleen zoals bedoeld . Houd indien nodig
toezicht op de kinderen om te begrijpen stap &open regels van de feeder.
de voederbak leeg, sluit hem en vergrendel hem voordat u hem verplaatst.
4. Gebruik de voerbak alleen op een vlak, egaal, hard en glad oppervlak
dat een volledig gevulde voerbak veilig kan dragen.

- 3 -

- 4 -
Bereid lichaam A en pedaal B voor.
- 5 -
Lijn de 4 palen van pedaal B uit met de gaten in body A
om het geheel te monteren.

- 6 -
Zet de schroeven vast met ② 4 - M4 moeren.
(De montage is voltooid)

- 7 -

- 8 -
Modus
A
Pluimvee kan trappen om het deksel te openen en
het fysieke object te pakken.
The training hole is not assembled with screws.

- 9 -
Modus
B
U kunt trainingsgat 1 of trainingsgat 2 vastzetten met
de ① M6x6 schroef en ④M6 moer om de pedalen en
de kap op hun plaats te houden.
The lid is normally open.
The pedal is in a fixed position.
Training hole 2
Training hole 1

- 10 -
Fabrikant : Shanghaimuxinmuyeyouxiangongsi
Adres: Shuangchenglu 803nong11hao1602A-1609shi, baoshanqu,
shanghai 200000 CN.
Geïmporteerd naar AUS: SIHAO PTY LTD. 1 ROKEVA
STREETEASTWOOD NSW 2122 Australië
Geïmporteerd naar de VS: Sanven Technology Ltd. Suite 250, 9166
Anaheim
Plaats, Rancho Cucamonga, CA 91730
REP
UK
E-CrossStu GmbH
Mainzer Landstr.69, 60329 Frankfurt am Main.
REP
EC
YH CONSULTING LIMITED.
C/O YH Consulting Limited Office 147, Centurion House,
London Road, Staines-upon-Thames, Surrey, TW18 4AX


- 12 -
Teknisk Support och e-garanticertifikat www.vevor.com/support
FJÄDERFÄMATARE
ANVÄNDARMANUAL
We continue to be committed to provide you tools with competitive price.
"Save Half", "Half Price" or any other similar expressions used by us only represents an
estimate of savings you might benefit from buying certain tools with us compared to the major
top brands and does not necessarily mean to cover all categories of tools offered by us. You
are kindly reminded to verify carefully when you are placing an order with us if you are
actually saving half in comparison with the top major brands.

- 1 -
CF-06H
Have product questions? Need technical support? Please feel free to
contact us:
Technical Support and E-Warranty Certificate
www.vevor.com/support
NEED HELP? CONTACT US!
This is the original instruction, please read all manual instructions
carefully before operating. VEVOR reserves a clear interpretation of our
user manual. The appearance of the product shall be subject to the
product you received. Please forgive us that we won't inform you again if
there are any technology or software updates on our product.
POULTRY FEEDER

- 2 -
VARNING:
Läs denna bruksanvisning innan du använder denna produkt.
Underlåtenhet att göra det kan resultera i allvarliga skador.
Försiktighetsåtgärder vid montering
1. Montera endast enligt dessa instruktioner. Felaktig montering kan skapa
faror.
2. Bär ANSI-godkända skyddsglasögon och kraftiga arbetshandskar vid
montering.
3.Håll monteringsområdet rent och väl upplyst .
4. Håll åskådare borta från området under monteringen.
5. Sätt dig inte ihop när du är trött eller påverkad av alkohol, droger eller
medicin.
6. Produktegenskaper gäller endast för korrekt och färdigmonterade
produkter .
7. Montera på en plan, jämn, hård och slät yta som säkert kan stödja en
fullastad matare.
8. För ytterligare information om delarna som listas på följande sidor, se
monteringsdiagrammet i denna manual. Packa upp och separera alla delar
på ett rent arbetsområde.
Använd försiktighetsåtgärder
FÖR ATT FÖRHINDRA ALLVARLIGA SKADA OCH DÖDSFALL VID
VÄLLNING:
KLITRERA INTE PÅ DETTA FÖREMÅL.
2. Denna produkt är inte en leksak eller en leksakskrin. Tillåt inte barn att
leka med detta föremål. Använd endast på avsett sätt . Om det behövs,
övervaka barnen för att förstå steg &öppna regler för mataren .
3. Töm, stäng och lås mataren innan du flyttar den.
4. Använd endast på en plan, jämn, hård och slät yta som säkert kan stödja
en fullastad matare.

- 3 -

- 4 -
Förbered kropp A och pedal B.

- 5 -
Rikta in de 4 stolparna på pedal B och hålpositionerna
på kropp A för att montera.

- 6 -
Lås skruvarna med muttrar ② 4 - M4.
(Monteringen är klar)

- 7 -

- 8 -
Läge A
Fjäderfä kan trampa för att öppna locket för att få det
fysiska föremålet.
The training hole is not assembled with screws.

- 9 -
Läge B
Du kan låsa träningshål 1 eller träningshål 2 med ①
M6x6-skruven och ④M6-muttern för att hålla
pedalerna och locket på plats.
The lid is normally open.
The pedal is in a fixed position.
Training hole 2
Training hole 1

- 10 -
Tillverkare : Shanghaimuxinmuyeyouxiangongsi
Adress: Shuangchenglu 803nong11hao1602A-1609shi, baoshanqu,
shanghai 200000 CN.
Importerad till AUS: SIHAO PTY LTD. 1 ROKEVA STREETEASTWOOD
NSW 2122 Australien
Importerad till USA: Sanven Technology Ltd. Suite 250, 9166 Anaheim
Place, Rancho Cucamonga, CA 91730
REP
UK
E-CrossStu GmbH
Mainzer Landstr.69, 60329 Frankfurt am Main.
REP
EC
YH CONSULTING LIMITED.
C/O YH Consulting Limited Office 147, Centurion House,
London Road, Staines-upon-Thames, Surrey, TW18 4AX