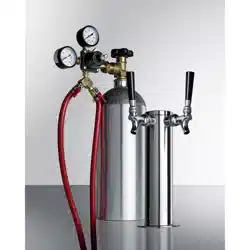
Installing the Dual Cocktail Tap Kit
(for carbonated cocktails)
Model:
KITCKTC2
The tap kit is pre-assembled for easy installation. Users only need to connect the ball lock fittings to the keg(s).
Included:
• Tower (1)
• Handles (2)
• Screws (4)
• Empty CO
2
Tank (1)
• Outlet Ball Lock Fitting (2)
• Inlet Ball Lock Fitting (2)
1
N
ote: Your CO
2
tank
is
shipped empty to avoid any possible accidents during transportation. Have your gas
supplier fill the gas tank. Before installation, please read and understand all gas tank handling procedures.
Note:
•
These taps should not be used for milk.
•
When replacing your kegs, first turn off the safety switch on the CO
2
regulator valve and remove the coupler to
take out the keg.
•
When replacing the CO
2
gas tank, remember to turn off the tank's main switch and the safety switch on the regulator
valve. Afterward, use a wrench to loosen the hexagonal nut port connecting the regulator valve with the gas tank.
Then, use a wrench to remove the fixed bolt securing the gas tank, and carefully remove the tank.
•
During the installation process, be sure that all parts are connected tightly and that there are no gas leaks.
•
When connecting the hose to the connection port, you can dip the ends into warm water to make the
connection easier.
•
If the high-pressure compressed gas in the CO
2
gas tank is not handled properly, it could be dangerous if not handled
properly.
•
Make a note of the D.O.T. testing date on the tank's neck before installation. If it is more than 5 years old, do not use the
product. Return it to the gas supplier.
•
Keep gas tanks away from heat sources. Unused tanks should be placed upright in a cool, ventilated place (preferably
at 70°F).
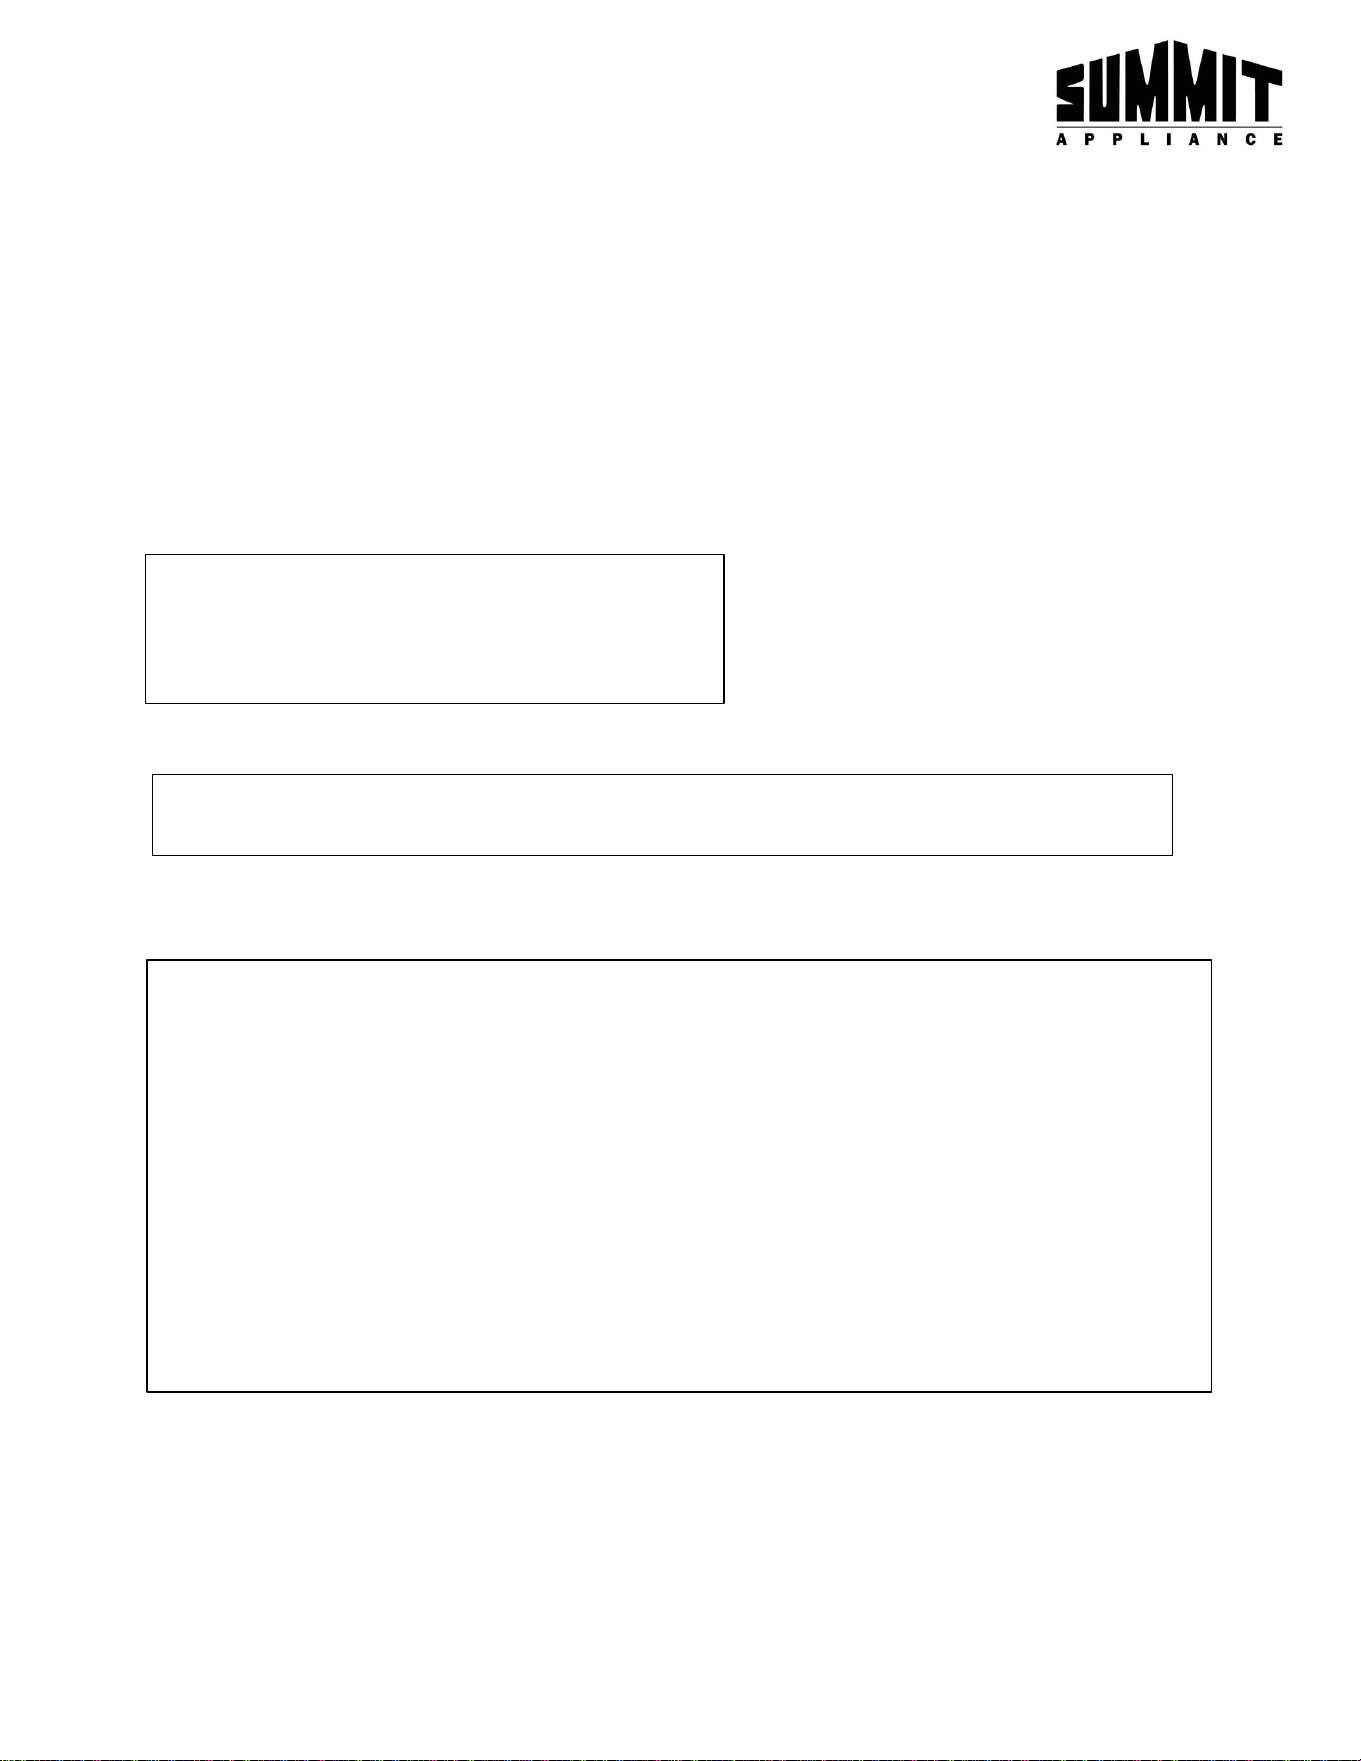
Installing the CO₂ Regulator to the CO₂ Tank:
(for carbonated cocktails)
1.
Ensure the tower dispenser is closed.
2.
Ensure the CO
2
tank is full. (All gas tanks are shipped empty.)
3.
Screw the CO
2
regulator on to the CO
2
tank valve. Use an
adjustable wrench to tighten the nut securely to prevent gas
leaks.
4.
Connect
one of the CO₂ gas line by firmly pressing the ball
lock fitting onto the keg’s gas inlet until it clicks
into place.
5.
Connect one of the cocktail line from the tower to the keg by
firmly pressing the ball lock fitting onto the keg’s liquid outlet
until it clicks into place.
6.
Repeat steps 4 & 5 for the second keg.
7.
Open the gas tank valve fully to check for leaks by turning the
knob counterclockwise.
8.
For carbonated cocktails, set the CO₂ output pressure to 30–
40 psi. Allow the keg to sit for 3–5 hours to fully carbonate.
9.
Lock the regulator setting by tightening the locknut on the
pressure screw until the keg is fully carbonated.
1.
Lift the kegs by the handles and gently place it inside the unit.
2.
Arrange the tubing neatly behind the kegs to ensure the door can close properly.
3.
Screw the handles onto the tower taps
.
2
If you need help with your installation call our Customer Service facility at 800-932
-4267 (Ext. 513) between 9:00 AM and 5:00 PM ET or visit our
website summitappliance.com/support at any time. We will do our best to answer your questions.
To order replacement parts, visit our website: summitapplianceparts.com
Summit Appliance Division · Felix Storch, Inc. · www.summitappliance.com · 718-893-3900 · [email protected]
CO
2
Bef
ore Serving the C
arbonated Cocktail:
1.
Agitate the kegs to keep the cocktails from separating.
2.
Unlock the regulator setting by loosening the locknut on the pressure screw.
3.
Set the CO₂ output pressure to 6-12 psi
before dispensing.
4.
Lock the regulator setting.
Placing the Kegs & Final Steps:
Image v
aries by model.*
