ASSEMBLY & OPERATING INSTRUCTIONS
ITEM
MW21
Diagrams within this manual may not be drawn proportionally
Due to continuing improvements actual product may differ slightly from the product described herein

Page 2 ITEM MW21
SPECIFICATIONS
Top
Die
Diameter
(mm//in)
147//5-3/4
7
Pcs Bottom Dies Shaping Radius
(mm//in)
12.7//1/2,25.4//1,38.1//1-1/2,
63.5//2-1/2,127//5,228.6//9,Flat
Throat
(mm//in)
400//15-3/4
SAVE THIS MANUAL
You will need the manual for the safety warnings and precautions, assembly instructions,
operating and maintenance procedures, parts list and diagram. Keep your invoice with this
manual. Write the invoice number on the inside of the front cover. Keep the manual and invoice in
a safe and dry place for future reference.
SAFETY WARNINGS AND PRECAUTIONS
WARNING: When using tool, basic safety precautions should always be followed to reduce the
risk of personal injury and damage.
Read all instructions before using this tool!
1.
Keep work area clean. Cluttered areas invite injuries.
2.
Observe work area conditions. Do not use machines or power tools in damp or wet
locations. Don’t expose to rain. Keep work area well lighted. Do not use electrically
powered tools in the presence of flammable gases or liquids.
3.
Keep children away. Children must never be allowed in the work area. Do not let them
handle machines, tools, or extension cords.
4.
Store idle equipment. When not in use, tools must be stored in a dry location to inhibit rust.
Always lock up tools and keep out of reach of children.
5.
Do not force tool. It will do the job better and more safely at the rate for which it was
intended. Do not use inappropriate attachments in an attempt to exceed the tool capacity.
6.
Use the right tool for the job. Do not attempt to force a small tool or attachment to do the
work of a larger industrial tool. Do not modify this tool and do not use this tool for a purpose
for which it was not intended.
7.
Dress properly. Do not wear loose clothing or jewelry as they can be caught in moving
parts. Protective, electrically non-conductive clothes and non-skid footwear are
recommended when working. Wear restrictive hair covering to contain long hair.
8.
Use eye and ear protection. Always wear ANSI approved impact safety goggles. Wear
a full face shield if you are producing metal filings or wood chips. Wear an ANSI approved
dust mask or respirator when wo rking around metal, wood, and chemical dusts and mists.
9.
Do not overreach. Keep proper footing and balance at all times. Do not reach over or across
running machines. Keep hands and fingers clear of the Roll Dies when operating.

ITEM MW21 Page 3
10.
Maintain tools with care. Keep tools sharp and clean for better and safer performance.
Follow instructions for lubricating and changing accessories. Inspect tool cords periodically
and, if damaged, have them repaired by an authorized technician. The handle must be kept
clean, dry, and free from oil and grease at all times.
11.
Remove adjusting keys and wrenches. Check that keys and adjusting wrenches are
removed from the tool or machine work surface before plugging it in.
12.
Stay alert. Watch what you are doing, use common sense. Do not operate any tool when
you are tired.
13.
Check for damaged parts. Before using any tool, any part that appears damaged
should be carefully checked to determine that it will operate properly and perform its
intended function. Check for alignment and binding of moving parts; any broken parts or
mounting fixtures; and any other condition that may affect proper operation. Any part
that is
damaged should be properly repaired or replaced by a qualified technician. Do not use the
tool if any switch does not turn on and off properly.
14.
Replacement parts and accessories. When servicing, use only identical replacement
parts.
Use of any other parts will void the warranty.
Only use accessories intended for
use with this
tool.
15.
Do not operate tool if under the influence of alcohol or drugs. Read warning labels if
taking prescription medicine to determine if your judgment or reflexes are impaired while
taking drugs. If there is any doubt, do not operate the tool.
16.
Maintenance. For your safety, service and maintenance should be performed regularly by a
qualified technician.
17.
Workpiece may be sharp. After bending or cutting workpieces use caution. Be aware of
sharp edges or sharp shreds of metal that may be created. Use heavy duty gloves when
handling the workpiece.
WARNING: The warnings, cautions, and instructions discussed in this instruction manual
cannot cover all possible conditions and situations that may occur. It must be understood by
the operator that common sense and caution are factors which cannot be built into this
product, but must be supplied by the operator.
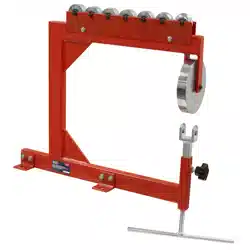
FEATURES
1. Make
smooth radian surface in sheet metal without heating and
hammering.
2.
Easy for adjusting
& assembly.
3.
Bottom Anvil Dies for different
radian.
4.
All steel
construction.
UNPACKIG
When unpacking, check to make sure that the item is intact and undamaged. If any
parts are missing or broken, please contact the seller.
ASSEMBLY

Page 4 ITEM MW21
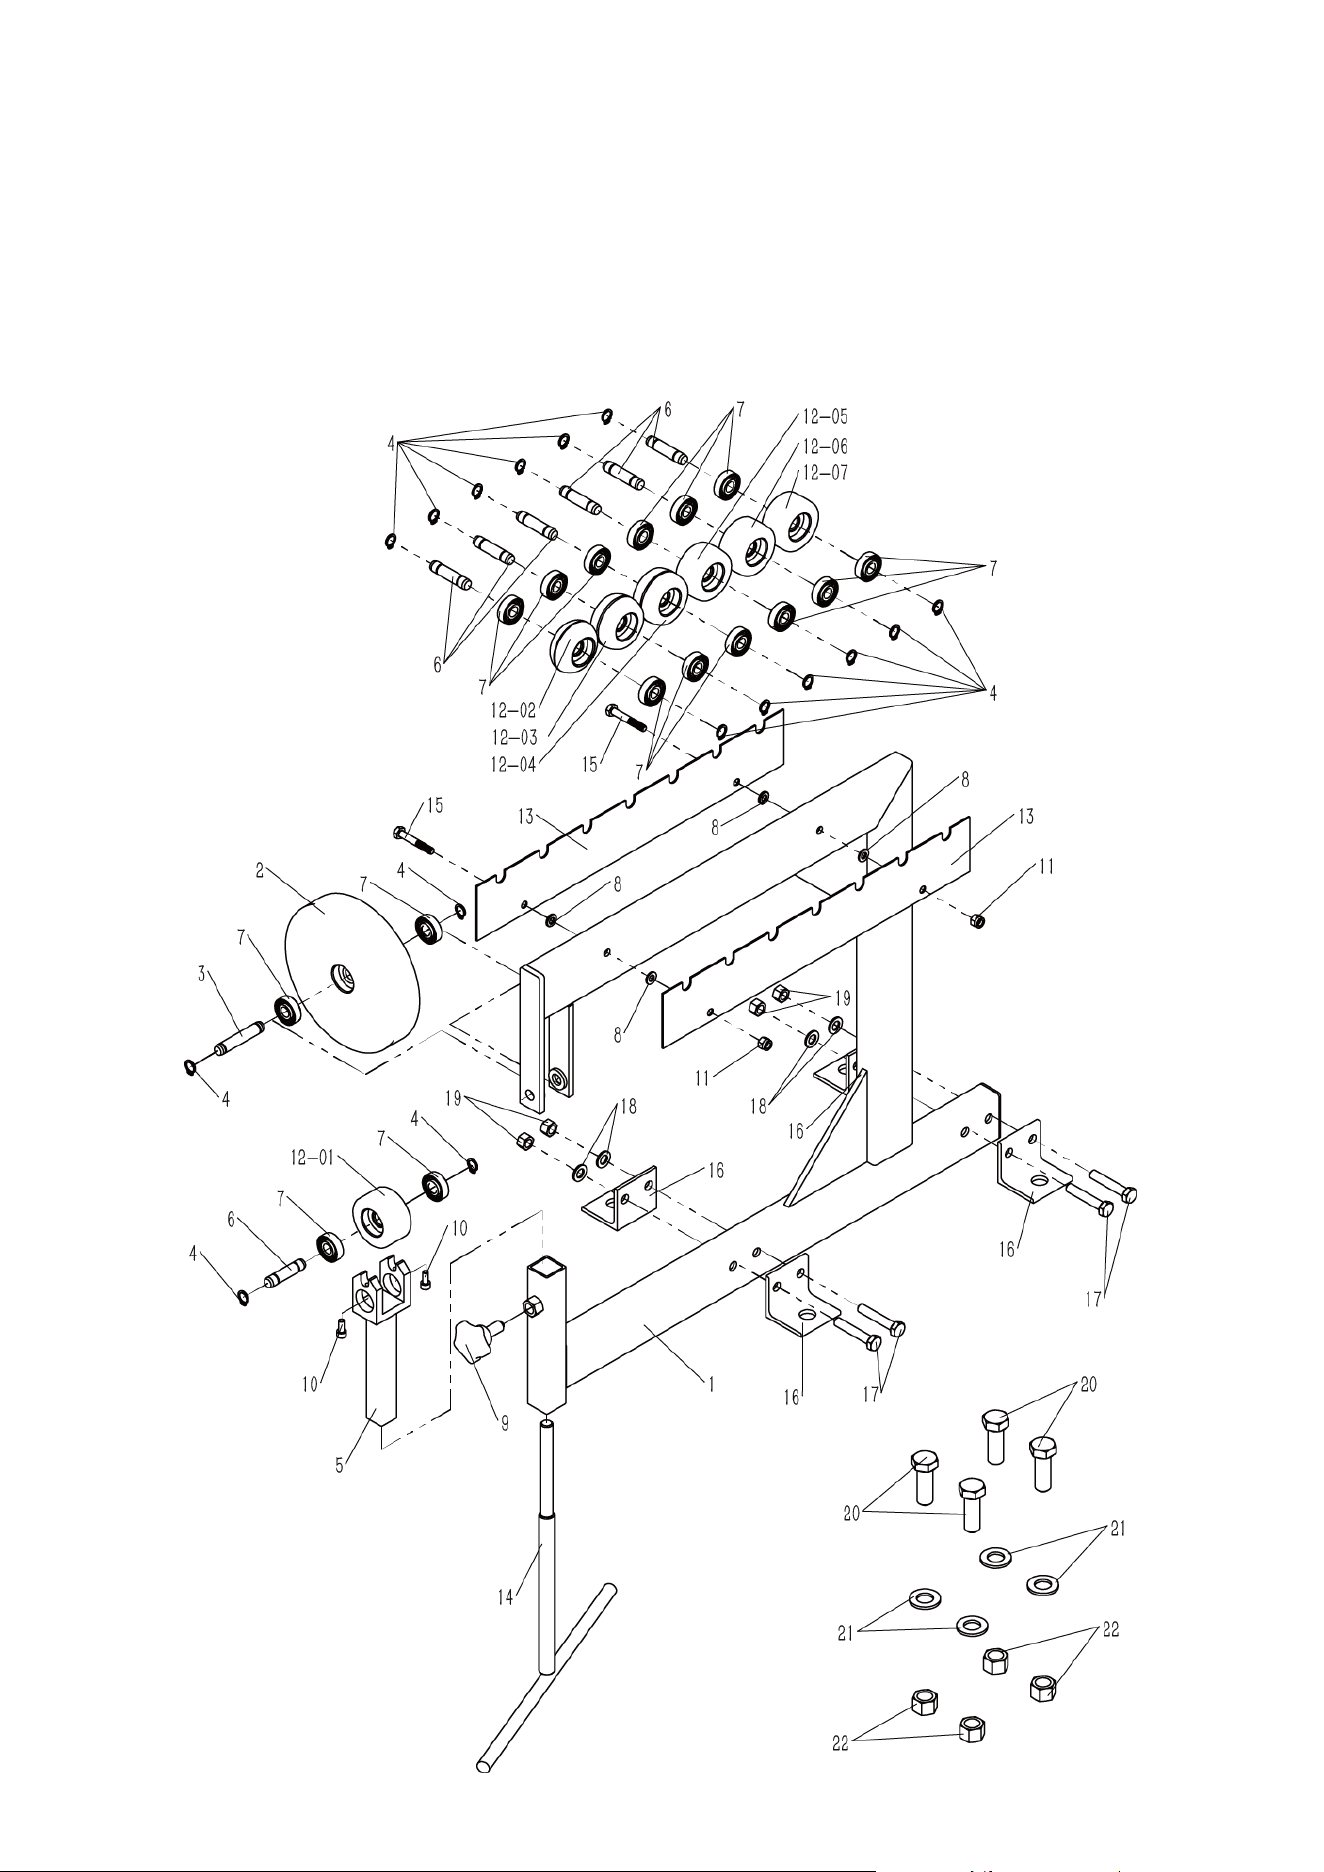
1. Place the Top Die (2#)
into
the
bracket
at the
top
of the
unit.
Fix in
place with the
Top Die
Shaft
(3#) and
secure with
the
C-Ring
(4#).
2.
Put the
Anvil Bracket
(5#)
into
the
holder
at the end of the Frame (1#).
3.
Screw
the
Adjusting Screw
(14#)
into
the unit.
4.
Screw
the
Knob
(9#)
into
the
threaded hole
on Frame (1#).
Lift Anvil Bracket
(5#) to let the
Knob
(9#)
seat into
the
slot
of
Anvil Bracket
(5#).
Tighten Knob
(9#).
5. Place the
two pieces
of the Die Rack (13#)
onto
the
unit
and
secure with Nut M6
(11#) ,
Washer 6mm
(8#) and
Bolt M6x40
(15#).
6.
Secure
the
English Wheel
at
its mid-point with
a
vise. Only mount
the
English
Wheel on a
work surface that
is
capable
of
supporting both
the
weight
of the Wheel and the
work
piece.
7.
Slide
the
Anvil Shafts
(6#)
through
the
hole
in the
Anvils
(12-01#,12-02#,12-03#,12-04#,12-05#,12-06#,12-07#) and
place them
in the
Die Rack
(13#).
8.
Connect Angle Steel (16#) with Frame (1#) with Bolt M8x45 (17#), Washer 8mm (18#) and
Nut M8 (19#).
OPERATION
1.
Always
wear
work gloves when performing operations with
the
English
Wheel.
2.
Select
the
proper Anvil
(12-01#,12-02#,12-03#,12-04#,12-05#,12-06#,12-07#)
for
the
job
and
place it
on the
Anvil Bracket
(5#).
3.
Insert
the
work piece between
the Top Die (2#) and the
chosen Anvil
(12-01#, 12-02#,
12-03#, 12-04#,12-05#,12-06#,12-07#).
4.
Turn
the
Adjusting Screw
(14#)
until
the Top Die (2#) and the
Anvil
(12-01#, 12-02#,
12-03#,12-04#,12-05#,12-06#,12-07#)
engage
the
metal.
It is
recommended
to have a
loose pinch , rather than
a
tight
one. A
tight
pinch
will
make
it harder
to
move
the
metal
and
may
cause creasing.
A
loose pinch
makes
it
easy to
move
the
metal,
and
allows greater
accuracy. Although, it
may
take
more
passes
to
form
the metal.
5.
Form
the
metal
by
pushing
and
pulling it between
the dies.
6. When
finished, loosen
the
Adjusting Screw
(14#) and
remove
the
work piece from
the
English
Wheel.
7. Clean,
then store
the
product indoors out
of
children’s
reach.
MAINTENANCE
1. Keep the machine clean.
2. Lubricate the moving parts with grease.
3. Coat the outside surface with antirust oil.
ITEM MW21 Page 5
PLEASE READ THE FOLLOWING CAREFULLY
PARTS LIST
1
Frame
1
2
Top Die
1
3 Top Die Shaft
1
4
C-Ring
16
5
Anvil Bracket
1
6
Anvil Shaft
7
7
Bearing
16
8
Washer 6mm
4
9
Knob
1
10
Screw M5x12
2
11
Nut M6
2
12-01
Flat Anvil
1
12-02
1/2" Radius Anvil
1
12-03
1" Radius Anvil
1
12-04
1-1/2" Radius Anvil
1
12-05
2-1/2" Radius Anvil
1
12-06
5" Radius Anvil
1
12-07
9" Radius Anvil
1
13
Die Rack
2
14
Adjusting Screw
1
15
Bolt M6x40
2
16
Angle Steel
4
17
Bolt M8x45
4
18
Washer 8mm
4
19
Nut M8
4
20
Bolt M14x40
4
21
Washer 14mm
4
22
Nut M14
4
Page 6 ITEM MW21
PARTS DIAGRAM
