
1. SAFETY
9 Save this instruction manual for safety warnings and precautions, assembly instructions, operating and maintenance procedures, parts
list and diagrams. Keep your invoice. Keep the instruction manual and invoice in a safe and dry place for future reference.
9 Only use on rm, level, unobstructed surfaces which are capable of supporting the metal shaping station.
9 Ensure metal shaping station is xed to surface capable of supporting the station and accessories.
9 Always use the metal shaping station in a well lit, clean and dry place.
9 Make sure surface is rm under foot. Preferably concrete.
8 DO NOT use non-original parts; use of such parts may be dangerous will aect the warranty.
9 Replace or repair damaged parts. Use only recommended parts. Unauthorised parts may be dangerous and will invalidate the warranty.
9 Keep metal shaping station dry.
9 Keep children and unauthorised persons away from the work area.
9 Ensure that the unit is properly and securely assembled before use.
9 Use the right tool for the job. DO NOT attempt to force a small tool or attachment to do the work of a larger industrial tool. DO NOT
modify this tool and DO NOT use this tool for a purpose for which it was not intended.
9 Dress properly. DO NOT wear loose clothing or jewelry as they can be caught in moving parts. Protective, electrically non-conductive
clothes and non-skid footwear are recommended when working. Wear restrictive hair covering to contain long hair.
9 Use eye and ear protection. Always wear ANSI approved impact safety goggles. Wear a full face shield if you are producing metal
lings or wood chips. Wear an ANSI approved dust mask or respirator when working around metal, wood, and chemical dusts and
mists.
9 Maintain tools with care. Keep tools sharp and clean for better and safer performance. Follow instructions for lubricating and changing
accessories. Inspect tool cords periodically and, if damaged, have them repaired by an authorized technician. The handle must be kept
clean, dry, and free from oil and grease at all times.
9 Stay alert. Watch what you are doing, use common sense. DO NOT operate any tool when you are tired.
9 Replacement parts and accessories. When servicing, use only identical replacement parts. Use of any other parts will void the
warranty. Only use accessories intended for use with this tool.
9 Maintenance. For your safety, service and maintenance should be performed regularly by a qualied technician.
9 Workpiece may be sharp. After bending or cutting workpieces use caution. Be aware of sharp edges or sharp shreds of metal that may
be created. Use heavy duty gloves when handling the workpiece.
WARNING! When not in use, tools must be stored in a dry location to inhibit rust. Always lock up tools and keep out of reach of
children.
WARNING! Failure to comply with these instructions may result in damage to the station or other property and/or personal injury.
WARNING! The warnings, cautions and instructions discussed in this instruction manual cannot cover all possible conditions and
situations that may occur. It must be understood that common sense and caution are factors which cannot be built into this product, but
must be applied by the operator.
WARNING! When using this tool, basic safety precautions should always be followed to reduce the risk of personal injury and damage.
8 DO NOT force tool. It will do the job better and more safely at the rate for which it was intended. DO NOT use inappropriate
attachments in an attempt to exceed the tool capacity.
8 DO NOT overreach. Keep proper footing and balance at all times.
8 DO NOT operate tool if under the inuence of alcohol or drugs. Read warning labels if taking prescription medicine to determine if your
judgment or reexes are impaired while taking drugs. If there is any doubt, DO NOT operate the tool.
2. INTRODUCTION
Versatile station designed to hold T-dollies and/or sandbags securely. Accommodates most sizes of dollies, oering exibility for
dierent metal shaping tasks. Features mounting holes on the base for easy installation on the oor, ensuring stability during use.
Provides a stable platform for leather panel beating sandbag when needing to conduct metal forming tasks. Overall height of 885mm
creates a compact workstation for convenient metal shaping operations, allowing easy access to tools and sandbag mounting plate for
sheet metal work.
METAL SHAPING STATION FOR HOLDING
T-DOLLIES & SANDBAGS
Thank you for purchasing a Sealey product. Manufactured to a high standard, this product will, if used according to these instructions,
and properly maintained, give you years of trouble free performance.
IMPORTANT: PLEASE READ THESE INSTRUCTIONS CAREFULLY. NOTE THE SAFE OPERATIONAL REQUIREMENTS, WARNINGS &
CAUTIONS. USE THE PRODUCT CORRECTLY AND WITH CARE FOR THE PURPOSE FOR WHICH IT IS INTENDED. FAILURE TO DO
SO MAY CAUSE DAMAGE AND/OR PERSONAL INJURY AND WILL INVALIDATE THE WARRANTY. KEEP THESE INSTRUCTIONS SAFE
FOR FUTURE USE.
MW19 Issue 2 30/08/24
Original Language Version
© Jack Sealey Limited
MODEL NO: MW19
Refer to
instruction
manual
Wear eye
protection
Wear hearing
Protection
MW19 Issue 2 30/08/24
Original Language Version
© Jack Sealey Limited
3. SPECIFICATION
4. ASSEMBLY
Numbers refer to attached parts list.
Before you begin, separate all parts and group by size and style. If any parts are missing, contact your Sealey stockist immediately.
NOTE: Finger tighten nuts and bolts when assembling. Once assembled, use the supplied hex key to ensure all xings are secure.
Note: For additional information regarding the parts listed, refer to the Parts Diagram.
WARNING! This stand must be bolted on a solid level ground.
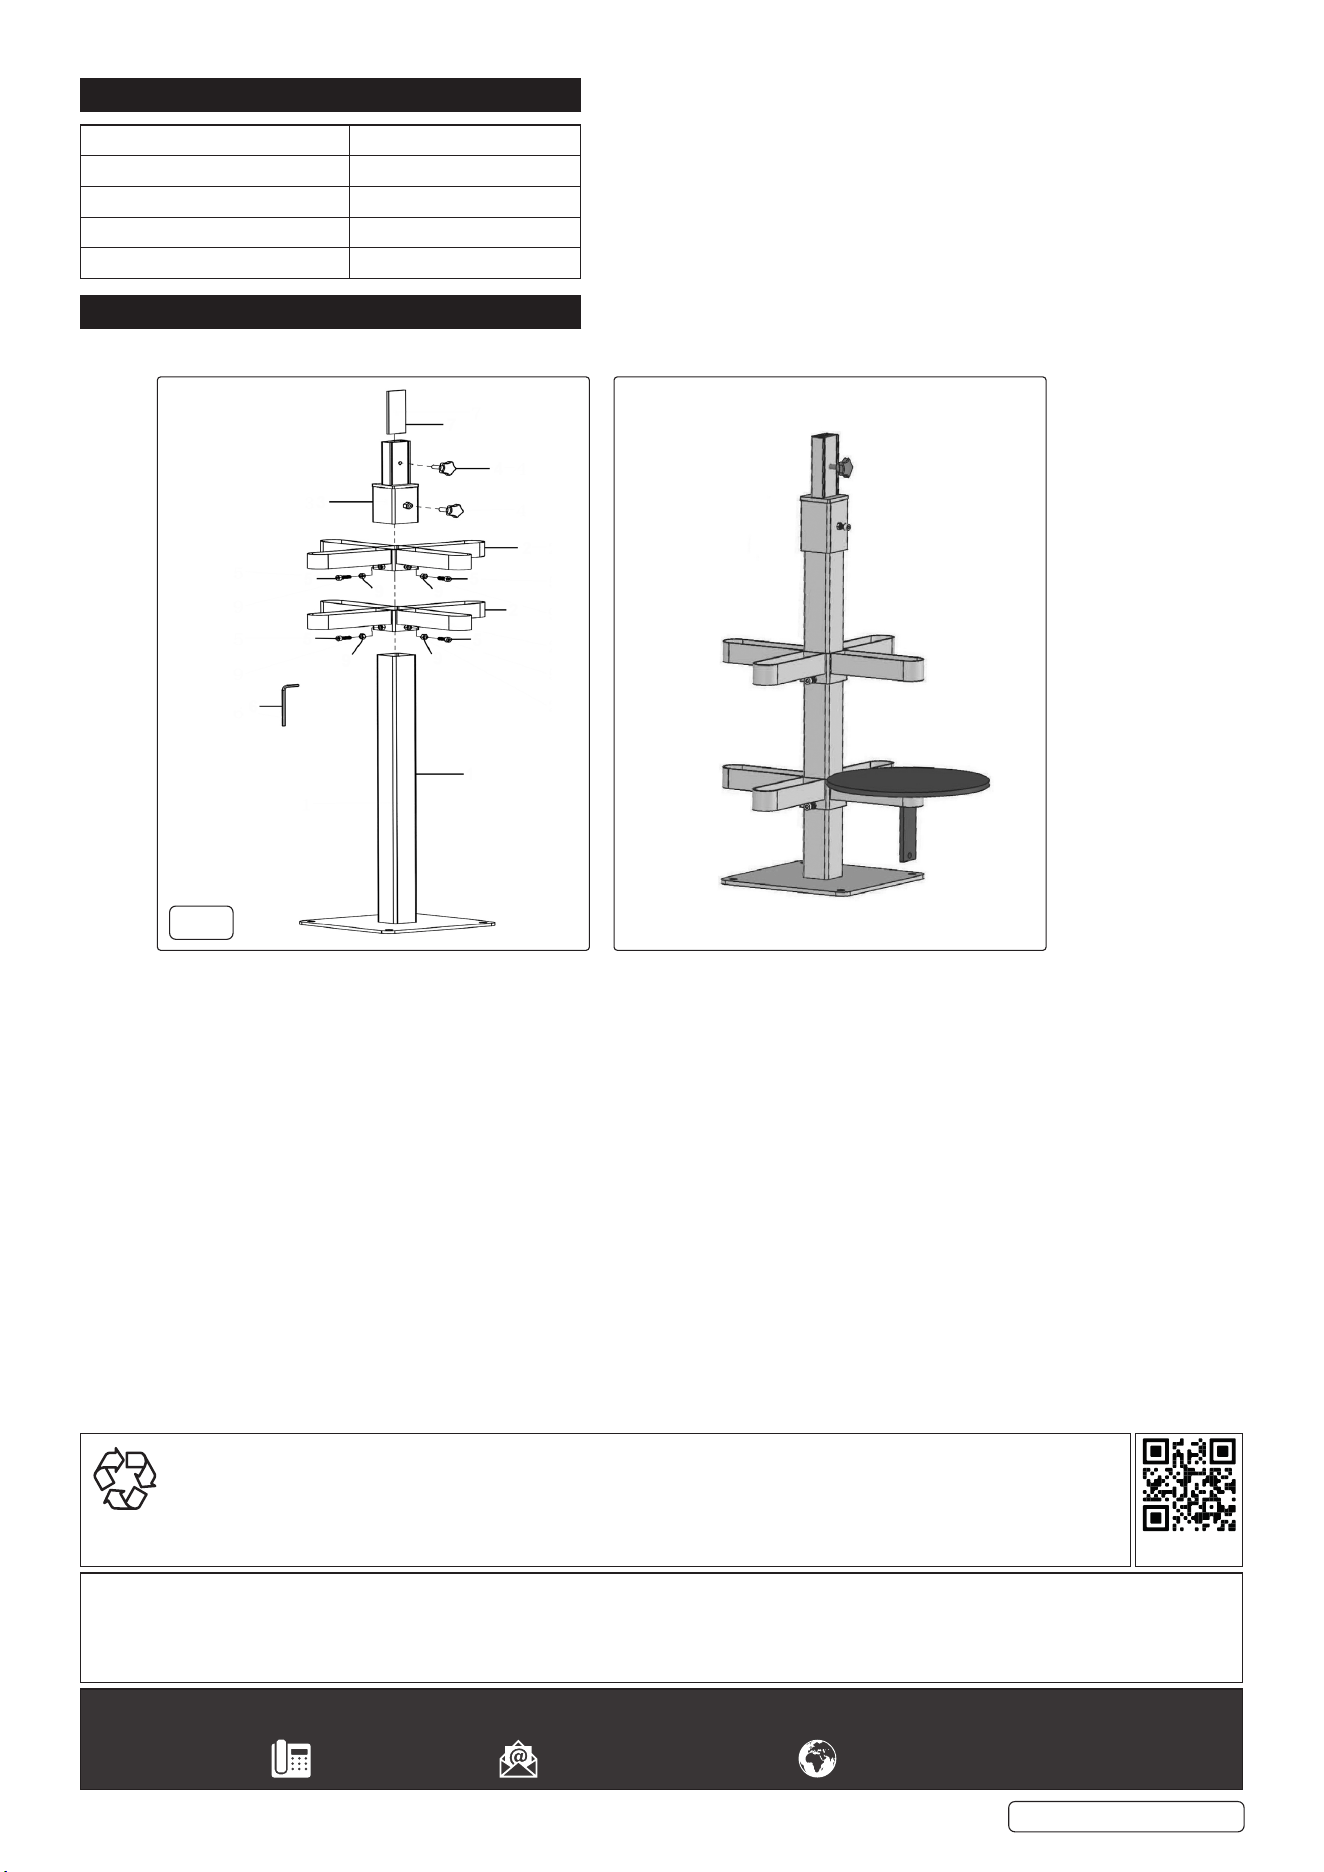
4.1. ASSEMBLING THE STAND (FIG.1)
4.1.1. Slide the Storage Racks (2#) onto the Stand (1#), insert socket cap bolts M8 x 20mm (5#) use steel nuts M8 zinc (9#). DO NOT tighten
at this point.
4.1.2. Slide the dolly adapter (3#) onto the stand (1#), tighten socket cap bolts M8 x 20mm (5#).
4.1.3. Insert the top plate (7#) into the hole of the dolly adapter (3#).
4.1.4. Place the dolly into the hole of the dolly adapter (3#), tighten knob, plastic, threaded (4#).
Sealey Group, Kempson Way, Suffolk Business Park, Bury St Edmunds, Suffolk. IP32 7AR
01284 757500 sales@sealey.co.uk www.sealey.co.uk
Note: It is our policy to continually improve products and as such we reserve the right to alter data, specications and component parts without prior notice.
Important: No Liability is accepted for incorrect use of this product. Please note that other versions of this product are available. If you require
documentation for alternative versions, please email or call our technical team on technical@sealey.co.uk or 01284 757505.
Warranty: Guarantee is 12 months from purchase date, proof of which is required for any claim.
ENVIRONMENT PROTECTION
Recycle unwanted materials instead of disposing of them as waste. All tools, accessories and packaging should be
sorted, taken to a recycling centre and disposed of in a manner which is compatible with the environment. When
the product becomes completely unserviceable and requires disposal, drain any uids (if applicable) into approved
containers and dispose of the product and uids according to local regulations.
REGISTER YOUR
PURCHASE HERE
FIG.1
1
6
5
9 9
5
2
2
4
7
3
5 5
9 9
Model No: MW19
Height: 885mm
Max. Shank Size (W x H): 47 x 25mm
Nett Weight: 23.1kg
Top Size: Ø320mm (Ø12.6”)
