Loading ...
Loading ...
Loading ...
9291
ENGLISH
Your appliance comes with the following accessories:
These accessories are also tted with gripping areas to facilitate easier handling.
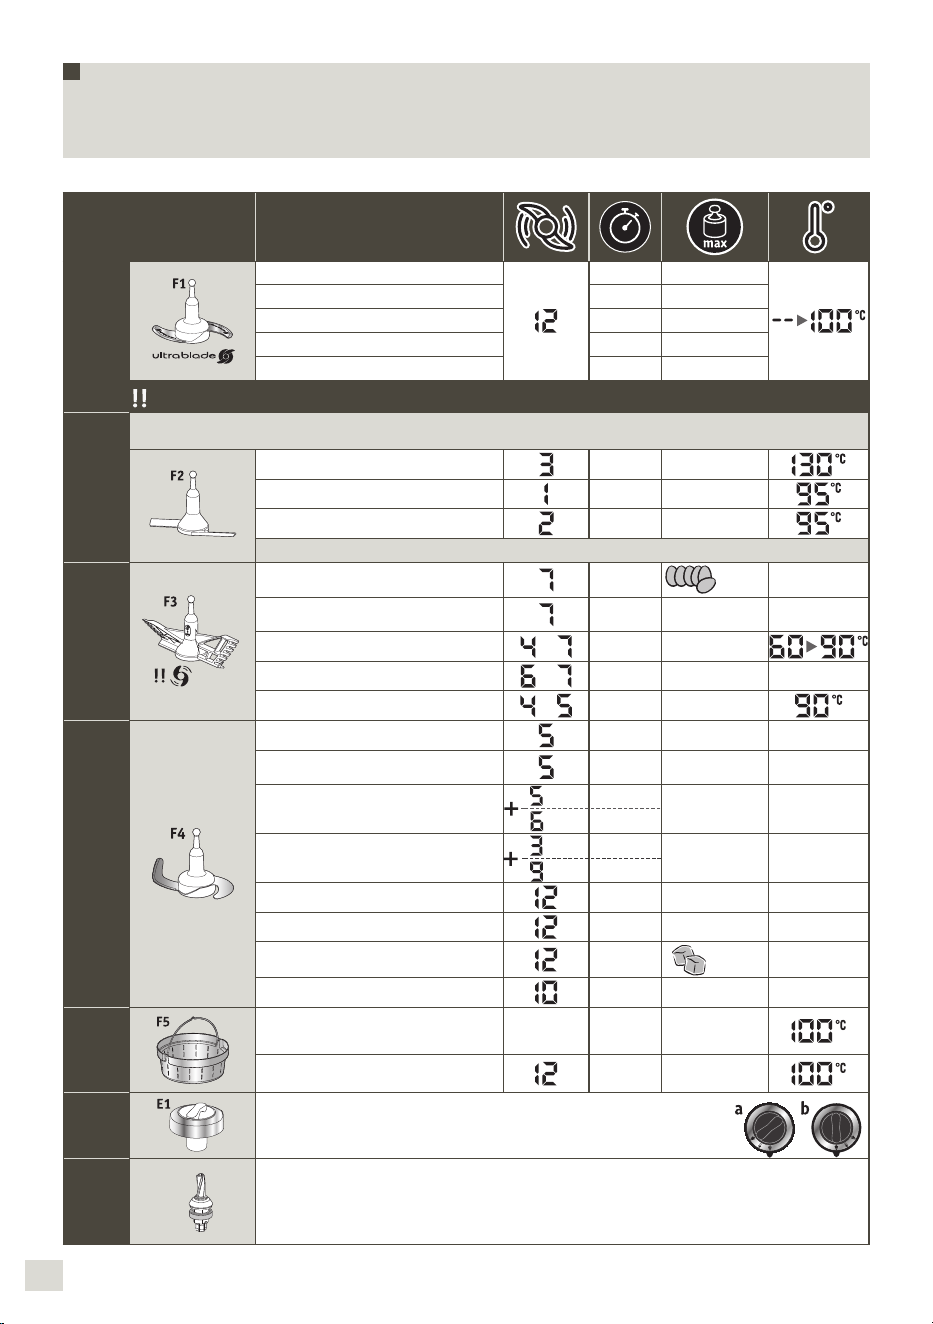
Ultrablade knife
Mixing soups
3min 3L
Mixing fruit purees 40s 1Kg
Chopping vegetables 15s 1Kg
Chopping meat 30s 1Kg
Chopping fish 15s 1Kg
Do not use this accessory to chop hard products, use the F4 kneading blade/crusher.
Mixer
It mixes Cooked dishes without damaging the ingredients
Very useful for browning phases before preparations (risottos, soups).
Browned dishes 5min 500g
Stews 45min 3L
Risottos 22min 1.5Kg
Ratatouille, Chutney, Pulses (settings: check the recipe booklet)
Whisk
9 max
Wisking egg whites, 5/10min
7
max
Mayonnaise,
Whipped cream, meringues
2/5min 0.5L
Sauces, creams
to
1/20min 1L
Mashed potato
to
1min 1L
Polenta
to
1/16min 1L
Kneading/grinding knife
Kneading white bread dough 2min 30s 1.2Kg
Kneading short crust pastry,
biscuit dough, special bread
2min 30s 1Kg
Kneading rich dough
(brioche, kugelhopf. etc.)
1min 30s
2 min
0.8Kg
Mixing light batters (cake
mixture, etc.)
40 s
3min
1Kg
Grinding nuts
1min 0.6Kg
Grinding hard texture foods
1min 0.6Kg
Crushing ice
1min
6 to 10
Pancake batter, waffle batter
1min 1.5L
Steam
basket
Steam cooking vegetables,
fish or meat
20/40min 1Kg
Soup with chunks
3min 3L
Cap/
Stopper
Cap/Stopper for regulating steam extraction
– High setting (a) = steam cooking.
– Low setting (b) = risotto, creamy puddings, sauces, etc.
Detachable
spindle
D3
Detachable spindle
Lidless browning and cooking.
Your i Prep & Cook XL appliance can operate in
‘connected’ mode, and also in ‘unconnected’
mode. It also has two operating modes:
automatic program mode and manual mode.
Automatic program mode:
the speed, cooking temperature and
cooking time are pre-programed to
make soups, stews, steamed dishes and
pastries automatically.
Manual mode:
you can personalise the settings for
speed, cooking temperature and cooking
time as you wish.
Use with or without the lid
Temperature from
30°C to 130°C
Temperature from
135°C to 150°C
– When you have selected a temperature
between 135°C and 150°C, you must use
your appliance without the lid. If the lid
is positioned on the bowl, a lock will be
displayed on the LCD screen, prompting
you to unlock it.
– Once you have added the food items,
stir them using the spatula and regularly
repeat the operation to prevent the
formation of stains on the bottom of the
bowl. (See “Cleaning” paragraph).
– If you choose to use the appliance with
its lid in place, the maximum cooking
temperature shall then be 130°C.
YOUR APPLIANCE IS EQUIPPED WITH
SAFETYLOCKING LID
The lid is secure each time the appliance
starts. This security feature prevents the
lid from opening when preparing a recipe
(See Fig.17). Do not attempt to force the
lid when it is locked. This security lock is
released each time that the appliance stops. If
you have selected a temperature greater than
or equal to 50°C and a speed greater than or
equal to 5, a countdown of 10 seconds then
appears on the control-panel ‘s LCD display.
(See Fig.18). It will only be possible to open
it at the end of the countdown.
FITTING THE BOWL, ACCESSORIES AND
LID ASSEMBLY
Before using your appliance for the rst
time, clean all the parts (D, E, F, G) in
warm soapy water, except for the motor
unit (A). Your bowl (D) has a removable
drive (D3) to make cleaning easier.
Make sure that all the packaging has
been removed before use, especially the
protection between the bowl (D) and the
motor unit (A).
Place the seal (E4) on the seal carrier (E3)
(See Fig. 1) and clip the assembly on the
lid (E2) (See Fig. 2).
Position the gasket (D4) on the detachable
spindle (D3). Lock the assembly to the
bottom of the bowl with the locking ring
(D5) (See Fig. 3). If you use the cooking
mode without the lid, position the seal (D4)
on the detachable spindle (D3). Lock the
entire appliance to the bottom of the bowl
with the locking ring (D5) (See Fig. 3).
Position the chosen accessory in the bowl:
– the accessories (F1, F2, F3, or F4) on the
shared drive at the bottom of the bowl
(See Fig. 4.1),
– for steam cooking, the steam basket (F5)
inside the bowl, (See Fig. 4.3), taking
care to rst ll the 0.7l basin with a liquid
(water, sauce, etc.) (See Fig. 4.2).
Add the ingredients to the inside of the
bowl or steam basket.
Position the lid on the bowl (D) by
aligning the two triangles (See Fig. 5),
lock the lid without pressing by turning it
in the direction of the arrow (See Fig. 6).
Position the steam regulator cap (E1) on the
lid. There are 2 possible positions (See Fig. 7):
The low setting allows a maximum
amount of condensation to
be released and therefore it is
recommended to prepare dishes
and sauces with a better consistency
(risotto, creamy puddings, sauces, etc.).
The high setting allows a maximum
amount of heat and steam to build
up in the bowl for all types of steam
cooking (soups, etc.).
This setting also prevents splashing during
mixing.
Position the bowl (D) on the motor unit (A)
until you hear a “click” (See Fig. 8).
The appliance only starts up if the bowl
and the lid are correctly positioned and
locked on the motor unit.
F1 F2
F3 F4
F5
F1 F2
F3 F4
– *The Bluetooth® brand and logos are registered brands of Bluetooth SIG, Inc. and their use by the SEB Group has been
ofcially authorised.
– Google Play and Android are Google Inc. brands.
– Apple and the Apple logo are Apple Inc. brands, registered in the USA and other countries. App Store is an Apple Inc. service mark.
Loading ...
Loading ...
Loading ...