Loading ...
Loading ...
Loading ...
4
J
H
I
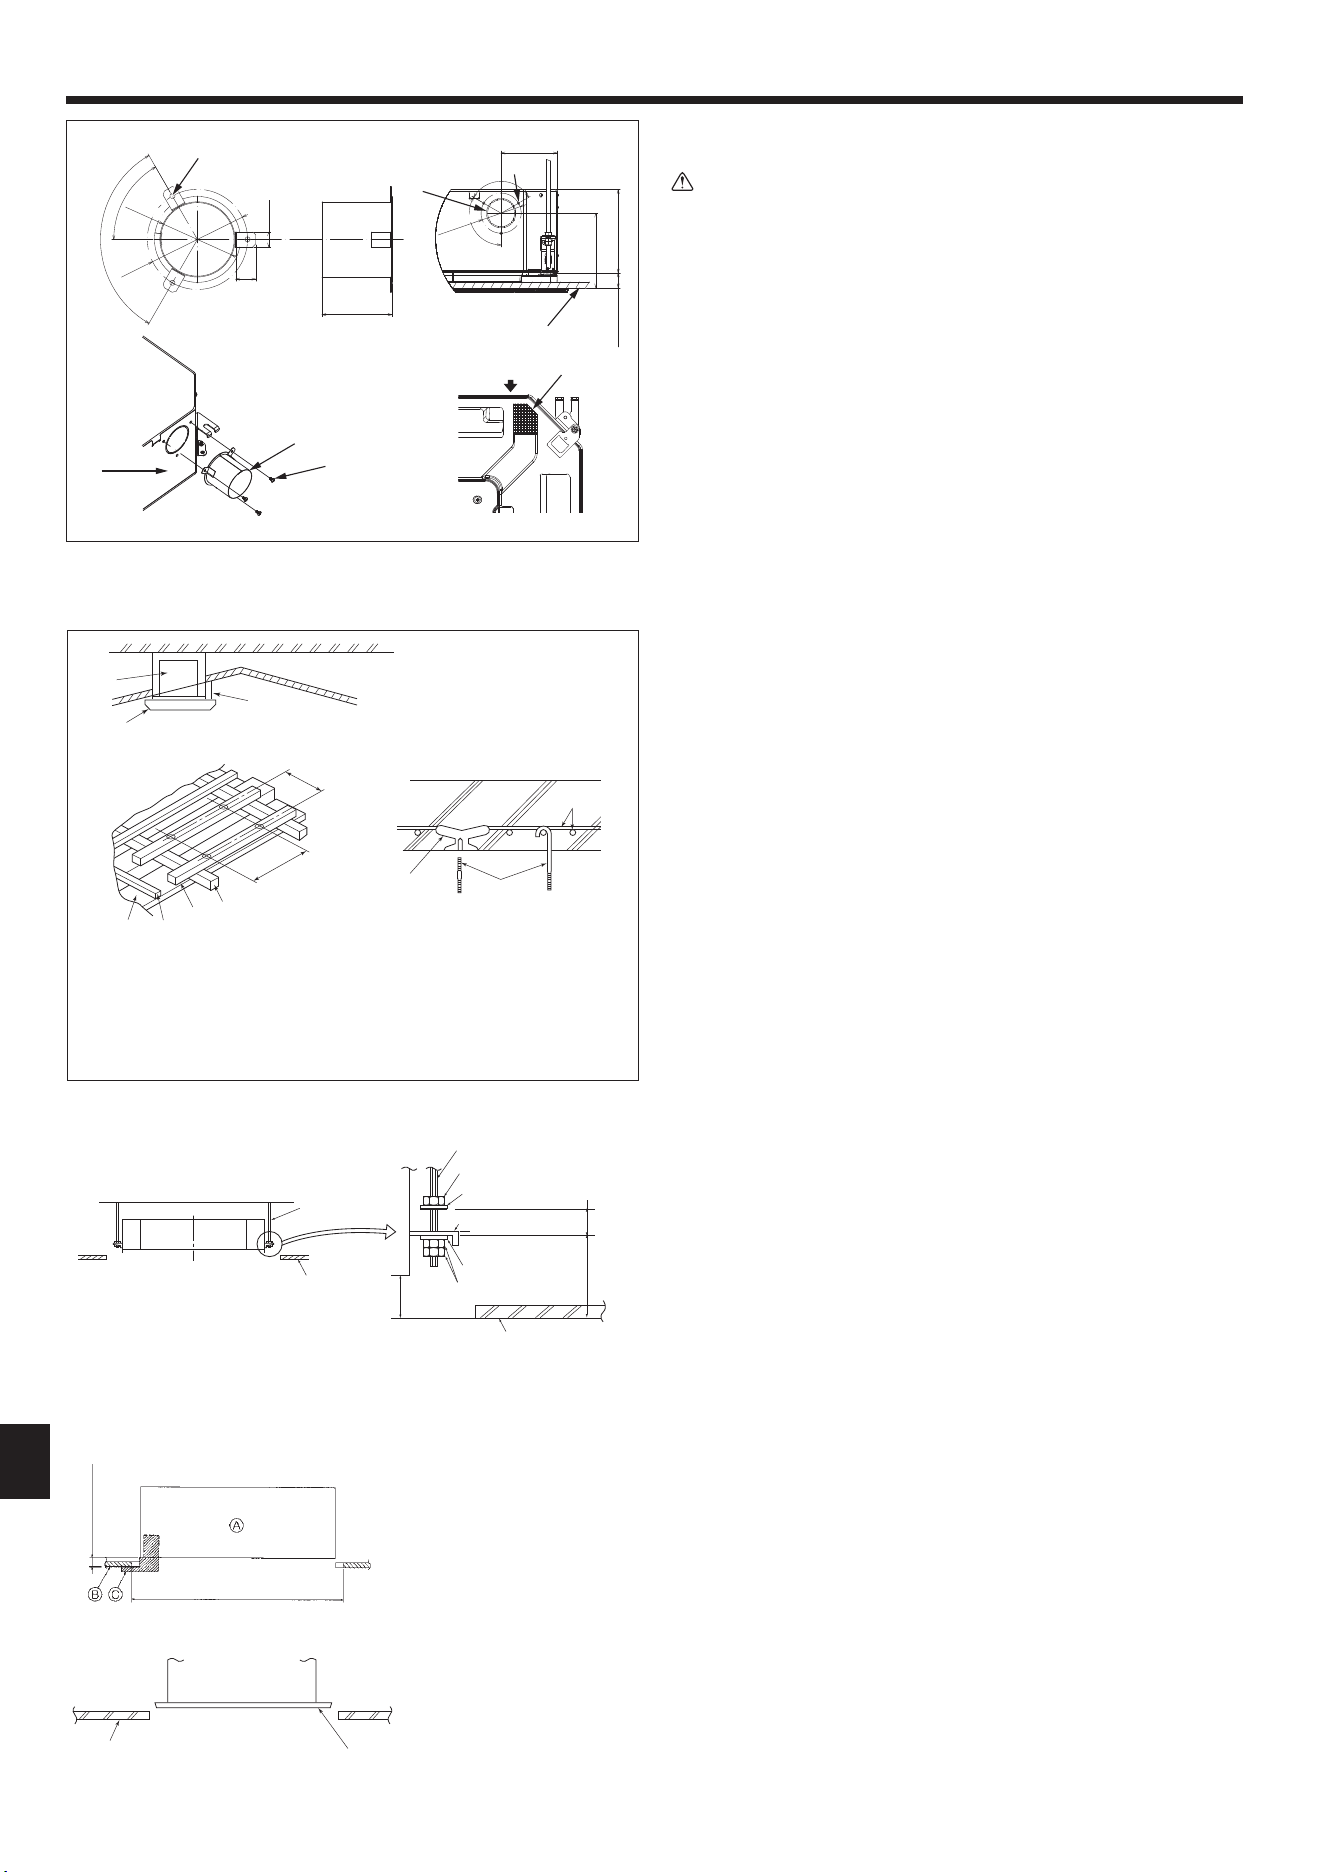
4. Installingtheindoorunit
4.3. Installationofduct(incaseoffreshairintake)
(Fig.4-3)
Caution:
Linkageofductfanandairconditioner
lncasethataductfanisused,besuretomakeitlinkedwiththeairconditioner
whenoutsideairistaken.
Donotruntheductfanonly.Itcancausedewdrop.
Makingaductange(preparedlocally)
• Theshapeofductangeshownleftisrecommended.
Installationofductange
• Cutoutthecutouthole.Donotknockitout.
• Installaductangetothecutoutholeoftheindoorunitwiththree4× 10 mm tapping
screws which should be prepared locally.
Installationofduct(shouldbepreparedlocally)
• Prepareaductofwhichinnerdiametertsintotheouterdiameteroftheductange.
• Incasethattheenvironmentabovetheceilingishightemperatureandhighhumidity,
wraptheductinaheatinsulatetoavoidcausingdewdroponthewall.
Removethedrainpaninsulation.
A Ductangerecommendedshape
(Thickness:0.8mm(1/32inch)ormore)
B 3-ø5mm(3/16inch)hole
C Detail drawing of fresh air intake
D Indoor unit
E Ceiling surface
F 3-Tappingscrewhole
G ø73.4mm(2-7/8inch)cutouthole
H Ductange(Preparedlocally)
I 4 × 10 mm Tapping screw
(Preparedlocally)
J Insulation
4.4.Suspension structure (Give site of suspension
strongstructure)(Fig.4-4)
• Theceilingworkdiffersaccordingtotheconstructionofthebuilding.Buildingcon-
structors and interior decorators should be consulted for details.
(1)Extentofceilingremoval:Theceilingmustbekeptcompletelyhorizontalandthe
ceilingfoundation(framework:woodenslatsandslatholders)mustbereinforced
inordertoprotecttheceilingfromvibration.
(2)Cutandremovetheceilingfoundation.
(3)Reinforcetheendsoftheceilingfoundationwhereithasbeencutandaddceiling
foundation for securing the ends of the ceiling board.
(4)Wheninstallingtheunitonaslantingceiling,interlockapillowbetweentheceiling
andthegrilleandsetsothattheunitisinstalledhorizontally.
1 Woodenstructures
• Usetiebeams(single-storyhouses)orsecondoorbeams(twostoryhouses)as
reinforcing members.
• Woodenbeamsforsuspendingairconditionersmustbesturdyandtheirsidesmust
beatleast6cm(2-3/8inch)longifthebeamsareseparatedbynotmorethan90
cm(36inch)andtheirsidesmustbeatleast9cm(3-9/16inch)longifthebeams
areseparatedbyasmuchas180cm(71inch).Thesizeofthesuspensionbolts
shouldbeø10(3/8").(Theboltsdonotcomewiththeunit.)
2 Ferroconcrete structures
Securethesuspensionboltsusingthemethodshown,orusesteelorwoodenhang-
ers,etc.toinstallthesuspensionbolts.
A Unit
B Grille
C Pillow
D Ceiling
E Rafter
F Beam
G Roof beam
H Useinsertsratedat100-150kg
(220-331lbs)each(procurelocally)
I SuspensionboltsM10(3/8")(procure
locally)
J Steel reinforcing rod
1
2
Fig.4-4
A Suspensionbolt(Procurelocally)
B Ceiling
C Nut(Procurelocally)
D Washer(withinsulation)(Accessory)
Fig.4-5
4.5. Unitsuspensionprocedures(Fig.4-5)
Suspend the main unit as shown in the diagram.
1. Inadvance,setthepartsontothesuspensionboltsintheorderofthewashers
(withinsulation),washers(withoutinsulation)andnuts(double).
• Fitthewasherwithcushionsothattheinsulationfacesdownward.
• Incaseofusingupperwasherstosuspendthemainunit,thelowerwashers(with
insulation)andnuts(double)aretobesetlater.
2. Lift the unit to the proper height of the suspension bolts to insert the mounting
plate between washers and then fasten it securely.
3. Whenthemainunitcannotbealignedagainstthemountingholeontheceiling,
itisadjustableowingtoaslotprovidedonthemountingplate.(Fig.4-6)
• MakesurethatstepAisperformedwithin37-42mm(1-15/32to1-21/32inch).
Damage could result by failing to adhere to this range.
4.6. Conrmingthepositionofmainunitandtightening
thesuspensionbolts(Fig.4-7)
• Usingthegaugeattachedtothegrille,ensurethatthebottomofthemainunitis
properlyalignedwiththeopeningoftheceiling.Besuretoconrmthis,otherwise
condensation may form and drip due to air leakage etc.
• Conrmthatthemainunitishorizontallylevelled,usingaleveloravinyltubelled
with water.
• Aftercheckingthepositionofthemainunit,tightenthenutsofthesuspensionbolts
securely to fasten the main unit.
• Theinstallationtemplatecanbeusedasaprotectivesheettopreventdustfrom
entering the main unit when the grilles are left unattached for a while or when the
ceilingmaterialsaretobelinedafterinstallationoftheunitisnished.
* Asforthedetailsoftting,refertotheinstructionsgivenontheInstallationtemplate.
A Mainunit
B Ceiling
C Installationtemplate(Accessory)
Fig.4-7
Fig.4-3
(inch)
Fig.4-6
*B:Suspensionboltpitch(seeFig.4-2Bfordetails)
E Mountingplate
F Washer(withoutinsulation)(Accessory)
G Check using the Installation gauge
A Mainunit
B Ceiling
C Gauge(Grilleaccessory)
D Ceiling opening dimensions
D
E
F
G
*B
*B
5
A
B
A
C
D
E
F
C
B
G
C
B
A
A
B
C
A C
H
I
B
G
F
D
E
J
120°
120°
120°
60°
ø 3-15/16
ø 3-15/16ø 3-15/16
ø 2-15/16
19/32
25/32
2-3/4
5-1/2
7-5/16
1-15/32
+3/16
0
8-3/16
ø 2-15/16
ø 3-15/16
22-11/16to24-1/32
D
A=1-15/32
+3/16
0
Min.1-3/16
Ductangeconnection
(inch)
1-15/32
+3/16
0
Loading ...
Loading ...
Loading ...