Loading ...
Loading ...
Loading ...
46
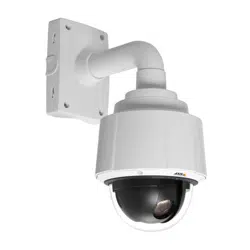
AXIS Q6034 - Troubleshooting
Lower frame rate than expected Reduce number of applications running on the client computer.
Limit the number of simultaneous viewers.
Check with the system administrator that there is enough bandwidth available. See also the
online help.
Check in the AMC Control Panel (H.264 tab) that video processing is set to Decode all frames
possible.
Lower the image resolution.
Why do I not get 30 frames per second? See the section
General performance considerations,
on page 51.
Image degeneration Decrease the GOV length, see the online help for more information.
The Status indicator LED is flashing red and the camera is inaccessible
A firmware upgrade has been inter-
rupted or the firmware has otherwise
been damaged
See
Emergency Recovery Procedure,
on page 43.
No images displayed on web page
Problem with AXIS Media Control.
(
Internet Explorer only
)
To enable the updating of video images in Internet Explorer, set your browser to allow ActiveX
controls. Also, make sure that AXIS Media Control is installed on your workstation.
Installation of additional ActiveX com-
ponent restricted or prohibited
Configure your camera to use a Java applet for updating the video images under
Live View Config > Layout > Default Viewer for Internet Explorer. See the online help for more
information.
Video/Image problems, general
Image too dark or too light Check the video image settings. See the online help on Video Stream and Camera Settings.
Missing images in uploads This can occur when trying to use a larger image buffer than is actually available. Try lowering
the frame rate or the upload period.
Slow image update Configuring pre-buffers, motion detection, high-resolution images, or high frame rates, will
affect the performance of the camera.
Poor performance Poor performance may be caused by heavy network traffic, multiple users accessing the unit,
low performance clients, use of features such as motion detection, event handling and image
rotation other than 180 degrees.
Image not clear Check that the dome cover is clean.
Do not
clean a dome cover that looks clean to the eye and never polish the surface. Excessive
cleaning can damage the surface.
For general cleaning of a dome cover it is recommended to use a non-abrasive, solvent-free
neutral soap or detergent with water and a soft cloth. Rinse well with clean lukewarm water.
Dry with a soft cloth to prevent water spotting.
Never use harsh detergents, gasoline, benzende or acetone etc. and avoid cleaning in direct sun-
light or at elevated temperatures.
Poor quality snapshot images
Screen incorrectly configured on your
workstation
In Display Properties, configure your screen to show at least 65000 colors, that is, at least
16-bit. Using only 16 or 256 colors will produce dithering artifacts in the image.
Overlay/Privacy mask is not displayed
Incorrect size or location of overlay or
privacy mask.
The overlay or privacy mask may have been positioned incorrectly or may be too large. Refer to
Overlay Image Settings in the online help for more information.
Browser freezes
Netscape 7.x or Mozilla 1.4 (or later)
can sometimes freeze on a slow com-
puter
Lower the image resolution.
Problems uploading files
Limited space There is only limited space available for the upload of your own files. Try deleting existing files
to free up space.
Motion Detection triggers unexpectedly
Changes in luminance Motion detection is based on changes in luminance in the image. This means that if there are
sudden changes in the lighting, motion detection may be triggered mistakenly. Lower the sensi-
tivity setting to avoid problems with luminance.
No audio
Incorrect setup Check the sound card in the PC. Ensure that the mute button is not pressed and the volume set-
tings are correct.
No audio or
very poor audio quality
Check that the correct Audio Input source is selected under Setup > Audio > Source. Select
Microphone for the internal microphone or for a connected external microphone. Select Line for
a connected line in source.
Loading ...
Loading ...
Loading ...