1. SAFETY
WARNING! Ensure Health and Safety, local authority and general workshop practice regulations are adhered to when using tools and
equipment.
WARNING! Some edges, in particular the scribe are sharp and caution should be used when handling, store safely in the storage case
when not in use.
8 DO NOT use the gauge if damaged.
9 Maintain the gauge in good and clean condition for best and safest performance.
9 Keep the work area clean, uncluttered and ensure there is adequate lighting.
9 Maintain correct balance and footing. Ensure the floor is not slippery and wear non-slip shoes.
9 Remove ill fitting clothing. Remove ties, watches, rings and other loose jewellery. Contain or tie back long hair.
9 Keep children and unauthorised persons away from the work area.
2. INTRODUCTION
Precision ground base with 6-button electronic gauge. Includes fine adjustment control carriage for accurate use. Six digit LCD read-out
displays in Metric or Imperial. Features absolute and comparative functions. Tolerance function enables fast check of batch work. Supplied
with scriber foot and clamp. Powered by CR2032 battery (supplied).
3. SPECIFICATION
Model No: .......................................................... AK9636D
Battery: ........................................... 1 x CR2032 (supplied)
Range: ......................................................0-300mm(0-12”)
Repeatability: .........................................0.01mm(0.0005”)
Resolution: .............................................0.01mm(0.0001”)
1 Power Switch A Scale
2 mm / inch selection B Beam
3 Relative / Absolute C Fine adjustment
4 Zero setting button D LCD Display
5 + preset button E Fastening Screw
6 - preset button F Battery lid
G Base
H Scriber
4. OPERATION
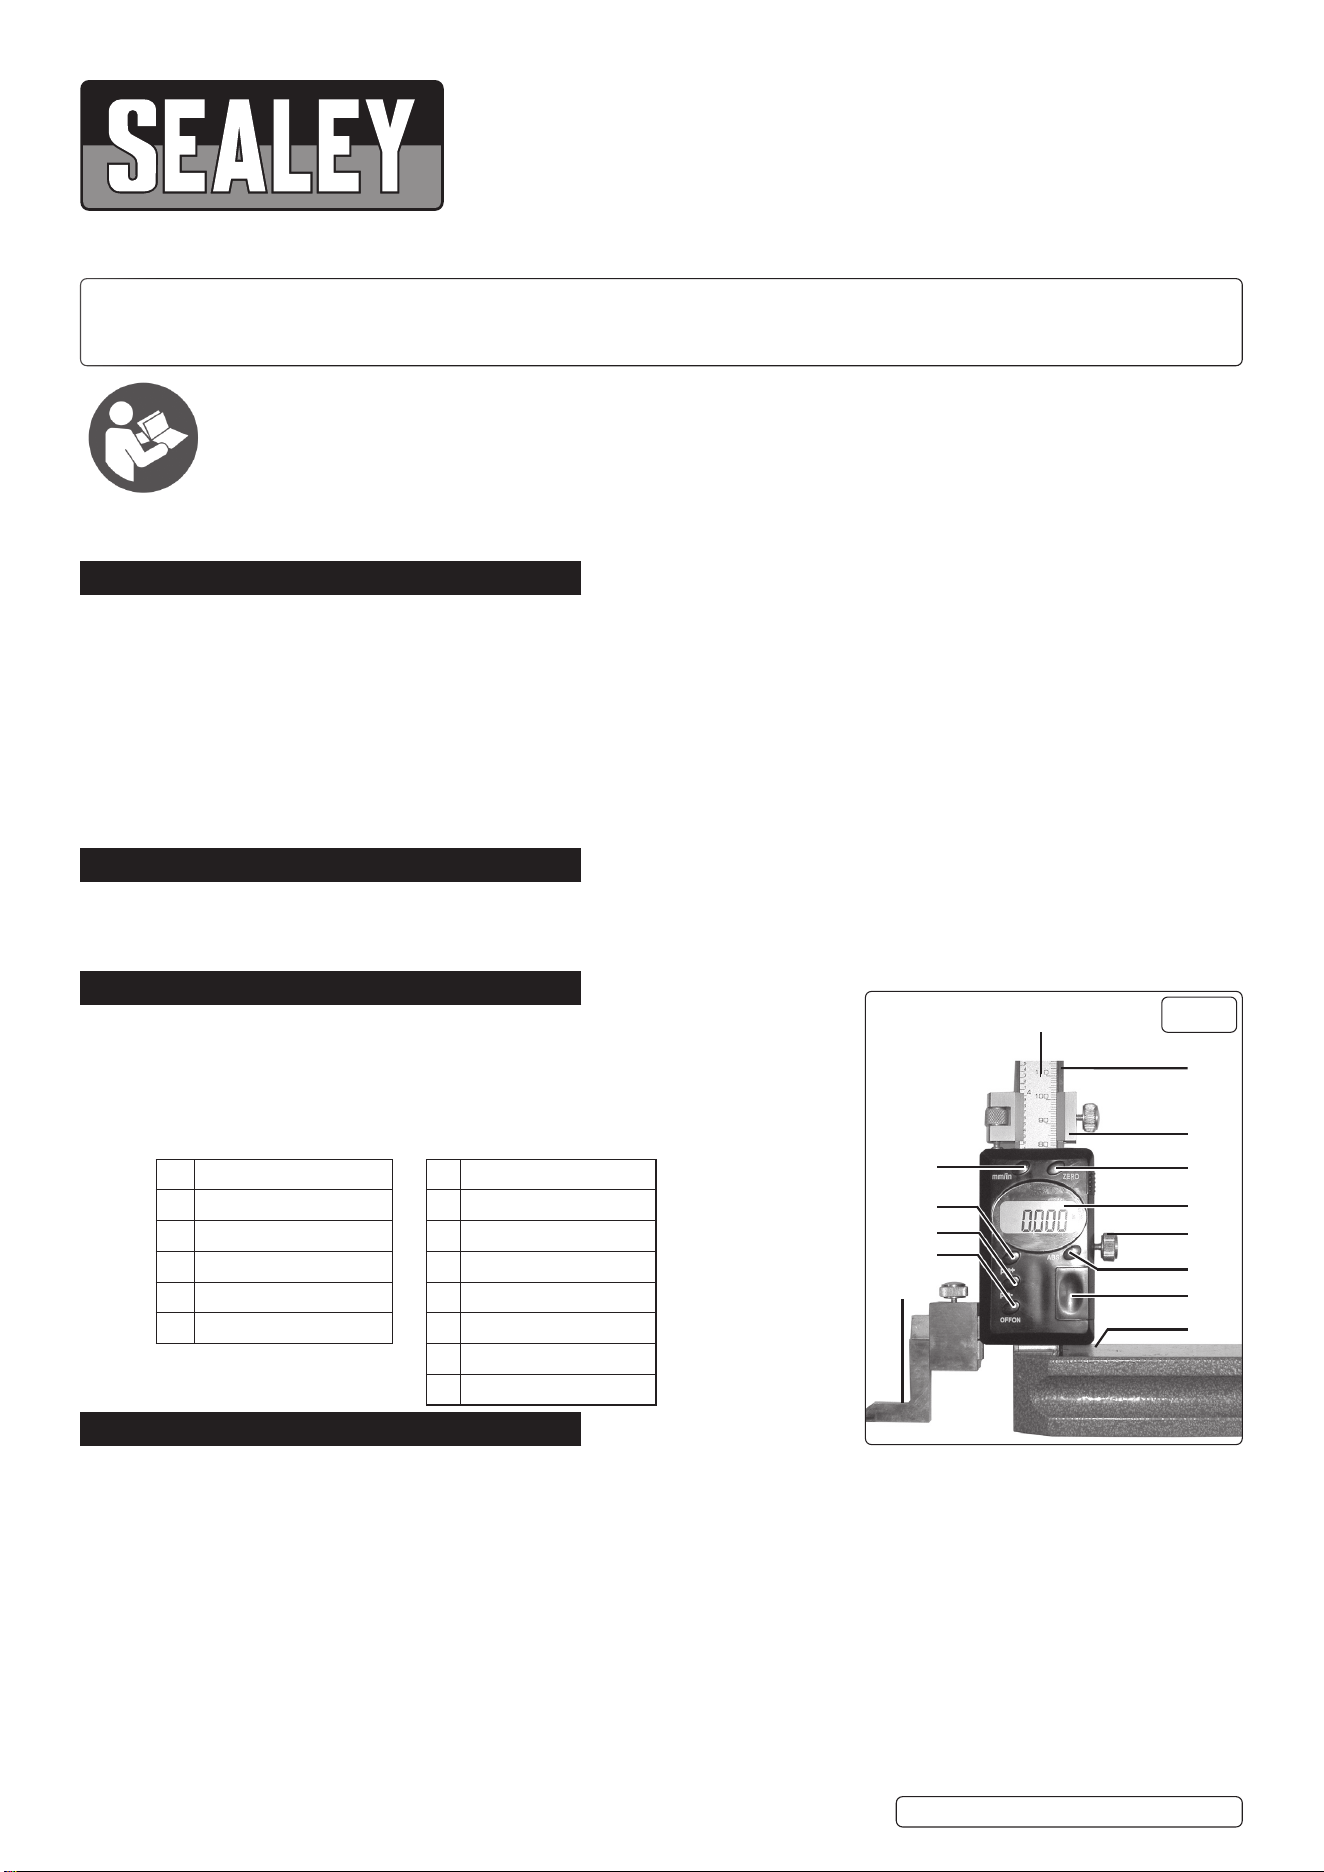
4.1. FIT SCRIBER
4.1.1. Place the clamp upon the arm extending from the slider.
4.1.2. Slot the scriber into the clamp and tighten.
4.2. OPERATION
4.2.1. Turn the gauge on by pressing the power button (Fig 1.1).
4.2.2. Select desired units of measurement (inch/mm) using the selection button (Fig 1.2).
4.2.3. To set the gauge to absolute zero at any point, press the Zero setting button (Fig 1.4).
4.2.4. To set the origin to a value other than zero, use the +/- preset buttons (Fig 1.5.6).
4.2.5. To increase the value of the origin, press the zero setting button and +preset button simultaneously. The word “set” will ash in the
display. To increase the value by 0.01mm or 0.0005” press the + preset button once. To increase the value further, keep the + preset
button depressed until the desired value has been set. Press the zero setting button once more to return to measuring mode.
4.2.6. To decrease the value of the origin, repeat step 4.5.1, this time using the - preset button.
NOTE: The preset origin will remain set even when the unit is turned OFF. To turn OFF the preset origin enter the setup mode again
(3.5) and press + or - until the LCD displays 0.00mm or 0.000” press the Zero button again to return to measuring mode.
DIGITAL HEIGHT GAUGE 0-300MM(0-12”)
MODEL NO: AK9636D.V2
Thank you for purchasing a Sealey product. Manufactured to a high standard, this product will, if used according to these instructions,
and properly maintained, give you years of trouble free performance.
IMPORTANT: PLEASE READ THESE INSTRUCTIONS CAREFULLY. NOTE THE SAFE OPERATIONAL REQUIREMENTS, WARNINGS & CAUTIONS. USE
THE PRODUCT CORRECTLY AND WITH CARE FOR THE PURPOSE FOR WHICH IT IS INTENDED. FAILURE TO DO SO MAY CAUSE DAMAGE AND/OR
PERSONAL INJURY AND WILL INVALIDATE THE WARRANTY. KEEP THESE INSTRUCTIONS SAFE FOR FUTURE USE.
Refer to
instructions
1
6
5
2
4
A
B
C
D
E
F
G
H
3
g.1
AK9636D.V2 Issue 3 (ALL) 04/07/23
Original Language Version
© Jack Sealey Limited
4.2.7. To accurately position the slider, use the fine adjustment set (Fig 1/C).
4.2.8. Position the slider roughly i.e. within 5mm of the point being measured.
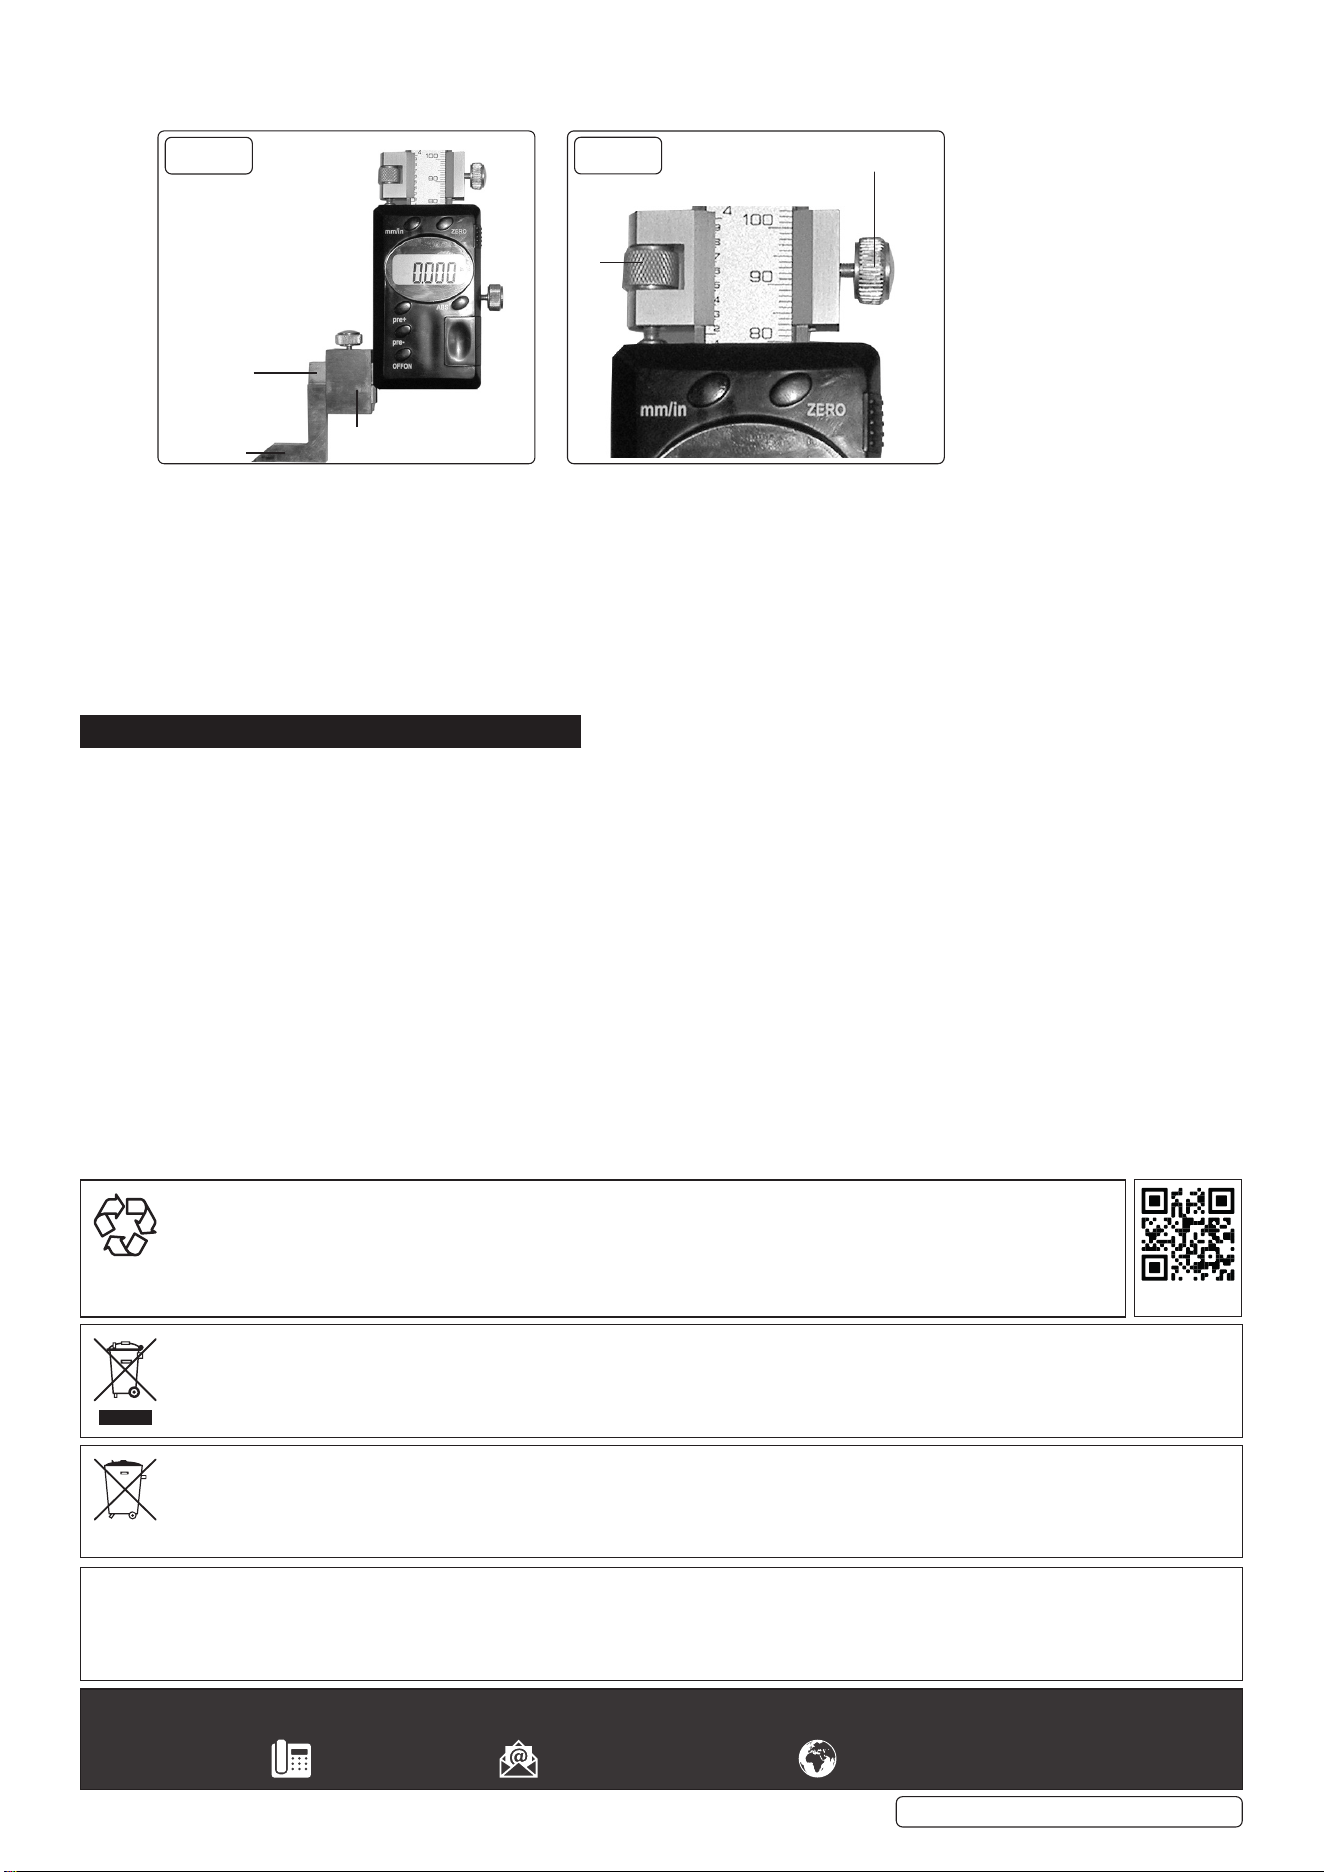
4.2.9. Tighten xing screw (Fig 3/B) in order to x the position of the ne adjustment set.
4.2.10. Now carefully position the slider using adjustment screw A.
4.2.11. When the desired measurements have been made, release the xing screw (Fig 3/B and retract the ne adjustment set.
4.2.12. To x the position of the slider itself e.g. for using the scriber, tighten the fastening screw (Fig 1/E).
4.3. ABS BUTTON
4.3.1. A second measurement that then also needs to be added to the rst one can be obtained by pressing the ABS switch after obtaining
the rst measurement display will show INC.
4.3.2. Then move the callipers to measure the second one. After noting this, press the ABS/0 switch again and the display will show the total
of both measurements. You can repeat this process as many times as is required
5. MAINTENANCE
5.1. If the gauge is not to be used for an extended period of time, remove the battery for storage.
NOTE: The LCD will flash continuously if the battery is run down.
5.2. To remove/change the battery: Slide the battery compartment lid located on the front of the main body (Fig 1/F). Remove/replace the
battery (CR2032) (anode (+) facing outward) and slide the cover back on.
5.3. Avoid subjecting the gauge to shock.
8 DO NOT place the gauge within a strong magnetic field, as this can damage the electronics.
5.4. Occasionally oil the scriber, arm and main base - this is to prevent corrosion.
8 DO NOT allow oil or any other liquids to come into contact with the slider, as this could damage the electronics.
5.5. The gauge contains no user serviceable parts. See your authorised stockist for advice/repairs.
Sealey Group, Kempson Way, Suffolk Business Park, Bury St Edmunds, Suffolk. IP32 7AR
01284 757500 sales@sealey.co.uk www.sealey.co.uk
ENVIRONMENT PROTECTION
Recycle unwanted materials instead of disposing of them as waste. All tools, accessories and packaging should be sorted,
taken to a recycling centre and disposed of in a manner which is compatible with the environment. When the product
becomes completely unserviceable and requires disposal, drain any fluids (if applicable) into approved containers and
dispose of the product and fluids according to local regulations.
WEEE REGULATIONS
Dispose of this product at the end of its working life in compliance with the EU Directive on Waste Electrical and Electronic Equipment
(WEEE). When the product is no longer required, it must be disposed of in an environmentally protective way. Contact your local solid
waste authority for recycling information.
BATTERY REMOVAL SEE SECTION 5.2.
Under the Waste Batteries and Accumulators Regulations 2009, Jack Sealey Ltd are required to inform potential purchasers of products
containing batteries (as defined within these regulations), that they are registered with Valpak’s registered compliance scheme. Jack
Sealey Ltd Batteries Producer Registration Number (BPRN) is BPRN00705.
Note: It is our policy to continually improve products and as such we reserve the right to alter data, specifications and component parts without prior
notice.
Important: No Liability is accepted for incorrect use of this product.
Warranty: Guarantee is 12 months from purchase date, proof of which is required for any claim.
AK9636D.V2 Issue 3 (ALL) 04/07/23
Original Language Version
© Jack Sealey Limited
B
A
g.3
g.2
Arm
Clamp
Scriber
REGISTER YOUR
PURCHASE HERE
