Loading ...
Loading ...
Loading ...

8
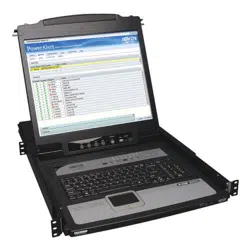
The NetDirector Console KVM Switch with IP Access is designed for
mounting in a 1U rack system. For convenience, a rack-mount kit is
included with your console KVM switch for quick installation. The various
mounting options are explained in the sections that follow.
Standard Rack Mounting
The standard rack mounting brackets that come attached to the
console KVM switch allow the unit to be installed in a standard 1U rack
by a single individual.
1. Slide out the rear mounting brackets from the console and mount
both brackets (separate from the console) to the inside rear of a
standard 1U rack system using user-supplied screws.
2. Take the console and gently slide it into the two rear-mounted
brackets in the rack and secure the console in place by inserting
user-supplied screws.
5.2 Standard Rack Mounting
5.3 Grounding
5. Installation
(
continued
)
To prevent damage to your installation it is important that all devices are
properly grounded. Use the included grounding wire to ground the KVM
switch by connecting one end of the wire to the grounding terminal on
the unit, and the other end of the wire to a suitably grounded object.
5.4 LCD OSD Configuration
The LCD Buttons
The LCD OSD allows you to set up and configure the LCD display.
Four buttons are used to perform the configuration, as described in
the table below:
Button Function
MENU
When you have not entered the LCD OSD Menu
function, pressing this button invokes the Menu
function and brings up the Main Menu.
When navigating through the menus, this button
moves you right or up. When making an adjust-
ment, it increases the value.
When navigating through the menus, this button
moves you left or down. When making an adjust-
ment, it decreases the value.
EXIT
• When you have not entered the LCD OSD
Menu function, pressing this button performs
an auto adjustment. An auto adjustment
automatically configures all the settings for
the LCD panel to what the OSD considers their
optimum values to be.
• When you have entered the LCD OSD Menu
function, pressing this button exits the current
menu and returns you to the previous menu.
Use it to leave an adjustment menu when you
are satisfied with the adjustment you have
made.
• When you are at the Main Menu, pressing this
button exits the LCD OSD.
The Adjustment Settings
An explanation of the LCD OSD adjustment settings is given in the
table below:
Setting Explanation
Brightness
Adjusts the background black level of the screen
image.
Contrast
Adjusts the foreground white level of the screen
image.
Phase Adjusts the vertical size of the screen image.
Clock Adjusts the horizontal size of the screen image.
H-Position
Positions the display area on the LCD panel
horizontally (moves the display area left or right).
V-Position
Positions the display area on the LCD panel
vertically (moves the display area up or down).
Color Temperature
Adjusts the color quality of the display. You can
adjust the “warmth” value, color balance, etc. The
Adjust Color selection has a further submenu that
lets you fine tune the RGB values.
Language
Selects the language that the LCD OSD displays
its menus in (English, French, German, Spanish
or Italian).
OSD Duration
Lets you set the amount of time that the OSD
displays on the screen. If there is no input for the
amount of time you choose, the OSD display turns
off.
Reset
Resets the menu and submenu adjustments
(except for language settings) to the original
factory default settings.
2-Post Rack Mounting
The console KVM switch can also be mounted in a 2-post rack
installation using the optional 2-Post Rack-Mount Kit
(model #: B019-000). The mounting hardware allows for the console
to be opened with the drawer in any position. Heavy-duty 14-gauge
steel provides stability and prevents the console frame from twisting.
See the B019-000 instructional manual for detailed mounting
instructions.
Loading ...
Loading ...
Loading ...