1 2
INSTALLATION INSTRUCTIONS
SPECIFICATIONS
DESCRIPTION
3
•
Easily replaces a standard single pole Light or Fan switch.
•
Compatible with most types of lights.
•
Attractive blue LED indicators conveniently located next to each button
•
Indoor use only
1.
Connect the BLACK wire on the switch to the HOT wire.
2.
Connect the WHITE wire on the switch to the NEUTRAL wire.
3.
Connect the RED wire on the switch to the LOAD wire.
4.
Connect the GREEN wire on the switch to the GROUND wire.
SETTING/ OPERATING
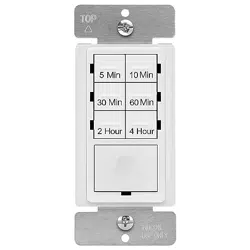
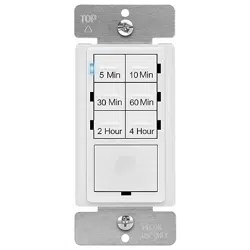
HET06-R
Preset Buttons: The LED indicator will blink twice to confirm each button press.
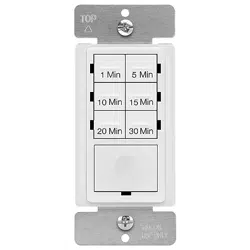
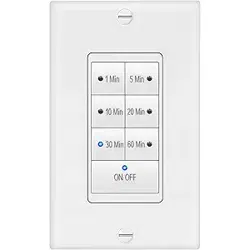
There are 6 buttons with preset times of 5 Min, 10 Min, 30 Min, 60 Min, 2 Hours, and 4 hours.
• While the Load is OFF, press and release the button with the desired time once to
turn the Load on for that selected amount of time.
o When the time expires, the Load will automatically turn off.
• While the Load is ON, press and release the button with the desired time once to
restart the countdown with the newly selected time.
The HE
T06-R
is a timer switch with 6 preset time buttons and 1 Manual ON
button. All Loads
connect to this timer will automatically turn OFF when the selected time expires. The 6
selectable times are 5 Min, 10 Min, 30 Min, 60 Min, 2 Hours, and 4 Hours.
FEATURES
Turn the POWER OFF at the circuit breaker before installing
the Timer
Read and understand these instructions before installing. It is recommended that a qualified
electrician performs this installation. Make sure to turn off the circuit breaker or fuse(s) and
make sure power is off before wiring the device.
This device is intended for installation in accordance with the National Electric
Code and local regulations.
Use Copper wires ONLY.
WIRING DIRECTIONS
Preset 7-Button Timer Switch
WARNING
WARRANTY INFORMATION
This device is warranted to be free of material and workmanship defects for 2 years from the date of
purchase. Original receipt or proof of purchase from an authorized retailer must be presented upon warranty
claim. ALL claims must be verified and approved by Enerlites, Inc. Warranties from other Enerlites products
may vary. This warranty is nontransferable and does not cover normal wear and tear or any malfunction,
failure, or defect resulting from misuse, abuse, neglect, alteration, modification, or improper installation. To
the fullest extent permitted by the applicable state law, Enerlites shall not be liable to the purchaser or end
user customer of Enerlites products for direct, indirect, incidental, or consequential damages even if Enerlites
has been advised of the possibility of such damages. Enerlites’ total liability under this or any other warranty,
express or implied, is limited to repair, replacement or refund. Repair, replacement or refund are the sole and
exclusive remedies for breach of warranty or any other legal theory.
© 2016 Enerlites Inc.
CA, U.S.A.
WWW.ENERLITES.COM
0208160040-02
Voltage................................................................................................................ 120VAC, 60HZ
Load(Single Pole Circuit)
Time Delay.................................................................................5, 10, 30, 60 mins, 2 or 4 hours
Environment....................................................................................Commercial Indoor use only
Humidity............................................................................................ 95% RH, non-condensing
Tungsten................................................................................................................... 1200W
Resistive................................................................................................................... 1800W
Motor......................................................................................................................... 1/2 HP
Operating Temperature.......................................................................32° to 131° F
(0° to 55° C
)
Manual ON Button: The LED indicator will blink twice to confirm each button press.
The Manual ON button is the large button located below the preset buttons.
•
•
•
While the Load is OFF, press and release the Manual ON button to turn the Load
ON with the last selected timer preset.
While the Load is ON, press and release the Manual ON button to override the timer
and turn the Load OFF.
To hold the Load ON: Press and hold the Manual ON button for 8 seconds. The
Load will turn ON and stay ON. The timer WILL NOT turn
the Load OFF.
o Press and release the Manual ON button to turn the Load OFF.
o Press and release the button with the desired time once to keep the Load
on for that selected amount of time.
LED Light: Default, the LED indicator light next to each selected button blinks twice each time
it is pressed to mark the time selected. The LED indicator can be changed to a solid ON
Indicator with the following programming step:
• While the Load is ON or OFF, Hold down the 5 Min and 10 Min buttons until ALL the
LEDs flash twice (about 5 Seconds).
o To switch back to Blinking Indicator, repeat the same step: hold down the
two buttons for about 5 Seconds.