The sum of the power output of the appliances used with the timer switch should not exceed the specified power rating of the timer switch. This could lead to the timer switch burning or even causing a fire. Please check the specified Voltage and Load for your specified timer switch model. And please use the timer in a dry, indoor environment.
If you haven't used the device for a while, or if the supply voltage is too low, the functions and the symbols may appear strange or faint on the display. The timer needs to be plugged into a power socket in order to charge it.
If you experience any kind of malfunction, you can push the Reset button to restore the device.
In order to protect the screen from damage during transportation, a screen protection film has been placed over the screen. If you don't like this film, or if the film has been scratched, you can completely remove it. Doing so will leave no marks on the screen itself.
Only one mode can be selected at a time. You cannot use different modes simultaneously or it won’t be switch between modes automatically. The last mode that has been set is the current working mode.
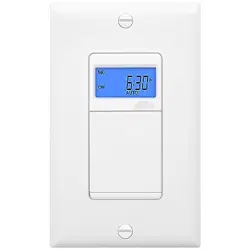
Product Specifications:
Rated Voltage: 120V
Rated Current: 15A
Max. Frequency: 60Hz
Max. Power Output: 1800W
Standby Power Consumption: ≤0.5W
Instructions
Clock setting
(Current time setting)
Tip: If you press and hold the Minute or Hour buttons, you can to move through the numbers more quickly
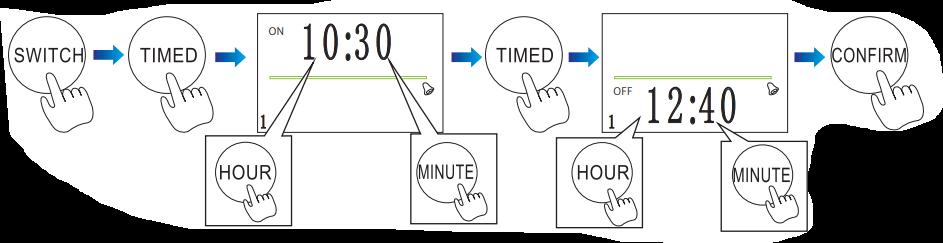
Daily Timing
(Example: Having the device turn on at 09:00 and off at 15:30 each day. Three periods can be set for each day.)
Tip: When setting the time, you can press the Countdown button to clear the current time setting
Note: After setting, 1/2/3 will be displayed on the lower left corner of the display. If a number is not displayed, it means that there has either been a setting error or that there is a conflict between the set time periods.
If you wish to set more than one period, do not press the Confirm button after setting the time. Instead, press the Timed button and you will be able to enter the second and third period times. You will see a 2 or 3 in the bottom left of the display. Press the Confirm button when you have finished setting your desired periods.
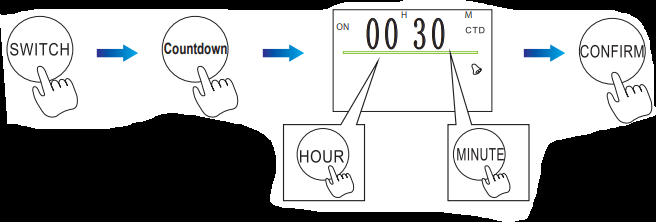
Countdown and Turn Off
(Example: The device will turn o the power after 30 minutes)
Tip: When setting the time, you can press the Countdown button to clear the current time setting.
Note: When setting a countdown, you can also set an alarm that will sound when the countdown has ended. To set an alarm, press the Confirm and Minute buttons at the same time. An alarm bell symbol will appear on the right of the display. To remove the alarm, press the Confirm and Minute buttons together again.
Note: When the countdown has ended,the screen is flashing
Press the Confirm button, the countdown function will operate again.
Adjust the countdown time and comfirm it.
Switch to another mode.
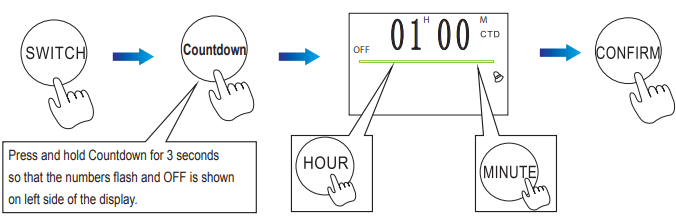
Countdown and Turn On
(Example: The device will turn on the power after 1 hour)
Tip: When setting the time, you can press the Countdown button to clear the current time setting.
Note: When setting a countdown, you can also set an alarm that will sound when the countdown has ended. To set an alarm, press the Confirm and Minute buttons at the same time. An alarm bell symbol will appear on the right of the display. To remove the alarm, press the Confirm and Minute buttons together again.
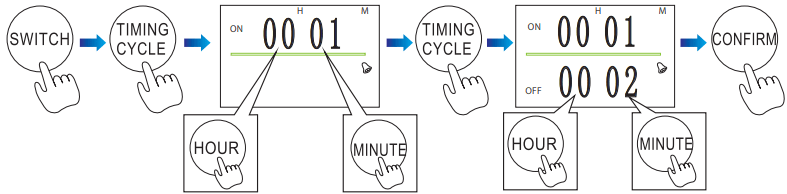
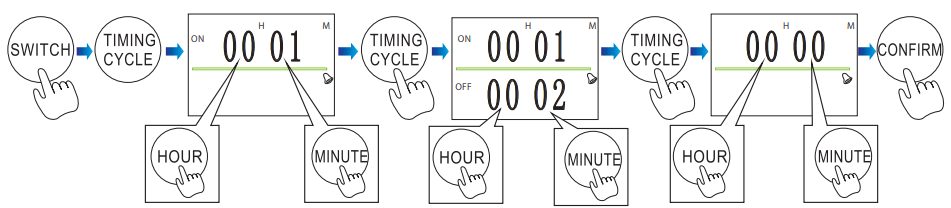
Continuous Intervals
1. Hour & Minute
(Example: You wish the device to turn on power for 1 minute, then turn off for 2 minutes, on for 1 minute, off for 2 minutes, and so on.)
Tip: When setting the time, you can press the Countdown button to clear the current time setting.
2. Minute & Second
(Example: You wish the device to turn on power for 1 second, then turn off for 2 seconds, on for 1 second, off for 2 seconds, and so on.)
Note: The two numbers on the left represent minutes and can be set by pushing the Hour button. The two numbers on the right represent seconds and can be set by pushing the Minute button.
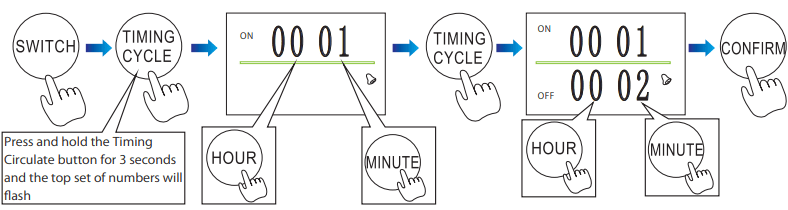
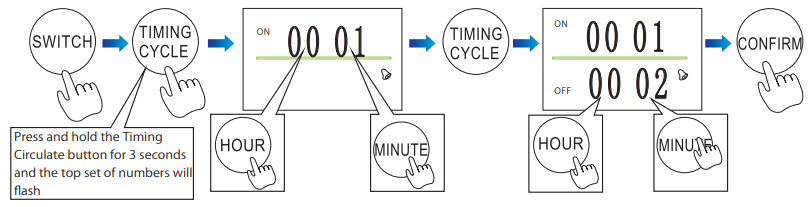
3. Set Interval Periods (Daily)
(Example: The device will turn on at 09:00 and work through of intervals of being on for 1 second, off for 2 seconds and so on until 10:30, when the device will turn off.)
Step 1: Set the interval by using the Minute & Second (Continuous Interval) method. Press the Confirm button.
Step 2: Set the on and off time for the device by using the Daily Timing method.
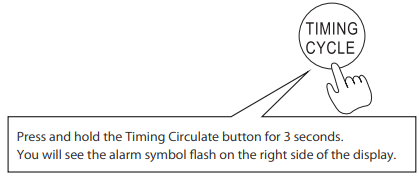
Step 3: After confirming the on and off time, press and hold the Timing Circulate button for 3 seconds. You will see the alarm symbol flash on the right side of the display.
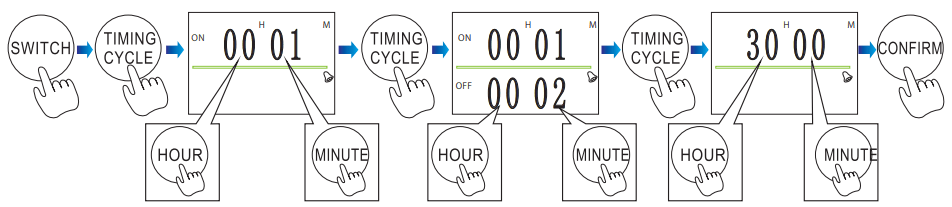
4. Set Interval Periods (Hours/Minutes)
(Example 1: The device will turn on for 1 minute and turn off for 2 minutes. This cycle will continue for 30 hours.)
(Example 2: The device will turn on for 1 minute and turn off for 2 minutes. If the number is left as 00h: 00m, the device will be set on an endless cycle.)
Button Lock:
Press the Confirm and Hour buttons together to activate the button lock. A lock icon will be shown. Repeat the process to remove the lock.
Alarm:
Press the Confirm and Minute buttons together to activate the alarm. An alarm icon will be shown. Repeat the process to remove the alarm. And press any button will be sound, if you activate the alarm.
Always ON:
Press the Confirm and Timed buttons together to activate Always On mode. This means the device will always supply power.