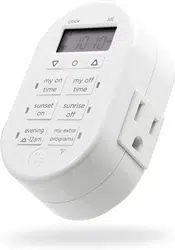
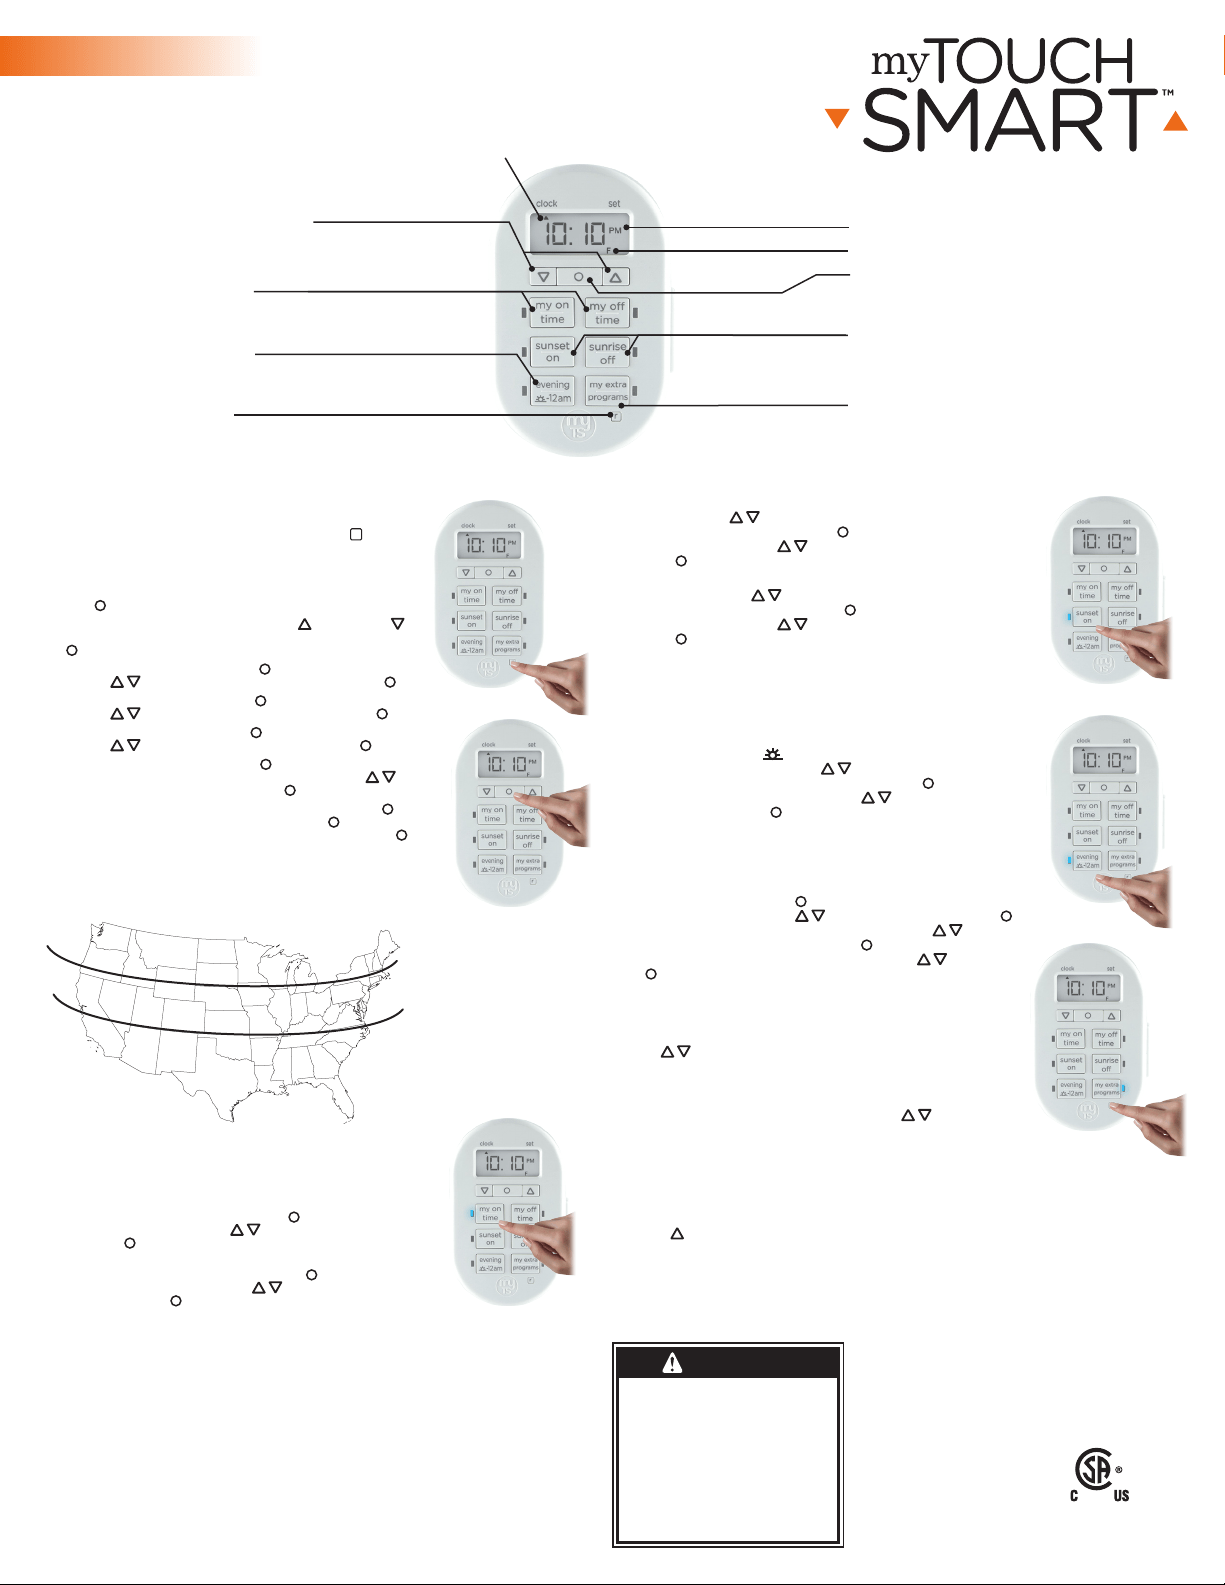
Sunset On: Press “sunset on” button and the sunset time will flash on the
screen. Use arrows ( ) to adjust time (time can be adjusted up to 1
hour in either direction) and press Set ( ). Days of the week will then
flash on screen. Use arrows ( ) to select the correct day options and
press Set ( ).
Sunrise O: Press “sunrise o” button and the sunrise time will flash on
the screen. Use arrows ( ) to adjust time (time can be adjusted up to
1 hour in either direction) and press Set ( ). Days of the week will then
flash on screen. Use arrows ( ) to select the correct day options and
press Set ( ).
II. Preset schedules
Evening Preset: This option will turn the light on at sunset and o at
12am. When the “evening ( -12am)” button is pressed, the sunset time
will flash on the screen. Use arrows ( ) to adjust time (time can be
adjusted up to 1 hour in either direction) and press Set ( ). Days of the
week will then flash on screen. Use arrows ( ) to select the correct
day options and press Set ( ).
III. Extra programs
This option oers 7 additional On/O programs. When the “my extra
programs” button is pressed “1 ON” will flash on screen but no time will be
displayed, only “--:--.” Press Set ( ) to select program “1 on” and the “--:--”
will flash on screen. Use arrows ( ) to select time and press Set (
). Days of the week will then flash on screen. Use arrows ( ) to select
the desired days of the week and press Set ( ). Program 1 On (“1 ON”)
is now set. To go to the next program, use the arrows ( ) and press
SET ( ) on the next program you want to set. Repeat these steps for
Program 1 O (“1 OFF”), Program 2 On (“2 ON”), Program 2 O (“2
OFF”), etc.
To skip through without setting, simply stop pressing buttons and the
display will revert to clock mode after 10 seconds. You can also use the
arrows ( ) to scroll through the options without setting a time. After
Program 7 O (“7 OFF”), the menu will start over with Program 1 On
(“1 ON”). The LED indicator light will remain on if any of the additional
programs are set.
To delete one of the extra programs: Use arrows ( ) to scroll
time back to between 11:59pm and 12:00am. The display will show
“--:--” to confirm the program has been deleted. No additional steps are
needed. The display will revert back to clock mode after 10 seconds.
IV. Days of the week options order
Days of the week options will display in the following order when
using the arrow unless you are using the settings in “my extra
programs.” In this case, they will begin with the last On time that was set.
M thru Su — all days of the week
M thru F
Sa, Su
1. Setup
If no numbers are visible on-screen, plug timer into an outlet and let
timer charge for 1 hour. Once charged, press the reset (
r
) button
in the lower right corner using a toothpick or pencil.
Note: If no buttons are pressed for 5 seconds during the intial set
up of the timer or when setting additional programs, timer will go
back to Clock Mode. To re-enter programming mode, press and
hold Set ( ) button for 3 seconds.
Upon reset, clock should be blinking. Use up ( ) and down ( )
arrows to set current time (take note of AM or PM time) and press
Set ( ).
“YEAR” will flash on screen. Press Set ( ) and it will show “2017.”
Use arrows ( ) to change year if needed and press Set ( ).
“MON” will flash on screen. Press Set ( ) and it will show “01.”
Use arrows ( ) to select current month and press Set ( ).
“DAY” will flash on screen. Press Set ( ) and it will show “01.”
Use arrows ( ) to select current day and press Set ( ).
“ZONE” will flash on screen. Press Set ( ) and it will show “NOR”,
followed by “CENT,” “SOU,” “HI” and “ALAS.” Use arrows ( ) to
select correct region (zone) and press Set ( ). See figure below.
“DST” (Daylight Saving Time) will flash on screen. Press Set ( ) and it
will show “ON” on the left of the screen. Press Set ( ) again to leave
DST on or use arrows to change to “OFF” before pressing Set ( ).
Note: Choose DST ON if your local area observes Daylight Saving
Time. The timer will automatically adjust backwards and forwards an
hour. Choose DST OFF if your local area does not observe Daylight
Saving Time.
2. Programming options
Note: If the LED next to any button is illuminated, that indicates that
the program is active. To deactivate, press the button again.
I. Choose your custom on/o times
My On Time: Press “my on time” button and the clock will begin
blinking. Set desired on time and press Set ( ). Days of the week will
then flash on screen. Use arrows ( ) to select the correct day(s)
and press Set ( ).
My O Time: Press “my o time” button and the clock will begin
blinking. Select desired o time and press Set ( ). Days of the week
will then flash on screen. Use arrows ( ) to select the correct day
options and press Set ( ).
MADE IN CHINA
Distributed by Jasco Products Company LLC, 10 E.
Memorial Rd., Oklahoma City, OK 73114.
This Jasco product comes with a 1-year limited warranty.
Visit www.byjasco.com for warranty details.
Questions? Contact us at 1-800-654-8483 between
7:00AM–8:00PM CST.
RISK OF ELECTRIC SHOCK
• PLUG DIRECTLY INTO AN
ELECTRICAL OUTLET
• DO NOT USE IN WET LOCATIONS
• FULLY INSERT PLUG
• USE INDOORS ONLY
• UNPLUG TIMER BEFORE CLEANING
• KEEP CHILDREN AWAY
RISK OF FIRE
• DO NOT USE TO CONTROL APPLIANCES
THAT CONTAIN HEATING ELEMENTS
(COOKING APPLIANCES, HEATERS,
IRONS, ETC.)
• DO NOT EXCEED ELECTRICAL RATINGS
• DO NOT USE WITH EXTENSION CORDS
33860-1 VERSION 01 03/31/17
Specifications:
125V 50/60 Hz
15A 1875W General
Purpose/Resistive
10A 1250W Tungsten
1/2 HP
Works with dimmable
LED and CFL bulbs.
Indoor Digital
SunSmart™
Plug-In Timer
WARNING
Patent pending
U.S. Pat 9,320,122
MTS53007
FCC Statement
This device complies with part 15 of the FCC and Industry Canada license-exempt RSS standard(s). Operation is
subject to the following two conditions: (1 this device may not cause harmful interference, and (2) this device must
accept any interference received, including interference that may cause undesired operation.
FCC NOTE: The manufacturer is not responsible for any radio or TV interference caused by unauthorized
modifications to this equipment. Such modifications could void the user’s authority to operate the equipment.
NOTE: This equipment has been tested and found to comply with the limits for a Class B digital device, pursuant to
Part 15 of the FCC Rules. These limits are designed to provide reasonable protection against harmful interference in
a residential installation. This equipment generates, uses and can radiate radio frequency energy and, if not installed
and used in accordance with the instructions may cause harmful interference to radio communications. However,
there is no guarantee that interference will not occur in a particular installation. If this equipment does cause
harmful interference to radio or television reception, which can be determined by turning the equipment o and on,
the user is encourage to try to correct the interference by one or more of the following measures:
• Reorient or relocate the receiving antenna.
• Increase the separation between the equipment and receiver.
• Connect the equipment into an outlet on a circuit dierent from that to which the receiver is connected.
• Consult the dealer or an experienced radio/TV technician for help.
CAN ICES-3(B)/NMB-3(B)
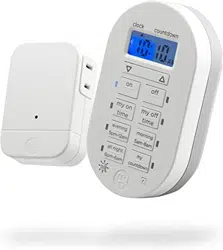
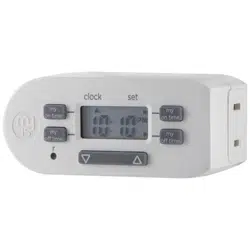
My on/o time
Set custom on/o time
Clock vs. set mode indicator
Reset button
Clears all current times and schedules —
resets timer to factory settings
Up and down arrows
Scroll to set current time and scroll
to schedule program
Evening preset
Set on/o time to dusk - 12am
AM/PM indicator
Sunset on/sunrise o time
Set on/o time to sunset/sunrise
or +/- 1hr
My extra programs button
Oers seven additional on/o
programs
Set button
Press to select various options
Day of week indicator
Su thru Th
F, Sa
Su thru Sa — each day of the week separately
NORTH
ALASKA
HAWAII
NORTH
CENTRAL
CENTRAL
SOUTH
SOUTH
MTS53007
Encender al anochecer: Presione el botón “sunset on” (encender al
anochecer) y la hora del anochecer parpadeará en la pantalla.
Use las flechas ( ) para ajustar la hora (la hora se puede ajustar hasta
una hora en cualquier dirección) y presione programar ( ). Los días de la
semana comenzarán a parpadear en la pantalla. Use las flechas ( ) para
seleccionar las opciones de los días correctos y presione programar ( ).
Apagar al amanecer: Presione el botón “sunrise o” (apagar al amanecer) y
la hora del amanecer parpadeará en la pantalla. Use las flechas ( ) para
ajustar la hora (la hora se puede ajustar hasta una hora en cualquier dirección)
y presione programar ( ). Los días de la semana comenzarán a parpadear
en la pantalla. Use las flechas ( ) para seleccionar las opciones de los días
correctos y presione programar ( ).
II. Horarios programados
Preprogramar para la noche: Esta opción encenderá la luz al anochecer y la
apagará a las 12 a. m. Al presionar el botón “evening
( -12am)” (noche a las 12 a. m.), la hora del anochecer parpadeará en la
pantalla. Use las flechas ( ) para ajustar la hora (la hora se puede ajustar
hasta una hora en cualquier dirección) y presione programar ( ). Los días de
la semana comenzarán a parpadear en la pantalla. Use las flechas ( ) para
seleccionar las opciones de los días correctos y presione programar ( ).
III. Programas adicionales
Esta opción ofrece 7 programas adicionales de encendido/apagado. Al
presionar el botón “my extra programs” (mis programas adicionales), en la
pantalla parpadeará “1 ON” pero no se mostrará ninguna hora, solo “--:--.”
Presione programar ( ) para seleccionar el programa “1 on” (1 encender)
y “--:--” parpadeará en la pantalla. Use las flechas ( ) para seleccionar
la hora y presione programar ( ). Los días de la semana comenzarán
a parpadear en la pantalla. Use las flechas ( ) para seleccionar los
días de la semana que desee y presione programar ( ). El programa 1
encender (“1 ON”) ha quedado establecido. Para ir al siguiente programa,
use las flechas ( ) y presione programar ( ) en el siguiente programa
que desee establecer. Repita estos pasos para el programa 1 apagar (“1
OFF”), el programa 2 encender (“2 ON”), el programa 2 apagar (“2 OFF”),
etc.
Para saltarse hasta el final sin programar ninguno, simplemente deje de
presionar los botones y la pantalla volverá al modo de reloj después de
10 segundos. También puede usar las flechas ( ) para desplazarse
por las opciones sin programar una hora. Después del programa 7 apagar
(“7 OFF”), el menú comenzará de nuevo con el programa 1 encender (“1
ON”). La luz LED permanecerá encendida si se configura cualquiera de los
programas adicionales.
Para eliminar uno de los programas adicionales: Use las flechas (
) para desplazar las horas hacia atrás entre 11:59 p. m. y 12:00 a. m. En la
pantalla aparecerá “--:--” para confirmar que se ha eliminado el programa.
No hace falta hacer nada más. La pantalla volverá al modo reloj después de
10 segundos.
IV. Orden de las opciones de los días de la semana
Las opciones de los días de la semana aparecerán en el siguiente orden a
menos que esté programando con los programas en “my extra programs” (mis programas adicionales). En
este caso comenzarán con la última hora de encender que se programó.
M a Su (lunes a domingo) todos los días de la semana
M a F (lunes a viernes)
Sa, Su (sábado, domingo)
1. Programación
Si no aparecen números en la pantalla, enchufe el temporizador en un
tomacorriente y deje que se cargue durante una hora. Una vez cargado,
presione el botón restablecer (
r
) que se encuentra en la esquina inferior
derecha con un lápiz o palillo de dientes.
Nota: Si no se presiona ningún botón durante 5 segundos, durante la
configuración inicial del temporizador o al configurar programas adicionales,
el temporizador volverá al modo Reloj. Para volver al modo programación,
presione y no suelte el botón Set (programar) ( ) durante 3 segundos.
Una vez restablecido, el reloj debe estar parpadeando. Use las flechas subir
( ) y bajar ( ) para programar la hora actual (tenga en cuenta si es AM o
PM) y presione programar ( ).
En la pantalla parpadeará “YEAR” (año). Presione programar ( ) y aparecerá
“2017”. Use las flechas ( ) para cambiar año si fuese necesario y presione
programar ( ).
En la pantalla parpadeará “MON” (mes). Presione programar ( ) y aparecerá
“01”. Use las flechas ( ) para seleccionar el mes actual y presione
programar ( ).
En la pantalla parpadeará “DAY” (día). Presione programar ( ) y aparecerá “01”.
Use las flechas ( ) para seleccionar el día actual y presione programar ( ).
En la pantalla parpadeará “ZONE” (zona). Presione programar ( ) y aparecerá
“NOR” (norte), seguido de “CENT,” (central) “SOU,” (sur) “HI” (Hawáii) y “ALAS”
(Alaska). Use las flechas ( ) para seleccionar el huso horario correcto y
presione programar ( ). Consulte la figura abajo.
En la pantalla parpadeará “DST” (hora de verano). Presione programar ( ) y
aparecerá “ON” (encendido) al lado izquierdo de la pantalla. Presione programar
( ) nuevamente para dejar DST encendido o use las flechas para cambiarlo a
“OFF” (apagado) antes de presionar programar ( ).
Nota: elija DST ON (activado) si en su área local se aplica el horario de verano. El
temporizador se ajustará automáticamente una hora hacia atrás o hacia adelante.
Elija DST OFF (desactivado) si en su área local no se aplica el horario de verano.
2. Opciones de programación
Nota: Si la luz LED al lado de cualquier botón está iluminada, eso indica que el
programa está activo. Para desactivarlo, presione el botón nuevamente.
I. Escoja la hora de encendido/apagado que desee.
Mi hora de encendido: Presione el botón “my on time” (mi hora de encendido)
y el reloj comenzará a parpadear. Establezca la hora de encendido que desee y
presione programar ( ). Los días de la semana comenzarán a parpadear en la
pantalla. Use las flechas ( ) para seleccionar los días correctos y presione
programar ( ).
Mi hora de apagado: Presione el botón “my o time” (mi hora de apagado) y el
reloj comenzará a parpadear. Establezca la hora de apagado que desee y presione
programar ( ). Los días de la semana comenzarán a parpadear en la pantalla.
Use las flechas ( ) para seleccionar las opciones de los días correctos y
presione programar ( ).
HECHO EN CHINA
Distribuido por Jasco Products Company LLC, 10 E
Memorial Rd., Oklahoma City, Oklahoma 73114.
Este producto de Jasco tiene una garantía limitada
de un (1)año. Visite www.byjasco.com para conocer
los detalles de la garantía.
¿Tiene preguntas? Comuníquese al 1-800-654-8483 entre
las 7:00 a.m. y las 8:00 p.m. CST (hora central estándar).
RIESGO DE DESCARGA ELÉCTRICA
• CONECTE DIRECTAMENTE A UN TOMACORRIENTE
ELÉCTRICO
• NO UTILICE EL DISPOSITIVO EN LUGARES HÚMEDOS
• ENCHUFE COMPLETAMENTE LA CLAVIJA
• SOLO PARA USO EN INTERIORES
• DESCONECTE EL TEMPORIZADOR ANTES DE
LIMPIAR
• MANTENGA FUERA DEL ALCANCE DE LOS NIÑOS
RIESGO DE INCENDIO
• NO UTILICE PARA CONTROLAR APARATOS QUE
INCLUYAN RESISTENCIAS ELÉCTRICAS (APARATOS
DE COCCIÓN, CALEFACTORES, PLANCHAS, ETC.)
• NO SUPERE LOS VALORES NOMINALES ELÉCTRICOS.
• NO USAR CON UN CABLE DE EXTENSIÓN
Especificaciones:
125 V 50/60 Hz
15 A 1875 W fines generales/
carga resistiva
10 A 1250 W tungsteno
1/2 HP
Funciona con bombillas
atenuables LED y CFL.
Digital para interiores
Temporizador enchufable
SunSmart™
ADVERTENCIA
Patente en trámite
Pat. en EE. UU. 9,320,122
MTS53007
Declaración de la Comisión Federal de Comunicaciones (FCC)
Este aparato cumple con las Especificaciones del apartado 15 de las normas de la FCC y con las especificaciones de las normas
radioeléctricas (RSS) del Ministerio de Industria de Canadá aplicables a aparatos exentos de licencia. El funcionamiento está
sujeto a las dos condiciones siguientes: (1 este dispositivo no debe causar interferencia perjudicial y (2) debe aceptar cualquier
interferencia recibida, incluidas las interferencias que puedan causar un funcionamiento no deseado.
NOTA DE LA FCC: El fabricante no es responsable de las interferencias de radio o televisión causadas por modificaciones
no autorizadas al equipo. Dichas modificaciones podrían anular la autoridad del usuario para usar el equipo.
NOTA: Este equipo se probó y se determinó que cumple con los límites de un dispositivo digital de claseB, conforme
al apartado15 de las normasFCC. Estos límites están diseñados para brindar protección razonable contra interferencias
perjudiciales en una instalación residencial. Este equipo genera, usa y puede irradiar energía de radiofrecuencia y, si no se
instala y usa según las instrucciones, puede causar interferencia perjudicial a las radiocomunicaciones. Sin embargo, no puede
garantizarse que no se producirán interferencias en una instalación dada. Si este equipo causa interferencia perjudicial a la
recepción de radio o televisión, lo que puede determinarse apagando y encendiendo el equipo, se recomienda al usuario que
intente corregir la interferencia mediante una o más de las siguientes medidas:
• Reoriente o reubique la antena receptora.
• Aumente la separación entre el equipo y el receptor.
• Conecte el equipo en un tomacorriente de un circuito diferente del que está conectado el receptor.
• Consulte al distribuidor o a un técnico capacitado en radio/televisión para recibir ayuda.
CAN ICES-3(B)/NMB-3(B)
Mi hora de encendido y apagado (on/o)
Programación personalizada
de la hora de encendido y apagado (on/o)
Indicador de modo reloj vs. programar
Botón restablecer
Borra todas las horas y programaciones actuales
— reestablece el cronómetro a los parámetros de
configuración de fábrica.
Flechas arriba y abajo
Desplácese para establecer la hora
actual y configurar la programación
Preprogramar para la noche
Programar hora de encender/
apagar del anochecer a las 12 a. m.
Indicador AM/PM
Hora de encender al anochecer y de
apagar al amanecer
Configurar hora de encender/apagar al
anocher/amanecer — o +/- 1 hr
Botón my extra programs (mis
programas adicionales)
Ofrece siete programas adicionales de
encendido/apagado
Botón programar
Oprimir para seleccionar varias opciones
Indicador de día de la semana
Su a Th (domingo a jueves)
F, Sa (viernes, sábado)
Su a Sa (domingo a sábado) — cada día de la
semana por separado
NORTE
ALASKA
HAWÁII
NORTE
CENTRAL
CENTRAL
SUR
SUR