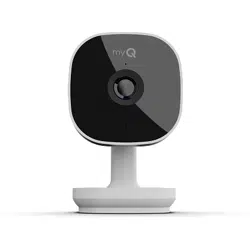
myQ-SGC2WCH / myQ-SGC2WLM
Smart Garage™ Camera
Installation Guide
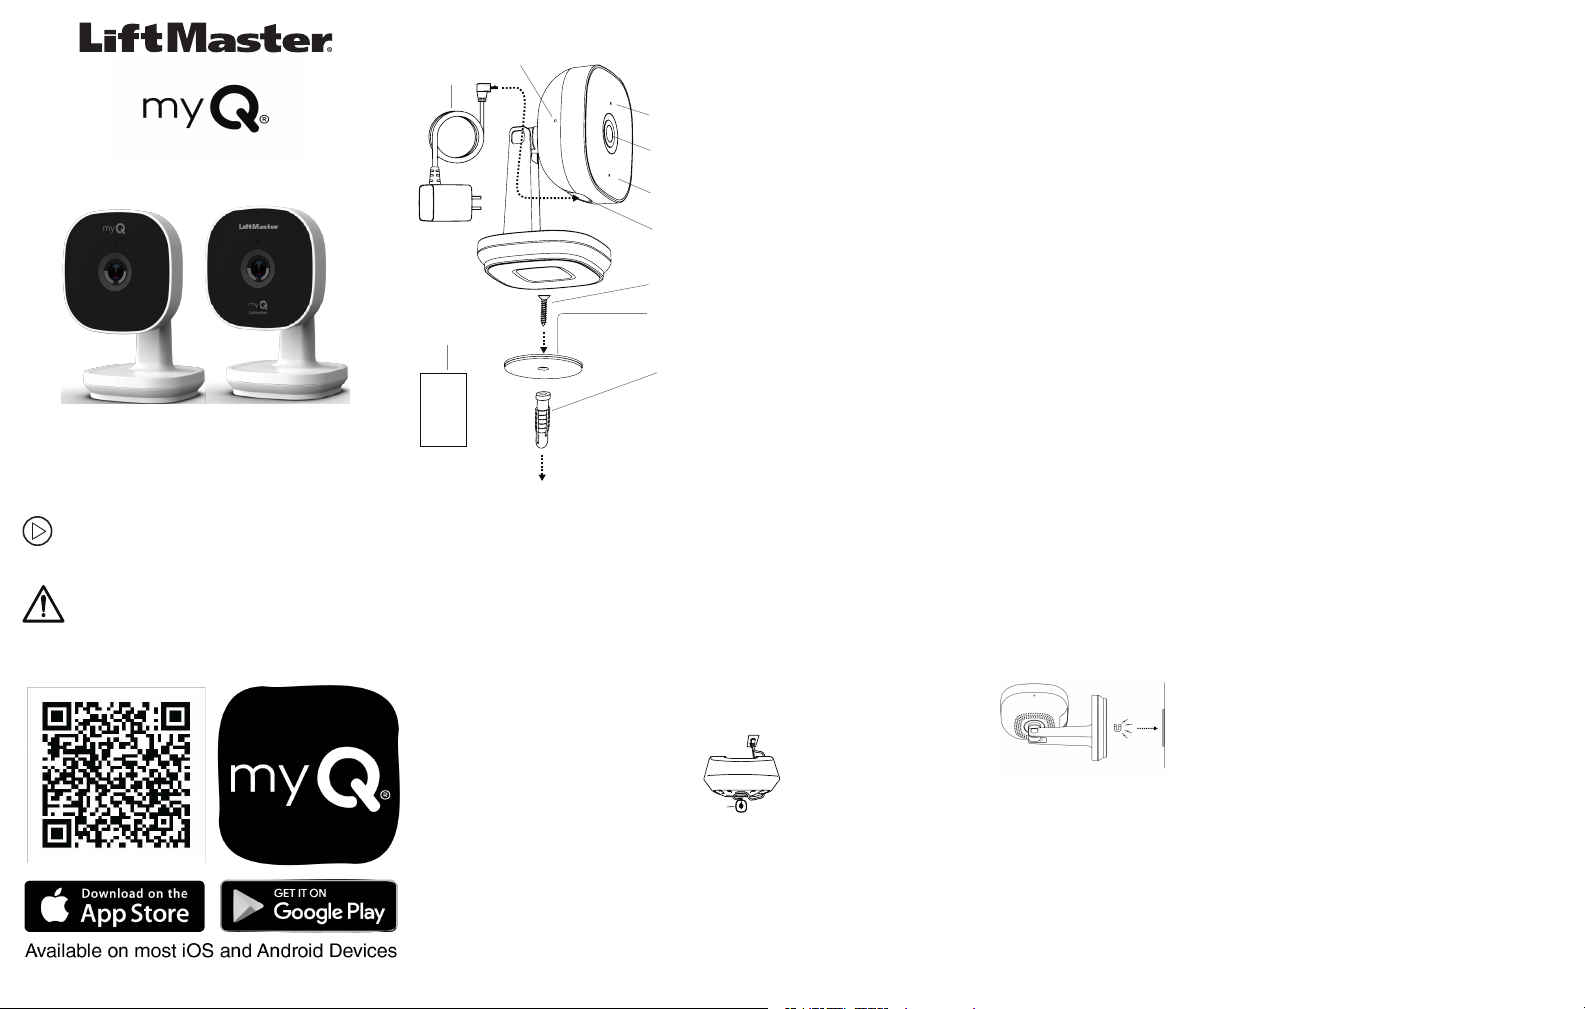
What's In the Box
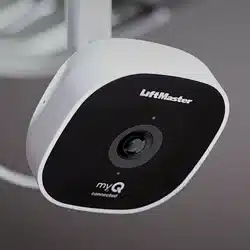
USB Input
Microphone
Camera Lens
Reset Button
Micro USB
Cable
LED
Mounting
Plate
Mounting
Screw
Drywall
Anchor
Alcohol wipe, for
adhesive mount only
1. Connect Your Smart Garage
™
Camera
Use the myQ
®
App, your mobile device, and your
router to control your Smart Garage™ Camera.
Before You Start:
1. Be sure your mobile device's Wi-Fi
®
is on
and displays a strong signal where the
camera will sit.
2. Check that Bluetooth is enabled on your
mobile device.
3. Enable Location Services on your mobile
device.
4. Download the myQ
®
App.
TIP: If you already have the myQ
®
App,
confirm you have the latest version to
optimize your myQ
®
experience.
5. Create or sign in to your account.
6. Add your Smart Garage™ Camera to your
myQ
®
account.
2. Preparation
Check Your View Before You Mount:
l
Power up the Smart Garage™ Camera in your
chosen mounting area.
l
Ensure Smart Garage™ Camera is in reach of
the included 6' Micro-USB power adapter.
l
Hold the camera at your chosen mounting
area, free from visual and metal obstructions.
Check your mobile device view shows what
you want to see before you mount.
l
Remove the protective lens cover film.
See the Smart Garage™ Camera installation
video at support.chamberlaingroup.com.
WARNING: This product can expose you to
chemicals including lead, which are known
to the State of California to cause cancer or
birth defects or other reproductive harm. For more
information go to www.P65Warnings.ca.gov
3. Mount the Smart Garage™ Camera
For Indoor Use Only
Items You May Need:
l
Ladder
l
Philips Screw Driver
l
Drill and .25" diameter Drill Bit (drywall mount
only)
l
Hammer
Choose from Options A or B:
Option A: Set to Garage Door Opener
Smart
Garage™
Camera
1. Determine whether the garage
door opener has a plastic or
metallic cover. For plastic,
clean desired mounting
location using included alcohol
wipe ensuring location is clean
of all dirt/debris and is allowed to dry. Peel
liner from adhesive (from the mounting
plate), do not touch adhesive and place the
plate to desired clean area and apply
moderate pressure for a minimum of 15
seconds. Wait 1 hour before placing the
camera onto the magnetic mounting plate to
allow the adhesive bond to reach maximum
strength. Place the camera on the magnetic
mounting plate. For metallic covers, no disk
is required. Simply place the camera base to
the metallic cover.
2. Face the camera head toward the desired
location.
Option B: Surface Mount
1. Determine if the
camera will be
mounted to
drywall or a
stud. For drywall
mount, pre-drill
a .25” diameter hole and lightly tap the
anchor into the hole using a hammer. Install
the mounting plate using the supplied
screw. For stud mount, do not use the
anchor and install the mounting plate using
supplied screw.
2. With the Smart Garage™ Camera head
facing in the desired visual location, attach it
to the magnetic mounting plate.
4. Connect Power
1. Power your Smart Garage™ Camera with the
included micro-USB power adapter. The
LED lights solid white. After approximately
40 seconds, the LED flashes blue, blue-
green, then solid green. You are now
connected.
Warning: Keep the cable away from all
moving garage door opener and other parts.
2. From the myQ
®
App, tap your camera and
the live video displays.
3. Adjust the Smart Garage™ Camera, twisting
the posable camera head to change the
viewing angle.

LED Status Indicators
What You See What It Means
Solid White Smart Garage™ Camera
is powering up.
Flashing Blue Ready to be set up in the
myQ
®
App.
Solid Blue Connected to your mobile
device. You are not yet
connected to the Internet.
If this persists after
setup, check your home
router and Internet.
Flashing Blue
and Green
Connecting to Wi-Fi and
connecting to the myQ
®
App.
Flashing Green Connected to the router,
but there is no internet.
Solid Green Connected to the myQ
®
App.
What You See What It Means
Flashing
Purple
Receiving firmware
updates.
Flashing Red Camera overheating.
Solid Red Motion sensing active.
One Year Limited Warranty
The Chamberlain Group LLC warrants to the first
consumer purchaser of this product that it is free
from defect in material and/or workmanship for a
period of 1 year from the date of purchase.
Software Agreement
Use of this product and the software embedded
within the product are subject to the copyright
notices, terms, and conditions accessible in the
myQ
®
App. Open the App Menu and select Help,
and then License and Terms of Use for more
information.
Need Help?
Go to: support.chamberlaingroup.com
NOTICE: This device complies with part 15 of the FCC rules and Innovation,
Science and Economic Development Canada license-exempt RSSs. Operation
is subject to the following two conditions: (1) this device may not cause
harmful interference, and (2) this device must accept any interference
received, including interference that may cause undesired operation.
Any changes or modifications not expressly approved by the party responsible
for compliance could void the user’s authority to operate the equipment.
This device must be installed to ensure a minimum 20 cm (8 in.) distance is
maintained between users/bystanders and device.
This device has been tested and found to comply with the limits for a Class B
digital device, pursuant to part 15 of the FCC rules and Industry Canada ICES
standard. These limits are designed to provide reasonable protection against
harmful interference in a residential installation. This equipment generates,
uses and can radiate radio frequency energy and, if not installed and used in
accordance with the instructions, may cause harmful interference to radio
communications. However, there is no guarantee that interference will not
occur in a particular installation. If this equipment does cause harmful
interference to radio or television reception, which can be determined by
turning the equipment off and on, the user is encouraged to try to correct the
interference by one or more of the following measures:
l
Reorient or relocate the receiving antenna.
l
Increase the separation between the equipment and receiver.
l
Connect the equipment into an outlet on a circuit different from that to which
the receiver is connected.
l
Consult the dealer or an experienced radio/TV technician for help.
The device for operation in the band 5150-5250 MHz is only for indoor use to
reduce the potential for harmful interference to co-channel mobile satellite
systems.
© 2022, Chamberlain Group LLC
All Rights Reserved
myQ
®
, the myQ
®
logo, and the LiftMaster
®
logo are
registered trademarks of the Chamberlain Group LLC.
Wi-Fi
®
is a registered trademark of Wi-Fi Alliance
114-5836-000
myQ-SGC2WCH / myQ-SGC2WLM
Caméra Smart Garage™
Guide d’installation
Contenu de la boîte
Entrée USB
Microphone
Objectif
de caméra
Bouton de réinitialisation
Câble
Micro USB
DEL
Plaque
de montage
Vis de
montage
Ancrage
pour cloison
sèche
Lingette alcoolisée,
pour montage adhésif
uniquement
1. Connectez votre caméra Smart
Garage
™
Utilisez l’application myQ
®
, votre appareil mobile et votre routeur
pour contrôler votre Caméra Smart Garage™.
Avant de commencer:
1. Assurez-vous que le Wi-Fi
®
de votre appareil mobile est
activé et qu’il émet un signal fort à l’endroit où se
trouvera la caméra.
2. Vérifiez que la fonction Bluetooth est activée sur votre
appareil mobile.
3. Activez les services de localisation sur votre appareil
mobile.
4. Téléchargez l’application myQ
®
.
CONSEIL: Si vous avez déjà l’application myQ
®
,
confirmez que vous avez la dernière version pour
optimiser votre expérience myQ
®
.
5. Créez un compte ou connectez-vous au vôtre.
6. Ajoutez votre Caméra Smart Garage™ à votre compte
myQ
®
.
1. Préparation
Vérifiez votre vue avant de monter :
l
Mettez le site Caméra Smart Garage™ sous tension dans la
zone de montage que vous avez choisie.
l
Veillez à ce que Caméra Smart Garage™ soit à portée de
l’adaptateur d’alimentation Micro-USB 6pi inclus.
l
Tenez la caméra à l’endroit de montage que vous avez
choisi, sans obstruction visuelle ou métallique. Vérifiez que
la vue de votre appareil mobile montre ce que vous voulez
voir avant de monter.
l
Retirez le film de protection de l’objectif.
Voir la vidéo d’installation Caméra Smart Garage™ sur
support.chamberlaingroup.com.
AVERTISSEMENT: Ce produit peut vous exposer à des
produits chimiques, dont le plomb, qui sont reconnus par
l’État de Californie comme provoquant le cancer, des
malformations congénitales ou d’autres problèmes de
reproduction. Pour plus d’information, visitez
www.P65Warnings.ca.gov
3. Montez le Caméra Smart
Garage™
Utilisation à l’intérieur uniquement
Outils supplémentaires dont vous pourriez avoir
besoin:
l
Échelle
l
Tournevis cruciforme
l
Perceuse et mèche de 0,25po de diamètre (montage sur
cloison sèche uniquement)
l
Marteau
Choisissez parmi les options
A ou B:
Option A: Installez sur l’ouvre-porte de garage
Caméra
de garage
intelligente
1. Déterminez si l’ouvre-porte de garage a un
couvercle en plastique ou en métal. Pour le
plastique, nettoyez l’emplacement de
montage souhaité à l’aide de la lingette
alcoolisée fournie, en veillant à ce que
l’emplacement soit exempt de toute saleté/débris, puis
laissez sécher. Décollez la pellicule de l’adhésif (de la
plaque de montage), ne touchez pas l’adhésif et placez la
plaque sur la zone propre souhaitée et appliquez une
pression modérée pendant au moins 15secondes.
Attendez 1 heure avant de placer la caméra sur la plaque
de montage magnétique pour permettre au lien adhésif
d’atteindre sa force maximale. Placez la caméra sur la
plaque de montage magnétique. Pour les couvertures
métalliques, aucun disque n’est nécessaire. Il suffit de
placer la base de la caméra sur le couvercle métallique.
2. Orientez la tête de la caméra vers l’emplacement
souhaité.
Option B: Montage en surface
1. Déterminez si la caméra sera
fixée à une cloison sèche ou à
un montant. Pour un montage
sur cloison sèche, pré-percez
un trou de 0,25po de diamètre
et tapez légèrement l’ancrage dans le trou à l’aide d’un
marteau. Installez la plaque de montage à l’aide de la vis
fournie. Pour un montage sur goujon, n’utilisez pas
l’ancrage et installez la plaque de montage à l’aide de la
vis fournie.
2. Avec la tête de Caméra Smart Garage™ orientée vers
l’emplacement visuel souhaité, fixez-la à la plaque de
montage magnétique.
4. Connectez l’alimentation
1. Alimentez votre Caméra Smart Garage™ avec
l’adaptateur micro-USB inclus. La LED s’allume en blanc
fixe. Après environ 40secondes, le voyant clignote en
bleu, bleu-vert, puis vert fixe. Vous êtes maintenant
connecté.
Avertissement: Maintenez le câble à l’écart de toutes les
pièces mobiles de l’ouvre-porte de garage et des autres
pièces.
2. Depuis l’application myQ
®
, appuyez sur votre caméra et
la vidéo en direct s’affiche.
3. Réglez le site Caméra Smart Garage™, en faisant tourner
la tête de la caméra pour modifier l’angle de vue.

Indicateurs d’état DEL
Si vous voyez Cela signifie
Blanc fixe La caméra Smart Garage™
s’allume.
Bleu clignotant Prêt à être configuré dans
l’application myQ
®
.
Bleu fixe Connecté à votre appareil
mobile. Vous n’êtes pas encore
connecté à Internet. Si cela
persiste après l’installation,
vérifiez votre routeur domestique
et Internet.
Bleu et vert
clignotant
Connexion au Wi-Fi et connexion
à l’application myQ
®
.
Vert clignotant Connecté au routeur, mais il n’y
a pas Internet.
Vert fixe Connecté à l’application myQ
®
.
Violet clignotant Réception des mises à jour
micrologicielles.
Rouge clignotant La caméra surchauffe.
Si vous voyez Cela signifie
Rouge fixe Détection de mouvement active.
Garantie limitée d’un an
The Chamberlain Group LLC garantit au premier acheteur
consommateur de ce produit qu’il est exempt de tout défaut de
matériau et/ou de fabrication pendant une période d’un an à
compter de la date d’achat.
Accord logiciel
L’utilisation de ce produit et du logiciel intégré au produit est
soumise aux avis de copyright, aux termes et conditions
accessibles dans l’application myQ
®
. Ouvrez le menu de
l’application et sélectionnez Help (aide), puis License and Terms
of Use (licence et conditions d’utilisation) pour plus d’information.
Besoin d’aide?
Allez à: support.chamberlaingroup.com
AVIS: Cet appareil est conforme à la partie 15 du règlement de la FCC ainsi
qu’avec le CNR exempt de licence d’Innovation, Science et Développement
économique Canada. Son utilisation est sujette aux deux conditions
suivantes: (1)cet appareil ne doit pas causer d’interférences nuisibles, et
(2)cet appareil doit accepter toutes les interférences reçues, y compris les
interférences qui peuvent causer le fonctionnement indésirable de l’appareil.
Les modifications ou les changements non expressément approuvés par la
partie responsable de la conformité peuvent annuler l’autorité de l’utilisateur à
utiliser l’équipement.
Cet appareil doit être installé pour qu’une distance minimum de 20cm (8po)
soit maintenue entre les utilisateurs, les passants et l’appareil.
Cet appareil été testé et s’est avéré conforme aux limites d’un appareil
numérique de classe B selon la partie 15 des règlements de la FCC et des
normes ICES d’Industrie Canada. Ces limites ont pour objet de fournir une
protection raisonnable contre les interférences nuisibles dans une installation
résidentielle. Cet équipement produit, utilise et peut rayonner de l’énergie
radiofréquente et, s’il n’est pas installé et utilisé conformément aux
instructions, il risque de causer des interférences nuisibles aux
communications radio. Toutefois, il n’est pas possible de garantir l’absence
d’interférences dans une installation particulière. Si cet équipement cause des
interférences nuisibles à la réception radio ou TV, ce qui peut être déterminé
en l’éteignant puis en le rallumant, l’utilisateur est invité à essayer de corriger
l’interférence en prenant au moins l’une des mesures suivantes:
l
Réorienter ou déplacer l’antenne réceptrice.
l
Éloignez l’appareil de l’équipement ou du récepteur.
l
Branchez l’équipement sur une prise correspondant à un autre circuit que celui
sur lequel le récepteur est branché.
l
Consulter le revendeur ou un technicien radio/TV.
L’appareil destiné à fonctionner dans la bande 5150-5250 MHz doit être utilisé
uniquement à l’intérieur afin de réduire le potentiel d’interférences nuisibles
aux systèmes mobiles par satellite co-canaux.
© 2022, Chamberlain Group LLC
Tous droits réservés.
myQ
®
, le logo myQ
®
et le logo LiftMaster
®
sont
sont des marques déposées de The Chamberlain Group LLC.
Wi-Fi
®
est une marque
déposée de Wi-Fi Alliance
114-5836-000
myQ-SGC2WCH / myQ-SGC2WLM
Cámara Smart Garage™
Guía de instalación
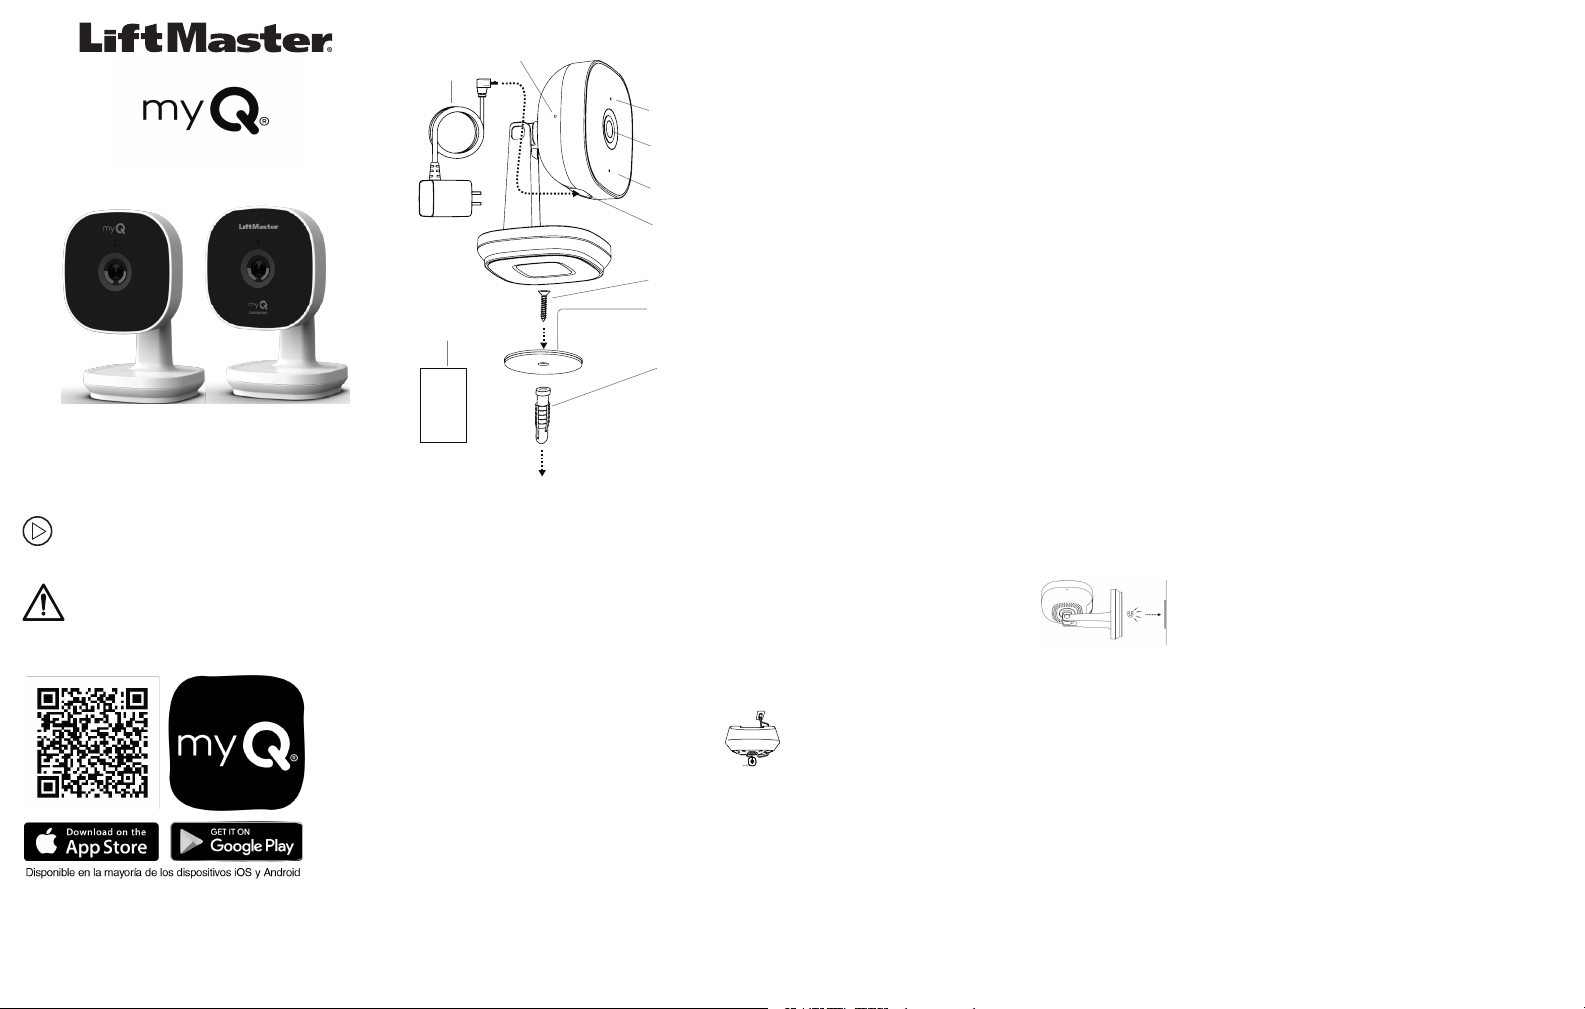
Qué hay en la caja
Entrada USB
Micrófono
Lente de
la cámara
Botón Reset (Reiniciar)
Cable
micro USB
LED
Placa
de montaje
Tornillos
de montaje
Anclaje
para yeso
Toallita con alcohol,
solo para el montaje adhesivo
1. Conecte su cámara inteligente Smart
Garage
™
Use la aplicación myQ
®
, su dispositivo móvil y su router para
controlar su Cámara Smart Garage™.
Antes de empezar:
1. Asegúrese de que la red Wi-Fi
®
de su dispositivo móvil
esté encendida y muestre una señal fuerte en el lugar
donde se ubicará la cámara.
2. Verifique que el Bluetooth esté activado en su dispositivo
móvil.
3. Habilite los servicios de localización en su dispositivo
móvil.
4. Descargue la aplicación myQ
®
.
SUGERENCIA: Si ya tiene la aplicación myQ
®
, confirme
si tiene la última versión para optimizar su experiencia
myQ
®
.
5. Cree su cuenta o inicie sesión en ella.
6. Agregue su Cámara Smart Garage™ a su cuenta myQ
®
.
1. Preparación
Verifique la vista antes del montaje:
l
Encienda la Cámara Smart Garage™ en la zona de montaje
elegida.
l
Asegúrese de que la Cámara Smart Garage™ esté al alcance
del adaptador de corriente micro USB de 6' incluido.
l
Sostenga la cámara en la zona de montaje elegida, libre de
obstáculos visuales y metálicos. Compruebe si la vista de su
dispositivo móvil muestra lo que quiere ver antes del
montaje.
l
Retire la película protectora de la lente.
Vea el video de instalación de la Cámara Smart Garage™en
support.chamberlaingroup.com.
ADVERTENCIA: Con este producto, puede quedar
expuesto a sustancias químicas, incluido el plomo, que el
Estado de California reconoce como causantes de cáncer
o anomalías congénitas u otros daños reproductivos. Para obtener
más información, visite www.P65Warnings.ca.gov
3. Monte la Cámara Smart Garage™
Solo para usarse en interiores
Elementos que podría necesitar:
l
Escalera
l
Destornillador Philips
l
Taladro y broca de 0.25" de diámetro (solo para montaje en
pared seca)
l
Martillo
Elija entre las opciones A o B:
Opción A: Ajustar el abrepuertas de garaje
Cámara
Smart
Garage™
1. Determine si el abrepuertas de garaje tiene
una cubierta de plástico o metálica. En el
caso del plástico, limpie la ubicación de
montaje deseada con la toallita con alcohol
incluida, para asegurarse de que la ubicación
esté limpia de toda suciedad/residuos y se pueda secar.
Despegue el revestimiento del adhesivo (de la placa de
montaje), sin tocar el adhesivo, coloque la placa en la
zona limpia deseada y aplique una presión moderada
durante un mínimo de 15 segundos. Espere una hora
antes de colocar la cámara en la placa de montaje
magnética a fin de que la unión adhesiva sea lo más
resistente posible. Coloque la cámara en la placa de
montaje magnética. En el caso de las cubiertas metálicas,
no se requiere ningún disco. Basta con colocar la base de
la cámara en la cubierta metálica.
2. Oriente el cabezal de la cámara hacia el lugar deseado.
Opción B: Montaje superficial
1. Determine si la cámara se
montará en una pared de yeso
o en un poste. Para el montaje
en una pared seca, taladre
previamente un agujero de
0.25" de diámetro y golpee ligeramente el anclaje en el
agujero con un martillo. Instale la placa de montaje con el
tornillo suministrado. Para el montaje en un poste, no
use el anclaje e instale la placa de montaje con el tornillo
suministrado.
2. Con el cabezal de la Cámara Smart Garage™ orientado
hacia la ubicación visual deseada, fíjelo a la placa de
montaje magnética.
4. Conexión de la alimentación
1. Alimente su Cámara Smart Garage™ con el adaptador de
corriente micro USB incluido. La luz LED se encuentra en
blanco fijo. Después de unos 40 segundos, el LED
parpadea en azul, azul-verde y, luego, en verde fijo. Ya se
conectó.
Advertencia: Mantenga el cable alejado de todas las
piezas móviles del abrepuertas de garaje y de otras
piezas.
2. Desde la aplicación myQ
®
, pulse la cámara y verá el
video en directo.
3. Ajuste la Cámara Smart Garage™ girando la cabeza de la
cámara móvil para cambiar el ángulo de visión.

LED indicadores de estado
Lo que se ve Lo que significa
Blanco sólido La Smart Garage™ Camera se
está encendiendo.
Azul parpadeante Ya puede configurarse en la
aplicación myQ
®
Azul sólido Se conectó a su dispositivo
móvil. Aún no se conectó a
Internet. Si esto persiste
después de la configuración,
compruebe su router e
Internet.
Azul y verde
parpadeante
Se está conectando a Wi-Fi y a
la aplicación myQ
®
.
Verde parpadeante Se conectó al router, pero no
hay Internet.
Verde sólido Se conectó a la aplicación
myQ
®
.
Púrpura parpadeante Recibiendo actualizaciones de
firmware.
Rojo parpadeante Sobrecalentamiento de la
Lo que se ve Lo que significa
cámara.
Rojo sólido Detección de movimiento
activa.
Garantía limitada de un año
Chamberlain Group LLC garantiza al primer consumidor que
compre este producto que está libre de defectos de materiales o de
mano de obra por un período de 1 año a partir de la fecha de
compra.
Contrato de software
El uso de este producto y del software que incluye está sujeto a los
avisos de derechos de autor, los términos y las condiciones
accesibles en la aplicación myQ
®
. Abra el menú de la aplicación y
seleccione Ayuda. Luego, Licencia y condiciones de uso para
obtener más información.
¿Necesita ayuda?
Diríjase a support.chamberlaingroup.com
AVISO: Este dispositivo cumple con la parte 15 de las reglas de la FCC y de
equipos RSS exentos de licencia de Innovation, Science and Economic
Development Canada. El funcionamiento está sujeto a las siguientes dos
condiciones: (1) este dispositivo no puede causar interferencia dañina, y (2)
este dispositivo debe aceptar toda interferencia recibida, incluso la que puede
causar un funcionamiento indeseado.
Los cambios o las modificaciones a esta unidad que no sean aprobados en
forma expresa por la parte responsable del cumplimiento pueden invalidar el
permiso del usuario para operar el equipo.
Este dispositivo debe instalarse para asegurarse de mantener una distancia
mínima de 20 cm (8 pulg.) entre los usuarios/transeúntes y el dispositivo.
Este dispositivo se ha probado, y se ha hallado que cumple con los límites de
un dispositivo digital de clase B, de acuerdo con la parte 15 de las reglas de la
FCC y de la norma ICES de Industry Canada. Estos límites están diseñados
para brindar una protección razonable contra la interferencia dañina en una
instalación residencial. Este equipo genera, utiliza y puede emitir energía de
radiofrecuencia y, si no se instala y utiliza de acuerdo con las instrucciones,
puede causar interferencias perjudiciales en las radiocomunicaciones. Sin
embargo, no existe garantía de que no ocurra interferencia en una instalación
en particular. Si este equipo efectivamente causa interferencia dañina a la
recepción de radio o televisión, lo cual puede determinarse apagando y
encendiendo el equipo, se recomienda al usuario que trate de corregir la
interferencia realizando uno o varios de los siguientes pasos:
l
Cambiar de dirección o de lugar la antena receptora.
l
Aumentar la separación entre el equipo y el receptor.
l
Conectar el equipo en un tomacorriente en un circuito diferente de donde esté
conectado el receptor.
l
Consultar al concesionario o a un técnico de radio/TV con experiencia para que
le ayude.
El dispositivo para el funcionamiento en la banda de 5150-5250 MHz es solo
para uso en interiores a fin de reducir la posibilidad de interferencias
perjudiciales para los sistemas móviles por satélite cocanal.
© 2022, Chamberlain Group LLC.
Todos los derechos reservados
myQ
®
, el logo de myQ
®
y el logo de LiftMaster
®
son
marcas registradas de Chamberlain Group LLC.
Wi-Fi
®
es una marca comercial registrada de Wi-Fi Alliance
114-5836-000

