Loading ...
Loading ...
Loading ...

12
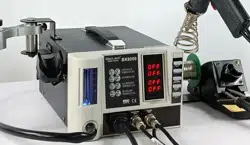
D. SOLDERING IRON
1. Connect the Soldering Iron connection assembly to the 6-pin
receptacle located at the front of the control panel (“8” from the
CONTROL PANEL GUIDE).
2. Follow the initial procedures (“A. INITIAL PROCEDURES”).
3. Connect the vacuum tube to the Smoke Absorber Terminal or
Vacuum Cap (“7” from the control panel). If smoke absorber
function is to be used.
4. Activate the “SOLDER IRON” Activation switch (“14” from control
panel). This will automatically start to increase the temperature of
the soldering iron to 350°C (default).
5. Adjust the soldering iron temperature using the SOLDERING IRON
TEMPERATURE ADJUSTMENT buttons (“4” from the control panel).
6. If smoke absorber function is to be used. Activate the “SMOKE
ABSORBER” Activation switch (“15” from the control panel).
7. Start using the soldering iron as soon as desired temperature is
reached.
8. When the task is finished, deactivate the SMOKE ABSORBER switch.
9. Deactivate the SOLDER IRON activation switch.
10. Allow sufficient time for the soldering iron to cool down before
keeping in a safe storage.
OPERATING GUIDELINES
17
NOTES:
● The sleep mode timer is configurable between 1 and 60 minutes.
● A sleep mode timer value of “0” disables the sleep function.
● Sleep mode settings for Hot-Air gun is saved into the memory and
shall remain in effect until it is reset or new data is entered.
H. Auto-Sleep Mode (Soldering Iron and Desoldering Gun)
The device has a built-in auto-sleep feature to conserve power
enhance the heater life. The sleep timer can be configured to power
down the soldering iron or desoldering gun after a defined time. When
in sleep mode four dashes “ - - - - “ will be shown indicating that it is
now in sleep mode. To reactivate the soldering iron or desoldering gun
simply push the its function button or its temperature adjustment
button.
Changing SLEEP Timer (Soldering Iron)
By default, the system’s sleep duration is 0 indicating the sleep
timer is disabled. To activate the sleep function follow the procedures.
1. Turn off the Soldering Iron Function switch (“14” from the control
panel) .Ensure that the Desoldering Gun Function switch is in the
off position(“12” from the control panel) .
2. Press and hold the DOWN button of the Desoldering Gun
Temperature Adjustment button (“5” from the control panel) .
3. The Soldering Iron Temperature Display (“14” from the control
panel) . Will switch to “000t” indicating it is now in the soldering
iron sleep timer adjustment mode. Release the DOWN button of
the Desoldering Gun Temperature Adjustment button
4. Use the Soldering Iron Temperature Adjustment buttons (“4” from
the control panel) to increase or decrease the sleep duration.
Timer is adjustable from 1 to 60 minutes, a value of 0 indicates
that the sleep timer function is turned off.
5. Confirm the change by pressing and holding the “DOWN” button
of the Desoldering Gun Temperature Adjustment button (“5” from
the control panel).
OPERATING GUIDELINES
Loading ...
Loading ...
Loading ...