Loading ...
Loading ...
Loading ...
1. Inspecting the saw blade
Continued use of a dull or damaged blade will result in
reduced cutting effi ciency and may cause overloading
of the motor. Replace the blade with a new one as
soon as excessive abrasion is noted.
CAUTION
If a dull saw blade is used, reactive force is
increased during cutting operation. Avoid the
use of the dull saw blade without repair.
2. Check the Screws
Loose screws are dangerous. Regularly inspect them
and make sure they are tight.
CAUTION
Using this power tool with loosen, screws is
extremely dangerous.
3. Motor unit maintenance
The motor winding is an important part of this tool.
Avoid damaging and be careful to avoid contact with
cleaning oil or water.
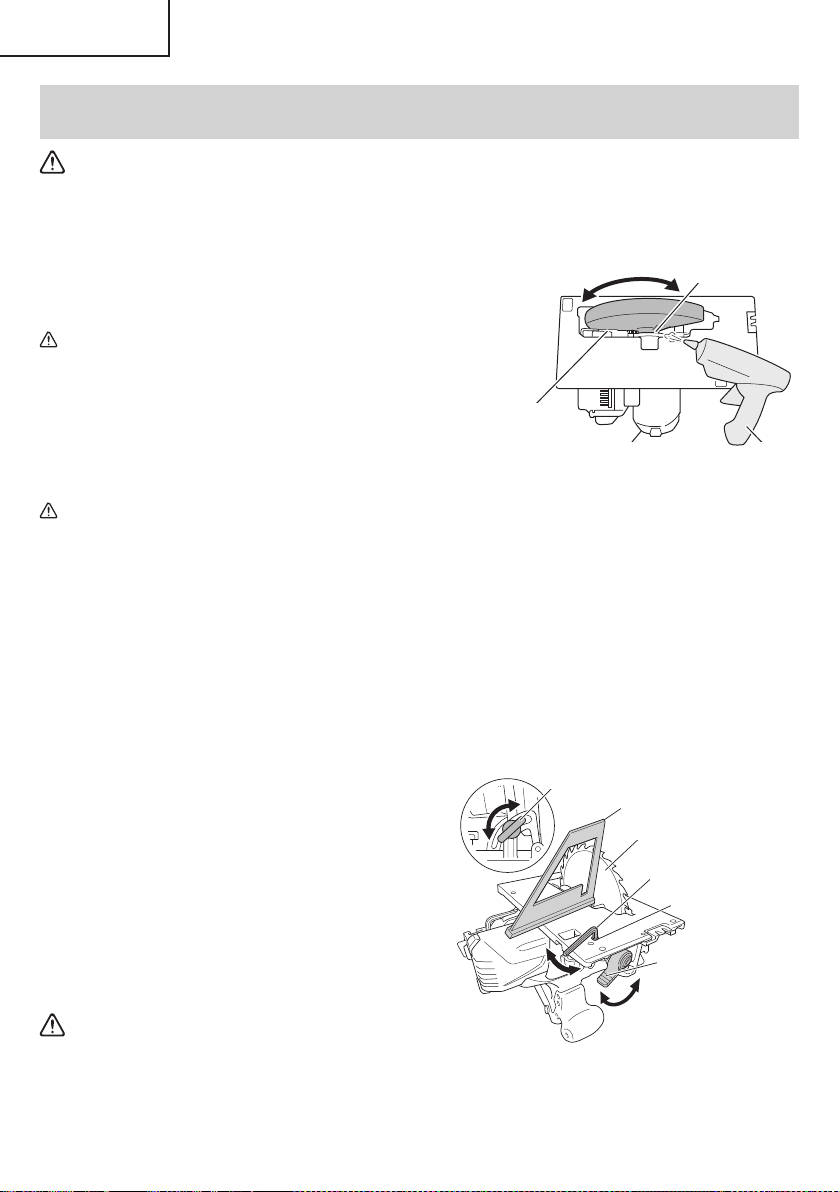
After 50 hours of use, clean the motor by blowing into
the ventilation holes of the motor housing with dry air
from an air gun or other tool (Fig. 36).
Dust or particle accumulation in the motor can result
in damage.
4. Inspecting and maintaining the lower guard
Always make sure that the lower guard moves
smoothly.
In the event of any malfunction, immediately repair the
lower guard.
For cleaning and maintenance, use an air gun or other
tool to blow clean the space between the lower guard
and gear cover as well as the rotation part of the lower
guard with dry air (Fig. 36).
Doing so is eff ective for the emission of chips or other
particles.
Accumulation of chips or other particles around the
lower guard may result in malfunction or damage.
WARNING
To prevent dust inhalation or eye irritation, wear
protective safety goggles and a dust mask when
using an air gun or other tool to clean the lower
guard, ventilation holes or other parts of the
product.
MAINTENANCE AND INSPECTION
WARNING
Be sure to turn off the switch and pull out the battery before doing any inspection or maintenance.
Ensure smooth
movement of
lower guard
Rotation part of
the lower guard
Housing vent
Space between lower
guard and gear cover
Air gun
Fig. 36
5. Clean inside the saw cover
Periodically inspect and clean the saw cover to
ensure that there is no accumulation of chips or other
particles.
6. Adjusting the base and saw blade to maintain
perpendicularity (Fig. 37)
The angle between the base and the saw blade
has been adjusted to 90°, however should this
perpendicularity be lost for some reason, adjust in the
following manner.
(1) Loosen the incline lever and incline wing-nut, place
the square on the base and against the saw blade to
attain a right angle, and lightly tighten the incline lever.
Square
Adjusting screw
Saw blade
Incline wing-nut
Hex. bar
wrench 2.5 mm
Incline lever
Fig. 37
24
English
00BookC18DBALNAmetabo.indb2400BookC18DBALNAmetabo.indb242021/03/3017:21:022021/03/3017:21:02
Loading ...
Loading ...
Loading ...