Model
Modèle
Modelo
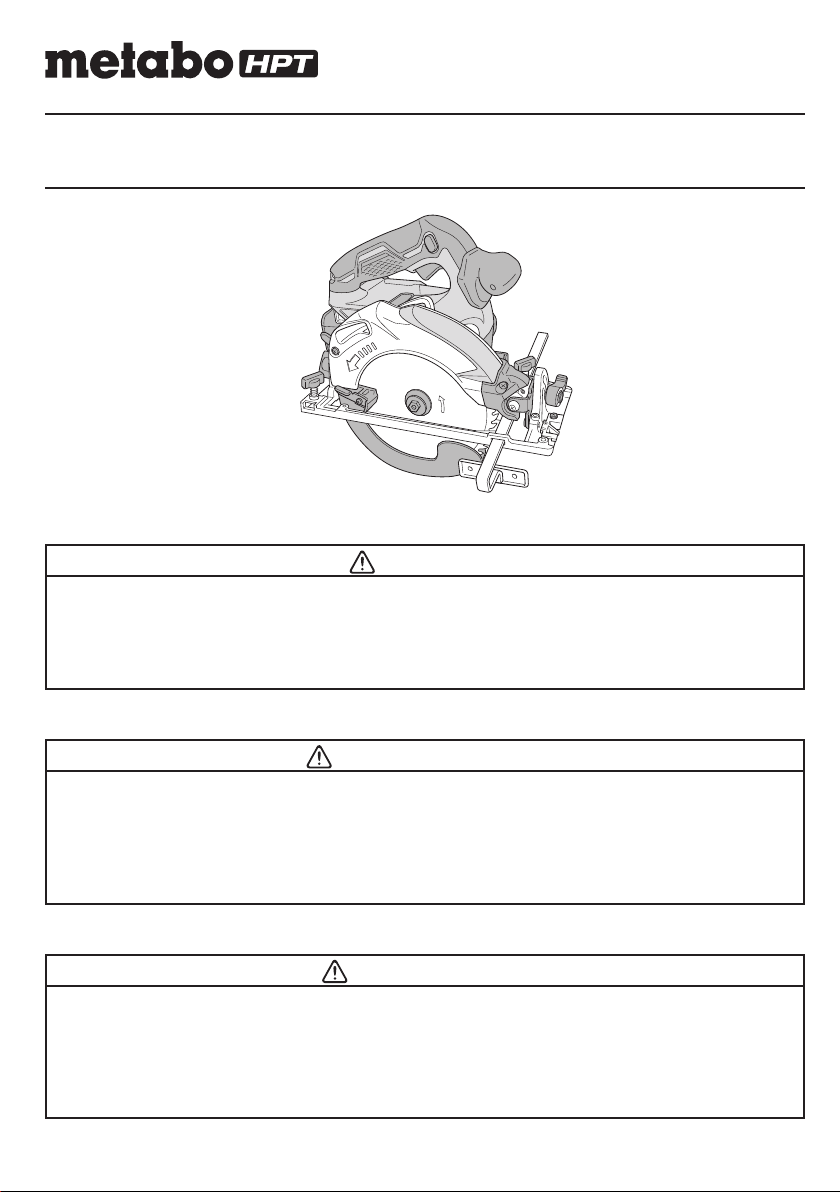
C 18DBAL
Cordless Circular Saw
Scie circulaire sans fi l
Sierra circular a batería
SAFETY INSTRUCTIONS AND INSTRUCTION MANUAL
WARNING
IMPROPER OR UNSAFE use of this power tool can result in death or serious bodily injury!
This manual contains important information about product safety. Please read and
understand this manual BEFORE operating the power tool. Please keep this manual
available for other users and owners before they use the power tool. This manual should be
stored in safe place.
INSTRUCTIONS DE SECURITE ET MODE D’EMPLOI
AVERTISSEMENT
Une utilisation INCORRECTE OU DANGEREUSE de cet outil motorisé peut entraîner la
mort ou de sérieuses blessures corporelles!
Ce mode d’emploi contient d’importantes informations à propos de la sécurité de ce produit.
Prière de lire et de comprendre ce mode d’emploi AVANT d’utiliser l’outil motorisé. Garder ce
mode d’emploi à la disponibilité des autres utilisateurs et propriétaires avant qu’ils utilisent
l’outil motorisé. Ce mode d’emploi doit être conservé dans un endroit sûr.
INSTRUCCIONES DE SEGURIDAD Y MANUAL DE INSTRUCCIONES
ADVERTENCIA
¡La utilización INAPROPIADA O PELIGROSA de esta herramienta eléctrica puede resultar
en lesiones de gravedad o la muerte!
Este manual contiene información importante sobre la seguridad del producto. Lea y
comprenda este manual ANTES de utilizar la herramienta eléctrica. Guarde este manual
para que puedan leerlo otras personas antes de utilizar la herramienta eléctrica. Este
manual debe ser guardado en un lugar seguro.
Designed for operating in USA & Canada only.
When this product is used in areas other than the USA & Canada,
we cannot guarantee the product quality and performance.
00BookC18DBALNAmetabo.indb100BookC18DBALNAmetabo.indb12021/03/3017:20:552021/03/3017:20:55

IMPORTANT SAFETY INFORMATION
Read and understand all of the safety precautions, warnings and operating instructions in the Instruction Manual before
operating or maintaining this power tool.
Most accidents that result from power tool operation and maintenance are caused by the failure to observe basic safety
rules or precautions. An accident can often be avoided by recognizing a potentially hazardous situation before it occurs,
and by observing appropriate safety procedures.
Basic safety precautions are outlined in the “SAFETY” section of this Instruction Manual and in the sections which
contain the operation and maintenance instructions.
Hazards that must be avoided to prevent bodily injury or machine damage are identifi ed by WARNINGS on the power
tool and in this Instruction Manual.
NEVER use this power tool in a manner that has not been specifi cally recommended by metabo HPT.
MEANINGS OF SIGNAL WORDS
WARNING indicates a potentially hazardous situations which, if ignored, could result in death or serious injury.
CAUTION indicates a potentially hazardous situations which, if not avoided, may result in minor or moderate injury, or
may cause machine damage.
NOTE emphasizes essential information.
SAFETY
GENERAL POWER TOOL SAFETY WARNINGS
WARNING
Read all safety warnings and all instructions.
Failure to follow the warnings and instructions may result in electric shock, fi re and/or serious injury.
Save all warnings and instructions for future reference.
The term “power tool” in the warnings refers to your mains-operated (corded) power tool or battery-operated
(cordless) power tool.
1) Work area safety
a) Keep work area clean and well lit.
Cluttered or dark areas invite accidents.
b) Do not operate power tools in explosive
atmospheres, such as in the presence of
fl ammable liquids, gases or dust.
Power tools create sparks which may ignite the
dust or fumes.
c) Keep children and bystanders away while
operating a power tool.
Distractions can cause you to lose control.
2) Electrical safety
a) Power tool plugs must match the outlet.
Never modify the plug in any way.
Do not use any adapter plugs with earthed
(grounded) power tools.
Unmodifi ed plugs and matching outlets will reduce
risk of electric shock.
b) Avoid body contact with earthed or grounded
surfaces such as pipes, radiators, ranges and
refrigerators.
There is an increased risk of electric shock if your
body is earthed or grounded.
c) Do not expose power tools to rain or wet
conditions.
Water entering a power tool will increase the risk
of electric shock.
d) Do not abuse the cord. Never use the cord for
carrying, pulling or unplugging the power tool.
Keep cord away from heat, oil, sharp edges or
moving parts.
Damaged or entangled cords increase the risk of
electric shock.
e) When operating a power tool outdoors, use
an extension cord suitable for outdoor use.
Use of a cord suitable for outdoor use reduces the
risk of electric shock.
f) If operating a power tool in a damp location
is unavoidable, use a residual current device
(RCD) protected supply.
Use of an RCD reduces the risk of electric shock.
3) Personal safety
a) Stay alert, watch what you are doing and use
common sense when operating a power tool.
Do not use a power tool while you are tired
or under the infl uence of drugs, alcohol or
medication.
2
English
00BookC18DBALNAmetabo.indb200BookC18DBALNAmetabo.indb22021/03/3017:20:552021/03/3017:20:55

A moment of inattention while operating power
tools may result in serious personal injury.
b) Use personal protective equipment. Always
wear eye protection.
Protective equipment such as dust mask, non-skid
safety shoes, hard hat, or hearing protection used
for appropriate conditions will reduce personal
injuries.
c) Prevent unintentional starting. Ensure the
switch is in the off -position before connecting
to power source and/or battery pack, picking
up or carrying the tool.
Carrying power tools with your fi nger on the switch
or energising power tools that have the switch on
invites accidents.
d) Remove any adjusting key or wrench before
turning the power tool on.
A wrench or a key left attached to a rotating part of
the power tool may result in personal injury.
e) Do not overreach. Keep proper footing and
balance at all times.
This enables better control of the power tool in
unexpected situations.
f) Dress properly. Do not wear loose clothing or
jewellery. Keep your hair, clothing and gloves
away from moving parts.
Loose clothes, jewellery or long hair can be caught
in moving parts.
g) If devices are provided for the connection
of dust extraction and collection facilities,
ensure these are connected and properly
used.
Use of dust collection can reduce dust-related
hazards.
4) Power tool use and care
a) Do not force the power tool. Use the correct
power tool for your application.
The correct power tool will do the job better and
safer at the rate for which it was designed.
b) Do not use the power tool if the switch does
not turn it on and off .
Any power tool that cannot be controlled with the
switch is dangerous and must be repaired.
c) Disconnect the plug from the power source
and/or the battery pack from the power tool
before making any adjustments, changing
accessories, or storing power tools.
Such preventive safety measures reduce the risk
of starting the power tool accidentally.
d) Store idle power tools out of the reach of
children and do not allow persons unfamiliar
with the power tool or these instructions to
operate the power tool.
Power tools are dangerous in the hands of
untrained users.
e) Maintain power tools. Check for misalignment
or binding of moving parts, breakage of parts
and any other condition that may aff ect the
power tool’s operation.
If damaged, have the power tool repaired
before use.
Many accidents are caused by poorly maintained
power tools.
f) Keep cutting tools sharp and clean.
Properly maintained cutting tools with sharp
cutting edges are less likely to bind and are easier
to control.
g) Use the power tool, accessories and tool bits
etc. in accordance with these instructions,
taking into account the working conditions and
the work to be performed.
Use of the power tool for operations diff erent
from those intended could result in a hazardous
situation.
5) Battery tool use and care
a) Recharge only with the charger specifi ed by
the manufacturer.
A charger that is suitable for one type of battery
pack may create a risk of fi re when used with
another battery pack.
b) Use power tools only with specifi cally
designated battery packs.
Use of any other battery packs may create a risk of
injury and fi re.
c) When battery pack is not in use, keep it away
from other metal objects like paper clips,
coins, keys, nails, screws, or other small metal
objects, that can make a connection from one
terminal to another.
Shorting the battery terminals together may cause
burns or a fi re.
d) Under abusive conditions, liquid may be
ejected from the battery; avoid contact. If
contact accidentally occurs, fl ush with water.
If liquid contacts eyes, additionally seek
medical help.
Liquid ejected from the battery may cause irritation
or burns.
6) Service
a) Have your power tool serviced by a
qualifi ed repair person using only identical
replacement parts.
This will ensure that the safety of the power tool is
maintained.
– WARNING –
To reduce the risk of injury, user must read
instruction manual.
3
English
00BookC18DBALNAmetabo.indb300BookC18DBALNAmetabo.indb32021/03/3017:20:562021/03/3017:20:56

CIRCULAR SAW SAFETY WARNINGS
Cutting procedures
a) DANGER: Keep hands away from cutting
area and the blade. Keep your second hand on
auxiliary handle, or motor housing.
If both hands are holding the saw, they cannot be cut
by the blade.
b) Do not reach underneath the workpiece.
The guard cannot protect you from the blade below
the workpiece.
c) Adjust the cutting depth to the thickness of the
workpiece.
Less than a full tooth of the blade teeth should be
visible below the workpiece.
d) Never hold piece being cut in your hands or
across your leg. Secure the workpiece to a stable
platform.
It is important to support the work properly to minimize
body exposure, blade binding, or loss of control.
e) Hold the power tool by insulated gripping
surfaces only, when performing an operation
where the cutting tool may contact hidden wiring.
Contact with a “live” wire will also make exposed
metal parts of the power tool “live” and could give the
operator an electric shock.
f) When ripping always use a rip fence or straight
edge guide.
This improves the accuracy of cut and reduces the
chance of blade binding.
g) Always use blades with correct size and shape
(diamond versus round) of arbour holes.
Blades that do not match the mounting hardware of
the saw will run eccentrically, causing loss of control.
h) Never use damaged or incorrect blade washers
or bolt.
The blade washers and bolt were specially designed
for your saw, for optimum performance and safety of
operation.
Kickback causes and related warnings
– kickback is a sudden reaction to a pinched, bound or
misaligned saw blade, causing an uncontrolled saw to lift
up and out of the workpiece toward the operator;
– when the blade is pinched or bound tightly by the kerf
closing down, the blade stalls and the motor reaction
drives the unit rapidly back toward the operator;
– if the blade becomes twisted or misaligned in the cut, the
teeth at the back edge of the blade can dig into the top
surface of the wood causing the blade to climb out of the
kerf and jump back toward the operator.
Kickback is the result of saw misuse and/or incorrect
operating procedures or conditions and can be avoided by
taking proper precautions as given below.
a) Maintain a fi rm grip with both hands on the saw
and position your arms to resist kickback forces.
Position your body to either side of the blade,
but not in line with the blade.
Kickback could cause the saw to jump backwards,
but kickback forces can be controlled by the operator,
if proper precautions are taken.
b) When blade is binding, or when interrupting a
cut for any reason, release the trigger and hold
the saw motionless in the material until the blade
comes to a complete stop.
Never attempt to remove the saw from the work
or pull the saw backward while the blade is in
motion or kickback may occur.
Investigate and take corrective actions to eliminate
the cause of blade binding.
c) When restarting a saw in the workpiece, centre
the saw blade in the kerf and check that saw
teeth are not engaged into the material.
If saw blade is binding, it may walk up or kickback
from the workpiece as the saw is restarted.
d) Support large panels to minimise the risk of
blade pinching and kickback.
Large panels tend to sag under their own weight.
Supports must be placed under the panel on both
sides, near the line of cut and near the edge of the
panel.
e) Do not use dull or damaged blades.
Unsharpened or improperly set blades produce
narrow kerf causing excessive friction, blade binding
and kickback.
f) Blade depth and bevel adjusting locking levers
must be tight and secure before making cut.
If blade adjustment shifts while cutting, it may cause
binding and kickback.
g) Use extra caution when sawing into existing
walls or other blind areas.
The protruding blade may cut objects that can cause
kickback.
Lower guard function
a) Check lower guard for proper closing before each
use. Do not operate the saw if lower guard does
not move freely and close instantly. Never clamp
or tie the lower guard into the open position.
If saw is accidentally dropped, lower guard may be
bent.
Raise the lower guard with the retracting handle and
make sure it moves freely and does not touch the
blade or any other part, in all angles and depths of cut.
b) Check the operation of the lower guard spring.
If the guard and the spring are not operating
properly, they must be serviced before use.
Lower guard may operate sluggishly due to damaged
parts, gummy deposits, or a build-up of debris.
c) Lower guard should be retracted manually
only for special cuts such as “plunge cuts” and
“compound cuts”.
4
English
00BookC18DBALNAmetabo.indb400BookC18DBALNAmetabo.indb42021/03/3017:20:562021/03/3017:20:56

10. Do not wipe plastic parts with solvent.
Solvents such as gasoline, thinner benzine, carbon
tetrachloride, and alcohol may damage and crack
plastic parts. Do not wipe them with such solvents.
Wipe plastic parts with a soft cloth lightly dampened
with soapy water and dried thoroughly.
11. Keep motor air vent clean.
The tool’s motor air vent must be kept clean so that
air can freely fl ow at all times. Check for dust build-up
frequently.
12. NEVER leave tool running unattended. Turn
power off .
Don’t leave tool until it comes to a complete stop.
13. NEVER touch the blade with bare hands after
operation.
14. For this mode, the saw blades should be 165 mm.
15. Because the cordless circular saw operates by
battery power, be aware of the fact that it can begin to
operate at any time.
16. When working at elevated locations, clear the area of
other people and aware of conditions below you.
17. Do not give a strong shock to the switch panel or
break it. It may lead to a trouble.
IMPORTANT SAFETY INSTRUCTIONS
FOR BATTERY CHARGER
WARNING
Death or serious bodily injury could result from
improper or unsafe use of battery chargers.
To avoid these risks, follow these basic safety
instructions:
READ ALL INSTRUCTIONS
1. This manual contains important safety and operating
instructions for battery charger Model UC18YSL3 /
UC18YFSL.
2. Before using battery charger, read all instructions
and cautionary markings on (1) battery charger, (2)
battery, and (3) product using battery.
3. To reduce risk of injury, charge metabo HPT
rechargeable battery type BSL18 series. Other type
of batteries may burst causing personal injury and
damage.
4. Use of an attachment not recommended or sold by
the battery charger manufacturer may result in a risk
of fi re, electric shock, or injury to persons.
5. To reduce risk of damage to electric plug and cord,
pull by plug when disconnecting battery charger.
6. Make sure cord is located so that it will not be stepped
on, tripped over, or otherwise subjected to damage or
stress.
7. An extension cord should not be used unless
absolutely necessary. Use of improper extension
cord could result in a risk of fi re and electric shock.
Raise lower guard by retracting handle and as soon
as blade enters the material, the lower guard must be
released.
For all other sawing, the lower guard should operate
automatically.
d) Always observe that the lower guard is covering
the blade before placing saw down on bench or
fl oor.
An unprotected, coasting blade will cause the saw to
walk backwards, cutting whatever is in its path.
Be aware of the time it takes for the blade to stop after
switch is released.
SPECIFIC SAFETY RULES
1. Never touch moving parts.
Never place your hands, fi ngers or other body parts
near the tool’s moving parts.
2. Never operate without all guards in place.
Never operate this tool without all guards or safety
features in place and in proper working order. If
maintenance or servicing requires the removal of a
guard or safety feature, be sure to replace the guard
or safety feature before resuming operation of the
tool.
3. Use right tool.
Don’t force small tool or attachment to do the job of a
heavy-duty tool.
Don’t use tool for purpose not intended —for
example— don’t use circular saw for cutting tree
limbs or logs.
4. Handle tool correctly.
Do not drop or throw the tool.
5. Defi nitions for symbols.
V .................volts
—
................. direct current
no ................no load speed
---/min ..........revolutions or reciprocation per minute
Hz ................hertz
A ..................amperes
6. Keep all screws, bolts and covers tightly in place.
Keep all screws, bolts, and plates tightly mounted.
Check their condition periodically.
7. Do not use power tools if the plastic housing or
handle is cracked.
Cracks in the tool’s housing or handle can lead to
electric shock. Such tools should not be used until
repaired.
8. Blades and accessories must be securely
mounted to the tool.
Prevent potential injuries to yourself or others. Blades,
cutting implements and accessories which have been
mounted to the tool should be secure and tight.
9. Carefully handle power tools.
Should a power tool be dropped or struck against
hard materials inadvertently, it may be deformed,
cracked, or damaged.
5
English
00BookC18DBALNAmetabo.indb500BookC18DBALNAmetabo.indb52021/03/3017:20:562021/03/3017:20:56
If extension cord must be used make sure:
a. That blades of extension cord are the same
number, size, and shape as those of plug on
battery charger:
b. That extension cord is properly wired and in good
electrical condition; and
c. That wire size is large enough for AC ampere
rating of battery charger as specifi ed in Table 1.
Table 1
RECOMMENDED MINIMUM AWG SIZE FOR
EXTENSION CORDS FOR BATTERY CHARGERS
AC Input Rating Amperes* AWG Size of Cord
Equal to or
greater than
but less
than
Length of Cord, Feet (Meter)
25 (7.5) 50 (15) 100 (30) 150 (45)
0 2 18 18 18 16
2 3 18 18 16 14
3 4 18 18 16 14
Follow these instructions to avoid the risk of injury:
WARNING:
Improper use of the battery
or battery charger can lead to
serious injury. To avoid these
injuries:
1. NEVER disassemble the battery.
2. NEVER incinerate the battery, even if it is damaged or
is completely worn out. The battery can explode in a
fi re.
3. NEVER short-circuit the battery.
4. NEVER insert any objects into the battery charger’s
air vents. Electric shock or damage to the battery
charger may result.
5. NEVER charge outdoors. Keep the battery away
from direct sunlight and use only where there is low
humidity and good ventilation.
6. NEVER charge when the temperature is below 14°F
(-10°C) or above 104°F (40°C).
7. NEVER connect two battery chargers together.
8. NEVER insert foreign objects into the hole for the
battery or the battery charger.
9. NEVER use a booster transformer when charging.
10. NEVER use DC power to charge.
11. NEVER store the battery or battery charger in places
where the temperature may reach or exceed 104°F
(40°C) such as inside metal box or car.
12. NEVER expose the battery or battery charger to rain
or wet conditions
13. ALWAYS operate charger on standard household
electrical power (120 volts). Using the charger on any
other voltage may overheat and damage the charger.
14. ALWAYS wait at least 15 minutes between charges to
avoid overheating the charger.
15. ALWAYS disconnect the power cord from its
receptacle when the charger is not in use.
* If the input rating of a battery charger is given in watts
rather than in amperes, the corresponding ampere
rating is to be determined by dividing the wattage
rating by the voltage rating–for example:
1,250 watts
= 10 amperes
125 volts
8. Do not operate battery charger with damaged cord or
plug-replace them immediately.
9. Do not operate battery charger if it has received a
sharp blow, been dropped, or otherwise damaged in
any way; take it to a qualifi ed serviceman.
10. Do not disassemble battery charger and the battery;
take it to a qualifi ed serviceman when service or
repair is required. Incorrect reassembly may result in
a risk of electric shock or fi re.
11. You must charge the battery before you can use the
power tool.
12. To reduce risk of electric shock, unplug the charger
from the electrical outlet when not in use, as well as
before maintenance or cleaning.
IMPORTANT SAFETY INSTRUCTIONS
FOR USE OF THE BATTERY AND
BATTERY CHARGER
You must charge the battery before you can use the power
tool. Before using the model UC18YSL3 / UC18YFSL
battery charger, be sure to read all instructions and
cautionary statements on it, the battery and in this manual.
CAUTION
USE ONLY metabo HPT BATTERY TYPES BSL18
SERIES. OTHER TYPES OF BATTERIES MAY
BURST AND CAUSE INJURY!
6
English
00BookC18DBALNAmetabo.indb600BookC18DBALNAmetabo.indb62021/03/3017:20:562021/03/3017:20:56

CAUTION ON LITHIUM-ION BATTERY
To extend the lifetime, the lithium-ion battery equips with
the protection function to stop the output.
In the cases of 1 to 3 described below, when using this
product, even if you are pulling the switch, the motor may
stop. This is not the trouble but the result of protection
function.
1. When the battery power remaining runs out, the motor
stops.
In such case, charge it up immediately.
2. If the tool is overloaded, the motor may stop. In this
case, release the switch of tool and eliminate causes
of overloading. After that, you can use it again.
3. If the battery is overheated under overload work, the
battery power may stop.
In this case, stop using the battery and let the battery
cool. After that, you can use it again.
Furthermore, please heed the following warning and
caution.
WARNING
In order to prevent any battery leakage, heat generation,
smoke emission, explosion and ignition beforehand,
please be sure to heed the following precautions.
1. Make sure that swarf and dust do not collect on the
battery.
○
During work make sure that swarf and dust do not fall
on the battery.
○
Make sure that any swarf and dust falling on the power
tool during work do not collect on the battery.
○
Do not store an unused battery in a location exposed
to swarf and dust.
○
Before storing a battery, remove any swarf and dust
that may adhere to it and do not store it together with
metal parts (screws, nails, etc.).
2. Do not pierce battery with a sharp object such as a
nail, strike with a hammer, step on, throw or subject
the battery to severe physical shock.
3. Do not use an apparently damaged or deformed
battery.
4. Do not use the battery in reverse polarity.
5. Do not connect directly to an electrical outlets or car
cigarette lighter sockets.
6. Do not use the battery for a purpose other than those
specifi ed.
7. If the battery charging fails to complete even when a
specifi ed recharging time has elapsed, immediately
stop further recharging.
8. Do not put or subject the battery to high temperatures
or high pressure such as into a microwave oven,
dryer, or high pressure container.
9. Keep away from fi re immediately when leakage or foul
odor are detected.
10. Do not use in a location where strong static electricity
generates.
11. If there is battery leakage, foul odor, heat generated,
discolored or deformed, or in any way appears
abnormal during use, recharging or storage,
immediately remove it from the equipment or battery
charger, and stop use.
12. Do not immerse the battery or allow any fl uids to fl ow
inside. Conductive liquid ingress, such as water, can
cause damage resulting in fi re or explosion. Store your
battery in a cool, dry place, away from combustible
and fl ammable items. Corrosive gas atmospheres
must be avoided.
CAUTION
1. If liquid leaking from the battery gets into your eyes,
do not rub your eyes and wash them well with fresh
clean water such as tap water and contact a doctor
immediately.
If left untreated, the liquid may cause eye-problems.
2. If liquid leaks onto your skin or clothes, wash well with
clean water such as tap water immediately.
There is a possibility that this can cause skin irritation.
3. If you fi nd rust, foul odor, overheating, discolor,
deformation, and/or other irregularities when using
the battery for the fi rst time, do not use and return it to
your supplier or vendor.
WARNING
If an electrically conductive foreign object enters the
terminals of the lithium ion battery, a short-circuit may
occur resulting in the risk of fi re. Please observe the
following matters when storing the battery.
○
Do not place electrically conductive cuttings,
nails, steel wire, copper wire or other wire in the
storage case.
○
Either install the battery in the power tool or store
by securely pressing into the battery cover until
the ventilation holes are concealed to prevent
short-circuits (See Fig. 1).
7
English
00BookC18DBALNAmetabo.indb700BookC18DBALNAmetabo.indb72021/03/3017:20:562021/03/3017:20:56
REGARDING LITHIUM-ION BATTERY
TRANSPORTATION
When transporting a lithium-ion battery, please observe
the following precautions.
WARNING
Notify the transporting company that a package
contains a lithium-ion battery, inform the company
of its power output and follow the instructions of the
transportation company when arranging transport.
●
Lithium-ion batteries that exceed a power output
of 100 Wh are considered to be in the freight
classifi cation of Dangerous Goods and will
require special application procedures.
●
For transportation abroad, you must comply with
international law and the rules and regulations of
the destination country.
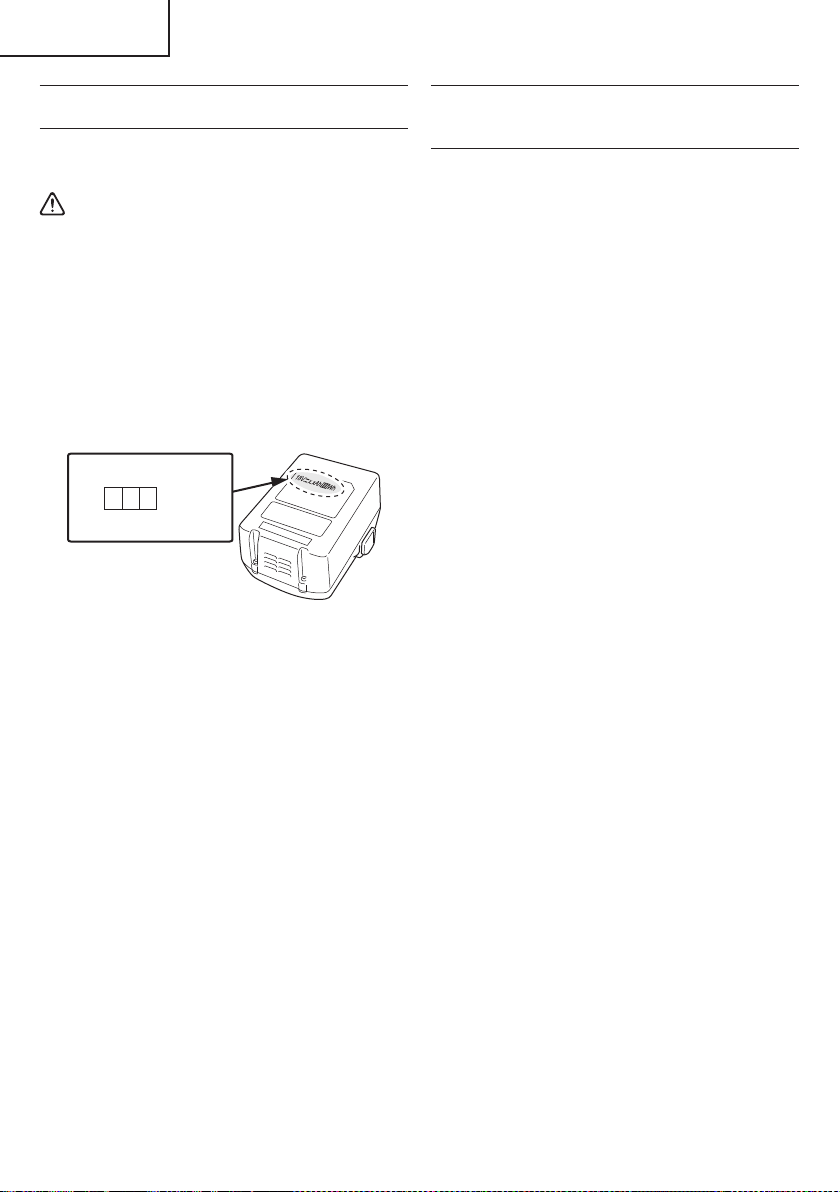
Wh
Power Output
2 to 3 digit number
Fig. 1
USB DEVICE CONNECTION
PRECAUTIONS
(ONLY WITH UC18YSL3 CHARGER)
When an unexpected problem occurs, the data in a USB
device connected to this product may be corrupted or lost.
Always make sure to back up any data contained in the
USB device prior to use with this product.
Please be aware that our company accepts absolutely no
responsibility for any data stored in a USB device that is
corrupted or lost, nor for any damage that may occur to a
connected device.
SAVE THESE INSTRUCTIONS
AND
MAKE THEM AVAILABLE TO OTHER USERS
AND
OWNERS OF THIS TOOL!
8
English
00BookC18DBALNAmetabo.indb800BookC18DBALNAmetabo.indb82021/03/3017:20:562021/03/3017:20:56
FUNCTIONAL DESCRIPTION
NOTE
The information contained in this Instruction Manual is designed to assist you in the safe operation and maintenance
of the power tool.
NEVER operate, or attempt any maintenance on the tool unless you have fi rst read and understood all safety
instructions contained in this manual.
Some illustrations in this Instruction Manual may show details or attachments that diff er from those on your own
power tool.
NAME OF PARTS
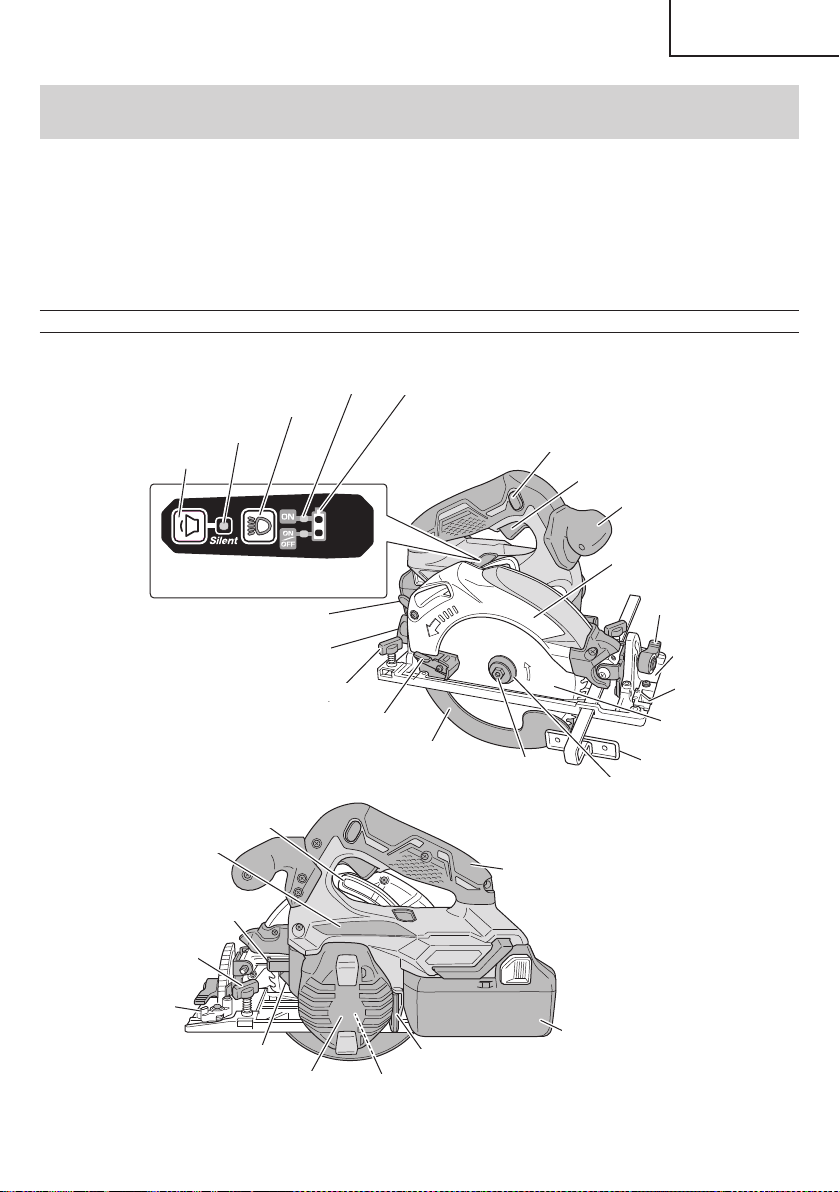
1. Cordless Circular Saw (C18DBAL)
Lock lever
Battery
(optional accessories)
LED Light
Hex. bar wrench 5 mm
Nameplate
Handle
Housing
Motor
(Inside the Housing)
Wing-bolt
Stopper lever
Link
Saw blade
Washer (B)
Base
Saw cover
Switch trigger
Lock-off button
Wing-bolt
Incline wing-nut
Cutting depth lever
Lower guard lever
Incline lever
Switch panel
Mode selector switch
Silent mode indicator lamp
Lighting mode switch
Lighting mode indicator lamp
Remaining battery indicator lamp
Guide piece
Sub handle
Lower guard
Hexagonal
fl ange bolt
Guide
Fig. 2
9
English
00BookC18DBALNAmetabo.indb900BookC18DBALNAmetabo.indb92021/03/3017:20:562021/03/3017:20:56
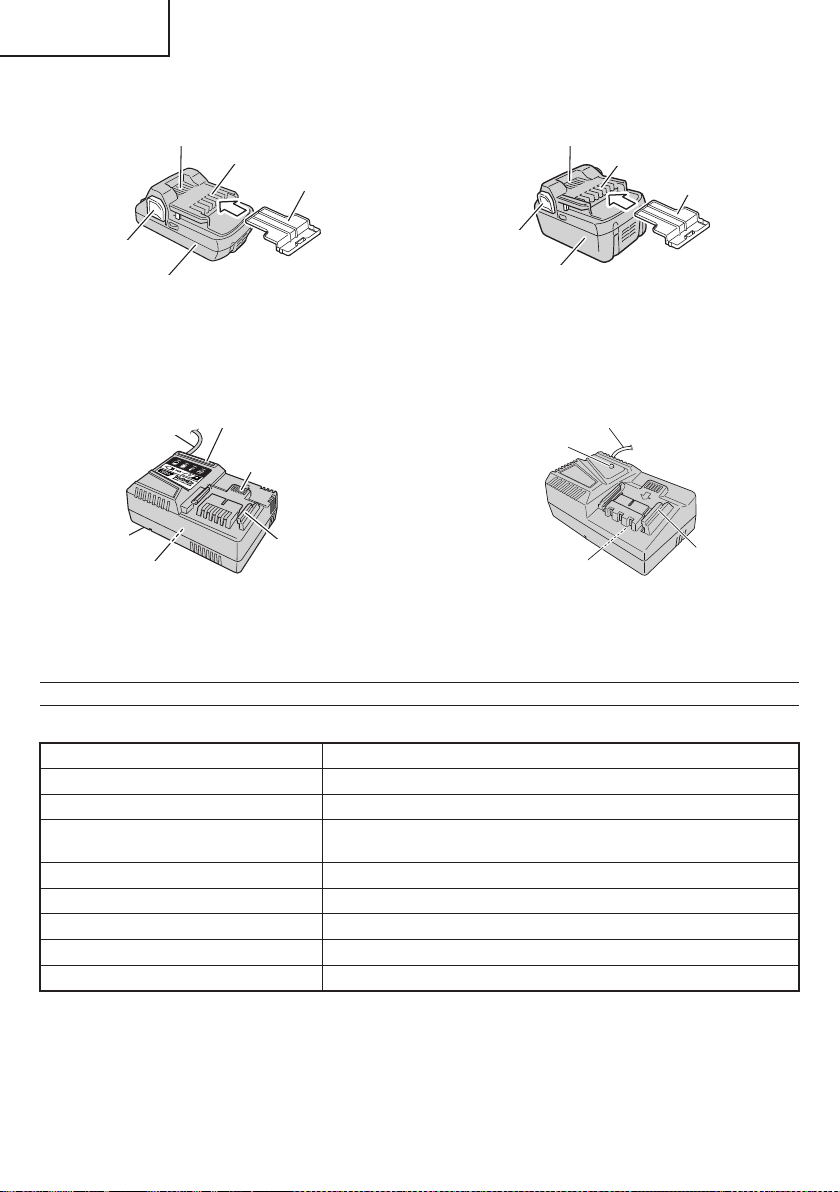
2. Battery (optional accessories)
Battery
Latch
Ventilation holes
Terminals
Battery cover
<BSL1830C>
Ventilation holes
Latch
Terminals
Battery cover
Battery
<BSL1860>
Fig. 3
3. Battery Charger (optional accessories)
<UC18YSL3>
Nameplate
Cord
Guide rail
Charge indicator lamp
Ventilation holes
Body
Nameplate
Guide rail
Cord
Pilot lamp
<UC18YFSL>
Fig. 4
SPECIFICATIONS
1. Cordless Circular Saw
Model C18DBAL
Voltage 18 V
Motor DC brushless motor
No-load speed
4,100 /min (Power mode)
2,500 /min (Silent mode)
Blade Size 6-1/2" (165 mm) D × 5/8" (15.9 mm) H × 1/16" (1.6 mm) T
Max. Cutting Depth at 90° 2-19/32" (66 mm)
Max. Cutting Depth at 45° 1-49/64" (45 mm)
Max. Blade Angle Adjustable -5°–45°
Weight (without battery) 6.0 lbs. (2.7 kg)
10
English
00BookC18DBALNAmetabo.indb1000BookC18DBALNAmetabo.indb102021/03/3017:20:562021/03/3017:20:56
2. Battery Charger (optional accessories)
Model UC18YSL3 UC18YFSL
Input power source Single phase: AC 120 V 60 Hz
Charging time
(At a temperature of 68°F (20°C))
BSL1860 : Approx. 38 min BSL1830C : Approx. 45 min
Charging voltage DC 14.4–18 V
Charging current DC 8.0 A DC 3.5 A
Weight 1.3 lbs. (0.6 kg) 1.1 lbs. (0.5 kg)
NOTE: The charging time may vary according to temperature and power source voltage.
Electronic control
○
Soft-start
○
Overload protection
This protection feature cuts off the power to the motor
in the event of overloading of motor or a conspicuous
reduction in rotational speed during operation.
When the overload protection feature has been
activated, the motor may stop.
In this case, release the tool switch and eliminate
causes of overloading.
After that you can use it again.
○
Overheat protection
This protection feature cuts off the power to the motor
and stops the power tool in the event of overheating of
motor during operation.
When the overheat protection feature has been
activated, the motor may stop.
In this case, release the tool switch and cool it down in
a few minutes.
After that you can use it again.
○
Rotation speed changeover function (Power mode /
Silent mode)
(Power mode / Silent mode switch function)
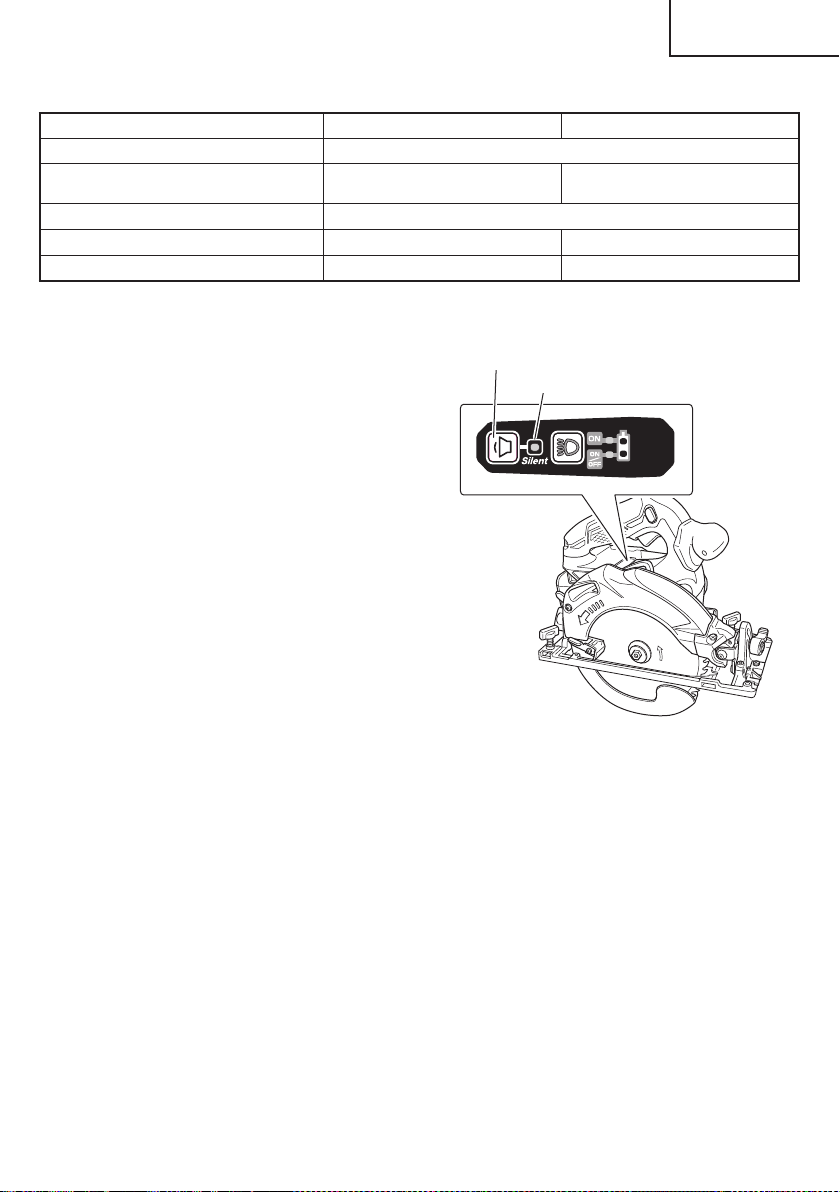
Each press of the Mode Selector Switch changes the
operating mode. (Fig. 5)
Mode selector switch
Silent mode indicator lamp
Fig. 5
Silent mode reduces maximum motor RPM enabling
effi cient work with less noise.
The Silent Mode Indicator Lamp lights in Silent mode.
When the load increases during Silent mode, the tool
will automatically switch to Power mode and revert
back to Silent mode when the load decreases.
In Power mode, no change is made to Silent mode
even when the load decreases.
NOTE
○
To enable mode changes, pull the switch once after
installing the battery.
○
Do not give a strong shock to the switch panel or
break it. It may lead to a trouble.
11
English
00BookC18DBALNAmetabo.indb1100BookC18DBALNAmetabo.indb112021/03/3017:20:572021/03/3017:20:57
APPLICATIONS
○
Cutting various types of wood.
REMOVAL AND INSTALLATION METHOD
OF BATTERY
○
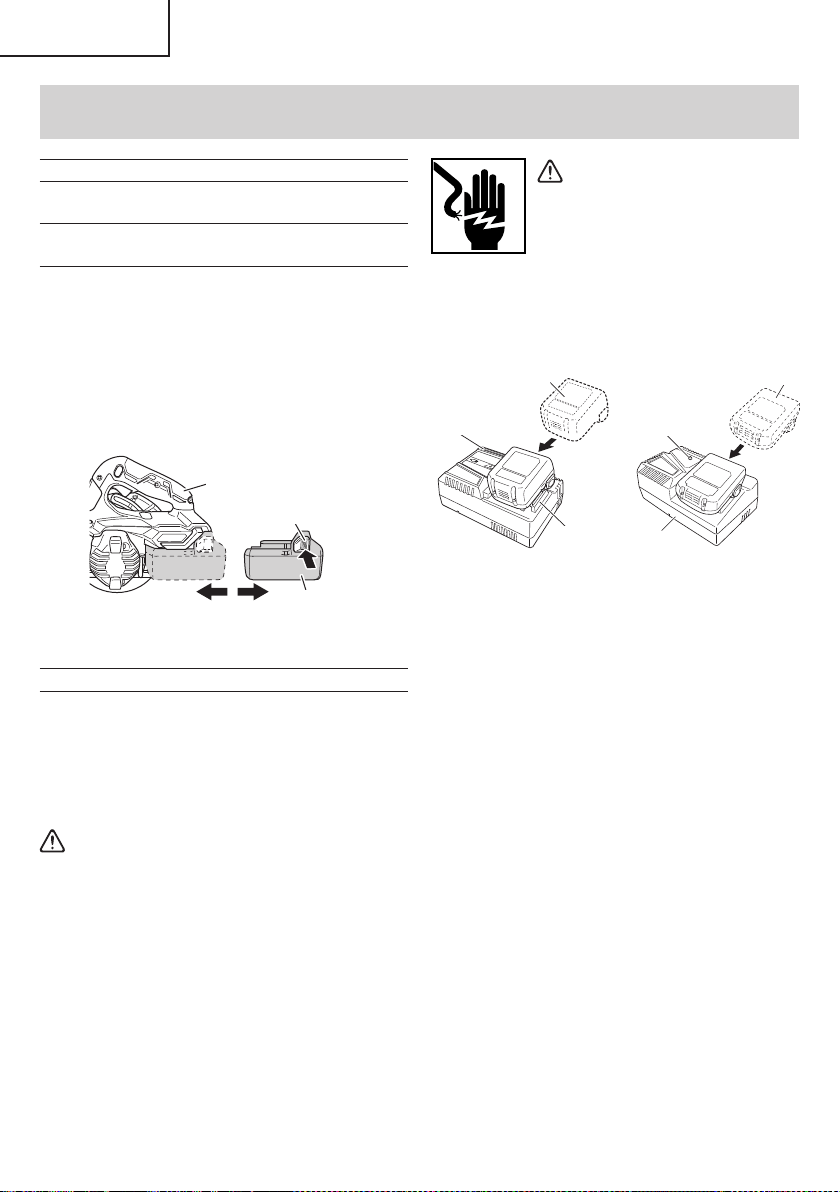
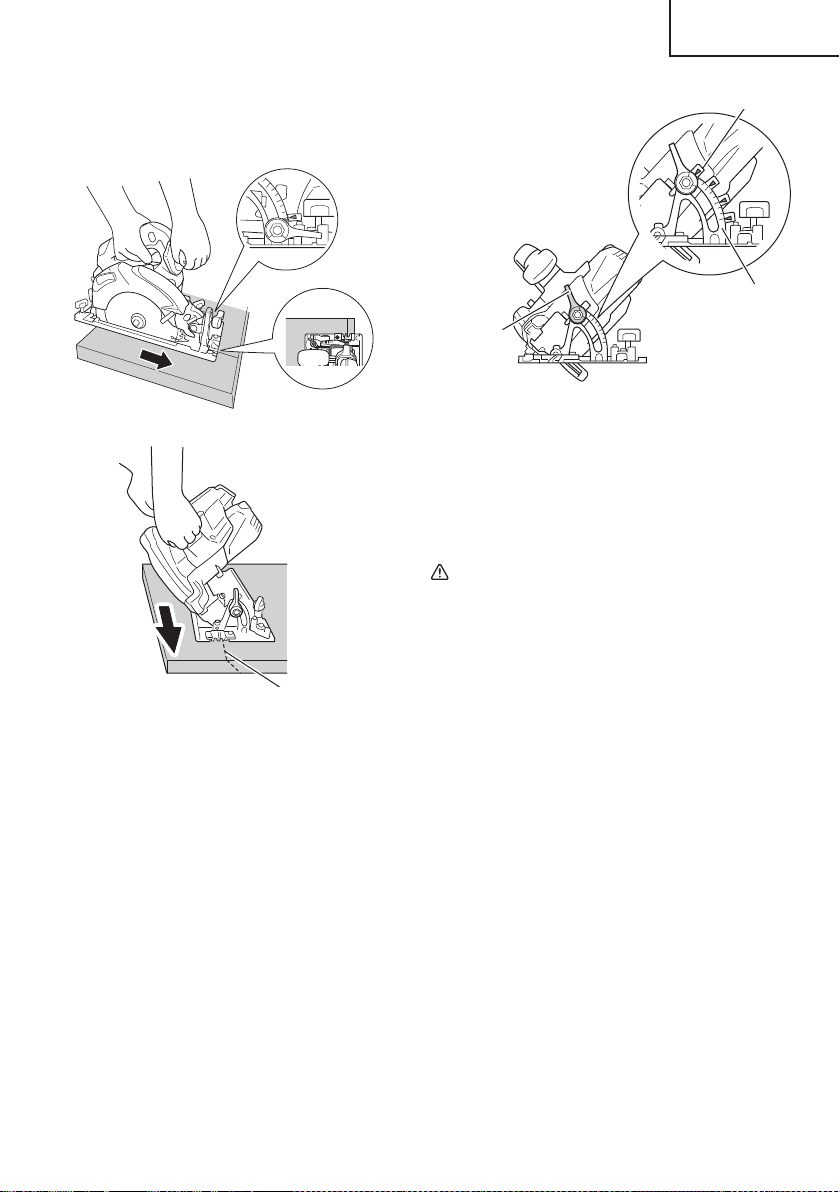
How to install the battery.
Align the battery with the groove in tool handle and
slip it into place.
Always insert it all the way until it locks in place with a
little click, If not, it may accidentally fall out of the tool,
causing injury to you or someone around you (Fig. 6).
○
How to remove the battery.
Withdraw battery from the tool handle while pressing
the latch (2 pcs) of the battery (Fig. 6).
Latch
Battery
Pull outInsert
Push
Handle
Fig. 6
CHARGING METHOD
NOTE
Before plugging into the receptacle, make sure the
following points.
○
The power source voltage is stated on the nameplate.
○
The cord is not damaged.
WARNING
Do not charge at voltage higher than indicated
on the nameplate.
If charged at voltage higher than indicated on the
nameplate, the charger will burn out.
1. <UC18YSL3>
Connect the charger’s power cord to a receptacle.
When the power cord is connected, the charge
indicator lamp will blink in red. (At 1-second intervals)
<UC18YFSL>
Connect the charger’s power cord to a receptacle.
When the power cord is connected, the pilot lamp will
blink in red. (At 1-second intervals)
WARNING
Do not use the electrical cord
if damaged. Have it repaired
immediately.
2. Insert the battery to the battery charger.
Firmly Insert the battery into the battery charger as
shown in Fig. 7.
<UC18YSL3>
Charge
indicator lamp
Guide rail
Battery
<UC18YFSL>
Charger
Battery
Pilot lamp
Fig. 7
3. Charging
<UC18YSL3>
When inserting a battery in the charger, the charge
indicator lamp will blink in blue.
When the battery becomes fully recharged, the
charge indicator lamp will light up in green. (See
Table 2-a)
●
Charge indicator lamp indication
The indications of the charge indicator lamp will be as
shown in Table 2-a, according to the condition of the
battery charger or the battery.
<UC18YFSL>
When the battery is inserted into the battery charger,
charging will commence and the pilot lamp will light in
red. (See Table 2-b)
NOTE
If the pilot lamp does not light or blink in red, pull out
the plug from the receptacle and check if the battery
is properly mounted.
When the battery is fully charged, the pilot lamp
will blink in red slowly. (At 1-second intervals) (See
Table 2-b)
ASSEMBLY AND OPERATION
12
English
00BookC18DBALNAmetabo.indb1200BookC18DBALNAmetabo.indb122021/03/3017:20:572021/03/3017:20:57
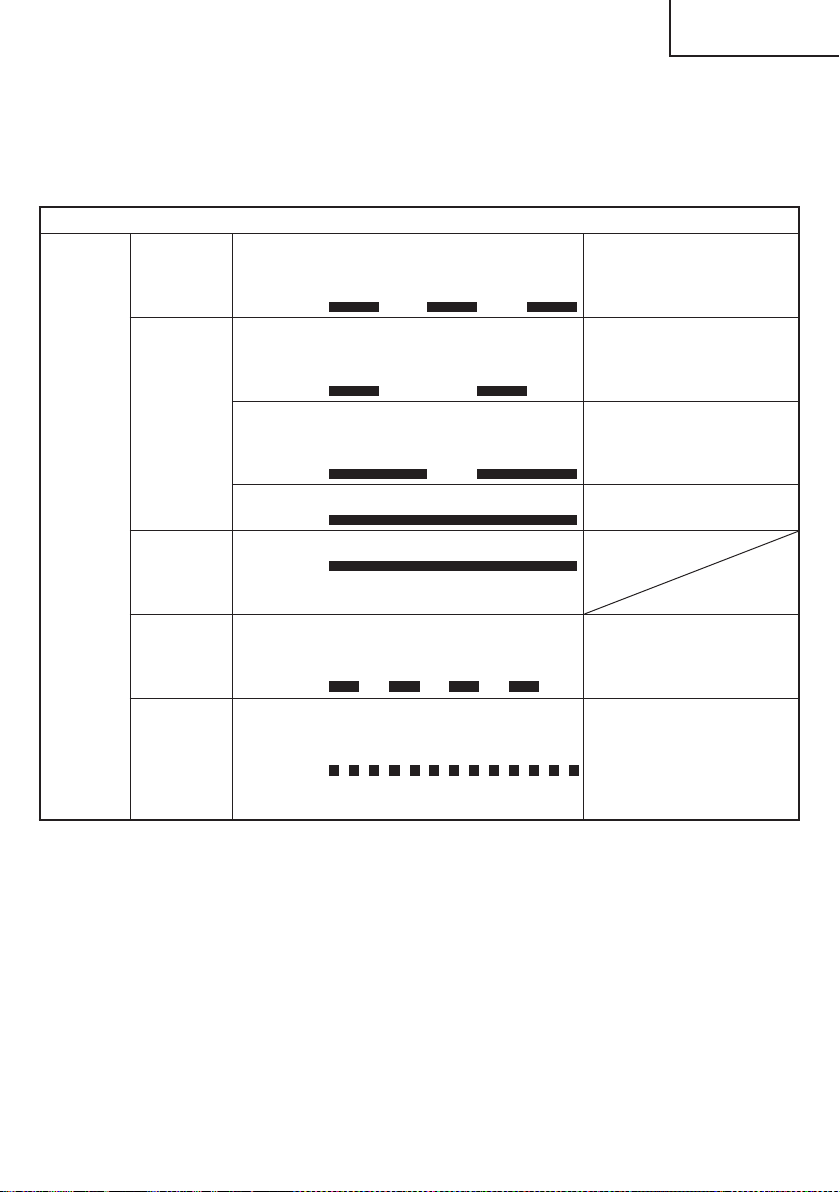
Table 2-a
Indications of the charge indicator lamp
Charge
indicator
lamp
(RED /
BLUE /
GREEN /
PURPLE)
Before
charging
Blinks
(RED)
Lights for 0.5 seconds. Does not light
for 0.5 seconds.
(off for 0.5 seconds)
Plugged into power source
While
charging
Blinks
(BLUE)
Lights for 0.5 seconds. Does not light
for 1 second.
(off for 1 second)
Battery capacity at less than
50%
Blinks
(BLUE)
Lights for 1 second. Does not light for
0.5 seconds.
(off for 0.5 seconds)
Battery capacity at less than
80%
Lights
(BLUE)
Lights continuously
Battery capacity at more than
80%
Charging
complete
Lights
(GREEN)
Lights continuously
(Continuous buzzer sound: about
6 seconds)
Overheat
standby
Blinks
(RED)
Lights for 0.3 seconds. Does not light
for 0.3 seconds.
(off for 0.3 seconds)
Battery overheated. Unable
to charge. (Charging will
commence when battery cools)
Charging
impossible
Flickers
(PURPLE)
Lights for 0.1 seconds. Does not light
for 0.1 seconds.
(off for 0.1 seconds)
(Intermittent buzzer sound: about
2 seconds)
Malfunction in the battery or the
charger
●
Pilot lamp indication
The indications of the pilot lamp will be as shown in
Table 2-b, according to the condition of the charger or
the rechargeable battery.
13
English
00BookC18DBALNAmetabo.indb1300BookC18DBALNAmetabo.indb132021/03/3017:20:582021/03/3017:20:58
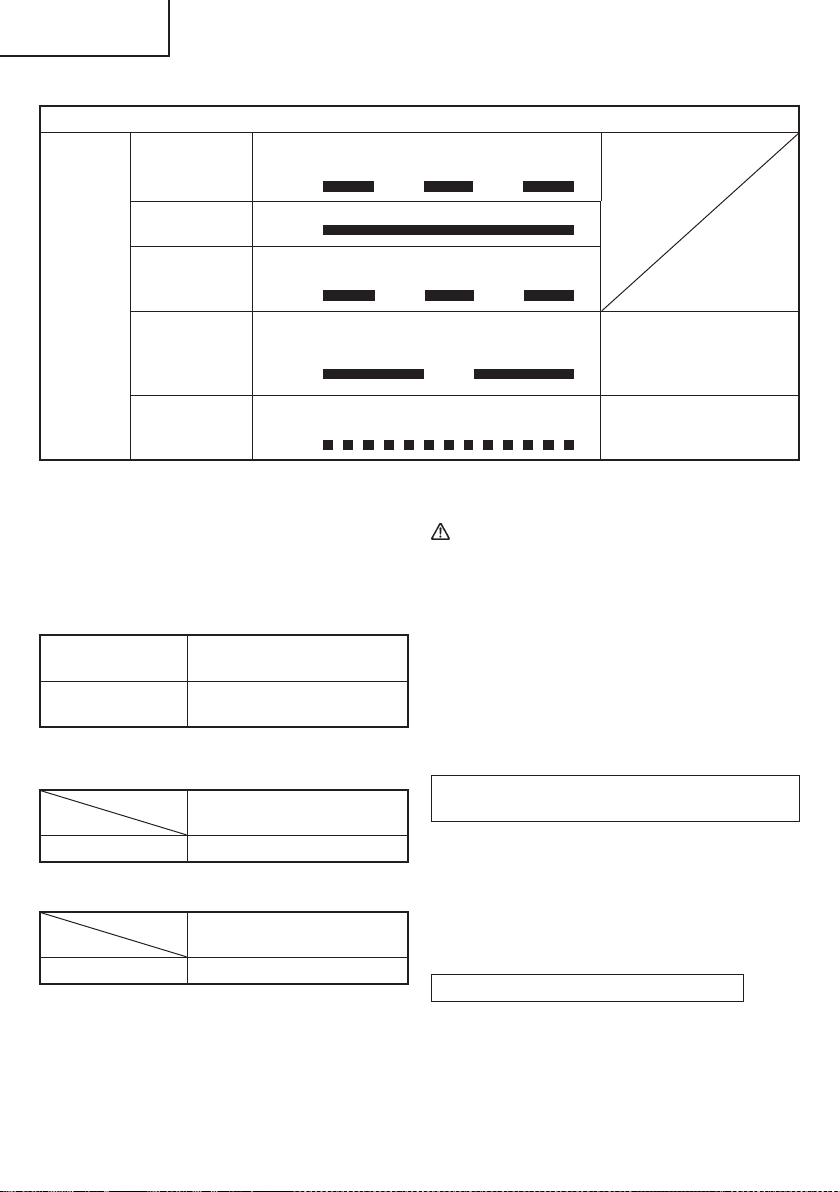
Table 2-b
Indications of the pilot lamp
Pilot lamp
(red)
Before charging Blinks
Lights for 0.5 seconds. Does not light for
0.5 seconds. (off for 0.5 seconds)
While charging Lights
Lights continuously
Charging
complete
Blinks
Lights for 0.5 seconds. Does not light for
0.5 seconds. (off for 0.5 seconds)
Overheat
standby
Blinks
Lights for 1 second. Does not light for
0.5 seconds. (off for 0.5 seconds)
Battery overheated.
Unable to charge.
(Charging will commence
when battery cools)
Charging
impossible
Flickers
Lights for 0.1 seconds. Does not light for
0.1 seconds. (off for 0.1 seconds)
Malfunction in the battery or
the charger
(1) Regarding the temperature of the rechargeable
battery.
The temperatures for rechargeable batteries are
as shown in the Table 3, and batteries that have
become hot should be cooled for a while before being
recharged.
Table 3
Rechargeable
batteries
Temperatures at which the
battery can be recharged
BSL1860, BSL1830C
32°F–122°F
( 0°C–50°C)
(2) Regarding recharging time (At 68°F (20°C))
Table 4 Charging time (UC18YSL3)
Charger
Battery
UC18YSL3
BSL1860 Approx. 38 min
Table 5 Charging time (UC18YFSL)
Charger
Battery
UC18YFSL
BSL1830C Approx. 45 min
NOTE
The recharging time may vary according to the
ambient temperature.
4. Disconnect battery charger from the receptacle.
CAUTION
Do not pull the plug out of the receptacle by
pulling on the cord.
Make sure to grasp the plug when removing from
receptacle to avoid damaging cord.
5. Remove the battery from the battery charger.
Supporting the battery charger with hand, pull out the
battery from the battery charger.
NOTE
Be sure to pull out the battery from the battery charger
after use, and then keep it.
Regarding electric discharge in case of new
batteries, etc.
As the internal chemical substance of new batteries
and batteries that have not been used for an extended
period is not activated, the electric discharge might
be low when using them the fi rst and second time.
This is a temporary phenomenon, and normal time
required for recharging will be restored by recharging
the batteries 2–3 times.
How to make the batteries perform longer
(1) Recharge the batteries before they become
completely exhausted.
When you feel that the power of the tool becomes
weaker, stop using the tool and recharge its battery.
If you continue to use the tool and exhaust the electric
current, the battery may be damaged and its life will
become shorter.
14
English
00BookC18DBALNAmetabo.indb1400BookC18DBALNAmetabo.indb142021/03/3017:20:582021/03/3017:20:58
(2) Avoid recharging at high temperatures.
A rechargeable battery will be hot immediately after
use. If such a battery is recharged immediately after
use, its internal chemical substance will deteriorate,
and the battery life will be shortened. Leave the
battery and recharge it after it has cooled for a while.
CAUTION
●
When the battery charger has been continuosly
used, the battery charger will be heated, thus
constituting the cause of the failures. Once the
charging has been completed, give 15 minutes
rest until the next charging.
●
If the battery is charged while it is heated
because it has been left for a long time in a
location subject to direct sunlight or because
the battery has just been used, the pilot lamp
of UC18YFSL charger lights for 1 second, does
not light for 0.5 seconds (off for 0.5 seconds) or
the charge indicator lamp of UC18YSL3 charger
lights for 0.3 seconds, does not light for 0.3
seconds (off for 0.3 seconds). In such a case,
fi rst let the battery cool, then start charging.
●
When the charge indicator lamp fl ickers (at
0.2-second intervals), check for and take out
any foreign objects in the charger’s battery
installation hole. If there are no foreign objects,
it is probable that the battery or charger is
malfunctioning. Take it to your authorized
Service Center.
HOW TO RECHARGE USB DEVICE
(ONLY WITH UC18YSL3 CHARGER)
WARNING
○
Prior to use, check the connecting USB cable for
any defect or damage.
Using a defective or damaged USB cable can
cause smoke emission or ignition.
○
When the product is not being used, cover the
USB port with the rubber cover.
Buildup of dust etc. in the USB port can cause
smoke emission or ignition.
NOTE
○
The time required for charging will be longer when
a USB device and battery are being simultaneously
charged.
○
There may be an occasional pause during USB
recharging.
○
When a USB device is not being charged, turn the
USB power switch OFF and remove the USB device
from the charger.
Failure to do so may not only reduce the battery life
of a USB device, but may also result in unexpected
accidents.
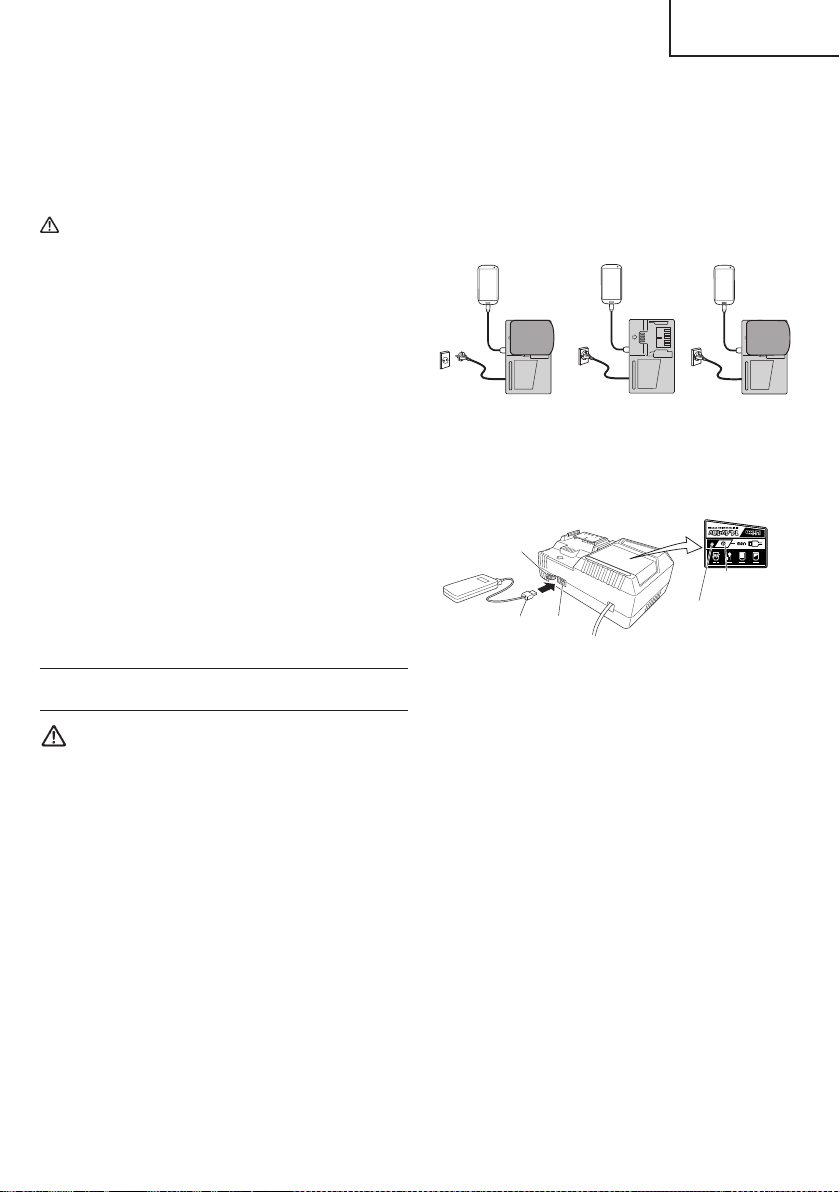
(1) Select a charging method
Depending on the charge method selected, either the
battery is inserted into the charger or the power cord
is plugged into an outlet.
○
Charging a USB device by battery (Fig. 8-a)
○
Charging a USB device from a electrical outlet
(Fig. 8-b)
○
Charging a USB device and battery from a
electrical outlet (Fig. 8-c)
abc
Fig. 8
(2) Turn the USB power switch ON (Fig. 9)
When you turn the USB power switch ON, the USB
power indicator lamp will light up.
USB power
switch
USB power
indicator lamp
Rubber cover
USB port
USB cable
Fig. 9
(3) Connect the USB cable. (Fig. 9)
Pull back the rubber cover and fi rmly plug in a
commercially available USB cable (appropriate to the
device being charged) into the USB port.
○
When the power cord is not plugged into an outlet and
the battery runs out of power, power output will stop
and the USB power indicator lamp will shut off .
○
When the USB power indicator lamp goes out, change
the battery or plug the power cord into an electrical
outlet.
(4) When charging is completed
○
The USB power indicator lamp will not go out when a
USB device has been completely charged.
To verify charge status, check the USB device.
○
Turn the USB power switch OFF and unplug the power
cord from the electrical outlet. (Fig. 9)
○
Remove the battery from the charger and place the
rubber cover over the USB port.
15
English
00BookC18DBALNAmetabo.indb1500BookC18DBALNAmetabo.indb152021/03/3017:20:582021/03/3017:20:58
PRIOR TO OPERATION
CAUTION
To avoid serious accident, ensure the switch is in
the OFF position, and pull out the battery.
1. Check the work area environment
Check the work area to make sure that it is clear of
debris and clutter.
Clear the area of unnecessary personnel. Ensure that
lighting and ventilation is adequate.
2. Mounting the Saw Blade (Fig. 10)
WARNING
If the Hexagonal fl ange bolt is worked using other
tools than the provided hex. wrench, excessive
tightening and insuffi cient tightening may take
place, resulting in injury.
(1) Thoroughly remove any sawdust which has
accumulated on the spindle, bolt and washers.
(2) Apply quality machine oil to the surfaces of washers
(B) and (A) which come into contact with the blade.
(3) As shown in Fig. 10, one side of the saw blade should
be fi tted to the projecting center of washer (A) which
matches the blade’s inner diameter, and the other
side to the concave side of washer (B).
(4) To ensure that the saw blade rotates in the correct
direction, make sure the arrow on the saw blade
points in the same direction indicated by the arrow on
the saw cover.
(5) Using the fi ngers, tighten the Hexagonal fl ange bolt
securing the saw blade as much as possible. Then
press the lock button, lock the spindle, and fully tighten
the Hexagonal fl ange bolt with the hex. wrench.
Hexagonal
fl ange bolt
Washer (A)
Spindle
Washer (B)
Concave
Saw blade
Fig. 10
CAUTION
After mounting the saw blade, reconfi rm that the
lock button is fi rmly secured in the prescribed
position.
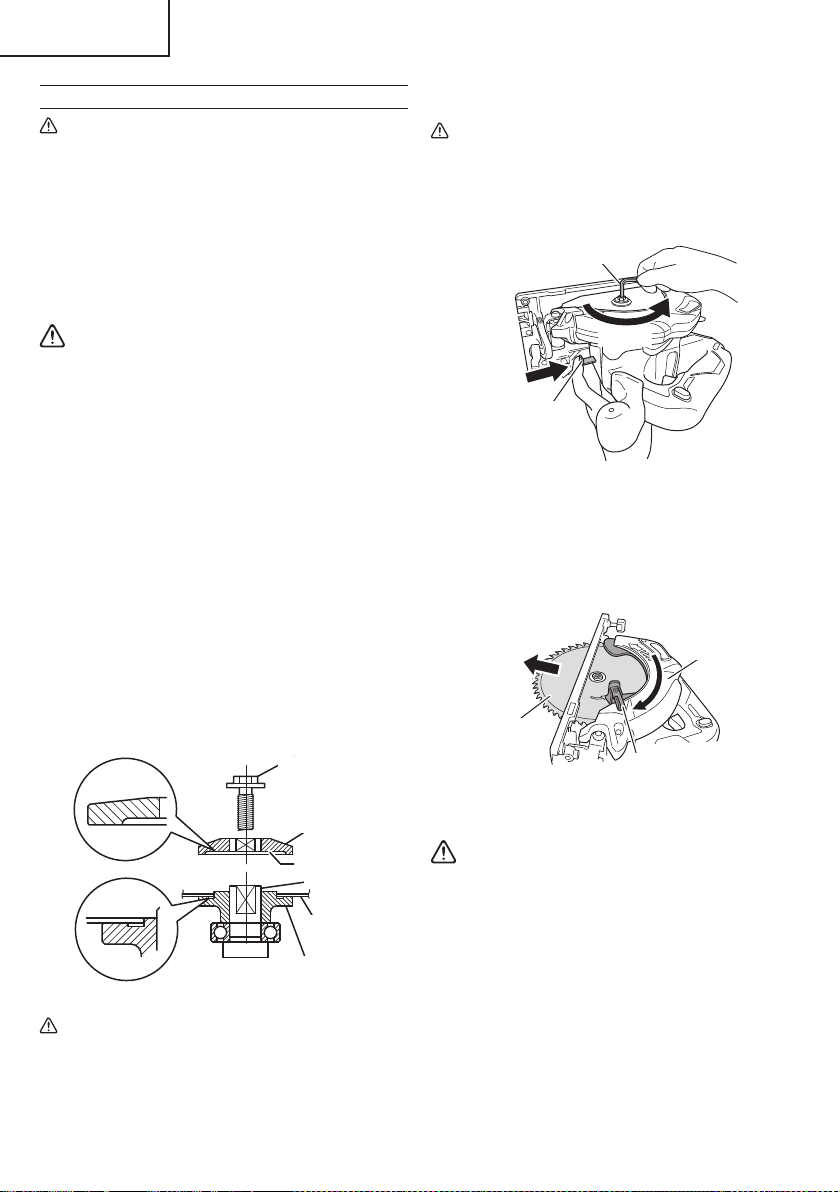
3. Dismounting the saw blade
CAUTION
Never touch the saw blade immediately after use.
The metal is hot and can easily burn your skin.
(1) Set the cutting volume at maximum, and place the
Circular Saw as shown in Fig. 11.
Hex. bar wrench 5 mm
Lock lever
Loosen
Fig. 11
(2) Depress the lock lever, lock the spindle, and remove
the Hexagonal fl ange bolt and washer (B) with the
hex. bar wrench 5 mm.
(3) While holding the lower guard lever to keep the lower
guard fully retracted into the saw cover, remove the
saw blade (Fig. 12).
Lower guard lever
Saw cover
Saw blade
Fig. 12
4. Check performance of lower guard
WARNING
Make absolutely sure that the lower guard is not
fi xed. Also, check and see if it can move smoothly.
If the saw blade is kept exposed, injury can result.
The lower guard (refer to Fig. 2) serves to protect your
body from coming into contact with the saw blade.
Make absolutely certain that the cover smoothly
performs to cover the saw blade. If the lower guard
should not move smoothly, never use it without
repairing it.
In such a case, get in touch with the store where
you bought the circular saw or the metabo HPT
AUTHORIZED SERVICE CENTER for necessary repair.
16
English
00BookC18DBALNAmetabo.indb1600BookC18DBALNAmetabo.indb162021/03/3017:20:582021/03/3017:20:58
5. Check for proper operation of the brake
This circular saw features an electric brake that
functions when the switch is released. Before using
the circular saw, ensure that the electric brake
functions properly. If it does not, bring the tool to a
metabo HPT AUTHORIZED SERVICE CENTER.
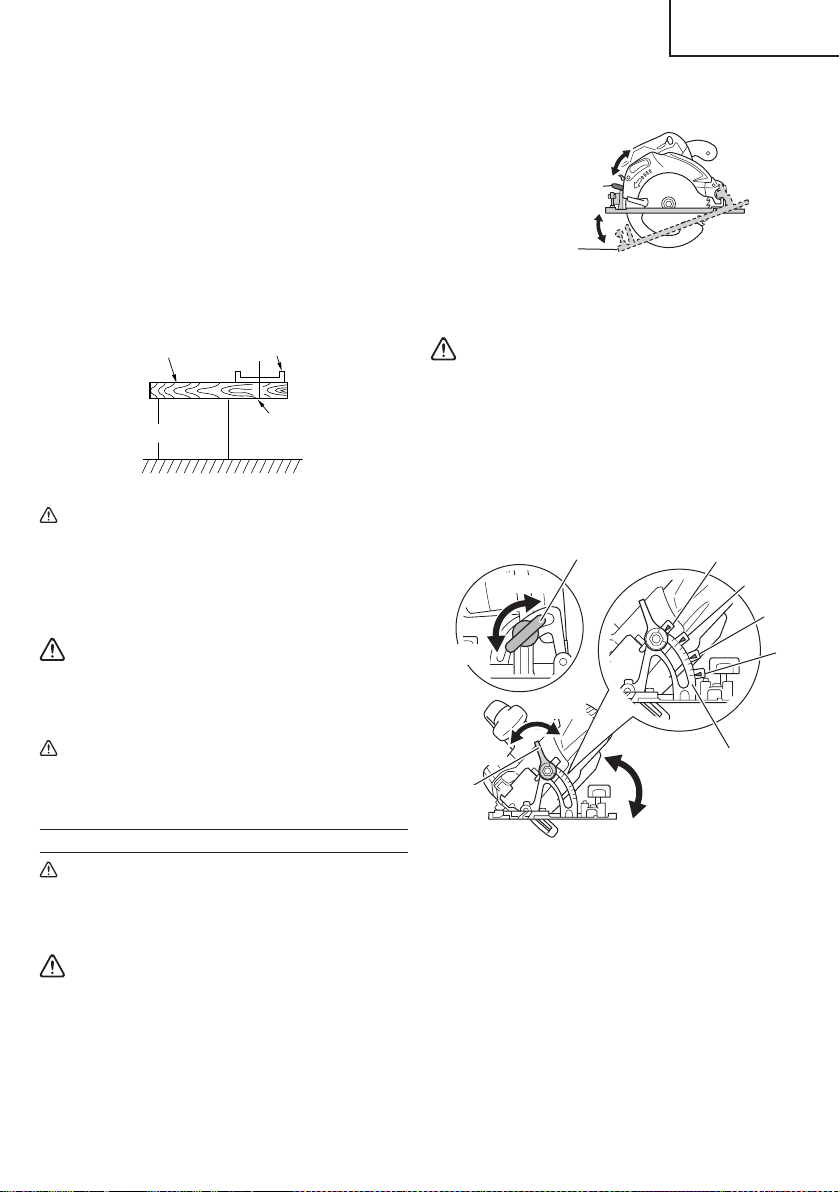
6. Prepare a wooden work bench (Fig. 13)
Since the saw blade will extend beyond the lower
surface of the lumber, place the lumber on a work
bench when cutting. If a square block is utilized
as a work bench, select level ground to ensure it is
properly stabilized. An unstable work bench will result
in hazardous operation.
BaseLumber
Work bench
Saw blade
Fig. 13
CAUTION
To avoid possible accident, always ensure that
the portion of lumber remaining after cutting is
securely anchored or held in position.
7. Check battery insertion
WARNING
If the battery is inserted while the power switch
is in the ON position, the power tool will start
operating immediately, inviting serious accident.
CAUTION
Until the battery locks in place with a little click,
if not, it may accidentally fall out of the tool
causing injury to you or someone around you.
ADJUSTING THE SAW PRIOR TO USE
CAUTION
Pull out battery before doing any adjusting.
1. Adjusting the cutting depth (Fig. 14)
WARNING
If the lever is loose, injury can result. Tighten it
securely after adjustment.
To adjust cutting depth, loosen the cutting depth lever
and, while holding the base with one hand, move
the main body up and down to obtain the prescribed
cutting depth.
After adjusting to the prescribed cutting depth, tighten
the cutting depth lever securely.
Cutting depth lever
Base
Tighten
Loosen
Fig. 14
2. Adjusting the angle of inclination
WARNING
If the wing-nut is loose, injury can result. Tighten
it securely after adjustment.
You can incline saw blade from -5° to a maximum
angle of 45° in relation to the base.
As shown in Fig. 15 by loosening the incline lever
on the inclined gauge and incline wing-nut, the saw
blade may be inclined to a maximum angle of 45° in
relation to the base.
15
30
0
Incline wing-nut
Incline
lever
Tighten
Loosen
Inclined gauge
45°
30°
15°
0°
Tighten
Loosen
Fig. 15
To use at an angle of -5°, fi rst loosen the cutting depth
lever and minimize the cutting depth of the saw blade.
Next, loosen the incline lever and the incline wing-nut,
turning the stopper lever in the direction indicated
as A (Fig. 16). Tilting the main unit in the direction
indicated as B, fasten the unit with the incline lever
and incline wing-nut (Fig. 17).
17
English
00BookC18DBALNAmetabo.indb1700BookC18DBALNAmetabo.indb172021/03/3017:20:592021/03/3017:20:59
Incline wing-nut
Incline lever
Loosen
A
Loosen
Stopper lever
Fig. 16
Tighten
Tighten
Incline wing-nut
Incline lever Stopper lever
B
Fig. 17
Always ensure that the wing-nut is thoroughly
tightened after making the desired adjustment.
NOTE
Values of the inclined gauge provided on the base
merely serve as a rough guideline. For cutting
operation at an inclined precise angle, use the circular
saw after adjusting the angle between the base and
the saw blade with a protractor, etc.
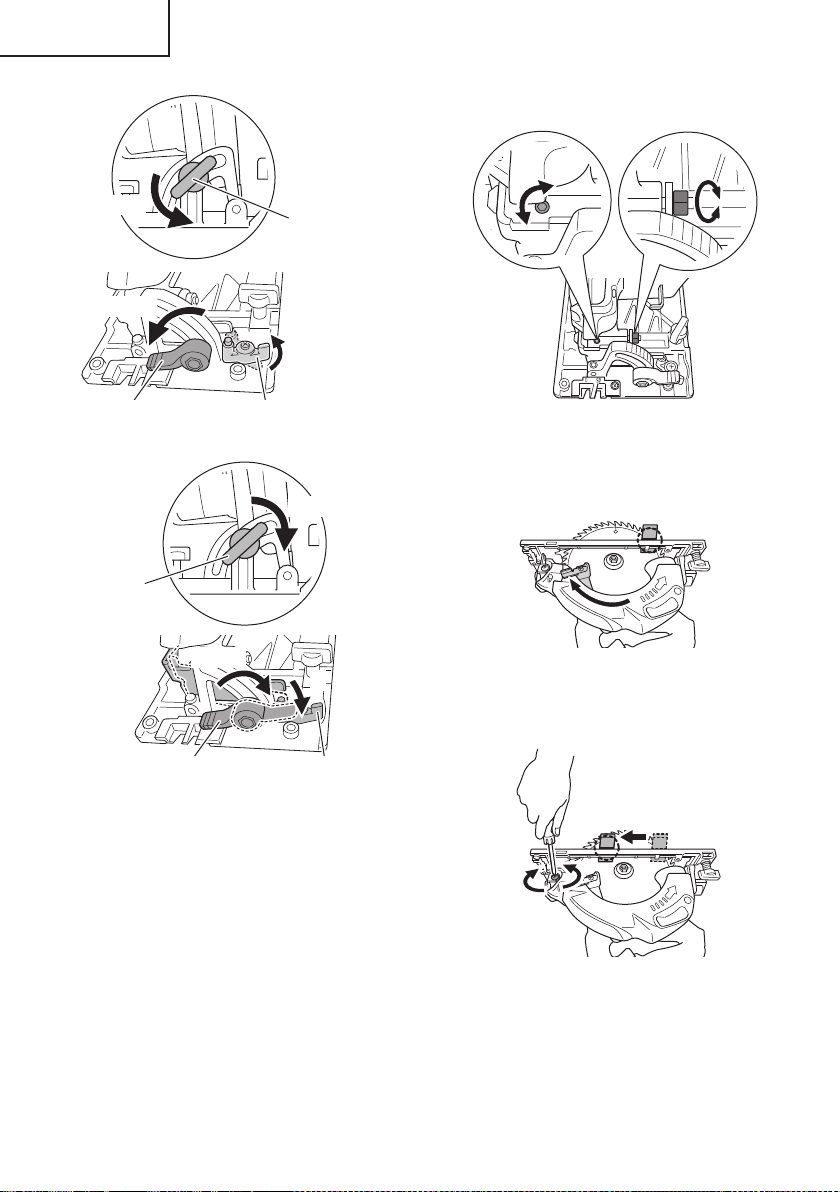
3. Fine tuning of parallelism
It is possible to fi ne-tune the parallelism of the saw
blade to the base using the parallelism adjustment
screw.
Adjustment has already been made at the time of
shipment from the factory. However, in the unlikely
event of parallelism being faulty, adjust as follows.
(1) Unfasten only the mounting screws of the saw cover
hinge portion (Fig. 18).
5
Fig. 18
(2) Retract the lower guard into the saw cover.
(3) Insert wood chip in the rear side of the saw blade
base, and mark the position on the base (Fig. 19).
Fig. 19
(4) Move the marked wood chip to the front of the base,
and turn the parallelism adjustment screw so that the
marking corresponds to the base side (Fig. 20).
Fig. 20
NOTE
After parallelism adjustment, if the saw cover hinge
portion is loose, tighten the M5 U-Nut. Do not over
tighten the nut as this may result in deformation of the
bevel plate.
18
English
00BookC18DBALNAmetabo.indb1800BookC18DBALNAmetabo.indb182021/03/3017:20:592021/03/3017:20:59
(5) After adjustment, fasten the mounting screws tightly
in place.
NOTE
Parallelism may be slightly faulty if the cutting depth is
adjusted after parallelism adjustment.
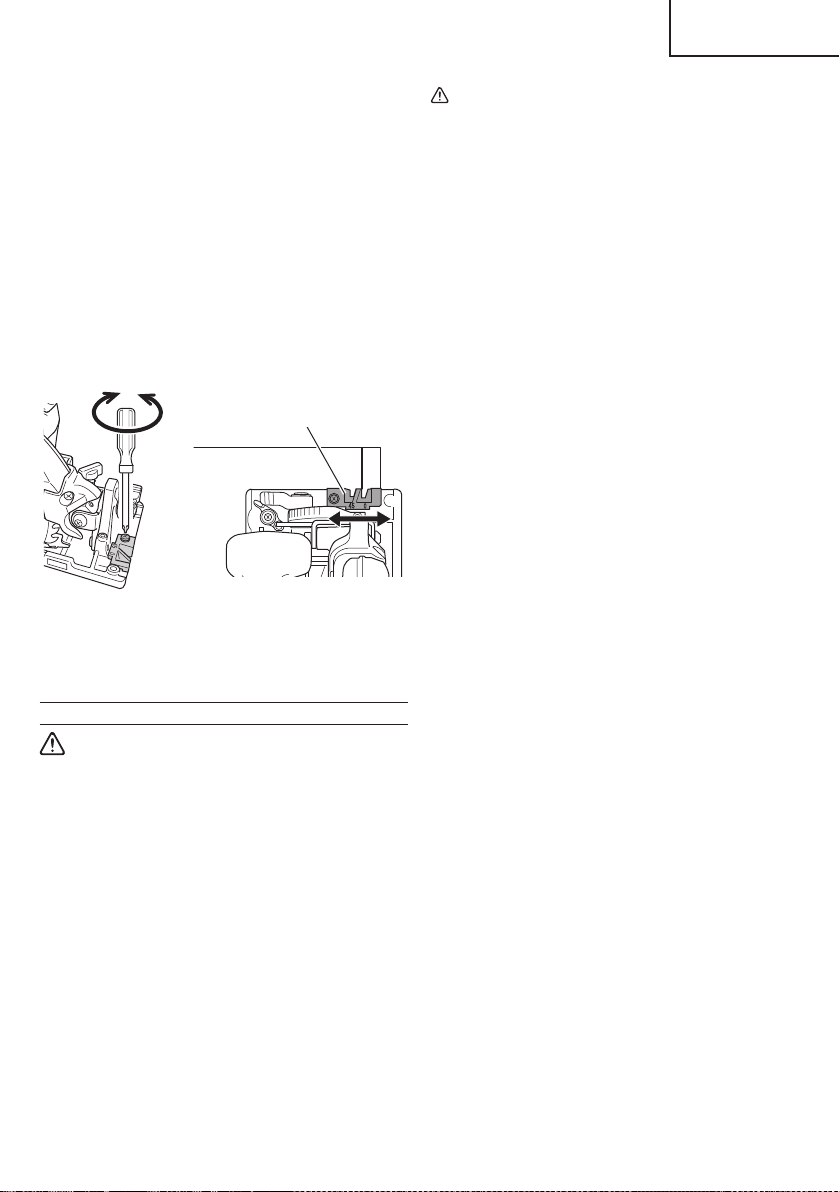
4. Adjusting the guide piece
On the circular saw, it is possible to make fi ne
adjustment of the fi xing position of the guide piece,
where the saw blade and the premarked line are to be
aligned.
When the saw is shipped from the factory, the linear
portion of a front scale on the guide piece is aligned
with the central position of the saw blade (Fig. 21).
Guide piece
Fig. 21
Loosen the fi xed M4 screw on the guide piece, should
the fi xing position be wrong, and make necessary
adjustment of the position.
OPERATION
WARNING
●
Never touch the moving parts.
●
Never operate the circular saw with the saw
blade turned upward or to the side.
●
Do not fi x and secure the lock-off button.
Besides, keep your fi nger off the switch trigger
when the circular saw is being carried around.
Otherwise, the main body switch can be
inadvertently turned ON, resulting in unexpected
accidents.
●
Keep the light ON during cutting operation only.
If it is lit ON in other cases, the main body switch
can be inadvertently turned ON, resulting in
unexpected accidents.
●
Do not use any abrasive wheels.
●
Use only blade diameter specifi ed on the product
nameplate.
CAUTION
●
Don’t remove circular saw from workpiece during
a cut while the saw blade is moving.
●
Pull out the battery after completing operation.
●
Do not look directly into the light from the LED
light. Continuous and direct exposure to the light
from the LED light can injure your eyes.
●
To extend the lifetime, the lithium-ion battery
equips with the protection function to stop the
output. Therefore, if the tool is overloaded, the
motor may stop. However, this is not the trouble
but the result of protection function. In this case,
release the switch of tool and eliminate the
causes of overloading.
●
Before use, check to see if the lock-off button
moves smoothly.
NOTE
Take care not to lock the motor. If the motor is locked,
immediately turn the power off . If the motor is locked
for a while, the motor or battery may be burnt.
1. Check if saw blade is tightened
While the saw blade is tightened securely for
immediate use when it is assembled at the factory,
be sure to check it out again for caution’s sake. A
bolt can be tightened when it is turned clockwise.
Use the provided hex. bar wrench 5 mm to check it
out. For further details, refer to the item of [PRIOR TO
OPERATION] on Page 16.
2. Check if the lever is tightened
If the lever to adjust cutting depth (Fig. 14) is loose,
injury can result. Make sure that it is tightened
securely.
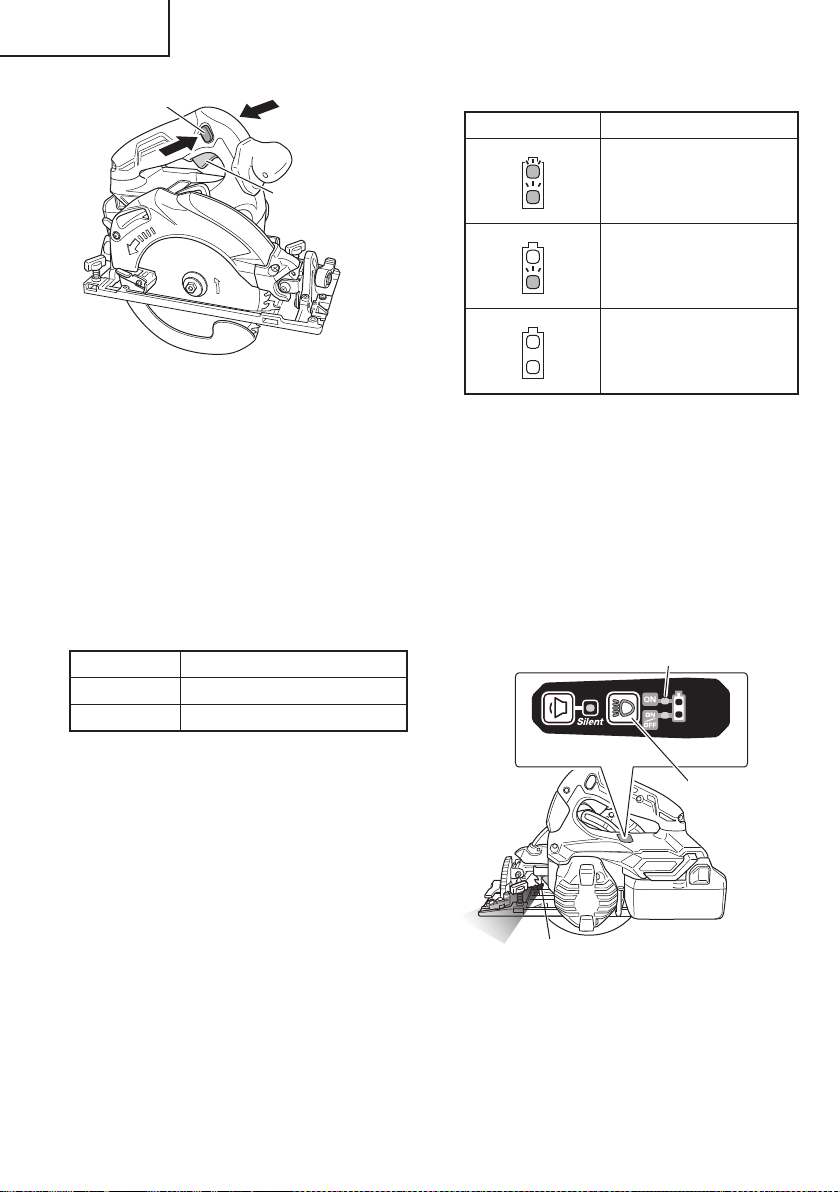
3. Operation of switch (Fig. 22)
(switch trigger and light switch)
For safe operation of the machine, a “lock-off button”
is provided on the side of a handle.
If the “switch trigger” is pulled in a state where “lock-
off button” is pressed in the direction of the arrow
mark, the main switch can be turned ON.
After the switch is on, the saw blade will continue to
operate as long as you pull on the switch trigger, even
if you release the lock-off button. Also, the LED light
will remain lit for Always-ON mode as well as during
SW interlocked mode.
19
English
00BookC18DBALNAmetabo.indb1900BookC18DBALNAmetabo.indb192021/03/3017:20:592021/03/3017:20:59
Switch trigger
Lock-off button
Fig. 22
4. About the mode select function
Each time the mode selector switch is pushed, the
operation mode changes.
When Silent mode is selected, the Silent mode
indicator lamp lights up.
Silent mode reduces maximum motor RPM enabling
effi cient work with less noise.
If the load increases while the motor is operating in
Silent mode, it automatically changes to Power mode.
Additionally, if the load decreases again, it
automatically returns to Silent mode.
In Power mode, no change is made to Silent mode
even when the load decreases.
Mode No-load speed
Power 4,100 /min
Silent 2,500 /min
NOTE
●
The mode will only change after a battery is installed
and the switch is pulled once.
●
The current mode will be maintained even if the switch
is on/off , or the battery is removed/reinserted.
5. About Remaining Battery Indicator
Remaining battery power can be verifi ed by pulling
on the switch to make the remaining battery indicator
lamp light up red. (Fig. 22)
The indicator lamp will change to the lighting mode
indicator lamp (green) 10 seconds after the switch is
released. The Table 6 shows the state of remaining
battery indicator lamp and the battery remaining
power.
Table 6
State of lamp Battery Remaining Power
The battery remaining power
is enough.
The battery remaining power
is a half.
The battery remaining power
is nearly empty.
Re-charge the battery
soonest possible.
As the remaining battery indicator shows somewhat
diff erently depending on ambient temperature and
battery characteristics, read it as a reference.
6. How to use the LED light
By pressing the lighting mode switch on the switch
panel, the LED light mode changes as Table 7. It is
indicated by green lamp. (Fig. 23)
Pulling the switch changes the indicator lamp to the
remaining battery indicator lamp (red).
To prevent the battery power consumption, turn off the
LED light frequently.
Lighting mode indicator lamp
Switch panel
Lighting
mode switch
LED Light
Fig. 23
20
English
00BookC18DBALNAmetabo.indb2000BookC18DBALNAmetabo.indb202021/03/3017:20:592021/03/3017:20:59
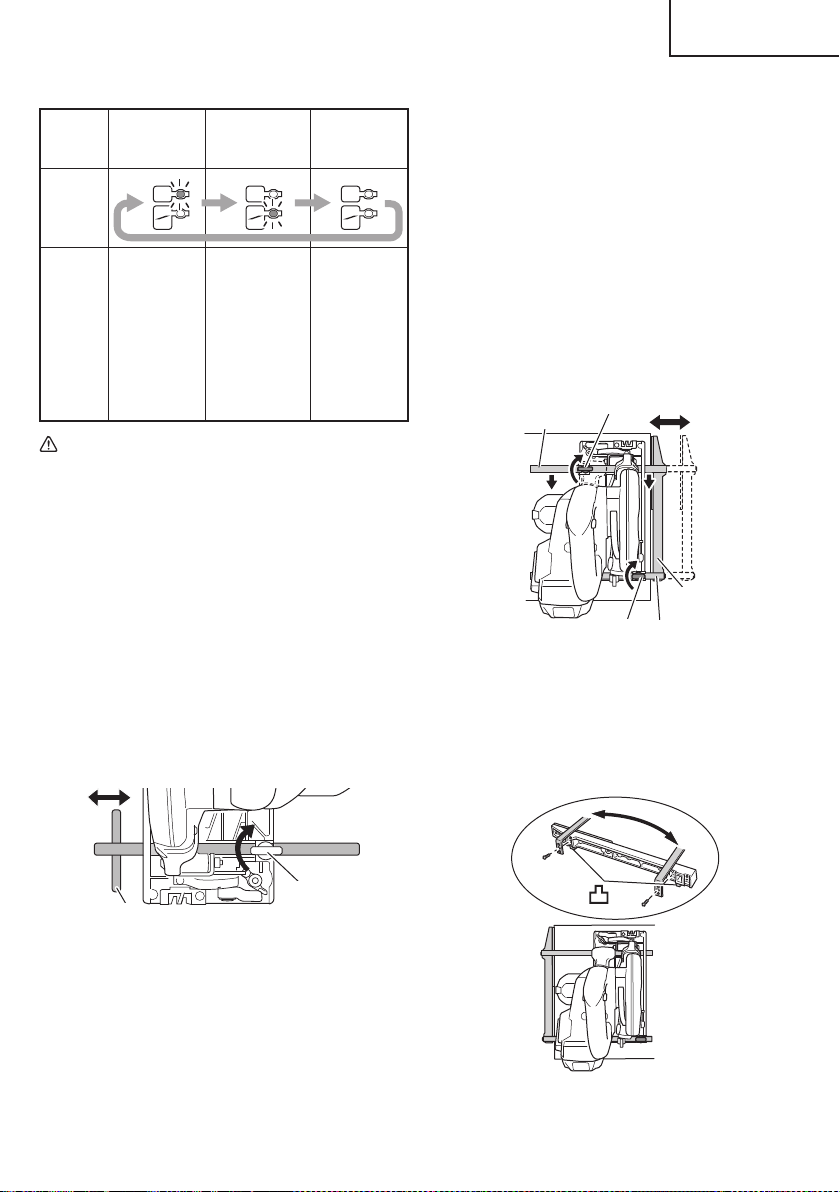
Table 7
Always-ON
mode
SW
interlocked
mode
Always-OFF
mode
Panel
display
State
Always ON
(turn off after
2 minutes)
Light only
SW-ON
(Automatically
goes out
approximately
10 seconds
after the
switch is
released)
Always OFF
CAUTION
Wipe off any dirt or grime attached to the lens of
the LED light with a soft cloth, being careful not
to scratch the lens.
Scratches on the lens of the LED light can result
in decreased brightness.
NOTE
To prevent the battery power consumption caused by
forgetting to turn off the LED light, the light goes off
automatically in about 2 minutes.
7. Attaching the guide (sold separately)
Slide the guide through the front hole on the side of
the base (the cut-off side). Move the guide to the right
or left to adjust the cutting position, and tighten the
wing-bolt at the front to fasten the guide.
Guide
Wing-bolt
Fig. 24
ON
ON
OFF
ON
ON
OFF
ON
ON
OFF
8. Attaching the long guide (sold separately)
You can cut at a greater degree of parallel angle
against the end face of materials than the regular
guide.
When using the long guide, use the wing-bolts at the
front and rear.
(1) Normal installation
a) Slide the front and rear guide bars through the
holes on the base side and move the long guide to
the right or left to adjust the cutting position.
b) Press the front guide bar against the indicated
direction and tighten the front wing-bolt. Then,
tighten the rear wing-bolt to fasten the guide bar.
c) Lay the front of the long guide along the material to
cut.
Long guide
Front wing-bolt
Front guide bar
Rear guide bar
Rear wing-bolt
Fig. 25
(2) Installation to the housing side
Use by re-installing the two front and rear guide bars.
a) Remove the two screws of the long guide.
b) With the protrusions of the long guide pointing
downwards, re-attach the two guide bars.
Fig. 26
21
English
00BookC18DBALNAmetabo.indb2100BookC18DBALNAmetabo.indb212021/03/3017:21:002021/03/3017:21:00
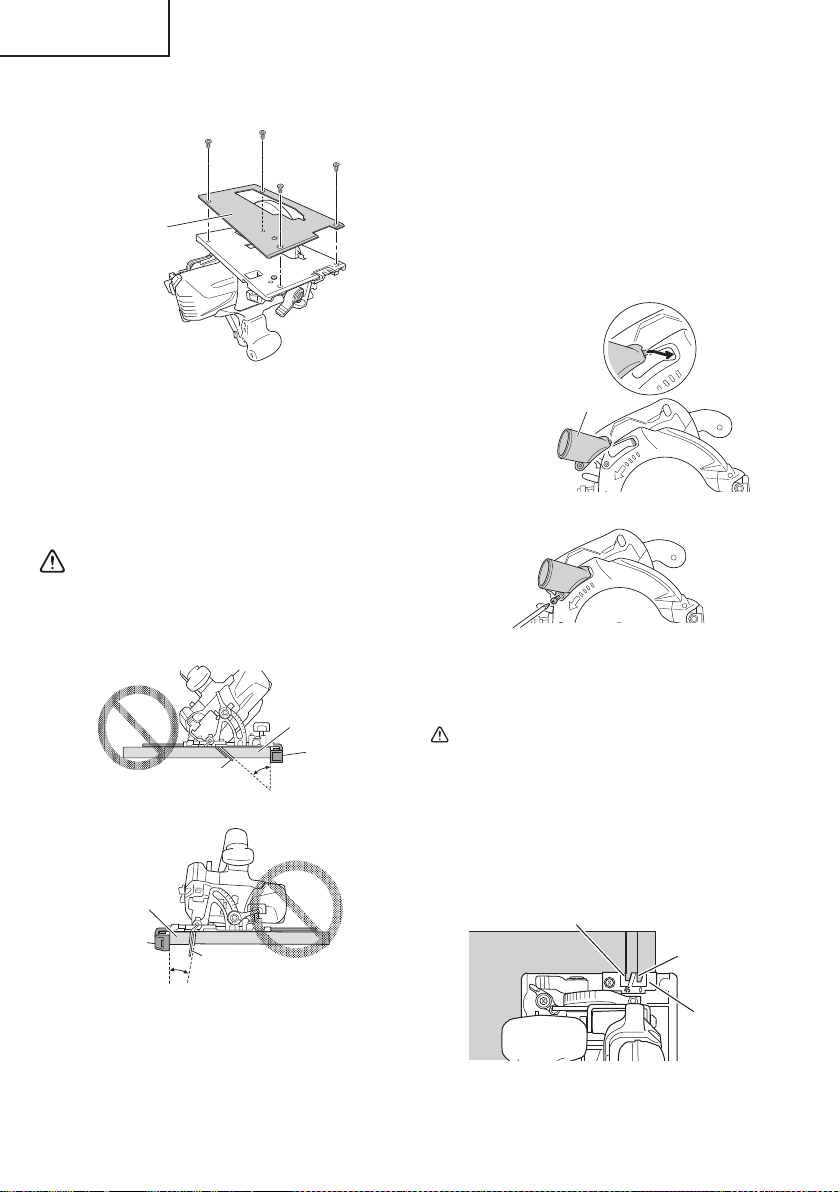
9. Attaching the fl uorine plate (sold separately)
Firmly fi x to the base with the bolts.
Fluorine plate
Fig. 27
NOTE
●
The maximum cutting depth will be 2.5 mm shallower.
●
Cutting anything other than wood will remove the
fl uorine, making the base diffi cult to slide.
●
The fl uorine coating of the base surface makes it
easier to slide, making the motor susceptible to
pressure. Do not press too hard on the unit.
WARNING
When using the guide, avoid inclined cutting that
will allow the cut material to be caught between
the saw blade and the guide. Doing so may result
in injury.
Saw blade
Guide
Lumber
Fig. 28
Saw blade
Guide
Lumber
Fig. 29
10. Attaching the dust collection adapter (sold separately)
When connecting with a dust extractor, attach the
dust collection adapter to the chip exhaust. When
connecting to the dust extractor, a hose with an
inside diameter of φ25 mm can be used for the dust
extractor.
Insert the catch of the dust collection adapter to the
front part of the chip exhaust, and fasten the dust
collection adapter with the M4 screw that is included
with the unit.
Dust collection adapter
Fig. 30
Fig. 31
11. Cutting procedures
CAUTION
●
Recheck that the saw blade is securely clamped.
●
Confi rm that the lever for adjusting the slot
depth, the wing-nut for adjusting the angle of
inclination.
(1) Place the base on the material, then align the
premarked line and the saw blade with the notch at
the front of the base (Fig. 32).
Guide piece
45°
0°
Fig. 32 <Top View>
22
English
00BookC18DBALNAmetabo.indb2200BookC18DBALNAmetabo.indb222021/03/3017:21:002021/03/3017:21:00
(2) When the base is not inclined, use the right side of the
notch (Fig. 32, Fig. 33).
If the base is inclined (45 degrees), use the left side of
the notch (Fig. 32, Fig. 34).
15
30
Fig. 33
Cutting line
(at 45 degrees)
Fig. 34
NOTE
When using the saw at the inclination of 45 degrees,
use both the marks of on the bevel plate and [45] on
the inclined gauge of the base (Fig. 35).
What’s more, if it is absolutely essential to use the
saw at a precise angle, make adjustment using a
protractor, etc.
15
30
0
Bevel plate
Inclined gauge
Incline lever
Fig. 35
(3) Ensure that the switch is turned to the ON position
before the saw blade comes in contact with the
lumber. The switch is turned ON when the switch
trigger is squeezed; and OFF when the switch trigger
is released. Moving the saw straight at a constant
speed will produce optimum cutting.
CAUTION
●
Before starting to saw, ensure that the saw blade
has reached full speed revolution.
●
Should the saw blade be stopped or made an
abnormal noise during operation, turn off the
switch immediately.
●
When fi nished with a job, pull out the battery
from the main body.
●
To avoid abnormal heating of the blade tip or
damage to the saw blade, do not twist or apply
excessive force to the saw blade when cutting.
Let the blade move forward smoothly.
●
In the situation where the circular saw is
continuously operated while replacing the
battery with stocked spare batteries one after
another, the motor tends to overheat. Therefore,
whenever the housing becomes hot, give the saw
a break for a while.
●
Avoid cutting operation in a state where the base
bottom is afl oat from the material being cut.
Otherwise, the motor can get locked.
23
English
00BookC18DBALNAmetabo.indb2300BookC18DBALNAmetabo.indb232021/03/3017:21:012021/03/3017:21:01
1. Inspecting the saw blade
Continued use of a dull or damaged blade will result in
reduced cutting effi ciency and may cause overloading
of the motor. Replace the blade with a new one as
soon as excessive abrasion is noted.
CAUTION
If a dull saw blade is used, reactive force is
increased during cutting operation. Avoid the
use of the dull saw blade without repair.
2. Check the Screws
Loose screws are dangerous. Regularly inspect them
and make sure they are tight.
CAUTION
Using this power tool with loosen, screws is
extremely dangerous.
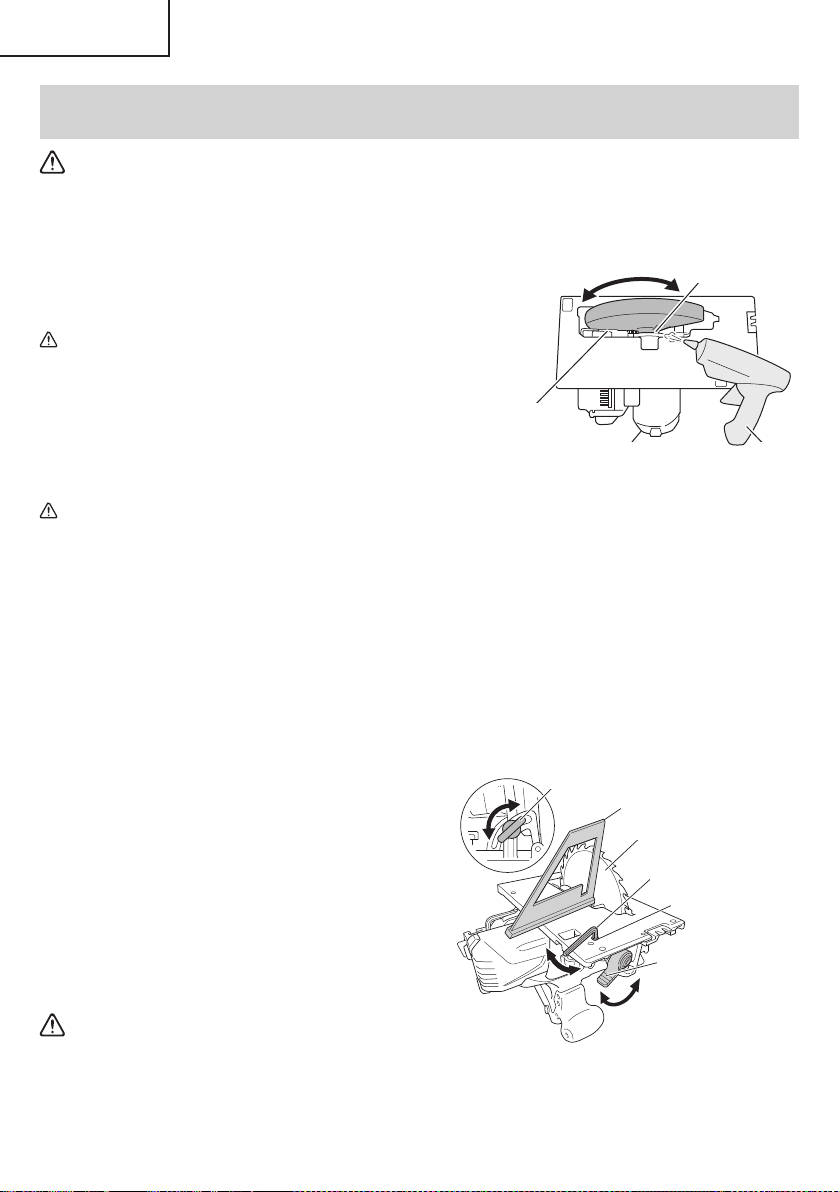
3. Motor unit maintenance
The motor winding is an important part of this tool.
Avoid damaging and be careful to avoid contact with
cleaning oil or water.
After 50 hours of use, clean the motor by blowing into
the ventilation holes of the motor housing with dry air
from an air gun or other tool (Fig. 36).
Dust or particle accumulation in the motor can result
in damage.
4. Inspecting and maintaining the lower guard
Always make sure that the lower guard moves
smoothly.
In the event of any malfunction, immediately repair the
lower guard.
For cleaning and maintenance, use an air gun or other
tool to blow clean the space between the lower guard
and gear cover as well as the rotation part of the lower
guard with dry air (Fig. 36).
Doing so is eff ective for the emission of chips or other
particles.
Accumulation of chips or other particles around the
lower guard may result in malfunction or damage.
WARNING
To prevent dust inhalation or eye irritation, wear
protective safety goggles and a dust mask when
using an air gun or other tool to clean the lower
guard, ventilation holes or other parts of the
product.
MAINTENANCE AND INSPECTION
WARNING
Be sure to turn off the switch and pull out the battery before doing any inspection or maintenance.
Ensure smooth
movement of
lower guard
Rotation part of
the lower guard
Housing vent
Space between lower
guard and gear cover
Air gun
Fig. 36
5. Clean inside the saw cover
Periodically inspect and clean the saw cover to
ensure that there is no accumulation of chips or other
particles.
6. Adjusting the base and saw blade to maintain
perpendicularity (Fig. 37)
The angle between the base and the saw blade
has been adjusted to 90°, however should this
perpendicularity be lost for some reason, adjust in the
following manner.
(1) Loosen the incline lever and incline wing-nut, place
the square on the base and against the saw blade to
attain a right angle, and lightly tighten the incline lever.
Square
Adjusting screw
Saw blade
Incline wing-nut
Hex. bar
wrench 2.5 mm
Incline lever
Fig. 37
24
English
00BookC18DBALNAmetabo.indb2400BookC18DBALNAmetabo.indb242021/03/3017:21:022021/03/3017:21:02

(2) Using the included 2.5 mm hex. bar wrench, turn the
adjusting screw until its tip touches the metal part of
the base, and then fi rmly tighten the incline lever and
incline wing-nut.
7. Check for dust
Dust may be removed with a clean rag or a cloth
dampened with soapy water.
Do not use bleach, chlorine, gasoline or thinner, for
they may damage the plastics.
8. Lubrication
The bearings in this tool have been suffi ciently
lubricated with quality lubricating oil, taking into
account the expected life of this tool under normal
operating conditions. As a result, no further lubrication
is necessary.
9. Disposal of the exhausted battery
WARNING
Do not dispose of the exhausted battery. The
battery may explode if it is incinerated. The
battery is recyclable. At the end of it’s useful
life, under various state and local laws, it may
be illegal to dispose of this battery into the
municipal waste stream. Check with your local
solid waste offi cials for details in your area for
recycling options or proper disposal.
10. Storage
Storing in a place below 104°F (40°C) and out of the
reach of children.
NOTE
Storing lithium-ion batteries
Make sure the lithium-ion batteries have been fully
charged before storing them.
Prolonged storage (3 months or more) of batteries with
a low charge may result in performance deterioration,
signifi cantly reducing battery usage time or rendering
the batteries incapable of holding a charge.
However, signifi cantly reduced battery usage time
may be recovered by repeatedly charging and using
the batteries two to fi ve times.
If the battery usage time is extremely short despite
repeated charging and use, consider the batteries
dead and purchase new batteries.
11. Service and repairs
All quality power tools will eventually require servicing
or replacement of parts because of wear from normal
use. To assure that only genuine replacement
parts must be used, all service and repairs must be
performed by a metabo HPT AUTHORIZED SERVICE
CENTER, ONLY.
CAUTION
In the operation and maintenance of power tools,
the safety regulations and standards prescribed
in each country must be observed.
Important notice on the batteries for the
metabo HPT cordless power tools
Please always use one of our designated genuine
batteries. We cannot guarantee the safety and
performance of our cordless power tool when used
with batteries other than these designated by us,
or when the battery is disassembled and modifi ed
(such as disassembly and replacement of cells or
other internal parts).
25
English
00BookC18DBALNAmetabo.indb2500BookC18DBALNAmetabo.indb252021/03/3017:21:022021/03/3017:21:02
ACCESSORIES
WARNING
ALWAYS use Only authorized metabo HPT replacement parts and accessories. Never use replacement
parts or accessories which are not intended for use with this tool. Contact metabo HPT if you are not sure
whether it is safe to use a particular replacement part or accessory with your tool.
The use of any other attachment or accessory can be dangerous and could cause injury or mechanical
damage.
NOTE
Accessories are subject to change without any obligation on the part of the metabo HPT.
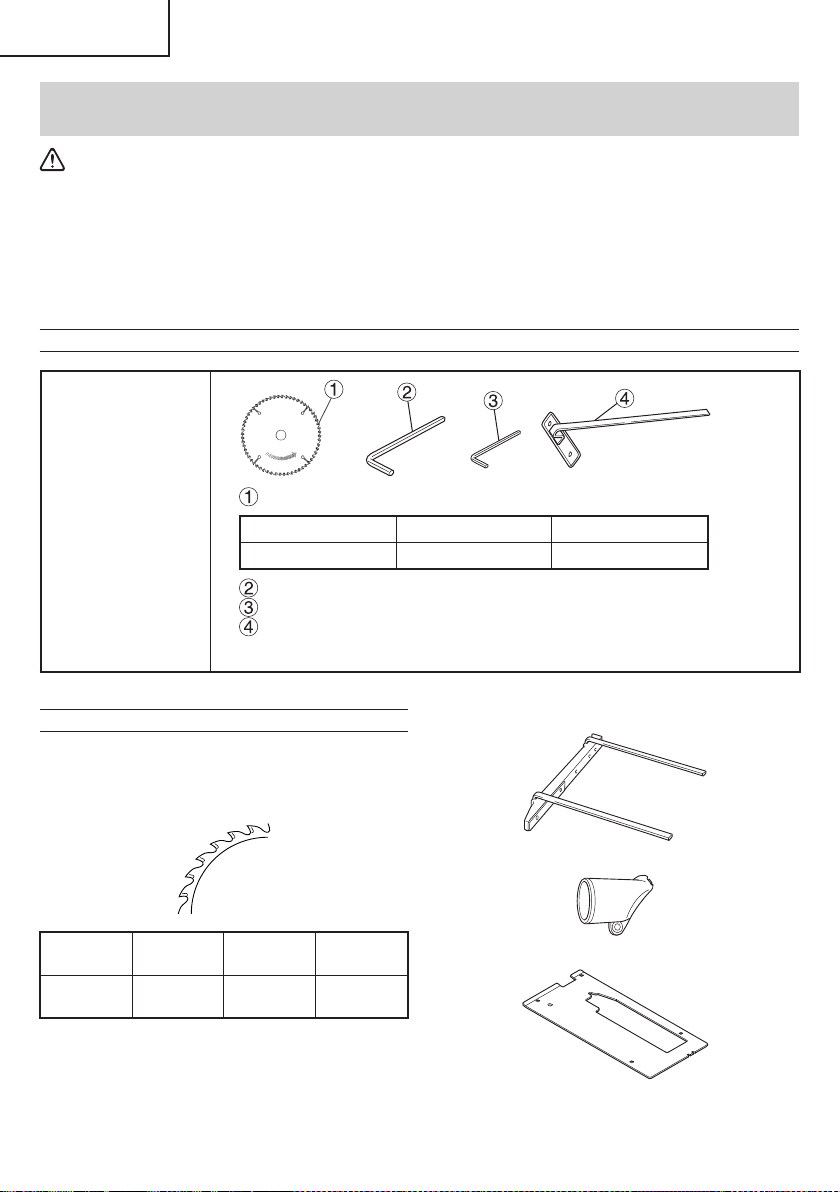
STANDARD ACCESSORIES
C18DBAL
(NN)
Saw Blade (mounted on tool) .............................................................1
External Dia. Hole Dia. Code No.
6-1/2" (165 mm) 5/8" (15.9 mm) 372983
Hex. bar wrench 5 MM (Code No. 944459) (mounted on tool) ............1
Hex. bar wrench 2.5 MM (Code No. 990666) ......................................1
Guide (Code No. 302756) ...................................................................1
Battery, battery charger and battery cover are not contained.
OPTIONAL ACCESSORIES ... SOLD separately
1. Battery (BSL1830C / BSL1860)
2. Battery charger (UC18YSL3 / UC18YFSL)
3. Battery cover (Code No. 329897)
4. Saw Blade Use ... Cutting various types of wood.
External
Dia.
Hole
Dia.
No. of
teeth
Code
No.
6-1/2"
(165 mm)
5/8"
(15.9 mm)
24 Pieces 372983
NOTE
Specifi cations are subject to change without any
obligation on the part of the metabo HPT.
5. Long guide (Code No. 316161)
6. Dust collection adapter (Code No. 339383)
7. Fluorine plate (Code No. 339188)
26
English
00BookC18DBALNAmetabo.indb2600BookC18DBALNAmetabo.indb262021/03/3017:21:022021/03/3017:21:02
Designed for operating in USA & Canada only.
When this product is used in areas other than the USA & Canada,
we cannot guarantee the product quality and performance.
Model
Modèle
Modelo
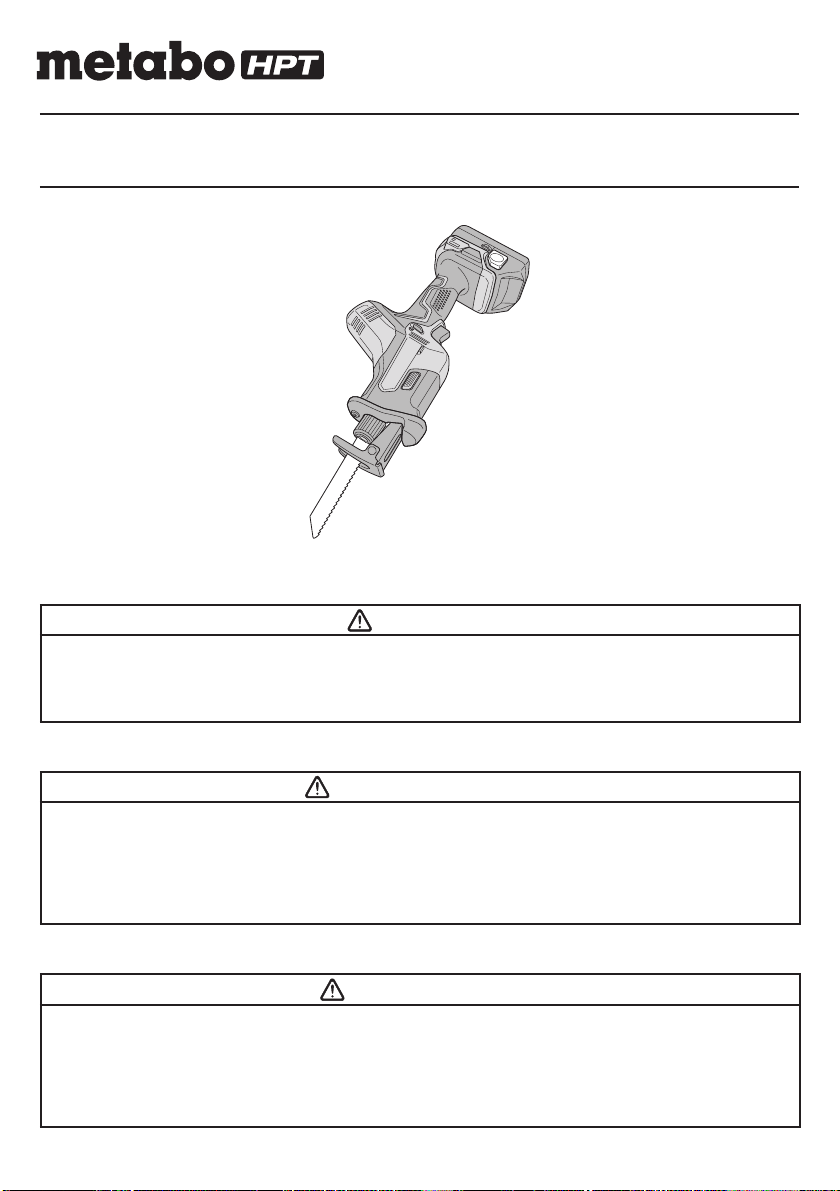
CR 18DA
Cordless Reciprocating Saw
Scie alternative sans fi l
Sierra sable inalámbrica
SAFETY INSTRUCTIONS AND INSTRUCTION MANUAL
WARNING
IMPROPER OR UNSAFE use of this power tool can result in death or serious bodily injury!
This manual contains important information about product safety. Please read and understand
this manual BEFORE operating the power tool. Please keep this manual available for other
users and owners before they use the power tool. This manual should be stored in safe place.
INSTRUCTIONS DE SECURITE ET MODE D’EMPLOI
AVERTISSEMENT
Une utilisation INCORRECTE OU DANGEREUSE de cet outil motorisé peut entraîner la mort
ou de sérieuses blessures corporelles!
Ce mode d’emploi contient d’importantes informations à propos de la sécurité de ce produit.
Prière de lire et de comprendre ce mode d’emploi AVANT d’utiliser l’outil motorisé. Garder ce
mode d’emploi à la disponibilité des autres utilisateurs et propriétaires avant qu’ils utilisent
l’outil motorisé. Ce mode d’emploi doit être conservé dans un endroit sûr.
INSTRUCCIONES DE SEGURIDAD Y MANUAL DE INSTRUCCIONES
ADVERTENCIA
¡La utilización INAPROPIADA O PELIGROSA de esta herramienta eléctrica puede resultar
en lesiones de gravedad o la muerte!
Este manual contiene información importante sobre la seguridad del producto. Lea y
comprenda este manual ANTES de utilizar la herramienta eléctrica. Guarde este manual para
que puedan leerlo otras personas antes de utilizar la herramienta eléctrica. Este manual debe
ser guardado en un lugar seguro.
000BookCR18DANA.indb1000BookCR18DANA.indb12021/03/3014:31:472021/03/3014:31:47

2
English
IMPORTANT SAFETY INFORMATION
Read and understand all of the safety precautions, warnings and operating instructions in the Instruction Manual before
operating or maintaining this power tool.
Most accidents that result from power tool operation and maintenance are caused by the failure to observe basic safety
rules or precautions. An accident can often be avoided by recognizing a potentially hazardous situation before it occurs,
and by observing appropriate safety procedures.
Basic safety precautions are outlined in the “SAFETY” section of this Instruction Manual and in the sections which
contain the operation and maintenance instructions.
Hazards that must be avoided to prevent bodily injury or machine damage are identifi ed by WARNINGS on the power
tool and in this Instruction Manual.
NEVER use this power tool in a manner that has not been specifi cally recommended by metabo HPT.
MEANINGS OF SIGNAL WORDS
WARNING indicates a potentially hazardous situations which, if ignored, could result in death or serious injury.
CAUTION indicates a potentially hazardous situations which, if not avoided, may result in minor or moderate injury, or
may cause machine damage.
NOTE emphasizes essential information.
SAFETY
GENERAL POWER TOOL SAFETY WARNINGS
WARNING
Read all safety warnings, instructions, illustrations and specifi cations provided with this power tool.
Failure to follow all instructions listed below may result in electric shock, fi re and/or serious injury.
Save all warnings and instructions for future reference.
The term “power tool” in the warnings refers to your mains-operated (corded) power tool or battery-operated
(cordless) power tool.
1) Work area safety
a) Keep work area clean and well lit.
Cluttered or dark areas invite accidents.
b) Do not operate power tools in explosive
atmospheres, such as in the presence of
fl ammable liquids, gases or dust.
Power tools create sparks which may ignite the
dust or fumes.
c) Keep children and bystanders away while
operating a power tool.
Distractions can cause you to lose control.
2) Electrical safety
a) Power tool plugs must match the outlet.
Never modify the plug in any way.
Do not use any adapter plugs with earthed
(grounded) power tools.
Unmodifi ed plugs and matching outlets will
reduce risk of electric shock.
b) Avoid body contact with earthed or grounded
surfaces such as pipes, radiators, ranges
and refrigerators.
There is an increased risk of electric shock if your
body is earthed or grounded.
c) Do not expose power tools to rain or wet
conditions.
Water entering a power tool will increase the risk
of electric shock.
d) Do not abuse the cord. Never use the cord
for carrying, pulling or unplugging the power
tool.
Keep cord away from heat, oil, sharp edges
or moving parts.
Damaged or entangled cords increase the risk of
electric shock.
e) When operating a power tool outdoors, use
an extension cord suitable for outdoor use.
Use of a cord suitable for outdoor use reduces the
risk of electric shock.
f) If operating a power tool in a damp location
is unavoidable, use a residual current device
(RCD) protected supply.
Use of an RCD reduces the risk of electric shock.
3) Personal safety
a) Stay alert, watch what you are doing and use
common sense when operating a power tool.
000BookCR18DANA.indb2000BookCR18DANA.indb22021/03/3014:31:482021/03/3014:31:48

3
English
Do not use a power tool while you are tired
or under the infl uence of drugs, alcohol or
medication.
A moment of inattention while operating power
tools may result in serious personal injury.
b) Use personal protective equipment. Always
wear eye protection.
Protective equipment such as a dust mask, non-
skid safety shoes, hard hat or hearing protection
used for appropriate conditions will reduce
personal injuries.
c) Prevent unintentional starting. Ensure
the switch is in the off -position before
connecting to power source and/or battery
pack, picking up or carrying the tool.
Carrying power tools with your fi nger on the
switch or energising power tools that have the
switch on invites accidents.
d) Remove any adjusting key or wrench before
turning the power tool on.
A wrench or a key left attached to a rotating part of
the power tool may result in personal injury.
e) Do not overreach. Keep proper footing and
balance at all times.
This enables better control of the power tool in
unexpected situations.
f) Dress properly. Do not wear loose clothing or
jewellery. Keep your hair and clothing away
from moving parts.
Loose clothes, jewellery or long hair can be
caught in moving parts.
g) If devices are provided for the connection
of dust extraction and collection facilities,
ensure these are connected and properly
used.
Use of dust collection can reduce dust-related
hazards.
h) Do not let familiarity gained from frequent
use of tools allow you to become complacent
and ignore tool safety principles.
A careless action can cause severe injury within a
fraction of a second.
4) Power tool use and care
a) Do not force the power tool. Use the correct
power tool for your application.
The correct power tool will do the job better and
safer at the rate for which it was designed.
b) Do not use the power tool if the switch does
not turn it on and off .
Any power tool that cannot be controlled with the
switch is dangerous and must be repaired.
c) Disconnect the plug from the power
source and/or remove the battery pack,
if detachable, from the power tool before
making any adjustments, changing
accessories, or storing power tools.
Such preventive safety measures reduce the risk
of starting the power tool accidentally.
d) Store idle power tools out of the reach of
children and do not allow persons unfamiliar
with the power tool or these instructions to
operate the power tool.
Power tools are dangerous in the hands of
untrained users.
e) Maintain power tools and accessories. Check
for misalignment or binding of moving parts,
breakage of parts and any other condition
that may aff ect the power tool’s operation.
If damaged, have the power tool repaired
before use.
Many accidents are caused by poorly maintained
power tools.
f) Keep cutting tools sharp and clean.
Properly maintained cutting tools with sharp
cutting edges are less likely to bind and are easier
to control.
g) Use the power tool, accessories and tool bits
etc. in accordance with these instructions,
taking into account the working conditions
and the work to be performed.
Use of the power tool for operations diff erent
from those intended could result in a hazardous
situation.
h) Keep handles and grasping surfaces dry,
clean and free from oil and grease.
Slippery handles and grasping surfaces do not
allow for safe handling and control of the tool in
unexpected situations.
5) Battery tool use and care
a) Recharge only with the charger specifi ed by
the manufacturer.
A charger that is suitable for one type of battery
pack may create a risk of fi re when used with
another battery pack.
b) Use power tools only with specifi cally
designated battery packs.
Use of any other battery packs may create a risk
of injury and fi re.
c) When battery pack is not in use, keep it away
from other metal objects, like paper clips,
coins, keys, nails, screws or other small
metal objects, that can make a connection
from one terminal to another.
Shorting the battery terminals together may
cause burns or a fi re.
d) Under abusive conditions, liquid may be
ejected from the battery; avoid contact. If
contact accidentally occurs, fl ush with water.
If liquid contacts eyes, additionally seek
medical help.
Liquid ejected from the battery may cause
irritation or burns.
e) Do not use a battery pack or tool that is
damaged or modifi ed.
Damaged or modifi ed batteries may exhibit
unpredictable behaviour resulting in fi re,
explosion or risk of injury.
000BookCR18DANA.indb3000BookCR18DANA.indb32021/03/3014:31:482021/03/3014:31:48

4
English
f) Do not expose a battery pack or tool to fi re or
excessive temperature.
Exposure to fi re or temperature above 265 °F may
cause explosion.
g) Follow all charging instructions and do
not charge the battery pack or tool outside
the temperature range specifi ed in the
instructions.
Charging improperly or at temperatures outside
the specifi ed range may damage the battery and
increase the risk of fi re.
6) Service
a) Have your power tool serviced by a
qualifi ed repair person using only identical
replacement parts.
This will ensure that the safety of the power tool is
maintained.
b) Never service damaged battery packs.
Service of battery packs should only be
performed by the manufacturer or authorized
service providers.
– WARNING –
To reduce the risk of injury, user must read
instruction manual.
SPECIFIC SAFETY RULES
1. Hold power tool by insulated gripping surfaces,
when performing an operation where the cutting
accessory may contact hidden wiring.
Cutting accessory contacting a “live” wire may make
exposed metal parts of the power tool “live”and could
give the operator an electric shock.
2. Use clamps or another practical way to secure
and support the workpiece to a stable platform.
Holding the workpiece by hand or against your body
leaves it unstable and may lead to loss of control.
3. ALWAYS wear ear protectors when using the tool
for extended periods.
Prolonged exposure to high intensity
noise can cause hearing loss.
4. NEVER touch moving parts.
NEVER place your hands, fi ngers or other body parts
near the tool’s moving parts.
5. NEVER operate without all guards in place.
NEVER operate this tool without all guards or safety
features in place and in proper working order. If
maintenance or servicing requires the removal of a
guard or safety feature, be sure to replace the guard
or safety feature before resuming operation of the
tool.
6. Use right tool.
Don’t force small tool or attachment to do the job of a
heavy-duty tool.
Don’t use tool for purpose not intended —for
example— don’t use circular saw for cutting tree
limbs or logs.
7. NEVER use a power tool for applications other
than those specifi ed.
NEVER use a power tool for applications other than
those specifi ed in the Instruction Manual.
8. Handle tool correctly.
Operate the tool according to the instructions
provided herein. Do not drop or throw the tool.
NEVER allow the tool to be operated by children,
individuals unfamiliar with its operation or
unauthorized personnel.
9. Keep all screws, bolts and covers tightly in
place.
Keep all screws, bolts, and plates tightly mounted.
Check their condition periodically.
10. Do not use power tools if the plastic housing or
handle is cracked.
Cracks in the tool’s housing or handle can lead to
electric shock. Such tools should not be used until
repaired.
11. Blades and accessories must be securely
mounted to the tool.
Prevent potential injuries to yourself or others.
Blades, cutting implements and accessories which
have been mounted to the tool should be secure and
tight.
12. Handle the blades very carefully.
13. Check the blade carefully for cracks or damage
before operation. Replace cracked or damaged
blade immediately.
14. Avoid cutting nails. Inspect for and remove all
nails from the workpiece before operation.
15. Hold the tool fi rmly.
16. Keep motor air vent clean.
The tool’s motor air vent must be kept clean so that
air can freely fl ow at all times. Check for dust build-up
frequently.
17. NEVER use a tool which is defective or operating
abnormally.
If the tool appears to be operating unusually, making
strange noises, or otherwise appears defective, stop
using it immediately and arrange for repairs by a
metabo HPT authorized service center.
18. NEVER leave tool running unattended. Turn
power off .
Don’t leave tool until it comes to a complete stop.
19. Carefully handle power tools.
Should a power tool be dropped or struck against
hard materials inadvertently, it may be deformed,
cracked, or damaged.
20. Do not wipe plastic parts with solvent.
Solvents such as gasoline, thinner benzine, carbon
tetrachloride, and alcohol may damage and crack
plastic parts. Do not wipe them with such solvents.
Wipe plastic parts with a soft cloth lightly dampened
with soapy water and dry thoroughly.
000BookCR18DANA.indb4000BookCR18DANA.indb42021/03/3014:31:482021/03/3014:31:48
5
English
21. ALWAYS wear eye protection that meets the
requirement of the latest revision of
ANSI Standard Z87.1.
22. ALWAYS wear a mask or respirator to protect yourself
from dust or potentially harmful particles generated
during operation.
23. ALWAYS fi rmly grip the handle while operating.
24. ALWAYS be careful with buried object such as an
underground wiring.
Touching these active wiring or electric cable with
this tool, you may receive an electric shock.
Confi rm if there are any buried object such as electric
cable within the wall, fl oor or ceiling where you are
going to operate here after.
25. Defi nitions for symbols used on this tool
V ..................volts
---
.................dire ct c urr ent
Hz ................hertz
A ..................amperes
no ................no load speed
---/min .......... revolutions or reciprocation per minute
26. Do not touch the blade immediately after
operation: it may be extremely hot and could
burn your skin.
27. During use, do not touch the metal portion of the tool.
28. NEVER touch the blade with bare hands after
operation.
29. Because the cordless reciprocating saw operates by
battery power, be aware of the fact that it can begin to
operate at any time.
30. When working at elevated locations, clear the area
of all other people and be aware of conditions below
you.
31. Do not use the product if the tool or the battery
terminals (battery mount) are deformed.
Installing the battery could cause a short circuit that
could result in smoke emission or ignition.
32. Keep the tool’s terminals (battery mount) free of swarf
and dust.
○
Prior to use, make sure that swarf and dust have not
collected in the area of the terminals.
○
During use, try to avoid swarf or dust on the tool from
falling on the battery.
○
When suspending operation or after use, do not leave
the tool in an area where it may be exposed to falling
swarf or dust.
Doing so could cause a short circuit that could result
in smoke emission or ignition.
IMPORTANT SAFETY INSTRUCTIONS
FOR BATTERY CHARGER
WARNING
Death or serious bodily injury could result from
improper or unsafe use of battery chargers.
To avoid these risks, follow these basic safety
instructions:
READ ALL INSTRUCTIONS
1. This manual contains important safety and operating
instructions for battery charger Model UC18YFSL.
2. Before using battery charger, read all instructions
and cautionary markings on (1) battery charger, (2)
battery, and (3) product using battery.
3. To reduce risk of injury, charge metabo HPT
rechargeable battery multi volt type series and BSL18
series. Other type of batteries may burst causing
personal injury and damage.
4. Use of an attachment not recommended or sold by
the battery charger manufacturer may result in a risk
of fi re, electric shock, or injury to persons.
5. To reduce risk of damage to electric plug and cord,
pull by plug when disconnecting battery charger.
6. Make sure cord is located so that it will not be stepped
on, tripped over, or otherwise subjected to damage or
stress.
7. An extension cord should not be used unless
absolutely necessary. Use of improper extension
cord could result in a risk of fi re and electric shock.
If extension cord must be used make sure:
a. That blades of extension cord are the same
number, size, and shape as those of plug on
battery charger:
b. That extension cord is properly wired and in good
electrical condition; and
c. That wire size is large enough for AC ampere
rating of battery charger as specifi ed in Table 1.
000BookCR18DANA.indb5000BookCR18DANA.indb52021/03/3014:31:482021/03/3014:31:48

6
English
Table 1
RECOMMENDED MINIMUM AWG SIZE FOR
EXTENSION CORDS FOR BATTERY CHARGERS
AC Input Rating Amperes* AWG Size of Cord
Equal to or
greater than
but less
than
Length of Cord, Feet (Meter)
25 (7.5) 50 (15) 100 (30) 150 (45)
0 2 18 18 18 16
2 3 18 18 16 14
3 4 18 18 16 14
4. NEVER insert any objects into the battery charger’s
air vents. Electric shock or damage to the battery
charger may result.
5. NEVER charge outdoors. Keep the battery away
from direct sunlight and use only where there is low
humidity and good ventilation.
6. NEVER charge when the temperature is below 32°F
(0°C) or above 104°F (40°C).
7. NEVER connect two battery chargers together.
8. NEVER insert foreign objects into the hole for the
battery or the battery charger.
9. NEVER use a booster transformer when charging.
10. NEVER use DC power to charge.
11. NEVER store the battery or battery charger in places
where the temperature may reach or exceed 104°F
(40°C) such as inside metal box or car.
12. NEVER expose the battery or battery charger to rain
or wet conditions.
13. ALWAYS operate charger on standard household
electrical power (120 volts). Using the charger on any
other voltage may overheat and damage the charger.
14. ALWAYS wait at least 15 minutes between charges to
avoid overheating the charger.
15. ALWAYS disconnect the power cord from its
receptacle when the charger is not in use.
CAUTION ON LITHIUM-ION BATTERY
To extend the lifetime, the lithium-ion battery equips with
the protection function to stop the output.
In the cases of 1 to 3 described below, when using this
product, even if you are pulling the switch, the motor may stop.
This is not the trouble but the result of protection function.
1. When the battery power remaining runs out, the
motor stops.
In such case, charge it up immediately.
2. If the tool is overloaded, the motor may stop. In this
case, release the switch of tool and eliminate causes
of overloading. After that, you can use it again.
3. If the battery is overheated under overload work, the
battery power may stop.
In this case, stop using the battery and let the battery
cool. After that, you can use it again.
Furthermore, please heed the following warning and
caution.
*
If the input rating of a battery charger is given in watts
rather than in amperes, the corresponding ampere
rating is to be determined by dividing the wattage
rating by the voltage rating–for example:
1,250 watts
= 10 amperes
125 volts
8. Do not operate battery charger with damaged cord or
plug-replace them immediately.
9. Do not operate battery charger if it has received a
sharp blow, been dropped, or otherwise damaged in
any way; take it to a qualifi ed serviceman.
10. Do not disassemble battery charger; take it to a
qualifi ed serviceman when service or repair is
required. Incorrect reassembly may result in a risk of
electric shock or fi re.
11. To reduce risk of electric shock, unplug charger from
receptacle before attempting any maintenance or
cleaning. Removing the battery will not reduce this
risk.
IMPORTANT SAFETY INSTRUCTIONS
FOR USE OF THE BATTERY AND
BATTERY CHARGER
You must charge the battery before you can use the power
tool. Before using the model UC18YFSL battery charger,
be sure to read all instructions and cautionary statements
on it, the battery and in this manual.
REMEMBER: USE ONLY metabo HPT BATTERY TYPES
BSL18 SERIES. OTHER TYPES OF BATTERIES MAY
BURST AND CAUSE INJURY!
Follow these instructions to avoid the risk of injury:
WARNING:
Improper use of the battery
or battery charger can lead to
serious injury. To avoid these
injuries:
1. NEVER disassemble the battery.
2. NEVER incinerate the battery, even if it is damaged
or is completely worn out. The battery can explode in
a fi re.
3. NEVER short-circuit the battery.
000BookCR18DANA.indb6000BookCR18DANA.indb62021/03/3014:31:482021/03/3014:31:48
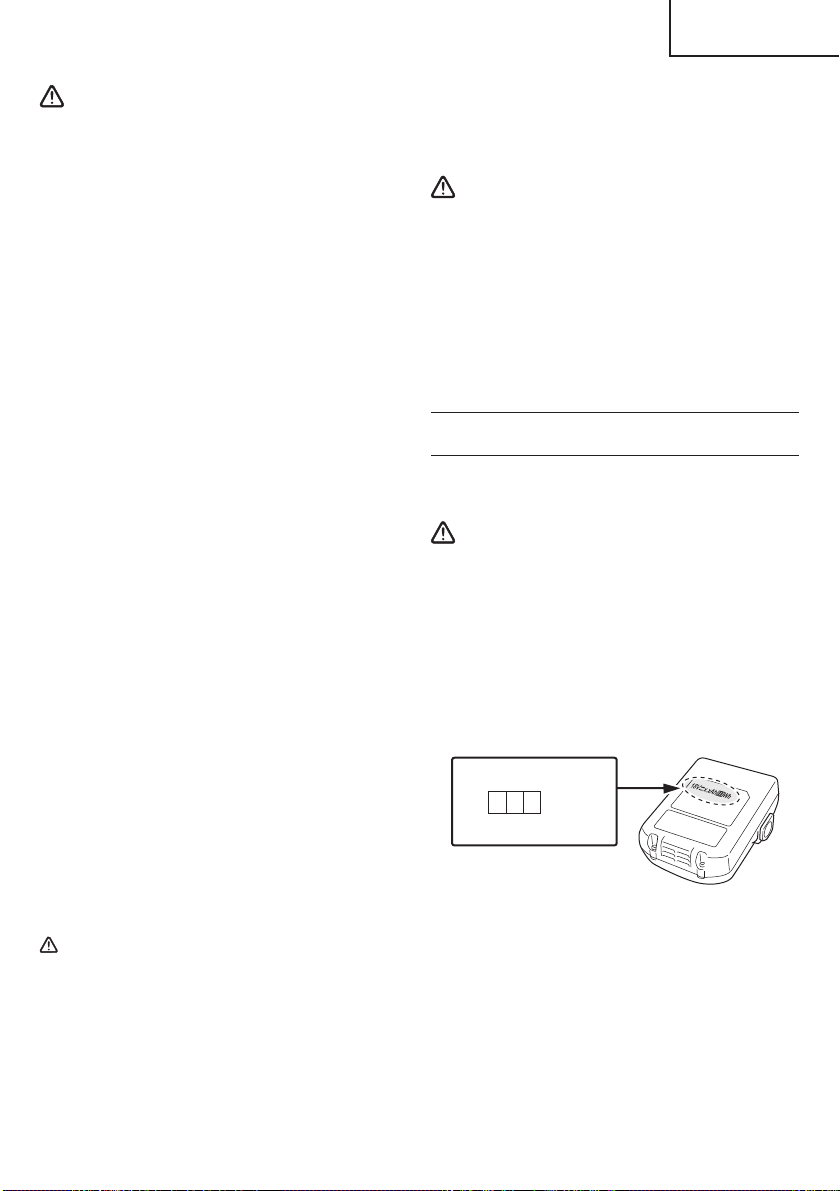
7
English
WARNING
In order to prevent any battery leakage, heat generation,
smoke emission, explosion and ignition beforehand,
please be sure to heed the following precautions.
1. Make sure that swarf and dust do not collect on the
battery.
○
During work make sure that swarf and dust do not fall
on the battery.
○
Make sure that any swarf and dust falling on the
power tool during work do not collect on the battery.
○
Do not store an unused battery in a location exposed
to swarf and dust.
○
Before storing a battery, remove any swarf and dust
that may adhere to it and do not store it together with
metal parts (screws, nails, etc.).
2. Do not pierce battery with a sharp object such as a
nail, strike with a hammer, step on, throw or subject
the battery to severe physical shock.
3. Do not use an apparently damaged or deformed
battery.
4. Do not use the battery in reverse polarity.
5. Do not connect directly to an electrical outlets or car
cigarette lighter sockets.
6. Do not use the battery for a purpose other than those
specifi ed.
7. If the battery charging fails to complete even when a
specifi ed recharging time has elapsed, immediately
stop further recharging.
8. Do not put or subject the battery to high temperatures
or high pressure such as into a microwave oven,
dryer, or high pressure container.
9. Keep away from fi re immediately when leakage or
foul odor are detected.
10. Do not use in a location where strong static electricity
generates.
11. If there is battery leakage, foul odor, heat generated,
discolored or deformed, or in any way appears
abnormal during use, recharging or storage,
immediately remove it from the equipment or battery
charger, and stop use.
12. Do not immerse the battery or allow any fl uids to fl ow
inside. Conductive liquid ingress, such as water,
can cause damage resulting in fi re or explosion.
Store your battery in a cool, dry place, away from
combustible and fl ammable items. Corrosive gas
atmospheres must be avoided.
CAUTION
1. If liquid leaking from the battery gets into your eyes,
do not rub your eyes and wash them well with fresh
clean water such as tap water and contact a doctor
immediately.
If left untreated, the liquid may cause eye-problems.
2. If liquid leaks onto your skin or clothes, wash well with
clean water such as tap water immediately.
There is a possibility that this can cause skin irritation.
3. If you fi nd rust, foul odor, overheating, discolor,
deformation, and/or other irregularities when using
the battery for the fi rst time, do not use and return it to
your supplier or vendor.
WARNING
If an electrically conductive foreign object enters the
terminals of the lithium ion battery, a short-circuit may
occur resulting in the risk of fi re. Please observe the
following matters when storing the battery.
○
Do not place electrically conductive cuttings,
nails, steel wire, copper wire or other wire in the
storage case.
○
Either install the battery in the power tool or
store by securely pressing into the battery
cover until the ventilation holes are concealed to
prevent short-circuits (See Fig. 3).
REGARDING LITHIUM-ION BATTERY
TRANSPORTATION
When transporting a lithium-ion battery, please observe
the following precautions.
WARNING
Notify the transporting company that a package
contains a lithium-ion battery, inform the company
of its power output and follow the instructions of the
transportation company when arranging transport.
●
Lithium-ion batteries that exceed a power output
of 100 Wh are considered to be in the freight
classifi cation of Dangerous Goods and will
require special application procedures.
●
For transportation abroad, you must comply with
international law and the rules and regulations
of the destination country.
Wh
Power Output
2 to 3 digit number
Fig. 1
000BookCR18DANA.indb7000BookCR18DANA.indb72021/03/3014:31:482021/03/3014:31:48

8
English
SAVE THESE INSTRUCTIONS
AND
MAKE THEM AVAILABLE TO OTHER USERS
AND
OWNERS OF THIS TOOL!
000BookCR18DANA.indb8000BookCR18DANA.indb82021/03/3014:31:492021/03/3014:31:49
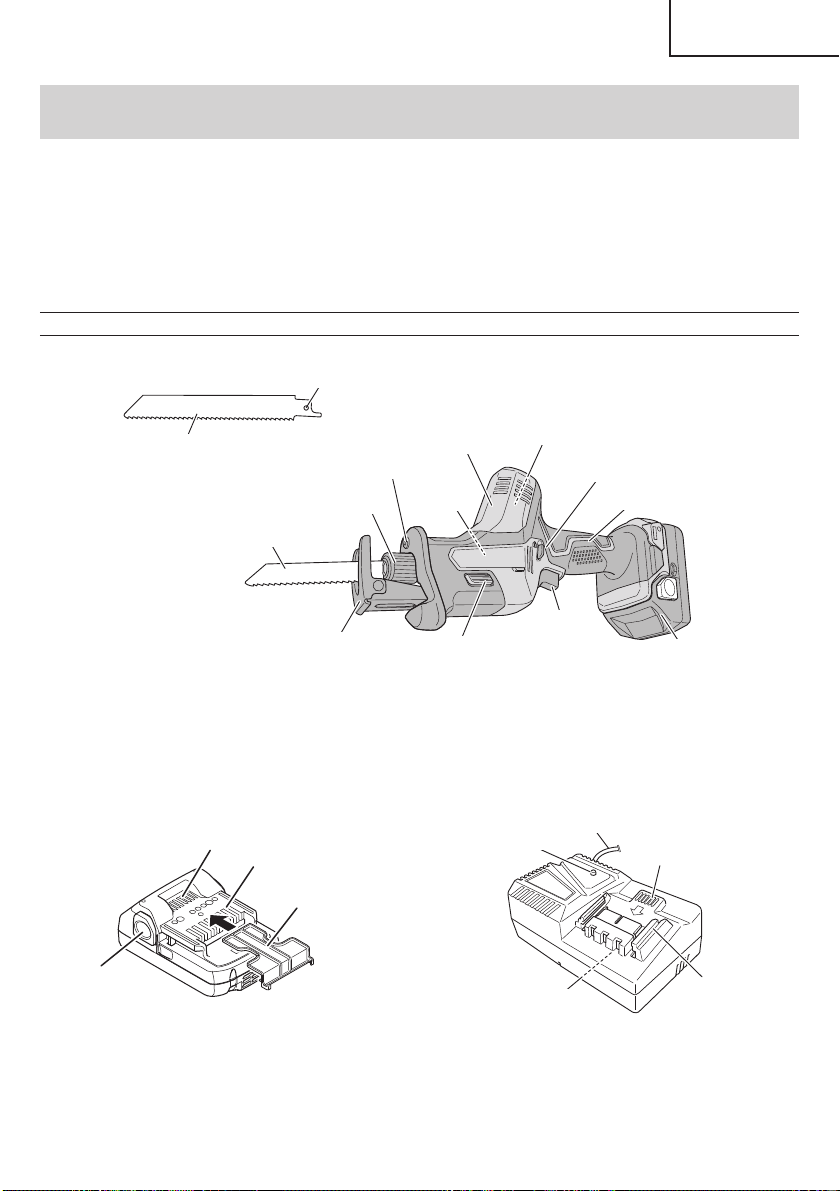
9
English
FUNCTIONAL DESCRIPTION
NOTE
The information contained in this Instruction Manual is designed to assist you in the safe operation and maintenance
of the power tool.
NEVER operate, or attempt any maintenance on the tool unless you have fi rst read and understood all safety
instructions contained in this manual.
Some illustrations in this Instruction Manual may show details or attachments that diff er from those on your own
power tool.
NAME OF PARTS
1. Cordless Reciprocating Saw (CR18DA)
Blade hole
Lock-off button
Handle
Battery
Trigger
switch
Base lock button
Base
Blade holder
LED light
Housing
Name
plate
Blade
Motor
Blade
Fig. 2
2. Battery
(optional accessories…sold separately)
3. Battery Charger
(optional accessories…sold separately)
Ventilation holes
Latch
Terminals
Battery cover
Nameplate
Pilot lamp
Guide rail
Cord
Ventilation holes
<BSL1815 / BSL1830C>
Fig. 3
<UC18YFSL>
Fig. 4
000BookCR18DANA.indb9000BookCR18DANA.indb92021/03/3014:31:492021/03/3014:31:49

10
English
SPECIFICATIONS
1. Cordless Reciprocating Saw
Model CR18DA
Motor DC motor
Capacity
Mild Steel Pipe: O.D. 1-31/32" (50 mm)
Wood: 1-31/32" (50 mm)
Mild Steel Plate: 15/32" (12 mm)
No-load speed 0–3,200 /min
Stroke 33/64" (13 mm)
Battery
Type Li-ion battery Model BSL1815 (1.5 Ah) / BSL1830C (3.0 Ah)
Voltage DC 18 V
Weight 3.5 lbs. (1.6 kg) (BSL1815 / BSL1830C attached)
2. Battery Charger
Model UC18YFSL
Input power source Single phase: AC 120 V 60 Hz
Charging time
(At a temperature of 68°F (20°C))
BSL1815: Approx. 22 min
BSL1830C: Approx. 45 min
Charging voltage DC 14.4–18 V
Charging current DC 3.5 A
Weight 1.1 lbs. (0.5 kg)
NOTE: The charging time may vary according to temperature and power source voltage.
000BookCR18DANA.indb10000BookCR18DANA.indb102021/03/3014:31:492021/03/3014:31:49
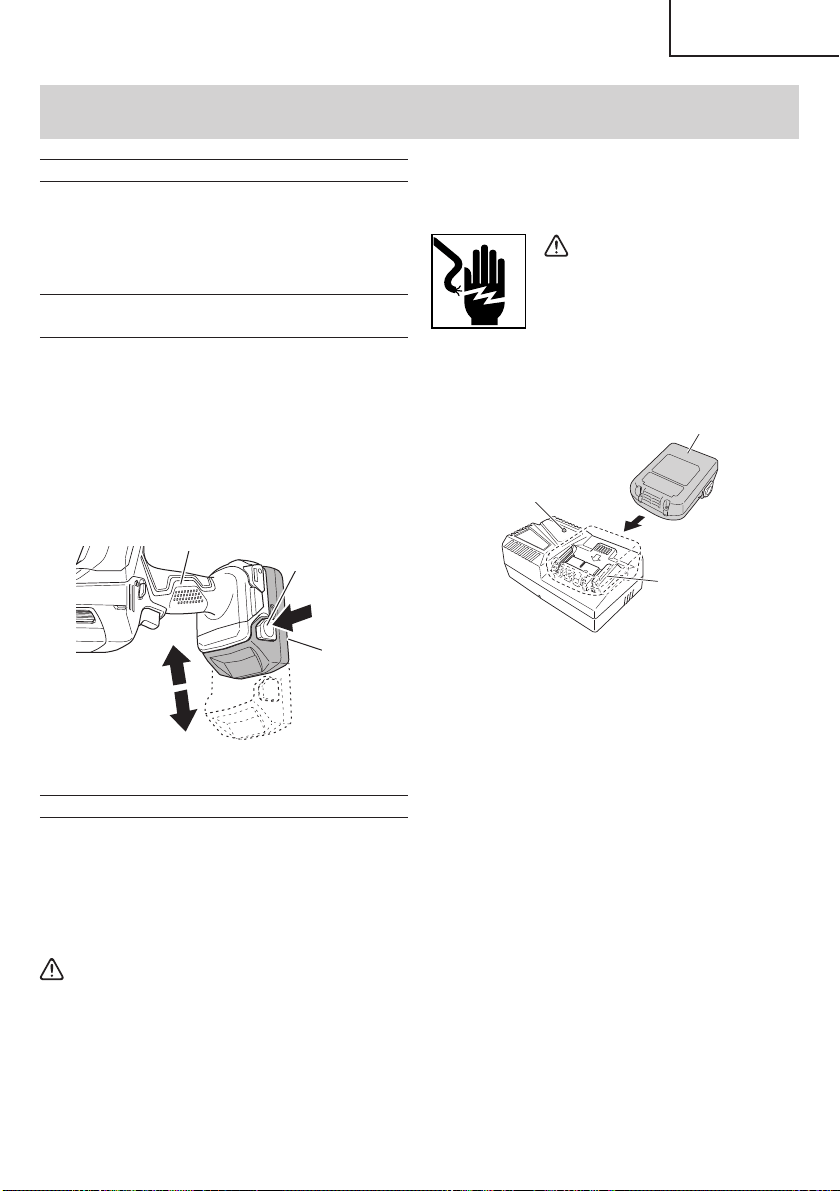
11
English
ASSEMBLY AND OPERATION
1. Connect the charger’s power cord to a receptacle.
When the power cord is connected, the charge
indicator lamp will blink in red. (At 1-second intervals)
WARNING
Do not use the electrical cord
if damaged. Have it repaired
immediately.
2. Insert the battery to the battery charger.
Firmly Insert the battery into the battery charger as
shown in Fig. 6.
Battery
Guide rail
Pilot lamp
Fig. 6
3. Charging
When inserting a battery in the charger, the pilot lamp
will light up continuously in red.
When the battery becomes fully recharged, the pilot
lamp will blink in red. (At 1- second intervals.) (See
Table 2)
(1) Lamp indication
The indications of the pilot lamp will be as shown
in Table 2, according to the condition of the battery
charger or the battery.
APPLICATIONS
○
Cutting metal and stainless steel pipe.
○
Cutting various lumber.
○
Cutting mild steel, aluminum and copper plate.
○
Cutting synthetic resins, such as phenol resin and
vinyl chloride.
REMOVAL AND INSTALLATION METHOD
OF BATTERY
○
How to install the battery.
Align the battery with the groove in tool handle and
slip it into place.
Always insert it all the way until it locks in place with a
little click, If not, it may accidentally fall out of the tool,
causing injury to you or someone around you (Fig. 5).
○
How to remove the battery.
Withdraw battery from the tool handle while pressing
the latch (2 pcs) of the battery (Fig. 5).
Latch
Handle
Battery
Pull out
Push
Insert
Fig. 5
CHARGING METHOD
NOTE
Before plugging into the receptacle, make sure the
following points.
○
The power source voltage is stated on the nameplate.
○
The cord is not damaged.
WARNING
Do not charge at voltage higher than indicated
on the nameplate.
If charged at voltage higher than indicated on
the nameplate, the charger will burn out.
000BookCR18DANA.indb11000BookCR18DANA.indb112021/03/3014:31:492021/03/3014:31:49
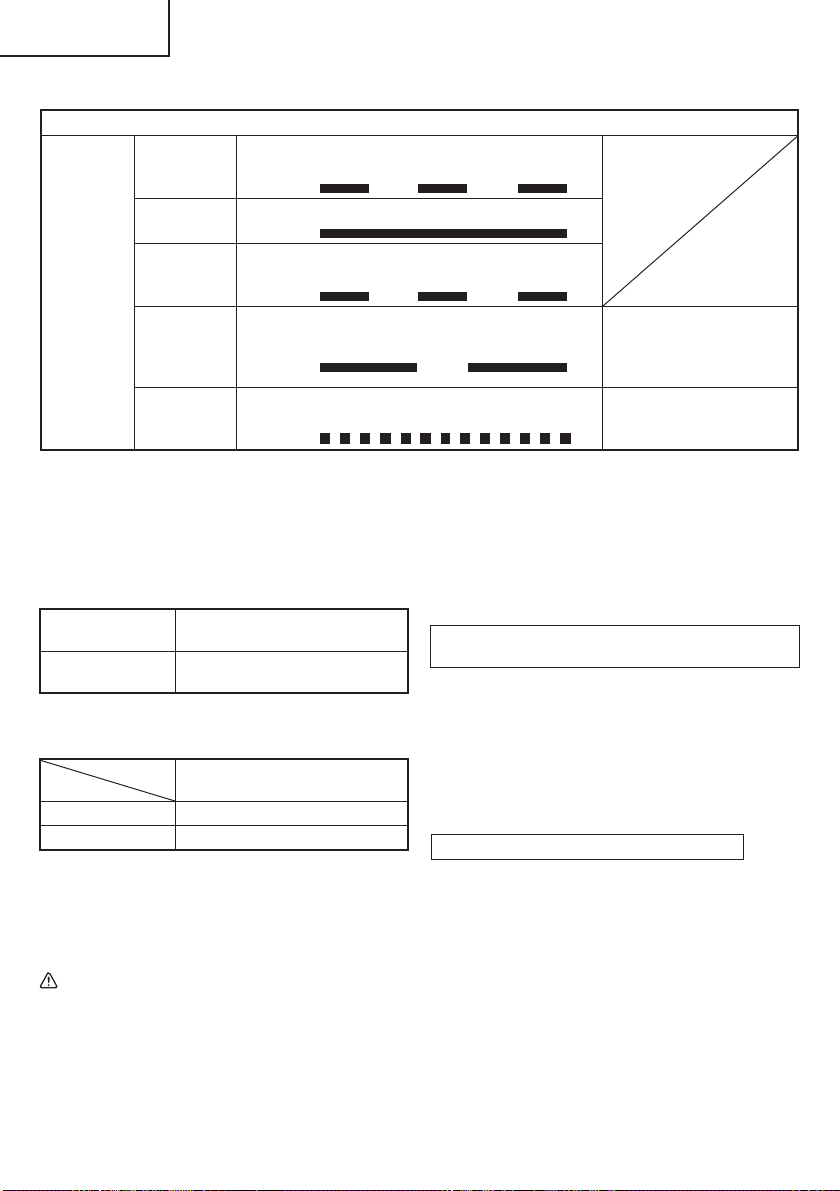
12
English
Table 2
Indications of the pilot lamp
Pilot lamp
(red)
Before
charging
Blinks
Lights for 0.5 seconds. Does not light for
0.5 seconds. (off for 0.5 seconds)
While
charging
Lights
Lights continuously
Charging
complete
Blinks
Lights for 0.5 seconds. Does not light for
0.5 seconds. (off for 0.5 seconds)
Overheat
standby
Blinks
Lights for 1 second. Does not light for
0.5 seconds. (off for 0.5 seconds)
Battery overheated.
Unable to charge.
(Charging will commence
when battery cools)
Charging
impossible
Flickers
Lights for 0.1 seconds. Does not light for
0.1 seconds. (off for 0.1 seconds)
Malfunction in the battery or
the charger
5. Remove the battery from the battery charger.
Supporting the battery charger with hand, pull out the
battery from the battery charger.
NOTE
Be sure to pull out the battery from the battery
charger after use, and then keep it.
Regarding electric discharge in case of new
batteries, etc.
As the internal chemical substance of new batteries
and batteries that have not been used for an extended
period is not activated, the electric discharge might
be low when using them the fi rst and second time.
This is a temporary phenomenon, and normal time
required for recharging will be restored by recharging
the batteries 2 – 3 times.
How to make the batteries perform longer
(1) Recharge the batteries before they become
completely exhausted.
When you feel that the power of the tool becomes
weaker, stop using the tool and recharge its battery.
If you continue to use the tool and exhaust the electric
current, the battery may be damaged and its life will
become shorter.
(2) Avoid recharging at high temperatures.
A rechargeable battery will be hot immediately after
use. If such a battery is recharged immediately after
use, its internal chemical substance will deteriorate,
and the battery life will be shortened. Leave the
battery and recharge it after it has cooled for a while.
(2) Regarding the temperature of the rechargeable
battery.
The temperatures for rechargeable batteries are
as shown in the Table 3, and batteries that have
become hot should be cooled for a while before being
recharged.
Table 3
Rechargeable
batteries
Temperatures at which the battery
can be recharged
BSL1815,
BSL1830C
32°F–122°F
(0°C–50°C)
(3) Regarding recharging time (At 68°F (20°C))
Table 4 Charging time
Charger
Battery
UC18YFSL
BSL1815 Approx. 22 min
BSL1830C Approx. 45 min
NOTE
The recharging time may vary according to the
ambient temperature.
4. Disconnect battery charger from the receptacle.
CAUTION
Do not pull the plug out of the receptacle by
pulling on the cord.
Make sure to grasp the plug when removing from
receptacle to avoid damaging cord.
000BookCR18DANA.indb12000BookCR18DANA.indb122021/03/3014:31:492021/03/3014:31:49
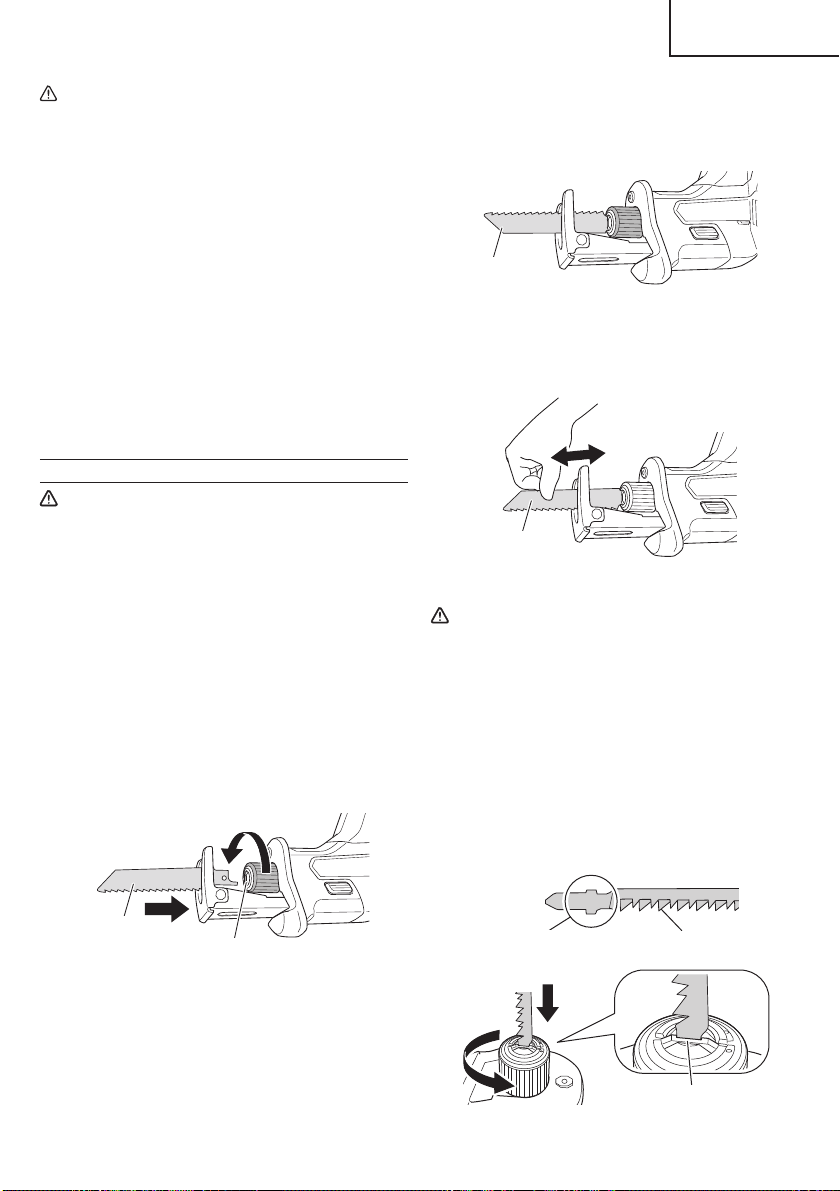
13
English
(2) The blade will be locked in place when the blade
holder is released.
The blade can be attached facing up or down
depending on the operation. (Fig. 8)
Blade
Fig. 8
(3) Pull the back of the saw blade two or three times by
hand and check that the blade is securely mounted.
(Fig. 9)
Blade
Fig. 9
CAUTION
When pulling the saw blade, be absolutely sure
to pull it from the back. Pulling other parts of the
blade will result in an injury.
NOTE
The blade can be mounted without fi tting it into the
base.
However, in this case, always make sure that the
base is attached to the tool after mounting the blade.
3. Mounting the jigsaw blade (sold separately)
A T-shank jigsaw blade can be used with this product.
(Fig. 10)
Center cavity
T-shank
Jigsaw blade
Fig. 10
CAUTION
●
When the battery charger has been continuously
used, the battery charger will be heated, thus
constituting the cause of the failures. Once the
charging has been completed, give 15 minutes
rest until the next charging.
●
If the battery is charged while it is heated
because it has been left for a long time in a
location subject to direct sunlight or because
the battery has just been used, the pilot lamp of
the charger lights for 1 second, does not light for
0.5 seconds (off for 0.5 seconds).
The battery will not be recharged. In such a
case, let the battery cool before charging.
●
When the pilot lamp fl ickers (at 0.2-second
intervals), check for and take out any foreign
objects in the charger’s battery connector. If
there are no foreign objects, it is probable that
the battery or charger is malfunctioning. Take it
to your authorized Service Center.
PRIOR TO OPERATION
CAUTION
To avoid serious accident, ensure the switch is
in the OFF position, and pull out the battery.
1. Check the work area environment
Check the work area to make sure that it is clear of
debris and clutter.
Clear the area of unnecessary personnel. Ensure that
lighting and ventilation is adequate.
2. Mounting the blade
This unit employs a detachable mechanism that
enables mounting and removal of saw blades without
the use of a wrench or other tools.
(1) Turning the blade holder in the direction indicated by
the arrow, insert the blade all the way into the small
slit of the blade holder. (Fig. 7)
Slit of blade holder
Blade
Fig. 7
000BookCR18DANA.indb13000BookCR18DANA.indb132021/03/3014:31:492021/03/3014:31:49
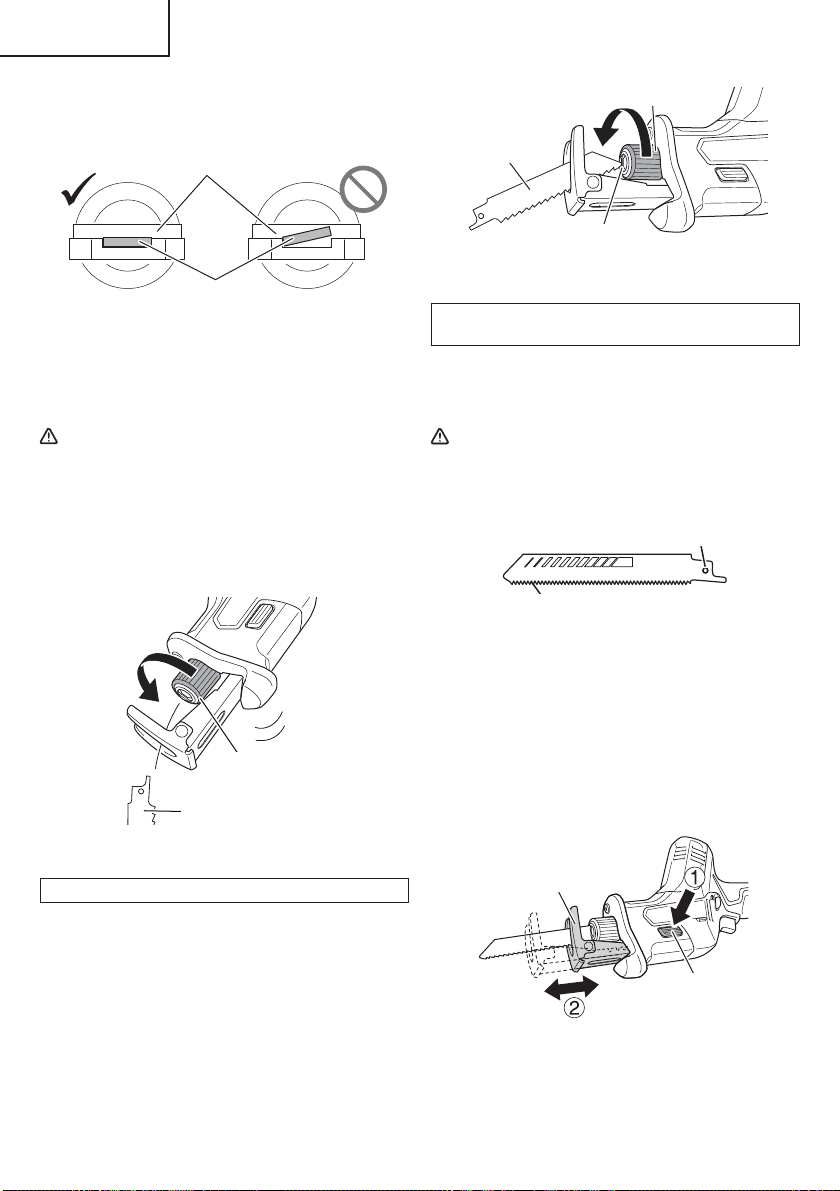
14
English
Mounted in the same manner as a reciprocating saw
blade. Make sure that the shank of the blade is fi tted
into the center cavity. (Fig. 11)
Blade
Slit
Fig. 11
Pull the back of the saw blade two or three times by
hand and check that the blade is securely mounted.
4. Dismounting the blade
CAUTION
Never touch the saw blade immediately after
use. The metal is hot and can easily burn your
skin.
(1) After turning the blade holder, point the blade
downward. The blade should fall out on its own. If the
blade fails to fall out, pull it out by hand. (Fig. 12)
Blade
Blade holder
Fig. 12
WHEN THE BLADE IS BROKEN
Even when the saw blade is broken and remains
inside the small slit of the blade holder, it should fall
out when the blade holder is turned and the blade is
pointed downward. If the blade fails to fall out on its
own, take it out by using the procedures described
below.
(1) If a part of the broken saw blade is sticking out of the
small slit of the blade holder, pull out the protruding
part and take the blade out.
(2) If the broken saw blade is hidden inside the small
slit, hook the broken blade using a tip of another saw
blade and take it out. (Fig. 13)
Another blade
Blade holder
Slit
Fig. 13
MAINTENANCE AND INSPECTION OF SAW BLADE
MOUNT
(1) After use, blow away sawdust, earth, sand, moisture,
etc., with air or brush them away with a brush, etc., to
ensure that the blade mount can function smoothly.
CAUTION
Do not use any saw blade with a worn-out blade
hole. Otherwise, the saw blade can come off ,
resulting in personal injury. (Fig. 14)
Blade
Blade hole
Fig. 14
5. Adjusting the base
To maximize blade life, the base slides in or out
to allow the stroke length to be adjusted for better
effi ciency. (Fig. 15)
Pressing the base lock button will allow the base to
be adjusted forward or back.
The base is fi xed in position when you hear a “click”.
(Fig. 15)
Base lock button
Base
Fig. 15
000BookCR18DANA.indb14000BookCR18DANA.indb142021/03/3014:31:502021/03/3014:31:50
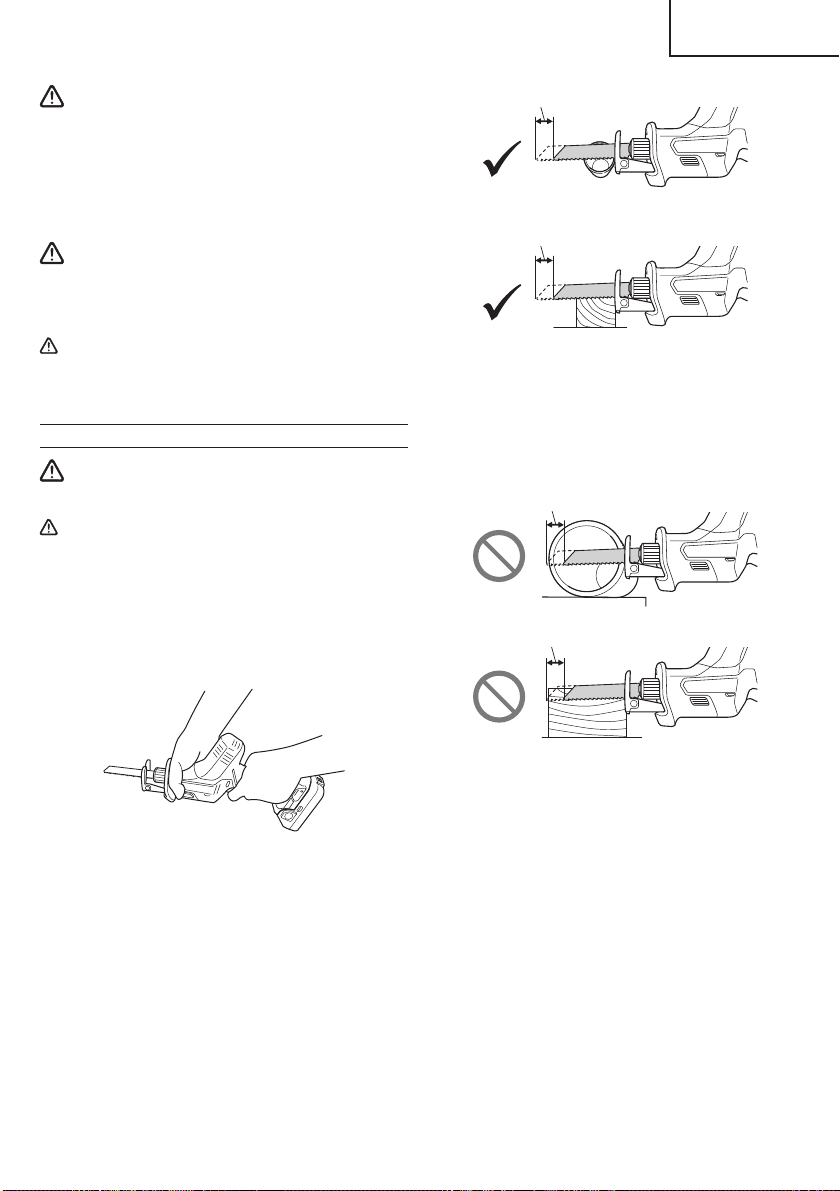
15
English
WARNING
To avoid injury and damage, do not operate the
saw without the base in place. The blade holder
may strike against the workpiece and damage
the reciprocating mechanism.
6. Check battery insertion
WARNING
If the battery is inserted while the power switch
is in the ON position, the power tool will start
operating immediately, inviting serious accident.
CAUTION
Until the battery locks in place with a little click,
if not, it may accidentally fall out of the tool
causing injury to you or someone around you.
OPERATION
WARNING
Never touch the moving parts.
CAUTION
●
Be careful not to let sawdust, earth, moisture,
etc., enter the inside of the machine through the
plunger section during operation. If sawdust
and the like accumulate in the plunger section,
always clean it before use.
●
Be sure to hold the body from the top of the
housing. (Fig. 16)
Fig. 16
●
During use, press the base against the material
while cutting.
Vibration can damage the saw blade if the base
is not pressed fi rmly against the workpiece.
Furthermore, a tip of the saw blade can
sometimes contact the inner wall of the pipe,
damaging the saw blade.
●
Select a saw blade of the most appropriate
length. Ideally, the length protruding from
the base of the saw blade after subtracting
the stroke quantity should be larger than the
material (Fig. 17).
Stroke
Stroke
Fig. 17
If you cut a large pipe, large block of wood, etc.,
that exceeds the cutting capacity of a blade;
there is a risk that the blade may contact with
the inner wall of the pipe, wood, etc., resulting in
damage. (Fig. 18)
Stroke
Stroke
Fig. 18
●
To extend the lifetime, the lithium-ion battery
equips with the protection function to stop the
output. Therefore, if the tool is overloaded, the
motor may stop. However, this is not the trouble
but the result of protection function. In this case,
release the switch of tool and eliminate the
causes of overloading.
●
Don’t remove the tool from workpiece during a
cut while the saw blade is moving.
●
Pull out the battery after completing operation.
NOTE
Take care not to lock the motor. If the motor is locked,
immediately turn the power off . If the motor is locked
for a while, the motor or battery may be burnt.
000BookCR18DANA.indb15000BookCR18DANA.indb152021/03/3014:31:502021/03/3014:31:50
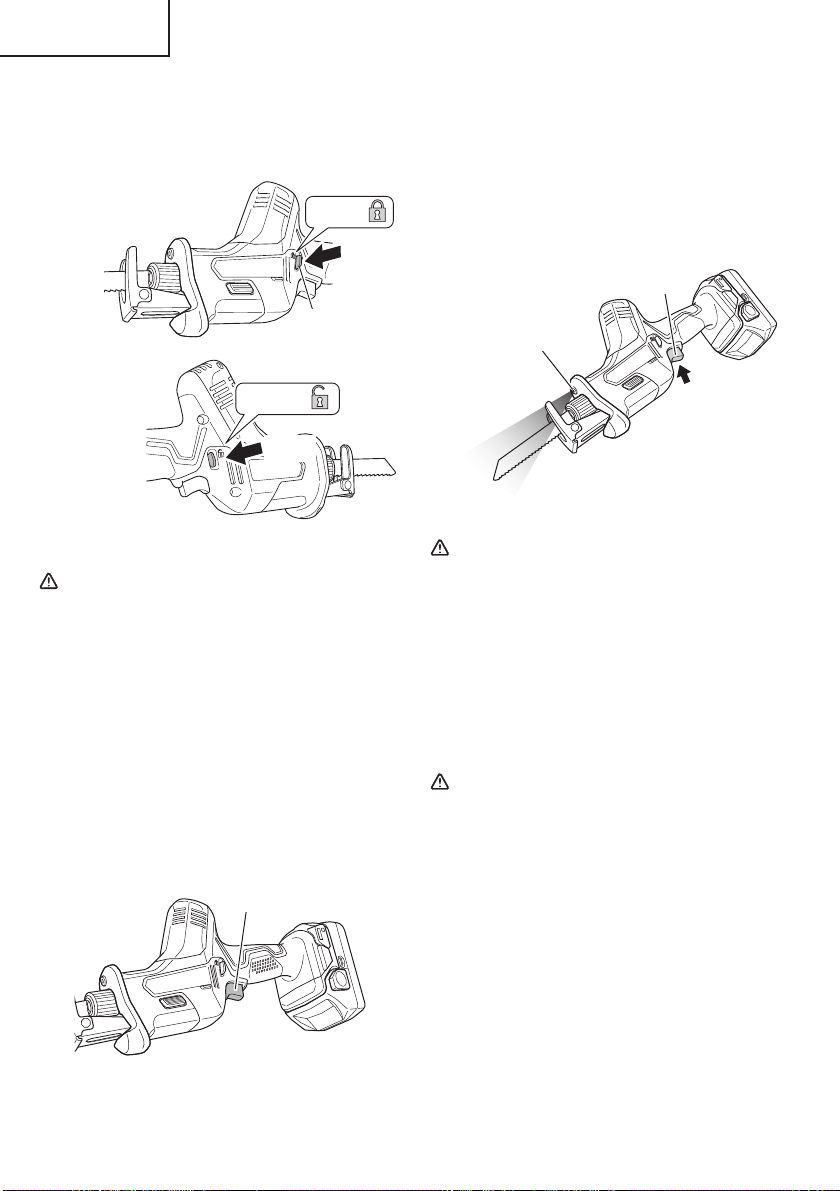
16
English
1. Switch operation
(1) Lock-off button
The tool is equipped with a lock-off button. To start
the tool, press the lock-off button and then squeeze
the trigger switch. (Fig. 19)
Lock
Unlock
Push
Push
Lock-off button
Fig. 19
CAUTION
Do not fi x and secure the lock-off button.
Besides, keep your fi nger off the trigger switch
when the tool is being carried around. Otherwise,
the trigger switch can be inadvertently turned
ON, resulting in unexpected accidents.
(2) Trigger switch
This tool is equipped with a variable speed controlled
trigger switch. The tool can be turned “ON” or
“OFF” by squeezing or releasing the trigger. The
blade plunger stroke rate can be adjusted from the
minimum to maximum nameplate stroke rate by
the pressure you apply to the trigger. Apply more
pressure to increase the speed and release pressure
to decrease speed. (Fig. 20)
Trigger switch
Fig. 20
2. How to use the LED light
While the switch is pulled, the LED light will
automatically light up the tip portion of the tool.
(Fig. 21)
The LED light will automatically turn off the switch is
released.
The LED light also functions as a warning signal that
lights up during use.
For details, see “6. LED light warning signals”.
Trigger switch
LED light
Fig. 21
CAUTION
●
Do not expose directly your eye to the light by
looking into the light.
If your eye is continuously exposed to the light,
your eye will be hurt.
●
Wipe off any dirt or grime attached to the lens of
the LED light with a soft cloth, being careful not
to scratch the lens.
Scratches on the lens of the LED light can result
in decreased brightness.
3. Cutting metallic materials
CAUTION
●
Press the base fi rmly against the workpiece.
●
Never apply any unreasonable force to the saw
blade when cutting. Doing so can easily break
the blade.
●
The motor can be locked sometimes, depending
on the combination of the material to be cut and
the blade. Whenever the motor gets locked,
switch it off immediately.
●
Do not operate power tools in explosive
atmospheres, such as in the presence of
fl ammable liquids, gases or dust. Reciprocating
saw create sparks which may ignite the dust or
fumes.
000BookCR18DANA.indb16000BookCR18DANA.indb162021/03/3014:31:502021/03/3014:31:50

17
English
(1) Fasten a workpiece fi rmly before operation. (Fig. 22)
Fig. 22
(2) When cutting metallic materials, use proper machine
oil (turbine oil, etc.). When not using liquid machine
oil, apply grease over the workpiece.
CAUTION
The service life of the saw blade will be
drastically shortened if you don’t use machine
oil.
4. Cutting lumber
When cutting lumber, make sure that the workpiece is
fastened fi rmly before beginning. (Fig. 23)
Fig. 23
CAUTION
●
Never apply any unreasonable force to the saw
blade when cutting. Also remember to press the
base against the lumber fi rmly.
●
Delay the feed speed when cutting the material
into small circular arcs. An unreasonably fast
feed may break the blade.
5. Plunge cutting
With this tool, you can perform plunge cutting on
plywood panels and thin board materials.
Use the saw blade that is as short and thick as
possible. Be sure to use caution during the cutting
operation and observe the following procedures.
(1) Press the base against the material, keeping the tip
of the blade away from the material when you pull the
trigger switch. (Fig. 24).
(2) Pull lightly on the trigger switch to maintain a low
speed as you gradually saw into the material.
(Fig. 25).
(3) Pull the switch all the way and slowly advance the
saw. (Fig. 26).
NOTE
○
Using the collar or the base as support, gradually cut
in from the tip of the blade.
○
As the base is metal, using it for support may scratch
or damage the surface depending on the material
being cut. In this case, use the collar as support. If
you remove the base when window cutting, make
sure it is re-attached to the tool when you continue
operating the tool.
Collar
Fig. 24
Fig. 25
Fig. 26
CAUTION
●
Avoid plunge cutting for metallic materials. This
can easily damage the blade.
●
Never pull the Trigger switch while the tip of the
saw blade is pressed against the material. If you
do so, the blade can easily be damaged when it
collides with the material.
●
Make absolutely sure that you cut slowly
while holding the body fi rmly. If you apply any
unreasonable force to the saw blade during
the cutting operation, the blade can easily be
damaged.
000BookCR18DANA.indb17000BookCR18DANA.indb172021/03/3014:31:502021/03/3014:31:50
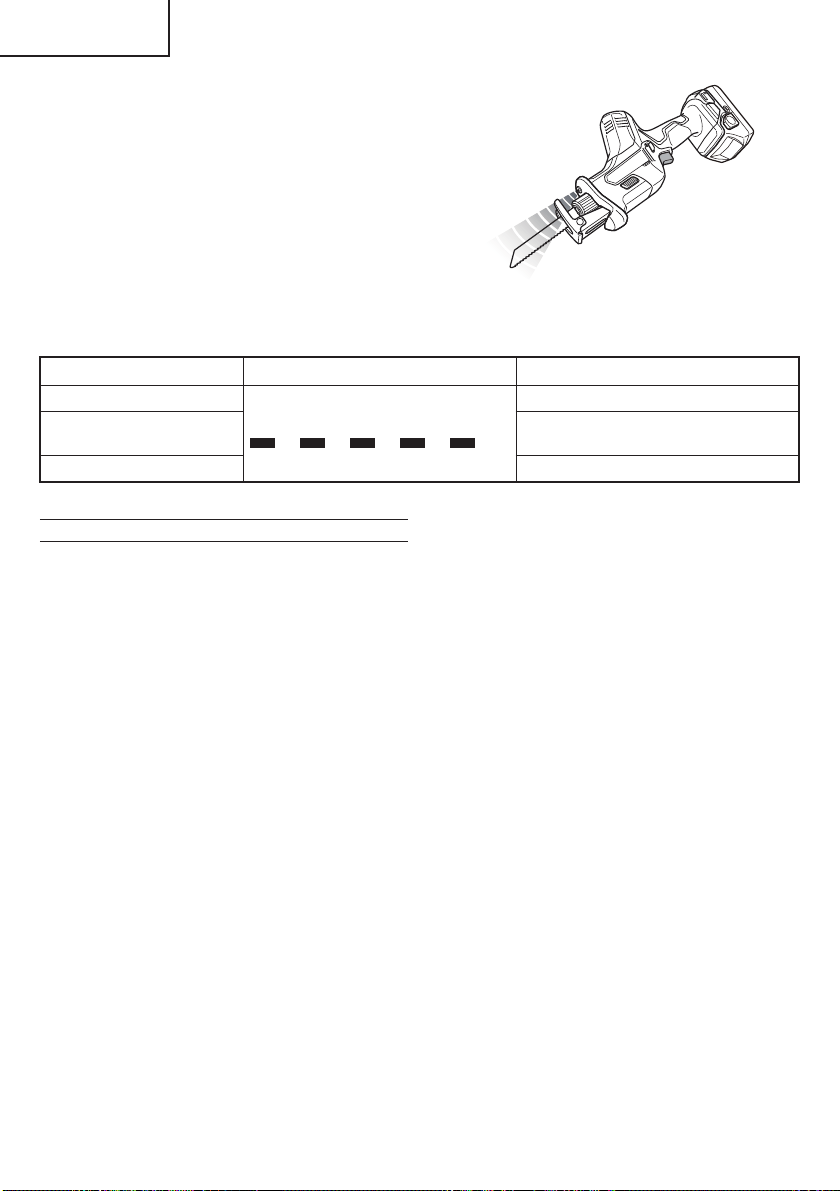
18
English
6. LED light warning signals (Fig. 27)
This product features functions that are designed
to protect the tool itself as well as the battery. While
the switch is pulled, if any of the safeguard functions
activate during operation, the LED light will blink as
described in Table 5. When any of the safeguard
functions are triggered, immediately remove your
fi nger from the switch and follow the instructions
described under corrective action.
Fig. 27
Table 5
Safeguard Function LED Light Display Corrective Action
Overload Protection
On 0.25 second/off 0.25 second
Remove the cause of the overload.
Temperature Protection
Allow the tool and battery to thoroughly
cool.
Low Voltage Protection Recharge the battery.
OPERATIONAL CAUTIONS
Resting the unit after continuous work
(1) The power tool is equipped with a temperature
protection circuit to protect the motor.
Continuous work may cause the temperature of the
unit to rise, activating the temperature protection
circuit and automatically stopping operation.
If this happens, allow the power tool to cool before
resuming use.
(2) After use for continuous works, rest the unit for
15 minutes or so when replacing the battery. The
temperature of the motor, switch, etc., will rise if
the work is started again immediately after battery
replacement, eventually resulting in burnout.
000BookCR18DANA.indb18000BookCR18DANA.indb182021/03/3014:31:502021/03/3014:31:50

19
English
MAINTENANCE AND INSPECTION
WARNING
Be sure to turn off the switch and pull out the battery before doing any inspection or maintenance.
1. Inspecting the blade
Continued use of a dull or damaged blade will
result in reduced cutting effi ciency and may cause
overloading of the motor. Replace the blade with a
new one as soon as excessive abrasion is noted.
CAUTION
If a dull saw blade is used, reactive force is
increased during cutting operation. Avoid the
use of the dull saw blade without repair.
2. Check the Screws
Loose screws are dangerous. Regularly inspect them
and make sure they are tight.
CAUTION
Using this power tool with loosened screws is
extremely dangerous.
3. Maintenance of the motor
The motor unit winding is the very “heart” of the
power tool. Exercise due care to ensure the winding
does not become damaged and/or wet with oil or
water.
4. Check for Dust
Dust may be removed with a soft cloth or a cloth
dampened with soapy water.
Do not use bleach, chlorine, gasoline or thinner, for
they may damage the plastics.
5. Inspection of terminals (tool and battery)
Check to make sure that swarf and dust have not
collected on the terminals.
On occasion check prior, during and after operation.
CAUTION
Remove any swarf or dust which may have collected
on the terminals.
Failure to do so may result in malfunction.
6. Lubrication
The bearings in this tool have been suffi ciently
lubricated with quality lubricating oil, taking into
account the expected life of this tool under normal
operating conditions. As a result, no further
lubrication is necessary.
7. Disposal of the exhausted battery
WARNING
Do not dispose of the exhausted battery. The
battery must explode if it is incinerated. The
battery is recyclable. At the end of it’s useful
life, under various state and local laws, it may
be illegal to dispose of this battery into the
municipal waste stream. Check with your local
solid waste offi cials for details in your area for
recycling options or proper disposal.
8. Storage
Storing in a place below 104°F (40°C) and out of the
reach of children.
NOTE
Storing lithium-ion batteries
Make sure the lithium-ion batteries have been fully
charged before storing them.
Prolonged storage (3 months or more) of batteries
with a low charge may result in performance
deterioration, signifi cantly reducing battery usage
time or rendering the batteries incapable of holding a
charge.
However, signifi cantly reduced battery usage time
may be recovered by repeatedly charging and using
the batteries two to fi ve times.
If the battery usage time is extremely short despite
repeated charging and use, consider the batteries
dead and purchase new batteries.
9. Service and repairs
All quality power tools will eventually require servicing
or replacement of parts because of wear from normal
use. To assure that only authorized replacement
parts will be used, all service and repairs must
be performed by a metabo HPT AUTHORIZED
SERVICE CENTER, ONLY.
CAUTION
In the operation and maintenance of power tools,
the safety regulations and standards prescribed
in each country must be observed.
000BookCR18DANA.indb19000BookCR18DANA.indb192021/03/3014:31:502021/03/3014:31:50
20
English
Important notice on the batteries for the
metabo HPT cordless power tools
Please always use one of our designated genuine
batteries. We cannot guarantee the safety and
performance of our cordless power tool when used
with batteries other than these designated by us, or
when the battery is disassembled and modifi ed (such
as disassembly and replacement of cells or other
internal parts).
ACCESSORIES
WARNING
ALWAYS use Only authorized metabo HPT replacement parts and accessories. NEVER use replacement
parts or accessories which are not intended for use with this tool. Contact metabo HPT if you are not
sure whether it is safe to use a particular replacement part or accessory with your tool.
The use of any other attachment or accessory can be dangerous and could cause injury or mechanical
damage.
NOTE: Accessories are subject to change without any obligation on the part of the metabo HPT.
STANDARD ACCESSORIES
CR18DA
(NN)
No. 107 Bl-METAL Blades. Parts Number: 318617 .................................................... 1
No. 5 HCS Blades (HCS: Highspeed Carbon Steel) Parts Number: 958185 ......... 1
Battery, battery charger, plastic case and battery cover are not contained.
OPTIONAL ACCESSORIES
1. Battery (BSL1815 / BSL1830C)
2. Battery charger (UC18YFSL)
3. Battery cover (Code No. 329897)
000BookCR18DANA.indb20000BookCR18DANA.indb202021/03/3014:31:502021/03/3014:31:50
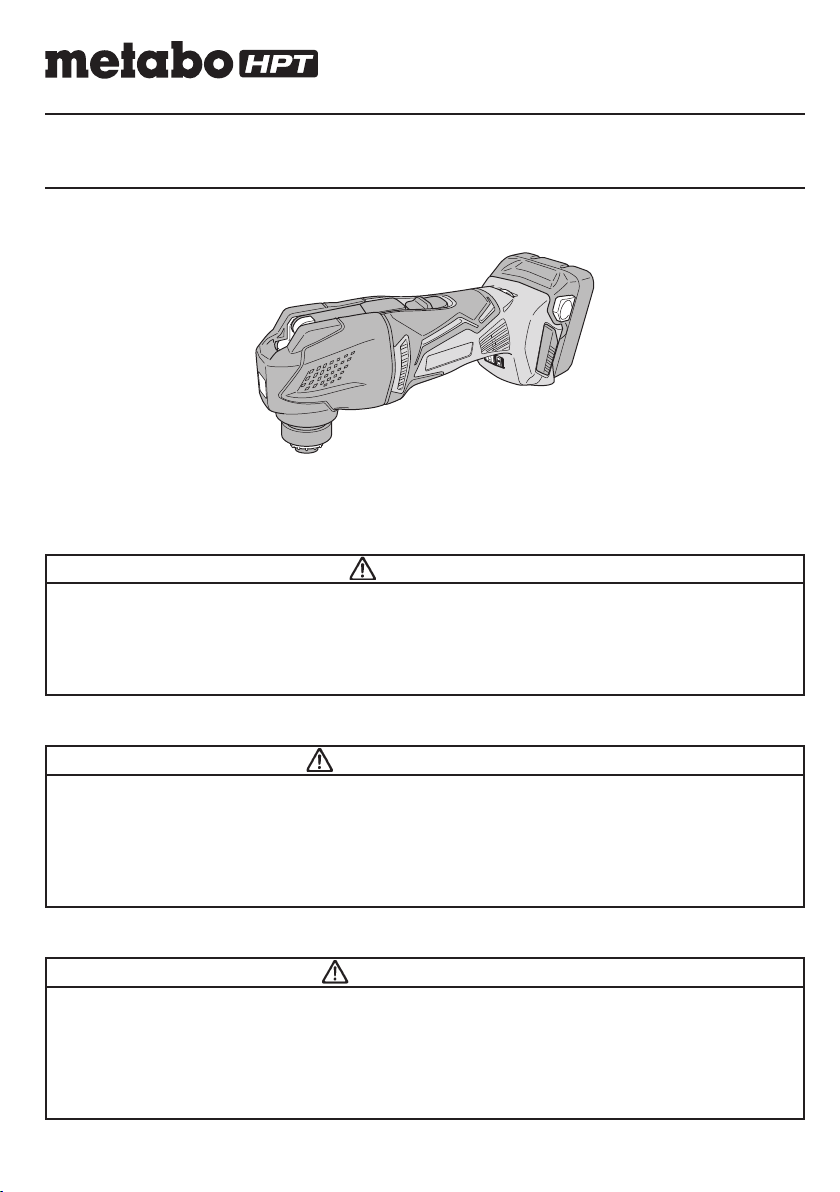
Model
Modèle
Modelo
CV 18DBL
Cordless Multi Tool
Multi tool sans fi l
Multiherramienta a batería
SAFETY INSTRUCTIONS AND INSTRUCTION MANUAL
WARNING
IMPROPER OR UNSAFE use of this power tool can result in death or serious bodily injury!
This manual contains important information about product safety. Please read and
understand this manual BEFORE operating the power tool. Please keep this manual
available for other users and owners before they use the power tool. This manual should be
stored in safe place.
INSTRUCTIONS DE SECURITE ET MODE D’EMPLOI
AVERTISSEMENT
Une utilisation INCORRECTE OU DANGEREUSE de cet outil motorisé peut entraîner la
mort ou de sérieuses blessures corporelles !
Ce mode d’emploi contient d’importantes informations à propos de la sécurité de ce produit.
Prière de lire et de comprendre ce mode d’emploi AVANT d’utiliser l’outil motorisé. Garder ce
mode d’emploi à la disponibilité des autres utilisateurs et propriétaires avant qu’ils utilisent
l’outil motorisé. Ce mode d’emploi doit être conservé dans un endroit sûr.
INSTRUCCIONES DE SEGURIDAD Y MANUAL DE INSTRUCCIONES
ADVERTENCIA
¡La utilización INAPROPIADA O PELIGROSA de esta herramienta eléctrica puede resultar
en lesiones de gravedad o la muerte!
Este manual contiene información importante sobre la seguridad del producto. Lea y
comprenda este manual ANTES de utilizar la herramienta eléctrica. Guarde este manual
para que puedan leerlo otras personas antes de utilizar la herramienta eléctrica. Este
manual debe ser guardado en un lugar seguro.
Designed for operating in USA & Canada only.
When this product is used in areas other than the USA & Canada,
we cannot guarantee the product quality and performance.
000BookCV18DBLUSmetabo.indb1000BookCV18DBLUSmetabo.indb12021/03/3014:46:462021/03/3014:46:46

2
English
IMPORTANT SAFETY INSTRUCTIONS
Read all of the safety precautions, warnings and operating instructions in the Instruction Manual before operating or
maintaining this power tool.
Most accidents that result from power tool operation and maintenance are caused by the failure to observe basic safety
rules or precautions. An accident can often be avoided by recognizing a potentially hazardous situation before it occurs,
and by observing appropriate safety procedures.
Basic safety precautions are outlined in the "SAFETY" section of this Instruction Manual and in the sections which
contain the operation and maintenance instructions.
Hazards that must be avoided to prevent bodily injury or machine damage are identifi ed by WARNINGS on the power
tool and in this Instruction Manual.
NEVER use this power tool in a manner that has not been specifi cally recommended by metabo HPT.
MEANINGS OF SIGNAL WORDS
WARNING indicates a potentially hazardous situations which, if ignored, could result in death or serious injury.
CAUTION indicates a potentially hazardous situations which, if not avoided, may result in minor or moderate injury, or
may cause machine damage.
NOTE emphasizes essential information.
SAFETY
GENERAL POWER TOOL SAFETY WARNINGS
WARNING
Read all safety warnings and all instructions.
Failure to follow the warnings and instructions may result in electric shock, fi re and/or serious injury.
Save all warnings and instructions for future reference.
The term “power tool” in the warnings refers to your mains-operated (corded) power tool or battery-operated
(cordless) power tool.
1) Work area safety
a) Keep work area clean and well lit.
Cluttered or dark areas invite accidents.
b) Do not operate power tools in explosive
atmospheres, such as in the presence of
fl ammable liquids, gases or dust.
Power tools create sparks which may ignite the
dust or fumes.
c) Keep children and bystanders away while
operating a power tool.
Distractions can cause you to lose control.
2) Electrical safety
a) Power tool plugs must match the outlet.
Never modify the plug in any way.
Do not use any adapter plugs with earthed
(grounded) power tools.
Unmodifi ed plugs and matching outlets will reduce
risk of electric shock.
b) Avoid body contact with earthed or grounded
surfaces such as pipes, radiators, ranges and
refrigerators.
There is an increased risk of electric shock if your
body is earthed or grounded.
c) Do not expose power tools to rain or wet
conditions.
Water entering a power tool will increase the risk
of electric shock.
d) Do not abuse the cord. Never use the cord
for carrying, pulling or unplugging the power
tool. Keep cord away from heat, oil, sharp
edges or moving parts.
Damaged or entangled cords increase the risk of
electric shock.
e) When operating a power tool outdoors, use
an extension cord suitable for outdoor use.
Use of a cord suitable for outdoor use reduces the
risk of electric shock.
f) If operating a power tool in a damp location
is unavoidable, use a residual current device
(RCD) protected supply.
Use of an RCD reduces the risk of electric shock.
3) Personal safety
a) Stay alert, watch what you are doing and use
common sense when operating a power tool.
Do not use a power tool while you are tiredor
under the infl uence of drugs, alcohol or
medication.
000BookCV18DBLUSmetabo.indb2000BookCV18DBLUSmetabo.indb22021/03/3014:46:472021/03/3014:46:47

3
English
A moment of inattention while operating power
tools may result in serious personal injury.
b) Use personal protective equipment. Always
wear eye protection.
Protective equipment such as dust mask, non-
skid safety shoes, hard hat, or hearing protection
used for appropriate conditions will reduce
personal injuries.
c) Prevent unintentional starting. Ensure the
switch is in the off -position before connecting
to power source and/or battery pack, picking
up or carrying the tool.
Carrying power tools with your fi nger on the switch
or energising power tools that have the switch on
invites accidents.
d) Remove any adjusting key or wrench before
turning the power tool on.
A wrench or a key left attached to a rotating part of
the power tool may result in personal injury.
e) Do not overreach. Keep proper footing and
balance at all times.
This enables better control of the power tool in
unexpected situations.
f) Dress properly. Do not wear loose clothing or
jewellery. Keep your hair, clothing and gloves
away from moving parts.
Loose clothes, jewellery or long hair can be caught
in moving parts.
g) If devices are provided for the connection
of dust extraction and collection facilities,
ensure these are connected and properly
used.
Use of dust collection can reduce dust-related
hazards.
4) Power tool use and care
a) Do not force the power tool. Use the correct
power tool for your application.
The correct power tool will do the job better and
safer at the rate for which it was designed.
b) Do not use the power tool if the switch does
not turn it on and off .
Any power tool that cannot be controlled with the
switch is dangerous and must be repaired.
c) Disconnect the plug from the power source
and/or the battery pack from the power tool
before making any adjustments, changing
accessories, or storing power tools.
Such preventive safety measures reduce the risk
of starting the power tool accidentally.
d) Store idle power tools out of the reach of
children and do not allow persons unfamiliar
with the power tool or these instructions to
operate the power tool.
Power tools are dangerous in the hands of
untrained users.
e) Maintain power tools. Check for misalignment
or binding of moving parts, breakage of parts
and any other condition that may aff ect the
power tool’s operation.
If damaged, have the power tool repaired
before use.
Many accidents are caused by poorly maintained
power tools.
f) Keep cutting tools sharp and clean.
Properly maintained cutting tools with sharp
cutting edges are less likely to bind and are easier
to control.
g) Use the power tool, accessories and tool bits
etc. in accordance with these instructions,
taking into account the working conditions
and the work to be performed.
Use of the power tool for operations diff erent
from those intended could result in a hazardous
situation.
5) Battery tool use and care
a) Recharge only with the charger specifi ed by
the manufacturer.
A charger that is suitable for one type of battery
pack may create a risk of fi re when used with
another battery pack.
b) Use power tools only with specifi cally
designated battery packs.
Use of any other battery packs may create a risk of
injury and fi re.
c) When battery pack is not in use, keep it away
from other metal objects, like paper clips,
coins, keys, nails, screws or other small metal
objects, that can make a connection from one
terminal to another.
Shorting the battery terminals together may cause
burns or a fi re.
d) Under abusive conditions, liquid may be
ejected from the battery; avoid contact. If
contact accidentally occurs, fl ush with water.
If liquid contacts eyes, additionally seek
medical help.
Liquid ejected from the battery may cause irritation
or burns.
6) Service
a) Have your power tool serviced by a
quali
fi ed repair person using only identical
replacement parts.
This will ensure that the safety of the power tool is
maintained.
–WARNING–
To reduce the risk of injury, user must read
instruction manual.
000BookCV18DBLUSmetabo.indb3000BookCV18DBLUSmetabo.indb32021/03/3014:46:472021/03/3014:46:47
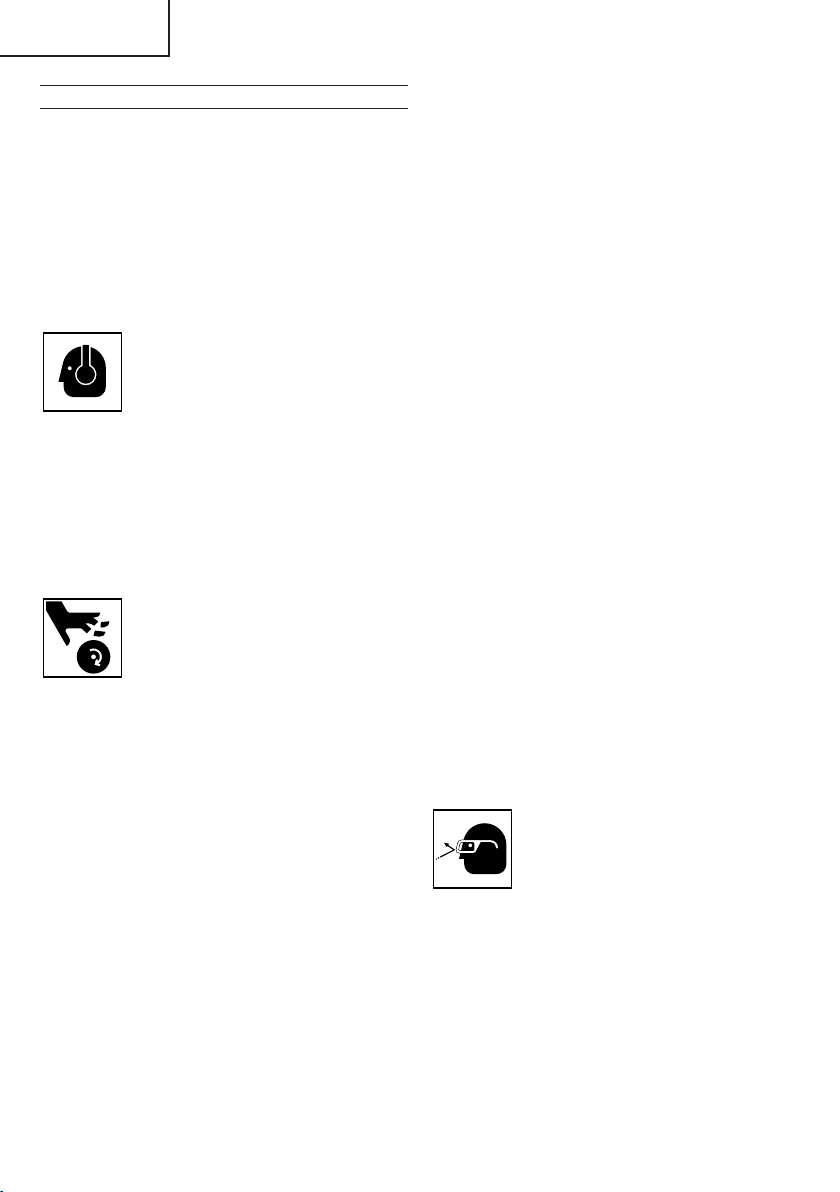
4
English
SPECIFIC SAFETY RULES AND SYMBOLS
1. Hold power tool by insulated gripping surfaces,
when performing an operation where the cutting
accessory may contact hidden wiring.
Cutting accessory contacting a “live” wire may make
exposed metal parts of the power tool “live” and could
give the operator an electric shock.
2. Use clamps or another practical way to secure
and support the workpiece to a stable platform.
Holding the work by hand or against your body leaves
it unstable and may lead to loss of control.
3. ALWAYS wear ear protectors when using the tool
for extended periods.
Prolonged exposure to high intensity noise
can cause hearing loss.
4. NEVER touch the application tool with bare hands
after operation.
5. Because the cordless multi tool operates by battery
power, be aware of the fact that it can begin to operate
at any time.
6. When working at elevated locations, clear the area
of all other people and be aware of conditions below
you.
7. NEVER touch moving parts.
NEVER place your hands, fi ngers or other
body parts near the tool’s moving parts.
8. NEVER operate without all guards in place.
NEVER operate this tool without all guards or safety
features in place and in proper working order. If
maintenance or servicing requires the removal of a
guard or safety feature, be sure to replace the guard
or safety feature before resuming operation of the
tool.
9. Use right tool.
Don’t force small tool or attachment to do the job of a
heavy-duty tool.
Don’t use tool for purpose not intended —for
example— don’t use multi tool for cutting tree limbs or
logs.
10. NEVER use a power tool for applications other
than those specifi ed.
NEVER use a power tool for applications other than
those specifi ed in the Instruction Manual.
11. Handle tool correctly.
Operate the tool according to the instructions
provided herein. Do not drop or throw the tool.
NEVER allow the tool to be operated by children,
individuals unfamiliar with its operation or
unauthorized personnel.
12. Keep all screws, bolts and covers tightly in place.
Keep all screws, bolts, and plates tightly mounted.
Check their condition periodically.
13. Do not use power tools if the plastic housing or
handle is cracked.
Cracks in the tool’s housing or handle can lead to
electric shock. Such tools should not be used until
repaired.
14. Application tools and accessories must be
securely mounted to the tool.
Prevent potential injuries to yourself or others.
Application tools, cutting implements and accessories
which have been mounted to the tool should be
secure and tight.
15. Keep motor air vent clean.
The tool’s motor air vent must be kept clean so that
air can freely fl ow at all times. Check for dust build-up
frequently.
16. NEVER use a tool which is defective or operating
abnormally.
If the tool appears to be operating unusually, making
strange noises, or otherwise appears defective, stop
using it immediately and arrange for repairs by a
metabo HPT authorized service center.
17. NEVER leave tool running unattended. Turn
power off .
Don’t leave tool until it comes to a complete stop.
18. Carefully handle power tools.
Should a power tool be dropped or struck against
hard materials inadvertently, it may be deformed,
cracked, or damaged.
19. Do not wipe plastic parts with solvent.
Solvents such as gasoline, thinner benzine, carbon
tetrachloride, and alcohol may damage and crack
plastic parts. Do not wipe them with such solvents.
Wipe plastic parts with a soft cloth lightly dampened
with soapy water and dry thoroughly.
20. ALWAYS wear eye protection that meets the
requirement of the latest revision of ANSI
Standard Z87.1.
21. ALWAYS wear a mask or respirator to protect yourself
from dust or potentially harmful particles generated
during operation.
22. ALWAYS fi rmly grip the handle while operating.
23. ALWAYS be careful with buried object such as an
underground wiring.
Touching these active wiring or electric cable with this
tool, you may receive an electric shock.
Confi rm if there are any buried object such as electric
cable within the wall, fl oor or ceiling where you are
going to operate here after.
000BookCV18DBLUSmetabo.indb4000BookCV18DBLUSmetabo.indb42021/03/3014:46:472021/03/3014:46:47
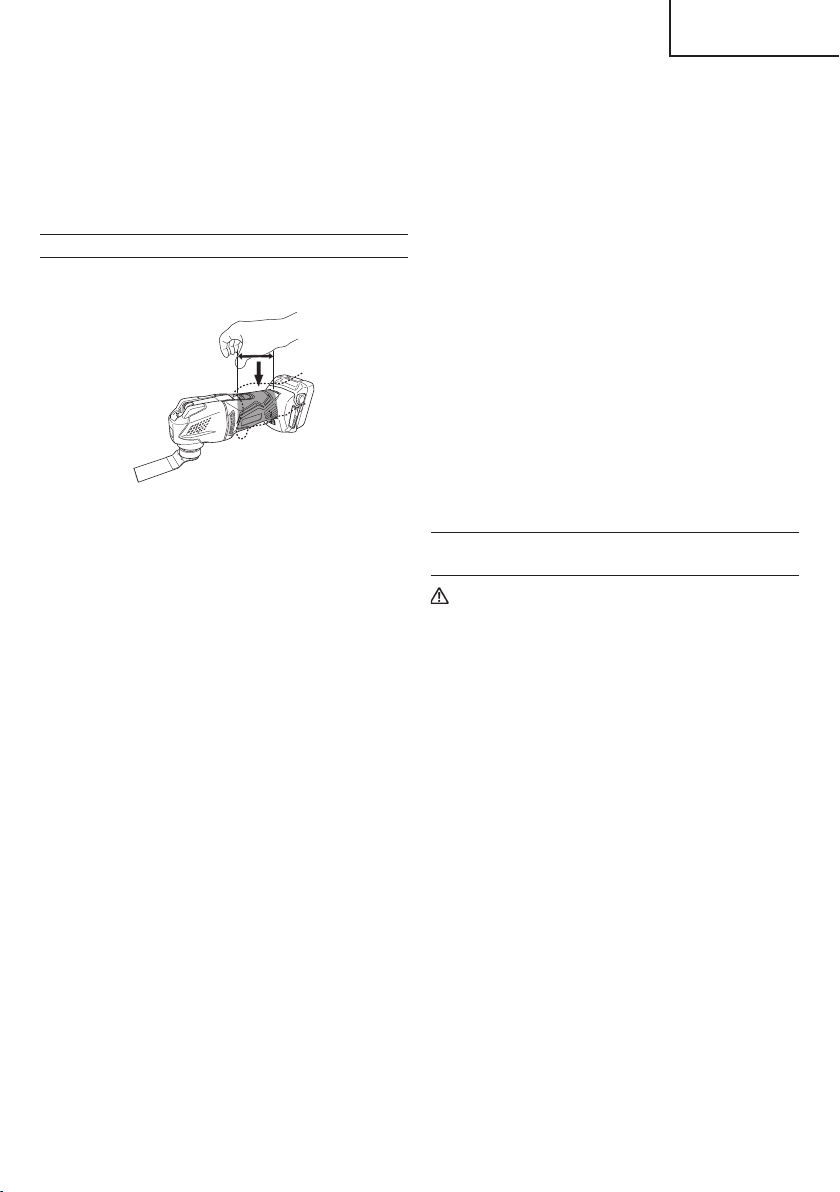
5
English
24. Defi nitions for symbols used on this tool
V ..............volts
—
---
............direct current
Hz ............hertz
A ..............amperes
no ............no load speed
---/min ...... revolutions or reciprocation per minute
ADDITIONAL SAFETY WARNINGS
1. Always hold the tool fi rmly with one hand on housing
(Fig. 1). Do not touch the metal part.
Fig. 1
2. Make sure that the area to be cut is absolutely free
of any hidden obstructions including electrical wiring,
water, or gas pipes. Cutting into the aforementioned
may result in electric shock or short circuit, gas leak
or other hazards that can cause serious accidents or
injuries.
3. Make sure to securely hold the tool during operation.
Failure to do so can result in accidents or injuries.
4. Secure the workpiece. A workpiece clamped with
clamping devices or in a vice is held more secure than
by hand.
5. Setting up and checking the work environment.
Check if the work environment is suitable by following
the precaution.
6. Dust particles such as silica or asbestos are
hazardous to your health. When working with
materials containing these components, take
appropriate dust-proofi ng measures.
7. Working with metal can cause sparks. Make sure
there are no fl ammable and combustible materials in
the vicinity and that they are stored in a safe location.
8. The motor may stop in the event the tool is overloaded.
In this should occur, release the tool’s switch and
eliminate the cause of the overload.
9. Do not look directly into the light. Such actions could
result in eye injury.
10. Do not touch the application tool, its attachment area
or other metal surfaces immediately after use as they
will be hot. Doing so may result in burns or injury.
The metal is hot and can easily burn your skin.
11. Make sure that there is no one below when operating
the tool in high locations. Dropping the tool or
materials may result in accident or injury.
12. Never apply any unreasonable force to the application
tool when working. Doing so may break the application
tool or damage the motor.
13. Do not leave the tool running unattended on the fl oor,
table or other locations. Doing so may result in injury.
14. When attaching application tools, be careful not to get
your fi ngers or other extremities caught in the lever.
15. If the application tool seems to be loose or uneven
after attaching it to the unit, re-attach the tool.
Operating the unit with a loose or uneven application
tool may result in injury.
16. When switching on the tool, make sure the application
tool is not in contact with any processing materials.
Failure to do so may result in injury.
17. For cutting effi ciency, switch the mode of the
application tool according to task conditions and
materials to be cut.
18. After use, be sure not to place the tool near chips or
sawdust before it comes to a full stop as the tool may
suck in those particles.
19. Do not polish wood with sanding paper used for metal
polishing.
20. Do not use worn or clogged sanding paper.
IMPORTANT SAFETY INSTRUCTIONS
FOR BATTERY CHARGER
WARNING
Death or serious bodily injury could result from
improper or unsafe use of battery chargers.
To avoid these risks, follow these basic safety
instructions:
Battery and battery charger are not included with this
product
READ ALL INSTRUCTIONS
1. This manual contains important safety and operating
instructions for battery charger Model UC18YFSL /
UC18YKSL.
2. Before using battery charger, read all instructions
and cautionary markings on (1) battery charger, (2)
battery, and (3) product using battery.
3. To reduce risk of injury, charge metabo HPT
rechargeable battery type BSL18 series. Other type
of batteries may burst causing personal injury and
damage.
4. Use of an attachment not recommended or sold by
the battery charger manufacturer may result in a risk
of fi re, electric shock, or injury to persons.
5. To reduce risk of damage to electric plug and cord,
pull by plug when disconnecting battery charger.
6. Make sure cord is located so that it will not be stepped
on, tripped over, or otherwise subjected to damage or
stress.
000BookCV18DBLUSmetabo.indb5000BookCV18DBLUSmetabo.indb52021/03/3014:46:472021/03/3014:46:47
6
English
7. An extension cord should not be used unless
absolutely necessary. Use of improper extension
cord could result in a risk of fi re and electric shock.
If extension cord must be used make sure:
a. That blades of extension cord are the same
number, size, and shape as those of plug on
battery charger:
* If the input rating of a battery charger is given in watts
rather than in amperes, the corresponding ampere
rating is to be determined by dividing the wattage
rating by the voltage rating―for example:
1,250 watts
= 10 amperes
125 volts
8. Do not operate battery charger with damaged cord or
plug-replace them immediately.
9. Do not operate battery charger if it has received a
sharp blow, been dropped, or otherwise damaged in
any way; take it to a qualifi ed serviceman.
10. Do not disassemble battery charger; take it to a
qualifi ed serviceman when service or repair is
required. Incorrect reassembly may result in a risk of
electric shock or fi re.
11. To reduce risk of electric shock, unplug charger from
receptacle before attempting any maintenance or
cleaning. Removing the battery will not reduce this
risk.
IMPORTANT SAFETY INSTRUCTIONS
FOR USE OF THE BATTERY AND
BATTERY CHARGER
You must charge the battery before you can use the power
tool. Before using the model UC18YFSL / UC18YKSL
battery charger, be sure to read all instructions and
cautionary statements on it, the battery and in this manual.
CAUTION
USE ONLY metabo HPT BATTERY TYPES BSL18
SERIES. OTHER TYPES OF BATTERIES MAY
BURST AND CAUSE INJURY!
Follow these instructions to avoid the risk of injury:
WARNING
Improper use of the battery or battery charger
can lead to serious injury. To avoid these injuries:
1. NEVER disassemble the battery.
2. NEVER incinerate the battery, even if it is damaged or
is completely worn out. The battery can explode in a
fi re.
3. NEVER short-circuit the battery.
4. NEVER insert any objects into the battery charger’s
air vents. Electric shock or damage to the battery
charger may result.
5. NEVER charge outdoors. Keep the battery away
from direct sunlight and use only where there is low
humidity and good ventilation.
6. NEVER charge when the temperature is below 32°F
(0°C) or above 104°F (40°C).
Charging the battery at temperatures outside the
range of 32°F–104°F (0°C–40°C) may prevent proper
charging and reduce battery life.
7. NEVER connect two battery chargers together.
8. NEVER insert foreign objects into the hole for the
battery or the battery charger.
9. NEVER use a booster transformer when charging.
10. NEVER use an engine generator or DC power to
charge.
11. NEVER store the battery or battery charger in places
where the temperature may reach or exceed 104°F
(40°C) such as inside metal box or car.
12. NEVER expose the battery or battery charger to rain
or wet conditions.
13. ALWAYS operate charger on standard household
electrical power (120 volts). Using the charger on any
other voltage may overheat and damage the charger.
Table 1
RECOMMENDED MINIMUM AWG SIZE FOR
EXTENSION CORDS FOR BATTERY CHARGERS
AC input rating Ampere* AWG size of cord
Equal to or
greater than
but less
than
Length of cord, feet (meter)
25 (7.5) 50 (15) 100 (30) 150 (45)
0 2 18 18 18 16
2 3 18 18 16 14
3 4 18 18 16 14
b. That extension cord is properly wired and in good
electrical condition; and
c. That wire size is large enough for AC ampere
rating of battery charger as specifi ed in Table 1.
000BookCV18DBLUSmetabo.indb6000BookCV18DBLUSmetabo.indb62021/03/3014:46:472021/03/3014:46:47

7
English
14. ALWAYS wait at least 15 minutes between charges to
avoid ove rheating the charger.
15. ALWAYS disconnect the power cord from its
receptacle when the charger is not in use.
CAUTION ON LITHIUM-ION BATTERY
To extend the lifetime, the lithium-ion battery equips with
the protection function to stop the output.
In the cases of 1 to 3 described below, when using this
product, even if you are pulling the switch, the motor may
stop. This is not the trouble but the result of protection
function.
1. When the battery power remaining runs out, the motor
stops.
In such case, charge it up immediately.
2. If the tool is overloaded, the motor may stop. In this
case, release the switch of tool and eliminate causes
of overloading. After that, you can use it again.
3. If the battery is overheated under overload work, the
battery power may stop.
In this case, stop using the battery and let the battery
cool. After that, you can use it again.
Furthermore, please heed the following warning and
caution.
WARNING
In order to prevent any battery leakage, heat generation,
smoke emission, explosion and ignition beforehand,
please be sure to heed the following precautions.
1. Make sure that swarf and dust do not collect on the
battery.
○
During work make sure that swarf and dust do not fall
on the battery.
○
Make sure that any swarf and dust falling on the power
tool during work do not collect on the battery.
○
Do not store an unused battery in a location exposed
to swarf and dust.
○
Before storing a battery, remove any swarf and dust
that may adhere to it and do not store it together with
metal parts (screws, nails, etc.).
2. Do not pierce battery with a sharp object such as a
nail, strike with a hammer, step on, throw or subject
the battery to severe physical shock.
3. Do not use an apparently damaged or deformed
battery.
4. Do not use the battery in reverse polarity.
5. Do not connect directly to an electrical outlets or car
cigarette lighter sockets.
6. Do not use the battery for a purpose other than those
specifi ed.
7. If the battery charging fails to complete even when a
specifi ed recharging time has elapsed, immediately
stop further recharging.
8. Do not put or subject the battery to high temperatures
or high pressure such as into a microwave oven,
dryer, or high pressure container.
9. Keep away from fi re immediately when leakage or foul
odor are detected.
10. Do not use in a location where strong static electricity
generates.
11. If there is battery leakage, foul odor, heat generated,
discolored or deformed, or in any way appears
abnormal during use, recharging or storage,
immediately remove it from the equipment or battery
charger, and stop use.
12. Do not immerse the battery or allow any fl uids to fl ow
inside. Conductive liquid ingress, such as water, can
cause damage resulting in fi re or explosion. Store your
battery in a cool, dry place, away from combustible
and fl ammable items. Corrosive gas atmospheres
must be avoided.
CAUTION
1. If liquid leaking from the battery gets into your eyes,
do not rub your eyes and wash them well with fresh
clean water such as tap water and contact a doctor
immediately.
If left untreated, the liquid may cause eye-
problems.
2. If liquid leaks onto your skin or clothes, wash well with
clean water such as tap water immediately.
There is a possibility that this can cause skin irritation.
3. If you fi nd rust, foul odor, overheating, discolor,
deformation, and/or other irregularities when using
the battery for the fi rst time, do not use and return it to
your supplier or vendor.
WARNING
If an electrically conductive foreign object enters the
terminals of the lithium ion battery, a short-circuit may
occur resulting in the risk of fi re. Please observe the
following matters when storing the battery.
○
Do not place electrically conductive cuttings,
nails, steel wire, copper wire or other wire in the
storage case.
○
Either install the battery in the power tool or store
by securely pressing into the battery cover until
the ventilation holes are concealed to prevent
short-circuits (See Fig. 3).
000BookCV18DBLUSmetabo.indb7000BookCV18DBLUSmetabo.indb72021/03/3014:46:472021/03/3014:46:47
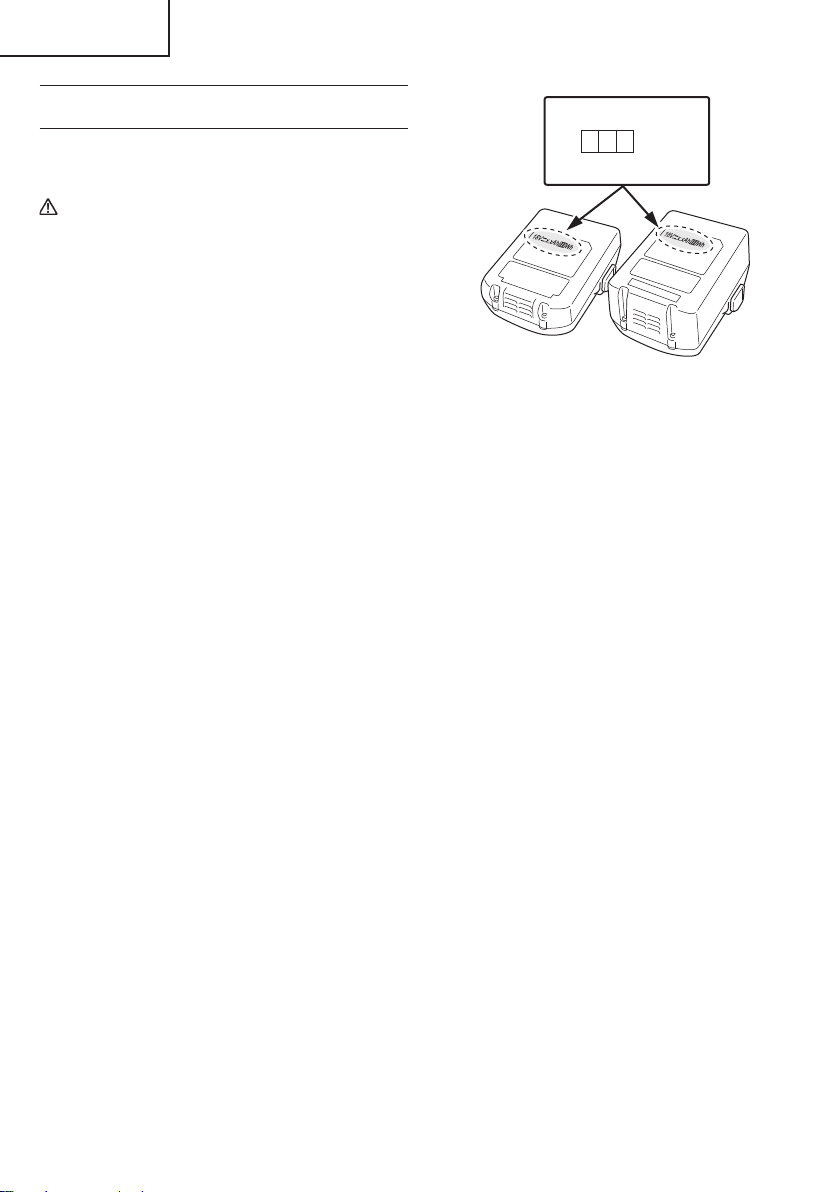
8
English
REGARDING LITHIUM-ION BATTERY
TRANSPORTATION
When transporting a lithium-ion battery, please observe
the following precautions.
WARNING
Notify the transporting company that a package
contains a lithium-ion battery, inform the company
of its power output and follow the instructions of the
transportation company when arranging transport.
●
Lithium-ion batteries that exceed a power output
of 100 Wh are considered to be in the freight
classifi cation of Dangerous Goods and will
require special application procedures.
●
For transportation abroad, you must comply with
international law and the rules and regulations of
the destination country.
SAVE THESE INSTRUCTIONS
AND
MAKE THEM AVAILABLE TO OTHER USERS
AND
OWNERS OF THIS TOOL!
Wh
Power Output
2 to 3 digit number
Fig. 2
000BookCV18DBLUSmetabo.indb8000BookCV18DBLUSmetabo.indb82021/03/3014:46:472021/03/3014:46:47
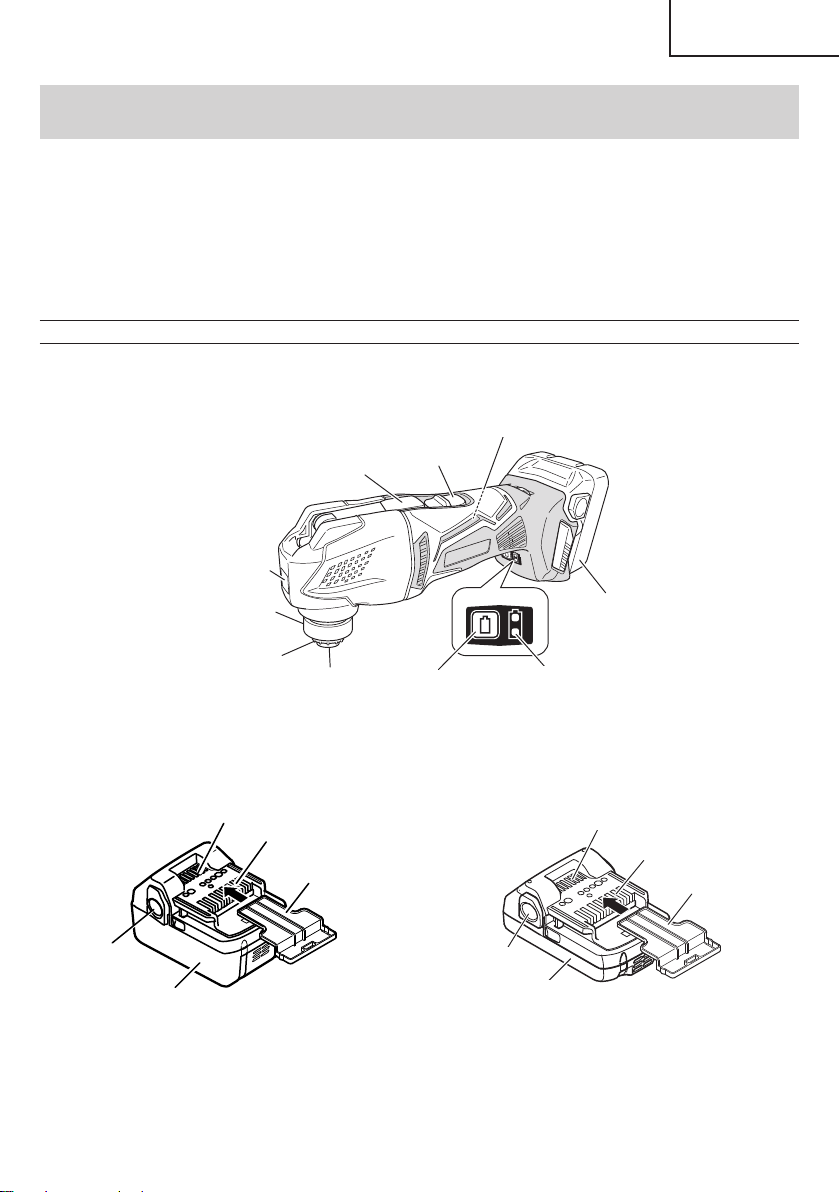
9
English
FUNCTIONAL DESCRIPTION
NOTE
The information contained in this Instruction Manual is designed to assist you in the safe operation and maintenance
of the power tool.
NEVER operate, or attempt any maintenance on the tool unless you have fi rst read and understood all safety
instructions contained in this manual.
Some illustrations in this Instruction Manual may show details or attachments that diff er from those on your own
power tool.
NAME OF PARTS
1. Cordless Multi Tool (CV18DBL)
Battery and battery charger are not included with this product.
Battery
Nameplate
LED Light
Guide sleeve
Attachment Ring
Tool Shaft
Remaining battery
indicator switch
Remaining battery
indicator lamp
Switch
Lever
Switch Panel
○
Battery
Latch
Ventilation holes
Terminals
Battery cover
Battery
Battery
Latch
Ventilation holes
Terminals
Battery
cover
<BSL1850> <BSL1815 / BSL1830C>
Fig. 3
000BookCV18DBLUSmetabo.indb9000BookCV18DBLUSmetabo.indb92021/03/3014:46:482021/03/3014:46:48
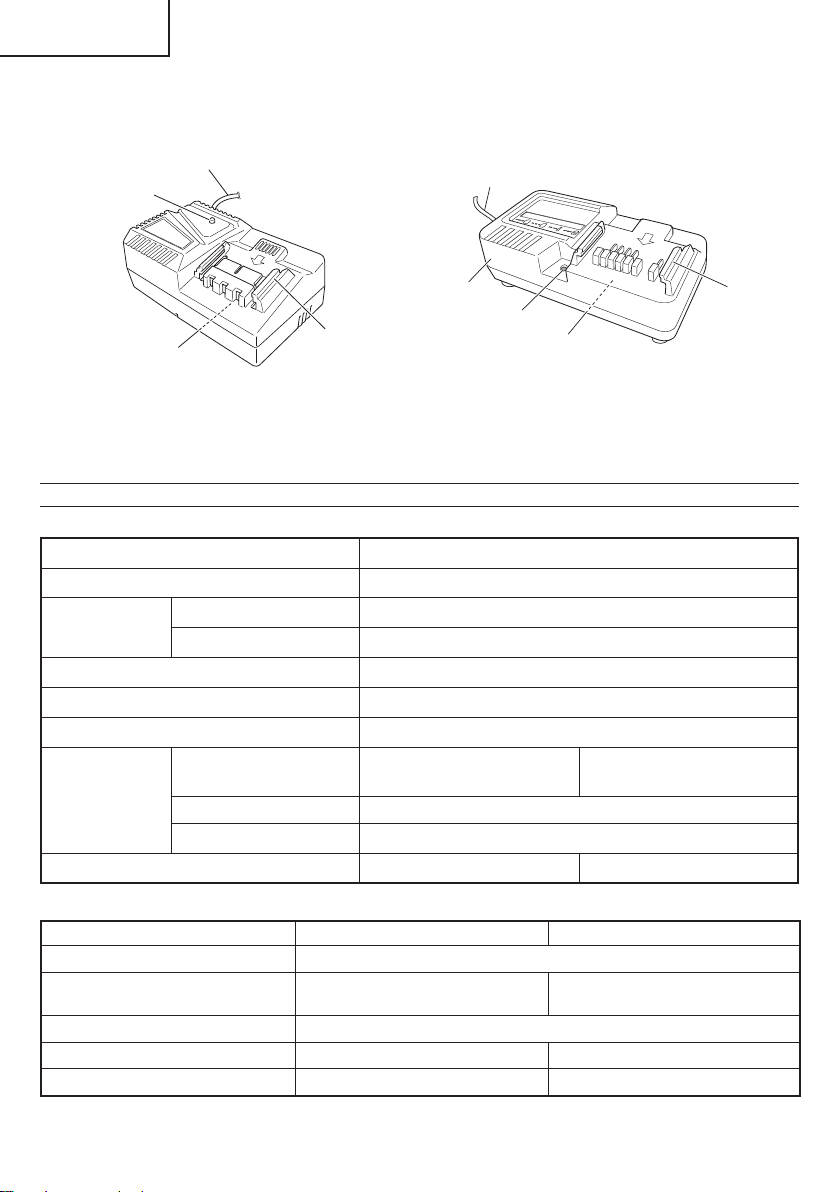
10
English
2 Battery Charger
Battery and battery charger are not included with this product.
Pilot lamp
Guide rail
Nameplate
Cord
Nameplate
Pilot lamp
Guide
rail
Cord
Body
<UC18YFSL> <UC18YKSL>
Fig. 4
SPECIFICATIONS
1. Cordless Multi Tool
Model CV18DBL
Voltage 18 V
No Load Vibration
Frequency
Auto Variable Speed Mode 15,000 /min
Standard Mode 6,000–20,000 /min
Oscillation angle, Total (left/right) 3.2 degrees (1.6 degrees total)
Type of motor Fan-cooled DC brushless motor
Overall length 12-3/32" (307 mm)
Battery
Model
BSL1850 (5.0 Ah)
BSL1815 (1.5 Ah)
BSL1830C (3.0 Ah)
Type Li-ion battery
Voltage DC 18 V
Weight
4.4 lbs. (2.0 kg) 3.7 lbs. (1.7 kg)
2. Battery Charger
Model UC18YKSL UC18YFSL
Input power source Single phase: AC 120 V 60 Hz
Charging time
(At a temperature of 68°F (20°C))
BSL1815 : Approx. 40 min
BSL1850 : Approx. 75 min
BSL1830C : Approx. 45 min
Charging voltage DC 14.4–18 V
Charging current DC 2.0 A DC 3.5 A
Weight 0.8 lbs. (0.35 kg) 1.1 lbs. (0.5 kg)
000BookCV18DBLUSmetabo.indb10000BookCV18DBLUSmetabo.indb102021/03/3014:46:482021/03/3014:46:48
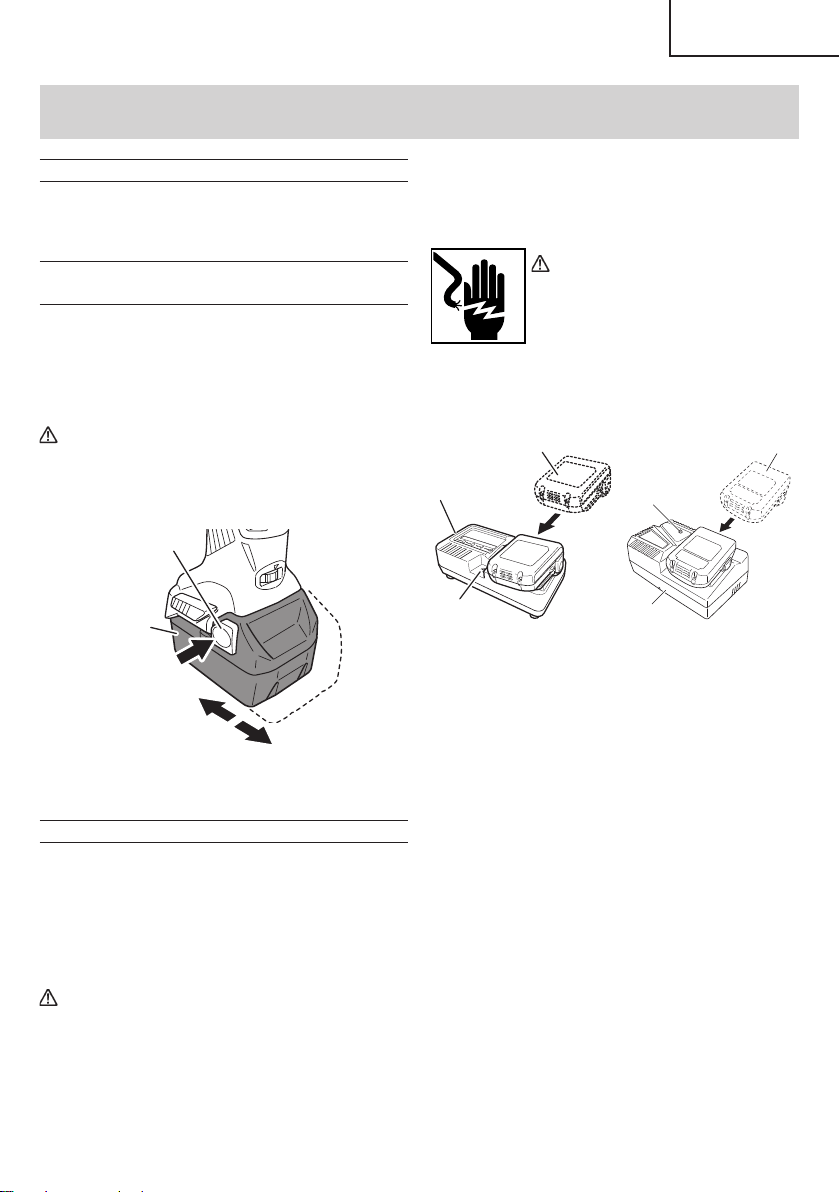
11
English
ASSEMBLY AND OPERATION
APPLICATIONS
○
Flush cutting and pocket cutting of various materials
○
Peeling of tiles, caulking, etc.
○
Polishing wood materials, etc.
REMOVAL AND INSTALLATION METHOD
OF BATTERY
Battery and battery charger are not included with this
product.
1. Battery removal
Hold the handle tightly and push the battery latch to
remove the battery (See Fig. 5).
CAUTION
Never short-circuit the battery.
2. Battery installation
Insert the battery while observing its polarities (see
Fig. 5).
Battery
Pull out
Push
Latch
Insert
Fig. 5
CHARGING METHOD
NOTE
Before plugging into the receptacle, make sure the
following points.
○
The power source voltage is stated on the nameplate.
○
The cord is not damaged.
WARNING
Do not charge at voltage higher than indicated
on the nameplate.
If charged at voltage higher than indicated on
the nameplate, the charger will burn up.
1. Insert the plug of battery charger into the receptacle.
When the plug of battery charger has been inserted
into the receptacle, pilot lamp will blink in red. (At
1-second intervals)
WARNING
Do not use the electrical cord
if damaged. Have it repaired
immediately.
2. Insert the battery to the battery charger.
Insert the battery into the battery charger as shown in
Fig. 6.
Battery
Pilot lamp
Charger
Charger
Battery
Pilot lamp
<UC18YKSL> <UC18YFSL>
Fig. 6
3. Charging
When the battery is inserted into the battery charger,
charging will commence and the pilot lamp will light in
red. (See Table 2)
NOTE
If the pilot lamp does not light or blink in red, pull out
the plug from the receptacle and check if the battery
is properly mounted.
When the battery is fully charged, the pilot lamp
will blink in red slowly. (At 1-second intervals) (See
Table 2)
(1) Pilot lamp indication
The indications of the pilot lamp will be as shown in
Table 2, according to the condition of the charger or
the rechargeable battery.
000BookCV18DBLUSmetabo.indb11000BookCV18DBLUSmetabo.indb112021/03/3014:46:482021/03/3014:46:48
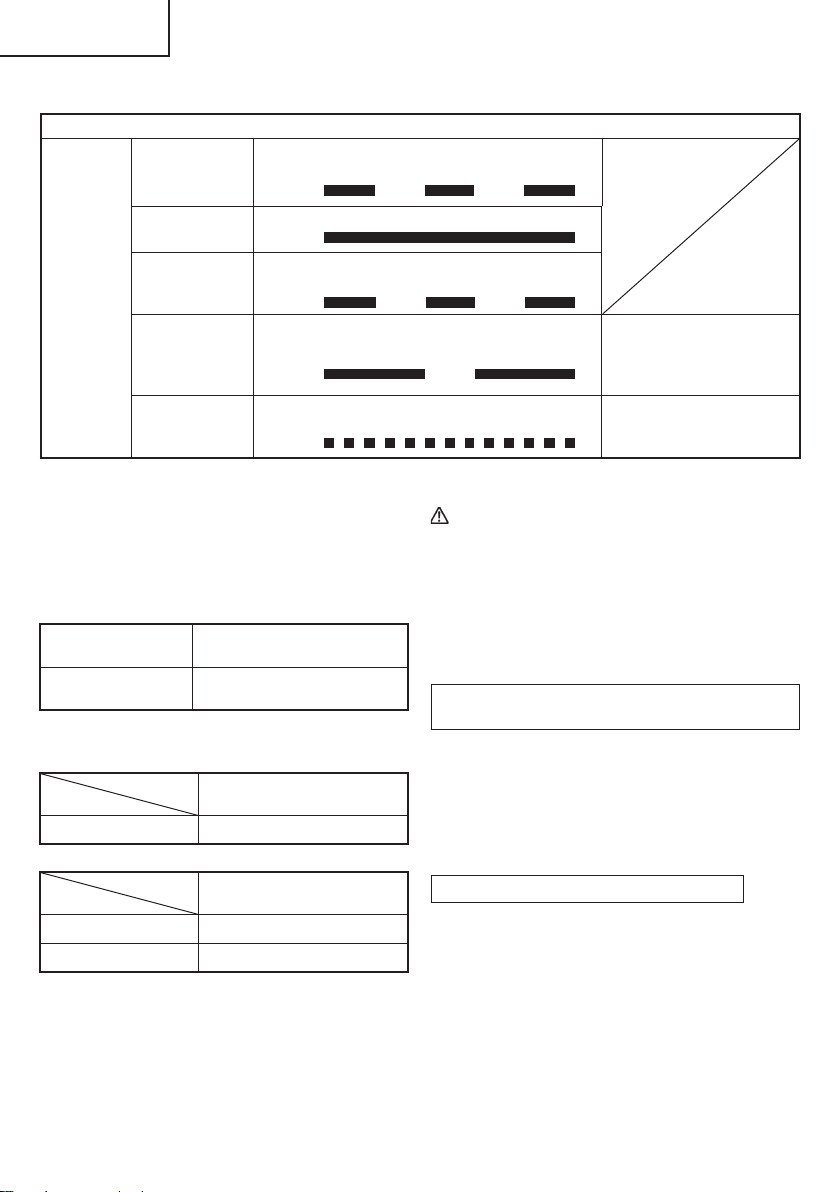
12
English
Table 2
Indications of the pilot lamp
Pilot lamp
(red)
Before charging Blinks
Lights for 0.5 seconds. Does not light for
0.5 seconds. (off for 0.5 seconds)
While charging Lights
Lights continuously
Charging
complete
Blinks
Lights for 0.5 seconds. Does not light for
0.5 seconds. (off for 0.5 seconds)
Overheat
standby
Blinks
Lights for 1 second. Does not light for 0.5
seconds. (off for 0.5 seconds)
Battery overheated.
Unable to charge.
(Charging will commence
when battery cools)
Charging
impossible
Flickers
Lights for 0.1 seconds. Does not light for
0.1 seconds. (off for 0.1 seconds)
Malfunction in the battery or
the charger
(2) Regarding the temperature of the rechargeable
battery.
The temperatures for rechargeable batteries are
as shown in the Table 3, and batteries that have
become hot should be cooled for a while before being
recharged.
Table 3 Recharging ranges of batteries
Rechargeable
batteries
Temperatures at which the
battery can be recharged
BSL1850, BSL1815,
BSL1830C
32°F–122°F
(0°C–50°C)
(3) Regarding recharging time (At 68°F (20°C))
Table 4 Charging time (UC18YKSL)
Charger
Battery
UC18YKSL
BSL1815 Approx. 40 min
Table 5 Charging time (UC18YFSL)
Charger
Battery
UC18YFSL
BSL1850 Approx. 75 min
BSL1830C Approx. 45 min
NOTE
The charging time may vary according to temperature
and power source voltage.
4. Disconnect battery charger from the receptacle.
CAUTION
Do not pull the plug out of the receptacle by
pulling on the cord.
Make sure to grasp the plug when removing from
receptacle to avoid damaging cord.
5. Remove the battery from the battery charger.
Supporting the battery charger with hand, pull out the
battery from the battery charger.
Regarding electric discharge in case of new
batteries, etc.
As the internal chemical substance of new batteries
and batteries that have not been used for an extended
period is not activated, the electric discharge might
be low when using them the fi rst and second time.
This is a temporary phenomenon, and normal time
required for recharging will be restored by recharging
the batteries 2–3 times.
How to make the batteries perform longer
(1) Recharge the batteries before they become
completely exhausted.
When you feel that the power of the tool becomes
weaker, stop using the tool and recharge its battery.
If you continue to use the tool and exhaust the electric
current, the battery may be damaged and its life will
become shorter.
000BookCV18DBLUSmetabo.indb12000BookCV18DBLUSmetabo.indb122021/03/3014:46:482021/03/3014:46:48

13
English
(2) Avoid recharging at high temperatures.
A rechargeable battery will be hot immediately after
use. If such a battery is recharged immediately after
use, its internal chemical substance will deteriorate,
and the battery life will be shortened. Leave the
battery and recharge it after it has cooled for a while.
CAUTION
●
When the battery charger has been continuosly
used, the battery charger will be heated, thus
constituting the cause of the failures. Once the
charging has been completed, give 15 minutes
rest until the next charging.
●
If the battery is charged while it is heated
because it has been left for a long time in a
location subject to direct sunlight or because
the battery has just been used, the pilot lamp of
the charger lights for 1 second, does not light for
0.5 seconds (off for 0.5 seconds). The battery will
not be recharged. In such a case, let the battery
cool before charging.
●
When the pilot lamp fl ickers (at 0.2-second
intervals), check for and take out any foreign
objects in the charger’s battery connector. If
there are no foreign objects, it is probable that
the battery or charger is malfunctioning. Take it
to your authorized Service Center.
PRIOR TO OPERATION
1. Preparing and checking the work environment
Make sure that the work site meets all the conditions
laid forth in the precautions.
2. Checking the battery
Make sure that the battery is installed fi rmly. If it is at
all loose it could come off and cause an accident.
3. Power switch
Ensure that the power switch is in the OFF position.
If the battery is installed while the power switch is in
the ON position, the power tool will start operating
immediately, which could cause a serious accident.
4. Checking the Accessory
○
Check to see if the application tool is a genuine
component recommended by the manufacturer and
that there are no cracks or other damage.
○
Check to see if the application tool is properly installed
as instructed.
5. Changing application tools (Fig. 7)
CAUTION
●
Be sure to switch power OFF and disconnect the
battery from the body when changing application
tools.
●
Never touch the application tool immediately
after use. The metal is hot and can easily burn
your skin.
●
The lever is attached to a strong spring. Be very
careful not to get your fi ngers caught when
pushing the lever down.
NOTE
○
Make sure the facing of the application tool is correct.
○
Make sure the application tool is properly set on the
protrusion of the attachment ring.
(1) Pull the lever up. There will be some resistance, but
make sure the lever is pulled until it is parallel with the
main unit.
(2) Pull and turn the guide sleeve until “
” is aligned with
the “
” mark.
(3) Pull out the tool shaft.
(4) Attach the application tool to the attachment ring,
making sure the tool’s hole is fi tted to the ring’s
protrusion. The angle of attachment for the application
tool can be set in 30° increments.
(5) Insert the tool shaft.
(6) Align the guide sleeve’s “
” mark to the “ ” position.
(7) Push down the lever.
(8) Align the holes when sticking the sanding paper to the
sanding pad.
000BookCV18DBLUSmetabo.indb13000BookCV18DBLUSmetabo.indb132021/03/3014:46:482021/03/3014:46:48
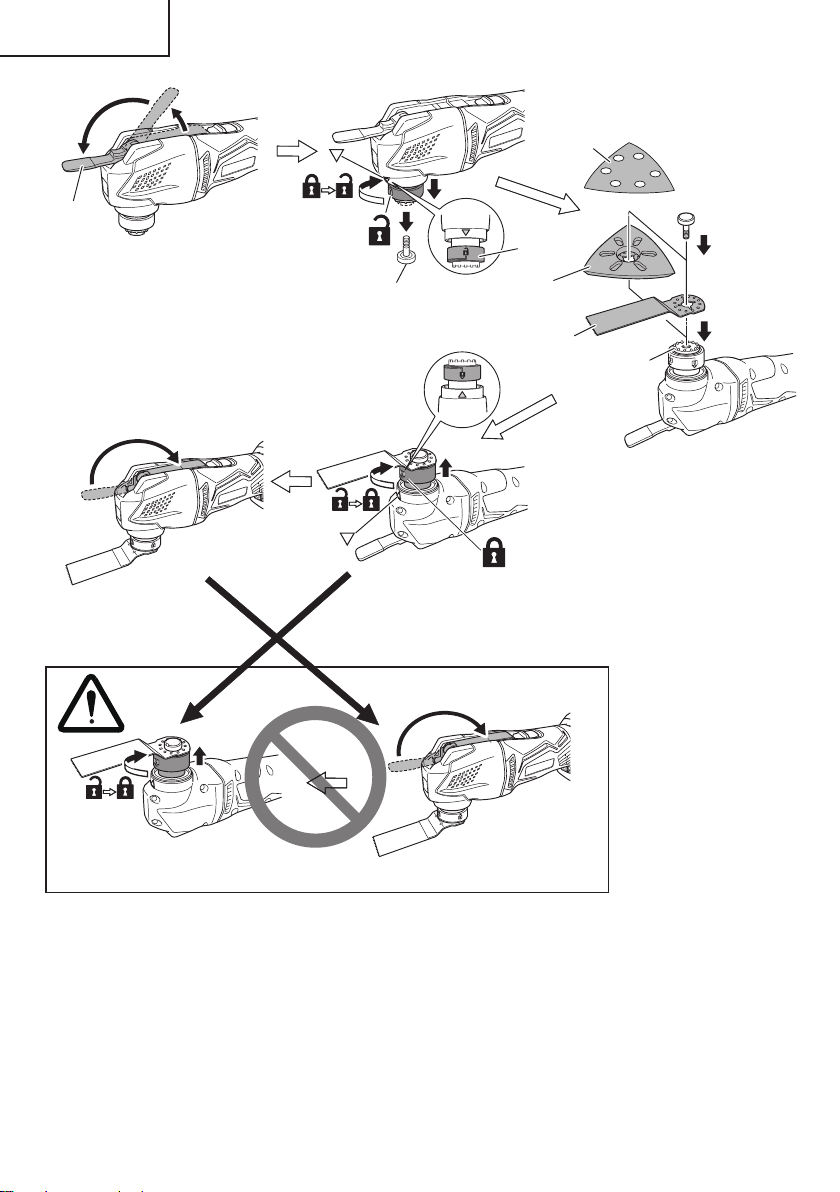
14
English
Fig. 7
Lever
Tool Shaft
Guide
sleeve
Sanding
Paper
Blade
Pad
Ring's
Protrusion
000BookCV18DBLUSmetabo.indb14000BookCV18DBLUSmetabo.indb142021/03/3014:46:492021/03/3014:46:49
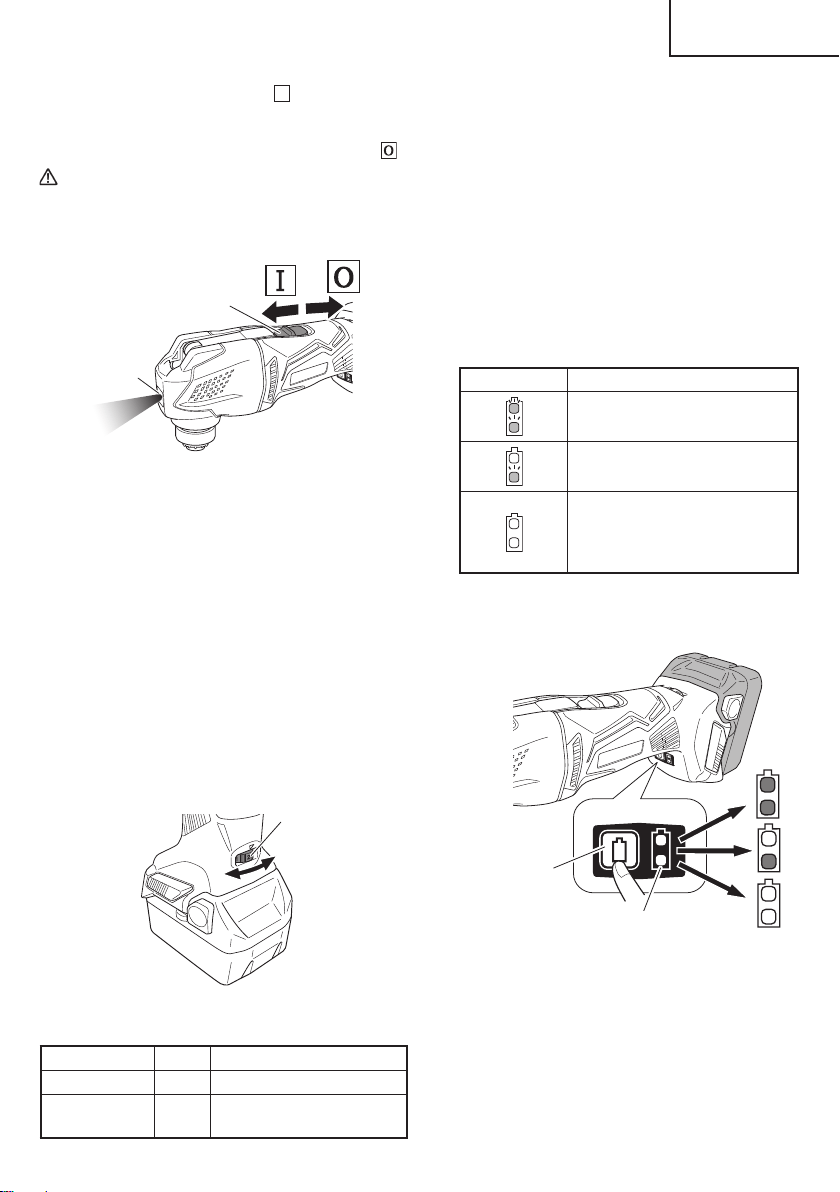
15
English
6. Sliding the switch towards
Ϩ
will switch on,
simultaneously activating the LED light which will light
the application tool. (Fig. 8)
To turn the main unit off , slide the switch towards
.
CAUTION
Do not look directly into the light from the LED
lamp. Continuous and direct exposure to the
light from the LED lamp can injure your eyes.
Switch
LED light
Fig. 8
7. Adjusting operating speed (Fig. 9)
The tool is equipped with two modes: “Standard
Mode” and “AUTO Mode”.
(1) Standard Mode
You can change the vibration frequency between
6,000 to 20,000 /min by adjusting the dial from “1” to
“5”.
(2)
AUTO Mode
Depending on the workload, AUTO Mode “A” will
automatically change the vibration frequency to
15,000 /min or 20,000 /min. This has the eff ect of
lowering vibration and noise prior to and during
operation.
Adjust the dial for the mode and speed that best suits your
task conditions and materials.
Dial
Fig. 9
Table 6 Operating speed
Mode Dial Vibration frequency
Standard Mode 1–5 6,000–20,000 /min
AUTO Mode A
No load: 15,000 /min
With load: 20,000 /min
With AUTO Mode, the vibration frequency may not
reach 20,000 /min or return to 15,000 /min depending on
variables such as the type of work or the attachment in
use.
8. About remaining battery indicator
When pressing the remaining battery indicator switch,
the remaining battery indicator lamp lights and the
battery remaining power can be checked. (Fig. 10)
When releasing your fi nger from the remaining battery
indicator switch, the remaining battery indicator lamp
goes off . The Table 7 shows the state of remaining
battery indicator lamp and the battery remaining
power.
Table 7
State of lamp Battery Remaining Power
The battery remaining power is
enough.
The battery remaining power is
a half.
The battery remaining power is
nearly empty.
Re-charge the battery soonest
possible.
As the remaining battery indicator shows somewhat
diff erently depending on ambient temperature and
battery characteristics, read it as a reference.
Remaining battery
indicator switch
Remaining battery
indicator lamp
Fig. 10
NOTE
○
Do not give a strong shock to the switch panel or
break it. It may lead to a trouble.
○
To save the battery power consumption, the
remaining battery indicator lamp lights while pressing
the remaining battery indicator switch.
000BookCV18DBLUSmetabo.indb15000BookCV18DBLUSmetabo.indb152021/03/3014:46:492021/03/3014:46:49

16
English
CAUTION:
on lithium-ion battery
To extend the lifetime, the lithium-ion battery
equips with the protection function to stop the
output. Therefore, if the tool is overloaded, the
motor may stop. However, this is not the trouble
but the result of protection function. In this case,
release the switch of tool and eliminate the
causes of overloading.
CAUTION
●
When switching on the tool, make sure the
application tool is not in contact with the material
to be processed. Failure to do so may result in
injury.
●
For cutting effi ciency, switch the speed of the
application tool according to task conditions and
materials to be cut.
●
Do not apply any unnecessary pressure when
operating the tool. Doing so may damage the
application tool.
●
After use, be sure not to place the tool near chips
or sawdust before it comes to a full stop as the
tool may suck in those particles.
CUTTING, SAWING AND SCRAPING
Sawing and scraping tasks require specifi c application
tools (sold separately).
WARNING
●
Be absolutely sure to keep the switch turned off
and the battery removed to prevent any accident.
●
During operation, do not place your face or
hands near the application tool of the unit.
1. Switch the unit on and use the dial to set the speed of
the application tool. (Fig. 11)
2. Lightly place the application tool on the material and
move the application tool forward at a pace where the
movement isn’t slowed. (Fig. 11)
Ϩ
Dial
Switch
Fig. 11
SANDING
Sanding tasks require specifi c application tools (sold
separately).
WARNING
●
Be absolutely sure to keep the switch turned off
and the battery removed to prevent any accident.
●
During operation, do not place your face or
hands near the application tool of the unit.
1. Switch the unit on and use the dial to set the speed of
the application tool. (Fig. 12)
2. Lightly place the application tool on the material and
move the application tool back and forth at a pace
where the movement isn’t slowed. (Fig. 12)
CAUTION
●
Do not polish wood with sanding paper used for
metal polishing.
●
Do not use worn or clogged sanding paper.
Ϩ
Dial
Switch
Fig. 12
Tips on SANDING
○
How to place the sandpaper
Lightly press the tool to the surface to be processed;
making sure that the sandpaper is evenly applied to
the surface. Applying unnecessary pressure will place
stress on the motor and shorten the sandpaper’s life,
reducing polishing effi ciency.
○
How to move the tool
Using your hand, repeatedly push out and pull back in
a back and forth motion.
○
New coarse sandpaper with rougher grit
New coarse sandpaper with rougher grit may cause
the unit to jerk. During the start of the task, slightly
tilt the unit towards the front or back for a while,
maintaining the tilted position. The jerking will stop as
the sandpaper adapts to the task.
○
Until the surface being processed is polished
Use the same grade of sandpaper until the surface
being processed is evenly polished. Switching to
a diff erent grade of sandpaper when the task is not
completed may result in an uneven fi nish.
○
Testing
Before starting a task, it is recommended that you
check the vibration frequency using excess material.
000BookCV18DBLUSmetabo.indb16000BookCV18DBLUSmetabo.indb162021/03/3014:46:492021/03/3014:46:49
17
English
MAINTENANCE AND INSPECTION
WARNING:
Be sure to turned off the switch and pull out the battery.
1. Inspecting the application tool
Continued use of a dull or damaged application tool
will result in reduced cutting effi ciency and may cause
overloading of the motor. Replace the application tool
with new one as soon as excessive abrasion is noted.
2. Check the Screws
Loose screws are dangerous. Regularly inspect them
and make sure they are tight.
CAUTION
Using this power tool with loosened, screws is
extremely dangerous.
3. Maintenance of the motor
The motor unit winding is the very “heart” of the power
tool.
Exercise due care to ensure the winding does not
become damaged and/or wet with oil or water.
4. Check for Dust
Dust may be removed with a soft cloth or a cloth
dampened with soapy water.
Do not use bleach, chlorine, gasoline or thinner, for
they may damage the plastics.
5. Disposal of the exhausted battery
WARNING
Do not dispose of the exhausted battery. The
battery must explode if it is incinerated. The
product that you have purchased contains a
rechargeable battery. The battery is recyclable.
At the end of it´s useful life, under various state
and local laws, it may be illegal to dispose of this
battery into the municipal waste stream. Check
with your local solid waste offi cials for details
in your area for recycling options or proper
disposal.
6. Storage
Storing in a place below 104°F (40°C) and out of the
reach of children.
NOTE
Storing lithium-ion batteries
Make sure the lithium-ion batteries have been fully
charged before storing them.
Prolonged storage (3 months or more) of batteries with
a low charge may result in performance deterioration,
signifi cantly reducing battery usage time or rendering
the batteries incapable of holding a charge.
However, signifi cantly reduced battery usage time
may be recovered by repeatedly charging and using
the batteries two to fi ve times.
If the battery usage time is extremely short despite
repeated charging and use, consider the batteries
dead and purchase new batteries.
7. Service and repairs
All quality power tools will eventually require
servicing or replacement of parts because of wear
from normal use. To assure that only authorized
replacement parts will be used, all service and
repairs must be performed by a metabo HPT
AUTHORIZED SERVICE CENTER, ONLY.
CAUTION
In the operation and maintenance of power tools,
the safety regulations and standards prescribed
in each country must be observed.
Important notice on the batteries for the
metabo HPT cordless power tools
Please always use one of our designated genuine
batteries. We cannot guarantee the safety and
performance of our cordless power tool when used
with batteries other than these designated by us, or
when the battery is disassembled and modifi ed (such
as disassembly and replacement of cells or other
internal parts).
000BookCV18DBLUSmetabo.indb17000BookCV18DBLUSmetabo.indb172021/03/3014:46:492021/03/3014:46:49

18
English
ACCESSORIES
WARNING
ALWAYS use Only authorized metabo HPT replacement parts and accessories. NEVER use replacement
parts or accessories which are not intended for use with this tool. Contact metabo HPT if you are not sure
whether it is safe to use a particular replacement part or accessory with your tool.
The use of any other attachment or accessory can be dangerous and could cause injury or mechanical
damage.
NOTE
Accessories are subject to change without any obligation on the part of the metabo HPT.
STANDARD ACCESSORIES
CV18DBL
(NN)
○
Cut Saw Blade (MSD32PBC) ....................................................................................1
Battery, battery charger, plastic case and battery cover are not contained.
OPTIONAL ACCESSORIES (sold separately)
1. Battery (BSL1815, BSL1830C, BSL1850)
2. Battery Charger (UC18YKSL, UC18YFSL)
3. Application tool
For details contact metabo HPT Authorized Service Center.
NOTE
Specifi cations are subject to change without any obligation on the part of the metabo HPT.
000BookCV18DBLUSmetabo.indb18000BookCV18DBLUSmetabo.indb182021/03/3014:46:502021/03/3014:46:50
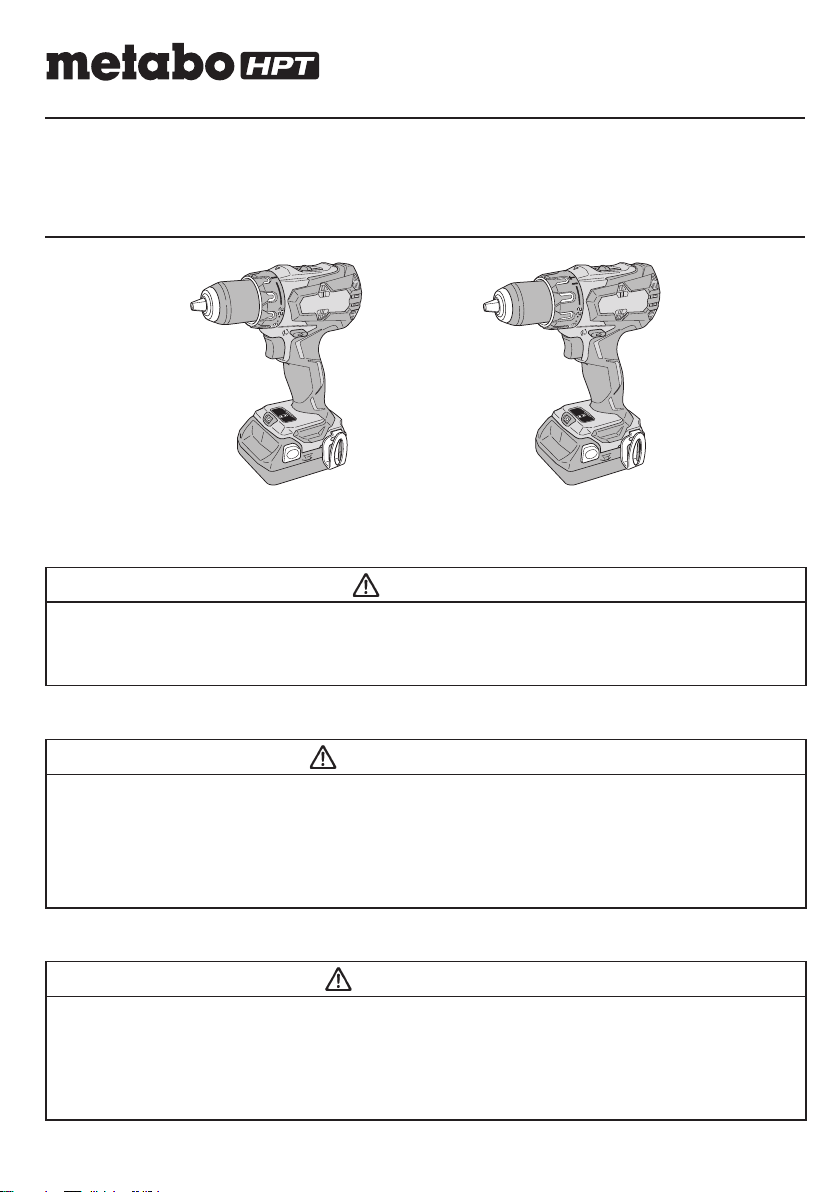
Designed for operating in USA & Canada only.
When this product is used in areas other than the USA & Canada,
we cannot guarantee the product quality and performance.
SAFETY INSTRUCTIONS AND INSTRUCTION MANUAL
WARNING
IMPROPER OR UNSAFE use of this power tool can result in death or serious bodily injury!
This manual contains important information about product safety. Please read and understand
this manual before operating the power tool. Please keep this manual available for other users
and owners before they use the power tool. This manual should be stored in safe place.
INSTRUCTIONS DE SECURITE ET MODE D’EMPLOI
AVERTISSEMENT
Une utilisation INCORRECTE OU DANGEREUSE de cet outil motorisé peut entraîner la mort
ou de sérieuses blessures corporelles!
Ce mode d’emploi contient d’importantes informations à propos de la sécurité de ce produit.
Prière de lire et de comprendre ce mode d’emploi AVANT d’utiliser l’outil motorisé. Garder ce
mode d’emploi à la disponibilité des autres utilisateurs et propriétaires avant qu’ils utilisent l’outil
motorisé. Ce mode d’emploi doit être conservé dans un endroit sûr.
INSTRUCCIONES DE SEGURIDAD Y MANUAL DE INSTRUCCIONES
ADVERTENCIA
¡La utilización INAPROPIADA O PELIGROSA de esta herramienta eléctrica puede resultar
en lesiones de gravedad o la muerte!
Este manual contiene información importante sobre la seguridad del producto. Lea y
comprenda este manual ANTES de utilizar la herramienta eléctrica. Guarde este manual para
que puedan leerlo otras personas antes de utilizar la herramienta eléctrica. Este manual debe
ser guardado en un lugar seguro.
Model
Modèle
Modelo
DS 18DBFL2
DV 18DBFL2
Cordless Driver Drill
Perceuse-visseuse sans fi l
Taladro atornillador a batería
Cordless Hammer Drill
Perceuse à percussion sans fi l
Taladro de percusión a batería
DS18DBFL2
DV18DBFL2
000BookDS18DBFL2metabo.indb1000BookDS18DBFL2metabo.indb12020/11/0517:45:522020/11/0517:45:52
IMPORTANT SAFETY INFORMATION
Read and understand all of the safety precautions, warnings and operating instructions in the Instruction Manual before
operating or maintaining this power tool.
Most accidents that result from power tool operation and maintenance are caused by the failure to observe basic safety
rules or precautions. An accident can often be avoided by recognizing a potentially hazardous situation before it occurs,
and by observing appropriate safety procedures.
Basic safety precautions are outlined in the “SAFETY” section of this Instruction Manual and in the sections which
contain the operation and maintenance instructions.
Hazards that must be avoided to prevent bodily injury or machine damage are identifi ed by WARNINGS on the power
tool and in this Instruction Manual.
NEVER use this power tool in a manner that has not been specifi cally recommended by metabo HPT.
MEANINGS OF SIGNAL WORDS
WARNING indicates a potentially hazardous situations which, if ignored, could result in death or serious injury.
CAUTION indicates a potentially hazardous situations which, if not avoided, may result in minor or moderate injury, or
may cause machine damage.
NOTE emphasizes essential information.
SAFETY
GENERAL POWER TOOL SAFETY WARNINGS
WARNING
Read all safety warnings and all instructions.
Failure to follow the warnings and instructions may result in electric shock, fi re and/or serious injury.
Save all warnings and instructions for future reference.
The term “power tool” in the warnings refers to your mains-operated (corded) power tool or battery-operated
(cordless) power tool.
1) Work area safety
a) Keep work area clean and well lit.
Cluttered or dark areas invite accidents.
b) Do not operate power tools in explosive
atmospheres, such as in the presence of
fl ammable liquids, gases or dust.
Power tools create sparks which may ignite the
dust or fumes.
c) Keep children and bystanders away while
operating a power tool.
Distractions can cause you to lose control.
2) Electrical safety
a) Power tool plugs must match the outlet.
Never modify the plug in any way.
Do not use any adapter plugs with earthed
(grounded) power tools.
Unmodifi ed plugs and matching outlets will reduce
risk of electric shock.
b) Avoid body contact with earthed or grounded
surfaces such as pipes, radiators, ranges and
refrigerators.
There is an increased risk of electric shock if your
body is earthed or grounded.
c) Do not expose power tools to rain or wet
conditions.
Water entering a power tool will increase the risk
of electric shock.
d) Do not abuse the cord. Never use the cord
for carrying, pulling or unplugging the power
tool.
Keep cord away from heat, oil, sharp edges or
moving parts.
Damaged or entangled cords increase the risk of
electric shock.
e) When operating a power tool outdoors, use
an extension cord suitable for outdoor use.
Use of a cord suitable for outdoor use reduces the
risk of electric shock.
f) If operating a power tool in a damp location
is unavoidable, use a residual current device
(RCD) protected supply.
Use of an RCD reduces the risk of electric shock.
2
English
000BookDS18DBFL2metabo.indb2000BookDS18DBFL2metabo.indb22020/11/0517:45:522020/11/0517:45:52

3) Personal safety
a) Stay alert, watch what you are doing and use
common sense when operating a power tool.
Do not use a power tool while you are tired
or under the infl uence of drugs, alcohol or
medication.
A moment of inattention while operating power
tools may result in serious personal injury.
b) Use personal protective equipment. Always
wear eye protection.
Protective equipment such as dust mask, non-skid
safety shoes, hard hat, or hearing protection used
for appropriate conditions will reduce personal
injuries.
c) Prevent unintentional starting. Ensure the
switch is in the off -position before connecting
to power source and/or battery pack, picking
up or carrying the tool.
Carrying power tools with your fi nger on the switch
or energising power tools that have the switch on
invites accidents.
d) Remove any adjusting key or wrench before
turning the power tool on.
A wrench or a key left attached to a rotating part of
the power tool may result in personal injury.
e) Do not overreach. Keep proper footing and
balance at all times.
This enables better control of the power tool in
unexpected situations.
f) Dress properly. Do not wear loose clothing or
jewellery. Keep your hair, clothing and gloves
away from moving parts.
Loose clothes, jewellery or long hair can be caught
in moving parts.
g) If devices are provided for the connection
of dust extraction and collection facilities,
ensure these are connected and properly
used.
Use of dust collection can reduce dust-related
hazards.
4) Power tool use and care
a) Do not force the power tool. Use the correct
power tool for your application.
The correct power tool will do the job better and
safer at the rate for which it was designed.
b) Do not use the power tool if the switch does
not turn it on and off .
Any power tool that cannot be controlled with the
switch is dangerous and must be repaired.
c) Disconnect the plug from the power source
and/or the battery pack from the power tool
before making any adjustments, changing
accessories, or storing power tools.
Such preventive safety measures reduce the risk
of starting the power tool accidentally.
d) Store idle power tools out of the reach of
children and do not allow persons unfamiliar
with the power tool or these instructions to
operate the power tool.
Power tools are dangerous in the hands of
untrained users.
e) Maintain power tools. Check for misalignment
or binding of moving parts, breakage of parts
and any other condition that may aff ect the
power tool’s operation.
If damaged, have the power tool repaired
before use.
Many accidents are caused by poorly maintained
power tools.
f) Keep cutting tools sharp and clean.
Properly maintained cutting tools with sharp
cutting edges are less likely to bind and are easier
to control.
g) Use the power tool, accessories and tool bits
etc. in accordance with these instructions,
taking into account the working conditions
and the work to be performed.
Use of the power tool for operations diff erent
from those intended could result in a hazardous
situation.
5) Battery tool use and care
a) Recharge only with the charger specifi ed by
the manufacturer.
A charger that is suitable for one type of battery
pack may create a risk of fi re when used with
another battery pack.
b) Use power tools only with specifi cally
designated battery packs.
Use of any other battery packs may create a risk of
injury and fi re.
c) When battery pack is not in use, keep it away
from other metal objects like paper clips,
coins, keys, nails, screws, or other small
metal objects, that can make a connection
from one terminal to another.
Shorting the battery terminals together may cause
burns or a fi re.
d) Under abusive conditions, liquid may be
ejected from the battery; avoid contact. If
contact accidentally occurs, fl ush with water.
If liquid contacts eyes, additionally seek
medical help.
Liquid ejected from the battery may cause irritation
or burns.
6) Service
a) Have your power tool serviced by a
qualifi ed repair person using only identical
replacement parts.
This will ensure that the safety of the power tool is
maintained.
3
English
000BookDS18DBFL2metabo.indb3000BookDS18DBFL2metabo.indb32020/11/0517:45:522020/11/0517:45:52
12. Handle tool correctly.
Operate the tool according to the instructions provided
herein. Do not drop or throw the tool. Never allow the
tool to be operated by children, individuals unfamiliar
with its operation or unauthorized personnel.
13. Keep all screws, bolts and covers tightly in place.
Keep all screws, bolts, and plates tightly mounted.
Check their condition periodically.
14. Do not use power tools if the plastic housing or
handle is cracked.
Cracks in the tool’s housing or handle can lead to
electric shock. Such tools should not be used until
repaired.
15. Blades and accessories must be securely
mounted to the tool.
Prevent potential injuries to yourself or others. Blades,
cutting implements and accessories which have been
mounted to the tool should be secure and tight.
16. Never use a tool which is defective or operating
abnormally.
If the tool appears to be operating unusually, making
strange noises, or otherwise appears defective, stop
using it immediately and arrange for repairs by a
metabo HPT authorized service center.
17. Carefully handle power tools.
Should a power tool be dropped or struck against
hard materials inadvertently, it may be deformed,
cracked, or damaged.
18. Do not wipe plastic parts with solvent.
Solvents such as gasoline, thinner benzine, carbon
tetrachloride, and alcohol may damage and crack
plastic parts. Do not wipe them with such solvents.
Wipe plastic parts with a soft cloth lightly dampened
with soapy water and dry thoroughly.
19. Always wear eye protection that meets the
requirement of the latest revision of ANSI
Standard Z87.1.
20. This product contains a strong permanent
magnet in the motor.
Observe the following precautions regarding adhering
of chips to the tool and the eff ect of the permanent
magnet on electronic devices.
CAUTION
Do not place the tool on a workbench or work area
where metal chips are present.
The chips may adhere to the tool, resulting in injury or
malfunction.
If chips have adhered to the tool, do not touch it.
Remove the chips with a brush.
Failure to do so may result in injury.
– WARNING –
To reduce the risk of injury, user must read
instruction manual.
SPECIFIC SAFETY RULES AND SYMBOLS
1. Always wear ear protectors when using the tool
for extended periods.
Prolonged exposure to high intensity
noise can cause hearing loss.
2. Use auxiliary handle(s), if supplied with the tool.
Loss of control can cause personal injury.
3. Hold power tool by insulated gripping surfaces,
when performing an operation where the cutting
accessory may contact hidden wiring.
Cutting accessory contacting a “live” wire may make
exposed metal parts of the power tool “live” and could
give the operator an electric shock.
4. Hold power tool by insulated gripping surfaces,
when performing an operation where the
fastener may contact hidden wiring.
Fasteners contacting a “live” wire may make exposed
metal parts of the power tool “live” and could give the
operator an electric shock.
5. Never place hands or other body parts near the drill
bit or chuck during operation. Hold the drill by its
handle only.
6. Because the cordless tool operates by battery power,
be aware of the fact that it can begin to operate at any
time.
7. When working at elevated locations, clear the area of
all other people and be aware of conditions below you.
8. Never touch moving parts.
Never place your hands, fi ngers or other body parts
near the tool’s moving parts.
9. Never operate without all guards in place.
Never operate this tool without all guards or safety
features in place and in proper working order. If
maintenance or servicing requires the removal of a
guard or safety feature, be sure to replace the guard
or safety feature before resuming operation of the
tool.
10. Use right tool.
Don’t force small tool or attachment to do the job of a
heavy-duty tool.
Don’t use tool for purpose not intended —for
example— don’t use circular saw for cutting tree
limbs or logs.
11. Never use a power tool for applications other
than those specifi ed.
Never use a power tool for applications other than
those specifi ed in the instruction manual.
4
English
000BookDS18DBFL2metabo.indb4000BookDS18DBFL2metabo.indb42020/11/0517:45:522020/11/0517:45:52
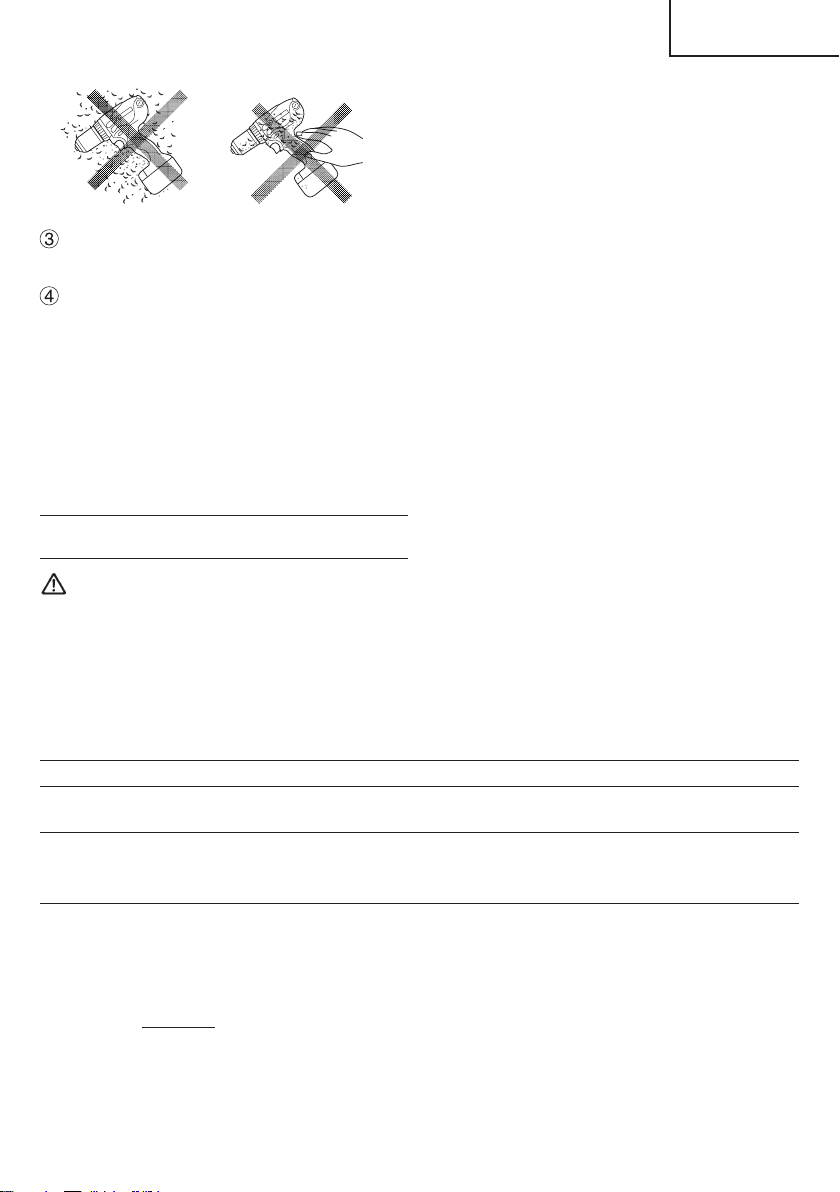
If you use a pacemaker or other electronic medical
device, do not operate or approach the tool.
Operation of the electronic device may be aff ected.
Do not use the tool in the vicinity of precision devices
such as cell phones, magnetic cards or electronic
memory media.
Doing so may lead to misoperation, malfunction or
loss of data.
21. Defi nitions for symbols used on this tool
V ............ volts
—
---
......... direct current
no .......... no load speed
---/min .... revolutions or reciprocation per minute
IMPORTANT SAFETY INSTRUCTIONS
FOR BATTERY CHARGER
WARNING
Death or serious bodily injury could result from
improper or unsafe use of battery chargers.
To avoid these risks, follow these basic safety
instructions:
READ ALL INSTRUCTIONS
1. This manual contains important safety and operating
instructions for battery charger Model UC18YSL3 /
UC18YKSL / UC18YFSL.
2. Before using battery charger, read all instructions
and cautionary markings on (1) battery charger, (2)
battery, and (3) product using battery.
3. To reduce risk of injury, charge metabo HPT
rechargeable battery models of the BSL18 series
and model BSL36A18. Other models of batteries may
burst causing personal injury and damage.
4. Use of an attachment not recommended or sold by
the battery charger manufacturer may result in a risk
of fi re, electric shock, or injury to persons.
5. To reduce risk of damage to electric plug and cord,
pull by plug when disconnecting battery charger.
6. Make sure cord is located so that it will not be stepped
on, tripped over, or otherwise subjected to damage or
stress.
7. An extension cord should not be used unless
absolutely necessary. Use of improper extension
cord could result in a risk of fi re and electric shock.
If extension cord must be used make sure:
a. That blades of extension cord are the same
number, size, and shape as those of plug on
battery charger:
b. That extension cord is properly wired and in good
electrical condition; and
c. That wire size is large enough for AC ampere
rating of battery charger as specifi ed in Table 1.
Table 1
RECOMMENDED MINIMUM AWG SIZE FOR
EXTENSION CORDS FOR BATTERY CHARGERS
AC Input Rating Amperes* AWG Size of Cord
Equal to or
greater than
but less
than
Length of Cord, Feet (Meter)
25 (7.5) 50 (15) 100 (30) 150 (45)
0 2 18 18 18 16
2 3 18 18 16 14
3 4 18 18 16 14
* If the input rating of a battery charger is given in watts
rather than in amperes, the corresponding ampere
rating is to be determined by dividing the wattage
rating by the voltage rating–for example:
1,250 watts
= 10 amperes
125 volts
8. Do not operate battery charger with damaged cord or
plug-replace them immediately.
9. Do not operate battery charger if it has received a
sharp blow, been dropped, or otherwise damaged in
any way; take it to a qualifi ed serviceman.
10. Do not disassemble battery charger; take it to a
qualifi ed serviceman when service or repair is
required. Incorrect reassembly may result in a risk of
electric shock or fi re.
11. To reduce risk of electric shock, unplug charger from
receptacle before attempting any maintenance or
cleaning. Removing the battery will not reduce this
risk.
5
English
000BookDS18DBFL2metabo.indb5000BookDS18DBFL2metabo.indb52020/11/0517:45:532020/11/0517:45:53

IMPORTANT SAFETY INSTRUCTIONS
FOR USE OF THE BATTERY AND
BATTERY CHARGER
You must charge the battery before you can use the power
tool. Before using the model UC18YSL3 / UC18YKSL /
UC18YFSL battery charger, be sure to read all instructions
and cautionary statements on it, the battery and in this
manual.
REMEMBER: USE ONLY metabo HPT BATTERY
MODELS OF THE BSL18 SERIES AND MODEL
BSL36A18. OTHER MODELS OF BATTERIES MAY
BURST AND CAUSE INJURY!
Follow these instructions to avoid the risk of injury:
WARNING:
Improper use of the battery
or battery charger can lead to
serious injury. To avoid these
injuries:
1. NEVER disassemble the battery.
2. NEVER incinerate the battery, even if it is damaged or
is completely worn out. The battery can explode in a
fi re.
3. NEVER short-circuit the battery.
4. NEVER insert any objects into the battery charger’s
air vents. Electric shock or damage to the battery
charger may result.
5. NEVER charge outdoors. Keep the battery away
from direct sunlight and use only where there is low
humidity and good ventilation.
6. NEVER charge when the temperature is below 32°F
(0°C) or above 104°F (40°C).
7. NEVER connect two battery chargers together.
8. NEVER insert foreign objects into the hole for the
battery or the battery charger.
9. NEVER use a booster transformer when charging.
10. NEVER use an engine generator or DC power to
charge.
11. NEVER store the battery or battery charger in places
where the temperature may reach or exceed 104°F
(40°C) such as inside metal box or car.
12. NEVER expose the battery or battery charger to rain
or wet conditions.
13. ALWAYS operate charger on standard household
electrical power (120 volts). Using the charger on any
other voltage may overheat and damage the charger.
14. ALWAYS wait at least 15 minutes between charges to
avoid overheating the charger.
15. ALWAYS disconnect the power cord from its
receptacle when the charger is not in use.
CAUTION ON LITHIUM-ION BATTERY
To extend the lifetime, the lithium-ion battery equips with
the protection function to stop the output.
In the cases of 1 to 3 described below, when using this
product, even if you are pulling the switch, the motor may
stop. This is not the trouble but the result of protection
function.
1. When the battery power remaining runs out, the motor
stops.
In such case, charge it up immediately.
2. If the tool is overloaded, the motor may stop. In this
case, release the switch of tool and eliminate causes
of overloading. After that, you can use it again.
3. If the battery is overheated under overload work, the
battery power may stop.
In this case, stop using the battery and let the battery
cool. After that, you can use it again.
Furthermore, please heed the following warning and
caution.
WARNING
In order to prevent any battery leakage, heat generation,
smoke emission, explosion and ignition beforehand,
please be sure to heed the following precautions.
1. Make sure that swarf and dust do not collect on the
battery.
○
During work make sure that swarf and dust do not fall
on the battery.
○
Make sure that any swarf and dust falling on the power
tool during work do not collect on the battery.
○
Do not store an unused battery in a location exposed
to swarf and dust.
○
Before storing a battery, remove any swarf and dust
that may adhere to it and do not store it together with
metal parts (screws, nails, etc.).
2. Do not pierce battery with a sharp object such as a
nail, strike with a hammer, step on, throw or subject
the battery to severe physical shock.
3. Do not use an apparently damaged or deformed
battery.
4. Do not use the battery in reverse polarity.
5. Do not connect directly to an electrical outlets or car
cigarette lighter sockets.
6. Do not use the battery for a purpose other than those
specifi ed.
7. If the battery charging fails to complete even when a
specifi ed recharging time has elapsed, immediately
stop further recharging.
8. Do not put or subject the battery to high temperatures
or high pressure such as into a microwave oven,
dryer, or high pressure container.
9. Keep away from fi re immediately when leakage or foul
odor are detected.
6
English
000BookDS18DBFL2metabo.indb6000BookDS18DBFL2metabo.indb62020/11/0517:45:532020/11/0517:45:53
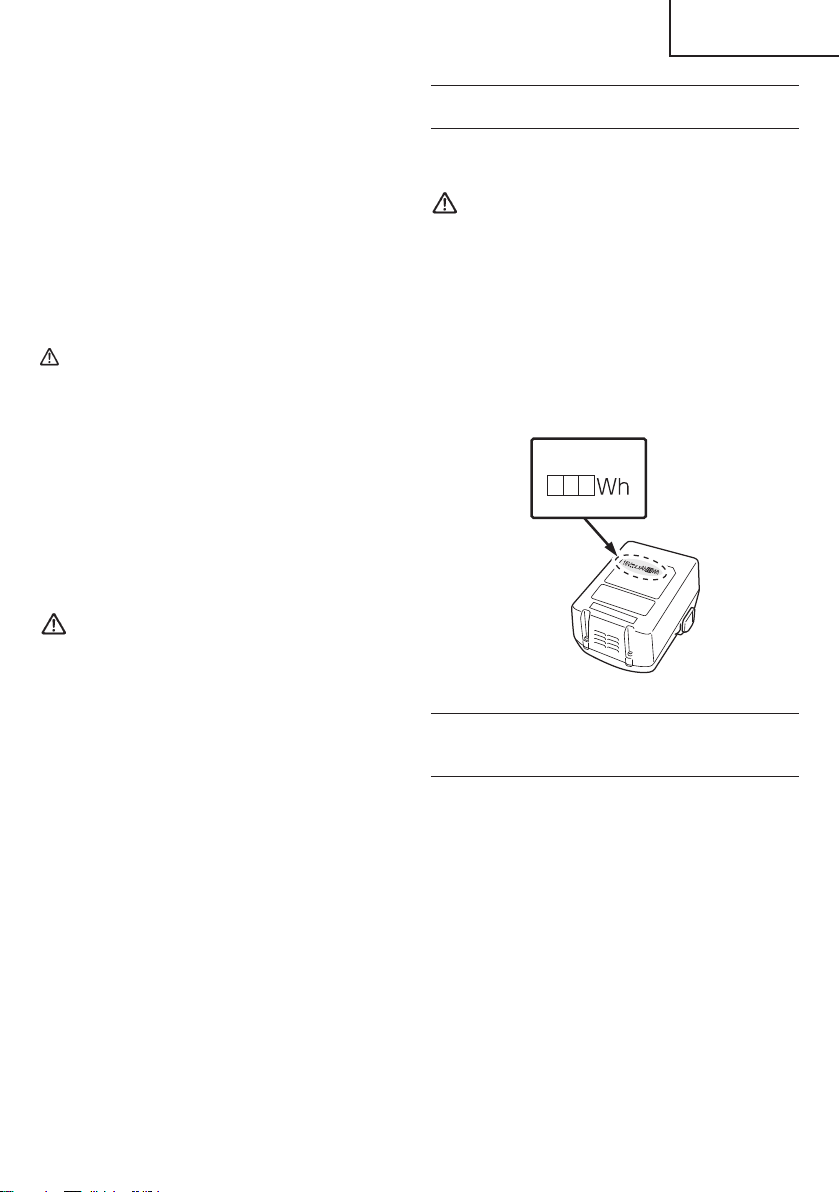
10. Do not use in a location where strong static electricity
generates.
11. If there is battery leakage, foul odor, heat generated,
discolored or deformed, or in any way appears
abnormal during use, recharging or storage,
immediately remove it from the equipment or battery
charger, and stop use.
12. Do not immerse the battery or allow any fl uids to fl ow
inside. Conductive liquid ingress, such as water, can
cause damage resulting in fi re or explosion. Store your
battery in a cool, dry place, away from combustible
and fl ammable items. Corrosive gas atmospheres
must be avoided.
CAUTION
1. If liquid leaking from the battery gets into your eyes,
do not rub your eyes and wash them well with fresh
clean water such as tap water and contact a doctor
immediately.
If left untreated, the liquid may cause eye-problems.
2. If liquid leaks onto your skin or clothes, wash well with
clean water such as tap water immediately.
There is a possibility that this can cause skin irritation.
3. If you fi nd rust, foul odor, overheating, discolor,
deformation, and/or other irregularities when using
the battery for the fi rst time, do not use and return it to
your supplier or vendor.
WARNING
If an electrically conductive foreign object enters the
terminals of the lithium ion battery, a short-circuit may
occur resulting in the risk of fi re. Please observe the
following matters when storing the battery.
○
Do not place electrically conductive cuttings,
nails, steel wire, copper wire or other wire in the
storage case.
○
Either install the battery in the power tool or store
by securely pressing into the battery cover until
the ventilation holes are concealed to prevent
short-circuits (See Fig. 3).
REGARDING LITHIUM-ION BATTERY
TRANSPORTATION
When transporting a lithium-ion battery, please observe
the following precautions.
WARNING
Notify the transporting company that a package
contains a lithium-ion battery, inform the company
of its power output and follow the instructions of the
transportation company when arranging transport.
●
Lithium-ion batteries that exceed a power output
of 100 Wh are considered to be in the freight
classifi cation of Dangerous Goods and will
require special application procedures.
●
For transportation abroad, you must comply with
international law and the rules and regulations of
the destination country.
Power Output
2 to 3 digit number
Fig. 1
USB DEVICE CONNECTION
PRECAUTIONS
(ONLY WITH UC18YSL3 CHARGER)
When an unexpected problem occurs, the data in a USB
device connected to this product may be corrupted or lost.
Always make sure to back up any data contained in the
USB device prior to use with this product.
Please be aware that our company accepts absolutely no
responsibility for any data stored in a USB device that is
corrupted or lost, nor for any damage that may occur to a
connected device.
SAVE THESE INSTRUCTIONS
AND
MAKE THEM AVAILABLE TO OTHER USERS
AND
OWNERS OF THIS TOOL!
7
English
000BookDS18DBFL2metabo.indb7000BookDS18DBFL2metabo.indb72020/11/0517:45:532020/11/0517:45:53
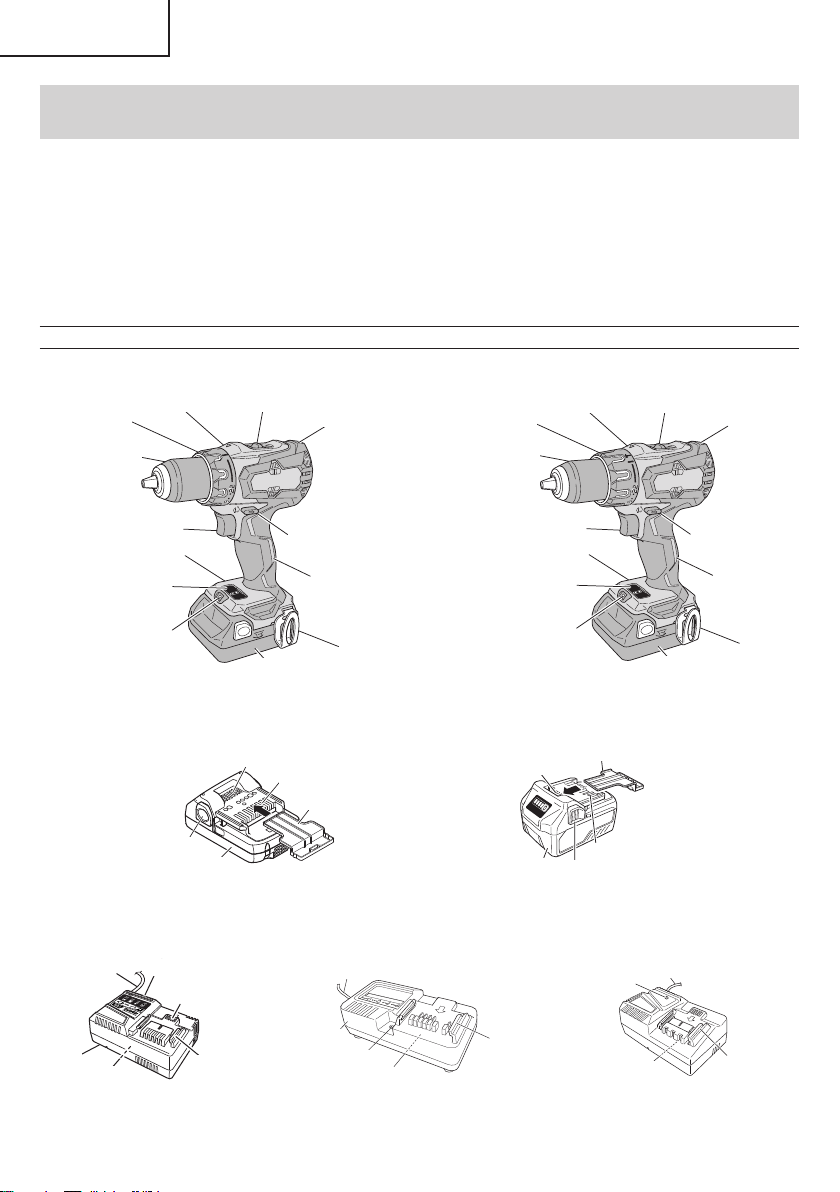
FUNCTIONAL DESCRIPTION
NOTE
The information contained in this Instruction Manual is designed to assist you in the safe operation and maintenance
of the power tool.
NEVER operate, or attempt any maintenance on the tool unless you have fi rst read and understood all safety
instructions contained in this manual.
Some illustrations in this Instruction Manual may show details or attachments that diff er from those on your own
power tool.
NAME OF PARTS
1. Cordless Driver Drill / Cordless Hammer Drill (DS18DBFL2 / DV18DBFL2)
<DV18DBFL2>
Display panel
Clutch dial
Keyless chuck
Shift knob
Selector button
Housing
Switch trigger
Battery
Hook
Handle
Nameplate
LED Light
Front case
<DS18DBFL2>
Display panel
Clutch dial
Keyless chuck
Shift knob
Selector button
Housing
Switch trigger
Battery
Hook
Handle
Nameplate
LED Light
Front case
Fig. 2
2. Battery
Battery
Latch
Ventilation holes
Terminals
Battery cover
Battery
Ventilation holes
Terminals
Battery cover
Latch
<BSL1815 / BSL1830C> <BSL36A18>
Fig. 3
3. Battery Charger
Nameplate
Charge indicator lamp
Ventilation holes
Guide rail
Cord
Body
Pilot lamp
Guide rail
Cord
Body
Nameplate
Nameplate
Guide rail
Pilot lamp
Cord
<UC18YSL3> <UC18YKSL> <UC18YFSL>
Fig. 4
8
English
000BookDS18DBFL2metabo.indb8000BookDS18DBFL2metabo.indb82020/11/0517:45:532020/11/0517:45:53
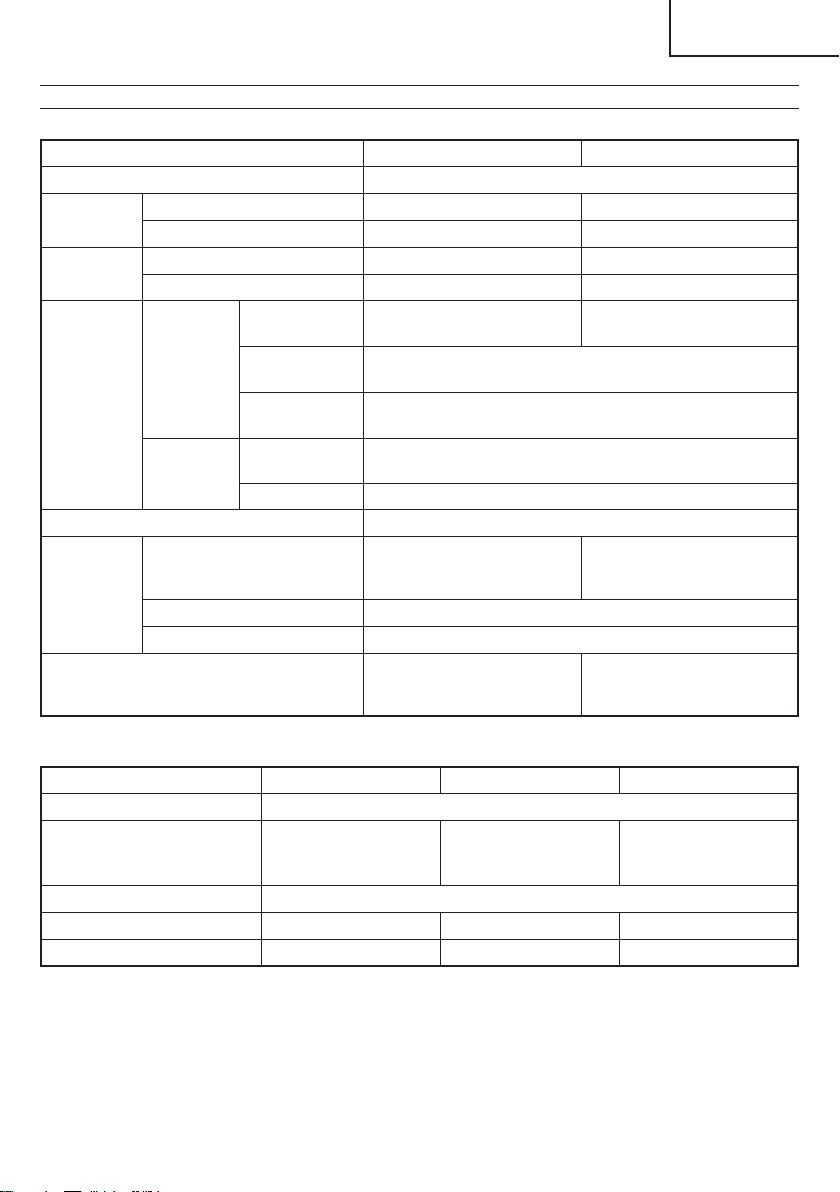
SPECIFICATIONS
1. Cordless Driver Drill / Cordless Hammer Drill
Model DS18DBFL2 DV18DBFL2
Motor DC motor
No-load
speed
Low 0–400 /min 0–400 /min
High 0–1,800 /min 0–1,800 /min
Impact rate
Low ————— 0–6,000 /min
High ————— 0–27,000 /min
Capacity
Drilling
Brick (Depth
1-1/4 in. (30 mm))
————— 1/2 in. (13 mm)
Wood (Thickness
11/16 in. (18 mm))
2 in. (50 mm)
(Soft Wood)
Metal (Thickness
1/16 in. (1.6 mm))
1/2 in. (13 mm)
(Mild Steel)
Screw Driver
Wood screw
#20 × 4 in.
(8 mm × 100 mm)
Small screw 1/4 in. (6 mm)
Drill chuck capacity Maximum gripping diameter 1/2 in. (13 mm)
Battery
Model
BSL1815 (1.5 Ah) /
BSL1830C (3.0 Ah)
BSL1815 (1.5 Ah) /
BSL1830C (3.0 Ah) /
BSL36A18 (18 V, 5.0 Ah)
Type Li-ion battery
Voltage DC 18 V (BSL36A18: DC 36 V / 18 V)
Weight 3.5 lbs. (1.6 kg)
with BSL1815 / BSL1830C:
3.7 lbs. (1.7 kg)
with BSL36A18: 4.4 lbs. (2.0 kg)
2. Battery Charger
Model UC18YSL3 UC18YKSL UC18YFSL
Input power source Single phase: AC 120 V 60 Hz
Charging time
(At a temperature of 68°F (20°C))
BSL36A18 : Approx. 32 min
BSL1815 : Approx. 40 min
BSL1830C : Approx. 90 min
BSL1815 : Approx. 22 min
BSL1830C : Approx. 45 min
BSL36A18 : Approx. 75 min
Charging voltage DC 14.4–18 V
Charging current DC 8.0 A DC 2.0 A DC 3.5 A
Weight 1.3 lbs. (0.6 kg) 0.8 lbs. (0.35 kg) 1.1 lbs. (0.5 kg)
9
English
000BookDS18DBFL2metabo.indb9000BookDS18DBFL2metabo.indb92020/11/0517:45:542020/11/0517:45:54

ASSEMBLY AND OPERATION
1. <UC18YSL3>
Connect the charger’s power cord to a receptacle.
When the power cord is connected, the charge
indicator lamp will blink in red. (At 1-second intervals)
<UC18YKSL / UC18YFSL>
Connect the charger’s power cord to a receptacle.
When the power cord is connected, the pilot lamp will
blink in red. (At 1-second intervals)
WARNING
Do not use the electrical cord
if damaged. Have it repaired
immediately.
2. Insert the battery to the battery charger.
Firmly Insert the battery into the battery charger as
shown in Fig. 6.
<UC18YSL3>
Charge
indicator lamp
Guide rail
Battery
Battery
Pilot lamp
Charger
<UC18YKSL> <UC18YFSL>
Charger
Battery
Pilot lamp
Fig. 6
APPLICATIONS
<DV18DBFL2>
○
Use as a hammer drill
Drilling of soft bricks and concrete blocks.
<DS18DBFL2 / DV18DBFL2>
○
Use as a drill
Drilling of soft steel, wood, plastic and aluminum
materials.
○
Use as a screwdriver
Tightening and loosening of machine screws, wood
screws and tapping screws.
REMOVAL AND INSTALLATION METHOD
OF BATTERY
○
How to install the battery.
Align the battery with the groove in tool handle and
slip it into place.
Always insert it all the way until it locks in place with a
little click, If not, it may accidentally fall out of the tool,
causing injury to you or someone around you (Fig. 5).
○
How to remove the battery.
Withdraw battery from the tool handle while pressing
the latch (2 pcs) of the battery (Fig. 5).
Battery
Push
Pull out
Insert
Handle
Latch
Fig. 5
CHARGING METHOD
NOTE
Before plugging into the receptacle, make sure the
following points.
○
The power source voltage is stated on the nameplate.
○
The cord is not damaged.
WARNING
Do not charge at voltage higher than indicated
on the nameplate.
If charged at voltage higher than indicated on the
nameplate, the charger will burn out.
10
English
000BookDS18DBFL2metabo.indb10000BookDS18DBFL2metabo.indb102020/11/0517:45:542020/11/0517:45:54
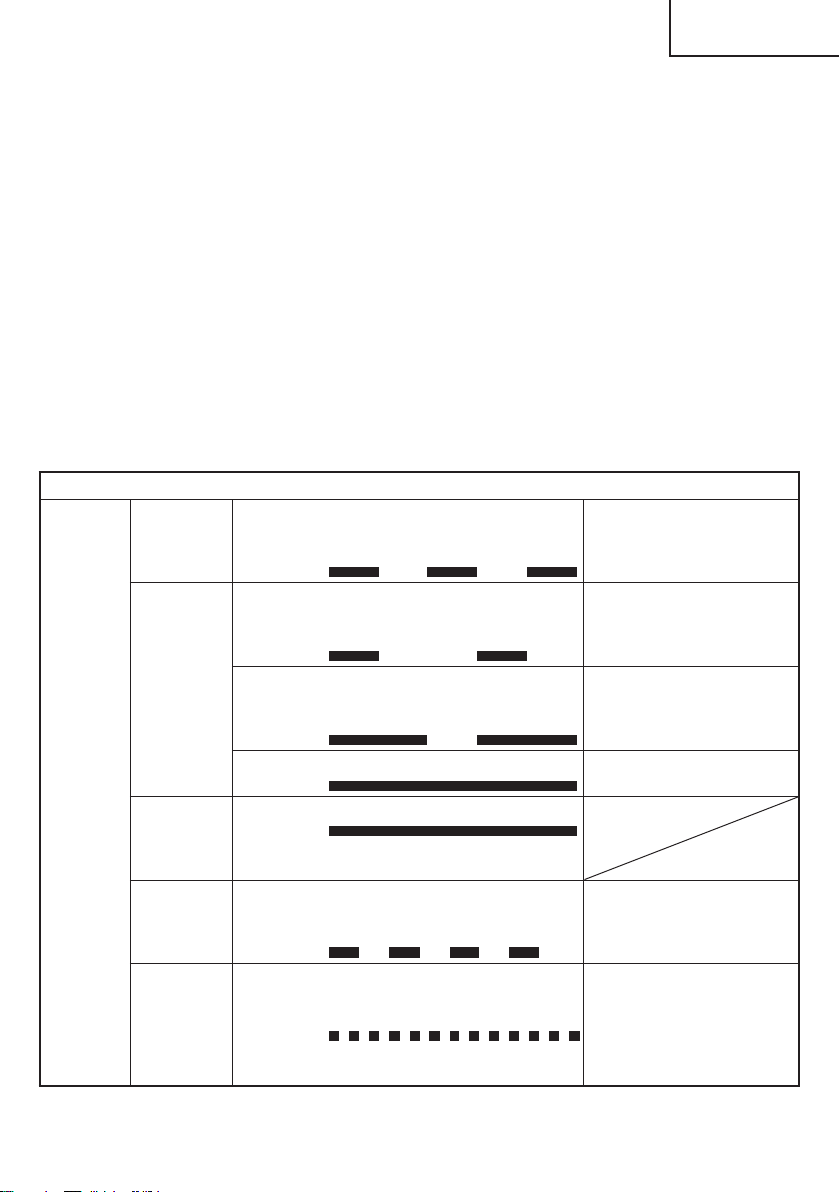
3. Charging
<UC18YSL3>
When inserting a battery in the charger, the charge
indicator lamp will blink in blue.
When the battery becomes fully recharged, the
charge indicator lamp will light up in green. (See
Table 2-a)
●
Charge indicator lamp indication
The indications of the charge indicator lamp will be as
shown in Table 2-a, according to the condition of the
battery charger or the battery.
<UC18YKSL / UC18YFSL>
When the battery is inserted into the battery charger,
charging will commence and the pilot lamp will light in
red. (See Table 2-b)
NOTE
If the pilot lamp does not light or blink in red, pull out
the plug from the receptacle and check if the battery
is properly mounted.
When the battery is fully charged, the pilot lamp
will blink in red slowly. (At 1-second intervals) (See
Table 2-b)
●
Pilot lamp indication
The indications of the pilot lamp will be as shown in
Table 2-b, according to the condition of the charger or
the rechargeable battery.
Table 2-a
Indications of the charge indicator lamp
Charge
indicator
lamp
(RED /
BLUE /
GREEN /
PURPLE)
Before
charging
Blinks
(RED)
Lights for 0.5 seconds. Does not light
for 0.5 seconds.
(off for 0.5 seconds)
Plugged into power source
While
charging
Blinks
(BLUE)
Lights for 0.5 seconds. Does not light
for 1 second.
(off for 1 second)
Battery capacity at less than
50%
Blinks
(BLUE)
Lights for 1 second. Does not light for
0.5 seconds.
(off for 0.5 seconds)
Battery capacity at less than
80%
Lights
(BLUE)
Lights continuously
Battery capacity at more than
80%
Charging
complete
Lights
(GREEN)
Lights continuously
(Continuous buzzer sound: about
6 seconds)
Overheat
standby
Blinks
(RED)
Lights for 0.3 seconds. Does not light
for 0.3 seconds.
(off for 0.3 seconds)
Battery overheated. Unable
to charge. (Charging will
commence when battery cools)
Charging
impossible
Flickers
(PURPLE)
Lights for 0.1 seconds. Does not light
for 0.1 seconds.
(off for 0.1 seconds)
(Intermittent buzzer sound: about
2 seconds)
Malfunction in the battery or the
charger
11
English
000BookDS18DBFL2metabo.indb11000BookDS18DBFL2metabo.indb112020/11/0517:45:542020/11/0517:45:54
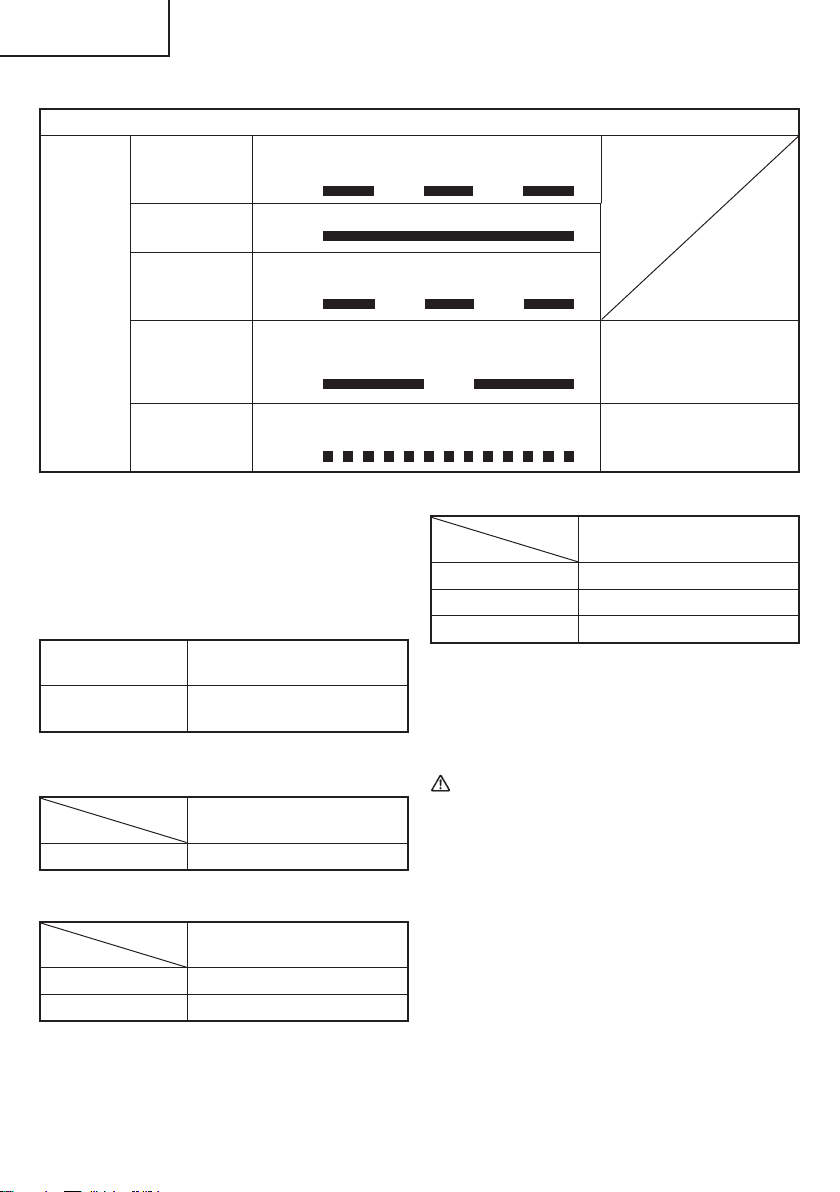
(1) Regarding the temperature of the rechargeable
battery.
The temperatures for rechargeable batteries are
as shown in the Table 3, and batteries that have
become hot should be cooled for a while before being
recharged.
Table 3
Rechargeable
batteries
Temperatures at which the
battery can be recharged
BSL1830C, BSL1815,
BSL36A18
32°F–122°F
( 0°C–50°C)
(2) Regarding recharging time (At 68°F (20°C))
Table 4 Charging time (UC18YSL3)
Charger
Battery
UC18YSL3
BSL36A18 Approx. 32 min
Table 5 Charging time (UC18YKSL)
Charger
Battery
UC18YKSL
BSL1830C Approx. 90 min
BSL1815 Approx. 40 min
Table 6 Charging time (UC18YFSL)
Charger
Battery
UC18YFSL
BSL1815 Approx. 22 min
BSL1830C Approx. 45 min
BSL36A18 Approx. 75 min
NOTE
The recharging time may vary according to the
ambient temperature.
4. Disconnect battery charger from the receptacle.
CAUTION
Do not pull the plug out of the receptacle by
pulling on the cord.
Make sure to grasp the plug when removing from
receptacle to avoid damaging cord.
5. Remove the battery from the battery charger.
Supporting the battery charger with hand, pull out the
battery from the battery charger.
NOTE
Be sure to pull out the battery from the battery charger
after use, and then keep it.
Table 2-b
Indications of the pilot lamp
Pilot lamp
(red)
Before charging Blinks
Lights for 0.5 seconds. Does not light for
0.5 seconds. (off for 0.5 seconds)
While charging Lights
Lights continuously
Charging
complete
Blinks
Lights for 0.5 seconds. Does not light for
0.5 seconds. (off for 0.5 seconds)
Overheat
standby
Blinks
Lights for 1 second. Does not light for
0.5 seconds. (off for 0.5 seconds)
Battery overheated.
Unable to charge.
(Charging will commence
when battery cools)
Charging
impossible
Flickers
Lights for 0.1 seconds. Does not light for
0.1 seconds. (off for 0.1 seconds)
Malfunction in the battery or
the charger
12
English
000BookDS18DBFL2metabo.indb12000BookDS18DBFL2metabo.indb122020/11/0517:45:542020/11/0517:45:54
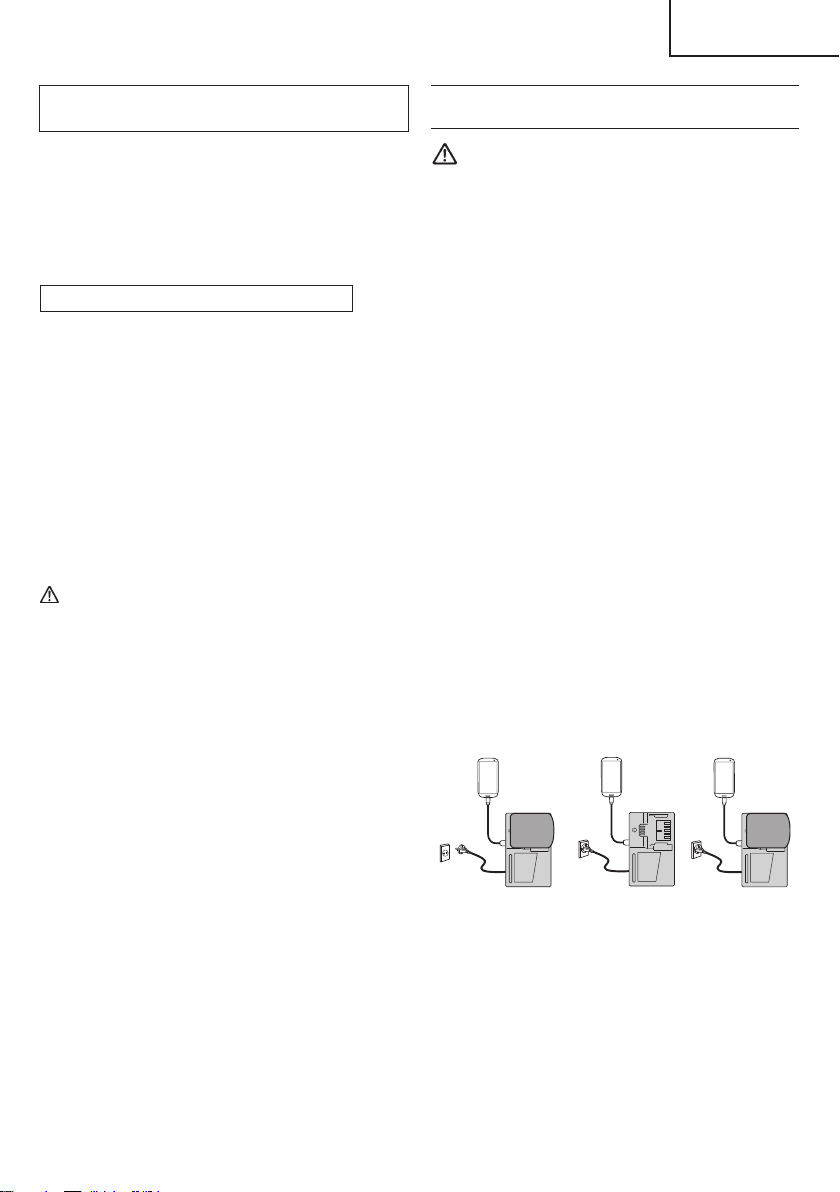
Regarding electric discharge in case of new
batteries, etc.
As the internal chemical substance of new batteries
and batteries that have not been used for an extended
period is not activated, the electric discharge might
be low when using them the fi rst and second time.
This is a temporary phenomenon, and normal time
required for recharging will be restored by recharging
the batteries 2–3 times.
How to make the batteries perform longer
(1) Recharge the batteries before they become
completely exhausted.
When you feel that the power of the tool becomes
weaker, stop using the tool and recharge its battery.
If you continue to use the tool and exhaust the electric
current, the battery may be damaged and its life will
become shorter.
(2) Avoid recharging at high temperatures.
A rechargeable battery will be hot immediately after
use. If such a battery is recharged immediately after
use, its internal chemical substance will deteriorate,
and the battery life will be shortened. Leave the
battery and recharge it after it has cooled for a while.
CAUTION
●
When the battery charger has been continuosly
used, the battery charger will be heated, thus
constituting the cause of the failures. Once the
charging has been completed, give 15 minutes
rest until the next charging.
●
If the battery is charged while it is heated
because it has been left for a long time in a
location subject to direct sunlight or because
the battery has just been used, the pilot lamp
of UC18YKSL/UC18YFSL charger lights for
1 second, does not light for 0.5 seconds (off for
0.5 seconds) or the charge indicator lamp of
UC18YSL3 charger lights for 0.3 seconds, does
not light for 0.3 seconds (off for 0.3 seconds). In
such a case, fi rst let the battery cool, then start
charging.
●
When the charge indicator lamp fl ickers (at
0.2-second intervals), check for and take out
any foreign objects in the charger’s battery
installation hole. If there are no foreign objects,
it is probable that the battery or charger is
malfunctioning. Take it to your authorized
Service Center.
HOW TO RECHARGE USB DEVICE
(ONLY WITH UC18YSL3 CHARGER)
WARNING
○
Prior to use, check the connecting USB cable for
any defect or damage.
Using a defective or damaged USB cable can
cause smoke emission or ignition.
○
When the product is not being used, cover the
USB port with the rubber cover.
Buildup of dust etc. in the USB port can cause
smoke emission or ignition.
NOTE
○
The time required for charging will be longer when
a USB device and battery are being simultaneously
charged.
○
There may be an occasional pause during USB
recharging.
○
When a USB device is not being charged, turn the
USB power switch OFF and remove the USB device
from the charger.
Failure to do so may not only reduce the battery life
of a USB device, but may also result in unexpected
accidents.
(1) Select a charging method
Depending on the charge method selected, either the
battery is inserted into the charger or the power cord
is plugged into an outlet.
○
Charging a USB device by battery (Fig. 7-a)
○
Charging a USB device from a electrical outlet
(Fig. 7-b)
○
Charging a USB device and battery from a
electrical outlet (Fig. 7-c)
abc
Fig. 7
13
English
000BookDS18DBFL2metabo.indb13000BookDS18DBFL2metabo.indb132020/11/0517:45:542020/11/0517:45:54
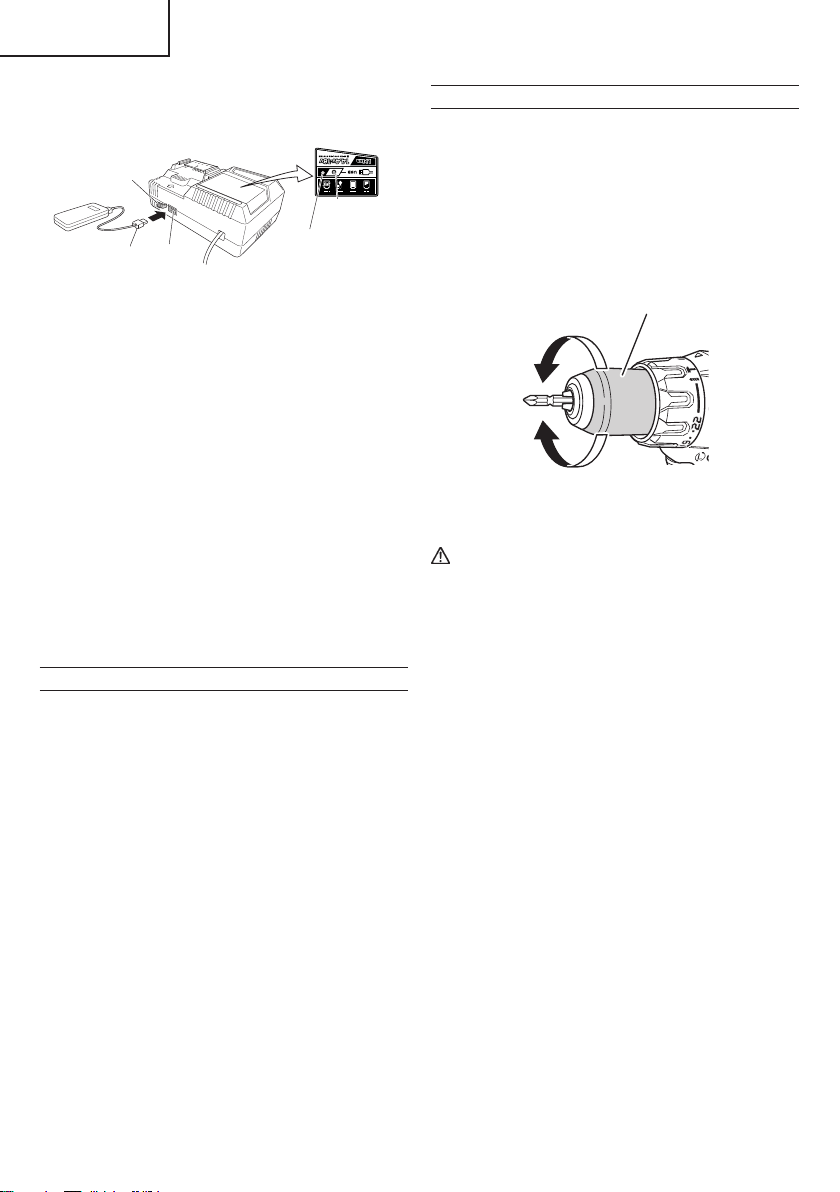
(2) Turn the USB power switch ON (Fig. 8)
When you turn the USB power switch ON, the USB
power indicator lamp will light up.
USB power
switch
USB power
indicator lamp
Rubber cover
USB port
USB cable
Fig. 8
(3) Connect the USB cable. (Fig. 8)
Pull back the rubber cover and fi rmly plug in a
commercially available USB cable (appropriate to the
device being charged) into the USB port.
○
When the power cord is not plugged into an outlet and
the battery runs out of power, power output will stop
and the USB power indicator lamp will shut off .
○
When the USB power indicator lamp goes out, change
the battery or plug the power cord into an electrical
outlet.
(4) When charging is completed
○
The USB power indicator lamp will not go out when a
USB device has been completely charged.
To verify charge status, check the USB device.
○
Turn the USB power switch OFF and unplug the power
cord from the electrical outlet. (Fig. 8)
○
Remove the battery from the charger and place the
rubber cover over the USB port.
BEFORE USE
Check the work area to make sure that it is clear of debris
and clutter.
Clear the area of unnecessary personnel. Ensure that
lighting and ventilation is adequate.
OPERATION
1. Mounting and dismounting of the bit.
(1) Mounting the bit.
Loosen the sleeve by turning it toward the left (in the
counterclockwise direction as viewed from the front)
to open the clip on the keyless chuck. After inserting
a driver bit, etc., into the keyless drill chuck, and
tighten the sleeve by turning it toward the right (in the
clockwise direction as viewed from the front). (See
Fig. 9).
Tighten
Loosen
Sleeve
Fig. 9
CAUTION
When mounting a bit into the keyless chuck,
tighten fi rmly. If the sleeve is not tight, the bit
may slip or fall out, causing injury.
NOTE
If the sleeve becomes loose during operation, tighten
it further.
The tightening force becomes stronger when the
sleeve is tightened.
(2) Dismounting the bit
Loosen the sleeve by turning it toward the left (in the
counterclockwise direction as viewed from the front),
and then take out the bit etc. (See Fig. 9)
NOTE
○
If the sleeve is tightened in a state where the clip of the
keyless chuck is opened to a maximum limit, a click
noise may occur. This is the noise that occurs when
the loosening of the keyless chuck is prevented and is
not a malfunction.
○
When it is no longer possible to loosen the sleeve,
use a vise or similar instrument to secure the bit. Set
the clutch mode between 1 and 11 and then turn the
sleeve to the loose side (left side) while operating the
clutch. It should be easy now to loosen the sleeve.
2. Confi rm that the battery is mounted correctly.
14
English
000BookDS18DBFL2metabo.indb14000BookDS18DBFL2metabo.indb142020/11/0517:45:542020/11/0517:45:54
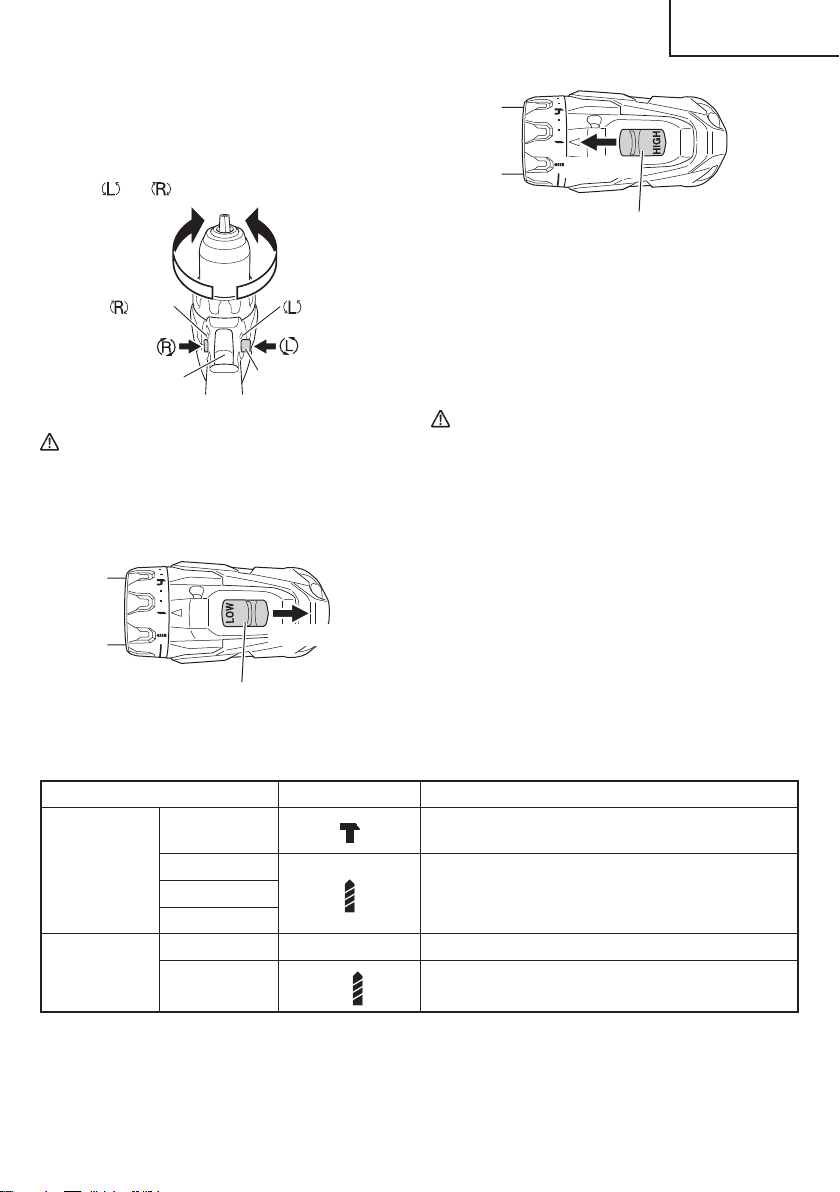
3. Check the rotational direction.
The bit rotates clockwise (viewed from the rear side)
by pushing the R-side of the selector button.
The L-side of the selector button is pushed to
turn the bit counterclockwise (See Fig. 10).
(The
and marks are provided on the body.)
marks marks
Trigger switch
Selector button
Fig. 10
CAUTION
The push button can not be switched while the
power tool is turning. To switch the push button,
stop the power tool, then set the push button.
4. Change rotation speed.
Shift knob
Low speed
Fig. 11
Shift knob
High speed
Fig. 12
Operate the shift knob to change the rotational speed.
Move the shift knob in the direction of the arrow (See
Figs. 11 and 12).
When the shift knob is set to “LOW”, the drill rotates at
a low speed. When set to “HIGH”, the drill rotates at a
high speed.
CAUTION
●
When changing the rotational speed with the
shift knob, confi rm that the switch is off .
Changing the speed while the motor is rotating
will damage the gears.
●
When a large force is required for operation
(operations indicated in the following chart) set
the shift knob to “LOW”. If “HIGH” is set and the
unit is used, it may cause the motor to burn out
or malfunction prematurely.
5. The scope and suggestions for uses
The usable scope for various types of work based
on the mechanical structure of this unit is shown in
Table 7.
Table 7
Work Cap position Suggestions
Drilling
Brick
(DV18DBFL2)
Use for drilling purpose.
Wood
Use for drilling purpose.Steel
Aluminum
Screw tightening
Small screw 1–22 Use the bit and socket matching the screw diameter.
Wood screw
1–
Use after drilling a pilot hole.
15
English
000BookDS18DBFL2metabo.indb15000BookDS18DBFL2metabo.indb152020/11/0517:45:552020/11/0517:45:55
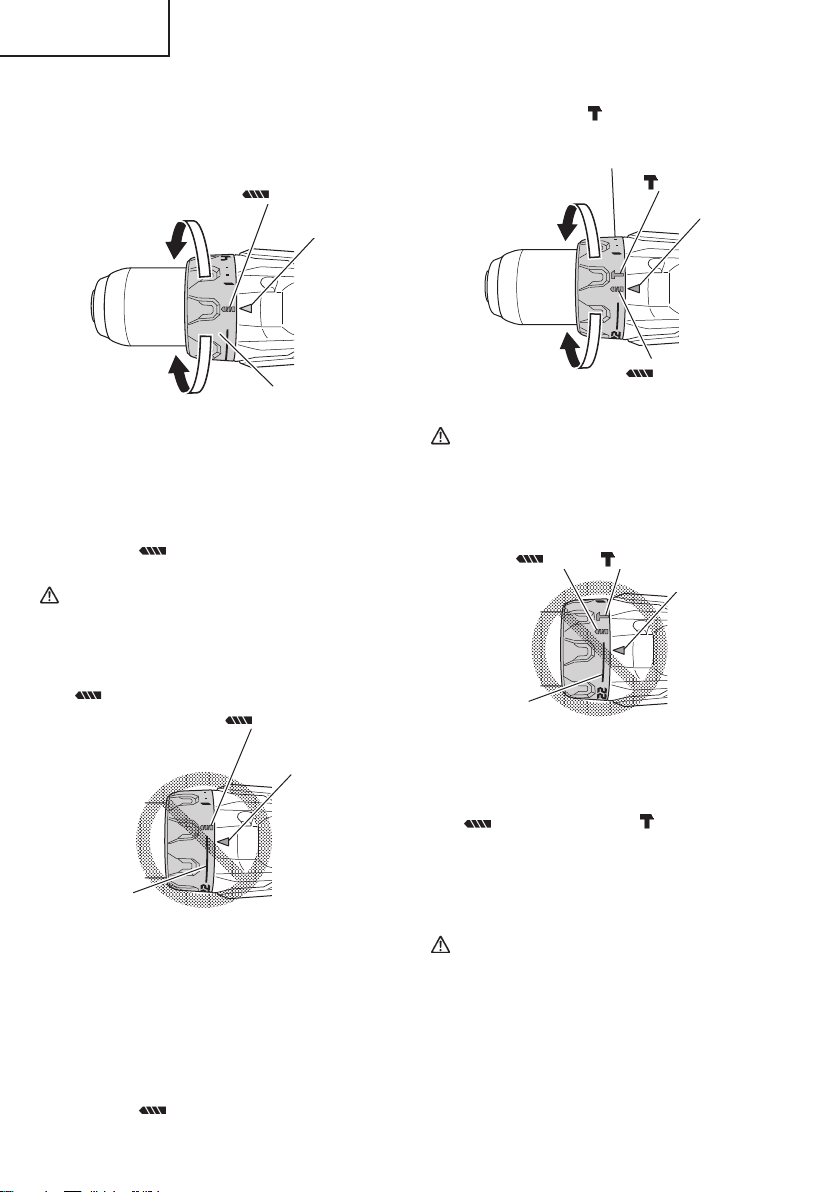
6. Confi rm the clutch dial position (See Fig. 13).
<DS18DBFL2>
The tightening torque of this unit can be adjusted
according to the clutch dial position, at which the
clutch dial is set.
Clutch dial
Triangle mark
Strong
Weak
mark
Fig. 13
(1) When using this unit as a screwdriver, line up the one
of the numbers “1, 4, 7 ... 22” on the clutch dial, or the
dot, with the triangle mark on the outer body.
(2) When using this unit as a drill, line up the clutch dial
drill mark “
” with the triangle mark on the outer
body.
CAUTION
●
The clutch dial cannot be set between the
numbers “1, 4, 7 ... 22” or the dot.
●
Do not use with the clutch dial set at the line
between the number “22” and the drill mark
“
”. Doing so may cause damage (See Fig. 14).
Line
Triangle mark
mark
Fig. 14
<DV18DBFL2> (Fig. 15)
The three modes of screwdriver, drill and hammer drill
can be switched by the position of the clutch dial in
this unit.
(1) When using this unit as a screwdriver, line up the one
of the numbers “1, 4, 7 ... 22” on the clutch dial, or the
dot, with the triangle mark on the outer body.
(2) When using this unit as a drill, line up the clutch dial
drill mark “
” with the triangle mark on the outer
body.
(3) When using this unit as a hammer drill, align the clutch
dial hammer mark “
” with the triangle mark on the
outer body.
mark
Triangle mark
mark
Clutch dial
Weak
Strong
Fig. 15
CAUTION
●
The clutch dial cannot be set between the
number “1, 4, 7 ... 22” or the dot.
●
Do not use with the clutch dial number at “22”
and the line at the middle of the drill mark. Doing
so may cause damage. (See Fig. 16)
Line
mark
Triangle mark
mark
Fig. 16
7. Rotation to Hammer changeover (DV18DBFL2)
The “Rotation (Rotation only)” and “Hammer (Hammer
+ Rotation)” can be switched by aligning the drill mark
“
” or the hammer mark “ ” with the triangle mark
on the outer body.
○
To make holes in the metal, wood or plastic, switch to
“Rotation (Rotation only)”.
○
To make holes in the bricks or concrete blocks, switch
to “Hammer (Hammer + Rotation)”.
CAUTION
Do not use the Cordless hammer drill in the
“Hammer” setting if the material can be bored
by rotation only. Such action will not only reduce
drill effi ciency, but may also damage the drill tip.
16
English
000BookDS18DBFL2metabo.indb16000BookDS18DBFL2metabo.indb162020/11/0517:45:552020/11/0517:45:55
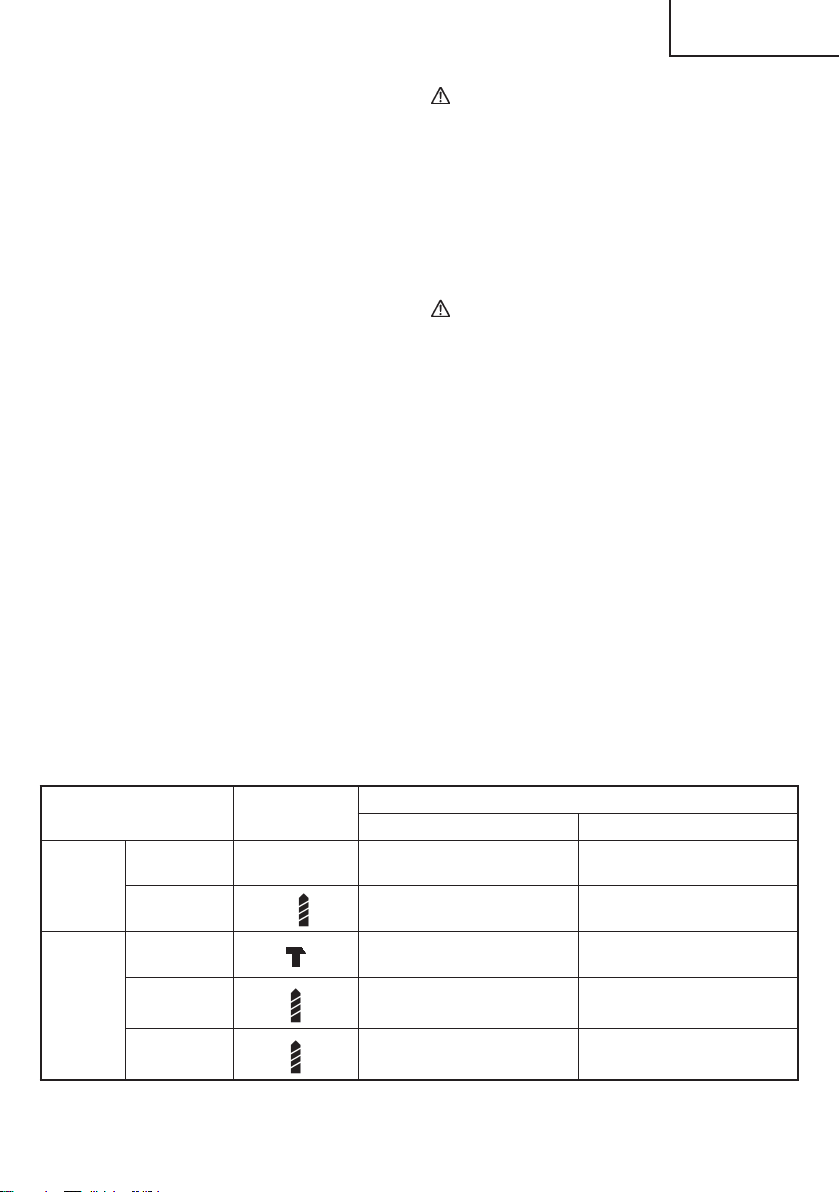
8. Tightening torque adjustment.
(1) Tightening torque
Tightening torque should correspond in its intensity to
the screw diameter. When too strong power is used,
the screw head may be broken or be injured.
Be sure to adjust the clutch dial position according to
the screw diameter.
(2) Tightening torque indication (See Fig. 13, 15)
The tightening torque diff ers depending on the type of
screw and the material being tightened.
The unit indicates the tightening torque with the
numbers “1, 4, 7 ... 22” on the clutch dial, and a dot.
The tightening torque at position “1” is the weakest
and the torque is strongest at the highest number.
(3) Adjusting the tightening torque (See Fig. 13, 15)
Rotate the clutch dial and line up the numbers “1, 4,
7, ... 22” on the clutch dial, or the dot, with the triangle
mark on the outer body. Adjust the clutch dial in the
weak or the strong torque direction according to the
torque you need.
9. Switch operation
○
When the trigger switch is depressed, the tool rotates.
When the trigger is released, the tool stops.
When releasing the trigger of the switch, the brake will
be applied for immediate stopping.
○
The rotational speed of the drill can be controlled by
varying the amount that the trigger switch is pulled.
Speed is low when the trigger switch is pulled slightly
and increases as the trigger switch is pulled more.
10. For drilling into brick (DV18DBFL2)
Excessive pressing force never increases drilling
speed. It will not only damage the drill tip or reduce
working effi ciency, but could also shorten the service
life of drill bit. Operate the hammer drill within 10-20 kg
pressing force while drilling into brick.
CAUTION
●
The motor rotation may be locked to cease while
the unit is used as drill. While operating the
driver drill, take care not to lock the motor.
●
If the motor is locked, immediately turn the power
off . If the motor is locked for a while, the motor or
battery may be burnt.
●
Too long hammering may cause the screw
broken due to excessive tightening.
11. How to select tightening torque and rotational speed
CAUTION
●
The selection examples shown in Table 8 should
be considered as general standard. As diff erent
types of tightening screws and diff erent materials
to be tightened are used in actual works proper
adjustments are naturally necessary.
●
When using the driver drill/hammer drill with a
machine screw at HIGH (high speed), a screw
may damage or a bit may loose due to the
tightning torque is too strong. Use the driver
drill/hammer drill at LOW (low speed) when using
a machine screw.
NOTE
The use of the battery in a cold condition (below
0 degree Centigrade) can sometimes result in the
weakened tightening torque and reduced amount of
work. This, however, is a temporary phenomenon,
and returns to normal when the battery warms up.
Table 8
Use Cap Position
Rotating speed selection (Position of the shift knob
LOW (Low speed) HIGH (High speed)
Screw
tightening
Machine screw
1–22
For 1/4 in. (6 mm) or smaller
diameter screws.
For 1/4 in. (6 mm) or smaller
diameter screws.
Wood screw
1–
For #20 (8 mm) or smaller
nominal diameter screws.
For #16 (6 mm) or smaller
nominal diameter screws.
Drilling
Brick
(DV18DBFL2)
For 1/2 in. (13 mm) or smaller
diameters.
For 13/32 in. (10 mm) or smaller
diameters.
Wood
For 2 in. (50 mm) or smaller
diam-eters.
For 1 in. (24 mm) or smaller
diameters.
Metal
———
For drilling with a metal working
drill bit.
17
English
000BookDS18DBFL2metabo.indb17000BookDS18DBFL2metabo.indb172020/11/0517:45:562020/11/0517:45:56
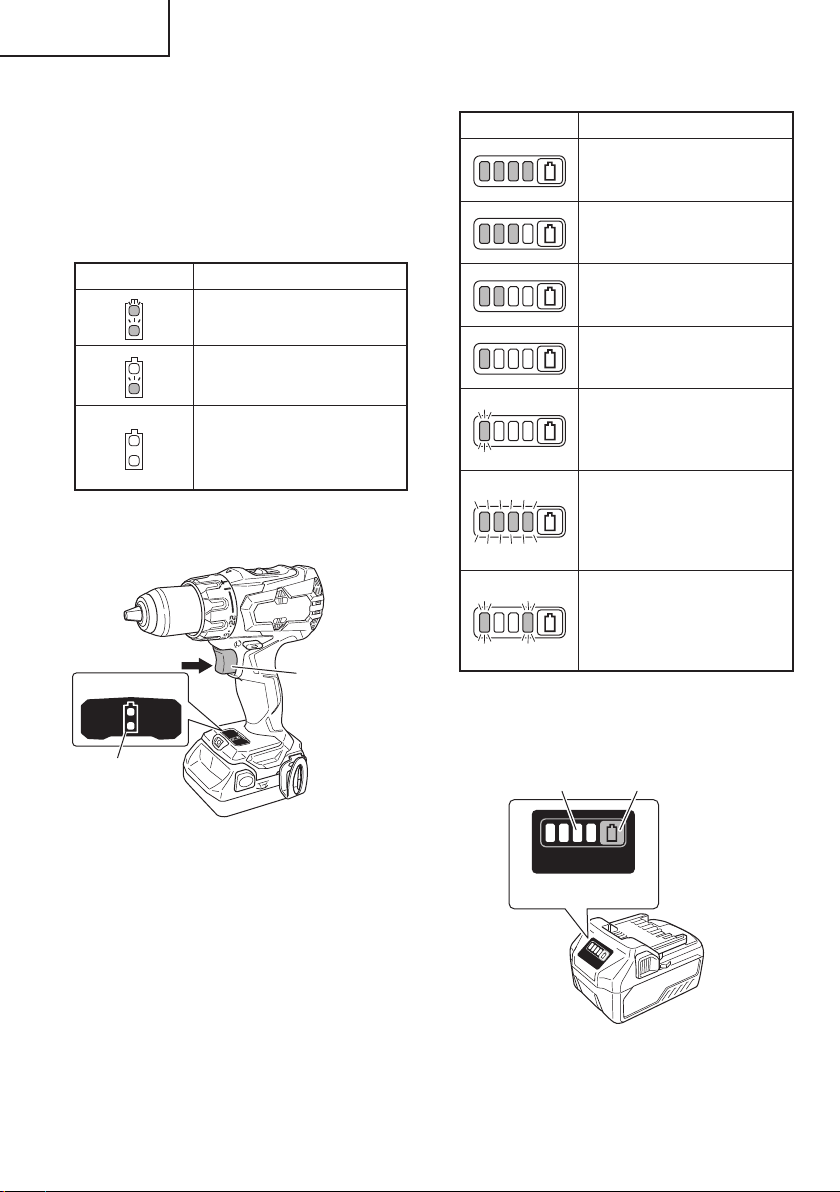
12. About Remaining Battery Indicator
Remaining battery power can be verifi ed by pulling on
the switch to light up the remaining battery indicator
lamp. (Fig. 17)
The indicator lamp will turn off 10 seconds after the
switch is released.
The Table 9 shows the state of remaining battery
indicator lamp and the battery remaining power.
Table 9
State of lamp Battery Remaining Power
The battery remaining power is
enough.
The battery remaining power
is a half.
The battery remaining power is
nearly empty.
Re-charge the battery soonest
possible.
As the remaining battery indicator shows somewhat
diff erently depending on ambient temperature and
battery characteristics, read it as a reference.
Display panel
Switch trigger
Remaining battery
indicator lamp
Fig. 17
NOTE
Do not give a strong shock to the display panel or
break it. It may lead to a trouble.
13. Remaining battery indicator
You can check the battery’s remaining capacity by
pressing the remaining battery indicator switch to light
the indicator lamp. (Fig. 18, Table 10)
The indicator will shut off approximately 3 seconds
after the remaining battery indicator switch is pressed.
It is best to use the remaining battery indicator as
a guide since there are slight diff erences such as
ambient temperature and the condition of the battery.
Also, the remaining battery indicator may vary from
those equipped to a tool or charger.
Table 10
State of lamp Battery Remaining Power
Lights ;
The battery remaining power is
over 75%
Lights ;
The battery remaining power is
50%–75%.
Lights ;
The battery remaining power is
25%–50%.
Lights ;
The battery remaining power is
less than 25%
Blinks ;
The battery remaining power
is nearly empty. Recharge the
battery soonest possible
Blinks ;
Output suspended due to high
temperature. Remove the
battery from the tool and allow it
to fully cool down.
Blinks ;
Output suspended due to failure
or malfunction. The problem
may be the battery so please
contact your dealer.
As the remaining battery indicator shows somewhat
diff erently depending on ambient temperature and
battery characteristics, read it as a reference.
Display panel
Remaining battery
indicator lamp
Remaining battery
indicator switch
Fig. 18
NOTE
Do not give a strong shock to the display panel or
break it. It may lead to a trouble.
18
English
000BookDS18DBFL2metabo.indb18000BookDS18DBFL2metabo.indb182020/11/0517:45:562020/11/0517:45:56
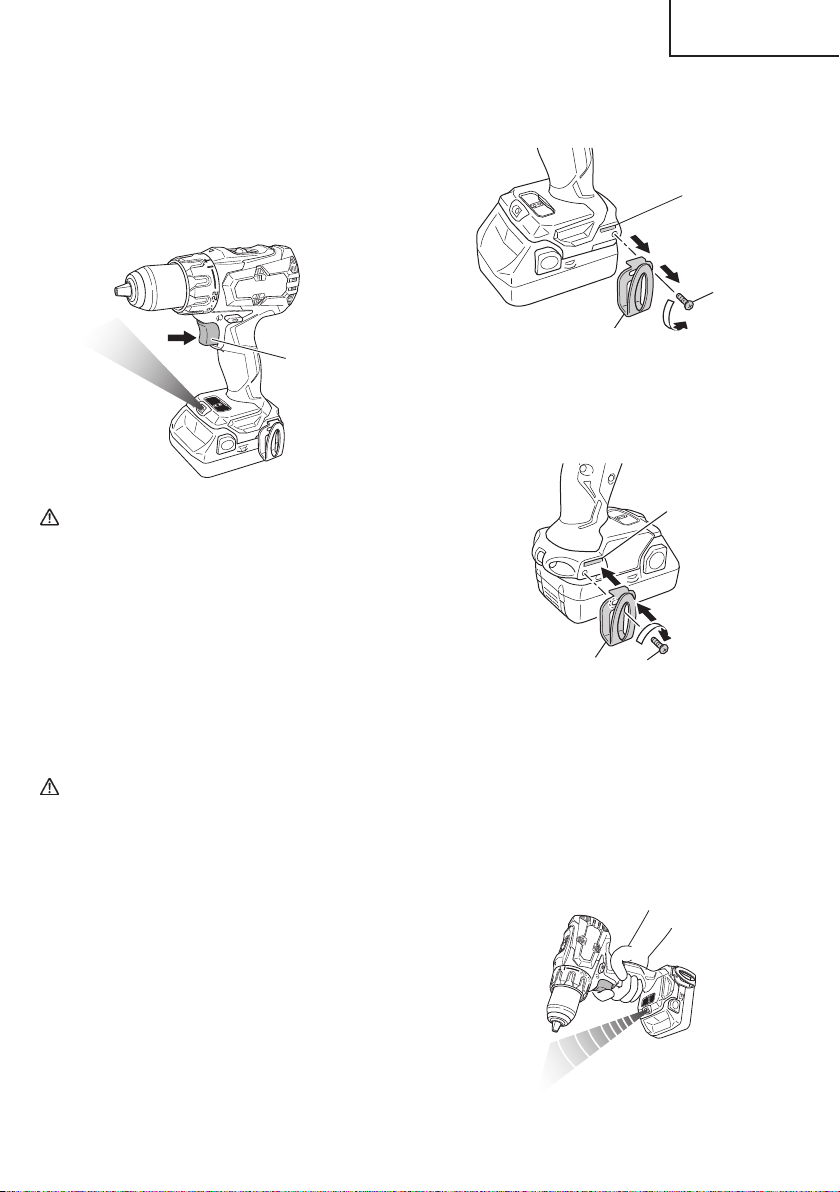
14. How to use the LED light
While the switch is pulled, the LED light will
automatically light up the tip portion of the tool. (Fig. 19)
The LED light will automatically turn off 10 seconds
after the switch is released.
The LED light also functions as a warning signal that
lights up during use.
For details, see “16. LED light warning signals”.
Switch trigger
Fig. 19
CAUTION
●
Do not expose directly your eye to the light by
looking into the light.
If your eye is continuously exposed to the light,
your eye will be hurt.
●
Wipe off any dirt or grime attached to the lens of
the LED light with a soft cloth, being careful not
to scratch the lens.
Scratches on the lens of the LED light can result
in decreased brightness.
15. Using the hook (for models with attached hook)
The hook is used to hang up the power tool to your
waist belt while working.
CAUTION
●
When using the hook, hang up the power tool
fi rmly not to drop accidentally.
If the power tool is dropped, it may lead to an
accident.
●
When carrying the power tool with hooked to
your waist belt, do not fi t any bit to the tip of
power tool. If the sharp bit such as drill is fi tted
to the power tool when carrying it with hooked to
your waist belt, you will be injured.
●
Install securely the hook. Unless the hook is
securely installed, it may cause an injury while
using.
(1) Removing the hook.
Remove the screws fi xing the hook with Philips screw
driver. (Fig. 20)
Groove
Hook
Screw
Fig. 20
(2) Replacing the hook and tightening the screws.
Install securely the hook in the groove of power
tool and tighten the screws to fi x the hook fi rmly.
(Fig. 21)
Screw
Hook
Groove
Fig. 21
16. LED light warning signals (Fig. 22)
This product features functions that are designed
to protect the tool itself as well as the battery. While
the switch is pulled, if any of the safeguard functions
activate during operation, the LED light will blink as
described in Table 11. When any of the safeguard
functions are triggered, immediately remove your
fi nger from the switch and follow the instructions
described under corrective action.
Fig. 22
19
English
000BookDS18DBFL2metabo.indb19000BookDS18DBFL2metabo.indb192020/11/0517:45:562020/11/0517:45:56

OPERATIONAL CAUTIONS
Resting the unit after continuous work
(1) The power tool is equipped with a temperature
protection circuit to protect the motor.
Continuous bolt-tightening work may cause the
temperature of the unit to rise, activating the
temperature protection circuit and automatically
stopping operation.
If this happens, allow the power tool to cool before
resuming use.
(2) After use for continuous tightening wood screw works,
rest the unit for 15 minutes or so when replacing the
battery. The temperature of the motor, switch, etc.,
will rise if the work is started again immediately after
battery replacement, eventually resulting in burnout.
Table 11
Safeguard Function LED Light Display Corrective Action
Overburden Protection
On 0.1 second/off 0.1 second
If the operating with the shift knob set on
HIGH, adjust to LOW and continue operation.
Remove the cause of the overburdening.
Temperature Protection
On 0.5 second/off 0.5 second
Allow the tool and battery to thoroughly cool.
20
English
000BookDS18DBFL2metabo.indb20000BookDS18DBFL2metabo.indb202020/11/0517:45:572020/11/0517:45:57
MAINTENANCE AND INSPECTION
CAUTION:
Pull out battery before doing any inspection or maintenance.
1. Checking the condition of the bit
The bits should be checked regularly. If worn or
broken bits can slip or decrease the effi ciency of the
motor and burn it out.
Replace worn bits with new ones.
CAUTION
If you use a driver bit of which point is worn or
broken, it will be dangerous since it slips. So
replace it with a new one.
2. Check the Screws
Loose screws are dangerous. Regularly inspect them
and make sure they are tight.
CAUTION
Using this power tool with loosened, screws is
extremely dangerous.
3. Check for Dust
Dust may be removed with a soft cloth or a cloth
dampened with soapy water.
Do not use bleach, chlorine, gasoline or thinner, for
they may damage the plastics.
4. Inspection of terminals (tool and battery)
Check to make sure that swarf and dust have not
collected on the terminals.
On occasion check prior, during and after operation.
CAUTION
Remove any swarf or dust which may have
collected on the terminals.
Failure to do so may result in malfunction.
5. Disposal of the exhausted battery
WARNING
Do not dispose of the exhausted battery. The
battery must explode if it is incinerated. The
product that you have purchased contains a
rechargeable battery. The battery is recyclable.
At the end of it’s useful life, under various state
and local laws, it may be illegal to dispose of this
battery into the municipal waste stream. Check
with your local solid waste offi cials for details
in your area for recycling options or proper
disposal.
6. Storage
Storing in a place below 104°F (40°C) and out of the
reach of children.
NOTE
Storing lithium-ion batteries
Make sure the lithium-ion batteries have been fully
charged before storing them.
Prolonged storage (3 months or more) of batteries with
a low charge may result in performance deterioration,
signifi cantly reducing battery usage time or rendering
the batteries incapable of holding a charge.
However, signifi cantly reduced battery usage time
may be recovered by repeatedly charging and using
the batteries two to fi ve times.
If the battery usage time is extremely short despite
repeated charging and use, consider the batteries
dead and purchase new batteries.
7. Service and repairs
All quality power tools will eventually require servicing
or replacement of parts because of wear from normal
use. To assure that only authorized replacement parts
will be used, all service and repairs must be performed
by a metabo HPT AUTHORIZED SERVICE CENTER,
ONLY.
CAUTION
In the operation and maintenance of power tools,
the safety regulations and standards prescribed
in each country must be observed.
Important notice on the batteries for the
metabo HPT cordless power tools
Please always use one of our designated genuine
batteries. We cannot guarantee the safety and
performance of our cordless power tool when used
with batteries other than these designated by us, or
when the battery is disassembled and modifi ed (such
as disassembly and replacement of cells or other
internal parts).
21
English
000BookDS18DBFL2metabo.indb21000BookDS18DBFL2metabo.indb212020/11/0517:45:572020/11/0517:45:57

TROUBLESHOOTING GUIDE
WARNING
●
To avoid injury from an accidental start, turn the switch OFF and remove the plug from the power source
or remove the battery from the main body before making any adjustments.
●
All electrical or mechanical repairs should be done only by qualifi ed service technicians. Contact
metabo HPT Authorized Service Center.
Problem Possible Cause Possible Solution
Tool doesn’t run No remaining battery power Charge the battery.
Battery isn’t securely attached. Push in the battery until a click is heard.
Tool suddenly stopped Tool was overburdened Remove the cause of the overburdening.
Battery or tool overheated Allow the tool and battery to thoroughly
cool.
Tool bits
-can’t be attached
-fall off
The shape of the attachment portion
doesn’t match
The chucking diameter of the keyless
chuck is 1/16 in (1.5 mm) to 1/2 in (13 mm).
Use a bit that falls within the stated range.
The lock of the keyless chuck is worn Contact a metabo HPT Authorized Service
Center and arrange to have the old keyless
chuck replaced with a new one.
Switch can’t be pulled Forward/reverse selector button is
positioned halfway
Press the button fi rmly into position for the
desired direction of rotation.
Screw head slips or comes
loose.
Bit number doesn’t match with the screw
size
Install a suitable bit.
The bit is worn Replace with a new bit.
Holes can’t be smoothly
drilled.
The drill is worn Replace with a new drill.
Rotation speed isn’t appropriate Adjust the rotation speed (HIGH/LOW) to
match the material to be drilled.
The drill is rotating in reverse Switch to forward rotation.
<UC18YKSL / UC18YFSL>
The pilot lamp rapidly
fl ickers red, and battery
charging doesn’t begin.
<UC18YSL3>
The charge indicator lamp is
rapidly blinking purple, and
battery charging doesn’t
begin.
The battery is not inserted all the way. Insert the battery fi rmly.
There is foreign matter in the battery
terminal or where the battery is attached.
Remove the foreign matter.
22
English
000BookDS18DBFL2metabo.indb22000BookDS18DBFL2metabo.indb222020/11/0517:45:572020/11/0517:45:57

Problem Possible Cause Possible Solution
<UC18YKSL / UC18YFSL>
The pilot lamp blinks red,
and battery charging
doesn’t begin.
<UC18YSL3>
The charge indicator lamp
blinks red, and battery
charging doesn’t begin.
The battery is not inserted all the way. Insert the battery fi rmly.
The battery is overheated. If left alone, the battery will automatically
begin charging if its temperature
decreases, but this may reduce battery
life. It is recommended that the battery be
cooled in a well-ventilated location away
from direct sunlight before charging it.
Battery usage time is short
even though the battery is
fully charged.
The battery’s life is depleted. Replace the battery with a new one.
The battery takes a long
time to charge.
The temperature of the battery, the
charger, or the surrounding environment
is extremely low.
Charge the battery indoors or in another
warmer environment.
The charger’s vents are blocked, causing
its internal components to overheat.
Avoid blocking the vents.
The cooling fan is not running. Contact a metabo HPT Authorized Service
Center for repairs.
<UC18YSL3 only>
The USB power lamp
has switched off and the
USB device has stopped
charging.
The battery’s capacity has become low. Replace the battery with one that has
capacity remaining.
Plug the charger’s power plug into an
electric socket.
USB power lamp does not
switch off even though the
USB device has fi nished
charging.
The USB power lamp lights up green to
indicate that USB charging is possible.
This is not a malfunction.
It is unclear what the
charging status of a USB
device is, or whether its
charging is complete.
The USB power lamp does not switch off
even when charging is complete.
Examine the USB device that is charging
to confi rm its charging status.
Charging of a USB device
pauses midway.
The charger was plugged into an
electrical socket while the USB device
was being charged using the battery as
the power source.
This is not a malfunction.
The charger pauses USB charging for
about 5 seconds when it is diff erentiating
between power sources.
A battery was inserted into the charger
while the USB device was being charged
using a power socket as the power
source.
Charging of the USB device
pauses midway when the
battery and the USB device
are being charged at the
same time.
The battery has become fully charged. This is not a malfunction.
The charger pauses USB charging for
about 5 seconds while it checks whether
the battery has successfully completed
charging.
23
English
000BookDS18DBFL2metabo.indb23000BookDS18DBFL2metabo.indb232020/11/0517:45:572020/11/0517:45:57
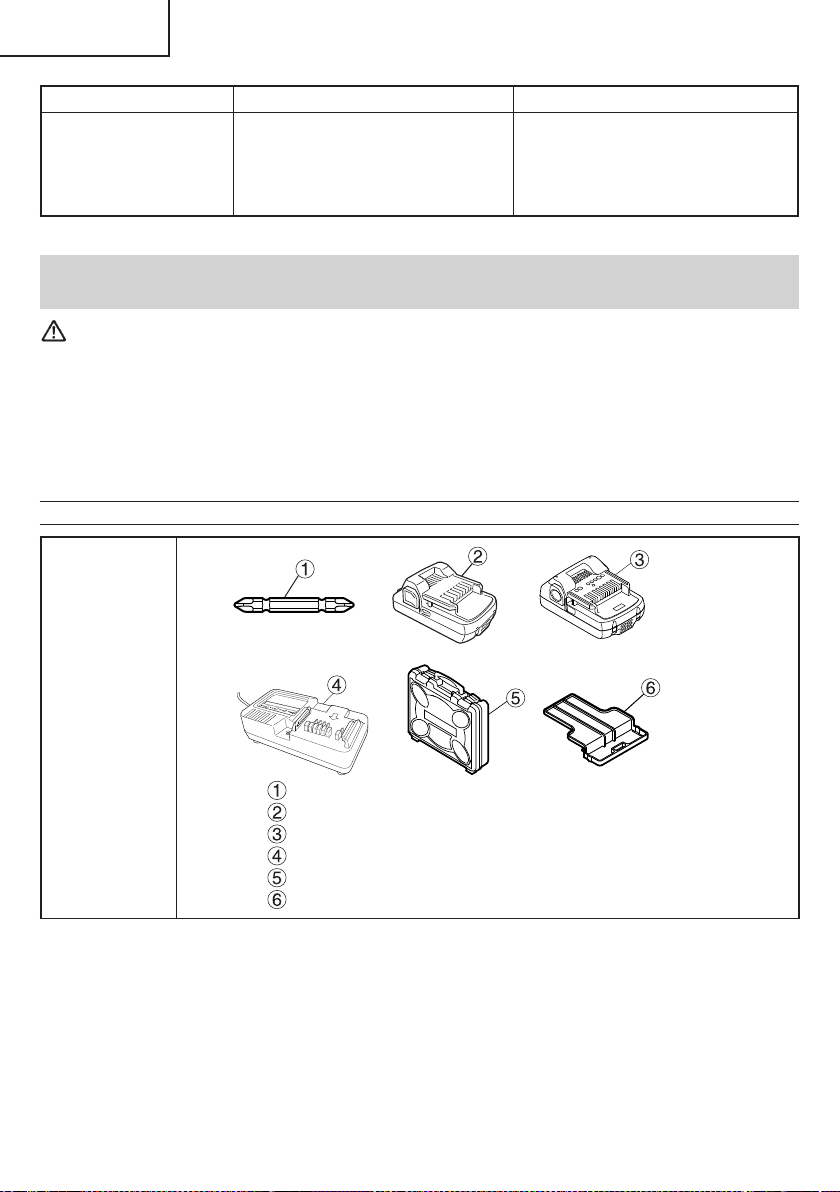
Problem Possible Cause Possible Solution
Charging of the USB device
doesn’t start when the
battery and the USB device
are being charged at the
same time.
The remaining battery capacity is
extremely low.
This is not a malfunction.
When the battery capacity reaches a
certain level, USB charging automatically
begins.
ACCESSORIES
WARNING
ALWAYS use Only authorized metabo HPT replacement parts and accessories. Never use replacement
parts or accessories which are not intended for use with this tool. Contact metabo HPT if you are not sure
whether it is safe to use a particular replacement part or accessory with your tool.
The use of any other attachment or accessory can be dangerous and could cause injury or mechanical
damage.
NOTE
Accessories are subject to change without any obligation on the part of the metabo HPT.
STANDARD ACCESSORIES
DS18DBFL2
Phillips bit (No. 2 x 65L) (Code No. 983006) ......................................... 1
Battery (BSL1830C) .............................................................................. 1
Battery (BSL1815) ................................................................................. 1
Battery Charger (UC18YKSL) ............................................................... 1
Plastic Case (Code No.337852) ............................................................ 1
Battery Cover (Code No.329897) ......................................................... 1
24
English
000BookDS18DBFL2metabo.indb24000BookDS18DBFL2metabo.indb242020/11/0517:45:572020/11/0517:45:57
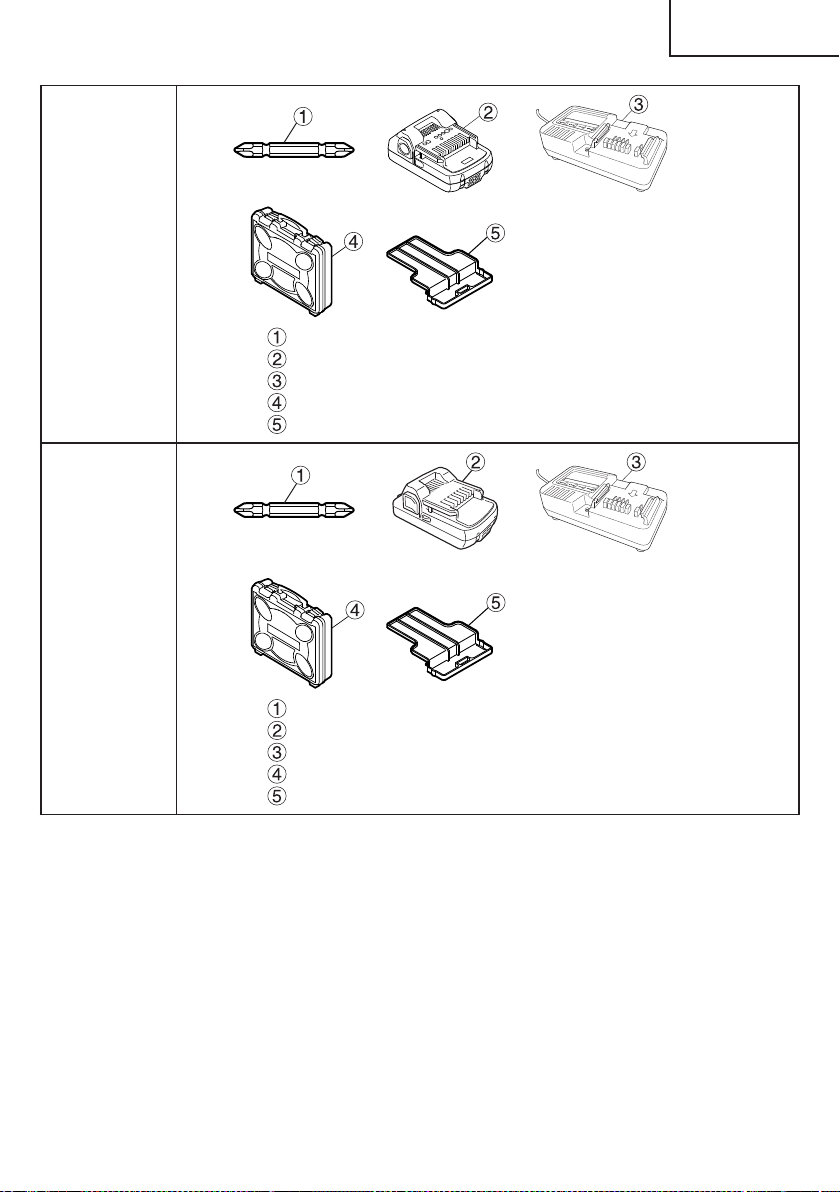
DS18DBFL2
(2LEGK)
DV18DBFL2
(2LEGK)
Phillips bit (No. 2 x 65L) (Code No. 983006) ......................................... 1
Battery (BSL1815) ................................................................................. 2
Battery Charger (UC18YKSL) ............................................................... 1
Plastic Case (Code No. 337852) ........................................................... 1
Battery Cover (Code No. 329897) ........................................................ 1
DV18DBFL2
(2LSGK)
Phillips bit (No. 2 × 65L) (Code No. 983006) ......................................... 1
Battery (BSL1830C) .............................................................................. 2
Battery Charger (UC18YKSL) ............................................................... 1
Plastic Case (Code No. 337852) ........................................................... 1
Battery cover (Code No. 329897) ......................................................... 1
25
English
000BookDS18DBFL2metabo.indb25000BookDS18DBFL2metabo.indb252020/11/0517:45:582020/11/0517:45:58
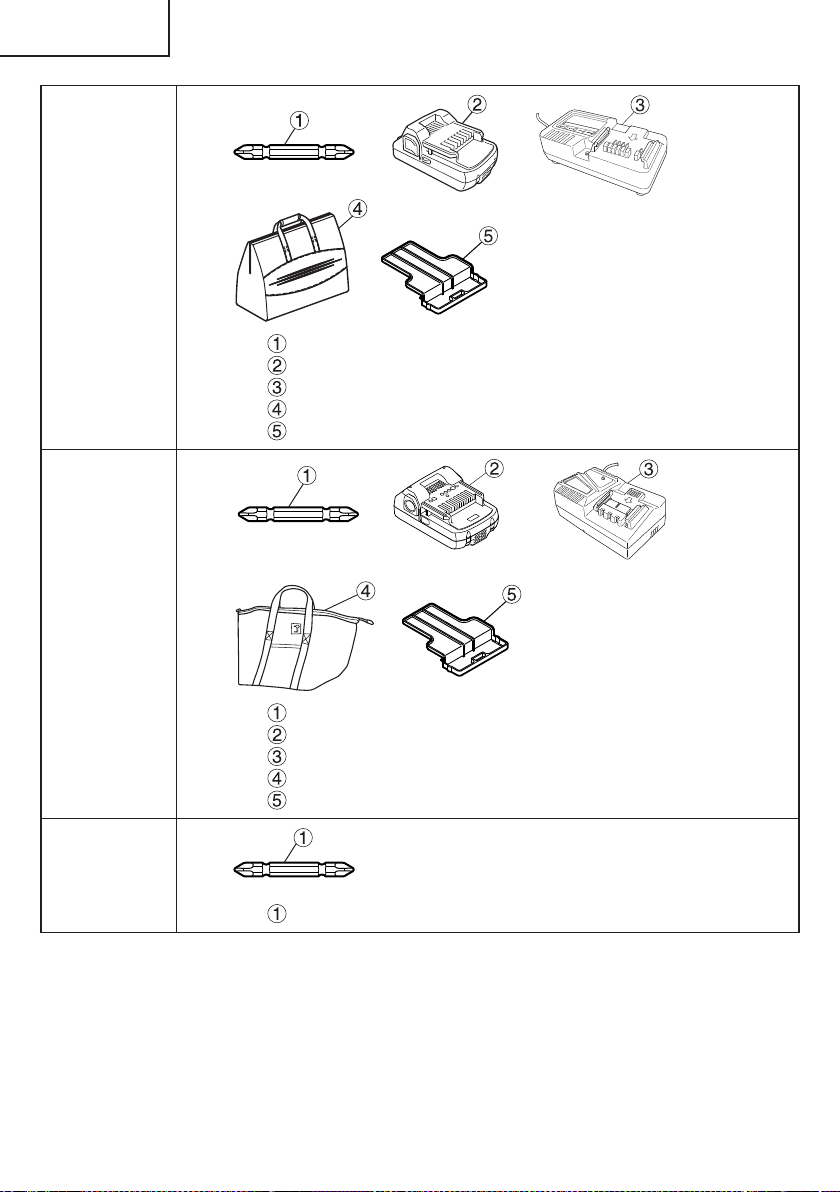
DS18DBFL2
(LMGX)
DV18DBFL2
(LMGX)
Phillips bit (No. 2 x 65L) (Code No. 983006) ......................................... 1
Battery (BSL1830C) .............................................................................. 1
Battery Charger (UC18YKSL) ............................................................... 1
Bag (Code No.331417) .......................................................................... 1
Battery Cover (Code No.329897) ......................................................... 1
DS18DBFL2
(2LERX)
Philips bit (No.2 × 65L) (Code No. 983006) .......................................... 1
Battery (BSL1815) ................................................................................. 2
Battery Charger (UC18YFSL)................................................................ 1
Bag (Code No. 375801M) ...................................................................... 1
Battery cover (Code No. 329897) ......................................................... 1
DS18DBFL2
(NN)
DV18DBFL2
(NN)
Phillips bit (No. 2 × 65L) (Code No. 983006) ......................................... 1
26
English
000BookDS18DBFL2metabo.indb26000BookDS18DBFL2metabo.indb262020/11/0517:45:582020/11/0517:45:58
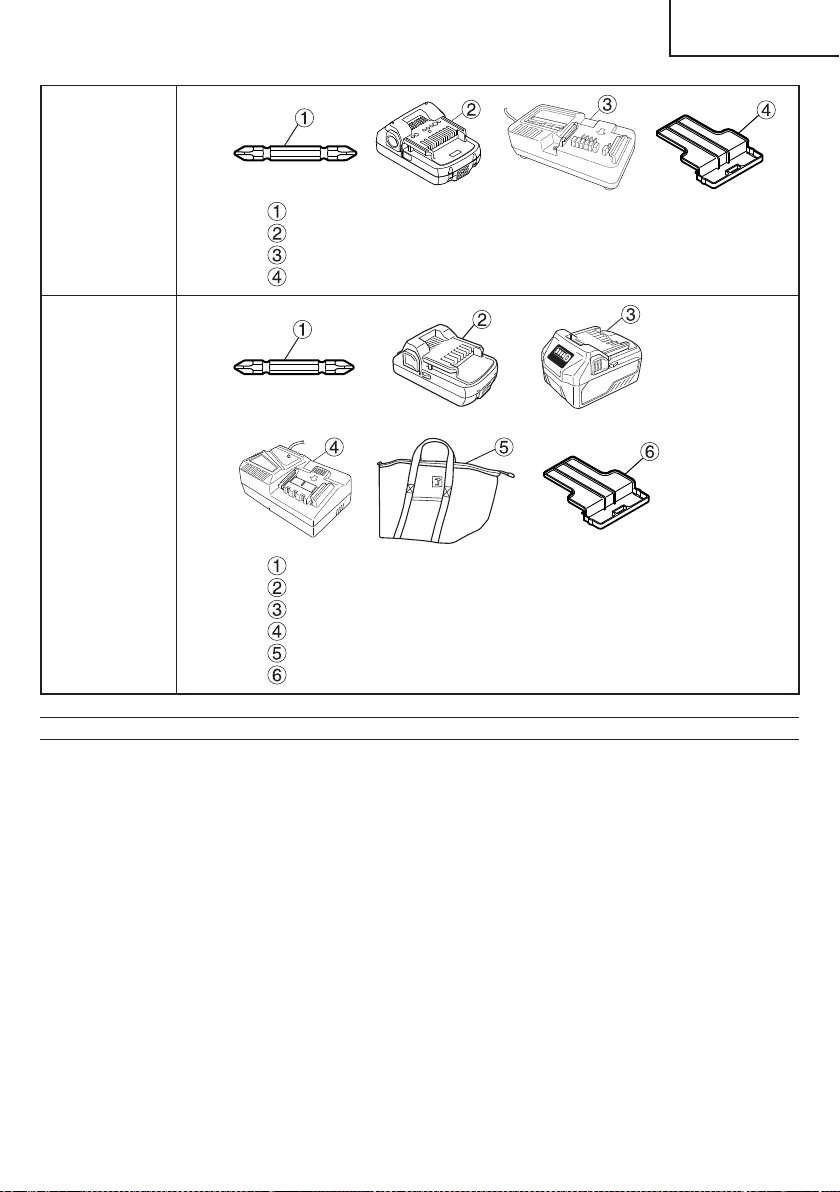
DS18DBFL2
(LEG)
Philips bit (No.2 × 65L) (Code No. 983006) .......................................... 1
Battery (BSL1815) ................................................................................. 1
Battery Charger (UC18YKSL) ............................................................... 1
Battery cover (Code No. 329897) ......................................................... 1
DV18DBFL2
(2LMRX)
Philips bit (No.2 × 65L) (Code No. 983006) .......................................... 1
Battery (BSL1830C) .............................................................................. 1
Battery (BSL36A18) .............................................................................. 1
Battery Charger (UC18YFSL)................................................................ 1
Bag (Code No. 375801M) ...................................................................... 1
Battery cover (Code No. 329897) ......................................................... 1
OPTIONAL ACCESSORIES.....sold separately
○
Battery (BSL1815 / BSL1830C / BSL36A18)
○
Hook
NOTE
Specifi cations are subject to change without any obligation on the part of the metabo HPT.
27
English
000BookDS18DBFL2metabo.indb27000BookDS18DBFL2metabo.indb272020/11/0517:45:592020/11/0517:45:59
Designed for operating in USA & Canada only.
When this product is used in areas other than the USA & Canada,
we cannot guarantee the product quality and performance.
SAFETY INSTRUCTIONS AND INSTRUCTION MANUAL
WARNING
IMPROPER OR UNSAFE use of this power tool can result in death or serious bodily injury!
This manual contains important information about product safety. Please read and understand
this manual BEFORE operating the power tool. Please keep this manual available for other
users and owners before they use the power tool. This manual should be stored in safe place.
INSTRUCTIONS DE SECURITE ET MODE D’EMPLOI
AVERTISSEMENT
Une utilisation INCORRECTE OU DANGEREUSE de cet outil motorisé peut entraîner la mort
ou de sérieuses blessures corporelles!
Ce mode d’emploi contient d’importantes informations à propos de la sécurité de ce produit.
Prière de lire et de comprendre ce mode d’emploi AVANT d’utiliser l’outil motorisé. Garder ce
mode d’emploi à la disponibilité des autres utilisateurs et propriétaires avant qu’ils utilisent
l’outil motorisé. Ce mode d’emploi doit être conservé dans un endroit sûr.
INSTRUCCIONES DE SEGURIDAD Y MANUAL DE INSTRUCCIONES
ADVERTENCIA
¡La utilización INAPROPIADA O PELIGROSA de esta herramienta eléctrica puede resultar
en lesiones de gravedad o la muerte!
Este manual contiene información importante sobre la seguridad del producto. Lea y
comprenda este manual ANTES de utilizar la herramienta eléctrica. Guarde este manual para
que puedan leerlo otras personas antes de utilizar la herramienta eléctrica. Este manual debe
ser guardado en un lugar seguro.
Model
Modèle
Modelo
G 18DSL2
Cordless Disc Grinder
Meuleuse sans fi l
Amoladora angular inalámbrica
00BookG18DSL2metabo.indb100BookG18DSL2metabo.indb12021/03/3014:38:432021/03/3014:38:43

IMPORTANT SAFETY INSTRUCTIONS
Read and understand all of the safety precautions, warnings and operating instructions in the Instruction Manual before
operating or maintaining this power tool.
Most accidents that result from power tool operation and maintenance are caused by the failure to observe basic safety
rules or precautions. An accident can often be avoided by recognizing a potentially hazardous situation before it occurs,
and by observing appropriate safety procedures.
Basic safety precautions are outlined in the “SAFETY” section of this Instruction Manual and in the sections which
contain the operation and maintenance instructions.
Hazards that must be avoided to prevent bodily injury or machine damage are identifi ed by WARNINGS on the power
tool and in this Instruction Manual.
NEVER use this power tool in a manner that has not been specifi cally recommended by metabo HPT.
MEANINGS OF SIGNAL WORDS
WARNING indicates a potentially hazardous situations which, if ignored, could result in death or serious injury.
CAUTION indicates a potentially hazardous situations which, if not avoided, may result in minor or moderate injury, or
may cause machine damage.
NOTE emphasizes essential information.
SAFETY
GENERAL POWER TOOL SAFETY WARNINGS
WARNING
Read all safety warnings and all instructions.
Failure to follow the warnings and instructions may result in electric shock, fi re and/or serious injury.
Save all warnings and instructions for future reference.
The term “power tool” in the warnings refers to your mains-operated (corded) power tool or battery-operated
(cordless) power tool.
1) Work area safety
a) Keep work area clean and well lit.
Cluttered or dark areas invite accidents.
b) Do not operate power tools in explosive
atmospheres, such as in the presence of
fl ammable liquids, gases or dust.
Power tools create sparks which may ignite the
dust or fumes.
c) Keep children and bystanders away while
operating a power tool.
Distractions can cause you to lose control.
2) Electrical safety
a) Power tool plugs must match the outlet.
Never modify the plug in any way.
Do not use any adapter plugs with earthed
(grounded) power tools.
Unmodifi ed plugs and matching outlets will reduce
risk of electric shock.
b) Avoid body contact with earthed or grounded
surfaces such as pipes, radiators, ranges and
refrigerators.
There is an increased risk of electric shock if your
body is earthed or grounded.
c) Do not expose power tools to rain or wet
conditions.
Water entering a power tool will increase the risk
of electric shock.
d) Do not abuse the cord. Never use the cord
for carrying, pulling or unplugging the power
tool.
Keep cord away from heat, oil, sharp edges or
moving parts.
Damaged or entangled cords increase the risk of
electric shock.
e) When operating a power tool outdoors, use
an extension cord suitable for outdoor use.
Use of a cord suitable for outdoor use reduces the
risk of electric shock.
f) If operating a power tool in a damp location
is unavoidable, use a residual current device
(RCD) protected supply.
Use of an RCD reduces the risk of electric shock.
2
English
00BookG18DSL2metabo.indb200BookG18DSL2metabo.indb22021/03/3014:38:442021/03/3014:38:44

3) Personal safety
a) Stay alert, watch what you are doing and use
common sense when operating a power tool.
Do not use a power tool while you are tired
or under the infl uence of drugs, alcohol or
medication.
A moment of inattention while operating power
tools may result in serious personal injury.
b) Use personal protective equipment. Always
wear eye protection.
Protective equipment such as dust mask, non-skid
safety shoes, hard hat, or hearing protection used
for appropriate conditions will reduce personal
injuries.
c) Prevent unintentional starting. Ensure the
switch is in the off -position before connecting
to power source and/or battery pack, picking
up or carrying the tool.
Carrying power tools with your fi nger on the switch
or energising power tools that have the switch on
invites accidents.
d) Remove any adjusting key or wrench before
turning the power tool on.
A wrench or a key left attached to a rotating part of
the power tool may result in personal injury.
e) Do not overreach. Keep proper footing and
balance at all times.
This enables better control of the power tool in
unexpected situations.
f) Dress properly. Do not wear loose clothing or
jewellery. Keep your hair, clothing and gloves
away from moving parts.
Loose clothes, jewellery or long hair can be caught
in moving parts.
g) If devices are provided for the connection
of dust extraction and collection facilities,
ensure these are connected and properly
used.
Use of dust collection can reduce dust-related
hazards.
4) Power tool use and care
a) Do not force the power tool. Use the correct
power tool for your application.
The correct power tool will do the job better and
safer at the rate for which it was designed.
b) Do not use the power tool if the switch does
not turn it on and off .
Any power tool that cannot be controlled with the
switch is dangerous and must be repaired.
c) Disconnect the plug from the power source
and/or the battery pack from the power tool
before making any adjustments, changing
accessories, or storing power tools.
Such preventive safety measures reduce the risk
of starting the power tool accidentally.
d) Store idle power tools out of the reach of
children and do not allow persons unfamiliar
with the power tool or these instructions to
operate the power tool.
Power tools are dangerous in the hands of
untrained users.
e) Maintain power tools. Check for misalignment
or binding of moving parts, breakage of parts
and any other condition that may aff ect the
power tool’s operation.
If damaged, have the power tool repaired
before use.
Many accidents are caused by poorly maintained
power tools.
f) Keep cutting tools sharp and clean.
Properly maintained cutting tools with sharp
cutting edges are less likely to bind and are easier
to control.
g) Use the power tool, accessories and tool bits
etc. in accordance with these instructions,
taking into account the working conditions
and the work to be performed.
Use of the power tool for operations diff erent
from those intended could result in a hazardous
situation.
5) Battery tool use and care
a) Recharge only with the charger specifi ed by
the manufacturer.
A charger that is suitable for one type of battery
pack may create a risk of fi re when used with
another battery pack.
b) Use power tools only with specifi cally
designated battery packs.
Use of any other battery packs may create a risk of
injury and fi re.
c) When battery pack is not in use, keep it away
from other metal objects like paper clips,
coins, keys, nails, screws, or other small
metal objects, that can make a connection
from one terminal to another.
Shorting the battery terminals together may cause
burns or a fi re.
d) Under abusive conditions, liquid may be
ejected from the battery; avoid contact. If
contact accidentally occurs, fl ush with water.
If liquid contacts eyes, additionally seek
medical help.
Liquid ejected from the battery may cause irritation
or burns.
6) Service
a) Have your power tool serviced by a
qualifi ed repair person using only identical
replacement parts.
This will ensure that the safety of the power tool is
maintained.
3
English
00BookG18DSL2metabo.indb300BookG18DSL2metabo.indb32021/03/3014:38:442021/03/3014:38:44

The eye protection must be capable of stopping
fl ying debris generated by various operations. The
dust mask or respirator must be capable of fi ltrating
particles generated by your operation. Prolonged
exposure to high intensity noise may cause hearing
loss.
i) Keep bystanders a safe distance away from work
area. Anyone entering the work area must wear
personal protective equipment.
Fragments of workpiece or of a broken accessory
may fl y away and cause injury beyond immediate area
of operation.
j) Hold the power tool by insulated gripping
surfaces only, when performing an operation
where the cutting tool may contact hidden wiring.
Contact with a “live” wire will also make exposed
metal parts of the power tool “live” and could give the
operator an electric shock.
k) Position the cord clear of the spinning accessory.
If you lose control, the cord may be cut or snagged
and your hand or arm may be pulled into the spinning
accessory.
l) Never lay the power tool down until the accessory
has come to a complete stop.
The spinning accessory may grab the surface and
pull the power tool out of your control.
m) Do not run the power tool while carrying it at your
side.
Accidental contact with the spinning accessory could
snag your clothing, pulling the accessory into your
body.
n) Regularly clean the power tool’s air vents.
The motor’s fan will draw the dust inside the housing
and excessive accumulation of powdered metal may
cause electrical hazards.
o) Do not operate the power tool near fl ammable
materials.
Sparks could ignite these materials.
p) Do not use accessories that require liquid
coolants.
Using water or other liquid coolants may result in
electrocution or shock.
KICKBACK AND RELATED WARNINGS
Kickback is a sudden reaction to a pinched or snagged
rotating wheel, backing pad, brush or any other accessory.
Pinching or snagging causes rapid stalling of the rotating
accessory which in turn causes the uncontrolled power
tool to be forced in the direction opposite of the accessory’s
rotation at the point of the binding.
For example, if an abrasive wheel is snagged or pinched
by the workpiece, the edge of the wheel that is entering
into the pinch point can dig into the surface of the material
causing the wheel to climb out or kick out. The wheel may
SAFETY WARNINGS FOR GRINDING
OPERATIONS
a) This power tool is intended to function as a
grinder. Read all safety warnings, instructions,
illustrations and specifi cations provided with
this power tool.
Failure to follow all instructions listed below may result
in electric shock, fi re and/or serious injury.
b) Operations such as sanding, wire brushing or
polishing or cutting-off are not recommended to
be performed with this power tool.
Operations for which the power tool was not designed
may create a hazard and cause personal injury.
c) Do not use accessories which are not specifi cally
designed and recommended by the tool
manufacturer.
Just because the accessory can be attached to your
power tool, it does not assure safe operation.
d) The rated speed of the accessory must be at
least equal to the maximum speed marked on the
power tool.
Accessories running faster than their rated speed can
break and fl y apart.
e) The outside diameter and the thickness of your
accessory must be within the capacity rating of
your power tool.
Incorrectly sized accessories cannot be adequately
guarded or controlled.
f) Threaded mounting of accessories must match
the grinder spindle thread. For accessories
mounted by fl anges, the arbour hole of the
accessory must fi t the locating diameter of the
fl ange.
Accessories that do not match the mounting hardware
of the power tool will run out of balance, vibrate
excessively and may cause loss of control.
g) Do not use a damaged accessory. Before each
use inspect the accessory such as abrasive
wheels for chips and cracks. If power tool or
accessory is dropped, inspect for damage
or install an undamaged accessory. After
inspecting and installing an accessory, position
yourself and bystanders away from the plane of
the rotating accessory and run the power tool at
maximum no-load speed for one minute.
Damaged accessories will normally break apart
during this test time.
h) Wear personal protective equipment. Depending
on application, use face shield, safety goggles or
safety glasses. As appropriate, wear dust mask,
hearing protectors, gloves and workshop apron
capable of stopping small abrasive or workpiece
fragments.
4
English
00BookG18DSL2metabo.indb400BookG18DSL2metabo.indb42021/03/3014:38:442021/03/3014:38:44

either jump toward or away from the operator, depending
on direction of the wheel’s movement at the point of
pinching. Abrasive wheels may also break under these
conditions.
Kickback is the result of power tool misuse and/or incorrect
operating procedures or conditions and can be avoided by
taking proper precautions as given below.
a) Maintain a fi rm grip on the power tool and
position your body and arm to allow you to resist
kickback forces. Always use auxiliary handle, if
provided, for maximum control over kickback or
torque reaction during start-up.
The operator can control torque reactions or kickback
forces, if proper precautions are taken.
b) Never place your hand near the rotating
accessory.
Accessory may kickback over your hand.
c) Do not position your body in the area where
power tool will move if kickback occurs.
Kickback will propel the tool in direction opposite to
the wheel’s movement at the point of snagging.
d) Use special care when working corners, sharp
edges etc. Avoid bouncing and snagging the
accessory.
Corners, sharp edges or bouncing have a tendency to
snag the rotating accessory and cause loss of control
or kickback.
e) Do not attach a saw chain woodcarving blade or
toothed saw blade.
Such blades create frequent kickback and loss of
control.
SAFETY WARNINGS SPECIFIC FOR
GRINDING OPERATIONS
a) Use only wheel types that are recommended for
your power tool and the specifi c guard designed
for the selected wheel.
Wheels for which the power tool was not designed
cannot be adequately guarded and are unsafe.
b) The grinding surface of centre depressed wheels
must be mounted below the plane of the guard
lip.
An improperly mounted wheel that projects through
the plane of the guard lip cannot be adequately
protected.
c) The guard must be securely attached to the
power tool and positioned for maximum safety,
so the least amount of wheel is exposed towards
the operator.
The guard helps to protect operator from broken
wheel fragments, accidental contact with wheel and
sparks that could ignite clothing.
d) Wheels must be used only for recommended
applications. For example: do not grind with the
side of cut-off wheel.
Abrasive cut-off wheels are intended for peripheral
grinding, side forces applied to these wheels may
cause them to shatter.
e) Always use undamaged wheel fl anges that are of
correct size and shape for your selected wheel.
Proper wheel fl anges support the wheel thus reducing
the possibility of wheel breakage. Flanges for cut-off
wheels may be diff erent from grinding wheel fl anges.
f) Do not use worn down wheels from larger power
tools.
Wheel intended for larger power tool is not suitable for
the higher speed of a smaller tool and may burst.
GENERAL SAFETY INSTRUCTIONS FOR
GRINDERS
– Check that speed marked on the wheel is equal to or
greater than the rated speed of the grinder;
– Ensure that the wheel dimensions are compatible with
the grinder;
– Abrasive wheels shall be stored and handled with
care in accordance with manufacturer’s instructions;
– Inspect the grinding wheel before use, do not use
chipped, cracked or otherwise defective products;
– Ensure that mounted wheels and points are fi tted in
accordance with the manufacturer’s instructions;
– Ensure that blotters are used when they are provided
with the bonded abrasive product and when they are
required;
– Ensure that the abrasive product is correctly mounted
and tightened before use and run the tool at no-load
for 30 s in a safe position, stop immediately if there
is considerable vibration or if other defects are
detected. If this condition occurs, check the machine
to determine the cause;
– If a guard is equipped with the tool never use the tool
without such a guard;
– Do not use separate reducing bushings or adapters to
adapt large hole abrasive wheels;
– For tools intended to be fi tted with threaded hole
wheel, ensure that the thread in the wheel is long
enough to accept the spindle length;
– Secure the workpiece and check that the workpiece
is properly supported. A workpiece clamped with
clamping devices or in a vice is held more securely
than by hand;
– Do not use cutting off wheel for side grinding;
– Ensure that sparks resulting from use do not create
a hazard e.g. do not hit persons, or ignite fl ammable
substances;
5
English
00BookG18DSL2metabo.indb500BookG18DSL2metabo.indb52021/03/3014:38:442021/03/3014:38:44
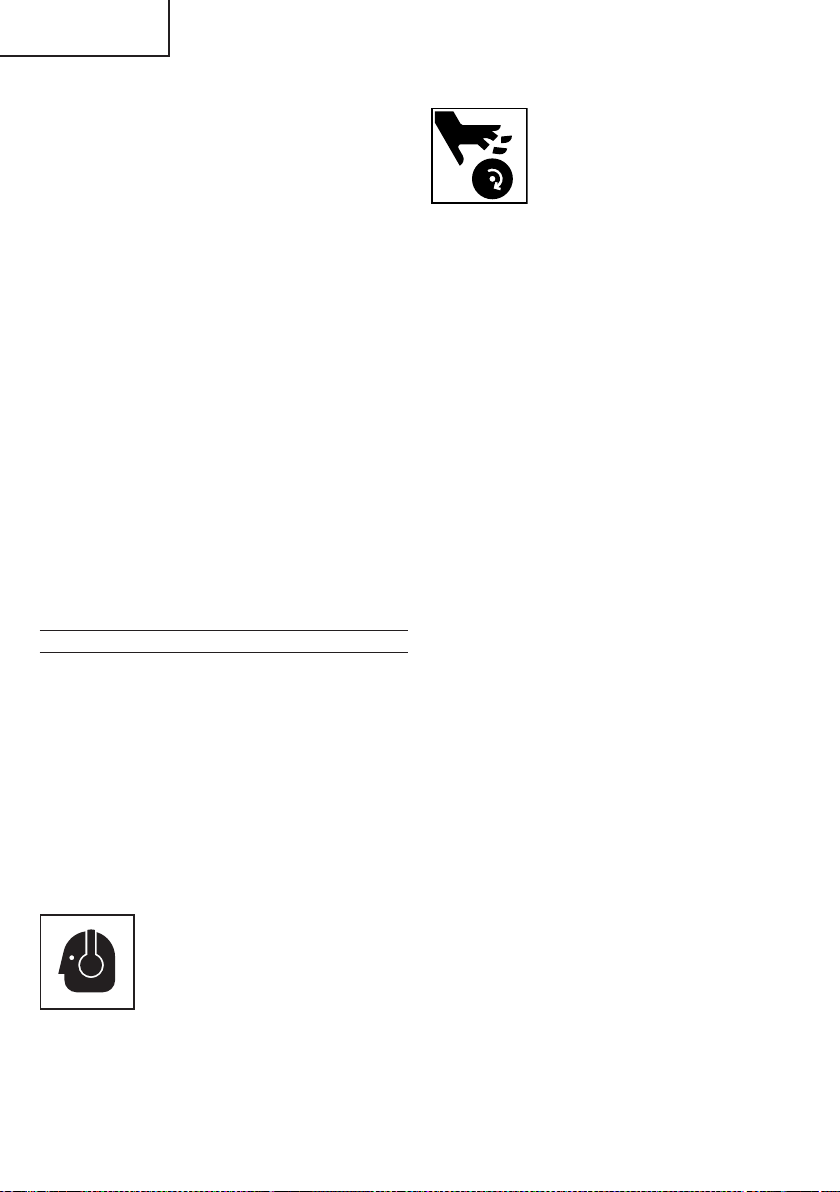
6. NEVER touch moving parts.
NEVER place your hands, fi ngers or
other body parts near the tool’s moving
parts.
7. NEVER operate without all guards in place.
NEVER operate this tool without all guards or safety
features in place and in proper working order. If
maintenance or servicing requires the removal of a
guard or safety feature, be sure to replace the guard
or safety feature before resuming operation of the
tool.
8. Use right tool.
Don’t force small tool or attachment to do the job of a
heavy-duty tool.
Don’t use tool for purpose not intended —for
example— don’t use circular saw for cutting tree
limbs or logs.
9. NEVER use a power tool for applications other
than those specifi ed.
NEVER use a power tool for applications other than
those specifi ed in the Instruction Manual.
10. Handle tool correctly.
Operate the tool according to the instructions provided
herein. Do not drop or throw the tool. NEVER allow the
tool to be operated by children, individuals unfamiliar
with its operation or unauthorized personnel.
11. Keep all screws, bolts and covers tightly in place.
Keep all screws, bolts, and plates tightly mounted.
Check their condition periodically.
12. Do not use power tools if the plastic housing or
handle is cracked.
Cracks in the tool’s housing or handle can lead to
electric shock. Such tools should not be used until
repaired.
13. Wheels and accessories must be securely
mounted to the tool.
Prevent potential injuries to youself or others. Wheels
and accessories which have been mounted to the tool
should be secure and tight.
14. Keep motor air vent clean.
The tool’s motor air vent must be kept clean so that
air can freely fl ow at all times. Check for dust build-up
frequently.
15. NEVER use a tool which is defective or operating
abnormally.
If the tool appears to be operating unusually, making
strange noises, or otherwise appears defective, stop
using it immediately and arrange for repairs by a
metabo HPT authorized service center.
16. NEVER leave tool running unattended. Turn
power off .
Don’t leave tool until it comes to a complete stop.
– Ensure that ventilation openings are kept clear when
working in dusty conditions, if it should become
necessary to clear dust, fi rst disconnect the tool from
the mains supply (use non metallic objects) and avoid
damaging internal parts;
– Always use eye and ear protection. Other personal
protective equipment such as dust mask, gloves,
helmet and apron should be worn;
– Pay attention to the wheel that continues to rotate
after the tool is switched off .
– Do not allow foreign matter to enter the hole for
connecting the rechargeable battery.
– Never disassemble the rechargeable battery and
charger.
– Never short-circuit the rechargeable battery.
Shortcircuiting the battery will cause a great electric
current and overheat. It results in burn or damage to
the battery.
– Do not dispose of the battery in fi re. If the battery is
burnt, it may explode.
– Do not insert object into the air ventilation slots of the
charger. Inserting metal objects or infl ammables into
the charger air ventilation slots will result in electrical
shock hazard or damaged charger.
– Bring the battery to the shop from which it was
purchased as soon as the post-charging battery life
becomes too short for practical use. Do not dispose
of the exhausted battery.
SPECIFIC SAFETY RULES AND SYMBOLS
1. ALWAYS use proper guard with grinding wheel.
A guard protects operator from broken wheel
fragments.
2. Accessories must be rated for at least the speed
recommended on the tool warning label.
Wheels and other accessories running over rated
speed can fl y apart and cause injury.
3. Hold power tools by insulated gripping surfaces
when performing an operation where the cutting
tool may contact hidden wiring or its own cord.
Contact with a “live” wire will make exposed metal
parts of the tool “live” and shock the operator.
4. ALWAYS wear ear protectors when using the tool
for extended periods.
Prolonged exposure to high intensity
noise can cause hearing loss.
5. Use only a depressed center wheel with a rated
capacity which is GREATER than 13,300 /min.
Using any wheel a rated capacity LESS than
13,300 /min and/or an incorrect sized wheel (see
SPECIFICATIONS at page 12) may result in wheel
breakage, fl ying wheel fragments, and resulting in
death or serious injury.
6
English
00BookG18DSL2metabo.indb600BookG18DSL2metabo.indb62021/03/3014:38:452021/03/3014:38:45
17. Carefully handle power tools.
Should a power tool be dropped or struck against
hard materials inadvertently, it may be deformed,
cracked, or damaged.
18. Do not wipe plastic parts with solvent.
Solvents such as gasoline, thinner benzine, carbon
tetrachloride, and alcohol may damage and crack
plastic parts. Do not wipe them with such solvents.
Wipe plastic parts with a soft cloth lightly dampened
with soapy water and dry thoroughly.
19. NEVER use a depressed center wheel which
is cracked or deformed or worn away (see the
MAINTENANCE AND INSPECTION section on
page 18).
20. NEVER use the grinder in places where the sparks
generated by the grinder can cause explosion, such
as where fl ammable materials or gases are present.
21. NEVER push in the push button while the spindle is
running.
22. ALWAYS wear eye protection that meets the
requirement of the latest revision of ANSI
Standard Z87.1.
23. ALWAYS wear a mask or respirator to protect yourself
from dust or potentially harmful particles generated
during the grinding operation.
24. ALWAYS fi rmly grip the body handle and side handle
while operating the grinder.
25. ALWAYS have a trial run before grinding commence.
(see Test the grinder before using on page 15).
26. ALWAYS follow the instructions contained in this
manual when replacing the depressed center wheel.
27. ALWAYS be careful with buried objict such as an
underground wiring.
Touching these active wiring or electric cable with this
tool, you may receive an electric shock.
Comfi rm if there are any buried object such as electric
cable within the wall, fl oor or ceiling where you are
going to operate here after.
28. Do not use the product if the tool or the battery
terminals (battery mount) are deformed.
Installing the battery could cause a short circuit that
could result in smoke emission or ignition.
29. Keep the tool’s terminals (battery mount) free of swarf
and dust.
○
Prior to use, make sure that swarf and dust have not
collected in the area of the terminals.
○
During use, try to avoid swarf or dust on the tool from
falling on the battery.
○
When suspending operation or after use, do not leave
the tool in an area where it may be exposed to falling
swarf or dust.
Doing so could cause a short circuit that could result
in smoke emission or ignition.
30. Defi nitions for symbols used on this tool
V .......... volts
—
---
........ direct current
Hz ........ hertz
A .......... amperes
n .......... rated speed
---/min .. revolutions or reciprocation per minute
IMPORTANT SAFETY INSTRUCTIONS
FOR BATTERY CHARGER
WARNING
Death or serious bodily injury could result from
improper or unsafe use of battery chargers.
To avoid these risks, follow these basic safety
instructions:
READ ALL INSTRUCTIONS
1. This manual contains important safety and operating
instructions for battery charger Model UC18YKSL /
UC18YFSL.
2. Before using battery charger, read all instructions
and cautionary markings on (1) battery charger, (2)
battery, and (3) product using battery.
3. To reduce risk of injury, charge metabo HPT
rechargeable battery type BSL18 series. Other type
of batteries may burst causing personal injury and
damage.
4. Use of an attachment not recommended or sold by
the battery charger manufacturer may result in a risk
of fi re, electric shock, or injury to persons.
5. To reduce risk of damage to electric plug and cord,
pull by plug when disconnecting battery charger.
6. Make sure cord is located so that it will not be stepped
on, tripped over, or otherwise subjected to damage or
stress.
7. An extension cord should not be used unless
absolutely necessary. Use of improper extension
cord could result in a risk of fi re and electric shock.
If extension cord must be used make sure:
a. That blades of extension cord are the same
number, size, and shape as those of plug on
battery charger:
b. That extension cord is properly wired and in good
electrical condition; and
c. That wire size is large enough for AC ampere
rating of battery charger as specifi ed in Table 1.
7
English
00BookG18DSL2metabo.indb700BookG18DSL2metabo.indb72021/03/3014:38:452021/03/3014:38:45

Table 1
RECOMMENDED MINIMUM AWG SIZE FOR
EXTENSION CORDS FOR BATTERY CHARGERS
AC Input Rating Amperes* AWG Size of Cord
Equal to or
greater than
but less
than
Length of Cord, Feet (Meter)
25 (7.5) 50 (15) 100 (30) 150 (45)
0 2 18 18 18 16
2 3 18 18 16 14
3 4 18 18 16 14
* If the input rating of a battery charger is given in watts
rather than in amperes, the corresponding ampere
rating is to be determined by dividing the wattage
rating by the voltage rating–for example:
1,250 watts
= 10 amperes
125 volts
8. Do not operate the battery charger with a damaged
cord or plug. If either is damaged, replace immediately.
9. Do not operate battery charger if it has received a
sharp blow, been dropped, or otherwise damaged in
any way; take it to a qualifi ed serviceman.
10. Do not disassemble battery charger; take it to a
qualifi ed serviceman when service or repair is
required. Incorrect reassembly may result in a risk of
electric shock or fi re.
11. To reduce risk of electric shock, unplug charger from
receptacle before attempting any maintenance or
cleaning. Removing the battery will not reduce this
risk.
IMPORTANT SAFETY INSTRUCTIONS
FOR USE OF THE BATTERY AND
BATTERY CHARGER
You must charge the battery before you can use the power
tool. Before using the model UC18YKSL / UC18YFSL
battery charger, be sure to read all instructions and
cautionary statements on it, the battery and in this manual.
CAUTION
USE ONLY metabo HPT BATTERY TYPES BSL18
SERIES. OTHER TYPES OF BATTERIES MAY
BURST AND CAUSE INJURY!
Follow these instructions to avoid the risk of injury:
WARNING:
Improper use of the battery
or battery charger can lead to
serious injury. To avoid these
injuries:
1. NEVER disassemble the battery.
2. NEVER incinerate the battery, even if it is damaged or
is completely worn out. The battery can explode in a
fi re.
3. NEVER short-circuit the battery.
4. NEVER insert any objects into the battery charger’s
air vents. Electric shock or damage to the battery
charger may result.
5. NEVER charge outdoors. Keep the battery away
from direct sunlight and use only where there is low
humidity and good ventilation.
6. NEVER charge when the temperature is below 32°F
(0°C) or above 104°F (40°C).
7. NEVER connect two battery chargers together.
8. NEVER insert foreign objects into the hole for the
battery or the battery charger.
9. NEVER use a booster transformer when charging.
10. NEVER use an engine generator or DC power to
charge.
11. NEVER store the battery or battery charger in places
where the temperature may reach or exceed 104°F
(40°C) such as inside metal box or car.
12. NEVER expose the battery or battery charger to rain
or wet conditions.
13. ALWAYS operate charger on standard household
electrical power (120 volts). Using the charger on any
other voltage may overheat and damage the charger.
14. ALWAYS wait at least 15 minutes between charges to
avoid overheating the charger.
15. ALWAYS disconnect the power cord from its
receptacle when the charger is not in use.
CAUTION ON LITHIUM-ION BATTERY
To extend the lifetime, the lithium-ion battery equips with
the protection function to stop the output.
In the cases of 1 to 3 described below, when using this
product, even if you are pulling the switch, the motor may
stop. This is not the trouble but the result of protection
function.
1. When the battery power remaining runs out, the motor
stops.
In such case, charge it up immediately.
8
English
00BookG18DSL2metabo.indb800BookG18DSL2metabo.indb82021/03/3014:38:452021/03/3014:38:45
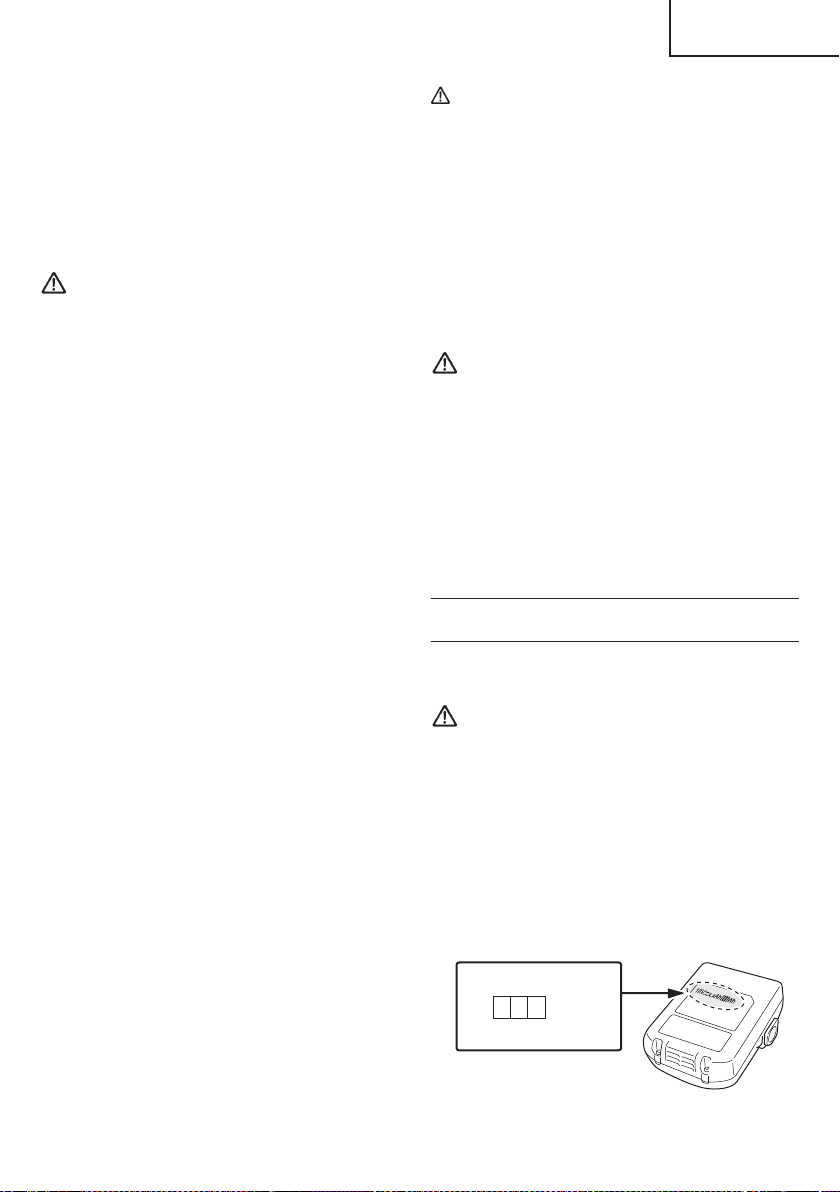
2. If the tool is overloaded, the motor may stop. In this
case, release the switch of tool and eliminate causes
of overloading. After that, you can use it again.
3. If the battery is overheated under overload work, the
battery power may stop.
In this case, stop using the battery and let the battery
cool. After that, you can use it again.
Furthermore, please heed the following warning and
caution.
WARNING
In order to prevent any battery leakage, heat generation,
smoke emission, explosion and ignition beforehand,
please be sure to heed the following precautions.
1. Make sure that swarf and dust do not collect on the
battery.
○
During work make sure that swarf and dust do not fall
on the battery.
○
Make sure that any swarf and dust falling on the power
tool during work do not collect on the battery.
○
Do not store an unused battery in a location exposed
to swarf and dust.
○
Before storing a battery, remove any swarf and dust
that may adhere to it and do not store it together with
metal parts (screws, nails, etc.).
2. Do not pierce battery with a sharp object such as a
nail, strike with a hammer, step on, throw or subject
the battery to severe physical shock.
3. Do not use an apparently damaged or deformed
battery.
4. Do not use the battery in reverse polarity.
5. Do not connect directly to an electrical outlets or car
cigarette lighter sockets.
6. Do not use the battery for a purpose other than those
specifi ed.
7. If the battery charging fails to complete even when a
specifi ed recharging time has elapsed, immediately
stop further recharging.
8. Do not put or subject the battery to high temperatures
or high pressure such as into a microwave oven,
dryer, or high pressure container.
9. Keep away from fi re immediately when leakage or foul
odor are detected.
10. Do not use in a location where strong static electricity
generates.
11. If there is battery leakage, foul odor, heat generated,
discolored or deformed, or in any way appears
abnormal during use, recharging or storage,
immediately remove it from the equipment or battery
charger, and stop use.
12. Do not immerse the battery or allow any fl uids to fl ow
inside. Conductive liquid ingress, such as water, can
cause damage resulting in fi re or explosion. Store your
battery in a cool, dry place, away from combustible
and fl ammable items. Corrosive gas atmospheres
must be avoided.
CAUTION
1. If liquid leaking from the battery gets into your eyes,
do not rub your eyes and wash them well with fresh
clean water such as tap water and contact a doctor
immediately.
If left untreated, the liquid may cause eye-problems.
2. If liquid leaks onto your skin or clothes, wash well with
clean water such as tap water immediately.
There is a possibility that this can cause skin irritation.
3. If you fi nd rust, foul odor, overheating, discolor,
deformation, and/or other irregularities when using
the battery for the fi rst time, do not use and return it to
your supplier or vendor.
WARNING
If an electrically conductive foreign object enters the
terminals of the lithium ion battery, a short-circuit may
occur resulting in the risk of fi re. Please observe the
following matters when storing the battery.
○
Do not place electrically conductive cuttings,
nails, steel wire, copper wire or other wire in the
storage case.
○
Either install the battery in the power tool or store
by securely pressing into the battery cover until
the ventilation holes are concealed to prevent
short-circuits (See Fig. 3).
REGARDING LITHIUM-ION BATTERY
TRANSPORTATION
When transporting a lithium-ion battery, please observe
the following precautions.
WARNING
Notify the transporting company that a package
contains a lithium-ion battery, inform the company
of its power output and follow the instructions of the
transportation company when arranging transport.
●
Lithium-ion batteries that exceed a power output
of 100 Wh are considered to be in the freight
classifi cation of Dangerous Goods and will
require special application procedures.
●
For transportation abroad, you must comply with
international law and the rules and regulations of
the destination country.
Wh
Power Output
2 to 3 digit number
Fig. 1
9
English
00BookG18DSL2metabo.indb900BookG18DSL2metabo.indb92021/03/3014:38:452021/03/3014:38:45

SAVE THESE INSTRUCTIONS
AND
MAKE THEM AVAILABLE TO OTHER USERS
AND
OWNERS OF THIS TOOL!
10
English
00BookG18DSL2metabo.indb1000BookG18DSL2metabo.indb102021/03/3014:38:452021/03/3014:38:45
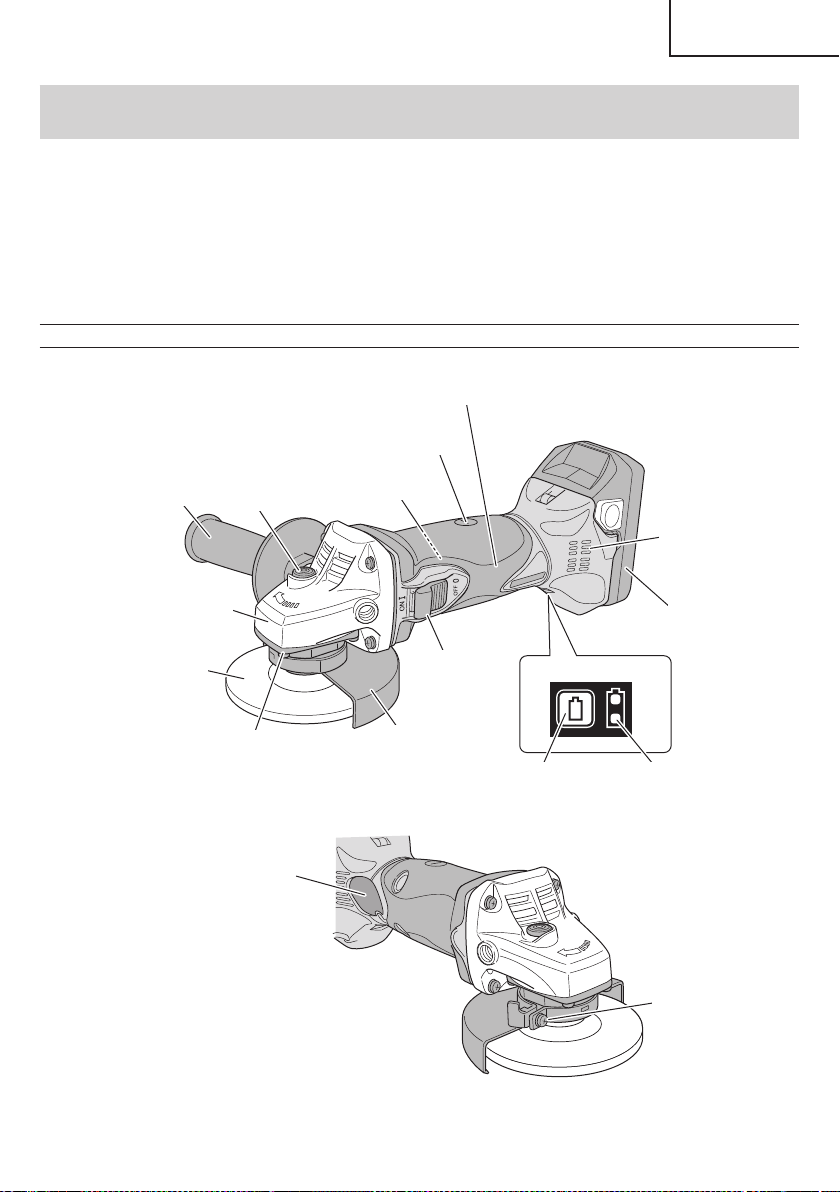
FUNCTIONAL DESCRIPTION
NOTE
The information contained in this Instruction Manual is designed to assist you in the safe operation and maintenance
of the power tool.
NEVER operate, or attempt any maintenance on the tool unless you have fi rst read and understood all safety
instructions contained in this manual.
Some illustrations in this Instruction Manual may show details or attachments that diff er from those on your own
power tool.
NAME OF PARTS
1. Cordless Disc Grinder (G18DSL2)
Remaining battery
indicator switch
Remaining battery
indicator lamp
Switch Panel
Gear cover
Packing gland
Switch
Housing
Side handle
Brush cap
Wheel guard
Depressed
center wheel
Push button
Nameplate
Screw
Battery
Motor
Filter
Fig. 2
11
English
00BookG18DSL2metabo.indb1100BookG18DSL2metabo.indb112021/03/3014:38:452021/03/3014:38:45
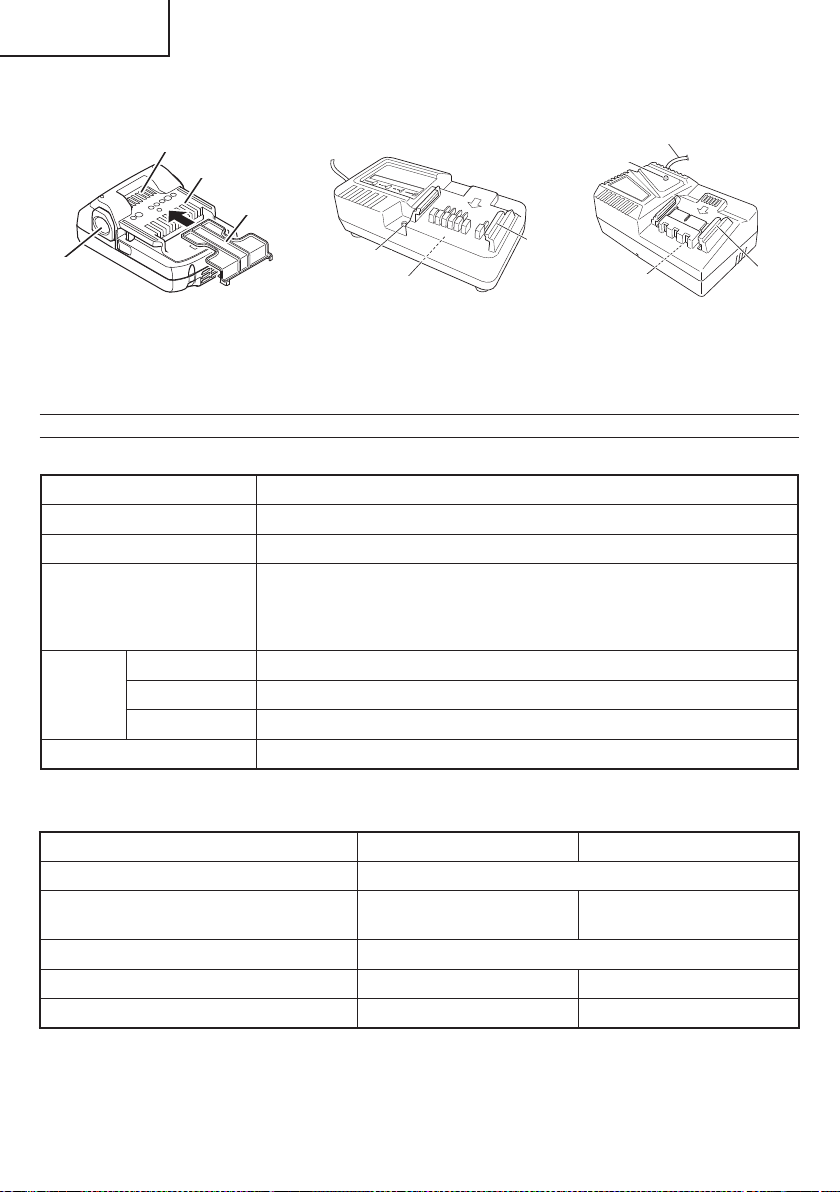
2. Battery 3. Battery Charger
Ventilation holes
Latch
Terminals
Battery cover
Nameplate
Guide rail
Cord
Pilot lamp
Guide rail
Nameplate
Pilot lamp
<BSL1815 / BSL1830C>
Fig. 3
<UC18YKSL> <UC18YFSL>
Fig. 4
SPECIFICATIONS
1. Cordless Disc Grinder
Model G18DSL2
Motor DC motor
Rated Speed 9,000 /min
Wheel Size
external diam.
thickness
hole diam.
4-1/2" (115 mm)
1/4" (6 mm)
7/8" (22 mm)
Battery
Model BSL1815 (1.5 Ah) / BSL1830C (3.0 Ah)
Type Li-ion battery
Voltage DC 18 V
Weight 4.3 lbs. (1.9 kg)
2. Battery Charger
Model UC18YKSL UC18YFSL
Input power source Single phase: AC 120 V 60 Hz
Charging time
(At a temperature of 68°F (20°C))
BSL1815 : Approx. 40 min BSL1830C : Approx. 45 min
Charging voltage DC 14.4–18 V
Charging current DC 2.0 A DC 3.5 A
Weight 0.8 lbs. (0.35 kg) 1.1 lbs. (0.5 kg)
NOTE: The charging time may vary according to ambient temperature and power source voltage.
12
English
00BookG18DSL2metabo.indb1200BookG18DSL2metabo.indb122021/03/3014:38:452021/03/3014:38:45
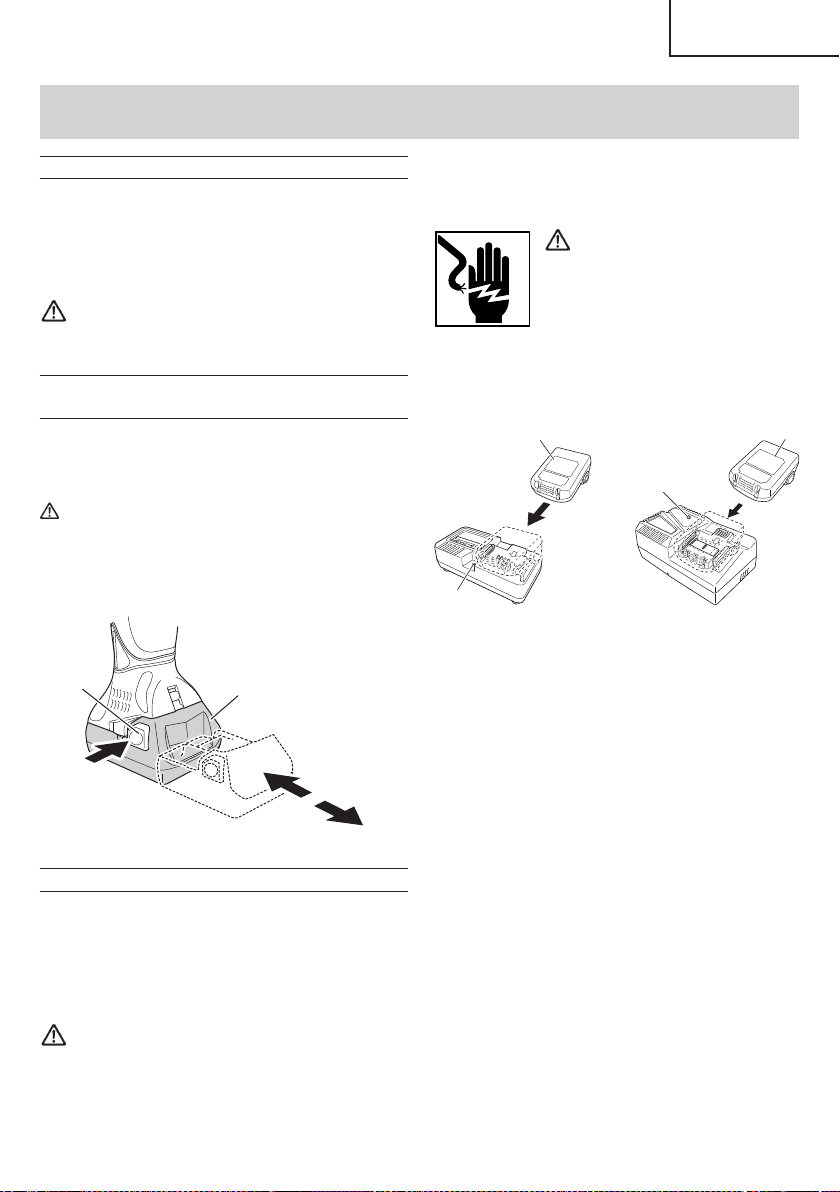
1. Connect the charger’s power cord to a receptacle.
When the power cord is connected, the charger’s pilot
lamp will blink in red. (At 1-second intervals)
WARNING
Do not use the electrical cord
if damaged. Have it repaired
immediately.
2. Insert the battery to the battery charger.
Insert the battery into the battery charger as shown in
Fig. 6
Pilot lamp
Battery
<UC18YKSL>
Pilot lamp
Battery
<UC18YFSL>
Fig. 6
3. Charging
When the battery is connected to the battery charger,
charging will commence and the pilot lamp will light in
red. (See Table 2)
NOTE
If the pilot lamp fl ikers in red, pull out the plug from
the receptacle and check if the battery is properly
mounted.
When the battery is fully charged, the pilot lamp
will blink in red slowly. (At 1-second intervals) (See
Table 2)
(1) Pilot lamp indication
The indications of the pilot lamp will be as shown in
Table 2, according to the condition of the charger or
the rechargeable battery.
APPLICATIONS
○
Removal of casting fi n and fi nishing of various type of
steel, bronze and aluminum materials and castings.
○
Grinding of welded sections or sections cut by means
of an acetylene torch.
○
Grinding of synthetic resins, slate, brick, marble.
WARNING
To avoid the risk of serious injury, NEVER use
this grinder with cup wheels and/or saw blades.
REMOVAL AND INSTALLATION METHOD
OF BATTERY
1. Battery removal
Hold the handle tightly and push the battery latch to
remove the battery (see Fig. 5).
CAUTION
Never short-circuit the battery.
2. Battery installation
Insert the battery while observing its polarities (see
Fig. 5).
Latch
Battery
Pull out
Insert
Push
Fig. 5
CHARGING METHOD
NOTE
Before plugging into the receptacle, make sure the
following points.
○
The power source voltage is stated on the nameplate.
○
The cord is not damaged.
WARNING
Do not charge at voltage higher than indicated
on the nameplate.
If charged at voltage higher than indicated on the
nameplate, the charger will burn up.
ASSEMBLY AND OPERATION
13
English
00BookG18DSL2metabo.indb1300BookG18DSL2metabo.indb132021/03/3014:38:462021/03/3014:38:46
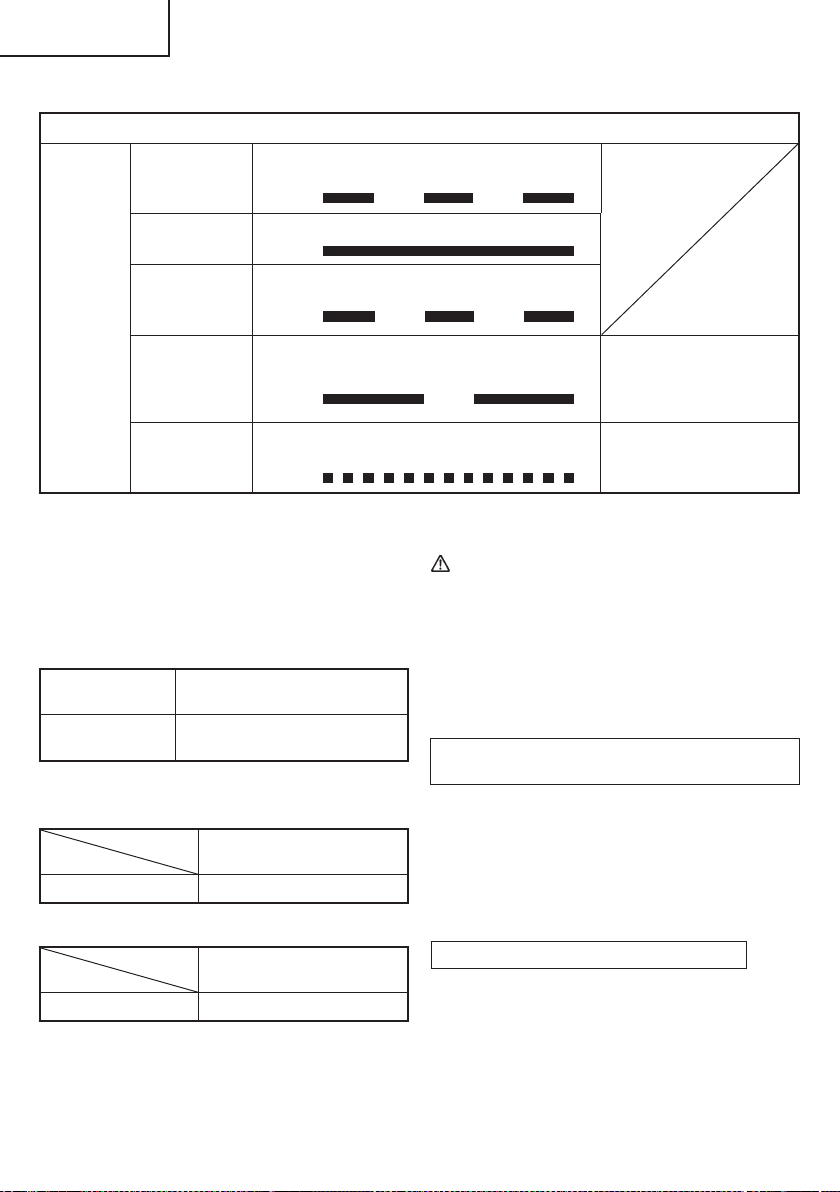
4. Disconnect battery charger from the receptacle.
CAUTION
Do not pull the plug out of the receptacle by
pulling on the cord.
Make sure to grasp the plug when removing from
receptacle to avoid damaging cord.
5. Remove the battery from the battery charger.
Supporting the battery charger with hand, pull out the
battery from the battery charger.
Regarding electric discharge in case of new
batteries, etc.
As the internal chemical substance of new batteries
and batteries that have not been used for an extended
period is not activated, the electric discharge might
be low when using them the fi rst and second time.
This is a temporary phenomenon, and normal time
required for recharging will be restored by recharging
the batteries 2–3 times.
How to make the batteries perform longer.
(1)
Recharge the batteries before they become
completely exhausted.
When you feel that the power of the tool becomes
weaker, stop using the tool and recharge its battery.
If you continue to use the tool and exhaust the electric
current, the battery may be damaged and its life will
become shorter.
Table 2
Indications of the pilot lamp
Pilot lamp
(red)
Before charging Blinks
Lights for 0.5 seconds. Does not light for
0.5 seconds. (off for 0.5 seconds)
While charging Lights
Lights continuously
Charging
complete
Blinks
Lights for 0.5 seconds. Does not light for
0.5 seconds. (off for 0.5 seconds)
Overheat
standby
Blinks
Lights for 1 second. Does not light for
0.5 seconds. (off for 0.5 seconds)
Battery overheated.
Unable to charge.
(Charging will commence
when battery cools)
Charging
impossible
Flickers
Lights for 0.1 seconds. Does not light for
0.1 seconds. (off for 0.1 seconds)
Malfunction in the battery or
the charger
(2) Regarding the temperature of the rechargeable
battery.
The temperatures for rechargeable batteries are
as shown in the Table 3, and batteries that have
become hot should be cooled for a while before being
recharged.
Table 3 Recharging ranges of batteries
Rechargeable
batteries
Temperatures at which the
battery can be recharged
BSL1815,
BSL1830C
32°F–122°F
(0°C–50°C)
(3) Regarding recharging time (At 68°F (20°C))
Table 4 Charging time (UC18YKSL)
Charger
Battery
UC18YKSL
BSL1815 Approx. 40 min
Table 5 Charging time (UC18YFSL)
Charger
Battery
UC18YFSL
BSL1830C Approx. 45 min
NOTE
The charging time may vary according to temperature
and power source voltage.
14
English
00BookG18DSL2metabo.indb1400BookG18DSL2metabo.indb142021/03/3014:38:462021/03/3014:38:46
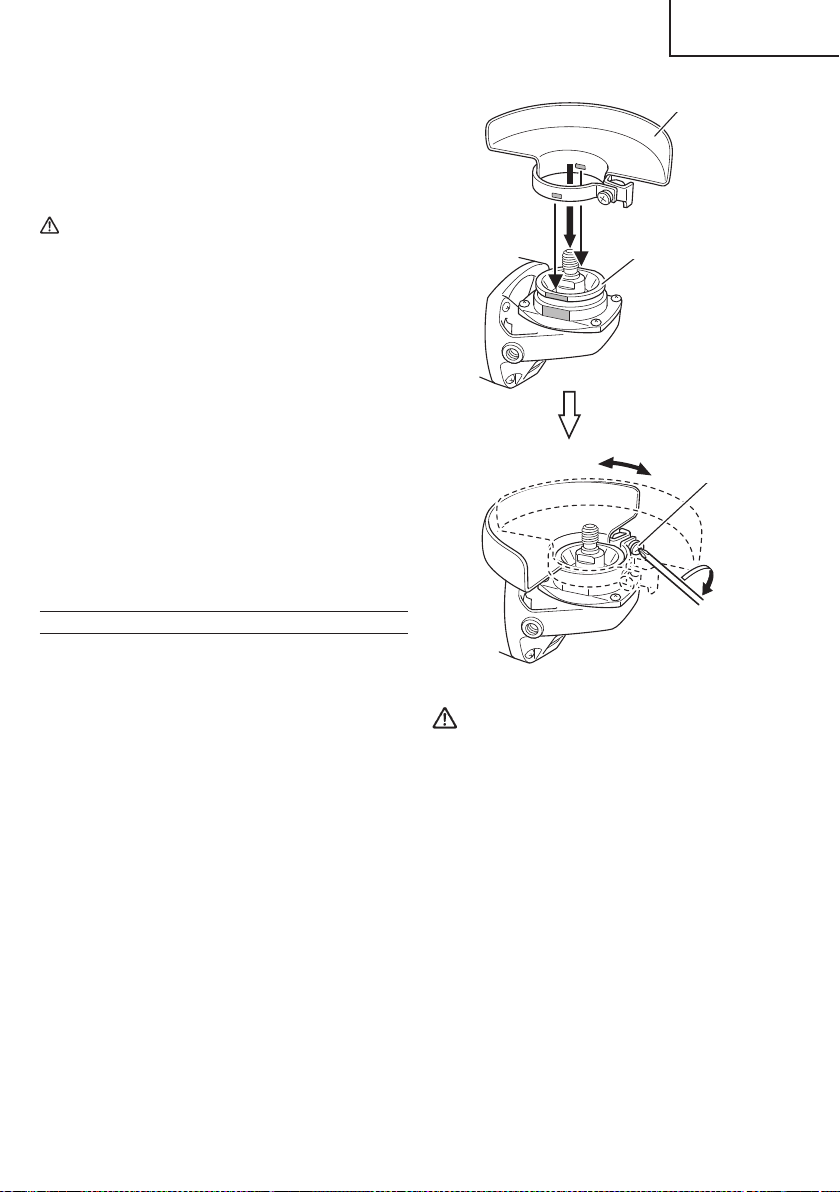
(2)
Avoid recharging at high temperatures.
A rechargeable battery will be hot immediately after
use. If such a battery is recharged immediately after
use, its internal chemical substance will deteriorate,
and the battery life will be shortened. Leave the
battery and recharge it after it has cooled for a while.
CAUTION
●
When the battery charger has been continuosly
used, the battery charger will be heated, thus
constituting the cause of the failures. Once the
charging has been completed, give 15 minutes
rest until the next charging.
●
If the battery is charged while it is heated
because it has been left for a long time in a
location subject to direct sunlight or because the
battery has just been used, the pilot lamp of the
charger lights for 1 second, does not light for 0.5
seconds (off for 0.5 seconds).
The battery will not be recharged. In such a case,
let the battery cool before charging.
●
When the pilot lamp fl ickers (at 0.2-second
intervals), check for and take out any foreign
objects in the charger’s battery connector. If
there are no foreign objects, it is probable that
the battery or charger is malfunctioning. Take it
to your authorized Service Center.
PRIOR TO OPERATION
1. Power switch
Ensure that the switch is in the OFF position.
2. Check your work environment
Ensure the following before operation:
○
No fl ammable gas, liquid, or object at worksite.
○
When grinding thin steel sheet it may cause a high
booming noise.
To avoid such noise, place a rubber mat under the
workpiece.
○
Clear the area of children or unauthorized
personnel.
3. Mounting the wheel guard
Be sure to mount the wheel guard at an angle that will
protect the operator’s body from injury by a broken
wheel piece.
[How to attach and adjust the wheel guard] (Fig. 7)
○
Slightly loosen the screw on the wheel guard.
○
Install the wheel guard to the packing gland, turn
it to the angle suitable for operation, and make
adjustment.
○
After the adjustment, ensure that the screw is
securely tightened on the wheel guard in order to
fi x it completely.
Packing gland
Wheel guard
Screw
Fig.7
WARNING
If the wheel guard is not attached properly, a
broken wheel may result in and cause death or
serious injury.
4. Thoroughly check that the depressed center wheel
is free of cracks, splits and other abnomalities before
mounting. Make sure it is fi rmly clamped and has
been properly mounted. Refer to page 17 of this
manual for Depressed Center Wheel Assembly and
Disassembly.
5. Test the grinder before using.
Before actually beginning the grinding work, test the
grinder by fi rst clearing the area of all other personnel.
Make sure the wheel guard is in place and that you
are wearing eye protection. Turn the grinder “on”, and
make sure the grinder runs smoothly and shows no
abnormalities.
Duration of the trial run is as follows:
When depressed center wheel
is replaced .............................. 3 minutes or more
When starting daily work ..........1 minute or more
15
English
00BookG18DSL2metabo.indb1500BookG18DSL2metabo.indb152021/03/3014:38:462021/03/3014:38:46
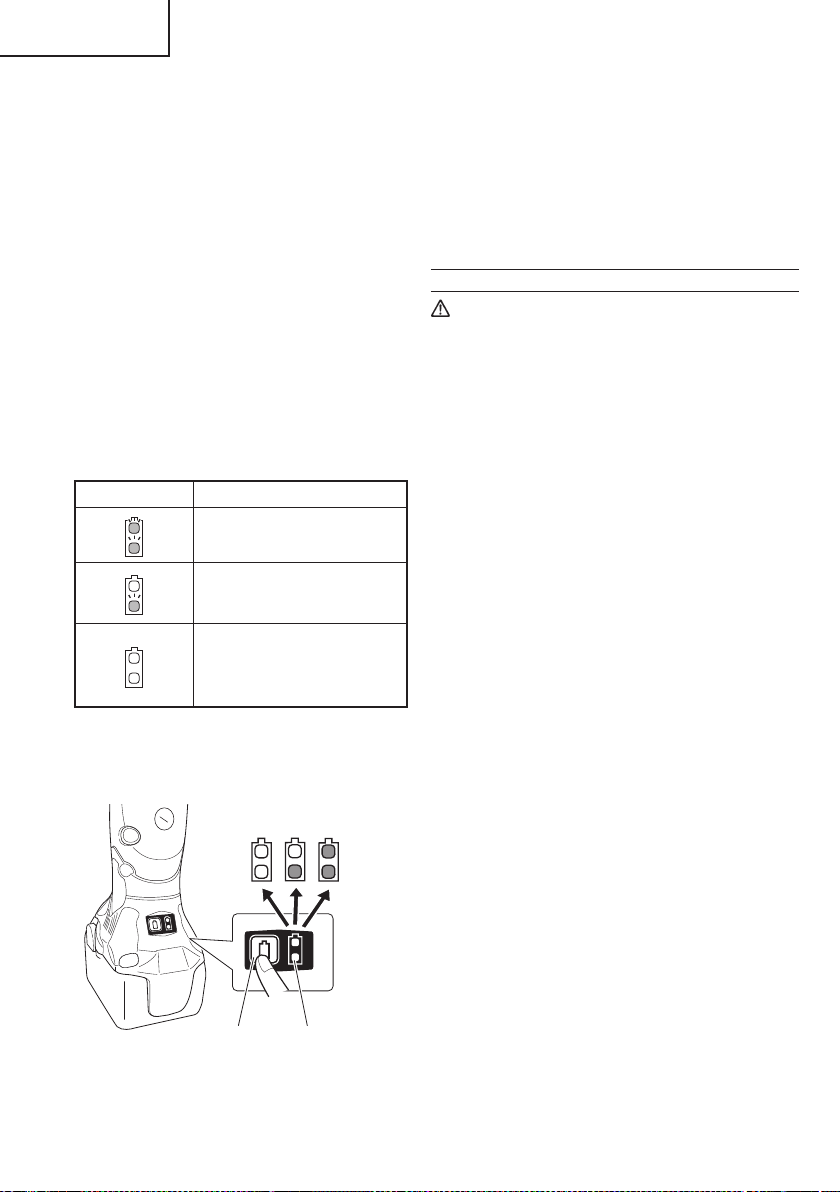
NOTE
○
When using a Multi-volt battery, please refer to the
indicator lamp on the battery for the battery remaining
power.
○
Do not give a strong shock to the switch panel or
break it. It may lead to a trouble.
○
To save the battery power consumption, the
remaining battery indicator lamp lights while pressing
the remaining battery indicator switch.
GRINDER OPERATION
CAUTION
To extend the lifetime, the lithium-ion battery
equips with the protection function to stop the
output. Therefore, if the tool is overloaded, the
motor may stop. However, this is not the trouble
but the result of protection function. In this case,
release the switch of tool and eliminate the
causes of overloading.
NOTE
○
To prevent injuries, this product has a function that
prevents unexpected motor rotation when the battery
is inserted. The motor will not run if the battery is
inserted while the switch is still on. After installing the
battery, turn the switch off and then back on again.
○
The G18DSL2 model is equipped with a protection
function that will shut down the tool in the event of an
overload.
When the overload protection feature has been
activated, the motor may stop.
In this case, release the tool switch and eliminate
causes of overloading.
After that you can use it again.
1. Hold the grinder fi rmly by its housing and side handle
(Fig. 2).
The grinder produces a counterforce which must be
controlled by fi rmly holding onto the grinder.
2. Turn the grinder “ON” (Fig. 9)
While holding the grinder fi rmly, slide the switch to
the “ON” position with one fi nger to turn on the tool.
Releasing the switch will turn off the tool.
For continued operation, slide the switch to the “ON”
position and press down the “ON” position of the
switch to lock it in place.
Turn the grinder “OFF” (Fig. 9)
Press the “OFF” position of the switch to release the
lock and turn the grinder off .
6. Use only properly rated depressed center wheels.
Use only depressed center wheels rated at
13,300 /min or more.
Using a depressed center wheel rated less can lead
to wheel disintegration during operation and cause
serious bodily injury.
7. Check the push button.
Make sure that the push button is disengaged by
pushing push button two or three times before turning
on the grinder. (Fig. 11)
8. About Remaining Battery Indicator
When pressing the remaining battery indicator switch,
the remaining battery indicator lamp lights and the
battery remaining power can be checked. (Fig. 8)
When releasing your fi nger from the remaining battery
indicator switch, the remaining battery indicator lamp
goes off . The table 6 shows the state of remaining
battery indicator lamp and the battery remaining
power.
Table 6
State of lamp Battery Remaining Power
The battery remaining power is
enough.
The battery remaining power
is a half.
The battery remaining power is
nearly empty.
Re-charge the battery soonest
possible.
As the remaining battery indicator shows somewhat
diff erently depending on ambient temperature and
battery characteristics, read it as a reference.
Remaining
battery
indicator switch
Remaining
battery
indicator lamp
Fig. 8
16
English
00BookG18DSL2metabo.indb1600BookG18DSL2metabo.indb162021/03/3014:38:462021/03/3014:38:46
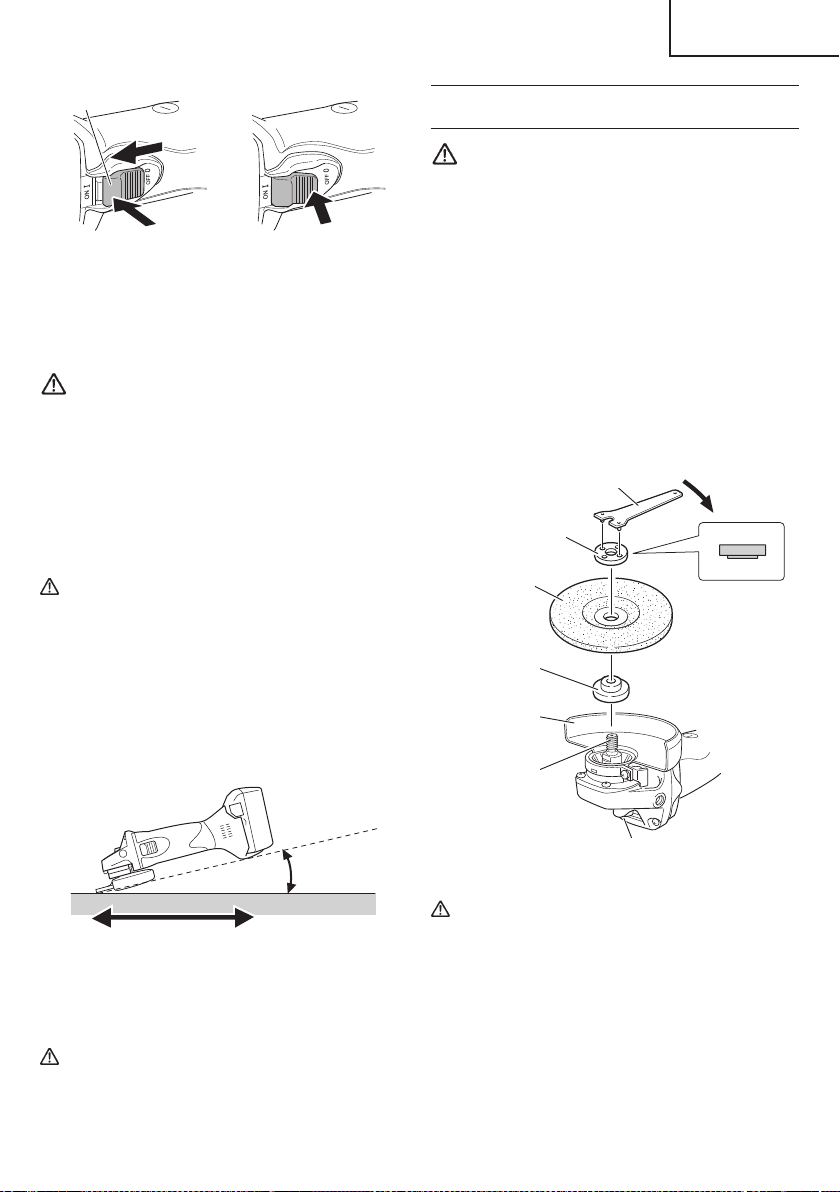
DEPRESSED CENTER WHEEL ASSEMBLY
AND DISASSEMBLY
WARNING
Be sure to turned off the switch and pull out the
battery.
1. Assembly
(1) Turn the disc grinder upsidedown so that the spindle
is facing upward.
(2) Align the oval-shaped indentation of the wheel washer
with the notched part of the spindle, then attach them.
(3) Fit the protuberance of the depressed center wheel
onto the wheel washer.
(4) Screw the wheel nut onto the spindle.
(5) While pushing the push button with one hand, lock the
spindle by turning the depressed center wheel slowly
with the other hand.
Tighten the wheel nut by using the supplied wrench as
shown in Fig. 11.
Push button
Depressed
center wheel
Wrench
Spindle
Wheel washer
Wheel guard
Wheel nut
Tighten
Fig. 11
CAUTION
Tighten the wheel nut securely and confi rm that
the depressed center wheel does not wobble.
2. Disassembly
To remove the depressed center wheel, simply
reverse the above-mentioned procedure.
OFF
ON
LOCK
Switch
Fig. 9
3. Use light grinding pressure.
There is no need to press hard when grinding. Usually
the grinder’s own weight is suffi cient to allow the
required light contact with the surface to be ground.
WARNING
Do not press the grinder forcibly against the
surface to be ground. Heavy pressure can result
in wheel breakage and serious injury. It can also
damage the surface being ground or damage the
grinder’s motor.
4. Use proper grinding angle.
Grind only with the wheel’s edge by lifting the grinder
15° to 30°, as shown in Fig. 10.
CAUTION
Do not use the entire surface of the depressed
center wheel. Use only the edge of the depressed
center wheel.
5. Move the grinder in the proper direction.
When using a new depressed center wheel in
direction A (Fig. 10), the wheel edge may cut into the
workpiece. In this case, grind in direction B (Fig. 10).
Once the wheel edge is worn, the workpiece can be
ground in both directions.
15°–30°
A B
Fig. 10
6. Adjust operation to desired fi nish.
For a fi ne fi nish, decrease pressure by lifting slightly.
Grind slowly and at the appropriate speed.
CAUTION
The revolving depressed center wheel will create
air turbulence.
Do no lay the grinder down in areas of dust or dirt
until it has come to a complete stop.
17
English
00BookG18DSL2metabo.indb1700BookG18DSL2metabo.indb172021/03/3014:38:462021/03/3014:38:46
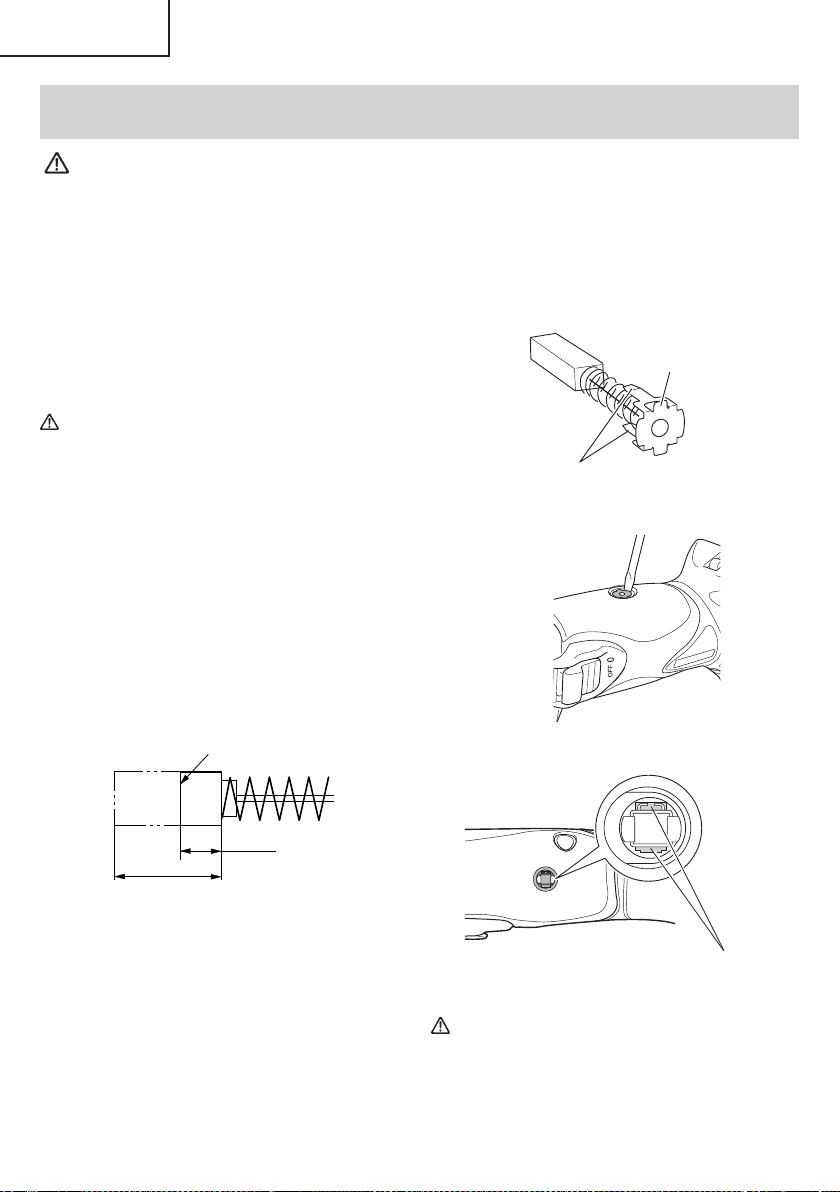
MAINTENANCE AND INSPECTION
WARNING:
●
Be sure to turned off the switch and pull out the battery.
●
Using cracked, deformed or damaged wheels can lead to wheel breakage and
resulting serious injury.
1. Replacing the depressed center wheel
Replace the depressed center wheel when it has been
worn out to about 2-3/8" (60 mm) in external diameter.
Confi rm that there is no crack or any damage to
the depressed center wheel. If there is a crack or a
transformation in the wheel, replace it immediately.
2. Check the Screws
Loose screws are dangerous. Regularly inspect them
and make sure they are tight.
CAUTION
Using this power tool with loosened screws is
extremely dangerous.
3. Maintenance of the motor
The motor unit winding is the very “heart” of the power
tool.
Exercise due care to ensure the winding does not
become damaged and/or wet with oil or water.
4. Inspecting the carbon brushes (Fig. 12)
The motor employs carbon brushes which are
consumable parts. Since and excessively worn
carbon brush can result in motor trouble, replace the
carbon brush with new ones when it becomes worn
to or near the “wear limit”. In addition, always keep
carbon brushes clean and ensure that they slide
freely within the brush holders.
Wear limit
0.12" (3 mm)
0.45"
(11.5 mm)
Fig. 12
NOTE
When replacing the carbon brush with a new one, be
sure to use the metabo HPT Carbon Brush Code No.
999101.
5. Replacing carbon brushes
Take out the carbon brush by fi rst removing the brush
cap and then hooking the protrusion of the carbon
brush with a fl at head screw driver, etc., as shown in
Fig. 13.
When installing the carbon brush, choose the
direction so that the nail of the carbon brush agrees
with the contact portion outside the brush tube. Then
push it in with a fi nger as illustrated in Fig. 14. Lastly,
install the brush cap.
Nail of carbon brush
Protrusion of
carbon brush
Fig. 13
Contact portion
outside brush tube
Fig. 14
CAUTION
●
Be absolutely sure to insert the nail of the carbon
brush into the contact portion outside the brush
tube. (You can insert whichever one of the two
nails provided.)
18
English
00BookG18DSL2metabo.indb1800BookG18DSL2metabo.indb182021/03/3014:38:462021/03/3014:38:46

●
Caution must be exercised since any error in this
operation can result in the deformed nail of the
carbon brush and may cause motor trouble at an
early stage.
6. Check for Dust
Dust may be removed with a soft cloth or a cloth
dampened with soapy water.
Do not use bleach, chlorine, gasoline or thinner, for
they may damage the plastics.
7. Inspection of terminals (tool and battery)
Check to make sure that swarf and dust have not
collected on the terminals.
On occasion check prior, during and after operation.
CAUTION
Remove any swarf or dust which may have
collected on the terminals.
Failure to do so may result in malfunction.
8. Cleaning the fi lter
After use, remove any grime or dust from the fi lter with
an airgun or other tool.
9. Disposal of the exhausted battery
WARNING
Do not dispose of the exhausted battery. The
battery must explode if it is incinerated. The
product that you have purchased contains a
rechargeable battery. The battery is recyclable.
At the end of it’s useful life, under various state
and local laws, it may be illegal to dispose of this
battery into the municipal waste stream. Check
with your local solid waste offi cials for details
in your area for recycling options or proper
disposal.
10. Storage
Storing in a place below 104°F (40°C) and out of the
reach of children.
NOTE
Storing lithium-ion batteries
Make sure the lithium-ion batteries have been fully
charged before storing them.
Prolonged storage (3 months or more) of batteries with
a low charge may result in performance deterioration,
signifi cantly reducing battery usage time or rendering
the batteries incapable of holding a charge.
However, signifi cantly reduced battery usage time
may be recovered by repeatedly charging and using
the batteries two to fi ve times.
If the battery usage time is extremely short despite
repeated charging and use, consider the batteries
dead and purchase new batteries.
11. Service and repairs
All quality power tools will eventually require servicing
or replacement of parts because of wear from normal
use. To assure that only authorized replacement parts
will be used, all service and repairs must be performed
by a metabo HPT AUTHORIZED SERVICE CENTER,
ONLY.
CAUTION
In the operation and maintenance of power tools,
the safety regulations and standards prescribed
in each country must be observed.
Important notice on the batteries for the
metabo HPT cordless power tools
Please always use one of our designated genuine
batteries. We cannot guarantee the safety and
performance of our cordless power tool when used with
batteries other than these designated by us, or when
the battery is disassembled and modifi ed (such as
disassembly and replacement of cells or other internal
parts).
19
English
00BookG18DSL2metabo.indb1900BookG18DSL2metabo.indb192021/03/3014:38:472021/03/3014:38:47

ACCESSORIES
WARNING
Never use any accessories other than those mentioned below.
The use of any accessories other than those mentionded below or attachments not intended for use
such as cup wheel, cut-off wheel or saw blade is dangerous and may cause personal injury or property
damage.
NOTE
Accessories are subject to change without any obligation on the part of the metabo HPT.
STANDARD ACCESSORIES
G18DSL2
(NN)
○
Depressed center wheel .................................................................................................................. 1
4-1/2" (115 mm) external dia. × 1/4" (6 mm) thickness × 7/8"" (22 mm) hole dia (Code No. 316821)
○
Wrench (Code No. 938332Z) ........................................................................................................... 1
○
Side handle (Code No. 994322) ....................................................................................................... 1
Battery, battery charger, plastic case and battery cover are not contained.
OPTIONAL ACCESSORIES (sold separately)
1. Battery (BSL1815 / BSL1830C)
2. Battery charger (UC18YKSL / UC18YFSL)
3. Battery cover (Code No. 329897)
NOTE
Specifi cations are subject to change without any obligation on the part of the metabo HPT.
20
English
00BookG18DSL2metabo.indb2000BookG18DSL2metabo.indb202021/03/3014:38:472021/03/3014:38:47
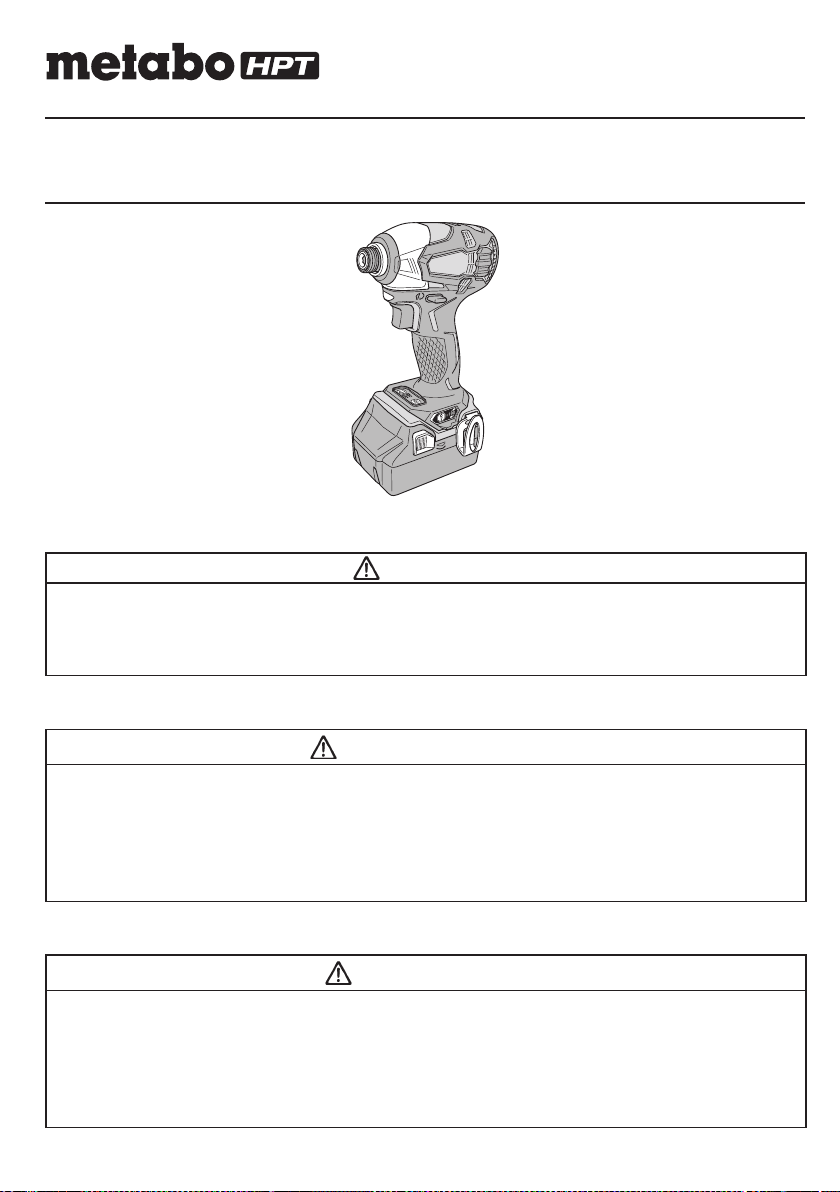
Designed for operating in USA & Canada only.
When this product is used in areas other than the USA & Canada,
we cannot guarantee the product quality and performance.
SAFETY INSTRUCTIONS AND INSTRUCTION MANUAL
WARNING
IMPROPER OR UNSAFE use of this power tool can result in death or serious bodily injury!
This manual contains important information about product safety. Please read and understand
this manual BEFORE operating the power tool. Please keep this manual available for other
users and owners before they use the power tool. This manual should be stored in safe place.
INSTRUCTIONS DE SECURITE ET MODE D’EMPLOI
AVERTISSEMENT
Une utilisation INCORRECTE OU DANGEREUSE de cet outil motorisé peut entraîner la mort
ou de sérieuses blessures corporelles!
Ce mode d’emploi contient d’importantes informations à propos de la sécurité de ce produit.
Prière de lire et de comprendre ce mode d’emploi AVANT d’utiliser l’outil motorisé. Garder ce
mode d’emploi à la disponibilité des autres utilisateurs et propriétaires avant qu’ils utilisent
l’outil motorisé. Ce mode d’emploi doit être conservé dans un endroit sûr.
INSTRUCCIONES DE SEGURIDAD Y MANUAL DE INSTRUCCIONES
ADVERTENCIA
¡La utilización INAPROPIADA O PELIGROSA de esta herramienta eléctrica puede resultar
en lesiones de gravedad o la muerte!
Este manual contiene información importante sobre la seguridad del producto. Lea y
comprenda este manual ANTES de utilizar la herramienta eléctrica. Guarde este manual para
que puedan leerlo otras personas antes de utilizar la herramienta eléctrica. Este manual debe
ser guardado en un lugar seguro.
Model
Modèle
Modelo
WH 18DBDL2
Cordless Impact Driver
Marteau à choc sans fi l
Atornillador de impacto inalámbrico
000WH18DBDL2metabo.indb1000WH18DBDL2metabo.indb12020/11/0610:24:332020/11/0610:24:33
IMPORTANT SAFETY INFORMATION
Read and understand all of the safety precautions, warnings and operating instructions in the Instruction Manual before
operating or maintaining this power tool.
Most accidents that result from power tool operation and maintenance are caused by the failure to observe basic safety
rules or precautions. An accident can often be avoided by recognizing a potentially hazardous situation before it occurs,
and by observing appropriate safety procedures.
Basic safety precautions are outlined in the “SAFETY” section of this Instruction Manual and in the sections which
contain the operation and maintenance instructions.
Hazards that must be avoided to prevent bodily injury or machine damage are identifi ed by WARNINGS on the power
tool and in this Instruction Manual.
NEVER use this power tool in a manner that has not been specifi cally recommended by metabo HPT.
MEANINGS OF SIGNAL WORDS
WARNING indicates a potentially hazardous situations which, if ignored, could result in death or serious injury.
CAUTION indicates a potentially hazardous situations which, if not avoided, may result in minor or moderate injury, or
may cause machine damage.
NOTE emphasizes essential information.
SAFETY
GENERAL POWER TOOL SAFETY WARNINGS
WARNING
Read all safety warnings and all instructions.
Failure to follow the warnings and instructions may result in electric shock, fi re and/or serious injury.
Save all warnings and instructions for future reference.
The term “power tool” in the warnings refers to your mains-operated (corded) power tool or battery-operated
(cordless) power tool.
1) Work area safety
a) Keep work area clean and well lit.
Cluttered or dark areas invite accidents.
b) Do not operate power tools in explosive
atmospheres, such as in the presence of
fl ammable liquids, gases or dust.
Power tools create sparks which may ignite the
dust or fumes.
c) Keep children and bystanders away while
operating a power tool.
Distractions can cause you to lose control.
2) Electrical safety
a) Power tool plugs must match the outlet.
Never modify the plug in any way.
Do not use any adapter plugs with earthed
(grounded) power tools.
Unmodifi ed plugs and matching outlets will reduce
risk of electric shock.
b) Avoid body contact with earthed or grounded
surfaces such as pipes, radiators, ranges and
refrigerators.
There is an increased risk of electric shock if your
body is earthed or grounded.
c) Do not expose power tools to rain or wet
conditions.
Water entering a power tool will increase the risk
of electric shock.
d) Do not abuse the cord. Never use the cord
for carrying, pulling or unplugging the power
tool.
Keep cord away from heat, oil, sharp edges or
moving parts.
Damaged or entangled cords increase the risk of
electric shock.
e) When operating a power tool outdoors, use
an extension cord suitable for outdoor use.
Use of a cord suitable for outdoor use reduces the
risk of electric shock.
f) If operating a power tool in a damp location
is unavoidable, use a residual current device
(RCD) protected supply.
Use of an RCD reduces the risk of electric shock.
2
English
000WH18DBDL2metabo.indb2000WH18DBDL2metabo.indb22020/11/0610:24:332020/11/0610:24:33

3) Personal safety
a) Stay alert, watch what you are doing and use
common sense when operating a power tool.
Do not use a power tool while you are tired
or under the infl uence of drugs, alcohol or
medication.
A moment of inattention while operating power
tools may result in serious personal injury.
b) Use personal protective equipment. Always
wear eye protection.
Protective equipment such as dust mask, non-skid
safety shoes, hard hat, or hearing protection used
for appropriate conditions will reduce personal
injuries.
c) Prevent unintentional starting. Ensure the
switch is in the off -position before connecting
to power source and/or battery pack, picking
up or carrying the tool.
Carrying power tools with your fi nger on the switch
or energising power tools that have the switch on
invites accidents.
d) Remove any adjusting key or wrench before
turning the power tool on.
A wrench or a key left attached to a rotating part of
the power tool may result in personal injury.
e) Do not overreach. Keep proper footing and
balance at all times.
This enables better control of the power tool in
unexpected situations.
f) Dress properly. Do not wear loose clothing or
jewellery. Keep your hair, clothing and gloves
away from moving parts.
Loose clothes, jewellery or long hair can be caught
in moving parts.
g) If devices are provided for the connection
of dust extraction and collection facilities,
ensure these are connected and properly
used.
Use of dust collection can reduce dust-related
hazards.
4) Power tool use and care
a) Do not force the power tool. Use the correct
power tool for your application.
The correct power tool will do the job better and
safer at the rate for which it was designed.
b) Do not use the power tool if the switch does
not turn it on and off .
Any power tool that cannot be controlled with the
switch is dangerous and must be repaired.
c) Disconnect the plug from the power source
and/or the battery pack from the power tool
before making any adjustments, changing
accessories, or storing power tools.
Such preventive safety measures reduce the risk
of starting the power tool accidentally.
d) Store idle power tools out of the reach of
children and do not allow persons unfamiliar
with the power tool or these instructions to
operate the power tool.
Power tools are dangerous in the hands of
untrained users.
e) Maintain power tools. Check for misalignment
or binding of moving parts, breakage of parts
and any other condition that may aff ect the
power tool’s operation.
If damaged, have the power tool repaired
before use.
Many accidents are caused by poorly maintained
power tools.
f) Keep cutting tools sharp and clean.
Properly maintained cutting tools with sharp
cutting edges are less likely to bind and are easier
to control.
g) Use the power tool, accessories and tool bits
etc. in accordance with these instructions,
taking into account the working conditions
and the work to be performed.
Use of the power tool for operations diff erent
from those intended could result in a hazardous
situation.
5) Battery tool use and care
a) Recharge only with the charger specifi ed by
the manufacturer.
A charger that is suitable for one type of battery
pack may create a risk of fi re when used with
another battery pack.
b) Use power tools only with specifi cally
designated battery packs.
Use of any other battery packs may create a risk of
injury and fi re.
c) When battery pack is not in use, keep it away
from other metal objects like paper clips,
coins, keys, nails, screws, or other small
metal objects, that can make a connection
from one terminal to another.
Shorting the battery terminals together may cause
burns or a fi re.
d) Under abusive conditions, liquid may be
ejected from the battery; avoid contact. If
contact accidentally occurs, fl ush with water.
If liquid contacts eyes, additionally seek
medical help.
Liquid ejected from the battery may cause irritation
or burns.
6) Service
a) Have your power tool serviced by a
qualifi ed repair person using only identical
replacement parts.
This will ensure that the safety of the power tool is
maintained.
3
English
000WH18DBDL2metabo.indb3000WH18DBDL2metabo.indb32020/11/0610:24:332020/11/0610:24:33
12. Do not use power tools if the plastic housing or
handle is cracked.
Cracks in the tool’s housing or handle can lead to
electric shock. Such tools should not be used until
repaired.
13. Blades and accessories must be securely
mounted to the tool.
Prevent potential injuries to yourself or others. Blades,
cutting implements and accessories which have been
mounted to the tool should be secure and tight.
14. NEVER use a tool which is defective or operating
abnormally.
If the tool appears to be operating unusually, making
strange noises, or otherwise appears defective, stop
using it immediately and arrange for repairs by a
metabo HPT authorized service center.
15. Carefully handle power tools.
Should a power tool be dropped or struck against
hard materials inadvertently, it may be deformed,
cracked, or damaged.
16. Do not wipe plastic parts with solvent.
Solvents such as gasoline, thinner benzine, carbon
tetrachloride, and alcohol may damage and crack
plastic parts. Do not wipe them with such solvents.
Wipe plastic parts with a soft cloth lightly dampened
with soapy water and dry thoroughly.
17. Always wear eye protection that meets the
requirement of the latest revision of ANSI
Standard Z87.1.
18. Defi nitions for symbols used on this tool
V ............ volts
—
---
......... direct current
no .......... no load speed
---/min .... revolutions or reciprocation per minute
IMPORTANT SAFETY INSTRUCTIONS
FOR USE OF THE CORDLESS IMPACT
DRIVER
WARNING
Death or serious bodily injury could result from
improper or unsafe use of the cordless impact
driver. To avoid these risks, follow these basic
safety instructions:
1. NEVER use this impact driver handle for any
application other than those in this manual.
2. NEVER place hands or other body parts near the drill
bit or chuck during operation.
Hold the impact driver by its handle only.
3. When working in high places, always make sure that
ther is no one below before starting to work.
– WARNING –
To reduce the risk of injury, user must read
instruction manual.
SPECIFIC SAFETY RULES AND SYMBOLS
1. Hold power tools by insulated gripping surfaces,
when performing an operation where the
fastener may contact hidden wiring.
Fasteners contacting a “live” wire may make exposed
metal parts of the power tool “live” and could give the
operator an electric shock.
2. ALWAYS wear ear protectors when using the tool
for extended periods.
Prolonged exposure to high intensity
noise can cause hearing loss.
3. NEVER place hands or other body parts near the drill
bit or chuck during operation. Hold the impact driver
by its handle only.
4. Because the cordless impact driver operates by
battery power, be aware of the fact that it can begin to
operate at any time.
5. When working at elevated locations, clear the area
of all other people and be aware of conditions below
you.
6. NEVER touch moving parts.
NEVER place your hands, fi ngers or other body parts
near the tool’s moving parts.
7. NEVER operate without all guards in place.
NEVER operate this tool without all guards or safety
features in place and in proper working order. If
maintenance or servicing requires the removal of a
guard or safety feature, be sure to replace the guard or
safety feature before resuming operation of the tool.
8. Use right tool.
Don’t force small tool or attachment to do the job of a
heavy-duty tool.
Don’t use tool for purpose not intended —for
example— don’t use circular saw for cutting tree
limbs or logs.
9. NEVER use a power tool for applications other
than those specifi ed.
NEVER use a power tool for applications other than
those specifi ed in the Instruction Manual.
10. Handle tool correctly.
Operate the tool according to the instructions provided
herein. Do not drop or throw the tool. NEVER allow the
tool to be operated by children, individuals unfamiliar
with its operation or unauthorized personnel.
11. Keep all screws, bolts and covers tightly in place.
Keep all screws, bolts, and plates tightly mounted.
Check their condition periodically.
4
English
000WH18DBDL2metabo.indb4000WH18DBDL2metabo.indb42020/11/0610:24:332020/11/0610:24:33

4. ALWAYS wear eye and ear protection when you work.
5. ALWAYS install the driver bit securely. A loose bit is
dangerous because it can come loose while you are
working.
6. ALWAYS use the driver bit that matches the screw
size.
7. ALWAYS have the screw you are screwing in and
this impact driver in a straight line. Working with this
impact driver at an angle to the screw can damage the
screw head and will not give the prescribed tightening
torque.
IMPORTANT SAFETY INSTRUCTIONS
FOR BATTERY CHARGER
WARNING
Death or serious bodily injury could result from
improper or unsafe use of battery chargers.
To avoid these risks, follow these basic safety
instructions:
READ ALL INSTRUCTIONS
1. This manual contains important safety and operating
instructions for battery charger Model UC18YSL3 /
UC18YFSL.
2. Before using battery charger, read all instructions
and cautionary markings on (1) battery charger, (2)
battery, and (3) product using battery.
3. To reduce risk of injury, charge metabo HPT
rechargeable battery models of the BSL18 series
and model BSL36A18. Other models of batteries may
burst causing personal injury and damage.
4. Use of an attachment not recommended or sold by
the battery charger manufacturer may result in a risk
of fi re, electric shock, or injury to persons.
5. To reduce risk of damage to electric plug and cord,
pull by plug when disconnecting battery charger.
6. Make sure cord is located so that it will not be stepped
on, tripped over, or otherwise subjected to damage or
stress.
7. An extension cord should not be used unless
absolutely necessary. Use of improper extension
cord could result in a risk of fi re and electric shock.
If extension cord must be used make sure:
a. That blades of extension cord are the same
number, size, and shape as those of plug on
battery charger:
b. That extension cord is properly wired and in good
electrical condition; and
c. That wire size is large enough for AC ampere
rating of battery charger as specifi ed in Table 1.
Table 1
RECOMMENDED MINIMUM AWG SIZE FOR
EXTENSION CORDS FOR BATTERY CHARGERS
AC Input Rating Amperes* AWG Size of Cord
Equal to or
greater than
but less
than
Length of Cord, Feet (Meter)
25 (7.5) 50 (15) 100 (30) 150 (45)
0 2 18 18 18 16
2 3 18 18 16 14
3 4 18 18 16 14
* If the input rating of a battery charger is given in watts
rather than in amperes, the corresponding ampere
rating is to be determined by dividing the wattage
rating by the voltage rating–for example:
1,250 watts
= 10 amperes
125 volts
8. Do not operate battery charger with damaged cord or
plug-replace them immediately.
9. Do not operate battery charger if it has received a
sharp blow, been dropped, or otherwise damaged in
any way; take it to a qualifi ed serviceman.
10. Do not disassemble battery charger; take it to a
qualifi ed serviceman when service or repair is
required. Incorrect reassembly may result in a risk of
electric shock or fi re.
11. To reduce risk of electric shock, unplug charger from
receptacle before attempting any maintenance or
cleaning. Removing the battery will not reduce this
risk.
5
English
000WH18DBDL2metabo.indb5000WH18DBDL2metabo.indb52020/11/0610:24:342020/11/0610:24:34

CAUTION ON LITHIUM-ION BATTERY
To extend the lifetime, the lithium-ion battery equips with
the protection function to stop the output.
In the cases of 1 to 3 described below, when using this
product, even if you are pulling the switch, the motor may
stop. This is not the trouble but the result of protection
function.
1. When the battery power remaining runs out, the motor
stops.
In such case, charge it up immediately.
2. If the tool is overloaded, the motor may stop. In this
case, release the switch of tool and eliminate causes
of overloading. After that, you can use it again.
3. If the battery is overheated under overload work, the
battery power may stop.
In this case, stop using the battery and let the battery
cool. After that, you can use it again.
Furthermore, please heed the following warning and
caution.
WARNING
In order to prevent any battery leakage, heat generation,
smoke emission, explosion and ignition beforehand,
please be sure to heed the following precautions.
1. Make sure that swarf and dust do not collect on the
battery.
○
During work make sure that swarf and dust do not fall
on the battery.
○
Make sure that any swarf and dust falling on the power
tool during work do not collect on the battery.
○
Do not store an unused battery in a location exposed
to swarf and dust.
○
Before storing a battery, remove any swarf and dust
that may adhere to it and do not store it together with
metal parts (screws, nails, etc.).
2. Do not pierce battery with a sharp object such as a
nail, strike with a hammer, step on, throw or subject
the battery to severe physical shock.
3. Do not use an apparently damaged or deformed
battery.
4. Do not use the battery in reverse polarity.
5. Do not connect directly to an electrical outlets or car
cigarette lighter sockets.
6. Do not use the battery for a purpose other than those
specifi ed.
7. If the battery charging fails to complete even when a
specifi ed recharging time has elapsed, immediately
stop further recharging.
8. Do not put or subject the battery to high temperatures
or high pressure such as into a microwave oven,
dryer, or high pressure container.
9. Keep away from fi re immediately when leakage or foul
odor are detected.
IMPORTANT SAFETY INSTRUCTIONS
FOR USE OF THE BATTERY AND
BATTERY CHARGER
You must charge the battery before you can use the power
tool. Before using the model UC18YSL3 / UC18YFSL
battery charger, be sure to read all instructions and
cautionary statements on it, the battery and in this manual.
CAUTION
USE ONLY metabo HPT BATTERY MODELS OF
THE BSL18 SERIES AND MODEL BSL36A18.
OTHER MODELS OF BATTERIES MAY BURST
AND CAUSE INJURY!
Follow these instructions to avoid the risk of injury:
WARNING:
Improper use of the battery
or battery charger can lead to
serious injury. To avoid these
injuries:
1. NEVER disassemble the battery.
2. NEVER incinerate the battery, even if it is damaged or
is completely worn out. The battery can explode in a
fi re.
3. NEVER short-circuit the battery.
4. NEVER insert any objects into the battery charger’s
air vents. Electric shock or damage to the battery
charger may result.
5. NEVER charge outdoors. Keep the battery away
from direct sunlight and use only where there is low
humidity and good ventilation.
6. NEVER charge when the temperature is below 14°F
(-10°C) or above 104°F (40°C).
7. NEVER connect two battery chargers together.
8. NEVER insert foreign objects into the hole for the
battery or the battery charger.
9. NEVER use a booster transformer when charging.
10. NEVER use DC power to charge.
11. NEVER store the battery or battery charger in places
where the temperature may reach or exceed 104°F
(40°C) such as inside metal box or car.
12. NEVER expose the battery or battery charger to rain
or wet conditions.
13. ALWAYS operate charger on standard household
electrical power (120 volts). Using the charger on any
other voltage may overheat and damage the charger.
14. ALWAYS wait at least 15 minutes between charges to
avoid overheating the charger.
15. ALWAYS disconnect the power cord from its
receptacle when the charger is not in use.
6
English
000WH18DBDL2metabo.indb6000WH18DBDL2metabo.indb62020/11/0610:24:342020/11/0610:24:34
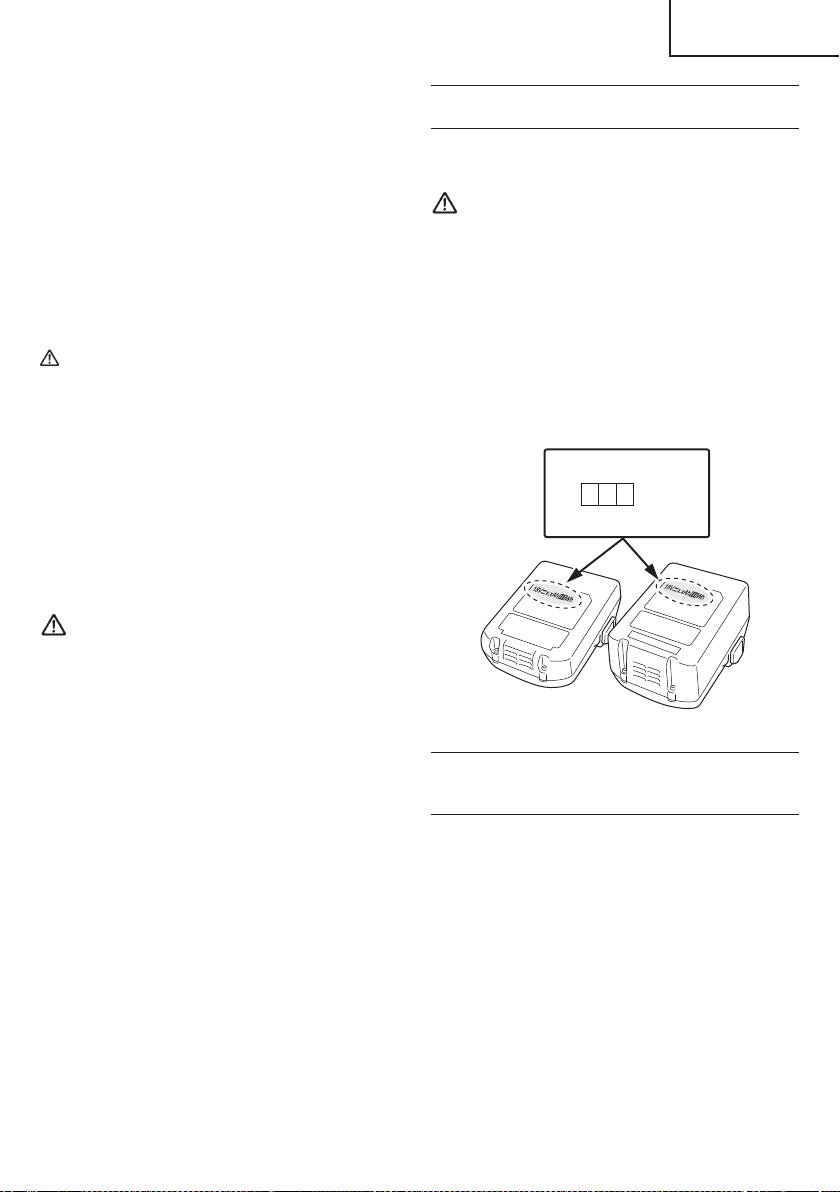
10. Do not use in a location where strong static electricity
generates.
11. If there is battery leakage, foul odor, heat generated,
discolored or deformed, or in any way appears
abnormal during use, recharging or storage,
immediately remove it from the equipment or battery
charger, and stop use.
12. Do not immerse the battery or allow any fl uids to fl ow
inside. Conductive liquid ingress, such as water, can
cause damage resulting in fi re or explosion. Store your
battery in a cool, dry place, away from combustible
and fl ammable items. Corrosive gas atmospheres
must be avoided.
CAUTION
1. If liquid leaking from the battery gets into your eyes,
do not rub your eyes and wash them well with fresh
clean water such as tap water and contact a doctor
immediately.
If left untreated, the liquid may cause eye-problems.
2. If liquid leaks onto your skin or clothes, wash well with
clean water such as tap water immediately.
There is a possibility that this can cause skin irritation.
3. If you fi nd rust, foul odor, overheating, discolor,
deformation, and/or other irregularities when using
the battery for the fi rst time, do not use and return it to
your supplier or vendor.
WARNING
If an electrically conductive foreign object enters the
terminals of the lithium ion battery, a short-circuit may
occur resulting in the risk of fi re. Please observe the
following matters when storing the battery.
○
Do not place electrically conductive cuttings,
nails, steel wire, copper wire or other wire in the
storage case.
○
Either install the battery in the power tool or store
by securely pressing into the battery cover until
the ventilation holes are concealed to prevent
short-circuits (See Fig. 3).
REGARDING LITHIUM-ION BATTERY
TRANSPORTATION
When transporting a lithium-ion battery, please observe
the following precautions.
WARNING
Notify the transporting company that a package
contains a lithium-ion battery, inform the company
of its power output and follow the instructions of the
transportation company when arranging transport.
●
Lithium-ion batteries that exceed a power output
of 100 Wh are considered to be in the freight
classifi cation of Dangerous Goods and will
require special application procedures.
●
For transportation abroad, you must comply with
international law and the rules and regulations of
the destination country.
Wh
Power Output
2 to 3 digit number
Fig. 1
USB DEVICE CONNECTION
PRECAUTIONS
(ONLY WITH UC18YSL3 CHARGER)
When an unexpected problem occurs, the data in a USB
device connected to this product may be corrupted or lost.
Always make sure to back up any data contained in the
USB device prior to use with this product.
Please be aware that our company accepts absolutely no
responsibility for any data stored in a USB device that is
corrupted or lost, nor for any damage that may occur to a
connected device.
7
English
000WH18DBDL2metabo.indb7000WH18DBDL2metabo.indb72020/11/0610:24:342020/11/0610:24:34

PRECAUTIONS REGARDING THE DUST-RESISTANCE AND WATER-PROOFING
FUNCTIONS
This product conforms to IP56 protection class ratings (dust-resistance and water-proofi ng) for electrical equipment as
stipulated by the international IEC regulations. (Only the main unit conforms to the IP56 protection class ratings when
equipped with a battery.)
[Descriptions of IP Codes]
IP56
Protection rating for water penetration
Must be no adverse eff ects on the equipment when sprayed with powerful jets of water from all directions
(water-proofed).
(100 L of water per minute sprayed for approximately three minutes from a distance of approximately three
meters with the use of a spray nozzle with a diameter of 12.5 mm.)
Protection rating for external assault by solid objects
Dust that may cause adverse eff ects on the equipment must not be able to enter (dust-resistance).
(The equipment to be left non-operable in a test chamber in which particles of talcum powder with a diameter
of less than 75 μm are fl oating in the air with the use of an agitation pump at a rate of 2 kg per cubic meter for
eight hours.)
The equipment has been designed to withstand the eff ects of dust and water, but there is no guarantee that it will not
malfunction. Do not use or leave the equipment in locations where it is subject to excessive amounts of dust, or in
locations where it is submerged in water or subject to rainwater.
SAVE THESE INSTRUCTIONS
AND
MAKE THEM AVAILABLE TO OTHER USERS
AND
OWNERS OF THIS TOOL!
8
English
000WH18DBDL2metabo.indb8000WH18DBDL2metabo.indb82020/11/0610:24:342020/11/0610:24:34
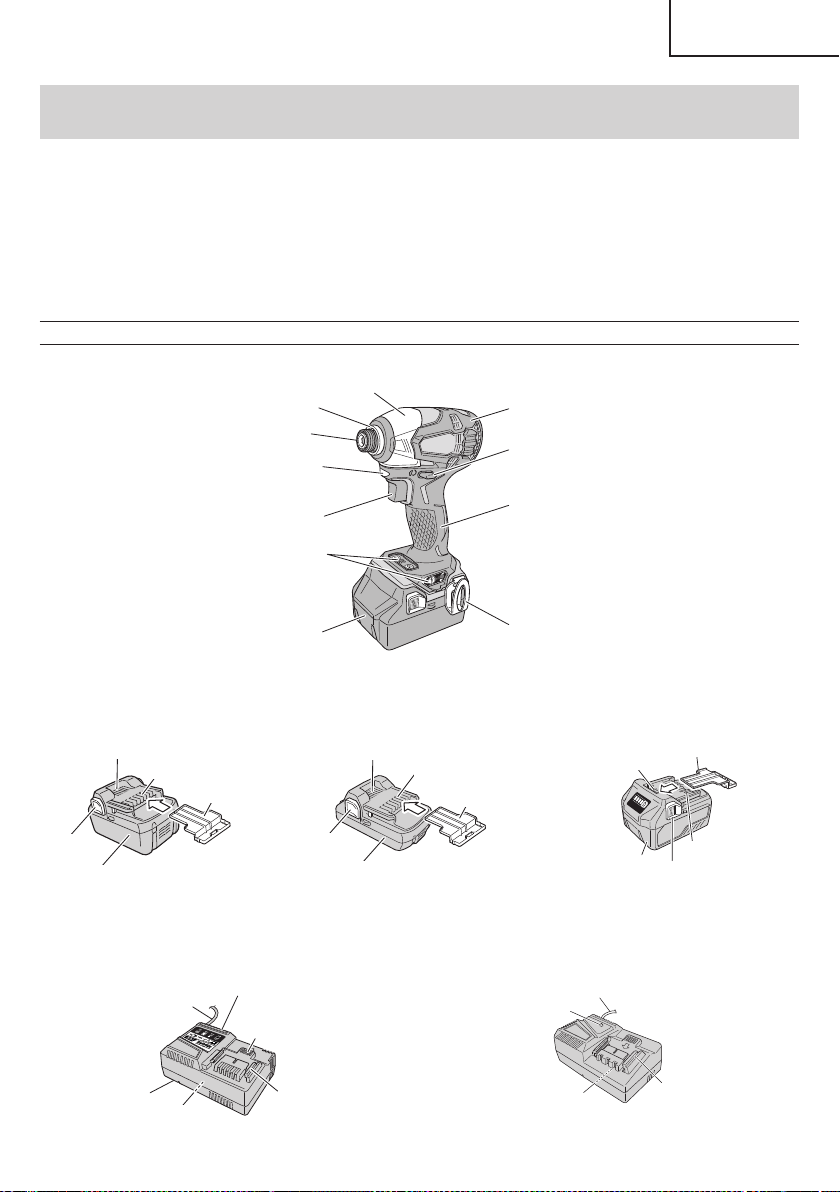
FUNCTIONAL DESCRIPTION
NOTE
The information contained in this Instruction Manual is designed to assist you in the safe operation and maintenance
of the power tool.
NEVER operate, or attempt any maintenance on the tool unless you have fi rst read and understood all safety
instructions contained in this manual.
Some illustrations in this Instruction Manual may show details or attachments that diff er from those on your own
power tool.
NAME OF PARTS
1. Cordless Impact Driver (WH18DBDL2)
Guide sleeve
Hammer case
Protector
Pushing button
Switch trigger
Switch panel
Housing
Battery
Hook
Handle
LED Light
<WH18DBDL2>
Fig. 2
2. Battery
Battery
Latch
Ventilation holes
Terminals
Battery cover
Battery
Latch
Ventilation holes
Terminals
Battery cover
Battery
Ventilation holes
Terminals
Battery cover
Latch
<BSL1860> <BSL1830C / BSL1815> <BSL36A18>
Fig. 3
3. Battery Charger
Ventilation holes
Body
Cord
Nameplate
Charge indicator lamp
Guide rail
Nameplate
Guide rail
Cord
Pilot lamp
<UC18YSL3> <UC18YFSL>
Fig. 4
9
English
000WH18DBDL2metabo.indb9000WH18DBDL2metabo.indb92020/11/0610:24:342020/11/0610:24:34

SPECIFICATIONS
1. Cordless Impact Driver
Model WH18DBDL2
No-load
speed
Power mode
0–2,900 /min
Normal mode
Soft mode 0–900 /min
Self drilling screw mode 0–2,900 /min
Capacity
Small screw 5/32" (M4)–3/8" (M10)
Ordinary bolt 3/16" (M5)–23/32" (M18)
High tension bolt 3/16" (M5)–9/16" (M14)
Self drilling screw φ3.5–φ6
Tightening torque
Maximum 1,832 in-lbs {207 N∙m 2,112 kgf∙cm}
Tightening is 9/16" (M14) high tension bolt, when fully
charged at 68°F (20°C) temp.
Tightening time: 3 sec.
Bit shank size 1/4" (6.35 mm) Hex.
Battery
Model
BSL1860 (6.0 Ah)
BSL36A18 (18 V, 5.0 Ah)
BSL1815 (1.5 Ah)/
BSL1830C (3.0 Ah)
Type Li-ion battery
Voltage DC 18 V (BSL36A18: DC 36 V / 18 V)
Weight 3.5 lbs. (1.6 kg) 2.9 lbs. (1.3 kg)
2. Battery Charger
Model UC18YSL3 UC18YFSL
Input power source Single phase: AC 120 V 60 Hz
Charging time
(At a temperature of 68°F (20°C))
BSL1830C : Approx. 30 min
BSL36A18 : Approx. 32 min
BSL1860 : Approx. 38 min
BSL1815 : Approx. 22 min
BSL1830C : Approx. 45 min
Charging voltage DC 14.4–18 V
Charging current DC 8.0 A DC 3.5 A
Weight 1.3 lbs. (0.6 kg) 1.1 lbs. (0.5 kg)
NOTE: The charging time may vary according to temperature and power source voltage.
10
English
000WH18DBDL2metabo.indb10000WH18DBDL2metabo.indb102020/11/0610:24:342020/11/0610:24:34
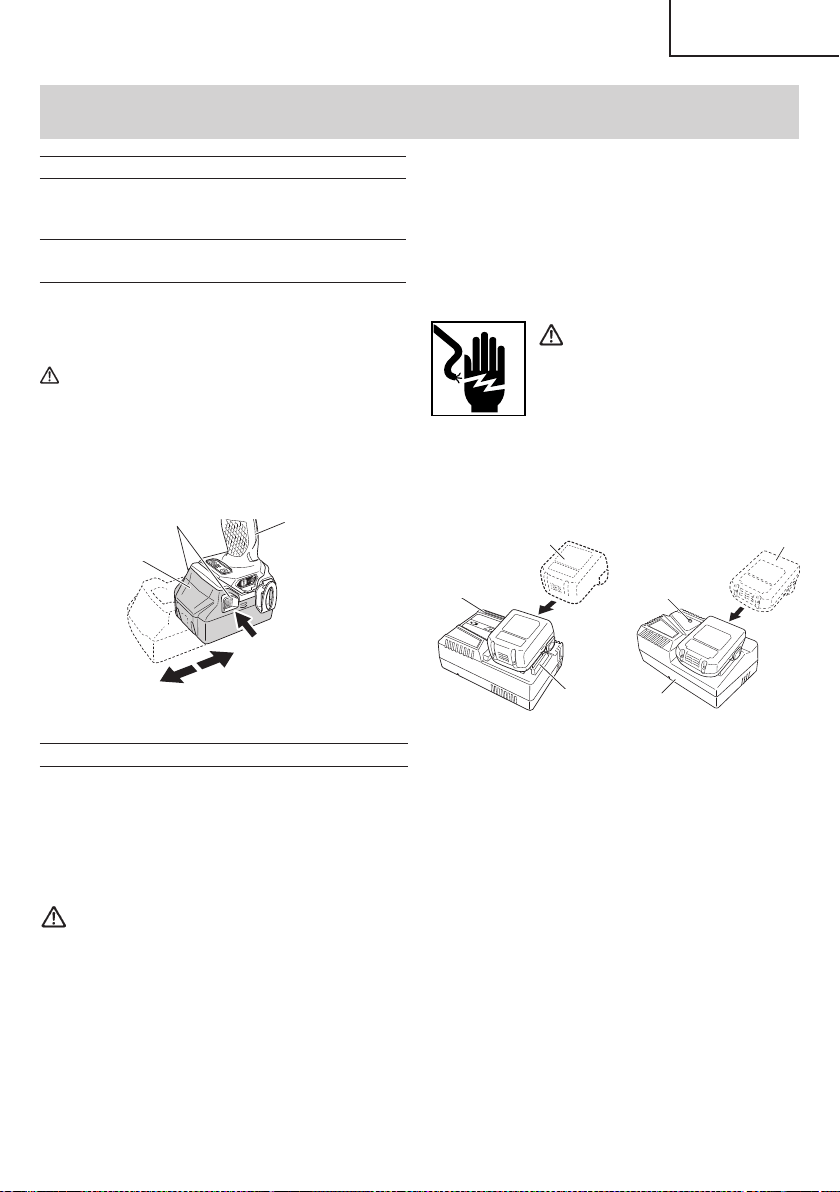
ASSEMBLY AND OPERATION
1. <UC18YSL3>
Connect the charger’s power cord to a receptacle.
When the power cord is connected, the charge
indicator lamp will blink in red. (At 1-second intervals)
<UC18YFSL>
Connect the charger’s power cord to a receptacle.
When the power cord is connected, the pilot lamp will
blink in red. (At 1-second intervals)
WARNING
Do not use the electrical cord
if damaged. Have it repaired
immediately.
2. Insert the battery to the battery charger.
Firmly Insert the battery into the battery charger as
shown in Fig. 6.
<UC18YSL3>
Charge
indicator lamp
Guide rail
Battery
<UC18YFSL>
Charger
Battery
Pilot lamp
Fig. 6
3. Charging
<UC18YSL3>
When inserting a battery in the charger, the charge
indicator lamp will blink in blue.
When the battery becomes fully recharged, the
charge indicator lamp will light up in green. (See
Table 2-a)
●
Charge indicator lamp indication
The indications of the charge indicator lamp will be as
shown in Table 2-a, according to the condition of the
battery charger or the battery.
APPLICATIONS
○
Driving and removing of machine screws, wood
screws, tapping screws, etc.
REMOVAL AND INSTALLATION METHOD
OF BATTERY
1. Battery removal
Hold the handle tightly and push the battery latch to
remove the battery (see Fig. 5).
CAUTION
Never short-circuit the battery.
2. Battery installation
Insert the battery while observing its polarities (see
Fig. 5).
Battery
Push
Pull out
Insert
Handle
Latch
Fig. 5
CHARGING METHOD
NOTE
Before plugging into the receptacle, make sure the
following points.
○
The power source voltage is stated on the nameplate.
○
The cord is not damaged.
WARNING
Do not charge at voltage higher than indicated
on the nameplate.
If charged at voltage higher than indicated on the
nameplate, the charger will burn out.
11
English
000WH18DBDL2metabo.indb11000WH18DBDL2metabo.indb112020/11/0610:24:352020/11/0610:24:35
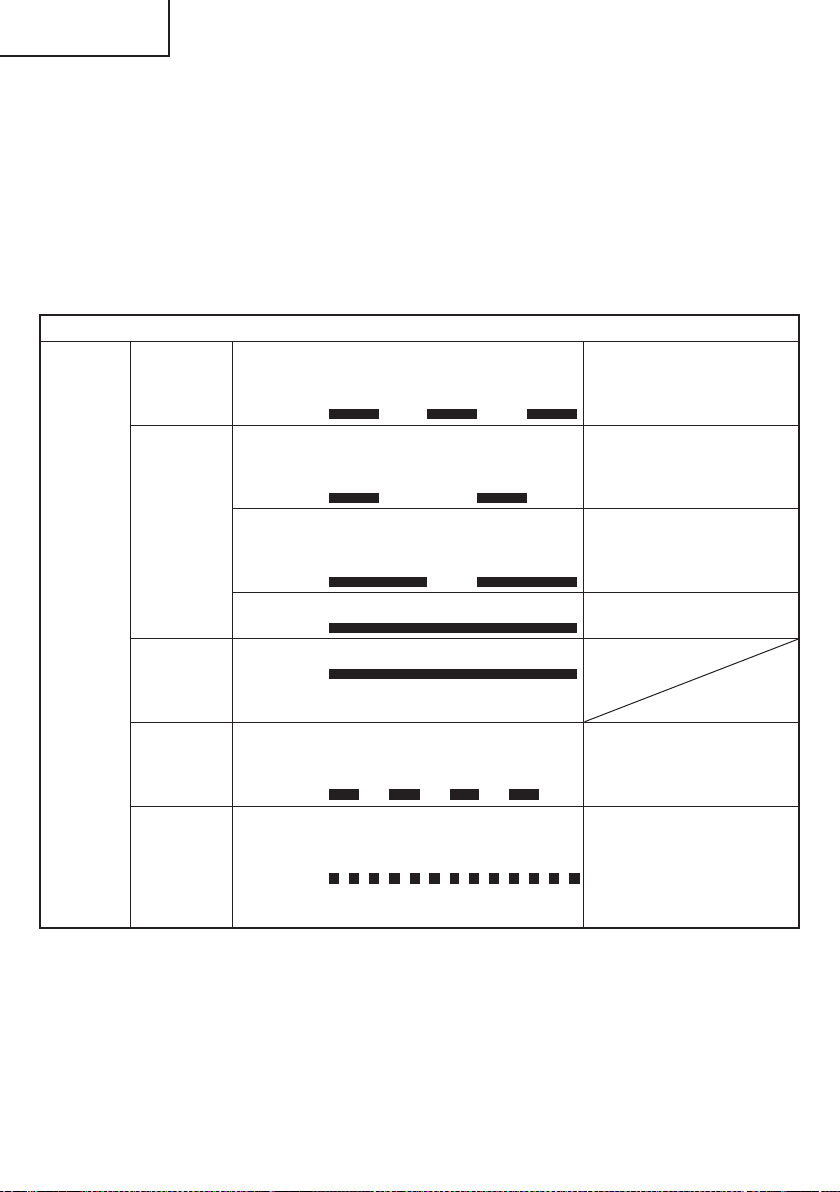
<UC18YFSL>
When the battery is inserted into the battery charger,
charging will commence and the pilot lamp will light in
red. (See Table 2-b)
NOTE
If the pilot lamp does not light or blink in red, pull out
the plug from the receptacle and check if the battery
is properly mounted.
Table 2-a
Indications of the charge indicator lamp
Charge
indicator
lamp
(RED /
BLUE /
GREEN /
PURPLE)
Before
charging
Blinks
(RED)
Lights for 0.5 seconds. Does not light
for 0.5 seconds.
(off for 0.5 seconds)
Plugged into power source
While
charging
Blinks
(BLUE)
Lights for 0.5 seconds. Does not light
for 1 second.
(off for 1 second)
Battery capacity at less than
50%
Blinks
(BLUE)
Lights for 1 second. Does not light for
0.5 seconds.
(off for 0.5 seconds)
Battery capacity at less than
80%
Lights
(BLUE)
Lights continuously
Battery capacity at more than
80%
Charging
complete
Lights
(GREEN)
Lights continuously
(Continuous buzzer sound: about
6 seconds)
Overheat
standby
Blinks
(RED)
Lights for 0.3 seconds. Does not light
for 0.3 seconds.
(off for 0.3 seconds)
Battery overheated. Unable
to charge. (Charging will
commence when battery cools)
Charging
impossible
Flickers
(PURPLE)
Lights for 0.1 seconds. Does not light
for 0.1 seconds.
(off for 0.1 seconds)
(Intermittent buzzer sound: about
2 seconds)
Malfunction in the battery or the
charger
When the battery is fully charged, the pilot lamp
will blink in red slowly. (At 1-second intervals) (See
Table 2-b)
●
Pilot lamp indication
The indications of the pilot lamp will be as shown in
Table 2-b, according to the condition of the charger or
the rechargeable battery.
12
English
000WH18DBDL2metabo.indb12000WH18DBDL2metabo.indb122020/11/0610:24:352020/11/0610:24:35
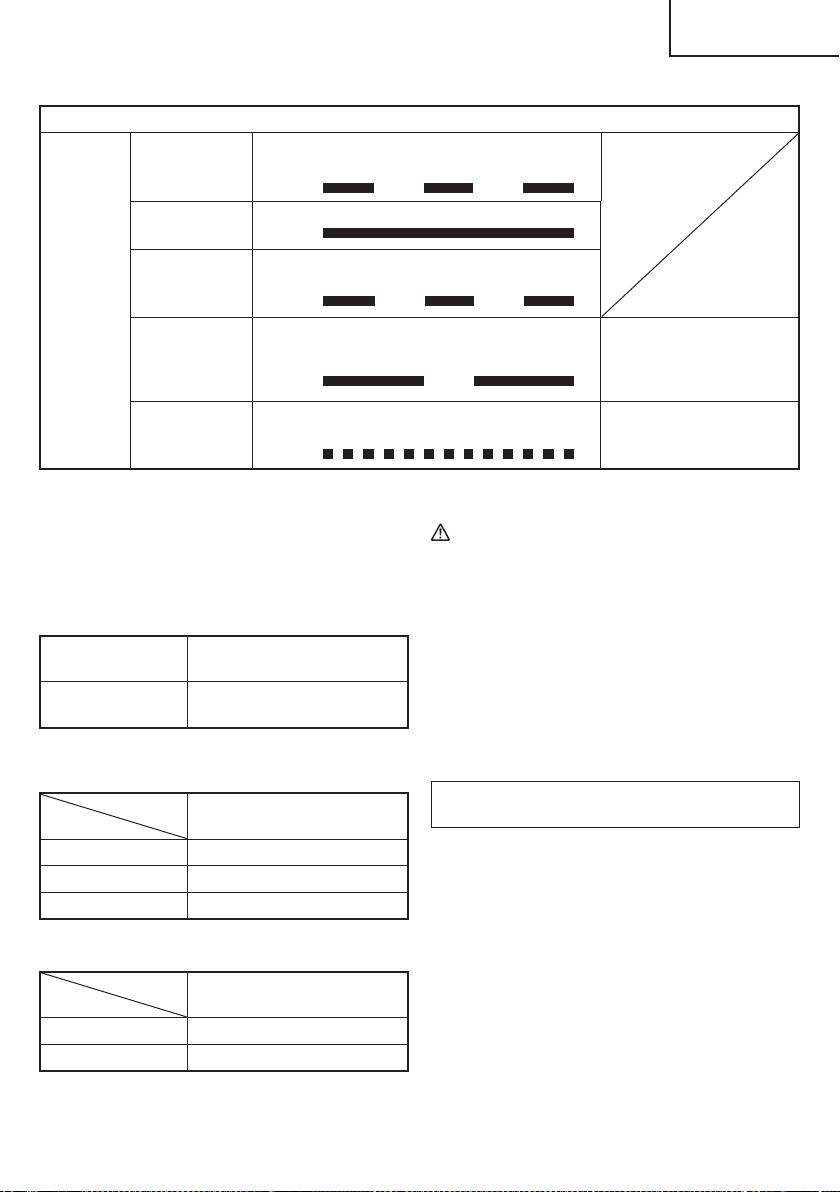
Table 2-b
Indications of the pilot lamp
Pilot lamp
(red)
Before charging Blinks
Lights for 0.5 seconds. Does not light for
0.5 seconds. (off for 0.5 seconds)
While charging Lights
Lights continuously
Charging
complete
Blinks
Lights for 0.5 seconds. Does not light for
0.5 seconds. (off for 0.5 seconds)
Overheat
standby
Blinks
Lights for 1 second. Does not light for
0.5 seconds. (off for 0.5 seconds)
Battery overheated.
Unable to charge.
(Charging will commence
when battery cools)
Charging
impossible
Flickers
Lights for 0.1 seconds. Does not light for
0.1 seconds. (off for 0.1 seconds)
Malfunction in the battery or
the charger
4. Disconnect battery charger from the receptacle.
CAUTION
Do not pull the plug out of the receptacle by
pulling on the cord.
Make sure to grasp the plug when removing from
receptacle to avoid damaging cord.
5. Remove the battery from the battery charger.
Supporting the battery charger with hand, pull out the
battery from the battery charger.
NOTE
Be sure to pull out the battery from the battery charger
after use, and then keep it.
Regarding electric discharge in case of new
batteries, etc.
As the internal chemical substance of new batteries
and batteries that have not been used for an extended
period is not activated, the electric discharge might
be low when using them the fi rst and second time.
This is a temporary phenomenon, and normal time
required for recharging will be restored by recharging
the batteries 2 – 3 times.
(1) Regarding the temperature of the rechargeable
battery.
The temperatures for rechargeable batteries are
as shown in the Table 3, and batteries that have
become hot should be cooled for a while before being
recharged.
Table 3
Rechargeable
batteries
Temperatures at which the
battery can be recharged
BSL1860, BSL36A18,
BSL1830C, BSL1815
32°F–122°F
( 0°C–50°C)
(2) Regarding recharging time (At 68°F (20°C))
Table 4 Charging time (UC18YSL3)
Charger
Battery
UC18YSL3
BSL1860 Approx. 38 min
BSL36A18 Approx. 32 min
BSL1830C Approx. 30 min
Table 5 Charging time (UC18YFSL)
Charger
Battery
UC18YFSL
BSL1815 Approx. 22 min
BSL1830C Approx. 45 min
NOTE
The recharging time may vary according to the
ambient temperature.
13
English
000WH18DBDL2metabo.indb13000WH18DBDL2metabo.indb132020/11/0610:24:352020/11/0610:24:35

How to make the batteries perform longer
(1) Recharge the batteries before they become
completely exhausted.
When you feel that the power of the tool becomes
weaker, stop using the tool and recharge its battery.
If you continue to use the tool and exhaust the electric
current, the battery may be damaged and its life will
become shorter.
(2) Avoid recharging at high temperatures.
A rechargeable battery will be hot immediately after
use. If such a battery is recharged immediately after
use, its internal chemical substance will deteriorate,
and the battery life will be shortened. Leave the
battery and recharge it after it has cooled for a while.
CAUTION
●
When the battery charger has been continuosly
used, the battery charger will be heated, thus
constituting the cause of the failures. Once the
charging has been completed, give 15 minutes
rest until the next charging.
●
If the battery is charged while it is heated
because it has been left for a long time in a
location subject to direct sunlight or because
the battery has just been used, the pilot lamp
of UC18YFSL charger lights for 1 second, does
not light for 0.5 seconds (off for 0.5 seconds) or
the charge indicator lamp of UC18YSL3 charger
lights for 0.3 seconds, does not light for 0.3
seconds (off for 0.3 seconds). In such a case,
fi rst let the battery cool, then start charging.
●
When the charge indicator lamp fl ickers (at
0.2-second intervals), check for and take out
any foreign objects in the charger’s battery
installation hole. If there are no foreign objects,
it is probable that the battery or charger is
malfunctioning. Take it to your authorized
Service Center.
HOW TO RECHARGE USB DEVICE
(ONLY WITH UC18YSL3 CHARGER)
WARNING
○
Prior to use, check the connecting USB cable for
any defect or damage.
Using a defective or damaged USB cable can
cause smoke emission or ignition.
○
When the product is not being used, cover the
USB port with the rubber cover.
Buildup of dust etc. in the USB port can cause
smoke emission or ignition.
NOTE
○
The time required for charging will be longer when
a USB device and battery are being simultaneously
charged.
○
There may be an occasional pause during USB
recharging.
○
When a USB device is not being charged, turn the
USB power switch OFF and remove the USB device
from the charger.
Failure to do so may not only reduce the battery life
of a USB device, but may also result in unexpected
accidents.
(1) Select a charging method
Depending on the charge method selected, either the
battery is inserted into the charger or the power cord
is plugged into an outlet.
○
Charging a USB device by battery (Fig. 7-a)
○
Charging a USB device from a electrical outlet
(Fig. 7-b)
○
Charging a USB device and battery from a
electrical outlet (Fig. 7-c)
abc
Fig. 7
(2) Turn the USB power switch ON (Fig. 8)
When you turn the USB power switch ON, the USB
power indicator lamp will light up.
USB power
switch
USB power
indicator lamp
Rubber cover
USB port
USB cable
Fig. 8
(3) Connect the USB cable. (Fig. 8)
Pull back the rubber cover and fi rmly plug in a
commercially available USB cable (appropriate to the
device being charged) into the USB port.
○
When the power cord is not plugged into an outlet and
the battery runs out of power, power output will stop
and the USB power indicator lamp will shut off .
○
When the USB power indicator lamp goes out, change
the battery or plug the power cord into an electrical
outlet.
14
English
000WH18DBDL2metabo.indb14000WH18DBDL2metabo.indb142020/11/0610:24:352020/11/0610:24:35
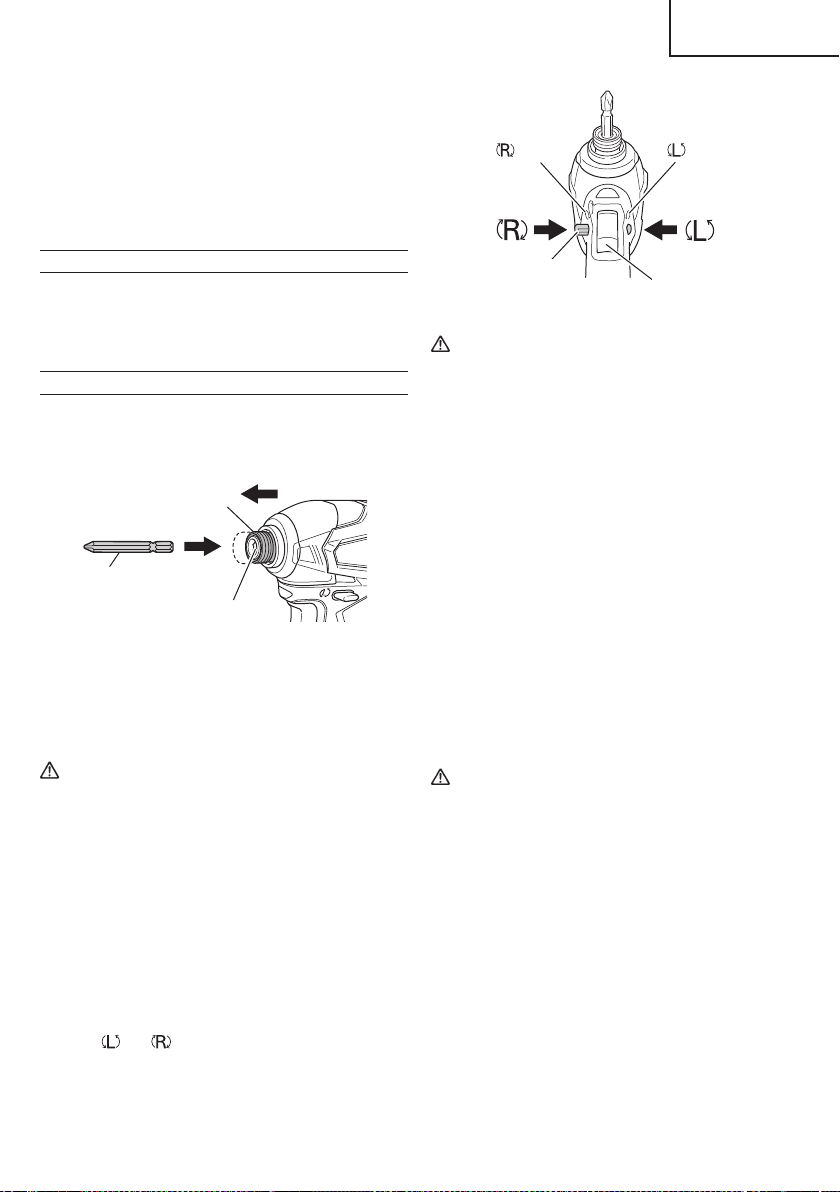
push push
marks
marks
Trigger switch
Pushing button
Fig. 10
CAUTION
The pushing button can not be switched while
the power tool is turning. To switch the pushing
button, stop the power tool, then set the pushing
button.
5 Switch operation
○
When the trigger switch is depressed, the tool rotates.
When the trigger is released, the tool stops.
○
The rotational speed can be controlled by varying
the amount that the trigger switch is pulled. Speed
is low when the trigger switch is pulled slightly and
increases as the trigger switch is pulled more.
○
When releasing the trigger of the switch, the brake will
be applied for immediate stopping.
NOTE
A buzzing noise is produced when the motor is about
to rotate; this is only a noise, not a machine failure.
6. Using the hook
The hook is used to hang up the power tool to your
waist belt while working.
CAUTION
●
When using the hook, hang up the power tool
fi rmly not to drop accidentally.
If the power tool is dropped, it may lead to an
accident.
●
When electing to carry the tool hooked to your
hip belt, make sure to detach the tool bit and side
handle.
Failure to do so may result in unexpected injury.
●
Install securely the hook. Unless the hook is
securely installed, it may cause an injury while
using.
(4) When charging is completed
○
The USB power indicator lamp will not go out when a
USB device has been completely charged.
To verify charge status, check the USB device.
○
Turn the USB power switch OFF and unplug the power
cord from the electrical outlet. (Fig. 8)
○
Remove the battery from the charger and place the
rubber cover over the USB port.
BEFORE USE
Check the work area to make sure that it is clear of debris
and clutter.
Clear the area of unnecessary personnel. Ensure that
lighting and ventilation is adequate.
OPERATION
1. Installing the bit
Always follow the following procedure to install driver
bit. (Fig.9)
Driver bit
Hexagonal hole in the anvil
Guide sleeve
Movement
Fig. 9
(1) Pull the guide sleeve forward.
(2) Insert the bit into the hexagonal hole in the anvil.
(3) Release the guide sleeve and it returns to its origianl
position.
CAUTION
If the guide sleeve does not return to its original
position, then the bit is not installed properly.
2. Removing the bit
Please do the opposite point on the method of
installing bit.
3. Confi rm that the battery is mounted correctly.
4. Check the rotational direction.
The bit rotates clockwise (viewed from the rear side)
by pushing the R-side of the pushing button.
The L-side of the pushing button is pushed to
turn the bit counterclockwise (See Fig. 10).
(The
and marks are provided on the body.)
15
English
000WH18DBDL2metabo.indb15000WH18DBDL2metabo.indb152020/11/0610:24:352020/11/0610:24:35
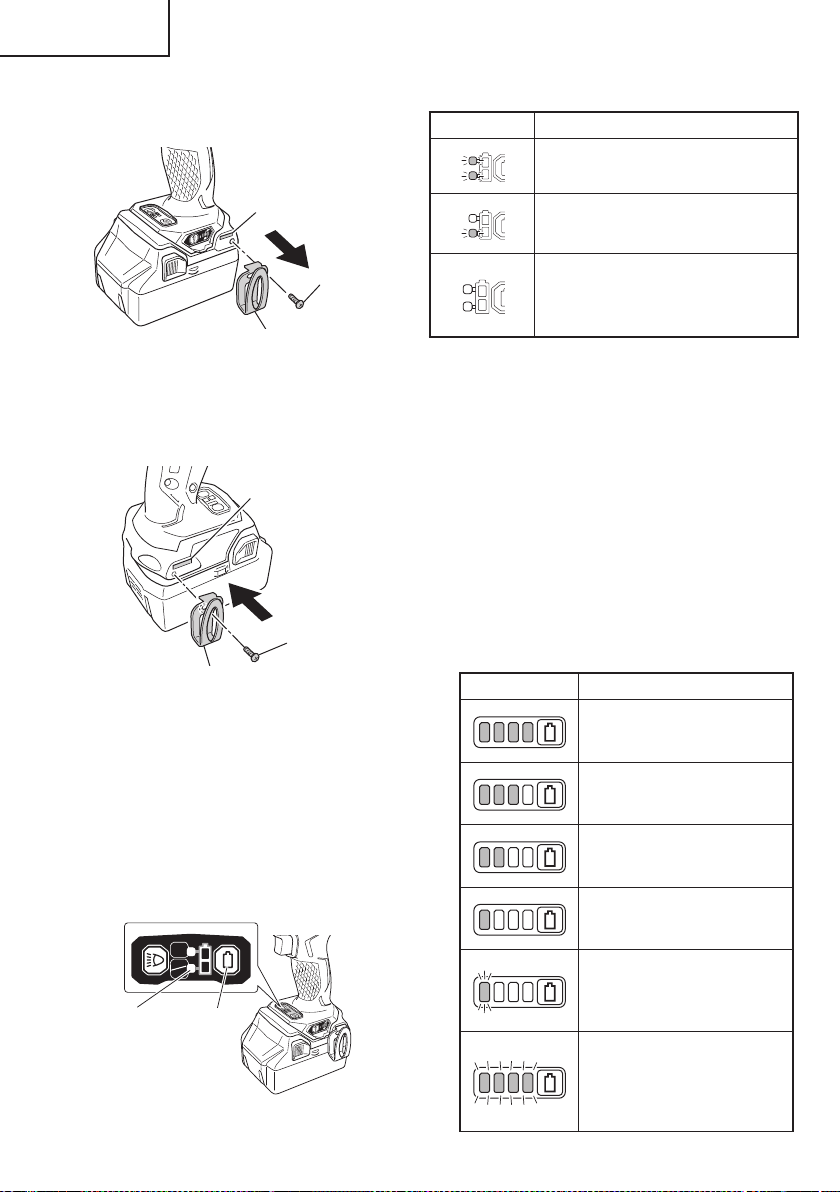
Table 6
State of lamp Battery Remaining Power
The battery remaining power is
enough.
The battery remaining power is a half.
The battery remaining power is nearly
empty.
Re-charge the battery soonest
possible.
As the remaining battery indicator shows somewhat
diff erently depending on ambient temperature and
battery characteristics, read it as a reference.
8. Remaining battery indicator
You can check the battery’s remaining capacity by
pressing the remaining battery indicator switch to light
the indicator lamp. (Fig. 14, Table 7)
The indicator will shut off approximately 3 seconds
after the remaining battery indicator switch is pressed.
It is best to use the remaining battery indicator as
a guide since there are slight diff erences such as
ambient temperature and the condition of the battery.
Also, the remaining battery indicator may vary from
those equipped to a tool or charger.
Table 7
State of lamp Battery Remaining Power
Lights ;
The battery remaining power is
over 75%
Lights ;
The battery remaining power is
50%–75%.
Lights ;
The battery remaining power is
25%–50%.
Lights ;
The battery remaining power is
less than 25%
Blinks ;
The battery remaining power
is nearly empty. Recharge the
battery soonest possible
Blinks ;
Output suspended due to high
temperature. Remove the
battery from the tool and allow it
to fully cool down.
(1) Removing the hook.
Remove the screws fi xing the hook with Philips screw
driver. (Fig. 11)
Hook
Screw
Groove
Fig. 11
(2) Replacing the hook and tightening the screws.
Install securely the hook in the groove of power
tool and tighten the screws to fi x the hook fi rmly.
(Fig. 12)
Screw
Hook
Groove
Fig. 12
7. About Remaining Battery Indicator
When pressing the remaining battery indicator switch,
the red indicator lamp lights and the battery remaining
power can be checked. (Fig. 13)
When releasing your fi nger from the remaining
battery indicator switch, the indicator lamp changes
indication of LED light mode. The Table 6 shows the
state of red indicator lamp and the battery remaining
power.
ON
ON
OFF
Remaining
battery
indicator
lamp
Remaining
battery
indicator
switch
Switch panel
Fig. 13
16
English
000WH18DBDL2metabo.indb16000WH18DBDL2metabo.indb162020/11/0610:24:362020/11/0610:24:36
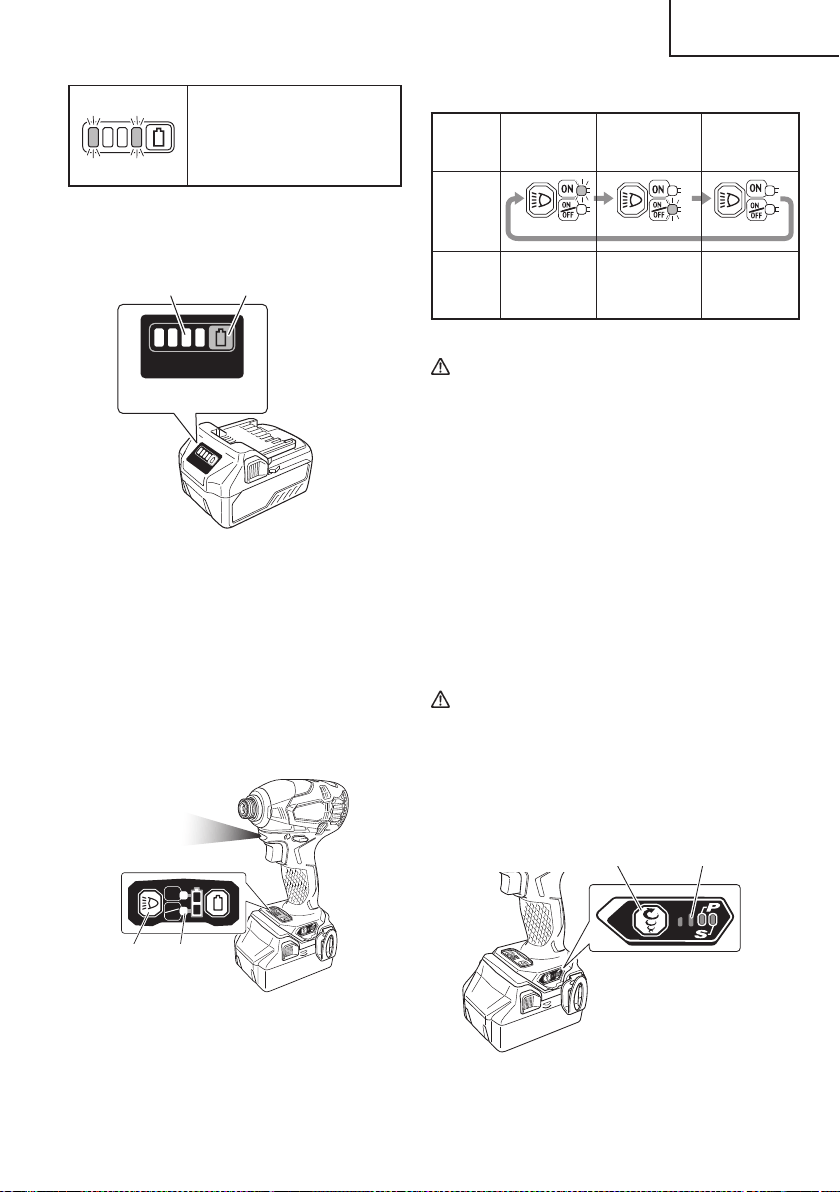
Blinks ;
Output suspended due to failure
or malfunction. The problem
may be the battery so please
contact your dealer.
As the remaining battery indicator shows somewhat
diff erently depending on ambient temperature and
battery characteristics, read it as a reference.
Display panel
Remaining battery
indicator lamp
Remaining battery
indicator switch
Fig. 14
NOTE
Do not give a strong shock to the switch panel or
break it. It may lead to a trouble.
9. How to use the LED light
By pressing the light selector switch on the switch
panel, the LED light mode changes as Table 8. It is
indicated by green lamp. (Fig. 15)
To prevent the battery power consumption, turn off the
LED light frequently.
ON
ON
OFF
Light
section
switch
Remaining
battery
indicator
lamp
Switch panel
Fig. 15
Table 8
Always-ON
mode
SW
interlocked
mode
Always-OFF
mode
Panel
display
State
Always ON
(turn off after
2 minutes)
Light only
SW-ON
Always OFF
CAUTION
●
Do not expose directly your eye to the light by
looking into the light.
If your eye is continuously exposed to the light,
your eye will be hurt.
●
Wipe off any dirt or grime attached to the lens of
the LED light with a soft cloth, being careful not
to scratch the lens.
Scratches on the lens of the LED light can result
in decreased brightness.
NOTE
To prevent the battery power consumption caused by
forgetting to turn off the LED light, the light goes off
automatically in about 2 minutes.
10. Tightening mode selector function (Fig. 16)
CAUTION
●
Do not subject the switch panel to shock or
damage.
●
Select tightening mode while the trigger switch
is released. Failure to do so could result in
malfunction.
Tightening mode
selector switch
Tightening
mode indicator
lamp
Fig. 16
17
English
000WH18DBDL2metabo.indb17000WH18DBDL2metabo.indb172020/11/0610:24:362020/11/0610:24:36
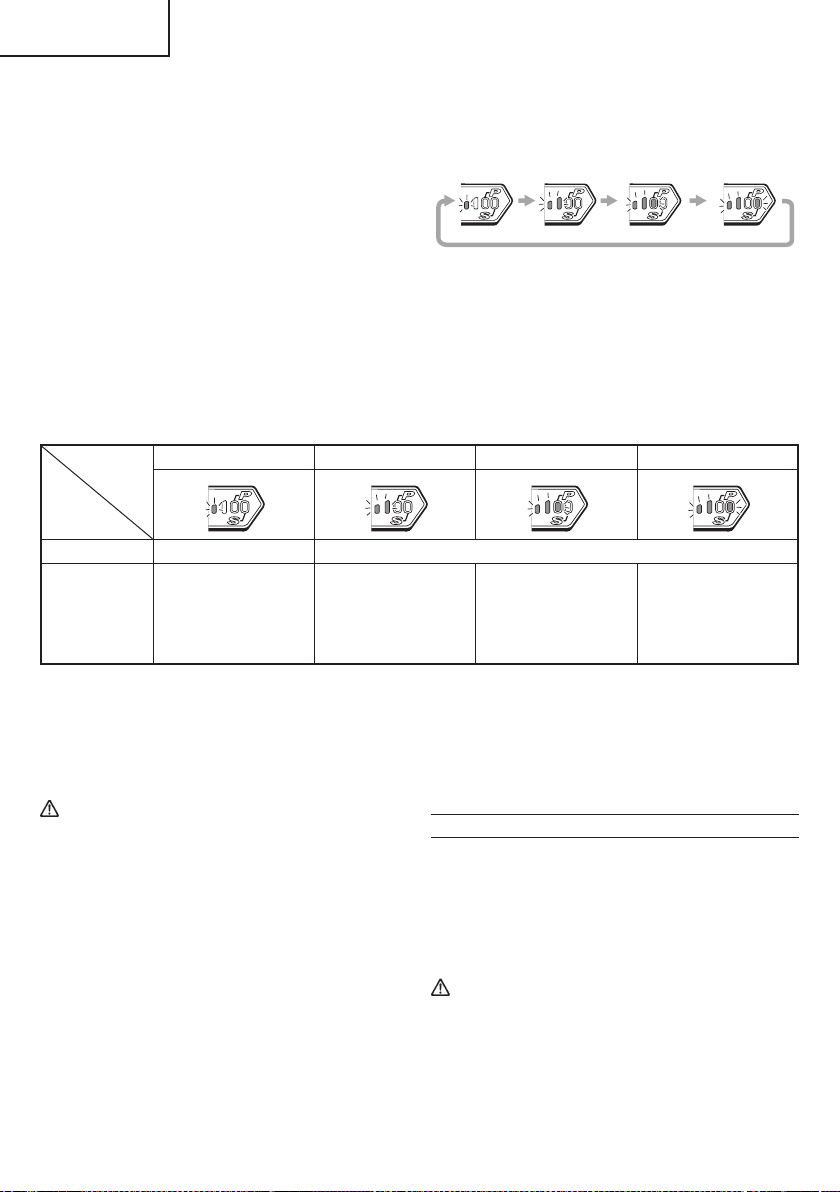
(1) Tightening mode selector switch
By using the Tightening mode selector switch on the side
of the tool body, the tightening torque can be adjusted
according to the type of work.
The Tightening mode switches between 4 diff erent modes
each time the Tightening mode selector switch is pressed.
Normal mode allows screws to be tightened smoothly and
gently.
Under normal circumstances, use Normal mode.
Power mode is suitable for heavy-load work that requires
more force, such as tightening long screws.
Use it when you feel that Normal mode lacks suffi cient
power.
Self-drilling screw mode is used for tightening self-
drilling Teks screws. This mode reduces the chances of
overtightening that could result in severing of the screw
head, breakage of the screw, or slippage.
NOTE
○
The appropriate mode diff ers depending on the screw
and the material being screwed. Drive in a few test
screws and adjust the mode setting accordingly.
○
The tightening mode selector switch can only be set
after the battery has been installed in the driver and
the trigger switch has been pulled once.
Examples of tightening mode selector function settings
Soft mode Normal mode Power mode Self drilling screw mode
Rotation speed 0–900 /min 0–2,900 /min
Use
“Delicate work”
Tightening small
diameter screws
(M6 or similar), etc.
“Normal work”
Tightening short
screws,
Affi xing plasterboard,
etc.
“Heavy load work”
Tightening long
screws, coach screws,
bolts, etc.
Self drilling screw
tightening
11. Tightening and loosening screws
Install the bit that matches the screw, line up the bit in
the grooves of the head of the screw, then tighten it.
Push the impact driver just enough to keep the bit
fi tting the head of the screw.
CAUTION
●
Applying the impact driver for too long tightens
the screw too much and can break it.
●
Tightening a screw with the impact driver at an
angle to that screw can damage the head of the
screw and the proper force will not be transmitted
to the screw. Tighten with this impact driver lined
up straight with the screw.
12. Tightening and loosening bolts
A hex. socket matching the bolt or nut must fi rst be
selected. Then mount the socket on the anvil, and grip
the nut to be tightened with the hex. socket. Holding
the tool in line with the bolt, press the power switch to
impact the nut for several seconds.
If the nut is only loosely fi tted to the bolt, the bolt
may turn with the nut, therefore mistaking proper
tightening. In this case, stop impact on the nut and
hold the bolt head with a wrench before restarting
impact, or manually tighten the bolt and nut to prevent
them slipping.
OPERATIONAL CAUTIONS
1. Resting the unit after continuous work
After use for continuous bolt-tightening work, rest the
unit for 15 minutes or so when replacing the battery.
The temperature of the motor, switch, etc., will rise
if the work is started again immediately after battery
replacement, eventually resulting in burnout.
CAUTION
Do not touch the metal parts, as it gets very hot
during continuous work.
18
English
000WH18DBDL2metabo.indb18000WH18DBDL2metabo.indb182020/11/0610:24:372020/11/0610:24:37

2. Cautions on use of the speed control switch
This switch has a built-in, electronic circuit which
steplessly varies the rotation speed. Consequently,
when the switch trigger is pulled only slightly (low
speed rotation) and the motor is stopped while
continuously driving in screws, the components of
the electronic circuit parts may overheat and be
damaged.
3. Use a tightening time suitable for the screw
The appropriate torque for a screw diff ers according
to the material and size of the screw, and the material
being screwed etc., so please use a tightening time
suitable for the screw. In particular, if a long tightening
time is used in the case of screws smaller than 5/16"
(M8), there is a danger of the screw breaking, so
please confi rm the tightening time and the tightening
torque beforehand.
4. Work at a tightening torque suitable for the bolt under
impact
The optimum tightening torque for nuts or bolts
diff ers with material and size of the nuts or bolts. An
excessively large tightening torque for a small bolt
may stretch or break the bolt. The tightening torque
increases in proportion to the operation time. Use the
correct operating time for the bolt.
5. Holding the tool
Hold the tool fi rmly with both hands. In this case hold
the tool in line with the screw or bolt.
It is not necessary to push the tool very hard. Hold the
tool with a force just suffi cient to counteract the impact
force.
6. Confi rm the tightening torque
The following factors contribute to a reduction of the
tightening torque. So confi rm the actual tightening
torque needed by screwing up some bolts before the
job with a hand torque wrench. Factors aff ecting the
tightening torque are as follows.
(1) Voltage
When the discharge margin is reached, voltage
decreases and tightening torque is lowered.
(2) Operating time
The tightening torque increases when the operating
time increases. But the tightening torque does not
increase above a certain value even if the tool is
driven for a long time.
(3) Diameter of bolt
The tightening torque diff ers with the diameter of the
bolt. Generally a larger diameter bolt requires larger
tightening torque.
(4) Tightening conditions
The tightening torque diff ers according to the torque
ratio; class, and length of bolts even when bolts with
the same size threads are used. The tightening torque
also diff ers according to the condition of the surface of
workpiece through which the bolts are to be tightened.
When the bolt and nut turn together, torque is greatly
reduced.
(5) Tightening torque varies, depending on the battery’s
charge level.
19
English
000WH18DBDL2metabo.indb19000WH18DBDL2metabo.indb192020/11/0610:24:382020/11/0610:24:38
MAINTENANCE AND INSPECTION
CAUTION:
Pull out battery before doing any inspection or maintenance.
1. Checking the condition of the bit
The bits should be checked regularly. If worn or
broken bits can slip or decrease the effi ciency of the
motor and burn it out.
Replace worn bits with new ones.
CAUTION
If you use a driver bit of which point is worn or
broken, it will be dangerous since it slips. So
replace it with a new one.
2. Check the Screws
Loose screws are dangerous. Regularly inspect them
and make sure they are tight.
CAUTION
Using this power tool with loosened, screws is
extremely dangerous.
3. Maintenance of the motor
The motor unit winding is the very “heart” of the power
tool.
Exercise due care to ensure the winding does not
become damaged and/or wet with oil or water.
4. Check for Dust
Dust may be removed with a soft cloth or a cloth
dampened with soapy water.
Do not use bleach, chlorine, gasoline or thinner, for
they may damage the plastics.
5. Disposal of the exhausted battery
WARNING
Do not dispose of the exhausted battery. The
battery must explode if it is incinerated. The
product that you have purchased contains a
rechargeable battery. The battery is recyclable.
At the end of it’s useful life, under various state
and local laws, it may be illegal to dispose of this
battery into the municipal waste stream. Check
with your local solid waste offi cials for details
in your area for recycling options or proper
disposal.
6. Storage
Storing in a place below 104°F (40°C) and out of the
reach of children.
NOTE
Storing lithium-ion batteries
Make sure the lithium-ion batteries have been fully
charged before storing them.
Prolonged storage (3 months or more) of batteries with
a low charge may result in performance deterioration,
signifi cantly reducing battery usage time or rendering
the batteries incapable of holding a charge.
However, signifi cantly reduced battery usage time
may be recovered by repeatedly charging and using
the batteries two to fi ve times.
If the battery usage time is extremely short despite
repeated charging and use, consider the batteries
dead and purchase new batteries.
7. Service and repairs
All quality power tools will eventually require
servicing or replacement of parts because of wear
from normal use. To assure that only authorized
replacement parts will be used, all service and
repairs must be performed by a metabo HPT
AUTHORIZED SERVICE CENTER, ONLY.
CAUTION
In the operation and maintenance of power tools,
the safety regulations and standards prescribed
in each country must be observed.
Important notice on the batteries for the
metabo HPT cordless power tools
Please always use one of our designated genuine
batteries. We cannot guarantee the safety and
performance of our cordless power tool when used
with batteries other than these designated by us, or
when the battery is disassembled and modifi ed (such
as disassembly and replacement of cells or other
internal parts).
20
English
000WH18DBDL2metabo.indb20000WH18DBDL2metabo.indb202020/11/0610:24:382020/11/0610:24:38

TROUBLESHOOTING GUIDE
WARNING
●
To avoid injury from an accidental start, turn the switch OFF and remove the plug from the power source
or remove the battery from the main body before making any adjustments.
●
All electrical or mechanical repairs should be done only by qualifi ed service technicians. Contact
metabo HPT Authorized Service Center.
Problem Possible Cause Possible Solution
Tool doesn’t run No remaining battery power Charge the battery.
The trigger switch was held down while
the battery was inserted.
The safety function was activated.
If the trigger switch is released once and
then pulled again, the tool will run.
Tool suddenly stopped Tool was overburdened Get rid of the problem causing the
overburden.
The battery is overheated. Let the battery cool down.
The trigger switch was held down for 5
minutes or more.
This is not a malfunction.
The motor was automatically stopped to
prevent failure of the tool.
Tool bits
-can’t be attached
-fall off
The shape of the attachment portion
doesn’t match
Use a bit with a hexagonal shaft that has a
width across fl ats of 6.35 mm.
If you are using an L-type tool bit, replace it
with an S-type bit.
Switch can’t be pulled Forward/reverse selector button is
positioned halfway
Press the button fi rmly into position for the
desired direction of rotation.
An abnormal high-pitched
noise occurs when the
trigger switch is pulled.
The trigger switch is being pulled only
slightly.
This is not a malfunction.
It does not occur if the trigger switch is
pulled more fully.
Screw head slips or comes
loose.
Bit number doesn’t match with the screw
size
Install a suitable bit.
The bit is worn Replace with a new bit.
<UC18YFSL>
The pilot lamp is rapidly
fl ickers red, and battery
charging doesn’t begin.
<UC18YSL3>
The charge indicator lamp is
rapidly blinking purple, and
battery charging doesn’t
begin.
The battery is not inserted all the way. Insert the battery fi rmly.
There is foreign matter in the battery
terminal or where the battery is attached.
Remove the foreign matter.
21
English
000WH18DBDL2metabo.indb21000WH18DBDL2metabo.indb212020/11/0610:24:382020/11/0610:24:38

Problem Possible Cause Possible Solution
<UC18YFSL>
The pilot lamp blinks red,
and battery charging
doesn’t begin.
<UC18YSL3>
The charge indicator lamp
blinks red, and battery
charging doesn’t begin.
The battery is not inserted all the way. Insert the battery fi rmly.
The battery is overheated. If left alone, the battery will automatically
begin charging if its temperature
decreases, but this may reduce battery
life. It is recommended that the battery be
cooled in a well-ventilated location away
from direct sunlight before charging it.
Battery usage time is short
even though the battery is
fully charged.
The battery’s life is depleted. Replace the battery with a new one.
The battery takes a long
time to charge.
The temperature of the battery, the
charger, or the surrounding environment
is extremely low.
Charge the battery indoors or in another
warmer environment.
The charger’s vents are blocked, causing
its internal components to overheat.
Avoid blocking the vents.
The cooling fan is not running. Contact a metabo HPT Authorized Service
Center for repairs.
<UC18YSL3 only>
The USB power lamp
has switched off and the
USB device has stopped
charging.
The battery’s capacity has become low. Replace the battery with one that has
capacity remaining.
Plug the charger’s power plug into an
electric socket.
USB power lamp does not
switch off even though the
USB device has fi nished
charging.
The USB power lamp lights up green to
indicate that USB charging is possible.
This is not a malfunction.
It is unclear what the
charging status of a USB
device is, or whether its
charging is complete.
The USB power lamp does not switch off
even when charging is complete.
Examine the USB device that is charging
to confi rm its charging status.
Charging of a USB device
pauses midway.
The charger was plugged into an
electrical socket while the USB device
was being charged using the battery as
the power source.
This is not a malfunction.
The charger pauses USB charging for
about 5 seconds when it is diff erentiating
between power sources.
A battery was inserted into the charger
while the USB device was being charged
using a power socket as the power
source.
Charging of the USB device
pauses midway when the
battery and the USB device
are being charged at the
same time.
The battery has become fully charged. This is not a malfunction.
The charger pauses USB charging for
about 5 seconds while it checks whether
the battery has successfully completed
charging.
22
English
000WH18DBDL2metabo.indb22000WH18DBDL2metabo.indb222020/11/0610:24:382020/11/0610:24:38
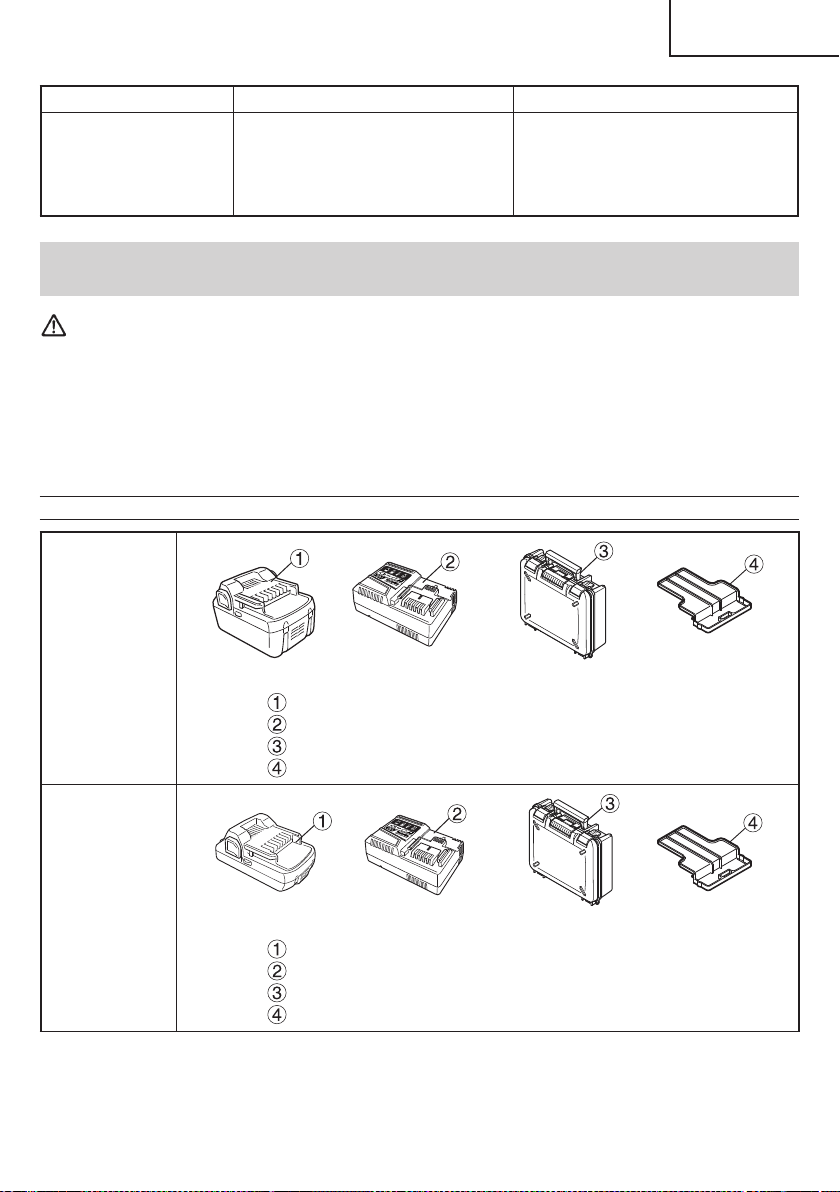
Problem Possible Cause Possible Solution
Charging of the USB device
doesn’t start when the
battery and the USB device
are being charged at the
same time.
The remaining battery capacity is
extremely low.
This is not a malfunction.
When the battery capacity reaches a
certain level, USB charging automatically
begins.
ACCESSORIES
WARNING
ALWAYS use Only authorized metabo HPT replacement parts and accessories. Never use replacement
parts or accessories which are not intended for use with this tool. Contact metabo HPT if you are not sure
whether it is safe to use a particular replacement part or accessory with your tool.
The use of any other attachment or accessory can be dangerous and could cause injury or mechanical
damage.
NOTE
Accessories are subject to change without any obligation on the part of the metabo HPT.
STANDARD ACCESSORIES
WH18DBDL2
(2LYCK)
Battery (BSL1860) ................................................................................. 2
Battery Charger (UC18YSL3) ................................................................ 1
Plastic Case (Code No. 370700) ........................................................... 1
Battery cover (Code No. 329897) ......................................................... 1
WH18DBDL2
(2LSCK)
Battery (BSL1830C) .............................................................................. 2
Battery Charger (UC18YSL3) ................................................................ 1
Plastic Case (Code No. 370700) ........................................................... 1
Battery cover (Code No. 329897) ......................................................... 1
23
English
000WH18DBDL2metabo.indb23000WH18DBDL2metabo.indb232020/11/0610:24:382020/11/0610:24:38
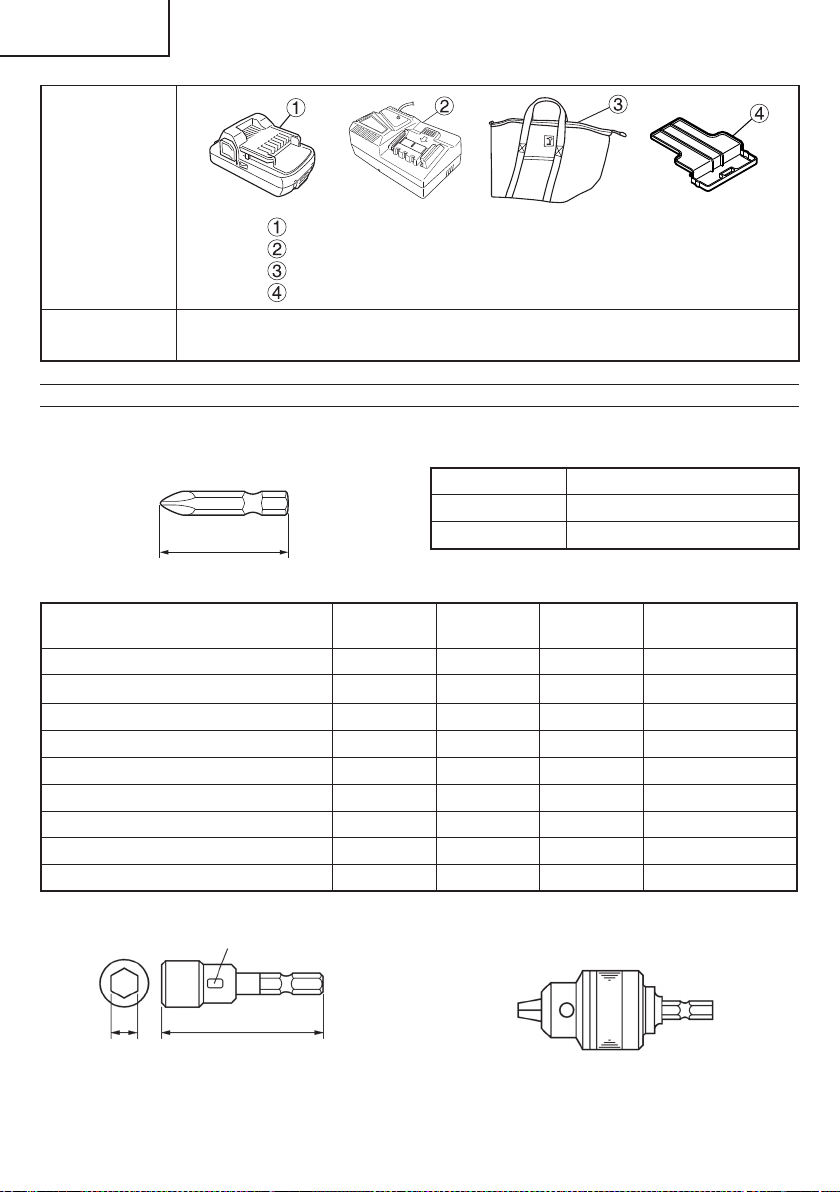
WH18DBDL2
(2LERX)
Battery (BSL1815) ................................................................................. 2
Battery Charger (UC18YFSL)................................................................ 1
Bag (Code No. 375801M) ...................................................................... 1
Battery cover (Code No. 329897) ......................................................... 1
WH18DBDL2
(NN)
Battery, battery charger, plastic case and battery cover are not contained.
OPTIONAL ACCESSORIES.....sold separately
3. Hexagonal socket
Part Name
Engraved
characters
LBCode No.
4 mm Hexagonal socket 7 65 7 992689
5 mm Hexagonal socket 8 65 8 996177
6 mm Hexagonal socket 10 65 10 985329
5/16" Hexagonal socket 12 65 12 996178
8 mm Hexagonal socket 13 65 13 996179
10 mm Hexagonal socket (small type) 14 65 14 996180
10 mm Hexagonal socket 16 65 16 996181
10 mm Hexagonal socket 17 65 17 996182
1/2" Hexagonal long socket 21 166 21 996197
1. Battery (BSL1860 / BSL36A18 / BSL1830C / BSL1815)
2. Phillips bit
2"(50 mm)
Bit No. Code No.
No.2 992671
No.3 992672
B
L
Engraved characters
4. Drill chuck adapter set: Code No. 321823
Use the drill available on the market.
NOTE
Specifi cations are subject to change without any
obligation on the part of the metabo HPT.
24
English
000WH18DBDL2metabo.indb24000WH18DBDL2metabo.indb242020/11/0610:24:392020/11/0610:24:39
English Deutsch Français
1
Switch Schalter Interrupteur
2
LED Torchlight LED-Laterne Projecteur LED
3
LED Worklight LED-Arbeitsleuchte Lampe de chantier LED
4
Battery (sold separately) Akku (separat erhältlich)
Batterie
(vendue séparément)
5
Latch Sperre Verrou
6
Hook Haken Crochet
7
Strap hook Bandhaken Crochet pour sangle
Symbols
WARNING
The following show
symbols used for the
machine. Be sure that you
understand their meaning
before use.
Symbole
WARNUNG
Die folgenden Symbole
werden für diese Maschine
verwendet. Achten Sie
darauf, diese vor der
Verwendung zu verstehen.
Symboles
AVERTISSEMENT
Les symboles suivants
sont utilisés pour l’outil.
Bien se familiariser avec
leur signifi cation avant
d’utiliser l’outil.
To reduce the risk of
injury, user must read
instruction manual.
Failure to follow the
warnings and instructions
may result in electric
shock, fi re and/or serious
injury.
Der Anwender muss die
Bedienungsanleitung
lesen, um das Risiko
einer Verletzung zu
verringern.
Wenn die Warnungen
und Anweisungen nicht
befolgt werden, kann es
zu Stromschlag, Brand
und/oder ernsthaften
Verletzungen kommen.
Pour réduire les
risques de blessures,
l’utilisateur doit lire le
manuel d’utilisation.
Tout manquement à observer
ces avertissements et
instructions peut engendrer
des chocs électriques,
des incendies et/ou des
blessures graves.
Only for EU countries
Do not dispose of electric tools
together with household waste
material!
In observance of European
Directive 2012/19/EU
on waste electrical and
electronic equipment and its
implementation in accordance
with national law, electric tools
that have reached the end
of their life must be collected
separately and returned to an
environmentally compatible
recycling facility.
Nur für EU-Länder
Werfen Sie Elektrowerkzeuge
nicht in den Hausmüll!
Gemäss Europäischer
Richtlinie 2012/19/EU über
Elektro- und Elektronik-
Altgeräte und Umsetzung
in nationales Recht müssen
verbrauchte Elektrowerkzeuge
getrennt gesammelt und
einer umweltgerechten
Wiederververtung zugeführt
werden.
Pour les pays européens
uniquement
Ne pas jeter les appareils
électriques dans les ordures
ménagères!
Conformément à la directive
européenne 2012/19/UE relative
aux déchets d’équipements
électriques ou électroniques
(DEEE), et à sa transposition
dans la législation nationale, les
appareils électriques doivent être
collectés à part et être soumis
à un recyclage respectueux de
l’environnement.
UB 18DJL
Italiano Nederlands Español
1
Interruttore Schakelaar Interruptor
2
Torcia a LED LED-lantaarn Linterna LED
3
Lampada da lavoro a LED LED-werklamp Linterna de trabajo LED
4
Batteria
(venduta separatamente)
Batterij (los verkrijgbaar)
Batería
(se vende por separado)
5
Fermo Klepje Seguro
6
Gancio Haak Gancho
7
Gancio per cinturino Riemhaak Gancho de cinta
Simboli
AVVERTENZA
Di seguito mostriamo i
simboli usati per la macchina.
Assicurarsi di comprenderne
il signifi cato prima dell’uso.
Symbolen
WAARSCHUWING
Hieronder staan
symbolen afgebeeld die
van toepassing zijn op
deze machine. U moet
de betekenis hiervan
begrijpen voor gebruik.
Símbolos
ADVERTENCIA
A continuación se
muestran los símbolos
usados para la máquina.
Asegúrese de comprender
su signifi cado antes del
uso.
Per ridurre il rischio di
lesioni, l’utente deve
leggere il manuale delle
istruzioni.
La mancata osservanza
degli avvertimenti e delle
istruzioni potrebbe essere
causa di scosse elettriche,
incendi e/o gravi lesioni.
Om het risico op
verwondingen te
verminderen, moet
de gebruiker de
instructiehandleiding lezen.
Nalating om de
waarschuwingen en
instructies op te volgen
kan in een elektrische
schok, brand en/of ernstig
letsel resulteren.
Para reducir el riesgo
de lesiones, el usuario
deberá leer el manual
de instrucciones.
Si no se siguen
las advertencias e
instrucciones, podría
producirse una descarga
eléctrica, un incendio y/o
daños graves.
Solo per Paesi UE
Non gettare le apparecchiature
elettriche tra i rifi uti domestici.
Secondo la Direttiva Europea
2012/19/UE sui rifi uti di
apparecchiature elettriche ed
elettroniche e la sua attuazione
in conformità alle norme
nazionali, le apparecchiature
elettriche esauste devono essere
raccolte separatamente, al fi ne
di essere reimpiegate in modo
eco-compatibile.
Alleen voor EU-landen
Geef elektrisch
gereedschap niet met het
huisvuil mee!
Volgens de Europese
richtlijn 2012/19/EU
inzake oude elektrische en
elektronische apparaten
en de toepassing daarvan
binnen de nationale
wetgeving, dient gebruikt
elektrisch gereedschap
gescheiden te worden
ingezameld en te worden
afgevoerd naar een
recycle bedrijf dat voldoet
aan de geldende milieu-
eisen.
Sólo para países de la Unión
Europea
¡No deseche los aparatos
eléctricos junto con los residuos
domésticos!
De conformidad con la Directiva
Europea 2012/19/UE sobre
residuos de aparatos eléctricos
y electrónicos y su aplicación
de acuerdo con la legislación
nacional, las herramientas
eléctricas cuya vida útil haya
llegado a su fi n se deberán
recoger por separado y trasladar
a una planta de reciclaje que
cumpla con las exigencias
ecológicas.
Svenska Dansk Norsk
1
Brytare Kontakt Bryter
2
LED-fi cklampa LED-lygte LED-lykt
3
LED-arbetslampa LED-arbejdslygte LED-arbeidslys
4
Batteri (säljs separat) Batteri (sælges separat) Batteri (selges separat)
5
Låsning Holdemekanisme Sperrehake
6
Hake Krog Krok
7
Remhake Krog til rem Stroppkrok
Symboler
VARNING
Nedan visas de symboler
som används för
maskinen. Se till att du
förstår vad de betyder
innan verktyget används.
Symboler
ADVARSEL
Det følgende viser symboler,
som anvendes for maskinen.
Vær sikker på, at du forstår
deres betydning, inden du
begynder at bruge maskinen.
Symboler
ADVARSEL
Følgende symboler brukes
for maskinen. Sørg for
å forstå betydningen
av disse symbolene før
maskinen tas i bruk.
Användaren måste läsa
bruksanvisningen för
att minska risken för
personskador.
Underlåtenhet att
följa varningarna och
instruktionerna nedan kan
resultera i elstötar, brand
och/eller allvarliga skador.
Brugeren skal læse
betjeningsvejledningen
for at mindske risikoen
for skader.
Det kan medføre elektrisk
stød, brand og/eller
alvorlig personskade,
hvis alle advarslerne og
instruktionerne nedenfor
ikke overholdes.
For å minske faren for
skade må brukeren lese
instruksjonsboken.
Hvis du ikke følger alle
advarsler og instruksjoner
kan bruk av utstyret
resultere i elektrisk støt,
brann og/eller alvorlig
personskade.
Gäller endast EU-länder
Elektriska verktyg får inte
kastas i hushållssoporna!
Enligt direktivet 2012/19/
EU som avser äldre
elektrisk och elektronisk
utrustning och dess
tillämpning enligt nationell
lagstiftning ska uttjänta
elektriska verktyg sorteras
separat och lämnas till
miljövänlig återvinning.
Kun for EU-lande
Elværktøj må ikke
bortskaff es som
almindeligt aff ald!
I henhold til det
europæiske direktiv
2012/19/EU om
bortskaff else af elektriske
og elektroniske produkter
og gældende national
lovgivning skal brugt
elværktøj indsamles
separat og bortskaff es
på en måde, der skåner
miljøet mest muligt.
Kun for EU-land
Kast aldri elektroverktøy i
husholdningsavfallet!
I henhold til EU-direktiv
2012/19/EU om kasserte
elektriske og elektroniske
produkter og direktivets
iverksetting i nasjonal
rett, må elektroverktøy
som ikke lenger
skal brukes, samles
separat og returneres
til et miljøvennlig
gjenvinningsanlegg.
Suomi Polski Magyar
1
Katkaisin Przełącznik Kapcsoló
2
LED-valonheitin Latarka LED LED Lámpa
3
LED-työvalo Światło LED LED Munkalámpa
4
Akku (myydään erikseen)
Bateria
(sprzedawana oddzielnie)
Akkumulátor
(külön megvásárolható)
5
Salpa Zapadka Retesz
6
Koukku Zaczep Kampó
7
Hihnakoukku Zaczep na pasek Szíj kampó
Symbolit
VAROITUS
Seuraavassa on näytetty
koneessa käytetyt
symbolit. Varmista,
että ymmärrät niiden
merkityksen ennen kuin
aloitat koneen käytön.
Symbole
OSTRZEŻENIE
Następujące oznaczenia
to symbole używane w
instrukcji obsługi maszyny.
Upewnij się, że rozumiesz
ich znaczenie zanim
użyjesz narzędzia.
Jelölések
FIGYELEM
Az alábbiakban a géphez
alkalmazott jelölések
vannak felsorolva. A gép
használata előtt feltétlenül
ismerje meg ezeket a
jelöléseket.
Loukkaantumisriskin
vähentämiseksi
käyttäjän on luettava
käyttöopas.
Jos varoituksia ja ohjeita
ei noudateta, on olemassa
sähköiskun, tulipalon ja/tai
vakavan henkilövahingon
vaara.
Aby zmniejszyć ryzyko
odniesienia obrażeń,
użytkownik powinien
przeczytać instrukcję
obsługi.
Nieprzestrzeganie
ostrzeżeń oraz wskazówek
bezpieczeństwa może
spowodować porażenie
prądem elektrycznym, pożar
i/lub odniesienie poważnych
obrażeń.
A sérülések
kockázatának
csökkentése érdekében,
a használónak el kell
olvasnia a használati
útmutatót.
A fi gyelmeztetések
és utasítások be nem
tartása áramütést, tüzet
és/vagy súlyos sérülést
eredményezhet.
Koskee vain EU-maita
Älä hävitä sähkötyökalua
tavallisen kotitalousjätteen
mukana!
Vanhoja sähkö- ja
elektroniikkalaitteita
koskevan EU-direktiivin
2012/19/EU ja sen
maakohtaisten
sovellusten mukaisesti
käytetyt sähkötyökalut
on toimitettava
ongelmajätteen
keräyspisteeseen
ja ohjattava
ympäristöystävälliseen
kierrätykseen.
Dotyczy tylko państw UE
Nie wyrzucaj
elektronarzędzi wraz z
odpadami z gospodarstwa
domowego!
Zgodnie z Europejską
Dyrektywą 2012/19/UE w
sprawie zużytego sprzętu
elektrotechnicznego i
elektronicznego oraz
dostosowaniem jej
do prawa krajowego,
zużyte elektronarzędzia
należy posegregować
i zutylizować w sposób
przyjazny dla środowiska.
Csak EU-országok
számára Az elektromos
kéziszerszámokat
ne dobja a háztartási
szemétbe!
A használt villamos és
elektronikai készülékekről
szóló 2012/19/EU irányelv
és annak a nemzeti jogba
való átültetése szerint az
elhasznált elektromos
kéziszerszámokat
külön kell gyűjteni, és
környezetbarát módon
újra kell hasznosítani.
Türkçe Pyccкий
1
Anahtar Переключатель
2
LED El Feneri Светодиодный фонарь
3
LED Işıldak
Светодиодный
аккумуляторный фонарь
4
Pil (ayrı olarak satılır)
Батарея
(
приобретается отдельно
)
5
Mandal Защелка
6
Kanca Крюк
7
Kayış kancası Крюк для ремня
Simgeler
DİKKAT
Aşağıda, bu alet için
kullanılan simgeler
gösterilmiştir. Aleti
kullanmadan önce bu
simgelerin ne anlama
geldiğini anladığınızdan
emin olun.
Символы
ПРЕДУПРЕЖДЕНИЕ
Ниже приведены
символы, используемые
для машины. Перед
началом работы
обязательно убедитесь
в том, что Вы понимаете
их значение.
Kullanıcı yaralanma
riskini azaltmak için
kullanım kılavuzunu
okumalıdır.
Uyarılara ve talimatlara
uyulmaması elektrik
çarpmasına, yangına ve/
veya ciddi yaralanmaya
neden olabilir.
Чтобы уменьшить
опасность получения травм,
пользователь должен
прочитать руководство по
эксплуатации.
Не выполнение правил
и инструкций может
привести к поражению
электрическим током,
пожару и/или серьезной
травме.
Sadece AB ülkeleri için
Elektrikli el aletlerini evdeki
çöp kutusuna atmayınız!
Kullanılmış elektrikli aletleri,
elektrik ve elektronikli eski
cihazlar hakkındaki 2012/19/
AB Avrupa yönergelerine
göre ve bu yönergeler
ulusal hukuk kurallarına
göre uyarlanarak, ayrı
olarak toplanmalı ve çevre
şartlarına uygun bir şekilde
tekrar değerlendirmeye
gönderilmelidir.
Только для стран
ЕС Не выкидывайте
электроприборы вместе с
обоычным мусором!
В соответствии с
европейской директивой
2012/19/ЕС об утилизации
старых электрических и
электронных приборов и в
соответствии с местными
законами электроприборы,
бывщие в
эксплуатации,
должны утилизовываться
отдельно безопасным
для окружающей среды
способом.
English
CORDLESS WORK LIGHT UB18DJL INSTRUCTION MANUAL
WARNING:
●
Be careful of electrical shock.
●
When not in use or during inspection and maintenance,
be sure to turn the switch OFF on the unit, and remove the
battery from it.
●
Do not cover the work light with cloth, cardboards or other
materials when the light is on. Doing so may result in fi re.
CAUTION:
●
Do not use any other than the specifi ed batteries.
●
Possibly hazardous optical radiation emitted from this
product. Do not stare at operating lamp. May be harmful to
the eye.
●
The LED cover will remain at a high temperature when
alight and immediately after use, so do not touch it.
●
Be sure to turn the switch OFF when not using.
●
Do not expose the work light to rain.
●
Do not shock or disassemble the work light.
●
Do not allow the work light to contact gasoline, thinner etc.
●
Do not leave the work light in a car or the like that tends to
be exposed to be searching heat of the sun (above 50 °C).
Otherwise, troubles can result.
SPECIFICATIONS
LED Torchlight / Worklight 3 W
×
1 pc. / 0.5 W
×
12 pcs.
Dimensions (without battery) 78 mm (width)
×
205 mm (length)
×
108 mm (height)
Weight (without battery) 0.3 kg
Battery 18 V 14.4 V
BSL1850 BSL1840 BSL1825 BSL1450 BSL1440 BSL1425
Torchlight (h)
43 35 22 37 30 18
Worklight [High/Medium/Low] mode
(h)
16 / 30 / 51 13 / 24 / 41 8 / 15 / 26 15 / 28 / 49 12 / 23 / 39 8 / 14 / 25
Operating time (Approx.): Using full charged battery
Please refer to (Fig. 8) for batteries that can be used.
HOW TO USE
1. Battery insert/removal: Insert the battery in direction A until
it clicks. To remove, extract it in direction B while holding
down the latch. (Fig. 3)
2. Each press of the switch will cycle the light through
“Torchlight”, “Worklight (High)”, “Worklight (Medium)”,
“Worklight (Low)” and “Off ”.
3. As shown in (Fig. 4), the facing of the worklight portion can
be changed. Move the worklight portion by hand to point
the light in a desired direction.
4. Use either the storage hook (Fig. 5) or strap hook (Fig. 6)
when hanging the unit from a pipe.
CAUTION:
●
Use cord or a similar article to fi x the unit in place to prevent
it from falling.
●
When battery power is low, the battery protection function
will switch the light off . For torchlight, the light will dim and
go out. For worklight, the light will fi rst switch over to single
LED illumination, and then go out (Fig. 7).
●
Please remove battery if the unit will not be used for a long
period of time.
NOTE
: Make sure the instruction manuals supplied with the
separately-purchased chargers and batteries are
read thoroughly prior to use.
GUARANTEE
We guarantee metabo HPT Power Tools in accordance with
statutory/country specifi c regulation. This guarantee does not
cover defects or damage due to misuse, abuse, or normal wear
and tear. In case of complaint, please send the Power Tool,
undismantled, with the GUARANTEE CERTIFICATE found at
the end of this Handling instruction, to a metabo HPT Authorized
Service Center.
NOTE:
The specifi cations herein are subject to change
without prior notice.
Deutsch
AKKU-LED-LAMPE UB18DJL BEDIENUNGSANLEITUNG
WARNUNG:
●
Vorsicht, Stromschlaggefahr.
●
Das Gerät, wenn es nicht in Gebrauch ist, oder bei
Inspektion und Wartung, unbedingt immer AUSSCHALTEN
und die Batterie aus ihm herausnehmen.
●
Bedecken Sie die Arbeitslampe nicht mit einem
Kleidungsstück, Karton, oder anderem Material, wenn das
Licht eingeschaltet ist. Dies könnte zu einem Brand führen.
ACHTUNG:
●
Benutzen Sie ausschließlich nur die angegebenen Akkus.
●
Dieses Produkt sendet eine möglicherweise gefährliche
optische Strahlung aus. Starren Sie nicht in die
Betriebslampe. Das kann für das Auge schädlich sein.
●
Das LED-Gehäuse hat bei Betrieb der Lampe und
unmittelbar nach Gebrauch eine hohe Temperatur, Daher
nicht berühren.
●
Schalten Sie die Laterne immer aus (OFF), wenn Sie sie
nicht brauchen.
●
Die Arbeitslampe keinem Regen aussetzen.
●
Die Arbeitslampe keinen Stößen aussetzen und nicht
zerlegen.
●
Die Arbeitslampe nicht in Berührung mit Benzin, Verdünner usw.
kommen lassen.
●
Die Arbeitslampe nicht in einem Auto o.ä. lassen, wo sie
sengender Sonnenhitze (über 50 Grad C) ausgesetzt sein
könnte. Andernfalls kann es zu Problemen kommen.
TECHNISCHE DATEN
LED Laterne / Arbeitsleuchte 3 W
×
1 Stk. / 0,5 W
×
12 Stk.
Abmessungen (ohne Akku) 78 mm (Breite)
×
205 mm (Länge)
×
108 mm (Höhe)
Gewicht (ohne Akku) 0,3 kg
Akku 18 V 14,4 V
BSL1850 BSL1840 BSL1825 BSL1450 BSL1440 BSL1425
Laterne (h)
43 35 22 37 30 18
Arbeitsleuchte
[Hoch/Mittel/Niedrig]-Modus
(h)
16 / 30 / 51 13 / 24 / 41 8 / 15 / 26 15 / 28 / 49 12 / 23 / 39 8 / 14 / 25
Betriebszeit (ca.): mit voll geladenem Akku
Für Akkus, die benutzt werden können, bitte siehe (Abb. 8).
VERWENDUNG
1. Ersetzen oder Entnehmen des Akkus: Legen Sie den Akku
in Richtung A ein, bis er einrastet. Zum Entnehmen ziehen
Sie ihn in Richtung B heraus, dabei halten Sie die Sperre
gedrückt. (Abb. 3)
2. Jedes Betätigen des Schalters schaltet das Licht zyklisch
um auf “Laterne”, “Arbeitslampe (Hoch)”, “Arbeitslampe
(Mittel)”, “Arbeitslampe (Niedrig)” und “Aus”.
3. Wie in (Abb. 4) gezeigt lässt sich die Richtung der
Arbeitslampe verstellen. Bewegen Sie den Arbeitslampenteil
von Hand, so dass er in die gewünschte Richtung zeigt.
4. Benutzen Sie entweder den Aufhängehaken (Abb. 5)
oder den Bandhaken (Abb. 6), wenn Sie das Gerät an ein
Rohr hängen wollen.
VORSICHT:
●
Eine Schnur oder Ähnliches benutzen, um das Gerät zu
befestigen, so dass es nicht zu Boden fallen kann.
●
Wenn der Ladestand der Batterie niedrig ist, schaltet die
Akku-Schutzfunktion das Licht aus. Bei der Laterne wird
das Licht zuerst schwächer und geht dann aus. Bei der
Arbeitslampe schaltet das Licht zuerst auf Beleuchtung mit
einem einzigen LED um und geht dann aus (Abb. 7).
●
Bitte nehmen Sie die Batterie heraus, wenn das Gerät über
einen längeren Zeitraum nicht benutzt werden wird.
HINWEIS
: Die mit separat gekauften Ladegeräten und
Akkus mitgelieferten Gebrauchsanleitungen
unbedingt vor Gebrauch durchlesen.
GARANTIE
Auf metabo HPT-Elektrowerkzeuge gewähren wir eine Garantie
unter Zugrundelegung der jeweils geltenden gesetzlichen und
landesspezifi schen Bedingungen. Dieses Garantie erstreckt
sich nicht auf Gehäusedefekte und nicht auf Schäden, die auf
Missbrauch, bestimmungswidrigen Einsatz oder normalen
Verschleiß zurückzuführen sind. Im Schadensfall senden
Sie das nicht zerlegte Elektrowerkzeug zusammen mit dem
GARANTIESCHEIN, den Sie am Ende der Bedienungsanleitung
fi nden, an ein von metabo HPT autorisiertes Servicecenter.
HINWEIS:
Die hier gegebenen Spezifi kationen können
ohne Vorankündigung Änderungen unterliegen.
Français
MODE D’EMPLOI DU LAMPE DE CHANTIER SANS-FIL UB18DJL
AVERTISSEMENT:
●
Veillez à éviter les chocs électriques
●
Vérifi ez que l’interrupteur est sur OFF et veillez à retirer la
batterie lorsque l’unité n’est pas utilisée ainsi que lors des
opérations de contrôle ou de maintenance.
●
Ne pas couvrir la lampe de chantier avec un tissu, du
carton ou tout autre matériau lorsqu’elle est allumée. Vous
risquez sinon de provoquer un incendie.
ATTENTION:
●
N’utilisez pas de batteries autres que celles spécifi ées.
●
Des rayonnements optiques dangereux peuvent être
émis par ce produit. Ne pas regarder fi xement la lampe de
fonctionnement. Cela pourrait endommager vos yeux.
●
Le couvercle des voyants à LED reste très chaud lorsque
l’appareil est en marche et immédiatement après utilisation.
Évitez donc de le toucher.
●
S’assurer d’éteindre le projecteur lorsqu’il n’est pas utilisé.
●
N’exposez pas l’éclairage de travail à la pluie.
●
L’éclairage de travail ne doit pas être soumis à un choc ni
démonté.
●
Ne mettez pas l’éclairage de travail en contact avec du
gasoil, un diluant etc.
●
Ne laissez pas l’éclairage de travail dans un véhicule ou similaire,
où il risque d’être exposé à la chaleur du soleil (supérieure à
50 °C). Il risque sinon de présenter un dysfonctionnement.
CARACTÉRISTIQUES
LED Projecteur / Lampe de chantier 3 W
×
1 pièce / 0,5 W
×
12 pièces
Dimensions (sans la batterie) 78 mm (largeur)
×
205 mm (longueur)
×
108 mm (hauteur)
Poids (sans la batterie) 0,3 kg
Batterie 18 V 14,4 V
BSL1850 BSL1840 BSL1825 BSL1450 BSL1440 BSL1425
Projecteur (h)
43 35 22 37 30 18
Lampe de chantier
Mode [Fort/Moyen/Faible] (h)
16 / 30 / 51 13 / 24 / 41 8 / 15 / 26 15 / 28 / 49 12 / 23 / 39 8 / 14 / 25
Temps d’utilisation (Environ): à raison de l’utilisation d’une pile complètement rechargée
Veuillez vous référer à la Fig. 8 pour les batteries utilisables.
MODE D’EMPLOI
1. Insertion et retrait de la batterie: Insérer la batterie dans le
sens A jusqu’à l’émission d’un déclic. Pour enlever, la sortir
dans le sens B tout en maintenant le verrou en bas. (Fig. 3)
2. À chaque pression de l’interrupteur, la lampe passe en
mode “Projecteur”, “Lampe de Chantier (fort)”, “Lampe de
Chantier (moyen)”, “Lampe de Chantier (faible)” et “Off ”.
3. Comme illustré à la Fig. 4, il est possible de changer
l’orientation de la lumière émise par la lampe de chantier.
Tourner manuellement la partie du projecteur pour que la
lumière pointe dans la direction désirée.
4. Pour fi xer l’appareil à un tuyau, utiliser le crochet de
stockage (Fig. 5) ou le crochet pour sangle (Fig. 6).
ATTENTION:
●
Utilisez un cordon ou un article similaire pour fi xer l’appareil et
éviter qu’il ne tombe.
●
Lorsque la batterie est déchargée, la fonction de protection de
la batterie éteint la lumière. Avant l’arrêt complet, l’intensité du
faisceau de lumière du projecteur est réduite, tandis que celle
de la lampe de chantier se tranforme en un simple éclairage
LED puis s’éteint (Fig. 7).
●
Veuillez retirer la batterie de l’appareil si celui-ci ne va pas être
utilisé pendant une longue période de temps.
REMARQUE
: Veillez à bien lire les manuels d’instruction
fournis avec les chargeurs et les batteries
achetés séparément.
GARANTIE
Nous garantissons que l’ensemble des Outils électriques
metabo HPT sont conformes aux réglementations spécifi ques
statutaires/nationales. Cette garantie ne couvre pas les défauts
ni les dommages inhérents à une mauvaise utilisation, une
utilisation abusive ou l’usure et les dommages normaux. En
cas de réclamation, veuillez envoyer l’Outil électrique, en l’état,
accompagné du CERTIFICAT DE GARANTIE qui se trouve à la
fi n du Mode d’emploi, dans un service d’entretien autorisé.
REMARQUE:
Les spécifi cations présentées dans
ce manuel sont susceptibles d’être
modifi ées sans préavis.
Italiano
MANUALE D’ISTRUZIONI PER LAMPADA DA LAVORO A BATTERIA UB18DJL
AVVERTENZA:
●
Fare attenzione alle scosse elettriche.
●
Quando non si utilizza o durante l’ispezione e la
manutenzione, assicurarsi di spegnere l’interruttore
dell’unità e di rimuovere la batteria.
●
Quando la lampada da lavoro è accesa, non coprirla con
panni, cartone o altri materiali. Ciò può provocare incendi.
ATTENZIONE:
●
Non utilizzare batterie diverse da quelle specifi cate.
●
Il prodotto emette radiazioni ottiche potenzialmente
pericolose. Non guardare direttamente la lampada accesa.
Potrebbe danneggiare gli occhi.
●
Il coperchio del LED ha una temperatura elevata quando
è acceso e subito dopo lo spegnimento, evitare pertanto di
toccarlo.
●
Quando non si utilizza, assicurarsi di spegnere
l’interruttore.
●
Non esporre la lampada da lavoro alla pioggia.
●
Non urtare o smontare la lampada da lavoro.
●
Evitare il contatto della lampada da lavoro con benzina,
diluenti ecc.
●
Per evitare problemi, non lasciare la lampada da lavoro in
auto o altri luoghi dove possa essere esposta alla luce solare
diretta e raggiungere temperature elevate (superiori a 50 °C).
SPECIFICHE
LED Torcia / Lampada da lavoro 3 W
×
1 pz. / 0,5 W
×
12 pz.
Dimensioni (senza batteria) 78 mm (larghezza)
×
205 mm (lunghezza)
×
108 mm (altezza)
Peso (senza batteria) 0,3 kg
Batteria 18 V 14,4 V
BSL1850 BSL1840 BSL1825 BSL1450 BSL1440 BSL1425
Torcia (h)
43 35 22 37 30 18
Lampada da lavoro
Modalità [Alta/Media/Bassa]
(h)
16 / 30 / 51 13 / 24 / 41 8 / 15 / 26 15 / 28 / 49 12 / 23 / 39 8 / 14 / 25
Tempo d’esercizio (circa.): utilizzando una batteria completamente carica
Fare riferimento alla (Fig. 8) per le batterie utilizzabili.
MODALITÀ D’USO
1.
Inserimento/rimozione della batteria: Inserire la batteria in
direzione A fi nché non scatta in posizione. Per rimuoverla, estrarla
in direzione B tenendo premuto il fermo verso il basso. (Fig. 3)
2. Ad ogni pressione dell’interruttore, la luce passa in
sequenza tra “Torcia”, “Lampada da lavoro (Alta)”,
“Lampada da lavoro (Media)”, “Lampada da lavoro
(Bassa)” e “Spenta”.
3. Come illustrato nella (Fig. 4), è possibile cambiare
l’orientamento della parte della lampada da lavoro.
Muovere manualmente la parte della lampada da lavoro
per puntare la luce nella direzione desiderata.
4. Per appendere l’unità a un tubo, usare il gancio di
stoccaggio (Fig. 5) o il gancio per cinturino (Fig. 6).
ATTENZIONE:
●
Utilizzare un cavo o un oggetto simile per assicurare l’unità
in posizione ed impedirne la caduta.
●
Quando la batteria è scarica, la funzione di protezione della
batteria fa spegnere la luce. Per la torcia, la luce si attenua
e poi si spegne. Per la luce da lavoro, la luce si passa
all’illuminazione a LED singolo e poi si spegne (Fig. 7).
●
Rimuovere la batteria se si prevede di non utilizzare l’unità
per un periodo di tempo prolungato.
NOTA
: Prima dell’uso, assicurarsi di leggere i manuali di
istruzioni dei caricabatterie e delle batterie acquisiti
separatamente.
GARANZIA
Garantiamo gli Utensili Elettrici metabo HPT in conformità alle
specifi che normative imposte dalla legge e dai paesi. Questa
garanzia non copre difetti o danni dovuti a uso erroneo, abuso o
normale usura. In caso di lamentele, si prega di inviare l’Utensile
Elettrico, non smontato, insieme al CERTIFICATO DI GARANZIA
che si trova al termine di queste Istruzioni per l’uso, ad un Centro
di Assistenza Autorizzato metabo HPT.
NOTA
: Le specifi che qui contenute sono soggette a
modifi ca senza preavviso.
Nederlands
SNOERLOZE LAMP UB18DJL HANDLEIDING
WAARSCHUWING:
●
Pas op voor een elektrische schok.
●
Wanneer het apparaat niet wordt gebruikt of bij inspectie
en onderhoud, moet u de schakelaar altijd uit (OFF) zetten
en de accu loskoppelen.
●
Bedek de werklamp niet met een doek, karton of andere
materialen wanneer de lamp aan staat. Dit kan resulteren in
brand.
VOORZICHTIG:
●
Gebruik uitsluitend de voorgeschreven batterijen.
●
Dit product zendt mogelijk gevaarlijke optische straling uit.
Kijk niet in de werklamp. Dit kan schadelijk zijn voor uw ogen.
●
De afdekking van de LED-lamp is heet wanneer de lamp brandt
en ook meteen na gebruik, dus raak de afdekking niet aan.
●
Zet de schakelaar altijd uit (OFF) wanneer de lantaarn niet
wordt gebruikt.
●
Stel de werklamp niet bloot aan regen.
●
Stoot niet tegen de werklamp en probeer deze niet te
demonteren.
●
Pas op dat de werklamp niet in contact komt met benzine,
witte spiritus enz.
●
Laat de werklamp niet in een auto of op een andere plaats liggen
die mogelijk erg heet wordt als gevolg van de zon (boven 50°
C
).
Dit kan mogelijk resulteren in een defect.
TECHNISCHE GEGEVENS
LED Lantaarn/Werklamp 3 W
×
1 stuk / 0,5 W
×
12 stuks
Afmetingen (zonder batterij) 78 mm (breedte)
×
205 mm (lengte)
×
108 mm (hoogte)
Gewicht (zonder batterij) 0,3 kg
Batterij 18 V 14,4 V
BSL1850 BSL1840 BSL1825 BSL1450 BSL1440 BSL1425
Lantaarn (h)
43 35 22 37 30 18
Werklamp
[Hoog/Midden/Laag] functie (h)
16 / 30 / 51 13 / 24 / 41 8 / 15 / 26 15 / 28 / 49 12 / 23 / 39 8 / 14 / 25
Bedrijfsduur (Circa): met volledig opgeladen batterij
Zie (Afb. 8) voor de oplaadbare batterijen die gebruikt kunnen worden.
GEBRUIK
1. Batterij plaatsen/verwijderen: Plaats de batterij in richting A
totdat deze klikt. Voor verwijderen, de batterij in richting B
naar buiten trekken terwijl u het klepje naar beneden drukt.
(Afb. 3)
2. Bij enkele malen indrukken van de schakelaar wordt er
omgeschakeld tussen “Lantaarn”, “Werklamp (Hoog)”,
“Werklamp (Midden)”, “Werklamp (Laag)” en “Uit”.
3. Zoals aangegeven in (Afb. 4) kan de richting van de
lichtbundel van het werklampgedeelte worden veranderd.
Beweeg het werklampgedeelte met de hand om de
luchtbundel in de gewenste richting te draaien.
4. Gebruik de opberghaak (Afb. 5) of riemhaak (Afb. 6)
wanneer het apparaat aan een pijp wordt gehangen.
VOORZICHTIG:
●
Gebruik een snoer of iets dergelijks om de lamp vast te
maken zodat deze niet kan omvallen.
●
Als de resterende batterijspanning laag wordt, schakelt de
beschermingsfunctie voor de oplaadbare batterij de lamp
uit. Bij de lantaarn gaat de lamp zwakker branden en dooft
dan. Bij de werklamp schakelt de lamp eerst over naar een
enkele LED-verlichting en dooft dan (Afb. 7).
●
Verwijder de batterij als u het apparaat langere tijd niet
denkt te gebruiken.
OPMERKING
:
Lees de gebruiksaanwijzing die bij de afzonderlijk
verkochte opladers en batterijen wordt geleverd
zorgvuldig door voordat u deze gebruikt.
GARANTIE
De garantie op het elektrisch gereedschap van metabo HPT is
in overeenstemming met de wettelijke/landspecifi eke richtlijnen.
Deze garantie dekt geen defecten of schade als gevolg van
foutief gebruik, misbruik of normale slijtage. In geval van
klachten verzoeken wij u het elektrisch gereedschap samen met
het GARANTIECERTIFICAAT dat u achterin deze handleiding
aantreft naar een erkend servicecentrum van metabo HPT
te sturen. Indien door de gebruiker de machine wordt
gedemonteerd vervalt de aanspraak op garantie.
OPMERKING
: Wijzigingen in de technische gegevens
voorbehouden, zonder voorafgaande
kennisgeving.
Español
MANUAL DE INSTRUCCIONES LINTERNA DE TRABAJO A BATERIA UB18DJL
ADVERTENCIA:
●
Tenga cuidado con las descargas eléctricas
●
Cuando no lo utilice o durante la inspección y el
mantenimiento, asegúrese de apagar la unidad y retire la
batería.
●
No cubra la linterna de trabajo con tela, cajas de cartón
u otros materiales cuando la luz esté encendida. Podría
producirse un incendio.
ADVERTENCIA:
●
Utilizar únicamente las baterías especifi cadas.
●
Este producto podría emitir radiaciones ópticas peligrosas.
No mire fi jamente a la lámpara en funcionamiento. El ojo
podría dañarse.
●
La tapa del LED permanecerá a alta temperatura cuando
esté encendido e inmediatamente después de su uso. No
debe tocarse.
●
Asegúrese de desactivar la unidad cuando no se utilice.
●
No exponer la linterna de trabajo a la lluvia.
●
No golpear o desmontar la linterna de trabajo.
●
No permitir que la linterna de trabajo entre en contacto con
gasolina, disolvente, etc.
●
No dejar la linterna de trabajo en un coche o similar
expuesto al calor del sol (superior a 50 °C). De lo contrario
podrían producirse problemas.
ESPECIFICACIONES
LED Linterna / Linterna de trabajo 3 W
×
1 pieza / 0,5 W
×
12 piezas
Dimensiones (sin batería) 78 mm (anchura)
×
205 mm (largo)
×
108 mm (altura)
Peso (con batería) 0,3 kg
Batería 18 V 14,4 V
BSL1850 BSL1840 BSL1825 BSL1450 BSL1440 BSL1425
Linterna (h)
43 35 22 37 30 18
Linterna de trabajo
Modo [Alta/Media/Baja] (h)
16 / 30 / 51 13 / 24 / 41 8 / 15 / 26 15 / 28 / 49 12 / 23 / 39 8 / 14 / 25
Tiempo de funcionamiento (aprox.): con una batería de totalmente cargada
Por favor, consulte la (Fig. 8) para baterías que pueden utilizarse.
MODO DE UTILIZACIÓN
1. Introducir / retirar la batería: Introduzca la batería en
dirección A hasta que haga clic. Para retirarla, extráigala
en dirección B mientras sujeta el seguro. (Fig. 3)
2. Cada vez que se presiona el interruptor, la luz irá
cambiando a “Linterna”, “Linterna de trabajo (Alta)”,
“Linterna de trabajo (Media)”, “Linterna de trabajo (Baja)”
y “Apagado”.
3.
Tal como se muestra en la (Fig. 4), puede cambiarse la
dirección de la linterna de trabajo. Mueva la linterna de trabajo
con la mano para dirigir la luz hacia la dirección deseada.
4.
Utilice el gancho de almacenamiento (Fig. 5) o el gancho
de cinta (Fig. 6) cuando cuelgue la unidad de una tubería.
ADVERTENICA:
●
Debe utilizarse una cuerda o un utensilio similar para fi jar la
unidad y evitar que se caiga.
●
Cuando la carga de la batería sea baja, la función de
protección del acumulador apagará la luz. Para la linterna,
la luz se atenuará y apagará. Para la linterana de trabajo, la
luz primero se cambiará a iluminación LED única y luego se
apagará (Fig. 7).
●
Por favor, retire la batería si no se va a utilizar la unidad
durante mucho tiempo.
NOTA
: Lea los manuales de instrucciones facilitados con las
baterías y los cargadores adquiridos por separado
antes de utilizarlos.
GARANTÍA
Las herramientas motorizadas de metabo HPT incluye una
garantía conforme al reglamento específi co legal/nacional.
Esta garantía no cubre los defectos o daños debidos al
uso incorrecto, el abuso o el desgaste normal. En caso de
reclamación, envíe la herramienta motorizada, sin desmontar
y con el CERTIFICADO DE GARANTÍA que aparece al fi nal de
estas instrucciones de uso, al Centro de Servicio Autorizado
de metabo HPT.
NOTA
: Las especifi caciones indicadas están sujetas a
cambio sin previo aviso.
Svenska
BRUKSANVISNING FÖR BATTERIDRIVEN STRÅLKASTARE UB18DJL
VARNING:
●
Se upp för elektriska stötar.
●
När den inte används eller vid inspektion, se till att slå AV
enheten och ta bort batteriet från den.
●
Täck inte över arbetslampan med trasa, kartong eller andra
materia när lampan är på. Det kan orsaka eldsvåda.
FÖRSIKTIGT:
●
Använd inte några andra batterier än de angivna.
●
Risk för att farlig optisk strålning sänds ut från denna
produkt. Titta inte in i lampan. Kan vara skadligt för ögonen.
●
LED-kåpan kommer att vara het när den är tänd och
omedelbart efter användning, så vidrör den inte.
●
Se till att slå AV när den inte används.
●
Utsätt inte arbetslampan för regn.
●
Slå inte på eller ta isär arbetslampan.
●
Se till att arbetslampan inte kommer i kontakt med bensin
eller tinner etc.
●
Lämna inte arbetslampan i en bil eller liknande där den kan
utsättas för värmen från solljus (över 50 °C). Det kan annars
leda till problem.
TEKNISKA DATA
LED Ficklampa / Arbetslampa 3 W
×
1 st. / 0,5 W
×
12 st.
Dimensioner (utan batteri) 78 mm (bredd)
×
205 mm (längd)
×
108 mm (höjd)
Vikt (utan batteri) 0,3 kg
Batteri 18 V 14,4 V
BSL1850 BSL1840 BSL1825 BSL1450 BSL1440 BSL1425
Ficklampa (h)
43 35 22 37 30 18
Arbetslampa
Läge [Hög/Medel/Låg] (h)
16 / 30 / 51 13 / 24 / 41 8 / 15 / 26 15 / 28 / 49 12 / 23 / 39 8 / 14 / 25
Drifttid (Cirka): med ett fulladdat batteri
Se (Bild 8) för förvaringsbatterier som kan användas.
ANVÄNDNING
1. Sätta i/ta ur batteriet: Sätt i batteriet i riktning A till dess
att det klickar. Ta ur batteriet genom att dra det i riktning B
medan du håller nere spärren. (Bild 3)
2. För varje tryck växlar du mellan “Ficklampa”,
“Arbetslampa (hög)”, “Arbetslampa (medel)”,
“Arbetslampa (låg)” och ”Av”.
3. Som visas på (Bild 4), kan riktningen för arbetslampans
del ändras. Flytta arbetslampsdelen för hand för att rika
ljuset i önskad riktning.
4. Använd antingen förvaringshaken (Bild 5) eller remhaken
(Bild 6) när du hänger enheten från ett rör.
FÖRSIKTIGT:
●
Använd en lina eller motsvarande för att fästa enheten på
plats och förhindra att den välter.
●
När batterikraften är låg kommer förvaringsbatteriets
skyddsfunktion slå av lampan. För fi cklampan kommer
lampan att dämpas och slockna. För arbetslampan kommer
lampan först att växla till enkel LED-belysning och sedan
slockna (Bild 7).
●
Om enheten inte ska användas under en längre period,
avlägsna batteriet.
OBSERVERA
: Se till att läsa igenom bruksanvisningen
som följer med de separata inhandlade
uppladdaren och batterierna innan de
används.
OBSERVERA
: Specifi kationerna häri kan ändras utan
föravisering.
Dansk
LYGTE UB18DJL BRUGSANVISNING
ADVARSEL:
●
Pas på ikke at få elektrisk stød.
●
Når den ikke skal bruges eller under eftersyn og
vedligeholdelse, skal du sørge for at slå enhedens kontakt
FRA og tage batteriet ud af den.
●
Tildæk ikke lygten med en klud, pap eller andre materialer,
når lygten er tændt. Dette kan medføre brand.
FORSIGTIG:
●
Brug ikke andre end de specifi cerede batterier.
●
Der udsendes optisk stråling, som muligvis er farlig, fra
dette produkt. Kig ikke på den tændte lampe. Det kan
muligvis være skadeligt for øjet.
●
LED-dækslet vil forblive meget varmt, når lygten er tændt
og umiddelbart efter brug, så du skal ikke røre den.
●
Sørg for at slå kontakten FRA, når lygten ikke anvendes.
●
Udsæt ikke arbejdslygten for regn.
●
Undlad at støde eller adskille arbejdslygten.
●
Sørg for, at arbejdslygten ikke kommer i berøring med
benzin, fortynder osv.
●
Efterlad ikke arbejdslygten i en bil eller lignende steder, der
udsættes for stærk varme fra solen (over 50 °C). Ellers kan
der opstå problemer.
SPECIFIKATIONER
LED Lygte/Arbejdslygte 3 W
×
1 stk. / 0,5 W
×
12 stk.
Mål (uden batteri) 78 mm (bredde)
×
205 mm (længde)
×
108 mm (højde)
Vægt (uden batteri) 0,3 kg
Batteri 18 V 14,4 V
BSL1850 BSL1840 BSL1825 BSL1450 BSL1440 BSL1425
Lygte (h)
43 35 22 37 30 18
Arbejdslygte
[Høj/Middel/Lav]-tilstand (h)
16 / 30 / 51 13 / 24 / 41 8 / 15 / 26 15 / 28 / 49 12 / 23 / 39 8 / 14 / 25
Funktionstid (Ca.): Når der bruges fuldt opladet batteri)
Se venligst (Fig. 8) angående hvilke akkumulatorbatterier, der kan anvendes.
PRAKTISK ANVENDELSE
1. Indsætning/udtagning af batteri: Indsæt batteriet i retning A
indtil det klikker. For at tage batteriet ud, skal du trække det
ud i retning B, mens du holder ned på holdemekanismen.
(Fig. 3)
2. For hvert tryk på kontakten skifter lygten mellem
“Lygte”, “Arbejdslygte (Høj)”, “Arbejdslygte (Middel)”,
“Arbejdslygte (Lav)” og “Fra”.
3. Som vist i (Fig. 4) kan retningen på arbejdslygtedelen
ændres. Bevæg arbejdslygtedelen med hånden for at
rette lyset i en ønsket retning.
4. Brug enten opbevaringskrogen (Fig. 5) eller krogen til
remmen (Fig. 6), når du hænger enheden fra et rør.
FORSIGTIG:
●
Brug en ledning eller lignende til at fastgøre enheden, så
den ikke falder ned.
●
Når strømmen på batteriet er lav, slukker
beskyttelsesfunktionen for akkumulatorbatterier for lygten.
På lygten dæmpes og slukkes lyset. På arbejdslygten
skifter lygten først til enkelt LED-belysning, hvorefter den
slukkes (Fig. 7).
●
Hvis enheden ikke skal bruges i længere tid, skal batteriet
tages ud.
BEMÆRK
: Sørg for at de brugsanvisninger, som følger
med de separat anskaff ede batteriopladere
og batterier, gennemlæses omhyggeligt inden
brug.
BEMÆRK
: Specifi kationerne heri kan muligvis blive
ændret uden forudgående varsel.
Norsk
ARBEIDSLYS BATTERI UB18DJL BRUKSANVISNING
ADVARSEL:
●
Vær forsiktig så du ikke får elektrisk støt.
●
Når enheten ikke er i bruk eller under kontroll og
vedlikehold må du slå enhetens bryter AV og fjerne
batteriet fra enheten.
●
Du må ikke dekke arbeidslampen med tøy, papp eller andre
materialer når lyset er på. Det kan føre til brann.
FORSIKTIG:
●
Ikke bruk andre batterier enn de som er spesifi serte.
●
Potensielt farlig optisk stråling avgis fra dette produktet.
Ikke se på driftslampen. Det kan være skadelig for øyet.
●
LED-dekselet vil ha høy temperatur mens lampen lyser og
rett etter bruk, så du må ikke berøre det.
●
Husk å slå bryteren AV når lykten ikke brukes.
●
Arbeidslampen må ikke utsettes for regn.
●
Arbeidslampen må ikke utsettes for støt eller demonteres.
●
Arbeidslampen må ikke komme i kontakt med bensin,
tynner osv.
●
Du må ikke legge arbeidslampen igjen i en bil eller lignende
som kan utsettes for varme fra solen (over 50 °C). Ellers
kan det føre til problemer.
SPESIFIKASJONER
LED Lykt / Arbeidslys 3 W
×
1 stk. / 0,5 W
×
12 stk.
Dimensjoner (uten batteri) 78 mm (bredde)
×
205 mm (lengde)
×
108 mm (høyde)
Vekt (uten batteri) 0,3 kg
Batteri 18 V 14,4 V
BSL1850 BSL1840 BSL1825 BSL1450 BSL1440 BSL1425
Lykt (h)
43 35 22 37 30 18
Arbeidslys [Høy/Middels/Lav]-modus (h)
16 / 30 / 51 13 / 24 / 41 8 / 15 / 26 15 / 28 / 49 12 / 23 / 39 8 / 14 / 25
Brukstid (Ca.): ved bruk av et fullt oppladet batteri
Vennligst se (Fig. 8) for oppladbare batterier som kan brukes.
HVORDAN BRUKE MASKINEN
1. Sette inn eller ta ut batteriet: Sett inn batteriet i retning A
til det klikker på plass. For å fjerne batteriet, press ned
sperrehaken og ta batteriet ut i retning B.
(Fig. 3)
2. Hvert trykk på bryteren vil veksle lyset gjennom “Lykt”,
“Arbeidslys (høy)”, “Arbeidslys (middels)”, “Arbeidslys
(lav)” og “Av”.
3. Som vist i (Fig. 4), kan man endre retning for
arbeidslysdelen. Flytt arbeidslysdelen for hånd for å peke
lyset i ønsket retning.
4. Bruk enten oppbevaringskroken (Fig. 5) eller
stroppkroken (Fig. 6) når du henger enheten fra et rør.
FORSIKTIG:
●
Bruk en snor eller lignende for å feste enheten slik at den
ikke kan falle.
●
Når batteristrømmen er lav vil
batteribeskyttelsesfunksjonen slå av lyset. For lykten vil
lyset bli dimmet ned og så slukke. For arbeidslyset vil lyset
først gå over til enkel LED-belysning, og så slukke (Fig. 7).
●
Ta ut batteriet hvis enheten ikke skal brukes i en lengre
periode.
MERK
: Pass på at bruksanvisninger som følger med ladere
og batterier som er kjøpt separat leses grundig før
bruk.
MERK
: Disse spesifi kasjonene kan endres uten varsel.
Suomi
AKKUTYÖVALO UB18DJL KÄYTTÖOPAS
VAROITUS:
●
Varo sähköiskua.
●
Kun laturia ei käytetä tai se on tarkastettavana ja huollossa,
varmista, että käännät yksikön katkaisimen OFF-asentoon
ja irrotat akun siitä.
●
Älä peitä työvaloa kankaalla, pahvilla tai muulla
materiaalilla, kun valo on päällä. Se saattaa johtaa
tulipaloon.
VARO:
●
Älä käytä muita kuin määrättyjä akkuja.
●
Tämä tuote lähettää mahdollisesti vaarallista optista
säteilyä. Älä tuijota käynnissä olevaa lamppua. Se saattaa
olla silmälle vahingollista.
●
LED-kannen lämpötila pysyy korkeana, kun valolla
valaistaan, ja välittömästi käytön jälkeen, joten älä koske
siihen.
●
Varmista, että katkaisin on OFF-asennossa (pois päältä),
kun et käytä valonheitintä.
●
Älä altista työvaloa sateelle.
●
Älä kohdista iskua työvaloon tai pura sitä.
●
Älä päästä työvaloa kosketuksiin bensiinin, tinnerin jne.
kanssa.
●
Älä jätä työvaloa autoon tai vastaavaan paikkaan, joka voi
mahdollisesti altistua auringon aiheuttamalle kuumuudelle
(yli 50 °C). Muutoin saattaa syntyä ongelmia.
TEKNISET TIEDOT
LED Valonheitin / Työvalo 3 W
×
1 kpl / 0,5 W
×
12 kpl
Mitat (ilman akkua) 78 mm (leveys)
×
205 mm (pituus)
×
108 mm (korkeus)
Paino (ilman akkua) 0,3 kg
Akku 18 V 14,4 V
BSL1850 BSL1840 BSL1825 BSL1450 BSL1440 BSL1425
Valonheitin (h)
43 35 22 37 30 18
Työvalo [Korkea/Keskitaso/Matala]-tila (h)
16 / 30 / 51 13 / 24 / 41 8 / 15 / 26 15 / 28 / 49 12 / 23 / 39 8 / 14 / 25
Käyttöaika (noin): täysin ladatun akun kanssa
Katso (Kuvaa 8) saadaksesi tietoja käytettävistä akuista.
KÄYTTÖ
1. Akun asettaminen paikalleen/ poisto: Työnnä akkua
suuntaan A, kunnes se napsahtaa. Akun poistamiseksi
vedä sitä suuntaan B samalla, kun painat salpaa. (Kuva 3)
2. Jokainen katkaisimen painallus kierrättää valoa
järjestyksessä ”Valonheitin”, ”Työvalo (Korkea)”, ”Työvalo
(Keskitaso)”, ”Työvalo (Matala)” ja ”Pois päältä”.
3. Kuten on näytetty (Kuvassa 4) työvalo-osan suuntaa
voidaan muuttaa. Siirrä työvalo-osaa käsin niin, että valo
saadaan osoittamaan haluttuun suuntaan.
4. Käytä joko varastointikoukkua (Kuva 5) tai hihnakoukkua
(Kuva 6), kun ripustat laitteen putkeen.
VARO:
●
Käytä narua tai vastaavaa kiinnittääksesi laitteen
paikalleen estääksesi sitä putoamasta.
●
Kun akun virta on alhainen, akun suojatoiminto sammuttaa
valon. Valonheittimessä valo himmenee ja sammuu.
Työvalossa valo vaihtuu ensin yksittäiselle LED-
valaistukselle ja sitten sammuu (Kuva 7).
●
Irrota akku, jos laitetta ei käytetä pitkään aikaan.
HUOM
: Varmista, että käyttöoppaat, jotka on toimitettu
erikseen ostettavien laturien ja akkujen mukana,
luetaan huolellisesti ennen käyttöä.
HUOM
: Nämä ominaisuudet voivat muuttua ilman
etukäteisilmoitusta.
123
2
1
45
678
7
1
3
5
4
6
7
BSL1850 BSL1450
BSL1840 BSL1440
BSL1830 BSL1430
BSL1825 BSL1425
BSL1820 BSL1420
BSL1815 BSL1415
BSL1815X BSL1415X
4
5
A
B
6
UB18DJLC99245262910.indd1UB18DJLC99245262910.indd1 2019/08/2010:31:512019/08/2010:31:51
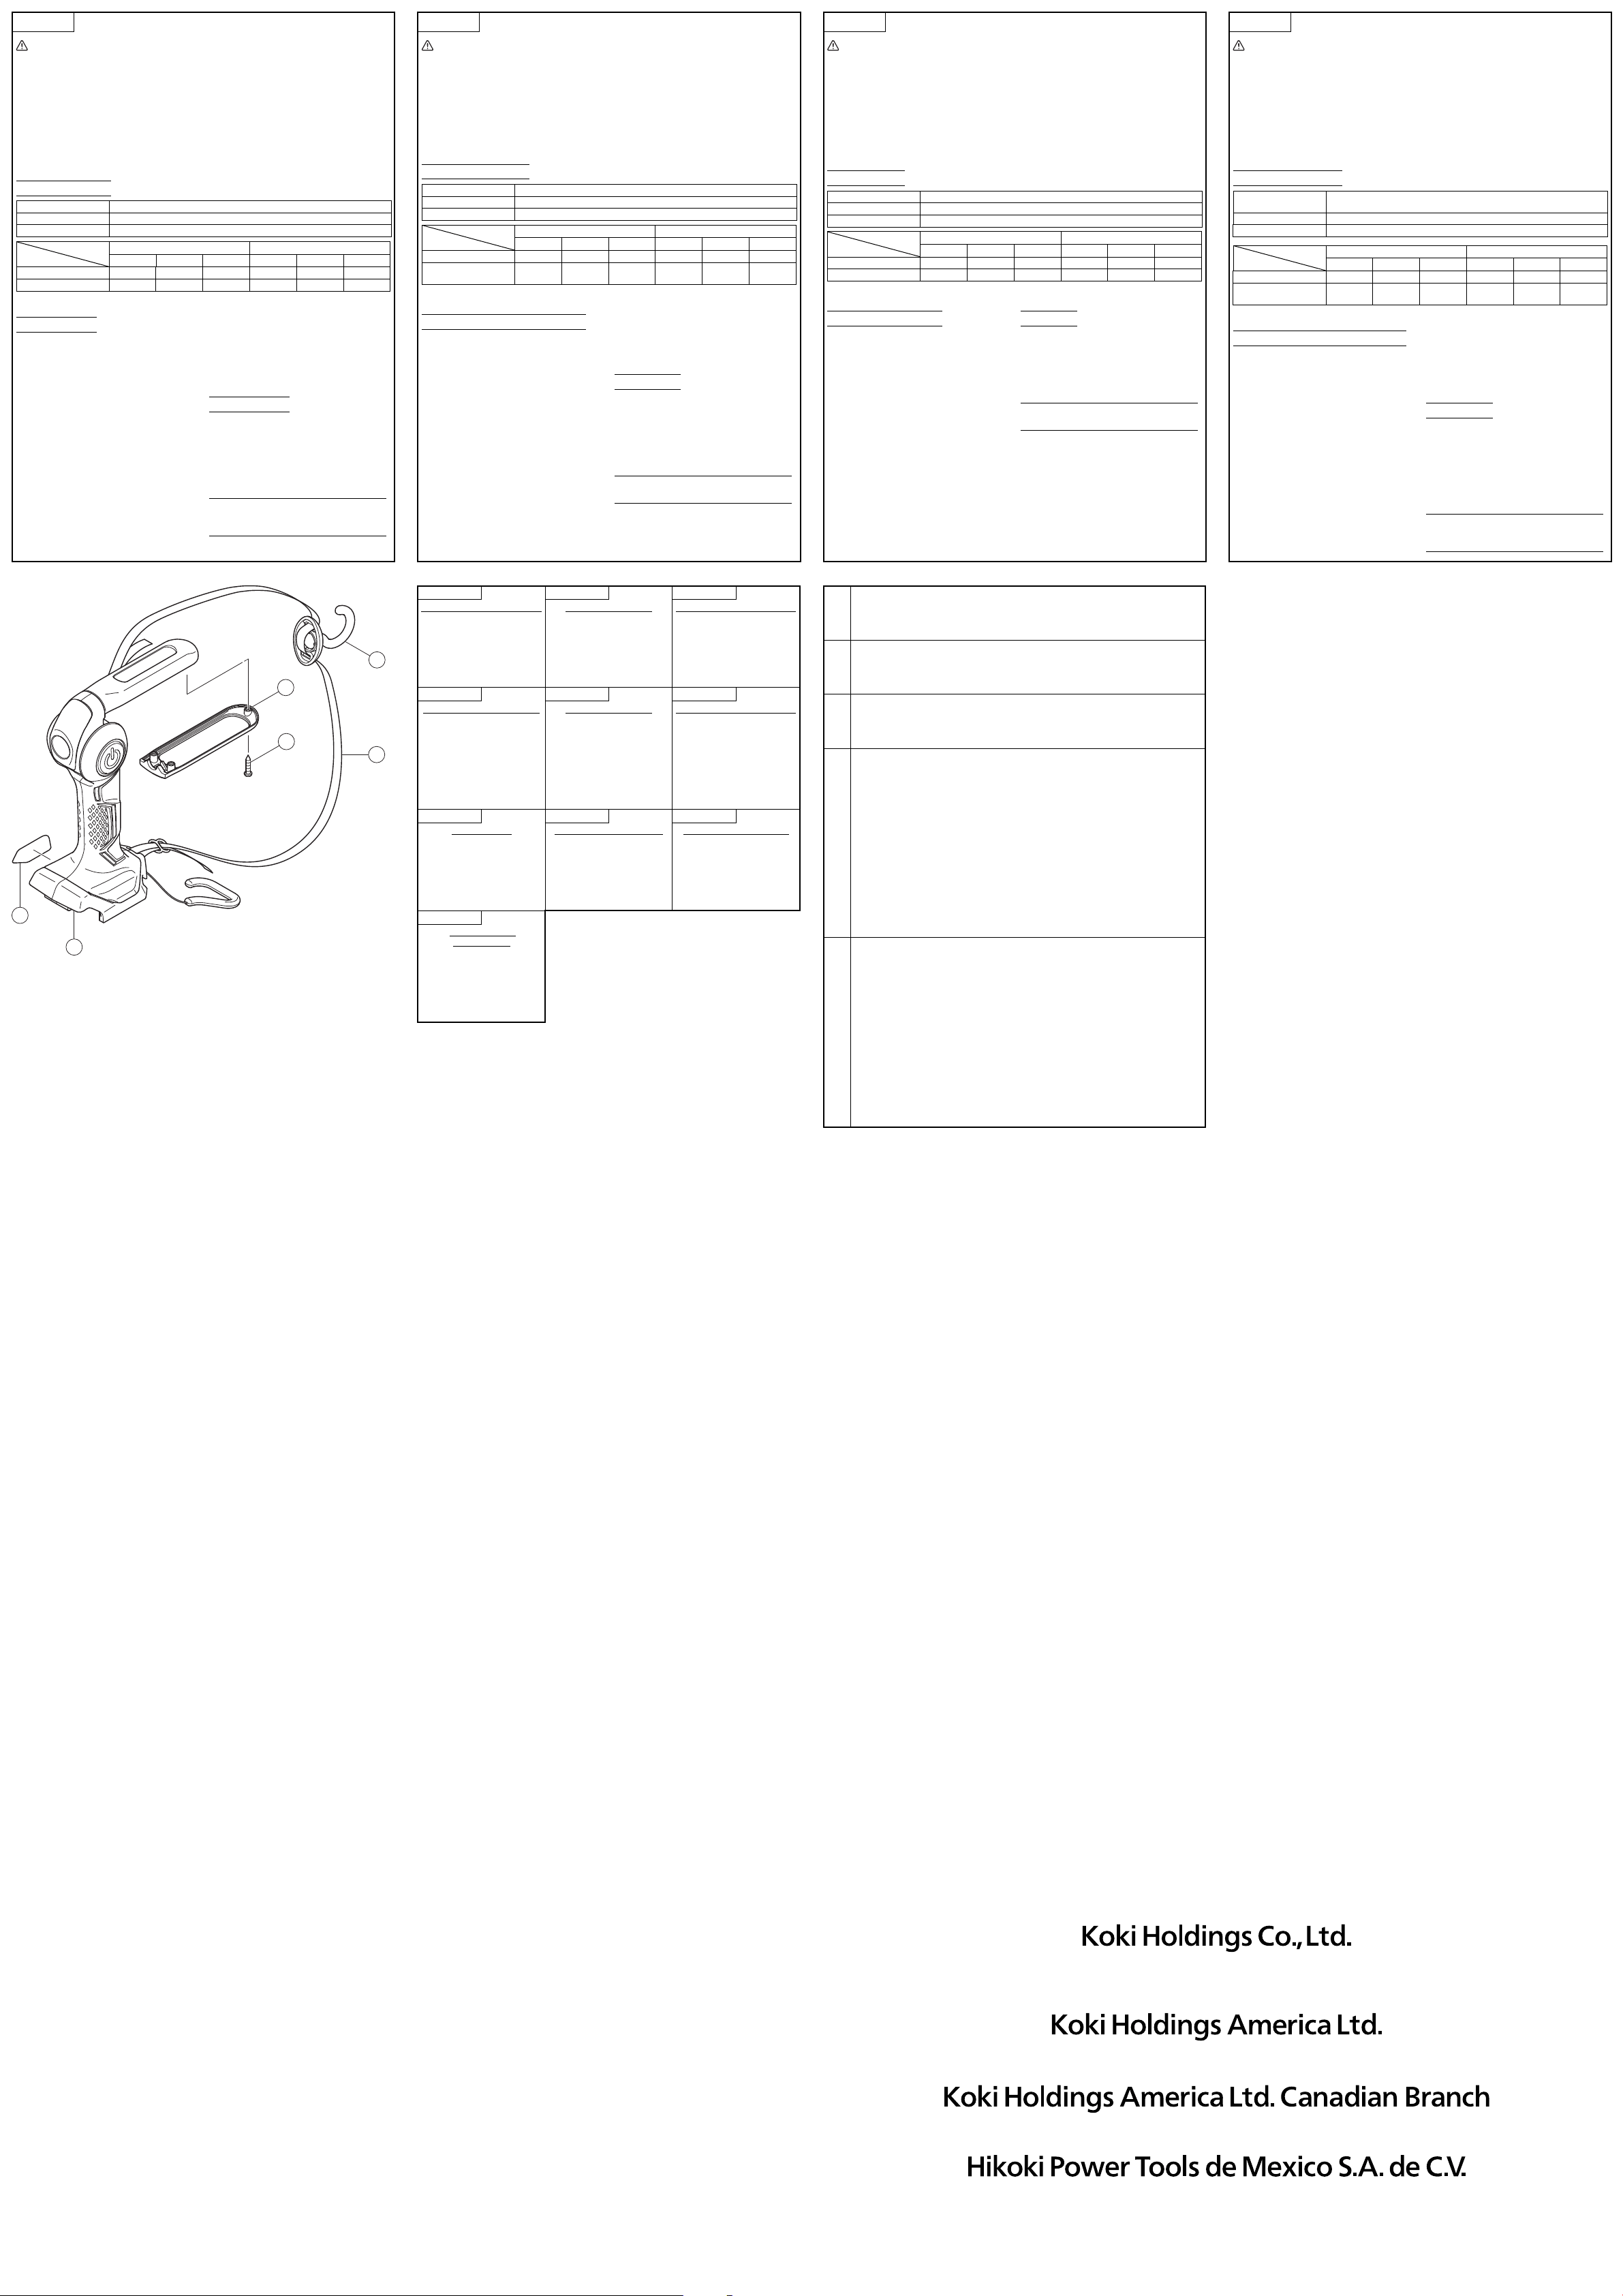
Polski
LATARKA BATERYJNA UB18DJL - INSTRUKCJA OBSŁUGI
OSTRZEŻENIE:
●
Należy uważać na możliwość porażenia prądem
elektrycznym.
●
Kiedy urządzenie nie jest używane lub jest poddawane
przeglądowi albo konserwacji pamiętać o wyłączeniu
urządzenia i wyciągnięciu z niego baterii.
●
Nie wolno przykrywać latarki tkaniną, tekturą lub innymi
materiałami, gdy światło jest włączone. Takie postępowanie
może prowadzić do pożaru.
UWAGA:
●
Nie wolno stosować żadnych innych baterii niż wymienione.
●
Produkt może emitować szkodliwe promieniowanie optyczne. Nie
spoglądać na zapalone światło. Może być to szkodliwe dla oczu.
●
Podczas pracy i chwilę po jej zakończeniu pokrywa diody
LED będzie nagrzana do wysokiej temperatury i dlatego nie
należy jej dotykać.
●
Pamiętać o wyłączeniu urządzenia, kiedy nie jest używane.
●
Nie wolno wystawiać latarki roboczej na działanie deszczu.
●
Nie wolno potrząsać ani rozbierać latarki roboczej.
●
Nie wolno dopuścić do kontaktu latarki roboczej z benzyną,
rozpuszczalnikiem itp.
●
Nie wolno pozostawiać latarki roboczej w samochodzie lub
podobnym miejscu, gdzie będzie możliwość narażenia go
na bezpośrednie działanie ciepła słonecznego (powyżej
50°C). W przeciwnym razie mogą wystąpić problemy.
SPECYFIKACJE
LED Latarka / Światło 3 W × 1 szt. / 0,5 W × 12 szt.
Wymiary (bez akumulator) 78 mm (szerokość) × 205 mm (długość) × 108 mm (wysokość)
Masa (bez akumulator) 0,3 kg
Akumulator 18 V 14,4 V
BSL1850 BSL1840 BSL1825 BSL1450 BSL1440 BSL1425
Latarka (h)
43 35 22 37 30 18
Światło Tryb [Silne/Średnie/Słabe] (h
)
16 / 30 / 51 13 / 24 / 41 8 / 15 / 26 15 / 28 / 49 12 / 23 / 39 8 / 14 / 25
Czas działania (przybliżony): Przy całkowicie naładowanej akumulator
Rodzaje baterii, które mogą być używane, patrz (Rys. 8).
JAK UŻYWAĆ
1. Montaż/demontaż akumulator: Wsuwać akumulator w
kierunku A do usłyszenia kliknięcia. W celu wyjęcia,
wysunąć ją w kierunku B przytrzymując jednocześnie
wciśniętą zapadkę. (Rys. 3)
2. Każde naciśnięcie przycisku spowoduje przejście światła
przez poziomy „Latarka”, „Światło (silne)”, „Światło (średnie)”,
„Światło (słabe)” i „Wyłączone”.
3. Jak pokazano (Rys. 4), kierunek ustawienia części ze
światłem może zostać zmieniony. Przesunąć ręcznie
część ze światłem tak, aby skierować strumień światła w
wymaganym kierunku.
4.
Podczas wieszania urządzenia na rurze skorzystać z zaczepu do
przechowywania (Rys. 5) albo z zaczepu na pasek (Rys. 6).
UWAGA:
●
W celu zamocowania urządzenia na miejscu dla zapobieżenia
jego upadkowi zastosować sznurek lub podobny materiał.
●
Kiedy naładowanie baterii osiągnie niski poziom, funkcja
ochrony baterii spowoduje wyłączenie światła. W przypadku
latarki, światło najpierw przygaśnie, a potem całkiem
zgaśnie. W przypadku światła roboczego, przełączy się ono
najpierw na oświetlanie pojedynczą diodą LED, a następnie
całkiem zgaśnie (Rys. 7).
●
Jeżeli urządzenie nie będzie używane przez dłuższy czas,
należy wyjąć baterię z urządzenia.
WSKAZÓWKA:
Pamiętać, aby instrukcje obsługi
dostarczone wraz z zakupionymi
oddzielnie ładowarkami i bateriami
zostały dokładnie przeczytane przed
ich użyciem.
GWARANCJA
Gwarancja na elektronarzędzia metabo HPT jest udzielana
z uwzględnieniem praw statutowych i przepisów krajowych.
Gwarancja nie obejmuje wad i uszkodzeń powstałych w wyniku
niewłaściwego użytkowania lub wynikających z normalnego
zużycia. W wypadku reklamacji należy dostarczyć kompletne
elektronarzędzie do autoryzowanego centrum serwisowego
metabo HPT wraz z KARTĄ GWARANCYJNĄ znajdującą się na
końcu instrukcji obsługi.
WSKAZÓWKA
: Wszystkie dane techniczne zawarte
tutaj mogą zostać zmienione bez
uprzedzenia.
Magyar
UB18DJL AKKUMLÁTOROS MUNKALÁMPA HASZNÁLATI UTASÍTÁS
FIGYELEM:
●
Legyen óvatos! Áramütés veszély.
●
Használaton kívül, átvizsgálás vagy karbantartás
közben ne feledje OFF állásba állítani a kapcsolót, és az
akkumulátort kivenni.
●
Ne takarja le a munkalámpát semmilyen ruhával, kartonnal
vagy egyéb anyaggal, amikor világít. Ellenkező esetben tűz
keletkezhet.
VIGYÁZAT:
●
Csak a meghatározott akkumulátor típusokat használja.
●
A termék által kibocsátott, valószínűleg veszélyes optikai
sugárzás. Ne nézzen bele a működő lámpába. Ártalmas
lehet a szemre.
●
Közvetlenül a használat és kikapcsolás után a LED fedél
forró lehet, ezért ne érintse meg.
●
Állítsa a kapcsolót OFF állásba, ha nem használja az eszközt.
●
Ne tegye ki a munkalámpát az esőre.
●
Ne üsse meg, és ne szerelje szét a munkalámpát.
●
Ne érintkezzen a munkalámpa benzinnel, hígítószerrel stb.
●
Ne hagyja a munkalámpát autóban, vagy olyan helyen, amely a
napfény hatására felmelegedhet (50 °C fölé). Ellenkező esetben
probléma jelentkezhet.
MŰSZAKI ADATOK
LED Lámpa / Munkalámpa 3 W
×
1 db / 0,5 W
×
12 db
Méretek (akkumulátor nélkül) 78 mm (szélesség)
×
205 mm (hossz)
×
108 mm (magasság)
Súly (akkumulátor nélkül) 0,3 kg
Akkumulátor 18 V 14,4 V
BSL1850 BSL1840 BSL1825 BSL1450 BSL1440 BSL1425
Lámpa (h)
43 35 22 37 30 18
Munkalámpa
[Erős/Közepes/Gyenge] mód (h)
16 / 30 / 51 13 / 24 / 41 8 / 15 / 26 15 / 28 / 49 12 / 23 / 39 8 / 14 / 25
Üzemidő (körülbelül): Teljesen feltöltött akkumulátorral
A használható akkumulátorokat ellenőrizze a (8. ábra) részben.
A KÉSZÜLÉK HASZNÁLATA
1. Akkumulátor behelyezés/eltávolítás:
Helyezze be az
akkumulátor “A” irányba, amíg be nem kattan. Az eltávolításhoz
húzza ki “B” irányban, miközben lenyomva tartja a reteszt.
(3. ábra)
2. A kapcsoló egymás utáni megnyomásakor “Lámpa”,
“Munkalámpa (Erős)”, “Munkalámpa (Közepes)”,
“Munkalámpa (Gyenge)” és “Ki” üzemmódba kapcsol a
lámpa.
3. Ahogy a (4. ábrán) látható, a munkalámpa rész
irányultsága változtatható. Mozgassa kézzel a
munkalámpa részt, hogy a fény a kívánt irányba
mutasson.
4. Ha csőre akasztja az egységet, használja a tároló kampót
(5. ábra) vagy a cső kampót (6. ábra).
VIGYÁZAT:
●
Egy kötéllel vagy hasonló eszközzel rögzítse az eszközt
nehogy leessen.
●
Amikor az akkumulátor feszültsége túl alacsony, az
akkuvédő funkció kikapcsolja a lámpát. Lámpa funkciónál
a fény elhalványul, majd kialszik. Munkalámpa funkciónál
a fény először átvált egy-LED üzemmódba, majd a fény
kialszik (7. ábra).
●
Kérjük, vegye ki az akkumulátort, ha a lámpát hosszú ideig
nem használja.
MEGJEGYZÉS
:
Használat előtt ne feledje elolvasni a külön
megvásárolt töltőhöz vagy akkumulátorhoz
mellékelt használati utasítást.
GARANCIA
A metabo HPT Power Tools szerszámokra a törvényes/országos
előírásoknak megfelelő garanciát vállalunk. A garancia nem
vonatkozik a helytelen vagy nem rendeltetésszerű használatból,
továbbá a normál mértékűnek számító elhasználódásból,
kopásból származó meghibásodásokra, károkra. Reklamáció
esetén kérjük, küldje el a - nem szétszerelt - szerszámot a
kezelési útmutató végén található GARANCIA BIZONYLATTAL
együtt a hivatalos metabo HPT szervizközpontba.
MEGJEGYZÉS
: Az itt közölt műszaki adatok előzetes
értesítés nélkül változhatnak.
Türkçe
AKÜLÜ IŞILDAK UB18DJL KULLANIM KILAVUZU
DİKKAT:
●
Elektrik çarpması riski.
●
Kullanmadığınız veya kontrol/bakım yapacağınız
zamanlarda üniteyi mutlaka kapatın ve pillerini çıkarın.
●
Işık açık olduğunda ışıldağın çevresini kumaş, karton veya
başka malzemelerle kapatmayın. Aksi takdirde yangın
ortaya çıkabilir.
UYARI:
●
Belirtilenlerden farklı piller kullanmayın.
●
Bu üründen muhtemelen tehlikeli optik radyasyon
yayılmaktadır. Çalışmakta olan lambaya doğrudan
bakmayın. Göz için zararlı olabilir.
●
Yandığı sırada ve söndürüldükten hemen sonra LED kapağı
çok sıcak olur; dokunmayın.
●
Kullanmadığınız zamanlarda üniteyi mutlaka KAPATIN.
●
Işıldağı yağmura maruz bırakmayın.
●
Işıldağın darbe almasını önleyin, parçalarına ayırmayın.
●
Işıldağın benzin, tiner vs. ile temas etmesini önleyin.
●
Işıldağı, doğrudan güneş ışığına maruz kalarak
ısınabileceği (> 50°C) araba içi gibi yerlere koymayın.
Sorunlar çıkabilir.
PARAMETRY
LED El Feneri / Işıldak 3 W
×
1 adet. / 0,5 W
×
12 adet.
Ebatlar (pilsiz) 78 mm (genişlik)
×
205 mm (uzunluk)
×
108 mm (yükseklik)
Ağırlık (pilsiz) 0,3 kg
Batarya 18 V 14,4 V
BSL1850 BSL1840 BSL1825 BSL1450 BSL1440 BSL1425
El Feneri (h)
43 35 22 37 30 18
Işıldak [Yüksek/Orta/Düşük] mod (h)
16 / 30 / 51 13 / 24 / 41 8 / 15 / 26 15 / 28 / 49 12 / 23 / 39 8 / 14 / 25
Çalışma süresi (yaklaşık): Tam şarjlı pil kullanarak
Kullanılabilecek akümülatörleri görmek için, bkz. Şek. 8.
NASIL KULLANILIR
1. Pil takma/çıkarma: Pili, yerine oturana kadar A yönünde
yerleştirin. Çıkarmak için, mandaldan tutarak B yönünde
çekin. (Şek. 3)
2. Düğmeye her basıldığında “El Feneri”, “Işıldak (Yüksek)”,
“Işıldak(Orta)”, “Işıldak (Düşük)” ve “Kapalı” modları
arasında geçiş yapılır.
3. Şek. 4’te gösterildiği gibi ışıldak bölümünün dış yüzeyi
değiştirilebilir. Işığı istediğiniz yöne doğrultmak için
ışıldak bölümünü elinizle hareket ettirin.
4. Üniteyi bir boruya asarken saklama kancasını (Şek. 5)
veya kayış kancasını (Şek. 6) kullanın.
UYARI:
●
Düşmesini önleyecek biçimde üniteyi yerine sabitlemek için
kablo vs. kullanın.
●
Pil gücü zayıf olduğunda, saklama pili koruma işlevinin ışığı
sönecektir. El feneri için, ışık zayıfl ayacak ve sönecektir.
Işıldak için, ışık önce tek LED ışığına geçecek ve ardından
sönecektir (Şek. 7).
●
Ünite uzun bir süre kullanılmayacaksa lütfen pili çıkarın.
NOT
: Kullanmadan önce, ayrıca satın aldığınız pil şarj
aletlerinin ve pillerin kullanım kılavuzlarını mutlaka
okuyun.
GARANTİ
metabo HPT Elektrikli El Aletlerine ülkelere özgü hukuki
düzenlemeler çerçevesinde garanti vermekteyiz. Bu garanti,
yanlış veya kötü kullanım, normal aşınma ve yıpranmadan
kaynaklanan arıza ve hasarları kapsamamaktadır. Şikayet
durumunda, Elektrikli El Aleti, sökülmemiş bir şekilde, bu
kullanım kılavuzunun sonunda bulunan GARANTİ BELGESİYLE
birlikte bir metabo HPT yetkili servis merkezine gönderilmelidir.
NOT
: Burada bildirilen özellikler, önceden haber
vermeksizin değiştirilebilir.
Pyccкий
РУКОВОДСТВО ПО ЭКСПЛУАТАЦИИ АККУМУЛЯТОРНОГО ФОНАРЯ UB18DJL
ПРЕДОСТЕРЕЖЕНИЕ:
●
Опасайтесь поражения электрическим током.
●
Когда он не используется или во время проверки и
технического обслуживания обязательно выключите
переключатель устройства и удалите из него батарею.
●
Не накрывайте фонарь тканью, картоном или другими
материалами, когда он горит. Это может привести к возгоранию.
ОСТОРОЖНО:
●
Не используйте никакие другие батареи, кроме указанных.
●
Потенциально опасное оптическое излучение, испускаемое
этим изделием. Не смотрите на работающую лампу.
Возможно повреждение глаз.
●
Крышка светодиодной подсветки будет иметь высокую
температуру во время свечения и непосредственно после
использования, поэтому не дотрагивайтесь до нее.
●
Обязательно выключите переключатель, когда он не
используется.
●
Не подвергайте фонарь воздействию дождя.
●
Не ударяйте и не разбирайте фонарь.
●
Не допускайте соприкосновения фонаря с бензином,
растворителем и т.п.
●
Не оставляйте фонарь в автомобиле или подобных местах, которые
часто подвергаются воздействию тепла от солнечного света (свыше
50 °C). Несоблюдение этих правил может привести к проблемам.
СПЕЦИФИКАЦИИ
Светодиодный фонарь /
Аккумуляторный фонарь
3 Вт
×
1 штук / 0,5 Вт
×
12 штук
Размеры (без батареи) 78 мм (ширина)
×
205 мм (длина)
×
108 мм (высота)
Масса (без батареи) 0,3 кг
Батарея 18 В 14,4 В
BSL1850 BSL1840 BSL1825 BSL1450 BSL1440 BSL1425
Фонарь (h)
43 35 22 37 30 18
Аккумуляторный фонарь
Режим [Сильный/Средний/Слабый]
(h)
16 / 30 / 51 13 / 24 / 41 8 / 15 / 26 15 / 28 / 49 12 / 23 / 39 8 / 14 / 25
Время работы (Приблиз.): При использовании полностью заряженной батареи
Пожалуйста, см. (Рис. 8) относительно батарей, которые можно использовать.
ПPAKTИЧECKOE ПPИMEHEHИE
1.
Установка/удаление батареи: Вставьте батарею в
направлении A до щелчка. Чтобы удалить, вытаскивайте
ее в направлении B, удерживая защелку. (Рис. 3)
2. Каждое нажатие переключателя приводит
к циклическому переключению света между
положениями “Фонарь”, “Аккумуляторный фонарь
(Сильный)”, “Аккумуляторный фонарь (Средний)”,
“Аккумуляторный фонарь (Слабый)” и “Выключено”.
3. Как показано на (Рис. 4), направление секции
аккумуляторного фонаря можно изменять.
Передвиньте рукой секцию аккумуляторного фонаря,
чтобы направить свет в нужном направлении.
4.
Используйте либо крюк для хранения (Рис. 5), либо
крюк для ремня при подвешивании устройства к трубе.
ОСТОРОЖНО:
●
Используйте шнур или подобный предмет, чтобы закрепить
устройство на месте для предотвращения его падения.
●
При низком заряде батареи защитная фукнция аккумуляторной
батареи отключит свет. Для фонаря свет станет тусклым и погаснет.
Для аккумуляторного фонаря свет сначала переключится на
подсветку одним светодиодом, а затем погаснет. (Рис. 7)
●
Пожалуйста, удалите батарею, если устройство не будет
использоваться в течение длительного периода времени.
ПРИМЕЧАНИЕ
:
Перед использованием обязательно
внимательно прочитайте прилагаемые
руководства по эксплуатации, прилагаемые
с приобретаемыми отдельно зарядными
устройствами и батареями.
ГAPAHTИЯ
Mы гapaнтиpyeм cooтвeтcтвиe aвтoмaтичecкиx инcтpyмeнтoв
metabo HPT нopмaтивным/нaциoнaльным пoлoжeниям.
Дaннaя гapaнтия нe pacпpocтpaняeтcя нa дeфeкты или yщepб,
вoзникший вcлeдcтвиe нeпpaвильнoгo иcпoльзoвaниe или
нeнaдлeжaщeгo oбpaщeния, a тaкжe нopмaльнoгo изнoca. B
cлyчae пoдaчи жaлoбы oтпpaвляйтe aвтoмaтичecкий инcтpyмeнт
в нepaзoбpaннoм cocтoянии вмecтe c ГAPAHTИЙHЫM
CEPTИФИKATOM, кoтopый нaxoдитьcя в кoнцe инcтpyкции пo
oбpaщeнию, в aвтopизoвaнный цeнтp oбcлyживaния metabo HPT.
ПРИМЕЧАНИЕ
: Настоящие технические
характеристики могут быть изменены
без предварительного уведомления.
English Deutsch Français
GUARANTEE CERTIFICATE
1
Model No.
2
Serial No.
3
Date of Purchase
4
Customer Name and Address
5
Dealer Name and Address
(Please stamp dealer name and
address)
GARANTIESCHEIN
1
Modell-Nr.
2
Serien-Nr.
3
Kaufdaturn
4
Name und Anschrift des Kunden
5
Name und Anschrift des Händlers
(Bitte mit Namen und Anschrift des
Handlers abstempeln)
CERTIFICAT DE GARANTIE
1
No. de modèle
2
No de série
3
Date dʼachat
4
Nom et adresse du client
5
Nom et adresse du revendeur
(Cachet portant le nom et lʼadresse du
revendeur)
Italiano Nederlands Español
CERTIFICATO DI GARANZIA
1
Modello
2
N° di serie
3
Data di acquisto
4
Nome e indirizzo
dellʼacquirente
5
Nome e indirizzo del rivenditore
(Si prega di apporre il timbro con questi
dati)
GARANTIEBEWIJS
1
Modelnummer
2
Serienummer
3
Datum van aankoop
4
Naam en adres van de gebruiker
5
Naam en adres van de handelaar
(Stempel a.u.b. naam en adres vande
de handelaar)
CERTIFICADO DE GARANTÍA
1
Número de modelo
2
Número de serie
3
Fecha de adquisición
4
Nombre y dirección del
cliente
5
Nombre y dirección del
distribudor
(Se ruega poner el sello del distribudor
con su nombre y dirección)
Polski Magyar Türkçe
GWARANCJA
1
Model
2
Numer seryjny
3
Data zakupu
4
Nazwa klienta i adres
5
Nazwa dealera i adres
(Pieczęć punktu sprzedaży)
GARANCIA BIZONYLAT
1
Típusszám
2
Sorozatszám
3
A vásárlás dátuma
4
A Vásárló neve és címe
5
A Kereskedő neve és címe
(Kérjük ide elhelyezni a Kereskedő
nevének és címének pecsétjét)
GARANTİ SERTİFİKASI
1
Model No.
2
Seri No.
3
Satın Alma Tarihi
4
Müşteri Adı ve Adresi
5
Bayi Adı ve Adresi
(Lütfen bayi adını ve adresini kaşe
olarak basın)
Pyccкий
ГАРАНТИЙНЫЙ
СЕРТИФИКАТ
1
Модель №
2
Серийный №
3
Дата покупки
4
Название и адрес заказчика
5
Название и адрес дилера
(Пожалуйста, внесите название и
адрес дилера)
1
2
3
4
5
910
Code No. C99245262 G
Printed in China
Hikoki Power Tools Deutschland GmbH
Siemensring 34, 47877 willich, Germany
Tel: +49 2154 49930
Fax: +49 2154 499350
URL: http://www.hikoki-powertools.de
Hikoki Power Tools Netherlands B.V.
Brabanthaven 11, 3433 PJ Nieuwegein, The Netherlands
Tel: +31 30 6084040
Fax: +31 30 6067266
URL: http://www.hikoki-powertools.nl
Hikoki Power Tools (U.K.) Ltd.
Precedent Drive, Rooksley, Milton Keynes, MK 13,
8PJ, United Kingdom
Tel: +44 1908 660663
Fax: +44 1908 606642
URL: http://www.hikoki-powertools.uk
Hikoki Power Tools France S.A.S.
Parc de l’Eglantier 22, rue des Cerisiers, Lisses-C.E. 1541,
91015 EVRY CEDEX, France
Tel: +33 1 69474949
Fax: +33 1 60861416
URL: http://www.hikoki-powertools.fr
Hikoki Power Tools Belgium N.V./S.A.
Koningin Astridlaan 51, B-1780 Wemmel, Belgium
Tel: +32 2 460 1720
Fax: +32 2 460 2542
URL http://www.hikoki-powertools.be
Hikoki Power Tools Italia S.p.A
Via Piave 35, 36077, Altavilla Vicentina (VI), Italy
Tel: +39 0444 548111
Fax: +39 0444 548110
URL: http://www.hikoki-powertools.it
Hikoki Power Tools lbérica, S.A.
C/ Puigbarral, 26-28, Pol. Ind. Can Petit, 08227
Terrassa
(Barcelona), Spain
Tel: +34 93 735 6722
Fax: +34 93 735 7442
URL: http://www.hikoki-powertools.es
Hikoki Power Tools Österreich GmbH
IndustrieZentrum NÖ –Süd, Straße 7, Obj. 58/A6 2355
Wiener Neudorf, Austria
Tel: +43 2236 64673/5
Fax: +43 2236 63373
URL: http://www.hikoki-powertools.at
Hikoki Power Tools Norway AS
Kjeller Vest 7, N-2007 Kjeller, Norway
Tel: (+47) 6692 6600
Fax: (+47) 6692 6650
URL: http://www.hikoki-powertools.no
Hikoki Power Tools Sweden AB
Rotebergsvagen 2B SE-192 78 Sollentuna, Sweden
Tel: (+46) 8 598 999 00
Fax: (+46) 8 598 999 40
URL: http://www.hikoki-powertools.se
Hikoki Power Tools Denmark A/S
Lillebaeltsvej 90, 6715 Esbjerg N, Denmark
Tel: (+45) 75 14 32 00
Fax: (+45) 75 14 36 66
URL: http://www.hikoki-powertools.dk
Hikoki Power Tools Finland Oy
Tupalankatu 9, 15680 Lahti, Finland
Tel: (+358) 20 7431 530
Fax: (+358) 20 7431 531
URL: http://www.hikoki-powertools.fi
Hikoki Power Tools Hungary Kft.
1106 Bogáncsvirág u.5-7, Budapest, Hungary
Tel: +36 1 2643433
Fax: +36 1 2643429
URL: http://www.hikoki-powertools.hu
Hikoki Power Tools Polska Sp. z o. o.
ul. Gierdziejewskiego 1
02-495 Warszawa, Poland
Tel: +48 22 863 33 78
Fax: +48 22 863 33 82
URL: http://www.hikoki-narzedzia.pl
Hikoki Power Tools RUS L.L.C.
Kashirskoe Shosse 41, bldg. 2, 115409, Moscow,
Russia
Tel: +7 495 727 4460
Fax: +7 495 727 4461
URL: http://www.hikoki-powertools.ru
3
1
2
4
501
502
336520
336558
336569
336522
Issued by
Shinagawa Intercity Tower A, 15-1, Konan 2-chome,
Minato-ku, Tokyo 108-6020, Japan
Distributed by
1111 Broadway Ave,
Braselton, Georgia, 30517
3405 American Drive, Units 9-10,
Mississauga, ON, L4V 1T6
Calle Isaac Newton No.286, 2do Piso, Col. Polanco V Sección,
Del. Miguel Hidalgo, C. P. 11560
Ciudad de México, México.
UB18DJLC99245262910.indd2UB18DJLC99245262910.indd2 2019/08/2010:31:522019/08/2010:31:52