Loading ...
Loading ...
Loading ...
PRIOR TO OPERATION
CAUTION
To avoid serious accident, ensure the switch is in
the OFF position, and pull out the battery.
1. Check the work area environment
Check the work area to make sure that it is clear of
debris and clutter.
Clear the area of unnecessary personnel. Ensure that
lighting and ventilation is adequate.
2. Mounting the Saw Blade (Fig. 10)
WARNING
If the Hexagonal fl ange bolt is worked using other
tools than the provided hex. wrench, excessive
tightening and insuffi cient tightening may take
place, resulting in injury.
(1) Thoroughly remove any sawdust which has
accumulated on the spindle, bolt and washers.
(2) Apply quality machine oil to the surfaces of washers
(B) and (A) which come into contact with the blade.
(3) As shown in Fig. 10, one side of the saw blade should
be fi tted to the projecting center of washer (A) which
matches the blade’s inner diameter, and the other
side to the concave side of washer (B).
(4) To ensure that the saw blade rotates in the correct
direction, make sure the arrow on the saw blade
points in the same direction indicated by the arrow on
the saw cover.
(5) Using the fi ngers, tighten the Hexagonal fl ange bolt
securing the saw blade as much as possible. Then
press the lock button, lock the spindle, and fully tighten
the Hexagonal fl ange bolt with the hex. wrench.
Hexagonal
fl ange bolt
Washer (A)
Spindle
Washer (B)
Concave
Saw blade
Fig. 10
CAUTION
After mounting the saw blade, reconfi rm that the
lock button is fi rmly secured in the prescribed
position.
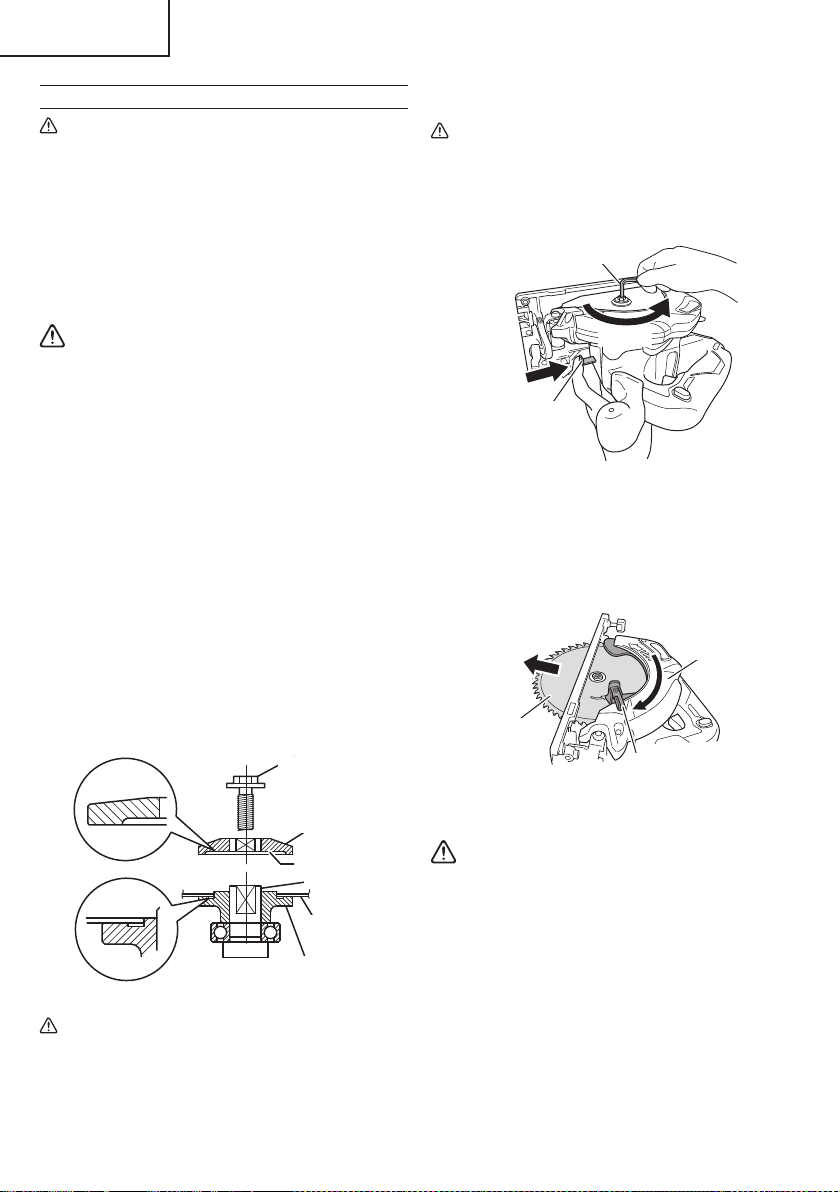
3. Dismounting the saw blade
CAUTION
Never touch the saw blade immediately after use.
The metal is hot and can easily burn your skin.
(1) Set the cutting volume at maximum, and place the
Circular Saw as shown in Fig. 11.
Hex. bar wrench 5 mm
Lock lever
Loosen
Fig. 11
(2) Depress the lock lever, lock the spindle, and remove
the Hexagonal fl ange bolt and washer (B) with the
hex. bar wrench 5 mm.
(3) While holding the lower guard lever to keep the lower
guard fully retracted into the saw cover, remove the
saw blade (Fig. 12).
Lower guard lever
Saw cover
Saw blade
Fig. 12
4. Check performance of lower guard
WARNING
Make absolutely sure that the lower guard is not
fi xed. Also, check and see if it can move smoothly.
If the saw blade is kept exposed, injury can result.
The lower guard (refer to Fig. 2) serves to protect your
body from coming into contact with the saw blade.
Make absolutely certain that the cover smoothly
performs to cover the saw blade. If the lower guard
should not move smoothly, never use it without
repairing it.
In such a case, get in touch with the store where
you bought the circular saw or the metabo HPT
AUTHORIZED SERVICE CENTER for necessary repair.
16
English
00BookC18DBALNAmetabo.indb1600BookC18DBALNAmetabo.indb162021/03/3017:20:582021/03/3017:20:58
Loading ...
Loading ...
Loading ...