CANDY HOOVER GROUP Via Comolli 16 Brugherio – Italy
User Instructions
Istruzioni per l’uso
OVENS
FORNI
2
31
EN
IT

EN 2
Safety Indications
General Instructions
Product description
Display
Heat Feel Sensor enrollment
Connectivity
General notes on cleaning
Maintenance
Troubleshooting
Installation
Summary
3
8
10
14
20
22
26
26
30
60

EN 3
• During cooking, moisture may condense inside the oven cavity or
on the glass of the door. This is a normal condition; the condensation
disappears when the oven reaches the cooking temperature.
• Cook the vegetables in a container with a lid instead of an open
tray.
• WARNING: the appliance and accessible parts become hot dur-
ing use. Be careful not to touch any hot parts.
• WARNING: the accessible parts can become hot when the oven
is in use. Young children should be kept at a safe distance.
• WARNING: the accessible parts can become hot when the grill
is in use. Children should be kept at a safe distance.
• -
placing the bulb, to avoid the possibility of electric shocks.
• Disconnect the appliance from the mains electricity supply be-
fore carrying out any work or maintenance.
• WARNING: in order to avoid any danger caused by the accidental
resetting of the thermal interruption device, the appliance should
not be powered by an external switching device, such as a timer,
• Children under 8 should be kept at a safe distance from the appli-
ance if not continuously supervised.
• Children should not play with the appliance.
• The appliance can be used by those aged 8 or over and by those
with limited physical, sensorial or mental capacities, without ex-
perience or knowledge of the product, only if supervised or pro-
vided with instruction as to the operation of the appliance, in a
safe way with awareness of the possible risks.
• Cleaning and maintenance should not be carried out by
unsupervised children.
• Do not use rough or abrasive materials or sharp metal scrapers
to clean the oven door glasses, as they can scratch the surface
and cause the glass to shatter.
•
Safety Indications

EN 4
parts. After cleaning, reassemble them according the instruc-
tions.
• Only use the meat probe recommended for this oven.
• Do not use a steam cleaner or high pressure spray for cleaning
operations.
• IF THE OVEN IS PROVIDED BY THE MANUFACTURER WITHOUT
PLUG:
THE APPLIANCE MUST NOT BE CONNECTED TO THE POWER
SOURCE USING PLUG OR SOCKETS, BUT MUST BE DIRECTLY
CONNECTED TO THE SUPPLY MAINS. The connection to
professional. In order to have an installation compliant to the
current safety legislation the oven must be connected only
placing an omnipolar breaker, with contact separation compliant
to the requirements for overvoltage category III, between the
appliance and the power source. The omnipolar breaker must
bear the maximum connected load and must be in line with
current legislation. The yellow-green earth cable should not be
interrupted by the breaker. The omnipolar breaker used for the
connection must be easily accessible when the appliance is
installed.
The connection to the power source must be carried out by a
oven and of the power source.
The disconnection must be achieved incorporating a switch in
• IF THE OVEN IS PROVIDED BY THE MANUFACTURER WITH
PLUG:
The socket must be suitable for the load indicated on the tag
and must have ground contact connected and in operation.
The earth conductor is yellow-green in colour. This operation
of incompatibility between the socket and the appliance plug,

EN 5
suitable type. The plug and the socket must be conformed to
the current norms of the installation country. Connection to the
power source can also be made by placing an omnipolar breaker,
with contact separation compliant to the requirements for
overvoltage category III, between the appliance and the power
source that can bear the maximum connected load and that is in
line with current legislation. The yellow-green earth cable should
not be interrupted by the breaker. The socket or omnipolar
breaker used for the connection should be easily accessible when
the appliance is installed.
The disconnection may be achieved by having the plug accessi-
with the wiring rules.
• lf the power cable is damaged, it should be substituted with a
cable or special bundle available from the manufacturer or by
contacting the customer service department. The type of pow-
er cable must be H05V2V2-F. This operation should be carried
-
low-green) must be approximately 10 mm longer than the other
conductors. For any repairs, refer only to the Customer Care De-
partment and request the use of original spare parts.
• Failure to comply with the above can compromise the safety of
the appliance and invalidate the guarantee.
• Any excess of spilled material should be removed before clean-
ing.
• A long power supply failure during an occurring cooking phase
may cause a malfunction of the monitor. ln this case contact
customer service.
• The appliance must not be installed behind a decorative door in
order to avoid overheating.
• When you place the shelf inside, make sure that the stop is
directed upwards and in the back of the cavity. The shelf must be
inserted completely into the cavity.
• When inserting the grid tray pay attention that the anti-slide edge

EN 6
is positioned rearwards and upwards.
• WARNING: Do not line the oven walls with aluminium foil or single-
use protection available from stores. Aluminium foil or any other
protection, in direct contact with the hot enamel, risk melting and
deteriorating the enamel of the insides.
• WARNING: Never remove the oven door seal.
•
cooking or when the oven is hot.
• No additional operation/setting is required in order to operate
the appliance at the rated frequencies.
• The oven can be located high in a column or under a worktop.
to allow proper circulation of the fresh air required for cooling and
• For a correct use of the oven it is advisable not to put the food in
direct contact with the racks and trays, but to use oven papers
and/ or special containers.
• WARNING: before initiating the automatic cleaning cycle:
- Clean the oven door;
- Remove large or coarse food residues from the inside of the oven
using a damp sponge. Do not use detergents;
-Do not place tea towels.
• ln ovens with meat probe it is necessary, before making the
cleaning cycle, close the hole with the nut provided. Always close
the hole with the nut when the meat probe is not used.
• During the pyrolytic cleaning process, surfaces can heat up more
than usual, children must therefore be kept at a safe distance.
•
the Pyrolizer is working, this will prevent the hob from overheating.
EN 7
WARNINGS:
•This product is exclusive for oven appliances.
It should only beused as described in this User Manual.
• DO NOT TOUCH Heat Feel Sensor WITH BARE HANDS
JUSTAFTER COOKING. Always wear oven gloves to remove Heat
Feel Sensor from the food after cooking.
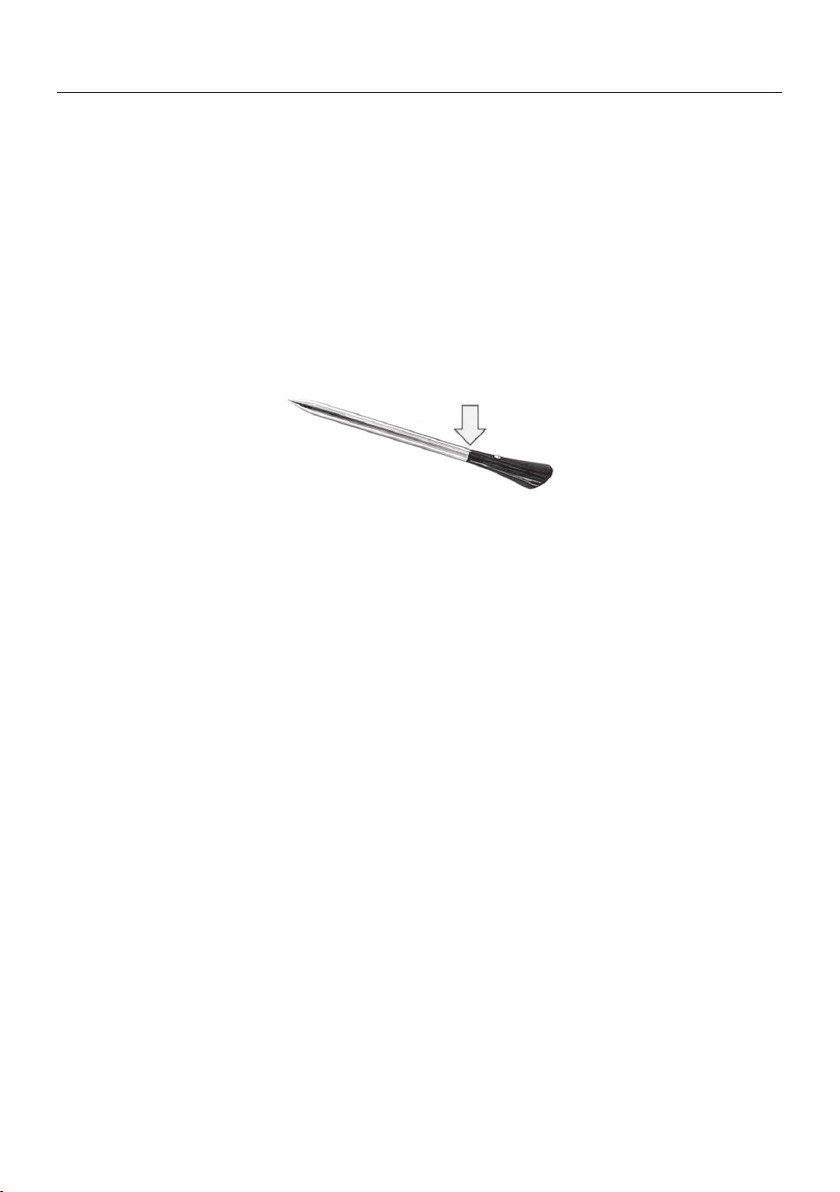
• It is required to FULLY INSERT Heat Feel Sensormetal bar
properlyinto the food until the BLACK ceramic EDGE of it during
cooking.
• Do not expose the metal part of Heat Feel Sensor to the heat
generated by oven directly. Do not expose the metal part of Heat
Feel Sensor to the heat generated by the appliance.
• Do not use Heat Feel Sensor in another appliance except for the
built-in oven.
• Do not use Heat Feel Sensor in a microwave oven.
• Heat Feel Sensor can be cleaned and washed but do not immerse
itlong in water.
• This product is not intended for use by persons with ages 12and
under.
• The supplier will not be liable for any damage of Heat Feel Sensor
due to misuse of the device.
• Clean the Heat Feel Sensor before the use
• Probe can work in this range of temperature: 10 °C to an internal
maximum temperature of 100°C of the metal part. Ceramic part
can reach 350°C.
• If the Heat Feel Sensor temperature exceeds 100°C, cooking will
stopand the Heat Feel Sensor must be removed from the oven as
soon aspossible, wearing gloves, to avoid damage to the probe
.
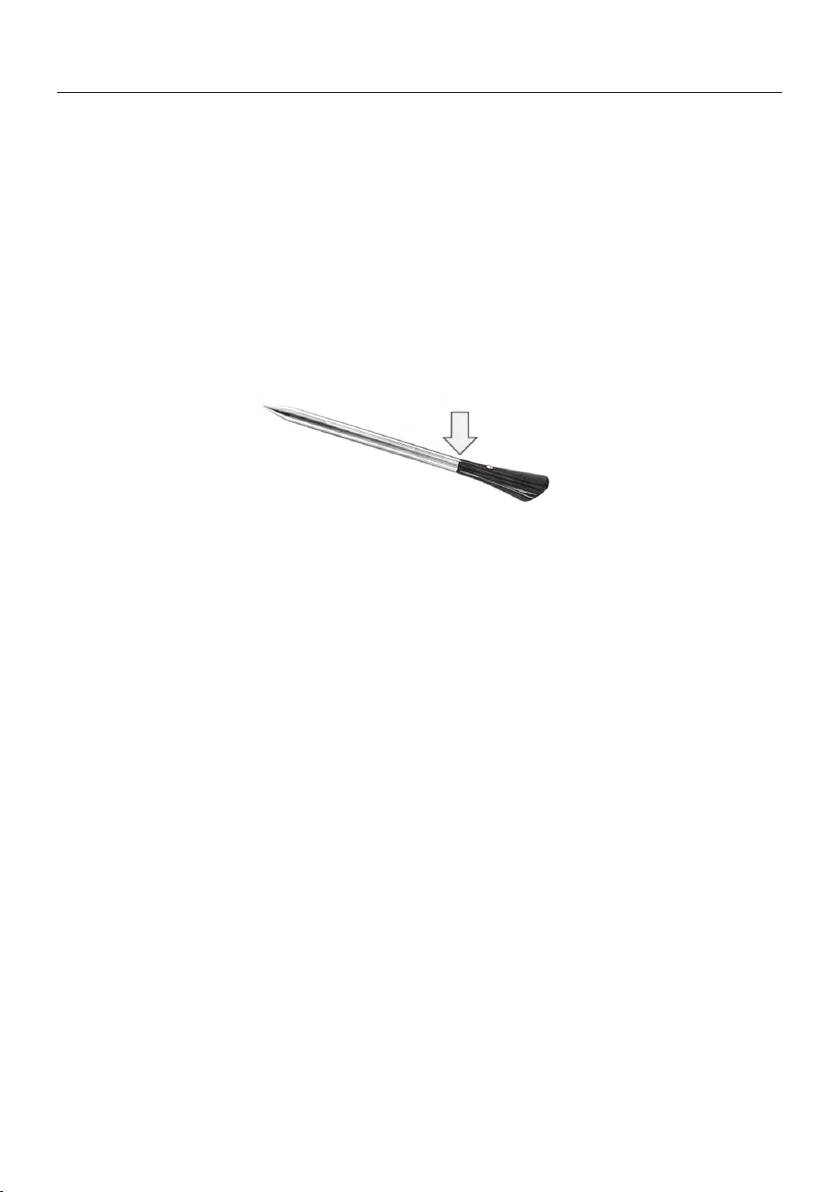
insert Heat Feel Sensor
in the food up to here
Heat Feel (Wireless temperature probe) WARNINGS

EN 8
General Instructions
Safety Indications
We thank you for choosing one of our products. For the best results with your oven, you should
read this manual carefully and retain it for future reference. Before installing the oven, take note
Having removed the oven from its packaging, check that it has not been damaged during trans-
is absolutely normal and, if it occurs, you should wait for the smoke to dissipate before putting
food in the oven. The manufacturer accepts no responsibility in cases where the instructions
contained in this document are not observed.
NOTE: the oven functions, properties and accessories cited in this manual will vary, depending
on the model you have purchased.
Only use the oven for its intended purpose, that is only for the cooking of foods; any other use, for
example as a heat source, is considered improper and therefore dangerous. The manufacturer
cannot be held responsible for any damage resulting from improper, incorrect or unreasonable
usage.
The use of any electrical appliance implies the observance of some fundamental rules:
- do not pull on the power cable to disconnect the product from the socket;
- do not touch the appliance with wet or damp hands or feet;
- in general the use of adaptors, multiple sockets and extension cables is not recommended;
Electrical Safety
ENSURE THAT AN ELECTRICIAN OR QUALIFIED TECHNICIAN MAKES THE ELECTRICAL
CONNECTIONS. The power supply to which the oven is connected must conform with the
laws in force in the country of installation. The manufacturer accepts no responsibility for any
damage caused by the failure to observe these instructions. The oven must be connected to
an electrical supply with an earthed wall outlet or a disconnector with multiple poles, depending
on the laws in force in the country of installation. The electrical supply should be protected with
suitable fuses and the cables used must have a transverse section that can ensure correct sup-
ply to the oven.
CONNECTION
The oven is supplied with a power cable that should only be connected to an electrical supply
with 220-240 Vac power between the phases or between the phase and neutral. Before the oven
is connected to the electrical supply, it is important to check:
- power voltage indicated on the gauge;
- the setting of the disconnector.

EN 9
The grounding wire connected to the oven’s earth terminal must be connected to the earth ter-
minal of the power supply.
WARNING
-
nuity of the power supply’s earth terminal. The manufacturer accepts no responsibility for any
accidents or other problems caused by failure to connect the oven to the earth terminal or by an
earth connection that has defective continuity.
NOTE: as the oven could require maintenance work, it is advisable to keep another wall socket
available so that the oven can be connected to this if it is removed from the space in which it is
Recommendations
Installation
After each use of the oven, a minimum of cleaning will help keep the oven perfectly clean.
Do not line the oven walls with aluminium foil or single-use protection available from stores. Al-
uminium foil or any other protection, in direct contact with the hot enamel, risks melting and de-
teriorating the enamel of the insides. In order to prevent excessive dirtying of your oven and the
resulting strong smokey smells, we recommend not using the oven at very high temperature. It
is better to extend the cooking time and lower the temperature a little. In addition to the acces-
sories supplied with the oven, we advise you only use dishes and baking moulds resistant to very
high temperatures.
The manufacturers have no obligation to carry this out. If the assistance of the manufacturer is
required to rectify faults arising from incorrect installation, this assistance is not covered by the
Incorrect installation may cause harm or injury to people, animals or belongings. The manufac-
turer cannot be held responsible for such harm or injury.
ventilation in the oven space to allow proper circulation of the fresh air required for cooling and
First Use
with a damp soft cloth. Wash all accessories and wipe inside the oven with a solution of hot water and
washing up liquid. Set the empty oven to the maximum temperature and leave on for about 1 hour, this
will remove any lingering smells of newness.
EN 10
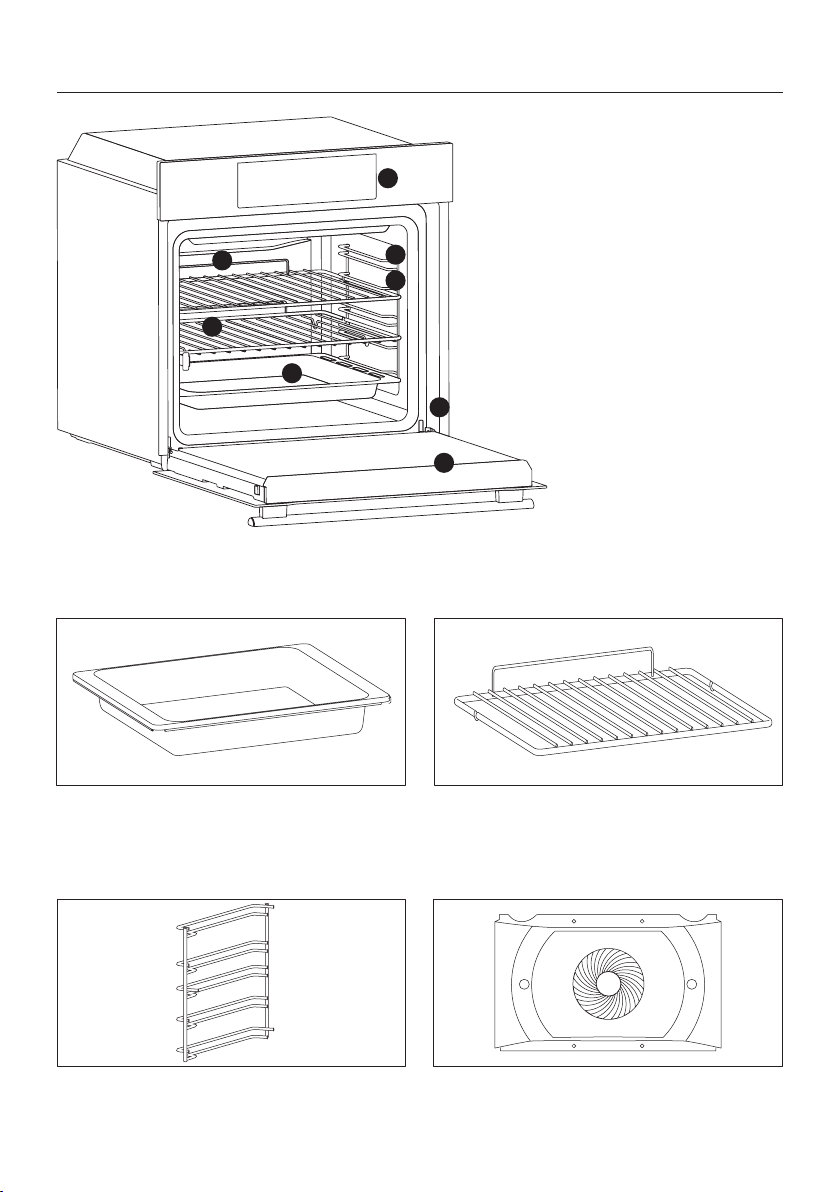
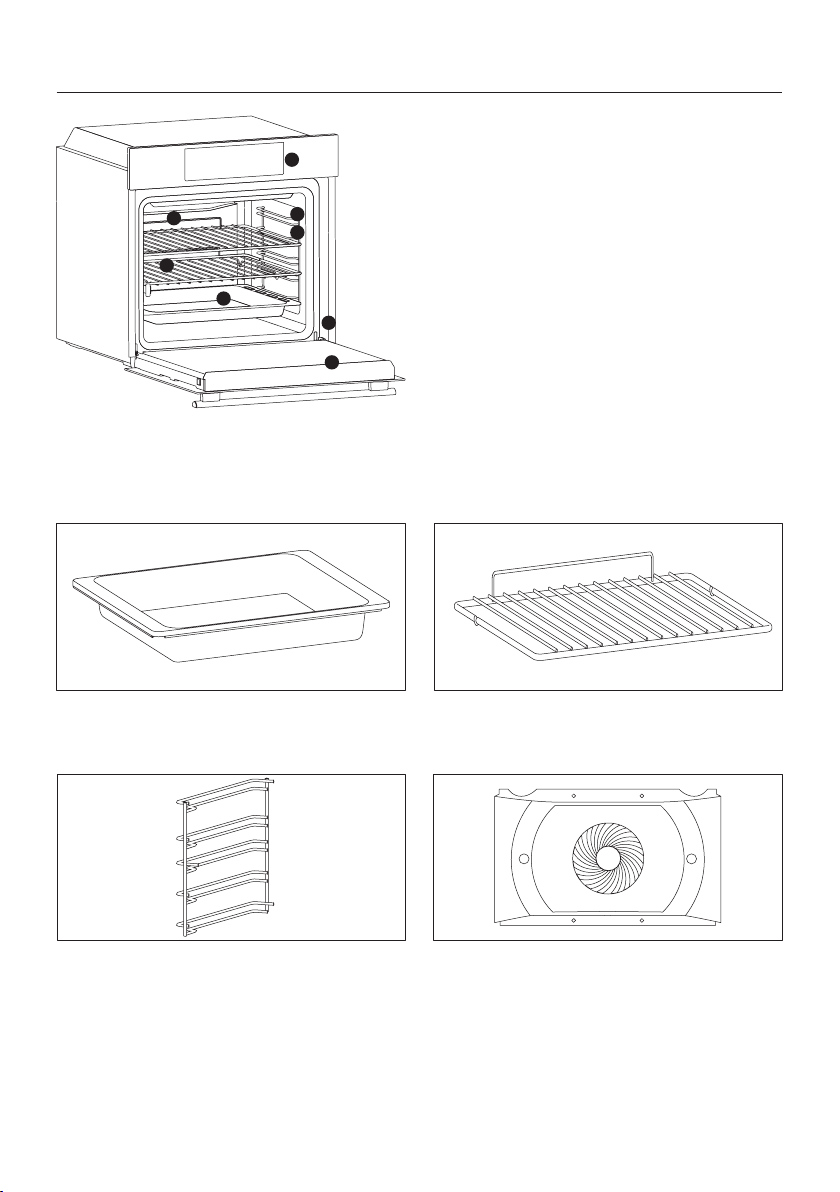
1. Control panel
2.
grid if included)
3. Grids
4. Trays
5.
6. Oven door
7.
8. Serial number
Product description
ACCESSORIES
Drip tray
Metal grid
1
2
7
3
8
4
6
5
Collects residues that drip when cooking food
on the grills.
Holds baking trays and plates.
Lateral wire grids
Located on both sides of the oven cavity, holds
metal grills and drip pans.
Chef panel
An air conveyor that increases air circulation
inside the oven. This enables improved cooking
EN 11
Hinges which ensure an automatic soft and
smooth movement during the closing phase of
the oven door.
Two guide rails which facilitate the cooking
status check as they allow easily the extraction
and repositioning of trays and grids inside the
oven cavity.
Telescopic guides
Softclose
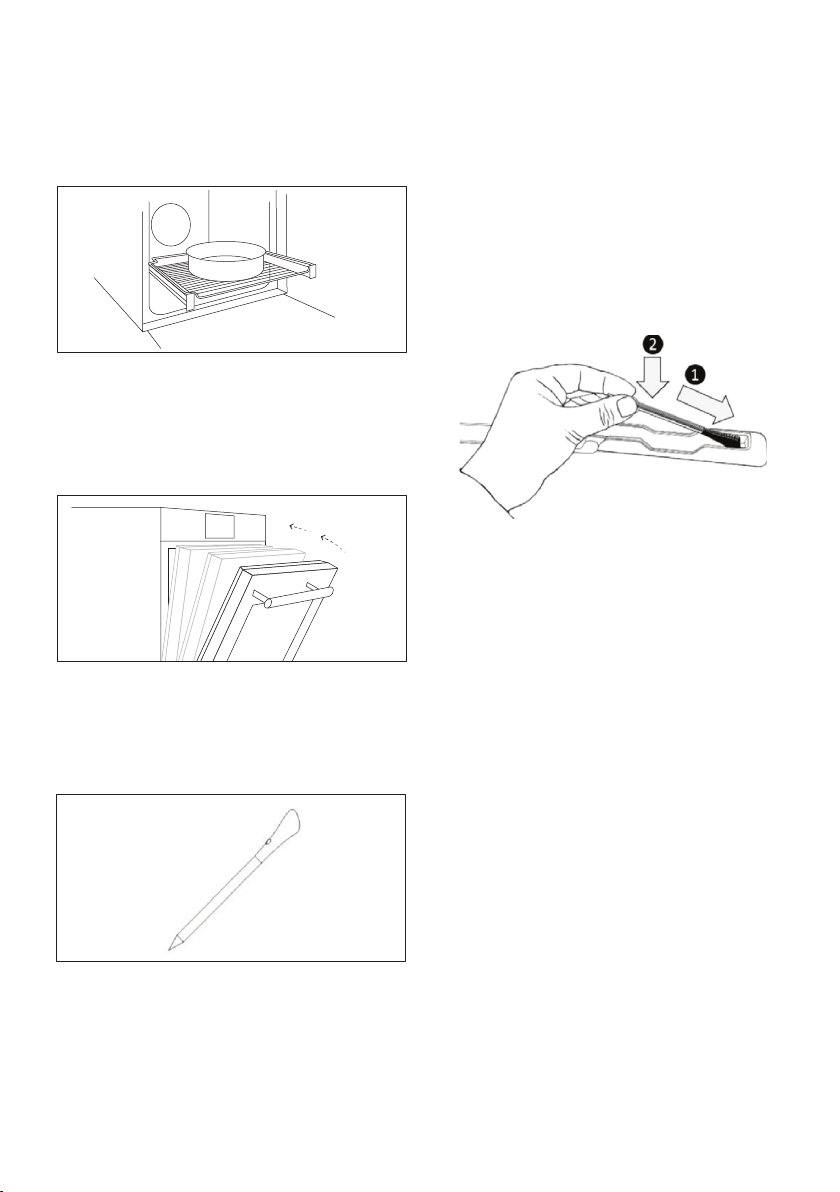
Heat Feel Sensor
HEAT FEEL SENSOR
• Before the use verify the charge of the Heat
Feel Sensor:
1.Put Heat Feel Sensor into the charger and
close the cover.
performance, more even cooking of food at
all temperatures, shorter cooking times and,
lastly, an even temperature distribution inside
the oven.
Measures the internal temperature of food
during cooking. Insert into the hole on the top
of the cavity. Should be inserted while oven is
cool.
2.Connect the charger to a USB power source,
such as USB adapter or USB socket of PC/
notebook with the USB cable. The charger
may not be working properly with power bank
Sensor is fully charged.
• Verify that Bluetooth of the oven is turned on.
• Make sure the Heat Feel Sensor is within
the range of monitoring distance. With long
distances the Heat Feel Sensor cannot be
detected by the oven.
• If the Heat Feel Sensor is covered by an
insulated material doses not communicate
with the oven. If the probe is disconnected
while standard cooking using the probe is
etc.…), the cooking process will be interrupted
after a brief interval. During cooking with recipe
and probe, the cooking process continues for
the remaining scheduled time if disconnected.

EN 12
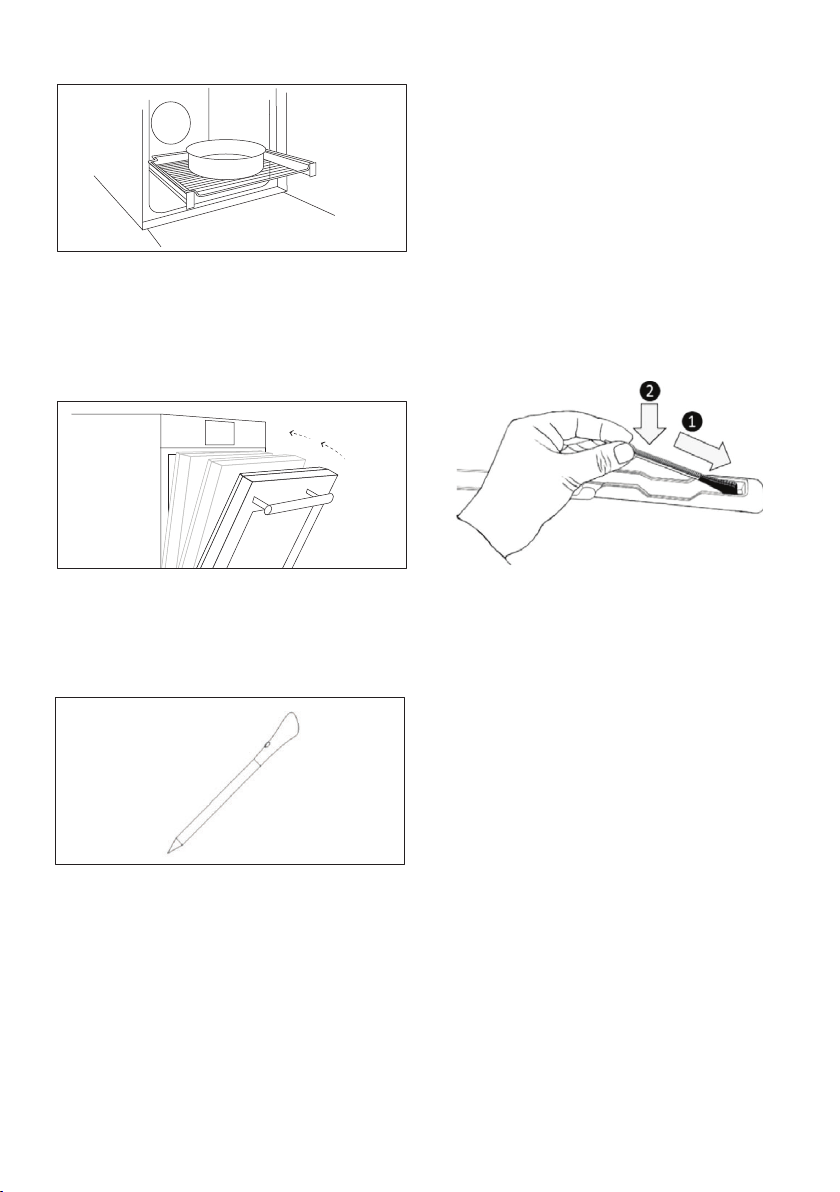
Turnspit
No pre-heating is required for rotisserie cooking.
Cooking with the door closed.
The energy consumption is 90-95% less than tradi-
tional system.
• Unscrew the hooks
• Insert the spit into the meat to be cooked
• Secure the meat with the hooks
• Tighten the screws
• Insert the spindle into the hole where the motor is
located.
• Remove the handle and use it at the end of cooking
to avoid burn when taking the food out of the oven

EN 13
Control panel
Start
Pause
Functions Time Temperature
On/o
1 6
2 3 4
Navigation buttons
5
Symbol Function Description
On/o
Functions
Time
normally to turn on the Minute Minder timer ; hold it down for 3
Temperature
door will automatically be locked and feedback will be displayed
.
Navigation
Buttons
Navigation buttons for setting functions and parameters.
Start
Pause
1
2
3
4
5
6
Please refer to next pages for detailed information on the display areas
EN 14
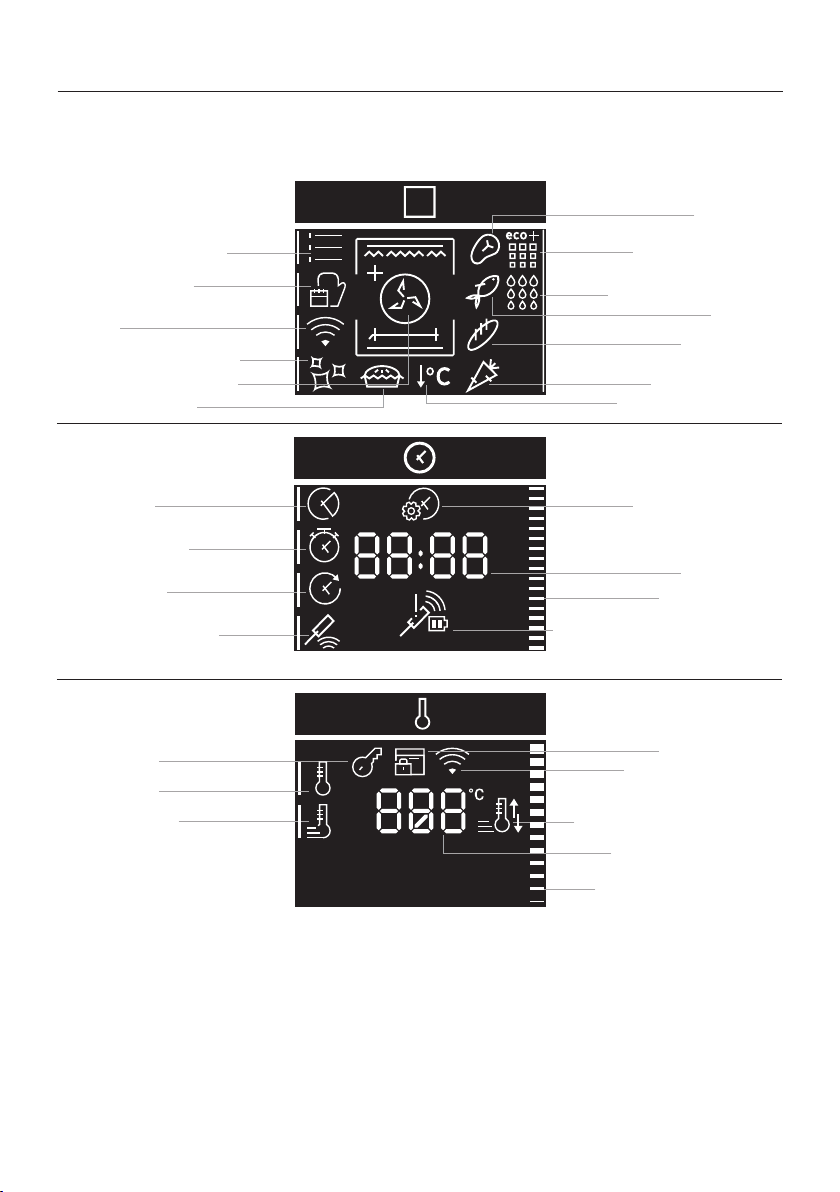
Display
functions and parameters
a. Manual functions
d. Cleaning functions
d2. Pyrolysis Eco
d3. Pyrolysis +
i. Set time of day
d4. Door Lock
e. Duration
d1. Hydroeasyclean
Time value
l. Preheat and cool down
feedback
f. Kitchen timer
b3. Bakery
Time indicator
Temperature indicator
g. Delay start
b4. Vegetables
h. Heat feel sensor
k. Fast preheating
c. WiFi
m. Key Lock
b. Food cooking
categories
FUNCTIONS AREA
TIME AREA
TEMPERATURE AREA
c1. Wi-Fi feedback
a1. Function symbols
h1. Heat feel sensor feedback
(battery and signal status)
j. Preheating
b2. Fish
b1. Meat
Temperature value
a2. Master bake
a3. Gentle cooking
EN 15
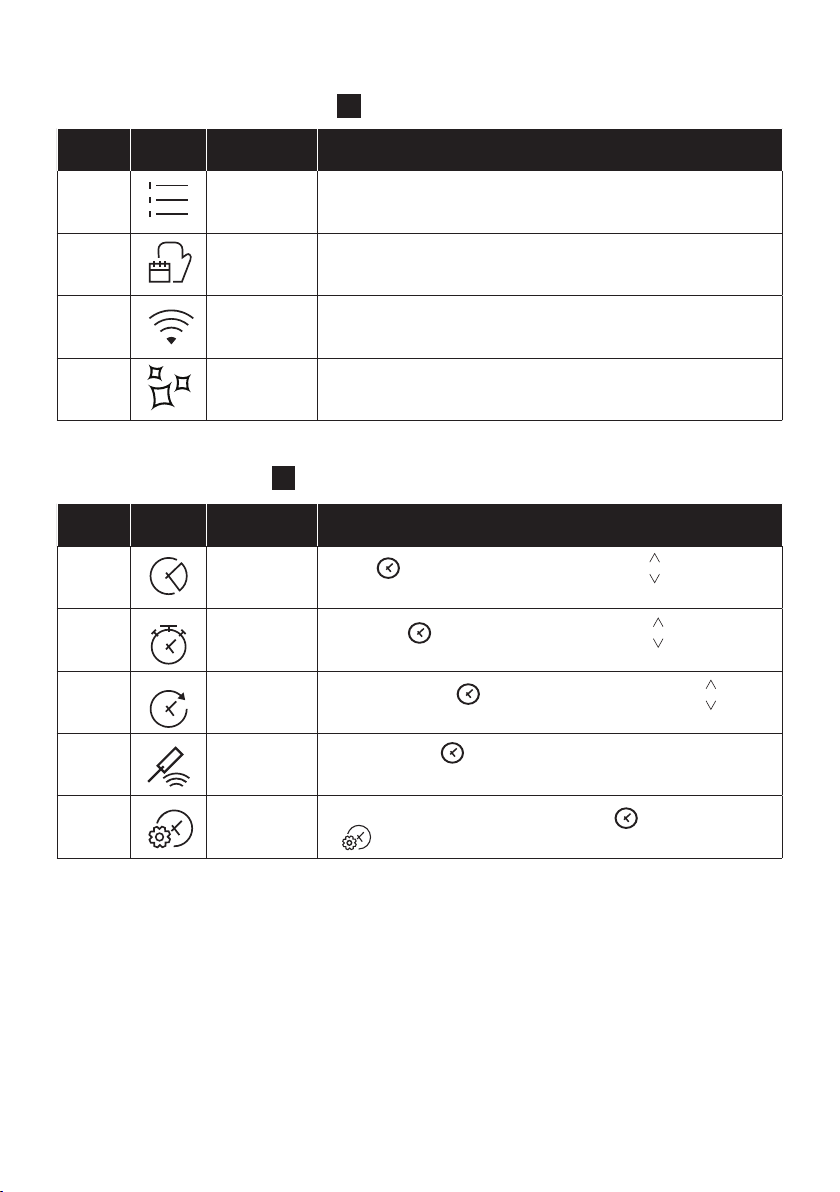
MAIN MENU – TIME AREA
3
Symbol Function Description
e
Duration
Press to set the cooking duration, use the keys to regulate
the time.
f
Kitchen
timer
Press twice to set the kitchen timer, use the keys to regulate
the time.
g
Delay start
Press three times to set the delay start, use the keys to
regulate the time.
h
Heat feel
sensor
Press four times to active the cooking with probe, see page 20
to see how it works.
i
Set time of
day
With the oven on standby, press and hold down for 3 seconds
to .
Symbol Function Description
a
Manual
functions
This function allows to choose cooking functions, temperature
and duration.
b
Food
categories
In this menu you can access a 4 food cooking categories already
integrated on your oven.
c
WiFi
In this mode you can connect your oven to a network and enroll it
with the hOn App.
d
Cleaning
functions
This function allows to choose a cleaning system available on your
oven.
The menus in overview
MAIN MENU – FUNCTIONS AREA
2
EN 16
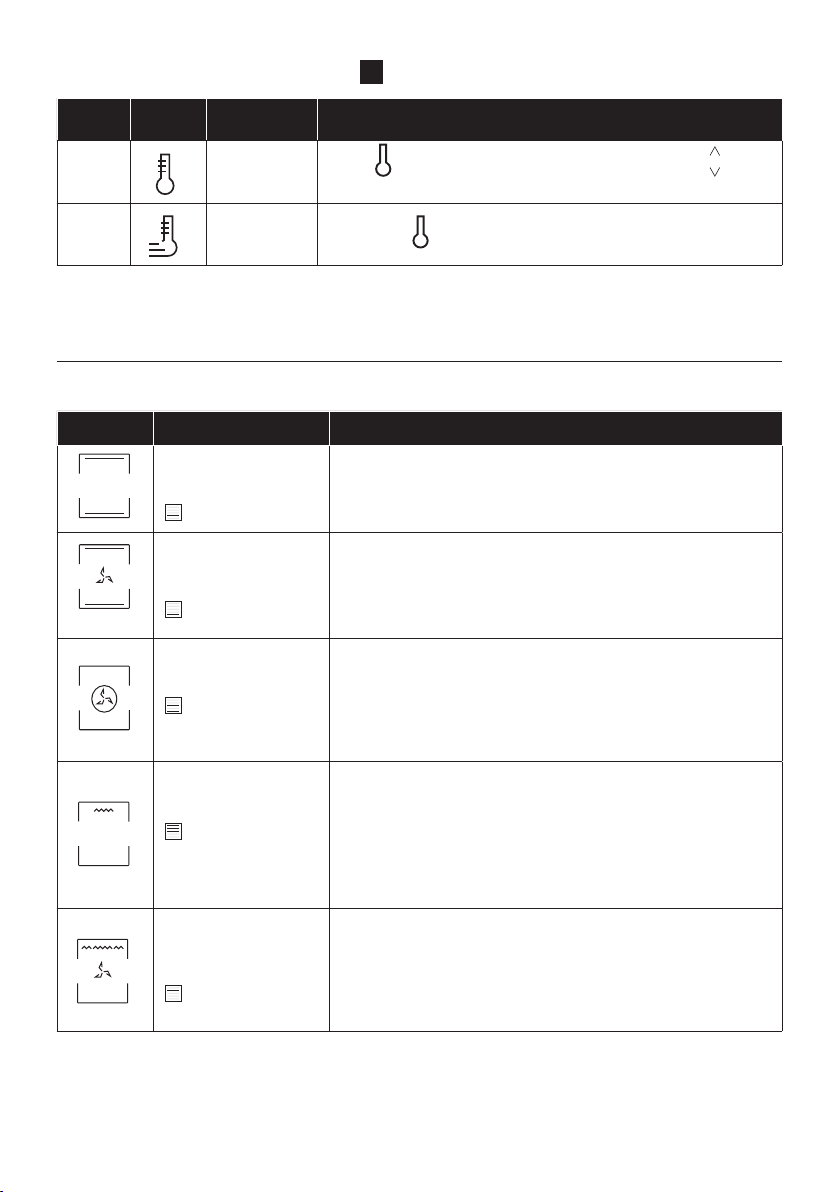
MAIN MENU – TEMPERATURE AREA
4
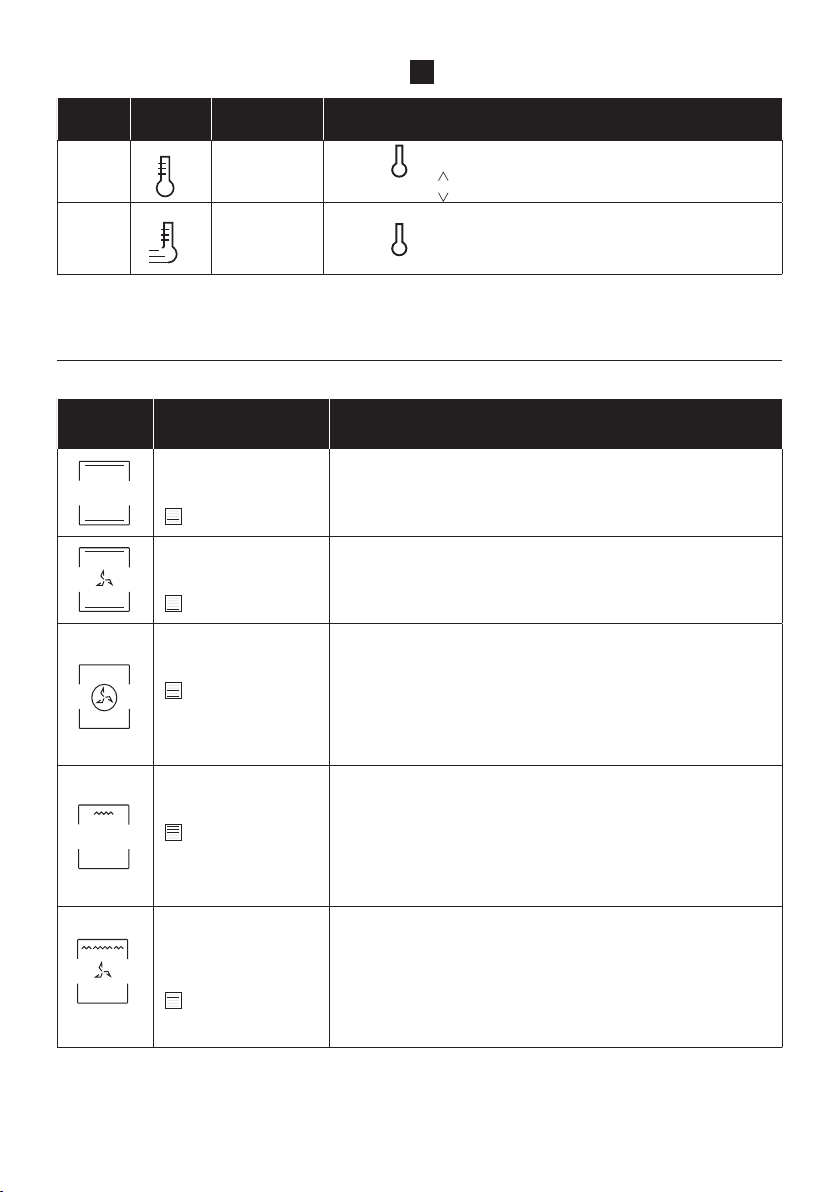
Symbol Function Description
j
Preheating
Press to set the preheating temperature, use the keys to
regulate the value.
k
Fast
preheating
Press twice to set the fast temperature.
* Depending on the oven model.
** Ideal temperature for suggested foods.
***Tested in accordance with the EN 60350-1 for the purpose of energy consumption declaration and energy class
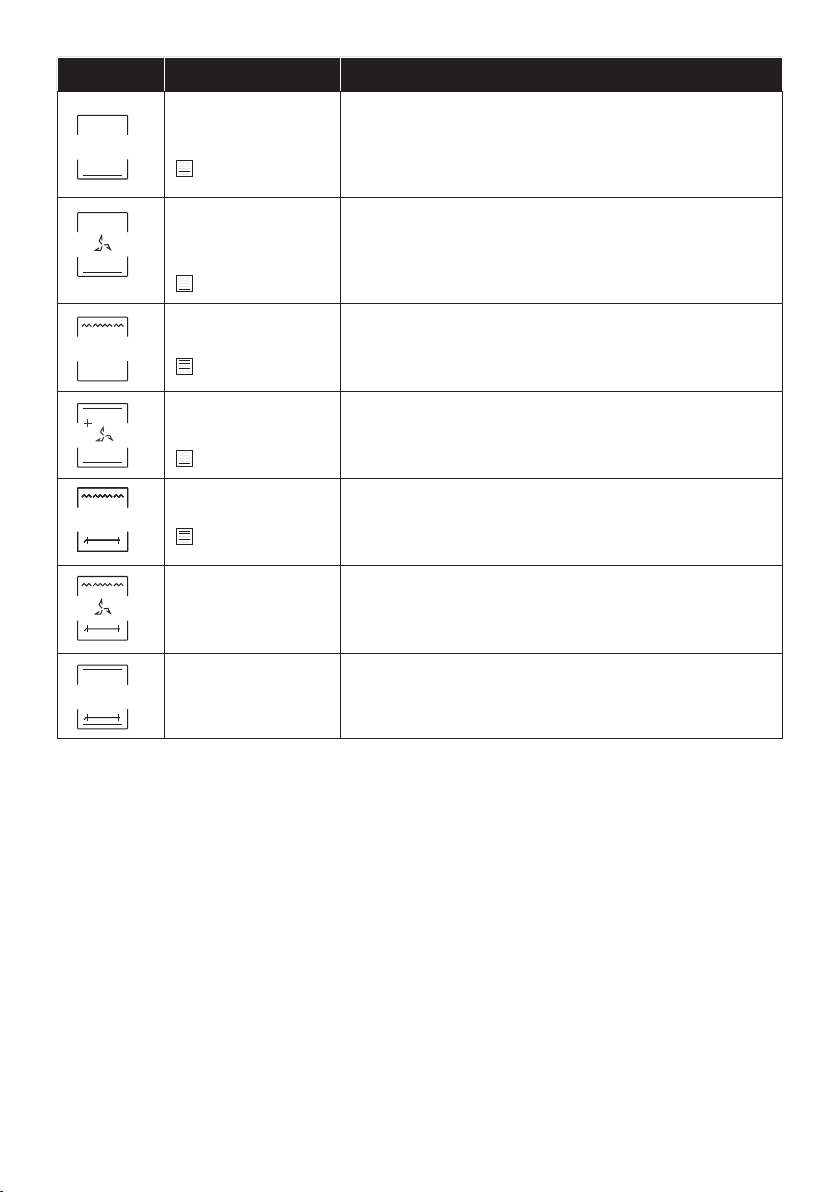
Symbol Description Suggestions
Conventional ***
150-200°C **
2
nd
/3
rd
level
IDEAL FOR: cakes, breads, biscuits, quiches on one level using
both upper and lower heating.
Can be used with Heat Feel sensor.
Fast Preheat option available.
Convection + Fan
180-200°C **
2
nd
/3
rd
level
IDEAL FOR: roasts, casseroles, vegetables and pies with moist
content.
Can be used with Heat Feel sensor.
Fast Preheat option available.
Multi-level
150-230°C **
3
rd
for single level
1
st
+3
rd
for double
level
IDEAL FOR: cakes, biscuits and pizzas on one or more levels.
Can be used with Heat Feel sensor.
Fast Preheat option available.
Grill
L3 (power) **
5
th
level for thin
food
3
rd
/ 4
th
level for thick
food
Grill + Fan
200°C **
2
nd
/ 3
rd
/4
th
level
Uses the top heating element with the fan to circulate the air
inside the oven. Use with the door closed. Slide the drip tray
under the shelf to collect juices. Turn food over halfway through
cooking. Preheating is required for red meats but not for white
meats.
COOKING MODES *
Manual functions (a1)

EN 17
Symbol Description Suggestions
Bottom heating
160-180°C **
1
st
/2
nd
level
IDEAL FOR: crème caramel, puddings and bain marie on one
Can be used with Heat Feel sensor.
Fast Preheat option available.
Bottom heating + Fan
170-210°C **
1
st
and 2
nd
level
IDEAL FOR: pizzas, salty cakes, tarts and foods with liquid
toppings on one level .
Can be used with Heat Feel sensor.
Fast Preheat option available.
Supergrill
L3 (power) **
4
sth
and 5
th
level
IDEAL FOR: big quantities of sausages, steaks and toast bread.
The entire area below the grill element becomes hot. Use
with the door closed. Turn food two thirds of the way through
Soft +
150-200°C
2
nd
/3
rd
level
IDEAL FOR: cakes and breads on one level.
Grill+Turnspit
L3 power
IDEAL FOR roasting foods such as chicken breasts, quails or
Place a baking tray underneath the food at Level 1 to collect
drips and juices.
Grill+Fan+Turnspit
200°C
IDEAL FOR roasting foods such as large chicken or turkey on
both sides at the same time.
Place a baking tray underneath the food at Level 1 to collect
drips and juices.
Conventional+
Turnspit
200-240°C
IDEAL FOR: Roasting beef or pork roasts. Place a baking tray
underneath the food at level 1 to collect drips and juices.
* Depending on the oven model.
** Ideal temperature for suggested foods.
***Tested in accordance with the EN 60350-1 for the purpose of energy consumption declaration and energy class
EN 18
SPECIAL FUNCTIONS *
Symbol Description Suggestions
a2
Master bake ***
180-200°C **
2° level
Ideal to keep food soft inside and crunchy outside.
For healthy cooking, this function reduces the amount of
fat or oil required. The combination of heating elements
with a pulsating cycle of air ensures even baking results.
a3
Gentle cooking
This function ensures the food remains tender and
succulent; thanks to the lower temperature, the surface
browning is minimized. This function is ideal for meat
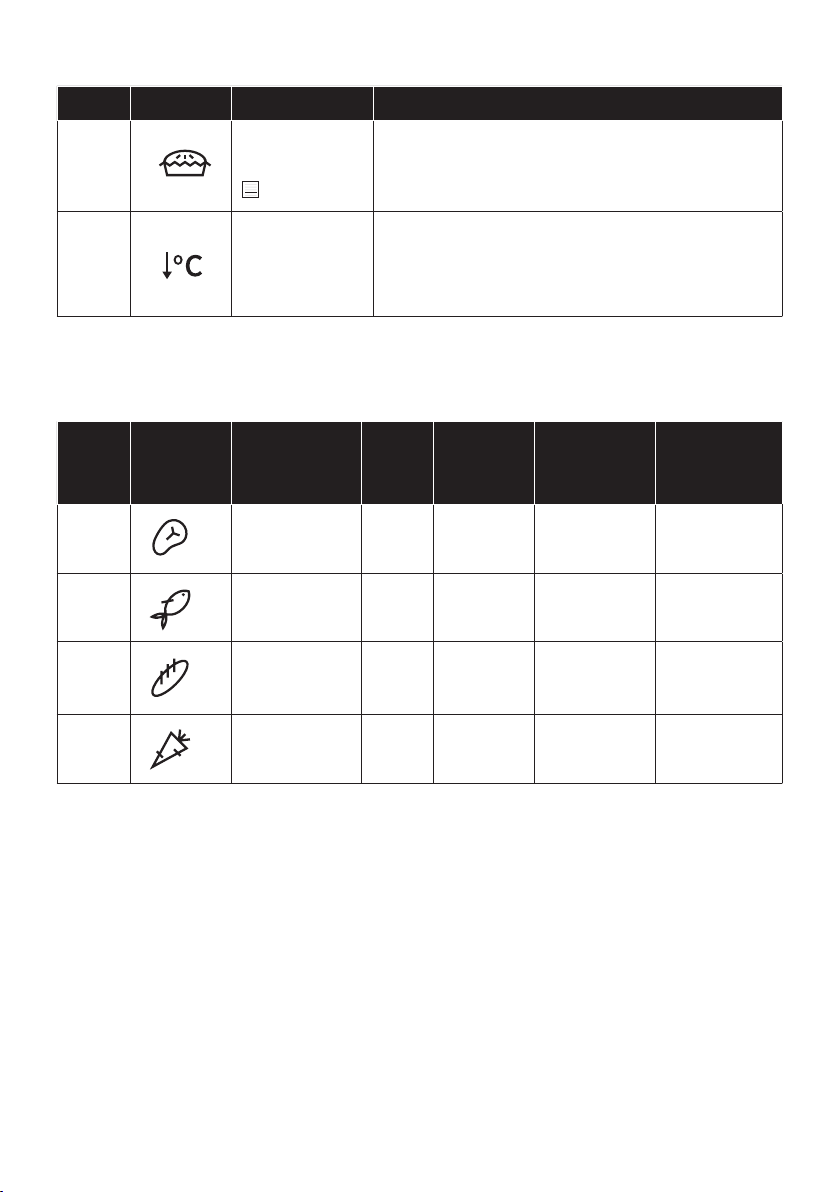
FOOD COOKING CATEGORIES
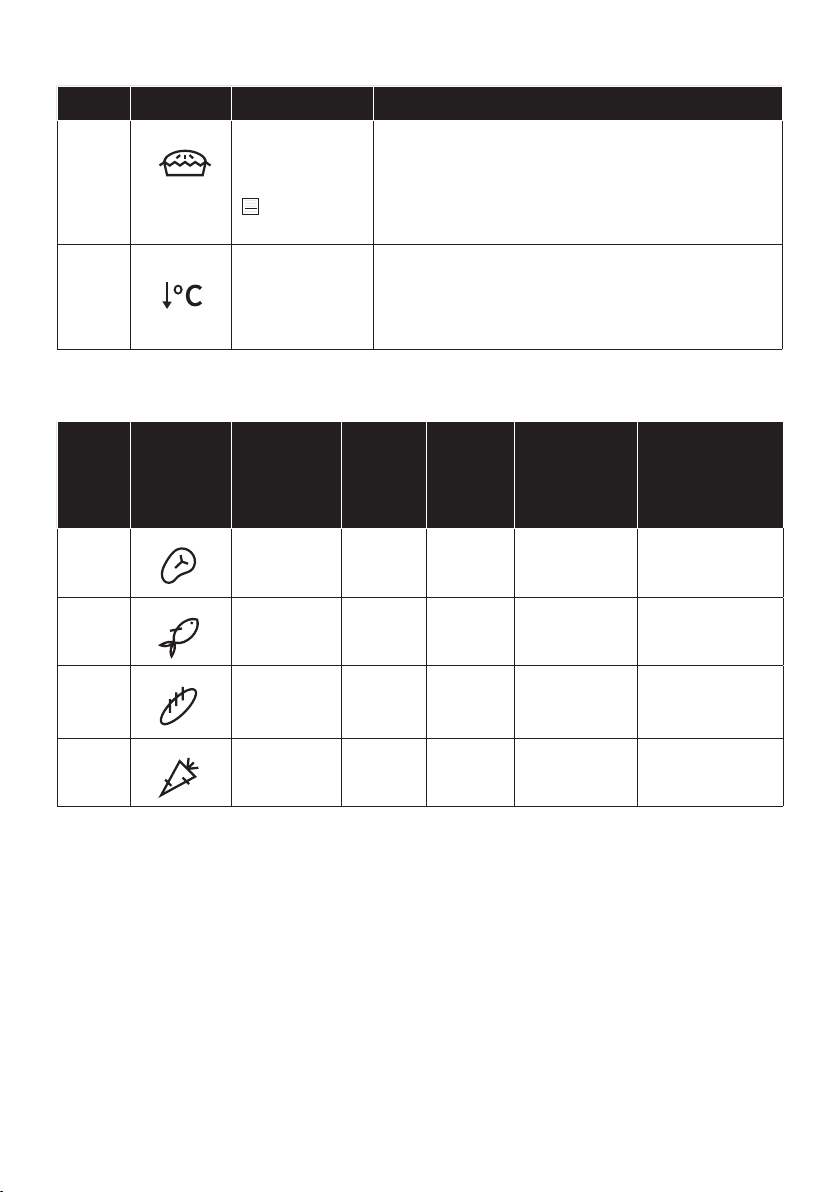
Symbol Description
Pre-
heat
Cooking
position
Heat Feel
tempera-
tures (°C)
Description
b1
Meat Y 2-3
58-62-65°C
for beef
For roasts and
cuts of beef,
veal and pork.
b2
Fish Y 2-3
65°C
b3
Bakery Y 1-2
95° for bread
and pasta
baked
For breads,
lasagne and
pastries.
b4
Vegetables Y 3-4 70°C
For roasted
vegetables and
potatoes.
Perfect cooking results guaranteed thanks to the pre-set parameters by category. The default
values of time and temperature refer to quantities for 4 servings. Use the table below to set the
cooking time correctly; use the Heat Feel sensor for best results
* Depending on the oven model.
** Ideal temperature for suggested foods.
***Tested in accordance with the EN 60350-1 for the purpose of energy consumption declaration and energy class

EN 19
Symbol Description Suggestions
a2
Master bake ***
180-200°C **
2° level
Ideal to keep food soft inside and crunchy outside.
For healthy cooking, this function reduces the amount of
fat or oil required. The combination of heating elements
with a pulsating cycle of air ensures even baking results.
a3
Gentle cooking
This function ensures the food remains tender and
succulent; thanks to the lower temperature, the surface
browning is minimized. This function is ideal for meat
Demo mode
ON / OFF
ADDITIONAL FUNCTIONS
Sym-
bol
Description Suggestions
m
Key lock
This function enables to lock the screen in order to
prevent any unwanted use by minors. Press and hold down
the same to deactivate it.
Favourite
function
.
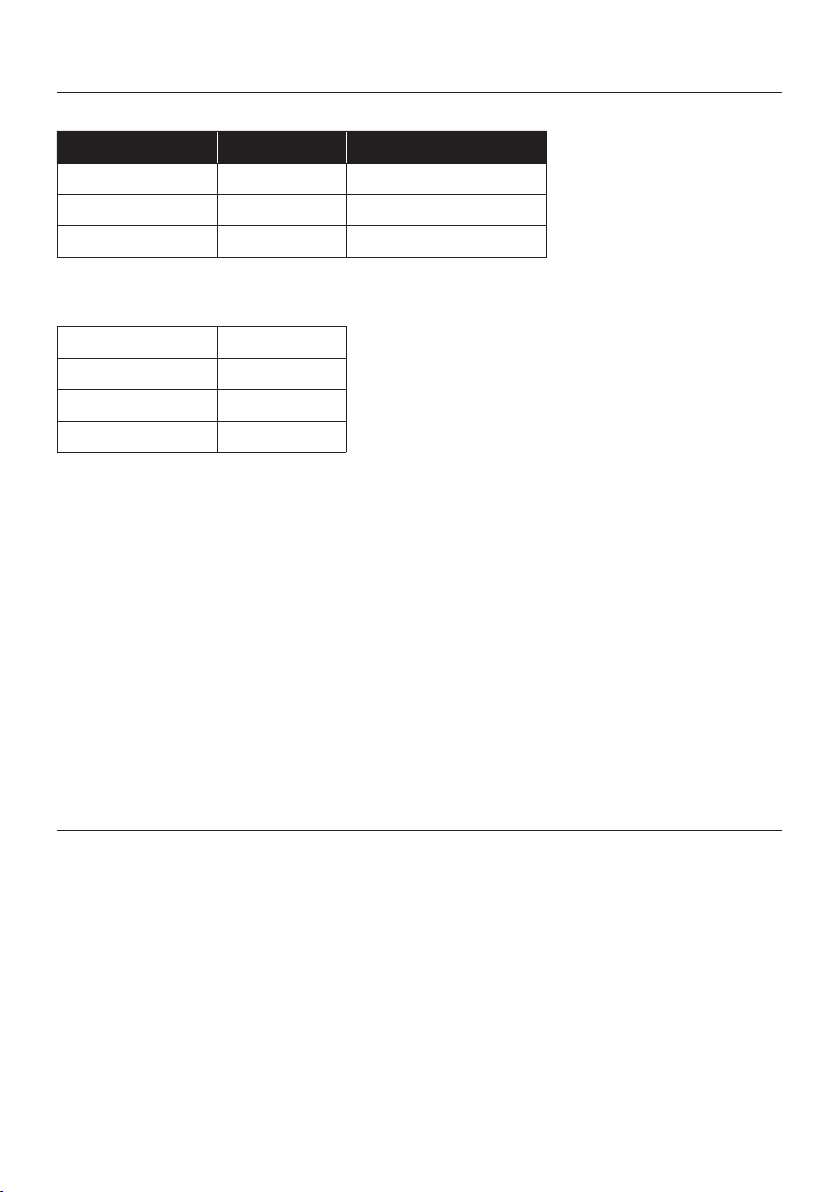
Food
Category
Serving size/grams (in bold,
default setting)
Cooking time (min)* *
after preheat
Meat 4/800; 6/1200; 8/1600 50; 52; 55
Fish 4/600; 6/900; 8/1200 36; 38; 40
Bakery 4/600; 6/900; 8/1000 42; 50; 56
Vegetables 4/800; 6/1200; 8/1600 57; 60; 65

Heat Feel Sensor enrollment
Step 1
• Tap
icon to select the
function and Tap
to select Heat feel sensor.
Step 2
• After a while, the oven
will recognize the probe
code. Tap
icon to set the
target temperature.
Step 3
• Tap , set the desired
temperature target, and
tap
.

EN 21
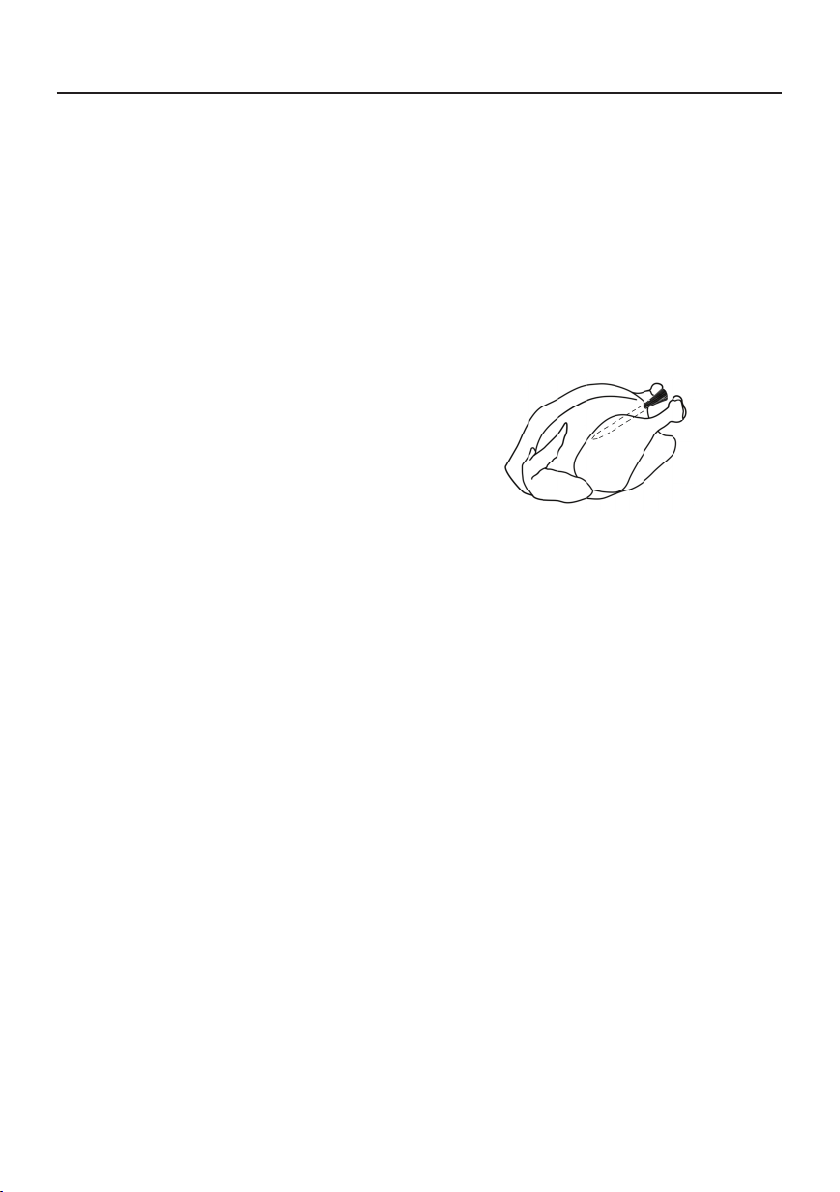
Cooking tips - Heat Feel Sensor
f
The Heat Feel sensor has one measuring point, insert it fully into the food with the metal tip located
at the centre of the food.
to correctly monitor the cooking process.
Thanks to its wireless design, the Heat Feel sensor can be used also to monitor foods that change
MEAT/ROASTS/STEAKS: insert the probe diagonally in the thickest part. For cylindrical shape
Suggested core temperatures:
rest for 15-20’ before serving)
- 55 – 60 – 65°C for other roasted meats
POULTRY: Insert the Heat Feel sensor into the thickest part of the breast. Suggested core
temperature for poultry is 83-85°C
Suggested core temperature: 65°C
BREAD/CASSEROLES: insert the Heat Feel sensor close to the geometric center of the food.
Suggested core temperature: 90°C
EN 22
Technology Wi-Fi Bluetooth
Standard IEEE 802.11 b/g/n Bluetooth v4.2, BR/EDR, BLE
2401÷2483 2402÷2480
100 10
WIRELESS PARAMETERS
PRODUCT INFORMATION FOR NETWORKED EQUIPMENT
• Power consumption of the product in networked standby if all wired network ports
are connected and all wireless network ports are activated: 2,0 W
Connectivity
How to activate wireless network port:
• If the oven is not enrolled, please follow the instruction for enrollment to enable WiFi.
• If the oven is enrolled, in WiFi menu select WiFi and set to On or hOn.
How to deactivate wireless network port:
•
•
Quick Pair
can proceed with enrollment on page 23.
on the oven until you enroll it.
turn on.
To enroll the oven after 30 minutes, follow the instructions on page 24.
Technology
W Bluetooth i-Fi
Standard Bluetooth v4.0 BLE
2400÷2480
Heat Feel Temperature Probe Model Et180:

EN 23
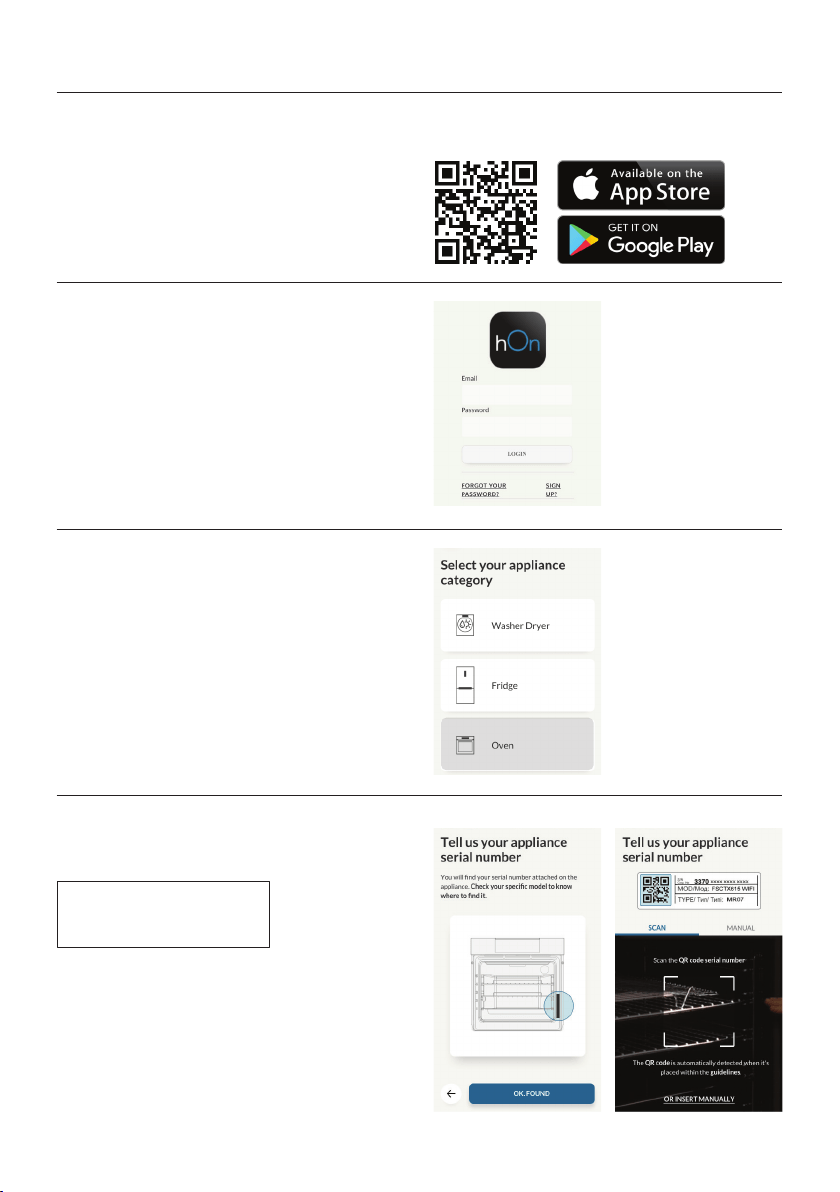
Oven enrollment on app
ON THE SMARTPHONE
Step 1
• Download hOn app
Step 2
• Log in or sign up.
Step 3
• Add new appliance
Step 4
• Scan the QR code or insert the serial number
Write here your serial number for future reference.

EN 24
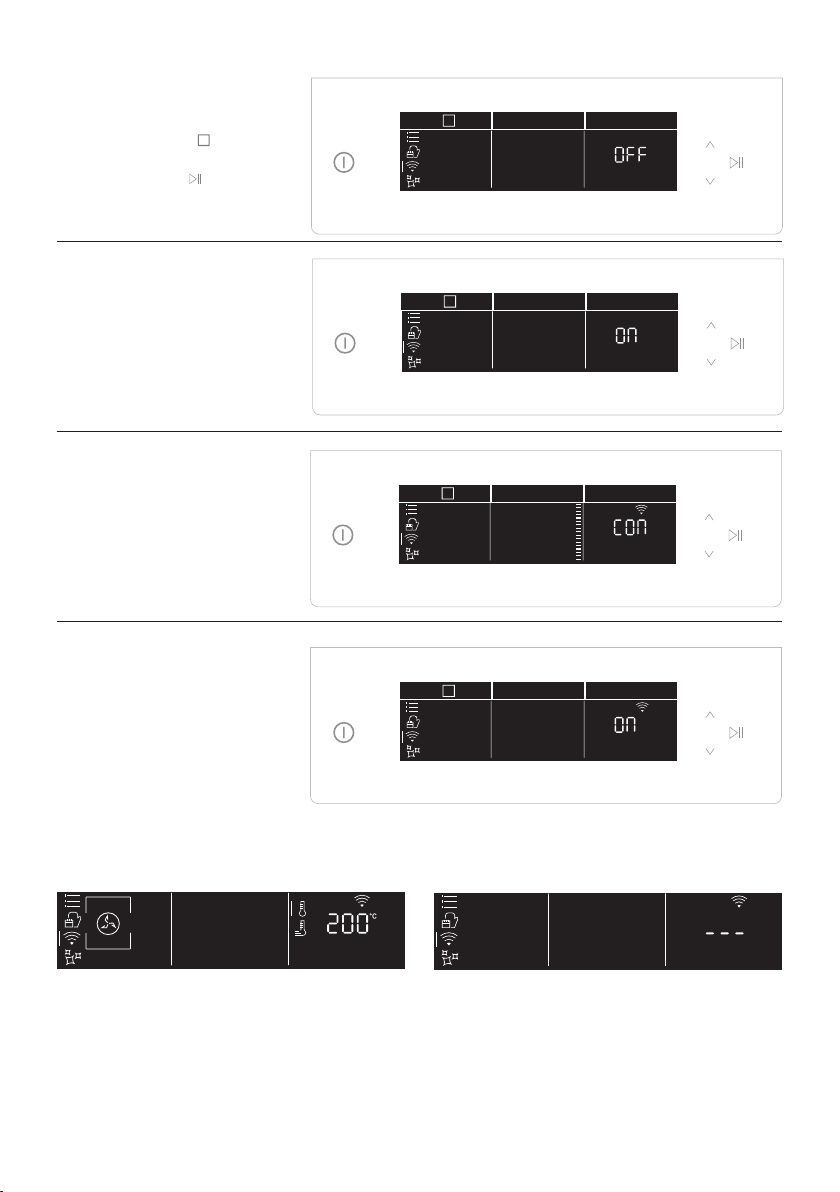
ON THE APPLIANCE
Step 5
• Tap
icon to select the
.
Step 6
• Tap and select On or
page 23 ) and tap start
.
Step 7
• After a while, the text
Connect begins to scroll.
Continue the pairing
process via app.
Step 8
•
the oven status will
automatically switch
according to your choice.
NOTE:
• Make sure to have minimum a 2.4GHz Home Wi-Fi network.
• Make sure to have your Home Wi-Fi password and name ready. You will need them later.
• Make sure your appliance is in a place where there is an excellent Home Wi-Fi signal.
• And yes, stay close to your appliance.
Router connection lost
While cooking - WiFi icon blinking Inside WiFi menu - Digits blinking
EN 25
Hereby, Candy Hoover Group Srl declares that the radio equipment is in compliance with Directive
the declaration of conformity is available at the following internet address: www.candy-group.com
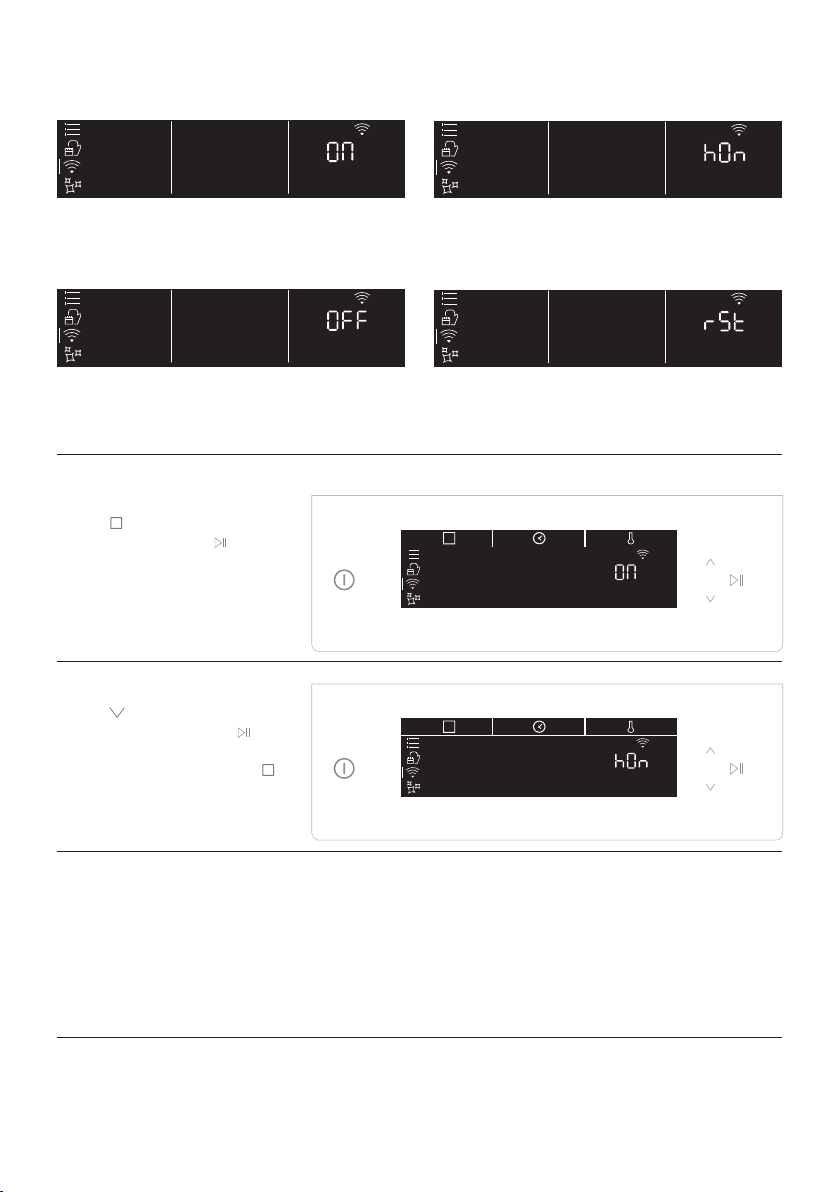
WiFi ON
It is only possible to monitor the oven status
by App.
WiFi OFF
The oven is not connected but still enrolled
with network credentials saved.
WiFi hOn
The oven can be used exclusively by App.
WiFi Reset
The connection is reset and a new enrollment
is possible.
Step 1
• Tap
icon to select the
will start blinking.
Step 2
• Tap icon to select the
to
activate remote control.
•
Remote control mode
EN 26
The lifecycle of the appliance can be extended
through regular cleaning. Wait for the oven to
cool before carrying out manual cleaning op
-
erations. Never use abrasive detergents, steel
wool or sharp objects for cleaning, so as to not
irreparably damage the enamelled parts. Use
only water, soap or bleach-based detergents
GLASS PARTS
It is advisable to clean the glass window with
absorbent kitchen towel after every use of
the oven. To remove more obstinate stains,
you can use a detergent-soaked sponge, well
wrung out, and then rinse with water.
OVEN WINDOW SEAL
If dirty, the seal can be cleaned with a slightly
damp sponge.
General notes on cleaning
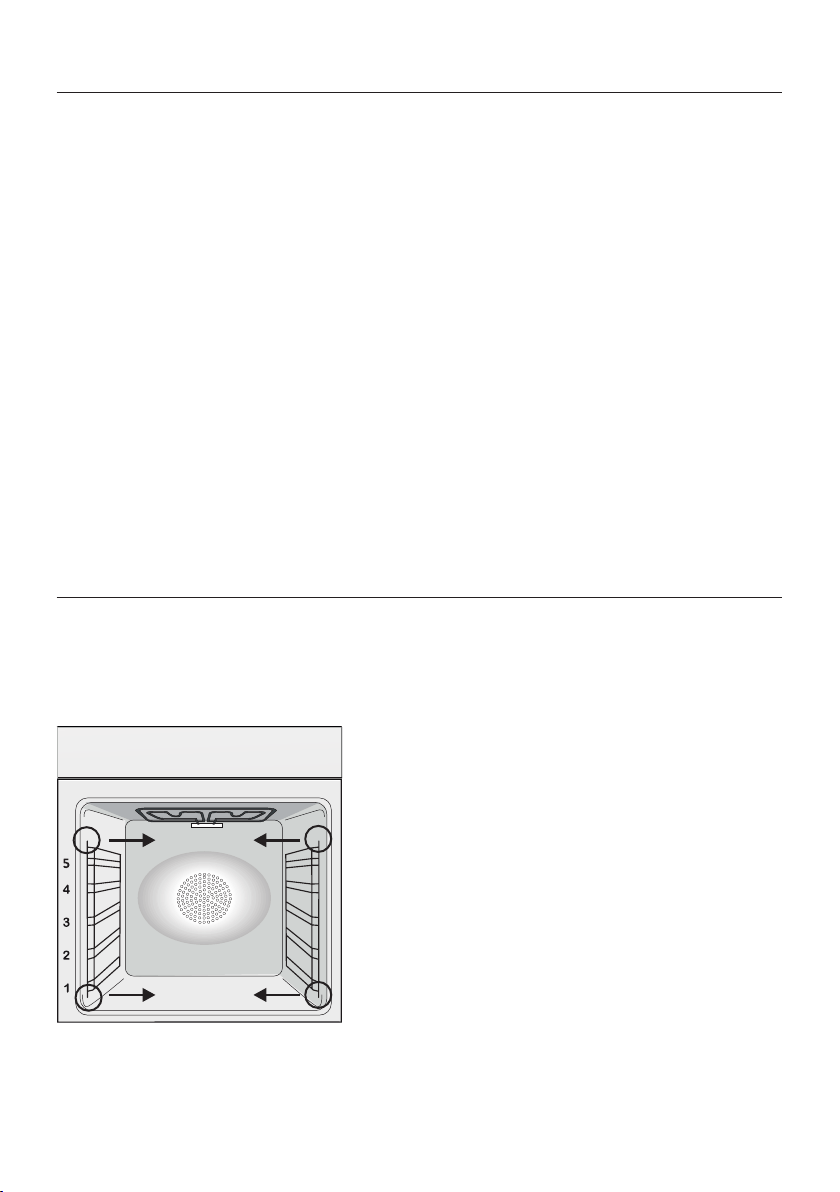
REMOVAL AND CLEANING OF THE SIDE RACKS
2. To clean the wire racks either put them in the dishwasher or use a wet sponge, ensuring that they
are dried afterwards.
Maintenance
ACCESSORIES
Clean accessories with a wet, soapy sponge
before rinsing and drying them: avoid using
abrasive detergents.
DRIP PAN
After using the grill, remove the pan from the
oven. Pour the hot fat into a container and
wash the pan in hot water, using a sponge and
washing-up liquid.
If greasy residues remain, immerse the pan in
water and detergent. Alternatively, you can
wash the pan in the dishwasher or use a com
-
mercial oven detergent. Never put a dirty pan
back into the oven.
CHANGING THE BULB
1. Disconnect the oven from the mains supply.
2. Undo the glass cover, unscrew the bulb and
replace it with a new bulb of the same type.
3. Once the defective bulb is replaced, replace
the glass cover.
This product contains one or more light

EN 27
1
4
7
2
5
8
3
6
9
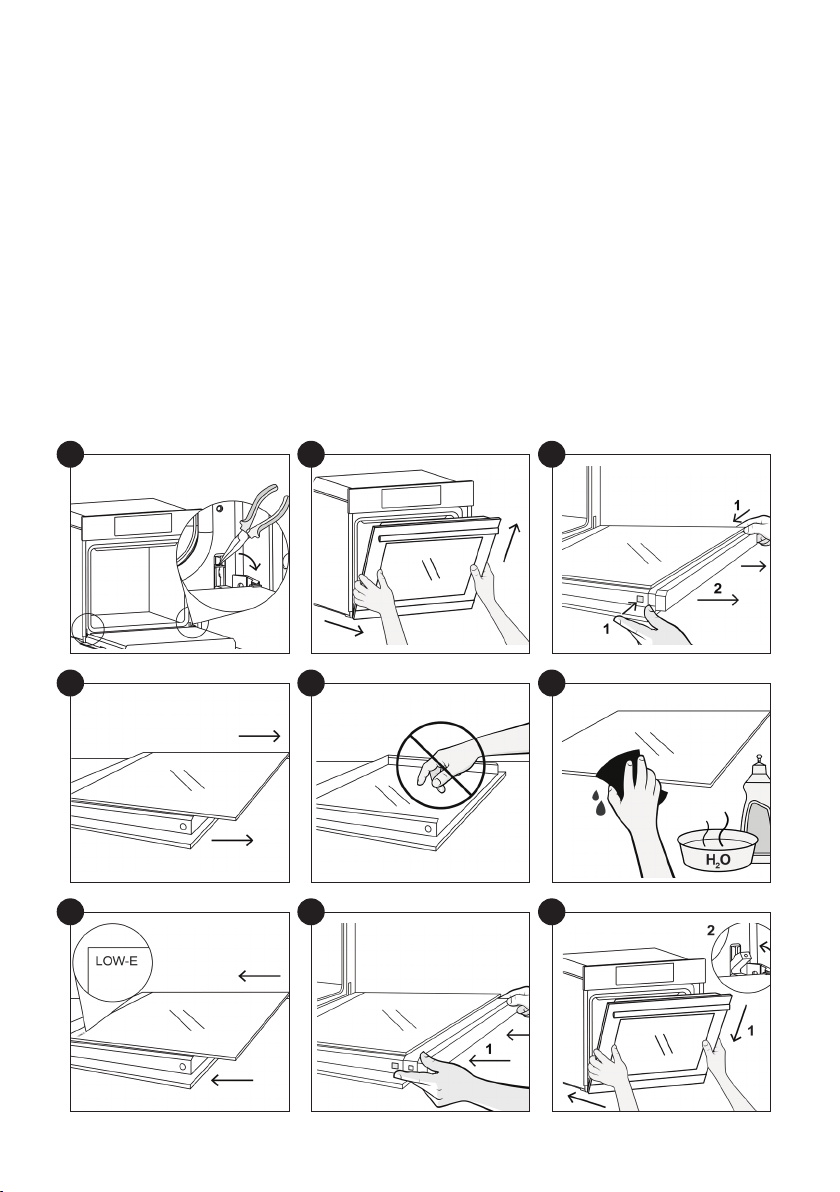
REMOVAL AND CLEANING OF THE GLASS DOOR
1.
2. Put the door at a 45° angle, then pull the door forwards and upwards at the same time to release
the handle facing down.
3. Press the two buttons on the left and right at the same time and pull the upper door cover
towards you to remove it.
4.
5.If there are glass panels in between, remove them and place them on a soft surface.
ATTENTION: the outer panel of glass is not removable
6. Clean the glass with a soft cloth using an appropriate cleaning product.
7. After cleaning, reassemble the parts in the opposite order to removal. On all glass panels, the
8.
9. Holding the door at 45°, simultaneously insert the right and left male parts of the hinge into the
holes of the hinges released, until you hear them click in place. Bring the door to an angle of 90° and
EN 28
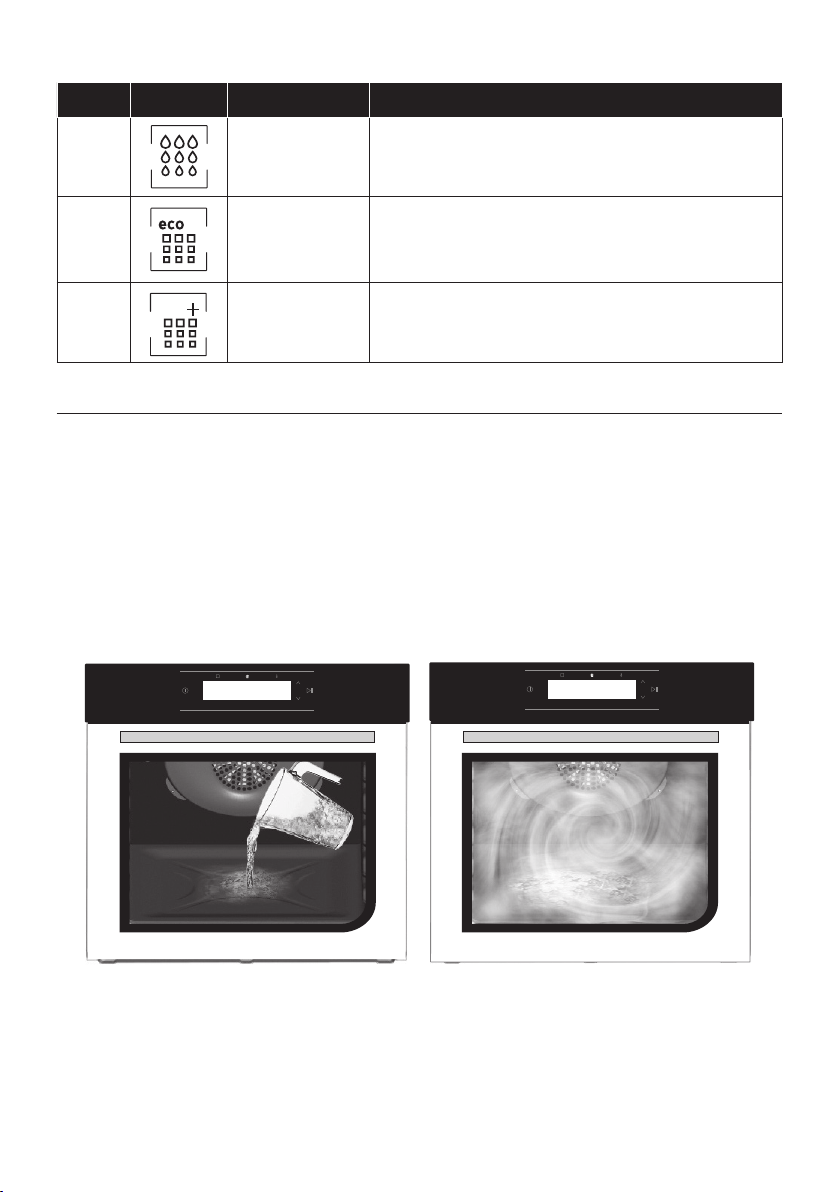
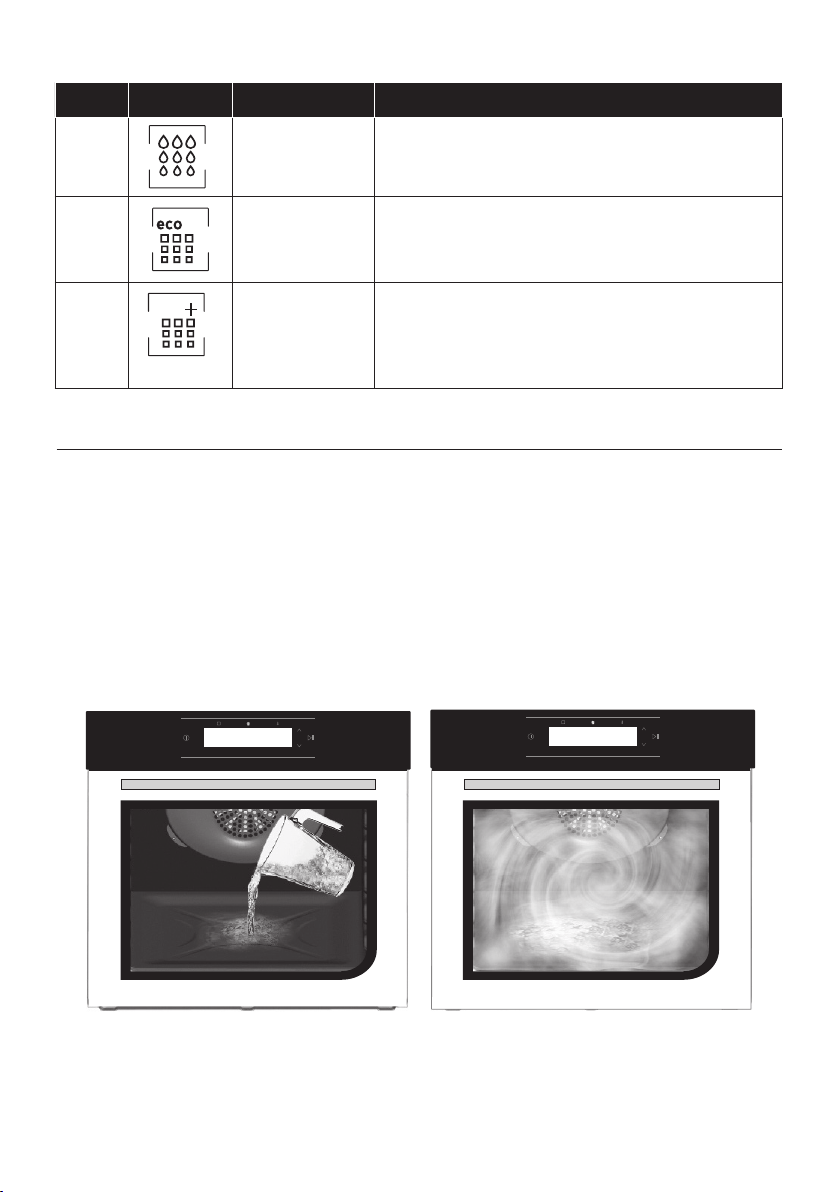
Hydro Easy Clean
The Hydro Easy Clean procedure uses steam to help remove remaining fat and food particles from the
oven.
1. Pour 300 ml of water into the Hydro Easy Clean container at the bottom of the oven.
4. Allow the program to operate.
5. After the cycle, allow the oven to cool down.
6. When the appliance is cool, clean the inner surfaces of the oven with a cloth.
Warning: Make sure that the appliance is cool before you touch it.
Care must be taken with all hot surfaces as there is a risk of burns. Use distilled or drinkable water.
Symbol Function Description
d1
Hydroeasyclean
d2
Pyrolysis Eco
For perfect, regular cleaning of the oven cavity.
This function enables to lock the door during the process
d3
Pyrolysis+
CLEANING FUNCTIONS *
300 ml
For extremely thorough cleaning and removing large
amounts of dirt from the oven cavity.
This function enables to lock the door during the

EN 29
Pyrolysis
The oven is equipped with a pyrolyser clea-
ning system, which destroys food residues at
high temperature. The operation is carried out
automatically by means of the programmer.
passing over a Pyrolyser wich starts as soon
as cooking begins. As very high temperatures
are required by the Pyrolyser, the oven door is
stopped at any time. The door cannot be ope-
ned until the safety lock is displayed.
NOTE :
oven, never use the gas burners or the electric
hot-plates while the Pyrolyser is working, this
will prevent the hob from overheating.
TWO PYROLYTIC CYCLE are pre-set:
PYROLYSIS ECO : Cleans a moderately stained
oven. Operates for a period of 90 minutes.
PYROLYSIS + : Cleans a heavily stained oven.
Operates for a period of 120 minutes.
Never use commercially available cleaning pro-
ducts on a Pyrolytic oven!
Tip : Carrying out Pyrolytic cleaning immedia-
tely after cooking allows you to take advantage
of residual heat, thus saving energy.
Before executing a pyrolytic cycle:
•Remove all the accessories from the oven
because they are not able to tolerate the
high temperatures used during the pyrolytic
cleaning cycle ; in particular removing grids,
side racks and the telescopic guides (refer
to the chapter REMOVING GRIDS AND SIDE
RACKS) .
•Remove any large spillages or stains as it
would take too long to destroy them. Also
excessively large amounts of grease could
ignite when subject to the very high tempe-
ratures of the Pyrolytic cycle.
•Close the oven door.
•Excess spillage must be removed before
cleaning.
• Clean the oven door;
• Remove large or coarse food residues from
the inside of the oven using a damp sponge.
Do not use detergents;
• Remove all accessories and the sliding rack
kit (where present);
• Do not place tea towels.
Using the pyrolitic cycle:
1- Tap
icon to select the cleaning functions
and, using the navigation buttons, choose
the preferred pyrolitic cycle.
2- It is possible to defer the start time of the
pyroclean cycle by changing the END time via
the programmer.
3- After few minutes, when the oven reaches a
high temperature, the door locks automatical-
ly. The pyroclean cycle can be stopped at any

EN 30
Waste management and environmental protection
This appliance is labelled in
accordance with European Di-
rective 2012/19/EU regarding
electric and electronic appli-
-
tain both polluting substances
-
fect on the environment) and base elements
-
rectly remove and dispose of the pollutants
and recover all the materials. Individuals can
play an important role in ensuring that the
WEEE do not become an environmental prob-
lem; it is essential to follow a few basic rules:
- the WEEE should not be treated as domestic
waste;
- the WEEE should be taken to dedicated col-
lection areas managed by the town council or a
registered company.
In many countries, domestic collections may
be available for large WEEEs. When you buy a
new appliance, the old one can be returned to
the vendor who must accept it free of charge
equivalent type and has the same functions as
the purchased appliance.
Troubleshooting
Problem Possible cause Solution
the oven does not heat
up
The clock is not set Set the clock
The oven does not
heat up
A cooking function and temperature has
not been set
Ensure that the necessary settings
are correct
No reaction of the
touch user interface
Steam and condensation on the user in-
terface panel
user interface panel to remove the
condensation layer
SAVING AND RESPECTING THE ENVIRON-
MENT
Where possible, avoid pre-heating the oven
infrequently as possible, because heat from
the cavity disperses every time it is opened.
oven between 5 and 10 minutes before the
planned end of the cooking time, and use the
residual heat that the oven continues to gen-
erate. Keep the seals clean and in order, to
avoid any heat dispersal outside of the cavity.
If you have an electric contract with an hour-
makes energy saving more simple, moving the
time slot.

IT 31
Indicazioni di Sicurezza
Avvertenze Generali
Descrizione del Prodotto
Display
Arruolamento Heat feel sensor
Connettività
Pulizia e manutenzione del forno
Manutenzione
Risoluzione dei Problemi
Garanzie
Installazione
Sommario
31
37
39
43
49
51
43
55
55
59
60
• Durante la cottura, l’umidità può condensarsi all’interno del
vano cottura o sul vetro della porta. Questa è una condizione
dopo l’accensione prima di mettere gli alimenti all’interno del
forno. In ogni caso, la condensa scompare quando il forno rag-
giunge la temperatura di cottura.
• Cuocere le verdure in un contenitore con coperchio invece che
in un vassoio aperto.
• Evitare di lasciare gli alimenti all’interno del forno dopo la cottu-
ra per più di 15/20 minuti.
Indicazioni di Sicurezza

IT 32
• AVVERTENZA: l’elettrodomestico e le sue parti accessibili
diventano calde durante l’uso. Fare attenzione a non entrare in
contatto con componenti surriscaldati.
• AVVERTENZA: i componenti accessibili diventano caldi quando
si utilizza il forno. Tenere i bambini a distanza di sicurezza.
• AVVERTENZA: i componenti accessibili diventano caldi quando
si utilizza il grill. Tenere i bambini a distanza di sicurezza.
• AVVERTENZA: Scollegare l’elettrodomestico dalla rete elettrica
simili.
• AVVERTENZA: per evitare rischi causati da un
involontario ripristino dell’interruttore automatico,
l’elettrodomestico non deve essere alimentato da un
dispositivo di commutazione esterno, quale ad esempio un
contaminuti, oppure essere collegato ad un circuito che viene
regolarmente acceso e spento.
• Mantenere lontano dall’elettrodomestico i bambini di età
inferiore agli 8 anni, a meno che non siano continuamente
supervisionati.
• I bambini non devono giocare con l’elettrodomestico.
L’elettrodomestico può essere utilizzato da bambini di età
sensoriali o mentali, oppure prive di esperienza e conoscenza,
che siano state supervisionate o istruite riguardo all’uso
dell’elettrodomestico in sicurezza, comprendendo i rischi che
derivano dall’uso dello stesso.
• Le operazioni di pulizia e manutenzione non devono essere
• Non utilizzare materiali ruvidi, abrasivi o raschietti metallici
• Il forno deve essere spento prima di rimuovere le parti rimovibili.
• Dopo la pulizia, rimontarle secondo le istruzioni.
• Utilizzare solo la sonda carne consigliata per questo forno.
• Non utilizzare pulitori a vapore o spruzzatori ad alta pressione

IT 33
per le operazioni di pulizia.
• SE IL FORNO È FORNITO DAL PRODUTTORE SENZA SPINA:
L’APPARECCHIO NON DEVE ESSERE COLLEGATO ALLA
FONTE DI ALIMENTAZIONE TRAMITE SPINA O PRESE, MA
DEVE ESSERE COLLEGATO DIRETTAMENTE ALLA RETE DI
ALIMENTAZIONE. Il collegamento alla fonte di alimentazione
vigente in materia di sicurezza il forno deve essere collegato solo
posizionando un interruttore omnipolare, con separazione dei
contatti conforme ai requisiti per la categoria di sovratensione
III, tra l’apparecchio e la fonte di alimentazione. L’interruttore
omnipolare deve sopportare il carico massimo collegato e deve
essere in linea con la normativa vigente. Il cavo di terra giallo-
verde non deve essere interrotto dall’interruttore automatico.
L’interruttore omnipolare utilizzato per il collegamento deve
essere facilmente accessibile quando l’apparecchio è installato.
Il collegamento alla fonte di alimentazione deve essere
considerando la polarità del forno e della fonte di alimentazione.
La disconnessione deve essere realizzata incorporando un
• SE IL FORNO È FORNITO DAL PRODUTTORE CON SPINA:
La presa deve essere adatta al carico indicato sulla targhetta e
deve avere il contatto di terra collegato e in funzione. Il condut-
tore di terra è giallo-verde. Questa operazione deve essere ese-
incompatibilità tra la presa e la spina dell’apparecchio, chiedere
adatto. La spina e la presa devono essere conformi alle norma-
tive attuali del paese di installazione. Il collegamento alla fonte
un interruttore omnipolare, con separazione dei contatti con-
forme ai requisiti per la categoria di sovratensione III, tra l’appar-
ecchio e la fonte di alimentazione che può sopportare il carico

IT 34
massimo collegato e che è in linea con la legislazione vigente. Il
cavo di terra giallo-verde non deve essere interrotto dall’inter-
ruttore automatico. La presa o l’interruttore automatico on-
nipolare utilizzati per il collegamento devono essere facilmente
accessibili al momento del montaggio dell’elettrodomestico.
La disconnessione può essere eseguita con la spina accessibile
delle normative relative ai cablaggi.
• Se il cavo di alimentazione si danneggia, deve essere sostitui-
to con un cavo o uno speciale fascio di cavi disponibile presso il
produttore o contattando il reparto assistenza al cliente.
• Il cavo di alimentazione deve essere di tipo H05V2V2-F
• Questa operazione deve essere eseguita solo da un tecnico
deve essere circa 10 mm più lungo degli altri conduttori. Per
qualsiasi tipo di riparazione, fare riferimento unicamente al
Reparto di Assistenza Cliente e richiedere l’utilizzo di ricambi
originali.
• Il mancato rispetto di quanto indicato sopra può compromettere
la sicurezza dell’elettrodomestico e rendere nulla la garanzia.
• Qualsiasi materiale fuoriuscito in eccesso deve essere tolto
prima della pulizia.
• L’interruzione prolungata dell’alimentazione durante una fase
di cottura potrebbe causare un guasto del monitor. In tal caso
contattare il servizio clienti.
• L’elettrodomestico non deve essere installato dietro a una
porta a scopo ornamentale per evitarne il surriscaldamento.
•
blocco sia rivolto verso l’alto e nella parte posteriore della guida.
• Quando si inserisce il vassoio della griglia, accertarsi che il bordo
antiscivolo sia orientato verso il fondo e verso l’alto.
• AVVERTENZA: Non rivestire le pareti del forno con fogli di
alluminio o protezioni monouso disponibili nei negozi. I fogli di
alluminio o qualsiasi altra protezione, a diretto contatto con lo

IT 35
smalto caldo, rischiano di fondere e deteriorare lo smalto degli
interni.
• AVVERTENZA: Non togliere mai la guarnizione della porta del
forno.
• ATTENZIONE: Non riempire il fondo della cavità con acqua
durante la cottura o quando il forno è caldo.
• Per far funzionare l’apparecchio alle frequenze nominali non
sono necessarie ulteriori operazioni o regolazioni.
• Il forno può essere collocato in alto, in colonna, o sotto un piano
componenti interni. In base al tipo di sistemazione, praticare le
• Per un corretto utilizzo del forno, evitare di collocare alimenti a
contatto diretto con le griglie e i vassoi; utilizzare carta da forno
e/o contenitori speciali.
• AVVERTENZA: prima di avviare il ciclo di pulizia automatica:
- Pulire la porta del forno;
- Asportare dall’interno del forno residui consistenti di cibo o
traboccamenti derivanti da cotture precedenti, utilizzando una
spugna umida. Non usare detergenti;
- Non introdurre tovagliette da tè
• Prima del ciclo di pulizia, nei forni con la sonda carne è necessario
chiudere il foro utilizzando il dado fornito in dotazione quando la
sonda carne non è utilizzata.
•
surriscaldarsi più del normale: mantenere sempre i bambini a
distanza di sicurezza.
• Se è stato collocato un piano cottura sopra il forno, non utilizzare
il piano cottura mentre è in funzione il pirolizzatore, per evitare il
surriscaldamento del piano cottura.
IT 36
AVVERTENZE:
• Il presente prodotto è pensato per essere utilizzato esclusivamente
con i forni. E secondo le indicazioni riportate nel presente Manuale
per l’utente.
• NON TOCCARE la sonda Heat Feel Sensor A MANI NUDE SUBITO
DOPO LA COTTURA. Indossare sempre guanti da forno per
rimuovere la sonda Heat Feel Sensor dagli alimenti dopo la cottura.
• Durante la cottura è necessario INSERIRE COMPLETAMENTE
al BORDO in ceramica NERA.
• Non esporre la parte metallica della sonda Heat Feel Sensor
al calore generato direttamente dal forno. Non esporre la parte
metallica della sonda Heat Feel Sensor al calore generato
dall’elettrodomestico.
• Non utilizzare la sonda Heat Feel Sensor in altri elettrodomestici
a eccezione del forno a incasso.
• Non utilizzare la sonda Heat Feel Sensor in forni a microonde.
• La sonda Heat Feel Sensor può essere pulita e lavata ma non
può essere immersa a lungo in acqua.
• Il prodotto non deve essere utilizzato da persone di età pari o
inferiore a 12 anni.
• Il fornitore declina ogni responsabilità per eventuali danni della
sonda Heat Feel Sensor dovuti a un uso improprio del dispositivo.
• Pulire la sonda Heat Feel Sensor prima dell’uso
• La sonda diventa operativa all’interno del seguente intervallo di
100°C della parte metallica. La parte in ceramica può raggiungere
i 350°C.
• Se la temperatura della sonda Heat Feel Sensor supera i 100°C,
la cottura si interrompe e la sonda Heat Feel Sensor deve essere
rimossa dal forno il prima possibile, indossando dei guanti, per
evitare danni alla sonda.
Inserire Heat Feel Sensor
AVVERTENZE Heat Feel Sensor (sonda di temperatura wireless)

IT 37
Avvertenze Generali
Suggerimenti sulla Sicurezza
Vi ringraziamo per aver scelto uno dei nostri prodotti. Per utilizzare il forno in modo ottimale è
consigliabile leggere con attenzione questo manuale e conservarlo con cura per ogni ulteriore
consultazione. Prima di installare il forno, prendere nota del numero di serie in modo da poterlo
comunicare al personale del servizio di assistenza in caso di richiesta di intervento. Dopo aver
bambini. Alla prima accensione del forno può svilupparsi fumo di odore acre, causato dal primo
riscaldamento del collante dei pannelli d’isolamento avvolgenti il forno: si tratta di un fenomeno
di introdurre le vivande. Il produttore declina ogni responsabilità in caso di mancata osservanza
delle istruzioni contenute in questo documento.
NOTA: le funzioni, le proprietà e gli accessori dei forni citati in questo manuale possono variare
a seconda dei modelli.
Utilizzare il forno solo per lo scopo per cui è stato progettato, ossia solo per la cottura di alimenti;
qualsiasi altro utilizzo, ad esempio come fonte di riscaldamento, è considerato improprio e quindi
pericoloso. Il costruttore non può essere considerato responsabile per eventuali danni derivanti
da usi impropri, erronei ed irragionevoli.
L’uso di un qualsiasi apparecchio elettrico comporta l’osservanza di alcune regole fondamentali:
- non tirare il cavo di alimentazione per scollegare il prodotto dall’alimentazione;
- non toccare l’apparecchio con mani o piedi bagnati o umidi;
- in generale è sconsigliabile l’uso di adattatori, prese multiple e prolunghe;
- in caso di guasto e/o cattivo funzionamento dell’apparecchio, spegnerlo e non manometterlo.
Sicurezza Elettrica
FARE EFFETTUARE I COLLEGAMENTI ELETTRICI AD UN’ELETTRICISTA O TECNICO
QUALIFICATO.
La rete di alimentazione a cui viene collegato il forno deve essere conforme con le normative
in vigore nel paese di installazione. Il produttore declina ogni responsabilità per eventuali dan-
ni derivanti dalla mancata osservanza di tali disposizioni. Il forno deve essere collegato alla rete
elettrica tramite una presa a muro con messa a terra o tramite un sezionatore con più poli, a
seconda delle disposizioni in vigore nel paese di installazione. La rete elettrica deve essere pro-
tetta mediante fusibili idonei e devono essere utilizzati cavi con una sezione trasversale idonea
a garantire una corretta alimentazione del forno.
COLLEGAMENTO
Il forno viene fornito con un cavo di alimentazione che deve essere collegato solo a una rete elet-
trica con una tensione di 220-240 VCA tra le fasi o tra la fase e il neutro. Prima di collegare il forno
alla rete elettrica, è indispensabile controllare:
- la tensione di alimentazione indicata sul misuratore;
- l’impostazione del sezionatore.
AVVERTENZE Heat Feel Sensor (sonda di temperatura wireless)

IT 38
di terra della rete elettrica.
ATTENZIONE
Prima di collegare il forno alla rete elettrica, far controllare la continuità della messa a terra della
incidenti o altri problemi derivanti dal mancato collegamento a terra del forno o dal suo collega-
mento ad una messa a terra con una continuità difettosa.
NOTA: poiché il forno potrebbe richiedere interventi di assistenza, è consigliabile prevedere la
disponibilità di un’ulteriore presa a muro a cui collegare il forno dopo che è stato rimosso dallo
spazio in cui è stato installato. Il cavo di alimentazione deve essere sostituito solo dal personale
Raccomandazioni
Installazione
-
tamente pulito. Non rivestire le pareti del forno con fogli d’alluminio da cucina o fogli monouso
-
molto alte. E’ generalmente preferibile imposta- re un tempo di cottura più lungo e utilizzare una
temperatura più bassa. Oltre agli accessori forniti con il forno, è consigliabile utilizzare piatti e teg-
lie resistenti alle alte temperature.
Il produttore non è obbligato ad occuparsi dell’installazione. Gli eventuali interventi di assistenza,
necessari per correggere problemi dovuti ad un’errata installazione, non sono coperti da garan-
istruzioni. Un’installazione impropria potrebbe causare infortuni alle persone, agli animali domes-
tici o danni alle attrezzature. Il produttore declina ogni responsabilità per eventuali lesioni o danni
dovuti ad un’errata installazione.
-
componenti interni. Realizzare le aperture indicate nell’ultima pagina del manuale, a seconda del
tipo di installazione.
Primo utilizzo
PULIZIA PRELIMINARE
morbido leggermente inumidito.
che il forno sia vuoto, impostare la temperatura massima e lasciarlo acceso per almeno 1 ora, così da
rimuovere tutti gli odori normalmente presenti nei forni nuovi.
IT 39
1. Pannello di controllo
2.
se inclusa)
3. Griglie
4. Vassoi
5.
6. Sportello del forno
7.
per cavità piane)
8. Numero di serie
Descrizione del Prodotto
1
2
7
3
8
4
6
5
ACCESSORI
Vassoio di gocciolamento
Griglia metallica
Raccoglie i residui del gocciolamento durante
la cottura degli alimenti sulle griglie.
Sostiene piastre e vassoi di cottura
Griglie metalliche laterali
Collocate su entrambi i lati della cavità del forno,
sostengono le griglie metalliche e i vassoi di goc
-
ciolamento.
NOTA: Per un corretto utilizzo del forno, si con
-
siglia di non porre gli alimenti a diretto contatto
con griglie e vassoi, ma di utilizzare carte forno
e/o appositi contenitori.
Chef panel
Convogliatore d’aria che favorisce la circolazi
-
one dell’aria all’interno del forno. Ciò consente
di migliorare le prestazioni di cottura, rendere
più uniforme la cottura degli alimenti a tutte le
temperature, ridurre i tempi di cottura e otte
-
nere una distribuzione uniforme della temper-
atura all’interno del forno.
IT 40
-
do e automatico durante la chiusura della porta
del forno.
Le due guide che facilitano il controllo dello
stato di cottura in quanto consentono di es
-
trarre e riposizionare facilmente i vassoi e le
griglie all’interno della cavità del forno.
Guide telescopiche
Chiusura graduale
Heat Feel Sensor
Misura la temperatura interna degli alimenti
durante la cottura. Inserire nel foro sulla parte
superiore della cavità. L’inserimento deve
avvenire quando il forno è freddo.
HEAT FEEL SENSOR
-
sor prima dell’uso:
1. Inserire la sonda Heat Feel Sensor nel
caricatore e chiudere il coperchio.
2. Collegare il caricatore a una fonte di
alimentazione USB, ad es. un adattatore USB o
tramite il cavo USB. Il caricabatterie potrebbe
non funzionare correttamente con una power
bank per via della sua funzione di spegnimento
automatico.
3. Durante la carica, il LED del caricatore si
accende e lampeggia. Si spegne quando la
sonda Heat Feel Sensor è totalmente carica.
attivato.
• Assicurarsi che la sonda Heat Feel Sensor si
trovi nel raggio della distanza di controllo. La
sonda Heat Feel Sensor non viene rilevata dal
forno se collocata a una distanza eccessiva.
• Se ricoperta di materiale isolante, la sonda
Heat Feel Sensor non comunica con il forno.
Se la sonda viene disconnessa durante la
Bluetooth spento, ecc..), il processo di cottura
viene interrotto dopo un breve intervallo.
Durante la cottura con ricetta e sonda, il
processo di cottura continua per il tempo
residuo programmato se la sonda viene
disconnessa.

IT 41
Girarrosto
Per arrostire non è richiesto il pre riscaldamento
chiusa Il consumo di energia è inferiore del 90-
95% rispetto al metodo tradizionale
Quando il forno è in funzione bisogna togliere
dalla cavità tutti gli accessori inutilizzati.
1. Svitare i ganci
3. Bloccare la carne con i ganci
4. Stringere le viti dei ganci
5. Inserire lo spiedo all’interno della cavità del
forno
6. Smontare l’impugnatura prima di iniziare la
cottura

IT 42
Pannello comandi
Avvio
Pausa
Funzioni Tempo Temperatura
1 6
2 3 4
Pulsanti di navigazione
5
Sim-
bolo
Funzioni Descrizione
On/o
Accendere e spegnere il forno. La prima volta che si accende
il forno è necessario impostare l’ora, utilizzando i pulsanti di
per confermare.
Funzioni
modello). Per salvare una funzione preferita e visualizzarla quando
Tempo
della cottura possono essere impostate solamente dopo aver
inserito il tempo di cottura. Mentre il forno si trova in standby,
promemoria minuti; tenere premuto per 3 secondi per impostare
Temperatura
per 5 secondi. Durante la pirolisi, lo sportello del forno si blocca
automaticamente e viene visualizzato il simbolo corrispondente
Pulsanti di
navigazione
Pulsanti di navigazione per l’impostazione di funzioni e parametri.
Avvio
Pausa
Avvio/Pausa della cottura o conferma delle funzioni.
1
2
3
4
5
6
Fare riferimento alle pagine successive per informazioni dettagliate sulle varie componenti del display
Accensione
/Spegnimento

IT 43
Display
per impostare funzioni e parametri
a. Funzioni manuali
d. Funzioni di pulizia
d2. Pirolisi Eco
d3. Pirolisi +
i. Impostazione orario
d4. Blocco sportello
e. Durata
d1. Hydroeasyclean
Tempo
l. Feedback
preriscaldamento
e rareddamento
f. Timer
b3. Prodotti
da forno
Indicatore di tempo
Indicatore di temperatura
g. Partenza ritardata
b4. Verdure
h. Heat feel sensor
k. Preriscaldamento
rapido
c. WiFi
m. Blocco tasti
b. Cotture per
categorie
AREA FUNZIONI
AREA TEMPO
AREA TEMPERATURA
c1. Feedback Wi-Fi
a1. Simboli di funzione
h1. Heat feel sensor feedback
(stato della batteria
e del segnale)
j. Preriscaldamento
b2. Pesce
b1. Carne
Temperatura
a2. Master bake
a3. Gentle cooking

IT 44
MENU PRINCIPALE - AREA TEMPO
3
Simbolo Funzione Descrizione
e
Durata
Premere per impostare la durata della cottura, utilizzare i tasti
per regolare il tempo.
f
Timer per
cottura
Premere due volte per impostare il timer per cottura, utilizzare
i tasti per regolare il tempo
g
Partenza
dierita
i tasti per regolare il tempo
h
Heat feel
sensor
Premere quattro volte per attivare la cottura con la sonda
i
Imposta l’ora
del giorno
Con il forno in modalità standby, tenere premuto per 3 secondi
Simbolo Funzione Descrizione
a
Funzioni
manuali
Questa funzione consente di scegliere le funzioni di cottura, la
temperatura e la durata.
b
Categoria di
alimenti
In questo menu è possibile accedere a 4 cotture per categorie di
alimenti già integrate nel forno.
c
WiFi
In questa modalità è possibile collegare il forno a una rete tramite
l’App hOn.
d
Funzioni di
pulizia
Questa funzione consente di scegliere un sistema di pulizia dis-
ponibile nel forno.
Panoramica dei menu
MENU PRINCIPALE - AREA FUNZIONI
2
IT 45
MENU PRINCIPALE – AREA TEMPERATURA
4
Simbolo Funzione Descrizione
j
Preriscal-
damento
Premere per impostare la temperatura di preriscaldamento,
utilizzare i tasti per regolare il valore.
k
Preriscal-
damento
rapido
Premere due volte per impostare la temperatura rapida.
* A seconda del modello del forno.
** Temperatura ideale per gli alimenti suggeriti.
Simbo-
lo
Descrizione
Suggerimento
Statico ***
150-200°C **
2
nd
/3
rd
livello
IDEALE PER: torte, pane, biscotti e quiche su un unico livello
utilizzando sia la resistenza superiore che inferiore. Compati-
bile con la sonda Heat Feel Sensor. Opzione Preriscaldamento
rapido disponibile.
Cottura ventilata
180-200°C **
2
nd
/3
rd
livello
IDEALE PER: arrosti, sformati, verdure e torte con ripieni umidi
su un unico livello. Ideale per la cottura di cibi ad alto contenuto
d’acqua. Compatibile con la sonda Heat Feel Sensor. Opzione
Preriscaldamento rapido disponibile.
Cottura multilivello
150-230°C **
3
rd
per unico
livello
1
st
+3
rd
per doppio
livello
IDEALE PER: torte, biscotti e pizze su uno o più livelli. Ideale per
cucinare cibi diversi.
Compatibile con la sonda Heat Feel Sensor.
Opzione Preriscaldamento rapido disponibile.
Grill
L3 (potenza) **
5
th
livello per cibi
sottili
3
rd
/ 4
th
livello per cibi
di forte spessore
IDEALE PER: gratin, carne alla griglia, pesce e verdure.
Questa funzione utilizza solo la resistenza superiore e il livello
della griglia può essere regolato. Utilizzare con lo sportello
chiuso. Collocare le carni bianche a distanza dalla griglia. Le carni
il vassoio di gocciolamento sottostante. Preriscaldare per 5
Grill ventilato
200°C **
2
nd
/ 3
rd
/4
th
livello
Utilizza la resistenza superiore con la ventola per ottimizzare
la circolazione dell’aria all’interno del forno. Utilizzare con lo
sportello chiuso. Fare scorrere il vassoio di gocciolamento sotto il
ripiano per raccogliere i succhi. Girare gli alimenti a metà cottura.
Il preriscaldamento è necessario per le carni rosse ma non per
quelle bianche.
MODALITÀ DI COTTURA *
Funzioni manuali (a1)
IT 46
* A seconda del modello del forno.
** Temperatura ideale per gli alimenti suggeriti.
Simbolo Descrizione Suggerimento
Resistenza inferiore
160-180°C **
1
st
/2
nd
livello
IDEALE PER: creme caramel, budini e bagnomaria su un unico
di una preparazione.
Compatibile con la sonda Heat Feel Sensor.
Opzione Preriscaldamento rapido disponibile.
Resistenza inferiore
ventilatan
170-210°C **
1
st
and 2
nd
livello
IDEALE PER: pizze, torte salate, crostate e cibi con condimen-
ti liquidi su un unico livello.
Compatibile con la sonda Heat Feel Sensor.
Opzione Preriscaldamento rapido disponibile.
Supergrill
L3 (potenza) **
4
sth
and 5
th
livello
IDEALE PER: grandi quantità di salsicce, bistecche e crostini di
pane. L’intera area al di sotto del grill diventa calda. Utilizzare
con lo sportello chiuso. Girare gli alimenti a due terzi della
Soft +
150-200°C
2
nd
/3
rd
livello
IDEALE PER: torte e pane su un unico livello.
Grill + Girarrosto
L3 potenza
pesce su entrambi i lati contemporaneamente.
Posizionare una teglia sotto il cibo in corrispondenza del livello
1 per raccogliere colature e succhi.
Grill + Ventilato +
Girarrosto
200°C
IDEALE PER arrostire cibi quali pollo o tacchino di grandi di-
mensioni su entrambi i lati contemporaneamente. Posizion-
are una teglia sotto il cibo in corrispondenza del livello 1 per
raccogliere colature e succhi.
Statico + Girarrosto
200-240°C
IDEALE PER: arrosti di manzo o maiale. Posizionare una teglia
sotto il cibo in corrispondenza del livello 1 per raccogliere
colature e succhi.
IT 47
FUNZIONI PARTICOLARI *
Simbolo Descrizione Suggerimento
a2
Master bake ***
180-200°C **
2° livello
Ideale per mantenere gli alimenti morbidi all’interno e
croccanti all’esterno.
Per una cucina sana, questa funzione riduce la quantità
di olio e grassi. La combinazione di elementi scaldanti
con ciclo pulsante dell’aria garantisce risultati di cottura
ottimali.
a3
Gentle cooking
Questa funzione permette di mantenere i cibi teneri e
succulenti; grazie alla temperatura più bassa, la doratura
per arrosti di carne e pesci interi. Per risultati ottimali,
COTTURE PER CATEGORIE DI ALIMENTI
Simbolo
Descri-
zione
Preris
calda
men-
to
Livello
di cot-
tura
Tempera-
ture Heat
Feel (°C)
Descrizione
b1
Carne Y 2-3
58-62-65°C
per la carne di
manzo
Per arrosti e tagli
di manzo, vitello e
maiale.
b2
Pesce Y 2-3 65°C
Per pesce intero
b3
Prodotti da
forno
Y 1-2
95° per pane e
pasta al forno
Per pane, lasagne
e dolci.
b4
Verdure Y 3-4 70°C
Per verdure e
patate arrosto.
Sono garantiti risultati di cottura perfetti grazie ai parametri preimpostati per ciascuna categoria.
Utilizzare la tabella sottostante per impostare correttamente il tempo di cottura; utilizzare la
sonda Heat Feel Sensor per ottenere risultati ottimali.
* A seconda del modello del forno.
** Temperatura ideale per gli alimenti suggeriti.

IT 48
Modalità demo
ON / OFF
FUNZIONI AGGIUNTIVE
Simbolo Descrizione Suggerimento
m
Blocco tasto
Questa funzione consente di bloccare lo schermo per
evitare utilizzi indesiderati da parte di minori. Per attivare
5 secondi. Procedere analogamente per disattivare il
blocco
Funzione
preferita
Per salvare una funzione preferita e visualizzarla quando si
Categoria
di alimenti
Porzione/grammi (l’impostazione
predenita è indicata in grassetto)
Tempo di cottura (min)* * dopo
il preriscaldamento
Carne 4/800; 6/1200; 8/1600 50; 52; 55
Pesce 4/600; 6/900; 8/1200 36; 38; 40
Prodotti da
forno
4/600; 6/900; 8/1000 42; 50; 56
Verdure 4/800; 6/1200; 8/1600 57; 60; 65

IT 49
Arruolamento Heat feel sensor
Step 1
• Toccare l’icona
per
selezionare la funzione e
toccare per selezionare
la sonda Heat Feel Sensor.
Step 2
• Nel giro di qualche istante,
il forno riconoscerà
il codice della sonda.
Toccare l’icona
per
impostare la temperatura
desiderata.
Step 3
• Toccare l’icona ,
impostare la temperatura
desiderata e toccare
.
IT 50
Suggerimenti per la cottura - Heat Feel Sensor
grill, supergrill, grill ventilato, resistenza inferiore e resistenza inferiore ventilata) e con le COTTURE
PER CATEGORIE DI ALIMENTI.
La sonda Heat Feel Sensor ha un singolo punto di misurazione; inserirla completamente
nell’alimento con la punta metallica in corrispondenza del centro della pietanza.
Grazie al suo design wireless, la sonda Heat Feel Sensor consente di monitorare anche gli alimenti
CARNE/ARROSTI/BISTECCHE: inserire la sonda diagonalmente nella parte più spessa. In caso
geometrico.
Temperature interne consigliate:
alluminio e lasciar riposare per 15-20’ prima del servizio)
- 55 - 60 - 65°C per altri arrosti di carne
POLLAME: Inserire la sonda Heat Feel Sensor nella parte più spessa del petto. La temperatura
interna consigliata per il pollame è di 83-85°C
interna consigliata: 65°C
PANE/SFORMATI: inserire la sonda Heat Feel Sensor vicino al centro geometrico dell’alimento.
Temperatura interna consigliata: 90°C

IT 51
Arruolamento rapido
La prima volta che si accende il prodotto, la rete WiFi si attiva per 30 minuti ed è possibile procedere
con l’arruolamento a pagina 52.
Se il forno non viene arruolato entro 30 minuti, il WiFi si spegne. Ciò accade ogni volta che si
Per evitare l’accensione del Wi-Fi, spegnerlo dalle impostazioni del Wi-Fi entro 30 minuti
dall’accensione del forno.
Per arruolare il forno al termine dei 30 minuti, seguire le istruzioni a pagina 53.
Tecnologia Wi-Fi Bluetooth
Standard IEEE 802.11 b/g/n Bluetooth v4.2, BR/EDR, BLE
2401÷2483 2402÷2480
100 10
PARAMETRI WIRELESS
INFORMAZIONI SUL PRODOTTO PER LE APPARECCHIATURE COLLEGATE IN RETE
• Consumo elettrico del prodotto in standby di rete quando tutte le porte di rete cablate sono
connesse e tutte le porte di rete wireless sono attivate: 2,0 W
Come attivare la porta di rete wireless:
• Se il forno non è arruolato, seguire le istruzioni relative all’arruolamento per abilitare la
funzionalità Wi-Fi.
• Se il forno è arruolato, nel menu Wi-Fi selezionare Wi-Fi e impostare On o hOn.
Come disattivare la porta di rete wireless:
• Se il forno non è arruolato, Il modulo WiFi è acceso per i primi 30 minuti dopo l’attivazione del
forno, per spegnerlo attendere 30 minuti oppure impostare su spento nel menu WiFi
•
Connettività
Tecnologia
W Bluetooth i-Fi
Standard Bluetooth v4.0 BLE
Banda/e di frequenza
2400÷2480
Sonda di temperatura Heat Feel Modello Et180:
IT 52
Arruolamento del forno sull’app
SU SMARTPHONE
Fase 1
• Scaricare l’applicazione hOn
Fase 2
•
Fase 3
• Aggiungere un nuovo elettrodomestico.
Fase 4
•
o inserire manualmente il numero di serie.
Scrivere qui il numero di serie per futuri riferimenti.
IT 53
SULL
ELETTRODOMESTICO
Fase 5
• Toccare l’icona
per
quindi toccare
.
Fase 6
• Toccare e selezionare On o
54) e toccare avvia .
Fase 7
• Nel giro di qualche istante,
comparirà la scritta Connect
di arruolamento prosegue
tramite l’app.
Fase 8
• Al termine dell’arruolamento,
il forno passa
automaticamente allo
a seconda della scelta
NOTA:
• Accertarsi che sia disponibile una rete Wi-Fi domestica a 2,4 GHz.
• Accertarsi di avere a portata di mano la password e il nome della rete Wi-Fi domestica. Questi
dati serviranno in un secondo momento.
• Accertarsi che l’elettrodomestico sia collocato in un luogo in cui il segnale della rete Wi-Fi
domestica sia eccellente.
• Rimanere vicino all’elettrodomestico.
Connessione del router persa
Durante la cottura - Icona WiFi lampeggiante
All’interno del menu Wi-Fi - Cifre lampeggianti

IT 54
Fase 1
• Toccare l’icona
per
e quindi toccare
inizierà a lampeggiare.
Fase 2
• Toccare l’icona per
selezionare la modalità
per attivare il controllo da
remoto.
•
per uscire
Con la presente, Candy Hoover Group Srl dichiara che l’apparecchiatura radio è conforme alla Di-
-
to della dichiarazione di conformità è disponibile al seguente indirizzo web: www.candy-group.com
Modalità controllo da remoto
WiFi ON
Lo stato del forno può essere monitorato solo
tramite l’app.
WiFi OFF
Il forno non è collegato ma è ancora arruolato
con le credenziali di rete salvate.
WiFi hOn
Il forno può essere utilizzato solo tramite l’app.
WiFi Reset
possibile un nuovo arruolamento.

IT 55
La vita di servizio dell’apparecchio si allunga se
questo viene pulito ad intervalli regolari. Atten
-
le operazioni di pulizia manuali. Non utilizzare
mai detergenti abrasivi, pagliette di ferro o og
-
getti appuntiti per lapulizia, per non danneggi-
are in modo irreparabile le parti smaltate.Utiliz-
zare solo acqua, sapone o detergenti a base di
PARTI IN VETRO
E’ consigliabile pulire lo sportello in vetro con
carta assorbente da cucina dopo ogni utilizzo
del forno. Per rimuovere le macchie più osti
-
nate, è possibile anche utilizzare una spugna
imbevuta di detergente ben strizzata e sciac
-
quare con acqua.
GUARNIZIONE DELLO SPORTELLO DEL
FORNO
Se sporca, la guarnizione può essere pulita con
una spugna leggermente inumidita.
Pulizia e manutenzione del forno
RIMOZIONE E PULIZIA DELLE SCAFFALATURE A FILO
2- Per pulire le griglie a rete, metterle in lavastoviglie o utilizzare una spugna umida, assicurandosi
che siano successivamente asciugate.
Manutenzione
ACCESSORI
Pulire gli accessori con una spugna imbevuta
con acqua e sapone, sciacquarli e asciugarli :
evitare di usare detergenti abrasivi.
TEGLIA ANTI GOCCIOLAMENTO
Dopo l’uso del grill, rimuovere la vaschetta dal
forno. Versare il grasso caldo in un contenitore
e lavare la vaschetta in acqua calda, utilizzando
una spugna e del detergente per piatti.
Se rimangono dei residui di grasso, immergere
la vaschetta in acqua e detergente. In alterna
-
tiva, è possibile anche lavare la vaschetta nella
lavastoviglie oppure utilizzare un detergente
per forni di tipo commerciale. Non reinserire
mai una vaschetta sporca nel forno.
SOSTITUZIONE DELLA LAMPADINA
1. Scollegare il forno alla rete.
2. Allentare la copertura in vetro, svitare la lam-
padina e sostituirla con una nuova dello stesso
modello.
3. Una volta sostituita la lampadina difettosa,
riavvitare la copertura in vetro.
Questo prodotto contiene una o più sorgenti
IT 56
RIMOZIONE E PULIZIA DELLA PORTA IN VETRO
1.
2. Portare la porta a 45°, tirare simultaneamente la porta in avanti e verso l’alto per disancorarla.
la maniglia rivolta verso il basso.
3. Premere contemporaneamente i due bottoni a sinistra e a destra e tirare verso di sè per estrarre
la copertura superiore della porta.
4. Rimuovere con molta cura il vetro interno del forno, tenendolo saldamente con due mani e
5.
ATTENZIONE: il vetro esterno non è removibile
6. Procedere alla pulizia dei vetri con panno morbido e prodotti idonei.
7. Al termine della pulizia riassemblare le parti nell’ordine opposto alla rimozione. Su tutti i vetri,
porta, vicino alla cerniera laterale sinistra. In questo modo, l’etichetta stampata del primo vetro
rimarrà interna alla porta.
8.
due bottoni laterali.
9. Tenendo la porta a 45° inserire la parte maschio della cerniera nei fori delle cerniere sganciate
e bloccare le
1
4
7
2
5
8
3
6
9
IT 57
Hydro Easy Clean
La procedura Hydro Easy Clean utilizza il vapore per rimuovere i residui di grasso e le particelle di cibo
dal forno.
1. Versare 300 ml di acqua nel contenitore Hydro Easy Clean sulla parte inferiore del forno.
4. Lasciare agire il programma.
Avvertenza: Assicurarsi che l’elettrodomestico sia freddo prima di toccarlo.
potabile.
Simbolo
Funzione
Descrizione
d1
Hydroeasyclean
d2
Pyrolysis Eco
Per una pulizia perfetta e regolare della cavità del forno.
Questa funzione consente di bloccare lo sportello
d3
Pyrolysis+
Per una pulizia estremamente accurata e per la rimozione
di grandi quantità di sporco dalla cavità del forno.
Questa funzione consente di bloccare lo sportello
FUNZIONI DI PULIZIA *
300 ml

IT 58
Pirolisi
automaticamente la pulizia. Le due opzioni dispo-
nibili sono ECO e SUPER. **L’opzione può essere
forno è dotato di un sistema di pulizia con piroliz-
zatore ad alta temperatura che distrugge i residui
di cibo. L’operazione viene eseguita automatica-
mente tramite il programmatore. I fumi risultanti
-
traverso un pirolizzatore che si avvia al momento
dell’inizio della cottura. Sullo sportello di questo
tipo di forni, viene installata una chiusura di sicu-
rezza, a causa del fatto che il pirolizzatore lavora a
temperature molto elevate. Il pirolizzatore può es-
sere arrestato in qualsiasi momento: tuttavia, non
l’icona della chiusura di sicurezza della porta.
NOTA: se il forno è posto sotto un piano cottura,
non utilizzare i bruciatori a gas o le piastre elettri-
che mentre il pirolizzatore è in funzione, per evitare
che le piastre si surriscaldino eccessivamente.
Sono disponibili due CICLI PIROLITICI pre-pro-
grammati:
•CICLO PIROLITICO ECO: questo ciclo consente
di pulire i forni moderatamente sporchi ed ha una
durata di 90 minuti.
•CICLO PIROLITICO SUPER: questo ciclo è indi-
cato per i forni particolarmente sporchi ed ha una
durata di 120 minuti.
Non utilizzare detergenti commerciali per pulire i
forni pirolitici. Suggerimento: l’esecuzione del ciclo
pirolitico al termine di un ciclo di cottura, consente
di sfruttare il calore residuo e di risparmiare ener-
gia.
Prima di eseguire un ciclo pirolitico:
•Rimuovere tutti gli accessori dal forno perché
non sono in grado di tollerare le temperature
elevate utilizzate durante il ciclo di pulizia piroli-
tico; in particolare rimuovere le griglie e il castel-
letto (rimando al capitolo RIMOZIONE GRIGLIE E
CASTELLETTO). Nei forni dotati di sonda carne
è necessario, prima di eettuare il ciclo di pulizia,
chiudere il foro con il dado fornito in dotazione.
•Rimuovere tutte le tracce di grasso e le macchie
estese che potrebbero richiedere troppo tempo
per essere rimosse. Questo tipo di macchie po-
trebbero incendiarsi a causa delle temperature
estremamente elevate del ciclo pirolitico.
•Chiudere lo sportello del forno.
•Se il forno è eccessivamente sporco, questo
deve essere rimosso prima della pulizia.
• Pulire la porta del forno.
• Con una spugna umida togliere dall’interno del
forno i residui più consistenti. Non usare deter-
genti.
• Estrarre tutti gli accessori e il kit guide scorre-
voli (se presente);
• Non lasciare stronacci o presine sulla mani-
glia.
Utilizzo del ciclo pirolitico:
1- Toccare l’icona
per selezionare le funzioni
scegliere il ciclo pirolitico preferito.
programmatore.
3- Dopo pochi minuti, quando il forno ha
raggiunto una temperatura alta, la porta si chiude
automaticamente. Il ciclo di pulizia pirolitica può
essere interrotto in qualsiasi momento premendo
4- Una volta che il ciclo di pulizia pirolitica è
terminato, la pirolisi si spegnerà automaticamente.

IT 59
Gestione dei riuti e rispetto dell’ambiente
Questo apparecchio è con-
trassegnato in conformità alla
Direttiva europea 2012/19/EU
sulle apparecchiature elettriche
contengono sia sostanze in-
-
care conseguenze negative
-
sono essere riutilizzati). E’ importante che i WEEE
-
vere e smaltire correttamente tutti gli inquinanti
e recuperare tutti i materiali. I singoli possono
giocare un ruolo importante nell’assicurare che i
WEEE non diventino un problema ambientale; è
essenziale seguire alcune regole di base:
domestici;
- i WEEE devono essere portati ai punti di racco-
lta appositi gestiti dal comune o da società reg-
istrate.
In molti paesi, per i WEEE di grandi dimensioni,
potrebbe essere presente la raccolta domestica.
nostro Centro di Assistenza Tecnica Autorizzato, in caso di necessità, insieme allo scontrino compro-
vante l’acquisto dell’elettrodomestico. Puoi consultare le condizioni di garanzia anche sul nostro sito
internet. Per ottenere assistenza compila l’apposito form on-line oppure contattaci al numero che tro-
vi indicato nella pagina di assistenza del nostro sito internet.
Risoluzione dei Problemi
Garanzie
PROBLEMA POSSIBILE CAUSA SOLUZIONE
Il forno non si scalda L’orologio non è impostato Impostare l’orologio
Il forno non si scalda Il blocco bambini è attivo Disattivare il blocco bambini
Il forno non si scalda
Le regolazioni necessarie non sono im-
postate
Assicurarsi che le impostazioni
necessarie siano corrette
Quando si acquista un nuovo apparecchio, quel-
lo vecchio potrebbe essere restituito al rivendi-
tore che deve acquisirlo gratuitamente su base
singola, sempre che l’apparecchio sia del tipo
equivalente e abbia le stesse funzioni di quello
acquistato.
RISPARMIARE E RISPETTARE L’AMBIENTE
Ove possibile, evitare di pre-riscaldare il forno e
cercare sempre di riempirlo. Aprire la porta del
forno quanto necessario, perché vi sono disper-
sioni di calore ogni volta che viene aperta. Per ris-
-
il forno continua a generare. Tenere le guarnizioni
pulite e in ordine, per evitare eventuali dispersioni
di energia. Se si dispone di un contratto di ener-
-
ridotta.
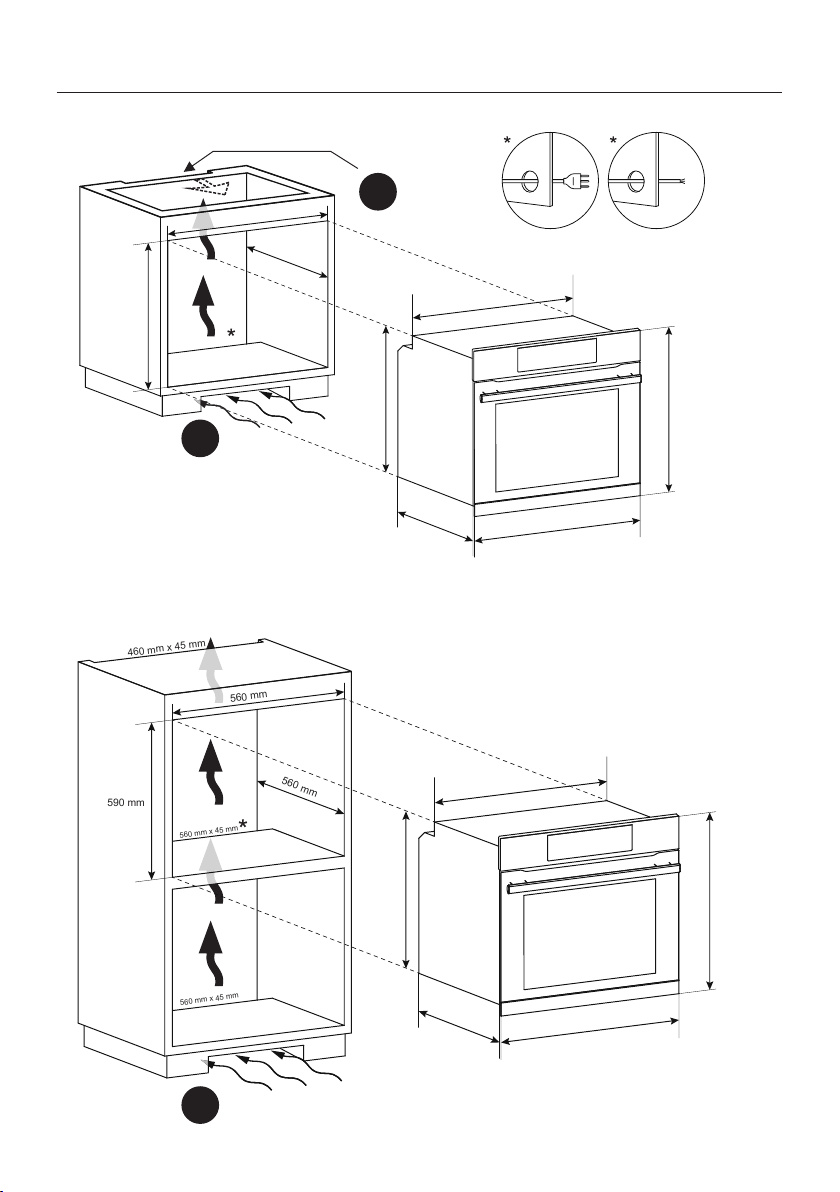
INSTALLATION 60
Installation
A
A
B
560 mm
560 mm
600 mm
560 mm x 45 mm
595 mm
560 mm
548,5 mm
595 mm
577,5 mm
20 mm
560 mm
560 mm
590 mm
560 mm x 45 mm
560 mm x 45 mm
460 mm x 45 mm
595 mm
560 mm
548,5 mm
595 mm
577,5 mm
20 mm

INSTALLATION 61
A
B
EN If the mounting of the plinth does not al-
low air circulation, it is necessary to create an
opening of 500x10 mm or the same surface in
5000 mm
2
.
EN If the furniture is coverage with a bottom at
the back part, provide an opening for the power
supply cable.
IT Se la zoccolatura non consente la circolazi
-
one dell’aria, è necessario creare un’apertura
di500×10 mm o 5000 mm2.
IT Se il mobile ha un fondo posteriore, praticare
un foro per il passaggio del cavo di alimentazi
-
one.
EN If the oven does not have a cooling fan, cre-
ate an opening 460 mm x 15 mm
IT Se il forno non dispone di una ventola di raf
-
freddamento, lasciare uno spazio 460 mm x 15
mm.
EN The manufacturer will not be responsible for any inaccuracy resulting from printing or transcript errors
-
ing the interests of consumption, without prejudice to the characteristics relating tosafety or function.
IT Le constructeur décline toute responsabilité concernant d’éventuelles inexacitudes imputables à des
erreurs d’impression ou de transcription contenue dans cette notice. Le constructeur se réserve le droit
aux caractéristiques de fonctionnement de sécurité des appareils.

70019116
