CANDY HOOVER GROUP Via Comolli 16 Brugherio – Italy
User Instructions
Istruzioni per l’uso
OVENS
FORNI
2
23
EN
IT

EN 2
Safety Indications
General Instructions
Product description
Display description
Use of the appliance
Connectivity
General notes on cleaning
Maintenance
Troubleshooting
Installation
Summary
3
7
9
10
13
15
19
19
22
44

EN 3
• During cooking, moisture may condense inside the oven cavity
or on the glass of the door. This is a normal condition. To reduce
•
tray.
• Avoid leaving food inside the oven after cooking for more than
•
•
•
•
•
•
•
•
•
vised children.
•
to clean the oven door glasses, as they can scratch the surface
Safety Indications

EN 4
and cause the glass to shatter.
•
tions.
•
•
• IF THE OVEN IS PROVIDED BY THE MANUFACTURER WITH
OUT PLUG:
• HE APPLIANCE MUST NOT BE CONNECTED TO THE POWER
SOURCE USING PLUG OR SOCKETS, BUT MUST BE DIRECTLY
CONNECTED TO THE SUPPLY MAINS. The connection to the
• IF THE OVEN IS PROVIDED BY THE MANUFACTURER WITH
PLUG:

EN 5
•
.
•
•
•
ing.
•
may cause a malfunction of the monitor. ln this case contact
customer service.
•
order to avoid overheating.
•

EN 6
•
•
ing and deteriorating the enamel of the insides.
• WARNING: Never remove the oven door seal.
•
•
•
•

EN 7
General Instructions
Safety Indications
read this manual carefully and retain it for future reference. Before installing the oven, take note
NOTE:
usage.
Electrical Safety
ENSURE THAT AN ELECTRICIAN OR QUALIFIED TECHNICIAN MAKES THE ELECTRICAL
CONNECTIONS.
CONNECTION

EN 8
WARNING
earth connection that has defective continuity.
NOTE:
Recommendations
Installation
First Use
EN 9
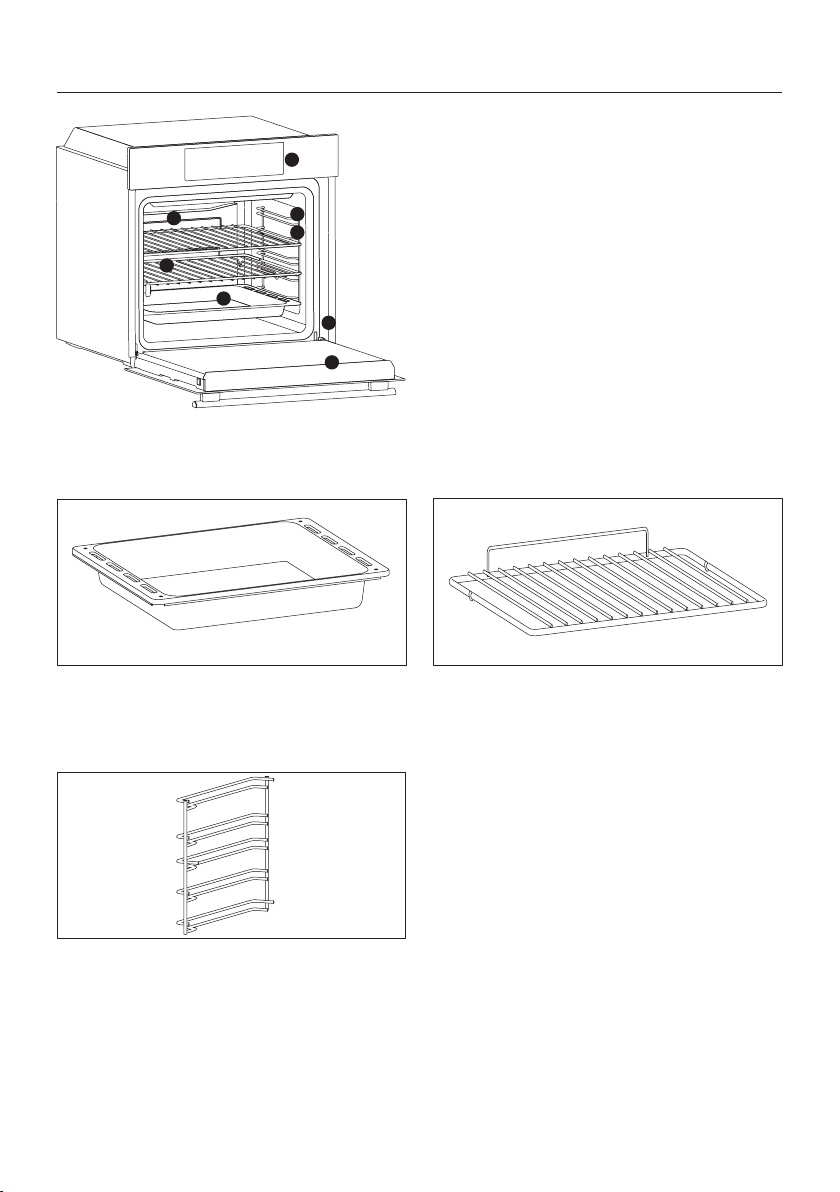
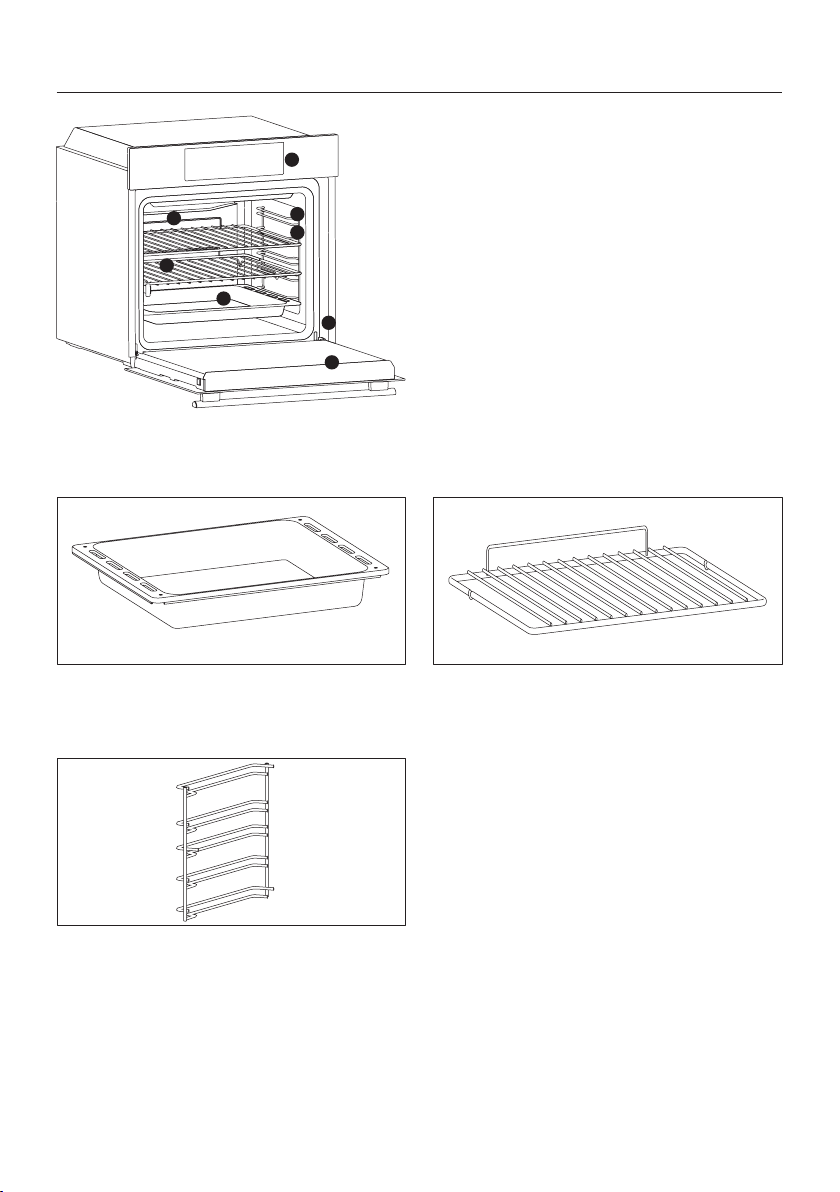
1.
3. Grids
Trays
6. Oven door
7.
8. Serial number
Product description
ACCESSORIES
Drip tray
Metal grid
on the grills.
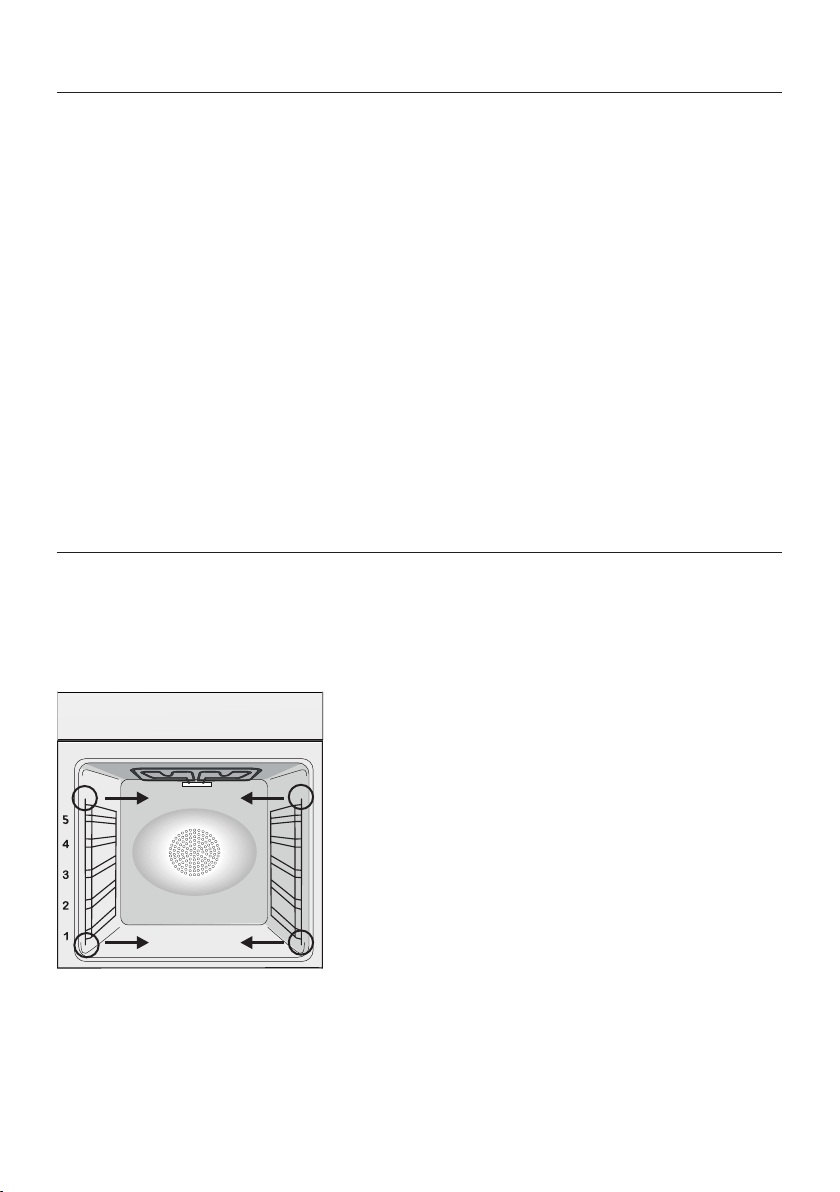
Lateral wire grids
1
2
7
3
8
4
6
5
EN 10
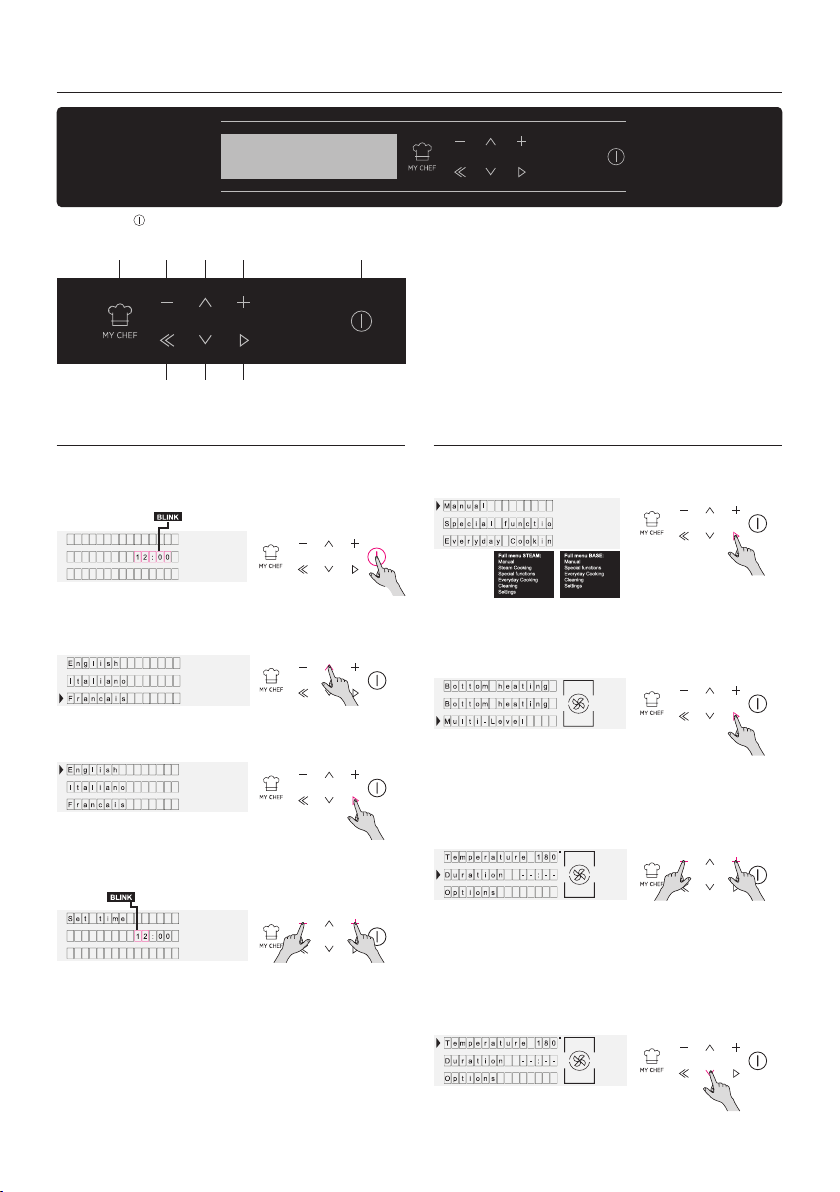
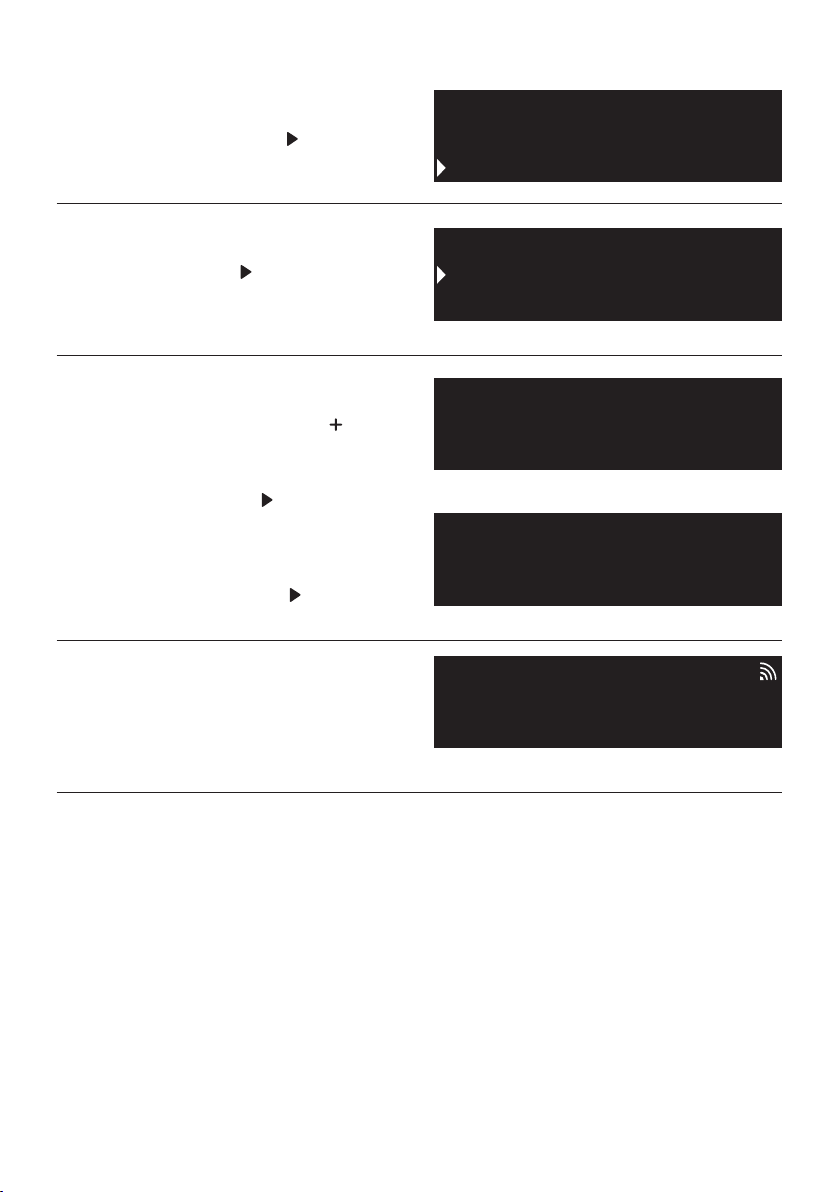
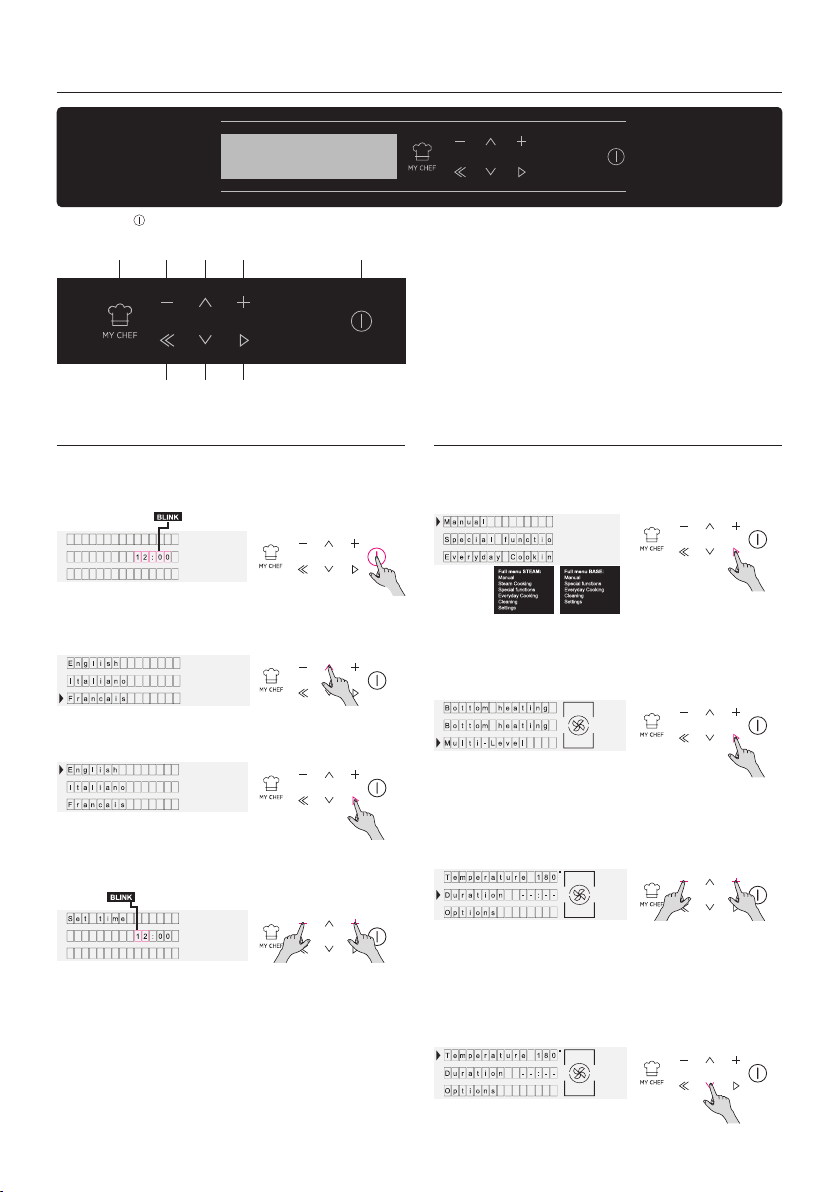
Display description
Product Setting Operating In Manual Mode
ON / OFF -
clock. When the oven is inactive, all the functions are
oking.
rature in selected function. Press OK to go ahead or
BACK to return to the cooking functions selection.
Press DOWN to change the cooking duration. It is
Please enter in the settings section and select the
Figure 1
Figure 5
Figure 6
Figure 7
Figure 8
Figure 2
Figure 3
Figure 4
MY CHEF MINUS
BACK
DOWN
UP
PLUS
OK
ON / OFF
EN 11
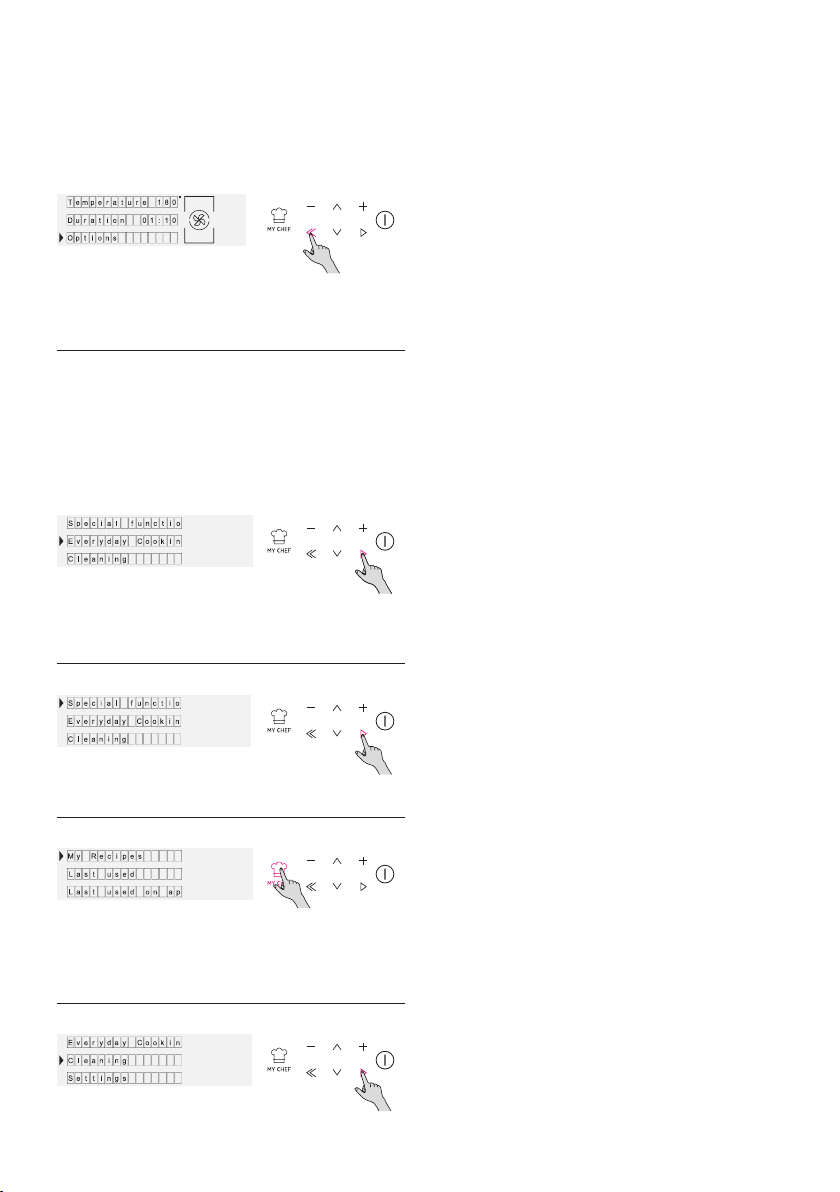
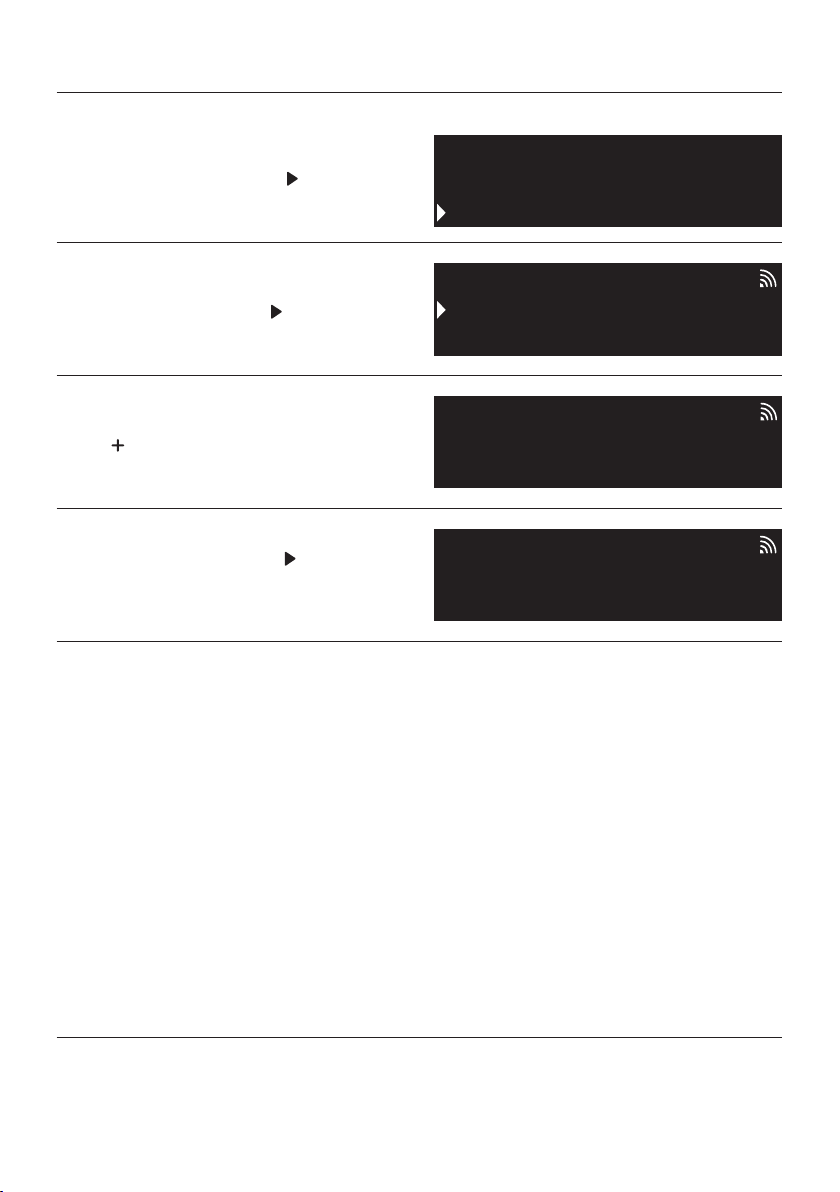
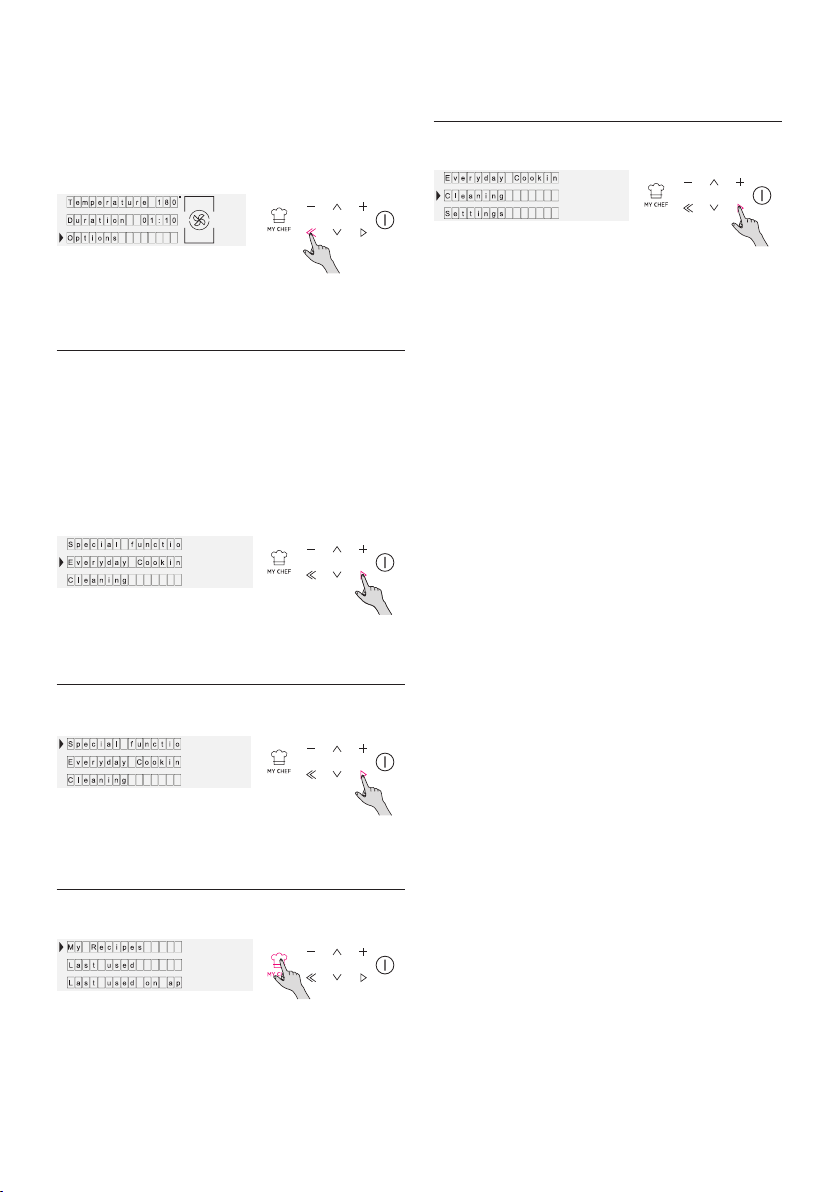
Operating In Special
Functions Mode
Operating In My Chef Mode
Operating In Cleaning
System Mode
Operating In Everyday
Cooking Mode
When a cooking is running you can:
Navigate the HOME menu till reaching the Everyday
Cooking area
UI and in APP.
to consumer needs.
Figure 9
Figure 10
Figure 11
Figure 12
Figure 13

EN 12
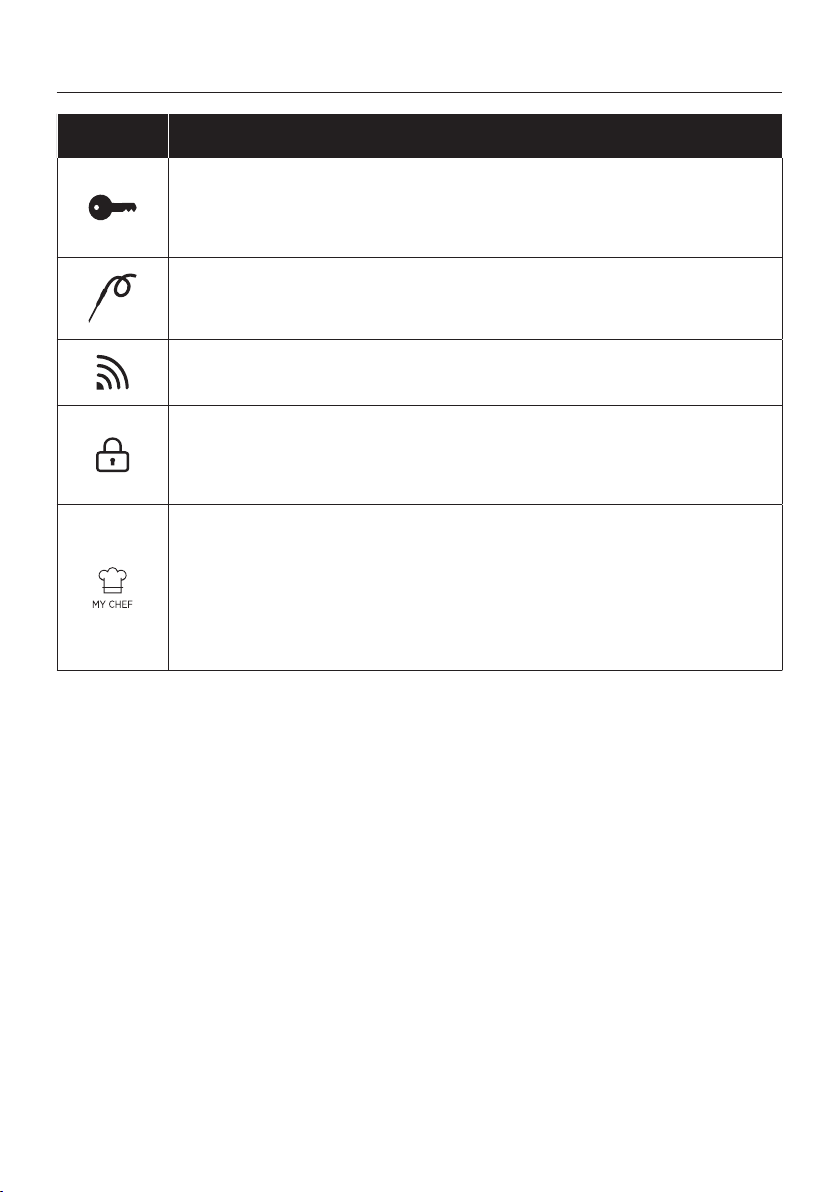
Function Descriptions
FUNCTION DESCRIPTION
KEY LOCK
MEAT PROBE
WIFI
LOCK
the door is unlocked.
MY CHEF
EN 13
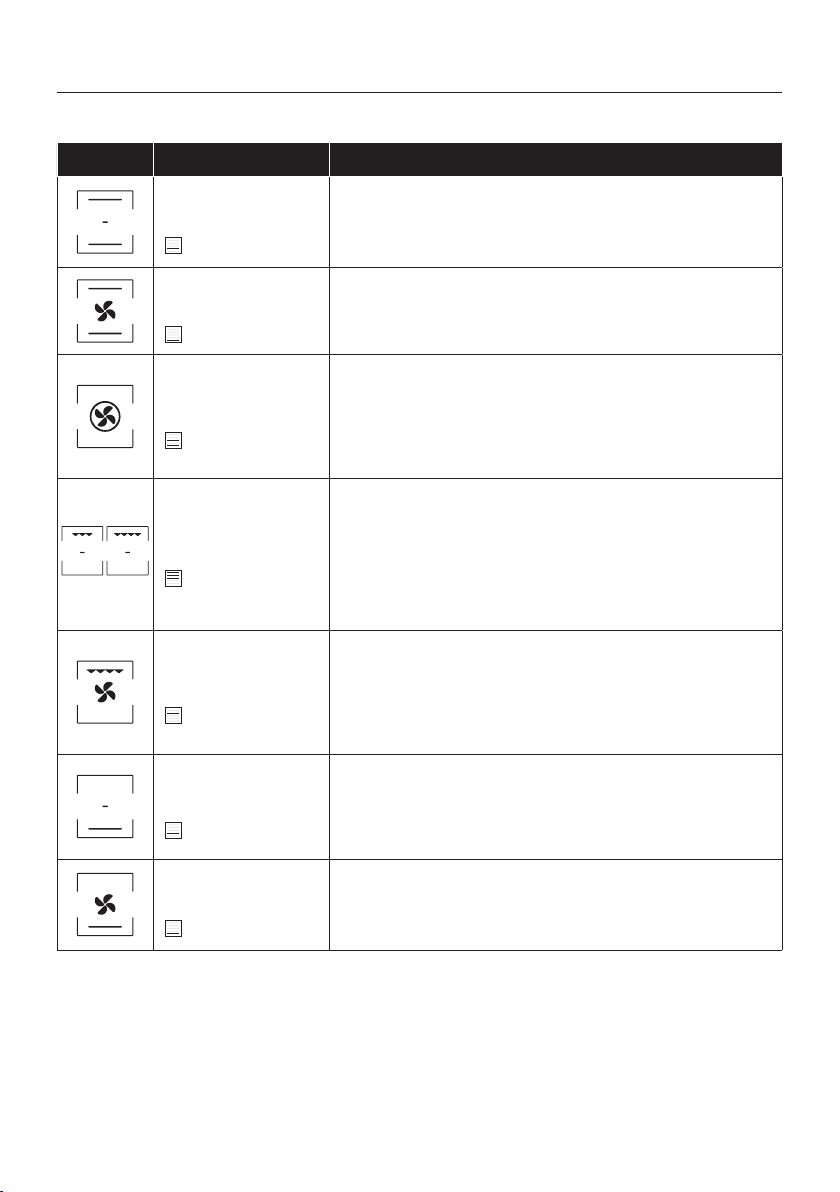
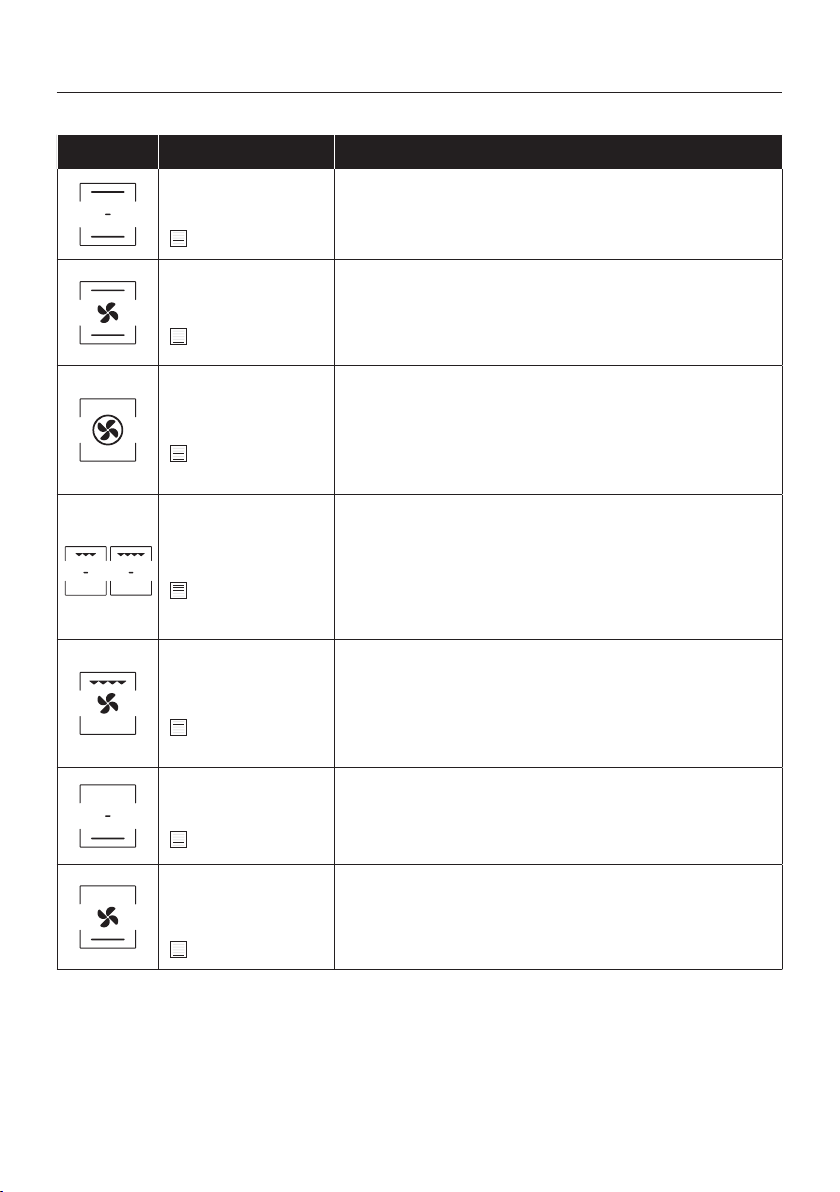
Symbol Description Suggestions
Conventional ***
160-200°C **
2° level
Convection + Fan
240°C **
1° level
Multi-level
180-200°C **
1°/3° level
Grill
L5 (power) **
3°/4°/5° level
Grill + Fan
200°C **
4° level
meats.
Bottom heating
160-180°C **
2° level
Bottom heating + Fan
210°C **
1° level
IDEAL FOR: tarts.
COOKING MODES *
Use of the appliance
EN 14
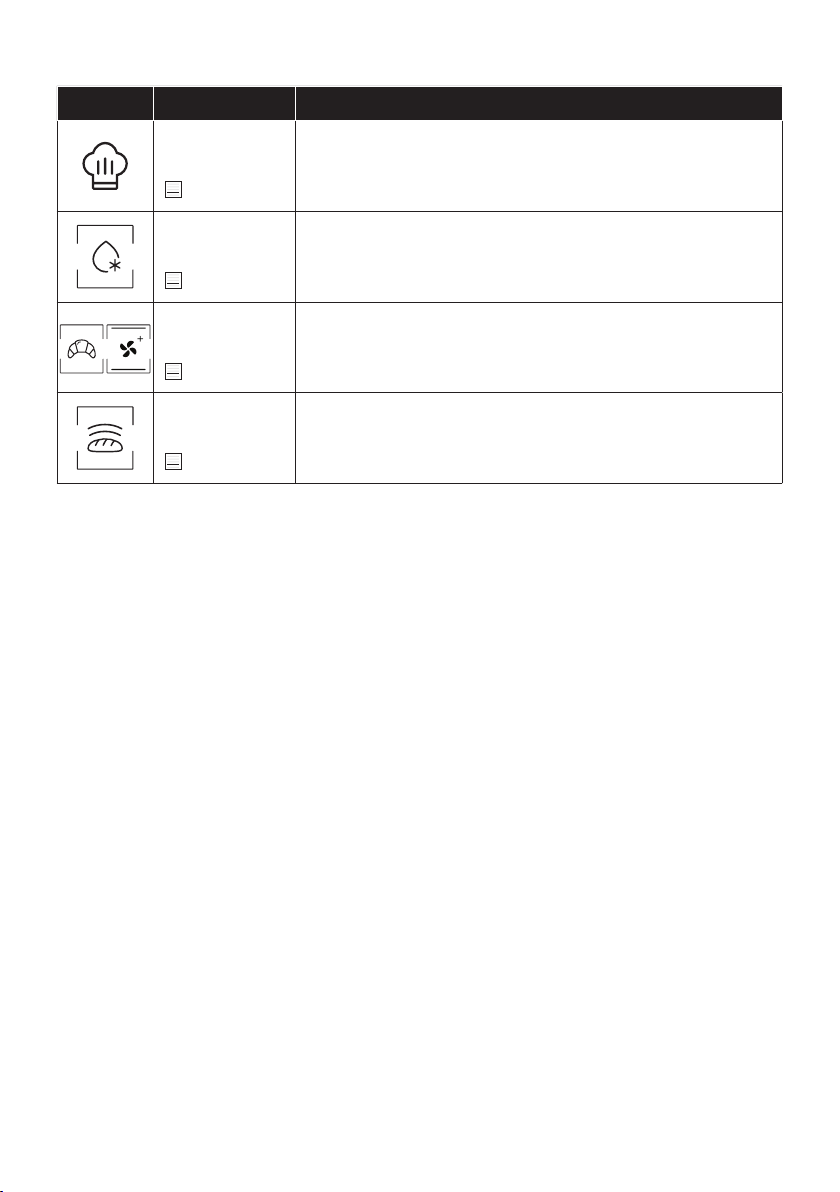
SPECIAL FUNCTIONS *
Symbol Description Suggestions
Master bake ***
180-200°C **
2° level
For healthy cooking, this function reduces the amount of fat or oil re
Defrost
40°C
2° level
Convection+
180-200°C *
2° level
Leavening
40°C
2° level
EN 15
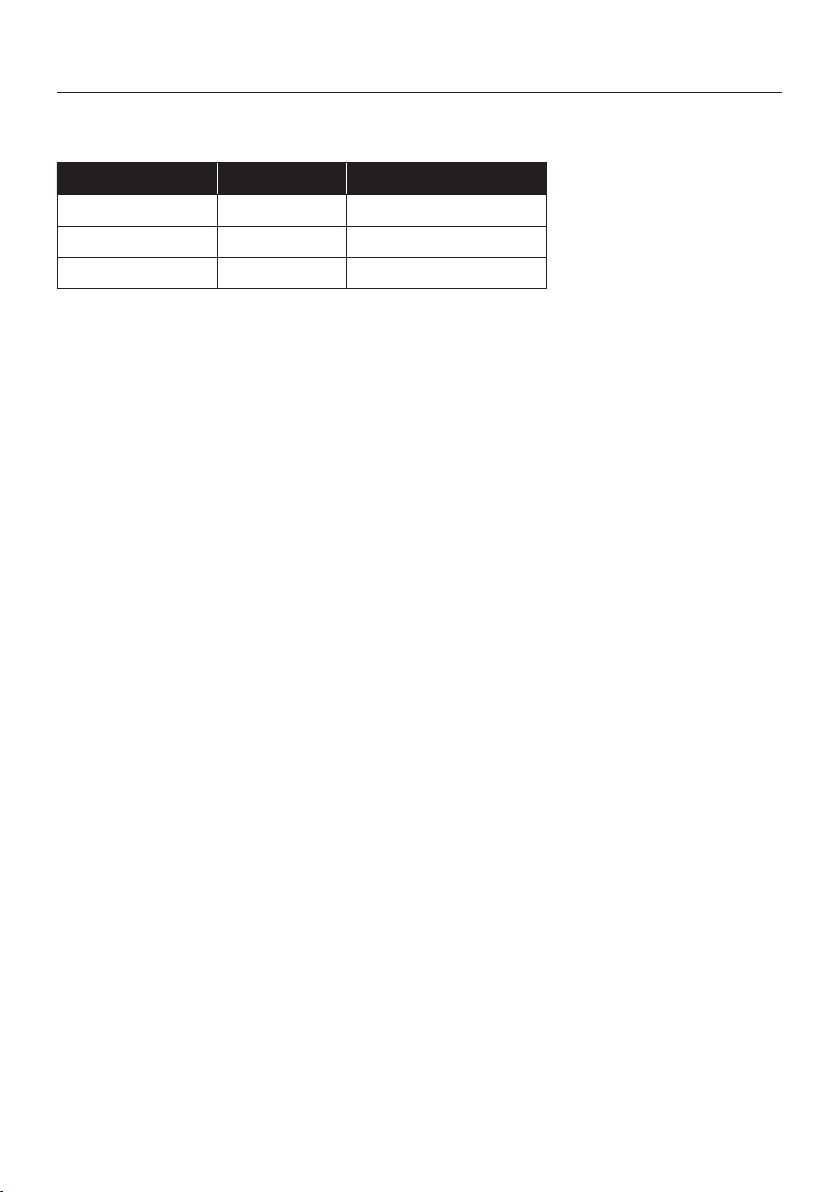
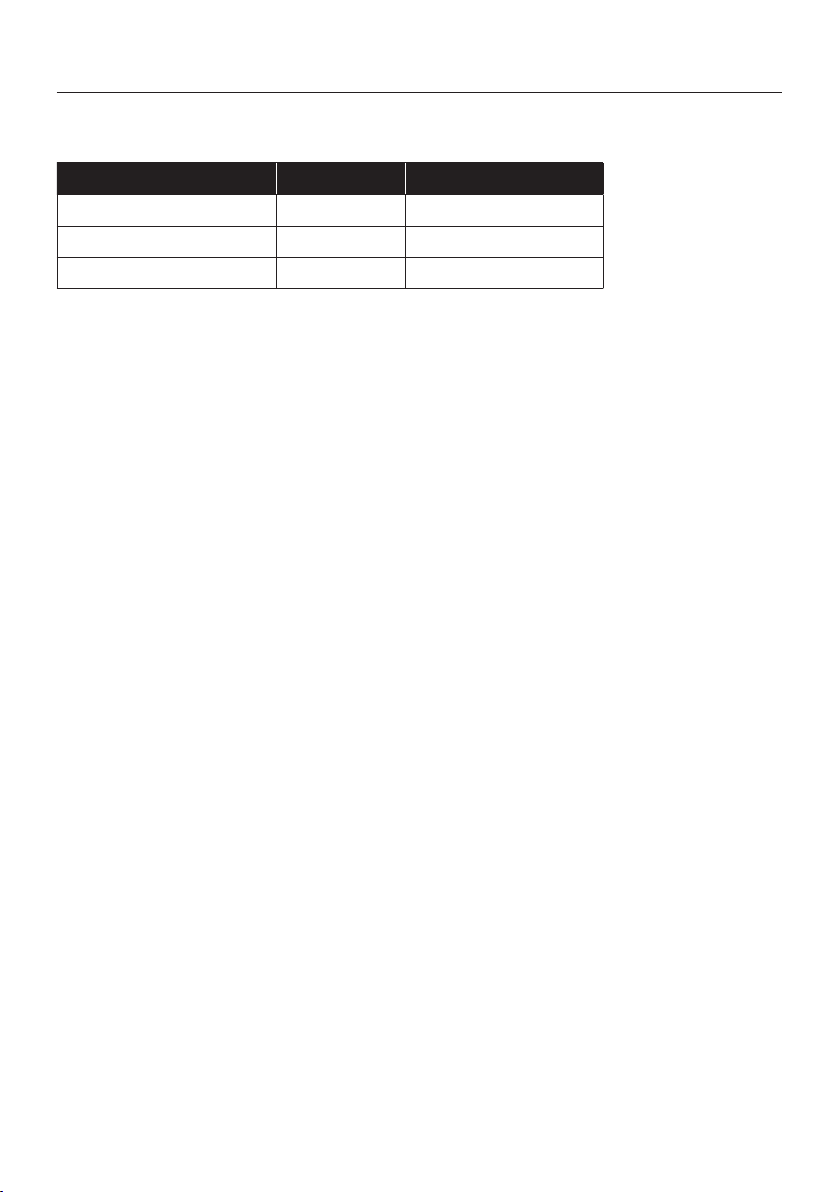
Technology Wi-Fi Bluetooth
Standard
WIRELESS PARAMETERS
PRODUCT INFORMATION FOR NETWORKED EQUIPMENT
•
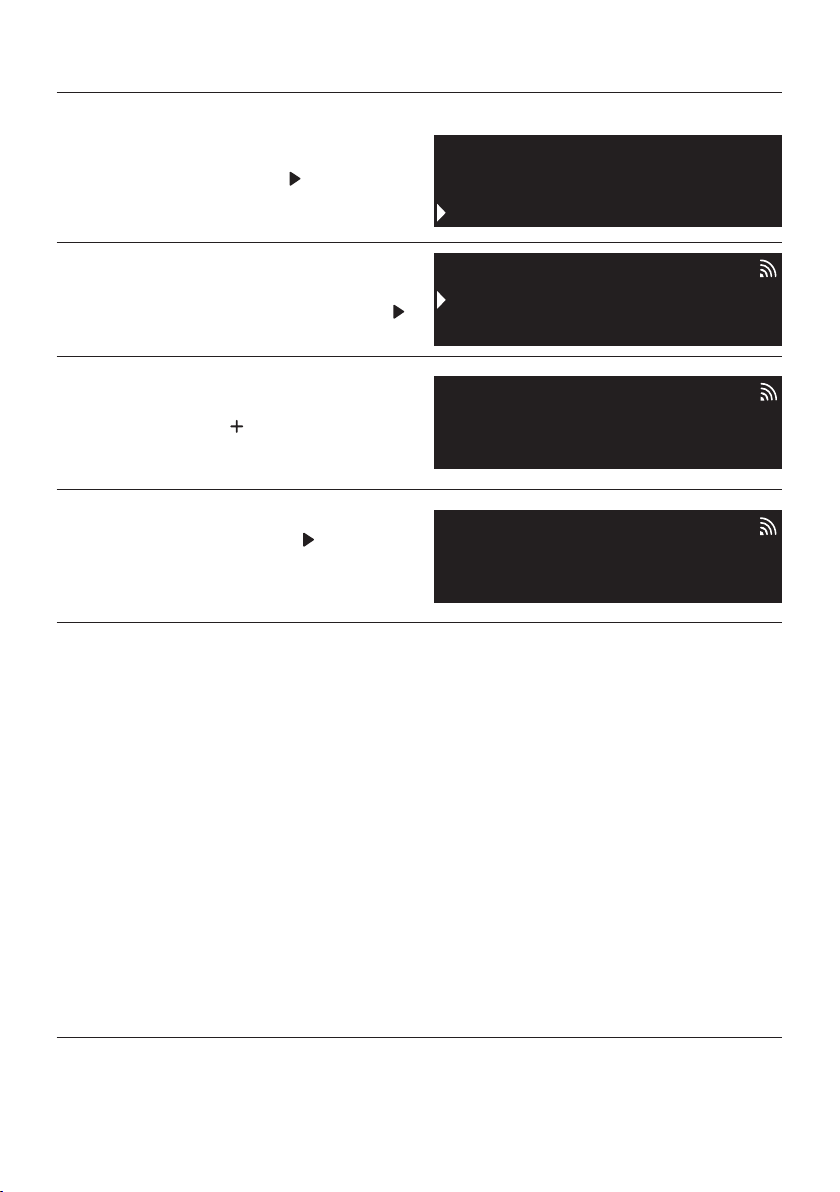
How to activate wireless network port:
• Navigate to settings > WiFi
•
1.
enrollment.
3.
•
1.
How to deactivate wireless network port:
• Navigate to settings > WiFi
•
1.
•
Connectivity
EN 16
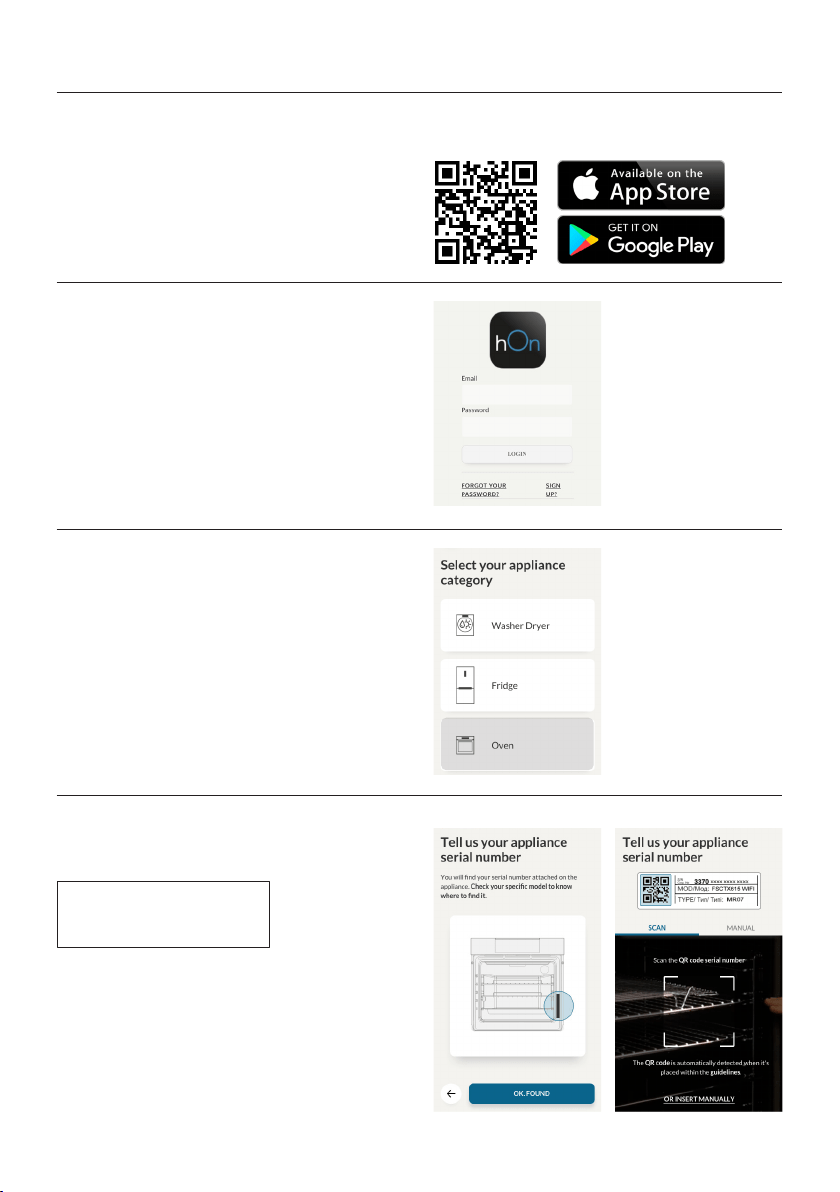
Oven enrollment on app
ON THE SMARTPHONE
Step 1
•
Step 2
•
Step 3
•
Step 4
•
EN 17
ON THE APPLIANCE
Step 5
•
Step 6
•
Step 7
•
•
•
Step 8
•
NOTE:
•
•
•
•
Cleaning
Settings
Everday Cooking
Wifi
Sounds
Lamp
Easy
Enrollment
Standard
Enrollment
Enrollment in progress
EN 18
NOTE:
Step 1
•
Step 2
•
Step 3
•
the
Step 4
•
Remote control mode
Cleaning
Settings
Everday Cooking
Remote control active
On
Remote control
Remote control
Wifi
Lamp
EN 19
through regular cleaning. Wait for the oven to
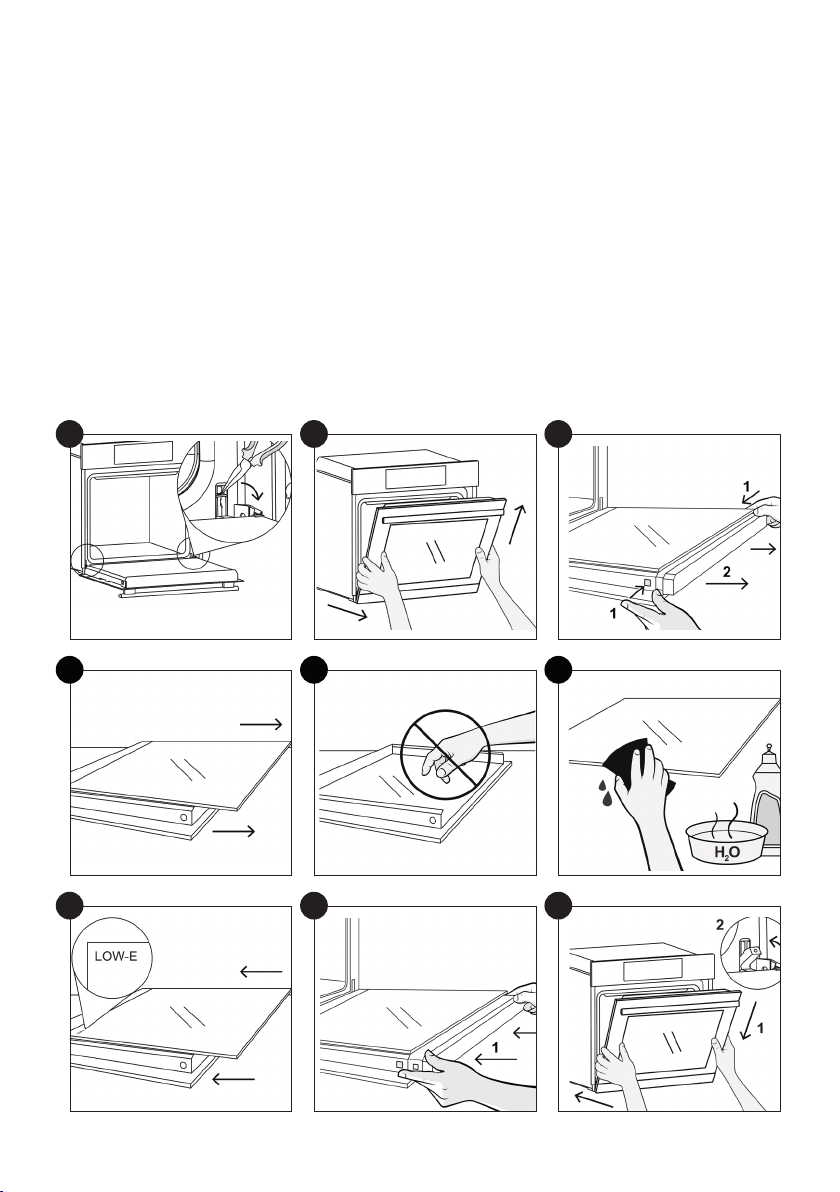
GLASS PARTS
OVEN WINDOW SEAL
General notes on cleaning
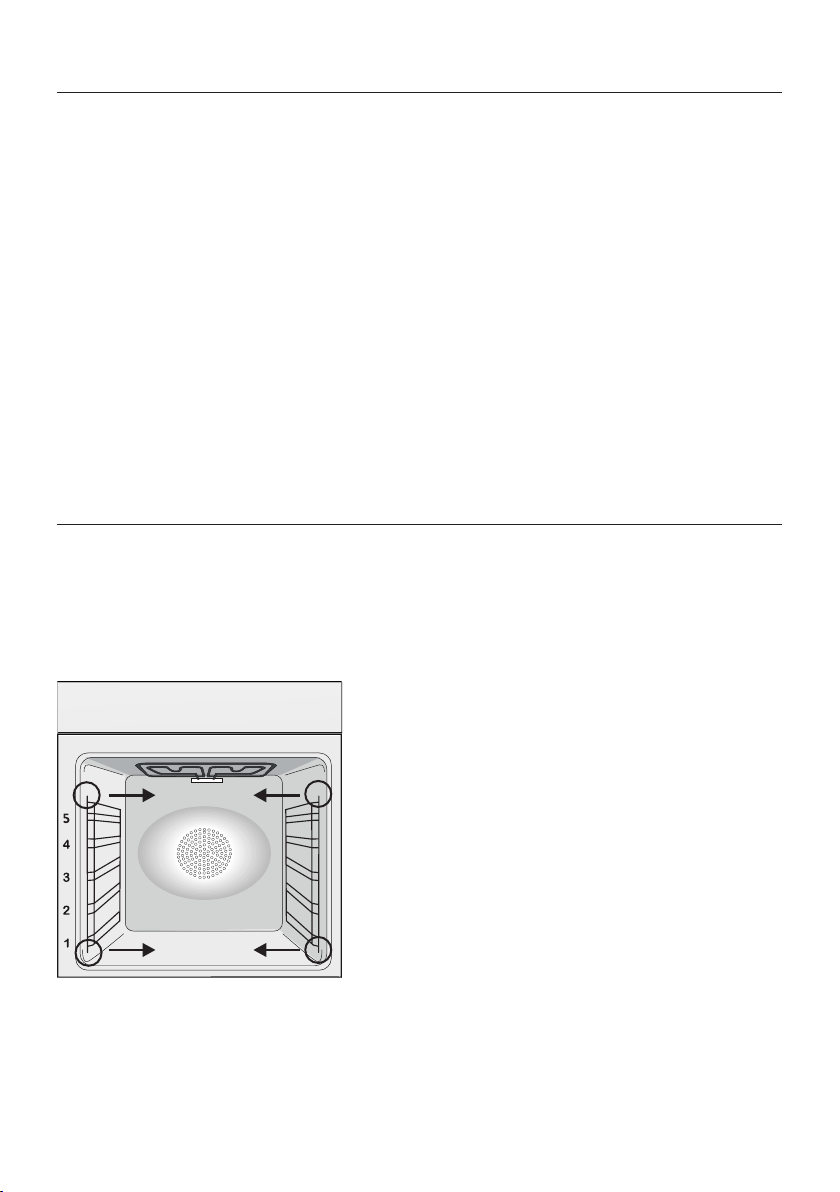
REMOVAL AND CLEANING OF THE SIDE RACKS
Maintenance
ACCESSORIES
DRIP PAN
oven. Pour the hot fat into a container and
CHANGING THE BULB
the glass cover.
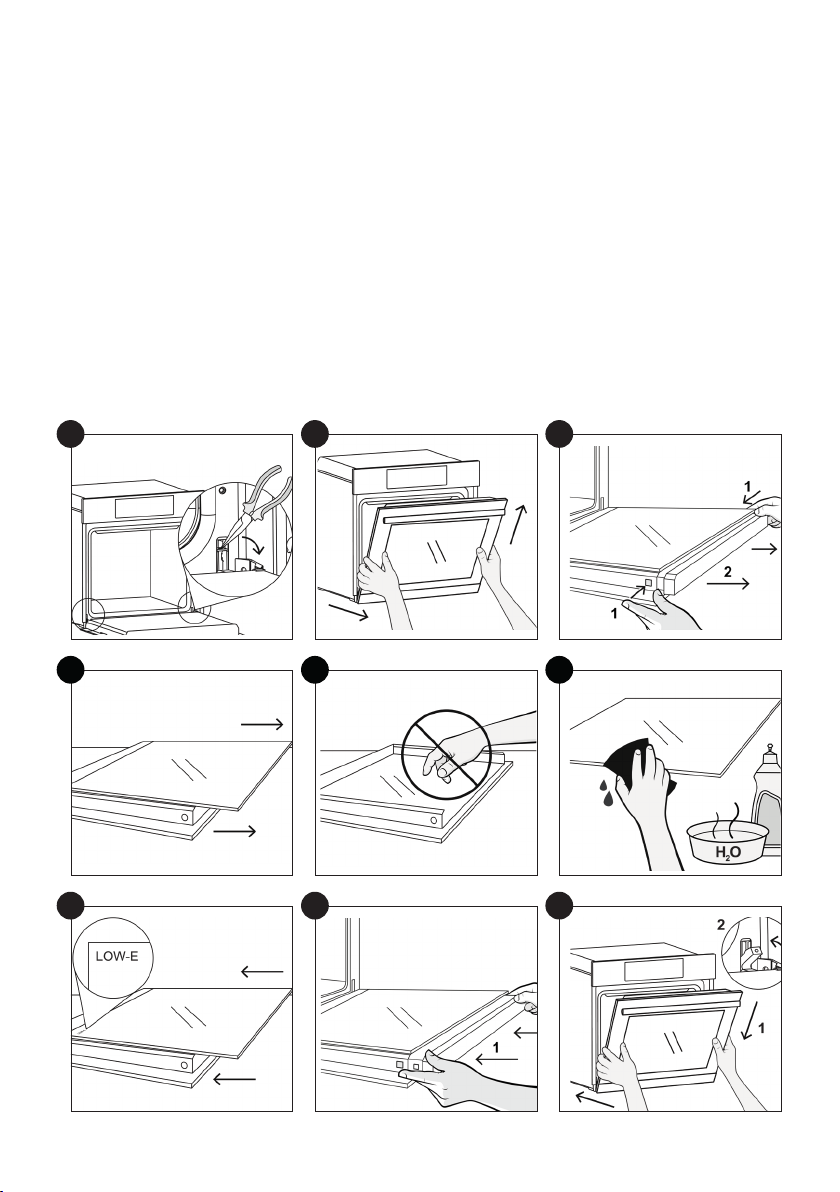
EN 20
1.
2.
3.
4.
5.
6.
7.
8.
9.
1
4
7
2
5
8
3
6
9

EN 21
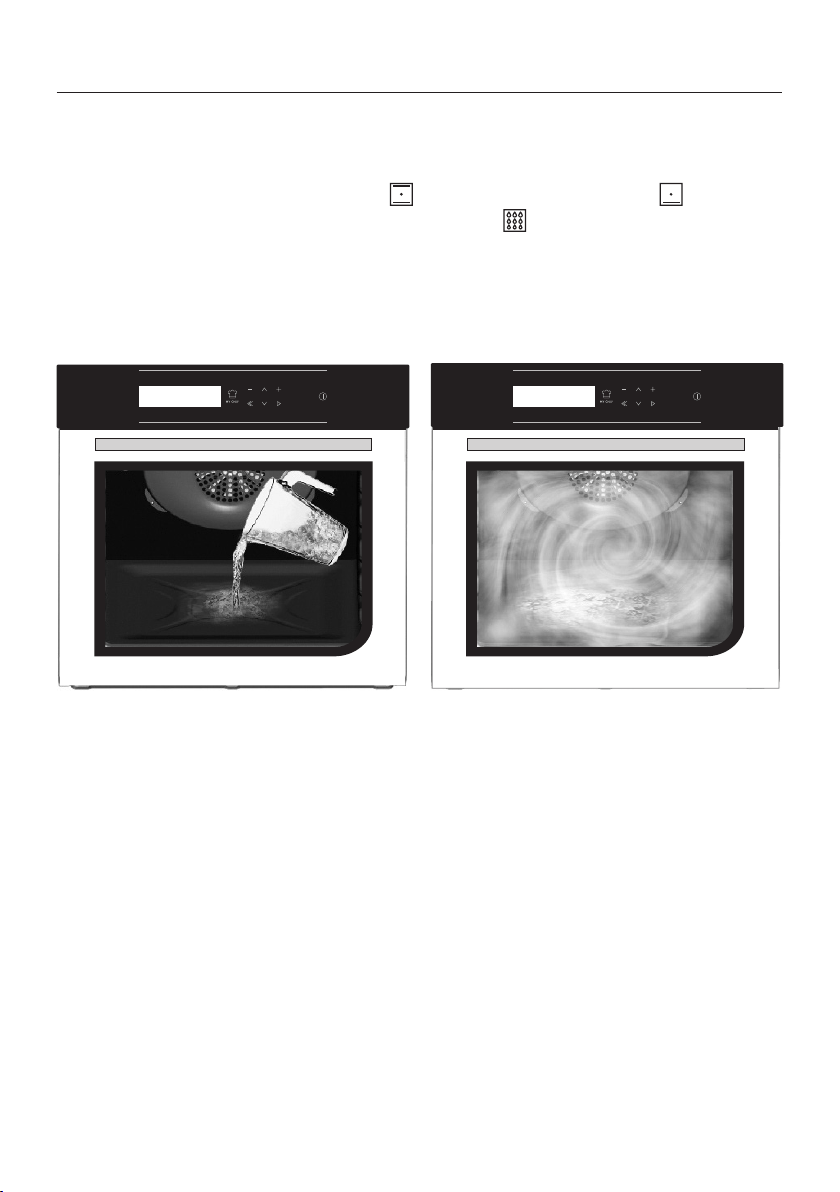
Hydro Easy Clean Function
the oven.
300 ml
EN 22
Waste management and environmental protection
(that can have a negative ef
and recover all the materials. Individuals can
In many countries, domestic collections may
Troubleshooting
Problem Possible cause Solution
the oven does not heat
The clock is not set Set the clock
The oven does not
Ensure that the necessary settings
are correct
No reaction of the
touch user interface
Steam and condensation on the user in
condensation layer
SAVING AND RESPECTING THE ENVIRON-
MENT
residual heat that the oven continues to gen
time slot.

IT 23
Indicazioni di Sicurezza
Avvertenze Generali
Descrizione del Prodotto
Descrizione del display
Uso dell’elettrodomestico
Connettività
Pulizia e manutenzione del forno
Manutenzione
Risoluzione dei Problemi
Garanzie
Installation
Sommario
24
28
30
31
34
36
40
40
43
43
44

IT 24
•
•
•
•
•
•
•
•
sionati.
•
Indicazioni di Sicurezza

IT 25
stesso.
•
•
•
•
•
•
• SE IL FORNO È FORNITO DAL PRODUTTORE SENZA SPINA:
FONTE DI ALIMENTAZIONE TRAMITE SPINA O PRESE, MA
DEVE ESSERE COLLEGATO DIRETTAMENTE ALLA RETE DI
deve essere in linea con la normativa vigente. Il cavo di terra gial
•

IT 26
•
• .
•
originali.
•
•
•

IT 27
•
•
•
•
smalto caldo, rischiano di fondere e deteriorare lo smalto degli
interni.
•
forno.
•
•
•
•

IT 28
Avvertenze Generali
Suggerimenti sulla Sicurezza
NOTA:
a seconda dei modelli.
Sicurezza Elettrica
FARE EFFETTUARE I COLLEGAMENTI ELETTRICI AD UN’ELETTRICISTA O TECNICO
QUALIFICATO.
COLLEGAMENTO
di terra della rete elettrica.

IT 29
ATTENZIONE
NOTA
Raccomandazioni
Installazione
Primo utilizzo
PULIZIA PRELIMINARE
IT 30
1. Pannello di controllo
3. Griglie
Vassoi
6.
7.
8. Numero di serie
Descrizione del Prodotto
1
2
7
3
8
4
6
5
ACCESSORI
Vassoio di gocciolamento
Griglia metallica
Raccoglie i residui del gocciolamento durante
la cottura degli alimenti sulle griglie.
Griglie metalliche laterali
sostengono le griglie metalliche e i vassoi di goc
ciolamento.
NOTA:
IT 31
Descrizione del display
Impostazione del prodotto Funzionamento in modalità Manuale
ON / OFF -
ne il forno.
Figura 1
Figura 5
Figura 6
Figura 7
Figura 8
Figura 2
Figura 3
Figura 4
MY CHEF MENO
INDIETRO
GIÙ
SU
PIÙ
OK
ON / OFF
IT 32
Funzionamento in modalità
Funzioni speciali
Funzionamento in modalità
My Chef
Funzionamento in modalità
Sistema di pulizia
Funzionamento in modalità
Cucina quotidiana
cottura.
cottura
Figura 9
Figura 10
Figura 11
Figura 12
Figura 13
IT 33
Descrizioni delle funzioni
Simbolo Suggerimento
BLOCCO TASTO
SONDA PER LA CARNE
WIFI
LOCK
MY CHEF
IT 34
* A seconda del modello del forno.
Simbolo Descrizione Suggerimento
Statico ***
160-200 °C **
2° livello
Cottura ventilata
240 °C **
1° livello
di cottura uniformi.
Cottura multilivello
180-200°C **
1°/3° livello
cucinano insieme alimenti diversi.
Grill
L5 (potenza) **
3°/4°/5° livello
Grill ventilato
200°C **
4° livello
Resistenza inferiore
160-180°C **
2° livello
Resistenza inferiore
ventilata
210°C **
1° livello
IDEALE PER: torte.
MODALITÀ DI COTTURA*
Uso dell’elettrodomestico

IT 35
FUNZIONI PARTICOLARI *
Simbolo Descrizione Suggerimento
Master bake ***
180-200 °C **
2° livello
Scongelamento
40°C
2° livello
Ventilata+
180-200°C *
2° livello
Lievitazione
40°C
2° livello
IT 36
Tecnologia Wi-Fi Bluetooth
Standard
PARAMETRI WIRELESS
INFORMAZIONI SUL PRODOTTO PER LE APPARECCHIATURE COLLEGATE IN RETE
•
Come attivare la porta di rete wireless:
•
•
1.
3.
•
1.
ferma.
Come disattivare la porta di rete wireless:
•
•
1.
ferma.
•
Connettività

IT 37
Registrazione del forno sull’app
SU SMARTPHONE
Fase 1
•
Fase 2
•
Fase 3
• Aggiungere un nuovo elettrodomestico.
Fase 4
•
manualmente il numero di serie.

IT 38
Cleaning
Settings
Everday Cooking
Wifi
Sounds
Lamp
Easy
Enrollment
Standard
Enrollment
Enrollment in progress
SULL’ELETTRODOMESTICO
Fase 5
•
IMPOSTAZIONI con il tasto
Fase 6
•
WI FI con il tasto
Fase 7
•
ARRUOLAMENTO FACILE o STANDARD
cliccare il tasto .
•
.
•
tasto .
Fase 8
•
NOTA:
•
•
dati serviranno in un secondo momento.
•
domestica sia eccellente.
•
IT 39
Cleaning
Settings
Everday Cooking
Remote control active
On
Remote control
Remote control
Wifi
Lamp
NOTA:
Fase 1
•
IMPOSTAZIONI con il tasto
Fase 2
•
Fase 3
•
remoto con il tasto
Fase 4
•
Modalità controllo remoto
IT 40
PARTI IN VETRO
GUARNIZIONE DELLO SPORTELLO DEL FOR-
NO
Pulizia e manutenzione del forno
RIMOZIONE E PULIZIA DELLE SCAFFALATURE A FILO
che siano successivamente asciugate.
Manutenzione
ACCESSORI
VASCHETTA DI GOCCIOLAMENTO
forno. Versare il grasso caldo in un contenitore
Se rimangono dei residui di grasso, immergere
SOSTITUZIONE DELLA LAMPADINA
1. Scollegare il forno alla rete.
modello.
IT 41
1.
2.
3.
4. Rimuovere con molta cura il vetro interno del forno, tenendolo saldamente con due mani e
5.
6.
7.
8.
9.
1
4
7
2
5
8
3
6
9
IT 42
Funzione Hydro Easy Clean
forno.
Attenzione:
300 ml
IT 43
Gestione dei riuti e rispetto dell’ambiente
istrate.
Risoluzione dei Problemi
Garanzie
PROBLEMA POSSIBILE CAUSA SOLUZIONE
Il forno non si scalda
Il forno non si scalda
Il forno non si scalda
necessarie siano corrette
RISPARMIARE E RISPETTARE L’AMBIENTE
ridotta.
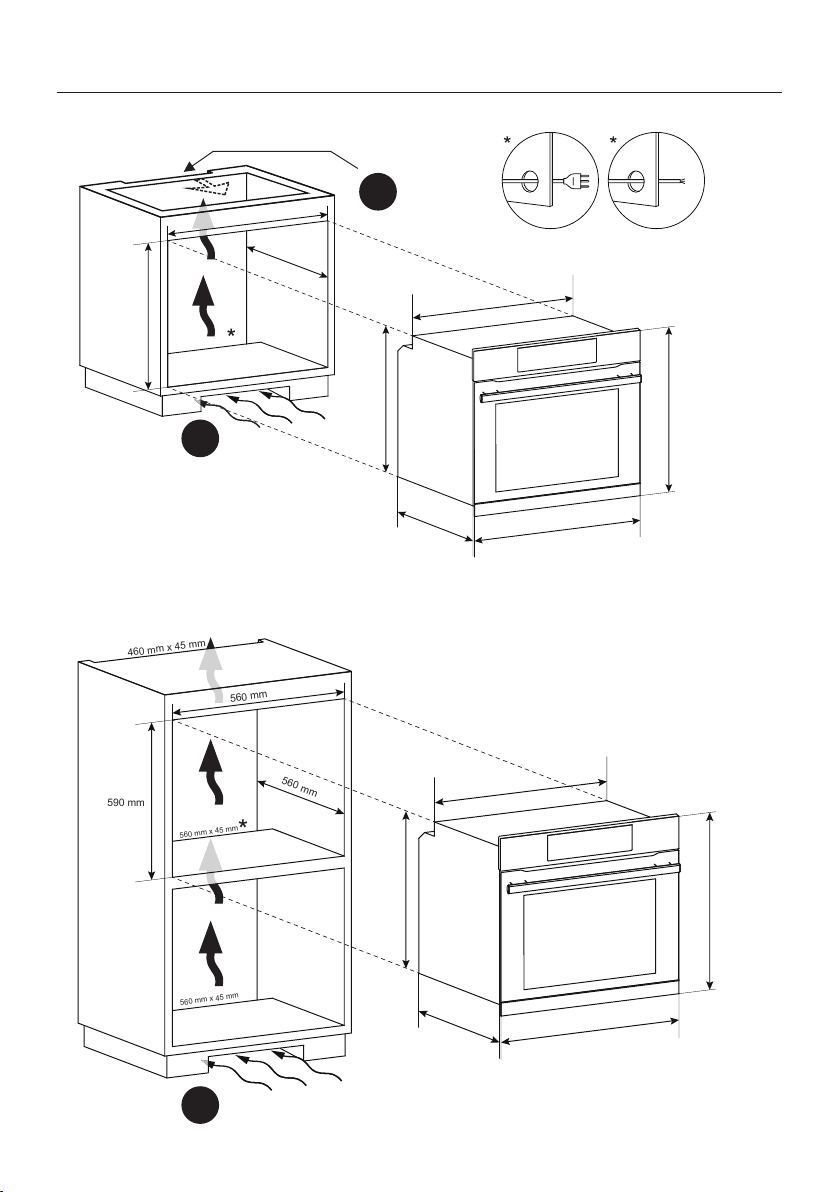
INSTALLATION 44
Installation
A
A
B
560 mm
560 mm
600 mm
560 mm x 45 mm
595 mm
560 mm
548,5 mm
595 mm
577,5 mm
20 mm
560 mm
560 mm
590 mm
560 mm x 45 mm
560 mm x 45 mm
460 mm x 45 mm
595 mm
560 mm
548,5 mm
595 mm
577,5 mm
20 mm
INSTALLATION 45
A
B
EN
IT
EN
.
IT
.
EN If the oven does not have a cooling fan, create
IT
.
EN
IT