
USER INSTRUCTIONS
OVENS
EN
02
CANDY HOOVER GROUP S.R.L. • Via Comolli 16 • 20861 Brugherio (MB) - Italy
INSTRUCCIONES DE USO
HORNOS EMPOTRABLES
ES
18

Safety Indications
EN 02
• During cooking, moisture may condense inside the oven cavity or
on the glass of the door. This is a normal condition. To reduce this
effect, wait 10-15 minutes after turning on the power before putting
food inside the oven. ln any case, the condensation disappears when
the oven reaches the cooking temperature.
• Cook the vegetables in a container with a lid instead of an open tray.
• Avoid leaving food inside the oven after cooking for more than
15/20 minutes.
• WARNING: the appliance and accessible parts become hot during
use. Be careful not to touch any hot parts.
• WARNING: the accessible parts can become hot when the grill is in
use. Children should be kept at a safe distance.
• WARNING: ensure that the appliance is switched off before
replacing the bulb, to avoid the possibility of electric shocks.
• WARNING: in order to avoid any danger caused by the accidental
resetting of the thermal interruption device, the appliance should
not be powered by an external switching device, such as a timer, or
be connected to a circuit that is regularly switched on and off.
• Children under 8 should be kept at a safe distance from the
appliance if not continuously supervised.
• Children should not play with the appliance.
• The appliance can be used by those aged 8 or over and by those
with limited physical, sensorial or mental capacities, without
experience or knowledge of the product, only if supervised or
provided with instruction as to the operation of the appliance, in a
safe way with awareness of the possible risks.
• Cleaning and maintenance should not be carried out by
unsupervised children.
• Do not use rough or abrasive materials or sharp metal scrapers to
clean the oven door glasses, as they can scratch the surface and
cause the glass to shatter.

EN 03
• The oven must be switched off before removing the removable
parts. After cleaning, reassemble them according the instructions.
• Only use the meat probe recommended for this oven.
• Do not use a steam cleaner for cleaning operations.
IF THE OVEN IS PROVIDED BY THE MANUFACTURER WITHOUT PLUG:
• THE APPLIANCE MUST NOT BE CONNECTED TO THE POWER
SOURCE USING PLUG OR SOCKETS, BUT MUST BE DIRECTLY
CONNECTED TO THE SUPPLY MAINS. The connection to the power
source must be carried out by a suitably qualified professional. In
order to have an installation compliant to the current safety
legislation the oven must be connected only placing an omnipolar
breaker, with contact separation compliant to the requirements for
overvoltage category III, between the appliance and the power
source. The omnipolar breaker must bear the maximum connected
load and must be in line with current legislation. The yellow-green
earth cable should not be interrupted by the breaker. The omnipolar
breaker used for the connection must be easily accessible when the
appliance is installed.
• The connection to the power source must be carried out by a
suitably qualified professional considering the polarity of the oven
and of the power source.
• The disconnection must be achieved incorporating a switch in the
fixed wiring in accordance with the wiring rules
IF THE OVEN IS PROVIDED BY THE MANUFACTURER WITH PLUG:
• The socket must be suitable for the load indicated on the tag and
must have ground contact connected and in operation. The earth
conductor is yellow-green in colour. This operation should be carried
out by a suitably qualified professional. ln case of incompatibility
between the socket and the appliance plug, ask a qualified
electrician to substitute the socket with another suitable type. The
plug and the socket must be conformed to the current norms of the
installation country.

Connection to the power source can also be made by placing an
omnipolar breaker, with contact separation compliant to the
requirements for overvoltage category III, between the appliance
and the power source that can bear the maximum connected load
and that is in line with current legislation. The yellow-green earth
cable should not be interrupted by the breaker. The socket or
omnipolar breaker used for the connection should be easily
accessible when the appliance is installed.
• The disconnection may be achieved by having the plug accessible
or by incorporating a switch in the fixed wiring in accordance with the
wiring rules.
• lf the power cable is damaged, it should be substituted with a cable
or special bundle available from the manufacturer or by contacting
the customer service department. The type of power cable must be
H05V2V2-F. This operation should be carried out by a suitably
qualified professional. The earth conductor (yellow-green) must be
approximately 10 mm longer than the other conductors. For any
repairs, refer only to the Customer Care Department and request the
use of original spare parts.
• Failure to comply with the above can compromise the safety of the
appliance and invalidate the guarantee.
• Any excess of spilled material should be removed before cleaning.
• A long power supply failure during an occurring cooking phase may
cause a malfunction of the monitor. ln this case contact customer
service.
• The appliance must not be installed behind a decorative door in
order to avoid overheating.
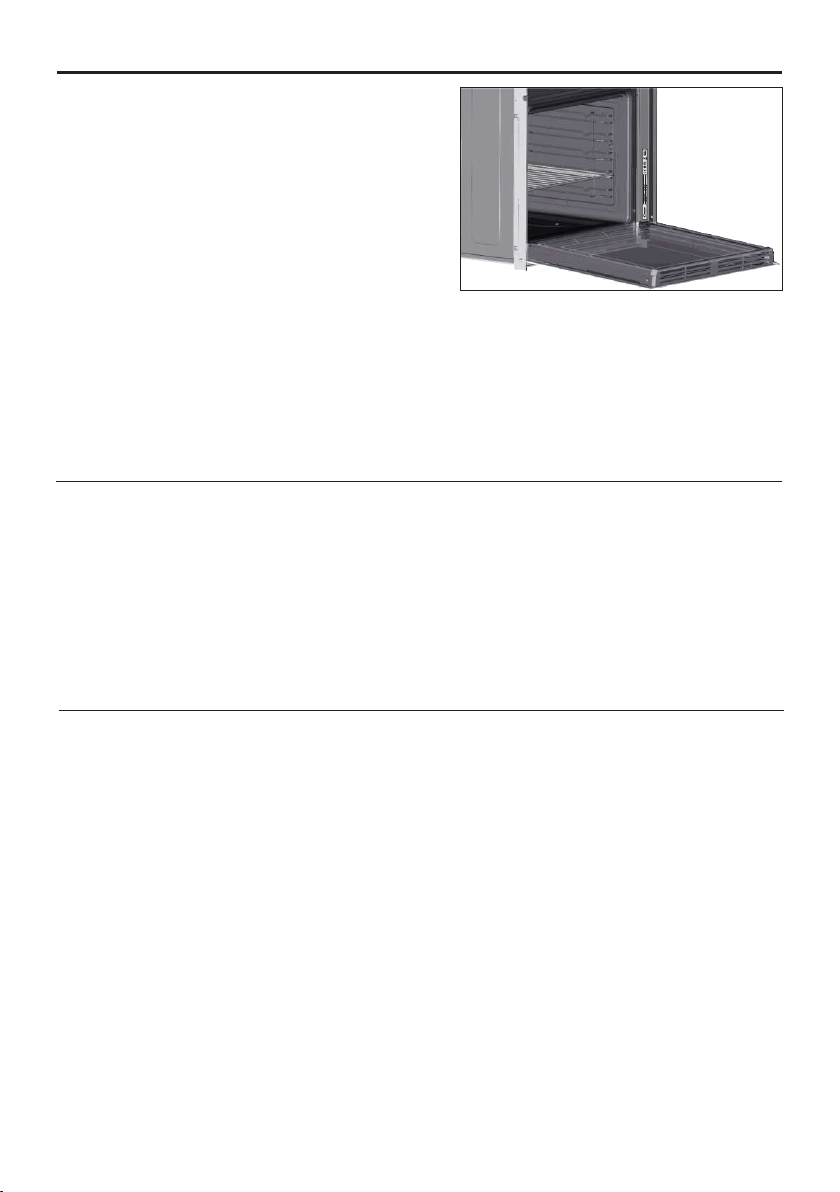
• When you place the shelf inside, make sure that the stop is directed
upwards and in the back of the cavity. The shelf must be inserted
completely into the cavity.
• WARNING: Do not line the oven walls with aluminium foil or single-
use protection available from stores.
EN 04

Aluminium foil or any other protection, in direct contact with the hot
enamel, risk melting and deteriorating the enamel of the insides.
• WARNING: Never remove the oven door seal.
• CAUTION: Do not refill the cavity bottom with water during cooking
or when the oven is hot.
• No additional operation/setting is required in order to operate the
appliance at the rated frequencies
• WARNING: before initiating the automatic cleaning cycle:
- Clean the oven door;
- Remove large or coarse food residues from the inside of the oven
using a damp sponge. Do not use detergents;
- Remove all accessories and the sliding rack kit (where present); -Do
not place tea towels.
• ln ovens with meat probe it is necessary, before making the
cleaning cycle, close the hole with the nut provided. Always close the
hole with the nut when the meat probe is not used.
• During the pyrolytic cleaning process, surfaces can heat up more
than usual, children must therefore be kept at a safe distance.
EN 05

Summary
General Instructions
7
1.1 Safety indications
1.2 Electrical safety
1.3 Recommendations
1.4 Installation
1.5 Waste management
2.1 Overview
2.2 Accessories
2.3 First use
Product Description
9
3.1 Display description
3.2 Cooking modes
Use of the Oven
10
4.1 General notes on cleaning
4.2 Pyrolysis
4.3 Hydro Easy Clean Function
4.4 Maintenance
• Instruction for removal and
cleaning of the side racks
• Removal of the oven window
• Removal and cleaning of the glass
door
• Changing the bulb
Oven Cleaning and Maintenance
13
5.1 F.A.Q.
Troubleshooting
17
EN 06
1. General Instructions
We thank you for choosing one of our products. For the
best results with your oven, you should read this
manual carefully and retain it for future reference.
Before installing the oven, take note of the serial
number so that you can give it to customer service staff
if any repairs are required. Having removed the oven
from its packaging, check that it has not been damaged
during transportation. If you have doubts, do not use
the oven and refer to a qualified technician for advice.
Keep all of the packaging material (plastic bags,
polystyrene, nails) out of the reach of children. When
the oven is switched on for the first time, strong
smelling smoke can develop, which is caused by the glue on the insulation panels surrounding the oven
heating for the first time. This is absolutely normal and, if it occurs, you should wait for the smoke to
dissipate before putting food in the oven. The manufacturer accepts no responsibility in cases where
the instructions contained in this document are not observed.
NOTE: the oven functions, properties and accessories cited in this manual will vary, depending on the
model you have purchased.
1.1 Safety Indications
Only use the oven for its intended purpose, that is only for the cooking of foods; any other use, for
example as a heat source, is considered improper and therefore dangerous. The manufacturer cannot
be held responsible for any damage resulting from improper, incorrect or unreasonable usage.
The use of any electrical appliance implies the observance of some fundamental rules:
- do not pull the power cable to disconnect the product to the power source;
- do not touch the appliance with wet or damp hands or feet;
- in general the use of adaptors, multiple sockets and extension cables is not recommended;
- in case of malfunction and/or poor operation, switch off the appliance and do not tamper with it.
1.2 Electrical Safety
ENSURE THAT AN ELECTRICIAN OR QUALIFIED TECHNICIAN MAKES THE ELECTRICAL CONNECTIONS.
The power supply to which the oven is connected must conform with the laws in force in the country of
installation. The manufacturer accepts no responsibility for any damage caused by the failure to observe
these instructions. The oven must be connected to an electrical supply with an earthed wall outlet or a
disconnector with multiple poles, depending on the laws in force in the country of installation. The
electrical supply should be protected with suitable fuses and the cables used must have a transverse
section that can ensure correct supply to the oven.
CONNECTION
The oven is supplied with a power cable that should only be connected to an electrical supply with 220-
240 Vac power between the phases or between the phase and neutral. Before the oven is connected to
the electrical supply, it is important to check:
- power voltage indicated on the gauge;
- the setting of the disconnector.
The grounding wire connected to the oven's earth terminal must be connected to the earth terminal of
the power supply.
WARNING
Before connecting the oven to the power supply, ask a qualified electrician to check the continuity of the
power supply's earth terminal. The manufacturer accepts no responsibility for any accidents or other
problems caused by failure to connect the oven to the earth terminal or by an earth connection that has
defective continuity.
EN 07
1.3 Recommendations
After each use of the oven, a minimum of cleaning will help keep the oven perfectly clean.
Do not line the oven walls with aluminium foil or single-use protection available from stores. Aluminium
foil or any other protection, in direct contact with the hot enamel, risks melting and deteriorating the
enamel of the insides. In order to prevent excessive dirtying of your oven and the resulting strong
smokey smells, we recommend not using the oven at very high temperature. It is better to extend the
cooking time and lower the temperature a little. In addition to the accessories supplied with the oven,
we advise you only use dishes and baking moulds resistant to very high temperatures.
1.4 Installation
The manufacturers have no obligation to carry this out. If the assistance of the manufacturer is required
to rectify faults arising from incorrect installation, this assistance is not covered by the guarantee. The
installation instructions for professionally qualified personnel must be followed. Incorrect installation
may cause harm or injury to people, animals or belongings. The manufacturer cannot be held
responsible for such harm or injury.
The oven can be located high in a column or under a worktop. Before fixing, you must ensure good
ventilation in the oven space to allow proper circulation of the fresh air required for cooling and
protecting the internal parts. Make the openings specified on last page according to the type of fitting.
NOTE: as the oven could require maintenance work, it is advisable to keep another wall socket available
so that the oven can be connected to this if it is removed from the space in which it is installed. The
power cable must only be substituted by technical service staff or by technicians with equivalent
qualifications.
1.5 Waste management and environmental protection
This appliance is labelled in accordance with European Directive 2012/19/EU regarding
electric and electronic appliances (WEEE). The WEEE contain both polluting substances
(that can have a negative effect on the environment) and base elements (that can be
reused). It is important that the WEEE undergo specific treatments to correctly remove and
dispose of the pollutants and recover all the materials. Individuals can play an important
role in ensuring that the WEEE do not become an environmental problem; it is essential to
follow a few basic rules:
- the WEEE should not be treated as domestic waste;
- the WEEE should be taken to dedicated collection areas managed by the town council or a registered
company.
In many countries, domestic collections may be available for large WEEEs. When you buy a new
appliance, the old one can be returned to the vendor who must accept it free of charge as a one-off, as
long as the appliance is of an equivalent type and has the same functions as the purchased appliance.
SAVING AND RESPECTING THE ENVIRONMENT
Where possible, avoid pre-heating the oven and always try to fill it. Open the oven door as infrequently
as possible, because heat from the cavity disperses every time it is opened. For a significant energy
saving, switch off the oven between 5 and 10 minutes before the planned end of the cooking time, and
use the residual heat that the oven continues to generate. Keep the seals clean and in order, to avoid any
heat dispersal outside of the cavity. If you have an electric contract with an hourly tariff, the "delayed
cooking" programme makes energy saving more simple, moving the cooking process to start at the
reduced tariff time slot.
EN 08
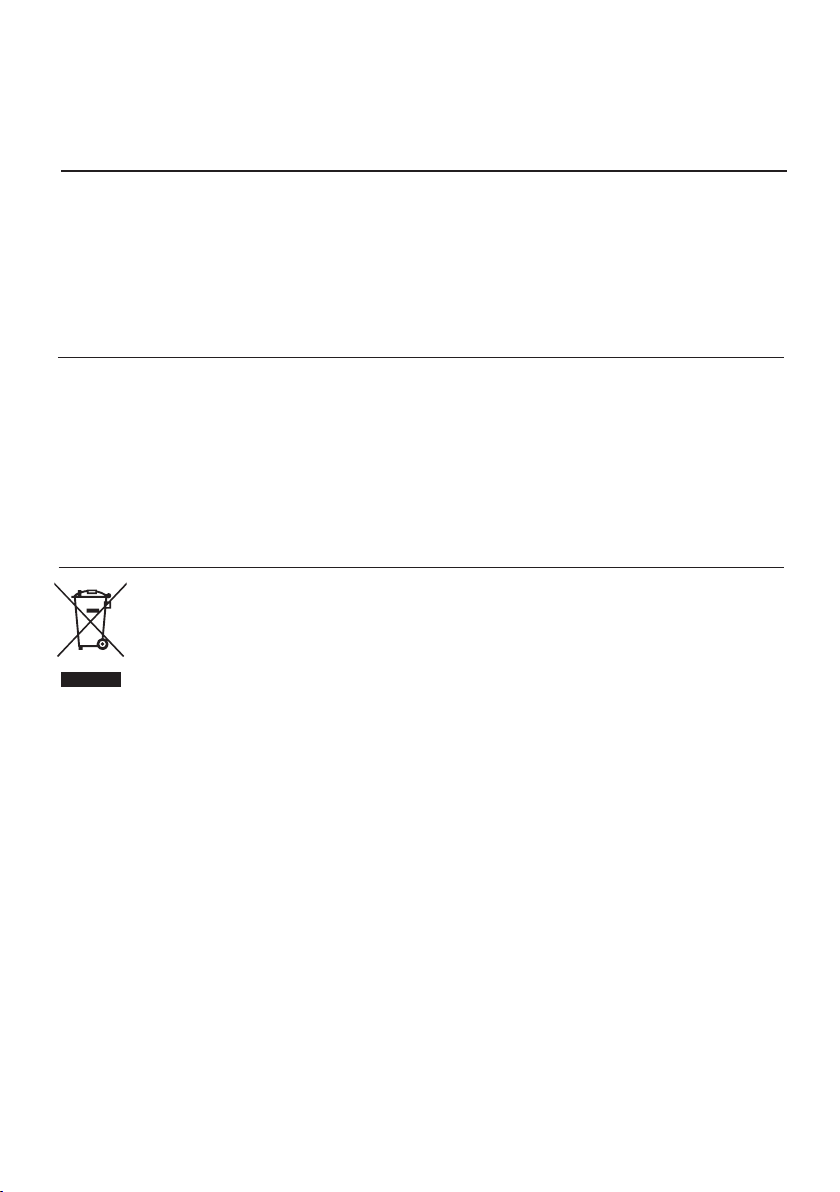
2. Product Description
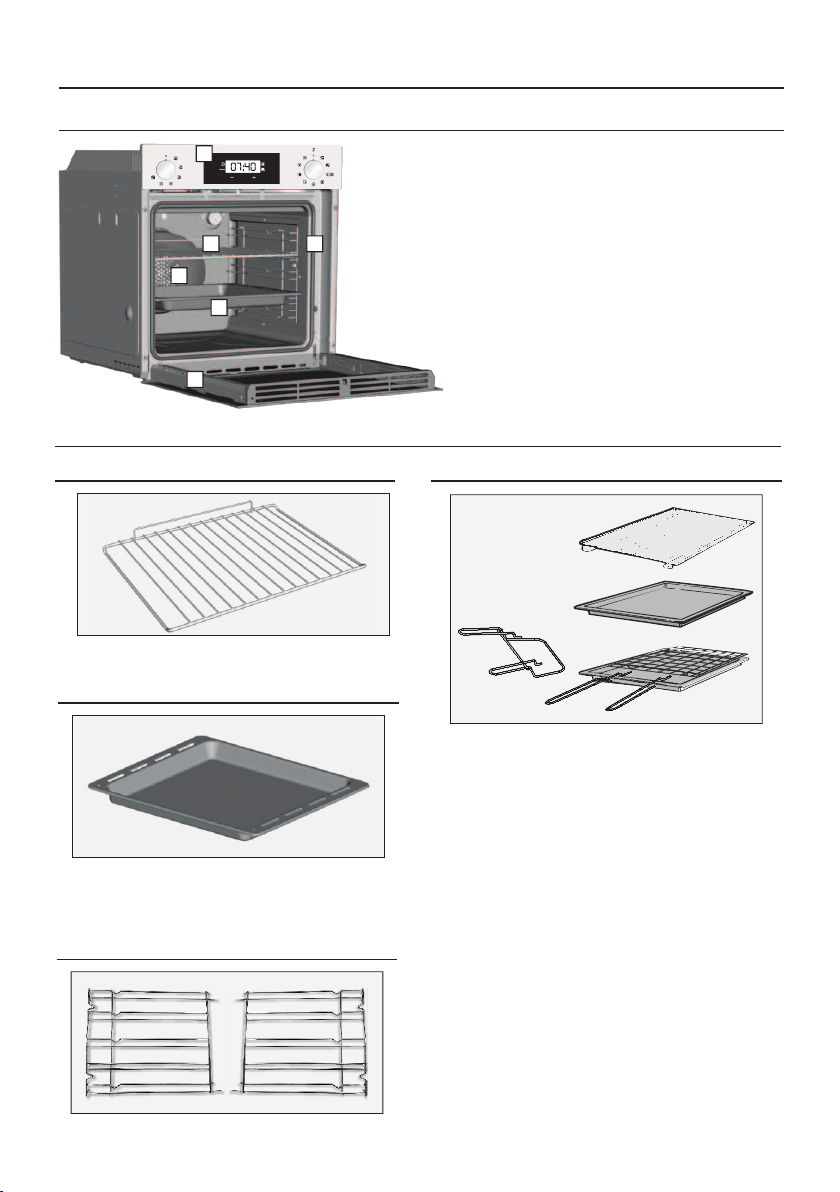
2.1 Overview
1. Control panel
2. Shelf positions
(lateral wire grid if included)
3. Metal grill
4. Drip pan
5. Fan (behind the steel plate)
6. Oven door
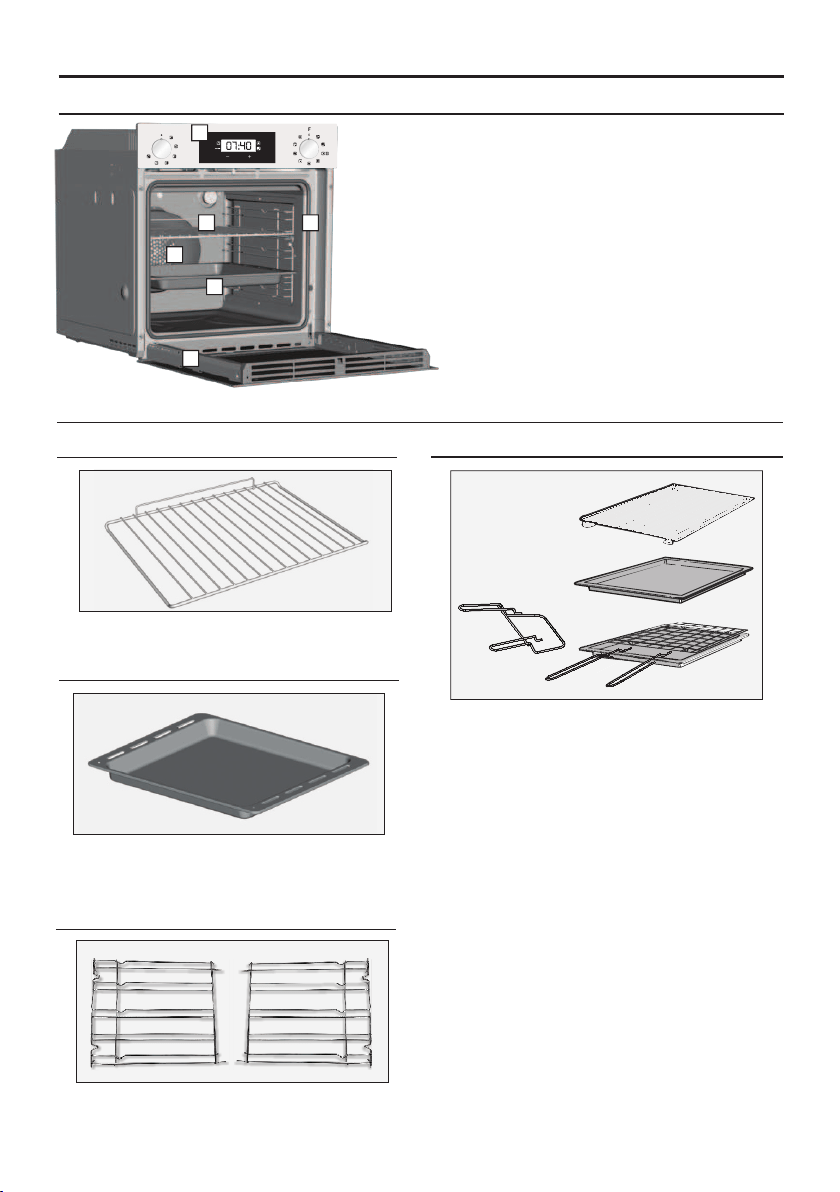
2.2 Accessories
Metal grill
1
Drip pan
2
Holds baking trays and plates.
Collects the residues that drip during the cooking
of foods on the grills.
EN 09
Lateral wire grids
3
It located at both sides of the oven cavity.
It holds metal grills and drip pans.
4
Grill pan set
The simple shelf can take moulds and dishes.
The tray holder shelf is especially good for grilling things.
Use it with the drip tray.
The special profile of the shelves means they stay
horizontal even when pulled right out. There is no risk of
a dish sliding or spilling.
The drip tray catches the juices from grilled foods. It is
only used with the Grill, Rotisserie, or Fan Assisted Grill ;
remove it from the oven for other cooking methods.
Never use the drip tray as a roasting tray as this creates
smoke and fat will spatter your oven making it dirty.
The tray holder
The tray holder shelf is ideal for grilling. Use it in
conjunction with the drip tray. A handle is included to
assist in moving the both accessories safely. Do no leave
the handle inside the oven.
23
5
4
6
1
1
2
3
4
5
6
7
2.3 First Use
PRELIMINARY CLEANING
Clean the oven before using for the first time. Wipe over external surfaces with a damp soft cloth. Wash
all accessories and wipe inside the oven with a solution of hot water and washing up liquid. Set the
empty oven to the maximum temperature and leave on for about 1 hour, this will remove any lingering
smells of newness.
3. Use of the Oven
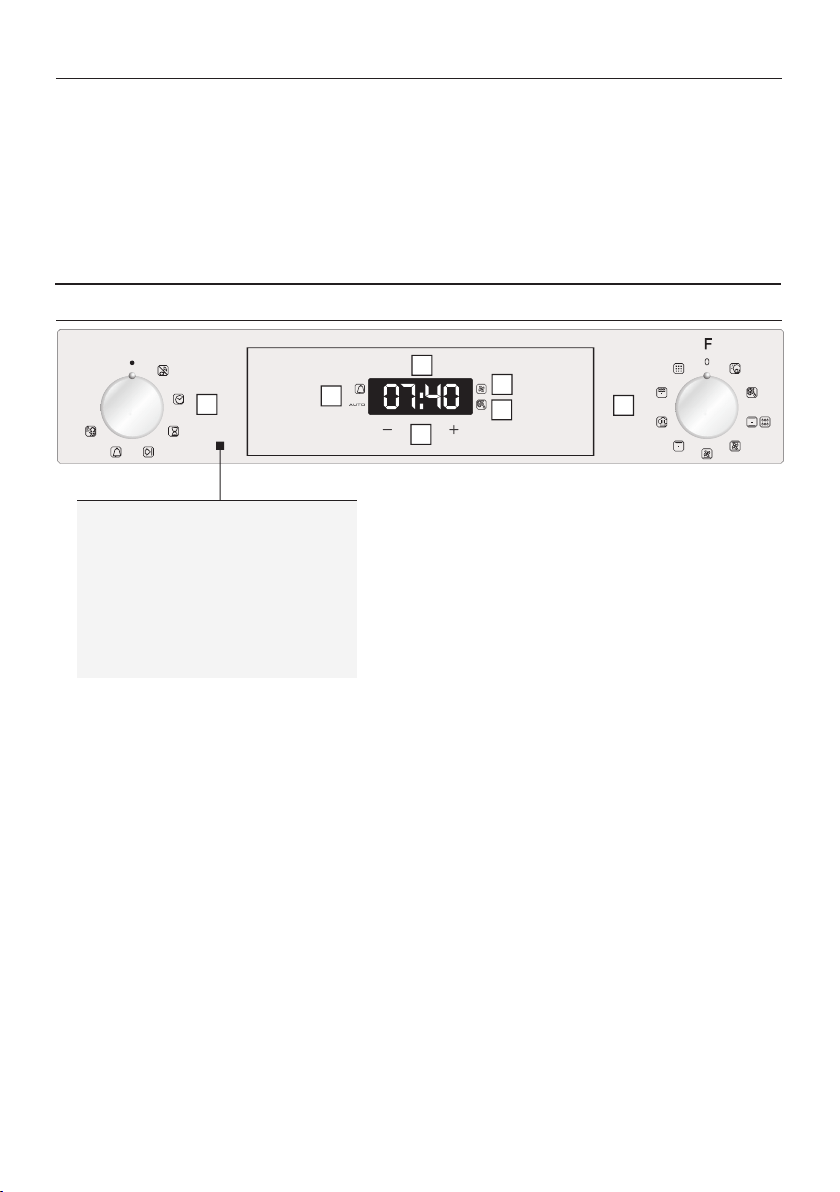
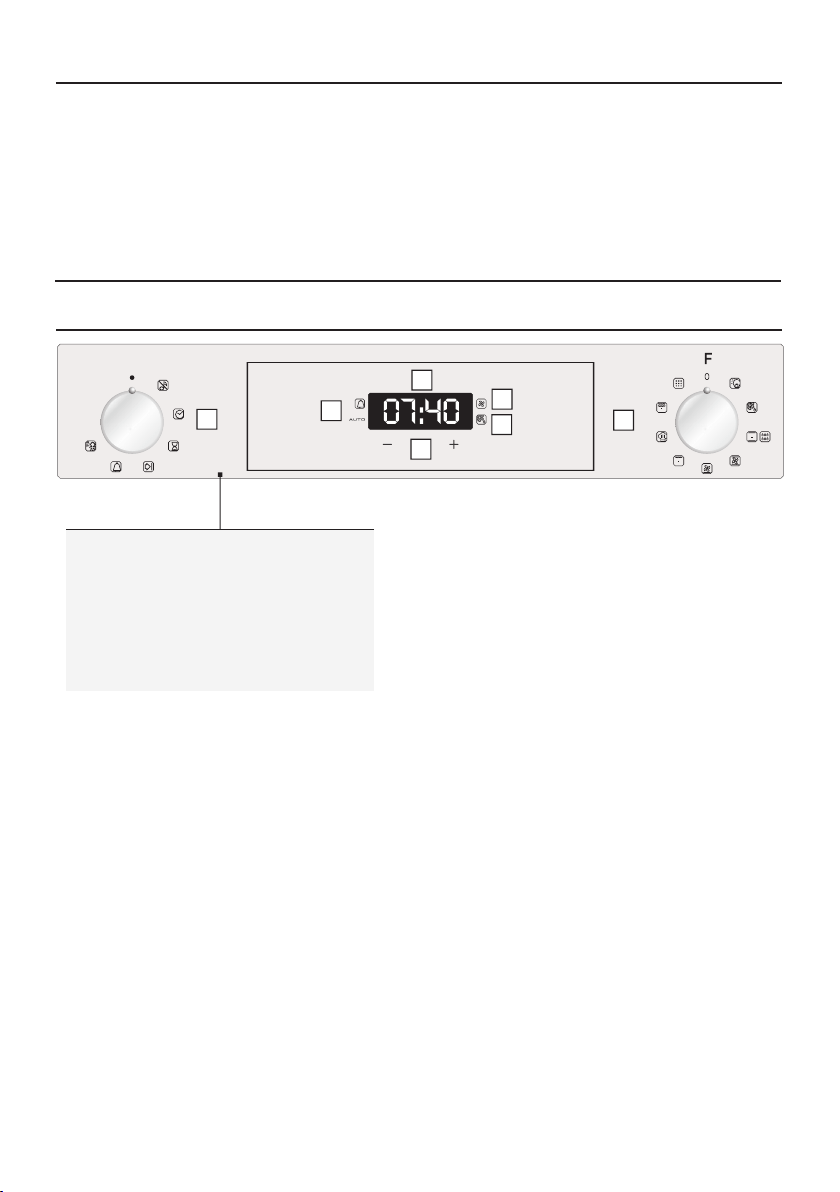
3.1 Display description
1. Timer/automatic mode
2. Fan function
3. Defrost mode
4. Temperature or clock display
5. LCD display adjustment controls
6. Function selector knob
7. Programme selector knob
WARNING!
The first operation to carry out after installation,
or after a power cut, is to set the time of day (a
power cut has occured if the display is flashing
12:00).
200°-> The temperature LED “°” flashes until the
displayed temperature is reached.
HOT -> When a programme finishes, if the oven is
still hot, the display shows "HOT", alternating with
the time, even if the knobs are positioned to OFF.
EN 10
FUNCTIONHOW TO ACTIVATE
HOW TO
DEACTIVATE
WHAT IT DOESWHY IT IS NEEDED
• Enables you to turn off
the sound of the minute
minder.
• Rotate the function
selector to the position
OFF.
• To turn off the sound of the
minute minder
• Enables you to set the
time which appears on
the display
• Rotate the function
selector to the position
OFF.
• Turn the right function
selector to a cooking
function
• Rotate the left function
selector to the position
"End of cooking"
• Set the end time of
cooking by using buttons
" + " and " - "
• Lighting Auto appears
• It allows to preset the end
of cooking time you want.
• When the cooking time is
set, turn the function
selector to OFF to go back
to actual time.
• To view the cooking time
selected, turn the left
function selector to End of
cooking Time
• When the cooking time
has elapsed, the oven
switch off automatically.
• To stop the cooking
functions early, turn the
function control to OFF
• Turn the left function
selector to the position
Minute Minder.
• Set the time of cooking
by using buttons
“+”and “-”
• Allow to use the oven as
alarm even if the oven is
switch off
• The oven cannot be used.
SILENCE
MODE
COOKING
DURATION
END OF
COOKING
MINUTE
MINDER
CHILD
SAFETY
LOCK
• Rotate the left function
selector to the position
" Silence mode “
• To set the time
NB : Set the time when you
first install your oven or just
after a black out (the clock is
showing a pulsating 12.00)
• Turn the right function
selector to a cooking
function
• Rotate the left function
selector to the position
"Cooking Time Duration”
• Set the time of cooking
by using buttons " + " and
" - "
• Lighting Auto appears
•When the cooking time
has elapsed, the oven
switch off automatically
and the alarm rings for
few seconds To stop the
cooking functions early,
turn the function control
to OFF or set the time on
00.00; by rotating the
function selector to
Cooking Time Duration
and by using the buttons "
+ " and " - “
• It allows to preset the
cooking time required for
the recipe chosen.
• When the cooking time is
set, turn the function
selector toOFF to go back
to actual time.
• To view the cooking time
selected, turn the left
function selector to
Cooking Time duration.
•This function is normally used
with the COOKING DURATION
function
•For example, the desired food
needs to cook for 45 minutes
and I want it to be ready for
12.30; in this case: at the end
of the set time, the oven
automatically switches off and
an alarm sounds. Select the
desired cooking function. Set
the cooking duration to 45
minutes (“-” “+”). Set the end
of cooking to 12:30 (“-” “+”).
Cooking will automatically
begin at 11:45 (12:30 minus 45
minutes), at the end of the set
cooking time, the oven will
automatically switch off.
WARNING: by setting only the
end of cooking time, and not
the cooking duration, the oven
will immediately switch on and
switch off at the end of the set
cooking time.
• Set the time on 00.00 by
turning the left function
selector to the position
Minute Minder, and using
the button " - “
• Turn the left function
selector to the position
Child lock.
• Press the button " + "
during 5 seconds
• Child lock is available
when " STOP " appears
on display
• Child lock is available
when LED of Child Lock
turn on and "STOP"
appears on display
• Turn back the left
function selector to Child
lock and press button " +
" during 5 seconds.
• Indication STOP
disappears.
• Indication STOP
dissapears and LED of
Child Lock starts blink.
• Rotate the left function
selector to the position
“Set the time”.
• Use the buttons " + " or
" - " to set the time
• For cooking the desired
recipes.
•Emits an audible signal at
the end of a set time.
•During operation, the
display shows the
remaining time.
• This function is useful
when there are children in
the house.
SET
THE TIME
EN 11
NOTE: Delayed cooking
feature is not available for
following cooking modes:
Fan Grill & Grill
T °C
default
220
210
200
ECO
L3
T °C
range
50 ÷ 280
50 ÷ 230
150 ÷ 220
ECO÷SUPER
L1 ÷ L5
Function
Dial
Function
LAMP: Turns on the oven light.
PYROLYSIS
GRILL (Depends on the oven model): use the grill with the door closed.
The top heating element is used alone and you can adjust the temperature.
Five minutes preheating is required to get the elements red-hot. Success is
guaranteed for grills, kebabs and gratin dishes. White meats should be put at a
distance from the grill; the cooking time is longer, but the meat will be tastier.
You can put red meats and fish fillets on the shelf with the drip tray
underneath. The oven has two grill positions:
Grill: 1800 W Barbecue: 3000 W
MULTI-LEVEL: We recommend you use this method for poultry, pastries, fish
and vegetables. Heat penetrates into the food better and both the cooking and
preheating times are reduced. You can cook different foods at the same time
with or without the same preparation in one or more positions. This cooking
method gives even heat distribution and the smells are not mixed.
Allow about ten minutes extra when cooking foods at the same time.
CONVENTIONAL : Both top and bottom heating elements are used. Preheat
the oven for about ten minutes. This method is ideal for all traditional roasting
and baking. For seizing red meats, roast beef, leg of lamb, game, bread, foil
wrapped food (papillotes), flaky pastry. Place the food and its dish on a shelf in
mid position.
DEFROST: When the dial is set to this position. The fan circulates air at room
temperature around the frozen food so that it defrosts in a few minutes
without the protein content of the food being changed or altered.
180
210
50 ÷ 240
50 ÷ 240
3.2 Cooking Modes
BOTTOM HEATING + FAN: The bottom heating element is used with the fan
circulating the air inside the oven. This method is ideal for juicy fruit flans, tarts,
quiches and pâté. It prevents food from drying and encourages rising in cakes,
bread dough and other bottom-cooked food. Place the shelf in the bottom
position.
*
EN 12
*Tested in accordance with the EN 60350-1 for the purpose of energy consumption declaration and energy class
*
MASTER BAKE: This function allows to cook in a healthier way, by reducing the
amount of fat or oil required. The combination of heating elements with a
pulsating cycle of air ensures a perfect baking result.
SUPER GRILL: the oven has two grill positions
Grill: 1800 W Grill Super: 3000 W
L3L1 ÷ L5

4. Oven cleaning and maintenance
4.1 General notes on cleaning
The lifecycle of the appliance can be extended through regular cleaning. Wait for the oven to cool before
carrying out manual cleaning operations. Never use abrasive detergents, steel wool or sharp objects for
cleaning, so as to not irreparably damage the enamelled parts. Use only water, soap or bleach-based
detergents (ammonia).
GLASS PARTS
It is advisable to clean the glass window with absorbent kitchen towel after every use of the oven. To
remove more obstinate stains, you can use a detergent-soaked sponge, well wrung out, and then rinse
with water.
OVEN WINDOW SEAL
If dirty, the seal can be cleaned with a slightly damp sponge.
ACCESSORIES
Clean accessories with a wet, soapy sponge before rinsing and drying them: avoid using abrasive
detergents.
DRIP PAN
After using the grill, remove the pan from the oven. Pour the hot fat into a container and wash the pan in
hot water, using a sponge and washing-up liquid.
If greasy residues remain, immerse the pan in water and detergent. Alternatively, you can wash the pan
in the dishwasher or use a commercial oven detergent. Never put a dirty pan back into the oven.
4.2 Pyrolysis
The oven is equipped with a pyrolyser cleaning system, which destroys food residues at high
temperature. The operation is carried out automatically by means of the programmer. The resulting
fumes are rendered “clean” by passing over a Pyrolyser wich starts as soon as cooking begins. As very
high temperatures are required by the Pyrolyser, the oven door is fitted with a safety lock. The pyrolyser
can be stopped at any time. The door cannot be opened until the safety lock is displayed.
NOTE : If a hob has been fitted above the oven, never use the gas burners or the electric hot-plates while
the Pyrolyser is working, this will prevent the hob from overheating.
TWO PYROLYTIC CYCLE are pre-set:
ECO PYROCLEAN : Cleans a moderately stained oven. Operates for a period of 90 minutes.
SUPER PYROCLEAN : Cleans a heavily stained oven. Operates for a period of 120 minutes.
Never use commercially available cleaning products on a Pyrolytic oven!
Tip : Carrying out Pyrolytic cleaning immediately after cooking allows you to take advantage of residual
heat, thus saving energy.
Before executing a pyrolytic cycle:
•Remove all the accessories from the oven because they are not able to tolerate the high
temperatures used during the pyrolytic cleaning cycle ; in particular removing grids, side racks and
the telescopic guides (refer to the chapter REMOVING GRIDS AND SIDE RACKS) . In ovens with meat
probe it is necessary, before making the cleaning cycle , close the hole with the nut provided.
•Remove any large spillages or stains as it would take too long to destroy them. Also excessively
large amounts of grease could ignite when subject to the very high temperatures of the Pyrolytic
cycle.
•Close the oven door.
•Excess spillage must be removed before cleaning.
• Clean the oven door;
• Remove large or coarse food residues from the inside of the oven using a damp sponge. Do not use
detergents;
• Remove all accessories and the sliding rack kit (where present);
• Do not place tea towels.
EN 13
Using the pyrolitic cycle:
1- Rotate the function selector to the position " ". On the display, appears the indication " ECO " or
" SUP ". The preset time is 90 min, this can be varied from 90 min (Eco mode) to 120 min (Sup mode) via
the programmer (setting button " + " or " - "). If the oven is very dirty, it is recommend o increase the time
to 90 min, if the oven is moderately dirty reduce the cleaning cycle time to 90 min.
2- It is possible to defer the start time of the pyroclean cycle by changing the END time via the
programmer.
3- After few minutes, when the oven reaches a high temperature, the door locks automatically. The
pyroclean cycle can be stopped at any time by turning the function selector back to '0' (the word OFF will
be displayed for 3 seconds).
4 - Once the pyroclean cycle is finished, the pyrolysis will switch off automatically. On the display
appears the indication "END" until the door is locked then "0--n".
5- You can turn the function selector back to " 0 " but if the temperaure is still high, the "0--n " indication
appears to inform that the door is locked.
Use of the pyrolytic cycle in Touch Control ovens:
1- Rotate the function selector into position pyrolisys. The display will show either "ECO" or "SUP“
2- The pre-set time is 690 minutes but it can be varied from 90 min. (Eco mode) to 120 min. (Sup mode)
using the programmer (" +" or "-" key). If the oven is very dirty, the time should be increased to 120 min.,
while if the oven is only a slightly dirty, reduce the cleaning cycle to 90 min.
EN 14
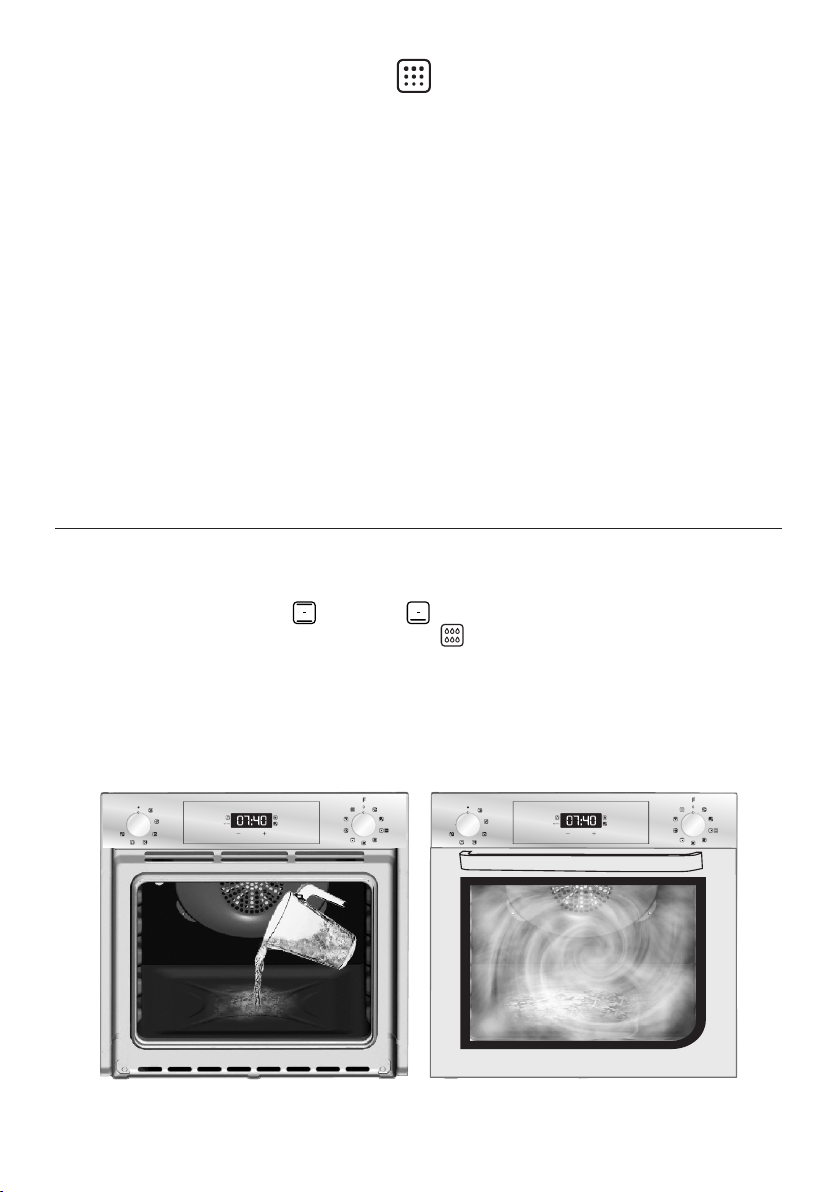
4.3 Hydro Easy Clean Function
The HYDRO EASY CLEAN procedure uses steam to help remove remaining fat and food particles from the
oven.
1. Pour 300 ml of water into the HYDRO EASY CLEAN container at the bottom of the oven.
2. Set the oven function to Static ( )or Bottom ( )heater
3. Set the temperature to the HYDRO EASY CLEAN icon
4. Allow the program to operate for 30 minutes.
5. After 30 minutes switch off the program and allow the oven to cool down.
6. When the appliance is cool, clean the inner surfaces of the oven with a cloth.
Warning: Make sure that the appliance is cool before you touch it.
Care must be taken with all hot surfaces as there is a risk of burns.
Use distilled or drinkable water.
300 ml
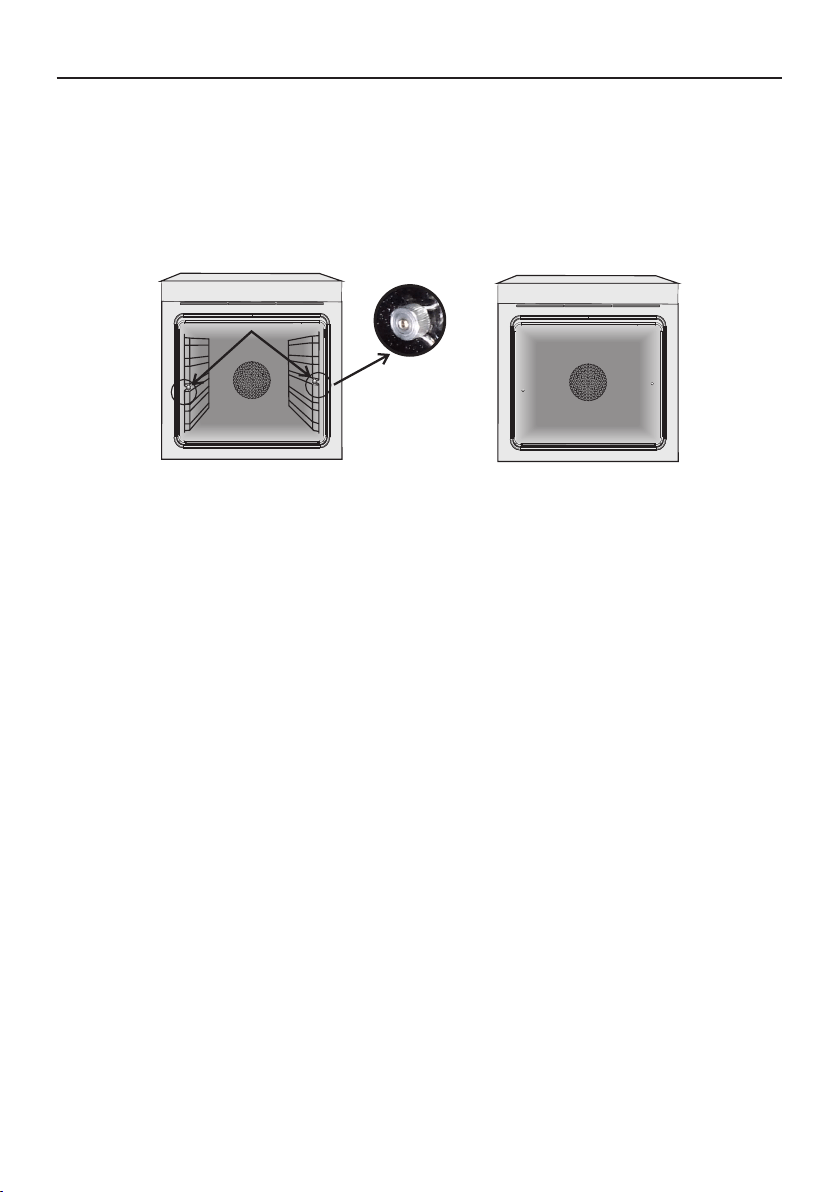
INSTRUCTİON FOR REMOVAL AND CLEANİNG OF THE SİDE RACKS
1. Unscrew the bolt in an anti-clockwise direction.
2. Remove the side racks by pulling them towards you.
3. Clean the side racks in a dishwasher or with a wet sponge and then dry them immediately.
4. Having cleaned the side racks, put them back in and reinsert the bolts, ensuring that they are fully
tightened.
4.4 Maintenance
REMOVAL OF THE OVEN WINDOW
1. Open the front window.
2. Open the clamps of the hinge housing on the right and left side of the front window by pushing them
downwards.
3. Replace the window by carrying out the procedure in reverse.
EN 15
A
1
2
3
1.
2.
3.
4.
5.
6.
7.
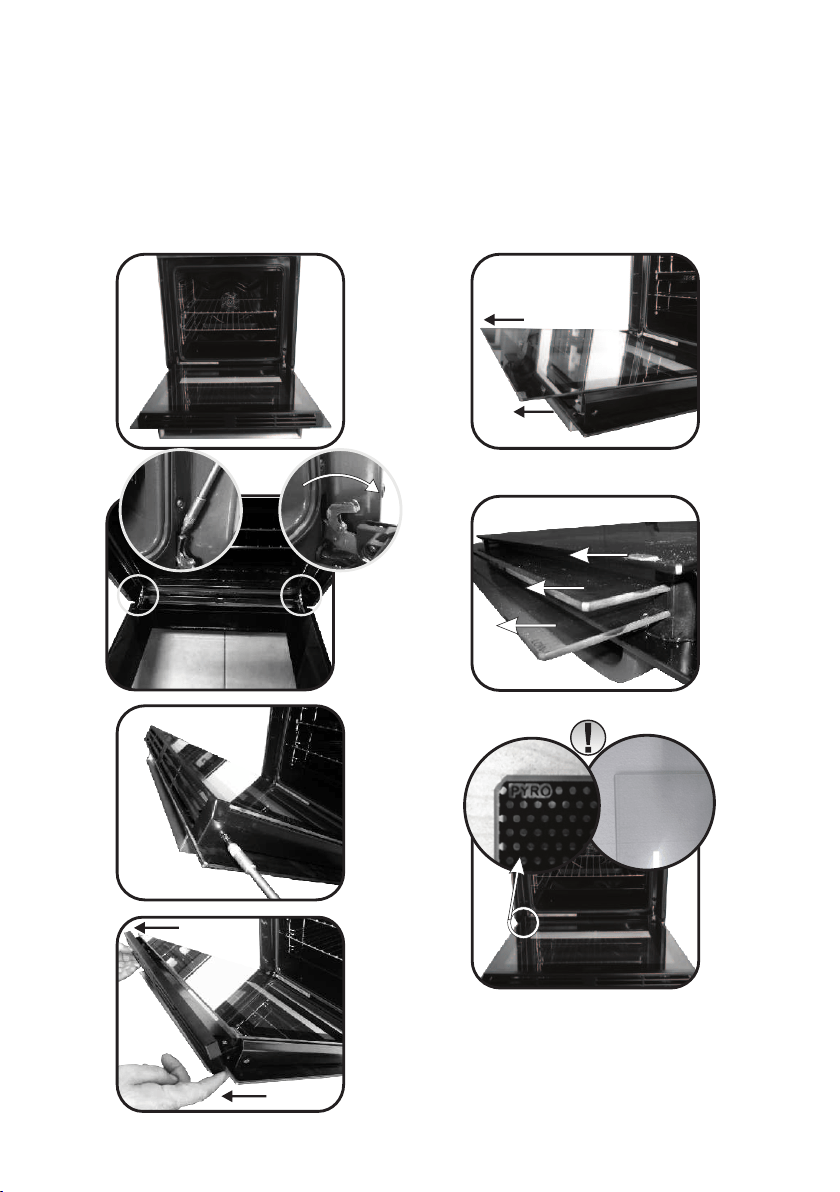
REMOVAL AND CLEANING OF THE GLASS DOOR
1. Open the oven door.
2.3.4. Lock the hinges, remove the screws and remove the upper metal cover by pulling it upwards.
5.6. Remove the glass, carefully extracting it from the oven door (NB: in pyrolytic ovens, also remove
the second and third glass (if present)).
7. At the end of cleaning or substitution, reassemble the parts in reverse order.
On all glass, the indication "Pyro" must be legible and positioned on the left side of the door, close to the
left-hand lateral hinge. In this way, the printed label of the first glass will be inside the door.
LOW-E
EN 16
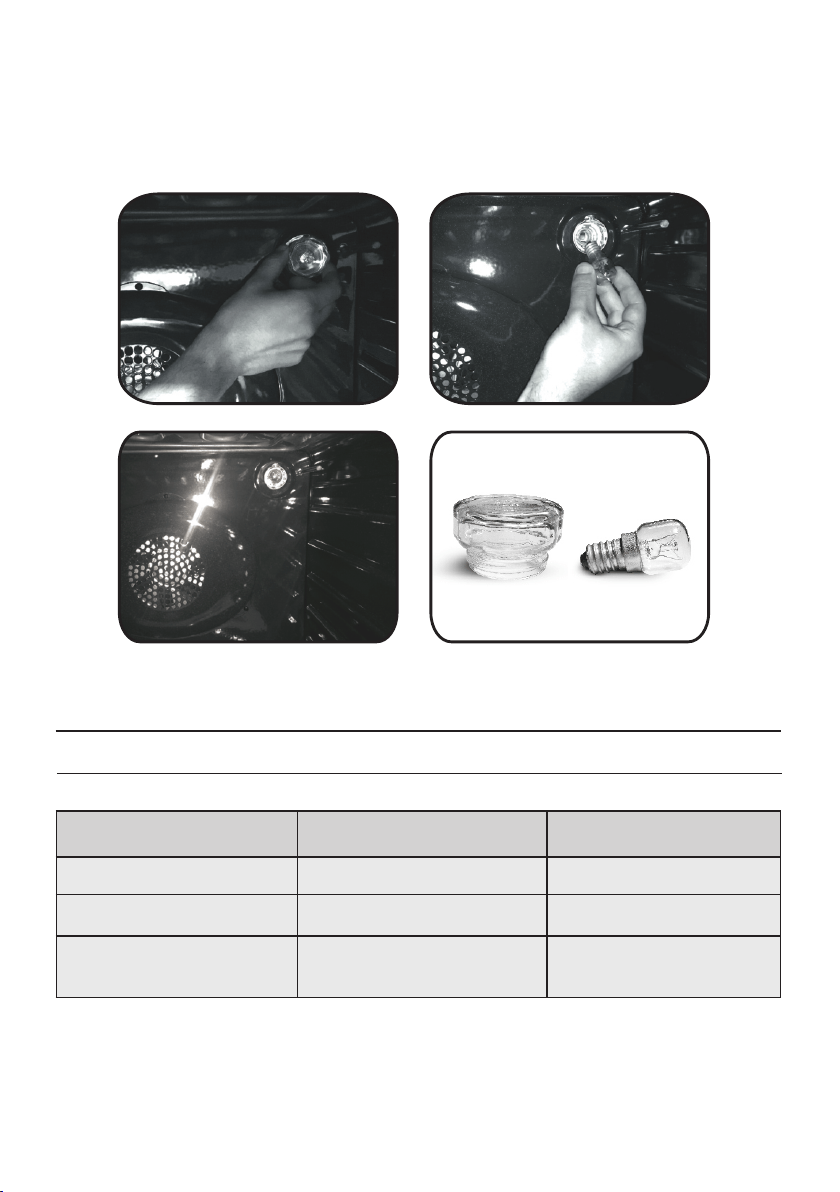
CHANGING THE BULB
1. Disconnect the oven from the mains supply.
2. Undo the glass cover, unscrew the bulb and replace it with a new bulb of the same type.
3. Once the defective bulb is replaced, replace the glass cover.
5. Troubleshooting
5.1 FAQ
PROBLEMPOSSIBLE CAUSE SOLUTION
The oven does not heat up
The clock is not setSet the clock
The child lock is on
A cooking function and
temperature has not been set
Deactivate the child lock
Ensure that the necessary
settings are correct
The oven does not heat up
The oven does not heat up
EN 17

Indicaciones de seguridad
• Durante la cocción, podría condensarse humedad dentro de la
cavidad del horno o en el cristal de la puerta. Esto es normal. Para
reducir este efecto, espere de 10 a 15 minutos antes de introducir
alimentos en el horno una vez que lo encienda. De todos modos, la
condensación desaparece cuando el horno alcanza la temperatura
de cocción.
• Para cocinar verduras, póngalas en un recipiente con una tapa en
lugar de utilizar una bandeja sin cubrir.
• Evite dejar los alimentos en el horno más de 15/20 minutos
después de cocinarlos.
• ADVERTENCIA: El aparato y sus componentes accesibles se
calientan durante el uso. Se debe tener cuidado de no tocar los
elementos calefactores.
• ADVERTENCIA: Las partes accesibles pueden estar muy calientes
cuando se utiliza el horno. Los niños deben mantenerse a una
distancia segura.
• Este aparato puede ser usado por niños mayores de 8 años y
personas con capacidades físicas, sensoriales o mentales reducidas o
falta de experiencia y conocimiento siempre y cuando hayan sido
supervisadas o instruidas sobre el uso del aparato de forma segura y
del conocimiento de los riesgos que comporta.
• Los niños no deben jugar con el aparato.
• La limpieza y el mantenimiento que debe realizar el usuario no será
realizada por niños sin supervisión.
• Durante el uso, se calienta el aparato. Se debe tener cuidado de no
tocar los elementos calefactores del
interior del horno.
ADVERTENCIA: Las partes accesibles pueden calentarse durante el
uso. Los niños deben permanecer alejados.
• No utilizar limpiadores abrasivos o rascadores metálicos afilados
para limpiar el cristal de la puerta del horno ya que pueden rayar la
superficie, pudiendo comportar la rotura del cristal.
• Se debe apagar el horno antes de retirar la pantalla, después de la
limpieza, se debe colocar según las instrucciones.
ES 18

• Use solamente el sensor de temperatura recomendado para este
horno.
• No utilice limpiadores de vapor para la limpieza del aparato.
Si el horno es suministrado por el fabricante sin enchufe:
• EL ELECTRODOMÉSTICO NO DEBE CONECTARSE A LA FUENTE DE
ALIMENTACIÓN MEDIANTE ENCHUFES O TOMAS DE CORRIENTE,
SINO QUE DEBE CONECTARSE DIRECTAMENTE A LA RED ELÉCTRICA.
La conexión a la fuente de alimentación debe llevarla a cabo un
profesional cualificado. Con el fin de llevar a cabo una instalación
conforme a la legislación de seguridad vigente, el horno debe
conectarse únicamente colocando un interruptor de corte
omnipolar entre el electrodoméstico y la fuente de alimentación,
con una separación de contacto que cumpla con los requisitos de la
categoría de sobretensión III. El interruptor omnipolar debe soportar
la carga máxima conectada y debe ser conforme a la legislación
vigente. El cable de tierra amarillo-verde no debe ser interrumpido
por el interruptor. Cuando se instala el electrodoméstico, el
interruptor omnipolar utilizado para la conexión debe ser fácilmente
accesible. La conexión a la fuente de alimentación debe llevarla a
cabo un profesional cualificado teniendo en cuenta la polaridad del
horno y de la fuente de alimentación. La desconexión debe llevarse a
cabo incorporando un interruptor en el cableado fijo de acuerdo con
las normas de cableado.
Si el horno es suministrado por el fabricante con enchufe:
• La toma de corriente debe ser adecuada para la carga indicada en la
etiqueta y debe tener la conexión a tierra conectada y en
funcionamiento. El conductor de tierra es de color amarillo-verde.
Esta ES 21 operación debe realizarla un profesional debidamente
cualificado. En caso de incompatibilidad entre la toma de corriente y
la clavija del electrodoméstico, solicite a un electricista cualificado
que sustituya la toma de corriente por otra del tipo adecuado. La
clavija y la toma de corriente deben cumplir con la normativa actual
del país de instalación. La conexión a la fuente de alimentación
también se puede realizar colocando un interruptor de corte
omnipolar entre el electrodoméstico y la fuente de alimentación,
ES 19

con una separación de contacto que cumpla con los requisitos de la
categoría de sobretensión III, que pueda soportar la carga máxima
conectada y que cumpla la legislación vigente. El cable de tierra
amarillo-verde no debe ser interrumpido por el interruptor. Cuando
se instala el electrodoméstico, la toma de corriente o el interruptor
omnipolar utilizado para la conexión deben ser fácilmente
accesibles. La desconexión se puede lograr manteniendo la clavija
accesible o incorporando un interruptor en el cableado fijo de
acuerdo con las normas de cableado.
• Si el cable de alimentación está dañado, debe sustituirse por un
cable o un haz de cables especial comercializado por el fabricante;
también puede ponerse en contacto con el departamento de
atención al cliente.
• El cable de alimentación debe ser de tipo H05V2V2-F.
• El incumplimiento de lo anterior puede poner en peligro la
seguridad del electrodoméstico y anular la garantía.
• Cualquier vertido de material excesivo debe eliminarse ante de la
limpieza.
• Durante la limpieza pirolítica, las superficies pueden calentarse más
de lo habitual, por lo que los niños deben mantenerse a una distancia
de seguridad.
• El electrodoméstico no debe instalarse detrás de una puerta
decorativa para evitar que se caliente en exceso.
• Cuando coloque la bandeja interior, asegúrese de dirigir el tope
hacia arriba en la parte trasera de la cavidad.
La bandeja debe introducirse por completo en la cavidad.
• ADVERTENCIA: No forre las paredes del horno con papel de
aluminio ni utilice las protecciones desechables que se encuentran
disponibles en los comercios. El papel de aluminio o cualquier otra
protección que entre en contacto directo con el esmalte caliente
puede derretirse y dañar el esmalte del interior.
• ADVERTENCIA: Nunca quite la junta de estanqueidad de la puerta
del horno.
• No se requiere ninguna operación/ajuste adicional para hacer
funcionar el aparato a las frecuencias nominales.
ES 20

Advertencias generales
22
1.1 Recomendaciones de seguridad
1.2 Seguridad eléctrica
1.3 Recomendaciones
1.4 Instalación
1.5 Gestión de residuos
2.1 Descripción general
2.2 Accesorios
2.3 Primer uso
Descripción del producto
24
3.1 Descripción de la pantalla
3.2 Modalidades de cocción
Utilización del horno
25
4.1 Notas genéricas de limpieza
4.2 Pirólisis
4.3 Mantenimiento
• Extracción de la puerta del horno
• Extracción y limpieza de la puerta
de vidrio
• Sustitución de la bombilla
Limpieza y mantenimiento
del horno
28
5.1 Preguntas más frecuentes
Solución de problemas
32
Resumen
ES 21

1. Advertencias Generales
Le agradecemos que haya elegido uno de nuestros
productos. Para utilizar el horno de forma óptima es
aconsejable leer con atención este manual y
conservarlo para poder consultarlo en el futuro. Antes
de instalar el horno, anote el número de serie para
poder facilitárselo al personal del servicio de asistencia
técnica en caso de solicitar su intervención. Después de
extraer el horno del embalaje, compruebe que no haya
sufrido daño alguno durante el transporte. En caso de
duda, no utilice el horno y solicite la asistencia de un
técnico cualificado. Conserve todo el material de
embalaje (bolsitas de plástico, poliestireno, clavos)
fuera del alcance de los niños. La primera vez que se enciende el horno puede producirse un humo de
olor acre, causado por el primer calentamiento del adhesivo de los paneles de aislamiento que recubren
el horno: se trata de un fenómeno absolutamente normal y, en caso de que se produzca, será preciso
esperar a que cese el humo antes de introducir los alimentos. El fabricante declina toda responsabilidad
en caso de no observar las instrucciones contenidas en este documento.
NOTA: las funciones, las propiedades y los accesorios de los hornos citados en este manual pueden
variar según los modelos.
1.1 Recomendaciones de seguridad
Utilice el horno solo con el fin para el que se ha diseñado, es decir: únicamente para cocer alimentos;
cualquier otro uso, por ejemplo como fuente de calefacción, se considera impropio y por lo tanto
peligroso. El fabricante no puede ser considerado responsable de eventuales daños derivados de usos
impropios, erróneos o irracionales.
El uso de cualquier aparato eléctrico comporta la observación de una serie de reglas fundamentales:
- no tire del cable de alimentación para desconectar este producto de la fuente de alimentación;
- no tocar el aparato con las manos ni los pies mojados o húmedos;
- en general no es aconsejable usar adaptadores, regletas ni alargadores;
- en caso de avería o mal funcionamiento del aparato, apáguelo y no lo manipule.
1.2 Seguridad eléctrica
CONFÍE LA CONEXIÓN ELÉCTRICA A UN ELECTRICISTA O A UN TÉCNICO CUALIFICADO.
La red de alimentación a la que se conecte el horno debe cumplir la normativa vigente en el país de
instalación. El fabricante declina toda responsabilidad por eventuales daños derivados de no observar
dicha normativa. El horno debe conectarse a la red eléctrica mediante un enchufe de pared con toma de
tierra o mediante un seccionador con varios polos, según la normativa vigente en el país de instalación.
La red eléctrica debe estar protegida mediante fusibles adecuados y deben utilizarse cables con una
sección transversal idónea que garantice una correcta alimentación del horno.
CONEXIÓN
El horno se suministra con un cable de alimentación que debe conectarse únicamente a una red
eléctrica con una tensión de 230 V de CA entre fases o entre la fase y el neutro. Antes de conectar el
horno a la red eléctrica es imprescindible comprobar:
- la tensión de alimentación indicada por el medidor;
- la configuración del seccionador.
El hilo de toma de tierra conectado al terminal de tierra del horno debe estar conectado al terminal de
tierra de la red eléctrica.
ATENCIÓN
Antes de conectar el horno a la red eléctrica, confíe la comprobación de la continuidad de la toma de
tierra de la red eléctrica a un electricista cualificado. El fabricante no se hace responsable de eventuales
accidentes u otros problemas derivados de no conectar el horno a tierra o de conectarlo a una toma de
tierra con una continuidad defectuosa.
ES 22
ES 23
1.3 Recomendaciones
Una limpieza mínima después de utilizar el horno ayudará a mantenerlo limpio durante más tiempo. No
forrar las paredes del horno con aluminio u otras protecciones disponibles en tiendas. El aluminio o los
protectores, en contacto directo con el esmalte caliente puede derretirse y deteriorar el esmalte del
interior. Para evitar un exceso de suciedad en el horno y que pueden derivar en olores y humo en
exceso, recomendamos no utilizar el horno a temperaturas muy elevadas. Es mejor ampliar el tiempo
de cocción y bajar un poco la temperatura.
1.4 Instalación
No es obligación del fabricante instalar el horno. Si se requiere la ayuda del fabricante para subsanar
fallos derivados de una instalación incorrecta, dicha asistencia no la cubrirá la garantía.
Han de seguirse a rajatabla las instrucciones de instalación para personal cualificado. Una instalación
incorrecta puede provocar daños personales, materiales o en animales. El fabricante no se hace
responsable de esos posibles daños.
El horno se puede colocar encima, en una columna, o debajo de una encimera. Antes de fijar el horno
hay que asegurar una buena ventilación en el hueco donde se vaya a colocar y que el aire necesario para
enfriar y proteger las piezas internas circula sin problema. Realizar las aperturas especificadas en la
última página según el tipo de altura.
NOTA: puesto que el horno podría requerir la intervención del servicio de asistencia, es aconsejable
prever la disponibilidad de otro enchufe de pared al que conectar el horno después de extraerlo del
espacio donde se ha instalado. El cable de alimentación debe sustituirse únicamente por personal de
asistencia técnica o por técnicos con una cualificación análoga.
1.5 Gestión de residuos y respeto por el medio ambiente
Este aparato está certificado conforme a la directiva europea 2012/19/EU sobre aparatos
eléctricos y electrónicos (WEEE). Los dispositivos WEEE contienen sustancias
contaminantes (que pueden provocar consecuencias negativas en el medio ambiente) o
componentes básicos (que pueden reutilizarse). Es importante que dichos dispositivos
estén sujetos a tratamientos específicos para eliminar y desechar correctamente todos los
contaminantes y recuperar todos los materiales. Cada individuo puede desempeñar un
papel importante a la hora de asegurar que los dispositivos WEEE no se conviertan en un
problema medioambiental; es esencial seguir algunas reglas básicas:
- los dispositivos WEEE no deben tratarse como residuos domésticos;
- los dispositivos WEEE deben llevarse a los puntos de recogida específicos gestionados por el municipio
o por una sociedad registrada.
En muchos países, para los WEEE de grandes dimensiones, puede haber disponible un servicio de
recogida a domicilio. Cuando se compra un nuevo aparato, el viejo puede entregarse al vendedor, que
debe adquirirlo gratuitamente siempre que el aparato sea de tipo equivalente y tenga las mismas
funciones que el que se ha adquirido.
AHORRAR Y RESPETAR EL MEDIO AMBIENTE
Siempre que sea posible, evite precalentar el horno e intente utilizarlo siempre lleno. Abra la puerta del
horno lo menos posible, ya que se producen dispersiones de calor cada vez que se lleva a cabo esta
operación. Para ahorrar mucha energía basta apagar el horno de 5 a 10 minutos antes del fin del tiempo
de cocción planificado y servirse del calor que el horno continúa generando. Mantener las juntas
limpias y en buen estado para evitar posibles dispersiones de energía. Si se dispone de un contrato de
energía eléctrica por tarifa horaria, el programa de cocción retardada permitirá ahorrar más fácilmente
retrasando el encendido del horno hasta el horario de tarifa reducida.
2.2 Accesorios
1 Rejilla metálica
2 Bandeja
Sostiene fuentes y platos.
Recoge los residuos que gotean durante la
cocción de alimentos con las resistencias.
Laterales de alambres
3
Rejilla del alambre lateral si está incluido.
2. Descripción del producto
2.1 Descripción general
1. Panel de control
2. Posiciones de las bandejas
(y del soporte elevado si corresponde)
3. Rejilla metálica
4. Bandeja
5. Ventilador (detrás de la placa de acero)
6. Puerta del horno
ES 24
4
Juego de sartén para parrilla
El estante simple puede contener moldes y platos.
El estante del soporte de la bandeja es especialmente
bueno para asar cosas. Úselo con la bandeja de goteo.
El perfil especial de los estantes significa que permanecen
horizontales incluso cuando se extraen. No hay riesgo de
que un plato se resbale o se derrame.
La bandeja de goteo recoge los jugos de los alimentos a la
parrilla. Solo se usa con la parrilla, el asador o la parrilla
asistida por ventilador; retírelo del horno para otros
métodos de cocción.
Nunca use la bandeja de goteo como bandeja para asar, ya
que esto genera humo y la grasa salpicará su horno y lo
ensuciará.
El soporte de la bandeja
El estante del soporte de la bandeja es ideal para asar a la
parrilla. Úselo junto con la bandeja de goteo. Se incluye un
asa para ayudar a mover ambos accesorios de forma segura.
No deje el asa dentro del horno.
23
5
4
6
1
1
2
3
4
5
6
7
ES 25
2.3 Primer uso
LIMPIEZA PRELIMINAR
Limpie el horno antes de utilizarlo por primera vez. Limpie las superficies externas con un paño suave
levemente humedecido.
Lave todos los accesorios y limpie el interior del horno con detergente lavavajillas y agua caliente.
Compruebe que el horno esté vacío, seleccione la temperatura máxima y déjelo encendido durante un
mínimo de una hora para eliminar todos los olores que suele haber presentes en los hornos nuevos.
3. Utilización del horno
3.1 Descripción de la pantalla
1. Timer/Modalidad automática
2. Función con ventilador
3. Modalidad de descongelación
4. Pantalla de temperatura o reloj
5. Botones de configuración
6. Perilla de selección de función
7. Perilla de selección del programador
ATENCIÓN
La primera operación que debe llevarse a cabo
después de la instalación o de una interrupción de
corriente es la configuración de la hora
(situaciones de este tipo pueden reconocerse
porque la pantalla se enciende y parpadea
mostrando 12:00).
200°-> El LED “°” de la temperatura parpadea
hasta que alcanza la temperatura seleccionada.
HOT -> Cuando un programa termina, si el horno
todavía está caliente, la pantalla muestra
alternativamente “HOT” y el tiempo, incluso si las
perillas se han colocado en OFF.
ES 26
FUNCIÓNCÓMO SE ACTIVA
CÓMO SE DESACTIVA
QuÉ HACEPARA QUÉ SIRVE
•Permite apagar el sonido
del programador.
•Gire la perilla hasta la
posición Off.
•Esta función se utiliza para
apagar el sonido del
programador.
•Permite regular la hora
que aparece en pantalla.
•Gire la perilla hasta la
posición Off.
•Seleccionar una función
de cocción.
•Gire la perilla hasta la
posición de Fin de la
cocción.
•Regular la hora de fin
de la cocción usando los
botones “+” y “-”.
•El Autodisplay se
ilumina.
•Permite memorizar la
hora de fin de la cocción.
•Cuando la hora de fin de
la cocción esté regulada,
gire el selector de función
hasta Off para volver a la
hora actual.
•Para ver el tiempo de
cocción seleccionado, gire
el selector de función
izquierdo hasta la posición
Fin de la cocción.
NOTA: La función de
cocción diferida no está
disponible para los
siguientes modos de
cocción: Grill con
ventilador y Grill
•Cuando la cocción
termina, el horno se
apaga automáticamente.
Para bloquear la cocción
anticipadamente, gire el
selector de función hasta
la posición Off.
•Gire la perilla del
programador hasta la
posición Timer.
•Regular el tiempo de
cocción usando los
botones “+” y “-”.
• La alarma acústica funciona
independientemente de si el
horno está encendido.
• El horno no se puede
utilizar.
MODALIDAD
SILENCIOSA
DURACIÓN
DE LA
COCCIÓN
FIN DE LA
COCCIÓN
TIMER
BLOQUEO
INFANTIL
•Gire la perilla del
programador hasta la
“Modalidad Silenciosa”.
•Esta función permite regular
la hora usando los botones “-”
y “+”.
NOTA: configure la hora en el
momento de la instalación del
horno o inmediatamente
después de una interrupción
de la corriente (12:00
parpadea en la pantalla).
•Seleccionar una función
de cocción.
•Gire la perilla del
programador hasta la
duración de la cocción.
•Regular el tiempo de
cocción usando los
botones “-” y “+”.
•El Autodisplay se
ilumina.
•Una vez transcurrido el
tiempo, el horno se
desactiva
automáticamente. Para
detener la cocción
anticipadamente debe
girarse la perilla de función
hasta la posición Off, o
ajustar el tiempo de
cocción a 00:00 girando la
perilla hasta la Duración de
la cocción y utilizando los
botones “-” y “+”.
• Permite regular el tiempo
de cocción.
Cuando el tiempo de
cocción esté regulado, gire
la perilla hasta Off para
volver a ver la hora actual.
Para ver la hora
seleccionada, gire el
selector de función
izquierdo hasta la posición
Duración de la cocción.
•Esta función también se utiliza
para cocciones que se puedan
programar por anticipado.
•Por ejemplo, el alimento
deseado debe cocer durante 45
minutos y deseo que esté listo a
las 12.30; en tal caso: al
término de la duración
configurada el horno se apaga
automáticamente y avisa con
una señal acústica. Seleccione
la función de cocción deseada.
Ajuste la duración de la cocción
a 45 minutos (“-” “+”). Ajuste el
fin de la cocción a las 12.30 h
(“-” “+”). La cocción se iniciará
automáticamente a las 11.45 h
(12.30 menos 45 minutos) y el
horno se apagará
automáticamente a la hora
configurada como fin de la
cocción.
•Ajuste el tiempo a 00:00,
girando la perilla del
programador hasta la
posición Timer y utilizando
los botones “+” y “-”.
•Gire la perilla del
programador hasta la
posición de bloqueo
infantil.
•Pulse el botón “+”
durante 5 segundos.
•El bloqueo infantil está en
funcionamiento cuando en
la pantalla se muestra
STOP.
• El bloqueo para niños
está disponible cuando el
LED del bloqueo para niños
se ilumina y aparece
«STOP» en la pantalla
•Vuelva a girar la perilla
hasta la función de
bloqueo infantil y pulse el
botón “+” durante 5
segundos.
•La indicación
desaparece de la pantalla.
• La indicación «STOP»
desaparece y el LED del
bloqueo para niños
comienza a parpadear.
•Gire la perilla hasta la
posición “Configuración
del reloj”.
•Use los botones “-” y “+”
para configurar la hora.
• Cuando haya transcurrido
el tiempo de cocción, el
horno se detiene
automáticamente y la
alarma suena durante unos
segundos.
•Esta función activa una
alarma sonora de varios
segundos al final del
tiempo configurado.
• Esta función es útil en
casas donde hay niños
pequeños.
CONFIGU-
RACIÓN
DEL RELOJ
ES 27
Mando
selector
FUNCIÓN ()dependiendo del modelo
LAMPARA: Conecta la luz interior
PIRÓLISIS
GRILL: El grill debe utilizarse con la puerta cerrada. Utilización de la resistencia
superior con posibilidad de ajustar la temperatura. Es necesario un
precalentamiento de 5 minutos para que la resistencia se ponga al rojo. Éxito
seguro con las parrilladas, las brochetas y los gratinados. Las carnes blancas
deben alejarse del grill, porque aunque así se alargará el tiempo de cocción, la
carne quedará más sabrosa. Las carnes rojas y los filetes de pescado se pueden
colocar encima de la rejilla colocando debajo la grasera.
MASTER BAKE : Esta función permite cocinar de forma más sana porque
reduce la cantidad de grasa y aceite que se necesita. La combinación de
elementos térmicos con un ciclo pulsatorio de aire garantiza un resultado de
cocción perfecto.
CALOR CIRCULANTE: Utilización simultánea de la resistencia inferior, superior
y de la turbina que hace circular el aire dentro del espacio del horno. Función
recomendada para las aves, la repostería, los pescados, las verduras... El calor
penetra mejor dentro del alimento a cocer reduciendo el tiempo de cocción,
así como el tiempo de precalentamiento. Se pueden realizar cocciones
combinadas con preparaciones idénticas o distintas en uno o dos niveles. Este
modo de cocción garantiza una distribución homogénea del calor y no mezcla
los olores. Para una cocción combinada se deben prever unos diez minutos
más.
DESCONGELACIÓN: Funcionamiento de la turbina de cocción que hace
circular el aire dentro del espacio del horno. Ideal para realizar una
descongelación previa a una cocción.
* Probado de conformidad con la norma EN 60350-1 con el propósito de declaración de consumo de energía y clase energética.
3.2 Modalidades de cocción
RESISTENCIA INFERIOR CIRCULANTE: Utilización de la resistencia inferior más
la turbina que hace circular el aire dentro del espacio del horno. Ideal para
hacer tartas de frutas jugosas, tortadas, quiches, pasteles. Evita que se sequen
los alimentos y favorece la subida de bizcochos, masa de pan y otras cocciones
realizadas por debajo. Coloque la rejilla en la ranura inferior.
CONVECCİÓN NATURAL: Funcionan la resistencia inferior y la resistencia
superior del horno. Es la cocción tradicional, ideal para cocinar asados, caza,
galletas, manzanas al horno y para conseguir alimentos crujientes.
T°C
establecida
180
220
210
200
210
ECO
40
L3
Rango
de T°C
40 ÷ 40
50 ÷ 240
50 ÷ 280
50 ÷ 230
150 ÷ 220
50 ÷ 240
ECO÷SUPER
L1 ÷ L5
*
*
SUPER GRILL : le four a deux positions de gril
Gril : 1800 W Super gril : 3000 W
L3L1 ÷ L5

4. Limpieza y mantenimiento del horno
4.1 Notas genéricas de limpieza
La vida útil del aparato se prolonga si se limpia a intervalos regulares. Espere a que el horno se enfríe
antes de llevar a cabo las operaciones de limpieza manuales. No utilice nunca detergentes abrasivos,
estropajos metálicos ni objetos puntiagudos para la limpieza con el fin de no dañar de forma irreparable
las piezas esmaltadas. Utilice únicamente agua, jabón o detergentes a base de amoniaco.
PIEZAS DE VIDRIO
Es aconsejable limpiar la puerta de vidrio con papel absorbente de cocina después de cada uso del
horno. Para eliminar las manchas más persistentes, se puede utilizar también una esponja empapada
en detergente bien escurrida y aclarar con agua.
JUNTA DE LA PUERTA DEL HORNO
Si se ensucia, la junta se puede limpiar con una esponja ligeramente húmeda.
ACCESORIOS
Limpie los accesorios con una esponja empapada en agua y jabón, escúrralos y séquelos: no utilice
detergentes abrasivos.
FUENTE DE GOTEO
Después de usar las resistencias, extraiga la fuente del horno. Vierta la grasa caliente en un recipiente y
lave la fuente con agua caliente utilizando una esponja y detergente lavavajillas.
Si quedan residuos grasos, sumerja la fuente en agua y detergente. También se puede lavar la fuente en
el lavavajillas o bien utilizar un detergente comercial para hornos. Nunca vuelva a introducir la fuente
sucia en el horno.
4.2 Pirólisis
Se puede configurar el horno de forma que lleve a cabo automáticamente la limpieza. Las dos opciones
disponibles son ECO y SUPER.
** La opción puede configurarse únicamente en los hornos dotados de dicha función.
El horno está dotado de un sistema de limpieza con pirolizador a alta temperatura que destruye los
residuos de comida. La operación se lleva a cabo automáticamente mediante el programador. Los
humos resultantes son limpios porque se conducen a través de un pirolizador que se conecta en cuanto
comienza la cocción. En la puerta de este tipo de hornos se instala un cierre de seguridad, ya que el
pirolizador funciona a temperaturas muy elevadas. El pirolizador se puede detener en cualquier
momento: no obstante, no se puede abrir la puerta hasta que aparezca el icono del cierre de seguridad
de la puerta.
NOTA: si el horno está ubicado sobre una encimera, no utilice los quemadores de gas ni las placas
eléctricas mientras funciona el pirolizador para evitar que las placas se calienten en exceso. Hay
disponibles dos CICLOS PIROLÍTICOS predeterminados:
• CICLO PIROLÍTICO ECO: este ciclo permite limpiar hornos moderadamente sucios y tiene una duración
de 90 minutos.
• CICLO PIROLÍTICO SUPER: este ciclo está indicado para hornos especialmente sucios y tiene una
duración de 120 minutos.
No utilice detergentes comerciales para limpiar los hornos pirolíticos. Sugerencia: la ejecución del ciclo
pirolítico al término de un ciclo de cocción permite aprovechar el calor residual y ahorrar energía.
ES 28

ES 29
Uso del ciclo pirolítico:
1- Gire el mando de las funciones hasta la posición " ". En el display, aparece la opción “ECO” o
“SUP”. El tiempo fijado es de 90 min, que puede ser variado desde 90 min. (modo ECO) hasta 120 min.
(modo SUP) mediante el programador (opciones “+” y “-”). Si el horno está muy sucio, es recomendable
incrementar el tiempo a 120 min, si no está excesivamente sucio, reducirlo a 90 min.
2- Es posible introducir el inicio diferido en el ciclo de pirólisis mediante el programador cambiando la
hora de fin.
3- Después de unos minutos, cuando el horno alcanza una alta temperatura, la puerta se bloquea
automáticamente. El ciclo de pirólisis se puede parar en cualquier momento moviendo el mando de las
funciones hasta la posición " 0 ".
4- Cuando el ciclo de pirólisis finaliza, se termina, se apagará esta función automáticamente. Una vez
que en el display aparece que ha terminado, se desbloqueará la puerta " 0 - - n ".
5- Puede girar el mando hasta la opción " 0 " y apagar el ciclo, pero como la temperatura es alta, la puerta
aparecerá como bloqueada hasta que disminuya la temperatura.
Uso del ciclo pirolítico en hornos con Touch Control:
1- Gire el selector de función a la posición correspondiente. En la pantalla aparece la indicación "ECO" o
"SUP“.
2- El tiempo predeterminado es de 90 minutos y puede variarse de 90 min. (modalidad Eco) a 120 min.
(modalidad Sup) con el programador (botones "+" o "-" ). Si el horno está muy sucio, le recomendamos
que aumente el tiempo a 120 min., mientras que si el horno no está muy sucio puede reducir el tiempo
del ciclo de limpieza a 90 min.
Antes de llevar a cabo un ciclo pirolítico:
• Extraiga todos los accesorios del horno, ya que no son capaces de resistir las elevadas
temperaturas utilizadas durante el ciclo de limpieza pirolítico; en especial, extraiga las rejillas y el
soporte elevado (véase el capítulo EXTRACCIÓN DE REJILLAS Y SOPORTE ELEVADO). En hornos
dotados de la sonda de carne es necesario, antes de efectuar el ciclo de limpieza, cerrar el horno con
la tuerca suministrada de serie.
• Extraer todo resto de grasa y limpiar cualquier mancha que pudiera exigir demasiado tiempo para
ser eliminada.
• Este tipo de manchas pueden incendiarse a causa de las temperaturas extremadamente elevadas
del ciclo pirolítico.
• Cierre la puerta del horno.
• limpie la puerta del horno.
• Con una esponja húmeda quite los residuos más consistentes del interior del horno. No utilice
detergentes.
• Quite todos los accesorios y el kit guías deslizables (si existe);
• No deje paños de cocina o manoplas en la manija.
ES 30
EXTRACCIÓN Y LIMPIEZA DE LAS REJILLAS
1. Desenrosque en sentido antihorario las tuercas estriadas.
2. Extraiga las rejillas tirando de ellas hacia fuera.
3. Límpielas lavándolas en el lavavajillas o con una esponja húmeda y séquelas inmediatamente
después.
4. Una vez limpias, vuelva a instalar las rejillas fijando las tuercas estriadas.
A
4.4 Mantenimiento
EXTRACCIÓN DE LA PUERTA DEL HORNO
1. Abra la puerta anterior.
2. Abra las pestañas de alojamiento de la bisagra por el lado derecho e izquierdo de la puerta anterior
presionándolas hacia abajo.
3. Vuelva a instalar la puerta llevando a cabo el procedimiento a la inversa.
4.3 Función Hydro Easy Clean
El procedimiento de limpieza “HYDRO EASY CLEAN” utiliza vapor para facilitar la eliminación de grasa y
restos de alimentos del horno.
1- Introduzca 300 ml de agua destilada o potable en el contenedor de HYDRO EASY CLEAN del fondo del
horno.
2- Configure la función del horno en Estática ( ) o Calentamiento desde abajo ( ).
3- Configure la temperatura en el icono HYDRO EASY CLEAN ( ).
4- Deje el electrodoméstico en funcionamiento durante 30 minutos.
5- Desactive el aparato y deje que se enfríe. Una vez que el horno se haya enfriado.
6- Limpie la superficie interna del horno con un paño.
Atención: Asegúrese de que el horno esté frío antes de tocarlo: corre el riesgo de escaldarse.
300 ml
ES 31
1
2
3
1.
2.
3.
4.
5.
6.
7.
EXTRACCIÓN Y LIMPIEZA DE LA PUERTA DE VIDRIO
1. Abra la puerta del horno.
2.3.4. Bloquee las bisagras, desenrosque los tornillos y extraiga la cubierta metálica superior tirando
hacia arriba.
5.6. Extraiga el vidrio con mucho cuidado de la contrapuerta del horno (N. B.: si se trata de un horno
pirolítico, extraiga también el segundo y el tercer vidrio si los hubiera).
7. Al término de la limpieza o sustitución, vuelva a ensamblar las piezas en el orden opuesto a la
extracción.
En todos los vidrios, la indicación ”Low-E” debe ser correctamente legible y estar ubicada a la izquierda
de la puerta, cerca de la bisagra lateral izquierda. De este modo, la etiqueta estampada en el primer
vidrio quedará por el interior de la puerta.
LOW-E

SUSTITUCIÓN DE LA BOMBILLA
1. Desenchufe el horno de la red eléctrica.
2. Suelte la cubierta de vidrio, desenrosque la bombilla y sustitúyala por una nueva del mismo modelo.
3. Una vez sustituida la bombilla defectuosa, vuelva a atornillar la cubierta de vidrio.
5. Solución de problemas
5.1 Preguntas más frecuentes
PROBLEMACAUSA POSIBLE SOLUCIÓN
El horno no se calienta
El reloj no está en horaConfigure el reloj
El bloqueo infantil está
activado
Los ajustes necesarios no
están configurados
Desactive el bloqueo infantil
Asegúrese de que los ajustes
necesarios sean correctos
El horno no se calienta
El horno no se calienta
ES 32
560 mm
560 mm x 45 mm
A
560 mm
590 mm
70016887 • A5 • 09.2022 • Rev_0
INSTALLATIONEN
The manufacturer will not be responsible for any inaccuracy resulting from printing or transcript errors contained in this brochure. We
reserve the right to carry out modifications to products as required, including the interests of consumption, without prejudice to the
characteristics relating to safety or function.
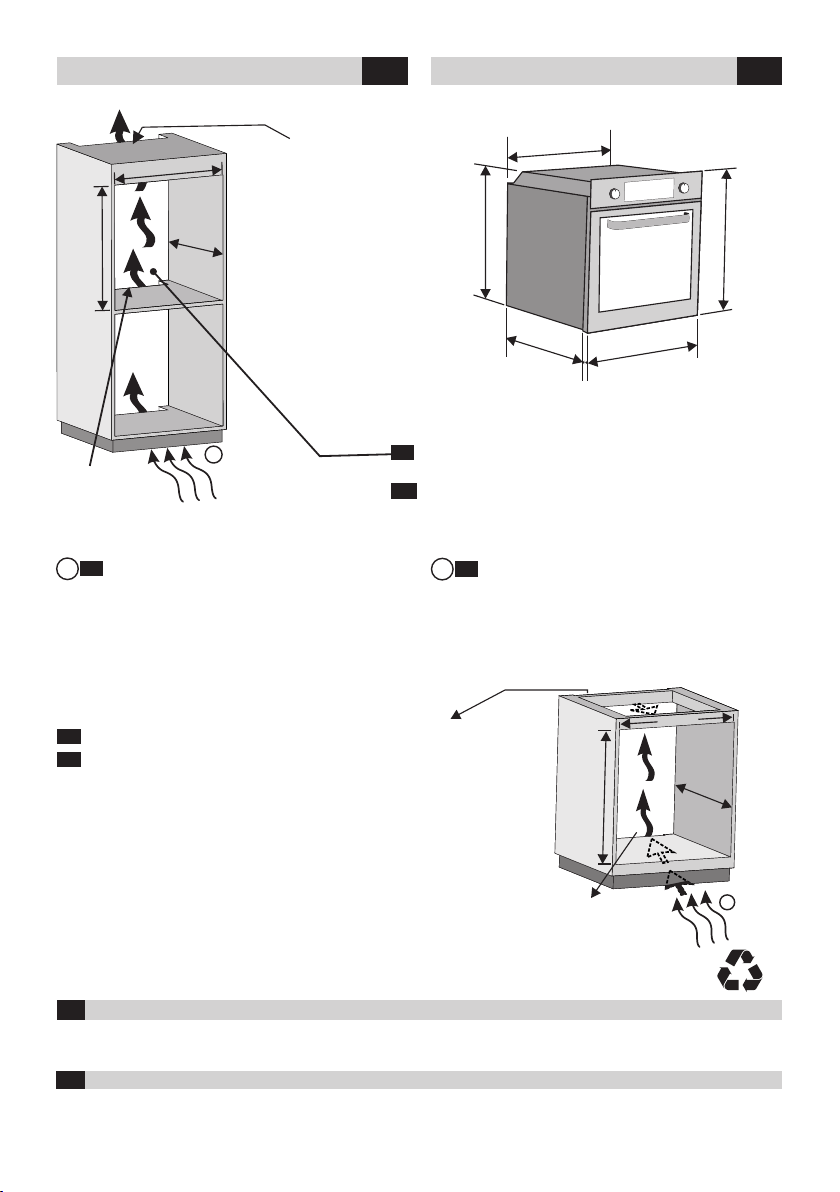
EN
If the oven does not have a cooling fan, create an opening 460 mm x 15 mm
EN
Opening / Apertura
560 mm x 45 mm
If the mounting of the plinth does not allow air
circulation, to obtain the maximum performance of the
oven it is necessary to create an opening of 500x10mm or
2
the same surface in 5.000 mm
EN
A
Opening / Apertura
460 mm x 15 mm
ES
El fabricante no se responsabiliza de las inexactitudes debidas a fallos de impresión o transcripción contenidos en este folleto. Nos
reservamos el derecho a modificar los productos como sea necesario, incluidos los intereses de consumo, sin perjuicio de las
características relacionadas con la seguridad o su funcionamiento.
INSTALACIÓNFR
595 mm
595 mm
546 mm
22 mm
580 mm
560 mm
Si el montaje del zócalo no permite la circulación de aire,
para obtener el máximo rendimiento del horno es necesario
crear una abertura de 500x10 mm o la misma superficie en
2
5.000 mm .
ES
A
Si el horno no tiene ventilador de refrigeración, practique una abertura.
460 mm x 15 mm
ES
A
600 mm
560
mm
560
mm
If the furniture is coverage with a bottom at the back part,
provide an opening for the power supply cable.
EN
Si el mueble tiene panel posterior, haga un orificio para el cable
de alimentación.
ES