ENGLISH
INSTALLATION AND USER’S MANUAL
ESPAÑOL
MANUAL DE USO E INSTALACIÓN
DEUTSCH
EINBAU- UND BEDIENUNGSANLEITUNG


30
INSTALLATION AND USER’S MANUAL
CONTENT
INTRODUCTION
SAFETY PRECAUTION
SPECIFICATION
05
INSTALLATION (VENT OUTSIDE)
06
INSTALLATION (VENT INSIDE)
14
DESCRIPTION OF COMPONENTS
15
OPERATION
15
MAINTENANCE
18
TROBULESHOOTING
19
CONFORMITY WITH DIRECTIVES
20
ENVIRONMENTAL PROTECTION
20
1

INTRODUCTION
Never let the children operate the machine.
The cooker hood is for home use only, not suitable for barbecue, roast
shop and other commercial purpose.
The cooker hood and its filter should be clean regularly in order to
keep in good working condition.
Clean the cooker hood according to the instruction manual and keep
the unit from danger of burning.
Forbid the direct baking from the gas cooker.
Please keep the kitchen room a good convection.
Before connecting this appliance check that the power supply cord is
not damaged. A damage supply cord must be replaced by qualified
service personnel only.
There shall be adequate ventilation of the room when the range hood
is used at the same time as appliances burning gas or other fuels;
The air must not be
discharged into a flue that is used for
exhausting fumes from appliances burning gas or other fuels;
Thank you for choosing this cooker hood.
This instruction manual is designed to provide you with all required
instructions related to the installation, use and maintenance of the appliance.
In order to operate the unit correctly and safety, please read this instruction
manual carefully before installation and usage.
The cooker hood uses high quality materials, and is made with a streamlined
design. Equipped with large power electric motor and centrifugal fan, it also
provides strong suction power, low noise operation, non-stick grease filter and
easy assembly installation.
Hereby, Candy Hoover Group Srl declares that the radio equipment is in
compliance with Directive 2014/53/EU and with the relevant Statutory
Requirements (for the UKCA market).
The full text of the declaration of conformity is available at the following
internet address: www.candy-group.com.
SAFETY PRECAUTION
Regulations concerning the discharge of air have to be fulfilled.
This appliance if not intended for use by persons(including children)
with reduced physical, sensory or mental capabilities, or lack of
experience and knowledge, unless they have been given supervision
or instruction concerning use of the appliance by a person slide for
their safety.
2
32
Do
not flambé under the range hood.
CAUTION: Accessible parts may become hot when used with
cooking appliance
Electrical Shock Hazard
Only plug this unit into
a
p
r
operly e
arthed o
u
tl
e
t. If i
n
d
o
u
b
t
s
e
ek
advice from
a suitably qualified engineer.
Failure to follow these instructions can result in death, fire, or
electrical shock.
- These shall be adequate ventilation of the room when the
range hood is used at the same
time as appliances burning
gas or other fuels(not applicable to appliances that only
discharge the air back into the room);
- the details concerning the method and frequency of cleaning.
- there is a fire risk if cleaning is not carried out in accordance
with the instructions; - do not flame under the range hood;
- CAUTION:Accessible parts may become hot when used with
cooking appliances.
Children should be supervised to ensure that they do not play with
the appliance.
3
The lamp used in this product is not suitable for use
in the lighting of a room.
The purpose of this lamp is to provide illumination for using the product.
32
Direct Connection
The appliance must be connected directly to the mains using an
omnipolar circuit breaker with a minimum opening of 3mm between
the contacts.
The installer must ensure that the correct electrical connection has
been made and that it complies with the wiring diagram.
The cable must not be bent or compressed.
Regularly check the power plug and power cord for damage. If the
supply cord is damaged, it must be replaced by a special cord or
assembly available from the manufacturer or its service agent.
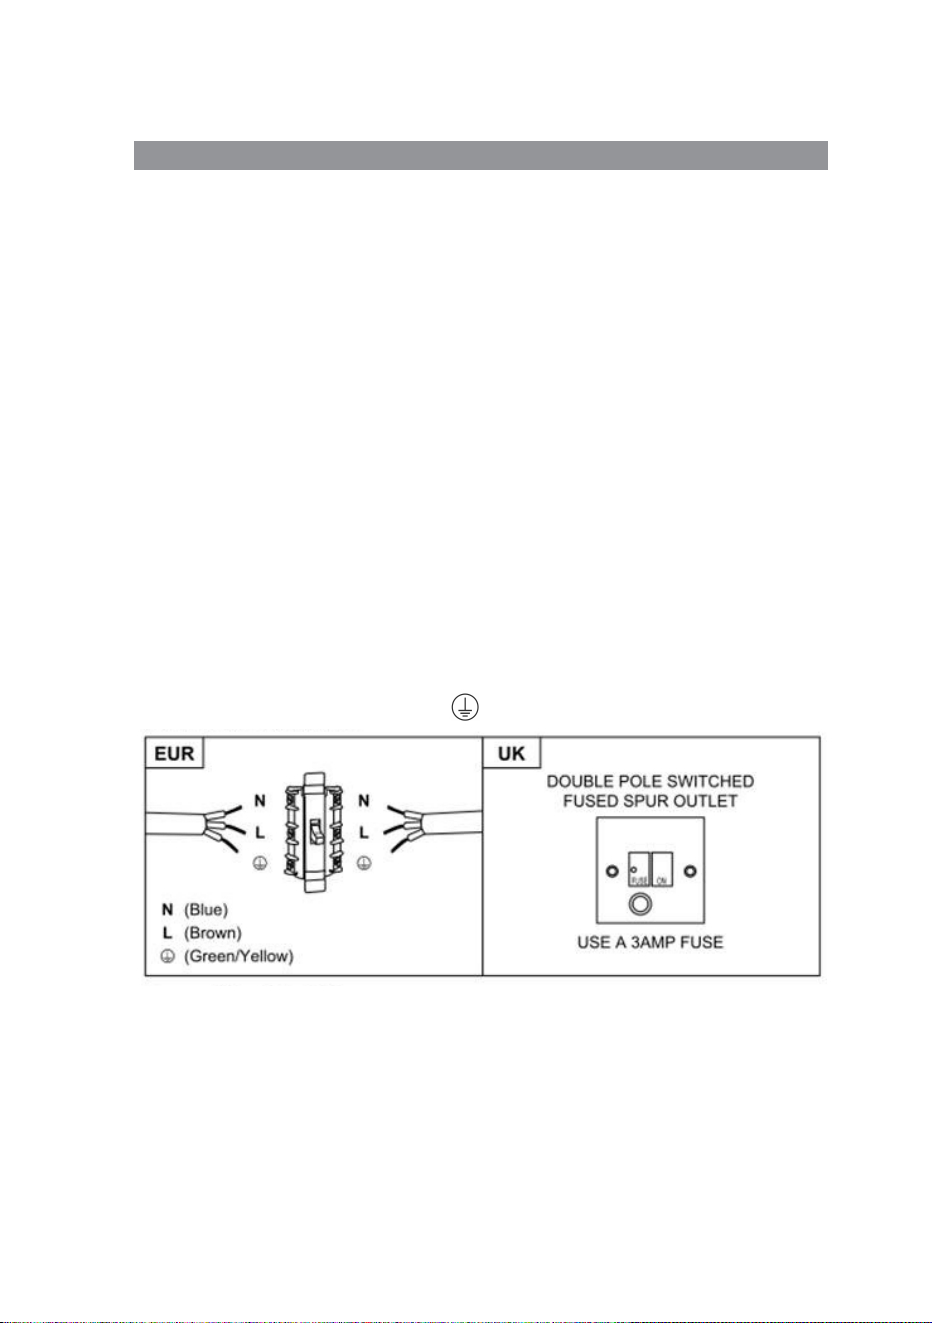
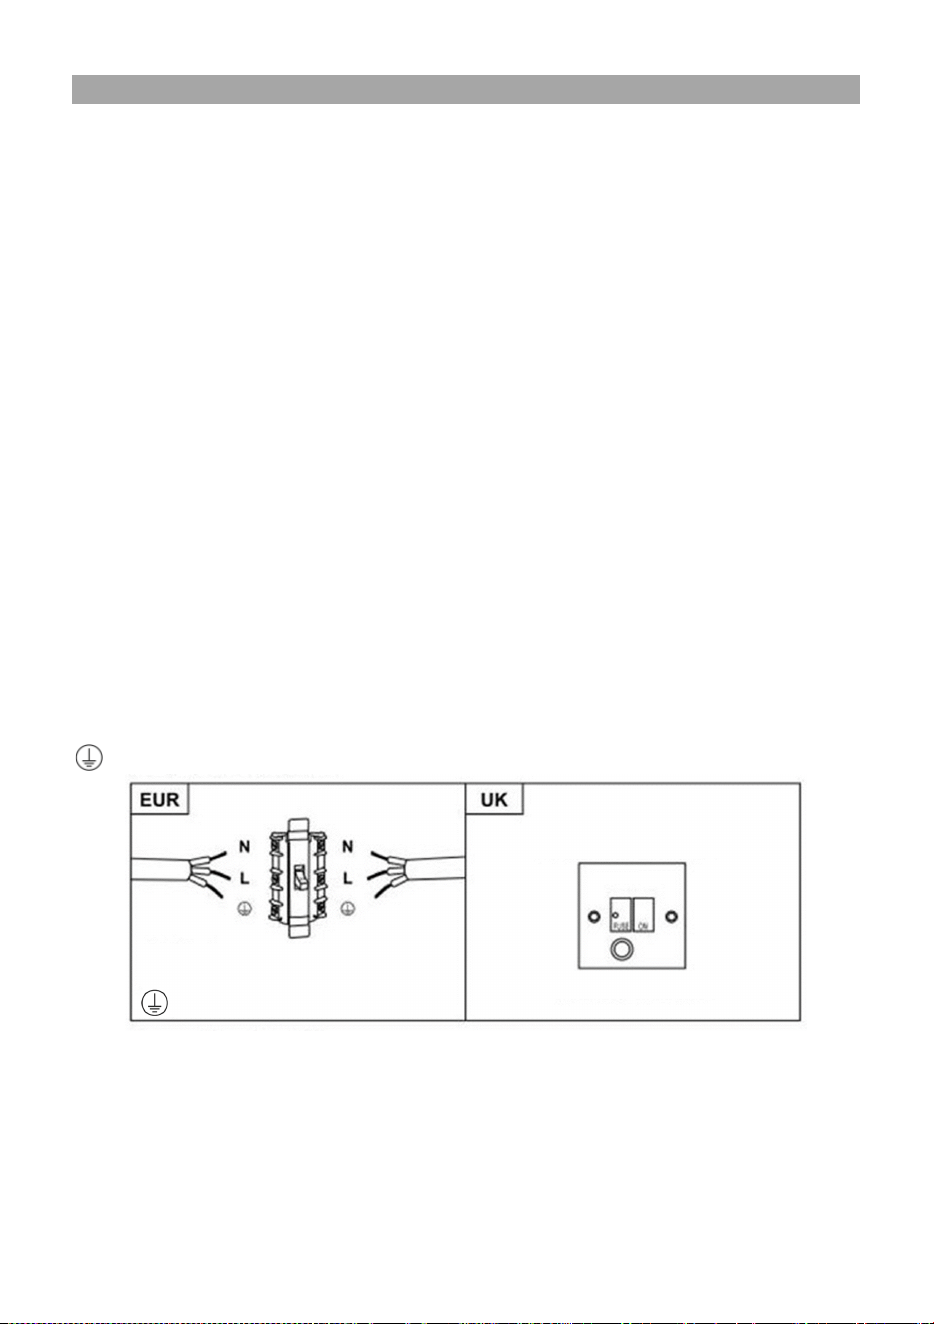
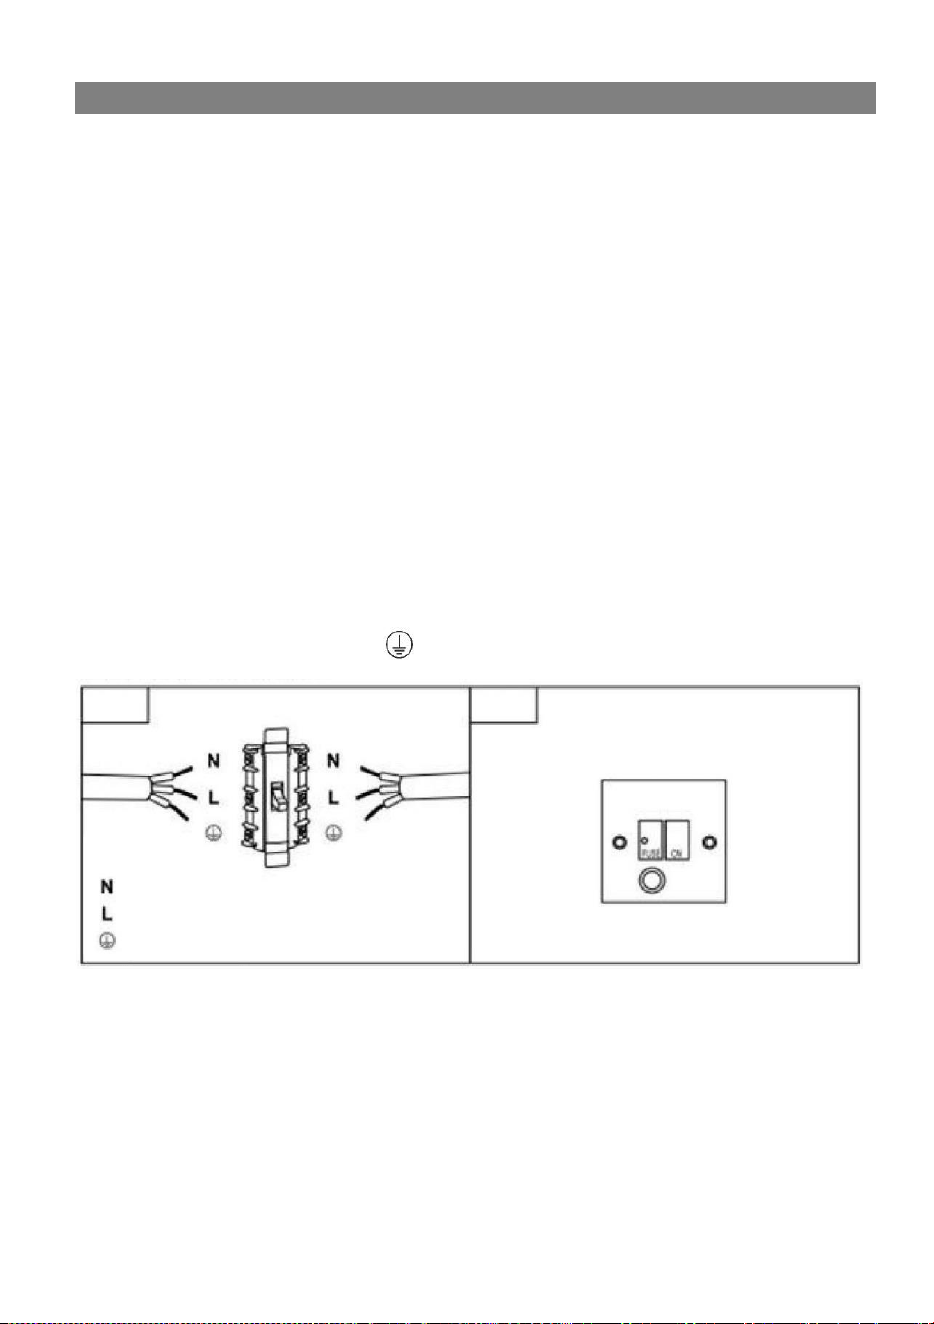
WARNING: This is a Class I appliance and MUST be earthed
This appliance is supplied with a 3 core mains cable coloured as
follows:
Brown = L or Live
Blue = N or Neutral
Green and Yellow = E or Earth
The fuse must be rated at 3 Amps.
Electrical Installation
All installation must be carried out by a competent person or qualified
electrician. Before connecting the mains supply ensure that the mains
voltage corresponds to the voltage on the rating plate.
4
33
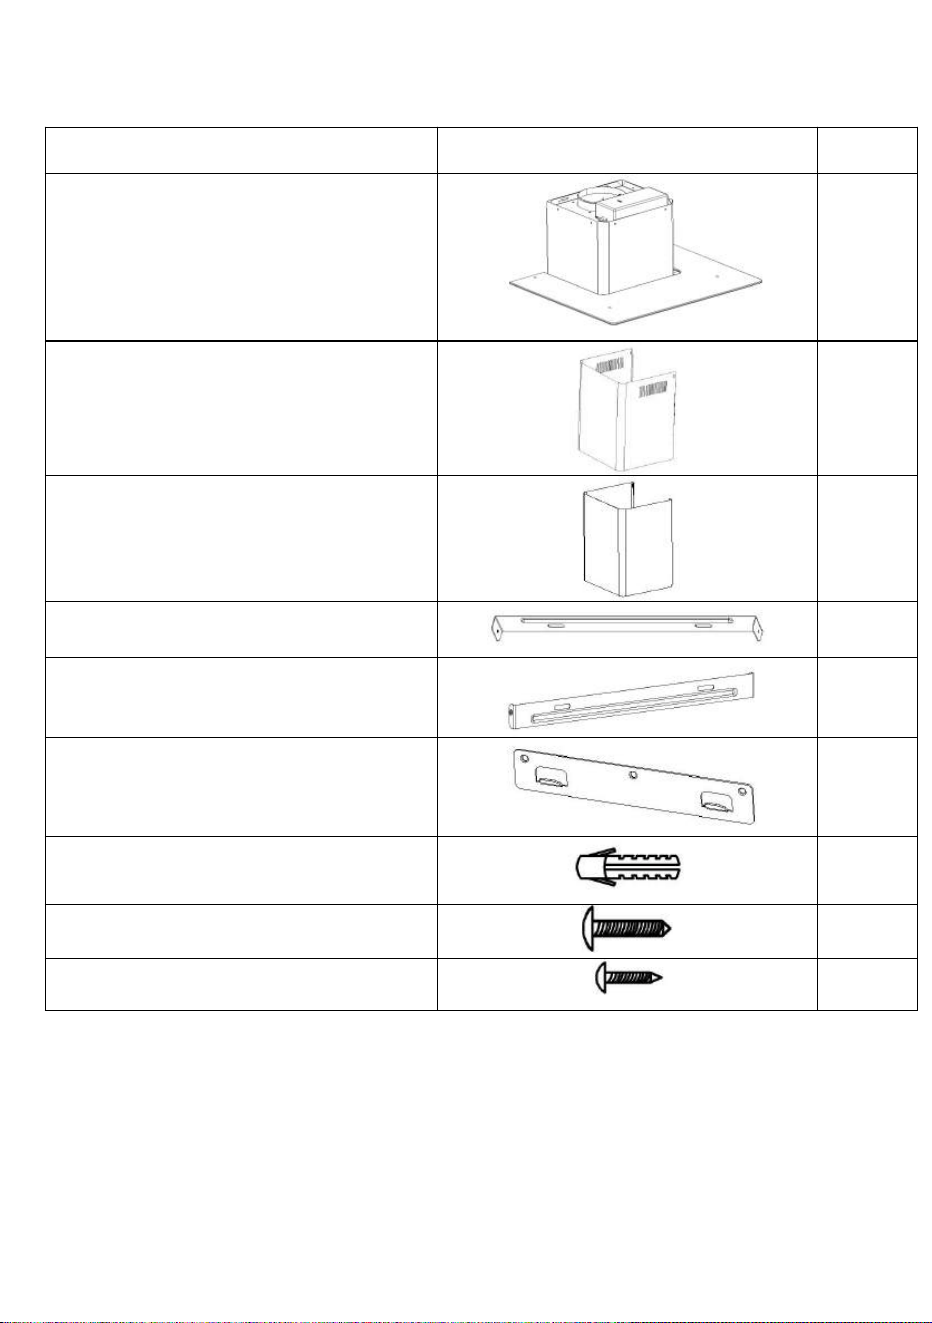
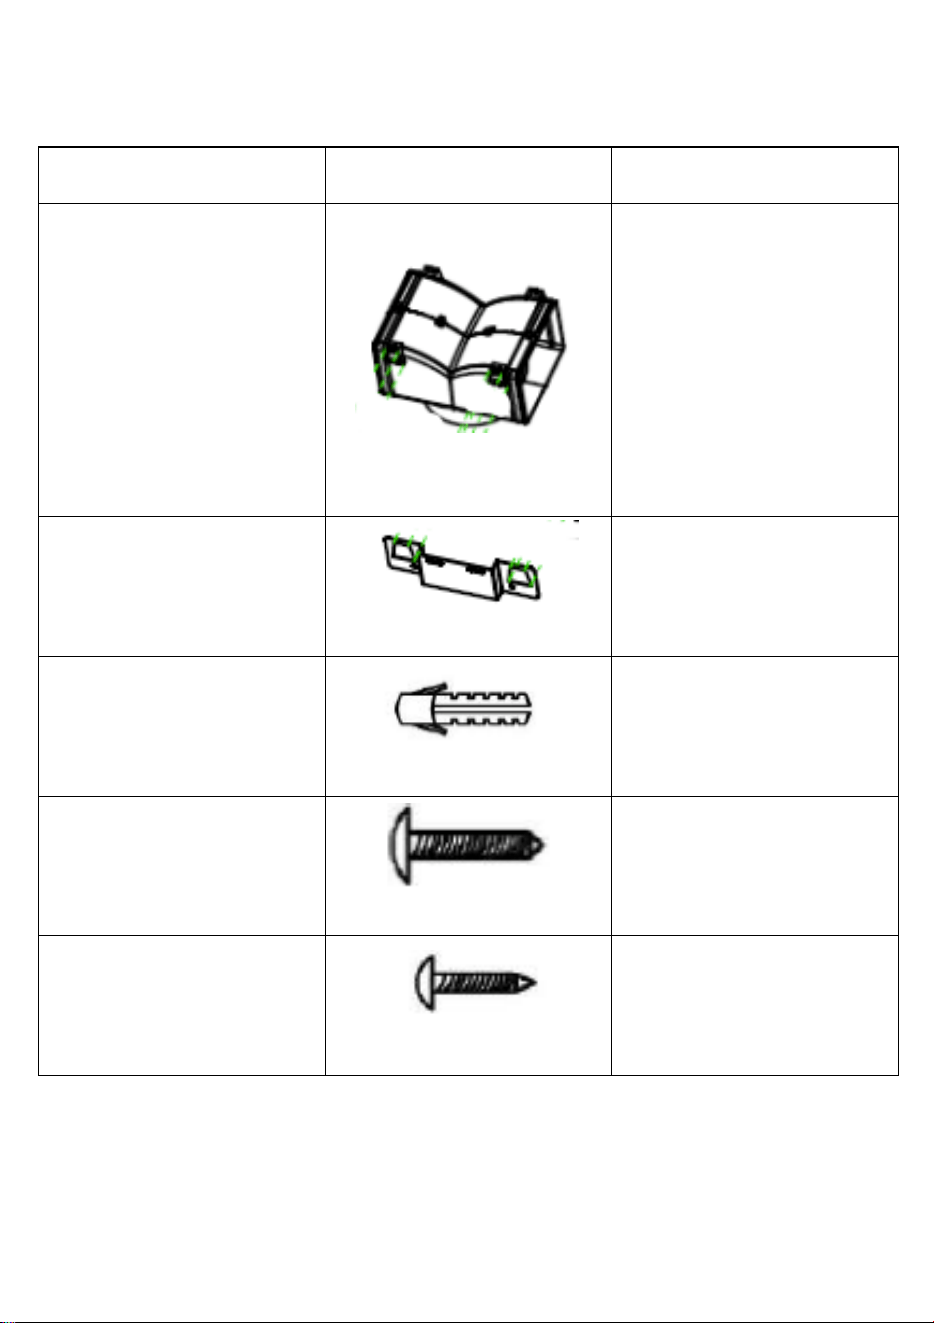
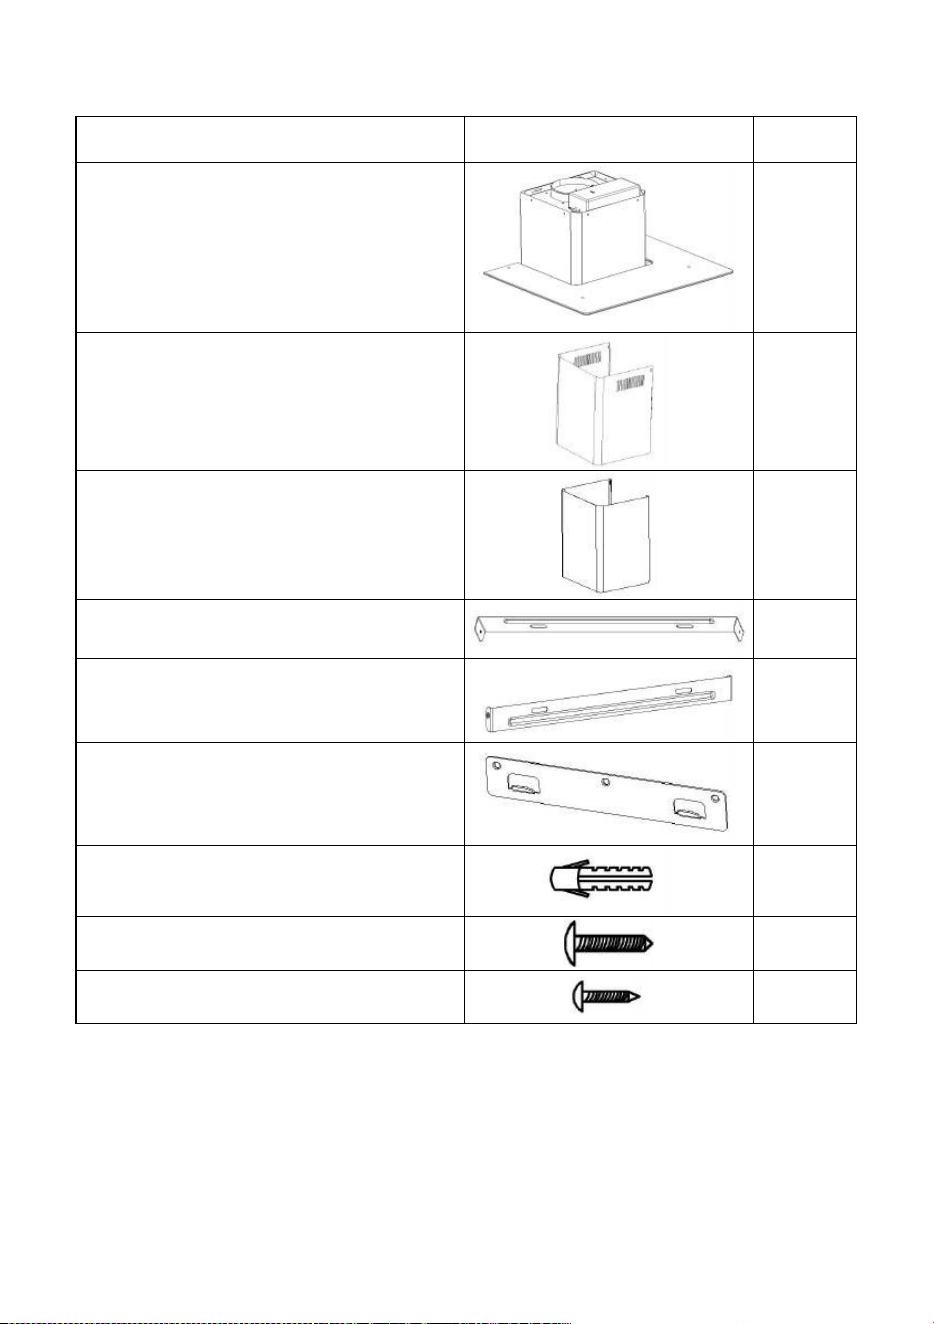
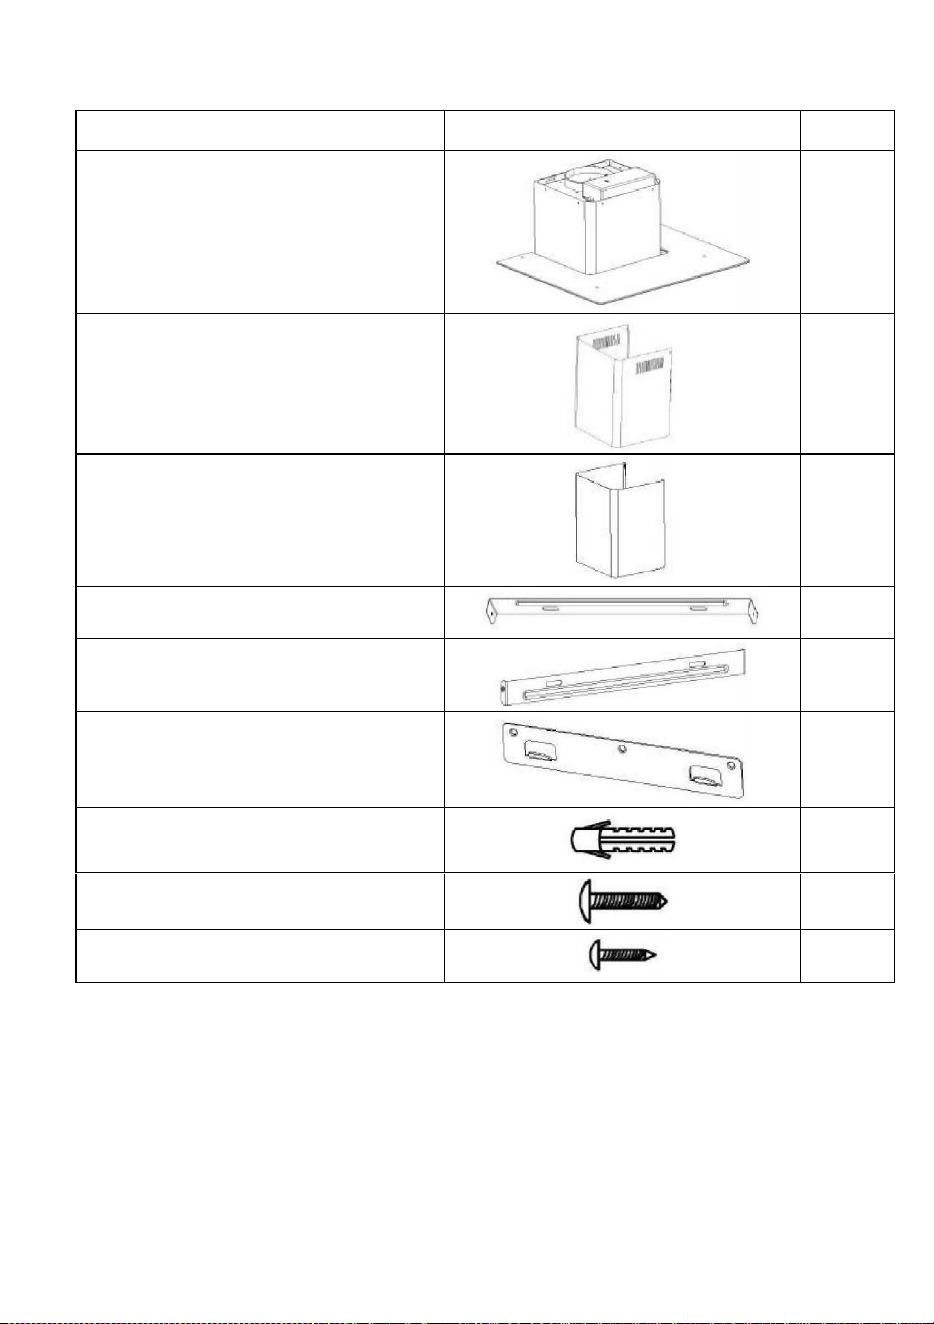
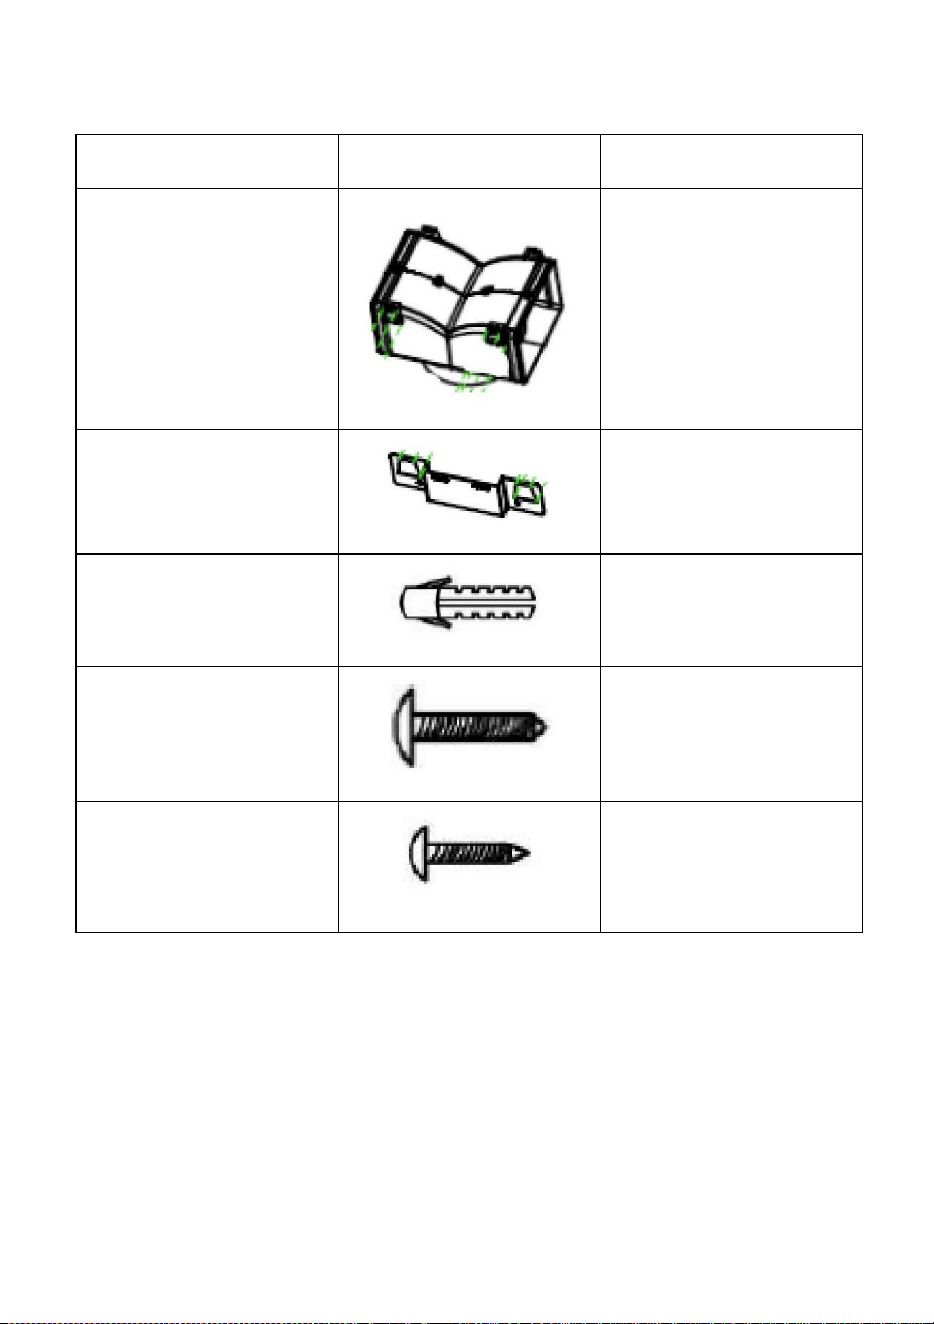
Standard Installation Accessories List
Spec.
Illustration Picture
Qty
Casing
1
Upper Chimney
1
Lower Chimney
1
Lower chimney bracket
1
Upper chimney bracket
1
Hanging Board
1
φ8 rawl plugs
φ8×φ6 white color
9
Screws
ST4.0×30
9
φ7.2screws
ST4.0×8
2
5
34
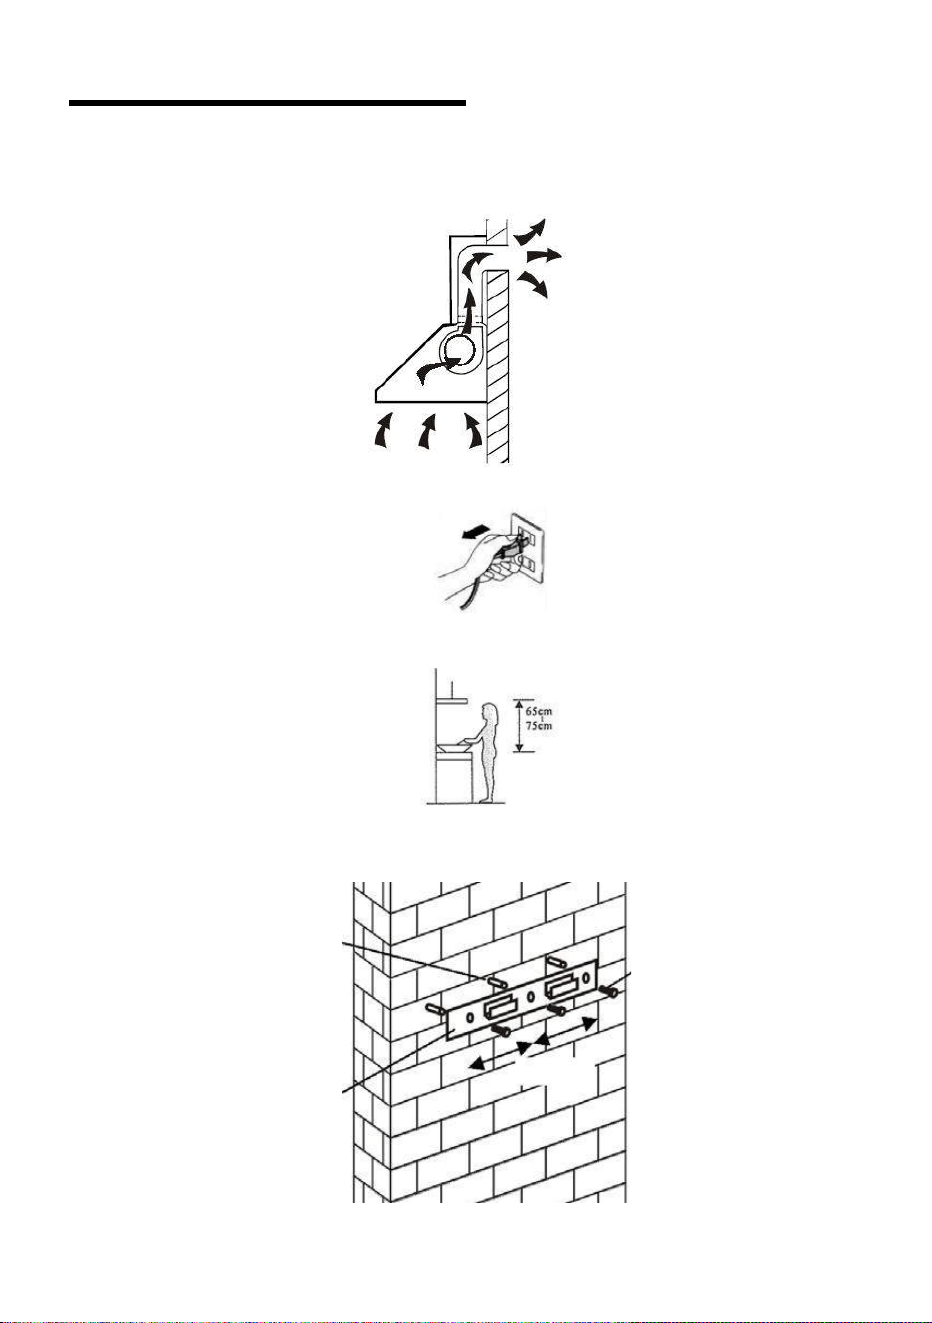
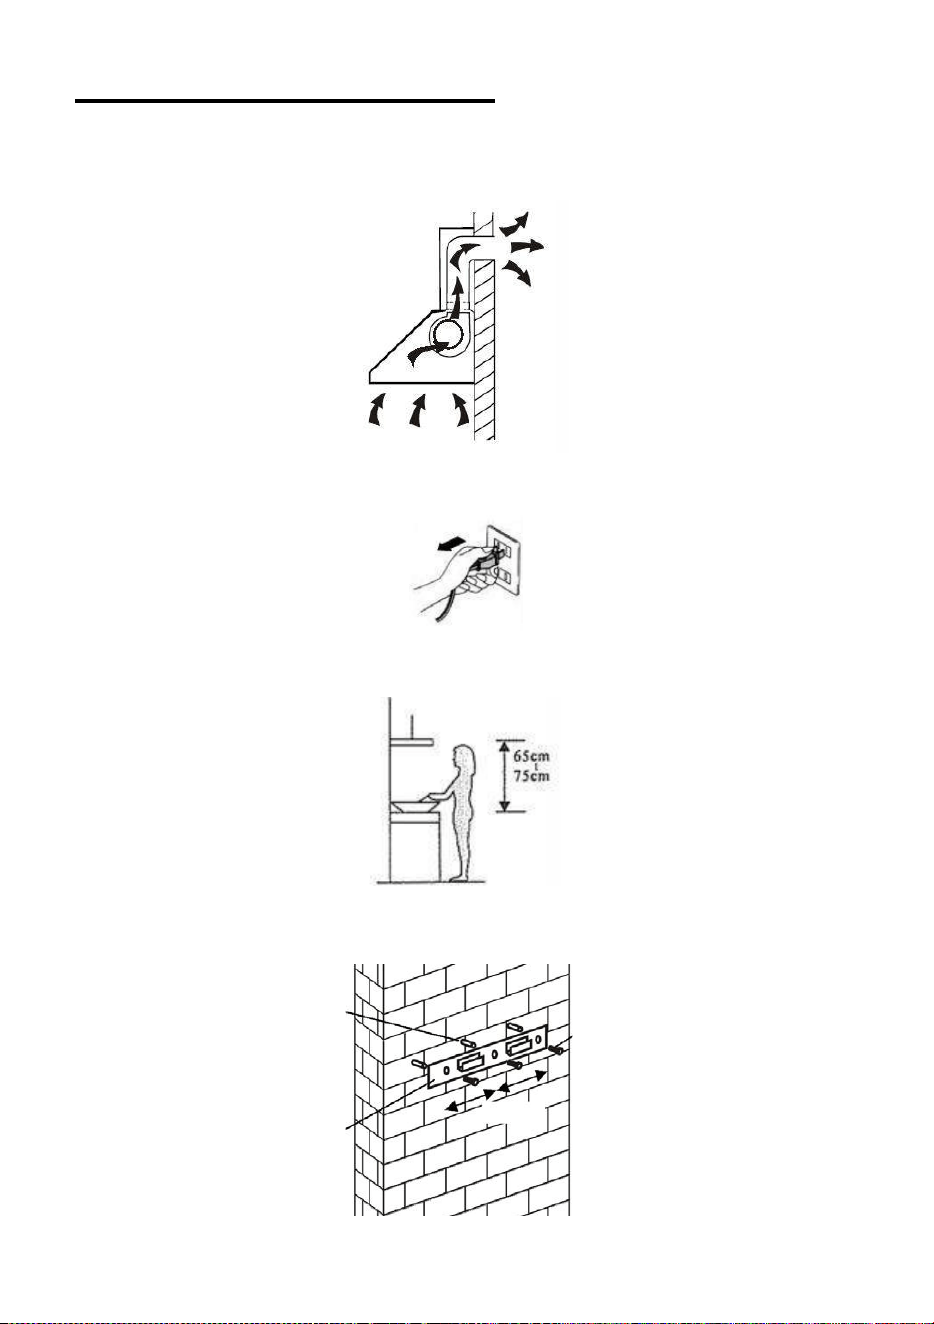
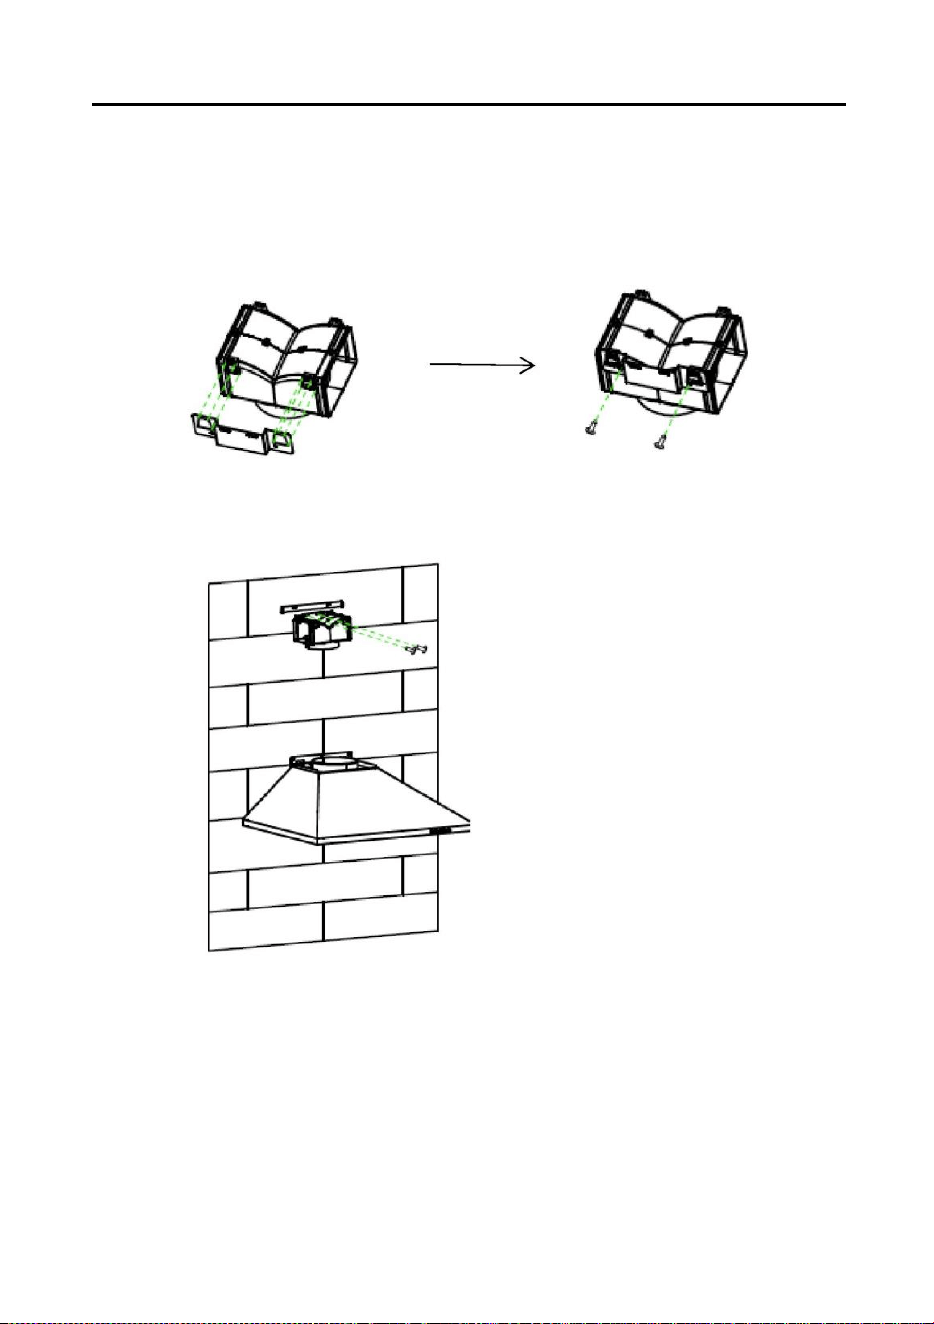
INSTALLATION
(
wall mounting
)
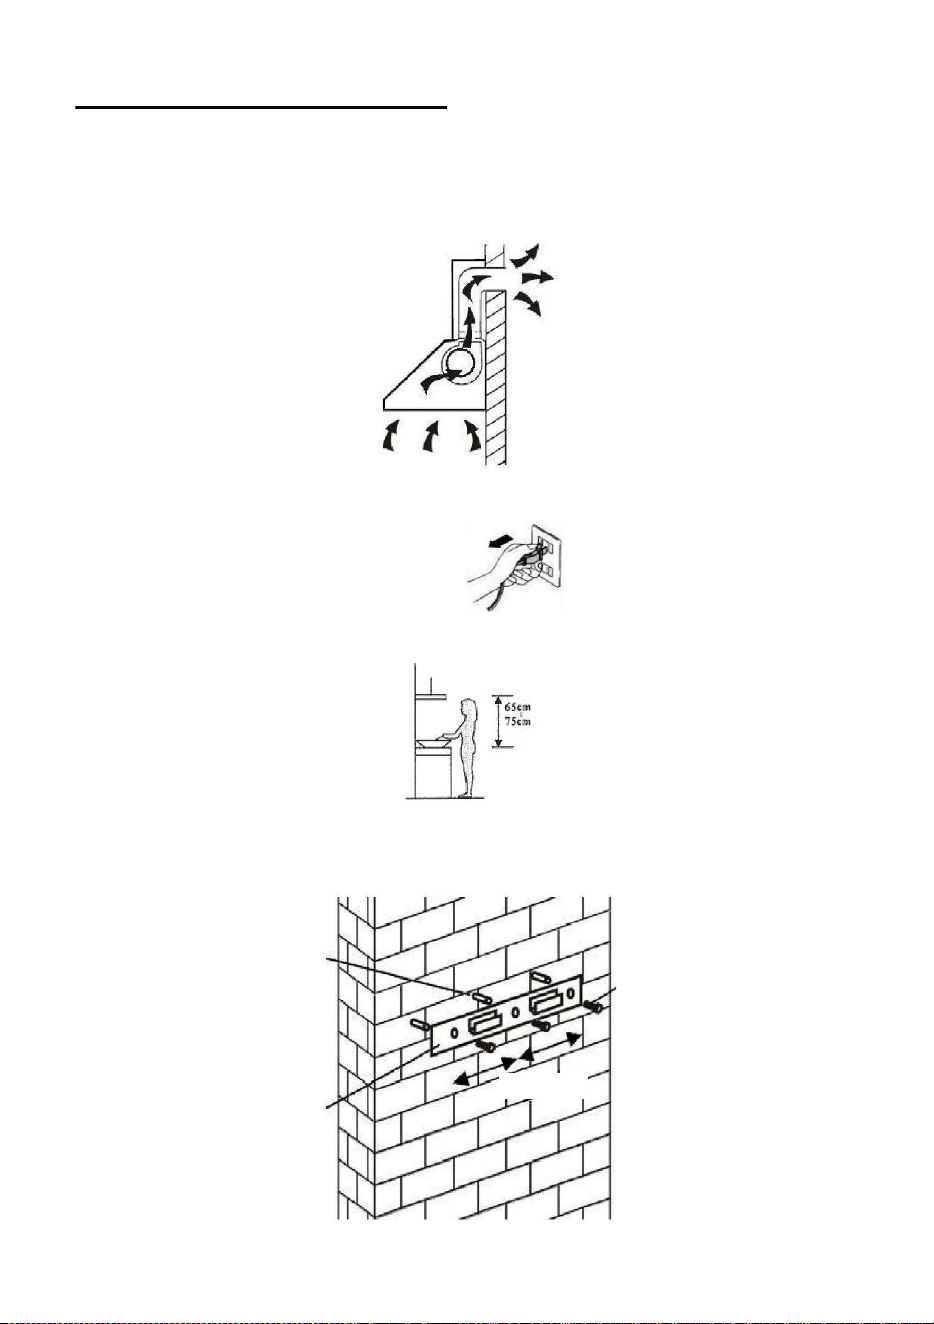
If you have an outlet to the outside, your cooker hood can be connected as
below picture by means of an extraction duct (enamel, aluminum, flexible pipe or
inflammable material with an interior diameter of 150mm)
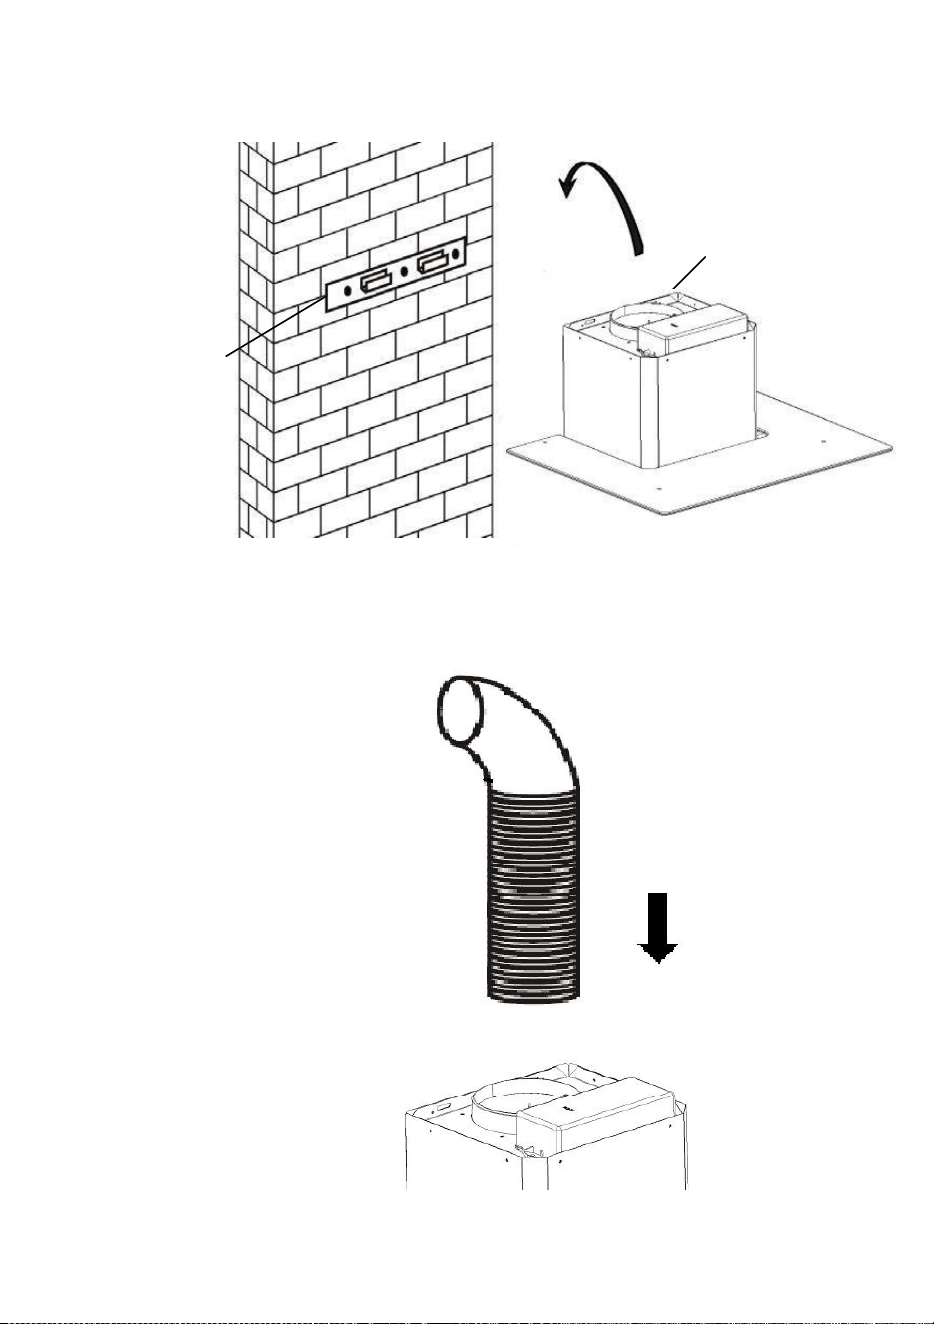
1. Before installation, turn the unit off and unplug it from the outlet.
2. The cooker hood should be placed at a distance of 65~75cm above
the cooking plane for best effect.
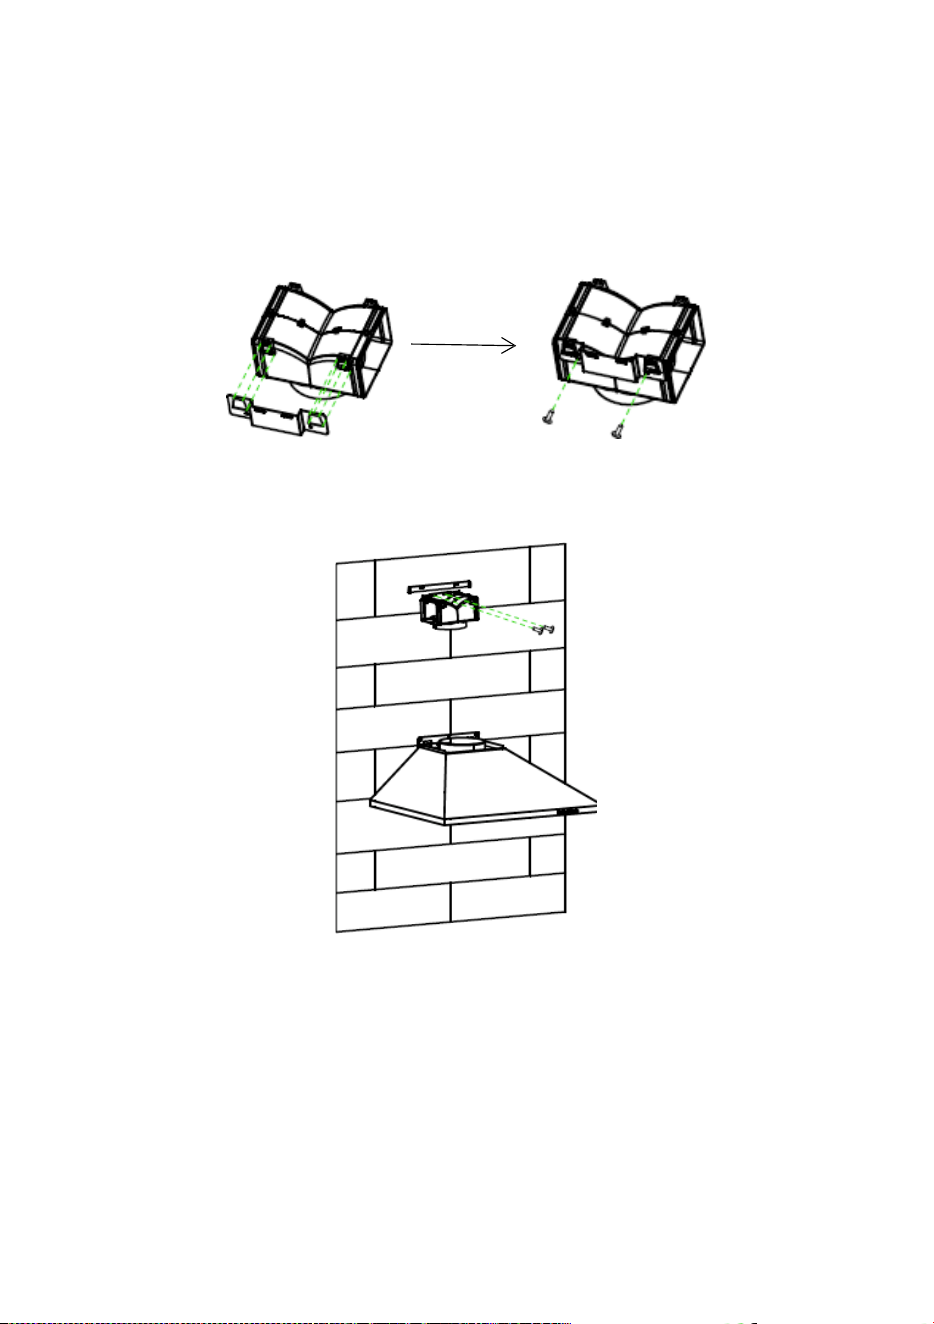
3. Drill 3 x 8mm holes to accommodate the bracket. Screw and tighten
the bracket onto the wall with the screws provided.
Wall plug
Wall bracket
107.5mm
Screw(4mm x 30mm)
6
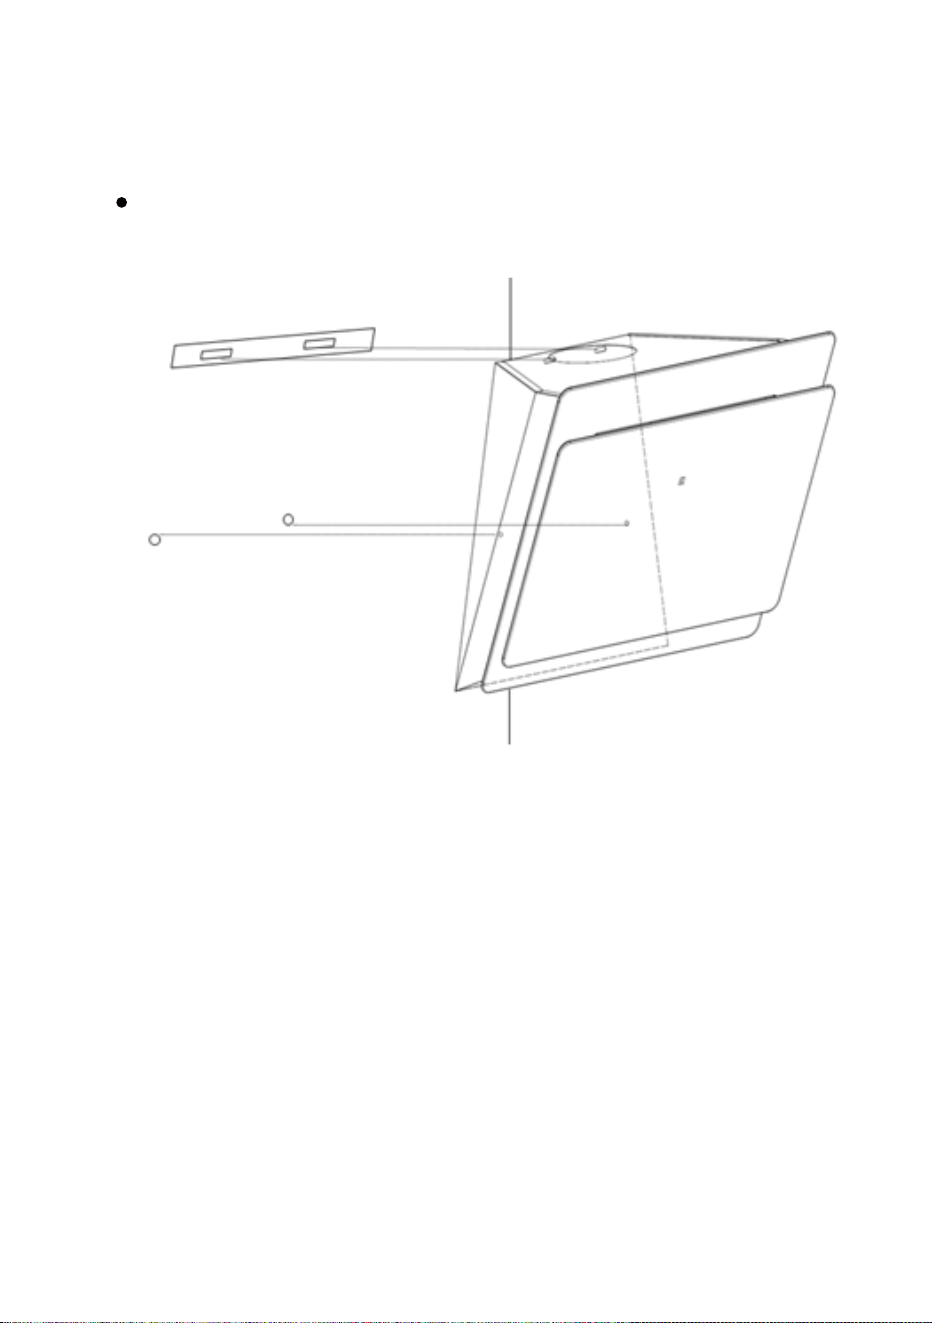
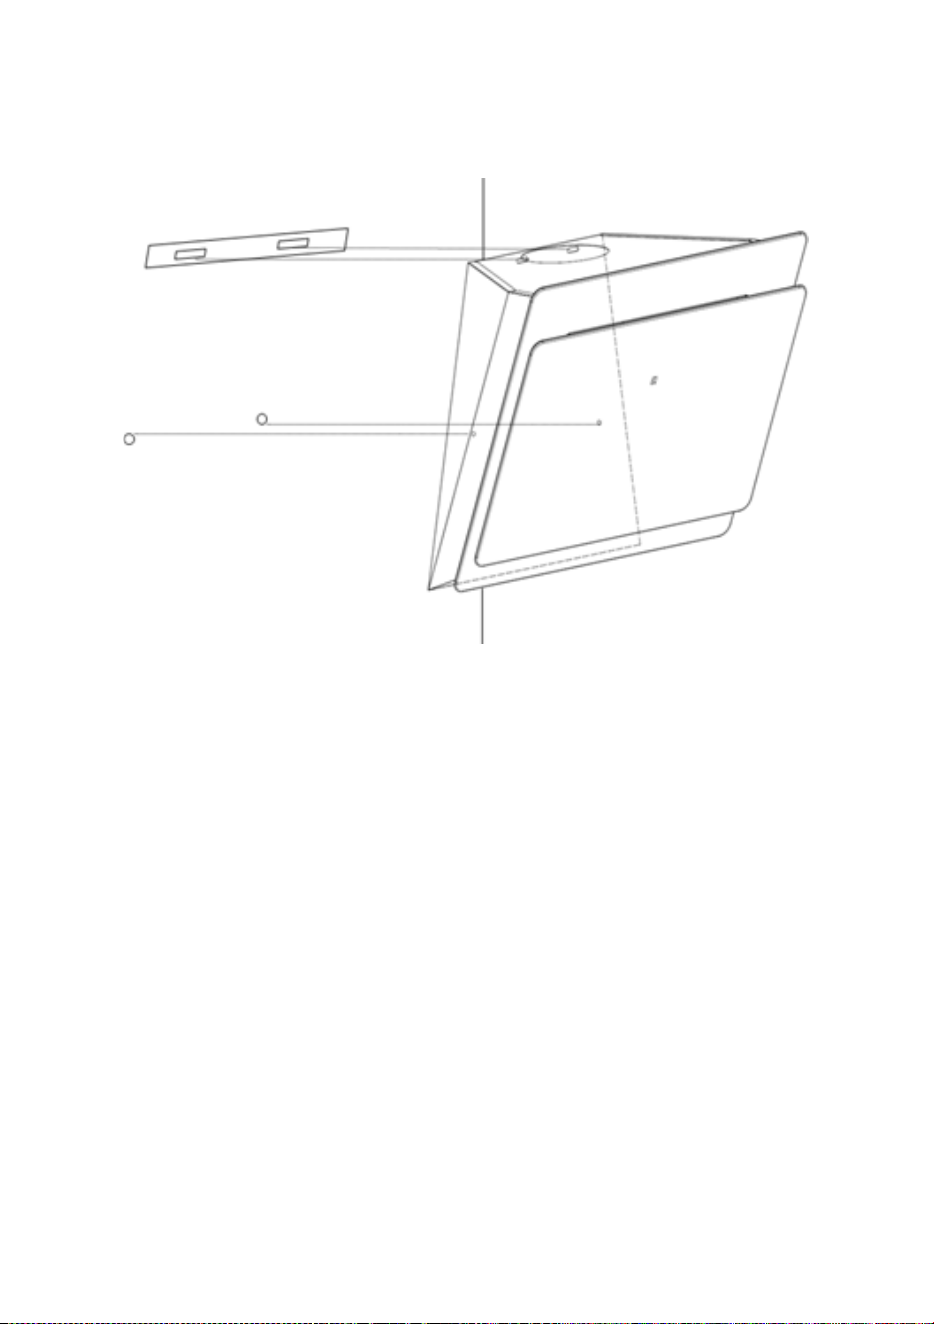
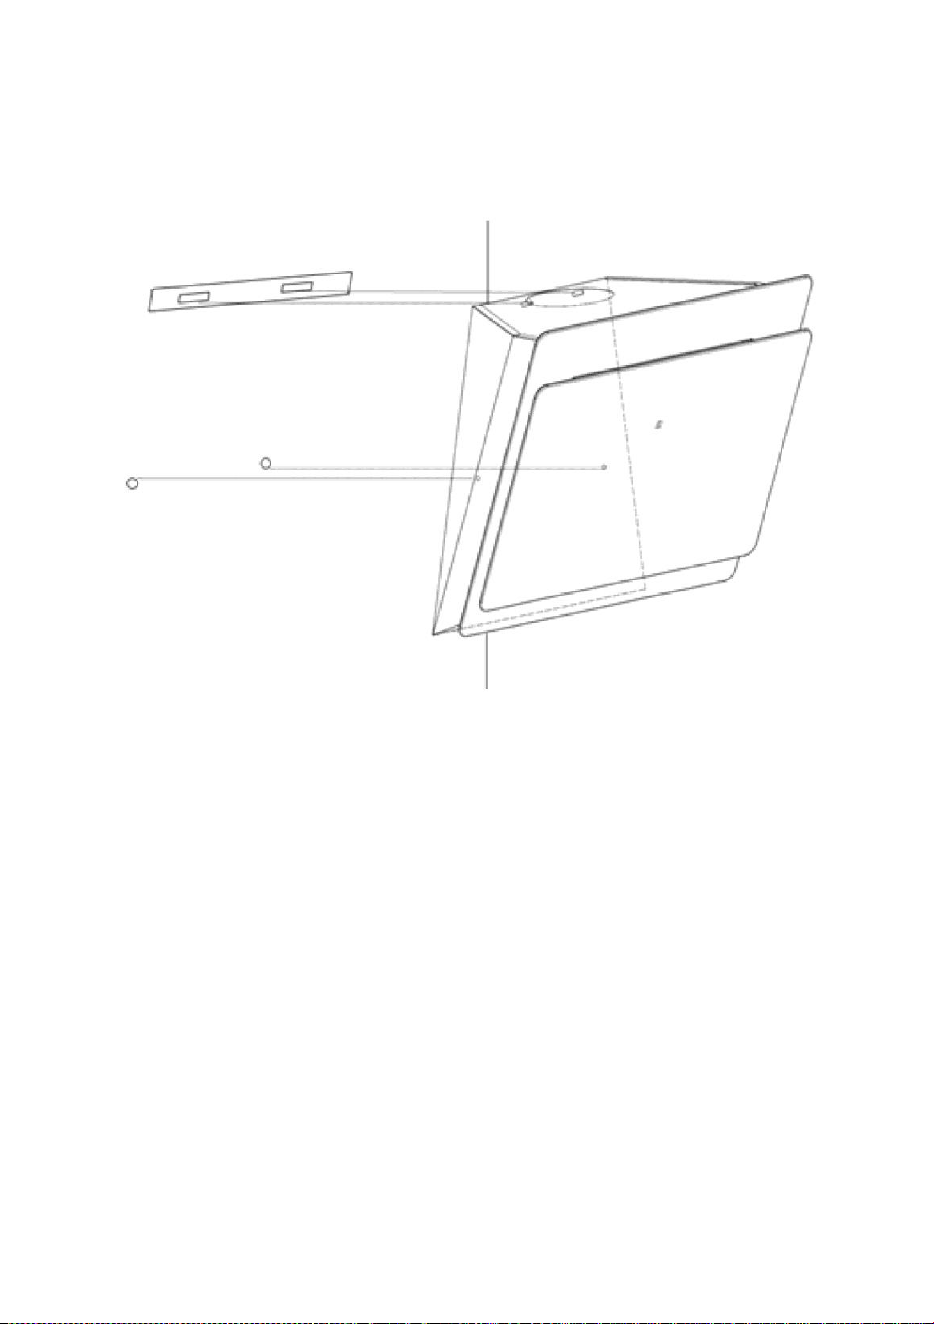
eed to drill 2x8mm extra holes & fixing screws & screw plugs before
installation. Voor schuine modellen
For inclined panel Model
7

35
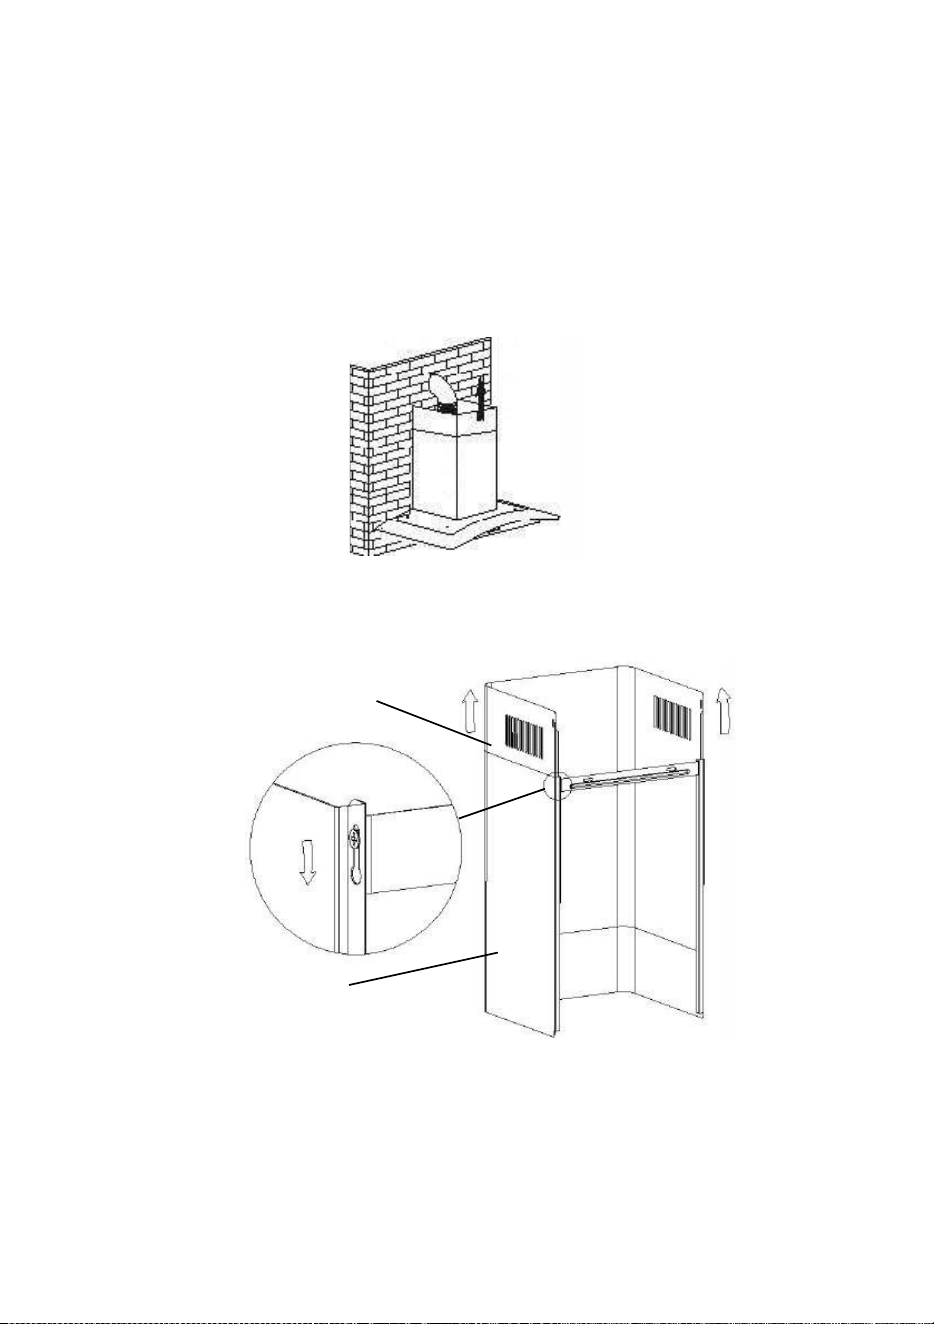
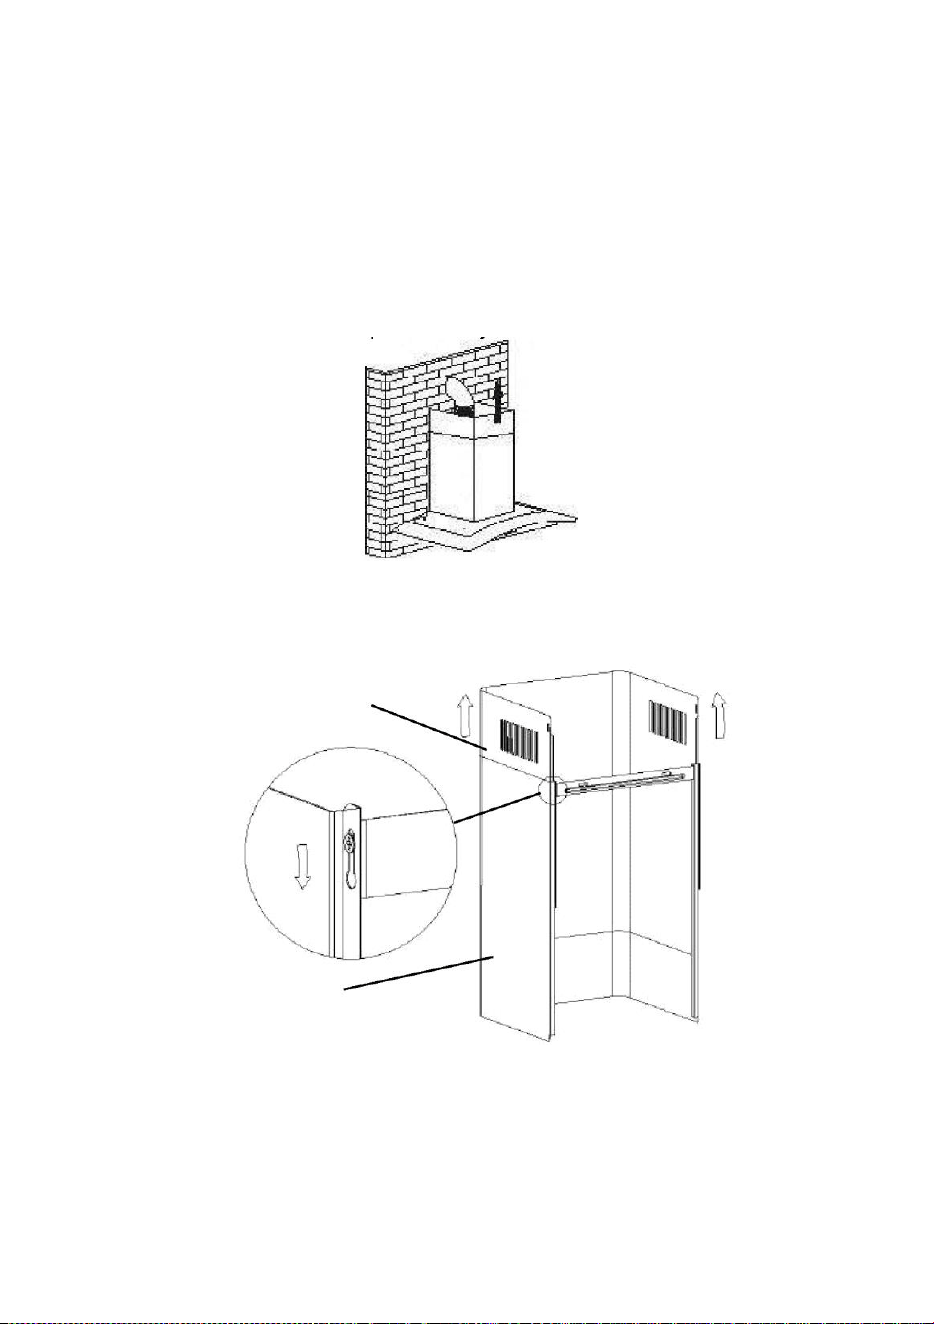
4. Leave up the cooker hood and hang onto the wall bracket hook.
Cooker hook
Wall
bracket
5. Fix the one-way-valve to the air outlet of the cooker hood. Then,
attached the exhaust pipe onto the one-way-valve as shown below.
Exhaust pipe
Cooker hood
8
36
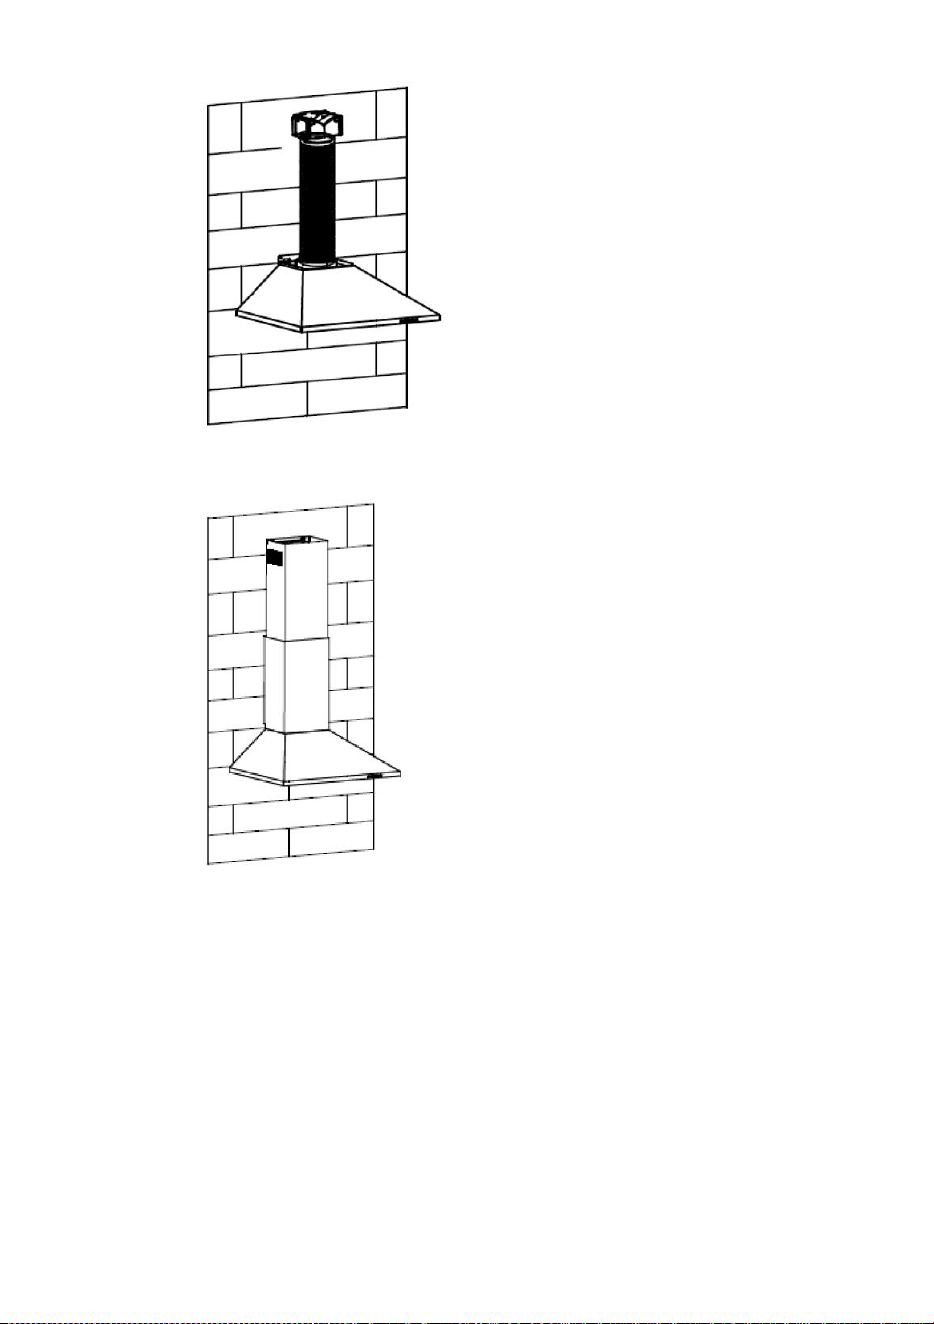
6.
i. Place the glass in appropriate position on the top the cooker
hood.
ii. Fix with 4 screws and washer. In order to avoid the glass
cracking, please do not tighten the screws too strongly.
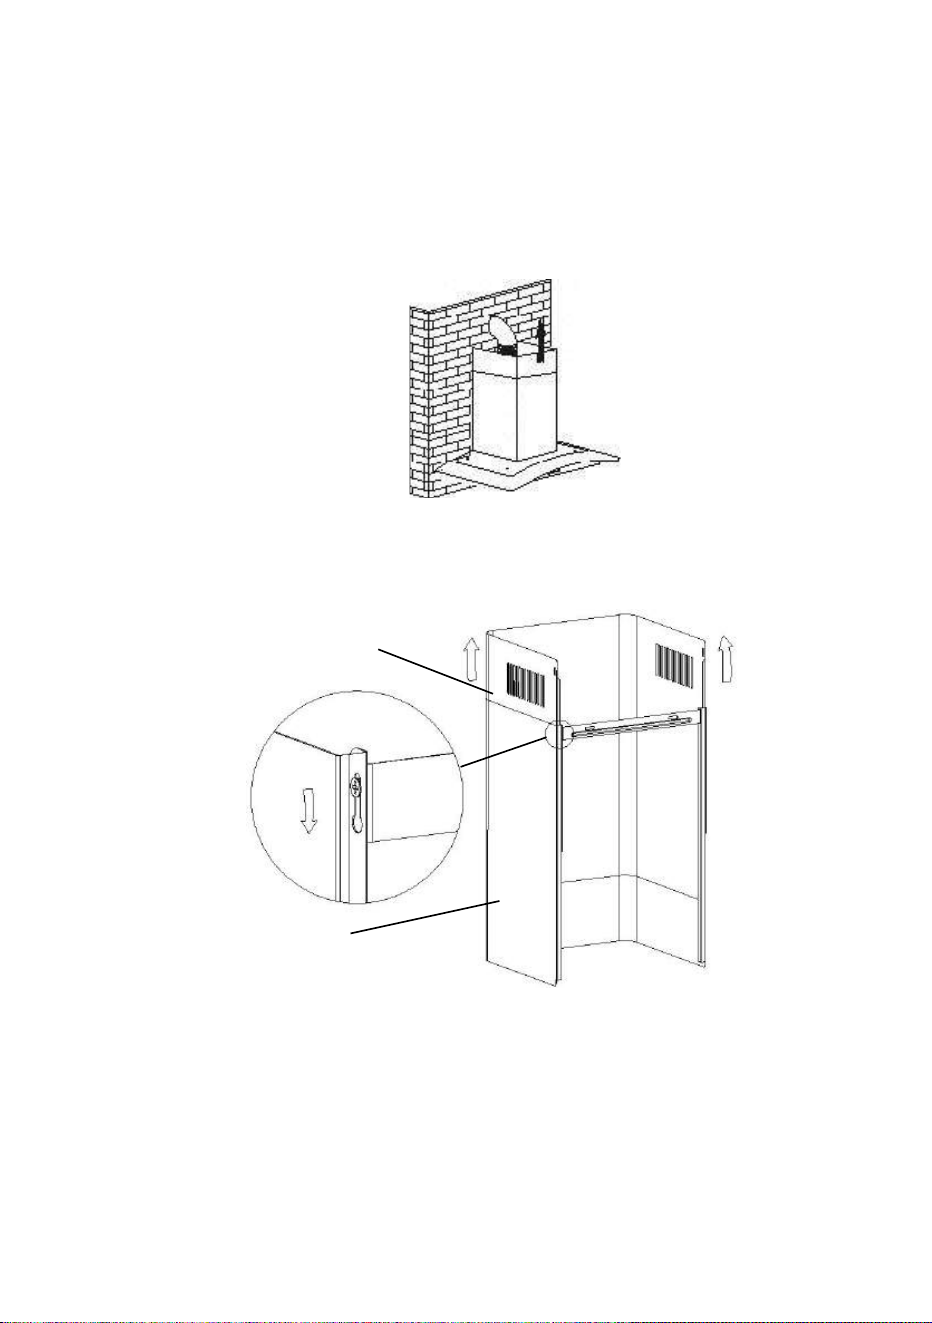
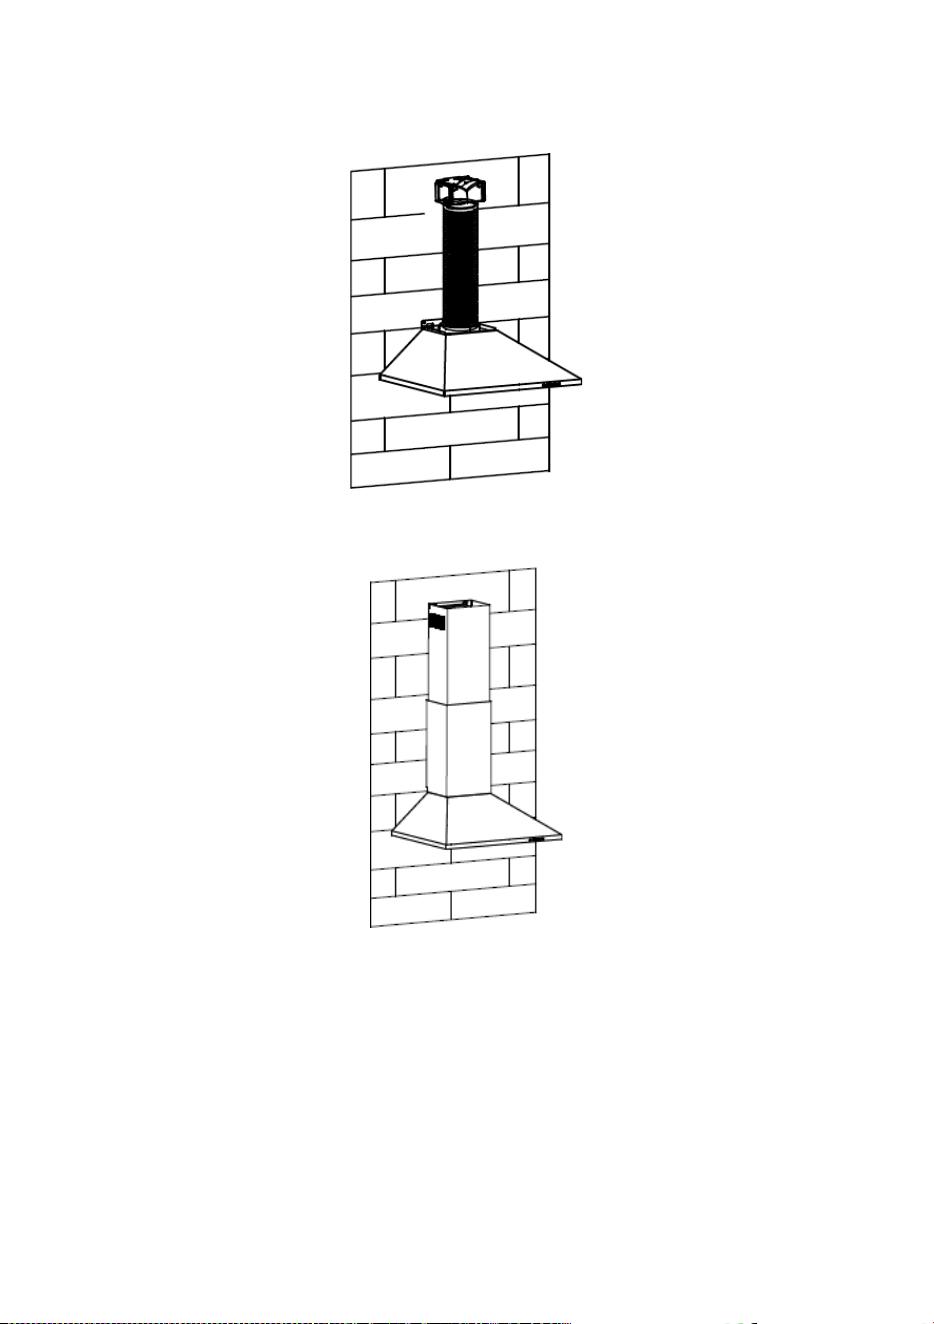
i. By Put the inner chimney into outer chimney .Then pulling out
the inner chimney upwards. Adjust to reach the height required.
ii. Sliding the chimney to adjust the chimney height. When the
height you required is reached, then hang the fixing hole to the fixing
screws as showed in below pictures.
Inner chimney
Outer chimney
9

37
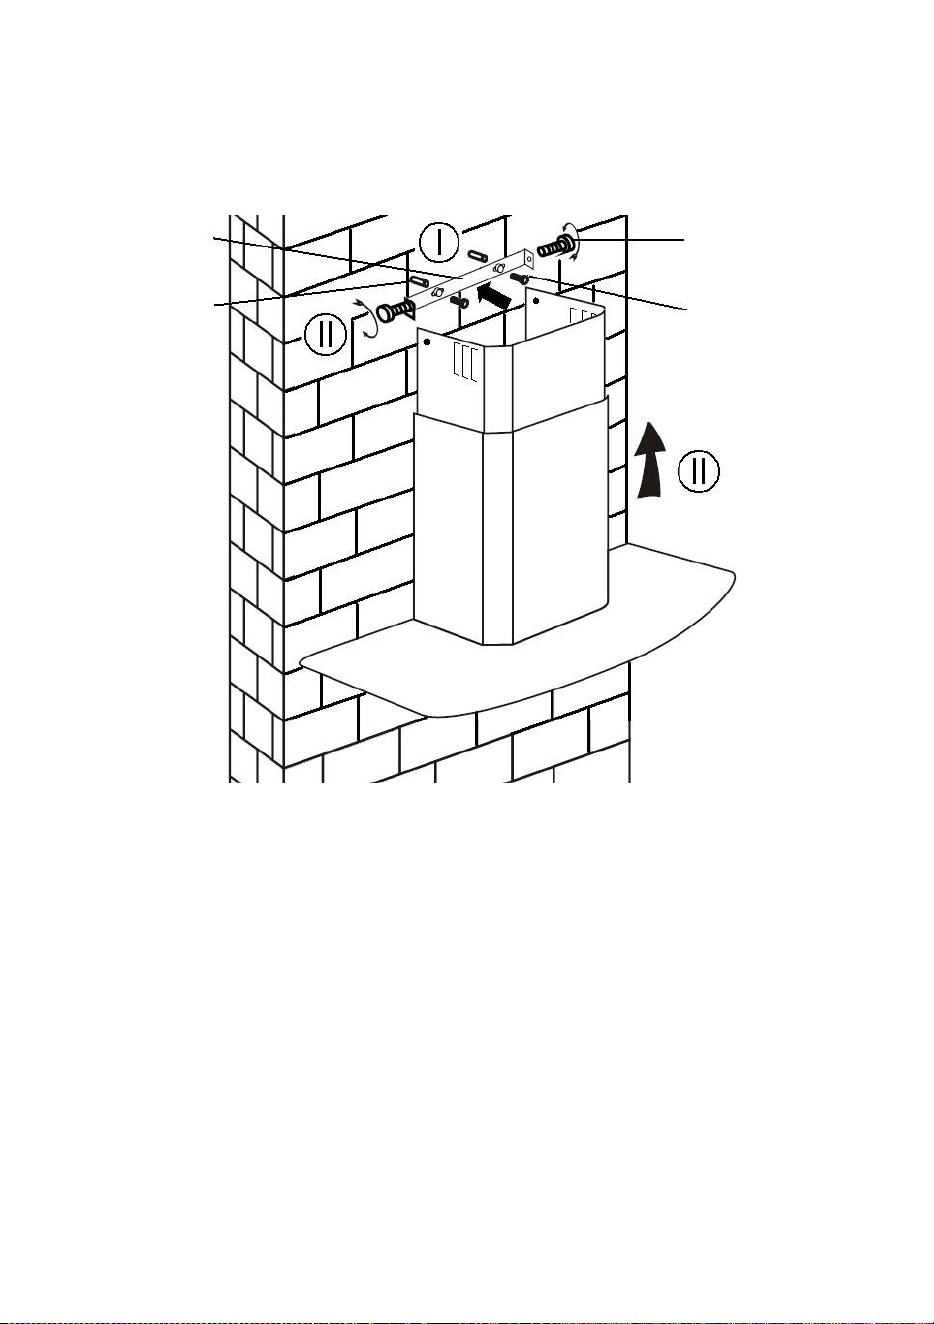
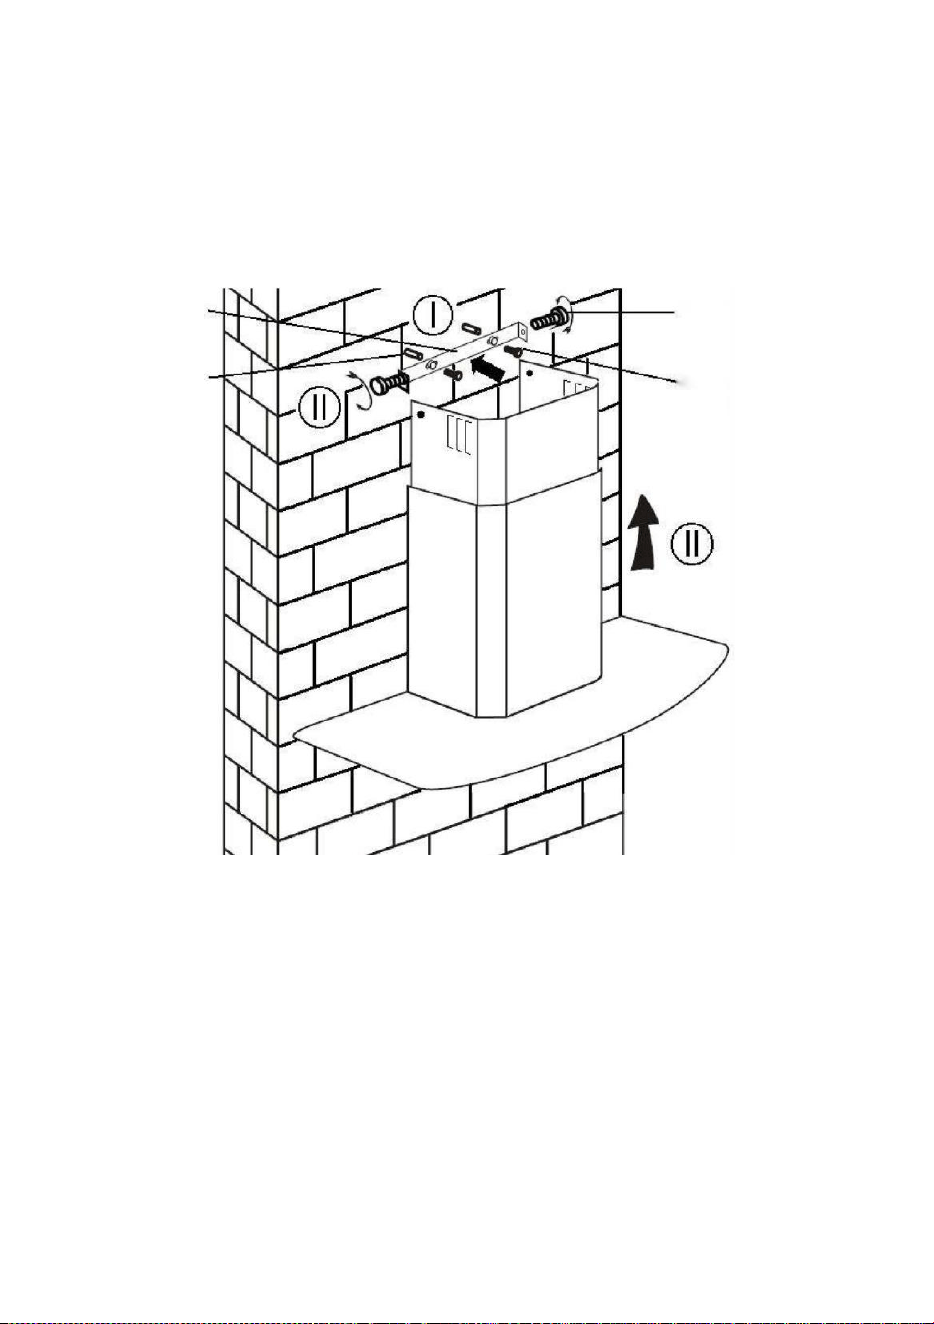
8.
i. Drill 2 x 8mm holes to accommodate the plate II. Screw and
tighten the plate II onto the wall with 2 screws provided.
ii. Assembly the chimney onto the unit and fix it with 2 screws.
Plate II
Wall plug
Screw
4mm x 8mm
Screw
(4mm x 30mm)
10
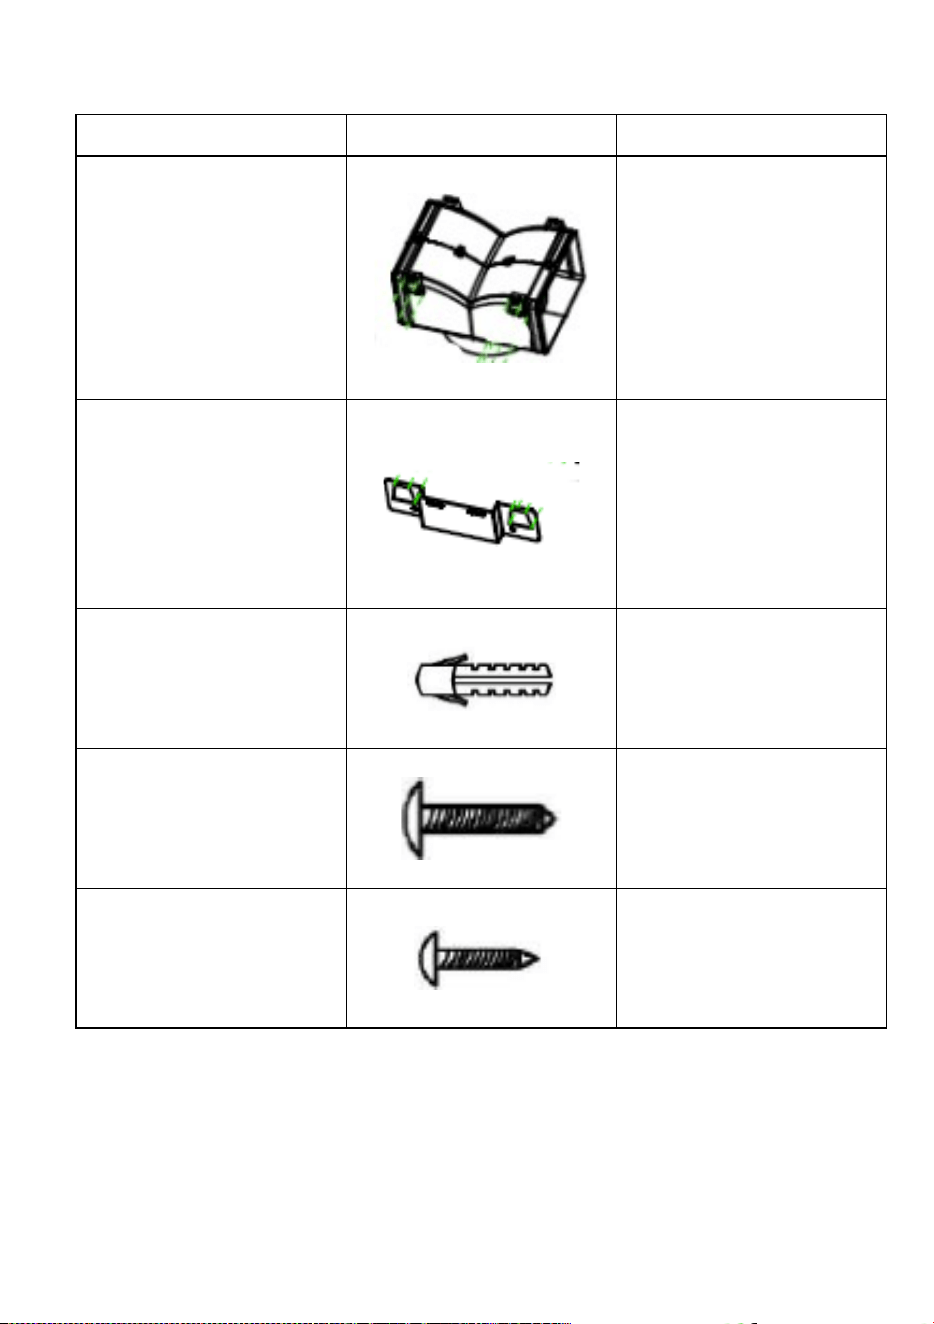
Standard Installation Accessories List
Spec. Illustration Picture Qty
Air Deflector
1
Bracket
1
φ8rawlplugs
φ8×φ6whitecolor
2
Screws
ST4.0×30
2
Screws
ST3.5×12
2
11
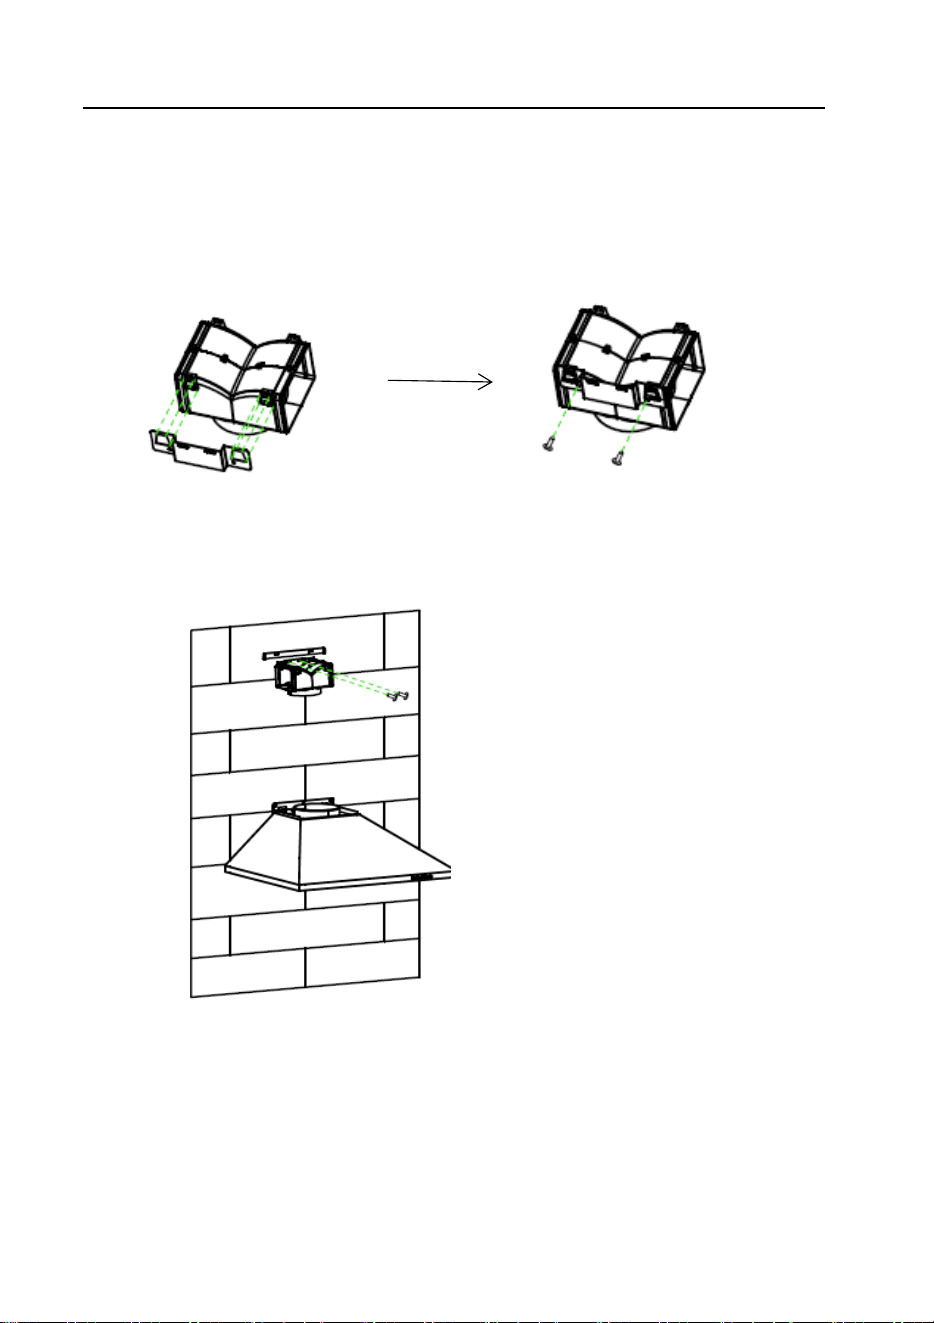
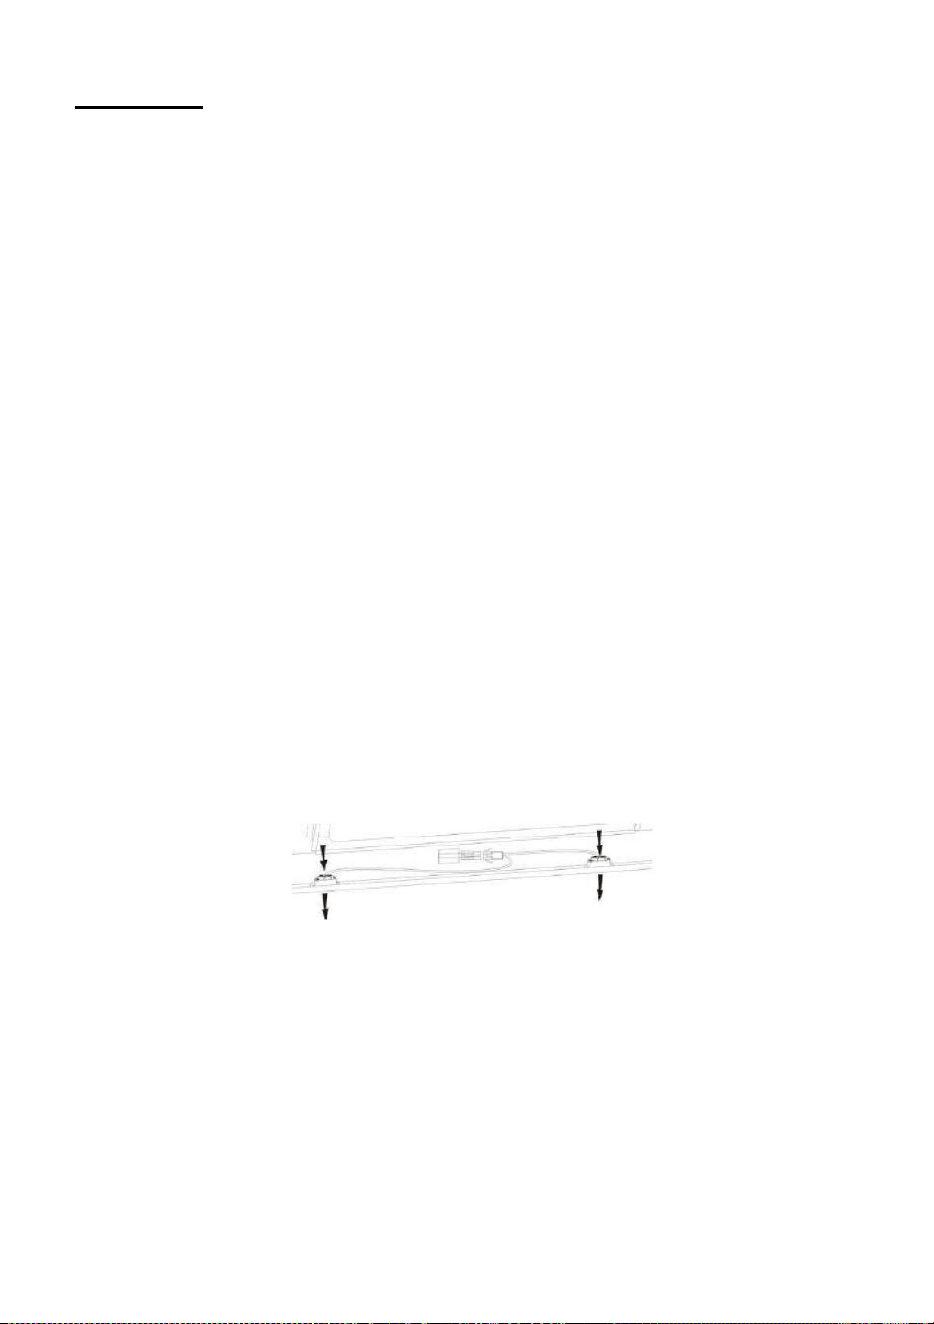
INSTALLATION(AIR DEFLECTOR FOR PYRAMID & SLANT MODELS):
Air deflector is mentioned as included and no t optional.
1.Fix the b racket to the T-shaped plastic o utlet w ith 2pcs ST3.5x12mm screws
provided as shown below:
2. Drill 2 holes on the wall to accommodate the wall plug s,then screw and
tighten the bracket onto the wall with 2pcs ST4x30mm screws provided.
3. Attach the exhaust pipe onto the air outlet of the cooker hood as shown
below:
12
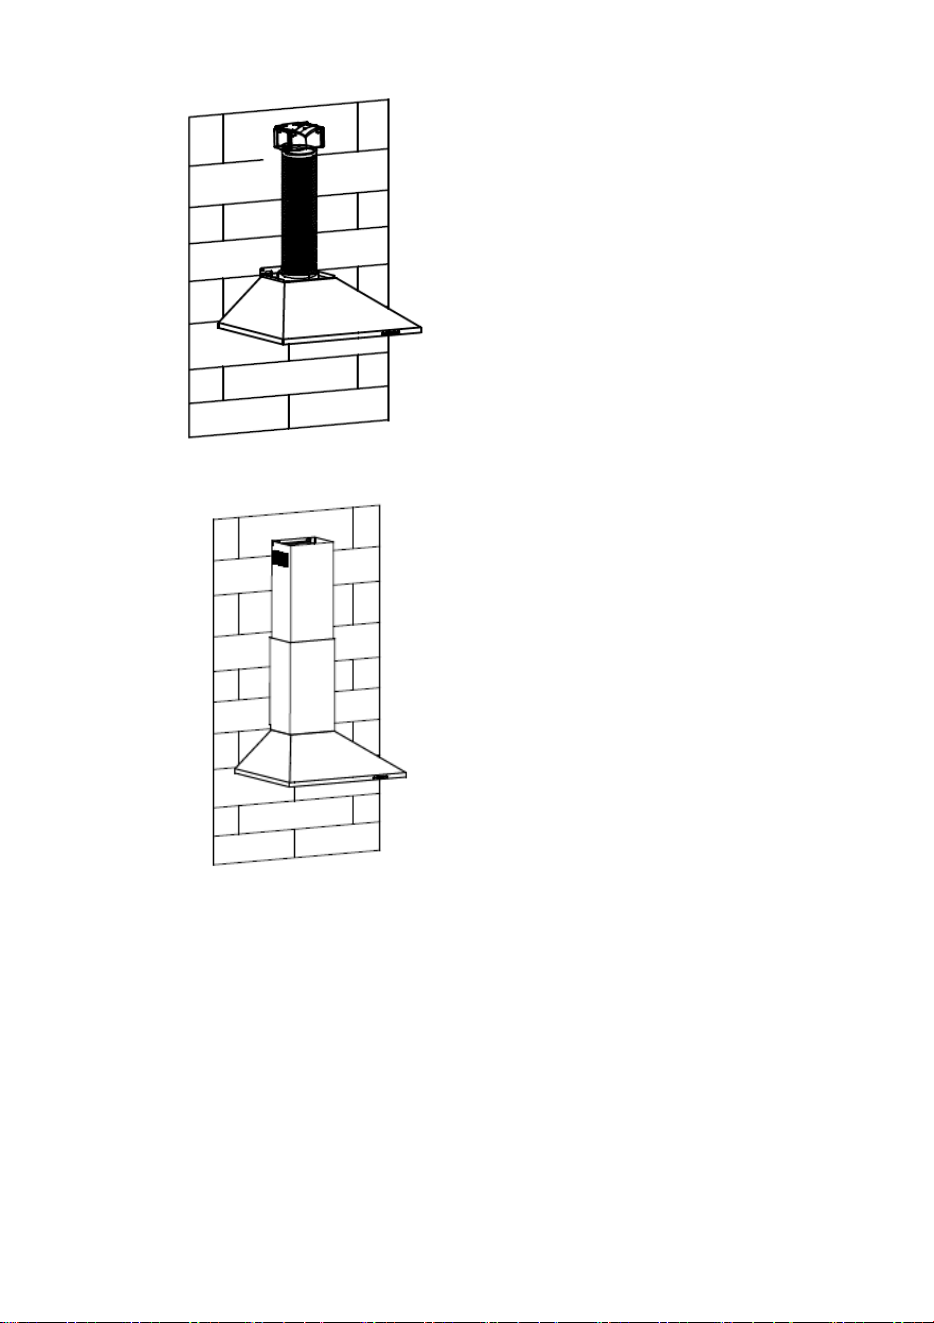
4.Install the chimney to the unit and fix it.
o “Please kindly be noted: T-shaped plastic outlet and v-flaps can not be use
datthesametime.Youcanusethemintwoways:1)Addv-flaponexistingo
utlet; 2) Use T-shaped plastic outlet, no add v-flap.”
o “Note: The product is provided with v-flap accessory. This accessory is not
mandatory for installation, operation and use of the product.”
13
38
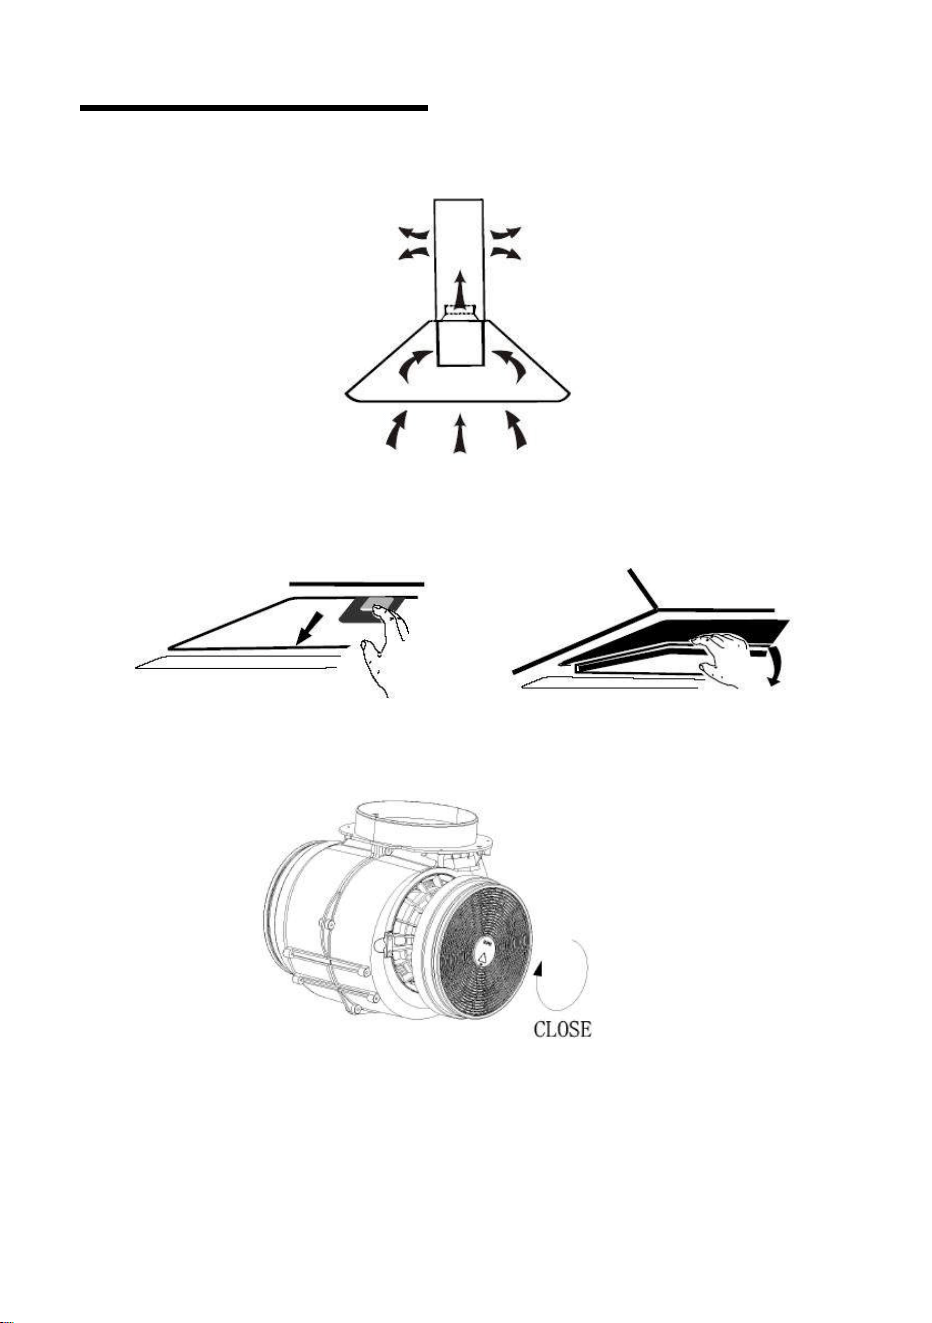
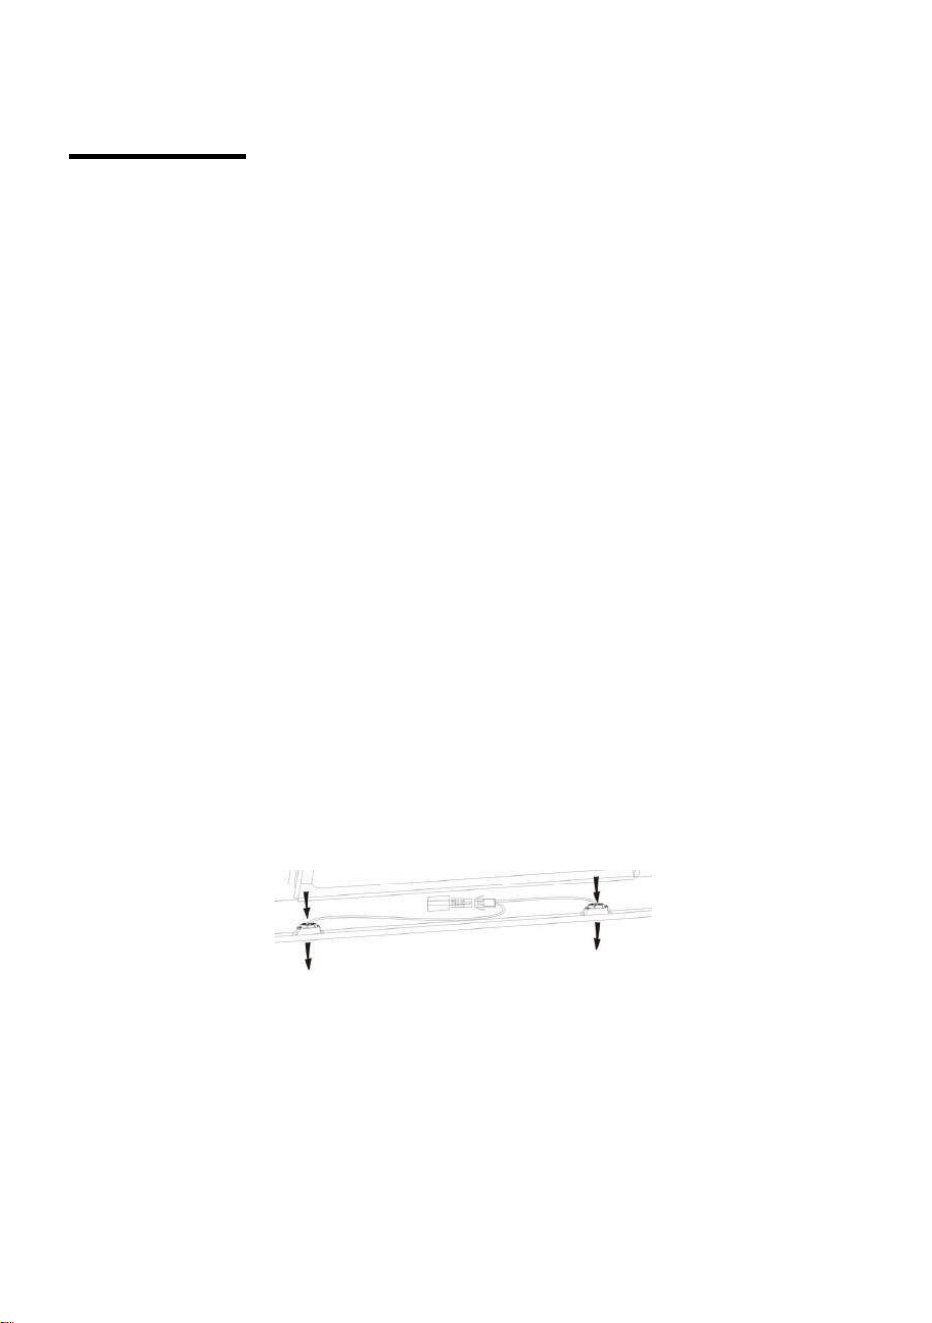
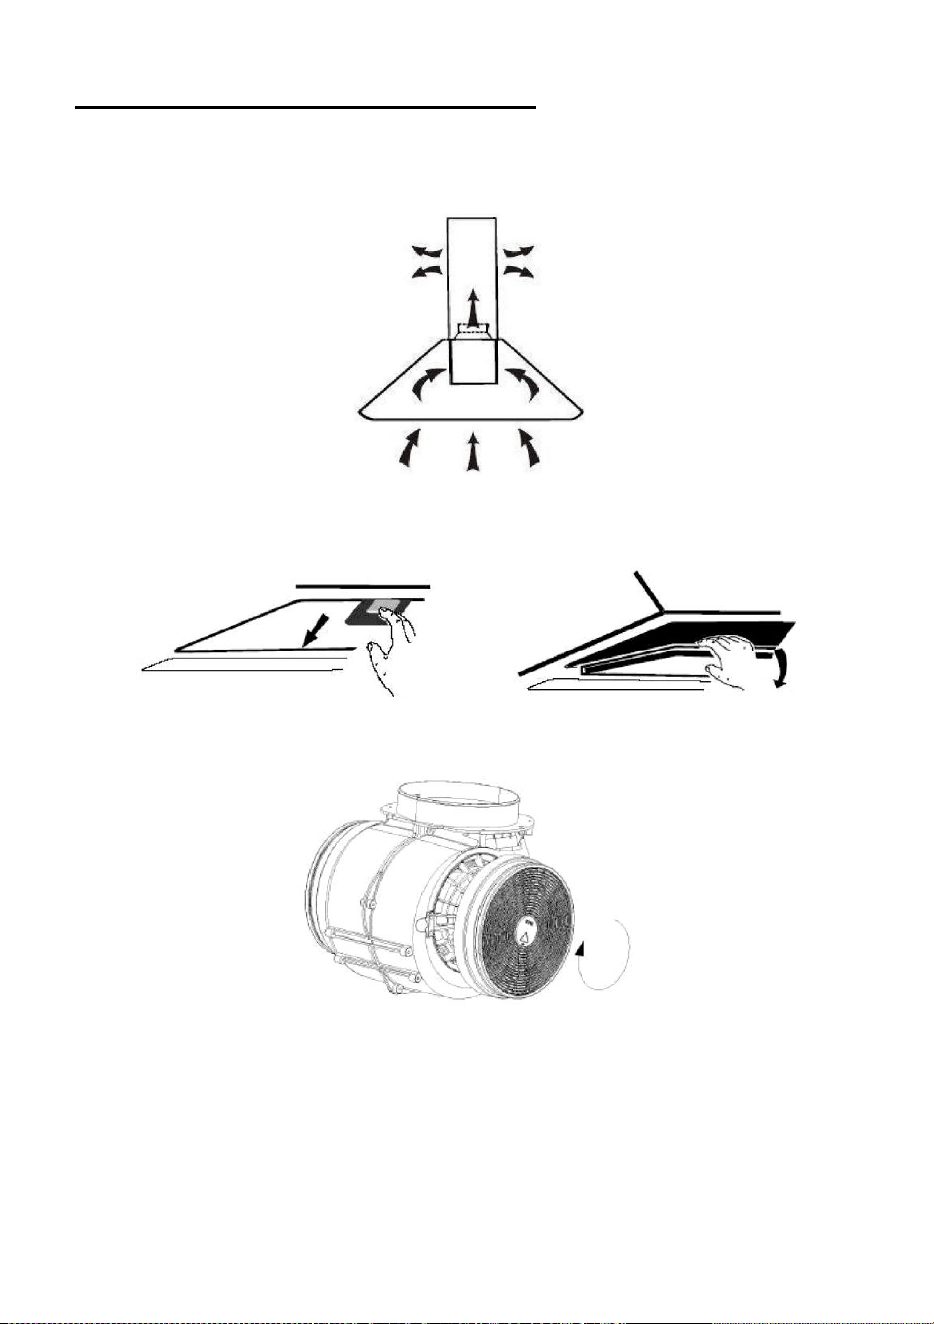
INSTALLATION (VENT INSIDE)
If you do not have an outlet to the outside, exhaust pipe is not required and
the installation is similar to the one show in section “INSTALLATION (VENT
OUTSIDE)”.
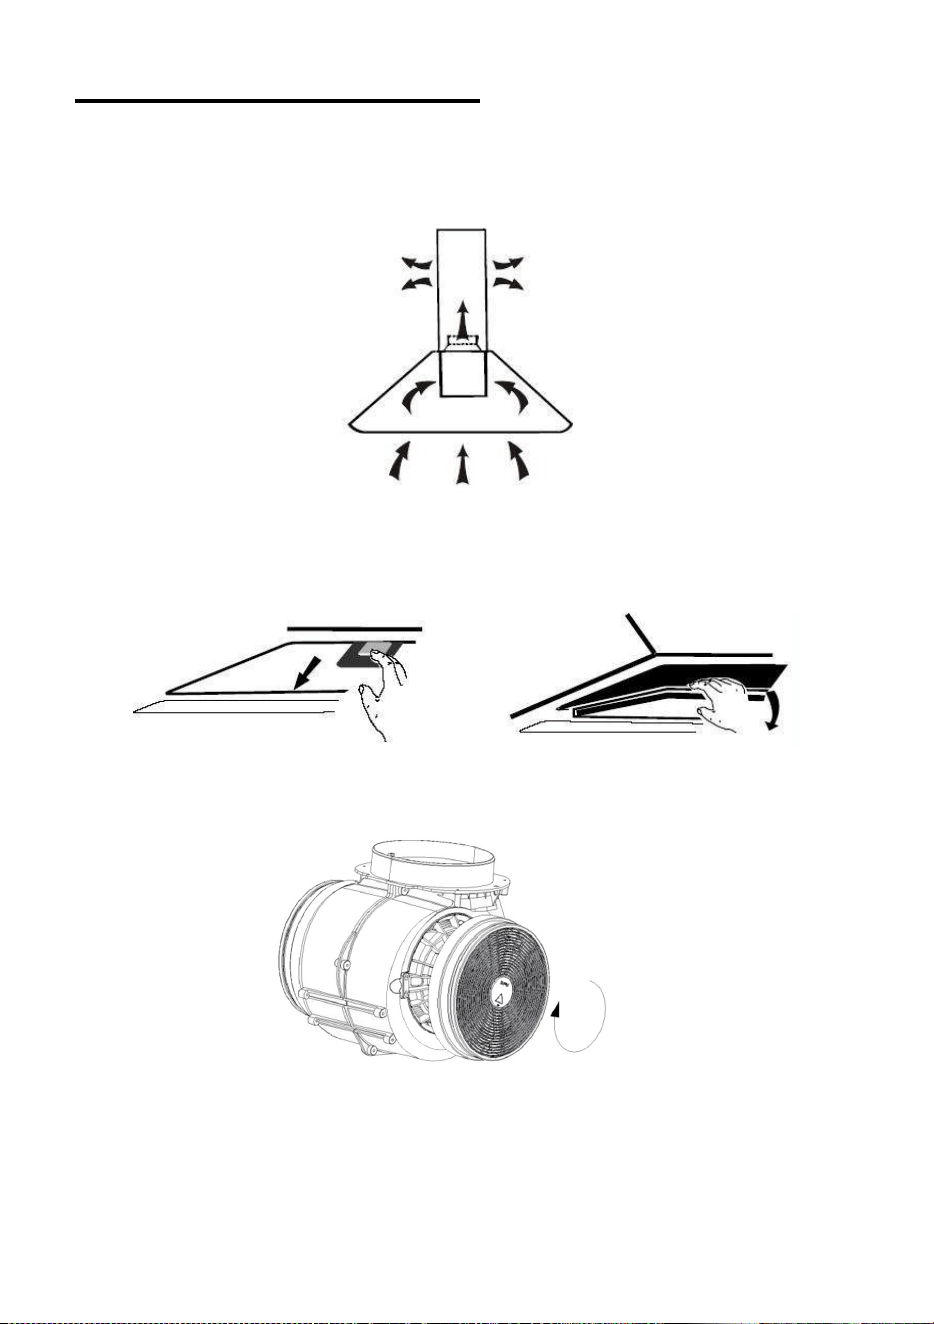
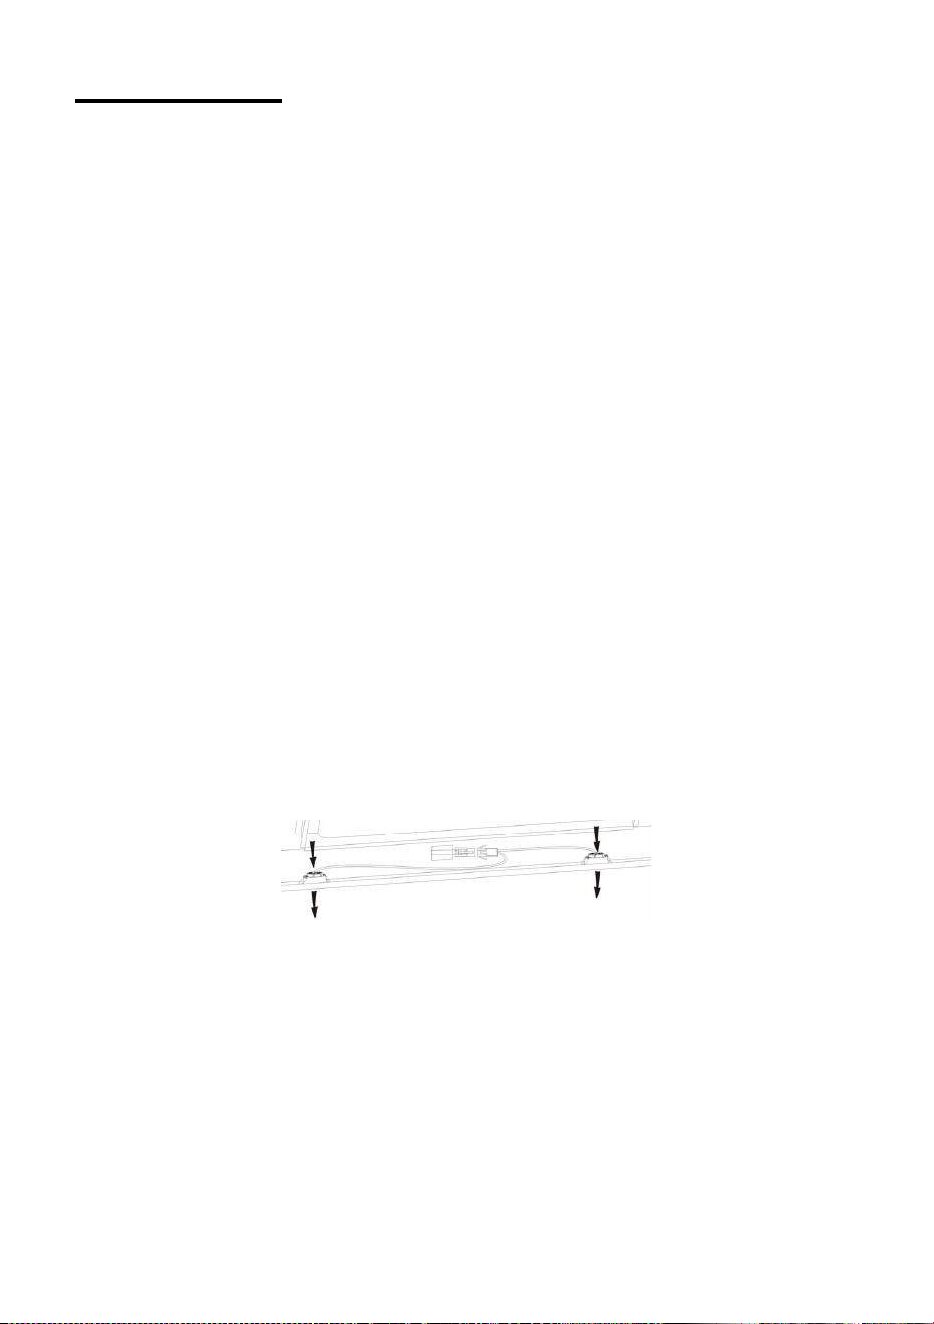
Activated carbon filter can be used to trap odors.
In order to install the activated carbon filter, the grease filter should be
detached first. Press the lock and pull it downward.
Plug the activated carbon filter into the unit and turn it in clockwise direction.
Repeat the same on the other side.
NOTE:
o Make sure the filter is securely locked. Otherwise, it would loosen and
cause dangerous.
o When activated carbon filter attached, the suction power will be
lowere
14
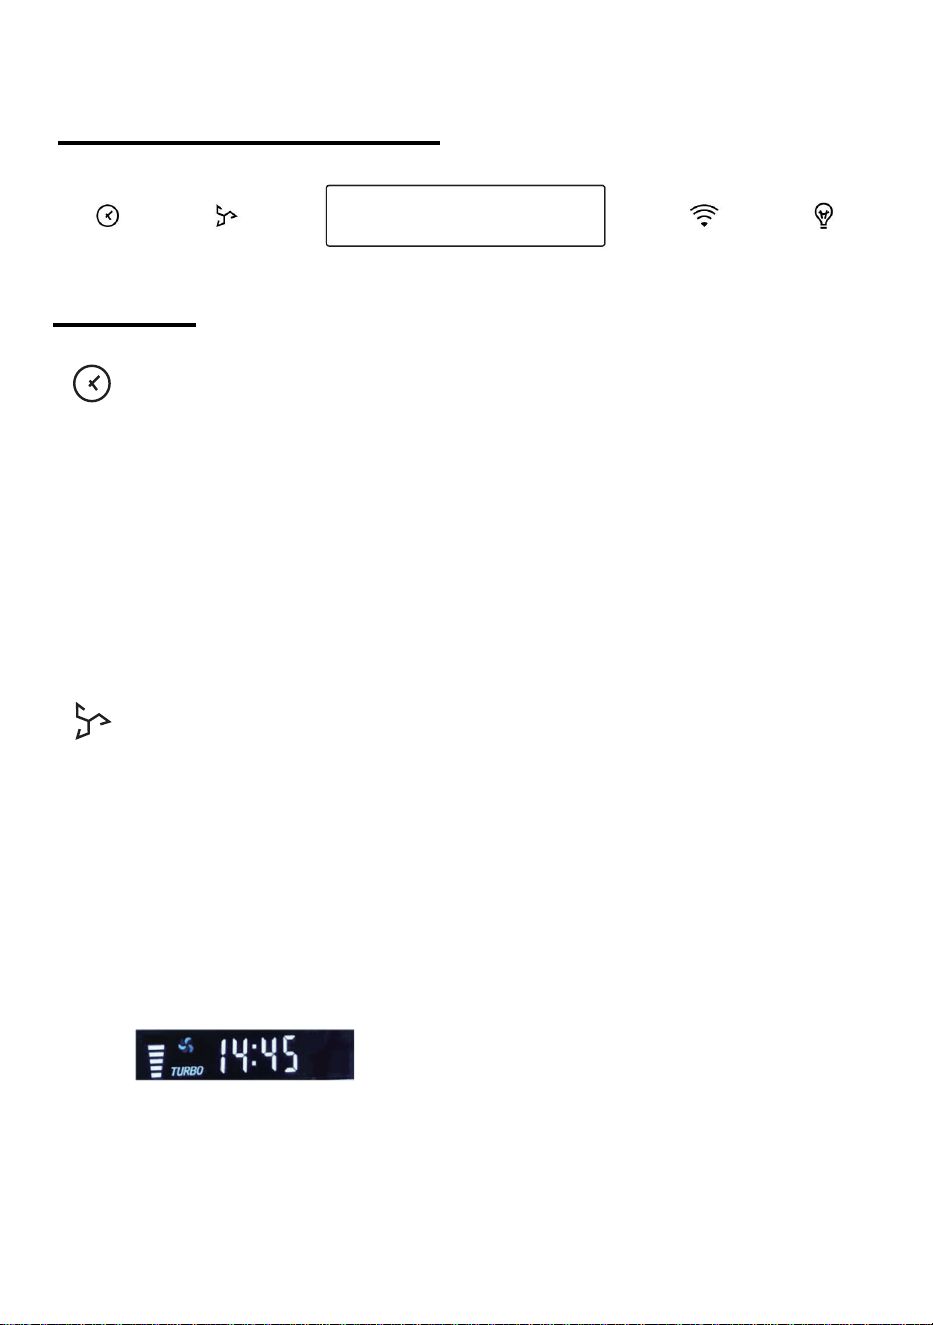
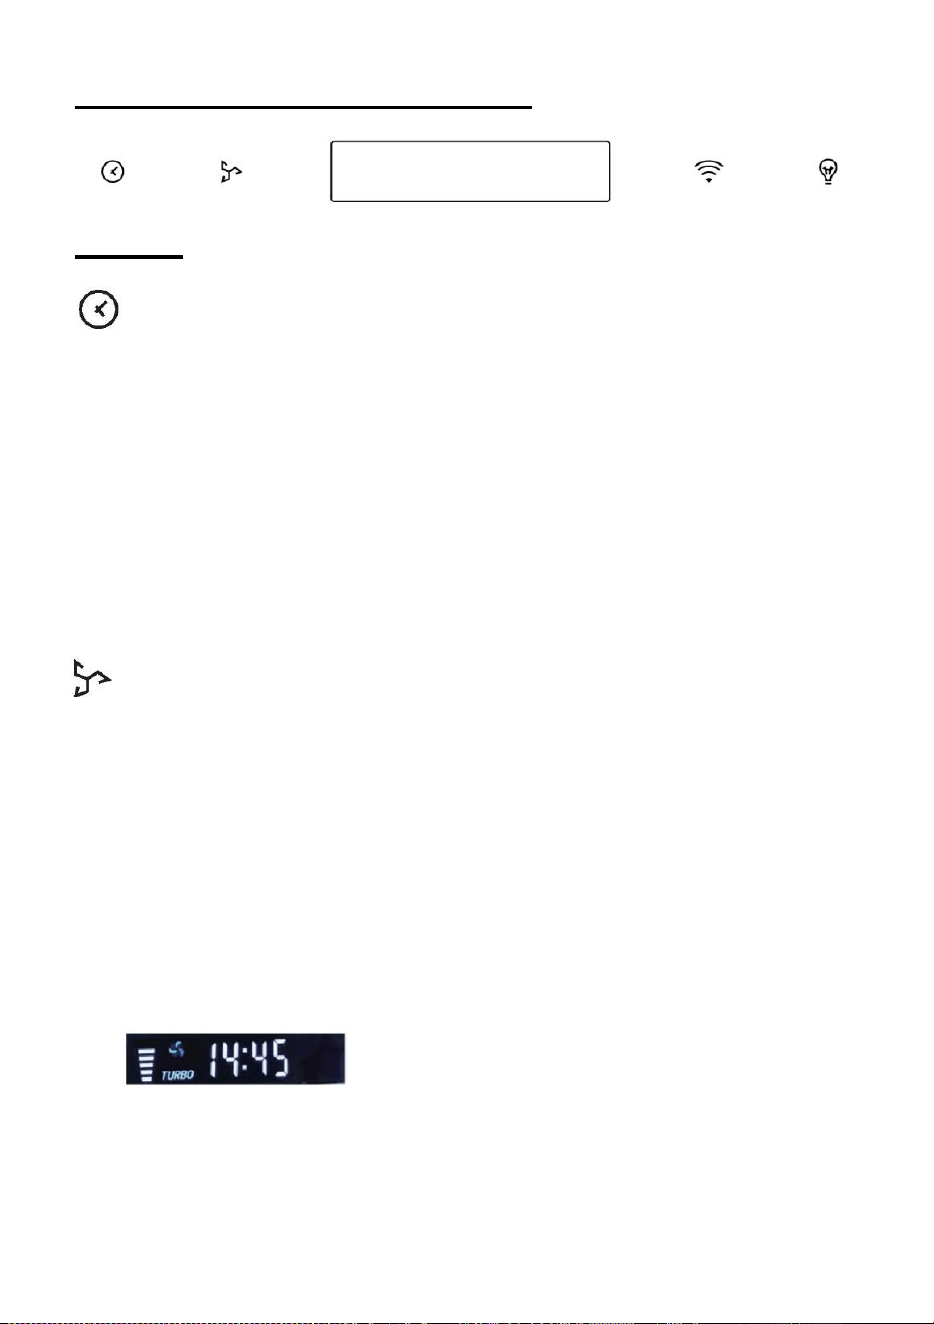
Timer button
1.
Setting the time of the day
When hood in standby mode (mot
or not working), press the timer button to
enter the time setting.
Press the ‘Fan speed’ key to set the hour of the day and press the
‘Light ‘key to set the minute.
2.
Setting the Timer
When the hood is in operation mode, press the timer button to
set the countdown.
Press the timer button one timer then the countdown will increase one
minute. The max countdown is 60 minutes.
FAN SPEED Button
Standby mode:
the backlit of all buttons and LCD display are off, long
press the speed button or lamp button approximately at 0.5 seconds: the
buzzer buzz once, the backlit of the button will light on, the speed icon
or lamp icon in the LCD display will light on, and the cooker hood enter
into power on mode; if only the motor working, short press the “‐
”button
to speed 1, the cooker hood will enter into standby mode if press the
“
‐
”button again, or only the lamp is on, short press the lamp button then
enter into standby mode.
DESCRIPTION OF COMPONENTS
OPERATION
1. Boost 1(speed 4):Fan speed at level 5 +TURBO
Press the speed button to speed 4,the fan icon in the LCD display shows
motor is working and the speed icon in the LCD display shows speed is
working at level 5+ TURBO, the cooker hood is working at boost mode.
Boost Function:
15
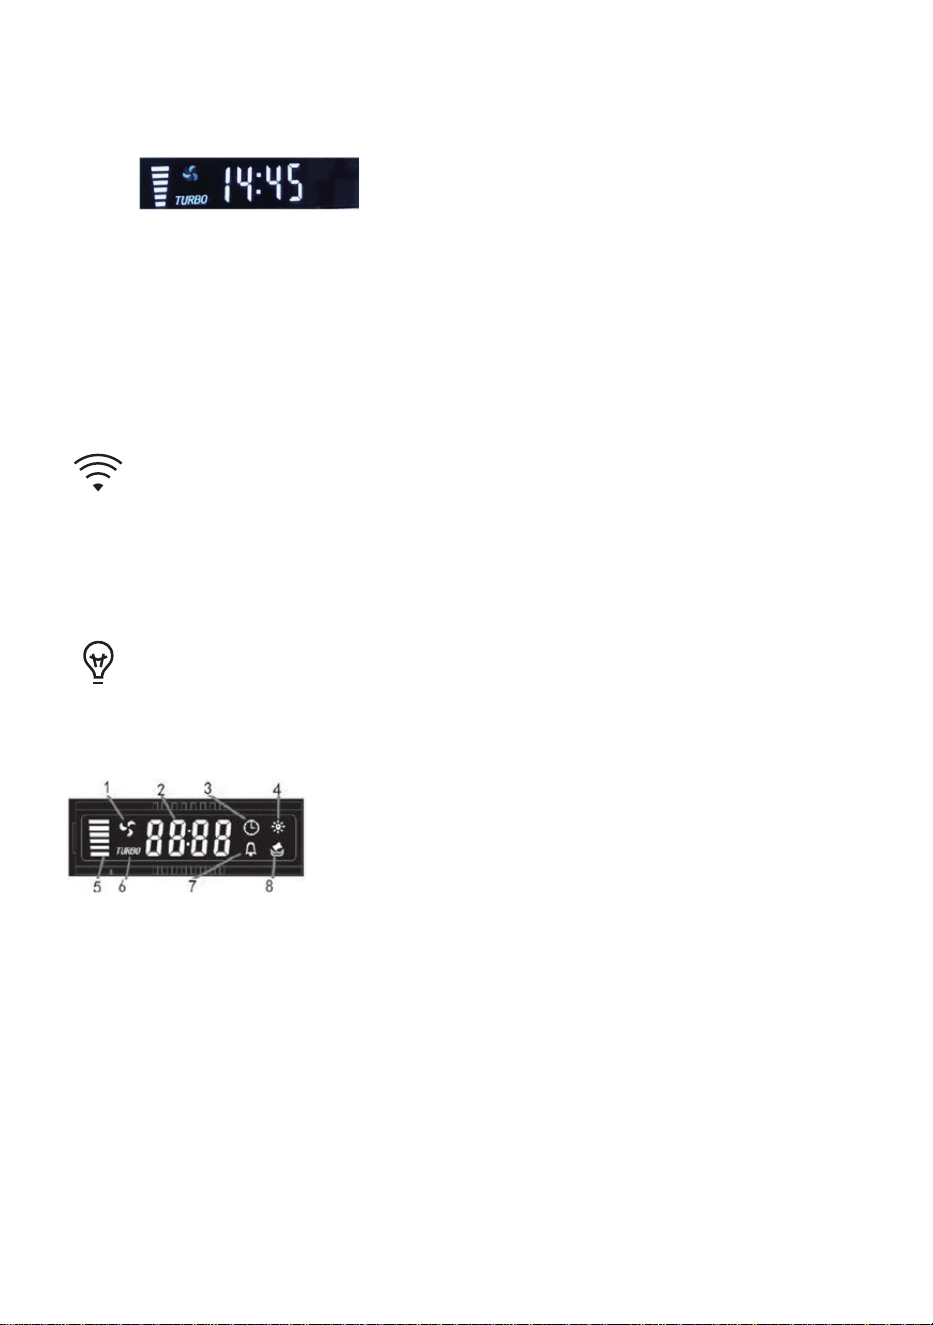
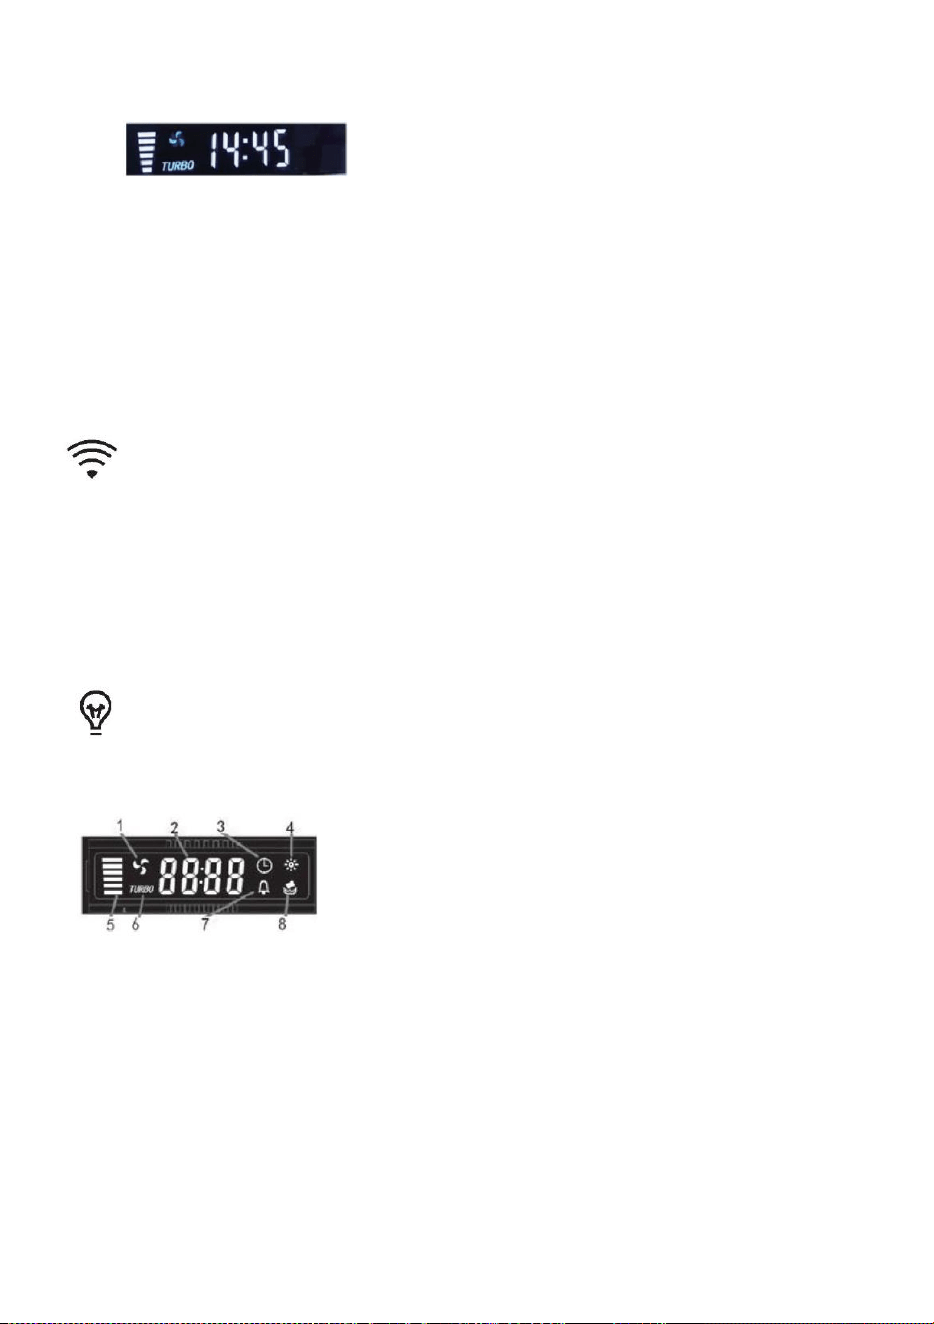
Wi‐Fi Connection
Setting the time of the day
Long press WiFi icon and enter into connecting mode: the backlit of WiFi
iconkeep flashing indicate the connection is under connecting, the backlit
of WiFi icon is light on indicate it is connected, same for standby mode;
long press WiFi icon again and the connection will be stopped;
LIGHT Button
For lighting ON & OFF.
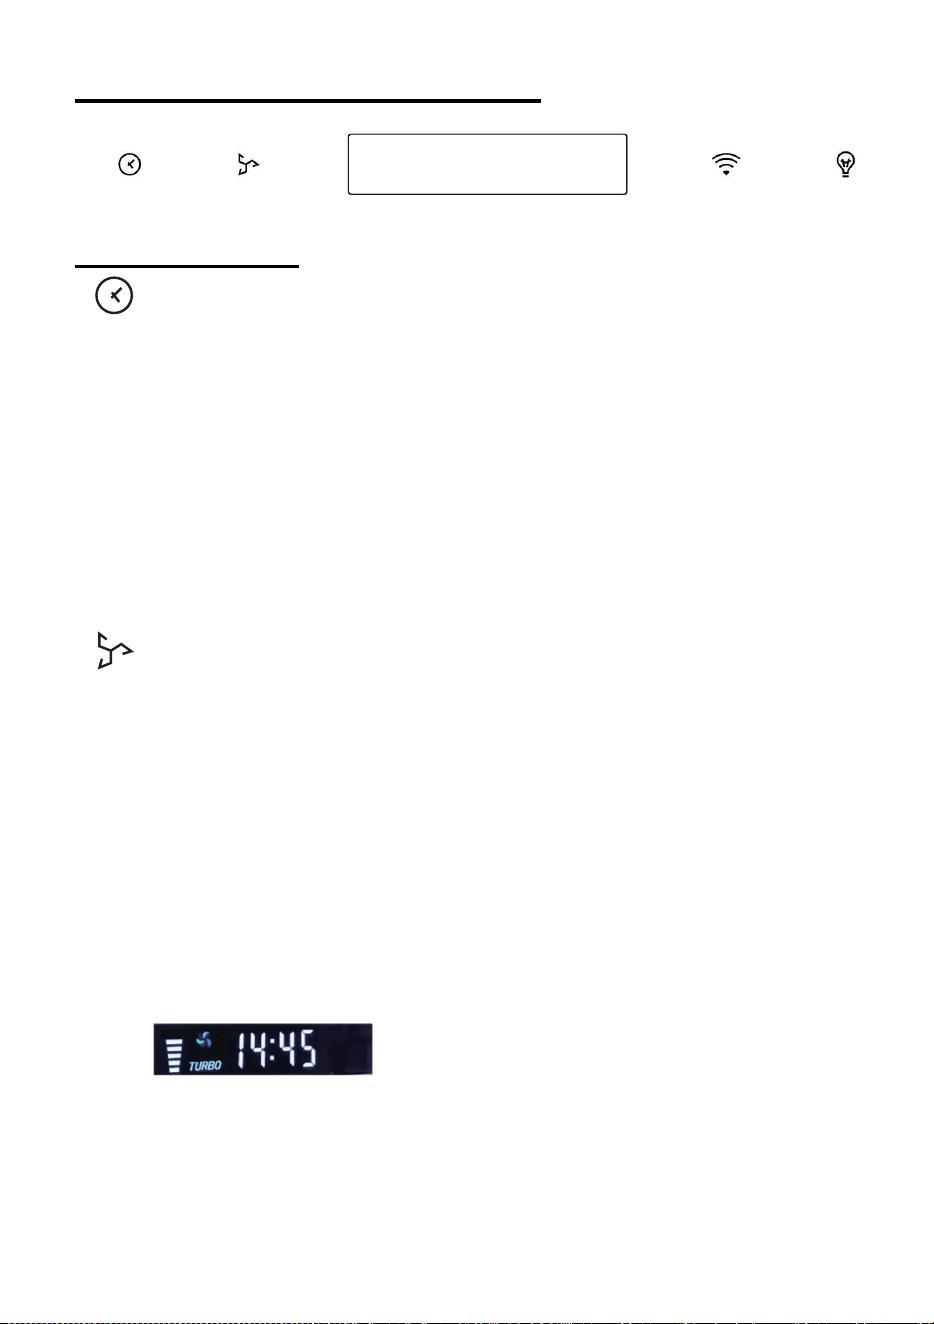
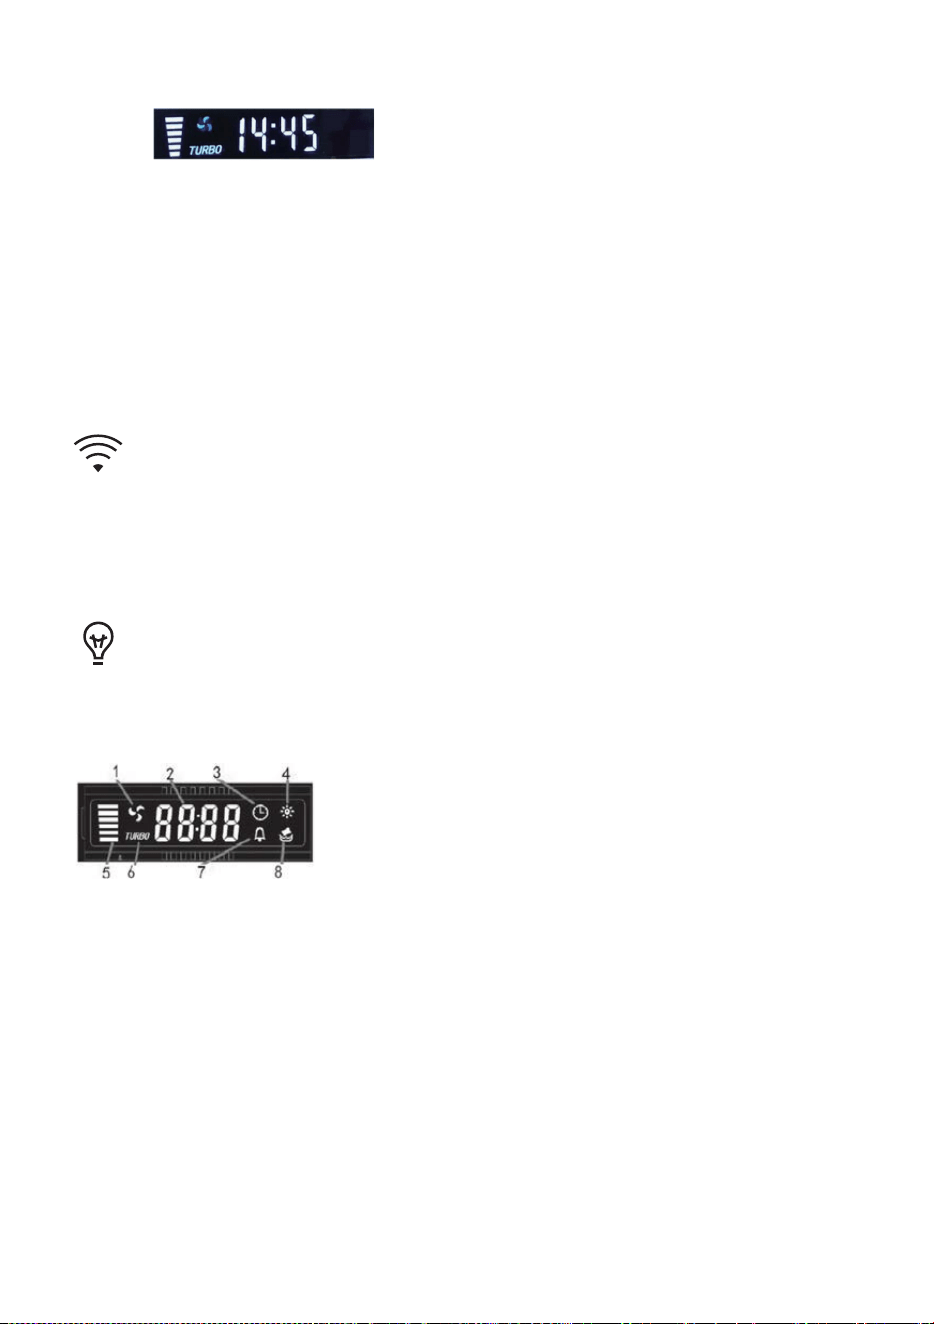
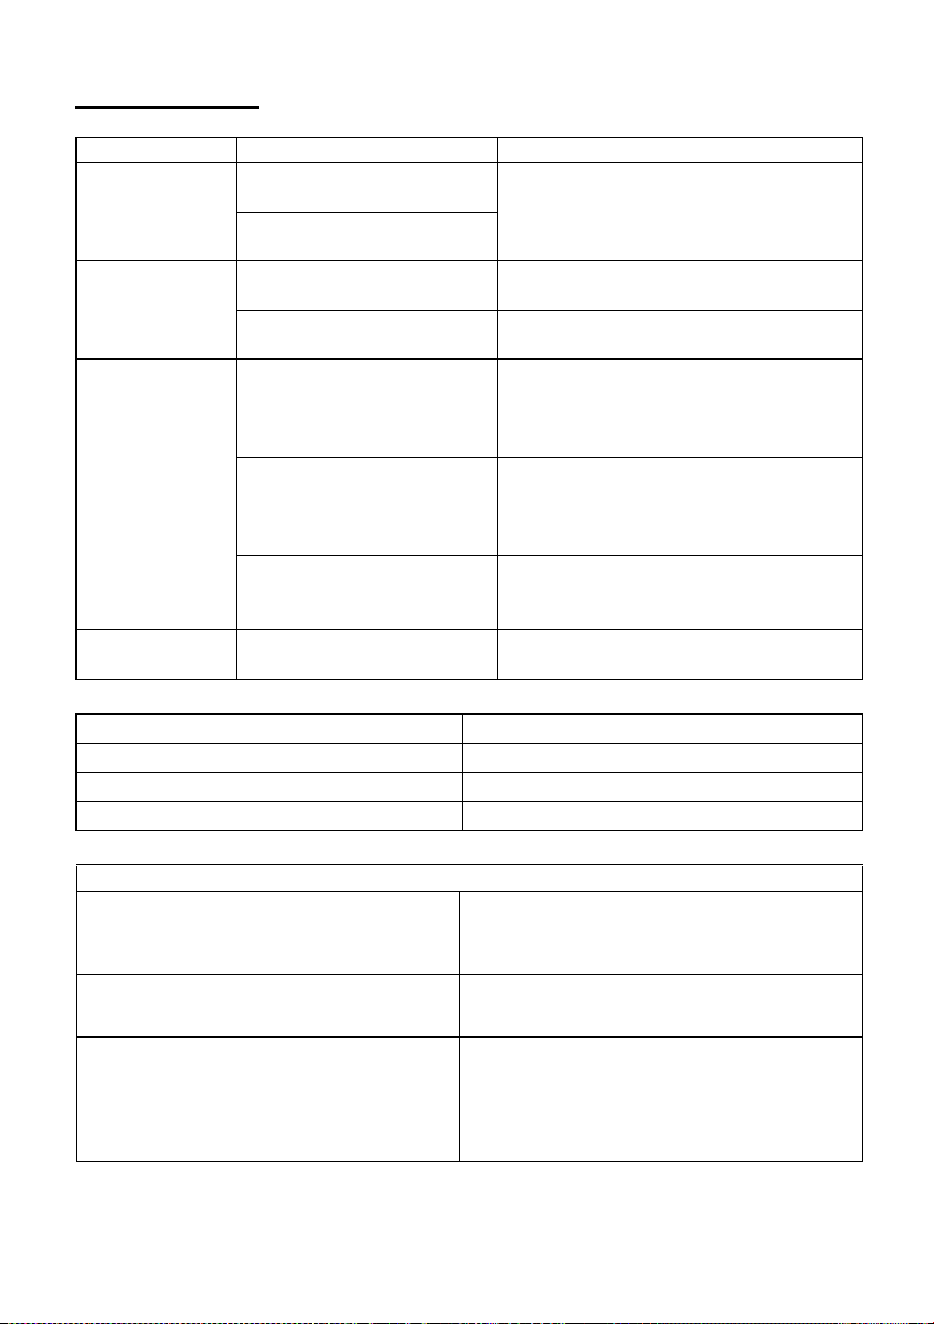
LCD display
1. Motor symbol, will rotate when the motor is
working;
2. Time display;
3. Timer symbol, will appear when timer is setting
and counting;
4. Light symbol;
5. Motor speed;
6. Turbo speed symbol, will appear when the speed
is highest setted;
7. Alarm symbol, will appear 5 seconds when the
counting down of timer is over.
8. Cleanning alarm, appear when total working time
up to 14 hours or at the first time using after
pluging.
2. Boost 2(
speed 5):Fan
speed
at
level
6 +TURBO
Press the speed button to
speed 5,the fan icon in the LCD display
shows motor is working and the speed icon in the LCD display shows
speed is working at level 6 + TURBO, the cooker hood is working at
boost mode.
Note: Enter into Boost speed while
the hood is in use and it will
increase speed for 5 minutes, before slowing down again.
16
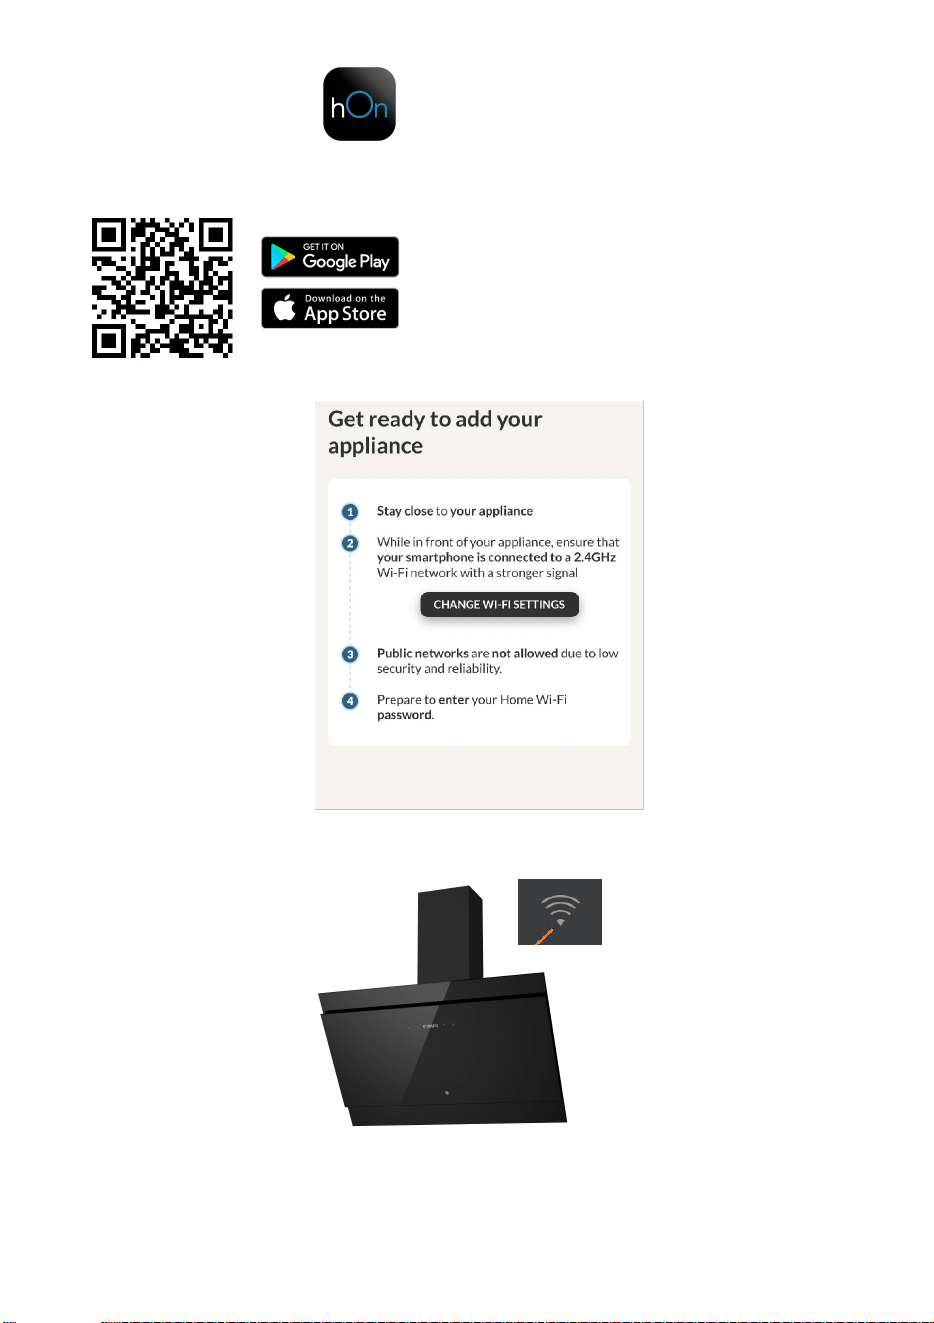
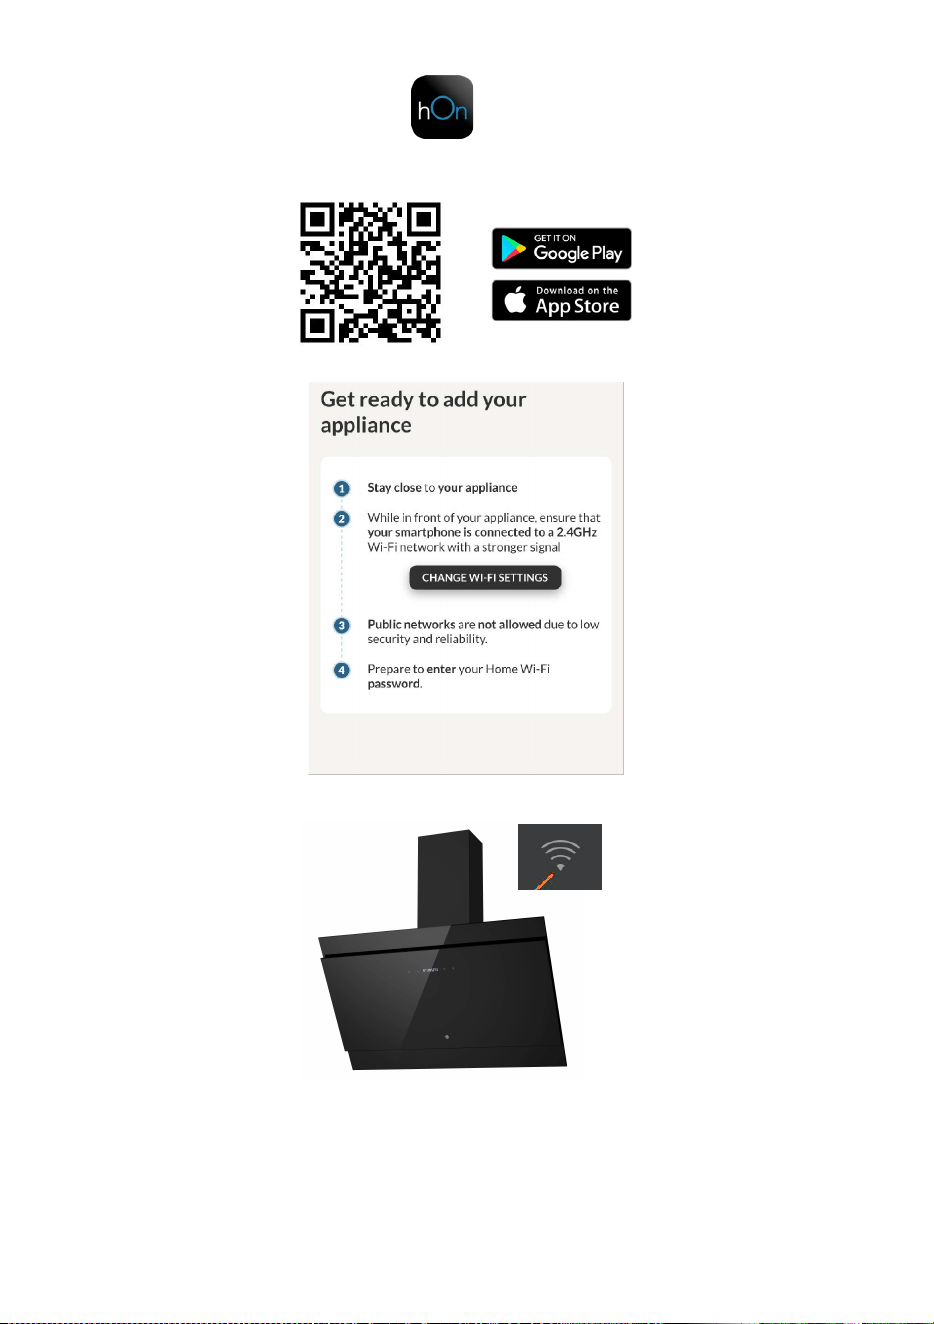
Download hOn App
First of all, you should download hOn APP and install to your portable device. Then
enroll your hood.
NOTE
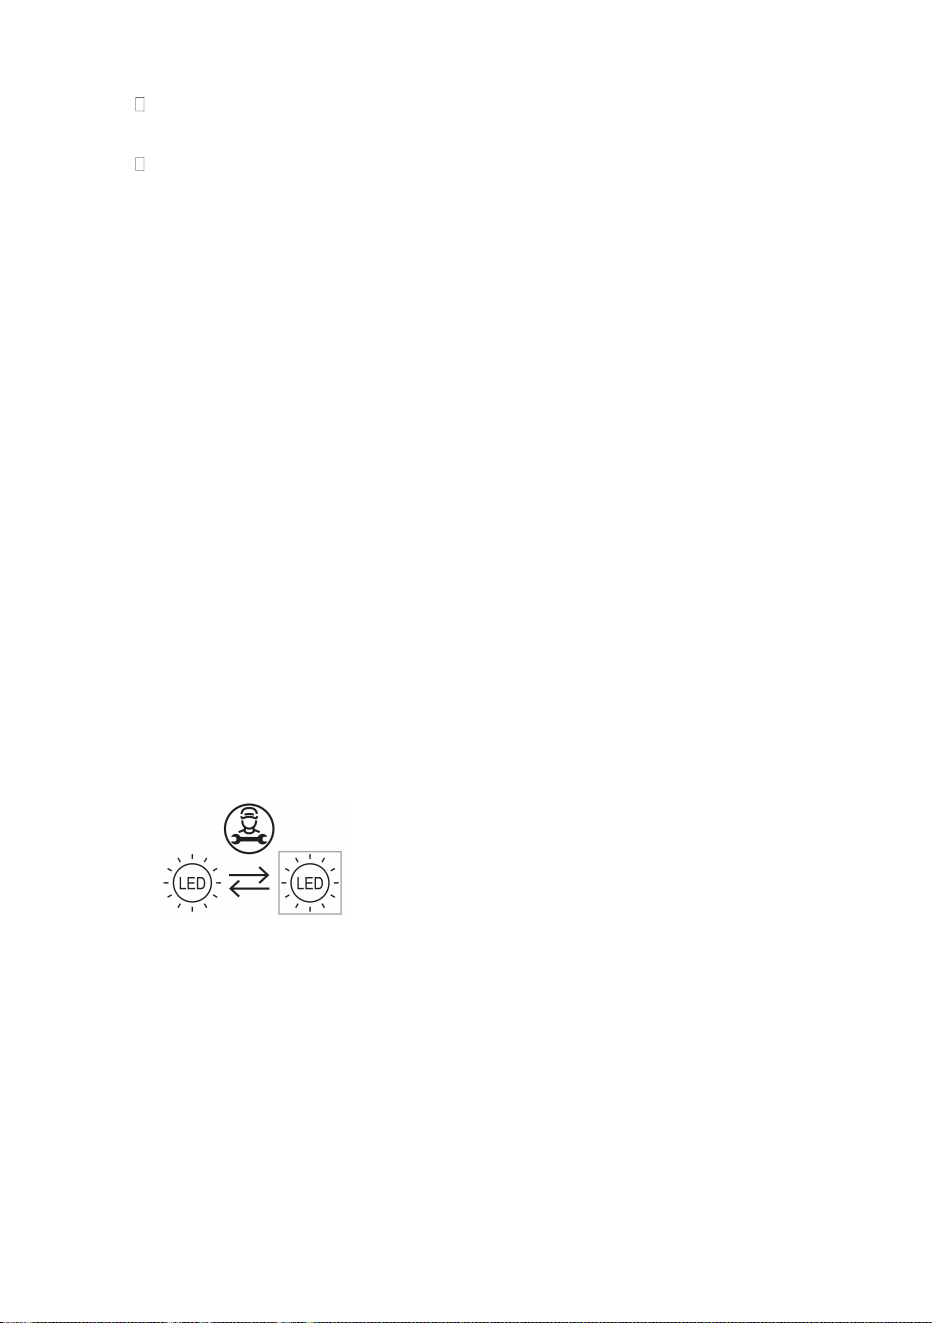
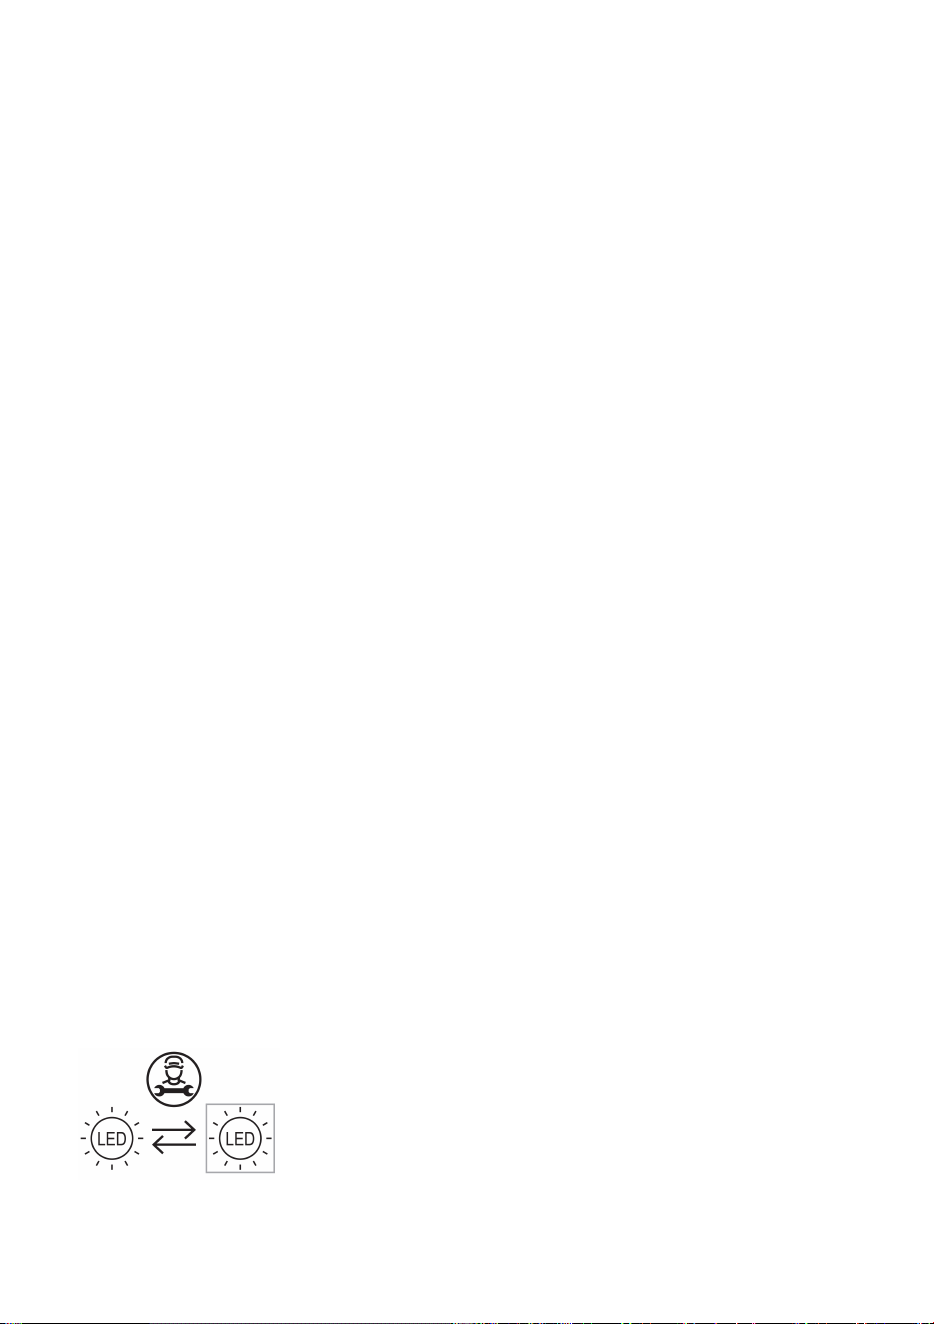
ENROLLMENT HOOVER HOOD
1- Press the WiFi button until the icon starts blinking When the pairing is
completed the WiFi icon will be on.
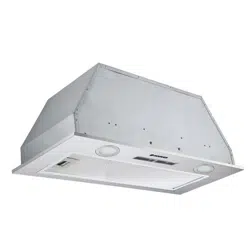
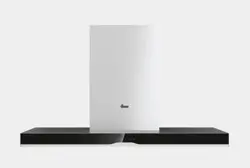
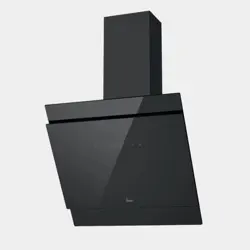
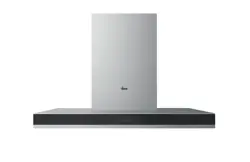
The image of the hood has the only purpose of presenting it. May not be perfectly representative.
17
MAINTENANCE
Before cleaning switch the unit off and pull out the plug.
I. Regular Cleaning
Use a soft cloth moistened with hand-warm mildly soapy water or
household cleaning detergent. Never use metal pads, chemical, abrasive
material or stiff brush to clean the unit.
II. Monthly Cleaning for Grease Filter
ESSENTIAL: Clean the filter every month can prevent any risk of fire.
The filter collects grease, smoke and dust…... so the filter is directly
affecting the efficiency of the cooker hood. If not cleaned, the grease
residue (potential flammable) will saturate on the filter. Clean it with
household cleaning detergent.
III. Annual Cleaning for Activated Carbon Filter
Apply SOLELY to unit that installed as a recirculation unit (not vented to
the outside). This filter traps odors and must be replaced at least once a
year
depending on how frequent the cooker hood used.
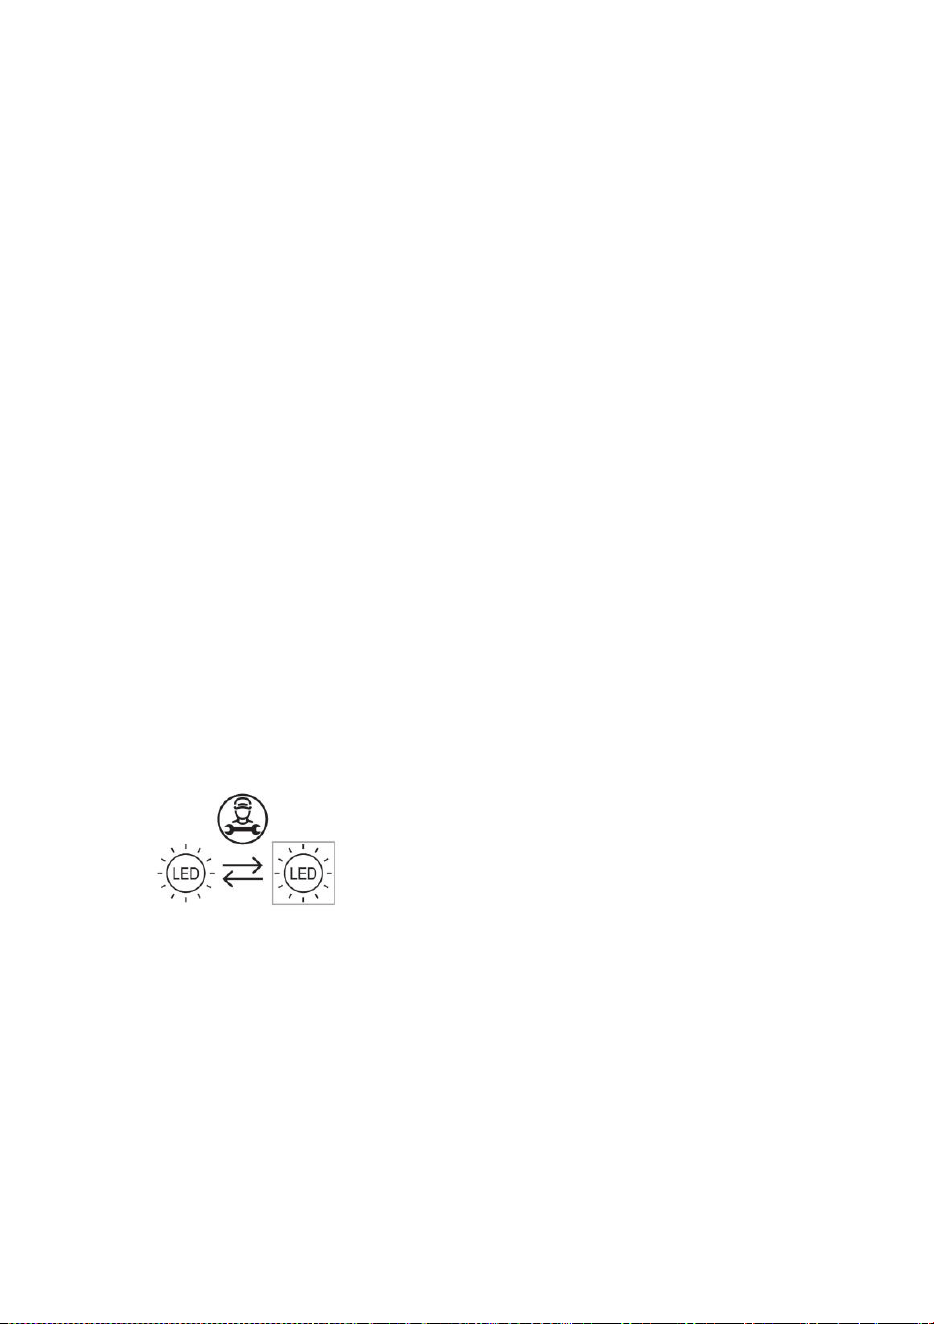
IV. Changing a light bulb
Remove the screws on the glass, take off the hood glass. Find the
bulb that requires replacement, you will find it located in the light
fixture which is inside the exposed section of the canopy.
Disconnect the light wiring point and remove the bulb holders and
wiring from the hood. Important: It’s not possible to replace the bulbs
individually, it will be necessary to obtain the bulbs, bulb holders and
wiring as a complete part. (LED light: MAX 1.5W)
Fit the replacement bulbs, bulb holders and wiring in the same
manners as the originals. Then reconnect the light wiring point.
Refit the hood glass and fasten the glass screws. Make sure the
screws are fully tightened.
18
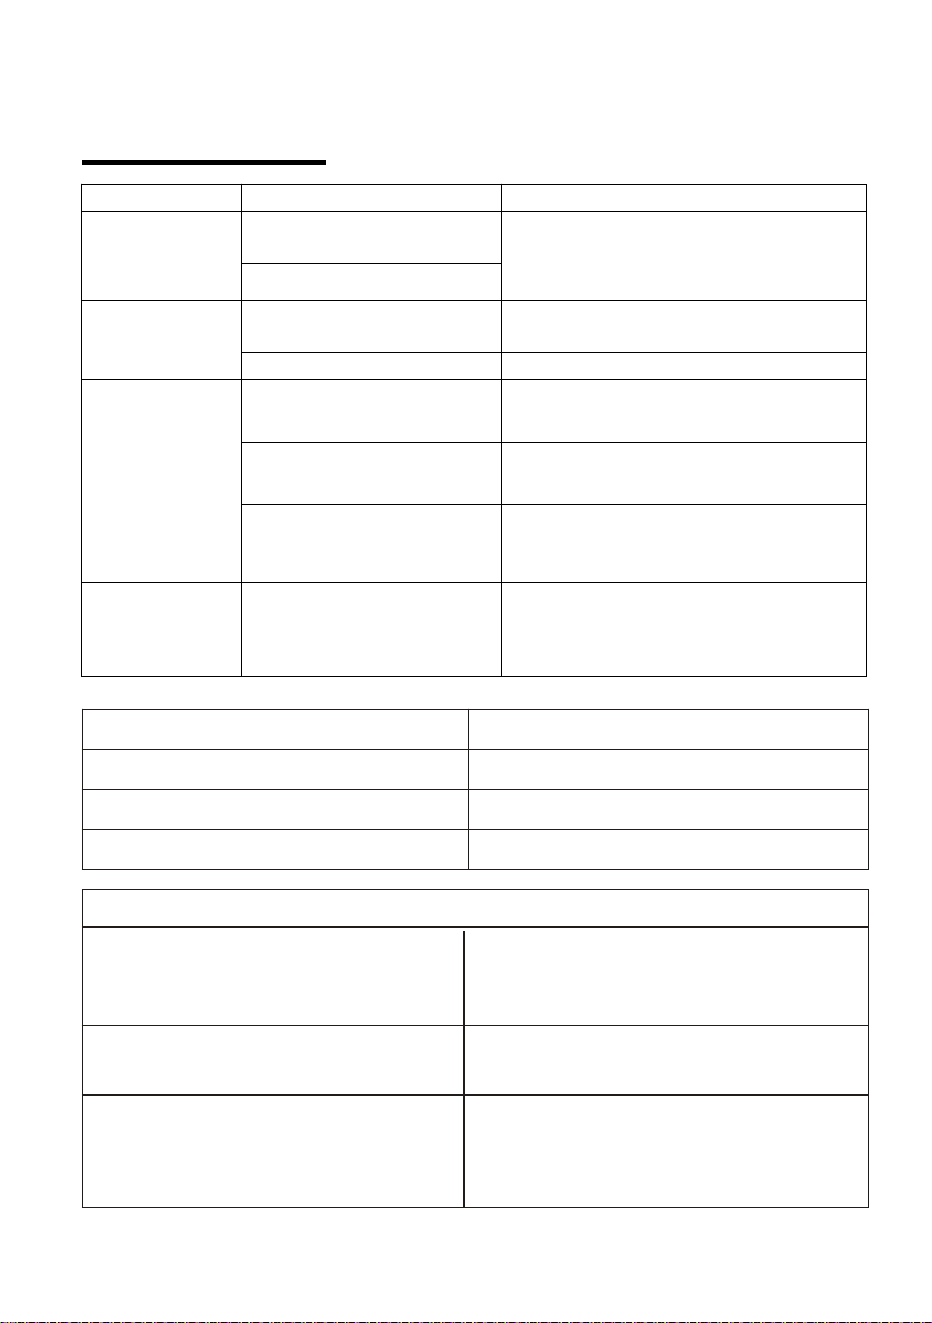
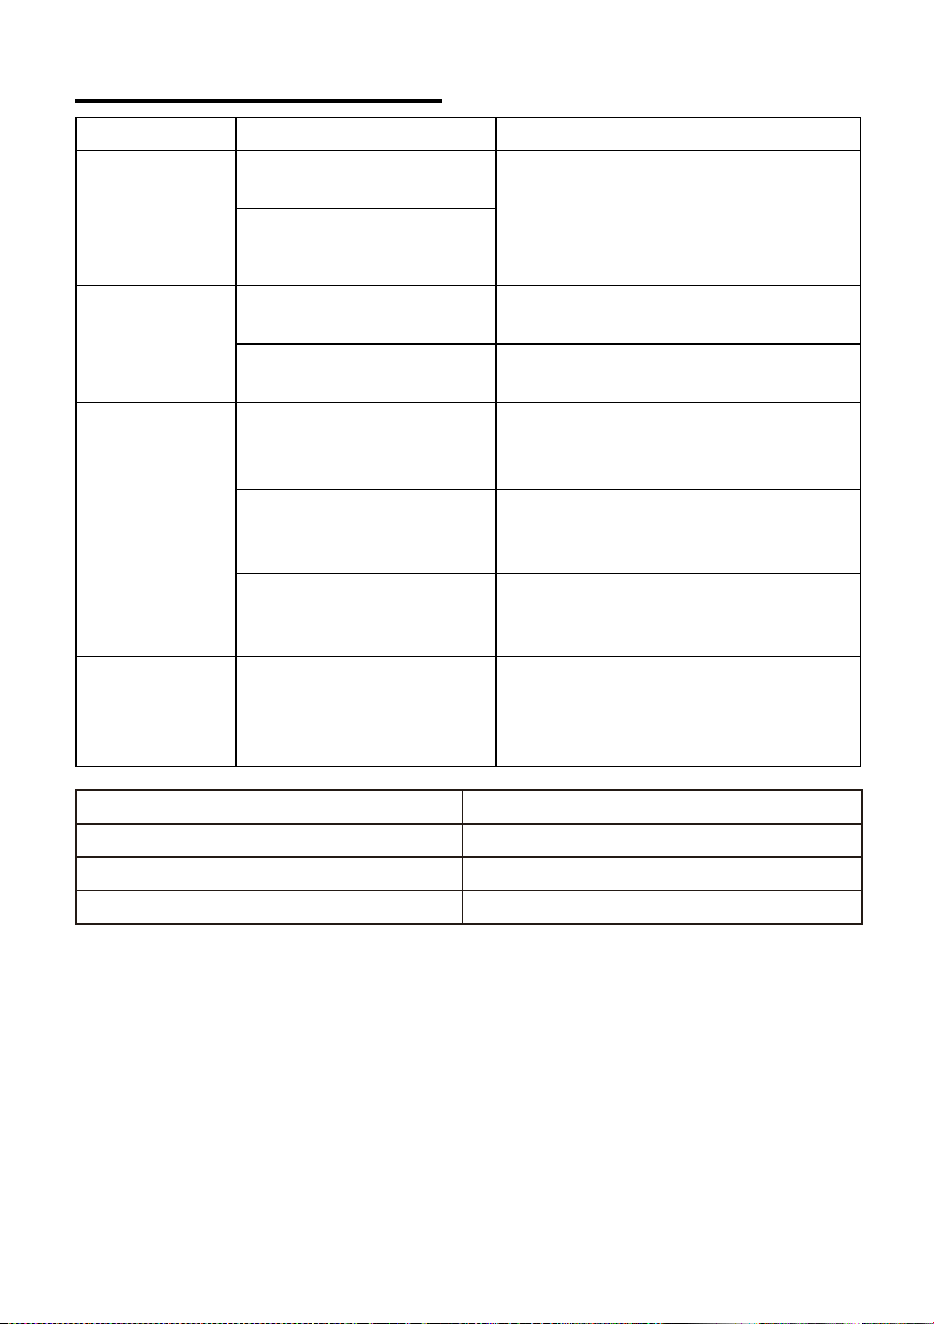
TROBULESHOOTING
Fault Cause Solution
Light on, but
fan does not
work
The fan blade is
jammed.
Switch off the unit and repair by
qualified service personnel only.
The motor is damaged.
Both light and
fan do not
work
Halogen light bulb burn.
Replace the bulb with correct
rating.
Power cord looses. Plug in to the power supply again.
Serious
Vibration of
the unit
The fan blade is
damaged.
Switch of the unit and repair by
qualified service personnel only.
The fan motor is not
fixed tightly.
Switch off the unit and repair by
qualified service personnel only.
The unit is not hung
properly on the bracket.
Take down the unit and check
whether the bracket is in proper
location.
Suction
performance
not good
Too long distance
between the unit and
the cooking plane
Readjust the distance to 65-75cm
Technology Wi-Fi
Standard
802.11 b/g/n
Frequency Band(s)[MHz]
2400 MHz - 2483.5 MHz
Maximum Power[mW]
100mW
Product information for networked equipment
power consumption of the product in
networked standby if all wired network
ports are connected and all wireless
network ports are activated:
2 W
If the Hood has been enrolled with the APP,
turn on the Hood to activate wireless
network port.
How to activate wireless network port:
If the Hood has been enrolled with the APP, turn
off the Hood to deactivate wireless network port. If
the Hood hasn’t been enrolled with the APP,
wireless network port will be deactivated even the
Hood is on.
How to deactivate wireless network port:
19
43
ENVIRONMENTAL PROTECTION
Waste electrical products should not be disposed of with
household waste. Please recycle where facilities exist.
Check with your Local Authority or retailer for recycling
advice.
This appliance is marked according to the European directive 2012/19/EU
on Waste Electrical and Electronic Equipment (WEEE).
By ensuring this product is disposed of correctly, you will help prevent
potential negative consequences for the environment and human health,
which could otherwise be caused by inappropriate waste handling of this
product.
The symbol on the product indicates that this product may not be treated as
household waste. Instead it shall be handed over to the applicable
collection point for the recycling of electrical and electronic equipment
Disposal must be carried out in accordance with local environmental
regulations for waste disposal.
For more detailed information about treatment, recovery and recycling of
this product, please contact your local city office, your household waste
disposal service or the shop where you purchased the product.
CUSTOMER ASSISTANCE SERVICE
If you cannot identify the cause of the operating anomaly, switch off the
appliance and contact the Assistance Service.
PRODUCT SERIAL NUMBER. Where can I find it?
It is important you to inform the Assistance Service of your product code
and its serial number (a 16 character code which begins with the number 3);
this can be found on the guarantee certificate or on the data plate located
on the appliance.
It will help to avoid wasted journeys to technicians, thereby (and most
significantly) saving the corresponding callout charges.
20

21
MANUAL DE USO E INSTALACIÓN
CONTENIDO
INTRODUCCIÓN ................................................................................ 22
PRECAUCIONES DE SEGURIDAD .................................................... 22
RIESGO DE DESCARGA ELÉCTRICA............................................... 23
INSTALACIÓN ELÉCTRICA ............................................................... 24
INSTALACIÓN (MONTAJE EN LA PARED) ........................................ 26
INSTALACIÓN (SALIDA INTERIOR) .................................................. 34
DESCRIPCIÓN DE LOS COMPONENTES ......................................... 35
FUNCIONAMIENTO............................................................................ 35
MANTENIMIENTO .............................................................................. 38
RESOLUCIÓN DE PROBLEMAS........................................................ 39
SERVICIO DE ASISTENCIA AL CLIENTE .......................................... 40
PROTECCIÓN MEDIOAMBIENTAL .................................................... 40

22
INTRODUCCIÓN
Gracias por elegir esta campana extractora.
Este manual de instrucciones está diseñado para proporcionarle todas las
instrucciones necesarias relacionadas con la instalación, el uso y el
mantenimiento del electrodoméstico. Para que el electrodoméstico funcione
correctamente y con seguridad, por favor lea este manual de instrucciones
cuidadosamente antes de la instalación y el uso.
La campana extractora utiliza materiales de alta calidad, y está hecha con un
diseño aerodinámico. Equipada con un motor eléctrico de gran potencia y un
ventilador centrífugo, también proporciona una fuerte potencia de aspiración,
un funcionamiento de bajo ruido, un filtro de grasa antiadherente y una
instalación de fácil montaje.
Por la presente, Candy Hoover Group Srl declara que los equipos
radioeléctricos cumplen con la Directiva 2014/53/UE y con los requisitos
legales pertinentes (para el mercado UKCA). Se encuentra disponible el texto
completo de la declaración de conformidad en la siguiente dirección de
Internet: www.candy-group.com
PRECAUCIONES DE SEGURIDAD
- No deje que los niños utilicen el electrodoméstico.
- La campana extractora es para uso doméstico exclusivamente
y no puede utilizarse en barbacoas, asadores u otros
establecimientos comerciales.
- La campana extractora y el filtro deben limpiarse de forma
periódica para mantener el producto en buenas condiciones de
uso.
- Limpie la campana extractora de acuerdo con el manual de
instrucciones y mantenga el electrodoméstico fuera de peligro
de quemaduras.
- La campana no debe utilizarse en un hornillo de gas. Durante
su uso, asegúrese de que exista ventilación suficiente en la
cocina.
- Antes de conectar este electrodoméstico, compruebe que el
cable de alimentación no esté dañado. Un cable de suministro
dañado debe ser reemplazado únicamente por personal de
asistencia cualificado.
- Debe haber una ventilación adecuada de la habitación cuando
se utilice la campana extractora al mismo tiempo que los
23
aparatos de gas u otros;
- No conecte el aparato a una salida de aire en la que se hayan
conectado otros dispositivos que quemen gas u otros
combustibles;
- Deben cumplirse las normas relativas a la salida de humos.
- Este aparato no está pensado para que lo utilicen personas
(incluidos niños) con capacidades físicas, sensoriales o
mentales reducidas, o con falta de experiencia y conocimiento,
a menos que hayan sido supervisados o formados sobre el uso
del dispositivo por parte de una persona responsable de su
seguridad.
- Es necesario vigilar a los niños para asegurarse de que no
jueguen con el electrodoméstico.
- Deberá asegurarse una buena ventilación de la cocina cuando
se utilice la campana de extractora al mismo tiempo que los
aparatos que quemen gas u otros combustibles (no aplicable a
los aparatos que solo descargan el aire de vuelta a la cocina);
- los detalles relativos al método y la frecuencia de la limpieza.
- existe un riesgo de incendio si la limpieza no se realiza de
acuerdo con las instrucciones; - no flamee debajo de la
campana extractora;
- PRECAUCIÓN: las piezas accesibles pueden calentarse
cuando se usan con aparatos de cocina.
Riesgo de descarga eléctrica
Conecte este electrodoméstico únicamente a una toma de corriente con
conexión a tierra. En caso de duda, busque el consejo de un técnico
debidamente cualificado.
El incumplimiento de estas instrucciones puede provocar la muerte, un
incendio o una descarga eléctrica.
La lámpara utilizada en este producto no es adecuada
para su uso en la iluminación de una habitación.
El propósito de esta lámpara es proporcionar iluminación para usar el
producto.
24
Instalación eléctrica
Toda la instalación debe ser realizada por un electricista cualificado u otro
profesional competente. Antes de conectar la alimentación de la red, asegúrese
de que la tensión de la red corresponda a la tensión que figura en la placa de
datos.
Conexión directa
El electrodoméstico se conecta directamente a la corriente, utilizando un
disyuntor omnipolar con una distancia mínima de 3 mm entre los contactos.
El instalador debe asegurarse de que la conexión a la red eléctrica se haya
realizado correctamente y cumpliendo el esquema eléctrico.
El cable no debe doblarse ni aplastarse.
Revise regularmente el enchufe y el cable de alimentación para ver si están
dañados. Si el cable de suministro está dañado, debe ser reemplazado por un
cable o conjunto especial disponible en el fabricante o su agente del servicio
de asistencia.
ADVERTENCIA: Este es un electrodoméstico de clase I y DEBE ser
conectado a tierra. Este electrodoméstico se suministra con un cable de red
de 3 núcleos del siguiente color:
Marrón = L (Live) o CORRIENTE
Azul = N (Neutral) o NEUTRAL
Verde y amarillo = E (Earth) o TIERRA
El fusible debe tener una capacidad de 3 A
N (Azul)
L
(marrón)
(Verde/amarillo)
USAR UN FUSIBLE DE 3 A
SALIDA CON CONMUTACIÓN CON
FUSIBLES DE DOBLE POLO
25
Lista de accesorios de instalación estándar
Espec. Fig. Ilustración Cant.
Carcasa
1
Chimenea superior
1
Chimenea inferior
1
Soporte de la chimenea inferior
1
Soporte de la chimenea superior
1
Placa de soporte
1
Taquetes Ø8 - Ø8×Ø6 color blanco
9
Tornillos ST4,0×30
9
Tornillos Ø 7,2 ST4,0×8
2
26
INSTALACIÓN (montaje en la pared)
Si tiene una salida al exterior, su campana extractora puede conectarse como
en la foto de abajo mediante un conducto de extracción (esmalte, aluminio,
tubo flexible o material no inflamable con un diámetro interior de 150 mm).
1.
Antes de la instalación, apague el electrodoméstico y desenchúfelo de la
toma de corriente.
2.
La campana extractora debe colocarse a una distancia de 65~ 75 cm de
la superficie de cocción para obtener resultados óptimos.
3.
Perfore 3 agujeros de 8 mm para acomodar el soporte. Atornille y apriete
el soporte en la pared con los tornillos suministrados.
107,5 mm
Taco
Soporte de
Tornillo (4 x 30 mm)
27
Para el modelo de panel inclinado
• Es necesario perforar agujeros adicionales de 2x8 mm y aplicar tornillos de
f
ijación y tapones roscados antes de la instalación. Voor schuine modellen
28
4.
Deje la campana extractora y cuélguela del enganche del soporte de la
pared.
5.
Fije la válvula unidireccional a la salida de aire de la campana extractora.
Entonces, conecte el tubo de escape a la válvula unidireccional como se
muestra a continuación.
Enganche de
cocina
Soporte de
pared
Campana extractora
Tubo de escape
29
6.
i.
Ponga el vidrio en la posición apropiada en la parte superior de la
c
ampana extractora.
ii.
Fije con 4 tornillos y arandela. Para evitar que el vidrio se agriete, no
apr
iete los tornillos con demasiada fuerza.
7.
i.
Ponga la chimenea interior en la chimenea exterior; luego tire de la
c
himenea interior hacia arriba. Ajústela para alcanzar la altura necesaria.
ii.
Deslice la chimenea para ajustar la altura de la chimenea. Cuando se
al
cance la altura requerida, entonces cuelgue el agujero de fijación a los
tornillos de fijación como se muestra en las fig. de abajo.
Chimenea
Chimenea
30
8.
i.
Perfore 2 agujeros de 8 mm para acomodar la placa II. Atornille y apriete
la placa II en la pared con los 2 tornillos suministrados.
ii.
Monte la chimenea en la unidad y fíjela con 2 tornillos.
Placa II
Taco
Tornillo
4
mm x 8 mm
Tornillo
4
mm x 30 mm
31
Lista de accesorios de instalación estándar
Espec. Fig. Ilustración Cant.
Deflector de aire
1
Soporte
1
Ø 8 taquetes
Ø 8×Ø 6 color blanco
2
Tornillos ST4,0×30
2
Tornillos ST3,5×12
2
32
INSTALACIÓN (DEFLECTOR DE AIRE PARA MODELOS
PIRAMIDALES E INCLINADOS)
El deflector de aire se menciona como incluido y no opcional.
1. Fije el soporte a la salida de plástico en forma de T con 2 tornillos
ST3,5x12 mm suministrados como se muestra a continuación:
2. Perfore 2 orificios en la pared para acomodar los tacos, luego
at
ornille y apriete el soporte en la pared con 2 tornillos ST4x30 mm.
33
3. Conecte el tubo de escape a la salida de aire de la campana de la
c
ocina como se muestra a continuación:
4. Instale la chimenea en la unidad y fíjela.
o "Por favor, tenga en cuenta lo siguiente: La salida de plástico en
f
orma de T y las lengüetas en V no se pueden utilizar al mismo
tiempo. Puede utilizarlos de dos maneras: 1) Añada la lengüeta en V
a la salida existente; 2) Utilice la salida de plástico en forma de T sin
añadir la lengüeta en V."
o "Nota: El producto dispone de una lengüeta en V como opcional. Este
accesorio no es obligatorio para la instalación, funcionamiento y us
o
del
producto."
34
INSTALACIÓN (SALIDA INTERIOR)
Si no tiene una salida al exterior, no se requiere un tubo de escape y la
instalación es similar a la que se muestra en la sección "INSTALACIÓN (SALIDA
EXTERIOR)".
El filtro de carbón activo puede utilizarse para atrapar olores.
Para instalar el filtro de carbón activo, primero hay que quitar el filtro para
grasa. Presione el cierre y tire de él hacia abajo.
Enchufe el filtro de carbón activo en el electrodoméstico y gírelo en el sentido
de las agujas del reloj. Repita lo mismo en el otro lado.
NOTA:
o
Asegúrese de que el filtro esté bien cerrado. De lo contrario, se aflojaría y
supondría un peligro.
o
Cuando el filtro de carbón activado se monta, la potencia de aspiración se
reduce.
Cierre
35
DESCRIPCIÓN DE LOS COMPONENTES
FUNCIONAMIENTO
Botón del temporizador
1.
Establecer la hora del día
Cuando la campana está en modo standby (el motor no funciona), pulse
el botón del temporizador para entrar en la configuración de la hora.
Pulse la tecla '
Velocidad del ventilador’ para configurar la hora del día
y pulse la tecla ‘Luz‘ para configurar los minutos.
2.
Configuración del temporizador
Cuando la campana está en modo de funcionamiento, pulse el botón del
temporizador para configurar la cuenta atrás.
Pulse una vez el botón del temporizador y la cuenta atrás aumentará un
minuto. La cuenta atrás máxima es de 60 minutos.
Botón de velocidad del ventilador
Modo standby: la retroiluminación de todos los botones y la pantalla
LCD están apagada, mantenga pulsado el botón de velocidad o el botón
de la lámpara durante unos 0,5 segundos: el
zumbador suena una vez,
la retroiluminación del botón se encenderá, el icono de la velocidad o el
icono de la lámpara en la pantalla LCD se encenderá y la campana
extractora entrará
en modo de encendido; si solo el motor funciona,
pulse brevemente el
botón "-" a la velocidad 1, la campana extractora
entrará en modo standby si pulsa el
botón "‐" de nuevo, o si la lámpara
está encendida, pulse brevemente el botón de la lámpara y entre en
modo standby.
Función Boost:
1.
Boost 1 (velocidad 4): velocidad del ventilador a nivel 5 +TURBO
Pulse el botón de velocidad para acelerar al nivel 4, el icono del
ventilador en la pantalla LCD muestra que el motor está funcionando y el
icono de velocidad en la pantalla LCD muestra que la velocidad está
funcionando en el nivel 5+ TURBO, la campana ext
ractora está
funcionando en modo boost (potencia extra).
36
2. Boost 2 (velocidad 5): velocidad del ventilador a nivel 6 +TURBO
Pulse el botón de velocidad para acelerar al nivel 5, el icono del
ventilador en la pantalla LCD muestra que el motor está func
ionando y el
icono de velocidad en la pantalla LCD muestra que la velocidad está
funcionando en el nivel 6+ TURBO, la campana extractora está
funcionando en modo boost (potencia extra).
Nota:
Seleccione la velocidad Boost mientras la campana está en
funcionamiento y aumentará la velocidad durante 5 minutos, antes
de ralentizarse de nuevo.
Conexión wifi
Establecer la hora del día
Pulse prolongadamente el icono wifi y entre en modo de conexión: si el
icono wifi sigue parpadeando significa que la conexión está en curso, si
está encendido significa que está conectada o en modo standby; pulse
prolongadamente el icono wifi de nuevo y la conexión se detendrá;
Botón de luz
Para encender y apagar la luz.
Pantalla LCD
1. Símbolo del motor, girará cuando el
motor esté funcionando;
2. Indicador de tiempo
3. Símbolo del temporizador, aparecerá
cuando el temporizador se esté
configurando y esté contando;
4. Símbolo de la luz;
5. Velocidad de motor;
6. Símbolo de velocidad turbo, aparecer
á
c
uando se haya configurado la velocida
d
más
alta;
7. Símbolo de alarma, aparecer
á 5
segund
os cuando finalice la cuent
a
at
rás del temporizador.
8. Alarma de limpieza, aparece cuando el
tiempo total de trabajo llegue a 14 horas o
la primera vez que se utilice después de
conectar.
37
Descargar la aplicación hOn
En primer lugar, debería descargar la app hOn e instalarla en su dispositivo
portátil. Entonces podrá registrar su campana.
NOTA
RE
GISTRO CAMPANA HOOVER
La imagen de la campana es meramente indicativa. Podría no corresponder a la realidad.
1- Pulse el botón wifi hasta que el icono comience a parpadear; cuando se haya
f
inalizado el emparejamiento, el icono wifi se mostrará encendido.
38
MANTENIMIENTO
Antes de la limpieza, apague el electrodoméstico y desenchúfelo.
I.
Limpieza regular
Utilice un paño suave humedecido con agua jabonosa tibia o detergente de uso
doméstico. No utilice estropajos metálicos, productos químicos, material
abrasivo o un cepillo rígido para limpiar el electrodoméstico.
II.
Limpieza mensual del filtro para grasa
FUNDAMENTAL: Limpiar el filtro cada mes puede evitar riesgos de incendio.
En el filtro se acumula grasa, humo, polvo, etc. por lo que el filtro afecta
directamente a la eficiencia de la campana extractora. Si no se limpia, los
restos de grasa (potencialmente inflamables) se saturarán en el filtro. Límpielo
con detergente de uso doméstico.
III.
Limpieza anual del filtro de carbón activo
SOLAMENTE se aplica a unidades instaladas como unidad de recirculación (sin
ventilación al exterior). Este filtro atrapa olores y debe ser reemplazado al menos
una vez al año
dependiendo de la frecuencia con la que se utilice la campana de la cocina.
IV.
Cambio de la bombilla
Retire los tornillos del cristal, y el cristal de la campana. Encuentre la
bombilla que desea sustituir, se encuentra en la lámpara que está
dentro de la sección expuesta de la cubierta.
Desconecte el punto de cableado de la luz y retire los portalámparas y
el cableado de la campana. Importante: No es posible reemplazar las
bombillas individualmente, hay que considerar las bombillas, los
portalámparas y el cableado como un conjunto. (Luz LED: máx. 1,5 W)
Coloque las bombillas de recambio, los portalámparas y el cableado de
la misma manera que los originales. A continuación, reconecte el punto
de cableado de la luz.
Vuelva a colocar el vidrio de la campana y apriete los tornillos del vidrio.
Asegúrese de que los tornillos estén bien apretados.
39
RESOLUCIÓN DE PROBLEMAS
Fallo
Causa
Solución
La lámpara se
enciende,
pero el
ventilador no
funciona.
La pala del ventilador
está atascada.
Apague el electrodoméstico y deje
que el personal de asistencia
proceda a repararlo.
El motor está dañado.
Tanto la
lámpara como
el ventilador
no funcionan.
La bombilla halógena se
ha fundido.
Sustituya la bombilla con una con
la clasificación correcta.
El cable de alimentación
se suelta.
Vuelva a conectarlo al suministro
eléctrico.
El
electrodomést
ico vibra
mucho.
La pala del ventilador
está dañada.
Apague el electrodoméstico y deje
que el personal de asistencia
proceda a repararlo.
El motor del ventilador
no está bien fijado.
Apague el electrodoméstico y deje
que el personal de asistencia
proceda a repararlo.
El electrodoméstico no
está bien sujeto en el
soporte.
Retire la unidad y compruebe si el
soporte está en la ubicación
correcta.
La aspiración
no es
suficientemen
te potente.
Demasiada distancia
entre el
electrodoméstico y la
placa de cocción.
Reajuste la distancia a 65-75 cm
Tecnología
Wifi
Estándar
802.11 b/g/n
Banda/s de frecuencia [MHz]
2400 MHz - 2483,5 MHz
Potencia máxima [mW]
100 mW
40
Información de producto para equipos en red
consumo de energía del producto en modo
standby en red si está conectado al
suministro eléctrico los puertos de red están
conectados y todos los puertos de red
inalámbrica están activados:
2 W
Cómo activar el puerto de red inalámbrica:
Si la campana se ha registrado en la app, active
la campana para activar el puerto de red
inalámbrica.
Cómo desactivar el puerto de red
inalámbrica:
Si la campana se ha registrado en la app,
desactive la campana para desactivar el puerto
de red inalámbrica. Si la campana no se ha
registrado en la app, el puerto de red
inalámbrica se desactivará aunque la campana
esté activada.
SERVICIO DE ASISTENCIA AL CLIENTE
Si no puede identificar la causa de la anomalía de funcionamiento, apague el
aparato y póngase en contacto con el Servicio de Asistencia.
NÚMERO DE SERIE DEL PRODUCTO. ¿Dónde puedo encontrarlo?
Es importante que informe al Servicio de Asistencia del código de su producto
y su número de serie (un código de 16 caracteres que comienza con el número
3); este se encuentra en el certificado de garantía o en la placa de datos
situada en el electrodoméstico.
Ayudará a evitar viajes inútiles a los técnicos, ahorrando así (y lo que es más
importante) los correspondientes cargos por llamadas.
PROTECCIÓN MEDIOAMBIENTAL
Los productos eléctricos no deben eliminarse como un residuo
doméstico. Hay que reciclarlos en el lugar indicado. Consulte con su
autoridad local o con el establecimiento donde compró el producto
para obtener consejos de reciclaje.
Este electrodoméstico tiene la marca de conformidad con la Directiva europea
2012/19/UE sobre residuos de aparatos eléctricos y electrónicos (RAEE).
Al asegurarse de desechar este electrodoméstico de forma correcta, estará
contribuyendo a evitar las posibles consecuencias negativas para el medio
ambiente y la salud humana que ocasionaría el tratamiento inadecuado de los
residuos de este producto.
La inclusión del símbolo en el producto o en su envase indica que no puede
tratarse como residuo doméstico. En su lugar, se entregará al punto de
recogida correspondiente para el reciclado de aparatos eléctricos y
electrónicos. La eliminación debe realizarse de acuerdo con las normas
ambientales locales para la eliminación de residuos.
Para obtener información detallada sobre el tratamiento, la recuperación y el
reciclaje de este producto, póngase en contacto con el ayuntamiento, el
servicio de recogida de basuras local o el establecimiento donde lo adquirió.


42
EINLEITUNG
Vielen Dank, dass Sie sich für diese Abzugshaube entschieden haben.
Diese Bedienungsanleitung enthält notwendigen Anleitungen für die Installation,
die Bedienung und die Wartung des Gerätes. Lesen Sie diese
Bedienungsanleitung vor der Installation und Benutzung bitte durch, damit das
Gerät richtig und sicher bedient werden kann.
Diese Abzugshaube ist auch hochwertigen Werkstoffen und in einer schlanken
Bauweise gefertigt. Ausgestattet mit einem großen, starken Elektromotor und
einem Zentrifugalgebläse bietet sie starke Saugleistung, geräuscharmen
Betrieb, einen austauschbaren Fettfilter sowie die einfache Montage.
Hiermit erklärt die Candy Hoover Group Srl, dass die Funkausstattung der
Richtlinie 2014/53/EU und den einschlägigen gesetzlichen Anforderungen (für
den UKCA-Markt) entspricht.
Der vollständige Text der Konformitätserklärung ist unter der folgenden
Internetadresse verfügbar: www.candy-group.com.
SICHERHEITSVORKEHRUNGEN
Kinder dürfen das Gerät niemals bedienen.
Die Abzugshaube ist für den Hausgebrauch und nicht für Grill-Restaurants,
Großküchen oder sonstigen gewerblichen Gebrauch geeignet.
Die Abzugshaube und ihr Filter sollten regelmäßig gereinigt werden,
damit sie in einem guten Zustand bleibt.
Reinigen Sie die Abzugshaube gemäß den Angaben in dieser
Bedienungsanleitung und vermeiden Sie Brandgefahr für das Gerät.
Direktes Backen auf dem Gasherd ist untersagt.
Für gute Be- und Entlüftung der Küche sorgen.
Vergewissern Sie sich, dass das Stromkabel nicht beschädigt ist, bevor
Sie das Gerät anschließen. Der Austausch eines defekten Stromkabels
muss qualifiziertem Kundendienstpersonal vorbehalten sein.
Für ausreichende Belüftung sorgen, wenn die Abzugshaube zusammen
mit Geräten betrieben wird, die Gas oder Benzin verbrennen.
Die Abluft sollte nicht in einen Rauchfang geleitet werden, der auch für
die Abgase einer Gas- oder Ölheizung verwendet wird.
Vorschriften zur Abluft müssen befolgt werden.
Das Gerät ist nicht zur Nutzung durch Personen (einschließlich
Kindern) mit eingeschränkten körperlichen, sensorischen oder geistigen
Fähigkeiten oder mangelnder Erfahrung und mangelndem Wissen
bestimmt, sofern diese nicht in die Bedienung des Geräts durch eine
Person eingewiesen wurden, die für ihre Sicherheit verantwortlich ist
oder von einer solchen Person beaufsichtigt werden.
43
Kinder sollten beaufsichtigt werden, um sicherzustellen, dass sie nicht
mit dem Gerät spielen.
Keine Gerichte unter der Abzugshaube flambieren.
VORSICHT: Es kann sein, dass bestimmte Teile der Abzugshaube
beim Kochen heiß werden.
- Für ausreichende Belüftung sorgen, wenn die Abzugshaube
zusammen mit Geräten betrieben wird, die Gas oder Benzin
verbrennen (gilt nicht für Geräte, die die abgesaugte Luft zurück
in den Raum leiten).
- Eine detaillierte Anweisung zur Reinigung und deren Häufigkeit.
- Es besteht Brandgefahr, wenn die Reinigung nicht gemäß den
Anweisungen durchgeführt wird; - nicht unter der
Dunstabzugshaube flambieren.
- VORSICHT: Es kann sein, dass bestimmte Teile der
Abzugshaube beim Kochen heiß werden.
Gefahr von Stromschlägen
Dieses Gerät nur mit einer richtig geerdeten Steckdose verbinden.
Wenden Sie sich im Zweifel an einen Fachelektriker.
Bei Zuwiderhandlung besteht Lebensgefahr, Brandgefahr oder
Elektroschlaggefahr.
Die in diesem Produkt verwendete Lampe ist nicht
für die Beleuchtung eines Raumes geeignet.
Diese Leuchte dient der Beleuchtung für die Benutzung des Produkts.
44
Elektrischer Anschluss
Sämtliche Anschlüsse müssen durch einen Fachmann oder qualifizierten
Elektriker vorgenommen werden. Vergewissern Sie sich vor dem Anschluss an
das Stromnetz, dass die Netzspannung mit der auf dem Typenschild
angegebenen Spannung übereinstimmt.
Direkter Anschluss
Das Gerät muss mit einem allpoligen Leistungsschalter mit einer
Mindestöffnung von 3 mm zwischen den Kontakten direkt an das Stromnetz
angeschlossen werden.
Der Installateur muss sicherstellen, dass der Stromanschluss korrekt hergestellt
wurde und dem Verdrahtungsplan und den Sicherheitsvorschriften entspricht.
Das Netzkabel darf nicht geknickt oder gequetscht werden.
Überprüfen Sie den Netzstecker und das Netzkabel regelmäßig auf
Beschädigungen. Wenn das Netzkabel beschädigt ist, muss es durch ein vom
Hersteller oder von seinem Service-Mitarbeiter empfohlenes ausgetauscht werden.
WARNUNG: Dies ist ein Gerät der Klasse I und MUSS geerdet werden.
Dieses Gerät wird mit einem 3-adrigen Netzkabel geliefert, das wie folgt gefärbt ist:
Braun = L oder Spannungsführender Draht
Blau = N oder Neutralleiter
Grün und Gelb = E oder Erdung
Die Sicherung muss für 3 Ampere ausgelegt sein.
EUR
EINE 3-AMPERE-
SICHERUNG
VERWENDEN
ZWEIPOLIG GESCHALTETE
ABGESICHERTE
STICHLEITUNG
UK
(Blau)
(Braun)
(Grün/Gelb)
45
Auflistung standardmäßiges Montagezubehör
SPEZIFIKATION
Spez.
Abbildung
Menge
Gehäuse
1
Oberer Abzug
1
Unterer Abzug
1
Untere Abzugshalterung
1
Obere Abzugshalterung
1
Aufhängeblech
1
φ8 Dübel
φ8×φ6 Weiß
9
Schrauben
ST4.0×30
9
φ7,2 Schrauben
ST4,0×8
2
46
INSTALLATION (Wandmontage)
INSTALLATION (ABLUFT NACH
DRAUSSEN)
Wenn eine Maueröffnung nach draußen vorhanden ist, kann die Abzugshaube
wie unten gezeigt über einen Abluftkanal (Emaille, Aluminium, flexibles Rohr
aus unbrennbarem Material mit einem Innendurchmesser von 150 mm) an
diese angeschlossen werden.
1. Schalten Sie vor der Installation das Gerät aus und ziehen Sie den
Netzstecker.
2. Die Abzugshaube sollte für eine optimale Leistung 65-75 cm über der
Kochfläche aufgehängt werden.
3. Bohren Sie die 3 x 8-mm-Löcher für die Aufnahme der Halterung.
Verschrauben Sie die Halterung mit den beiliegenden Schrauben fest
in der Wand.
Dübel
Wandhalterung
Schraube (4 mm x 30 mm)
107,5 mm
47
Für schräg geneigte Modelle
● Bohren Sie vor der Montage zusätzliche Löcher von 2x8 mm Durchmesser
und bringen Sie Dübel und Schrauben an. Für schräg geneigte Modelle

48
4. Heben Sie die Abzugshaube an und hängen Sie sie in die
Wandhalterung ein.
5. Befestigen Sie das Ein-Wege-Ventil am Luftauslass der Abzugshaube.
Verbinden Sie dann das Abluftrohr, wie nachstehend angezeigt, mit
dem Ein-Wege-Ventil.
Wand-
halterung
Abzugsaufhängung
Abzugshaube
Abluftrohr
49
6.
i. Setzen Sie die Glasscheibe in der entsprechen Position oben auf
der Abzugshaube ein.
ii. Mit vier (4) Schrauben und Unterlegscheibe befestigen. Die
Schrauben nicht zu fest anziehen, um Risse in der Glasscheibe
zu vermeiden.
7.
i. Stecken Sie den inneren in den äußeren Abzugskanal. Dann den
inneren Abzug nach oben heraus ziehen. Entsprechend der
gewünschten Höhe anpassen.
ii. Den Abzug schieben, um die Abzugshöhe anzupassen. Sobald
die erforderliche Höhe erreicht ist, hängen Sie die
Befestigungsöffnung, wie in den nachstehenden Abbildung
gezeigt, in die Befestigungsschraube ein.
Innenabzug
Außenabzug
50
8.
i. Bohren Sie 2 x 8-mm-Löcher für die Aufnahme von Blech II.
Verschrauben Sie Blech II mit den beiden (2) beiliegenden
Schrauben fest in der Wand.
ii. Montieren Sie den Abzug an der Haube und befestigen Sie ihn
mit zwei (2) Schrauben.
Blech II
Dübel
Schraube
4mm x 8mm
Schraube
(4mm x 30mm)
51
Auflistung standardmäßiges Montagezubehör
Spez.
Abbildung
Menge
Windabweiser
1
Halterung
1
φ8 Dübel
φ8xφ6 weiße Farbe
2
Schrauben
ST4,0x30
2
Schrauben
ST3,5x12
2
52
EINBAU (LUFTABWEISER FÜR PYRAMIDEN- UND SCHRÄGMODELLE):
Der Windabweiser gilt als im Lieferumfang enthalten und nicht als optional.
1. Befestigen Sie die Halterung mit 2 mitgelieferten Schrauben (ST3,5x12 mm)
wie unten gezeigt am T-förmigen Kunststoffabzug.
2. Bohren Sie 2 Löcher für die Dübel in die Wand, und schrauben Sie die
Halterung mit 2 mitgelieferten Schrauben (ST4x30 mm) an der Wand fest.
3. Befestigen Sie das Abluftrohr wie unten gezeigt am Luftauslass der
Dunstabzugshaube:
53
4. Montieren Sie den Abzug an der Haube und befestigen Sie ihn.
○ „Bitte beachten Sie: Der T-förmige Kunststoffauslass und die V-Klappen
können nicht gleichzeitig verwendet werden. Sie können sie auf zwei
verschiedene Arten nutzen: 1) V-Klappe am vorhandenen Auslass anbringen;
2) T-förmigen Kunststoffauslass verwenden und keine V-Klappe anbringen.“
○ „Hinweis: Das Produkt ist mit einem V-Klappen-Zubehör ausgestattet.
Dieses Zubehör ist für die Installation, den Betrieb und die Verwendung des
Produkts nicht zwingend erforderlich.“
54
INSTALLATION (ABLUFT NACH INNEN)
Wenn Sie keinen Abzug ins Freie haben, wird das Abluftrohr nicht benötigt. Die
Montage ist der im Abschnitt „INSTALLATION (ABLUFT NACH DRAUSSEN)“
beschriebenen vergleichbar.
Aktivkohlefilter schließen unangenehme Gerüche ein.
Bevor der Aktivkohlefilter installiert wird, muss zuerst der Fettfilter abgenommen
werden. Die Sperre drücken und nach unten ziehen.
Den Aktivkohlefilter in das Gerät einstecken und im Uhrzeigersinn drehen. Den
Vorgang auf der anderen Seite wiederholen.
HINWEIS:
○ Prüfen Sie, ob der Filter sicher verankert ist. Anderenfalls kann er
herausfallen und gefährliche Unfälle verursachen.
○ Bei Verwendung eines Aktivkohlefilters wird die Absaugkraft
herabgesetzt.
SCHLIESSEN
55
BESCHREIBUNG DER KOMPONENTEN
BETRIEB
Timer-Taste
1. Einstellung der Tageszeit.
Im Standby-Modus der Haube (Motor läuft nicht) drücken Sie die Timer-
Taste, um auf die Zeiteinstellung zuzugreifen.
Drücken Sie die Taste „Gebläsegeschwindigkeit“, um die Stunde
einzustellen; drücken Sie die Taste „Licht“, um die Minute einzustellen.
2. Timer-Einstellung
Drücken Sie während des Betriebs der Abzugshaube die Timer-Taste, um
den „Countdown“ einzustellen.
Wenn Sie die Timer-Taste einmal drücken, wird der Countdown um eine
Minute verlängert. Die maximale Countdown-Zeit sind 60 Minuten.
Taste „GEBLÄSEGESCHWINDIGKEIT“
Standby-Modus: die Hintergrundbeleuchtung aller Tasten und des LCD-
Displays sind ausgeschaltet, drücken Sie die Geschwindigkeitstaste oder
die Lampentaste etwa bei 0;5 Sekunden: der Summer summt einmal, die
Hintergrundbeleuchtung der Taste leuchtet auf, das Geschwindigkeits-
oder Lampensymbol im LCD-Display leuchtet auf, und die Dunstabzugshaube
geht in den Einschaltmodus über; wenn nur der Motor arbeitet, drücken Sie
kurz die " - " Taste auf Geschwindigkeit 1, die Dunstabzugshaube geht in
den Standby-Modus über, wenn Sie die " - " Taste erneut drücken, oder
nur die Lampe ist an, drücken Sie kurz die Lampentaste und gehen Sie
dann in den Standby-Modus.
Boost-Funktion:
1. Boost 1 (Geschwindigkeit 4): Gebläsedrehzahl auf Stufe 5 +TURBO
Drücken Sie die Geschwindigkeitstaste auf Stufe 4, das Gebläsesymbol im
LCD-Display zeigt an, dass der Motor arbeitet und das Geschwindigkeits-
symbol im LCD-Display zeigt an, dass die Geschwindigkeit auf Stufe 5+
TURBO arbeitet, die Dunstabzugshaube arbeitet im Boost-Modus.
56
2. Boost 2 (Geschwindigkeit 5): Gebläsedrehzahl auf Stufe 6 +TURBO
Drücken Sie die Geschwindigkeitstaste auf Stufe 5, das Gebläsesymbol im
LCD-Display zeigt an, dass der Motor arbeitet und das Geschwindigkeits-
symbol im LCD-Display zeigt an, dass die Geschwindigkeit auf Stufe 6+
TURBO arbeitet, die Dunstabzugshaube arbeitet im Boost-Modus.
Hinweis: Schalten Sie den Boost-Modus ein während die Haube in
Betrieb ist, wird die Geschwindigkeit 5 Minuten lang erhöht, bevor sie
sich wieder verlangsamt.
Wifi-Verbindung
Einstellung der Tageszeit.
Drücken Sie lange das WLAN-Symbol und öffnen Sie in den
Verbindungsmodus: Die Hintergrundbeleuchtung des WLAN-Symbols
blinkt und zeigt an, dass die Verbindung hergestellt wird. Wenn die
Hintergrundbeleuchtung des WLAN-Symbols leuchtet, wurde die
Verbindung hergestellt. Dasselbe gilt für den Standby-Modus; drücken Sie
erneut lange auf das WLAN-Symbol und die Verbindung wird beendet.
LICHT-Taste
Beleuchtung ein- und ausschalten.
LCD-Display
1. Motorsymbol, dreht sich, wenn der Motor in
Betrieb ist;
2. Anzeige der Uhrzeit;
3. Das Timer-Symbol wird angezeigt, wenn der
Timer eingestellt ist und zählt;
4. Licht-Symbol;
5. Motordrehzahl;
6. Das Symbol für die Turbogeschwindigkeit wird
angezeigt, wenn die höchste Geschwindigkeit
eingestellt ist;
7. Das Alarmsymbol erscheint 5 Sekunden nach
Ablauf des Countdowns des Timers.
8. Reinigungsalarm, erscheint bei einer
Gesamtbetriebszeit von bis zu 14 Stunden oder
bei der ersten Benutzung nach dem Einstecken.

57
Laden Sie die hOn-App herunter
Laden Sie zunächst die hOn-APP herunter und installieren Sie sie auf Ihrem
Handy oder Tablet. Dann melden Sie Ihre Dunstabzugshaube an.
HINWEIS
ANMELDUNG HOOVER-DUNSTABZUGSHAUBE
Die Abbildung der Dunstabzugshaube dient nur zu Illustrationszwecken. Sie weicht möglicherweise
vom gekauften Produkt ab.
1- Drücken Sie die WLAN-Taste, bis das Symbol zu blinken beginnt. Wenn die
Kopplung abgeschlossen ist, leuchtet das WLAN-Symbol.
58
WARTUNG
Vor der Reinigung muss das Gerät ausgeschaltet und der Stecker gezogen
werden.
I. Regelmäßige Reinigung
Verwenden Sie ein weiches Tuch, angefeuchtet mit handwarmem, milden
Seifenwasser oder einem Haushaltsreiniger. Das Gerät niemals mit
Metallpads, Chemikalien, Scheuermitteln oder einer harten Bürste reinigen.
II. Monatliche Reinigung des Fettfilters
WICHTIG: Um Brandgefahr zu vermeiden, sollte der Filter monatlich gereinigt
werden.
Im Filter sammeln sich Fett, Rauch und Staub somit wirkt der Filter sich
direkt auf die Leistung der Abzugshaube aus. Wenn er nicht gereinigt wird,
verstopfen (möglicherweise entzündliche) Fettrückstände den Filter. Reinigen
Sie ihn mit Haushaltsreiniger.
III. Jährliche Reinigung des Aktivkohlefilters
AUSSCHLIESSLICH für Geräte, die als Umlufthauben montiert sind (keine
Entlüftung ins Freie). Der Filter beseitigt Gerüche und muss, abhängig von der
Häufigkeit der Verwendung des Herds, mindestens einmal jährlich
ausgetauscht werden.
IV. Wechseln der Glühbirne
Die Schrauben am Glas lösen und das Glas abnehmen. Ermitteln Sie
die Glühbirne, die ausgetauscht werden muss. Sie befindet sich in dem
Beleuchtungskörper im freigelegten Bereich des Abzugs.
Lösen Sie die Verkabelung und nehmen Sie die Leuchtenhalter und das
Kabel aus der Haube. Wichtig: Die Glühbirnen können nicht einzeln
ausgetauscht werden, das heißt, Glühbirnen, Halter und Verkabelung
müssen als kompletter Satz ausgetauscht werden. (LED-Beleuchtung:
MAX. 1,5 W).
Montieren Sie die Ersatzbirnen, Halter und Verkabelung entsprechend
den Originalteilen. Schließen Sie die Verkabelung dann wieder an.
Die Glashaube wieder einsetzen und mit den Glasschrauben verschrauben. Die
Schrauben müssen vollständig angezogen sein.
59
FEHLERSUCHE
Fehler
Ursache
Lösung
Licht an, aber
Gebläse läuft
nicht.
Gebläseschaufel
blockiert.
Das Gerät ausschalten; die
Reparatur muss qualifiziertem
Kundendienstpersonal vorbehalten
sein.
Der Motor ist beschädigt.
Beide Lichter
an, aber
Gebläse läuft
nicht.
Halogenbirne
durchgebrannt.
Gegen eine Birne mit identischer
Leistung austauschen.
Stromkabel lose.
In die Steckdose einstecken.
Starke
Vibrationen des
Gerätes.
Gebläseschaufel
beschädigt.
Das Gerät ausschalten; die
Reparatur muss qualifiziertem
Kundendienstpersonal
vorbehalten sein.
Gebläsemotor nicht richtig
befestigt.
Das Gerät ausschalten; die
Reparatur muss qualifiziertem
Kundendienstpersonal vorbehalten
sein.
Die Haube ist nicht richtig
in die Halterung
eingehängt.
Die Haube abnehmen und die
Position der Halterung überprüfen.
Schlechte
Absaugleistung
Distanz zwischen Gerät
und Kochfeld zu groß.
Distanz neu anpassen: 65 bis 75 cm.
Technologie
Wi-Fi
Standard
802.11 b/g/n
Frequenzbandbereich(e) [MHz]
2400 MHz - 2483,5 MHz
Maximale Leistung [mW]
100mW
Produktinformationen für vernetzte Geräte
Stromverbrauch des Produkts im vernetzten
Standby-Modus, wenn alle verkabelten
Netzwerkanschlüsse verbunden und alle
drahtlosen Netzwerkanschlüsse aktiviert sind:
2 W
So aktivieren Sie einen drahtlosen
Netzwerkanschluss:
Wenn die Haube mit der APP angemeldet wurde,
schalten Sie sie ein, um den drahtlosen
Netzwerkanschluss zu aktivieren.
So deaktivieren Sie einen drahtlosen
Netzwerkanschluss:
Wenn die Haube mit der APP angemeldet wurde,
schalten Sie sie aus, um den drahtlosen
Netzwerkanschluss zu deaktivieren. Wenn die
Haube nicht mit der APP angemeldet wurde, wird
der drahtlose Netzwerkanschluss deaktiviert,
auch wenn die Haube eingeschaltet ist.
60
KUNDENDIENST
Falls Sie die Ursache des Fehlers nicht ermitteln können, schalten Sie das
Gerät bitte aus und wenden Sie sich an den Kundendienst.
PRODUKT-SERIENNUMMER Wo finde ich sie?
Es ist wichtig, dass Sie dem Kundendienst Ihren Produktcode und die
Seriennummer nennen (ein 16-stelliger Code, der mit „3“ beginnt). Diese
Angaben können Sie der Garantiekarte oder dem Typenschild am Gerät
entnehmen.
Auf diese Weise werden unnötiger Aufwand für die Techniker und (am
Wichtigsten) unnötige Telefon-/Kommunikationskosten vermieden.
VEREINBARKEIT MIT DEN RICHTLINIEN
UMWELTSCHUTZ
Elektrische Produkte dürfen nicht im Hausmüll entsorgt
werden. Bitte führen Sie diese ggf. dem Recycling-Kreislauf
zu. Informieren Sie sich bei der örtlichen Behörde oder beim
Händler, wie Ihr Gerät entsorgt werden muss.
Dieses Elektrohaushaltsgerät ist entsprechend der EU-Richtlinie 2012/19/CE
über Elektro- und Elektronik-Altgeräte (WEEE) gekennzeichnet.
Bitte stellen Sie sicher, dass das Produkt nach seiner Außerbetriebnahme
ordnungsgemäß entsorgt wird. Damit tragen Sie dazu bei, gesundheits- und
umweltschädigende Auswirkungen zu verhindern, die eine nicht korrekte
Entsorgung am Ende der Nutzungsdauer zur Folge haben könnte.
Das Symbol auf dem Produkt weist darauf hin, dass es nicht als Hausmüll
behandelt werden darf. Es sollte stattdessen bei einer entsprechenden
Sammelstelle für das Recycling von Elektro- und Elektronik-Altgeräten
abgegeben werden. Die Entsorgung muss gemäß den geltenden
Vorschriften zur Abfallentsorgung vorgenommen werden.
Für weitere Informationen über die Behandlung, Wiederverwertung und das
Recycling dieses Produkts wenden Sie sich bitte an Ihre örtlich zuständige
Behörde, Ihr Müllabfuhrunternehmen oder an das Geschäft, in dem Sie das
Produkt erworben haben.