CANDY HOOVER GROUP Via Comolli 16 Brugherio – Italy
User Instructions
OVENS
2EN
Mode d’emploi
FOURS
23FR
Handleiding
OVENS
44NL

EN 2
Safety Indications
General Instructions
Product description
Display description
Use of the appliance
Connectivity
General notes on cleaning
Maintenance
Troubleshooting
Installation
Summary
3
7
9
10
13
15
19
19
22
65

EN 3
• During cooking, moisture may condense inside the oven cavity
or on the glass of the door. This is a normal condition. To reduce
•
tray.
• Avoid leaving food inside the oven after cooking for more than
•
•
•
•
•
•
•
•
•
vised children.
•
to clean the oven door glasses, as they can scratch the surface
Safety Indications

EN 4
and cause the glass to shatter.
•
tions.
•
•
• IF THE OVEN IS PROVIDED BY THE MANUFACTURER WITH
OUT PLUG:
• HE APPLIANCE MUST NOT BE CONNECTED TO THE POWER
SOURCE USING PLUG OR SOCKETS, BUT MUST BE DIRECTLY
CONNECTED TO THE SUPPLY MAINS. The connection to the
• IF THE OVEN IS PROVIDED BY THE MANUFACTURER WITH
PLUG:

EN 5
•
.
•
•
•
ing.
•
may cause a malfunction of the monitor. ln this case contact
customer service.
•
order to avoid overheating.
•

EN 6
•
•
ing and deteriorating the enamel of the insides.
• WARNING: Never remove the oven door seal.
•
•
•
•

EN 7
General Instructions
Safety Indications
read this manual carefully and retain it for future reference. Before installing the oven, take note
NOTE:
usage.
Electrical Safety
ENSURE THAT AN ELECTRICIAN OR QUALIFIED TECHNICIAN MAKES THE ELECTRICAL
CONNECTIONS.
CONNECTION

EN 8
WARNING
earth connection that has defective continuity.
NOTE:
Recommendations
Installation
First Use
EN 9
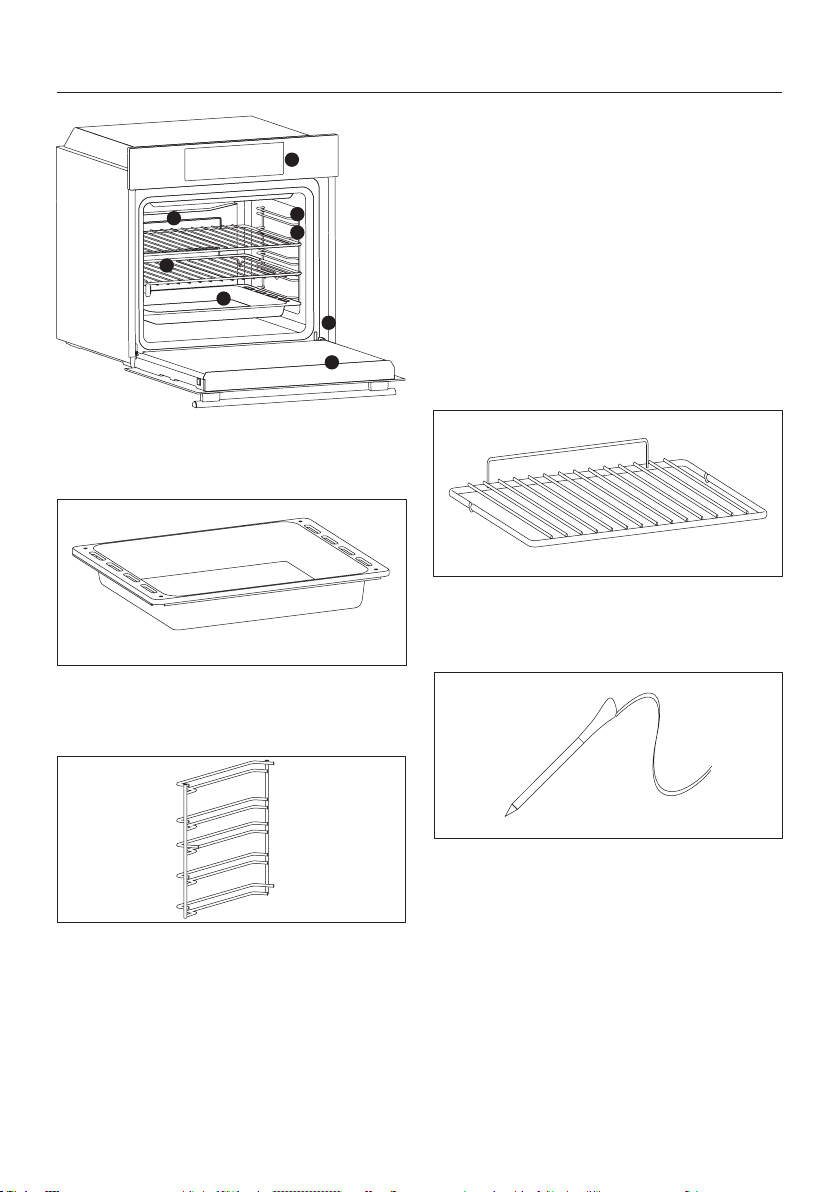
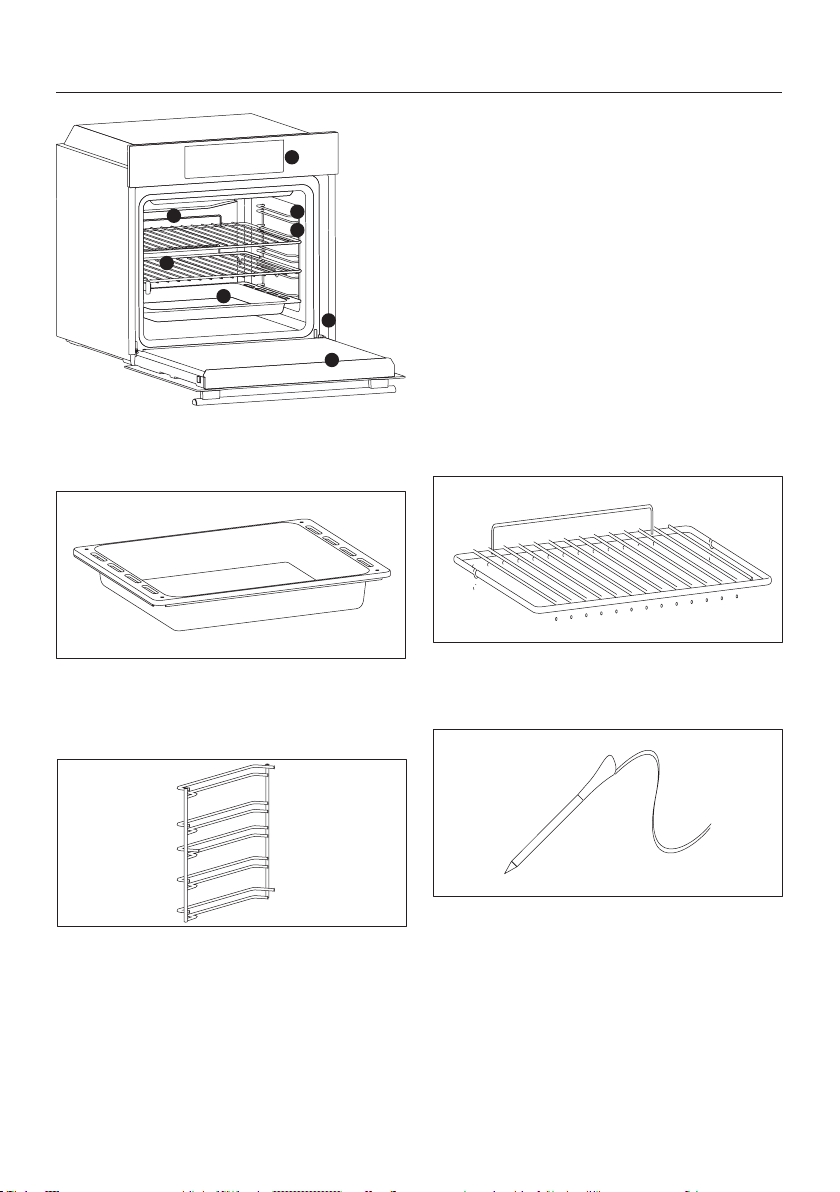
1.
3. Grids
Trays
6. Oven door
7.
8. Serial number
Product description
ACCESSORIES
Drip tray
Metal grid
on the grills.
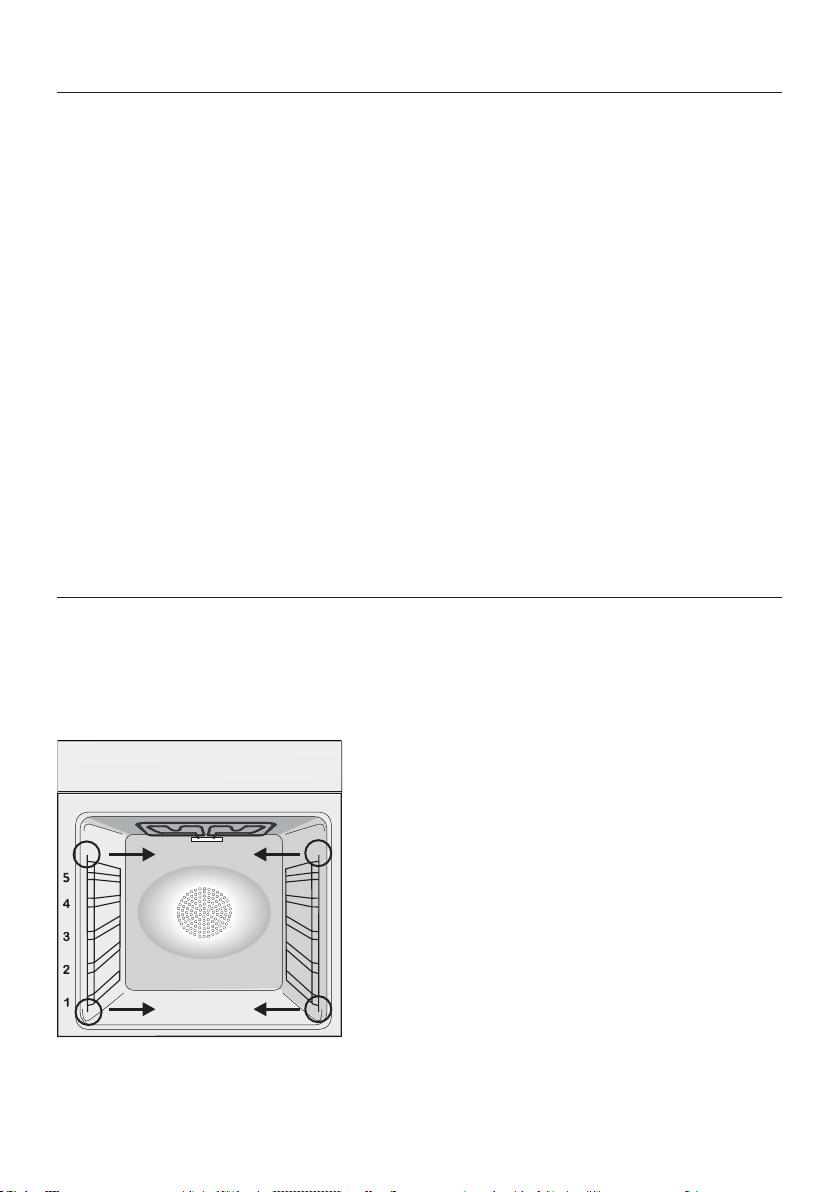
Lateral wire grids
1
2
7
3
8
4
6
5
Meat probe
ing cooking.
the cavity.
WARNINGS:
•
oven is still cool.
•
•

EN 10
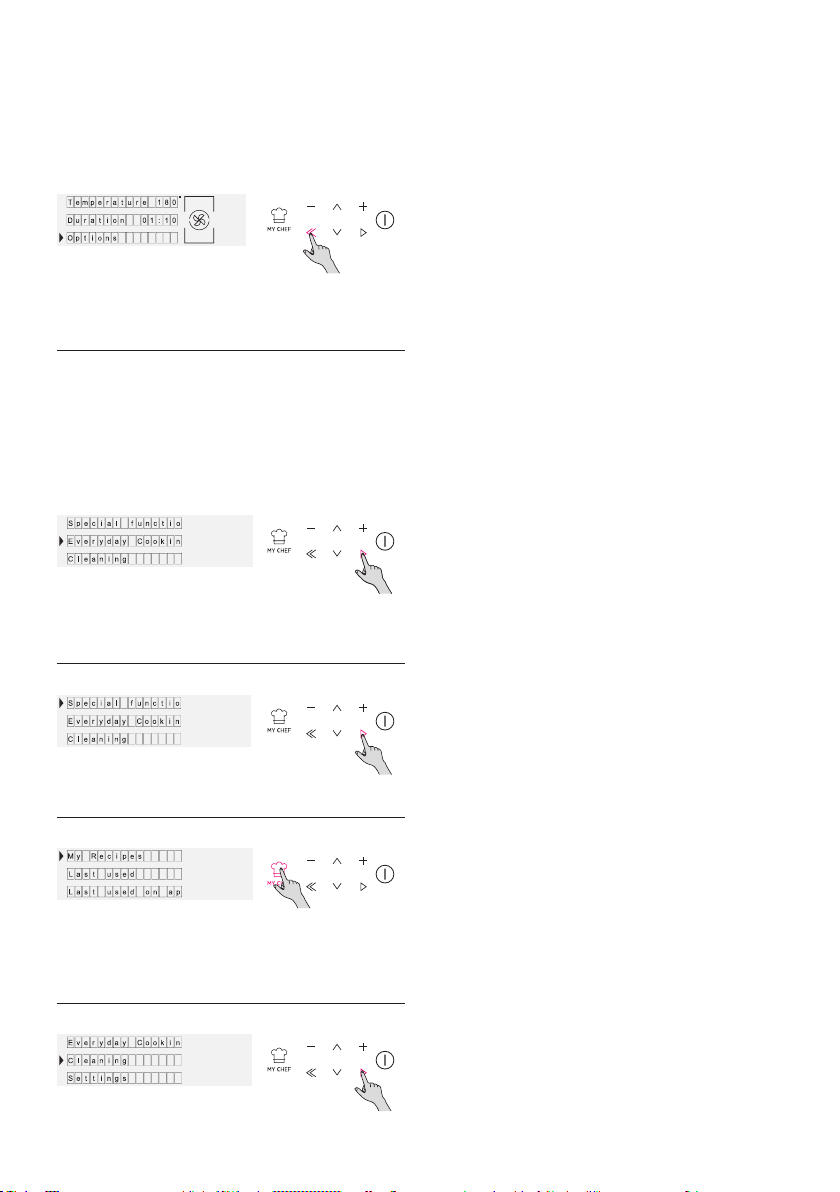
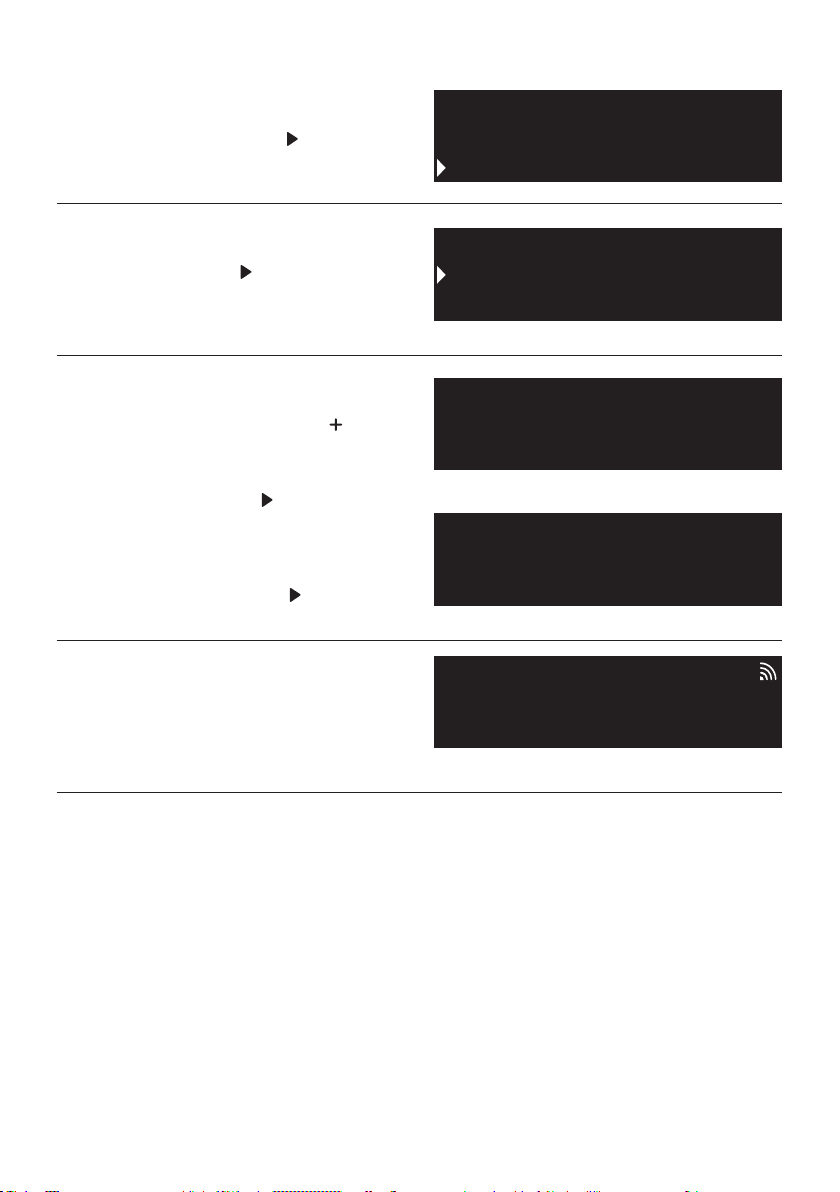
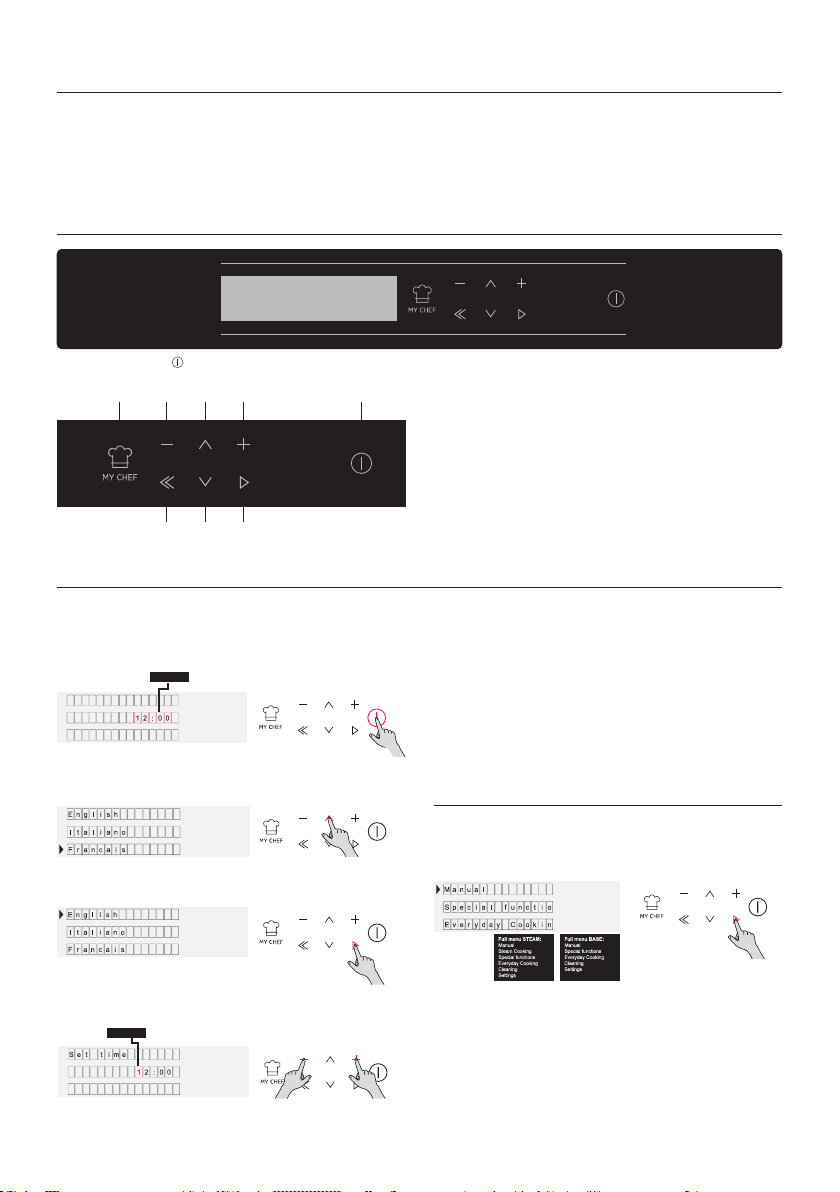
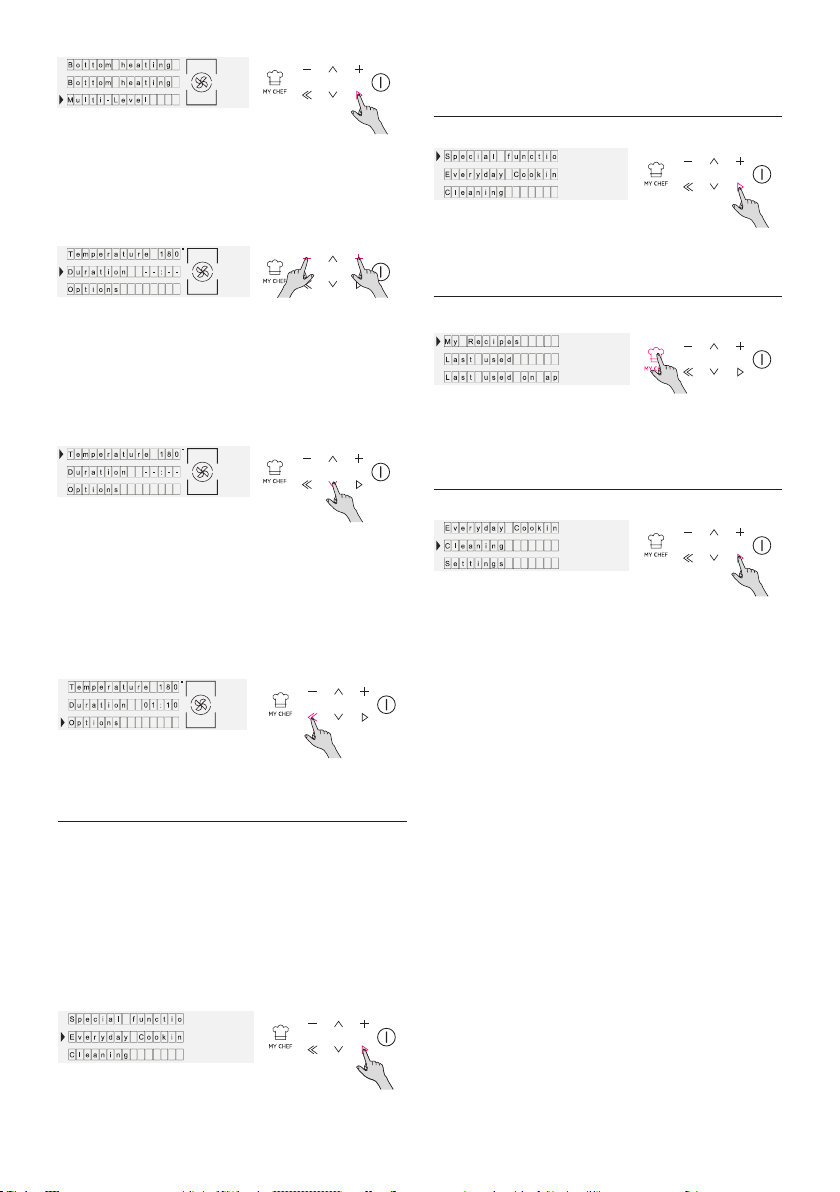
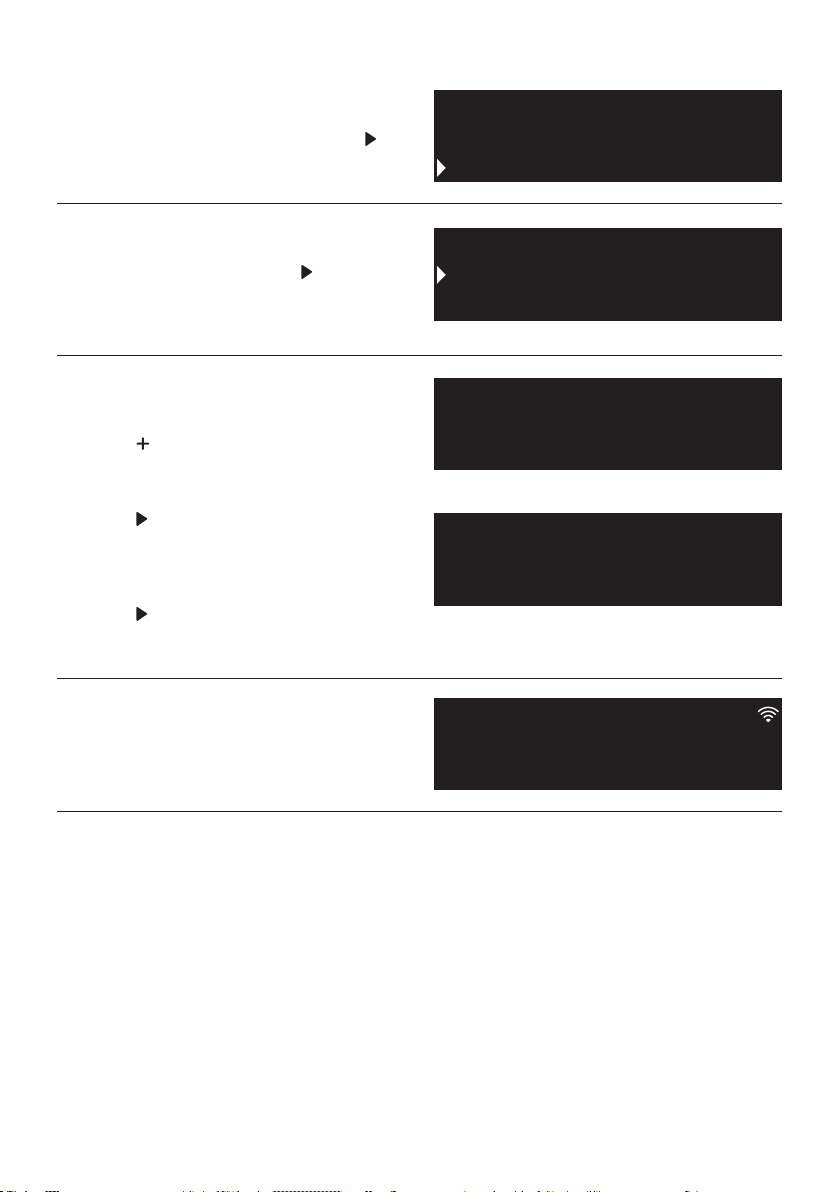
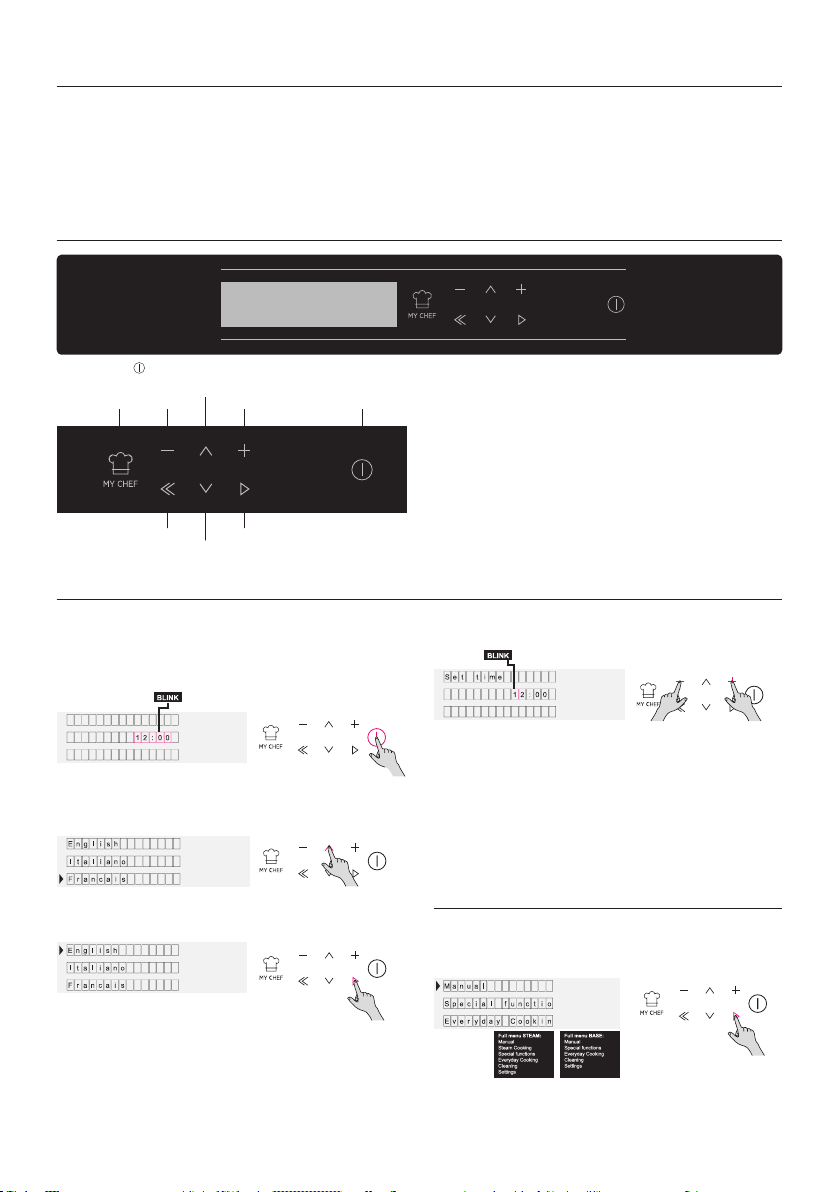
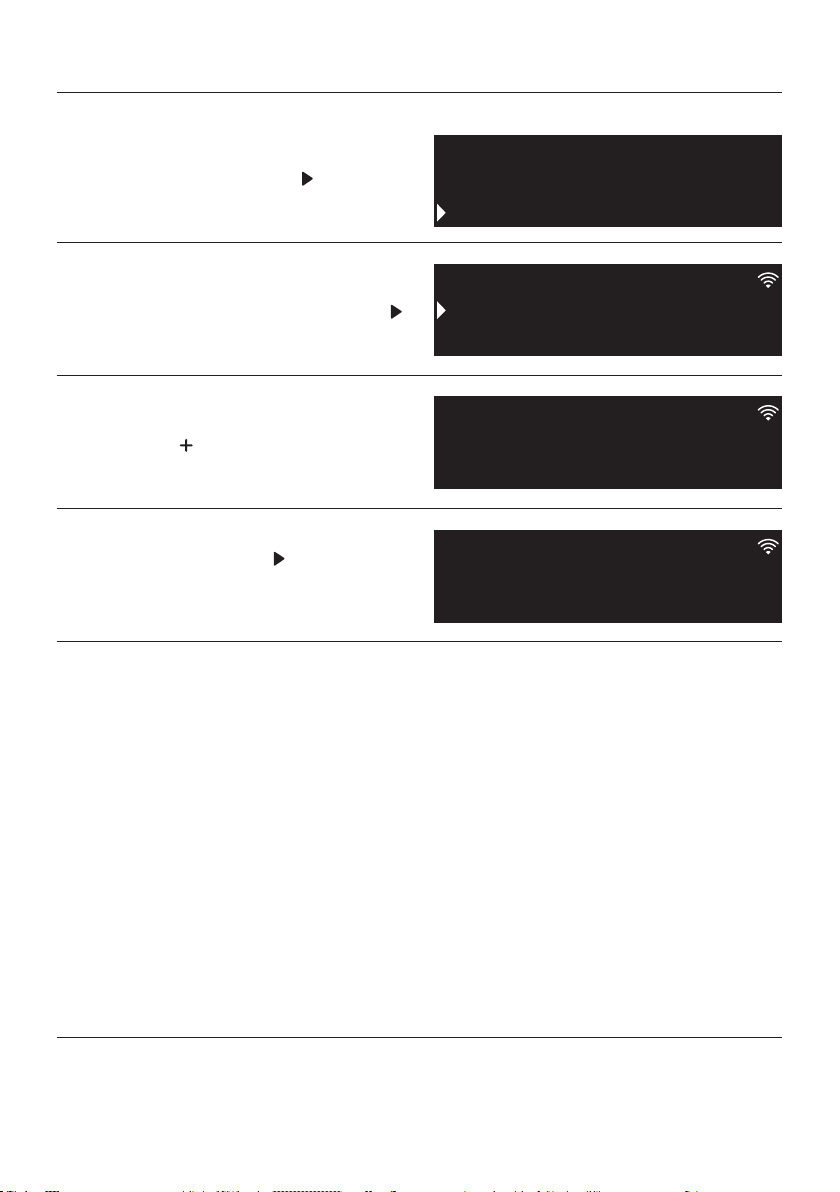
Display description
Product Setting Operating In Manual Mode
ON / OFF -
clock. When the oven is inactive, all the functions are
oking.
rature in selected function. Press OK to go ahead or
BACK to return to the cooking functions selection.
Press DOWN to change the cooking duration. It is
Please enter in the settings section and select the
Figure 1
Figure 5
Figure 6
Figure 7
Figure 8
Figure 2
Figure 3
Figure 4
MY CHEF MINUS
BACK
DOWN
UP
PLUS
OK
ON / OFF
EN 11
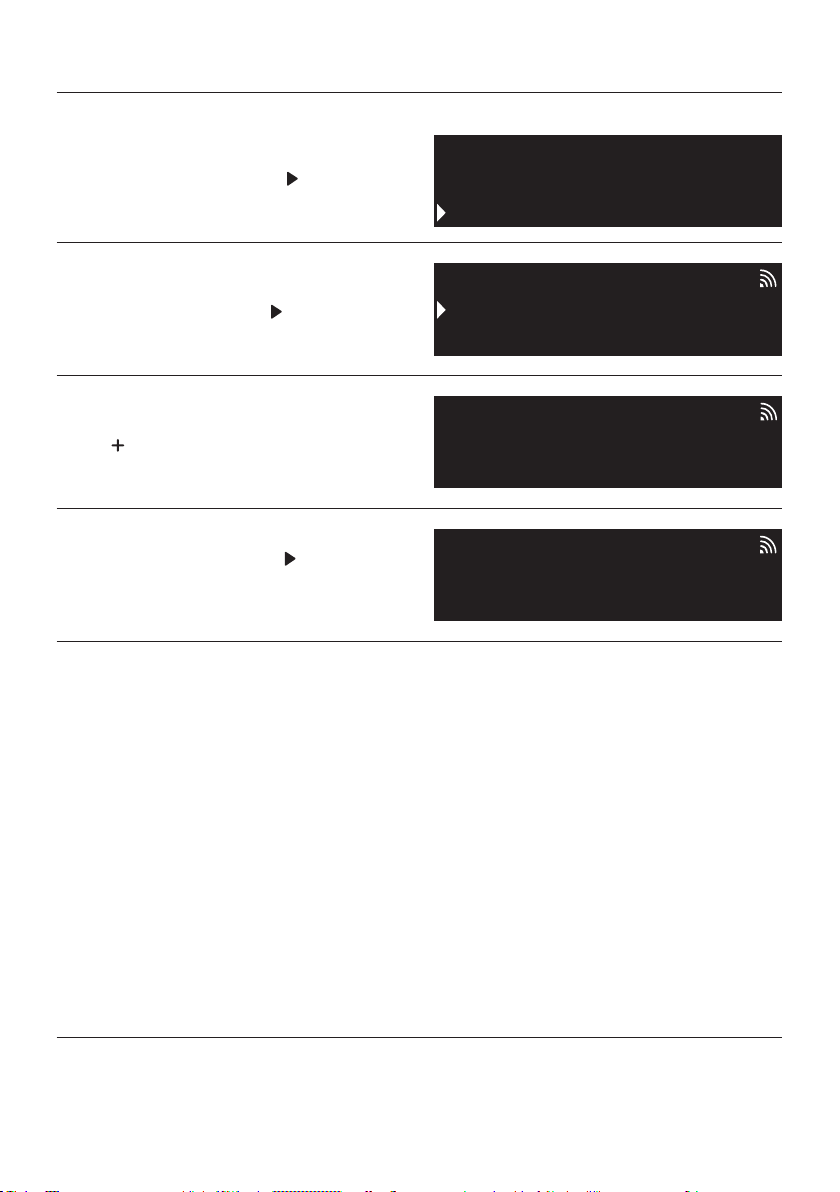
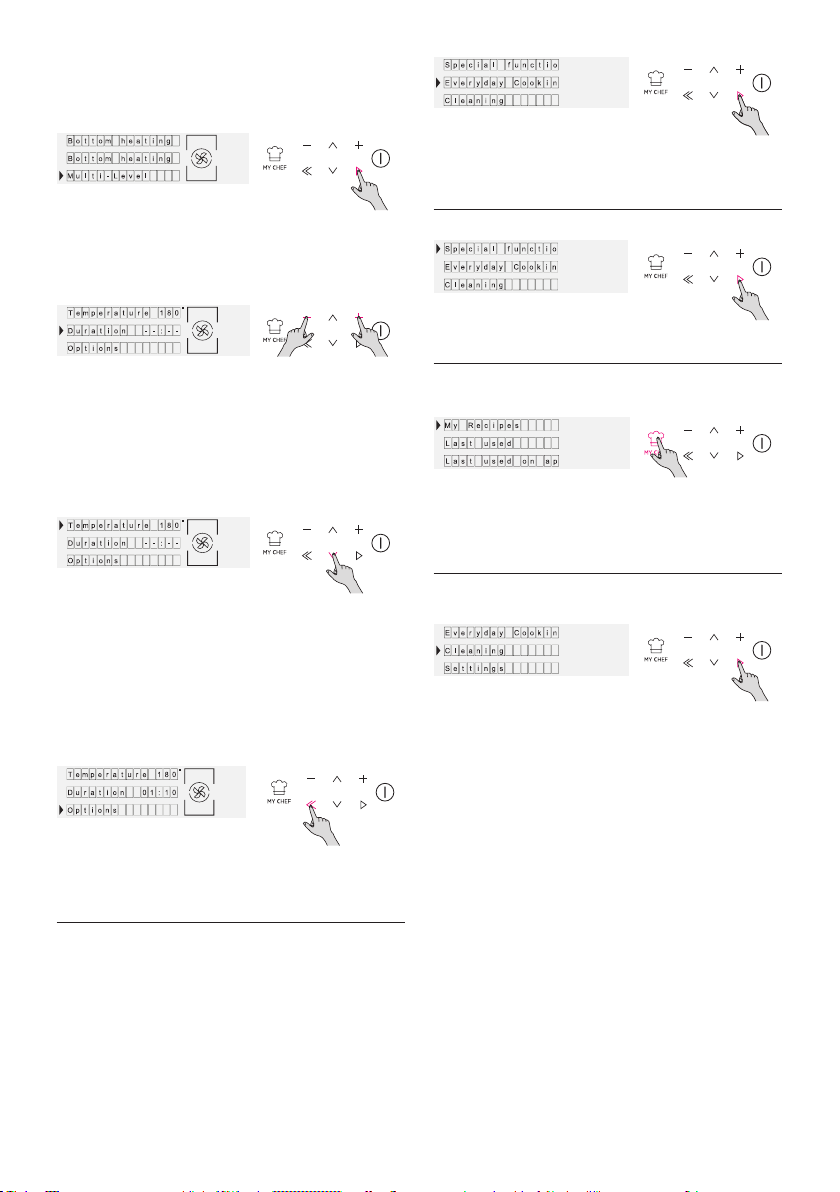
Operating In Special
Functions Mode
Operating In My Chef Mode
Operating In Cleaning
System Mode
Operating In Everyday
Cooking Mode
When a cooking is running you can:
Navigate the HOME menu till reaching the Everyday
Cooking area
UI and in APP.
to consumer needs.
Figure 9
Figure 10
Figure 11
Figure 12
Figure 13

EN 12
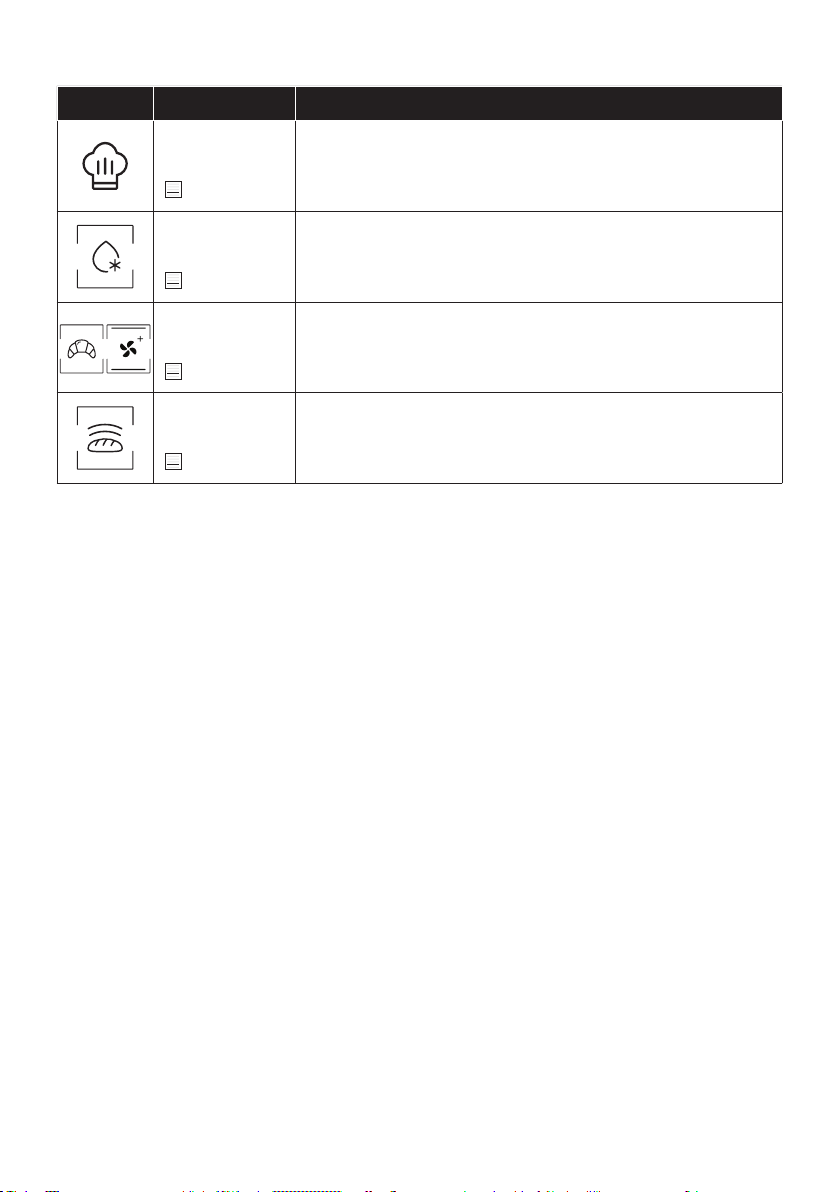
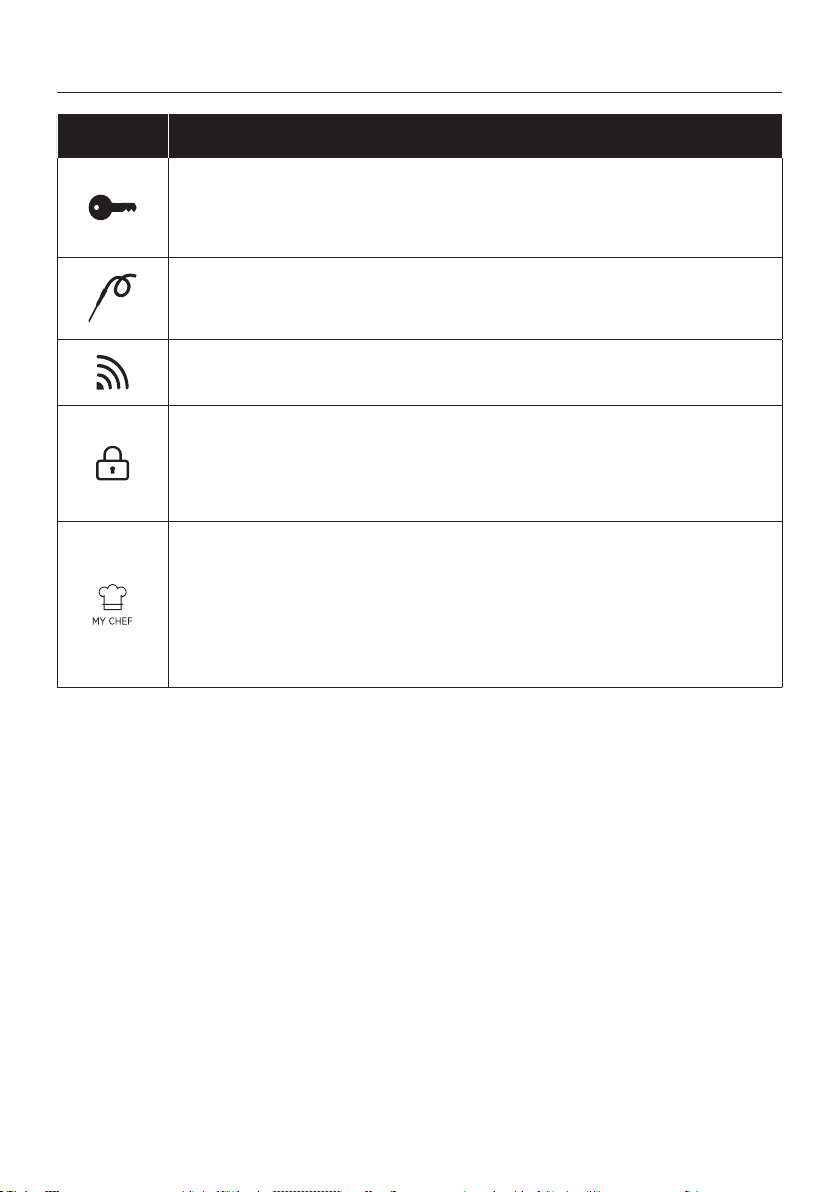
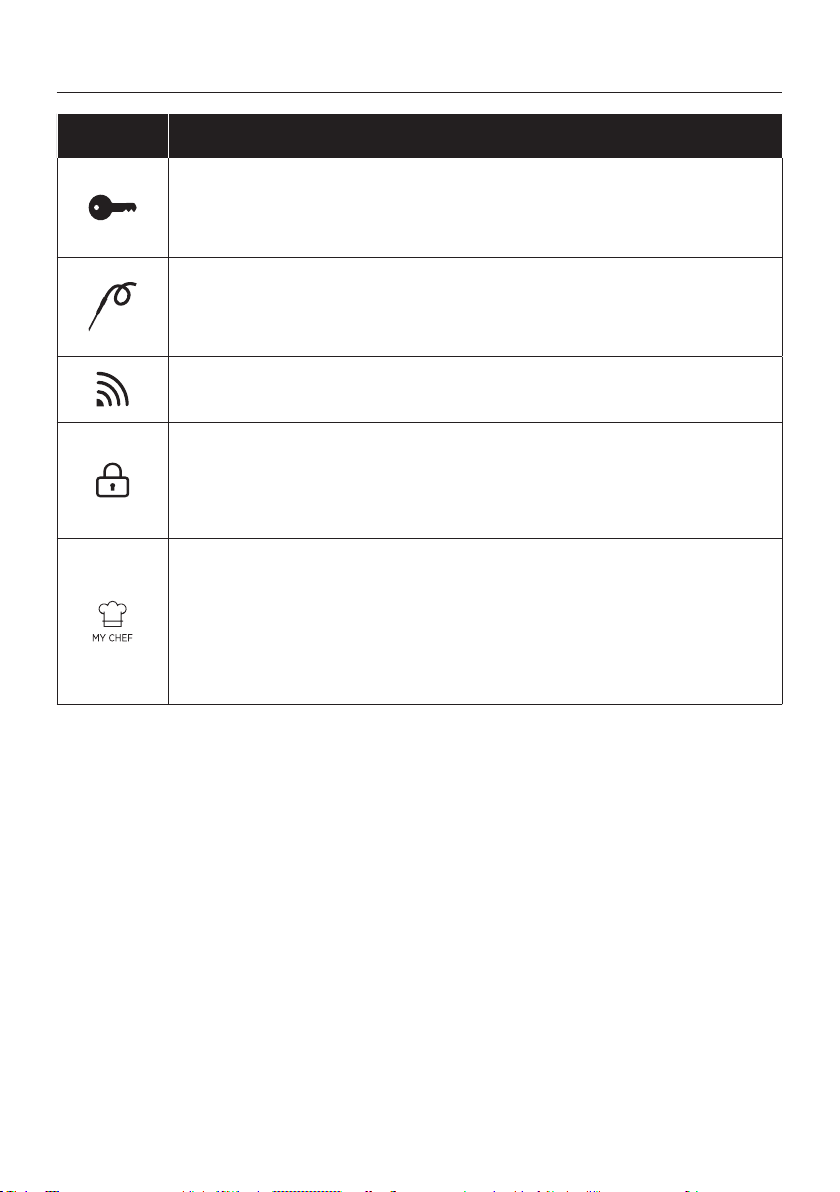
Function Descriptions
FUNCTION DESCRIPTION
KEY LOCK
MEAT PROBE
WIFI
LOCK
the door is unlocked.
MY CHEF

EN 13
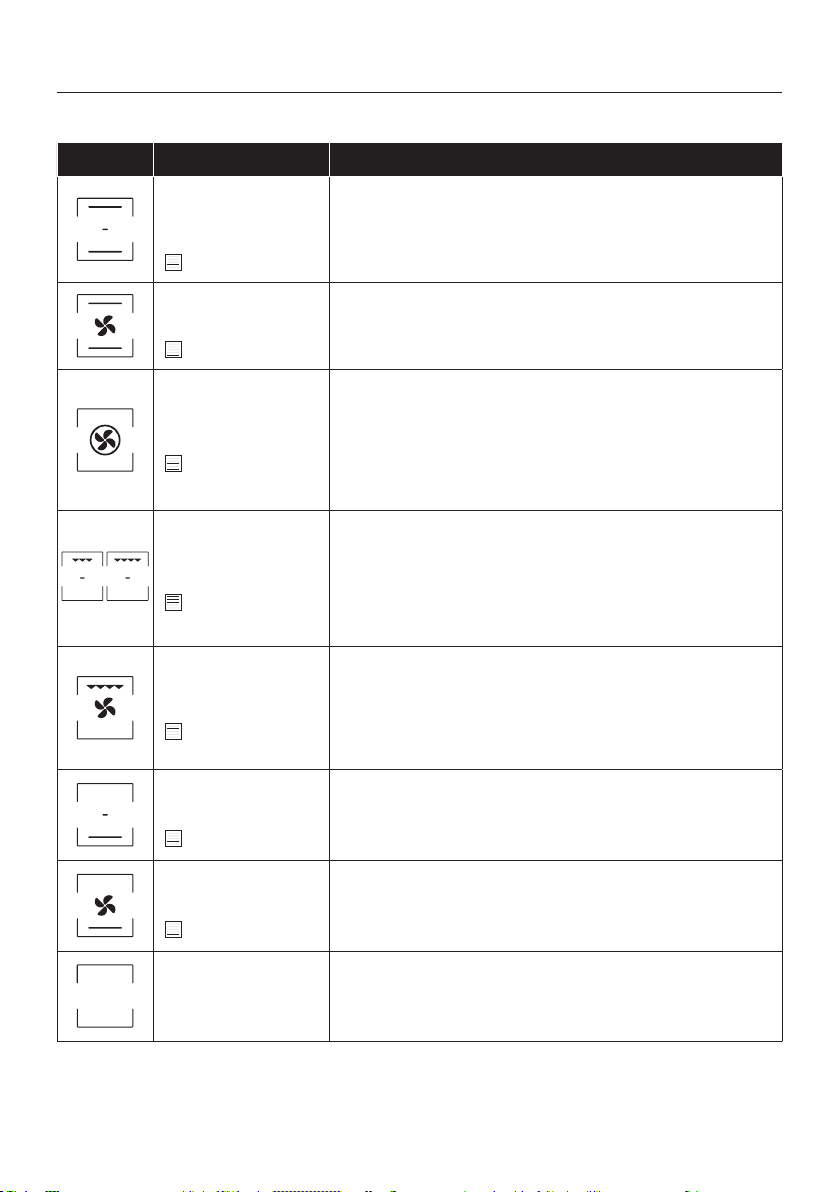
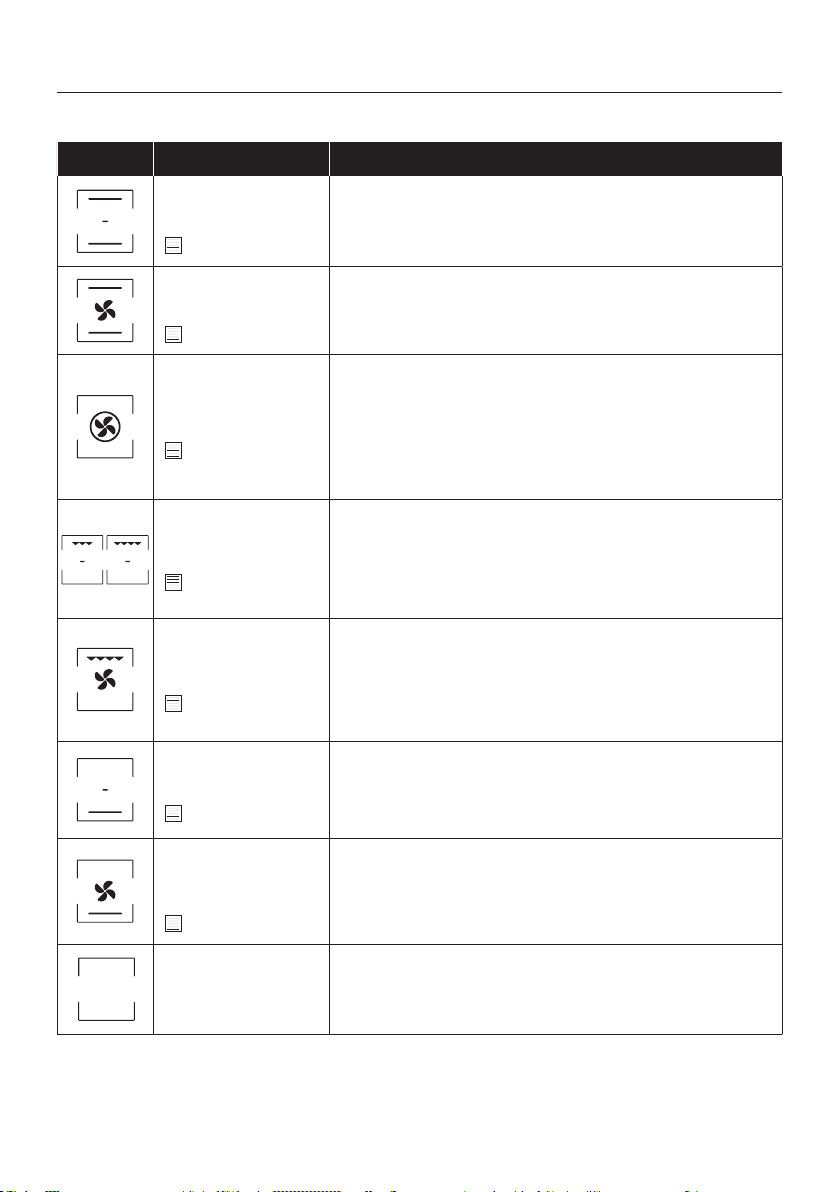
Symbol Description Suggestions
Conventional ***
160-200°C **
2° level
Convection + Fan
240°C **
1° level
Multi-level
180-200°C **
1°/3° level
Grill
L5 (power) **
3°/4°/5° level
Grill + Fan
200°C **
4° level
meats.
Bottom heating
160-180°C **
2° level
Bottom heating + Fan
210°C **
1° level
IDEAL FOR: tarts.
Pyrolysis+
Pyrolysis Eco
of dirt from the oven cavity.
COOKING MODES *
Use of the appliance
EN 14
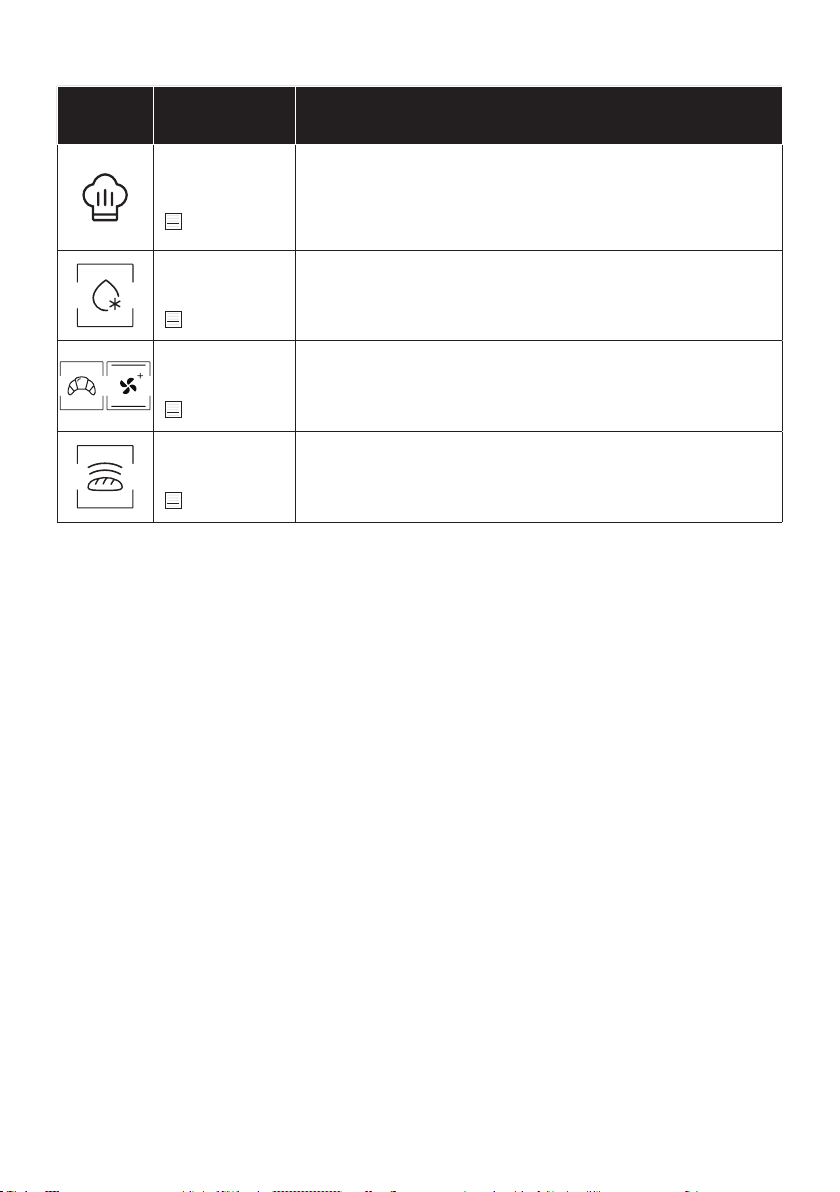
SPECIAL FUNCTIONS *
Symbol Description Suggestions
Master bake ***
180-200°C **
2° level
For healthy cooking, this function reduces the amount of fat or oil re
Defrost
40°C
2° level
Convection+
180-200°C *
2° level
Leavening
40°C
2° level
EN 15
Technology Wi-Fi Bluetooth
Standard
WIRELESS PARAMETERS
PRODUCT INFORMATION FOR NETWORKED EQUIPMENT
•
How to activate wireless network port:
• Navigate to settings > WiFi
•
1.
enrollment.
3.
•
1.
How to deactivate wireless network port:
• Navigate to settings > WiFi
•
1.
•
Connectivity

EN 16
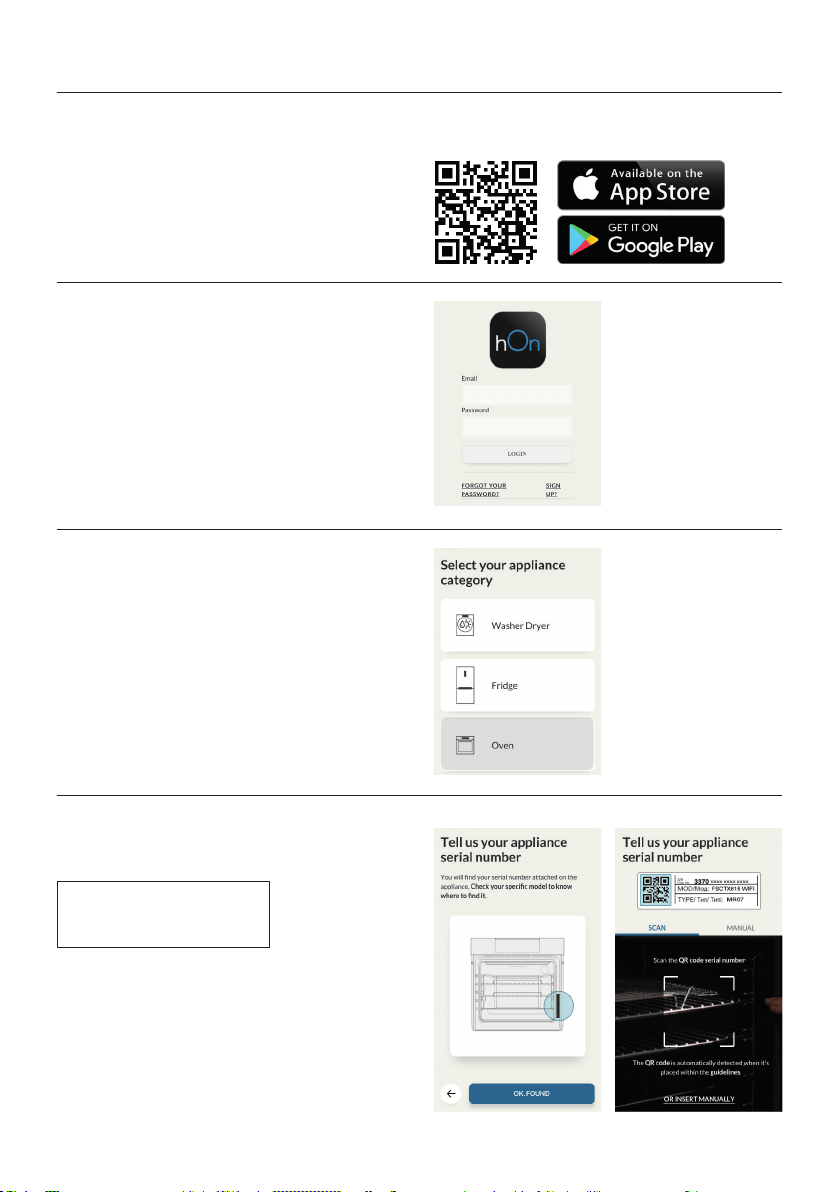
Oven enrollment on app
ON THE SMARTPHONE
Step 1
•
Step 2
•
Step 3
•
Step 4
•
EN 17
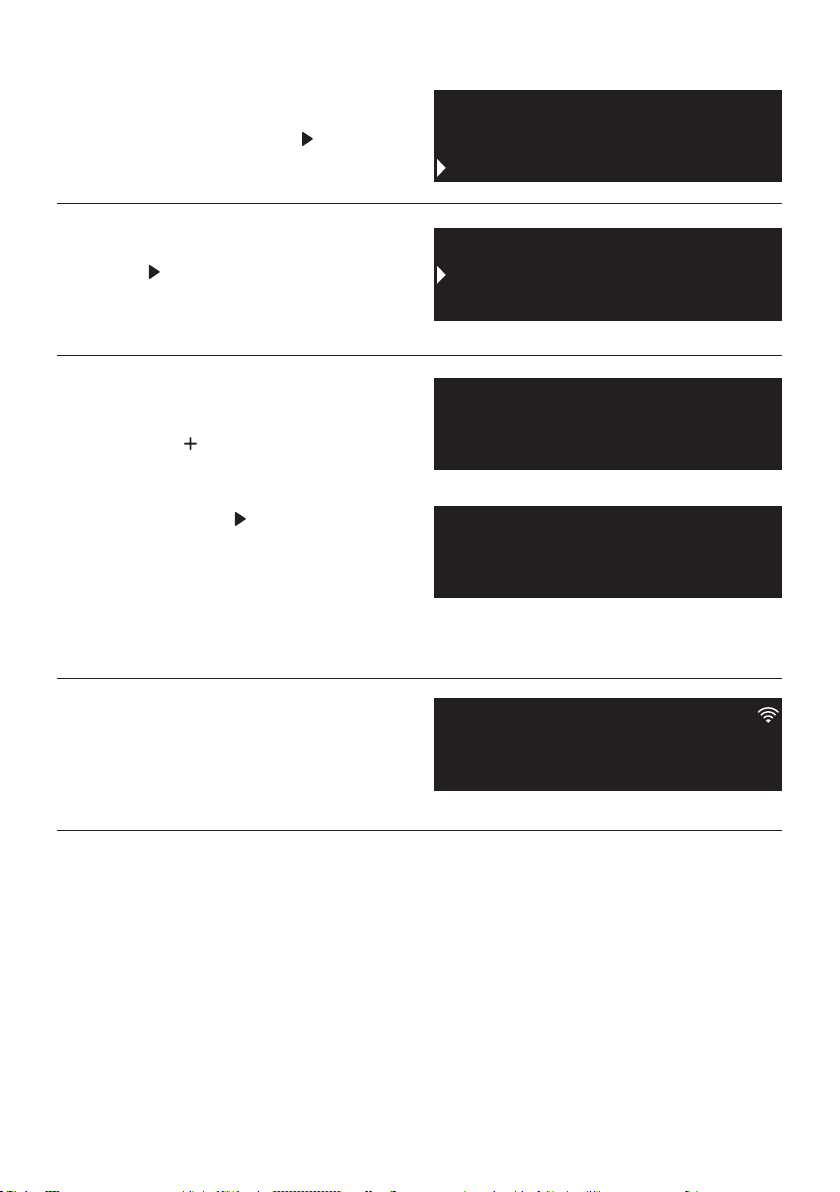
ON THE APPLIANCE
Step 5
•
Step 6
•
Step 7
•
•
•
Step 8
•
NOTE:
•
•
•
•
Cleaning
Settings
Everday Cooking
Wifi
Sounds
Lamp
Easy
Enrollment
Standard
Enrollment
Enrollment in progress
EN 18
NOTE:
Step 1
•
Step 2
•
Step 3
•
the
Step 4
•
Remote control mode
Cleaning
Settings
Everday Cooking
Remote control active
On
Remote control
Remote control
Wifi
Lamp

EN 19
through regular cleaning. Wait for the oven to
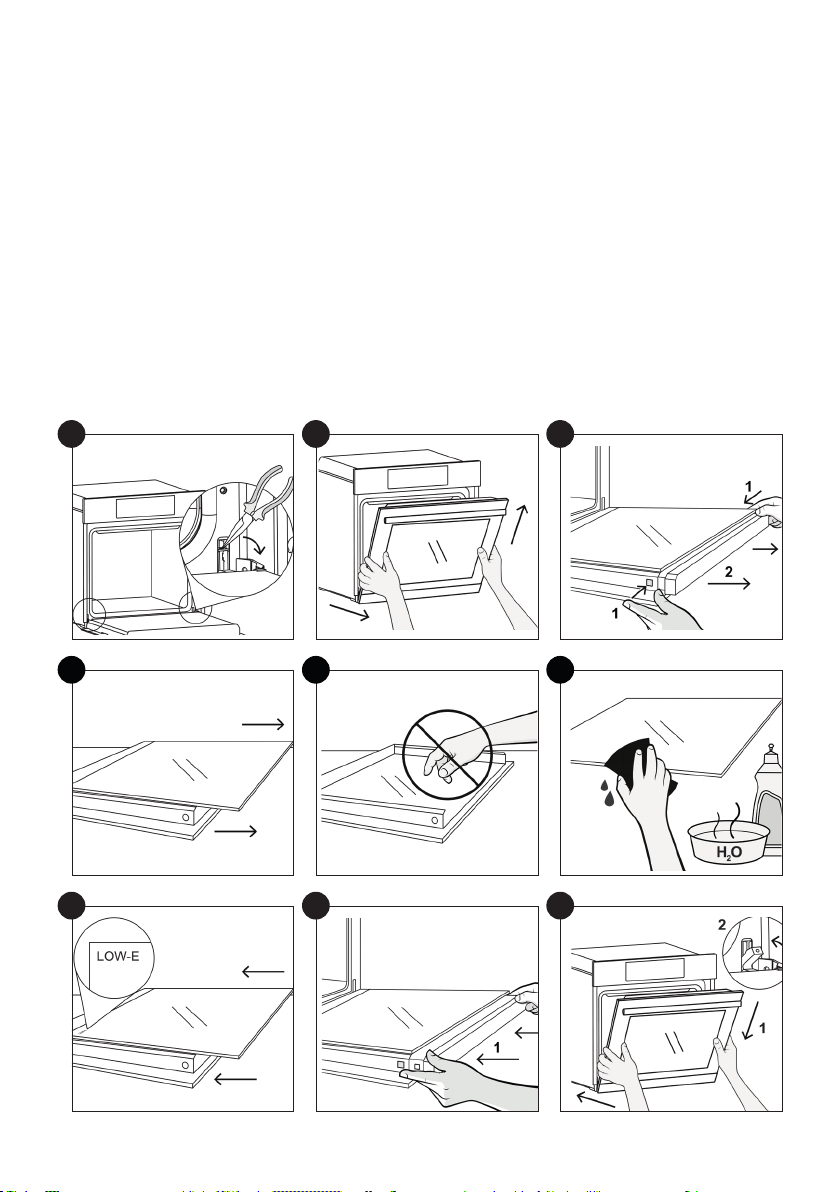
GLASS PARTS
OVEN WINDOW SEAL
General notes on cleaning
ACCESSORIES
DRIP PAN
oven. Pour the hot fat into a container and
REMOVAL AND CLEANING OF THE SIDE RACKS
Maintenance
CHANGING THE BULB
the glass cover.

EN 20
1.
2.
3.
4.
5.
6.
7.
8.
9.
1
4
7
2
5
8
3
6
9

EN 21
Pyrolysis
NOTE :
TWO PYROLYTIC CYCLE
ECO PYROCLEAN : Cleans a moderately stai
SUPER PYROCLEAN : Cleans a heavily stained
ducts on a Pyrolytic oven!
Tip : Carrying out Pyrolytic cleaning immedia
of residual heat, thus saving energy.
Before executing a pyrolytic cycle:
•Remove all the accessories from the oven
because they are not able to tolerate the
high temperatures used during the pyrolytic
cleaning cycle ; in particular removing grids,
side racks and the telescopic guides (refer
to the chapter REMOVING GRIDS AND SIDE
RACKS) . In ovens with meat probe it is ne-
cessary, before making the cleaning cycle ,
close the hole with the nut provided.
•Remove any large spillages or stains as it
would take too long to destroy them. Also
excessively large amounts of grease could
ignite when subject to the very high tempe-
ratures of the Pyrolytic cycle.
•Close the oven door.
•Excess spillage must be removed before
cleaning.
• Clean the oven door;
• Remove large or coarse food residues from
the inside of the oven using a damp sponge.
Do not use detergents;
• Remove all accessories and the sliding rack
kit (where present);
• Do not place tea towels.
Using the pyrolitic cycle:
if the oven is moderately dirty reduce the clea
locked.
Use of the pyrolytic cycle in Touch Control
ovens:
min.

EN 22
Waste management and environmental protection
(that can have a negative ef
and recover all the materials. Individuals can
In many countries, domestic collections may
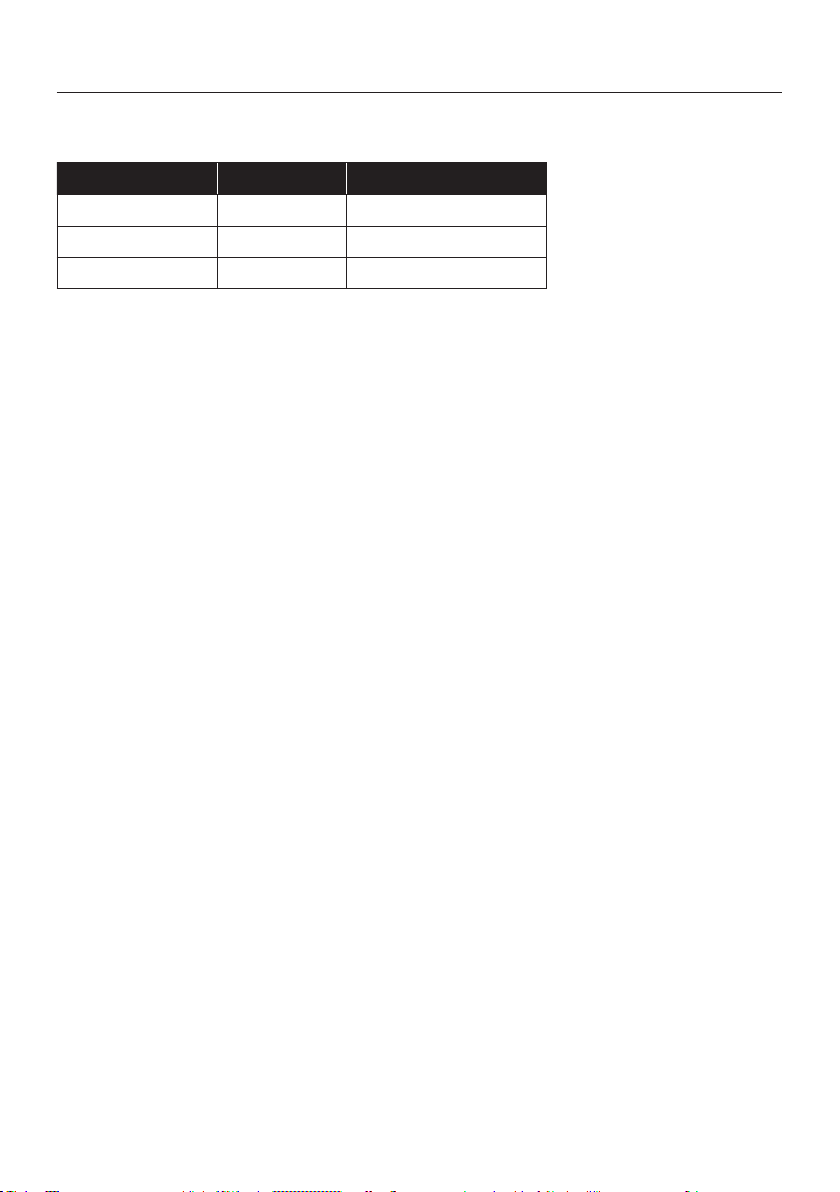
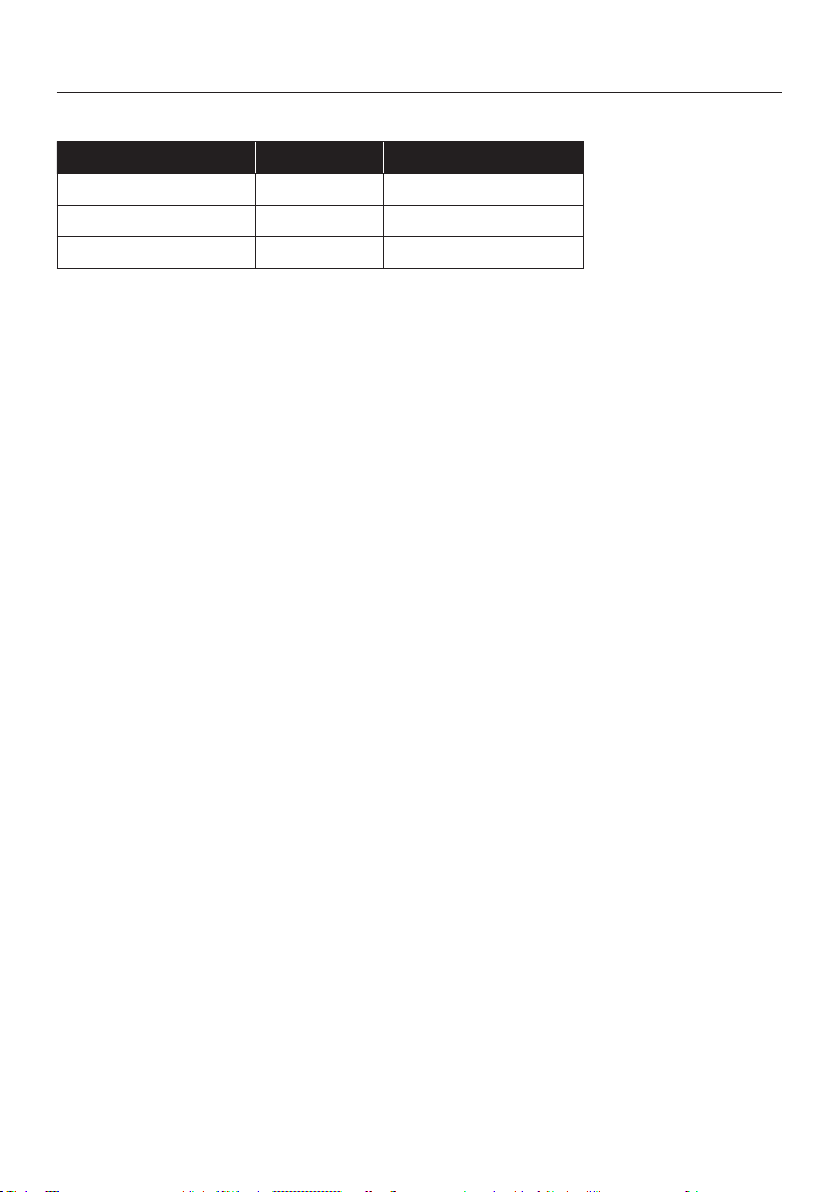
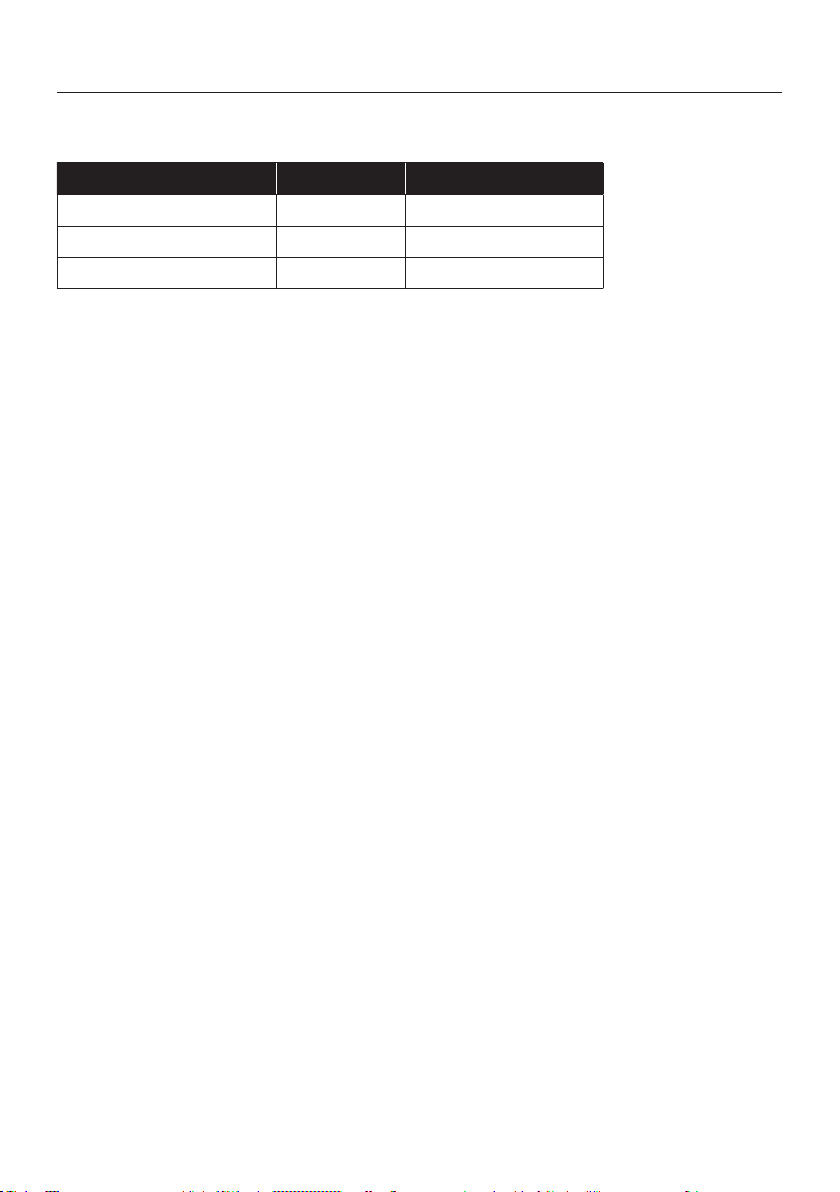
Troubleshooting
Problem Possible cause Solution
the oven does not heat
The clock is not set Set the clock
The oven does not
Ensure that the necessary settings
are correct
No reaction of the
touch user interface
Steam and condensation on the user in
condensation layer
SAVING AND RESPECTING THE ENVIRON-
MENT
residual heat that the oven continues to gen
time slot.

FR 23
Sommaire
Conseils De Sécurité
Instructions Générales
Description du produit
Description de l’achage
Utilisation de l’appareil
Connectivité
Nettoyage du four et maintenance
Entretien
Dépannage
Installation
23
28
30
31
34
36
40
40
43
65
•
•
dans un ustensile ouvert.
•
•
Conseils De Sécurité

FR 24
•
•
•
•
•
•
•
des enfants sans surveillance.
•
de la vitre.
•
•
•
four.
•
• SI LE FOUR EST FOURNI PAR LE FABRICANT SANS BOU
CHON:

FR 25
• SI LE FOUR EST FOURNI PAR LE FABRICANT AVEC FICHE:

FR 26
•
•
•
•
•
•
nettoyage.
•
•
•
•
•
•

FR 27
•
•
•
•
• AVERTISSEMENT : Avant de lancer le cycle de nettoyage au
•
•
•

FR 28
Instructions Générales
Indications de sécurité
REMARQUE:
y toucher.
Sécurité électrique
LE BRANCHEMENT ELECTRIQUE DOIT ÊTRE REALISE PAR UN INSTALLATEUR AGREE OU
UN TECHNICIEN DE QUALIFICATION SIMILAIRE.
surer une alimentation normale du four.
CONNEXION

FR 29
ATTENTION
REMARQUE:
Recommandations
Installation
FR 30
1. Panneau de commande
3. Grilles
6. Porte du four
7.
8. Numéro de série
Description du produit
1
2
7
3
8
4
6
5
ACCESSOIRES
Bac de récupération de l’eau
Grille métallique
cuisson des aliments sur les grilles.
Grilles latérales
Sonde de cuisson
AVERTISSEMENTS :
•
sonde de cuisson.
•
FR 31
Première Utilisation
Description de l’achage
Marche / Arrêt ->
MY CHEF MOINS
RETOUR
EN BAS
EN HAUT
PLUS
OK
ON/OFF
Conguration du produit
Figure 1
Figure 2
Figure 3
Figure 4
four.
Figure 5
CLIGNOTE
CLIGNOTE
Fonctionnement en mode
Manuel
FR 32
Figure 6
Figure 7
Figure 8
Fonctionnement en mode
Fonctions spéciales
Fonctionnement en mode
Cuisine de tous les jours
cuisson.
Figure 9
Figure 10
Figure 11
Fonctionnement en mode
My Chef
Fonctionnement en mode
Système de nettoyage
Figure 12
Figure 13
FR 33
Descriptions des fonctions
Symbole Suggestion
VERROUILLAGE DE LA TOUCHE
SONDE DE CUISSON
WIFI
VERROUILLAGE
MY CHEF
FR 34
Symbole Description Suggestions
Convection
naturelle ***
160-200°C **
niveau 2°
Chaleur tournante
240°C **
niveau 1°
Chaleur pulsée
180-200°C **
niveau 1°/3°
Gril
L5 (puissance) **
niveau 3°/4°/5°
Turbogril
200°C **
niveau 4°
Sole
160-180°C **
niveau 2°
Sole Brassée
210°C **
niveau 1°
IDÉAL POUR : tartes.
Pyrolyse+
Pyrolyse ÉCO
MODES DE CUISSON *
Utilisation de l’appareil

FR 35
FONCTIONS SPÉCIALES *
Sym-
bole
Description Suggestions
Master bake ***
180-200°C **
niveau 2°
cuisson uniformes.
Décongélation
40°C
niveau 2°
Convection+
180-200°C *
niveau 2°
Levage
40°C
niveau 2°
des aliments cuits au four.
FR 36
INFORMATIONS SUR LE PRODUIT POUR LES ÉQUIPEMENTS EN RÉSEAU
•
Comment activer le port de réseau sans l :
•
•
et facile.
1.
clignoter.
3.
•
1.
Comment désactiver le port de réseau sans f il:
•
•
1.
•
Connectivité
Technologie Wi-Fi Bluetooth
Standard
PARAMÈTRES SANS FIL

FR 37
Connexion du four à l’application
SUR LE SMARTPHONE
Étape 1
•
Étape 2
•
Étape 3
•
Étape 4
•
FR 38
SUR L’APPAREIL
Étape 5
•
Étape 6
•
Étape 7
•
touche
.
•
touche
.
•
touche
.
Étape 8
•
REMARQUE:
•
•
•
•
Cleaning
Settings
Recipes
Wifi
Sounds
Lamp
Easy
Enrollment
Standard
Enrollment
Enrollment in progress

FR 39
REMARQUE:
Étape 1
•
Étape 2
•
Étape 3
•
Étape 4
•
Mode Contrôle à distance
Cleaning
Settings
Recipes
Remote control
Wifi
Lamp
On
Remote control
Remote control active
FR 40
PARTIE VITREE
JOINT DE LA PORTE
Nettoyage du four et maintenance
RETRAIT ET NETTOYAGE DES GRILLES LATÉRALES
Entretien
ACCESSOIRES
LECHEFRITE
frite du four. Prendre soin de reverser les
duit du commerce.
REMPLACEMENT DE L’AMPOULE
couvercle en verre.
FR 41
1
2.
3.
4.
5.
6.
7.
8.
9.
1
4
7
2
5
8
3
6
9

FR 42
Pyrolysis
REMARQUE:
DEUX CYCLES DE PYROLYSE
• PYRO ECO : nettoyage du four moyennement
minutes.
• PYRO SUP:
toyer.
En utilisant le cycle de pyrolyse:
Utilisation du cycle de pyrolyse dans des fours
Touch Control:
FR 43
La gestion des déchets et la protection de vironnement
Õèóõƀöèñ÷äóóäõèìïèö÷ðäõôøƀ
æòñéòõðƀðèñ÷ Ƙ ïä çìõèæ¡
÷ìùè " !"¦!)¦ÞÎ õèïä÷ìùè äøû
çƀæëè÷ö çđƀôøìóèðèñ÷ö ƀïèæ¡
÷õìôøèöè÷ƀïèæ÷õòñìôøèö
¤ÍÎÎÎ¥ÕèöÍÎÎÎæòñ÷ìèññèñ÷
Ƙ ïä éòìö çèö öøåö÷äñæèö óòïï¡
øäñ÷èö ¤ôøì óèøùèñ÷äùòìõ çèöæòñöƀôøèñæèö
ñƀêä÷ìùèö öøõ ïđèñùìõòññèðèñ÷¥ è÷ çèö ƀïƀ¡
ðèñ÷öçèåäöè¤õƀø÷ìïìöäåïèö¥Òïèö÷ìðóòõ÷äñ÷
çè öòøðè÷÷õè ïèö ÍÎÎÎ Ƙ çèö ÷õäì÷èðèñ÷ö
öóƀæìĤôøèöèñùøèçđèû÷õäìõèè÷çđƀïìðìñèõçè
éäŚòñäóóõòóõìƀè÷òø÷èöïèööøåö÷äñæèöóòïï¡
øäñ÷èöóøìöçèõƀæøóƀõèõè÷õèæüæïèõ÷òøöïèö
ðä÷ƀõìäøû
Ìëäæøñóèø÷íòøèõøñõƽïèìðóòõ÷äñ÷ôøäñ÷Ƙ
ïä óõò÷èæ÷ìòñ çè ïđèñùìõòññèðèñ÷ æòñ÷õè ïèö
ÍÎÎÎ Ùòøõ ä÷÷èìñçõè æè÷ òåíèæ÷ìé ìï èö÷ ìð¡
óƀõä÷ìéçèöøìùõèôøèïôøèöõƙêïèöƀïƀðèñ÷äìõèö
:
¬ÕèöÍÎÎÎñèçòìùèñ÷óäöƸ÷õè÷õäì÷ƀöæòððè
çèöçƀæëè÷öðƀñäêèõö
¬Òïöçòìùèñ÷Ƹ÷õèõèðìöäøûóòìñ÷öçèæòïïèæ÷è
äóóõòóõìƀöêƀõƀöóäõïäðøñìæìóäïì÷ƀòøóäõçèö
öòæìƀ÷ƀöìððä÷õìæøïƀèö Íäñö óïøöìèøõö óäüö
ìïèö÷óòööìåïèçèæòïïèæ÷èõƘçòðìæìïèïèöÍÎÎÎ
ùòïøðìñèøû
Dépannage
Problemes Cause possible Solution
Õèéòøõñèæëäøģèóäö Õđëòõïòêèñđèö÷óäöõƀêïƀè Ûƀêïèýïđëòõïòêè
Õèéòøõñèæëäøģèóäö
Õäöƀæøõì÷ƀèñéäñ÷èö÷
äæ÷ìùƀè
Íƀöäæ÷ìùèõïäöƀæøõì÷ƀèñéäñ÷
Õèéòøõñèæëäøģèóäö
Õèöõƀêïäêèöñƀæèööäìõèö
ñèöòñ÷óäöìðóòöƀö
Êööøõèý¡ùòøöôøèïèö
óäõäðƙ÷õèöñƀæèööäìõèö
sont corrects
¬ Õòõöôøè ùòøö äæëè÷èý øñ ñòøùèï äóóäõèìï
ùòøöçèùèýõè÷òøõñèõïđäñæìèñäøùèñçèøõôøìïè
õƀæøóƙõèêõä÷øì÷èðèñ÷äøæäöóäõæäöƘæòñ¡
çì÷ìòñ ôøè ïđƀôøìóèðèñ÷ öòì÷ çè ÷üóè ƀôøìùä¡
ïèñ÷è÷óòööƙçèïèöðƸðèöéòñæ÷ìòñöôøèæèïøì
fourni.
ÉCONOMIE ET RESPECT DE L’ENVIRONNE-
MENT
Õòõöôøè æèïä èö÷ óòööìåïè ƀùì÷èõ ïè
óõƀæëäøģäêèçøéòøõè÷ƀùì÷èõçèïèéäìõè÷òøõñ¡
èõƘùìçè×đòøùõèýïäóòõ÷èçøéòøõôøèïòõöôøè
æèïäèö÷ñƀæèööäìõèæäõìïüäçèöçƀóèõçì÷ìòñö
çèæëäïèøõƘæëäôøèéòìöôøđìïèö÷òøùèõ÷Ùòøõ
øñè ƀæòñòðìè çđƀñèõêìè öìêñìĤæä÷ìùè ƀ÷èìñ¡
çõèïèéòøõèñ÷õè%è÷! ðìñø÷èöäùäñ÷ïäĤñçè
æøìööòñóõƀùøèè÷ø÷ìïìöèõïäæëäïèøõôøèïèéòøõ
æòñ÷ìñøèçèêƀñƀõèõÐäõçèýïèöíòìñ÷öóõòóõèö
è÷èñåòñƀ÷ä÷óòøõƀùì÷èõ÷òø÷èçƀóèõçì÷ìòñ
çđƀñèõêìè Üì ùòøöäùèý øñ æòñ÷õä÷ ƀïèæ÷õìôøè
äùèæ øñ ÷äõìé ëèøõè æõèøöè ïè óõòêõäððè
ēæøìööòñçìģƀõƀèĔóèø÷ùòøöéäìõèõƀäïìöèõçèö
ƀæòñòðìèö çđƀñèõêìè èñ çƀóïäŚäñ÷ ïè çƀåø÷
çøóõòêõäððèƘøñìñ÷èõùäïïèçè÷èðóöƘ÷äõìé
õƀçøì÷

NL 44
Veiligheidsvoorschriften
Avvertenze Generali
Productbeschrijving
Beschrijving van het display
Beschrijvingen van de functies
Connectiviteit
Algemene opmerkingen over de reiniging
Onderhoud
Problemen oplossen
Installation
Belangrijke veiligheidsinstructies
44
49
51
52
54
57
61
61
64
65
•
glas van de deur condenseren. Dit is normaal. Om dit ef
schakelen van de stroom voordat u voedsel in de oven doet.
•
• Laat geen voedsel in de oven achter na het koken voor langer dan
•
Veiligheidsvoorschriften

NL 45
• delen aanraakt.
•
•
•
•
staan.
•
•
•
•
•
instructies.
•
•
•

NL 46
• HET APPARAAT MAG NIET OP DE VOEDINGSBRON WORDEN
AANGESLOTEN DOOR MIDDEL VAN STEKKERS OF CON
met een contactscheiding die voldoet aan de eisen voor over
•
contactscheiding in overeenstemming met de vereisten voor

NL 47
•
•
kant, of via de klantenservice.
•
•
serveonderdelen.
•
len.
•
raat schoon te maken.
•
met de klantenservice.
•
•
•
• WAARSCHUWING: Bekleed de ovenruimte niet met aluminium

NL 48
•
contact komen met het hete email, kunnen smelten en het email
•
deur.
•
•
•
•
• WAARSCHUWING: alvorens de automatische reinigingscyclus
te starten:
•
geleverde moer te sluiten alvorens de reinigingscyclus te starten.
•
•

NL 49
Avvertenze Generali
Veiligheidsaanwijzingen
Opmerking:
Elektrische veiligheid
VERZEKER DAT DE ELEKTRISCHE AANSLUITINGEN WORDEN GEMAAKT DOOR EEN ELE-
KTRICIEN OF GEKWALIFICEERD TECHNICUS.
AANSLUITING

NL 50
WAARSCHUWING
stroomdoorgang heeft.
NB:
Aanbevelingen
Installatie

NL 51
1
2
7
3
8
4
6
5
1.
3. Roosters
6. Ovendeur
7.
8. Serienummer
Productbeschrijving
ACCESSOIRES
Lekbak
Metalen rooster
vallen.
Zijroosters
Vleessonde
WAARSCHUWINGEN:
•
e
•
NL 52
Eerste gebruik
VOORAFGAANDE REINIGING
Beschrijving van het display
Instelling van het product
ON / OFF -
Ga naar het instellingengedeelte en selecteer de
voor meer details.
Afbeelding 1
Afbeelding 5
Afbeelding 2
Afbeelding 3
Afbeelding 4
MY CHEF MIN
TERUG
OMLAAG
OMHOOG
PLUS
OK
ON / OFF
Gebruik in de
handbedieningsmodus
NL 53
Afbeelding 8
Afbeelding 7
Afbeelding 6
Gebruik in Dagelijkse
bereidingen
Afbeelding 9
Afbeelding 10
Gebruik in de modus
Speciale Functies
Gebruik in de modus My Chef
Gebruik in de modus
Reinigingssysteem
functies.
smethoden
Afbeelding 11
Afbeelding 12
Afbeelding 13
NL 54
Beschrijvingen van de functies
Symbool Tip
TOETSENVERGRENDELING
VLEESSONDE
naar het hoofdmenu.
WIFI
SLOT
MY CHEF
NL 55
geventileerde functies.
Symbool Beschrijving Suggesties
Conventioneel***
160-200°C **
2° level
Met ventilator
240°C **
1° level
I
Multi-level
180-200°C **
1°/3° level
I
Grill
L5 (power) **
3°/4°/5° level
Grill + ventilator
200°C **
4° level
G
Bodemverwarming
160-180°C **
2° level
Bodemverwarming
+ Ventilator
210°C **
1° level
I
ventilator die lucht in de oven laat circuleren. Het voorkomt
Pyrolyse+
Pyrolyse Eco
hoeveelheden vuil uit de ovenruimte.
KOOKMODI *
Gebruik van het apparaat
NL 56
SPECIALE FUNCTIES*
Sym-
bool
Beschrijving Suggesties
Master bake ***
180-200°C **
2° niveau
en.
Ontdooien
40°C
2° niveau
ervan aan te tasten.
Soft+
180-200°C *
2° niveau
cycli met verschillende ventilatorsnelheden.
Gisting
40°C
2° niveau
geventileerde functies.
NL 57
Technologie Wi-Fi Bluetooth
Standaard
DRAADLOZE PARAMETERS
PRODUCTINFORMATIE VOOR NETWERKAPPARATUUR
•
Een draadloze netwerkpoort activeren:
•
•
1.
de registratie te starten.
3.
•
1.
Een draadloze netwerkpoort deactiveren:
•
•
1.
•
Connectiviteit
NL 58
Verbinding oven op het apparaat
OP DE SMARTPHONE
Stap 1
•
Stap 2
• Log in of meld u aan.
Stap 3
•
Stap 4
•
handmatig in.
NL 59
OP HET APPARAAT
Stap 5
•
.
Stap 6
•
.
Stap 7
•
VERBINDING
.
•
•
Stap 8
•
NOTE:
•
•
•
•
Cleaning
Settings
Recipes
Wifi
Sounds
Lamp
Easy
Enrollment
Standard
Enrollment
Enrollment in progress
NL 60
NOTE:
of te resetten.
Stap 1
•
Stap 2
• Vanuit het instellingenmenu, selecteert u
Stap 3
•
Stap 4
• Bevestig de selectie met
Afstandsbedieningsmodus
Cleaning
Settings
Recipes
Remote control
Wifi
Lamp
On
Remote control
Remote control active

NL 61
en, gaat het langer mee. Wacht tot de oven
is afgekoeld voordat u het met de hand gaat
GLAZEN DELEN
Algemene opmerkingen over de reiniging
VERWIJDERING EN REINIGING VAN ROOSTERS
Onderhoud
AFDICHTING OVENVENSTER
ACCESSOIRES
LEKBAK
VERWIJDEREN EN REINIGEN VAN DE
ZIJLINGSE ROOSTERS
roosters in omgekeerde volgorde.

NL 62
1
4
7
2
5
8
3
6
9
1.
2.
3.
4.
ondergrond.
5.
6.
7.
8.
9.

NL 63
Pyrolyse
ergegeven.
OPMERKING:
oververhit raakt.
steld:
ECO PYROCLEAN: Reinigt een gematigd gekleu
SUPER PYROCLEAN:
ten.
Voordat een pyrolytische cyclus wordt uitge-
voerd:
• Verwijder alle accessoires uit de oven omdat
ze niet bestand zijn tegen de hoge temperatu-
ren die worden gebruikt tijdens de pyrolytische
reinigingscyclus; in het bijzonder het verwijde-
ren van roosters, zijrekken en de telescopische
geleiders (zie het hoofdstuk VERWIJDEREN
VAN ROOSTERS EN ZIJREKKEN). In ovens met
vleessonde is het noodzakelijk om, voordat u
de reinigingscyclus uitvoert, het gat met de
meegeleverde moer te sluiten.
• Verwijder grote hoeveelheden morsen of
vlekken omdat het te lang zou duren om ze te
vernietigen. Ook kunnen te grote hoeveelhe-
den vet ontbranden als ze worden blootgesteld
aan de zeer hoge temperaturen van de pyrolyti-
sche cyclus.
• Sluit de ovendeur.
• Overtollig morsen moet worden verwijderd
vóór het reinigen.
• Reinig de ovendeur;
• Verwijder grote of grove voedselresten uit
de binnenkant van de oven met een vochtige
spons. Gebruik geen schoonmaakmiddelen;
• Verwijder alle accessoires en de glijdende
stellage (indien aanwezig);
• Plaats geen theedoeken.
De pyrolitische cyclus gebruiken:
de deur vergrendeld is.
trol ovens:
NL 64
Afvalbeheer en milieubescherming
elektrisch en elektronisch
alen te herstellen en te recyclen.
door de gemeente of door geregistreerde
Problemen oplossen
Probleem Mogelijke oorzaak Oplossing
De klok is niet ingesteld Stel de klok in
Het kinderslot is ingeschakeld Schakel het kinderslot uit
ENERGIE BESPAREN MET RESPECT VOOR
HET MILIEU
inhoud te laten draaien. Laat de ovendeur niet
eren. Houd de dichtingen schoon en in goede
staat, om energieverlies te voorkomen. Als u
een contract heeft met een laag energie tarief,
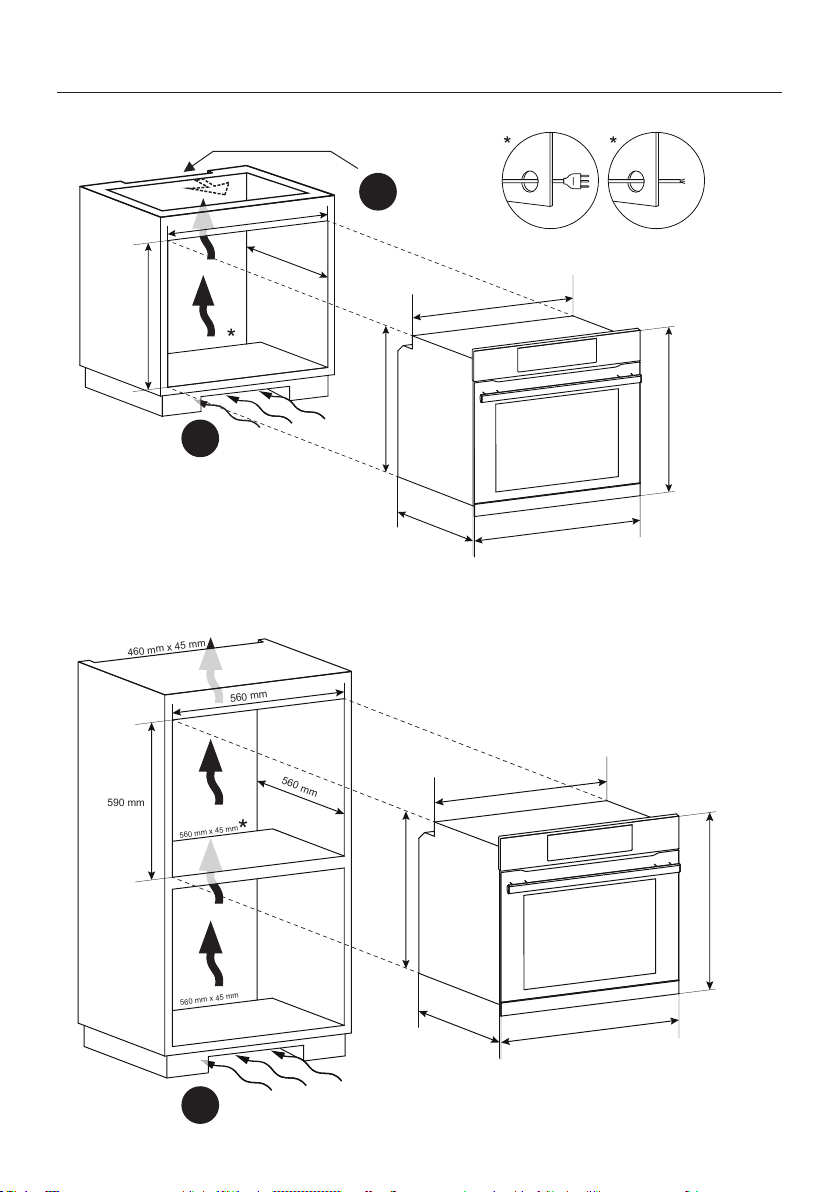
INSTALLATION 65
Installation
A
A
B
560 mm
560 mm
600 mm
560 mm x 45 mm
595 mm
560 mm
548,5 mm
595 mm
577,5 mm
20 mm
560 mm
560 mm
590 mm
560 mm x 45 mm
560 mm x 45 mm
460 mm x 45 mm
595 mm
560 mm
548,5 mm
595 mm
577,5 mm
20 mm
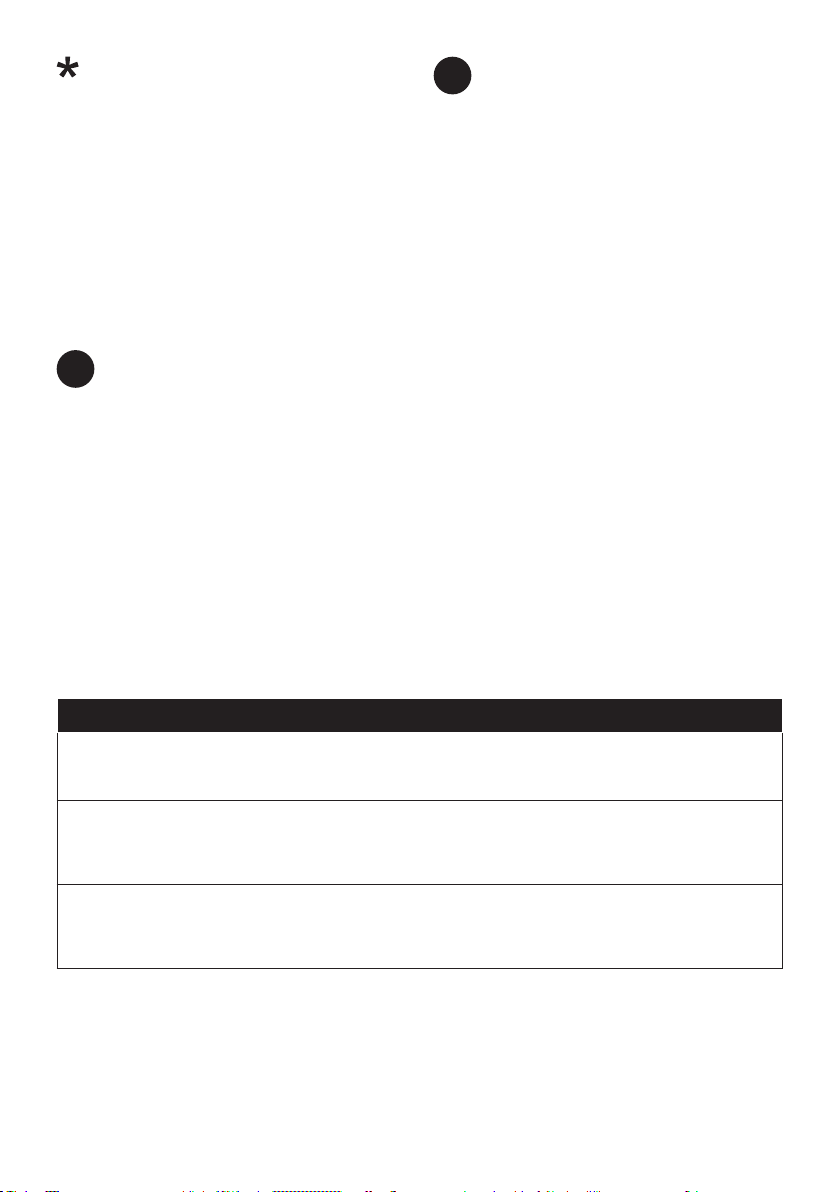
INSTALLATION 66
A
B
EN
EN
.
EN If the oven does not have a cooling fan, create
EN
FR
NL
FR
FR
mm
NL
NL
FR
NL


70013857 07.2022 REV A