Loading ...
Loading ...
Loading ...

Page 27
9PX 1-3 KVA US_EN
ENGLISH
3. Installation
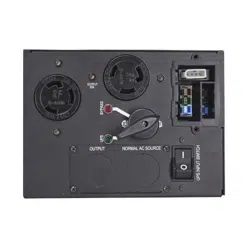
9PX 2200GRT & 9PX 3000GRT
1
MBP
LOAD
29 30 3331 34 35 36
15
28
32
6 7
5
1. Connect the input
36
on the
HotSwap MBP module to the
AC-power source.
2. Connect the UPS input cable
1
to
the “UPS Input socket”
35
on the
HotSwap MBP module.
3. Connect the UPS outlet
5
to the
“UPS Output”
34
on the HotSwap
MBP module (using the cable
28
supplied for G models).
These cables and the connectors
are marked in red.
4. Connect the equipment to the
outlets
29
on the HotSwap MBP
module. These outlets differ,
depending on the version of the
HotSwap MBP module.
Caution: when using HotSwap
MBP, do not use UPS outlets to
directly power equipment. As
operating the bypass switch
33
will cut supply voltage to the
equipment.
HotSwap MBP module operation
32 33
31
UPS start-up with the HotSwap MBP module
1. Check that the UPS is correctly connected to the HotSwap MBP module.
2. Set switch
33
to Normal position.
3. Start the UPS by pressing the ON/OFF button
on the UPS control panel.
The load is supplied by the UPS.
LED
31
"UPS ON - OK to switch" on the HotSwap MBP module goes ON.
HotSwap MBP module test
1. Set switch
33
to Bypass position and check that the load is still supplied.
2. Set switch
33
back to Normal position.
The HotSwap MBP module has a rotary
switch
33
with two positions:
Normal the load is supplied by the UPS,
LED
31
is on.
Bypass the load is supplied directly by
the AC-power source. LED
32
is on.
Loading ...
Loading ...
Loading ...