Loading ...
Loading ...
Loading ...
ENGLISH
6
4. To remove, press the clips and pull the steam jet nozzle
away from thehose.
WARNING: Inspect the seal on the steam nozzle
of the hose before each use (Figure H). If the seal is
missing or damaged contact your nearest authorized
repair agent. Do not use theappliance.
CAUTION: Ensure that the hose and/or steam nozzle
is securely fastened before using the hand-held
steamcleaner.
Figure H
34
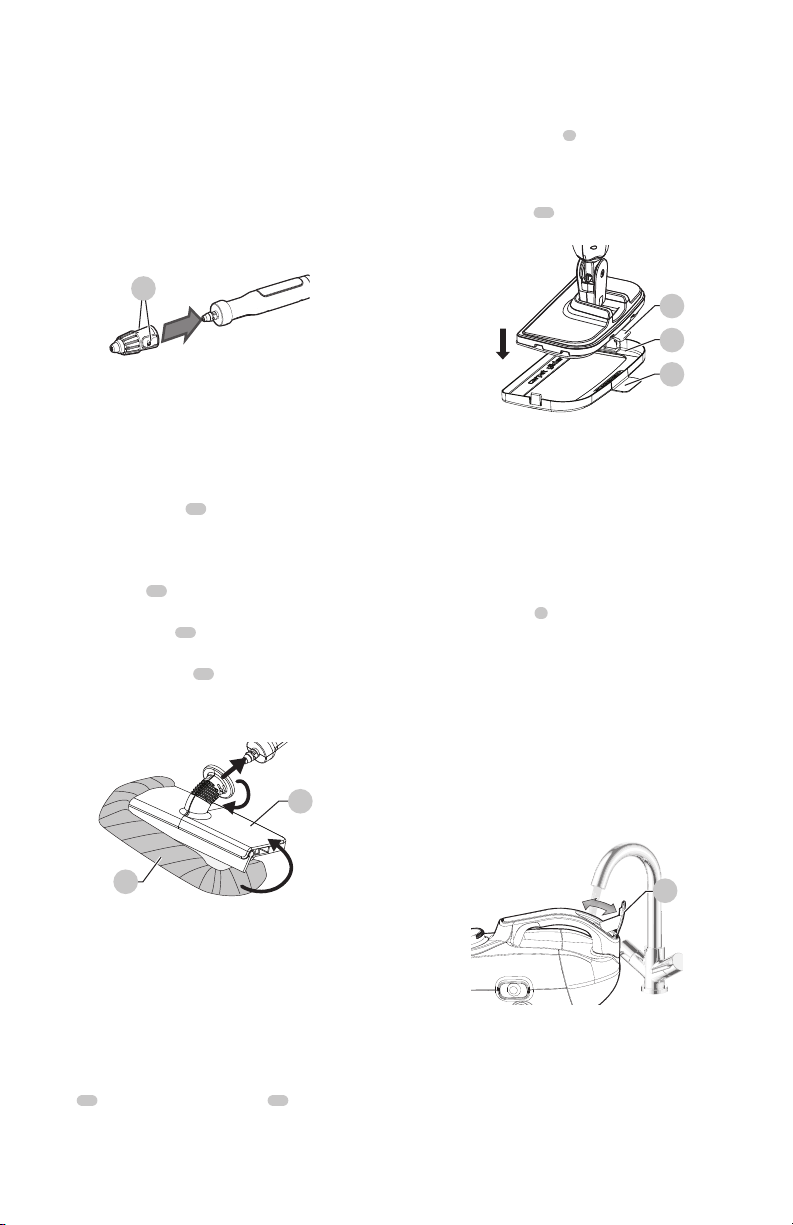
Attaching Pad to Squeegee FIg. I
WARNING: Burn hazard, do not use the squeegee
and pad on clothes that are beingworn.
CAUTION: Wait until steam cleaner cools down to
attach or remove the squeegee pad. (approximately
five minutes)
NOTE: The squeegee pad
35
works only with the
windowsqueegee.
NOTE: To ensure the steamer is safe for a fabric, first test it in an
inconspicuous area of the item you are to us iton.
1. Attach the hose
11
to the steam cleaner as described
for FigureF.
2. Attach the squeegee
36
to the hose as described for
FigureG.
3. Hook the squeegee pad
35
around one side of
the squeegee and stretch it to the other side of the
squeegee as shown in Figure I. Ensure the pad fully
covers thesqueegee.
Figure I
35
36
Removing Accessories from the Hose
• For accessories other than the steam nozzle, turn hand
held steamer off, unplug, and allow to cool down. Then
twist accessory counterclockwise then pull away from
thehose.
Attaching the Carpet Glider (Fig. A, J)
1. Place carpet glider on thefloor.
2. Lightly press the steam mop with attached cleaning
pad
21
down onto the carpet glider
28
until it clicks
intoplace.
Removing the Carpet Glider
CAUTION: Always wear suitable shoes when
changing the carpet glider on your steam mop. Do not
wear slippers or open-toedfootwear.
1. Return the handle tube
6
to the upright position, turn
the steam mop to ‘OFF’, andunplug.
2. Wait until steam mop cools down (approximately five
minutes). Place the front of your shoe onto the carpet
glider removal tab
37
and press downfirmly.
3. Lift the steam mop up off the carpetglider.
Figure J
37
28
21
Filling the Water Tank (Fig. K)
NOTICE: Fill the water tank with regular tapwater.
NOTICE: In areas of very hard water, the use of
de-ionized water isrecommended.
WARNING: Do not over fill the tank.
1. Ensure that the appliance is switched off and the power
cord is disconnected from the powersupply.
2. Open the filler cap
4
by pulling up (Figure K).
3. Fill the water tank withwater.
4. Close the fillercap.
NOTICE: Always empty the water tank afteruse.
NOTICE: Fill the water tank with clean tap water (Do
not use any additives or chemicals).
WARNING: When filling, detach from main unit and
maintain in a horizontalposition.
WARNING: Your water tank has a 17 fl oz (0.5 liter)
capacity. Do not over fill thetank.
NOTICE: Ensure the filler cap is firmlysecured.
Figure K
4
OPERATION
CAUTION: FOR FLOOR AND HAND HELD USE
ONLY; DO NOT USE THE UNIT UPSIDEDOWN.
Switching ON/OFF (Fig. A)
NOTICE: It takes approximately 15 seconds for the
steam mop to heatup.
Loading ...
Loading ...
Loading ...