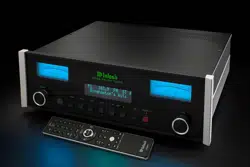
Loading ...
Loading ...
Loading ...
16
Remote IR Sensor
When an external IR Sensor is connected to the MR89
and located in the same room as the tuner, it is advisable
to disable the built-in IR Sensor located on the Front
Panel. Disable the sensor by performing the following
steps:
1. Press the MONO/SETUP Push-button until the
Setup Mode is active. Then rotate the PRESET/
MENU Control to select Setup Menu item “SETUP:
REMOTE IR SENSOR”. Refer to figure 25.
SETUP: REMOTE
IR SENSOR:
OFF
SETUP: REMOTE
IR SENSOR:
ON
Figure 25
2. Rotate the TUNE/ADJUST Control to select OFF.
3. Proceed to the next Setup Menu Item or press the
MONO/SETUP Push-button to exit the Setup Mode.
Remote Control Power Command
In a typical audio system, the MR89 switches On and
O with the McIntosh Preamplier or A/V Control
Center when a Power Control Connection is made
between the units. When the MR89 is used alone, it can
be set to be switched On or O using the Push-button on
the MR89 Remote Control.
To activate the Remote Control On/O feature perform
the following steps:
SETUP PRESETS:
CLEAR PRESETS: AM
Figure 19
SETUP PRESETS:
CLEAR PRESETS: FM
Figure 20
SETUP PRESETS:
CLEAR PRESETS: ALL
Figure 21
2. Rotate the TUNE/ADJUST Control to select one of
four choices:
NONE (default setting, No Presets are cleared)
AM (all AM Presets are cleared)
FM (all FM Presets are cleared)
All (all AM and FM Presets are cleared).
Note: The Presets are cleared when the Setup
Mode is exited.
3. Proceed to the next Setup Menu Item or press the
MONO/SETUP Push-button to exit the Setup Mode.
Meter Lights
Settings are ON, OFF. The rear panel Light Control
signal always takes precedence over the Set Up Menu.
Refer to gure 22.
METER LIGHTS
ON
METER LIGHTS
OFF
Figure 22
Information Display Brightness
The brightness level of the Front Panel Information
Display may be changed from the default setting.
To change the brightness perform the following steps:
1. Press the MONO/SETUP Push-button until the
Setup Mode is active. Then rotate the PRESET/
MENU Control to select Setup Menu item
“DISPLAY BRIGHTNESS”. Refer to figure 23.
DISPLAY
BRIGHTNESS
Figure 23
2. Rotate the TUNE/ADJUST Control to select the
desired brightness. The display actively changes
brightness as you adjust the control. There are four
available settings.
3. Proceed to the next Setup Menu Item or press the
MONO/SETUP Push-button to exit the Setup Mode.
Information Display Auto Fade
The Front Panel Information Display Auto Fade
Feature may be activated by performing the following
steps:
1. Press the MONO/SETUP Push-button until the
Setup Mode is active. Then rotate the PRESET/
MENU Control to select Setup Menu item “SETUP:
DISPLAY AUTO FADE: OFF ”. Refer to figure 24.
SETUP: DISPLAY
AUTOFADE: OFF
SETUP: DISPLAY
AUTOFADE: ON
Figure 24
2. Rotate the TUNE/ADJUST Control to select ON.
Approximately 15 seconds after there is no change
to the operating function (Front Panel or Remote
Control), the Front Panel Infomation Display will
blank out until an operating function is accessed.
3.
Proceed to the next Setup Menu Item or press the
MONO/SETUP Push-button to exit the Setup Mode.
Loading ...
Loading ...
Loading ...