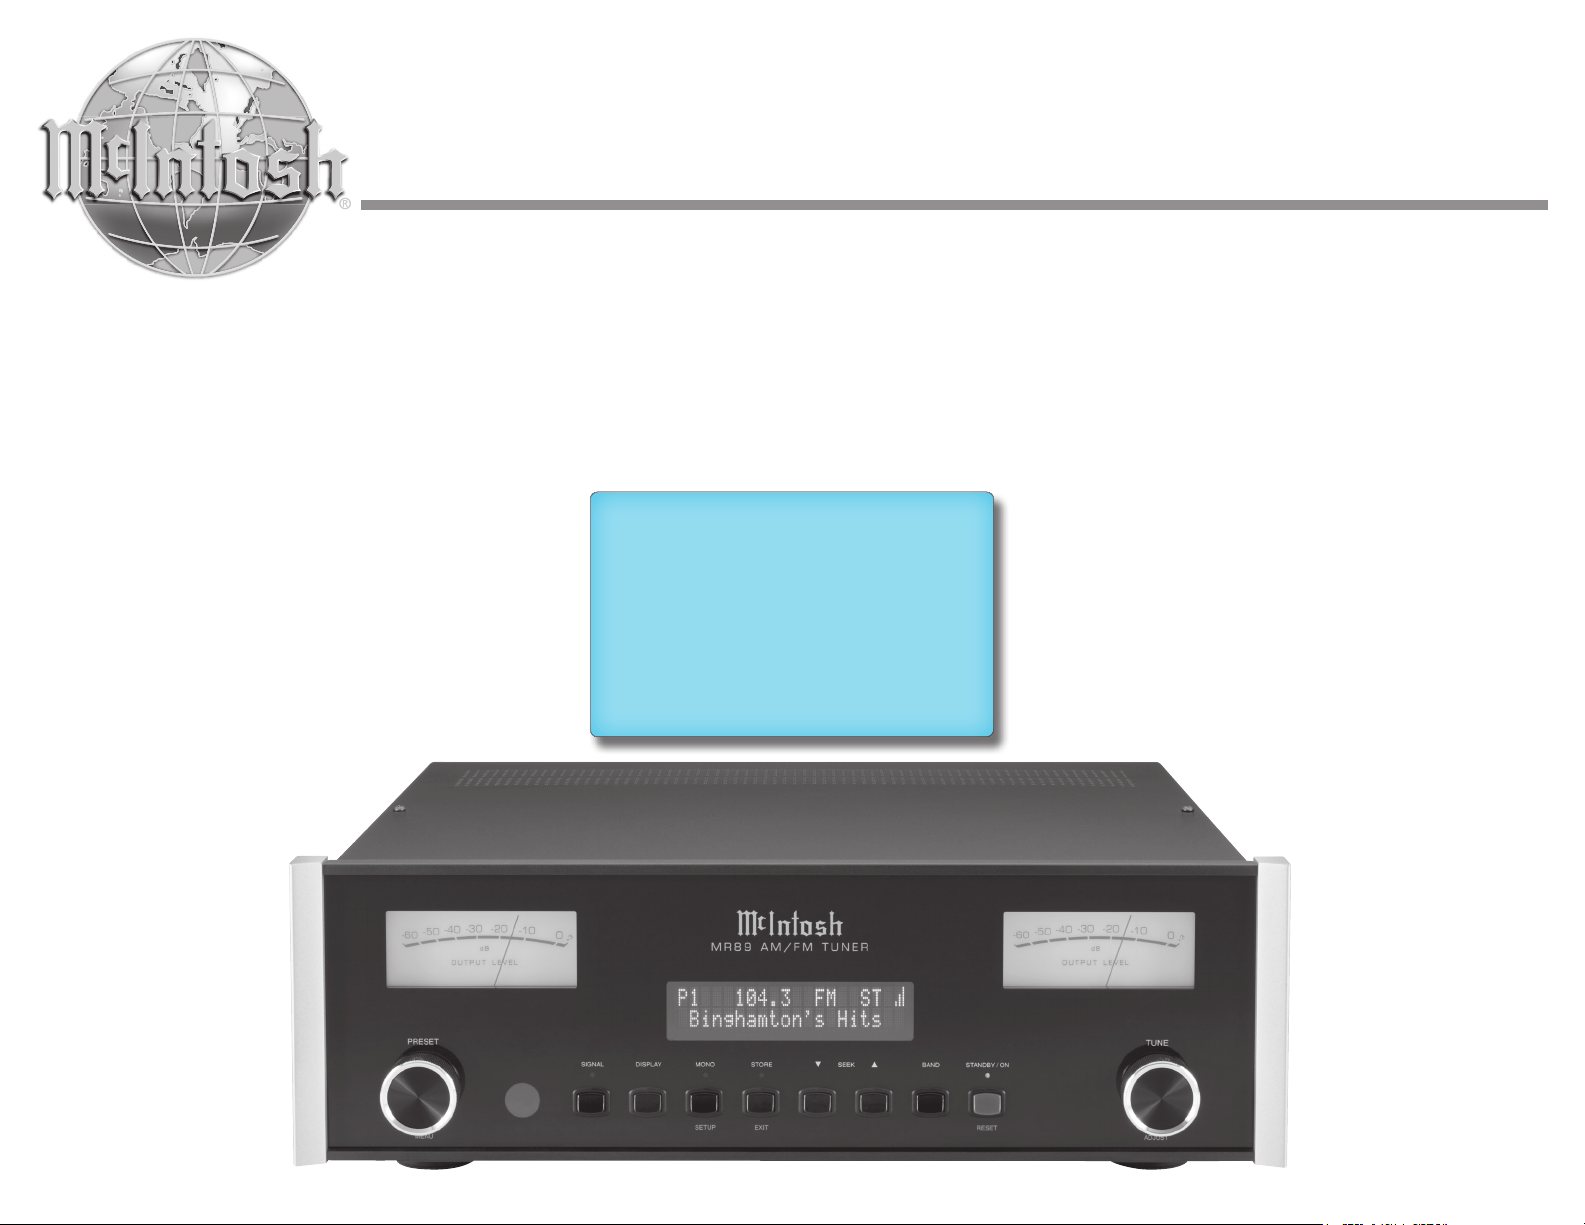
MR89
AM/FM Tuner
Owner’s Manual
McIntosh Laboratory, Inc. 2 Chambers Street Binghamton, New York 13903-2699 Phone: 607-723-3512 www.mcintoshlabs.com

2
The lightning ash with arrowhead, within an equilateral
triangle, is intended to alert the user to the presence of
uninsulated “dangerous voltage” within the product’s en-
closure that may be of sucient magnitude to constitute
a risk of electric shock to persons.
The exclamation point within an equilateral triangle is
intended to alert the user to the presence of important
operating and maintenance (servicing) instructions in
the literature accompanying the appliance.
WARNING - TO REDUCE RISK OF FIRE
OR ELECTRICAL SHOCK,
DO NOT EXPOSE THIS EQUIPMENT
TO RAIN OR MOISTURE
NO USER-SERVICEABLE PARTS IN-
SIDE. REFER SERVICING
TO QUALIFIED PERSONNEL
To prevent the risk of electric shock,
do not remove cover or back.
No user-serviceable parts inside.
1. Read these instructions.
2. Keep these instructions.
3. Heed all warnings.
4. Follow all instructions.
5. Do not use this apparatus near water.
6. Clean only with a dry cloth.
7. Do not block any ventilation openings.
Install in accordance with the manufacturer’s
instructions.
8. Do not install near any heat sources such
as radiators, heat registers, stoves, or other
apparatus (including ampliers) that produce
heat.
9. Do not defeat the safety purpose of the polar-
ized or grounding-type plug. A polarized plug
has two blades with one wider than the other.
A grounding type plug has two blades and a
third grounding prong. The wide blade or the
third prong are provided for your safety. If
the provided plug does not t into your outlet,
consult an electrician for replacement of the
obsolete outlet.
10. Protect the power cord from being walked on
or pinched particularly at plugs, convenience
receptacles, and the point where they exit from
the apparatus.
11. Only use attachments/accessories specied by
the manufacturer.
12. Use only with the cart, stand,
tripod, bracket, or table speci-
ed by the manufacturer, or
sold with the apparatus. When
a cart is used, use caution when
moving the cart/apparatus combination to
avoid injury from tip-over.
13. Unplug this apparatus during lightning storms
or when unused for long periods of time.
14. Refer all servicing to qualied service person-
nel. Servicing is required when the apparatus
has been damaged in any way, such as
power-supply cord or plug is damaged, liquid
has been spilled or objects have fallen into the
apparatus, the apparatus has been exposed to
rain or moisture, does not operate normally, or
has been dropped.
15. Do not expose this equipment to dripping or
splashing and ensure that no objects lled
with liquids, such as vases, are placed on the
equipment.
16. To completely disconnect this equipment
from the a.c. mains, disconnect the AC / DC
Adapter from the a.c. receptacle.
17. The mains plug of the power supply cord
shall remain readily operable. If the AC /
DC Adapter is provided with a mains power
supply cord attachment, the plug of this power
supply cord shall remain readily operable.
18. Do not expose batteries to excessive heat such
as sunshine, re or the like.
19. Connect mains power supply cord only to a
mains socket outlet with a protective earthing
connection.
WA R N I NG:
Use this product only with
the Power Adapter provided.
Failure to do so may result
in re and/or electrical shock.
IMPORTANT
SAFETY INSTRUCTIONS!
PLEASE READ THEM BEFORE
OPERATING THIS EQUIPMENT.
Copyright ©2022 by McIntosh Laboratory, Inc.
3
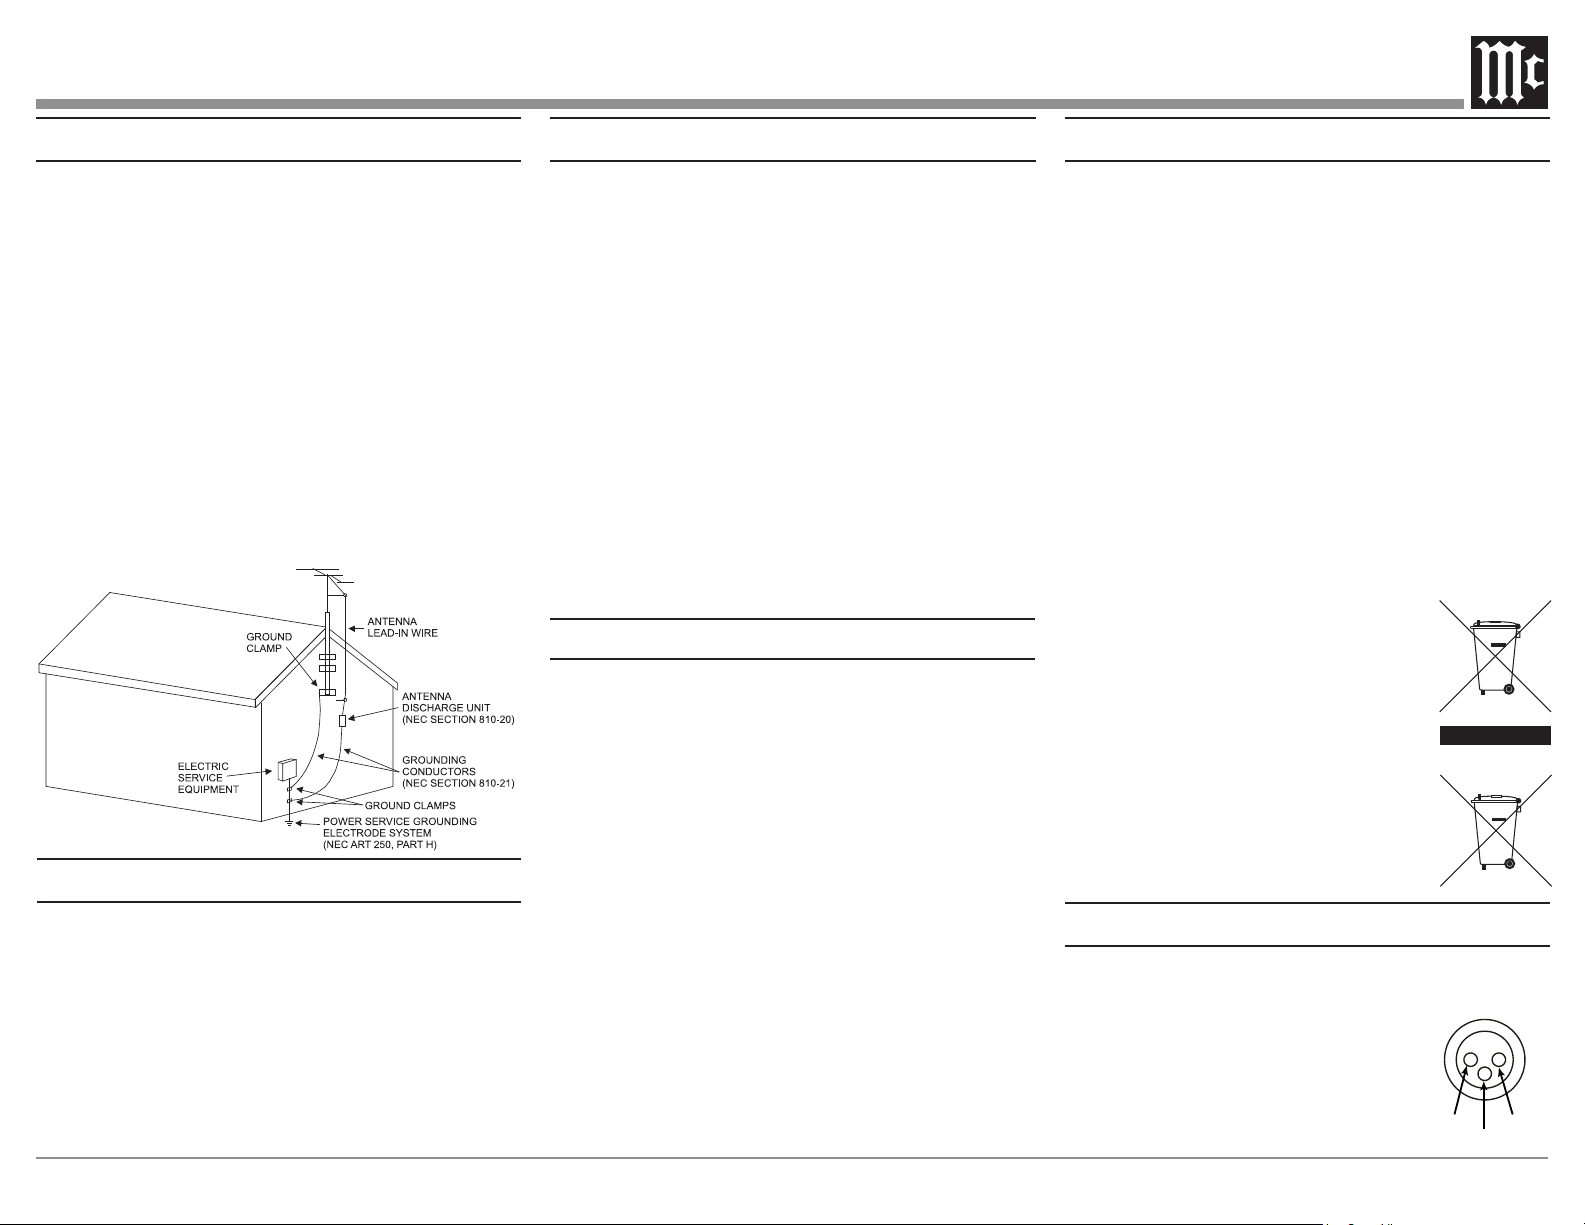
Outdoor Antenna Grounding
If an outside antenna or cable system is connected
to the product, be sure the antenna or cable system
is grounded so as to provide some protection against
voltage surges and built-up static charge.
Article 810 of the National Electrical Code, ANSI/
NFPA 70, provides information with reguards
to proper grounding of the mast and supporting
structure, grounding of the lead-in wire to an
antenna discharge unit, and size of ground conduc-
tors, location of antenna-discharge unit, connection
to ground electrodes and requirements for the
grounding electrode.
Example of antenna grounding as per
National Electrical Code,
ANSI/NFPA 70
Table of Contents
Connector and Cable Information .. .. .. .. .. 3-4
Introduction .. .. .. .. .. .. .. .. .. .. .. .. .. .. .. 4
Performance Features .. .. .. .. .. .. .. .. .. .. .. 4
Dimensions .. .. .. .. .. .. .. .. .. .. .. .. .. .. .. 5
Installation . .. .. .. .. .. .. .. .. .. .. .. .. .. .. .. 6
Rear Panel and RAA2 Connections . .. .. .. .. .. 7
How to Connect Antennas. .. .. .. .. .. .. .. .. .. 8
How to Connect the MR89 .. .. .. .. .. .. .. .. 9-10
Navigating the Remote Control .. .. .. .. .. .. ..11
Front Panel Displays,
Controls & Push-button
s ..................12
How to Operate.. .. .. .. .. .. .. .. .. .. .. .. .13-21
FM / AM Specifications .. .. .. .. .. .. .. .. .. . 22
General Specifications .. .. .. .. .. .. .. .. .. .. . 22
Packing Instructions, Parts List .. .. .. .. .. .. . 23
Thank You from all of us at McIntosh
You have invested in a precision instrument that will
provide you with many years of enjoyment. Please take
a few moments to familiarize yourself with the features
and instructions to get the maximum performance from
your equipment.If you need further technical assistance,
please contact your dealer who may be more familiar
with your particular setup including other brands. You
can also contact McIntosh with additional questions or
in the unlikely event of needing service.
McIntosh Laboratory, Inc.
2 Chambers Street
Binghamton, New York 13903
Technical Assistance: (607) 723-3512
Fax: (607) 724-0549
Customer Service: (607) 723-3515
Fax: (607) 723-1917
Email: support@mcintoshlabs.com
Website: www.mcintoshlabs.com
Please Take A Moment
For future reference, you can write down your serial
number and purchase information here. We can identify
your purchase from this information if the occasion
should arise:
Serial Number: _____________________________
Purchase Date: _____________________________
Dealer Name: _____________________________
Connector and Cable Information
XLR Connectors
Below is the Pin conguration for the XLR Balanced
Output Connectors on the MR89.
Refer to the diagrams for connections:
PIN 1: Shield/Ground
PIN 2: + Signal
PIN 3: - Signal
General Information
1. For additional connection information, refer to the
owner’s manual(s) for any component(s) connected to
the MR89 AM/FM Tuner.
2. The Main AC Power going to the MR89 and any other
McIntosh Component(s) should not be applied until all
the system components are connected together. Failure
to do so could result in malfunctioning of some or all
of the system’s normal operations. When the MR89
and other McIntosh Components are in their Standby
Power Off Mode, the Microprocessor’s Circuitry
inside each component is active and communication is
occurring between them.
3. The Balanced, Unbalanced, and digital Outputs may
be used simultaneously.
4. The Remote Control Supplied with the MR89 Tuner
is capable of operating other components.
For additional information go to
www.mcintoshlabs.com.
5. When discarding the unit, comply with
local rules or regulations. Batteries
should never be thrown away or incin-
erated but disposed of in accordance
with the local regulations concerning
battery disposal.
7. For additional information on the
MR89 and other McIntosh Products
please visit the McIntosh Web Site at
www.mcintoshlabs.com.
PIN 1
PIN 2
PIN 3

4
Power Control Connectors
The MR89 Power Control Input/Output Jacks receive/
send Power On/O Signals
when connected to other
McIntosh Components. A 1/8
inch stereo mini phone plug
is used for connection to the
Power Control Input/Output on
the MR89.
Note: The Data and Power Control Connecting Cable
is available from the McIntosh Parts Department:
Data and Power Control Cable Part No. 170-202.
Six foot, shielded 2 conductor, with 1/8 inch stereo
mini phone plugs on each end.
Data and IR Input Port Connectors
The MR89 Data In Port receives Remote Control
Signals. A 1/8 inch stereo mini phone plug is used for
connection. The IR Port also use a 1/8 inch stereo mini
phone plug and allow the connection of other brand IR
Receivers to the MR89.
Data
Signal
N/C
Data
Ground
IR Data
Control
Ground
N/C
RAA2 Connectors
Pin No. Wire Color Pin No. Wire Color
1. White/Orange 6. Green
2. Orange 7. White/Brown
3. White/Green 8. Brown
4. Blue
5. White/Blue *Cable outer shield
Pin 1
Pin 1
Pin 8
Pin 8
*Cable outer shield
Note: The RAA2 Connecting Cable is available from the
McIntosh Parts Department:
RAA2 Antenna Cable Part No. 171844
Power
Control
Ground
Lighting
Control
Twenty foot, shielded 8 conductor, with a shielded RJ45
connector on each end.
Introduction
The MR89 AM/FM Tuner is an elegant instrument
for superb reception from Radio Stations. The MR89
uses the latest in technology for the best sound quality,
along with a two-line display for convenient opera-
tion and comprehensive station information. Meters
provide real time insight into the audio program.
Performance Features
• Special FM RF Circuitry
The MR89 RF Circuitry receives strong local FM
Station Signals without distortion and receives
even the weakest of FM Signals with low noise.
• RAA2 External AM Antenna
The RAA2 External AM Antenna allows place-
ment of the AM Antenna for the best reception.
• Preset Stations and Permanent Memory
The MR89 Tuner stores up to twenty AM and FM
Station presets and they are retained in Permanent
Memor y.
• Balanced Outputs
The Balanced Outputs allow connection of the
MR89 to a Preamplier using long cable lengths
without a loss in sound quality.
• Digital Audio Outputs
There are Coaxial and Optical Digital Outputs for
external decoding of the PCM Signal.
• Multifunction Fluorescent Display
The Front Panel Display facilitates tuning, setup,
and provides signal information while a full comple-
ment of RS232 control with metadata support makes
the MR89 the go-to multi-format broadcast audio
source for today’s whole-house systems.
• Information Service
The MR89 will indicate various text information
such as Station Call Sign, Music Genre, Artist
Name and Song Title when transmitted by the
Radio Station.
• Remote Control with External Sensor Input
The Remote Control provides control of the MR89
operating functions and other McIntosh Source
Components. Enjoy your McIntosh System from
other rooms in your home by connecting external
sensors.
• Power and Lighting Control Input
Power control inputs allow the MR89 to receive
power on/o signals from other McIntosh compo-
nents. While powered, the MR89 meter lighting
can be enabled or disabled by other components.
• Power Control Output
A Power Control Output connection for conve-
nient Turn-On of McIntosh Power Components
and Accessories is included. The Power Control
Output follows the state of the front-panel standby
pushbutton, the power control input, and the
RS-232 and IR power commands.
• Special Power Supply
Fully regulated Power Supplies and a special
R-Core Power Transformer ensure stable noise
free operation even though the power line varies.
• Gold Plated Connectors
The MR89 Digital and Analog Audio Connectors
are gold plated for superior corrosion resistance
and high electrical conductivity.
• Solid State Front Panel Illumination
The even Illumination of the Front Panel and
meters is accomplished by extra long life Light
Emitting Diodes (LEDs).
•
Glass Front Panel and Super Mirror Chassis Finish
The famous McIntosh Illuminated Glass Front
Panel and the Stainless Steel Chassis with Super
Mirror Finish ensures the pristine beauty of the
MR89 will be retained for many years.

5
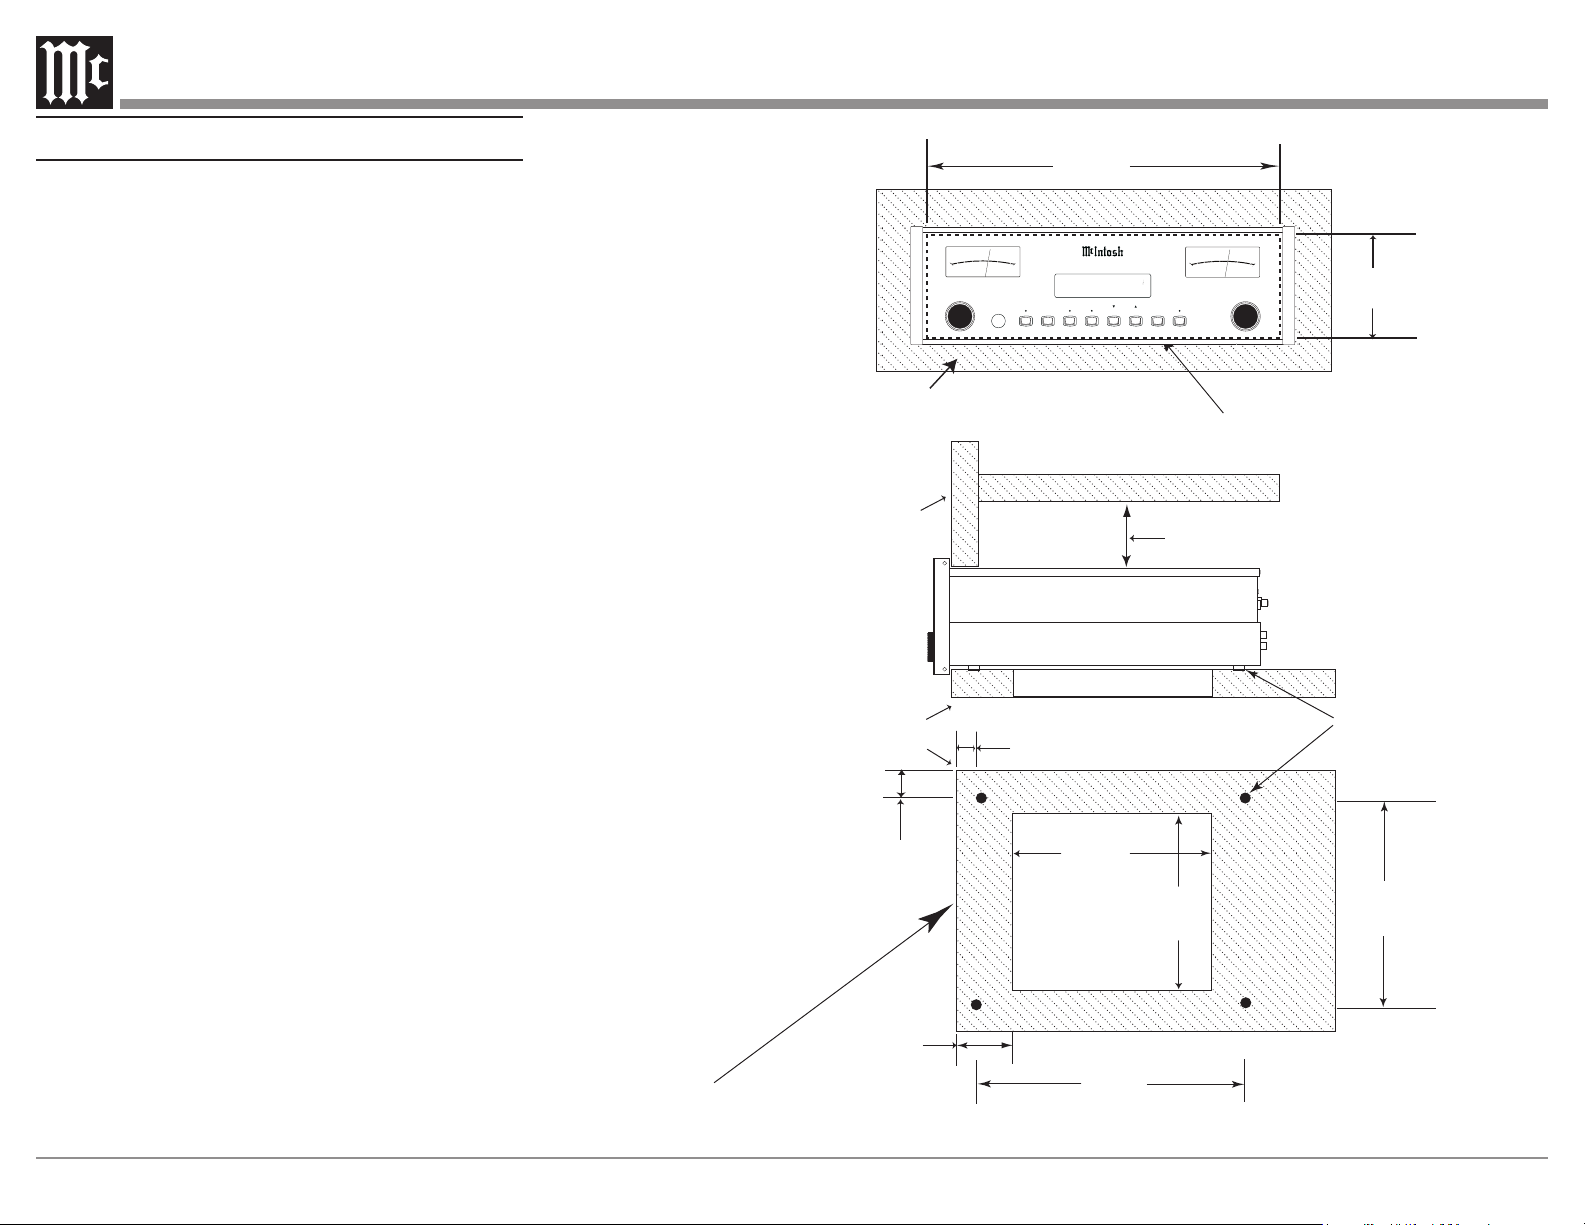
Dimensions
The following dimensions can assist in determining
the best location for your MR89.
Side View of the MR89
Front View of the MR89
Rear View of the MR89
17-1/2"
44.45cm
6"
15.24cm
5-3/8"
13.69cm
4-5/8"
11.75cm
17"
43.18cm
14-1/2"
36.83cm
15-7/8"
40.32cm
3/16"
0.48cm
4-13/16"
12.22cm
10-9/16"
26.83cm
5/8"
1.59cm
13/16"
2.06cm
2"
5.08cm
1-15/16"
4.92cm
13-1/4"
33.65cm
M R 8 9 A M/ F M T U N E R
PRESET
TUNE
MONO
STANDBY / ON
STORE
SIGNAL DISPLAY
BAND
SEEK
SETUP
RESET
EXIT
MENU ADJUST
+3
0
-10
-60
O U T PUT L EVEL
-50
-40
-30
-20
d B
+3
0
-10
-60
O U T PUT L
E
VEL
-50
-40
-30
-20
d B
P1 104.3
FM
ST
Binghamton’s Hits
6
Installation
The MR89 can be placed upright on a table or shelf,
standing on its four feet. It also can be custom installed
in a piece of furniture or cabinet of your choice.
The four feet may be removed from the bottom of
the MR89 when it is custom installed as outlined
below. The four feet together with the mounting screws
should be retained for possible future use if the MR89
is removed from the custom installation and used free
standing. The required panel cutout, ventilation cutout
and unit dimensions are shown.
Always provide adequate ventilation for your MR89.
Cool operation ensures the longest possible operating
life for any electronic instrument. Do not install the
MR89 directly above a heat generating component such
as a high powered amplier. If all the components are
installed in a single cabinet, a quiet running ventila-
tion fan can be a denite asset in maintaining all the
system components at the coolest possible operating
temperature.
When the MR89 is placed free-standing on a at
surface, allow at least 2 inches (5.08cm) above the
top, 2 inches (5.08cm) below the bottom and 2 inches
(5.08cm) on each side of the Tuner, so airow is not
obstructed. Allow 19-1/2 inches (49.53cm) depth
behind the front panel. Allow 1-7/16 inch (3.66cm) in
front of the mounting panel for knob clearance.
A custom cabinet installation should provide the
minimum spacing dimensions for cool operation.
Allow at least 2 inches (5.08cm) above the top, 2 inches
(5.08cm) below the bottom and 2 inches (5.08cm) on
each side of the Tuner, so airow is not obstructed.
The Custom Cabinet should be open backed and at
least 12 inches (30.48cm) away from any surface such
as a wall. Be sure to cut out a ventilation hole in the
mounting shelf according to the dimensions in the
drawing. Allow 1-7/16 inch (3.66cm) in front of the
mounting panel for knob clearance.
11"
27.94cm
15"
38.1cm
15"
38.1cm
1"
2.54cm
Cutout Opening
for Ventilation
Cutout Opening for Ventilation
Support
Shelf
Chassis
Spacers
1-1/8"
2.86cm
12-5/16"
31.27cm
1-3/4"
4.45cm
Note: Center the cutout Horizontally on the unit.
For purposes of clarity, the above
illustration is not drawn to scale.
Cabinet
Front
Panel
17-1/16"
43.34cm
Cutout Opening for Custom Mounting
Cabinet Front Panel
4-7/8"
12.38cm
2"
5.08cm
Custom Cabinet has
an open back and at
least 12”
(30.48cm)
away from any surface
such as a wall
M R8 9 A M/ F M T U N E R
PRESET
TUNE
MONO
STANDBY / ON
STORE
SIGNAL DISPLAY
BAND
SEEK
SETUP
RESET
EXIT
MENU ADJUST
+3
0
-10
-60
OU TPUT L EVEL
-50
-40
-30
-20
dB
+3
0
-10
-60
OU TPUT L
E
VEL
-50
-40
-30
-20
dB
P1 104.3
FM
ST
Binghamton’s Hits
MR89 Front Panel
Custom Cabinet Cutout
MR89 Side View
in Custom Cabinet
MR89 Bottom View
in Custom Cabinet
7
PUSH PUSH
POWER
CONTROL
OUT IR IN
IN
RS232C
DATA IN
SERVICE
PORT
RAA2
AM
ANT
FM
ANT
A059770 MR89 REAR UPPER 1/14/22 JM FILM 2/3/22 REVISED FILM 3/24/22
MR89 AM/FM TUNER
McINTOSH LABORATORY, INC., BINGHAMTON, NY
HANDCRAFTED IN USA WITH US AND IMPORTED PARTS
120V 50/60Hz
30 WATTS
LR
BALANCED
L
R
UNBAL
DIGITAL
OPTICAL
COAXIAL
SERIAL
NUMBER
OUTPUTS
CAUTION
RISK OF ELECTRIC SHOCK
DO NOT OPEN
A059771 MR89 CHASSIS WHITE INK 1/14/22 JM FILM 2/3/22
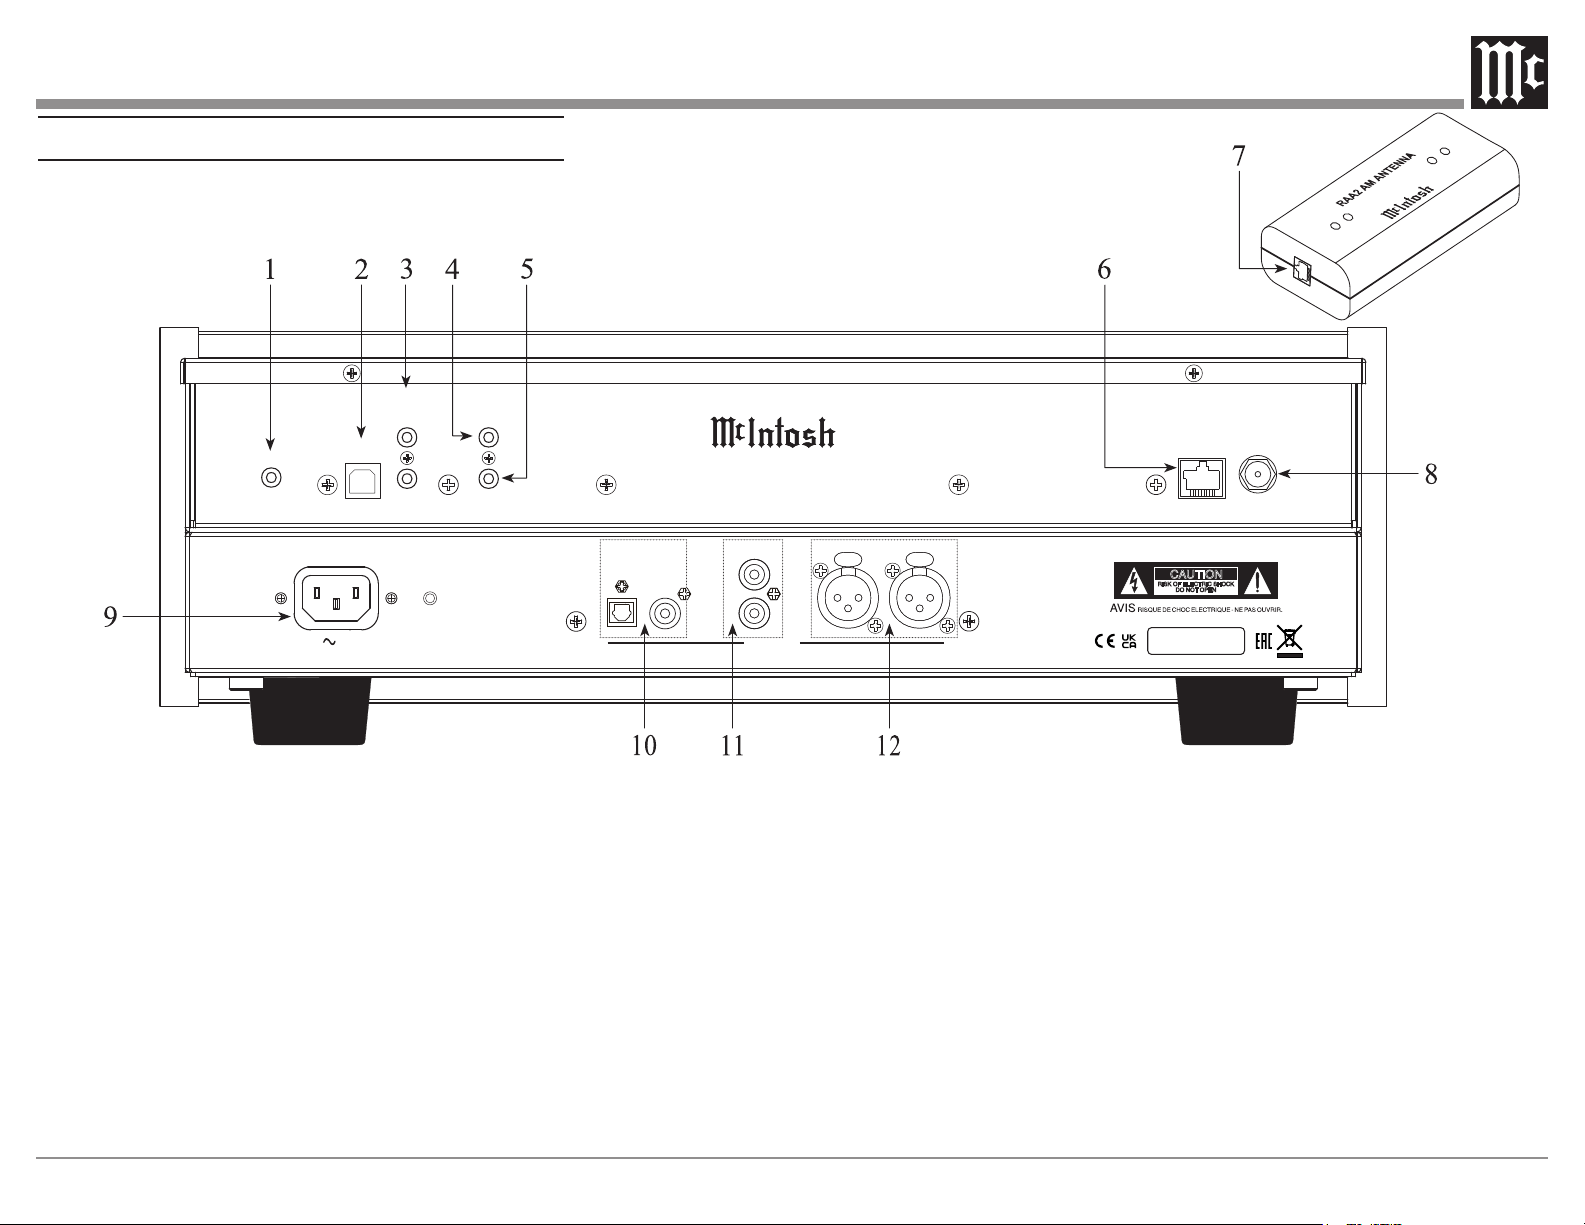
Rear Panel and RAA2 Connections
1 RS232 connector for communications with
an external control device
2 Used for upgrading the MR89 Firmware
3 POWER CONTROL IN receives power
and light control signals from a McIntosh
component (5-15 Volts ON, 0 Volts OFF).
POWER CONTROL OUT sends out a 12V
power control signal, and passes the light
control signal received at power control in
to another McIntosh Component when the
MR89 is On.
4 IR Input for connecting an IR Receiver
5 DATA IN receives operating data from a
McIntosh Preamplier or Control Center
6 AM ANT (Antenna) connector allows a
McIntosh RAA2 Remote Antenna to be
connected
7 Connect to the RAA2 AM ANT connector
on MR89 using the supplied cable
8 75 OHM FM ANT (Antenna) connects to
an external FM Antenna or cable
9 Connect the MR89 power cord to a live
AC outlet. Refer to information on the
back panel of your MR89 to determine the
correct voltage for your unit
10 COAXIAL AND OPTICAL DIGITAL
AUDIO OUTPUTS send signals to a
Preamplier or Control Center with a D/A
Converter or a decoder
11 UNBALANCED AUDIO OUTPUTS
supply analog audio signals to Unbalanced
Inputs of other components
12 BALANCED AUDIO OUTPUTS supply
analog audio signals to Balanced Inputs of
other components
8
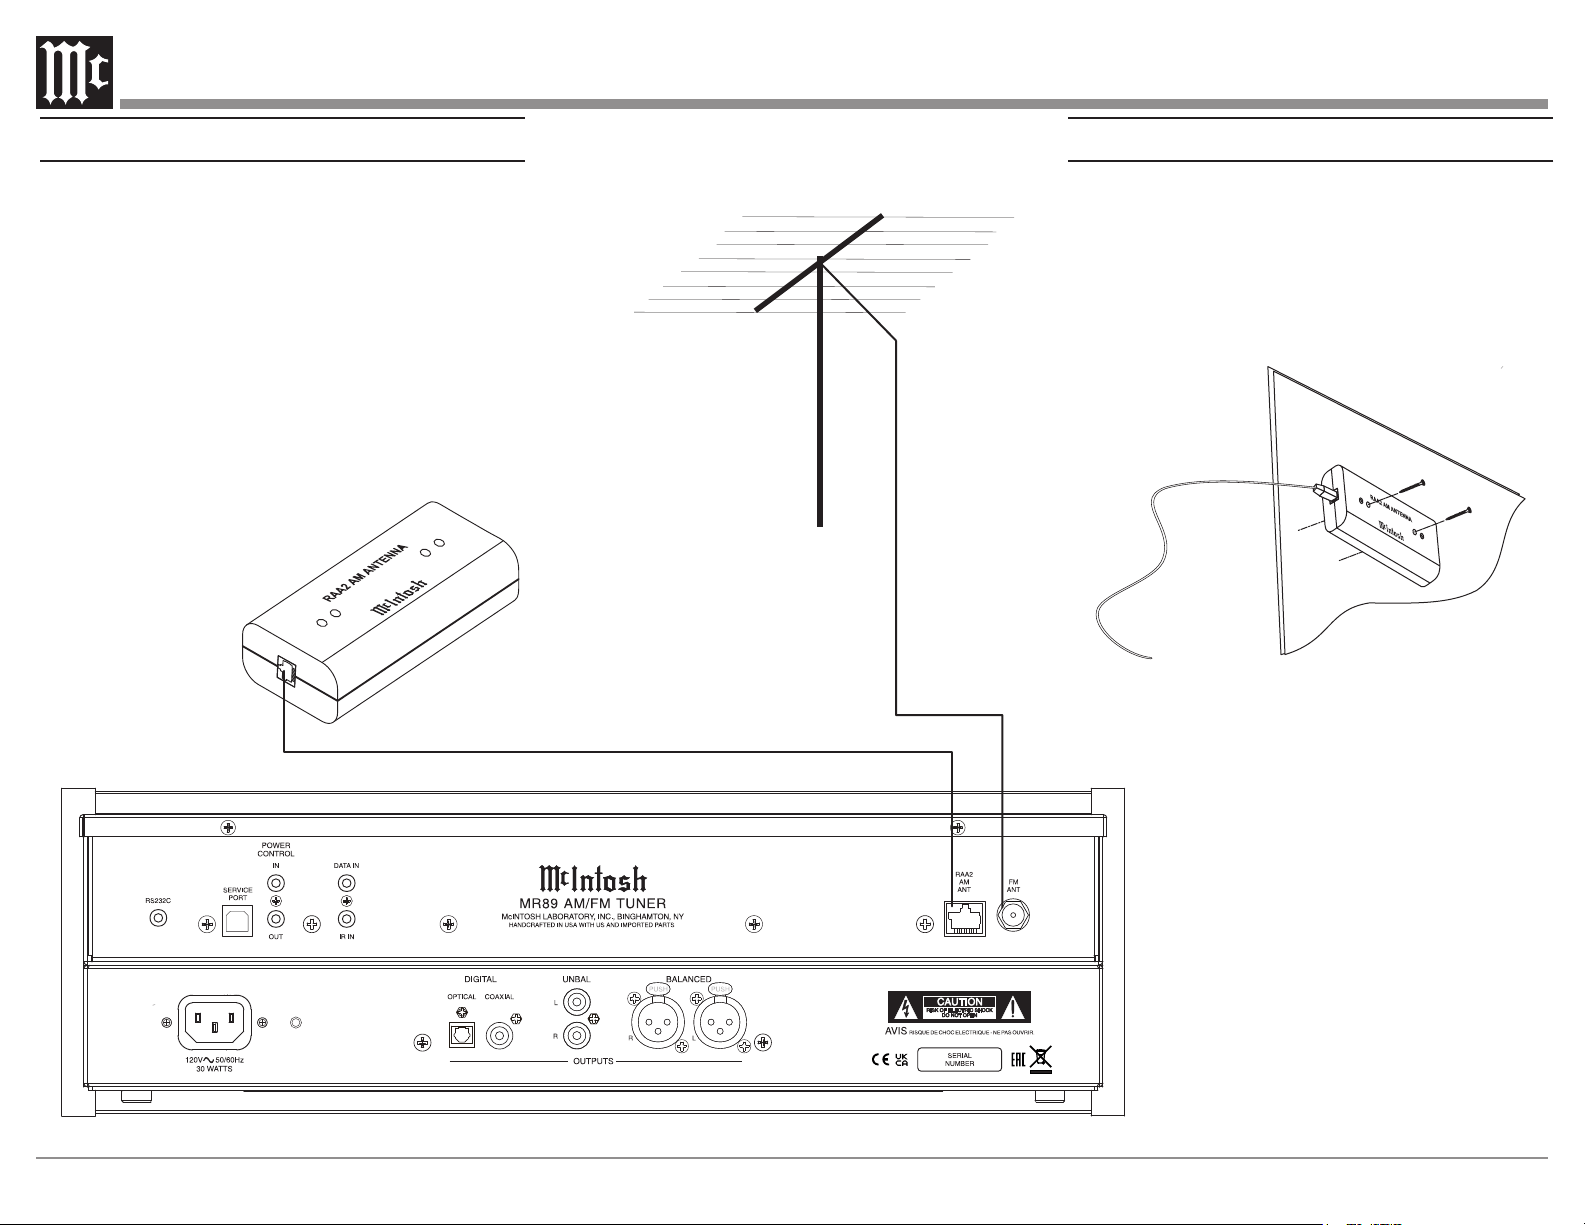
How to Connect Antenna Components
1. Using the supplied shielded cable, connect one
end into the RAA2 AM Antenna jack and the
other end of the same cable into the MR89 Tuner
jack labeled RAA2 AM ANT.
Note: If a longer length cable needs to be used between
the MR89 and the RAA2 AM Antenna, use an 8
conductor straight-thru cable with an outer shield
and RJ45 connectors on each end (shielded CAT5,
CAT5e or CAT6 patch cable).
2. Connect a 75 ohm coax cable from a FM
Antenna or cable system to the MR89, 75 OHM
FM ANT Connector.
FM Antenna
Mounting the RAA2 AM Antenna
Tune to a station with the weakest signal and orient
the RAA2 Antenna for maximum signal with minimum
noise and distortion. After the location is determined,
the RAA2 AM Antenna may be secured to a suitable
surface by using two #6 1-3/4 to 2 inches (4.44 to
5.08cm) long screws, refer to the illustration below.
9
A/V Control Center
Connect to AC Outlet
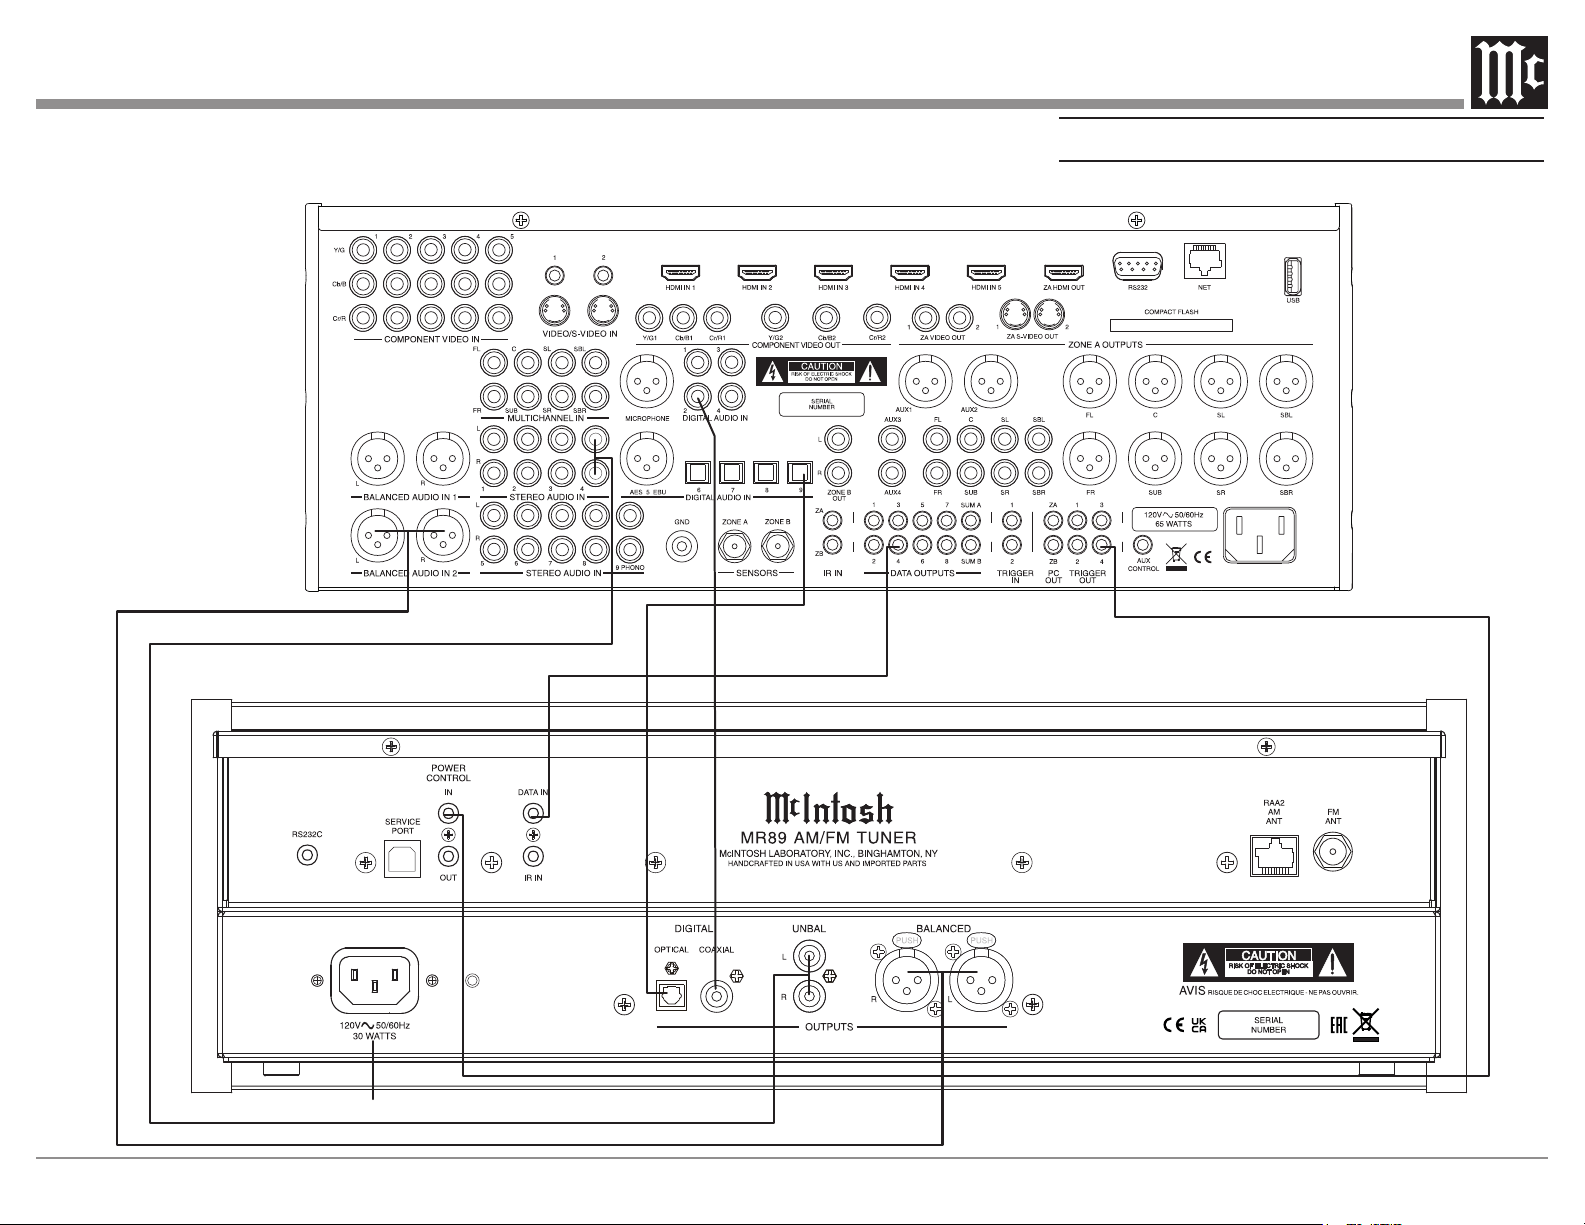
How to Connect the MR89

10
How to Connect the MR89
The MR89 has the ability to be remotely switched On/
O from a McIntosh Preamplier or A/V Control Center
via the Power Control connection. When powered,
this same connection allows remote control of MR89
meter lighting. The MR89 Data Port Connection allows
for the remote operation of basic functions using the
Preamplier or A/V Control Center Remote Control.
With an appropriate IR Sensor connected to the MR89,
remote control operation is possible from another room
and/or when the MR89 is located in a cabinet with the
doors closed.
These connection instructions, together with the
MR89 Connection Diagram below, is an example of
a typical audio or audio/video system. Your system
may vary from this, however the actual components
would be connected in a similar manner. For additional
information refer to “Connector and Cable Information”
on page 3.
Power Control Connections:
1. Connect a Control Cable from the Preamplier
or A/V Control Center appropriate Jack (Tuner/
Trigger 4, Power Control or Trigger) to the POWER
CONTROL IN Jack on the McIntosh MR89 Tuner.
2. Connect a Control Cable from the MR89 Tuner
POWER CONTROL OUT jack to the next McIntosh
Source Component Power Control In Jack.
Data Control Connections:
3.
Connect a Control Cable from the Preamplier or
A/V Control Center to the appropriate Data Port Out
Jack (Tuner/ 4) to the McIntosh MR89 Tuner DATA IN
Jack.
Sensor Connections:
4. Optionally, connect an appropriate IR Sensor to
the McIntosh MR89 Tuner IR IN Jack.
Digital Audio Connections:
5. Optionally, connect a Cable from the McIntosh
MR89 Tuner OPTICAL or COAXIAL to the
appropriate Optical or Coaxial Input (Tuner/ 9) on the
Preamplier or A/V Control Center.
6. Optionally, connect a Cable from the McIntosh
MR89 Tuner remaining DIGITAL Output to the
appropriate Optical or Coaxial Input on another
Preamplier or A/V Control Center.
Analog Audio Connections:
7. Connect Balanced Cables from the McIntosh
MR89 Tuner BALANCED OUTPUT Connectors
to the appropriate (Tuner/Balanced Audio In 2)
Preamplier or A/V Control Center Balanced Input
Connectors.
8. Optionally, connect an Audio Cable from the
MR89 Tuner UNBALanced OUTPUT Jacks to the
appropriate (Tuner/Stereo Audio In 4) Preamplier or
A/V Control Center Balanced Input Jacks.
Note: Preamplifiers require either a Balanced or
Unbalanced audio connection. A/V Control Centers
usually require unbalanced connections for proper
operation of Zone B and the record output, with
Balanced connections as optional.
AC Power Cords Connections:
9. Connect the McIntosh MR89 Tuner AC Power Cord to
a live AC outlet.
How to use the Remote Control
The Remote Control is capable of performing basic
Operating Functions for the MR89 AM/FM Tuner.
Note: Refer to the “Navigating the Remote Control”
Section of this manual for additional information
using this Remote Control, on page 11.
Manual Tuning
Use the BAND Push-button to select AM or
FM. Press the DIRECTIONAL Up or Down
Push-button on the inner ring to move from station to
station (AM or FM).
Automatic Tuning
Use the BAND Push-button to select AM or FM. Press
the SEEK 7 down or 8 up to move to the next station
(AM or FM).
Pre set Tun i ng
Use the BAND Push-button to select AM or FM.
Press the PRESET 9 down or : up Push-button
and the MR89 will stop on the next Station in Preset
Memor y.
Note: For information on entering a Station into memory,
refer to page 19.
Direct Preset Access
To access the desired Station previously assigned to a
Preset stored in memory, perform the following:
1. Press the BAND Push-button to select AM or FM
desired Preset.
2. Press the PRESET Push-button.
3. Using the 0 through 9 numeric Push-buttons enter the
Preset Number.
Note: When selecting a Preset 1 through 9 and there are
more than ten Presets entered into memory for the
given Band (AM or FM) there is a slight delay before
the MR89 will go to the single digit Preset.
Direct Station Access
To access a desired Station perform the following:
1. Press the BAND Push-button to select AM or FM
desired Preset.
2. Using the 0 through 9 numeric Push-buttons enter the
Frequency Number of the Station (for AM or FM).
Note: When in FM, enter 1057 for 105.7 FM, when in AM,
enter 1050 for 1050kHz AM.
11
1
2
3
4
5
6
7
8
9
10
11
12
13 14
15
16
17
18
19
21
20
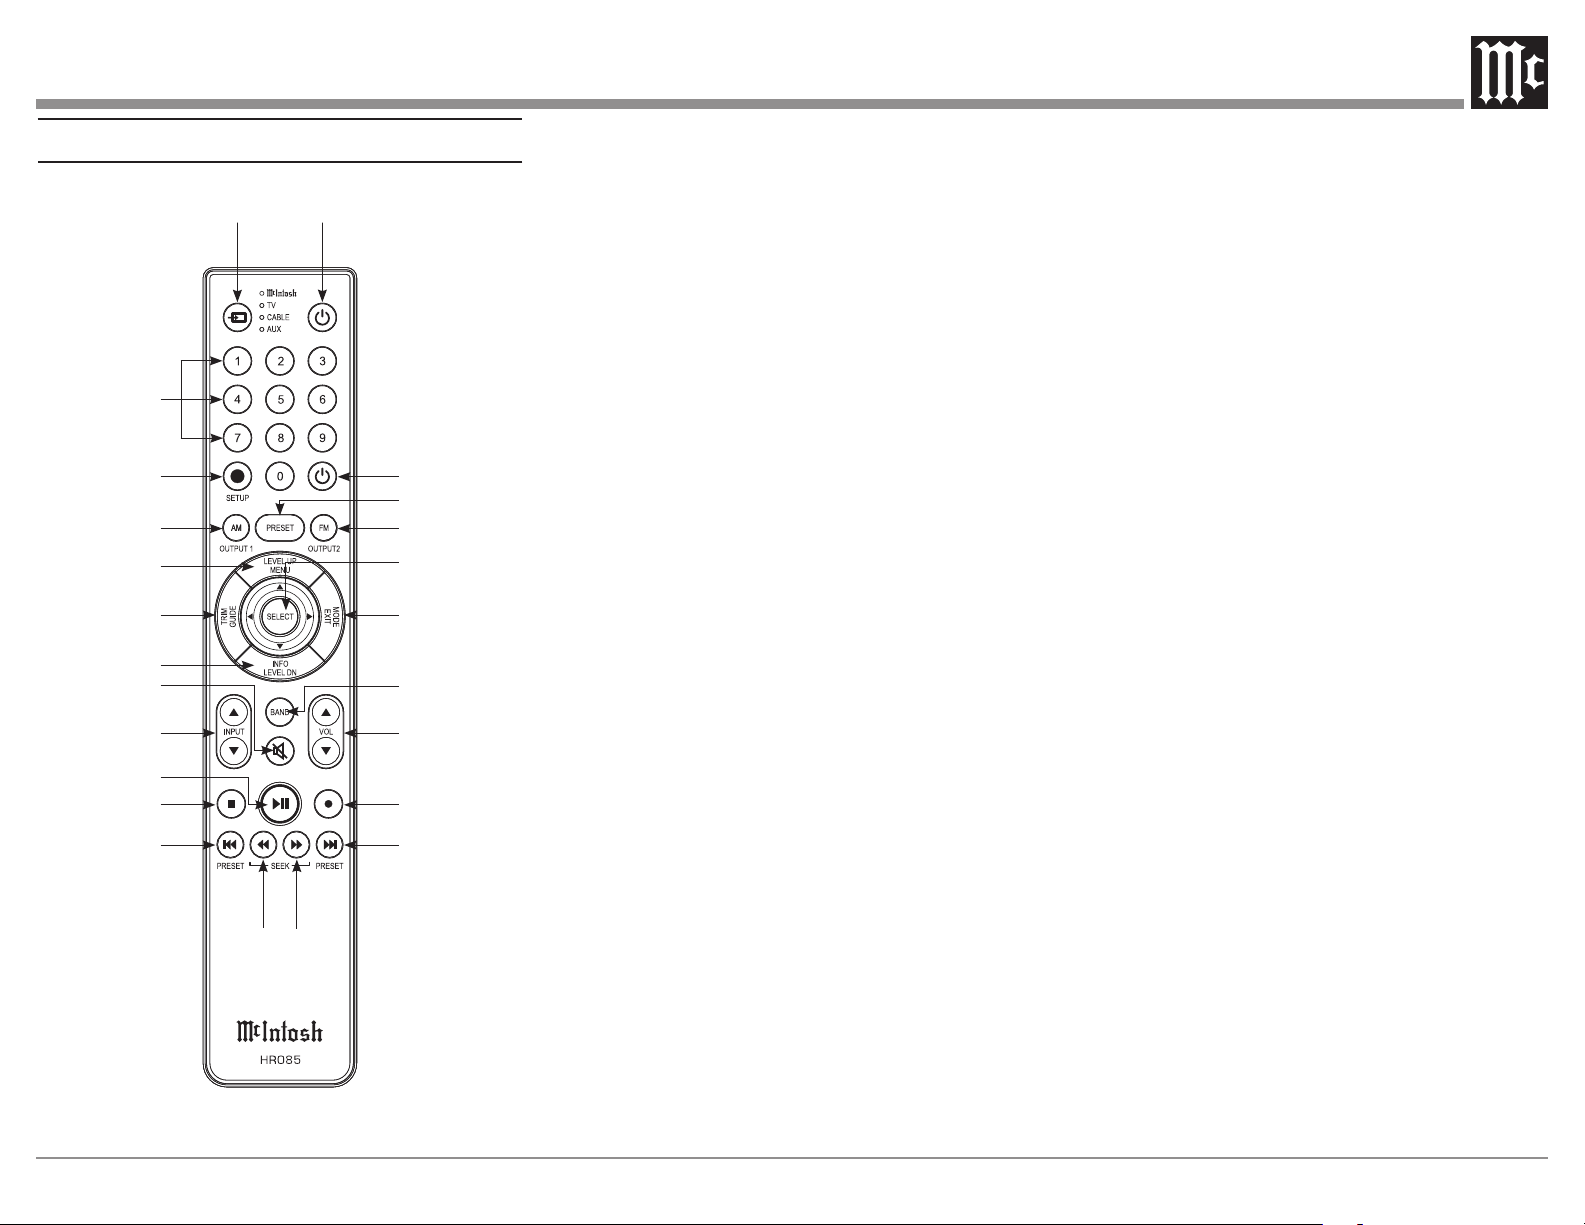
Navigating the Remote Control
1. Switch Device: Select dierent devices for remote
operation. Selected device is indicated by the LED
light when buttons are pressed.
2. Numbers: You can select tuner presets and
manually enter and radio stations – among other
numerical functions – using these buttons.
3. Setup: The Setup Button gives you access to the
additional functions for the buttons represented
in blue text. It’s like using the “Shift” key on a
keyboard to access special characters above the
number keys. (Note: Cannot be used to enter
Setup Mode.)
4. AM/Output 1: Access AM Tuner.
5. Level Up/Menu: Adjusts trim functions settings.
Accesses menu on compatible devices.
6. Trim/Guide: Enters Trim Functions Menu. Opens
guide on compatible devices.
7. Info/Level Down: Adjusts trim functions settings.
Accesses info on compatible devices.
8. Mute: Mutes audio playback.
9. Input: Changes and selects dierent inputs.
10. Play/Pause: Pressing this button will halt play-
back of active media, and it will resume from
where it left o if you press the button again.
11. Stop: Cancels media playback and resets progress
through it.
12. Previous/Previous Preset: You can go back to
your previous media selection by pressing this
button. Also allows you to navigate to a previous
tuner preset.
13. Fast Reverse/Seek Down: Navigate backwards
through the current active media using this button.
This is also used to adjust the tuner downwards.
22
23
24
14. Fast Forward/Seek Up: Navigate forward
through the current active media using this button.
This is also used to adjust the tuner upwards.
15. Next/Next Preset: You can go forward to your
next media selection by pressing this button. Also
allows you to navigate to a later tuner preset.
16. Record: On devices with a record function, this
will begin recording the actively playing media.
17. Volume: Adjust the volume with these buttons.
18. Band: You will have the option to change the
band on your connected tuner or select certain op-
tions on a variety of McIntosh models.
19. Mode/Exit: This will exit the Trim Functions
Menu. It will also display information or certain
options.
20. Select: Where applicable, you can press this but-
ton to select any highlighted option.
21. FM/Output 2: Access FM Tuner.
22. Preset: Press this button followed by a number
(0-9) to immediately select that stored preset.
23. Power O: Whichever device you have selected
on the remote control will turn o when you press
this button.
24. Power On: Whichever device you have selected
on the remote control will turn on when you press
this button.
Note: The included McIntosh HR085 Remote Control has
buttons used to control multiple devices.
Pushbuttons whose function are not identified herein
are for use with other McIntosh products.
For more information, refer to HR085 Owner's
Manual on www.mcintoshlabs.com.

12
M R 8 9 A M / F M T U N E R
PRESET
TUNE
MONO
STANDBY / ON
STORE
SIGNAL DISPLAY
BAND
SEEK
SETUP
RESET
EXIT
MENU ADJUST
+3
0
-10
-60
O U T PUT L EVEL
-50
-40
-30
-20
d B
+3
0
-10
-60
O U T PUT L
E
VEL
-50
-40
-30
-20
d B
P1 104.3
FM
ST
Binghamton’s Hits
Front Panel Displays, Controls, and Push-buttons
1 PRESET/MENU Control selects Presets
for listening or storing the desired radio
station. Also used to select various menus
when in the setup mode
2 IR Sensor receives commands from a
Remote Control
3 SIGNAL Push-button with indicator,
activates display of signal quality informa-
tion applicable to the selected band, such
as multipath interference and background
noise level
4 DISPLAY selects from various information
when transmitted by the Radio Station
such as program type, music format artist/
song name and is shown on the Information
Display
5 MONO/SETUP Push-button with indica-
tor, combines the Left and Right Channel
signals for Monophonic Sound on FM
Stations; it is also used to enter/exit the
Setup Mode
6 STORE/EXIT Push-button with indicator,
used to enter and clear stations in Preset
Menmory; it is also used for various
functions in the Setup Mode.
7 INFORMATION DISPLAY indicates FM
and AM tuning and signal information; as
well as various Operational Functions and
Setup Mode Settings
8 SEEK Push-buttons, used to nd the next
station10 COAXIAL AND OPTICAL
DIGITAL AUDIO OUTPUTS send signals
to a Preamplier or Control Center with a
D/A Converter or a decoder
9 BAND Push-button is used to select the
AM or FM tuning band
10 STANDBY/ON Push-button with indicator,
switches the MR89 ON or OFF (Standby)
and resets the microprocessors
11 TUNE/ADJUST Control selects the desired
radio station. Also used to select various
items when in the setup mode.
13
P1 91.5 FM ST
Figure 2
How to Operate the Tuner Setup Mode
Your McIntosh MR89 has been factory congured
for default operating settings that will allow immediate
enjoyment of superb audio from AM and FM, Radio
Stations without the need for further adjustments.
Proceed to “How to Operate the MR89 Tuner” at this
time unless you wish to make changes to the MR89
factory default settings.
A Setup Feature is provided to customize the operating
settings using the Front Panel Information Display. Refer
to the MR89 Front Panel Illustration on the opposite page
while performing the following steps.
Note: If the MR89 is currently On, proceed to step 2.
1. Press the STANDBY/ON Push-button to switch On
the MR89. The MR89 will go through a brief startup
initialization with the Front Panel Information Display
indicating the last tuned station.
Note: The first time the MR89 is switched On the Tuner will
default to the FM Band and is tuned to 88.1 MHz.
2. Press the MONO/SETUP Push-button until the Front
Panel Information Display indicates McIntosh MR89
V__.___ firmware version, refer to figure 1.
MR89 1.00
S/N: _______
Figure 1
The rmware governs the operational function of the
MR89 Tuner. As enhancements are made, the rmware
version is updated. Install the latest rmware for best
performance. At this time the LEDs above the STORE/
EXIT Push-button will be illuminated.
3. Rotate the MENU (PRESET) Control and notice the
Setup Mode goes forward through 20 different possible
adjustment selections and three informational displays.
4. To exit from the Setup Mode, press the MONO/
SETUP Push-button. The LED above the STORE/
EXIT Push-button will extinguish and the Front Panel
Display will revert back to its normal display. Refer to
figure 2.
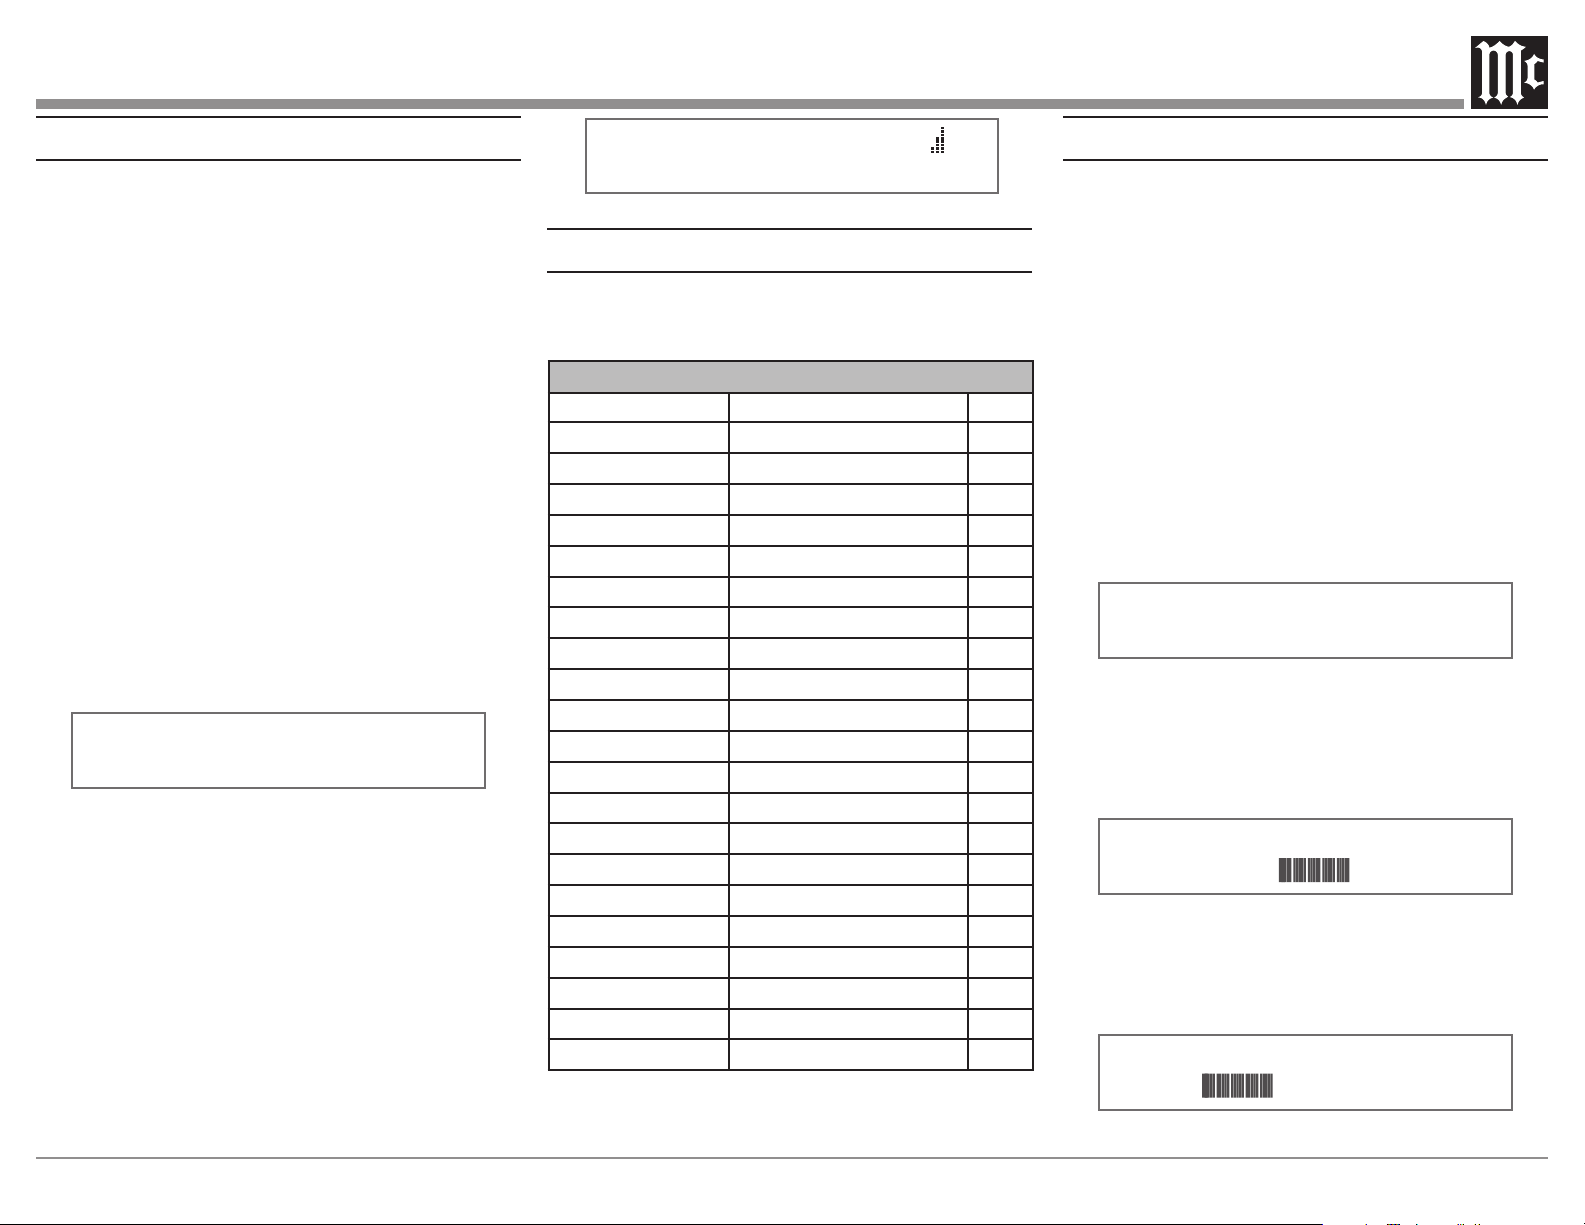
Default Settings
The Default Settings Chart below indicates the
Function Name, Default Setting and the Page Number
for additional information.
AM Seek Sensitivity
AM reception and signal quality varies due
to distance from the radio station, radio station
power output, sources of interference, placement
of the AM Antenna, atmospheric conditions and
the time of day (AM vs. PM).
Depending on reception conditions the received
AM Station Signals can vary from pleasing to just
barely listenable. The MR89 AM Tuner Circuitry
incorporates a Variable Sensitivity Control allow-
ing you to determine the listening quality of AM
Stations it will stop on while seeking.
To accomplish this perform the following steps:
1. Press the MONO/SETUP Push-button until the
Setup Mode is active. Then rotate the PRESET/
MENU Control to select Setup Menu item “AM
SEEK SENSITIVITY”. Refer to figure 3.
AM SEEK SENSITIVITY
LESS || MORE
Figure 3
2. Rotate the TUNE/ADJUST Control clockwise to
increase the Seek Sensitivity (more stations received,
however some might not be listenable, and the MR89
scan may stop on noise or interference). Refer to
figure 4.
AM SEEK SENSITIVITY
LESS
MORE
Figure 4
Rotate the TUNE/ADJUST Control counterclock-
wise to decrease the Seek Sensitivity (less stations
received, but most will be listenable). Refer to
figure 5.
AM SEEK SENSITIVITY
LESS
MORE
Figure 5
MR89 Default Settings
Function Name Setting
Pg No.
McIntosh MR89
V_.__, SN: _______ 13
AM Seek Sensitivity
Midway 13
FM Seek Sensitivity
Midway 14
Blend i ng Ty pe
Stereo 14
Stereo Blend Mode
Normal 14
Deemphasis
75 µS 14
Soft Mute
Normal 15
Highcut
OFF 15
Clear Presets
None 15
Meter Lights
ON 16
Display Auto Fade
O 16
Display Brightness
Full Bright 16
Remote IR Sensor
On 16
Remote Power IR
Enable 16
Remote IR Codes
Normal 17
Comm Port Baud Rate
115,200 17
Tuner Ty pe
TM
_ _ _ _ _ _ _ _
_
V
____
H0
17
Tuner Region
USA 18
Tuner Radio Text
1
On 18
Auto-O:
DISABLED 18
Factory Reset
__ 18
Note: In order to change the Tuner Radio Text Setup Setting
the Tuner Region needs to be set to “USA”.
Refer to Tuner Region on page 18.
14
3. Proceed to the next Setup Menu Item or press
the MONO/SETUP Push-button to exit the Setup
Mode.
FM Seek Sensitivity
Depending on reception conditions, distance from
the radio station, radio station power output, placement
and type of the FM Antenna, multipath interference
and atmospheric conditions the received FM Station
Signals can vary from pleasing to just barely listenable.
The MR89 FM Tuner Circuitry incorporates a Variable
Sensitivity Control allowing you to determine the listen-
ing quality of FM Stations it will stop on while seeking.
To accomplish this perform the following steps:
1. Press the MONO/SETUP Push-button until the
Setup Mode is active. Then rotate the PRESET/
MENU Control to select Setup Menu item “FM SEEK
SENSITIVITY”. Refer to figure 6.
FM SEEK SENSITIVITY
LESS || MORE
Figure 6
2.
Rotate the TUNE/ADJUST Control clockwise to
increase the Scan Sensitivity (more stations received,
however some might not be listenable), refer to figure 7.
FM SEEK SENSITIVITY
LESS MORE
Figure 7
Rotate the TUNE/ADJUST Control counterclockwise
to decrease the Scan Sensitivity (less stations
received, most will be listenable), refer to figure 8.
FM SEEK SENSITIVITY
LESS MORE
Figure 8
3. Proceed to the next Setup Menu Item or press the
MONO/SETUP Push-button to exit the Setup Mode.
Stereo Blend Type
When receiving low quality (weak, noisy, multipath)
FM Stereo Broadcasts, background noise can be
reduced by blending some of the left and right channel
information together, while still maintaining “The
Stereo Eect.” The MR89 provides two dierent blend-
ing types to select from, conventional Stereo Blending,
or Stereo High Blend.
Stereo Blending blends the left and right channel
information together uniformly across the audio
frequency range as signal quality decreases – blending
low and high frequencies the same amount. High
Blend blends the high frequency portion of the audio
frequency range more aggressively. The highest
frequencies are always blended and, as signal quality
decreases, more and more of the high frequencies are
aected until the eect transitions to conventional
Stereo Blending.
To select Blending Type perform the following steps:
1. Press the MONO/SETUP Push-button until the Setup
Mode is active. Then rotate the PRESET/MENU
Control to select Setup Menu item “SETUP: BLEND
TPYE.” Refer to Figure 9.
SETUP: BLEND TYPE
STEREO
Figure 9
2. Rotate the TUNE/ADJUST Control to select
“STEREO” for conventional Stereo Blending, or
“HIGH BLEND” to select High Blend. Refer to
Figure 10.
SETUP: BLEND TYPE
HIGH BLEND
Figure 10
3. Proceed to the next Setup Menu Item or press the
MONO/SETUP Push-button to exit the Setup Mode.
Stereo Blend Mode
The MR89 allows changes in the amount of Stereo
Separation via the Stereo Blend Function. When receiv-
ing weak FM Stereo Broadcasts any background noises
can be reduced by blending some of the left and right
channel information together, while still maintaining
“The Stereo Eect”.
To change from the Normal Setting perform the
following steps:
1. Press the MONO/SETUP Push-button until the
Setup Mode is active. Then rotate the PRESET/
MENU Control to select Setup Menu item “SETUP:
STEREO BLEND NORMAL”. Refer to figure 11.
SETUP: STEREO BLEND
NORMAL
Figure 11
2. Rotate the TUNE/ADJUST Control to select “LESS
NOISE” for a reduction in background noise or select
“MORE SEPARATION” with a possible increase in
background noise over the NORMAL Setting. Refer
to figures 12 and 13.
SETUP: STEREO BLEND
LESS NOISE
Figure 12
SETUP: STEREO BLEND
MORE SEPARATION
Figure 13
3. Proceed to the next Setup Menu Item or press the
MONO/SETUP Push-button to exit the Setup Mode.
Deemphasis
The FM Transmission Standard uses Preemphasis
(boosting the volume level of the high frequencies)
of the audio signal before transmssion. Inside the
15
tuner Deemphasis (cutting the volume level of the
high frequencies) is used to return the audio signal to
the correct high frequency volume levels. The use of
Preemphasis and Deemphasis helps to reduce losses and
noises during the transmission/receive process. There are
two dierent settings for Preemphasis/Deemphasis used
today, one is 75µS (microseconds) and other is 50µS.
Your Tuner was set to the standard used in your Country.
For additional information contact your McIntosh Dealer
or FM Broadcasters in your area for the correct setting.
To change Deemphasis Setting, perform the following
steps:
1. Press the MONO/SETUP Push-button until the
Setup Mode is active. Then rotate the PRESET/
MENU Control to select Setup Menu item “SETUP:
DEEMPHASIS _ _uS”. Refer to figures 14 and 15.
SETUP: DEEMPHASIS
75uS
Figure 14
SETUP: DEEMPHASIS
50uS
Figure 15
Softmute
The MR89 provides a Softmute function which can be
used to reduce audio output when receiving low quality
stations or to reduce between-station static and noise.
Several aggressiveness settings are available to suit
station quality or listening preference.
To change from the Normal Setting perform the
following steps:
1. Press the MONO/SETUP Push-button until the
Setup Mode is active. Then rotate the PRESET/
MENU Control to select Setup Menu item “SETUP:
SOFTMUTE”. Refer to figure 16.
SETUP: SOFTMUTE
OFF
SETUP: SOFTMUTE
LESS MUTING
SETUP: SOFTMUTE
NORMAL
SETUP: SOFTMUTE
MORE MUTING
Figure 16
2. Rotate the TUNE/ADJUST Control to “LESS
MUTING” to reduce reduction in audio levels when,
for example, listening to weak stations. Rotate the
Control to “MORE MUTING” for maximum muting
of between-station static. The Softmute function can
be disabled by rotating the Control to “OFF.”
3. Proceed to the next Setup Menu Item or press the
MONO/SETUP Push-button to exit the Setup Mode.
Highcut
The MR89 provides a Highcut function which can be
used to reduce high frequency audio content when tuned
to low level or low quality stations. Highcut is dierent
from stereo blending in the sense that applies a variable
lowpass lter to reduce the high frequency content of
poor quality stations, but does not blend the left and
right channel content together and reduce stereo separa-
tion. Several aggressiveness settings are available to suit
station quality or listening preference.
To change from the Normal Setting perform the
following steps:
1. Press the MONO/SETUP Push-button until the
Setup Mode is active. Then rotate the PRESET/
MENU Control to select Setup Menu item “SETUP:
HIGHCUT”. Refer to figure 17.
SETUP: HIGHCUT
OFF
SETUP: HIGHCUT
WEAK HIGHCUT
SETUP: HIGHCUT
NORMAL
SETUP:
HIGHCUT
STRONG HIGHCUT
Figure 17
2. Rotate the TUNE/ADJUST Control to “WEAK
HIGHCUT” to reduce high frequency attenuation.
Rotate the Control to “STRONG HIGHCUT” for
more aggressive high frequency attenuation. The
Highcut function can be disabled by rotating the
Control to “OFF.”
3. Proceed to the next Setup Menu Item or press the
MONO/SETUP Push-button to exit the Setup Mode.
Clear Presets
The MR89 AM/FM Tuner has three dierent Tuning
Modes. One of the Tuning Modes is Preset Tuning,
where favorite stations are entered into memory for
quick recall. Any preset station may be removed from
memory at any time. There are times when it may be
desirable to remove from memory all or some of the
preset stations.
To accomplish this perform the following steps:
1. Press the MONO/SETUP Push-button until the
Setup Mode is active. Then rotate the PRESET/
MENU Control to select Setup Menu item “SETUP:
PRESETS”. Refer to figures 18 thru 21.
SETUP PRESETS:
CLEAR PRESETS: NONE
Figure 18
16
Remote IR Sensor
When an external IR Sensor is connected to the MR89
and located in the same room as the tuner, it is advisable
to disable the built-in IR Sensor located on the Front
Panel. Disable the sensor by performing the following
steps:
1. Press the MONO/SETUP Push-button until the
Setup Mode is active. Then rotate the PRESET/
MENU Control to select Setup Menu item “SETUP:
REMOTE IR SENSOR”. Refer to figure 25.
SETUP: REMOTE
IR SENSOR:
OFF
SETUP: REMOTE
IR SENSOR:
ON
Figure 25
2. Rotate the TUNE/ADJUST Control to select OFF.
3. Proceed to the next Setup Menu Item or press the
MONO/SETUP Push-button to exit the Setup Mode.
Remote Control Power Command
In a typical audio system, the MR89 switches On and
O with the McIntosh Preamplier or A/V Control
Center when a Power Control Connection is made
between the units. When the MR89 is used alone, it can
be set to be switched On or O using the Push-button on
the MR89 Remote Control.
To activate the Remote Control On/O feature perform
the following steps:
SETUP PRESETS:
CLEAR PRESETS: AM
Figure 19
SETUP PRESETS:
CLEAR PRESETS: FM
Figure 20
SETUP PRESETS:
CLEAR PRESETS: ALL
Figure 21
2. Rotate the TUNE/ADJUST Control to select one of
four choices:
NONE (default setting, No Presets are cleared)
AM (all AM Presets are cleared)
FM (all FM Presets are cleared)
All (all AM and FM Presets are cleared).
Note: The Presets are cleared when the Setup
Mode is exited.
3. Proceed to the next Setup Menu Item or press the
MONO/SETUP Push-button to exit the Setup Mode.
Meter Lights
Settings are ON, OFF. The rear panel Light Control
signal always takes precedence over the Set Up Menu.
Refer to gure 22.
METER LIGHTS
ON
METER LIGHTS
OFF
Figure 22
Information Display Brightness
The brightness level of the Front Panel Information
Display may be changed from the default setting.
To change the brightness perform the following steps:
1. Press the MONO/SETUP Push-button until the
Setup Mode is active. Then rotate the PRESET/
MENU Control to select Setup Menu item
“DISPLAY BRIGHTNESS”. Refer to figure 23.
DISPLAY
BRIGHTNESS
Figure 23
2. Rotate the TUNE/ADJUST Control to select the
desired brightness. The display actively changes
brightness as you adjust the control. There are four
available settings.
3. Proceed to the next Setup Menu Item or press the
MONO/SETUP Push-button to exit the Setup Mode.
Information Display Auto Fade
The Front Panel Information Display Auto Fade
Feature may be activated by performing the following
steps:
1. Press the MONO/SETUP Push-button until the
Setup Mode is active. Then rotate the PRESET/
MENU Control to select Setup Menu item “SETUP:
DISPLAY AUTO FADE: OFF ”. Refer to figure 24.
SETUP: DISPLAY
AUTOFADE: OFF
SETUP: DISPLAY
AUTOFADE: ON
Figure 24
2. Rotate the TUNE/ADJUST Control to select ON.
Approximately 15 seconds after there is no change
to the operating function (Front Panel or Remote
Control), the Front Panel Infomation Display will
blank out until an operating function is accessed.
3.
Proceed to the next Setup Menu Item or press the
MONO/SETUP Push-button to exit the Setup Mode.
17
1. Press the MONO/SETUP Push-button until the
Setup Mode is active. Then rotate the PRESET/
MENU Control to select Setup Menu item “SETUP:
REMOTE POWER IR”. Refer to figure 26.
SETUP:
REMOTE
POWER IR:
ENABLE
SETUP:
REMOTE
POWER IR: DISABLE
Figure 26
2. Rotate the TUNE/ADJUST Control to select
ENABLE.
3. Proceed to the next Setup Menu Item or press the
MONO/SETUP Push-button to exit the Setup Mode.
Remote Control Codes
The Remote Control included with the MR89 utilizes
the Normal McIntosh Control Codes. The Second Set of
Control Codes the MR89 will respond to is referred to as
the Alternate Codes.
The Alternate Codes are used when the MR89 is used
in the same location as a McIntosh Preamplier and/
or A/V Control Center. This will prevent the Remote
Control from aecting the operation of both units at the
same time.
To activate the Remote Control Alternate Codes
perform the following steps:
1. Press the MONO/SETUP Push-button until the
Setup Mode is active. Then rotate the PRESET/
MENU Control to select Setup Menu item “SETUP:
IR CODES.” Refer to figure 27.
SETUP: IR CODES
NORMAL
SETUP: IR CODES
ALTERNATE
Figure 27
2. Rotate the TUNE/ADJUST Control to select
ALTERNATE.
3. To change the MR89’s HR085 remote control to the
ALTERNATE codes, press and hold the SELECT
push-button, followed by the 2 push-button. Hold
both push-buttons down for approximately 5 seconds
until the McIntosh LED at the top of the remote
flashes twice.
Note: To reset the remote control to the NORMAL codes,
press and hold the SELECT push-button, followed by
the 1 push-button. Hold both push-buttons down for
approximately 5 seconds until the McIntosh LED at
the top of the remote flashes once.
4. Press the MONO/SETUP Push-button to exit the Setup
Mode. Press the BAND Push-button on the Remote
Control to verify proper operation.
5. Proceed to the next Setup Menu Item
Comm Port Baud Rate
The MR89 may be remotely controlled from other
equipment connected to the Rear Panel RS232C connec-
tor. The speed at which the MR89 communicates with
other equipment is adjustable from 9,600 bits per second
to 115,200 bits per second.
To change from the default speed of 115,200 bits per
second, perform the following steps:
1. Press the MONO/SETUP Push-button until the Setup
Mode is active. Then rotate the PRESET/MENU
Control to select Setup Menu item “SETUP: COMM
PORT BAUD RATE”. Refer to figure 28.
SETUP: RS232
115200 BAUD
SETUP: RS232
57600 BAUD
SETUP: RS232
38400 BAUD
SETUP: RS232
19200 BAUD
SETUP: RS232
9600 BAUD
Figure 28
2. Rotate the TUNE/ADJUST Control to select the
desired speed.
3. Proceed to the next Setup Menu Item or press the
MONO/SETUP Push-button to exit the Setup Mode.
Tuner Type
The MR89 Tuner Type may be checked by performing
the following:
1. Press the MONO/SETUP Push-button until the Setup
Mode is active. Then rotate the PRESET/MENU
Control to select Setup Menu item “SETUP: TUNER
TYPE”. Refer to figure 29.
SETUP: TUNER TYPE
TM40104001 6V1020 H0
Figure 29
TM4________ _V____ H0
TM4________ portion is tuner board info.
_V____ portion is tuner device info.
H_ is tuner - detected host info.
“0” indicates MR89 detected.
2. Proceed to the next Setup Menu Item or press the
MONO/SETUP Push-button to exit the Setup Mode.
18
is detected for a period of time. Because of the nature
of radio reception and tuner operation, audible static
will be present when tuned between stations. This static
may be of sucient audio levels to prevent the auto-o
feature from engaging. The auto-o feature will engage
and shutdown the MR89 when, for example, it is tuned
to a station that has ceased broadcasting a program but
the station remains on the air broadcasting “dead air.”
By default the Auto-o feature is disabled, but may be
enabled by performing the following steps:
1. Press and hold in the MONO/SETUP Pushbutton to
enter the SETUP MODE. Then rotate the PRESET/
MENU Control to select Setup Menu item “SETUP:
AUTO-OFF.” Refer to Figure 32.
2. Rotate the TUNE/ADJUST control to select
“ENABLED.” Refer to Figure 33.
3. Proceed to the next Setup Menu Item or press the
MONO/SETUP push-button to exit the setup mode.
SETUP: AUTO-OFF
DISABLED
Figure 32
SETUP: AUTO-OFF
ENABLED
Figure 33
Factory Reset
If it becomes desirable to reset all the adjustable
settings (Setup and Presets) to the factory default values,
perform the following steps:
1. Press and hold in the MONO/SETUP Pushbutton to
enter the SETUP MODE. Then rotate the PRESET/
MENU Control until “FACTORY RESET (HOLD
MONO)” appears on the Information Display. Refer
to Figure 34.
2. Press and hold in the MONO/SETUP Pushbutton
until “FACTORY RESET, IN PROGRESS” appears
Tuner Regions
The MR89 is capable of receiving AM/FM Broadcasts
in various parts of the world. In some countries the
broadcasters use slightly dierent standards and the
MR89 accommodates these dierences.
Your McIntosh MR89 has been factory congured for
the broadcast standards in your country.
If for some reason there is need make a change, follow
the steps below for changing the receiving standards:
Note: Changing the current Tuner Region will result in
clearing of all the Station Presets.
1. Press the MONO/SETUP Push-button until the Setup
Mode is active. Then rotate the PRESET/MENU
Control to select Setup Menu item “SETUP: TUNER
REGION”. Refer to figure 30.
SETUP: TUNER
REGION: USA
SETUP: TUNER
REGION: JAPAN
SETUP: TUNER
REGION: EUR100
SETUP: TUNER
REGION: EUR50
Figure 30
2. Rotate the TUNE/ADJUST Control to select one of
four choices.
Setting AM Band FM Band
USA
530kHz - 1700kHz 88.1MHz - 107.9MHz
JAPA N
531kHz - 1629kHz 76MHz - 108MHz
EUR 100
531kHz - 1701kHz 87.5MHz - 108MHz
EUR 50
531kHz - 1701kHz 87.5MHz - 108MHz
Note: For additional information contact your McIntosh
Dealer.
3. Press the MONO/SETUP Push-button to exit the
Setup Mode. The MR89 Tuner will now switch
OFF to affect the region change just made. Press the
STANDBY/ON Push-button to switch the MR89
back On.
4. Proceed to the next Setup Menu Item.
Tuner Text Information
Some USA FM Stations broadcast program informa-
tion identifying things such as genre, station, and song
title. When Tuner Region in the Setup Menus is set to
“USA”, the MR89 supports display of this text. Note
that the MR89 may not support all of the dierent
language character sets thich an FM station might
transmit. When available from a FM Station, the text
information appears on the second line of Front Panel
Information Display.
The display of the Information can be switched O by
performing the following:
1. Press the MONO/SETUP Push-button until the
Setup Mode is active. Then rotate the PRESET/
MENU Control to select Setup Menu item “SETUP:
TUNER RADIO TEXT”. Refer to figure 31.
SETUP: TUNER
RADIO TEXT: ON
SETUP: TUNER
RADIO TEXT: OFF
Figure 31
2. Rotate the TUNE/ADJUST Control to switch Off
the text.
Note: this setup menu item is only available if Tuner Region
is set to “USA.”
Auto-O
The MR89 Auto-o feature is a power-saving mode
that automatically places the unit in Standby if no audio

19
on the Information Display, then release the INPUT
Control. Refer to Figure 35.
3. When complete, the information display will indicate
“FACTORY RESET, COMPLETED!” momentarily,
refer to figure 36, and then MR89 will automatically
shut off.
4. Press the Front Panel STAND/BY Push-button to
switch on the MR89
FACTORY RESET
(HOLD MONO)
Figure 34
FACTORY RESET
IN PROGRESS
Figure 35
FACTORY RESET
COMPLETED!
Figure 36
How to Operate
The McIntosh MR89 incorporates an advanced design
AM/FM/Tuner with many desirable performance
features to enhance your enjoyment of radio broadcasts.
Power On
Press the STANDBY/ON Push-button on the Front
Panel or the green (Power) Push-button on the
Remote Control. Refer to Remote on page 11, and
Front Panel on page 12. The MR89 will go through a
brief startup initialization followed by the Front Panel
Information Display indicating the last Station.
Note: The first time the MR89 is switched On the Tuner will
default to the FM Band.
Band Selection
Press the BAND Push-button on the Front Panel or the
AM or FM push-buttons on the Remote Control to select
either AM or FM. The display indicates which Band is
active, and if FM indicates “ST” when a received radio
broadcast is a Stereo Radio Signal.
Several seconds after the AM or FM Band is selected,
the Front Panel Information Display will change to
indicate the selected band and frequency the tuner is
currently tuned to. Refer to Front Panel on page 12.
Tuning Broadcasts
There are three Tuning methods for selection of AM or
FM Broadcasts as follows:
1. MANUAL Allows Manual Tuning
of available AM and FM broadcasts.
2. SEEK Automatic Tuning
of available AM and FM broadcasts.
3. PRESET Selection of AM and FM
broadcasts entered into memory.
Manual Tuning
Rotate the TUNE/ADJUST Knob counter-clockwise or
clockwise to the desired AM or FM broadcast.
To manually tune with the Remote Control, the inner
ring up or down may be used to tune up or down 1
channel at a time, or the numerical keypad may be used
to enter tune frequency directly.
The Front Panel Information Display will indicate the
band and exact Tune Frequency, and when the MR89 is
receiving in Stereo.
On the right side of the Front Panel Information Display,
the vertical columns indicate the relative signal strength
of the received Station. Refer to gures 37 and 38.
104.3 FM ST
Figure 37
1050 AM
Figure 38
Tuning
The SEEK Tuning Mode (Automatic Tuning) searches
the AM or FM Broadcast Bands for available Stations.
To use the SEEK Tuning Mode, press and release the
SEEK Up or Down Push-buttons on the Front Panel
to go up or down the dial; or use the SEEK 7 down
or SEEK 8 up the dial Push-buttons on the Remote
Control. Refer to Remote on page 11, and Front Panel
on Page 12. The MR89 Tuner will automatically stop
on the next Station. The seek sensitivity is adjustable in
user-setup.
Note: If the signal strength of a Station is weaker than the
threshold set in user-setup, SEEK Tuning will not
stop on that station.
Preset Tuning
The MR89 allows for presetting 20 AM and 20 FM
Stations into memory for rapid recall, without having
to manually tune through unwanted Broadcasts. By
rotating the PRESET/MENU Control, a Preset may be
selected. Until AM or FM presets are stored, the Front
Panel Information Display will indicate “NO PRESETS
STORED” upon rotation of the PRESET/MENU
Control. Refer to gure 39.
104.3 FM ST
NO PRESETS STORED
Figure 39
Creating Presets
Tune to a Station to be entered into memory either by
Manual Tuning or Seek Tuning and then perform the
follow steps:
1. Momentarily press and release the Front Panel
STORE Push-button. The Front Panel Information
Display will indicate “PRESET X: AVAILABLE”,
where X is the first available Preset Number. Refer to
figure 40. The Station to be entered into memory may
also be assigned to a different Preset Number (2-20)
by rotating the PRESET/MENU Control to select the
desired Preset Number.
104.3 FM ST
PRESET 1 AVAILABLE
Figure 40
Notes: 1. Presets are automatically assigned in order
from 1 to 20 unless a different Preset Number is
selected.
20
2. To exit without entering a new Preset into
memory, momentarily press the Front Panel EXIT
(STORE) Push-button.
2. To enter a Station into memory press and hold in the
STORE Push-button until the Front Panel Information
Display indicates “PRESET STORED” then release the
STORE Push-button. Refer to figure 41.
104.3 FM ST
PRESET 1 STORED
Figure 41
The just entered Preset will be assigned Preset Number
1 (or the Preset number you selected) and is displayed on
the Front Panel Information Display. Refer to gure 42.
P1 104.3 FM ST
Figure 42
3.
Assign additional Stations by performing steps 1 and 2.
Note: When all 20 Presets are assigned and there is another
station(s) to be assigned to a Preset, press the STORE
Push-button. The second line of the display will
indicate the current station stored in Preset Number 1.
Either enter the new station into Preset Number 1 or
Rotate the PRESET control to select the desired preset
to overwrite, and press and hold the STORE push-
button to store. Note that the previously stored preset
will be lost. Refer to Figure 43.
104.3 FM ST
PRESET 1: 91.5 MHZ
Figure 43
4. To verify the Preset(s) just entered into memory,
rotate the Front Panel PRESET/MENU Control or
use the PRESET : or PRESET 9 Push-buttons on
the Remote Control.
Clearing Presets
1. Select the Preset to be removed by using the Front
Panel PRESET/MENU Control or by using the
PRESET : or PRESET 9 Push-buttons on the
Remote Control. Refer to figure 44.
PX 104.3 FM ST
Figure 44
2. Press and hold in the Front Panel STORE
Push-button until the Front Panel Information
Display indicates “PRESET X CLEARED”, then
release the STORE Push-button. Refer to figure 45.
104.3 FM ST
PRESET X CLEARED
Figure 45
Note: If you wish to replace an already assigned Station
Preset with another radio Station, it is not necessary
to clear the Preset first, just enter in the new Station
for that Preset. The new Station will automatically
replace the previously assigned Station.
3. To clear any additional Station Presets perform steps
1 and 2 again.
After the creation of Preset(s), use the Front Panel
PRESET/MENU Control to select the desired Station
Preset or by using the Remote Control, PRESET : or
PRESET 9 Push-buttons.
Direct access is also possible by pressing the PRESET
Push-button followed by entering the number of Preset
using the 0-9 numeric Push-buttons on the Remote
Control.
MONO Push-Button Stereo/Mono Mode
The MR89 Tuner automatically switches between
Stereo and Monaural FM Broadcasts. When a Stereo
FM Broadcast is received, the Front Panel Information
Display indicates the Stereo Mode by the letters “ST.” To
change the reception mode to MONO press and release
the Front Panel MONO Push-button to combine left and
right stereo signals to a FM Monophonic signal. The ST
indication will be extinguished. Refer to gure 46.
P1 91.5 FM ST
P1 91.5 FM
Figure 46
SIGNAL Push-Button Display of Multipath
and Noise
The relative signal strength of the received Station
indicated as vertical columns on the right side of the
Front Panel Information Display is only one indication of
the signal quality. Refer to gure 47.
104.3 FM ST
Figure 47
The MR89 Tuner provides two additional displays to
better indicate the quality of the received FM Station
Signal. These displays include Mulitpath and Noise. To
activate these two displays perform the following:
1. Press and release the Front Panel SIGNAL
Push-button. The LED above the SIGNAL
Push-button will illuminate The Front Panel
Information Display will indicate “Mpath: _ _ _ _
Noise: _ _ _ _” on the second line of the Front Panel
Information Display. Refer to gure 48.
104.3 FM ST
Mpath: Noise:
Figure 48
Multipath interferance occurs when the MR89 receives
two or more signals from the Broadcast Station to which
it is tuned. The rst signal received is the direct signal
from the station and any additional signals received
occur as a result of the direct signal reected o of some
object such a building or terrain (hill/mountain). The
reected signal(s) arrives at the FM Antenna delayed
in time do to the longer travel distance incurred. This
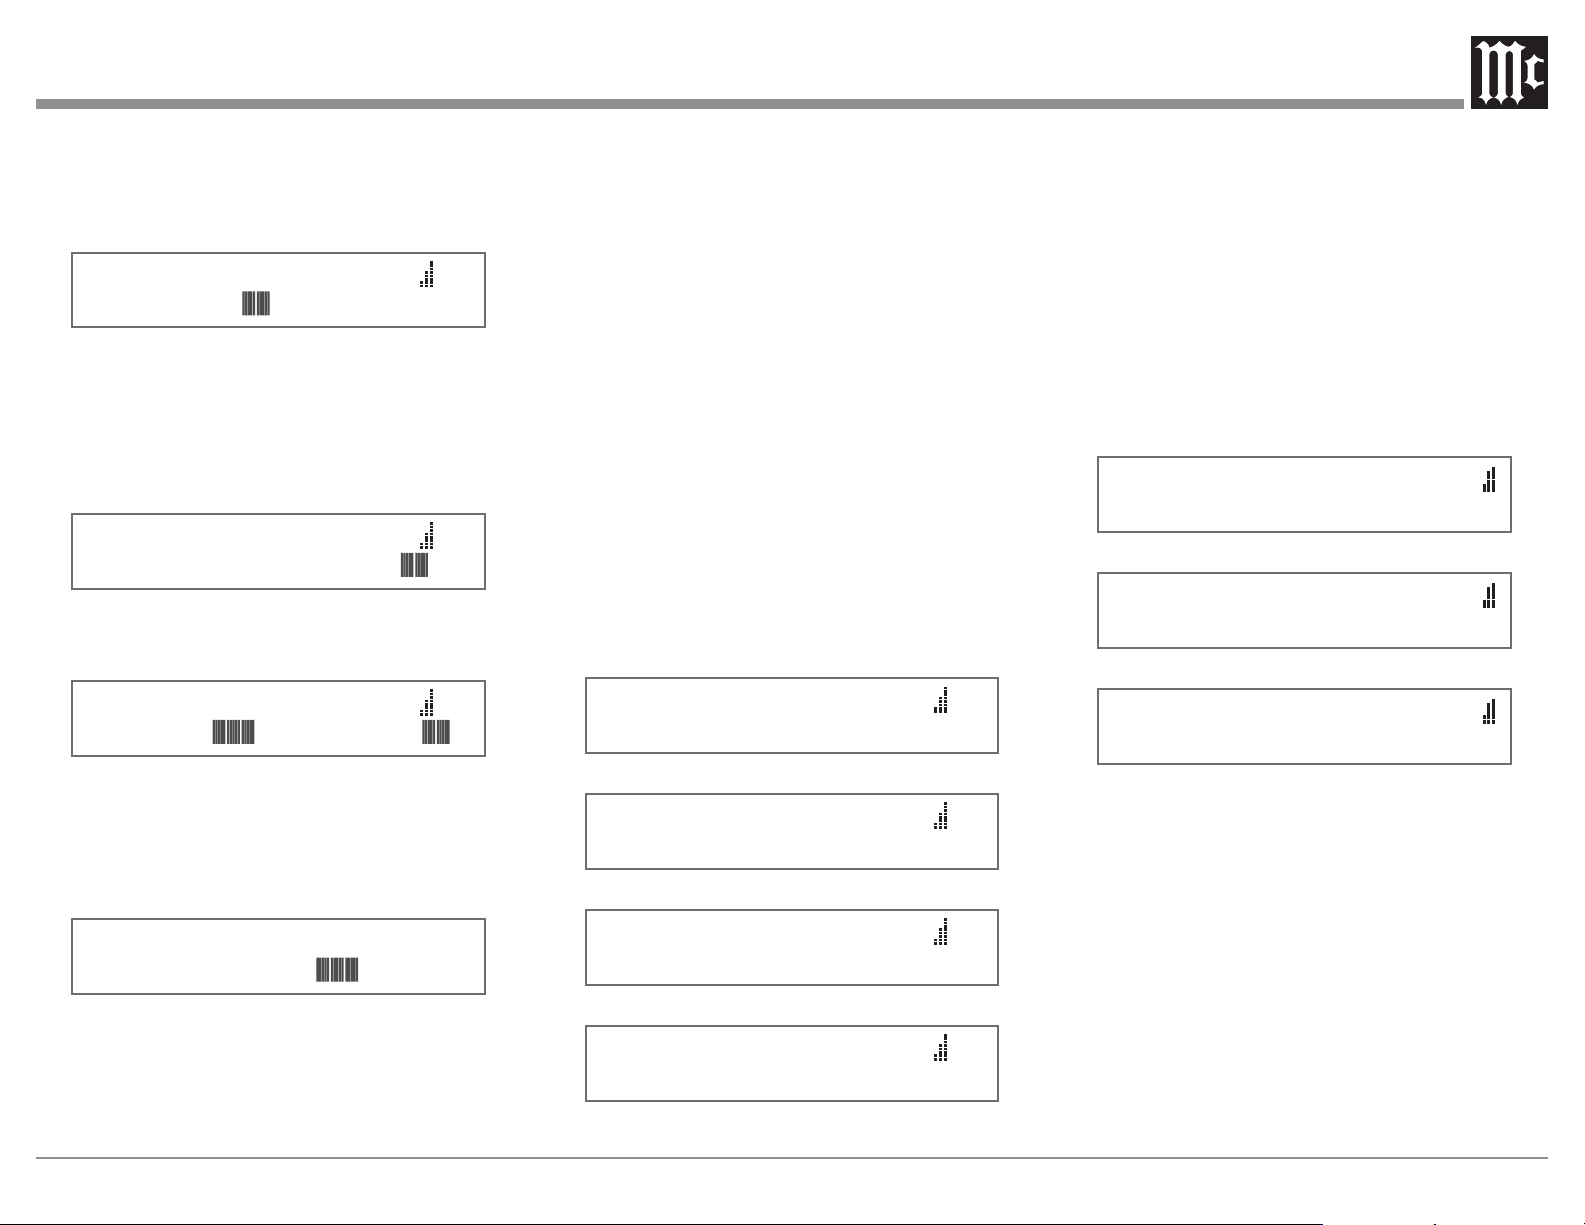
21
delayed signal results in an increase in distortion and
a reduction in Stereo Separation. Refer to gure 49. To
reduce or eliminate Multipath, reorient the FM Antenna
for minimum indication of Multipath even if the Signal
Strength indicates less signal.
104.3 FM ST
Mpath: Noise:
Figure 49
Noise received along with the desired FM Broadcast
Signal can occur from a variety sources, both local
and distant. If orienting the FM Antenna doesn’t either
reduce or eliminate the noise, an antenna with more gain
and directional capability might be required. Refer to
gure 50.
104.3 FM ST
Mpath: Noise:
Figure 50
Figure 51 illustrates a received FM Broadcast with
both Multipath and Noise.
104.3 FM ST
Mpath: Noise:
Figure 51
2. Press the BAND Front Panel Push-button to select
AM. The Front Panel Information Display will
indicate “Signal: _ _ _ _ _ _ _ _” on the second line
of the Front Panel Information Display. Refer to
figure 52.
1050 AM
SIGNAL:
Figure 52
Tune to the weakest AM Station in your area and
then orient and/or change the placement of the supplied
RAA2 AM Antenna for maximum Signal indication on
line 2 of the info display; and minimum audible noise
and distortion.
Reception of FM and AM Broadcasts is largely
determined by local conditions. For additional assistance
contact your McIntosh Dealer, as they are very familiar
with reception conditions in your area.
3. Press the SIGNAL Front Panel Push-button to
return the Front Panel Information Display to the
previous display.
DISPLAY Push-Button Text Information
The MR89 Tuner supports display of text from many
FM radio Stations. When available from a FM Broadcast
Station, the text information appears on the second line
of the Front Panel Information Display. Information
longer than 20 characters will scroll from right to
left. This information may include some or all of the
following:
A. Station Call Letters and/or Frequency.
B. Type of Program and/or music format.
C. Name of the Artist.
D. Name of the Song.
Refer to gures 53, 54, 55 and 56 for examples of the
Text Information.
104.3 FM ST
WWWW-FM JAZZ 104
Figure 53
104.3 FM ST
Jazz
Figure 54
104.3 FM ST
Jacintha - Autumn L
Figure 55
104.3 FM ST
Ntha - Autumn Leaves
Figure 56
Note: Some stations do not broadcast Text Information. In
that case, no information is displayed, regardless of
the Tuner Radio Text setting. Weak broadcast signals
might result in an interruption of the text information
and/or incorrect characters displayed. If this occurs,
try re-orienting the FM Antenna and/or replacing the
antenna with an improved reception model. See your
McIntosh Dealer for assistance.
The text information may be disabled in user setup,
see page 18. If text information is enabled, the DISPLAY
push-button can be used in round-robin fashion to either
DISPLAY: Genre, Radio Text, or text can be temporarily
Muted. Refer to gures 57, 58 and 59.
104.3 FM ST
DISPLAY: GENRE
Figure 57
104.3 FM ST
DISPLAY: RADIO TEXT
Figure 58
104.3 FM ST
DISPLAY: MUTED
Figure 59
Reset of Microprocessors
In the unlikely event the controls of the MR89 stop
functioning, the microprocessors can be reset by
performing the following:
1. Press and hold in the STANDBY/ON Push-button
for approximately five seconds until the STANDBY/
ON LED is extinguished, and then release the
push-button.
2. Press the STANDBY/ON Push-button and the
MR89 will resume normal operation..

22
FM Specications
Tuning Range 87.5MHz - 108.0MHz (Europe)
88.1MHz - 107.9MHz (USA)
76MHz - 108MHz (Japan)
Antenna Input 75 Ohms,
Type “F” Coax connector
Useable Sensitivity (26dB SNR) 1μV
Signal To Noise Ratio Mono: 70dB
Stereo: 68dB
Frequency Response ±1dB 20 to 18,000Hz
Harmonic Distortion Mono: 0.1%
Stereo: 0.3%
Channel Selectivity 70dB Adjacent Channel
Stereo Separation 45dB
AM Specications
Tuning Range 531kHz - 1701kHz (Europe)
530kHz - 1700kHz (USA)
531kHz - 1629kHz (Japan)
Antenna Input RAA2 (supplied),
Type “RJ45” connector
Sensitivity 350μV/m
Signal To Noise Ratio 55dB
Frequency Response ±1dB 20Hz - 15kHz,
-6dB 3kHz
Harmonic Distortion 0.1%
Selectivity 45dB Adjacent Channel
General Specications
Rated Output
1Vrms Unbalanced, 2Vrms Balanced
Output Impedance
100 ohms Unbalanced or Balanced
Digital Output
Optical: -15dbm to -21dbm (PCM)
Coaxial: 0.5Vp-p/75 ohm (PCM)
Sampling Frequency: 48kHz (PCM)
AM Antenna Input
Balanced, RJ45 connector (for use only
with supplied McIntosh RAA2 Remote AM
Antenna)
RAA2 Remote AM Antenna Overall
Dimensions
Width is 6 inches (15.24cm)
Height is 2-1/2 inches (6.35cm)
Depth is 1-1/2 inches (3.81cm)
Power Requirements
100V ~ 50/60Hz, 30 watts 220V ~ 50/60Hz, 30 watts
110V ~ 50/60Hz, 30 watts 230V ~ 50/60Hz, 30 watts
120V ~ 50/60Hz, 30 watts 240V ~ 50/60Hz, 30 watts
Note: Refer to the rear panel of the MR89 for
the correct voltage.
Dimensions
Overall
Width is 17-1/2 inches (44.45cm)
Height is 6 inches (15.24cm) including feet
Depth is 18 inches (45.72cm) including the Front
Panel, Knobs and Cables
Weight 23.0 pounds (11.6 kg) net,
37.5 pounds (18.1 kg) in shipping carton
Shipping Carton Dimensions
Width is 26-1/2 inches (67.3cm)
Depth is 24-1/4 inches (62.2cm)
Height is 11-3/4 inches (29.9cm)

23
Packing Instructions
IMPORTANT
Refer to
Packing Instructions
Parts List
Quantity Part Number Description
4 017937 Plastic Foot
1 033725 Inner Carton Top Pad
1 033836 Inside Carton Only
4 033837 Pad Foam End Cap
1 033838 Shipping Carton Only
1 034301 Bottom Pad
2 034446 Foam Plug
4 400159 #10-32 X 3/4” Screw
4 404080 #10 Flat Washer
In the event it is necessary to repack the equip-
ment for shipment, the equipment must be packed
exactly as shown below.
Use the original shipping carton and interior
parts only if they are all in good serviceable
condition.
If a shipping carton or any of the interior part(s)
are needed, please call or write Customer Service
Department of McIntosh Laboratory. Refer to
page 3.
See the Part List for the correct part numbers.
It is very important that the four plastic feet are attached to the bottom of the equipment.
This will ensure the proper equipment location on the bottom pad. Failure to do this will result in shipping damage.

The continuous improvement of its products is the
policy of McIntosh Laboratory Incorporated who
reserve the right to improve design without notice.
Printed in the U.S.A.
McIntosh Laboratory, Inc.
2 Chambers Street
Binghamton, NY 13903
www.mcintoshlabs.com
McIntosh Part No. 24117801