Loading ...
Loading ...
Loading ...

6
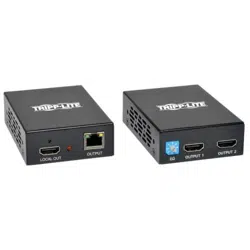
Standard 1 x 2 Extender Kit Installation
1
Make sure all devices being connected are powered OFF.
2
Connect the HDMI source to the INPUT port on the transmitter unit
using a Tripp Lite P568-Series High-Speed HDMI Cable.
3
Optional: Connect a monitor to the LOCAL port on the transmitter
unit using a Tripp Lite P568-Series High-Speed HDMI Cable.
4
Connect the external power supply to the transmitter unit and
plug the transmitter unit into a Tripp Lite Surge Suppressor, Power
Distribution Unit (PDU) or Uninterruptible Power Supply (UPS). The
green RJ45 LED illuminates to indicate that the unit is receiving
power from the external power supply.
5
Using Cat5e/6 cable, connect the RJ45 port on the transmitter unit
marked OUTPUT to the RJ45 port on the receiver unit marked INPUT.
6
Connect the external power supply to the receiver unit and plug the
receiver unit into a Tripp Lite Surge Suppressor, PDU or UPS. The
green RJ45 LED illuminates to indicate that the unit is receiving
power from the external power supply.
7
Connect a monitor to the OUTPUT 1 port on the receiver unit using a
Tripp Lite P568-Series High-Speed HDMI cable.
8
Repeat step 7 for the OUTPUT 2 port on the receiver unit.
9
Turn on the power to the connected devices. The orange RJ45 LED’s
on the transmitter and receiver units illuminate to indicate that a
signal is being received from the HDMI source. The video image will
now be displayed on the connected monitors.
10
If necessary, use the Equalization control on the receiver unit to
adjust the video image.
Note: An improper Equalization setting can cause the monitor not to display an
image at all. Try each setting until an acceptable image is displayed.
Loading ...
Loading ...
Loading ...