Loading ...
Loading ...
Loading ...
u
Remove the carbon filter
Fig. 57 (2)
.
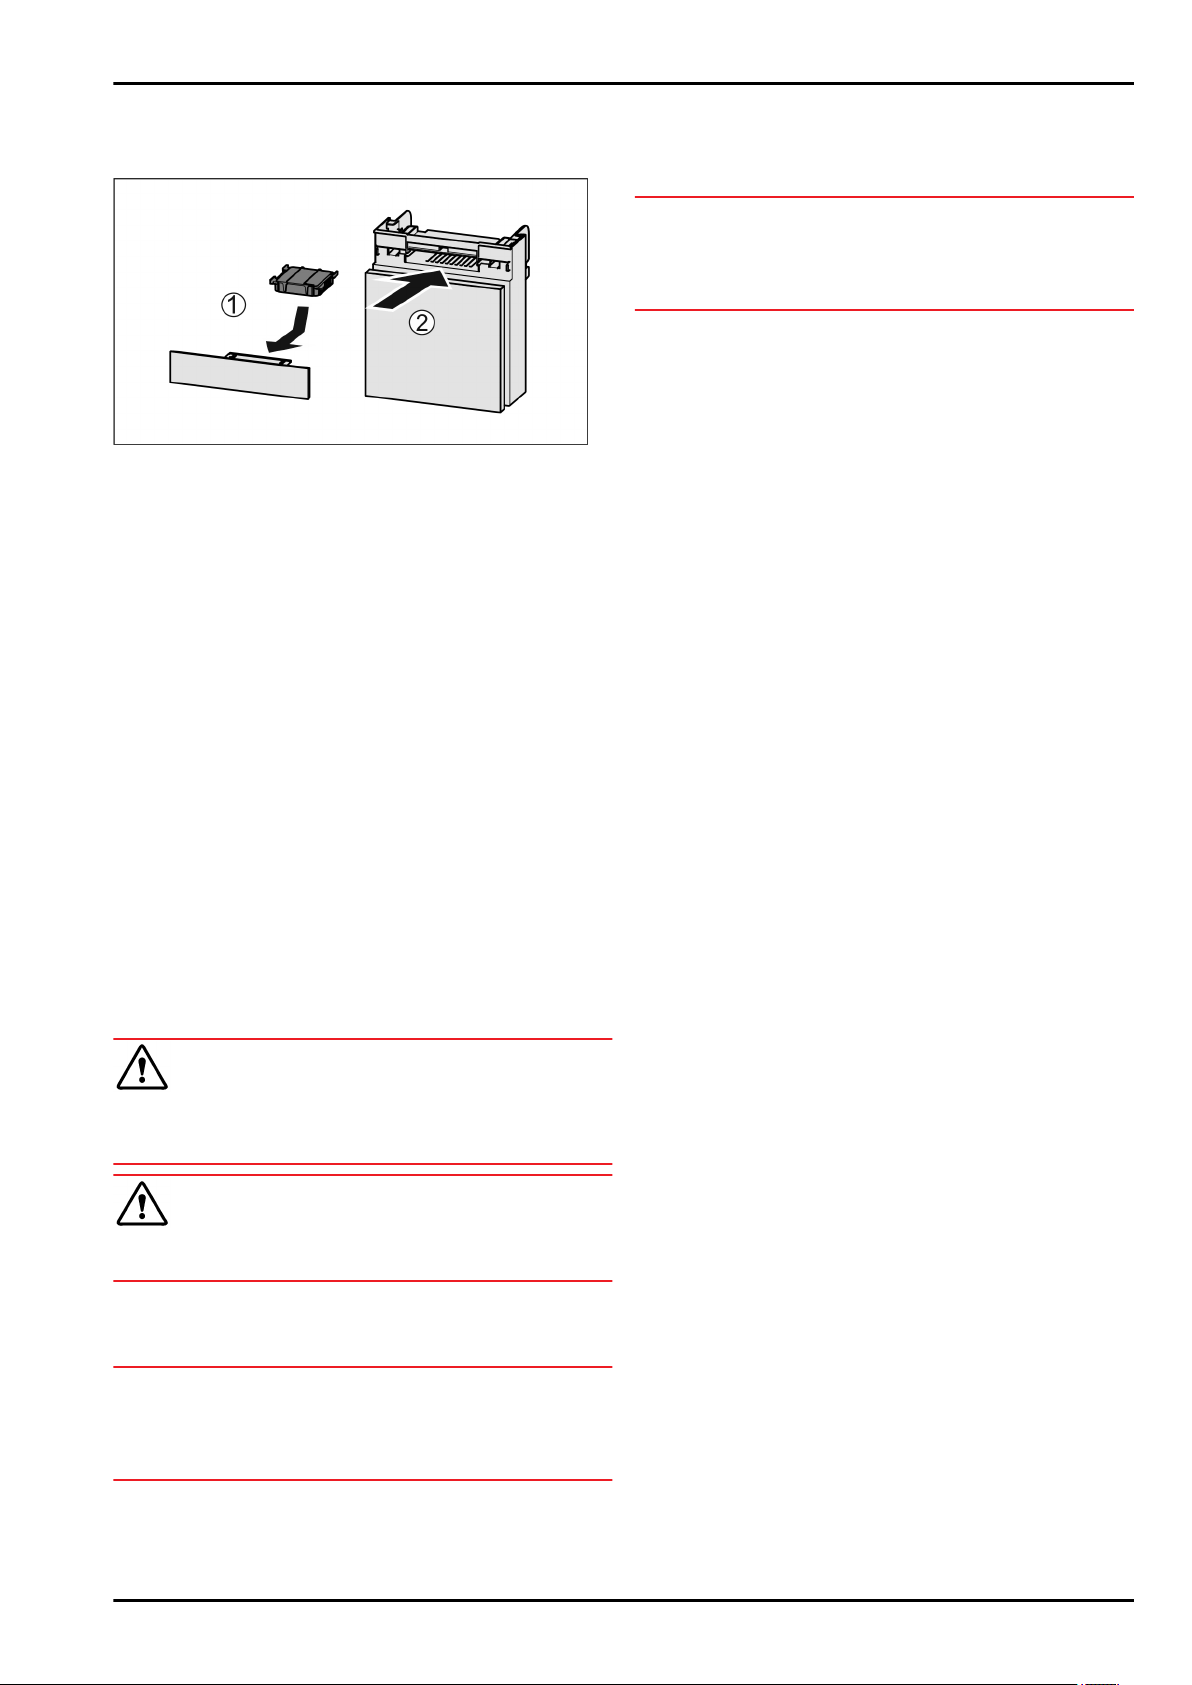
8.1.2 Inserting the FreshAir carbon filter
Fig. 58
u
Insert the carbon filter as shown in the diagram
Fig. 58 (1)
.
w
The carbon filter clicks into place.
If the carbon filter is pointing downwards:
u
Push the compartment in
Fig. 58 (2)
.
w
The carbon filter is now ready for use.
8.2 Defrosting the appliance
8.2.1 Defrosting the fridge section
Defrosting is automatic. The thawing water drains through the
outlet and evaporates.
u
Clean the outflow opening regularly (see 8.3 Cleaning the
appliance) .
8.2.2 Defrost freezer section using the NoFrost
option
Defrosting happens automatically via the NoFrost system.
The moisture is deposited on the evaporator, is periodically
defrosted and evaporates.
The appliance does not need to be defrosted.
8.3 Cleaning the appliance
8.3.1 Ready
WARNING
Danger of electric shock!
u
Remove the refrigerator connector or interrupt the power
supply.
WARNING
Risk of fire
u
Do not damage the refrigeration circuit.
u
Empty the appliance.
8.3.2 Cleaning the interior
NOTICE
Improper cleaning!
Damage to the appliance.
u
Only use soft cleaning cloths and ph-neutral all-purpose
cleaners.
u
Plastic surfaces: clean by hand with a soft clean cloth, luke-
warm water and a little detergent.
u
Metal surfaces: clean by hand with a soft clean cloth, luke-
warm water and a little detergent.
u
Drain outlet
Fig. 1 (11)
: remove any deposits with a thin item
such as a cotton bud.
8.3.3 Clean the components
NOTICE
Improper cleaning!
Damage to the appliance.
u
Only use soft cleaning cloths and ph-neutral all-purpose
cleaners.
Clean with a soft, clean cloth, lukewarm water and some
detergent:
- Fruit & Vegetable safe cover
- Drawer
Please note: Do not remove the magnet on the drawer. The
magnet ensures the functionality of the IceMaker.
- Divider in the IceMaker drawer
- Adjustable bottle shelf
- FlexSystem
- Freezer tray
Clean with a damp cloth:
- Retractable rails
Please note: The grease in the tracks is used for lubrication
and must not be removed!
Wash in the dishwasher up to 60 °C:
- Door rack
- VarioBox
- Bottle rack
- Shelf
- Dividing shelf
- Holder of the dividing shelf
- HydroBreeze water tank and water tank lid
- Egg rack
- Butter dish
u
To disassemble components: see the relevant section.
u
Clean the components.
8.3.4 Cleaning the HydroBreeze
Cleaning is required in the following cases:
q
Initial operation
q
HydroBreeze is off for more than 48 hours.
q
Refill the water tank.
Ensure that the following conditions are met:
q
HydroBreeze is off (see HydroBreeze) .
q
Water tank has been removed and cleaned in the dish-
washer.
u
Wipe out the recess with a damp cloth.
u
Insert the water tank.
u
Activate the HydroBreeze.
8.3.5 Cleaning the IceMaker
There are various options for cleaning the IceMaker.
Cleaning is required in the following cases:
q
Initial operation
q
If out of use for more than 5 days.
Ensure that the following conditions are met:
q
IceMaker drawer is emptied.
q
IceMaker drawer is in place.
q
IceMaker is on (see 6.2 Control concept) .
First use or after a long period of non-use
Clean the IceMaker with the TubeClean function.
u
Place a 1.5 l empty container (max. height 10 cm) into the
drawer under the IceMaker.
u
Activate the TubeClean function (see 6.2 Control concept) .
Maintenance
22 * Depending on model and options
Loading ...
Loading ...
Loading ...