Loading ...
Loading ...
Loading ...
12
Accessory Construction for Alternative Operation Methods
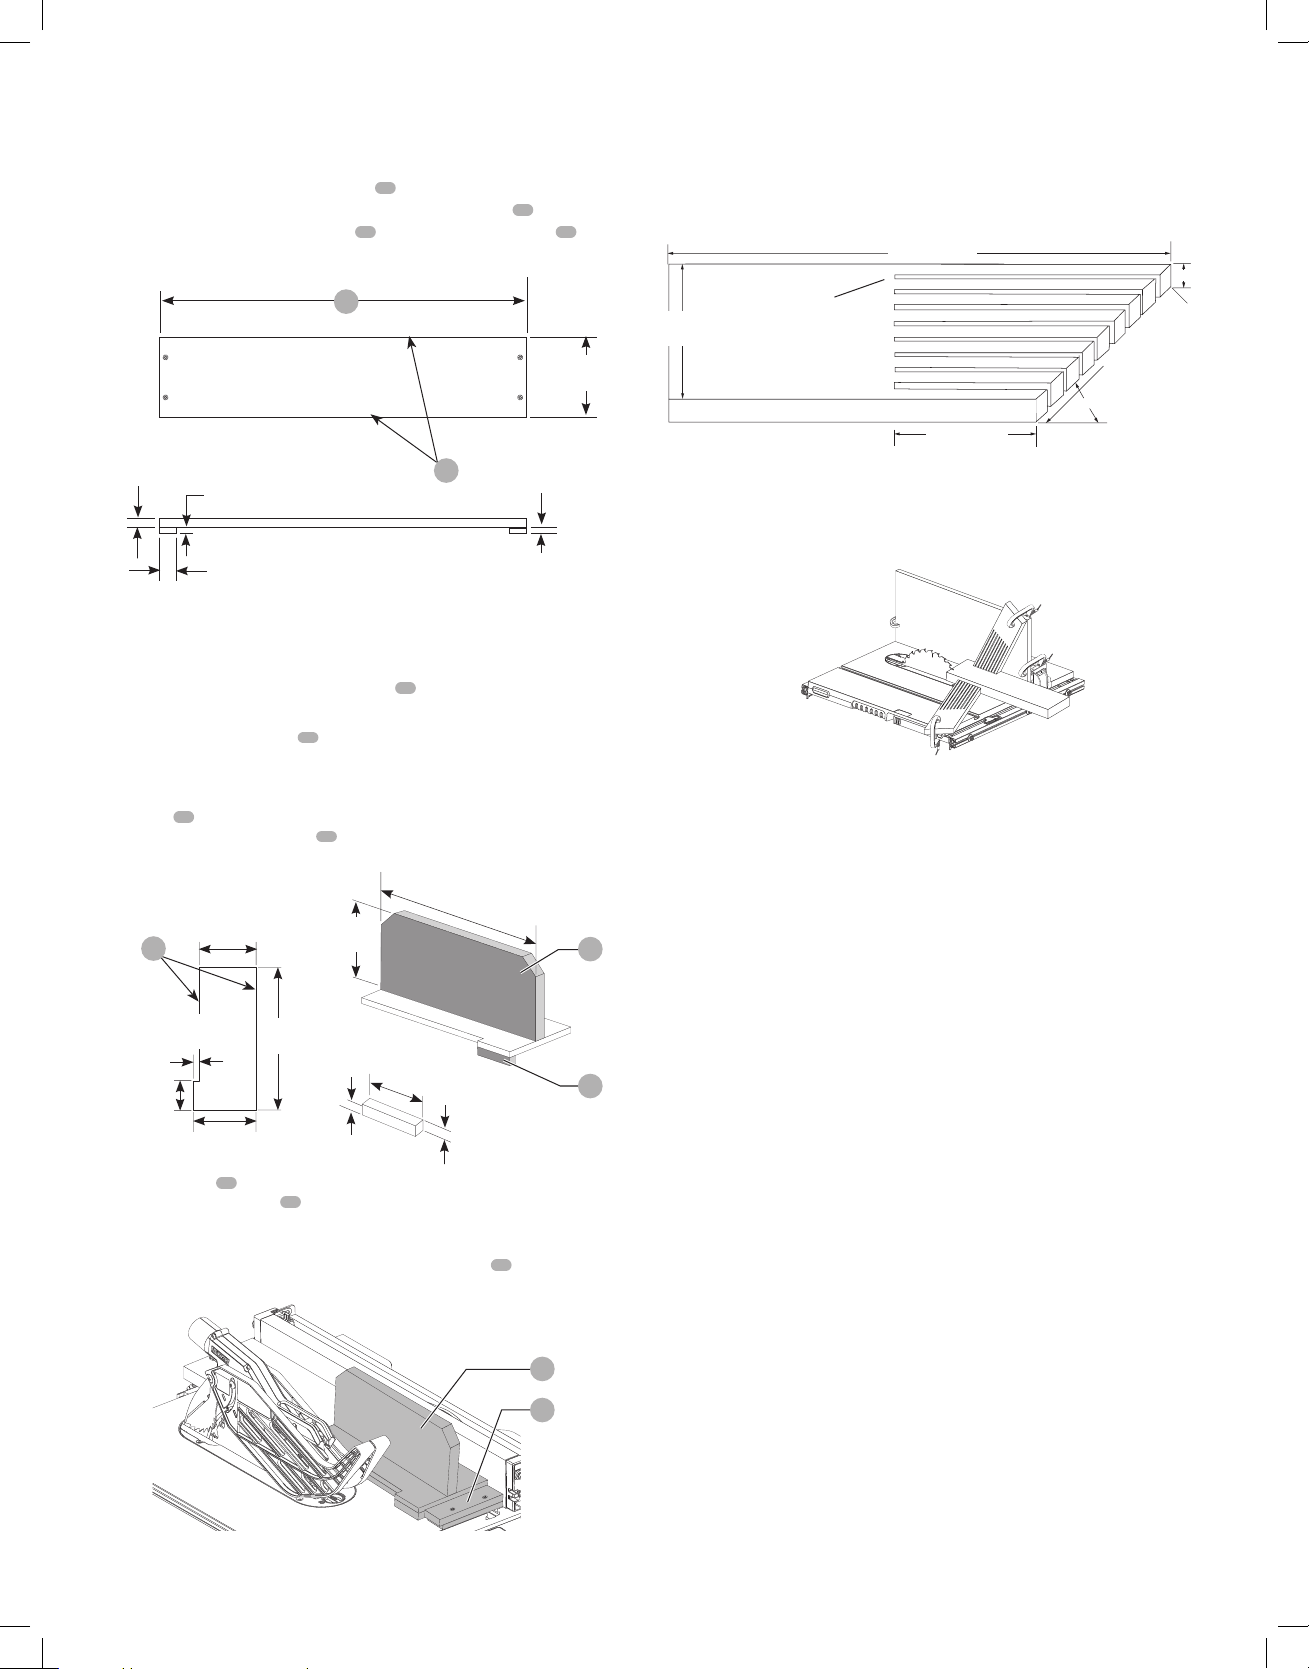
Narrow Rip Auxiliary Fence (Fig. AA–CC)
The narrow rip auxiliary fence should be used for a rip measuring 2" (51mm) or narrower. This
fence will allow the guard to remain on the saw when completing narrow ripping. This fence will
provide ample space for proper use of a push block (
66
, see Push Block).
1. Follow the diagram in Fig. AA to construct the narrow rip auxiliary fence
69
.
NOTE: The length should be cut to fit the length
64
of the saw table top and sides
65
must
beparallel.
3/8"
(9.5 mm)
1"
(25 mm)
1/2"
(12.7 mm)
Fig. AA
4-3/4"
(121 mm)
3/8"
(9.5mm)
64
65
2. After the narrow rip auxiliary fence is constructed, slip it over the saw table top and place it
flush to the fence as shown in FigureCC.
3. Feed the workpiece through until the edge of the material reaches the front edge of the saw
tabletop.
4. Continue feeding the material using the push block
66
until the cut iscomplete.
Push Block (Fig. BB, CC)
IMPORTANT: Only use the push block
66
with the narrow rip auxiliary fence, refer to Narrow
Rip Auxiliary Fence. The push block should be used once the material being cut reaches the saw
tabletop.
1. Construct a push block using the diagram in FigureBB.
NOTE: Edges
67
must beparrallel.
IMPORTANT: The over hanging edge
68
Fig. BB) MUST be square. An uneven lip could
cause the push block to slip or push the material away from thefence.
12
"
(305mm)
Fig. BB
2-1/2" (64mm)
5"
(127 mm)
1/2"
(12.7 mm)
4-3/4"
(121 mm)
12"
(305 mm)
1/2"
(12.7 mm)
5-1/4"
(133 mm)
2-1/2"
(64 mm)
1/2"
(12.7 mm)
66
67
68
2. Place the push block
66
(Fig. CC) behind the material and ensure the lip of the block is flush
to the narrow rip auxiliary fence
69
.
3. Once the push block is in place, continue feeding the material until the cut is complete
making sure the push block remains flush to the narrow rip auxiliary fence at alltimes.
IMPORTANT: The narrow rip auxiliary fence and the over hanging edge
68
Fig. BB) should both
be the samethickness.
Fig. CC
66
69
Featherboard Construction (Fig. DD, EE)
Featherboards are used to keep the work in contact with the fence and table, and help prevent
kickbacks. Dimensions for making a typical featherboard are shown in Figure DD. Make
the featherboard from a straight piece of wood that is free of knots and cracks. Clamp the
featherboard to the fence and table so that the leading edge of the featherboard will support the
workpiece until the cut is complete (Fig. EE). An 8" (203mm) high flat board can be clamped to
the rip fence and the featherboard can be clamped to the 8" (203mm) highboard.
60º
Fig. DD
24" (610mm)
5" (127mm)
3/4"
(20mm)
The kerf should
be about 1/4"
(6.4mm) apart
4"
(102mm)
WARNING: Use featherboards for all non thru-sawing operations where the blade guard
assembly, anti-kickback assembly and riving knife cannot be used. Always replace the
blade guard assembly, anti-kickback assembly and riving knife when the non thru-
sawing operation is complete. Make sure the featherboard presses only on the portion of
the workpiece in front of theblade.
Fig. EE
MAINTENANCE
WARNING: To reduce the risk of serious personal injury, turn unit off and remove the
battery pack before making any adjustments or removing/installing attachments
oraccessories. An accidental start-up can causeinjury.
Cleaning
WARNING: Blow dirt and dust out of all air vents with clean, dry air at least once aweek.
To minimize the risk of eye injury, always wear ANSIZ87.1 approved eye protection when
performingthis.
WARNING: Never use solvents or other harsh chemicals for cleaning the non-metallic parts
of thetool. These chemicals may weaken the plastic materials used in theseparts. Use a
cloth dampened only with water and mildsoap. Never let any liquid get inside the tool; never
immerse any part of the tool into aliquid.
Accessories
WARNING: Since accessories, other than those offered by
DEWALT
, have not been tested
with this product, use of such accessories with this tool could behazardous. To reduce the
risk of injury, only
DEWALT
recommended accessories should be used with thisproduct.
Recommended accessories for use with your tool are available at extra cost from your local dealer
or authorized servicecenter. If you need assistance in locating any accessory, please contact
DEWALT
Industrial ToolCo., 701East Joppa Road, Towson, MD 21286, call 1–800–4-
DEWALT
(1–800–433–9258) or visit our website:www.dewalt.com.
• Compatible Stands (DWE74911)
• Metric rip scale (N458905)
• Dust extraction Y connector (contact your local dealer)
Repairs
The charger and battery pack are notserviceable.
WARNING: To assure product SAFETY and RELIABILITY, repairs, maintenance and
adjustment (including brush inspection and replacement) should be performed by a
DEWALT
factory service center or a
DEWALT
authorized servicecenter. Always use identical
replacementparts.
Loading ...
Loading ...
Loading ...