Loading ...
Loading ...
Loading ...
9
• The saw blade furnished with your new saw is a 8-1/4" (210mm) combination blade, used for
crosscutting (across the grain) and ripping (with the grain) through the material. The center
hole to fit on the arbor is 5/8" (16mm) diameter. This blade will produce a good quality cut for
mostapplications.
• There are many types of blades available to do specific and special jobs such as cross cut only, rip
only, hollow ground, thin plywood, paneling,etc.
• Use only saw blades designed for maximum safe operating speeds of 6,000RPM orgreater.
• Saw blades should always be kept sharp. It is recommended that you locate a reputable
sharpening service to sharpen your blades whenneeded.
• Never stack blades on top of one another to store. Place material such as cardboard between
them to keep the blades from coming in contact with oneanother.
WARNING: To reduce the risk of injury, abrasive wheels or blades (including diamond)
should not be used on thissaw.
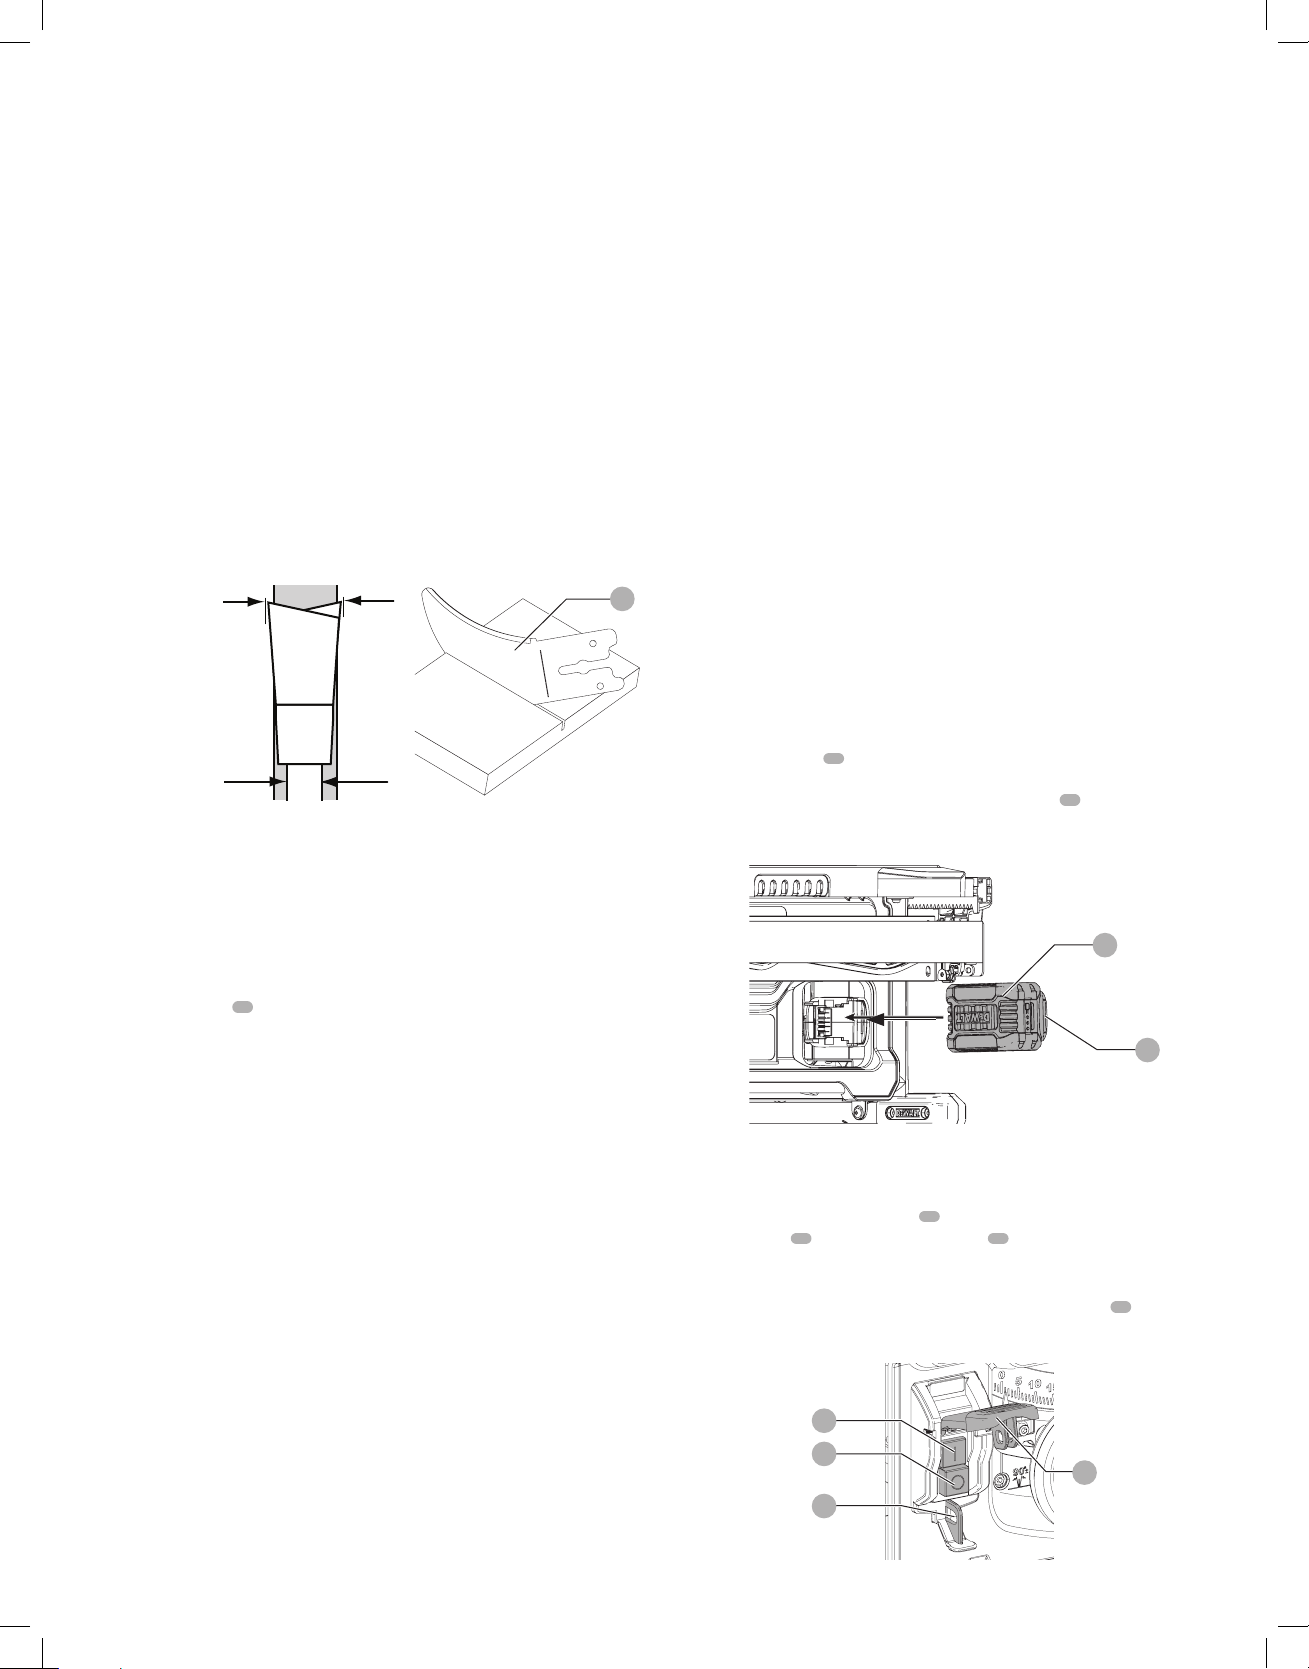
Splitter and Riving Knife Selection (Fig. P)
WARNING: To minimize the risk of kickback and to ensure proper cutting, the splitter and
riving knife must be the proper thickness for the bladeused.
The splitter and riving knife supplied with this table saw is the correct size for the blade supplied
with thesaw.
If a different blade is used, check the blade body (plate) thickness and the blade kerf (cutting)
width marked on the blade or on the blade packaging. The splitter and riving knife thickness
must be greater than the body thickness and less than the kerf width as shown in FigureP.
Riving knife thickness
Kerf width (width of cut
made by the blade)
Body (or plate)
thickness of the blade
Fig. P
23
The riving knife provided with this saw is marked as follows:
.063” (1.6mm) THICK RIVING KNIFE. ONLY FOR USE WITH 8 ¼” (210mm) BLADE WITH .071”
(1.8mm) MIN KERF WIDTH AND .055” (1.4mm) MAX BODYTHICKNESS.
Blade body thickness and kerf width dimensions for all
DEWALT
table saw blades are available at
www.dewalt.com
If a different blade is used and the body thickness and kerf width dimensions are not provided,
use the following procedure to determine the correct riving knife thickness:
1. Measure the body thickness of theblade.
2. Make a shallow cut in scrap material and measure the kerfwidth.
3. Select the riving knife
23
.
4. Slide the riving knife through the shallow cut made in step 2 to confirm the correct riving
knife has been selected. The riving knife should not bind or drag through thecut.
WARNING: If any dragging or binding of the material is encountered as it reaches the riving
knife, turn unit off and remove the battery pack. Repeat steps 1–4 to make the proper riving
knife selection before attempting anothercut.
Kickback
Kickback is a dangerous condition! It is caused by the workpiece binding against the blade. The
result is that the workpiece can move rapidly in a direction opposite to the feed direction. During
kickback, the workpiece could be thrown back at the operator. It can also drag the operator’s
hand back into the blade if the operator’s hand is at the rear of the blade. If kickback occurs, turn
the saw OFF and verify the proper functioning of the riving knife, anti-kickback assembly and
blade guard assembly before resumingwork.
WARNING: See Additional Safety Rules for Table Saws and follow all warnings
provided regardingKICKBACK.
OPERATION
WARNING: To reduce the risk of serious personal injury, turn unit off and remove the
battery pack before making any adjustments or removing/installing attachments
oraccessories. An accidental start-up can causeinjury.
WARNING: Before using the saw, verify the following each and every time:
• ALWAYS wear proper eye, hearing and respiratoryequipment.
• Blade is securelytightened.
• Bevel angle and rail lock levers arelocked.
• If ripping, ensure that rip fence locked lever is locked and that the fence is parallel to
theblade.
• If crosscutting, miter gage knob is securelytightened.
• The blade guard assembly is properly attached and the anti-kickback assembly
isfunctioning.
• ALWAYS inspect the blade guard assembly and riving knife for proper alignment,
operation and clearance with sawblade.
• ALWAYS make sure both guards are in the down position in contact with the table
beforeoperating.
WARNING: To reduce the risk of serious personal injury, have push stick ready to use before
startingcut.
Failure to adhere to these common safety rules can greatly increase the likelihood ofinjury.
WARNING: Before installing the battery in the table saw or operating the saw, always
inspect the blade guard assembly and riving knife for proper operation alignment and
clearance with sawblade.
WARNING: Ripping or crosscutting may cause saw to tip over while operating. Make sure
saw is securely mounted to a stablesurface.
WARNING: Never use the fence and miter gauge together. This may cause a kickback
condition and injure theoperator.
CAUTION: If this saw makes an unfamiliar noise or if it vibrates excessively, cease operating
immediately, turn unit off and remove the battery pack until the problem has been located
and corrected. Contact a
DEWALT
factory service center, a
DEWALT
authorized service center
or other qualified service personnel if the problem cannot befound.
WARNING: The proper throat plate must be in place at all times to reduce the risk of a
thrown workpiece and possibleinjury.
There are two basic types of cutting with table saws: ripping and crosscutting. Regardless of
material, man made or natural wood, the distinction between ripping and crosscutting is as
follows: Ripping is cutting to a different width (usually with the grain) and crosscutting describes
cutting material across the shorter dimension (usually against the grain).
WARNING: When ripping, always use the fence to provide a guide for the material and blade
guard assembly to protect against a kickbacksituation.
WARNING: Never perform any cutting operation free hand. Never perform plungecutting.
WARNING: When crosscutting, aways use the miter gage. Do not use both the rip fence and
miter gagetogether.
Installing and Removing the Battery Pack (Fig. Q)
NOTE: For best results, make sure your battery pack is fullycharged.
To install the battery pack
12
into the tool, align the battery pack with the rails inside the tool
and slide it in until the battery pack is firmly seated and ensure that it does notdisengage.
To remove the battery pack from the tool, press the release button
13
and firmly pull the battery
pack out of the tool. Insert it into the charger as described in the charger section of thismanual.
12
13
Fig. Q
On-Off Switch Operation (Fig. R)
WARNING: To reduce the risk of injury, be sure the switch is in the OFF position before
installing thebattery.
Lift the red paddle and push green button
52
in to turn this sawon.
Push the red button
53
or push down the red paddle
54
to turn this sawoff.
Locking Off the Saw
The On-Off switch may be locked to prevent unauthorized operation of the saw. To lock the
switch in the Off position, insert a padlock through the red handle and hole
55
. Padlock must
not exceed a maximum diameter of 1/4"(6.35mm).
52
53
54
55
Fig. R
Loading ...
Loading ...
Loading ...