Loading ...
Loading ...
Loading ...
DS55MU01
33
of 30 fps, starting with the contents of part0 folder and
after playing them in one loop, switching to contents
of part1 folder and playing them continuously till the
device boot complete.
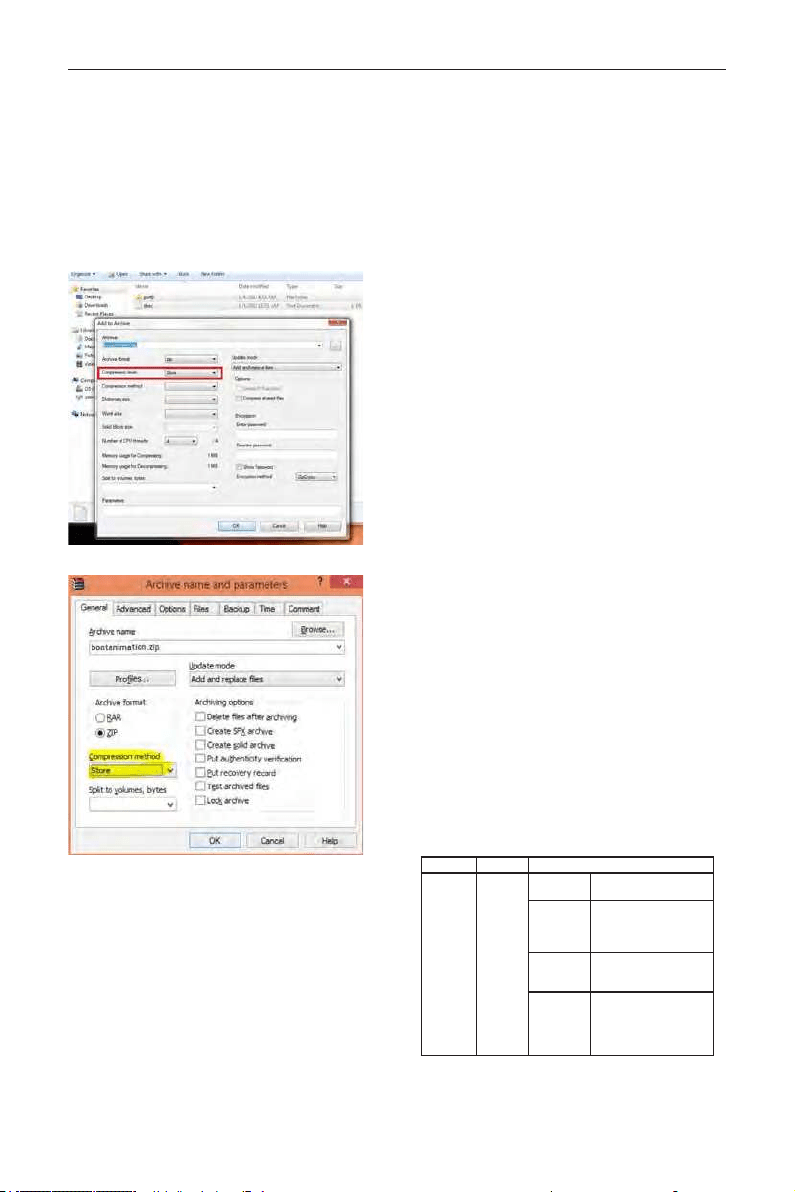
3. Zip le:
Select everything (image folders and desc.txt)
inside the Bootanimation folder and zip them into a
new uncompressed zip archive using your favorite
compression utility like 7zip or WinRAR and so on.
If using 7zip, set compression level to “Store”
If using WinRAR, set “Compression method” to “Store”
or else bootanimation WON’T work
4. Apply the custom bootanimation
Procedure:
(1). Put your custom bootanimztion.zip le into
external SD card or USB and plug into PD
platform.
(2.) Make sure the Logo option is enabled.
Press Home key on RCU: OSD menu ->
Conguration 2 -> Logo -> set “User”
(3.) Press combination key “Home + 1888” on
RCU to go to Admin mode:
Settings -> Signage Display -> GENERAL
SETTINGS -> Boot Logo
(4). The system will nd the bootanimation.zip in
external SD card or USB automatically and copy it
to /data/local
(5.) Once step 1~4 has been done, restart the
system. The new customized boot animation should
be displayed during boot time.
5.13.3. How to Install Android app?
There are 3 ways to install your own android app.
(a) Via File Manager in Admin Mode
1. If you have apk already
1.1 copy your apk to USB disk or SD card,
and then plug them into OTS Android Signage
Display.
1.2 Go to Admin Mode > Apps > File Manager
1.3 Using File Manager and nd out your apk
and then you can install. Just press “ok” on the
selected apk.
2. Download apk by Chromium browser, and then
go to <internal storage path>/Download/ by File
Manager.
2.1 The rest of steps is the same as above.
Please note, each model may have different
<internal storage path>.
(b) Via Adb Shell
1. Make sure that your PC can connect to OTS
Android Signage Display using adb.
2. Prepare your apk in a folder(for example, C:\
apkfolder) on PC.
3. Execute the following instruction by command
line tool.
C:\apkfolder> adb install -r apk_name.apk
(c) Via Customized Intent
1. If you develop an apk which can download any
android app, then your apk can issue a customized
intent.
2. Giving the apk name and the path it was stored.
The system will help you to install by program.
Description Intent Parameters
Sw Update
php.intent.
action.
UPDATE_
APK
lePath
The absolute le path
including the le name.
Keep
Indicate that you want to
keep the le or not after
updating. The default value is
false.
packageName
The target package you want
to launch automatically after
updating.
activityName
The target activity you want
to launch automatically after
updating. But if current top
activity is not activityName,
nothing happened.
For example,
Loading ...
Loading ...
Loading ...