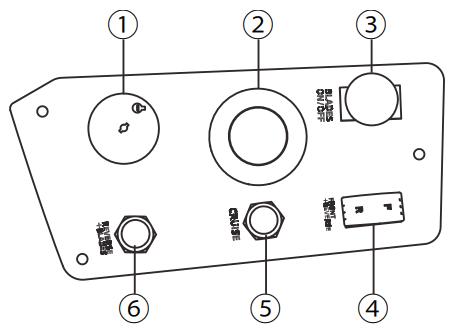
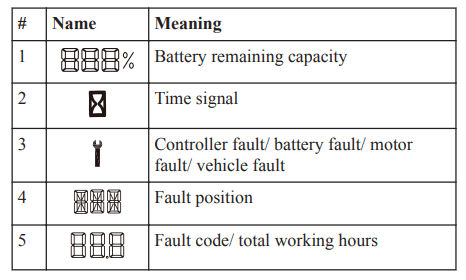
The power switch is used to turn the mower on and off. The start key must be inserted before the switch can be operated.
2
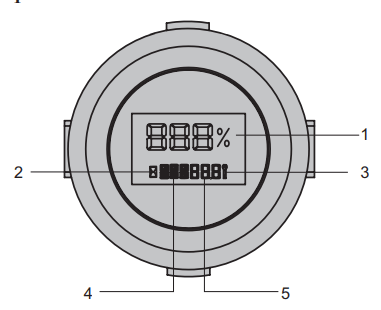
Digital display
This display shows important electrical system information. Refer to the Electrical section for complete information.
3
PTO switch
Pull the PTO switch up to activate the mower’s cutting blades. Push the knob down to stop the cutting blades.
4
Direction control button
The direction of movement of the mower is controlled using the direction control switch. Available settings are forward (F) and reverse (R).
5
Direction control button
The direction of movement of the mower is controlled using the direction control switch. Available settings are forward (F) and reverse (R).
6
Reverse mode button
Press the reverse mode button to allow the mower to cut when maneuvering in the reverse direction. The blades will not work if mower is operated in reverse without pressing the reverse mode button.
INSTALLATION
UNPACK THE MACHINE
1. Open the package.
2. Read the documentation provided in the box.
3. Remove all the unassembled parts from the box.
4. Remove the machine from the box.
5. Discard the box and packing material in compliance with local regulations.
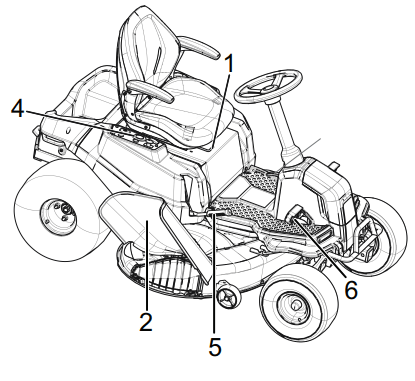
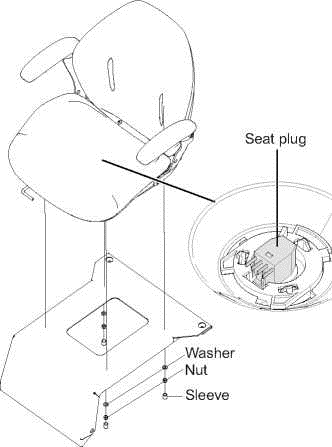
INSTALL THE SEAT
1. Place the seat assembly over the mounting brackets and align holes as shown.
2. Connect the seat plug to the machine.
3. Install the washers and nuts and tighten securely.
4. Attach the sleeve to the nut.
5. Make sure it is securely seated.
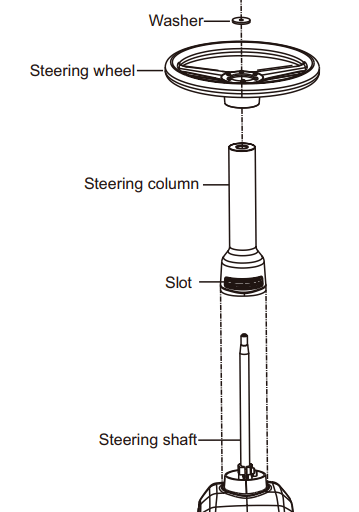
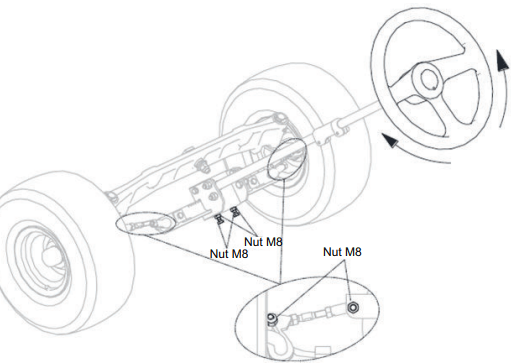
INSTALL THE STEERING WHEEL
1. Install the steering shaft into the coupler, rotating as needed to align hole in shaft with bolt hole in coupler.
2. Install two bolts and tighten securely.
3. Install the steering column. Note the tabs on the bottom of the steering column that fit into the holes in the opening and make sure steering column is securely seated.
4. Make sure the mower’s wheel is pointed straight ahead, then install the steering wheel over the steering column with force.
5. Install the bolt and washer; tighten securely.
6. Install the steering wheel cover plate.
INSTALL THE ACCESSORIES
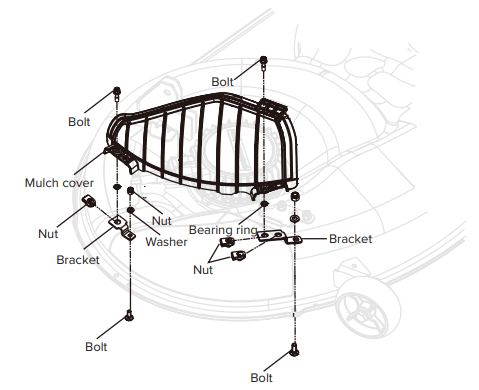
1.Mulch cover
INSTALL THE MULCH COVER
The mower is configured for side discharge when shipped. If mulching is desired:
1. Place the mulch cover on the tab on the mower housing.
2. Align the holes in the mulch cover and the holes in the mower housing.
3. Install and tighten the bolts, screws, fixation clamps and bearing ring as shown.
OPERATION
BEFORE OPERATION
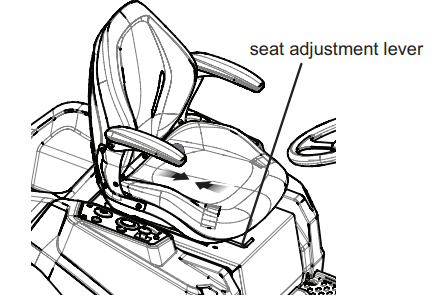
ADJUST THE SEAT
Adjust the seat position to ensure you are able to make firm contact with the accelerator and brake pedals before operating the mower.
1. Sit down on seat and lift the seat adjustment lever.
2. While holding the lever, slide the seat to the desired position.
3. Release the lever and make sure the seat is locked in position before operating the mower.
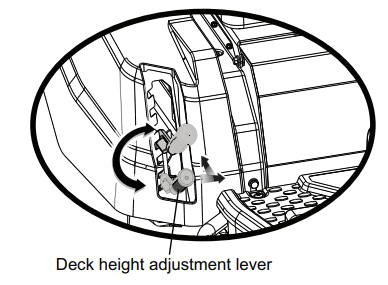
ADJUST THE DECK CUTTING HEIGHT
Before using the mower, raise the deck height to the cutting position best suited for your lawn.
Deck height is adjustable from 1.5-4.5" inches. Deck should be raised while mowing is in progress to avoid stumps, rocks or other obstacle that can be damage mower deck.
1. Stop the mower and disengage blades.
2. Turn key to OFF position and set the parking brake.
3. To raise the cutting deck, grasp the deck height adjustment lever, push left to disengage from slot, move toward the back of the mower, then push right into slot to secure.
4. To lower the cutting deck, grasp the deck height adjustment lever, push left to disengage from slot, move toward the front of the mower, then push right into slot to secure.
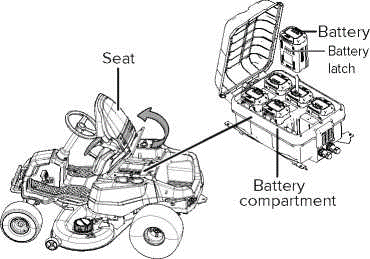
INSTALL THE BATTERY PACK
To verify mower batteries are fully charged, check the battery level indicator. See the battery manual for more details.
1. Lift the seat panel.
2. Lift the battery compartment cover.
3. Install the battery pack into the battery compartment.
BEFORE OPERATING THE MACHINE
• Ensure work area is clear of children, bystanders, and pets.
• Clear the work area of objects that may be thrown by the mower blades.
• Check brake operation.
• Check tire pressure.
• Check for loose fasteners.
• Check to make sure all guards are in place and working properly.
• Clean debris from mower.
• Test safety interlock system.
• Adjust seat to desired position.
• Verify battery charge level.
OPERATE THE MACHINE
START THE MACHINE
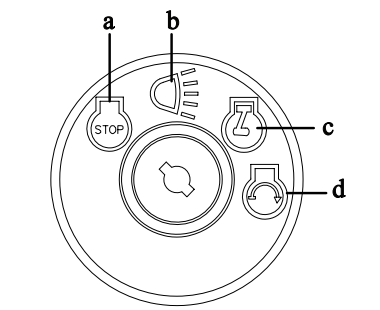
a
Stop / Off
b
On (with lights)
c
Run
d
Start
1. Raise the mower deck to its highest position.
2. Insert start key and turn to start position (d).
3.Release the parking brake.
4.Place steering control levers in forward (F) position and drive to desired mowing location.
STOP THE MACHINE
1. Stop mower on a flat, level surface.
2. Set the parking brake.
3. Push the PTO switch down to turn blades off.
4. Turn the key to OFF position (a).
SET THE CRUISE CONTROL
Cruise control allows the mower to remain at a constant speed without the operator having to maintain pressure on the accelerator pedal. It should only be used in the forward position on relatively smooth, straight surfaces, and should never be used on slopes or rough terrain.
SET THE CRUISE CONTROL
1. While driving the mower forward, press the accelerator pedal until the desired rate of speed is achieved.
2. Press the cruise control button. The light around the button will illuminate to show cruise control is active.
3. Release pressure on the accelerator pedal. Mower speed should remain constant.
RELEASE THE CRUISE CONTROL
1. Tap on the accelerator pedal, depress the brake pedal, or press the cruise control button again.
SET THE PARKING BRAKE
1. Fully depress and hold the brake pedal.
2. Push the parking brake lever all the way down untuil it engage into the slot.
3. Release the brake pedal.
REVERSE MODE OPERATION:
• Depress the brake pedal and bring the mower to a complete stop.
• Push the PTO switch down to turn blades off.
• Place direction control switch in reverse (R) position.
• Raise the PTO switch, slowly press accelerator pedal, and reverse mow as needed.
• Keep pressing the reverse mode button to activate the blade.
SAFETY INTERLOCK SYSTEM
This mower features a Safety Interlock System to protect the operator by shutting off the blades if the operator leaves the seat with the blades running. Test the system before each use to be sure it is working correctly.
1. Make sure direction control switch is in neutral (N) position and PTO switch is down.
2. Install start key and turn to start position.
3. Raise the PTO switch to activate blades.
4. Briefly lift off the seat, but do not get off the mower.
The blades should shut off within 5 seconds. If they don’t, contact customer service. Do not operate the mower until the safety interlock system has been repaired.
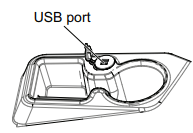
USE THE USB PORT
The USB charging port provides charging power of 5 Volts DC at up to 2.1 amps for your cell phone, MP3 player, or other USB devices. Consult the owner’s manual for your device for specific charging requirements.
Connect one end of a USB cable (not provided) to your device and the other end to the USB charging port on the mower, to begin charging your device.
OPERATION TIPS
• Keep mower blades sharp.
• Make sure the lawn is clear of stones, sticks, wires, toys, tree nuts, tree branches, and other objects that could damage the lawn mower blades or motor. Do not mow over property stakes or other metal posts. Such objects could damage the blade or be accidentally thrown by the mower in any direction and cause serious personal injury to the operator and others.
• For a healthy lawn, always cut off one-third or less of the total length of the grass.
• When mowing large areas, start by turning to the right so that clippings will discharge away from shrubs, fences, driveways, etc. After one or two rounds, mow in the opposite direction, making left hand turns until finished.
• Mow so that discharged clippings exit in the direction of the lawn area that has already been cut.
• When cutting heavy grass, reduce speed to allow for more effective cutting and a proper discharge of the clippings.
• During normal mowing, cut only about 1.5" of the grass blade. Cutting more than that is not recommended unless grass is sparse or it is the end of the mowing season.
• Do not cut wet grass. It will stick to the underside of the deck and prevent proper bagging or mulching of grass clippings.
• New or thick grass may require a narrower cut or a higher cutting height.
• Keep the mower deck and side discharge chute clean. Remove grass clippings, leaves, dirt, and any other accumulated debris before and after each use. Do not spray with a garden hose to clean.
SLOPE OPERATION
Slopes are a major factor related to loss of control and tip- over accidents, which can result in severe injury or death. Operation on all slopes requires extra caution. If you cannot back up the slope or if you feel uneasy on it, do not mow it.
• Travel in the manufacturer recommended direction on slopes. Use caution while operating near drop-offs.
• Do not operate machine under any condition where traction, steering, or stability is in question. Tires could slide even if the wheels are stopped.
• Always keep the machine in gear when going down slopes. Do not coast downhill.
• Mow up and down slopes, not across.
• Watch for holes, ruts, bumps, rocks, or other hidden objects. Uneven terrain could overturn the machine. Tall grass can hide obstacles.
• Do not mow near drop-offs, ditches or embankments. The machine could suddenly roll over if a wheel goes over the edge or if the edge caves in.
• Choose a low ground speed so you will not have to stop or shift while on a slope.
• Do not mow on wet grass. Tires may lose traction.
• Avoid starting, stopping, or turning on a slope. If the tires lose traction, disengage the blade(s) and proceed slowly straight down the slope.
• Keep all movement on slopes slow and gradual. Do not make sudden changes in speed or direction, which could cause the machine to roll over.
• Use extra care while operating machine with attachments; they can affect the stability of the machine. Do not use on steep slopes.
• If using the optional bagger kit, use extreme caution and operate the mower slowly when operating on slopes, as the bagging kit can change the stability of the mower.
• Always use the brakes when travelling down the slope. Do not attempt to let the mower coast downhill in neutral.
DIGITAL DISPLAY
The function of the digital display, located on the control panel, is to provide electrical system information to the operator. It gives detailed information in the form of pattern, codes and number.
MAINTENANCE
Regular maintenance is the best prevention for costly downtime or expensive, premature repair. The following pages contain suggested maintenance information and schedules which the operator should follow on a routine basis. For more detailed information, refer to the website for your unit. Remain alert for unusual noises, as they could be signaling a problem. Visually inspect the machine for any abnormal wear or damage.
TIRES
It is important for level mowing that all tires have the correct amount of air pressure. The recommended pressure are:
MOWER BLADE MAINTENANCE
Check the mower blades daily. They are the key to power efficiency and well-groomed turf. Keep them sharp -- a dull blade will tear rather than cut the grass, leaving a brown ragged top on the grass within a few hours. A dull blade also requires more power. Replace any blade that is bent, cracked or broken.
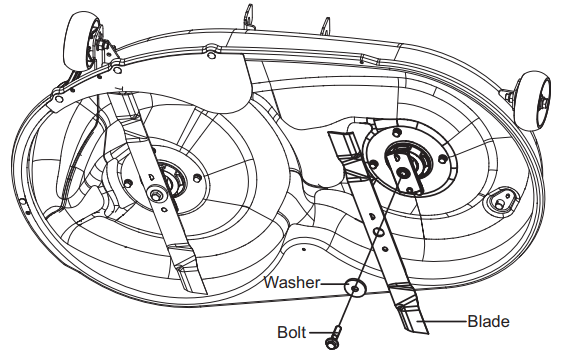
REPLACE THE BLADE
1. Stop the motor, remove the start key, and set the parking brake.
2. Raise the height of the cutting deck to its highest position to allow access to blades.
3.Wedge a block of wood between the blade and mower deck to prevent the blade from turning.
4. Loosen the blade nut by turning it counterclockwise (as viewed from bottom of mower) using a 16 mm wrench or socket (not provided).
5. Remove the blade nut, spacer, blade insulator, and blade.
6. Thread the blade nut on the shaft and finger tighten.
7. Torque the blade nut down clockwise using a torque wrench (not provided) to ensure the bolt is properly tightened. The recommended torque for the blade nut is 796~885 in. lbs.
8. Repeat with second blade, if needed
REPLACE THE HEADLIGHT
1. Park the mower on a level surface and set the parking brake.
2. Stop the motor and remove the start key.
3. Remove and set aside the hex head screw and flat washer holding the mower floor panel in place.
4. Lift floor panel slightly to access the two hex head screws and flat washers securing the headlight in place. Remove screws and washers and set aside.
5. Unplug the old headlight and discard.
6. Plug in new headlight and reinstall washers and screws. Tighten securely.
7. Lower floor panel and reinstall washer and screw to secure.
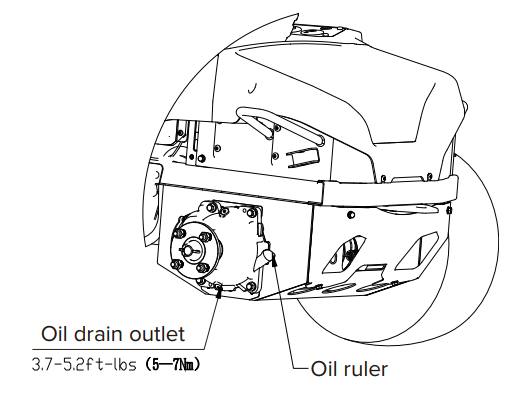
LUBRICATION
Please add oil before operation
Oil type
SAE85W-90
Oil capacity
130 ml
Contact your Greenworks dealer to replace the lubrication.
BATTERY PACK MAINTENANCE
Your Greenworks mower is powered by a battery pack which, when maintained properly, will provide years of useful life. For proper care, adhere to the following instructions:
• Always charge batteries after each use.
• Whenever a battery pack is fully discharged and turned off, it is best to recharge the battery as soon as possible. Over-discharge of the battery pack means the battery life will be shortened and the battery may become permanently damaged. There is no need to fully charge; it will be beneficial even if you only charge the battery pack for 5-10 minutes. It is best to recharge it within 24 hours.
• Check that battery cables are securely tightened to batteries each time you service the battery.
• Keep grass, dirt and debris from collecting near battery terminals and in battery area.
• Charge batteries indoors in a well-ventilated and dry location away from sparks or flames. Never expose charger to rain, vapor or liquid.
• Charge only lithium batteries provided by Greenworks.
• Do not touch uninsulated portion of charger (terminal pins) or of output connector.
• Do not use with defective cords and wires. Replace defective cords and wires immediately.
• For long-term storage, please make sure the storage temperature is -4°F - 113°F within one month, and 32°F -95°F between two and 12 months.
• The working environment of the battery pack is 14°F -113°F. Battery pack can be used a -5°F - 131°F for discharge, and 32°F - 107°F for charge.
BATTERY COMPARTMENT FILTER MAINTENANCE
Replace the battery compartment filter every 200 hours.
SERVICE
Park the mower on level ground. Make sure that you set the park brake, and that the deck blade switch is in “OFF” position. Raise deck, rotate key to “OFF” position, remove key from switch and disconnect battery cables by pulling inward on RED battery quick disconnect handle in battery box compartment.
Any maintenance operation that requires the removal of safety covers must be performed by a trained service technician.
Before working on or under the deck, make certain ignition switch is “OFF” and key is removed and deck blade switch cannot be accidentally started and disconnect battery cables by pulling inward on RED battery quick disconnect handle in battery box compartment.
Use a stick or similar instrument to clean under the mower, making sure that no part of the body -- especially arms and hands -- is under mower.
Keep your machine clean and remove any deposits of trash and clippings.
Keep battery compartment, deck and operator’s station clean of accumulated trash, grass clippings, and other debris.
Clean battery compartment, drive motor compartment, mower deck, seat, etc., of all dirt and debris. To clean, use only compressed air. DO NOT use water, solvents, hard cleaners or abrasives.
Always wear adequate eye protection when servicing the batteries or when grinding mower blades and removing accumulated debris. Never attempt to make any adjustments or repairs to the mower’s drive system, mower deck or any attachment while the traction drive system is running. Repairs or maintenance requiring power should be performed by trained maintenance personnel only.
Never work under the machine or attachment unless it is safely supported with jack stands. Make certain machine is secure when it is raised and placed on the jack stands. The jack stands should not allow the machine to move when the traction drive system is running and the drive wheels are rotating. Use only certified jack stands. Use only appropriate jack stands, with a minimum weight rating of 2000 pounds (907.2 kg) to block the unit up.
Use in pairs only. Follow the instructions supplied with the vehicle stands.
Do not touch hot parts of machine.
Keep nuts and bolts tight, especially the blade attachment bolts. Keep equipment in good working condition.
Never tamper with safety devices. Check their proper operation regularly.
Turn the key to the “OFF” position before unclogging the discharge chute.
Never clear the discharge chute with the machine running. Turn the key to the “OFF” position and be sure the blades have stopped before cleaning. Use a stick to clear a plugged discharge area. Never use your hand!
Stop unit and allow blades to stop before unclogging chute. Grass collection system components are subject to wear, damage and deterioration, which could expose moving parts or allow objects to be thrown. Frequently check components and replace with manufacturer’s recommended parts, when necessary.
Exercise caution when working under the deck as the mower blades are extremely sharp. Wear gloves and use extra caution when servicing them.
Use only genuine Greenworks Mower parts to ensure that original standards are maintained.
Always disconnect batteries when transporting unit. Keep unit free of grass clippings, leaves and other debris.
Check brake operation frequently. Adjust and service as required.
Maintain or replace safety and instruction labels, as necessary.
Have your ride-on lawn mower serviced by a qualified repair person using only identical replacement parts. This will ensure that the safety of the ride-on lawn mower is maintained.
Recharge only with the charger specified by the manufacturer. A charger that is suitable for one type of battery pack may create a risk of fire when used with another battery pack.
CLEANING AND STORAGE
CLEAN THE MOWER DECK
• Set the parking brake into the parking slots. Refer to section PARKING BRAKE SETTING in this manual.
• Adjust the mower deck height to the lowest. Refer to section "CUTTING-DECK HEIGHT ADJUSTMENT" in this manual.
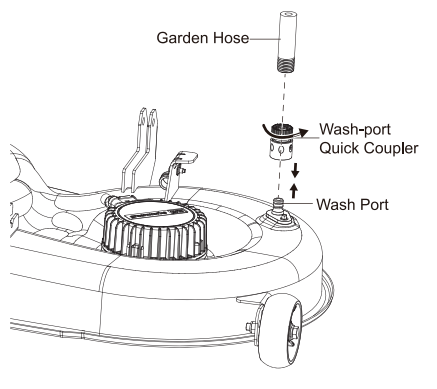
• Attach the supplied wash-port quick-coupler to garden hose.
• Attach garden hose with quick-coupler to wash port on the mower deck. The wash port is on the left side of the mower deck.
• Turn on the water.
• Pull the PTO switch to start the mower cutting blades and adjust the blade speed to the highest. Refer to section "Blade-Speed Adjustment Button" in this manual.
• Flush water under the deck for approximately one minute.
• Disengage the mower blades by pushing the PTO switch downward.
• Turn off the water and remove garden hose and quick-coupler from wash port.
• Remove quick-coupler from garden hose and store for future use.
• Turn off the mower completely. See section "STOPPING THE ELECTRIC ZERO TURN MOWER".
STORE THE MACHINE
The following steps should be taken in order to prepare the machine for storage.
• Clean the machine as described in the previous section.
• Inspect the blade and replace it or sharpen it, if required (refer to the Maintenance section).
• Do not store the machine next to corrosive materials, such as fertilizer or rock salt.
• Keep the machine out of the reach of children.
• Do not cover the machine with a solid plastic sheet. Plastic coverings trap moisture around the machine, which causes rust and corrosion.
• Check thoroughly for any worn or damaged parts that need replacing and order them from your dealer.
• Thoroughly lubricate machine, according to lubrication instructions.
• Fully charge and service the batteries.
• Do not deflate tires.
• The machine should be stored in a well-ventilated, clean and dry place.
PREPARE FOR USE AFTER STOAGE
The following steps should be taken before using the mower after it has been stored:
• Fully charge the batteries.
• Check tire pressure and inflate as needed.
• Briefly drive the mower and check all systems and components to ensure they are functioning correctly.
TROUBLESHOOTING
Problem
Cause
Solution
When you press the accelerator, the machine does not move.
1. There is no battery pack in the battery compartment, or the battery inserted is not Greenworks designed.
2. The battery pack is out of power.
3. You engage the park brake.
4. There is no person sitting on the seat or the seat switch is not connected.
5. The PTO switch is not in the original position when the machine is powered on.
6. The discharge system of the drive battery compartment is in the sleep mode.
1. Make sure at least one Greenwoks designed battery pack is inserted in the battery compartment.
2. Check the battery capacity.
3. Make sure you fully disengage the park brake, so the wheels can rotate freely.
4. Make sure the operator is sitting on the seat.
5. Return the switch to the initial position, and restart the machine. If the machine still fails to work, contact the service center for help.
6. Turn the key to the OFF position, and restart the machine 5 seconds later.
Sudden breakdown during driving.
1. The battery is out of power.
2. The seat switch is disconnected on rugged or bumpy roads.
3. The accelerator fails.
4. The vehicle controller fails.
1. Make sure at least one Greenwoks designed battery pack is inserted in the battery compartment. Make sure the battery pack has power.
2. Restart the machine to check if the machine works normally.
3. Contact a technical people for help.
The blade fails to run when you pull up the PTO switch.
1. There is no Greenwoks designed battery pack in the battery compartment.
2. The battery pack is out of power.
3. The seat switch is not connected.
4. The PTO switch is not pushed when the machine is powered on.
5. The blade motor is blocked or other functional protection.
1. Make sure at least one Greenwoks designed battery pack is inserted in the battery compartment. Make sure the battery pack has power.
2. Check the battery capacity.
3. Make sure the operator is sitting on the seat.
4. Push down on the PTO switch, restart the machine.
5. Cut the grass in low blade speed when you power on the machine, set the blade speed to high position once the machine cuts normally. Check if the connection between the blade and motor is without grass or foreign objects to ensure the blade rotates smoothly.
6. Turn the key to the OFF position, and restart the machine 5 seconds later.
The blade stops running during the mowing process.
1. The blade motor is overheated.
2. The deck is full of grass and garbage.
3. The blade motor is overloaded.
4. The battery pack termperature is too high.
5. The battery is undervoltage.
6. The blade is hit by a foreign object, causing the blade to stop suddenly for protection.
1. Do not use the machine too much, power off the machine for 5min. Raise the deck height or reduce the driving speed to protect the blade.
2. Clean the deck to ensure that the blade rotation is normal.
3. Push down on the PTO switch; restart the machine. Raise the deck height or reduce the drive speed to protect the blade.
4. The battery pack that controls the blade system enters under-voltage protection state, and the battery should be charged immediately
5. Turn the key to the OFF position, and restart the machine 5 seconds later.
Problem
Cause
Solution
The machine cuts the grass unevenly.
1. The blade is dull.
2. The blade is bent.
3. The deck is uneven.
1. Grind the blade according to the manual.
2. Replace the bent blade, replace the blade according to the instructions in the manual, and wear protective equipment.
3. Adjust the cutting deck according to the instructions in the manual to ensure the left and right deck height are even.
The actual cut height does not match the cut height you set.
1. The bolt of the deck is loose.
2. The deck is severely worn or damaged.
1. Adjust the cutting deck bolt, make sure the deck is not loose. Please balance the deck level after each adjustment.
2. Replace with a new cutting deck.
The machine cuts the grass abnormally.
1. The grass is too wet.
2. The grass amount you set is too much.
1. Please check the grass before working. If the grass is too wet, please wait until the grass gets drier.
2. If the grass is too intensive and high, raise the deck height, and avoid cutting intensive grass.
The machine vibrates too much.
1. The blade is loose.
2. The blade is bent.
3. The deck is uneven.
4. The deck is loose.
5. The blade cuts too much grass more than the amount you set.
1. Grind the blade according to the manual.
2. Replace the bent blade, replace the blade according to the instructions in the manual, and wear protective equipment.
3. Adjust the cutting deck according to the instructions in the manual to ensure the left and right deck height are even.
4. Tighten the fixing bolts of the deck.
5. If the grass is too intensive and high, please raise the cutting deck and try to avoid cutting intensive grass.
There is grass or debris on the ground after mowing.
1. The blade cuts too much grass more than the amount you set.
2. The grass is too wet.
3. You drive too fast.
4. The blade speed is too low.
1. If the grass is too dense and high, please raise the cutting deck. If the grass height exceeds 6 inch, please cut the area repeatedly. Try to avoid cutting intensive grass.
2. Please check the grass before working. If the grass is too wet, please wait until the grass gets drier.
3. Reduce the drive speed.
4. Turn the blade speed to high position.
The cutting endurance time is short.
Heavy grass can short the running time of the lawn mower.
Raise the cutting deck and reduce the blade speed to extend the running time.
The machine is off track.
The tire pressure of left and right rear wheels is different.
Regularly check the tire pressure of the rear tires according to the manual.
The machine fails to start after cleaning.
Improper cleaning, water enters the battery compartment or the key switch fails.
1. When cleaning the machine, please clean it according to the instructions.
2. If the vehicle is accidentally exposed to rain, please put the vehicle in a dry place for 12 hours or dry it before use.
3. Contact a service center for help.
The mower is blocked.
The deck is full of weeds and garbage.
Please clean the machine correctly according to the instructions after each use.
Problem
Cause
Solution
The steering wheel does not turn smoothly.
1. Check whether there is rigidity stuck in the gear and rack transmission.
2. Lack of lubrication oil, add lubrication oil.
3. The steering ball head and other parts are damaged and deformed.
1. Clean up the debris and add lubrication oil.
2. Replace the damaged parts.
3. Adjust the gear space.
4. Contact a service center for help.
Drive axle failure.
1. Oil leakage.
2. The wheel hub heats up.
3. Abnormal sound.
Contact a service center for help.
Wheel steering fails.
1. The transmission gear is worn for a long time.
2. The steering ball joint bolts are loose.
j
Check if the nut is loose. If the nut is tight, adjust the nut until the wheel steers correctly. (See figure below)
The machine quickly moves down the slope even if you press the brake pedal.
1. Tire wear is too serious.
2. The brake pedal is damaged or worn severely.
Contact a service center to replace the tire or check the brake pedal.
#2 I have looked at mowers with similar designs, but have not been able to use them since they do not have a step to get up to the seat. does your model have some kind of a step up?