

40V Lithium-Ion String Trimmer
Read all safety rules and instructions carefully before operating this tool.
Owner’s Manual
TOLL-FREE HELPLINE: 1-888-90WORKS (888.909.6757)
www.GreenWorksTools.com
2101602

2
CONTENTS
Contents .............................................................................................................................. 2
Product Specications ........................................................................................................ 2
Important Safety Instructions ............................................................................................... 3
Symbols ............................................................................................................................... 6
Know Your String Trimmer ................................................................................................... 8
Assembly ........................................................................................................................... 10
Operation ........................................................................................................................... 16
Battery & Charger Maintenance................................................ .......................................... 24
Maintenance........................................................................................................................... 26
Environmentally Safe Battery Disposal .................................................................................27
Troubleshooting..................................................................................................................28
Warranty..................................................................................................................................30
Exploded View and Part List .................................. ..............................................................31
PRODUCT SPECIFICATIONS
40V LITHIUM-ION STRING TRIMMER
Type ............................................................................................. Cordless, battery powered
Motor .................................................................................................................40V Brushed
Cutting Width .........................................................................................................12 in. (30 cm)
Line Diameter ..................................................................................Nylon / 0.065" (1.65 mm)
Speed ...........................................................................................................7500 (±10%) RPM
Run Time .........................................................................................................Up to 30 minutes
Charge Time .............................................................................................................60 minutes
Feed Type ...............................................................................................................Auto Feed
Weight (with 2Ah battery) ...............................................................................7.87 lbs (3.57 kg)

3
IMPORTANT SAFETY INSTRUCTIONS
WARNING
Read and understand all instructions before using this product. Failure to follow all
instructions listed below may result in electric shock, re, and/or serious personal injury.
• Use only identical manufacturer’s replacement parts and accessories. Use of any other parts
may create a hazard or cause product damage.
• Always wear safety glasses with side shields marked to comply with ANSI Z87.1. Everyday
glasses have only impact resistant lenses. They are NOT safety glasses. Following this rule
will reduce the risk of eye injury. Use face mask if operation is dusty.
• Avoid Dangerous Environment — Don’t expose power tools to damp or wet conditions. Water
entering a power tool will increase the risk of electric shock.
• Don’t use in rain.
• Keep all bystanders, children, and pets at least 50 ft. away.
• Use Right Appliance – Do not use appliance for any job except that for which it is intended.
• Avoid Unintentional Starting – Do not carry string trimmer with ngers on the switch. Be sure
the battery is removed while transporting.
• Do not operate the equipment while barefoot or when wearing sandals or similar lightweight
footwear. Wear protective footwear that will protect your feet and improve your footing on
slippery surfaces.
• Don’t overreach - Keep proper footing and balance at all times.
• Stay alert - Watch what you are doing. Use common sense. Do not operate this unit when you
are tired, ill or under the inuence of alcohol, drugs or medication.
• Store idle appliances indoors - When not in use, appliances should be stored indoors in dry,
and high or locked-up place - out of reach of children.
• Maintain appliance with care – Replace string head if cracked, chipped, or damaged in any
way. Be sure the string head is properly installed and securely fastened. Keep cutting edge
sharp and clean for best performance and to reduce the risk of injury. Follow instructions for
lubricating and changing accessories. Inspect appliance cord periodically, and if damaged,
have it repaired by an authorized service facility. Inspect extension cords periodically and
replace if damaged. Keep handles dry, clean, and free from oil and grease. Failure to do so
can cause serious injury.
• Check Damaged Parts – Before further use of the appliance, a guard or other part that is
damaged should be carefully checked to determine that it will operate properly and perform
its intended function. Check for alignment of moving parts, binding of moving parts, breakage
of parts, mounting, and any other condition that may affect its operation. A guard or other
part that is damaged should be properly repaired or replaced by an authorized service center
unless indicated elsewhere in this manual.
• Do not charge or operate cordless tools in damp or wet locations or in the rain. Following this
rule will reduce the risk of electric shock.
• Remove or disconnect battery before servicing, cleaning or removing material from the
gardening appliance.

4
IMPORTANT SAFETY INSTRUCTIONS
• Do not dispose of the batteries in a re. The cells may explode. Check with local codes for
possible special disposal instructions.
• Do not open or mutilate the batteries. Released electrolyte is corrosive and may cause
damage to the eyes or skin. It may be toxic if swallowed.
• Exercise care in handling batteries in order not to short the battery with conducting materials
such as rings, bracelets, and keys. The battery or conductor may overheat and cause burns.
• Dress Properly – Do not wear loose clothing or jewelry. They can be caught in moving parts.
Use of rubber gloves and substantial footwear is recommended when working outdoors. Wear
protective hair covering to contain long hair.
• Don’t Force Appliance – It will do the job better and with less likelihood of a risk of injury at the
rate for which it was designed.
• Recharge only with the charger specied by the manufacturer.A charger that is suitable for
one type of battery pack may create a risk of re when used with another battery pack.
• For use only with 29462/2901319/29472 battery. For use only with 29482 charger.
• When battery pack is not in use, keep it away from other metal objects, like paper clips, coins,
keys, nails, screws or other small metal objects, that can make a connection from one terminal
to another. Shorting the battery terminals together may cause burns or a re.
• Under abusive conditions, liquid may be ejected from the battery; avoid contact. If contact
accidentally occurs, ush with water. If liquid contacts eyes, additionally seek medical help.
Liquid ejected from the battery may cause irritation or burns.
• Do not use a battery pack or appliance that is damaged or modied. Damaged or modied
batteries may exhibit unpredictable behavior resulting in re, explosion or risk of injury.
• Do not expose a battery pack or appliance to re or excessive temperature. Exposure to re
or temperature above130°C may cause explosion.The temperature of 130°C can be replaced
by the temperature of 265°F.

5
CHILD SAFETY
Tragic accidents can occur if the operator is not aware of the presence of children.
• Keep children out of the working area and under the watchful care of a responsible adult.
• Do not allow children under the age of 14 to operate this trimmer. Children who are 14
years of age and older must read and understand the operating instructions and safety
rules in this manual and must be trained and supervised by a parent.
• Stay alert, and turn the trimmer off if a child or any other person enters the working area.
• Look behind and down for small children before and while cutting backwards.
• Use extreme care when approaching blind corners, doorways, shrubs, trees, or other
objects that may obscure your view of a child who may run into the path of the trimmer.
W A R N I N G (PROPOSITION 65)
Some dust created by power sanding, sawing, grinding, drilling, and other construction activities
contains chemicals known to cause cancer, birth defects or other reproductive harm. Some
examples of these chemicals are:
• Lead from lead-based paints
• Crystalline silica from bricks and cement and other masonry products, and
• Arsenic and chromium from chemically treated lumber.
Your risk of exposure to these chemicals varies depending on how often you do this type of
work. To reduce your exposure to these chemicals, work in a well-ventilated area, and work with
approved safety equipment, such as dust masks that are specially designed to lter out microscopic
particles.
IMPORTANT SAFETY INSTRUCTIONS
SAVE THESE INSTRUCTIONS
6
Some of the following symbols may be used on this product. Please study them and learn their
meaning. Proper interpretation of these symbols will allow you to operate the product better and safer.
SYMBOL NAME DESIGNATION/EXPLANATION
V Volts Voltage
A Amperes Current
Hz Hertz Frequency (cycles per second)
W Watts Power
min Minutes Time
Alternating Current Type of current
Direct Current Type or a characteristic of current
No Blade Do not install or use any type of blade on a
product or displaying this symbol.
/min Per Minute Revolutions, strokes, surface speed, orbits
etc., per minute.
Wet Conditions Alert Do not expose to rain or use in damp locations.
Read The Operator’s Manual To reduce the risk of injury user must read and
understand operator’s manual before using
this product.
Eye Protection Always wear eye protection with side shields
marked to comply with ANSI Z87.1 when
operating this equipment.
Safety Alert Precautions that involve your safety.
Ricochet Thrown objects can ricochet and result in
personal injury or property damage.
Keep Bystanders Away Keep all bystanders at least 50 ft. away.
SYMBOLS

The following signal words and meanings are intended to explain the levels of risk associated
with this product.
SERVICE
Servicing requires extreme care and knowledge and should be performed only by a qualified
service technician. For service we suggest you return the product to your nearest AUTHORIZED
SERVICE CENTER for repair. Use only identical manufacturer’s replacement parts and
accessories.
WARNING
To avoid serious personal injury, do not attempt to use this product until you have read this Owner's
Manual thoroughly and understand it completely. If you do not understand the warnings and
instructions in this Owner's Manual, do not use this product. Call the Toll-free Helpline (1-888-909-
6757) for assistance. The operation of any power tool can result in foreign objects being thrown
into your eyes, which can result in severe eye damage. Before operating a power tool, always wear
safety goggles, safety glasses with side shields, or a full face shield when needed. We recommend
a Wide Vision Safety Mask for use over eyeglasses or standard safety glasses with side shields.
Always use eye protection that is marked to comply with ANSI Z87.1.
WARNING
The operation of any power tool can result in foreign objects being thrown into your eyes,
which can result in severe eye damage. Before beginning power tool operation, always
wear safety goggles or safety glasses with side shields and, when needed, a full face
shield. We recommend Wide Vision Safety Mask for use over eyeglasses or standard
safety glasses with side shields. Always use eye protection which is marked to comply
with ANSI Z87.1.
DANGER Indicates an imminently hazardous situation, which, if not
avoided, will result in death or serious injury.
WARNING Indicates a potentially hazardous situation, which, if not avoided,
could result in death or serious injury.
CAUTION Indicates a potentially hazardous situation, which, if not avoided,
may result in minor or moderate injury.
CAUTION (Without Safety Alert Symbol) Indicates a situation that may
result in property damage.
SYMBOLS
SAVE THESE INSTRUCTIONS
7
SYMBOL SIGNAL MEANING
8
KNOW YOUR STRING TRIMMER
Fig. 1
1
2
3
4
5
6
8
9
7

9
KNOW YOUR STRING TRIMMER (See Figure 1.)
The safe use of this product requires an understanding of the information on the product and in
this operator’s manual as well as a knowledge of the project you are attempting. Before use of this
product, familiarize yourself with all operating features and safety rules.
1. REAR HANDLE
Ergonomic handle with overmold improves comfort and grip.
2. AUXILIARY HANDLE
The string trimmer is equipped with an auxiliary handle for ease of operation and to prevent loss
of control.
3. COUPLER
The coupler connects and locks the two shafts.
4. TRIMMER SHAFT
The trimmer shaft encloses and protects the cables between the motor and rear handle.
5. EDGE GUIDE
Allows for trimming around ower bed without damaging plants.
6. GUARD
The trimmer includes a guard that helps protect from ying debris.
7. BATTERY PACK LATCH
Press to release the battery pack from the tool.
8. LOCK-OUT BUTTON
The lock-out button prevents accidental starting.
9. SWITCH TRIGGER
To turn the string trimmer On and Off.
KNOW YOUR STRING TRIMMER
10
ASSEMBLY
WARNING
Do not use this product if any parts on the packing list are already assembled to your product when
you unpack it. Parts on this list are not assembled to the product by the manufacturer and require
customer installation. Use of a product that may have been improperly assembled could result in
serious personal injury.
PACKING LIST
Part Name Figure Qty
String trimmer
1
Auxiliary handle
1
Guard
1
Edge guide
1
Bonus spool
1
Bonus spool cover
1
Operator's manual
40V Brushed String Trimmer
Read all safety rules and instructions carefully before operating this tool.
Owner’s Manual
TOLL-FREE HELPLINE: 1-888-90WORKS (888.909.6757)
www.GreenWorksTools.com
2101602
1
Quick start guide
QUICK START GUIDE
40V LITHIUM-ION
BRUSHED STRING TRIMMER
2101602
ATTACHING THE GUARD
Missing parts, accessories or need a service center?
Do Not Return to Store
Call: 1-888-909-6757 www.GreenWorksTools.com
1. Invert the string trimmer to access the
trimmer head.
2. Remove supplied screws (1) from the
trimmer head with a philips screwdriver.
3. Place the guard (2) on to the trimmer
head.
4. Align the screw holes on the guard (3)
with the screw holes on the trimmer head
(4).
5. Insert the screws into the trimmer
head, fastening the guard in place using a
Phillps head screwdriver (not included).
ATTACHING THE AUXILIARY HANDLE
INSTALLING AN ATTACHMENT TO THE POWER HEAD
The attachment connects to the power
head by means of a coupler device.
1. Loosen the knob (1) on the coupler (5).
2. Push in the release button (2) located
on the attachment shaft (3). Align the
release button with the positioning hole
(4) and slide the two shafts together.
Rotate the attachment shaft until the
button locks into the positioning hole.
3. Tighten the attachment knob securely.
1. Press the auxiliary handle (1) onto the
power head shaft so that the handle is
angled toward the rear handle that allows
for comfortable operation.
2. Slide the auxiliary handle over the
holder (2) and ensure the holder fits
between the slots on the auxiliary handle.
3. Align the holes on the auxiliary handle
with the holes on holder.
4. Insert the handle knob (3) through the
auxiliary handle.
5. Tighten until there is no movement in
the handle.
STARTING/STOPPING THE TRIMMER
1. Ensure a fully charged battery is
installed into the string trimmer.
2. Place one hand on the trigger handle.
Place the other hand on the auxiliary
handle.
3. Press and hold the lock-out button (2)
and squeeze the switch trigger (1). The
string trimmer will turn ON.
4. Release the lock-out button. The string
trimmer will stay on as long as the switch
trigger is held.
5. Release switch trigger to stop.
WARNING:
This Quick Start Guide is not a substitute for reading the operator's manual. To reduce the risk of injury or death, user
must read and understand the operator's manual before using this product.
1
2
3
4
1
4
2
3
1
5
2
2
1
3
2
1
UNPACKING
This product requires assembly.
• Carefully remove the product and any accessories from the box. Make sure that all items
listed in the packing list are included.
• Inspect the tool carefully to make sure no breakage or damage occurred during shipping.
• Do not discard the packing material until you have carefully inspected and satisfactorily
operated the tool.
• If any parts are damaged or missing, please call 1-888-909-6757.

ASSEMBLY
11
WARNING
If any parts are damaged or missing, do not operate this product until the parts are replaced. Use
of this product with damaged or missing parts could result in serious personal injury.
WARNING
Do not attempt to modify this product or create accessories not recommended for use with this
string trimmer. Any such alteration or modification is misuse and could result in a hazardous
condition leading to possible serious personal injury.
WARNING
Do not connect to power supply until assembly is complete. Failure to comply could result in
accidental starting and possible serious personal injury.
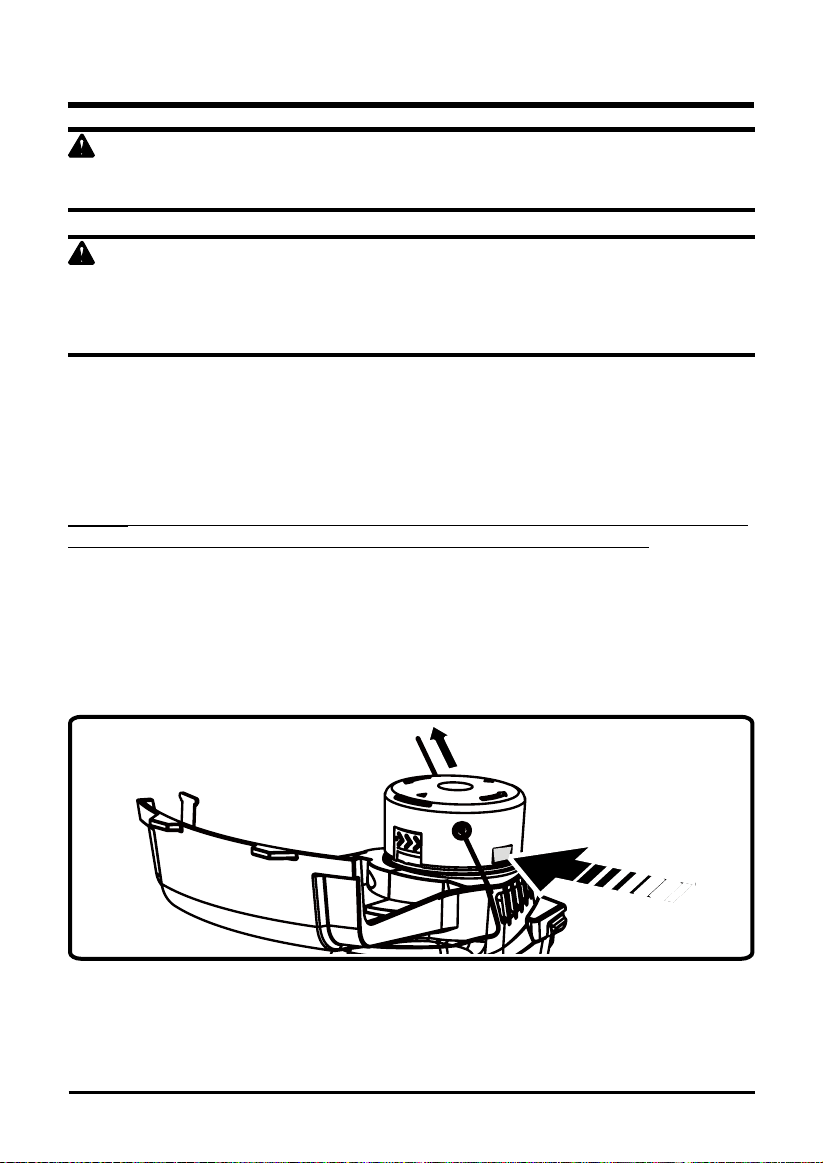
ATTACHING THE GUARD (See Figure 2.)
NOTE: Install the guard before the attachment is connected to the lower shaft.
1. Invert the string trimmer to access the trimmer head.
2. Remove supplied screws (1) from the trimmer head with a philips screwdriver.
1
Fig. 2.1
3. Place the guard (2) on to the trimmer head.
4. Align the screw holes on the guard (3) with the screw holes on the trimmer head (4)
2
3
4
Fig. 2.2
5. Insert the screws into the trimmer head, fastening the guard in place using a philips head
screwdriver (not included).
Fig. 2.3
ASSEMBLY
ASSEMBLY
13
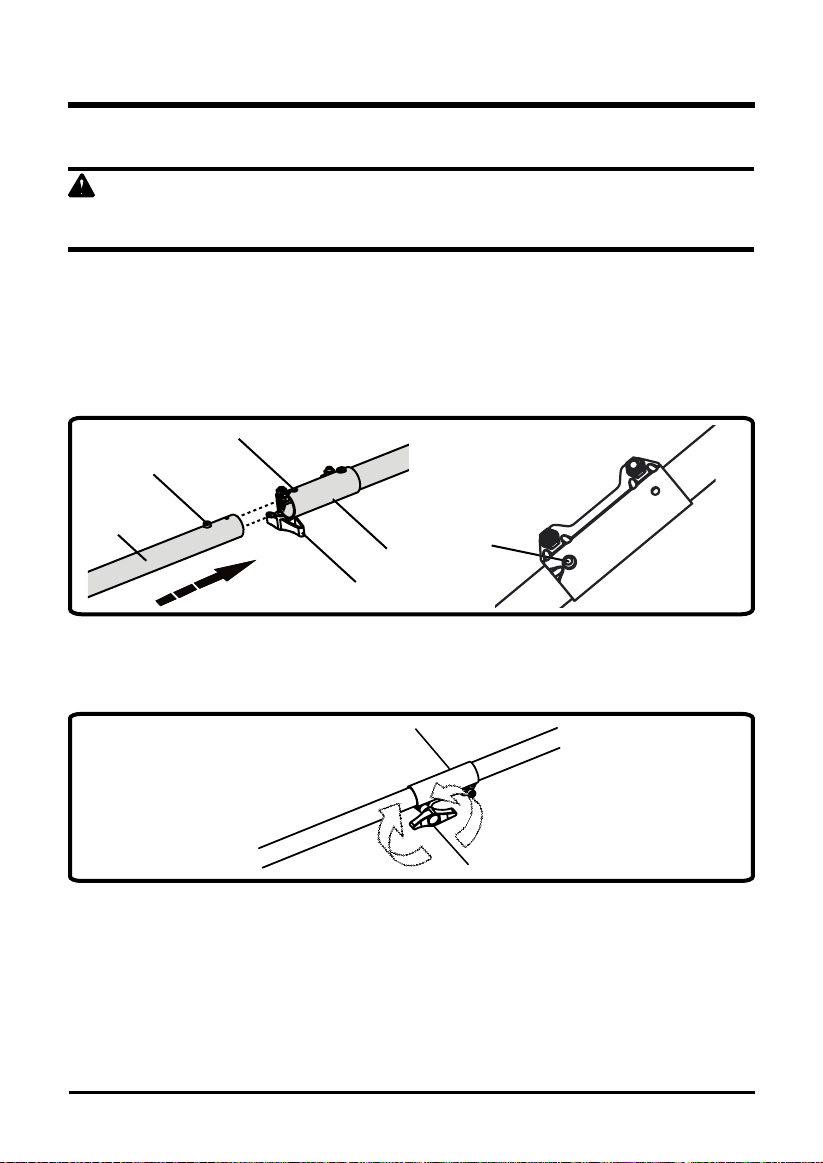
INSTALLING THE UPPER SHAFT TO THE LOWER SHAFT (See Figure 3.)
WARNING
Never install, remove, or adjust any attachment while string trimmer is running. Failure to stop the
motor can cause serious personal injury.
The attachment connects to the power head by means of a coupler device.
1. Set the unit on a at, level surface.
2. Loosen the knob (1) on the coupler (5).
3. Push in the release button (2) located on the lower shaft (3). Align the release button with
the positioning hole (4) and slide the two shafts together. Rotate the lower shaft until the
button locks into the positioning hole.
4
2
3
1
5
Fig. 3.1
2
NOTE: If the button does not release completely in the positioning hole, the shafts are not locked
into place. Slightly rotate from side to side until the button is locked into place.
4. Tighten the knob securely.
Fig. 3.2
LOOSE
N
5
TIGHTEN
1
ASSEMBLY
14
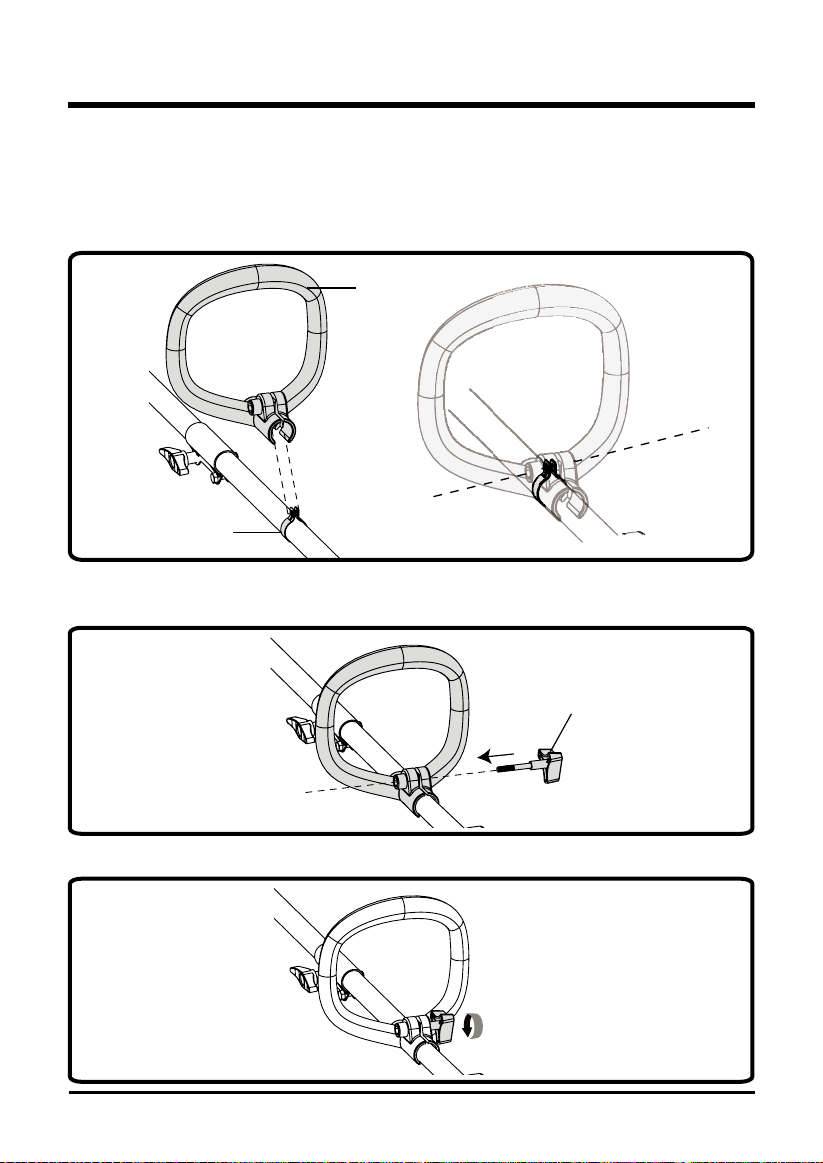
ATTACHING THE AUXILIARY HANDLE (See Figure 4.)
1. Press the auxiliary handle (1) onto the upper shaft so that the handle is angled toward the
rear handle that allows for comfortable operation.
2. Slide the auxiliary handle over the metal ring (2) and ensure the metal ring ts between
the slot on the auxiliary handle.
2
1
Fig. 4.1
3. Align the holes on the auxiliary handle with the holes on metal ring.
4. Insert the handle knob (3) through the auxiliary handle.
3
Fig. 4.2
5. Tighten until there is no movement in the handle.
Fig. 4.3
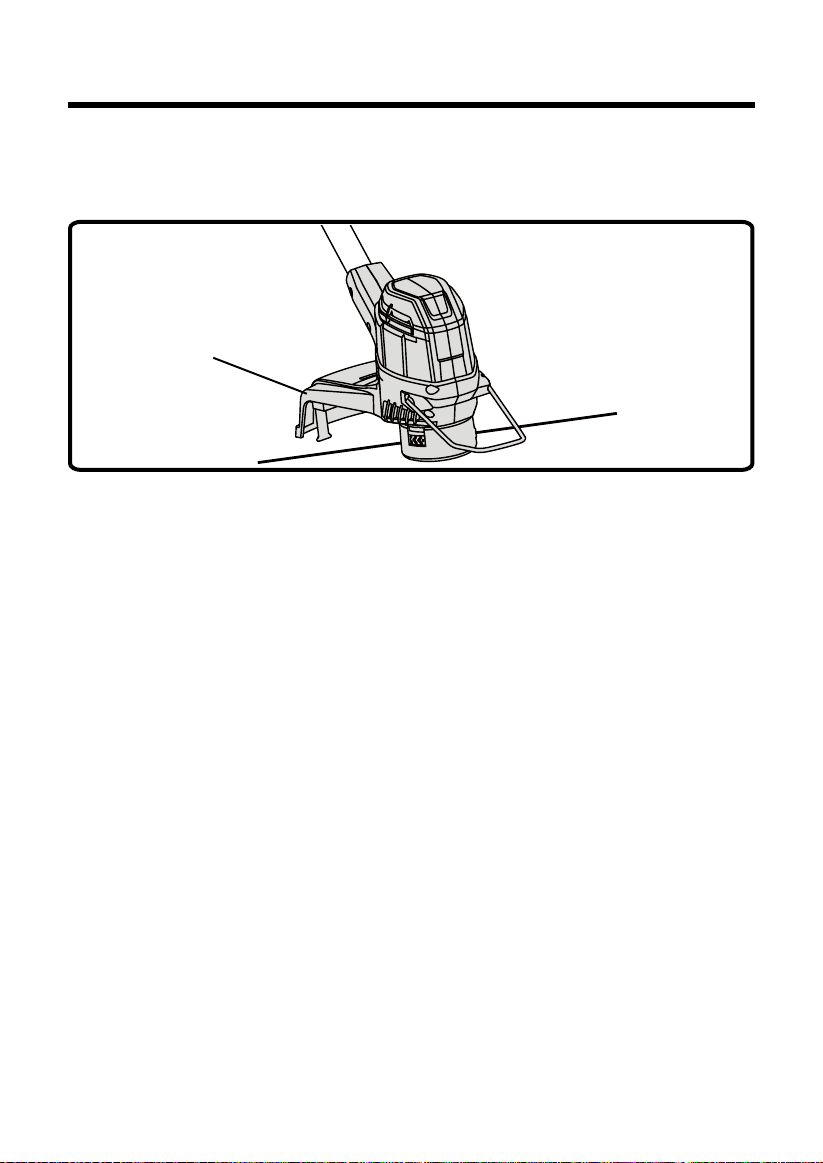
LINE TRIMMING CUT-OFF BLADE (See Figure 5.)
The trimmer is equipped with a line trimming cut-off blade on the guard. Replace the string when
trimming efciency diminishes. This will maintain best performance.
Fig. 5
CUT-OFF BLADE
ASSEMBLY
15

16
OPERATION
WARNING
Read and understand entire Operator's Manual for each optional attachment used on this power
head and follow all warnings and instructions. Failure to follow all instructions may result in electric
shock, re and/or serious personal injury.
WARNING
Do not allow familiarity with this product to make you careless. Remember that a careless fraction
of a second is sufcient to inict serious injury.
WARNING
Do not use any attachments or accessories not recommended by the manufacturer of this product.
The use of attachments or accessories not recommended can result in serious personal injury.
WARNING
This string trimmer is not meant to be used with brush cutter attachments. Use of a brush cutter
attachment could cause serious personal injuries or property damage.
17
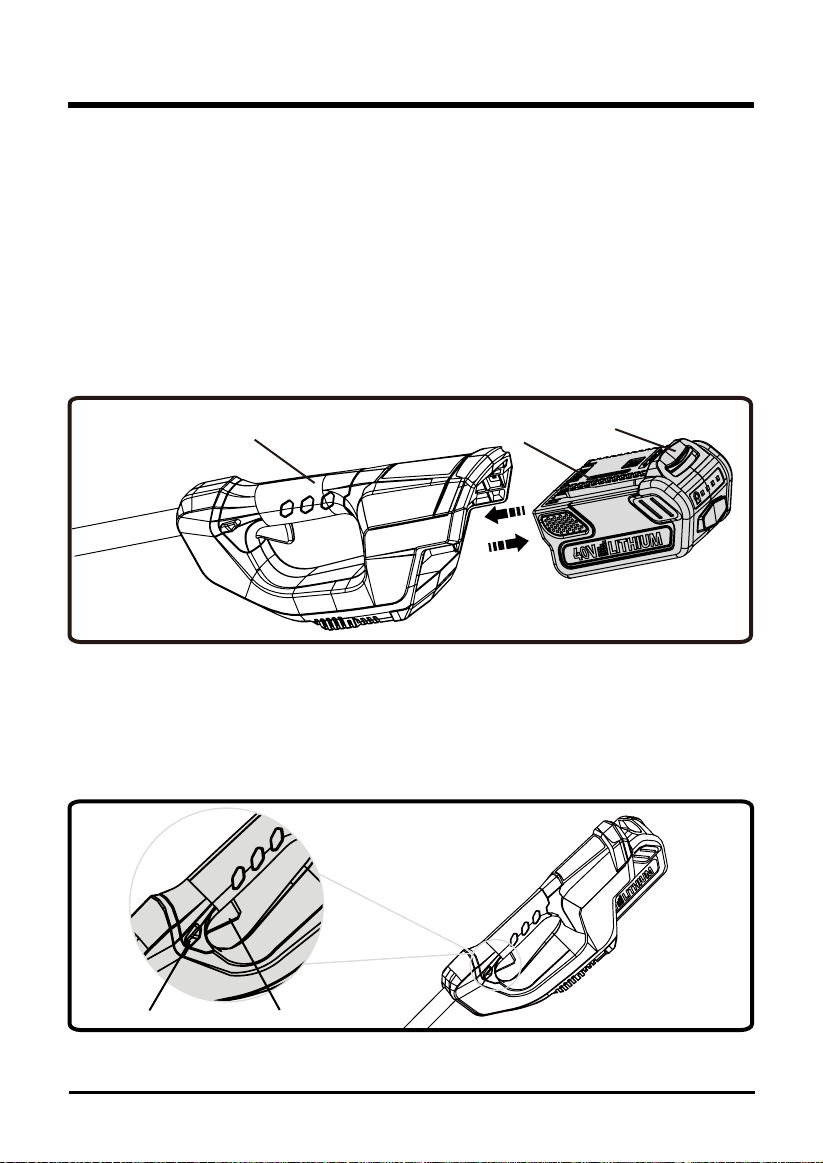
INSTALLING THE BATTERY PACK (See Figure 6.)
• Place the battery pack in the trimmer. Align raised ribs (3) on battery pack with grooves in the
trimmer’s battery port.
• Make sure the latch on the back of the battery pack clicks into place and that battery pack is
fully seated and secure in the trimmer before beginning operation.
REMOVING THE BATTERY PACK (See Figure 6.)
• Release the switch trigger and lock-out trigger to stop the trimmer.
• Press and hold the battery latch button (1) on the back of the battery pack.
• While holding the battery latch place one hand the the trimmer handle (2) and remove battery
pack.
Fig. 6
1
3
2
STARTING AND STOPPING THE TRIMMER (See Figure 7.)
• Ensure a fully charged battery is installed into the string trimmer.
• To start the string trimmer, press and hold the lock-out button (1) and squeeze the switch trigger (2).
• To stop the string trimmer, release switch trigger to stop.
1
Fig. 7
2
OPERATION

18
OPERATING THE TRIMMER (See Figure 8.)
WARNING
Always hold the string trimmer away from the body keeping clearance between the body and the
string trimmer. Any contact with the string trimmer cutting head while operating can result in serious
personal injury.
Follow these tips when using the string trimmer:
• Hold the trimmer with your right hand on the reat handle and your left hand on the auxiliary
handle.
• Keep a rm grip with both hands while in operation.
• Trimmer should be held at a comfortable position with the rear handle about hip height.
• Cut tall grass from the top down. This will prevent grass from wrapping around the shaft
housing and string head which may cause damage from overhearing.
If grass becomes wrapped around the string head:
• Remove the battery pack.
• Remove the grass.
Fig. 8
OPERATION
19
OPERATION
WARNING
Any contact with the attachment cutting head can result in burns and/or other serious personal
injury.
WARNING
Read the safety information for safe operation when using a blade attachment and refer to the
safety rules and instructions in your attachment manual. Never use a brush cutter attachment with
this electric power head. Improper operation of a blade or any attachment could result in serious
injury.
ADVANCING LINE
The trimmer is equipped with an auto-feed head. Bumping the head to try to advance the line will
damage the trimmer and void the warranty.
• With the trimmer running, release the switch trigger.
• Wait two seconds, and press the switch trigger.
NOTE: The line will extend approximately 1/4 in. with each stop and start of the switch
trigger until the line reaches the length of the grass deector cut-off blade.
• Resume trimming
ADVANCING THE LINE MANUALLY (See Figure 9.)
• Remove the battery pack.
• Push the black button located on the string head while pulling on line to manually advance
the line.
Fig. 9
20
OPERATION
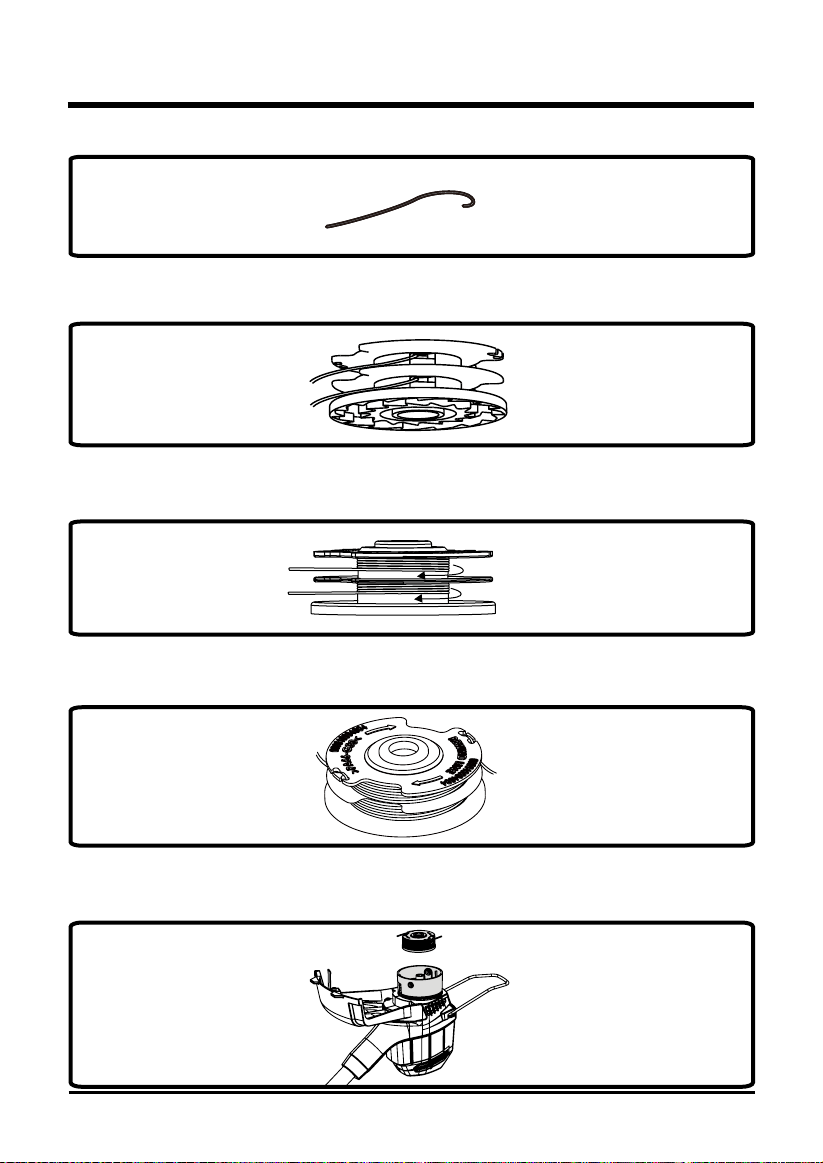
REPLACING THE LINE (See Figure 10.)
1. Press the tabs simultaneously on the side of the trimmer head and remove cover and spool.
Cover
Spool
Fig. 10-1
Tab
2. Remove any remaining line.
3. Clean dirt and debris from all parts. Replace spool if it is worn or damaged.
4. Replace with a pre-wound spool (#2900719), or replace line using two lines.
WARNING
Never use wire, rope, string, etc., which can break off and become a dangerous projectile.
5. Cut two lines, each being approximately 10 ft. (3 m) long. Use only .065 in. (1.65 mm)
diameter line.
3.0 m
(10 ft.)
= 1.65 mm (0.0005 ft.)
Fig. 10-2
21
OPERATION
6. Bend one end of the line 1/4 of an inch (0.002 ft.).
Fig. 10-3
7. Insert one line into the anchor hole in the upper part of the spool while the other line into the
anchor hole in the bottom part of the spool.
Fig. 10-4
8. Wind the lines clockwise around the spool simultaneously, as shown by the arrows on the
spool.
Fig. 10-5
9. Place lines in the slot on the upper spool ange, leaving about 6 in. ( 152mm ) extended
beyond the slot.
Fig. 10-6
NOTE: Do not overll. After winding the line, there should be at least 1/4 in. (6mm) between the
wound line and the outside edge of the spool.
10. Place the spool in the trimmer head as shown below.
Fig. 10-7
22
OPERATION
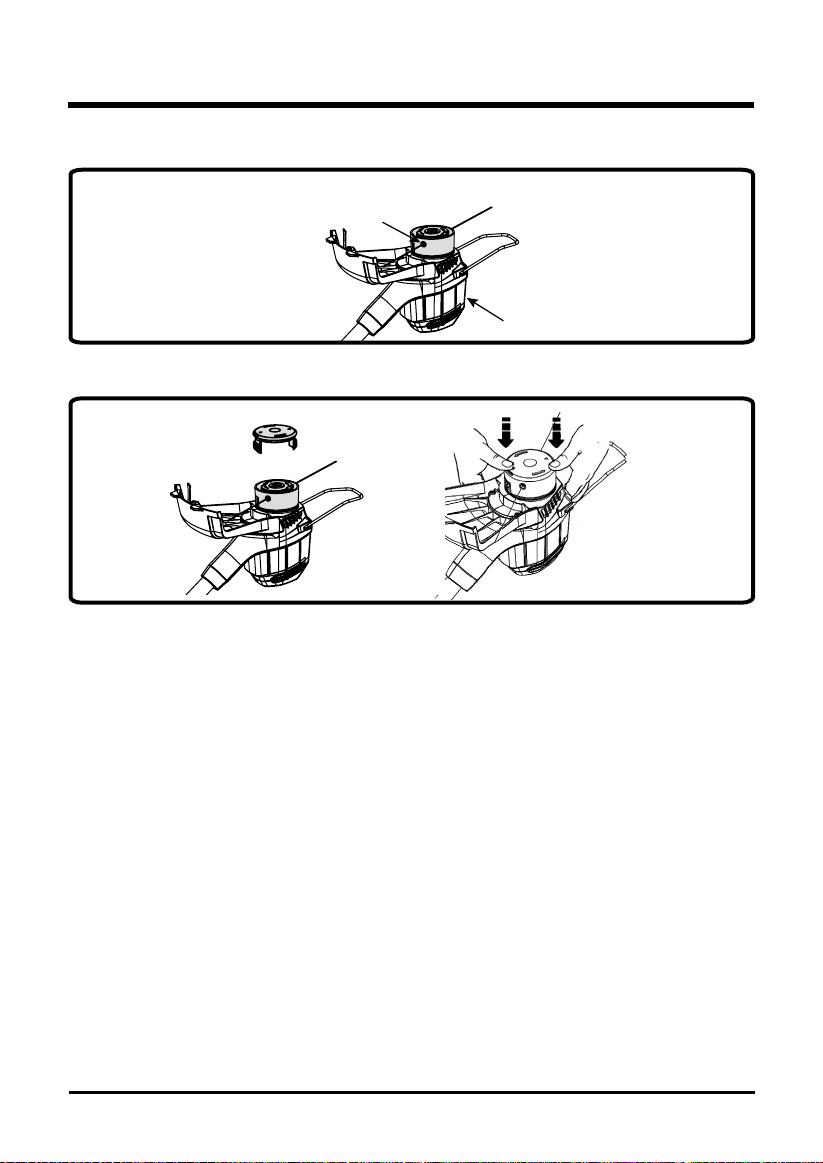
11. Insert the ends of the lines through line exit holes in the sides of the cover.
Line exit hole
Trimmer head
Fig. 10-8
12. Reinstall the cover onto the trimmer head. Push until cover snaps into place.
Fig. 10-9
23
OPERATION
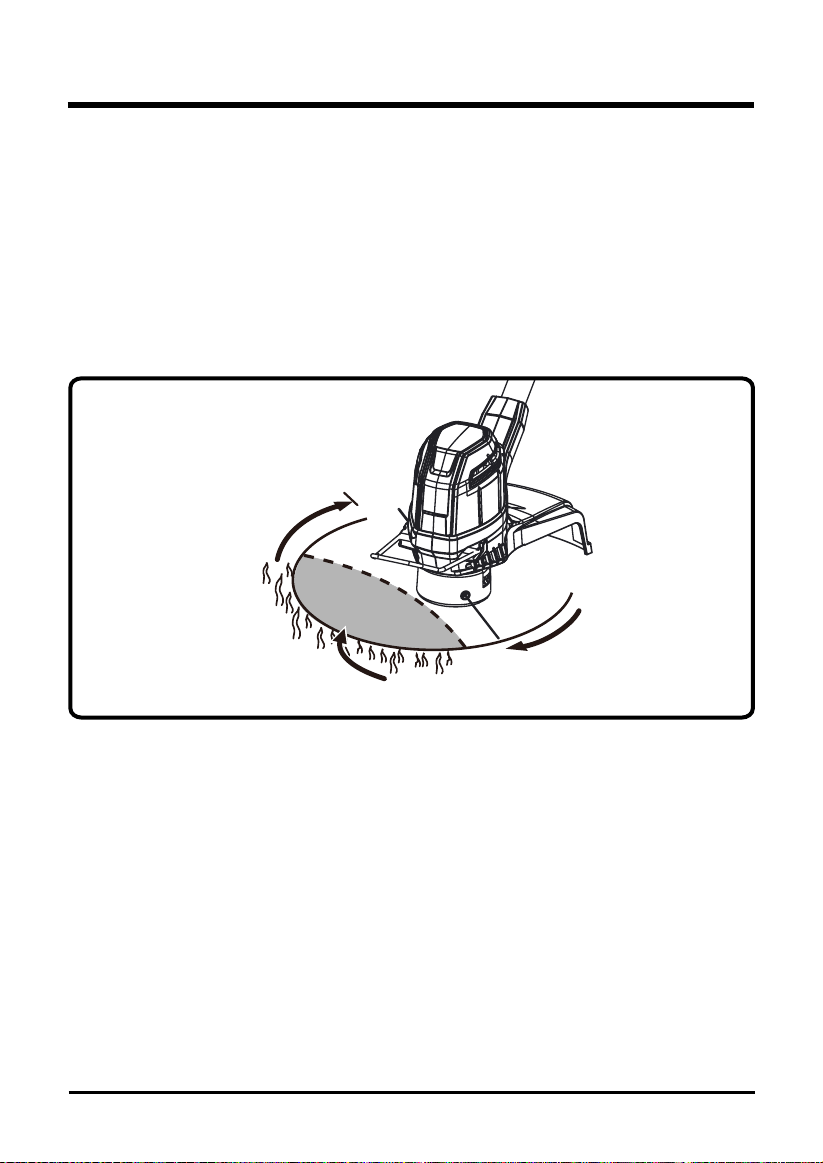
CUTTING TIPS (See Figure 11.)
• Keep the trimmer tilted toward the area being cut; this is the best cutting area.
• The trimmer cuts when passing the unit from right to left. This will avoid throwing debris at the
operator. Avoid cutting in the dangerous area shown in gure 11.
• Use the tip of string to do the cutting; do not force string head into uncut grass.
• Wire and picket fences cause extra string wear and breakage. Stone and brick walls, curbs,
and wood may wear string rapidly.
• Avoid trees and shrubs. Tree bark, wood moldings, siding, and fence posts can easily be
damaged by the string.
DANGEROUS CUTTING AREA
BEST CUTTING AREA
DIRECTION OF ROTATION
Fig. 11
24
BATTERY & CHARGER MAINTENANCE
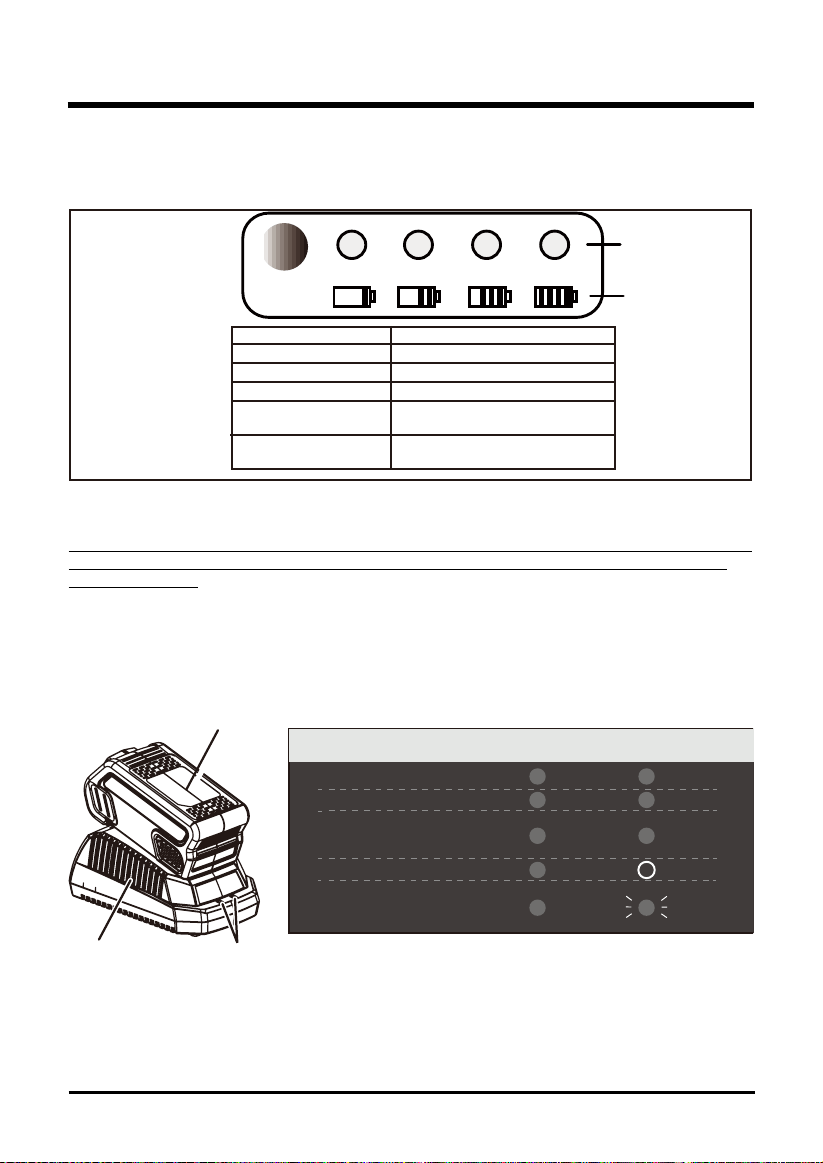
CHECKING BATTERY CAPACITY
Press the battery capacity indicator (BCI) button. The lights will illuminate according to the
batteries capacity level. See chart below:
BATTERY CAPACITY
INDICATOR (BCI) BUTTON
LIGHT METRE
BATTERY METRE
Lights Capacity
4 Green Lights The battery is at full capacity
3 Green Lights The battery is at 75% capacity
2 Green Lights The battery is at 50% capacity
1 Green Light
Lights go out
The battery is at 25% capacity and re-
quires charging soon
The battery is less than 10% capacity
and requires charging immediately
CHARGING PROCEDURE
NOTE: The battery is not shipped fully charged. It is recommended to fully charge before rst use to ensure
that maximum run time can be achieved. This lithium-ion battery will not develop a memory and may be
charged at any time.
1. Plug the charger into an AC power outlet.
2. Insert the battery pack (1) into the charger (2).
This is a diagnostic charger. The Charger LED Lights (3) will illuminate in specic order to
communicate the current battery status. They are as follows:
3
1
2
False Defect Note: When the battery is inserted into the charger, and the status LED ashes,
remove the battery from the charger for 1 minute, then reinsert. If the status LED indicates
normal than the battery pack is good. If the status LED is still blinking, remove the battery pack
and unplug the charger. Wait 1 minute and plug the charger back in and reinsert the battery
pack. If the status LED indicates normal than the battery pack is good. If the status LED is still
blinking then the battery pack is defective and needs to be replaced.
CHARGING PROCEDURE (LED INDICATOR)
BATTERY IS CHARGING:
FULLY CHARGED:
BATTERY IS TOO WARM:
(REMOVE FOR APPROX. 30
MINUTES TO ALLOW TO COOL)
DEFECTIVE BATTERY:
(REMOVE AND REPLACE WITH
NEW BATTERY IF THIS OCCURS)
NO BATTERY PRESENT
RE ED
GREEN
ORANGE
OFF
RED
RED
RED
RED
RED
BLINKING
D R
25
BATTERY & CHARGER MAINTENANCE
CHECKING THE CHARGE
If the battery pack does not charge properly:
• Check the current at the power outlet with another tool. Make sure that the outlet is not turned
off.
• Check that the charger contacts have not been shorted by debris or foreign material.
• If the surrounding air temperature is not normal room temperature, move the charger and
battery pack to a location where the temperature is between 45 ˚F and 104˚F .
WARNING
If the battery is inserted into the charger when warm or hot, the CHARGING LED indicator light on
the charger may switch on and illuminate ORANGE. If this occurs allow the battery to cool outside
of the charger from approximately 30 minutes.
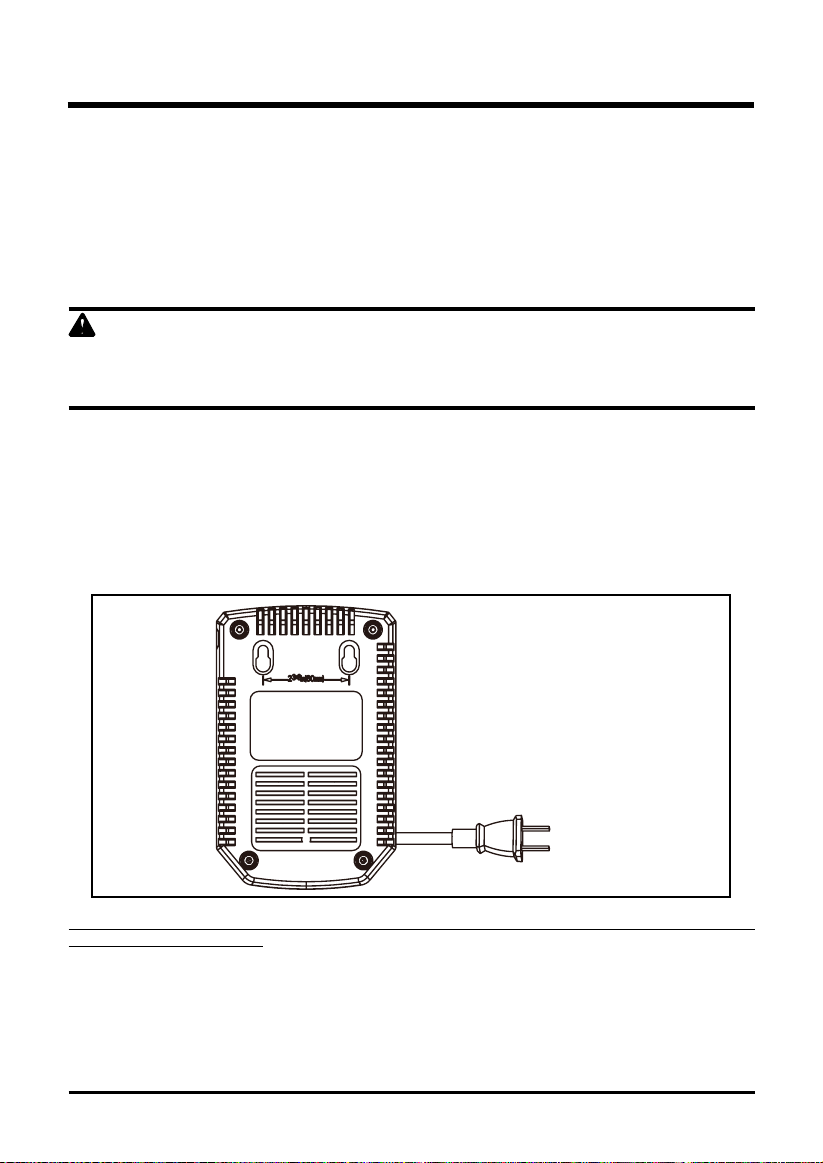
CHARGER MOUNTING
1. This charger can be installed hanging on a wall using two screws (not supplied)
2. Locate the placement for the charger to be wall mounted.
3. If fastening to wood studs use 2 wood screws.
4. Drill two holes 2 3/8” (6 cm) on center ensuring they are level.
5. If fastening to drywall use wall anchors and screws to secure the charger to the wall.
NOTE: If the battery and the charger won’t be used for a long time, please remove the battery from the charger
and pull out the AC power plug.

26
GENERAL MAINTENANCE
Avoid using solvents when cleaning plastic parts. Most plastics are susceptible to damage from
various types of commercial solvents and may be damaged by their use. Use clean cloths to
remove dirt, dust, lubricant, grease, etc.
Always store the machine clean and in a dry enclosure with the battery charged.
MAINTENANCE
Maintenance task Each time
the machine
is used
Every two
hours
Each week After use Every year
or when
required
Visual check of the tool's
safety systems (distancing
device, carrying eye, safety
casing)
X X
Check the trigger safety
system functions
X
Check the sharpness of
blades and sharpen if
necessary
X X X
Visual check of the tool (no
cracks or deformation)
X X X
Visual check of the tool at
the shaft attachment (no
deformations or wear)
X X X
Check the battery level X
Inspection of the tool by an
approved Greenworks dealer
X

27
ENVIRONMENTALLY SAFE BATTERY DISPOSAL
The following toxic and corrosive materials are in the batteries used in this string trimmer battery
pack: Lithium-Ion, a toxic material.
WARNING
All toxic materials must be disposed of in a specified manner to prevent contamination of the
environment. Before disposing of damaged or worn out Lithium-Ion battery packs, contact your
local waste disposal agency, or the local Environmental Protection Agency for information and
specific instructions. Take the batteries to a local recycling and/or disposal centre, certified for
lithium-ion disposal.
WARNING
If the battery pack cracks or breaks, with or without leaks, do not recharge it and do not use.
Dispose of it and replace with a new battery pack. DO NOT ATTEMPT TO REPAIR IT!
To avoid injury and risk of re, explosion, or electric shock, and to avoid damage to the
environment:
• Cover the battery's terminals with heavy-duty adhesive tape.
• DO NOT attempt to remove or destroy any of the battery pack components.
• DO NOT attempt to open the battery pack.
• If a leak develops, the released electrolytes are corrosive and toxic. DO NOT get the
solution in the eyes or on skin, and do not swallow it.
• DO NOT place these batteries in your regular household trash.
• DO NOT incinerate.
• DO NOT place them where they will become part of any waste landll or municipal solid
waste stream.
• Take them to a certied recycling or disposal centre.

28
TROUBLESHOOTING
Problem Cause Solution
String trimmer
fails to start.
1. The battery pack is not
attached to the trimmer.
1. Attach the battery pack to the trimmer.
2. No electrical contact
between the trimmer and
battery.
2. Remove battery check contact and
reinstall the battery pack.
3. The battery pack is
depleted.
3. Charge the battery pack.
4. The lock-off lever and
trigger are not depressed
simultaneously.
4. Press down the lock-off lever and hold
it
,
then depress the trigger to turn on the
string trimmer.
5. Did not press the power
button, press the trigger
directly.
5. Start the power button, the power
indicator will trigger later.
String trimmer
stops while
cutting.
1. The guard is not
mounted on the trimmer
,
resulting in an overly long
cutting and motor overload.
1. Remove the battery pack and mount
the guard on the trimmer.
2. Heavy cutting line is
used
.
2. Use only with nylon cutting line 0.065"
diameter or less.
3. The motor shaft or
trimmer head is bound with
grass.
3. Stop the trimmer
,
remove the battery
,
and remove the grass from the motor
shaft and trimmer head.
4. The motor is overloaded. 4. Remove the trimmer head from the
grass.the motor will recover to work
as soon as the load is removed. when
cutting
,
move the trimmer head in and
out of the grass to be cut and remove no
more than 8 inches of length in a single
cut.
5. The battery pack or
string trimmer is too hot.
5. Allow the battery pack to cool until the
temperature drops below 158°F
(
70°C
).
Allow the trimmer to cool until the
temperature drops below 140°C.
6. The battery pack is
disconnected from the tool
.
6. Re-install the battery pack.
7. The battery pack is
depleted.
7. Charge the battery pack.

29
Problem Cause Solution
Trimmer
head will not
advance line.
1. The motor shaft or
trimmer head is bound with
grass.
1. Stop the trimmer
,
remove the battery,
and clean the motor shaft and trimmer
head.
2. There is not enough line
on the spool.
2. Remove the battery and replace
the cutting line
;
follow the section “line
replacement”in this manual.
3. The trimmer head is
dirty
.
3. Remove the battery and clean the
spool, spool retainer and spool base.
4. The line is tangled on
the spool
.
4. Remove the battery, remove the line
from the spool and rewind
;
follow the
section "line replacement" in this manual.
5. The line is too short
.
5. Remove the battery and pull the lines
while alternately pressing down on and
releasing the bump knob.
6. Bump head hit on the
grass.
6. Remove bump head hit on the ground.
Line keeps
breaking.
1. Trimmer used incorrectly. 1. Only trim with the tip of the line
,
avoid
stones
,
walls and other hard objects.
Feed the line regularly to maintain full
cutting width.
Grass wraps
around trimmer
head and
motor housing.
1. Cutting tall grass at
ground level
1. Cut tall grass from the top down
,
removing no more than 8 inches in each
pass to prevent wrapping.
Line is not
cutting well
1. The line-cutting blade on
the edge of the guard has
become dull
.
1. Sharpen the line-cutting blade with a
le or replace it with a new blade.
TROUBLESHOOTING

30
LIMITED WARRANTY
GREENWORKS™ hereby warranties this product, to the original purchaser with proof of
purchase, for a period of four (4) years against defects in materials, parts or workmanship.
GREENWORKS™, at its own discretion will repair or replace any and all parts found to be
defective, through normal use, free of charge to the customer. This warranty is valid only for
units which have been used for personal use that have not been hired or rented for industrial/
commercial use, and that have been maintained in accordance with the instructions in the
owners’ manual supplied with the product from new.
Battery carries a two (2) year warranty against defects in workmanship and materials. Batteries
must be charged in accordance with the operator’s manuals directions and regulations in order
to be valid.
ITEMS NOT COVERED BY WARRANTY:
1. Any part that has become inoperative due to misuse, commercial use, abuse, neglect,
accident, improper maintenance, or alteration; or
2. The unit, if it has not been operated and/or maintained in accordance with the owner's
manual; or
3. Normal wear, except as noted below;
4. Routine maintenance items such as lubricants, blade sharpening;
5. Normal deterioration of the exterior nish due to use or exposure.
GREENWORKS HELPLINE (1 888 90WORKS):
Warranty service is available by calling our toll-free helpline, at 1-888-909-6757
(1-888-90WORKS).
TRANSPORTATION CHARGES:
Transportation charges for the movement of any power equipment unit or attachment are the
responsibility of the purchaser. It is the purchaser’s responsibility to pay transportation charges
for any part submitted for replacement under this warranty unless such return is requested in
writing by GREENWORKS.
31
EXPLODED VIEW

32
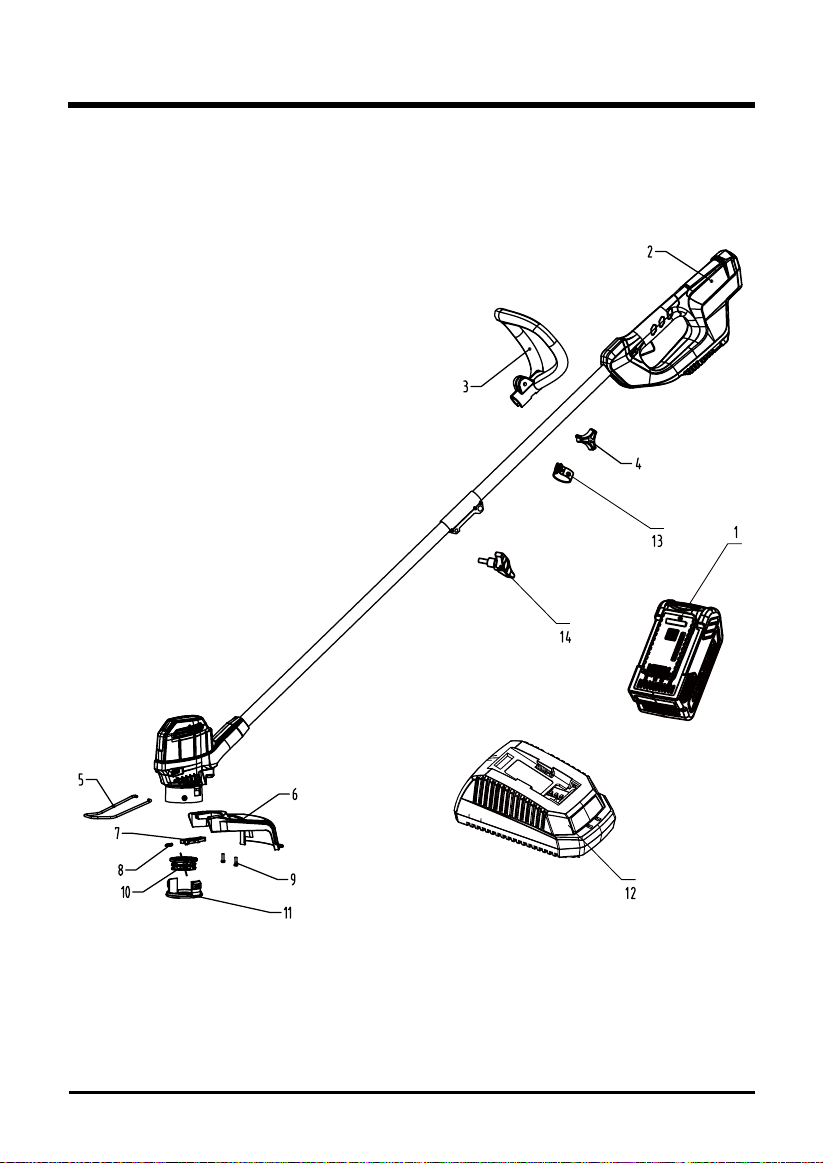
PARTS LIST
Item No. Part No. Description QTY
1 31103976(BK) (29462) (G-MAX) 40V 2Ah battery 1
2 2101602 Bare tool assembly 1
3 34105874 Auxiliary handle 1
4 34116884AB Auxiliary handle knob 1
5 333011426 Edge guide 1
6 341041426 Guard 1
7 34120186 Button 1
8 3340646A Spring 1
9 3220313-3 Screw ST4x14-F 2
10 31101724 Spool 1
11 34121186-2 Spool cover 1
12 31102998 (29482) (G-MAX) Charger 1
13 33306874 Metal ring 1
14 34107511AC Knob 1

TOLL-FREE HELPLINE: 1-888-90WORKS (888.909.6757)
Rev: 00 (08-04-15) Printed in China on 100% Recycled Paper