User Guide Greenworks 2101202 String Trimmer
Important Safety Instructions
- Check the work area before each use. Remove all objects such as rocks, broken glass, nails, wire, or string which can be thrown or become entangled in the machine.
- Use only identical manufacturer’s replacement parts and accessories. Use of any other parts may create a hazard or cause product damage.
- Do not charge battery tool in rain, or damp or wet location. f ollowing this rule will reduce the risk of electric shock. f or household use only.
- Battery tools do not have to be plugged into an electrical outlet; therefore, they are always in operating condition. Be aware of possible hazards when not using your battery tool or when changing accessories. Following this rule will reduce the risk of electric shock, fire, or serious personal injury.
- Remove or disconnect battery before servicing, cleaning or removing material from the gardening appliance.
- Use only Greenworks 80-volt batteries.
- Store idle appliances - When not in use, string trimmer should be stored indoors in a dry, locked place out of the reach of children.
- Do not dispose of the batteries in a fire. The cells may explode. Check with local codes for possible special disposal instructions.
CHILD SAFETY
- Tragic accidents can occur if the operator is not aware of the presence of children.
- Keep children out of the working area and under the watchful care of a responsible adult.
- Do not allow children under the age of 14 to operate this trimmer. Children who are 14 years of age and older must read and understand the operating instructions and safety rules in this manual and must be trained and supervised by a parent.
- Stay alert, and turn the trimmer off if a child or any other person enters the working area.
- Look behind and down for small children before and while cutting backwards.
- Use extreme care when approaching blind corners, doorways, shrubs, trees, or other objects that may obscure your view of a child who may run into the path of the trimmer.
Symbols
SERVICE
- Servicing requires extreme care and knowledge and should be performed only by a qualified service technician. for service we suggest you return the product to your nearest AUTHORIZED SERVICE CENTER for repair. When servicing, use only identical replacement parts.
WARNING
- To avoid serious personal injury, do not attempt to use this product until you have read this Owner's Manual thoroughly and understand it completely. If you do not understand the warnings and instructions in this Owner's Manual, do not use this product.
- Call the Toll-free Helpline (1-855-345- 3934) for assistance. The operation of any power tool can result in foreign objects being thrown into your eyes, which can result in severe eye damage.
- Before operating a power tool, always wear safety goggles, safety glasses with side shields, or a full face shield when needed. We recommend a Wide Vision Safety Mask for use over eyeglasses or standard safety glasses with side shields. Always use eye protection that is marked to comply
Know Your String Trimmer
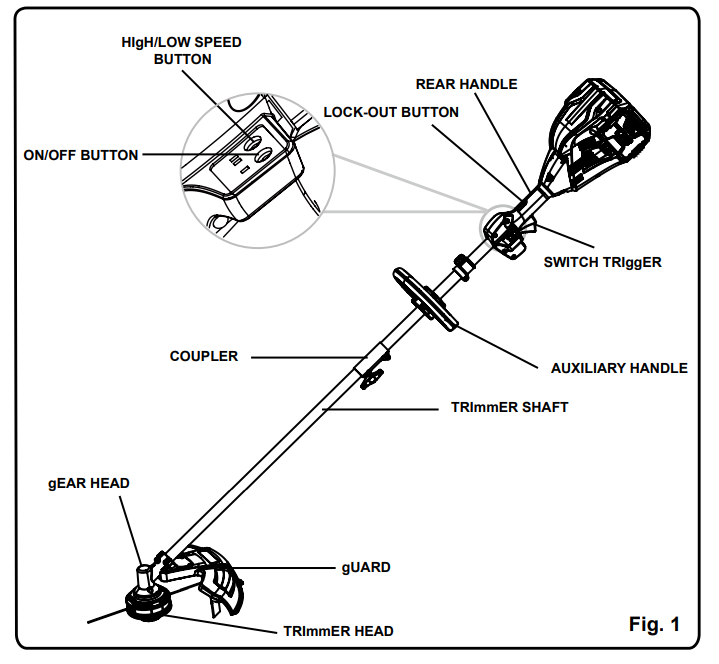
KNOW YOUR string trimmer (See Figure 1.)
- The safe use of this product requires an understanding of the information on the product and in this operator’s manual as well as a knowledge of the project you are attempting. Before use of this product, familiarize yourself with all operating features and safety rules.
Assembly
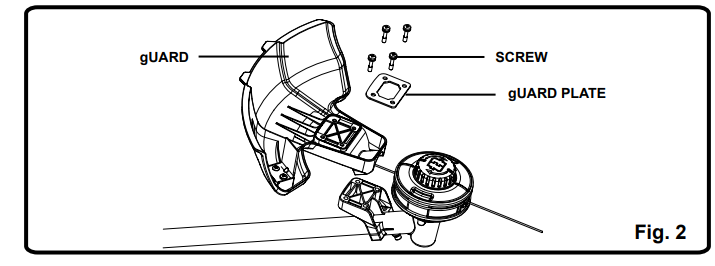
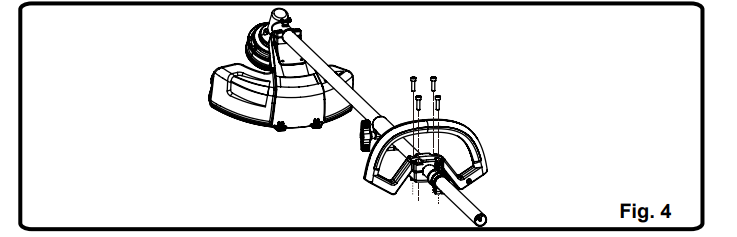
Attaching the Guard (see Figure 2.)
- Invert the string trimmer to access the trimmer head.
- Using a Phillips head screwdriver (not included), remove the pre-installed screws from the trimmer head.
- Place the guard on to the trimmer head and place the guard plate on the guard.
- Align the screw holes on the guard with the screw holes on the trimmer head.
- Insert the screws into the trimmer head, fastening the guard in place
UNPACKINg
- This product requires assembly.
- Carefully remove the product and any accessories from the box. Make sure that all items listed in the packing list are included.
- Inspect the tool carefully to make sure no breakage or damage occurred during shipping.
- Do not discard the packing material until you have carefully inspected and satisfactorily operated the tool. • If any parts are damaged or missing,
WARNIN g
- Read and understand entire Operator’s Manual for each optional attachment used on this power head and follow all warnings and instructions. failure to follow all instructions may result in electric shock, fire and/or serious personal injury.
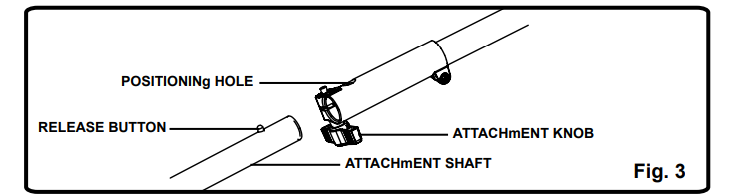
- The attachment connects to the power head by means of a coupler device.
- Loosen the attachment knob on the coupler.
- Push in the release button located on the attachment shaft. Align the button with the guide recess on the power head coupler and slide the two shafts together. Rotate the attachment shaft until the button locks into the positioning hole.
NOTE:
Stop the power head.
- Remove the battery from the power head.
- Loosen the attachment knob.
- Push in the release button and twist the shafts to remove and seperate ends.
- Press the auxiliary handle onto the power head shaft so that the handle is angled toward the rear handle that allows for comfortable operation.
- Slide the bolts through the holes in the auxiliary handle, and tighten them securely.
ADJUSTINg THE CUTTIN g SWATH (See Figure 5.)
- The trimmer is currently set at a 14 in. cutting swath. To adjust to a cutting swath of 16 in.:
- Remove the battery from the string trimmer.
- Remove both screws on the cut-off blade with a Phillips screwdriver (not included).
- Rotate the cut-off blade 180°.
- Replace both screws in the cut-off blade.
Note: Set the cut-off blade to 14 in. for greater runtime. Set the cut-off blade to 16 in. for greater cutting area.
Operation
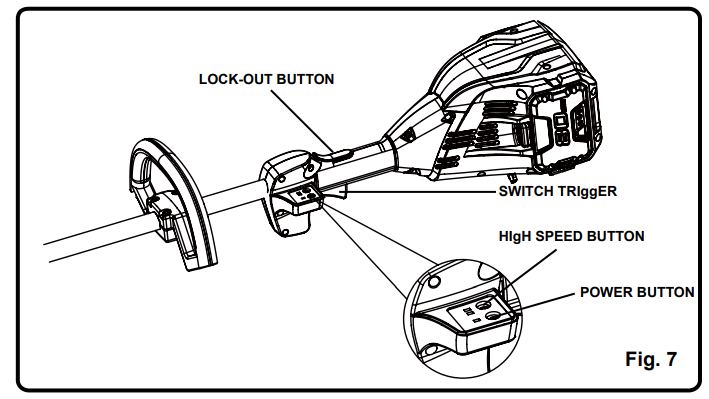
- Lock-out button (See Figure 7.) The lock-out button reduces the possibility of accidental starting. The lock-out button is located on the handle above the switch trigger
- The lock-out button must be depressed before you pull the switch trigger. The lock resets each time the trigger is released.
Starting and stoppin g the tri mmer (See Figure 7.)
To start:
Press the power button.
- Press high speed button to increase speed depending upon grass condition. Two LED's will illuminate above the high speed button indicating that the trimmer is in the high speed setting. •
- Depress the lock-out button and squeeze the switch trigger.
To stop:
- Release the switch trigger.
- Press the power button again to turn the unit off. Note: The unit will power itself down after being idle for 1 minute.
Operating the tri mmer (See Figure 8.)
- Hold the power head with your right hand on the rear handle and your left hand on the front handle. Keep a firm grip with both hands while in operation.
- Power head should be held at a comfortable position with the rear handle about hip height. Always operate power head at full throttle. If debris becomes wrapped around the attachment, release the switch trigger, and remove the debris.
WARNIN g
- Extreme care must be taken when using a blade attachment to ensure safe operation. Read the safety information for safe operation when using a blade attachment and refer to the safety rules and instructions in your attachment manual.
- Never use a brush cutter attachment with this electric power head. Improper operation of a blade or any attachment could result in serious injury.
Fig. 8
OPERATIon
Installing strin g in string head (See Figure 9.)
- Line up the slots on the spool cap with the slots on the string head.
- Insert line through the string head hole. Push line until it exits the opposite string head hole.
- Pull the line through until there is an equal amount of line on each side.
- Turn the spool cap clock-wise to begin winding the string into the string head. Leave approximately 5 inches of string protruding out of each side of the head.
- It is recommended that .080” line Diameter be used for this string head.
Note: Do not put more than 15 feet of line in at a time.
- Spool Cap
- String Head
- String Head Hole
- Slots
REmOVINg / REPLACIN g STRIN g HEAD (See Figure 10.)
- Line up the spacer hole up with the hole in the gear box.
- Place a small screw driver or metal rod (Not included) in the spacer hole.
- Rotate the head clockwise to loosen and remove.
- Reverse steps 1.-3. to reinstall the same string head.
- Line trimming cut-off blade (See Figure 11.) The trimmer is equipped with a line trimming cut-off blade on the guard. Replace the string when trimming efficiency diminishes. This will maintain best performance.
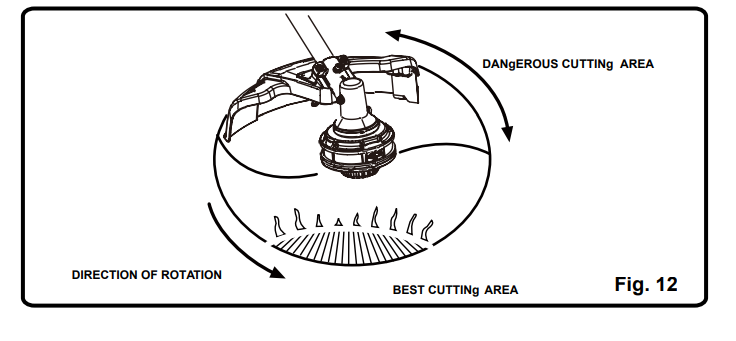
Cutting tips (See Figure 12.)
- Keep the trimmer tilted toward the area being cut; this is the best cutting area.
- The trimmer cuts when passing the unit from right to left. This will avoid throwing debris at the operator. Avoid cutting in the dangerous area shown in figure 12.
- Use the tip of string to do the cutting; do not force string head into uncut grass.
- Wire and picket fences cause extra string wear and breakage. Stone and brick walls, curbs, and wood may wear string rapidly.
- Avoid trees and shrubs. Tree bark, wood moldings, siding, and fence posts can easily be damaged by the string.
Maintenance
Cleaning the power head
- Stop the motor and remove the battery.
- Clean dirt and debris from the power head using a damp cloth with a mild detergent.
Note:
Troubleshooting
Motor fails to start when switch trigger is depressed
- Check the battery charge.
Recharge the battery per the instructions in the battery manual.
Push the power button if no LED's are illuminated.
String trimmer stops while cutting.
- The trimmer head is bound with grass.
Stop the trimmer, remove the battery, and remove the grass from the trimmer head.
- The battery pack is too hot.
Remove the battery and allow it to cool in a cool; dry area.
- The battery pack is fully discharged.
- Recharge the battery per the instructions in the battery manual.
Warranty
W A R N I N g
- Read and understand all instructions before using this product. f ailure to follow all instructions listed below may result in electric shock. fire. and/or serious personal injury.
- • Do not operate power tools in explosive atmospheres. such as in the presece of flammable liquids. gases. or dust. Power tools create sparks which may ignite the dust or fumes.
- • Do not allow children or untrained individuals to use this unit.
- • Don’t expose power tools to rain or wet conditions. Water entering a power tool will increase the risk of electric shock.
- • Do not handle plug or tool with wet hands.
- • Never allow children to operate the equipment. Never allow adults to operate the equipment without proper instruction.
ITEmS NOT COVERED BY WARRANTY:
1. Any part that has become inoperative due to misuse. abuse. neglect. accident. improper maintenance. or alteration; or
2. The unit. if it has not been operated and/or maintained in accordance with the owner's manual; or
3. Normal wear. except as noted below;
4. Routine maintenance items such as lubricants. blade sharpening;
5. Normal deterioration of the exterior finish due to use or exposure.
Warranty service is available by calling our toll-free helpline. 9 a.m. to 5 p.m. EST. Monday friday at (1-855-345-3934).
TRANSPORTATION CHARgES:
- Transportation charges for the movement of any power equipment unit or attachment are the responsibility of the purchaser.
- It is the purchaser’s responsibility to pay transportation charges for any part submitted for replacement under this warranty unless such return is requested in writing by gREENWORKS .