

Read all safety rules and instructions carefully before operating this tool.
Owne
www.greenworkstools.com
r’s Manual
TOLL-FREE HELPLINE: 1-888-90WORKS
(888.909.6757)
24V LITHIUM-ION CORDLESS STRING TRIMMER
2100302

2
CONTENTS
Contents .............................................................................................................................. 2
.......................................................................................................... 2
General safety rules .........................................................................................................3-5
Symbols ............................................................................................................................6-7
Know your string trimmer ..................................................................................................... 8
Assembly instruction ....................................................................................................... 9-12
Operation ...................................................................................................................... 13-14
Maintenance............................................................................................................................15
Environmentally safe battery disposal...........................................................................................16
Troubleshooting............................................................................................................................17
Warranty ............................................................................................................................ 18
Exploded View ....................................................................................................
................ 19
Parts List ............................................................................................................................ 20
PRODUCT SPECIFICATIONS
24V CORDLESS STRING TRIMMER EDGER
Type ............................................................................................. Cordless, battery-powered
Battery ...........................................................................................................24 V Lithium-Ion
Speed...............................................................................................8000 / 9000 RPM (no load)
Cutting Path.....................................................................................10'' / 12" (254mm / 305 mm)
Line diameter................................................................................................. 0.065" (1.65 mm)
Run Time.................................................................................................... approx. 40 minutes
3
GENERAL SAFETY RULES
W A R N I N G
Read and understand all instructions before using this product. Failure to follow all
•
liquids, gases, or dust. Power tools create sparks which may ignite the dust or fumes.
• Do not allow children or untrained individuals to use this unit.
• Don’t expose power tools to rain or wet conditions. Water entering a power tool will increase
the risk of electric shock.
• Do not handle plug or tool with wet hands.
• Never allow children to operate the equipment. Never allow adults to operate the equipment
without proper instruction.
• Always wear safety glasses with side shields marked to comply with ANSI Z87.1.
Everyday glasses have only impact resistant lenses. Th
ey are NOT safety glasses.
Following this rule will reduce the risk of eye injury. Use face mask if operation is dusty.
• Wear eye protection when operating this product. Secure long hair above shoulder level to
prevent entanglement in moving parts.
• Use extra care when cleaning on stairs.
• Do not expose to rain, store indoors.
• Do not operate in poor lighting.
• Keep all parts of your body away from any moving part.
•
• Wear heavy long pants, boots, and gloves. Avoid loose garments or jewelry that could get
caught in moving parts of the machine or its motor.
• Do not force tool. Use the correct tool for your application. The correct tool will do the job
better and safer at the rate for which it is designed.
• Do not operate the equipment while barefoot or when wearing sandals or similar lightweight
footwear. Wear protective footwear that will protect your feet and improve your footing on
slippery surfaces.
• S
ecure long hair so it is above shoulder level to prevent entanglement in any moving parts.
•
• Do not allow to be used as a toy. Close attention is necessary when used by or near children.
• Do not use tool if switch does not turn it on or off. Any tool that cannot be controlled with the
switch is dangerous and must be repaired.
• Keep all bystanders, children, and pets at least 50 ft. away.
•
medication.
• Do not operate in poor lighting.

4
GENERAL SAFETY RULES
• Keep all parts of your body away from any moving parts and all hot surfaces of the unit.
• Do not put any object into openings. Do not use with any opening blocked; keep openings free
• Check the work area before each use. Remove all objects such as rocks, broken glass, nails,
wire, or string which can be thrown or become entangled in the machine.
• Use only identical manufacturer’s replacement parts and accessories. Use of any other parts
may create a hazard or cause product damage.
• Do not charge battery tool in rain, or damp or wet location. Following this rule will reduce the
risk of electric shock.
• For household use only.
• Battery tools do not have to be plugged into an ele
ctrical ou
tlet; therefore, they are always in
operating condition. Be aware of possible hazards when not using your battery tool or when
personal injury.
• Remove or disconnect battery before servicing, cleaning or removing material from the
gardening appliance.
• Use only Greenworks batteries.
• Store idle appliances - When not in use, string trimmer should be stored indoors in a dry,
locked place out of the reach of children.
•
possible special disposal instructions.
• Do not open or mutilate the batteries. Released electrolyte is corrosive and may cause
damage to the eyes or skin. It may be toxic if swallowed.
•
explosion and possibly injury.
• Batteries can explode in the presence of a source of ignition, such as a pilot light. To reduce
the risk of serious personal injury, never use any cordless product in the presence of open
immediately.
• Do not crush, drop or damage battery pack. Do not use a battery pack or charger that has
been dropped or received a sharp blow. A damaged battery is subject to explosion. Properly
dispose of a dropped or damaged battery immediately.
• Exercise care in handling batteries in order not to short the battery with conducting materials
such as rings, bracelets, and keys. The battery or conductor may overheat and cause burns.
Do not open or mutilate the batteries. Released electrolyte is corrosive an
d may cause
da
mage to the eyes or skin. It may be toxic if swallowed.
• For best results, your battery tool should be charged in a location where the temperature is
more than 45°F but less than 104°F. To reduce the risk of serious personal injury, do not store
outside or in vehicles.
• Under extreme usage or temperature conditions, battery leakage may occur. If liquid comes in
contact with your skin, wash immediately with soap and water, then neutralize with lemon juice
then seek immediate medical attention. following this rule will reduce the risk of serious
personal injury.

5
• If the power supply cord is damaged, it must be replaced only by the manufacturer or by an
authorized service center to avoid risk.
• Do not point the string trimmer in the direction of people or pets.
• When not in use, string trimmer should be stored indoors in a dry, locked up place—out of the
reach of children.
• Maintain tool with care. Keep fan area clean for best and safest performance. Follow
removing the battery.
• To reduce the risk of electrical shock, do not expose to rain, do not use on wet surfaces. Store
indoors.
• Save these instructions. Refer to them frequently and use them to instruct others who may
use this power tool. If you loan someone this power tool, loan them these instructions also.
GENERAL SAFETY RULES
W A R N I N G (PROPOSITION 65)
Some dust created by power sanding, sawing, grinding, drilling, and other construction activities
contains chemicals known to cause cancer, birth defects or other reproductive harm. Some
examples of these chemicals are:
• Lead from lead-based paints
• Crystalline silica from bricks and cement and other masonry products, and
• Arsenic and chromium from chemically treated lumber.
Your risk of exposure to these chemicals varies depending on how often you do this type of
work. To reduce your exposure to these chemicals, work in a well-ventilated area, and work with
particles.
CHILD SAFETY
Tragic accidents can occur if the operator is not aware of the presence of children.
• Keep children out of the working area and under the watchful care of a responsible adult.
• Do not allow children under the age of 14 to operate this trimmer. Children who are 14
years of age and older must read and understand the operating instructions and safety
rules in this manual and must be trained and supervised by a parent.
• Stay alert, and turn the trimmer off if a child or any other person enters the working area.
• Look behind and down for small children before and while cutting backwards.
• Use extreme care when approaching blind corners, doorways, shrubs, trees, or other
objects that may obscure your view of a child who may run into the path of the trimmer.

6
SYMBOLS
SYMBOL NAME DESIGNATION/EXPLANATION
V Volts Voltage
A Amperes Current
Hz Hertz Frequency (cycles per second)
W Watts Power
min Minutes Time
Alternating Current Type of current
Direct Current Type or a characteristic of current
Class II Construction Double-insulated construction
No Load Speed Rational speed, at no load
/min Per Minute Revolutions, strokes, surface speed, orbits etc.,
per minute
Wet Conditions Alert Do not expose to rain or use in damp locations
Read The Operator’s Manual To reduce the risk of injury user must read and
understand operator’s manual before using this
product.
Eye Pro
tection Wear eye protection marked to comply with
ANSI Z87.1when operating this equipment.
Safety Alert Precautions that involve your safety.
Long Hair Failure to keep long hair away from the air inlet
could result in personal injury.
Loose Clothing Failure to keep loose clothing from being drawn
into air intake could result in personal injury.
Keep Bystanders Away Keep all bystanders at least 50 ft. away.
Some of the following symbols may be used on this product. Please study them and learn their
meaning. Proper interpretation of these symbols will allow you to operate the product better and safer.

The following signal words and meanings are intended to explain the levels of risk associated
with this product.
SERVICE
service technician. For service we suggest you return the product to your nearest AUTHORIZED
SERVICE CENTER for repair. When servicing, use only identical replacement parts.
W A R N I N G
To avoid serious personal injury, do not attempt to use this product until you have read this Owner's
Manual thoroughly and understand it completely. If you do not understand the warnings and
instructions in this Owner's Manual, do not use this product. Call the Toll-free Helpline (1-888-909-
6757) for assistance. The operation of any power tool can result in foreign objects being thrown
into your eyes, which can result in severe eye damage. Before operating a power tool, always wear
safety goggles, safety glasses with side shields, or a full face shield when needed. We recommend
a Wide Vision Safety Mask for use over eyeglasses or standard safety glasses with side shields.
Always use eye protection that is marked to comply with ANSI Z87.1.
W A R N I N G
The operation of any power tool can result in foreign objects being thrown into your eyes,
which can result in severe eye damage. Before beginning power tool operation, always
wear safety goggles or safety glasses with side shields and, when needed, a full face
shield. We recommend Wide Vision Safety Mask for use over eyeglasses or standard
safety glasses with side shields. Always use eye protection which is marked to comply
with ANSI Z87.1.
SYMBOL SIGNAL MEANING
DANGER Indicates an imminently hazardous situation, which, if not
avoided, will result in death or serious injury.
WARNING Indicates a potentially hazardous situation, which, if not avoided,
could result in death or serious injury.
CAUTION Indicates a potentially hazardous situation, which, if not avoided,
may result in minor or moderate injury.
CAUTION (Without Safety Alert Symbol) Indicates a situation that may
result in property damage.
SYMBOLS
SAVE THESE INSTRUCTIONS
7
8
KNOW YOUR STRING TRIMMER
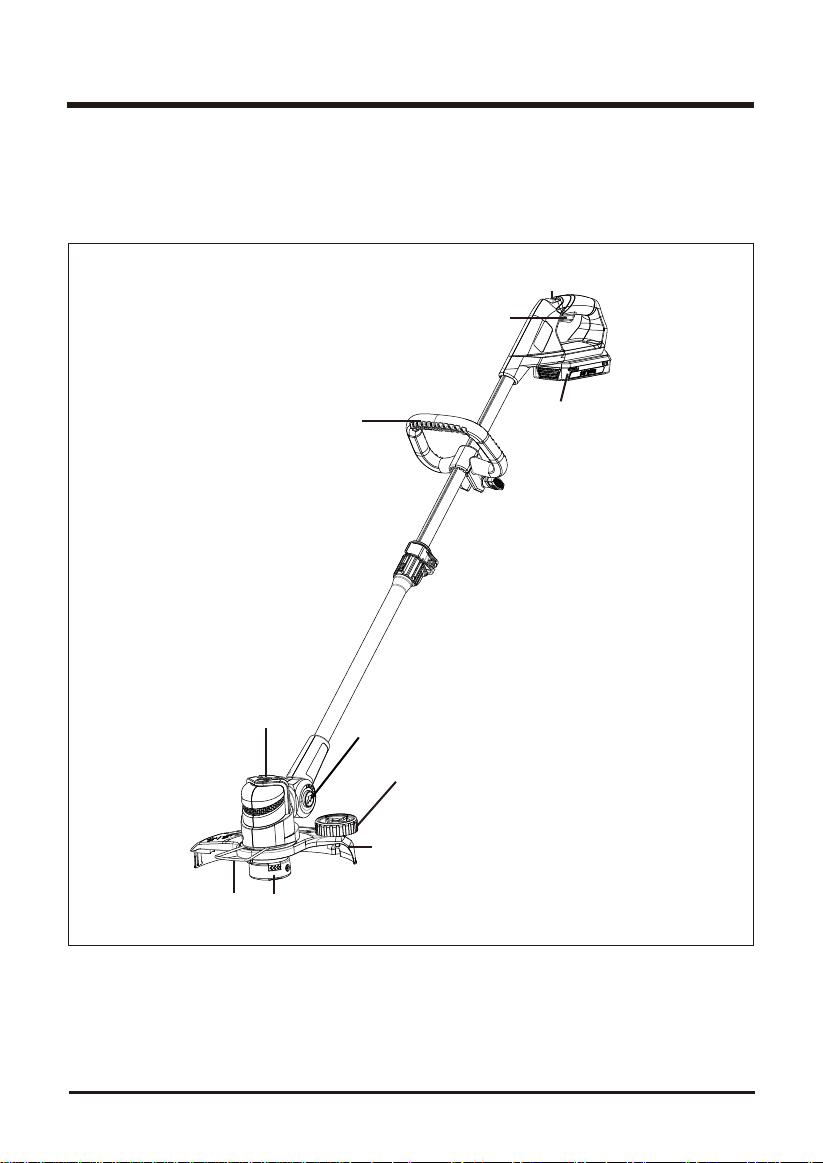
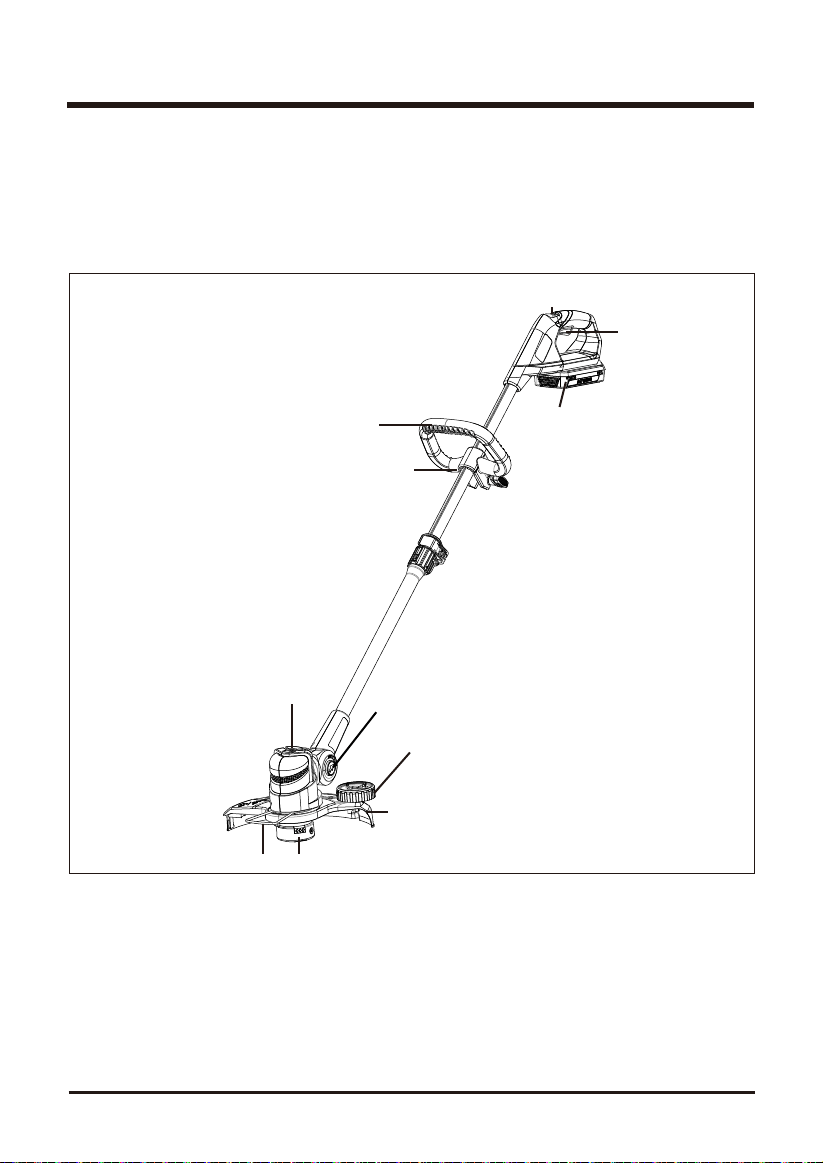
KNOW YOUR STRING TRIMMER (See Figure 1.)
The safe use of this product requires an understanding of the information on the product and in
this operator’s manual as well as a knowledge of the project you are attempting. Before use of
this product, familiarize yourself with all operating features and safety rules.
Battery pack
Switch lock out button
Auxiliary assist handle
Edger adjustment button
Edging guide wheel
Pivoting head adjustment button
Fig. 1
Single line cutting spool
Guide
Guard
Trigger switch
9
ASSEMBLY INSTRUCTION
W A R N I N G
• Replace the battery pack or charger immediately if the battery case or charger cord is
damaged.
• Always make sure the string trimmer switch is OFF before inserting or removing the
battery pack.
• Always make sure the battery pack is removed and the switch turned OFF, before
inspecting, adjusting, or maintaining any other part of the hedge trimmer.
• Read, understand, and follow the Battery Charger instructions.
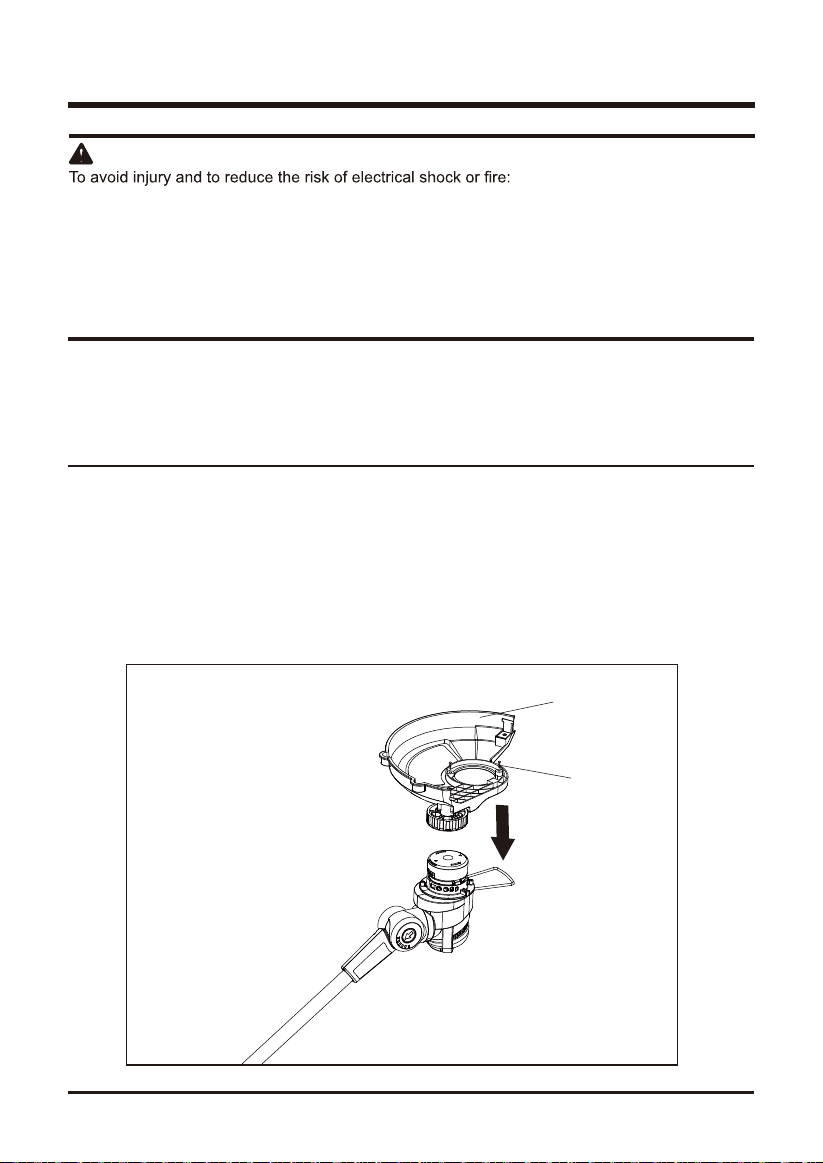
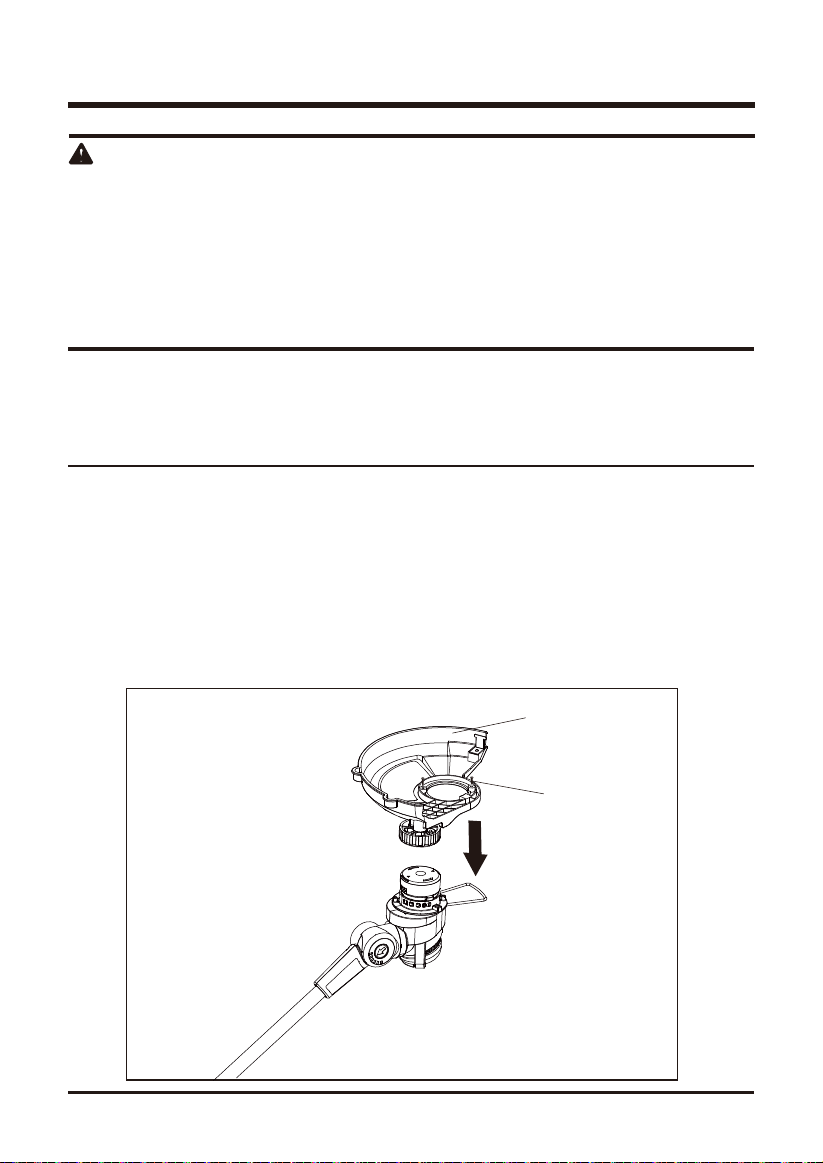
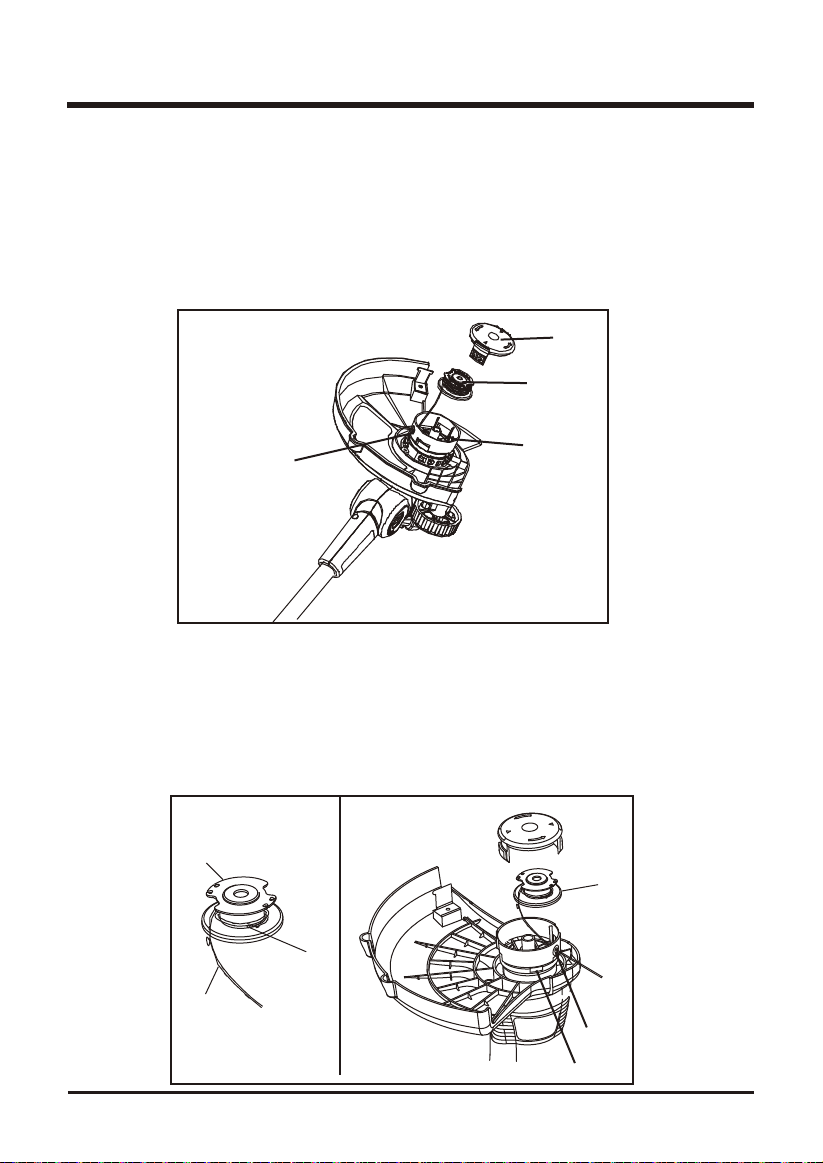
GUARD (
See Figure 2.)
To avoid injury, always remove the battery pack before installing the guard, changing a cutting
line, or making any adjustments.
If the guard is damaged, do not use the grass trimmer/edger until it is replaced.
NOTE: Install the protective guard before operating the grass trimmer/edger trimmer. It cannot be
removed or disassembled.
1. Remove the battery pack.
2. Invert the grass trimmer/edger to access the trimmer head.
3. Using a Phillips head screwdriver, remove the pre-installed screw (1) from the trimmer head.
4. Place the guard (2) on to the trimmer head and turn the guard 45° following the track on the
head.
5. Align the screw hole on the guard with the screw hole on the trimmer head.
6. Insert the screw into the trimmer head, fastening the guard in place.
Fig. 2
(1) DOWN
1
2
10
ASSEMBLY INSTRUCTION
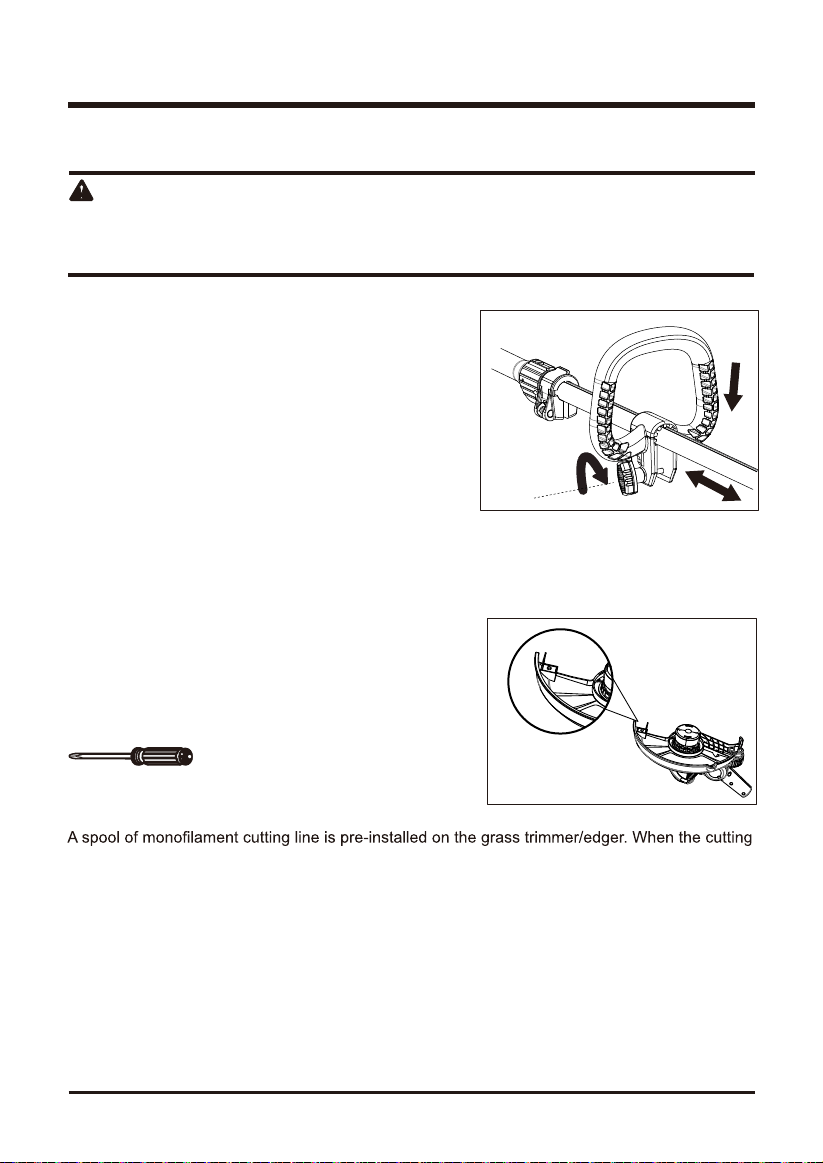
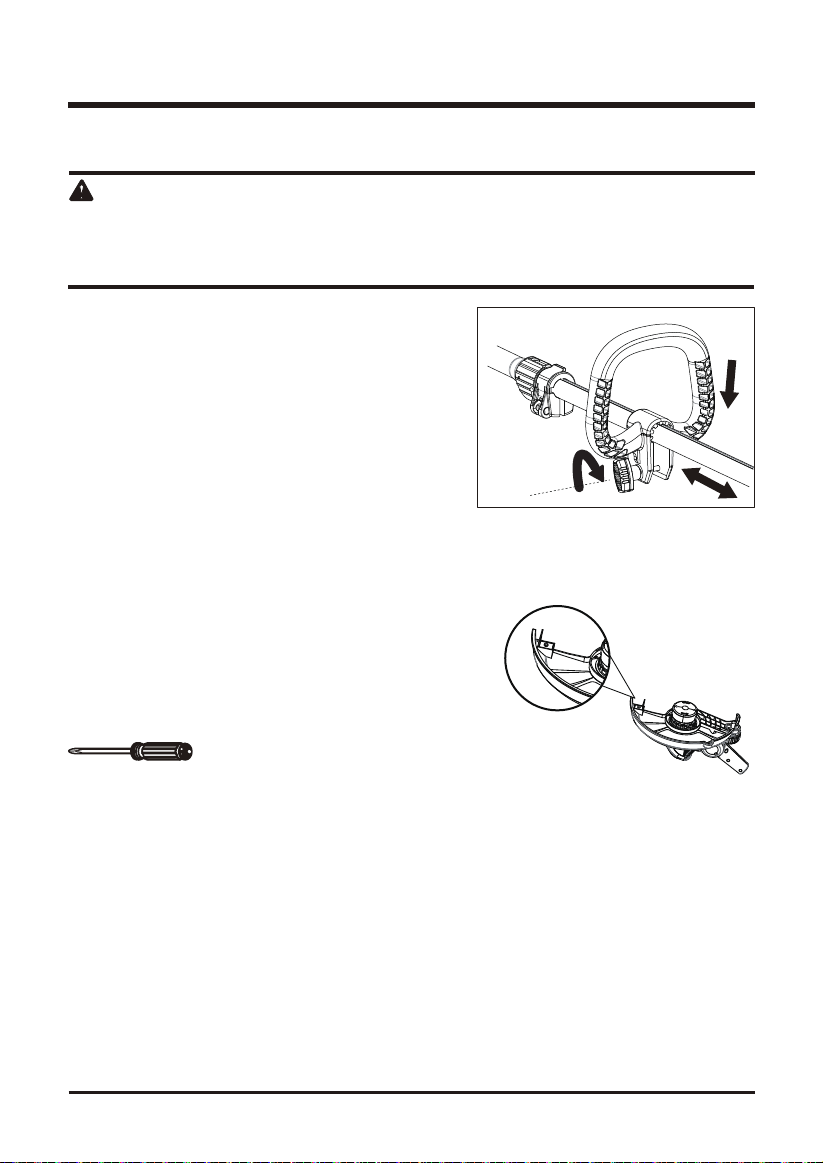
AUXILIARY HANDLE (
See Figure 3.)
W A R N I N G
To avoid injury, adjust the auxiliary handle for optimum control and balance. Do not overreach
when operating grass trimmer/edger. Keep proper balance atall times for better control of the tool
in unexpected situations.
CUTTIN
C
ADJUST THE CUTTING WIDTH
ONNECTING UPPER/LOWER TRIMMER SHAFTS
G LINE (
See Figure 4.)
line needs replacing, insert a new spool.
To avoid injury, always remove the battery pack before installing the guard, changing a cutting
line, or making any adjustments.
With lower shaft pointing downward insert lower shaft into upper shaft and turn shaft collar
The cutting blade can be rotated 180° for change the
cutting width from 10’’ to 12’’. see right picture.
Phillips screwdriver will be used. (not supplied)
clockwise to tighten.
1. Position auxiliary handle )onto the upper portion of
the trimmer shaft by sliding over shaft.
2. Once auxiliary handle is in the desired in use position
tighten the knob until locked into position.
3. Auxiliary handle can be adjusted to a suitable positon.
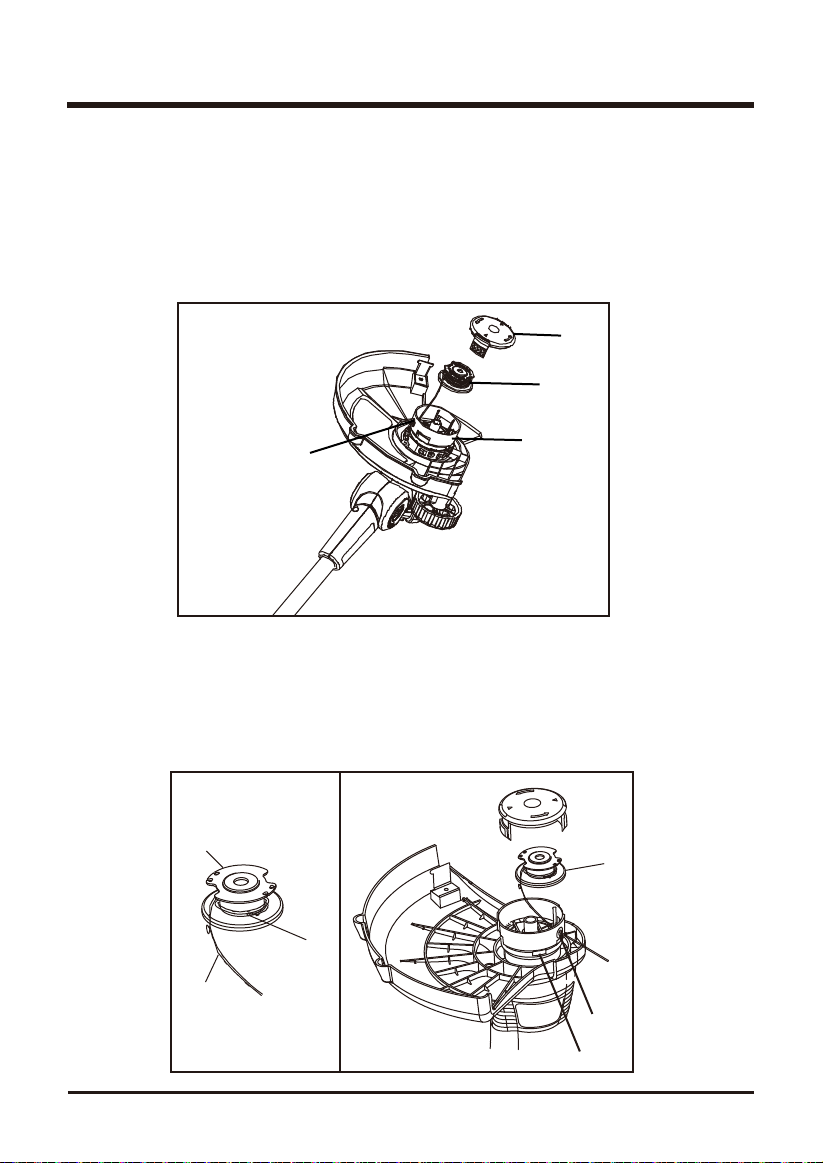
To remove the spool:
1. Disconnect trimmer from the power supply.
2. Turn grass trimmer/edger over to access the spool.
3. Remove spool cover by pressing on two tabs parallel to each other on the side of the cover (2).
4. Remove the spool (1) from the spool housing (3).
REPLACEMENT SPOOL MODEL#29632
10’’
12’’
NOTE:
1
2
3
Fig.3
ASSEMBLY INSTRUCTION
11
To replace the spool:
1. Replace the spool (1) with a new pre-wound spool.
2. Insert the end of line through the opening (4) in the spool housing (3).
3. Align the tabs on the spool cover with the slots in the spool housing on the trimmer head.
4. Push down on the spool cover locking it to the spool housing.
5. To advance the line when initially installed, you must pull the line while pressing the white line
release button on the side of the spool housing (3).
2
1
3
4
Fig. 4
To refill the spool:
1. Cut a length of 1/16" (1.65 mm) nylon monofilament line (1) approximately 18’ (5.5 m) long.
2. Insert end of line into the small hole (2) to anchor the line.
3. Wind the line evenly and tightly in a clockwise direction.
4. DO NOT wind the line beyond the edge (3) of the spool.
5. Insert the line through hole (4) in the spool housing.
6. Position line spool (5) in spool housing (6).
Fig. 5
4
6
5
2
3
1
ASSEMBLY INSTRUCTION
12
Fig. 6
W A R N I N G
• Replace the battery pack or the charger immediately if the battery case or charger cord is
damaged.
• Verify that the switch is in the OFF position before inserting or removing the battery pack.
• Verify that the battery pack is removed and the switch is in the OFF position before inspecting,
adjusting, or performing maintenance on any part of the blower.
• Read, understand, and follow the instructions contained in the section entitled Charging
Procedure.
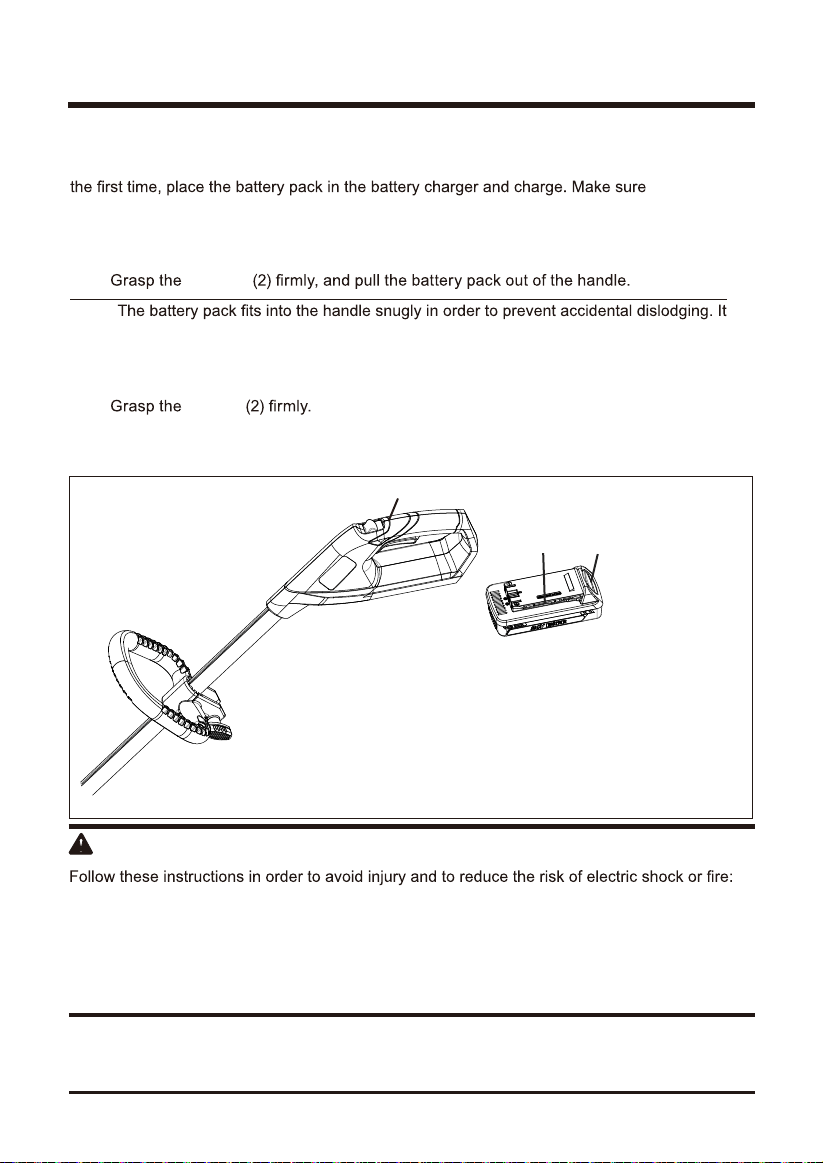
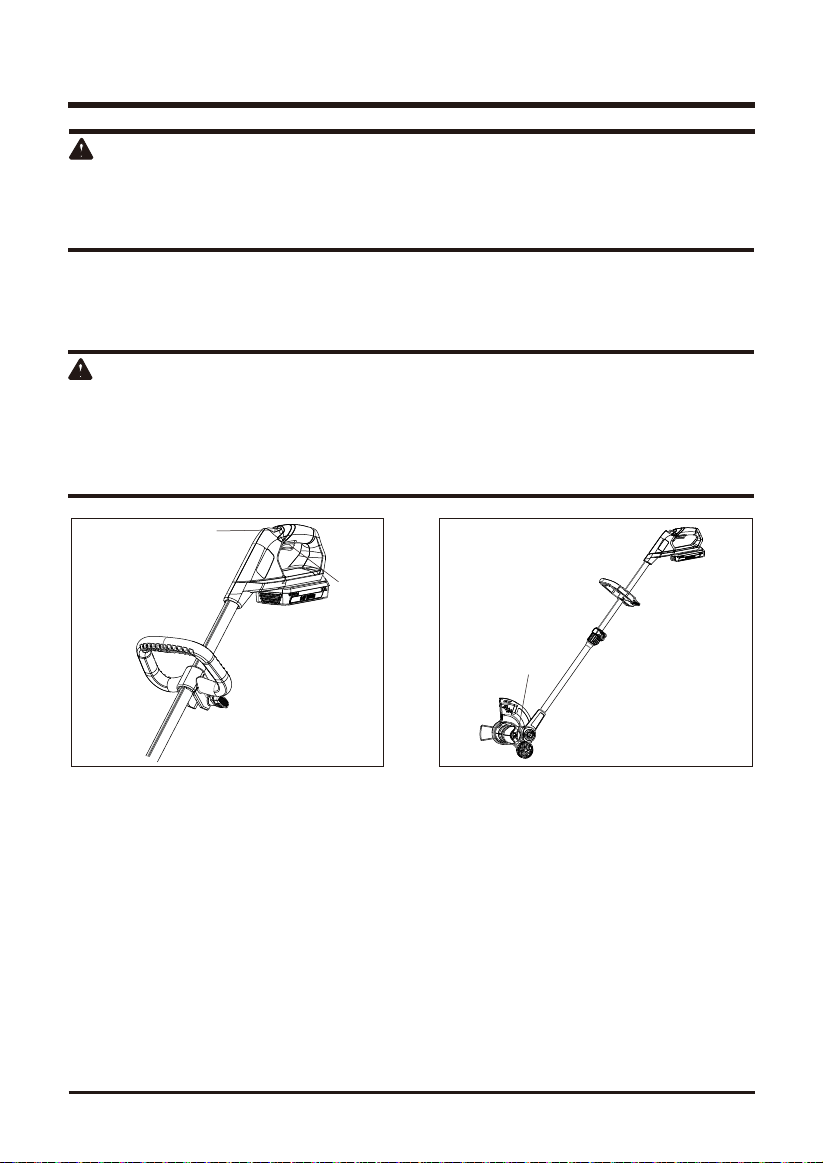
BATTERY
IMPORTANT! The battery pack is not charged when it is purchased. Before using the trimmer for
precautions, and follow the instructions in the Battery Charger section.
To remove (See Figure 6.)
1. Press the latch button (1) on the battery pack down and hold.
2.
NOTE:
may require a strong pull to remove it.
1. Align the tongue (3) of the battery pack with the cavity in the blower housing.
2.
3. Push the battery
trimmer
trimmer
pack into the handle until the latch locks into place.
4. Do not use force when inserting the battery pack. It should slide into position and “click”.
To install (See Figure 6.)
1
3
2
to read all safety

13
OPERATION
W A R N I N G
To avoid injury:
• Do not squeeze the trigger while the grass trimmer/edger is inverted.
Do not carry the grass trimmer/edger with your finger on the switch. Avoid unintentional starting.
To Turn On/Off: (
See Figure 7.)
1. Press the safety lock out button (2) and squeeze the trigger switch (1) to start.
2. Release the trigger switch (1) to stop.
3. By varying the pressure on the trigger, you can control the trimmer speed.
C A U T I O N
Always allow 5 seconds or more for the cutting linespool to stop rotating after releasing the
trigger switch.Do not invert the grass trimmer/edger , or place your hands under the protective
guard until the grass trimmer/edger spool has come to a complete stop.
Fig. 7
Edging Function (
See Figure 8.)
For use next to patios, driveways and walkways or any areas requiring a well groomed edge line.
1. Push on the edge button(1) and tilt the trimmer head 90 degrees until the head locks into position
and release button.
IMPORTANT:
The battery must be removed before making adjustments.
Lengthening the Line (
See Figure 9.)
While the grass trimmer/edger is operating, the cutting line gets worn down and becomes
shorter. This trimmer is equipped with Automatic Line Advancement which automatically feeds
additional line to the correct length as it wears down. If the line does not automatically advance,
the trimmer line may be tangled or empty. To advance the line, stop and restart the trimmer.
Upon starting, the line will automatically advance 1/4" (6.4 mm) .
Fig. 8
1
1
2

OPERATION
14
Trimmer Tips
Before each use
• Make sure the protective guard is tightly installed. Tighten the guard screw.
• Make sure the b attery is fully charged and that the charger is disconnected before using or
storing the trimmer.
• Do not store the grass trimmer/edger in sunlight, in an excessively warm place, or near a
furnace. The battery life will be shortened.
• If the battery must be stored in a warm place, charge it frequently.
• Before trimming, inspect the area for string, wire, branches or other material that may become
entangled in the cutting line and thrown.
During use
• Trim only when the grass and weeds are dry.
• Do not trim grass at night. Always make sure you have adequate lighting.
• Hold the grass trimmer/edger by both the switch handle and the auxiliary handle for best control
and balance.
• Stand with the cutting head tipped down at an angle in front, guiding the grass trimmer/edger in
a semicircular motion around you.
• If possible, guide the grass trimmer/edger to the left to cut.The line will cut as soon as it leaves
the guard, and the clippings are thrown away from
you.
• To produce a smoothly trimmed area, move the grass trimmer/edger in and out of the area
with consistent speed and height.
• Use only the tip of the cutting line to do the trimming, especially near walls and fences.
Trimming with the side of the cutting line may overload the motor, wear out the line faster, and
break the line more often.
• Do not rest the trimmer spool on the ground while trimming. This will cause spool wear and
battery drain.
• If the grass is higher than 6” (15 cm), trim in small stages.
• When the grass trimmer/edger is turned off and the spool stops rotating, the cutting line will
relax and may recede. Feed extra cutting line before storing the trimmer to prevent losing th
e line
completely into the spool.
• If the diameter of the cutting area gets smaller, the line is worn down and needs to be advanced
more often.
• If the grass trimmer/edger is not cutting correctly, the cutting line may not be feeding properly.
Remove and rewind the line spool.
Fig. 9
being cut

W A R N I N G
before adjusting, inspecting, or cleaning the blower.
Cleaning
Remove the battery pack.
1. Brush or blow dust and debris out of the air vents using compressed air or a vacuum. Keep
the air vents free of obstructions, sawdust, and wood chips. Do not spray, wash, or immerse the
air vents in water.
2. Wipe off the housing and the plastic components using a moist, soft cloth. Do not use strong
solvents or detergents on the plastic housing or plastic components. Certain household cleaners
may cause damage, and may cause a shock hazard.
Battery Pack
• Store the battery pack fully charged.
• Once the charging light turns green, remove the battery from the charger and disconnect the
charger from the outlet.
• Do not store the battery pack on the tool or in the charger.
• After charging, the battery pack may be stored in the charger, as long as the charger is not
plugged in.
Charger Maintenance
• Keep the charger clean and clear of debris. Do not allow foreign material to get into the
recessed cavity or onto the contacts. Wipe
the charger clean with a dry cloth. Do not use
solvents or water, and do not place the charger in wet conditions.
• Unplug the charger when there is no battery pack in it.
• Fully charge the batteries before placing them in storage. Do not recharge a fully charged
battery pack.
• Overcharging will shorten battery life.
• Recharge the battery pack whenever there is less power. Do not allow the batteries to become
completely discharged.
• Store the charger at normal room temperature. Do not store it in excessive heat. Do not use
the charger in direct sunlight. Recharge at room temperature between 45 and 104˚F (7 and
40˚C). If the battery pack is hot, allow it to cool down before recharging.
15
MAINTENANCE

16
ENVIRONMENTALLY SAFE BATTERY DISPOSAL
The following toxic and corrosive materials are in the batteries used in this grass
trimmer battery pack: Lithium, a toxic material.
W A R N I N G
W A R N I N G
environment. Before disposing of damaged or worn out nickelcadmium battery packs, contact
your local waste disposal agency, or the local Environmental Protection Agency for information
for cadmium disposal.
If the battery pack cracks or breaks, with or without leaks, do not recharge it and do not use.
Dispose of it and replace with a new battery pack. DO NOT ATTEMPT TO REPAIR IT!
To avoid injury and risk of fire, explosion, or electric shock, and to avoid damage to the
environment:
• Cover the battery's terminals with heavy-duty adhesive tape.
• DO NOT attempt to remove or destroy any of the battery pack components.
• DO NOT attempt to open the battery pack.
• If a leak develops, the released electrolytes are corrosive and toxic. DO NOT
get the
solution in the eyes or on skin, and do not swallow it.
• DO NOT place these batteries in you
r regular household trash.
• DO NOT incinerate.
•
waste stream.
•

17
PROBLEM POSSIBLE CAUSE SOLUTION
TROUBLESHOOTING
Motor fails to start
when switch trigger
is depressed.
Motor runs, but cutting
blades do not move.
Trimmer damaged.
Do not use string trimmer.
Call for technical service.
Trimmer smokes
during operation.
Cutting line does not
advance
Line may be tangled
on spool
Line has run out
Trimmer damaged.
Do not use string trimmer.
Call for technical service.
Remove battery. remove spool cover and
spool. unwind spool and rewind, ensuring
that line is not tangled.
Replace spool or spool line.
Battery is not secure.
Battery is not charged.
To secure the battery pack, make sure
the latches on the top of the battery pack
snap into place.
Charge the battery pack according to the
instructions included with your model.

18
GREENWORKS™ hereby warranties this product, to the original purchaser with proof of
purchase, for a period of four (4) years against defects in materials, parts or workmanship.
GREENWORKS™, at its own discretion will repair or replace any and all parts found to be
defective, through normal use, free of charge to the customer. This warranty is valid only for
units which have been used for personal use that have not been hired or rented for industrial/
commercial use, and that have been maintained in accordance with the instructions in the
owners’ manual supplied with the product from new.
ITEMS NOT COVERED BY WARRANTY:
1. Any part that has become inoperative due to misuse, commercial use, abuse, neglect,
accident, improper maintenance, or alteration; or
2. The unit, if it has not been operated and/or maintained in accordance with the owner's
manual; or
3. Normal wear, except as noted below;
4. Routine maintenance items such as spool-line, spool cover, blade sharpening;
5.
GREENWORKS HELPLINE (1 888 90WORKS):
Warranty service is available by calling our toll-free helpline, 9am to 5pm EST.
at
1-888-909-6757 (1-888-90WORKS).
TRANSPORTATION CHARGES:
Transportation charges for the movement of any power equipment unit or attachment are the
responsibility of the purchaser. It is the purchaser’s responsibility to pay transportation charges
for any part submitted for replacement under this warranty unless such return is requested in
writing by GREENWORKS.
LIMITED FOUR-YEAR WARRANTY
19
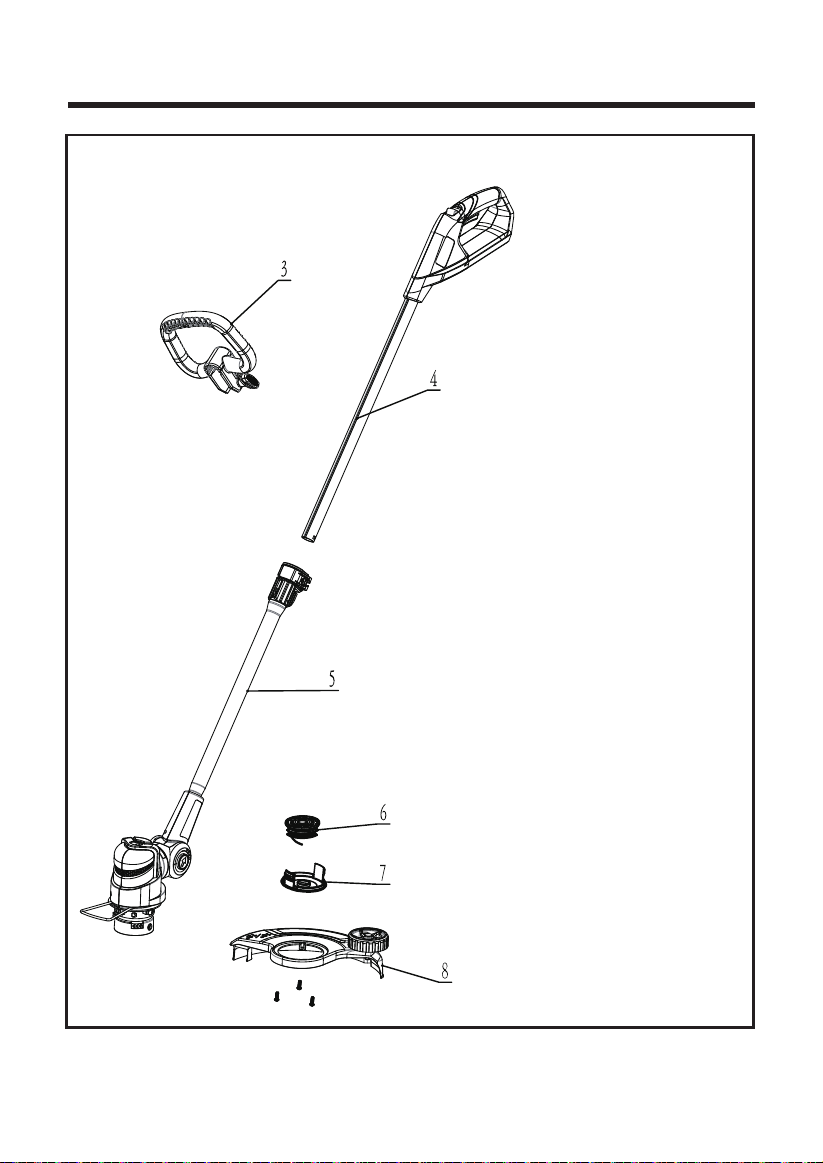
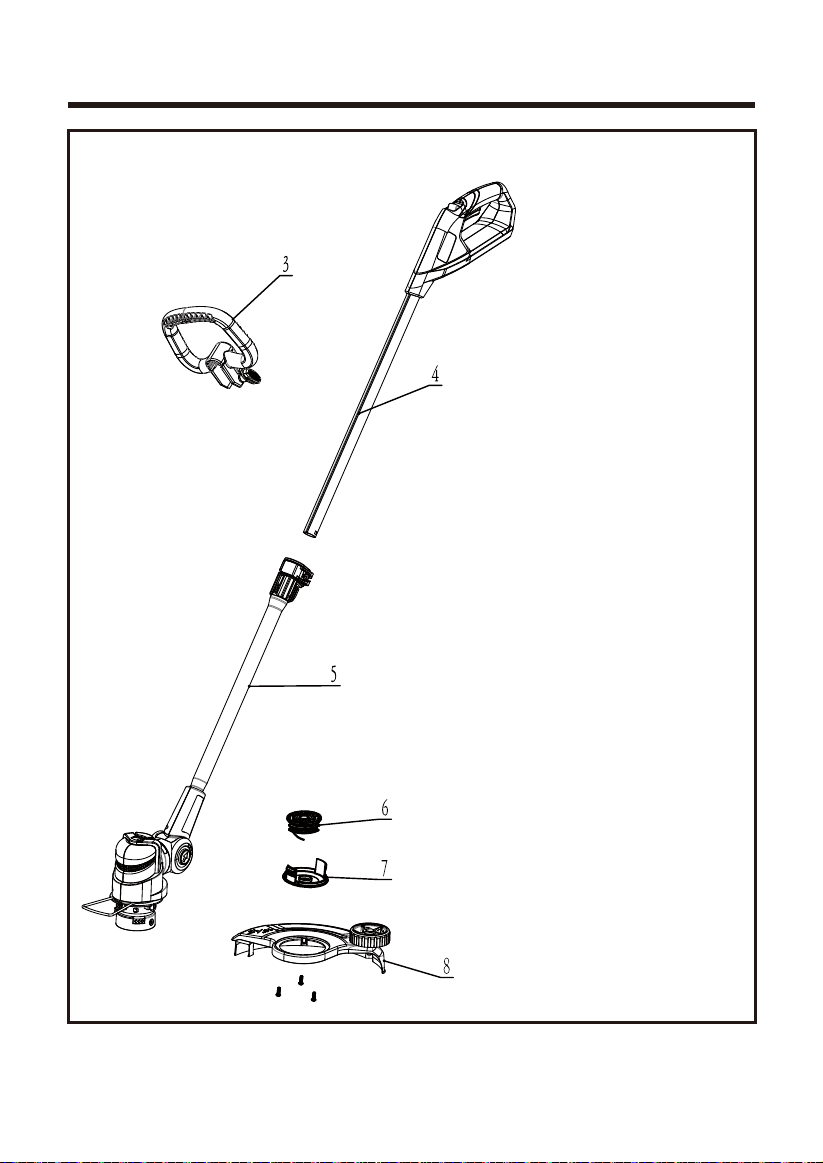
EXPLODED VIEW

20
PARTS LIST
Parts Num. Model Num. Description Q'ty
3 34107727
Upper shaft / handle assy.
1
4 33101727
Lower shaft / motor assy.
1
5 33102727
0.065’’ spool assy.
1
6 31105710
Single line spool cover
1
7 3411546A-6
24V guard assy.
1
8 34101719A 1
Auxiliary handle

TOLL-FREE HELPLINE: 1-888-90WORKS
(888.909.6757)
Rev: 01 (01-22-14) Printed in China on 100% Recycled Paper

2100302
4V
www.greenworkstools.com

2
ÍNDICE
2................................................................................................................................... ecidnÍ
............................................................................................... 2
.......................................................................................... 3-5
Símbolos ............................................................................................................................6-7
Familiarícese con su recortador de cuerda ............................................................................. 8
Ensamblaje 21-9.....................................................................................................................
Instrucciones de funcionamiento ......................................................................................13-14
Mantenimiento...........................................................................................................
.............. 15
Desecho de baterías compatible con el medio ambiente.............................................................16
Resolución de averías................................................................................................................. 17
Garantía 18.............................................................................................................................
Diagrama de componentes ..................................................................................................19
Lista de piezas .......................................................................................................................20
ESPECIFICACIONES DEL PRODUCTO
RECORTADOR DE HIERBA Y REBORDEADOR INALÁMBRICO A BATERÍAS DE
IÓN DE LITIO DE 24V
saíretab rop odarepo ,ocirbmálani................................................................................. opiT
Batería ..................................................................................................... 24 V de ión de litio
Velocidad....................................................................................8000 / 9000 RPM (sin carga)
Sendero de corte..............................................................................10’’ / 12’’ (254mm / 305mm)
Diámetro del alambre..................................................................................... 0.065" (1.65 mm)
Tiempo de funcionamiento.......................................................................... approx. 40 minutos
Reglas generales de seguridad
3
REGLAS GENERALES DE SEGURIDAD
A D V E R T E N C I A
Lea y comprenda todas las instrucciones antes de usar este producto. No obedecer
todas las instrucciones que se listan a continuación podría resultar en choques
eléctricos, incendios o lesiones personales graves.
• No opere herramientas eléctricas en entornos explosivos, por ejemplo ante la presencia de
podrían incendiar el aserrín o los vapores.
• No exponga las herramientas eléctricas a la lluvia ni a las condiciones húmedas. El agua
dentro de una herramienta eléctrica aumenta el riesgo de choques eléctricos.
• No toque el enchufe ni la herramienta con las manos mojadas.
• Nunca permita que los niños operen el equipo. Nunca permita que personas adultas hagan
funcionar el equipo sin la debida capacitación.
• Use siempre gafas de seguridad con protecciones laterales. Las gafas para uso diario tienen
lentes solamente resistentes a impactos. NO son gafas de seguridad. Observar esta regla
reduce el riesg
o de lesiones en los ojos. Utilice una careta si la operación produce polvo.
• Al operar este producto utilice protección para los ojos.
• Tenga cuidado extremo al limpiar gradas.
• No lo exponga a la lluvia, almacénelo bajo techo.
• Úselo solamente según se indica en este manual. Utilice solamente los accesorios
recomendados por el fabricante.
• Mantenga el cabello, la ropa suelta, los dedos y todas las demás partes de su cuerpo
alejados de los r
espiraderos y de las piezas móviles.
• Use pantalones gruesos y largos, botas y guantes. Evite usar ropa suelta y joyas que
pudieran enredarse en las piezas móviles de la máquina o el motor.
• No violente la herramienta. Use la herramienta correcta para su aplicación. Las herramientas
correctas hacen un mejor trabajo y con mayor seguridad a la velocidad para la que fueron
diseñadas.
• No haga funcionar el equipo estando descalzo ni al usar sandalias o calzado ligero similar.
• Asegure el cabello largo para mantenerlo arriba de sus hombros para evitar que se enrede en
las piezas móviles.
•
alcance natural. Hacerlo podría resultar en la pérdida del equilibrio.
• No permita que se le use como un juguete. Es necesario poner mucha atención al usarla y al
encontrarse cerca de niños.
• No use la herramienta si el interruptor no la enciende o apaga. Cualquier herramienta que no
puede ser controlada con su interruptor es peligrosa y se le debe reparar.
• Mantenga a los espectadores, niños y mascotas alejados por lo menos 15 metros (50 pies).
•
medicamentos.
• No la opere en lugares con poca iluminación.
0

4
REGLAS GENERALES DE SEGURIDAD
• Mantenga todas las partes de su cuerpo alejadas de todos los elementos móviles y
• No introduzca ningún objeto en los respiraderos. No la use si algún respiradero está
bloqueado; mantenga los respiraderos libres de polvo, pelusa, cabello y de cualquier cosa
• Revise el área de trabajo cada vez antes del uso. Quite todo objeto inadecuado tal como
rocas, fragmentos de vidrio, clavos, alambre o cuerdas que pudieran saltar o enrollarse en la
máquina.
• Utilice sólo repuestos y accesorios idénticos a los del fabricante. Usar cualquier otro repuesto
podría provocar peligros o crear daños al producto.
• Para uso en el hogar solamente.
• Las herramientas que funcionan a baterías no necesitan ser enchufadas en tomacorrientes;
por lo tanto, están siempre listas para operar. Tome conciencia de los posibles riesgos
existen
tes aun cuando no se está usando las herramientas de baterías y al cambiar
accesorios. Observar esta regla reduce el riesgo de choques eléctricos, incendios y lesiones
personales graves.
• No cargue las herramientas a baterías bajo la lluvia o condiciones húmedas o mojadas.
Observar esta regla reduce el riesgo de choques eléctricos.
• No use bajo la lluvia aparatos que funcionan a baterías.
• Antes de darle servicio a la herramienta y de limpiar o quitar materiales, quite o desconecte
la batería d
e la herramienta para el jardín.
• Utilice únicamente la batería Greenworks.
• Almacene los aparatos inactivos. Al no usar el recortador se le debe almacenar bajo techo en
un lugar seco, con llave, fuera del alcance de los niños.
•
códigos locales para averiguar si hay instrucciones especiales para su desecho.
• No abra las baterías ni las corte. El electrolito suelto es corrosivo y podría causar lesiones en
los ojos o la piel. Podría ser tóxico si se le ingiere.
• No coloque las herramientas a baterías o sus baterías cerca del fuego o el calor. Con ello se
reduce el riesgo de explosiones y posibles lesiones.
• Las baterías podrían explotar si existen fuentes de ignición, tales como luces piloto. Para
reducir el riesgo de lesiones personales graves, nunca use productos inalámbricos al existir
llamas. L
as baterías al explotar podrían impulsar escombros y productos químicos. En caso
de contacto, enjuague inmediatamente con agua las áreas expuestas.
• No aplaste, deje caer ni dañe el paquete de baterías. No use los paquetes de baterías
ni cargadores que se han caído o recibido golpes severos. Las baterías dañadas están
propensas a explotar. Deseche inmediata y apropiadamente las baterías que se han caído o
dañado.
• Tenga mucho cuidado al manejar baterías para no poner en corto la batería mediante
materia
les conductores tales como anillos, brazaletes y llaves. La batería o el material
conductor se podría sobrecalentar y provocar quemaduras.
• Para obtener los mejores resultados, se debe cargar la herramienta a baterías en un lugar
en que la temperatura sea entre 10°C y 38°C (entre 50°F y 100°F). Para reducir el riesgo de
lesiones personales graves, no la almacene en exteriores ni en vehículos.
• •

5
REGLAS GENERALES DE SEGURIDAD
• La batería podría desarrollar fugas si se le usa excesivamente o si hay temperaturas
extremas. Si el líquido entra en contacto con su piel, lávela inmediatamente con jabón y
agua, luego neutralícela con jugo de limón o con vinagre. Si el líquido entra en sus ojos,
enjuáguelos con agua limpia durante 10 minutos como mínimo, luego obtenga atención
médica inmediatamente. Observar esta regla reduce el riesgo de lesiones personales graves.
• Para evitar riesgos, si el cordón de alimentación se ha dañado, sólo el fabricante o un centro
de servicio aut
orizado pueden reemplazarlo.
• No apunte el recortador en la dirección de personas o mascotas.
• Nunca haga funcionar la unidad sin contar con los accesorios apropiados.
• Al no usar el recortador se le debe almacenar bajo techo en un lugar seco, con llave, fuera
del alcance de los niños.
• Proporcione mantenimiento cuidadoso a la herramienta. Mantenga limpia el área del
ventilador para que proporcione el mejor desemp
eño con la mayor seguridad. Siga las
instrucciones para dar mantenimiento apropiado. No trate de liberar obstrucciones de la
herramienta sin desactivarla primero.
•
húmedas. Almacénela en interiores.
• Guarde estas instrucciones. Léalas frecuentemente y utilícelas para instruir a otros que
pudieran hacer uso de esta herramienta. Si presta esta herramienta eléctrica, entregue estas
instrucciones también.
A D V E R T E N C I A ( P R O P O S I C I Ó N 6 5 ) El polvo creado por la
arena a chorro, el aserrado, esmerilado, taladrado y otras actividades de la construcción podría
contener productos químicos que se sabe provocan cáncer, defectos de nacimiento y otras
lesiones reproductivas. Algunos ejemplos de estos productos químicos son:
SEGURIDAD DE NIÑOS
Si el operador no se percata de la presencia de niños, se pueden generar accidentes trágicos.
• Mantenga a los niños alejados del área de trabajo y bajo el cuidado atento de un adulto
responsable.
• No deje que niños menores de 14 años operen este recortador. Los niños de 14 años
o más deben leer y comprender las instrucciones de funcionamiento y las reglas de
seguridad de este manual y uno de sus padres les debe capacitar y supervisar.
• Manténgase alerta, y apague el recortador si un niño o cualquier otra persona ingresa al
área de trabajo.
• Antes y al soplar hacia atrás, mire hacia atrás y hacia abajo para asegurarse de que no
hay niños pequeños.
Tenga extremo cuidado al acercarse a esquinas ciegas, entradas, arbustos, árboles u otros
objetos que le pudieran obstruir la visión de niños, los cuales pudieran correr hacia el área
de trabajo del recortador.
• Plomo en pintura a base de plomo
• Sílice cristalino en ladrillos, cemento y otros productos de mampostería, y
• Arsénico y cromo de madera con tratamiento químico.
Su riesgo de exposición
a estos productos químicos depende de la frecuencia en que efectúe
este tipo de trabajo. Para reducir su exposición a estos productos químicos, trabaje en áreas
bien ventiladas y use equipo de seguridad aprobado, tal como máscaras contra el polvo
0

6
S ÍMBOLO NOMBRE DESIGNACIÓN/EXPLICACIÓN
V Voltios
Voltaje
Corriente
Frecuencia (ciclos por segundo)
Potencia eléctrica
Tiempo
Tipo de corriente
Tipo o característica de la corriente
Fabricación con aislamiento doble
Velocidad racional sin carga
Revoluciones, carreras, velocidad superficial,
órbitas, etc. por minuto
No la exponga a la lluvia ni la use en lugares
húmedos o mojados
Para reducir el riesgo de lesiones el usuario
debe leer y comprender el manual del operador
antes de usar el producto
Al operar este equipo utilice protección para
los ojos.
Precauciones que involucran su seguridad.
Si no se mantiene alejado el cabello largo de la
entrada de aire se podrían provocar lesiones
personales.
Si no se evita que la ropa suelta sea succionada
hacia la entrada de aire se podrían provocar
lesiones personales.
A mperios
Hz Hertz
W Vatios
in M inutos
Corriente alterna
Corriente directa
Fabricación Clase II
Velocidad sin carga
/min Por minuto
Alerta de condiciones
húmedas
Lea el manual del operador
Protección para los ojos
Alerta de seguridad
C
Abello largo
Ropa suelta
Mantenga alejados a
los espectadores
Mantenga a todos los espectadores a 15 m.
(50 pies) de distancia por lo menos.
Este producto podría contener algunos de los siguientes símbolos. Sírvase estudiarlos y aprender su
una forma más segura.
SÍMBOLOS
0
7
este producto.
SERVICIO
Para dar servicio es necesario tener extremo cuidado y conocimiento, el servicio debe ser
al producto lo regrese a su CENTRO DE SERVICIO AUTORIZADO más cercano para que los
reparen. Al dar servicio, use solamente repuestos idénticos.
A D V E R T E N C I A
Para evitar lesiones personales graves, no trate de usar este producto antes de haber leído
completamente el presente Manual del Propietario y haberlo comprendido en su totalidad.
Si no comprende las advertencias y las instrucciones que aparecen en el presente Manual
del Propietario, no use el producto. Llame gratis al 1-888-909- 6757 para recibir ayuda. Toda
herramienta eléctrica al funcionar puede lanzar objetos extraños hacia sus ojos, lo que podría
provocarles lesiones graves. A
ntes de operar una herramienta eléctrica, use siempre gafas de
seguridad, gafas de seguridad con protecciones laterales o una careta completa si es necesario.
Recomendamos usar una careta de seguridad con rango visual ancho encima de gafas de
seguridad estándar, o usar gafas de seguridad estándar con protecciones laterales. Use siempre
protección para los ojos con viñetas que indiquen que cumplen ANSI Z87.1.
W A R N I N G
Toda herramienta eléctrica al funcionar puede lanzar objetos extraños hacia sus ojos, lo que podría provocarles
lesiones graves. Antes de comenzar el funcionamiento de una herramienta eléctrica, use siempre gafas de seguridad
o gafas de seguridad con protecciones laterales y, si es necesario, una careta completa. Recomendamos usar caretas
de seguridad con rango visual ancho encima de gafas de seguridad estándar, o usar gafas de seguridad estándar
con protecciones laterales. Use siempre protección para los ojos con viñetas que indiquen que cumplen ANSI
Z87.1.which
can result in severe eye damage. Before beginning power tool operation, always wear safety goggles or
safety glasses with side shields and, when needed, a full face shield. We recommend Wide Vision Safety Mask for use
over eyeglasses or standard safety glasses with side shields. Always use eye protection which is marked to comply
with ANSI Z87.1.
SÍMBOLOS
GUARDE ESTAS INSTRUCCIONES
SÍMBOLO AVISO SIGNIFICADO
PELIGRO Indica situaciones inminentemente peligrosas que, si no se
evitan, resultan en la muerte o en lesiones serias.
ADVERTENCIA Indica situaciones potencialmente peligrosas que, si no se evitan,
podrían resultar en la muerte o en lesiones serias
PRECAUCIÓN Indica situaciones potencialmente peligrosas que, si no se evitan,
podrían resultar en lesiones entre mínimas y moderadas.
PRECAUCIÓN (Sin el símbolo de alerta por seguridad) indica una situación que
podría resultar en daños a la propiedad.
0
8
FAMILIARÍCESE CON SU RECORT ADOR DE CUERDA
FAMILIARÍCESE CON SU RECORT ADOR DE CUERDA
(vea la figura 1.)
Para usar con seguridad este producto es necesario comprender la información que se presenta
en el producto y en el presente manual del operador, así como tener conocimiento del proyecto
que se intenta efectuar. Antes de usar este producto, familiarícese con todas las características
de funcionamiento y las reglas de seguridad.
Paquete de baterías
Interruptor de gatillo
Lugar de almacenamiento de la
bobina extra del alambre
Rueda para guía de rebordeo
Cubierta protectora
Bobina para corte de alambre único
Guía
Manija secundaria
Botón con interruptor para bloqueo
Fig. 1
Botón de ajuste de Edger
El giro de botón de ajuste principal
9
ENSAMBLAJE
A D V E R T E N C I A
Cubierta protectora
(Vea la figura 2)
Para evitar lesiones, quite siempre el paquete de baterías antes de colocar la cubierta protectora,
cambiar el alambre de corte o hacer cualquier ajuste. Si la cubierta protectora se ha dañado, no
use el recortador de hierba y rebordeador hasta que se le reemplace.
1. Reemplace el paquete de baterías.
2. Invierta el recortador de hierba y rebordeador para obtener acceso al cabezal de recorte.
3. Con un desatornillador en cruz, quite el tornillo (1) preinstalado del cabezal de recorte.
4. Coloque la cubierta protectora (2) en el cabezal de recorte y gire la cubierta 45° siguiendo el
carril en el cabezal.
5. Alinee el agujero para tornillos que está en la cubierta protectora con el agujero para tornillos
que está en el cabezal de recorte.
6. Coloque el tornillo en el cabezal de recorte para asegurar la cubierta protectora en su lugar.
NOTA: Antes de operar el recortador de hierba y rebordeador coloque la cubierta protectora.
No se le puede quitar ni desarmar.
(1) HACIA ABAJO
Fig. 2
Para evitar lesiones y reducir el riesgo de choques eléctricos o incendio:
• Reemplace el paquete de baterías o el cargador inmediatamente si la caja de la batería o el
cable del cargador se han dañado.
• Antes de insertar o sacar el paquete de baterías, asegúrese siempre que el interruptor del
recortador se encuentra en la posición de apagado.
• Antes de inspeccionar, ajustar o dar mantenimiento a cualquier pieza del recortador, asegúrese
siempre de que se ha quitado el paquete de baterías y de que se ha llevado el interruptor a la
posición de apagado.
• Lea, comprenda y siga las instrucciones para el cargador de baterías.
1
2
ENSAMBLAJE
10
MANIJA AUXILIAR (
Vea la figura 3.)
A D V E R T E N C I A
Para evitar lesiones, ajuste la manija auxiliar para obtener un control y equilibrio óptimos. No
extienda su cuerpo más allá de su alcance natural al operar el recortador de hierba y rebordeador.
Mantenga el equilibrio apropiadamente todo el tiempo para controlar mejor la herramienta en
situaciones inesperadas.
ALAMBRE DE CORTE
(
Vea la figura 4.)
El recortador de hierba y rebordeador tiene preinstalada una bobina con alambre de corte de
monofilamento. Cuando sea necesario reemplazar el alambre de corte, coloque una bobina
atreibuc al racoloc ed setna saíretab ed eteuqap le erpmeis etiuq ,senoisel rative araP .aveun
protectora, cambiar el alambre de corte o hacer cualquier ajuste.
CÓMO QUITAR LA BOBINA:
1. Desconecte el recortador de la fuente de alimentación.
2. Dé vuelta al recortador de hierba y rebordeador para obtener acceso al alambre de corte.
3. Quite la cubierta de la bobina presionando las dos lengüetas paralelas entre sí que están
a
4. Saque la bobina (1) de su carcaza (3).
El MODELO DE RECAMBIO del CARRETE# 29632
los lados de la cubierta (2).
CONECTAR LOS EJES SUPERIOR E INFERIOR DEL RECORTADOR
Con el eje inferior apuntando hacia abajo, introduzca el eje inferior en el eje superior y gire el
collarín del eje en sentido de las agujas del reloj para apretar.
AJUSTE LA ANCHURA CORTANTE
La lámina cortante puede ser hecha girar 180 ° para el
cambio la anchura cortante de 10" a 12". ver el cuadro derecho.
El destornillador Phillips será usado. (no suministrado)
10’’
12’’
NOTA:
1. Posición mango auxiliar) en la porción superior de
el eje de contemporizador deslizándose sobre eje.
2. Una vez que el mango auxiliar está en el deseado en
la posición de uso apriete la perilla hasta no cerrado con
llave en la posición.
3. El mango auxiliar puede ser ajustado a positon
conveniente.
1
2
3
Fig.3
ENSAMBLAJE
11
1. Reemplace la bobina (1) con una bobina nueva pre-bobinada.
2. Meta el extremo del alambre en la apertura (4) de la carcaza de la bobina (3).
3. Alinee las lengüetas que se encuentran en la cubierta de la bobina con las ranuras en la carcaza
de la bobina del cabezal del recortador.
4. Presione la cubierta de la bobina para trabarla en la carcaza de la bobina.
5. Para extender el alambre justo después de instalarlo se debe tirar del alambre mientras se
presiona el botón negro para liberación del alambre que está al lado de la carcaza de la bobina (3).
Cómo reemplazar la bobina:
Fig. 4
Rellenar la bobina:
1. Corte un trozo de hilo monofilamento de nylon (1) de 1,65 mm (1/16") de aproximadamente
5,5 m (18’) de longitud.
2. Introduzca el extremo del hilo en el pequeño orificio (2) para sujetarlo.
3. Enrolle el hilo de forma uniforme y firme en sentido de las agujas del reloj.
4. NO enrolle el hilo por fuera del borde (3) de la bobina.
5. Introduzca el hilo a través del orificio (4) en la carcasa de la bobina.
6. Coloque la bobina de hilo (5) en la carcasa de la bobina (6).
Fig. 5
2
3
1
2
1
4
4
6
5

ENSAMBLAJE
12
A D V E R T E N C I A
Siga estas instrucciones para evitar herida y al riesgo del reducethe de descarga eléctrica o fuego:
• Reemplaza el paquete de batería o el corcel inmediatamente si el caso de batería o cuerda de
corcel son dañados.
• Verifica que el interruptor está en el DE posición antes de insertar o quitar el paquete de batería.
• Verifica que el paquete de batería es quitado y el interruptor está en el DE posición antes de
inspeccionar, antes del ajuste, o antes de realizar mantenimiento en cualquier parte del fuelle.
• Leyó, comprende, y sigue las instrucciones contenidas en la sección permitieron Cargando
Procedimiento.
PAQUETE DE BATERÍAS
¡IMPORTANTE! El paquete de baterías no está cargado al momento de la compra. Antes de
usar el soplador por primera vez, coloque el paquete de baterías en el cargador de baterías y
cárguelo completamente. Asegúrese de leer todas las precauciones de seguridad y de seguir las
instrucciones en la sección titulada Procedimiento para cargar.
Para sacarlo
1. Lleve hacia abajo el botón de sujeción (1) del paquete de baterías y manténgalo así.
2.
1. Alinee la lengüeta (3) del paquete de baterías con el hueco en la carcaza del soplador.
2.
3. Empuje el paquete de baterías hacia la manija hasta que el pestillo llegue a su lugar.
4. No use fuerza al colocar el paquete de baterías. Deberá llegar a su posición y chasquear.
Para insertarlo
NOTA:
El paquete de baterías encaja cómodamente en la manija para evitar que se salga
accidentalmente. Podría ser necesario tirar fuertemente de él para sacarlo.
(
Vea la figura 6.)
(
Vea la figura 6.)
Fig. 6
1
3
2
13
INSTRUCCIONES DE FUNCIONAMIENTO
A D V E R T E N C I A
Para evitar lesiones:
• No apriete el gatillo mientras el recortador de hierba y rebordeador se encuentre invertido.
• No transporte el recortador de hierba y rebordeador con sus dedos en el interruptor. Evite los
arranques no intencionales.
Para arrancar o apagar
1. Para arrancar, presione el botón para bloqueo (2) y apriete el interruptor de gatillo (1).
2. Para parar, suelte el interruptor de gatillo (1).
3. Variando la presión en el disparador, puede controlar la velocidad de trimmer.
! P R E C A U C I Ó N !
Deje siempre transcurrir 5 segundos o más para que la bobina del alambre de corte deje de
girar después de que se suelta el interruptor de gatillo.
No invierta el recortador de hierba y rebordeador ni coloque sus manos debajo de la cubierta
protectora, antes de que la bobina del recortador de hierba y rebordeador se detenga por
completo.
Función de rebordeo
Para usarse en patios, entradas, aceras y cualquier área que requiera de bordes bien conformados.
1. Presione el botón de rebordeo y ladee el cabezal del recortador 90 grados hasta que se trabe
en su lugar, luego suelte el botón.
IMPORTANTE:
Se debe sacar la batería antes de efectuar ajustes.
Cómo extender el alambre
El alambre de corte se desgasta y se acorta al funcionar el recortador de hierba y rebordeador.
El recortador está equipado con un sistema automático para avance del alambre que
automáticamente proporciona más alambre a la correcta medida cuando éste se va desgastando.
Si el alambre no avanza automáticamente, podría ser que el alambre del recortador se haya
enredado, o que la bobina esté vacía.
Para extender el alambre, pare el recortador y vuelva a encenderlo. Al encender, el alambre se
extiende automáticamente 6,4 mm (1/4 pulgadas)
(
Vea la figura 7.)
(
Vea la figura 8.)
(
Vea la figura 9.)
Fig. 7
Fig. 8
1
1
2

INSTRUCCIONES DE FUNCIONAMIENTO
14
Consejos para el recortador
Antes de cada uso
• Asegúrese de que la cubierta protectora esté firmemente instalada. Apriete el tornillo de la
cubierta protectora.
• Antes de usar o almacenar el recortador, asegúrese de que la batería esté completamente
cargada y que el cargador esté desconectado.
• No almacene el recortador de hierba y rebordeador bajo la luz solar directa, en lugares
excesivamente calientes ni cerca de calentadores. La vida útil de la batería se acorta.
• Si es necesario almacenar la batería en un lugar caliente, cárguela frecuentemente.
• Antes de recortar, asegúrese de que en el lugar no hay cables, alambres, ramas ni otro material
que pudiera enredarse con el alambre de corte y ser lanzado.
.
Durante el uso
• Recorte solamente el pasto y la hierba que no estén húmedos.
• No recorte la hierba durante la noche. Asegúrese siempre de que hay una iluminación adecuada.
• Para obtener un mejor control y balance, sujete el recortador de hierba y rebordeador por la
manija con interruptor y por la manija auxiliar.
• Sostenga el cabezal de corte ladeando hacia abajo la parte de enfrente, guiando el recortador
de hierba y rebordeador en un movimiento semicircular alrededor de usted.
• De ser posible, mueva el recortador de hierba y rebordeador hacia la izquierda al cortar. El
alambre corta al dejar la cubierta protectora y los recortes son lanzados lejos del operador.
• Para producir un área llanamente recortada, mueva el recortador de hierba y rebordeador por
el área que está cortando a una velocidad y altura constantes.
• Use solamente la punta del alambre de corte para hacer el recorte, especialmente cerca de
paredes y cercas.. Cortar con la parte lateral del alambre de corte podría sobrecargar el motor,
desgastar el alambre más rápido y romper el alambre más a menudo.
• Mientras recorta, no apoye en el suelo la bobina del recortador. Esto hace que la bobina se
desgaste y la batería se drene.
• Si la hierba es más alta que 15 cm (6 pulgadas), recórtela en etapas pequeñas.
• Cuando se apaga el recortador de hierba y rebordeador y se detiene la bobina, el alambre de
corte se relaja y podría retroceder. Para evitar que el alambre retroceda completamente en la
bobina y se pierda, saque una longitud extra de alambre antes de almacenar el recortador.
• Si el diámetro del círculo de corte se reduce, significa que el alambre se ha desgastado y es
necesario avanzarlo más a menudo.
• Si el recortador de hierba y rebordeador no corta adecuadamente, podría ser que el alambre
de corte no está siendo extendido apropiadamente. Saque la bobina y vuelva a enrollar el alambre.
Fig. 9

Limpieza
Quite el paquete de batería.
1. Limpie la parte externa del recortador de setos con un paño suave y seco. No la lave con la
manguera o con agua.
2. Raspe la cubierta protectora para eliminar los recortes y el fango secos.
PAQUETE DE BATERÍAS
• Almacene el paquete de baterías completamente cargado.
•
• Una vez que la luz que carga gira verde, quita la batería del corcel y desconecta el corcel de la
salida.
No almacene el paquete de batería en el instrumento ni en el corcel.
• Después de cargarlo, se puede almacenar el paquete de baterías en el cargador siempre y
cuando el cargador no esté enchufado.
CÓMO DAR MANTENIMIENTO AL CARGADOR
• Mantenga el cargador limpio y libre de desechos. No deje que materiales extraños entren en el
hueco o en los contactos. Límpielos con un paño seco. No use solventes, agua ni lo coloque en
lugares mojados.
• Desenchufe siempre el cargador cuando no tenga el paquete de baterías dentro.
•
Cargue completamente las baterías antes de colocarlos en almacenamiento. No recargue un
paquete completamente cargado de batería.
• Cobrar demasiado acortará la vida de batería.
• Vuelva a cargar
el paquete de baterías cada vez que note que tiene menos potencia. Nunca
deje que las baterías se descarguen completamente.
• Mantenga almacenado el cargador a una temperatura ambiental normal. No lo almacene bajo
calor excesivo. No lo use bajo la luz solar directa. Recárguelo siempre a una temperatura ambi-
ental entre 7°C y 40°C (entre 45°F y 104°F). Si el paquete de baterías está caliente, deje que
se enfríe antes de volver a cargarlo.
15
MANTENIMIENTO
A D VER TEN C I A
• Para evitar el riesgo de incendio, choques eléctricos o muerte por electrocución:
• No use paños húmedos ni detergente sobre la batería o el cargador.
• Quite siempre el paquete de baterías antes de limpiar, inspeccionar o efectuar cualquier
mantenimiento en el recortador.

16
DESECHO DE BATERÍAS COMPATIBLE CON EL MEDIO AMBIENTE
Los siguientes materiales tóxicos y corrosivos se encuentran en las baterías que se
utilizan en el paquete de baterías del recortador. Lithium, un material tóxico.
ADVER TENCI A
ADVER TENCI A
Se debe desechar todo material tóxico de la forma especificada para evitar contaminar el
medio ambiente. Antes de desechar los paquetes de baterías de níquel y cadmio dañados o
desgastados, póngase en contacto con su agencia local para eliminación de desechos, o con
la Agencia local para Protección del Medio Ambiente para obtener información e instrucciones
específicas. Lleve las baterías a un centro local para reciclaje o eliminación, certificado para
eliminación de cadmio.
• Cubra los terminales de la batería con cinta adhesiva para trabajo pesado.
• NO trate de remover ni de destruir cualquiera de los componentes del paquete de
baterías.
• NO trate de abrir el paquete de baterías.
• Si se crea una fuga, los electrolitos liberados son corrosivos y tóxicos. NO deje que la
solución entre en contacto con los ojos o la piel, y no la ingiera.
• NO ponga estas baterías en la basura regular de su hogar.
• NO las incinere.
• NO
las ponga en alguna situación que haga que terminen siendo parte de un relleno de
terrenos con desperdicios o la cadena de desperdicios sólidos municipales.
Si el paquete de baterías se raja o se quiebra, habiendo fugas o no, no lo vuelva a cargar y no lo
use.
Deséchelo y reemplácelo con un paquete de baterías nuevo. ¡NO INTENTE REPARARLO!
Para evitar lesiones y riesgos de incendio, explosión o choques eléctricos y para evitar daños al
medio ambiente:

17
RESOLUCIÓN DE AVERÍAS
SENOICULOS ESUAC ELBISSOP AMELBORP
El motor no arranca
cuando se presiona el
interruptor de gatillo
La unidad no arranca.
Cortar la línea
no avanza
La línea puede ser
enredada en el carrete
La línea tiene se acaba
La batería no está bien
colocada
La batería no tiene carga.
Para fijar el paquete de baterías, asegúrese
de que los pestillos en la parte superior del
paquete de baterías se traben en su lugar.
Cargue el paquete de baterías de acuerdo
a las instrucciones que se incluyen con su
modelo.
El interruptor de energía
está defectuoso.
Regrese la unidad al lugar en que la compró
Quite batería. quita carrete cobertura y
carrete. desenrosca carrete y rebobina,
asegurando que esa línea no es enredada.
Reemplace la línea de carrete o carrete.
o llévela a un centro de reparaciones.

18
GARANTÍA LIMITADA DE CUATRO AÑOS
LÍNEA TELEFÓNICA PARA AYUDA DE GREENWORKS (1 888 90WORKS) :
Por este medio y por un período de cuatro años GREENWORKS™ garantiza este producto contra
defectos en materiales, piezas o mano de obra al comprador original que cuente con una prueba
de compra. GREENWORKS™, a su sola discreción reparará o reemplazará, sin costo algun o
para el cliente, cualquier pieza defectuosa, siempre y cuando se haya hecho uso normal de ella.
Esta garantía es válida solamente para unidades utilizadas de manera personal y que no hayan
sido utilizadas o alquiladas para uso industrial o comercial, y que hayan recibido mantenimiento
de acuerdo a las instrucciones que aparecen en el manual del propietario que se suministró con
el producto nuevo.
ARTÍCULOS QUE NO CUBRE LA GARANTÍA:
1. Cualqui er pieza que se haya vuelto inoperante debido a mal uso, uso comercial, abuso,
descuido, accidente, mantenimiento inapropiado o alteración; o
2. La unidad, si no ha sido operada o si no se le ha dado mantenimiento de acuerdo al
manual del propietario; o
3. Desgaste normal, excepto según se indica a continuación;
4. Artículos de mantenimiento rutinario tales como lubricantes, afilado de cuchillas ;
5. Deterioro normal del acabado exterior debido al uso y la exposición al entorno.
CARGOS DE TRANSPORTE:
Los cargos de transporte por el traslado de cualquier unidad de equipo o accesorio eléctrico son
responsabilidad del comprador. El comprador es responsable de pagar los cargos de transporte
de cualquier pieza presentada para reemplazo de acuerdo a esta garantía a menos que
GREENWORKS solicite por escrito tal retorno.
Se puede obtener servicio relacionado con la garantía llamando de lunes a viernes entre las
9 a.m. y las 5 p.m. hora estándar del este (EST) el 1-888-909-6757 (1-888-90WORKS).
19
DIAGRAMA DE CO MPONENTES

22
LISTA DE PIEZAS
N.º Pieza N.º Modelo Descripción Cant.
Eje superior / MANUBRIO.
Eje inferior / motor assy.
Conjunto de la bobina de 1,65 mm.
Conjunto de asa auxiliar para recortador de 24 V
3 34107727 1
4 33101727 1
5 33102727 1
6 31105710
Tapa de carrete de línea sola
1
7 3411546A-6 1
8 34101719A 1
Mango auxiliar

LÍNEA TELEFÓNICA GRATIS PARA AYUDA: 1-888-90WORKS
(888.909.6757)
Rev: 01 (01-22-14).
Impreso en China en papel reciclado