Line diameter................................................................................................. 0.065" (1.65 mm)
Run Time.................................................................................................... approx. 70 minutes
Weight .............................................................................................12.2 lbs (5.5 kg) with battery EDGER
OPERATIOn
W A R N I N G
To avoid injury:
•Do not squeeze the trigger while the grass trimmer/edger is inverted.
Do not carry the grass trimmer/edger with your finger on the switch. Avoid unintentional starting.
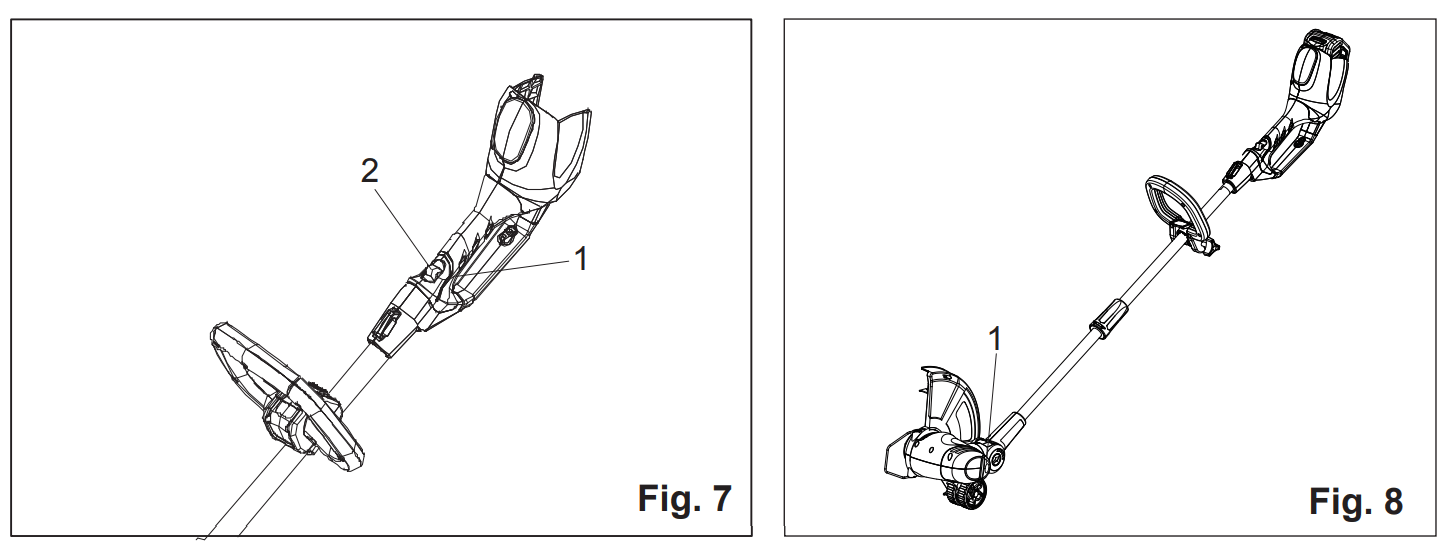
To Turn On/Off: (See Figure 7.)
Press the safety lock out button (2) and squeeze the trigger switch (1) to start.
Release the trigger switch (1) to stop.
C A U T I O N
Always allow 5 seconds or more for the cutting line spool to stop rotating after releasing the trigger switch.Do not invert the grass trimmer/edger, or place your hands under the protective guard until the grass trimmer/edger spool has come to a complete stop.
Edging Function (See Figure 8.) For use next to patios, driveways and walkways or any areas requiring a well groomed edge line. 1. Push on the edge button(1) and tilt the trimmer head 90 degrees until the head locks into position and release button.
IMPORTANT: The battery must be removed before making adjustments.
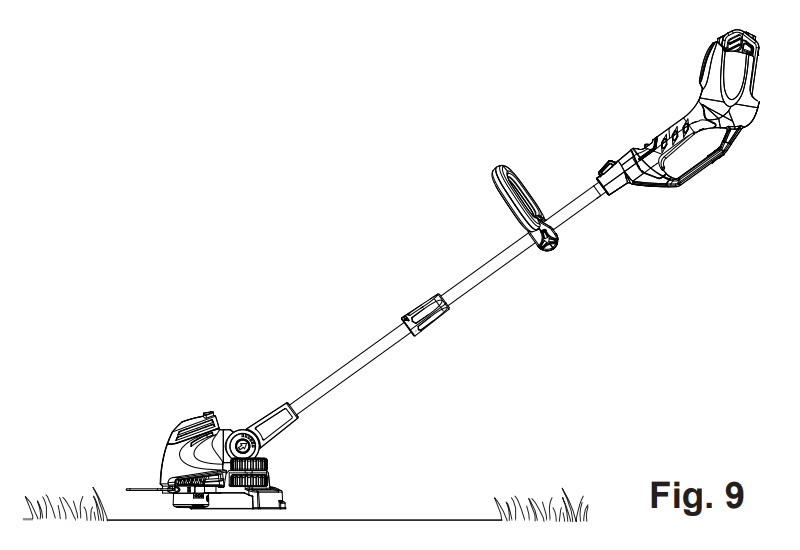
Lengthening the Line (See Figure 9.) While the grass trimmer/edger is operating, the cutting line gets worn down and becomes shorter. This trimmer is equipped with Automatic Line Advancement which automatically feeds additional line to the correct length as it wears down. If the line does not auto advance, the trimmer line may be tangled or empty. To advance the line, stop and restart the trimmer. Upon starting, the line will automatically advance 1/4" (6.4 mm).
Trimmer Tips
Before each use
Make sure the protective guard is tightly installed. Tighten the guard screw.
Make sure the battery is fully charged and that the charger is disconnected before using or storing the trimmer.
Do not store the grass trimmer/edger in sunlight, in an excessively warm place, or near a furnace. The battery life will be shortened.
If the battery must be stored in a warm place, charge it frequently.
Before trimming, inspect the area for string, wire, branches or other material that may become entangled in the cutting line and thrown.
During use
Trim only when the grass and weeds are dry.
Do not trim grass at night. Always make sure you have adequate lighting.
Hold the grass trimmer/edger by both the switch handle and the auxiliary handle for best control and balance.
Stand with the cutting head tipped down at an angle in front, guiding the grass trimmer/edger in a semicircular motion around you.
If possible, guide the grass trimmer/edger to the left to cut.The line will cut as soon as it leaves the guard, and the clippings are thrown away from you.
To produce a smoothly trimmed area, move the grass trimmer/edgermout of the area being cut with consistent speed and height.
Use only the tip of the cutting line to do the trimming, especially near walls and fences. Trimming with the side of the cutting line may overload the motor, wear out the line faster, and break the line more often.
Do not rest the trimmer spool on the ground while trimming. This will cause spool wear and battery drain.
If the grass is higher than 6” (15 cm), trim in small stages.
When the grass trimmer/edger is turned off and the spool stops rotating, the cutting line will relax and may recede. Feed extra cutting line before storing the trimmer to prevent losing the line completely into the spool.
If the diameter of the cutting area gets smaller, the line is worn down and needs to be advanced more often.
If the grass trimmer/edger is not cutting correctly, the cutting line may not be feeding properly. Remove and rewind the line spool.
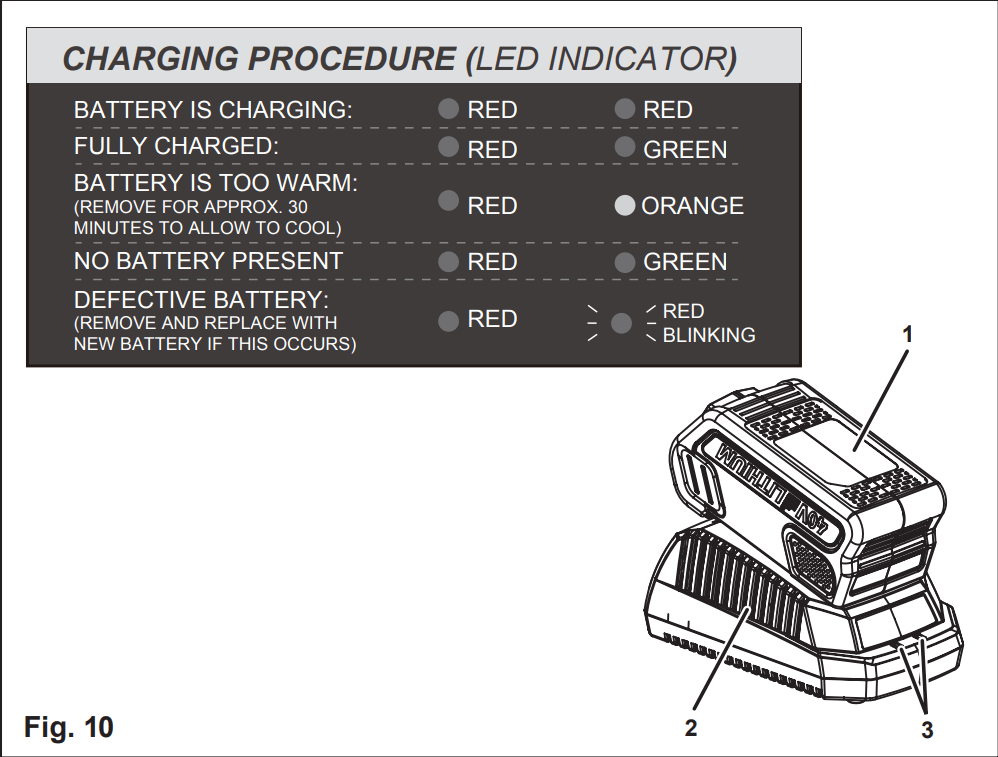
CHARGING PROCEDURE (See Figure 10)
NOTE: The battery is not shipped fully charged. It is recommended to fully charge before first use to ensure that maximum run time can be achieved. This lithium-ion battery will not develop a memory and may be charged at any time. A fully discharged battery pack will require approximately 60 minutes (73Wh) / 120 minutes (146Wh) to fully charge from a discharged state.
Plug the charger into an AC power outlet.
Insert the battery pack (1) into the charger (2). This is a diagnostic charger. The Charger LED Lights (3) will illuminate in specific order to communicate the current battery status. They are as follows:
CHECKING THE CHARGE
If the battery pack does not charge properly:
Check the current at the power outlet with another tool. Make sure that the outlet is not turned off.
Check that the charger contacts have not been shorted by debris or foreign material.
If the surrounding air temperature is not normal room temperature, move the charger and battery pack to a location where the temperature is between 45˚F and 104˚F .
CHARGER MAINTENANCE
Keep the charger clean and clear of debris. Do not allow foreign material into the recessed cavity or on the contacts. Wipe with a dry cloth. Do not use solvents, water, or place in wet conditions.
Always unplug the charger when there is no battery pack in it.
The battery pack may be stored in the charger,however, it is recommended to disconnect the charger from the power source. To ensure safety and reliability all repairs should be
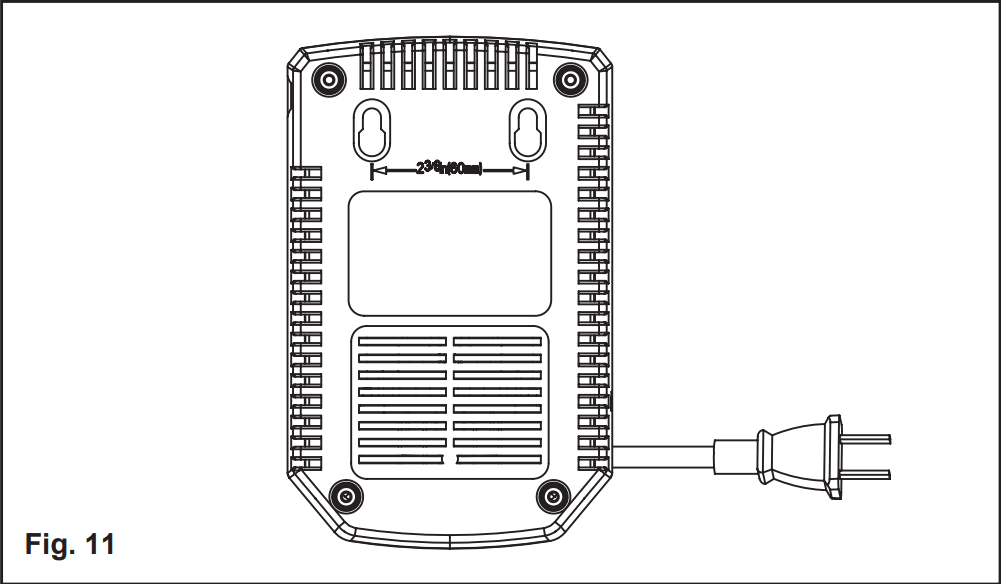
Check that the charger contacts have not been shorted by debris or foreign material. CHARGER MOUNTING (See Figure 11)
This charger can be installed hanging on a wall using two screws (not supplied)
Locate the placement for the charger to be wall mounted.
If fastening to wood studs use 2 wood screws.
Drill two holes 2 3/8” (6 cm) on center ensuring they are level.
If fastening to dry wall use wall anchors and screws to secure the charger to the wall.
ENTERTAINMENT
W A R N I N G
In order to avoid personal injury and the risk of the fire and electric shock, remove the battery pack before adjusting, inspecting, or cleaning the blower
Cleaning
Remove the battery pack.
1. Brush or blow dust and debris out of the air vents using compressed air or a vacuum. Keep the air vents free of obstructions, sawdust, and wood chips. Do not spray, wash, or immerse the air vents in water.
2. Wipe off the housing and the plastic components using a moist, soft cloth. Do not use strong solvents or detergents on the plastic housing or plastic components. Certain household cleaners may cause damage, and may cause a shock hazard.
Battery Pack
Store the battery pack fully charged.
Once the charging light turns green, remove the battery from the charger and disconnect the charger from the outlet.
Do not store the battery pack on the tool or in the charger.
After charging, the battery pack may be stored in the charger, as long as the charger is not plugged in.
Charger Maintenance
Keep the charger clean and clear of debris. Do not allow foreign material to get into the recessed cavity or onto the contacts. Wipe the charger clean with a dry cloth. Do not use solvents or water, and do not place the charger in wet conditions.
Unplug the charger when there is no battery pack in it.
Fully charge the batteries before placing them in storage. Do not recharge a fully charged battery pack.
Overcharging will shorten battery life.
Recharge the battery pack whenever there is less power. Do not allow the batteries to become completely discharged.
Store the charger at normal room temperature. Do not store it in excessive heat. Do not use the charger in direct sunlight. Recharge at room temperature between 45 and 104˚F (7 and 40˚C). If the battery pack is hot, allow it to cool down before recharging.
TROUBLESHOOTING
PROBLEM
POSSIBLE CAUSE
SOLUTION
Motor fails to start when switch trigger is depressed.
Battery is not secure.
Battery is not charged.
To secure the battery pack, make sure the latches on the top of the battery pack snap into place.
Charge the battery pack according to the instructions included with your model.

 W A R N I N G
  C A U T I O N