Home
Bookmarks
Home
Summit
Summit SEW24115 User Manual
Page 29
Summit SEW24115 24" Wide Electric Wall Oven, 115V
User Manual - Page 29
For SEW24115.
PDF File Manual
,
36 pages
,
Read Online
|
Download pdf file
Safety Instructions 2-4
Write the model and serial numbers here:
SAFETY PRECAUTIONS
SAFETY PRECAUTIONS
SAFETY PRECAUTIONS
Using the oven controls.
Oven Control, Clock and Timer Features and Settings
Temperature Conversions
Using the oven controls.
Before you begin...
How to Set the Oven for Baking or Roasting
Type of Food
Rack Position
Preheating and Pan Placement
How to Set the Oven for Broiling
Using the clock and timer.
To Set the Clock
To Set the Timer
To Cancel the Timer
Using the timed baking and roasting features.
How to Set an Immediate Start and Automatic Stop
How to Set a Delayed Start and Automatic Stop
Special features of your oven control.
12-Hour Shutdown
Fahrenheit or Celsius Temperature Selection
Control Lockout
12-Hour, 24-Hour or Clock Blackout
Auto Recipe⢠Conversion
Using the Sabbath feature.
How to Set for Regular Baking/Roasting
How to Set for Timed Baking/Roasting-Immediate Start and Automatic Stop
How to exit the Sabbath feature
Using the probe.
How to Set the Oven For Cooking When Using the Probe
Using the convection oven.
Convection Bake
Convection Roast
Using the convection oven.
Cookware for Convection Cooking
Paper and Plastic
Metal and Glass
How to Set the Oven for Convection Baking or Roasting
How to Set the Oven for Convection Roasting When Using the Probe
NOTE:
Using the oven timed convection baking features.
How to Set an Immediate Start and Automatic Stop
Using the oven timed convection baking features.
How to Set a Delayed Start and Automatic Stop
Adjust the oven thermostat - Do it yourself
To Adjust the Thermostat
The type of margarine will affect baking performance.
Using the proofing feature.
How to Set the Oven For Proofing
NOTE:
Using Steam Clean
To Begin Steam Clean Cycle:
Remove any remaining water with a dry cloth or sponge.
IMPORTANT NOTES:
Care and cleaning of the oven.
How to Remove Protective Shipping Film and Packaging Tape
Lift-Off Oven Door
Mounting Oven Door
Oven Rack and Accessories.
Removing and Installing Oven Racks
Oven Racks
Installing conventional rack
Installing full extension racks
Locate broiler pan
Care and cleaning of the oven.
Oven Racks
Oven Heating Elements
Control Panel
Painted Surfaces
Glass Surfaces
Stainless Steel Surfaces
Do not use a steel wool pad, it will scratch the surface.
Non-Self-Clean Oven Interior
To remove:
To replace:
NOTE:
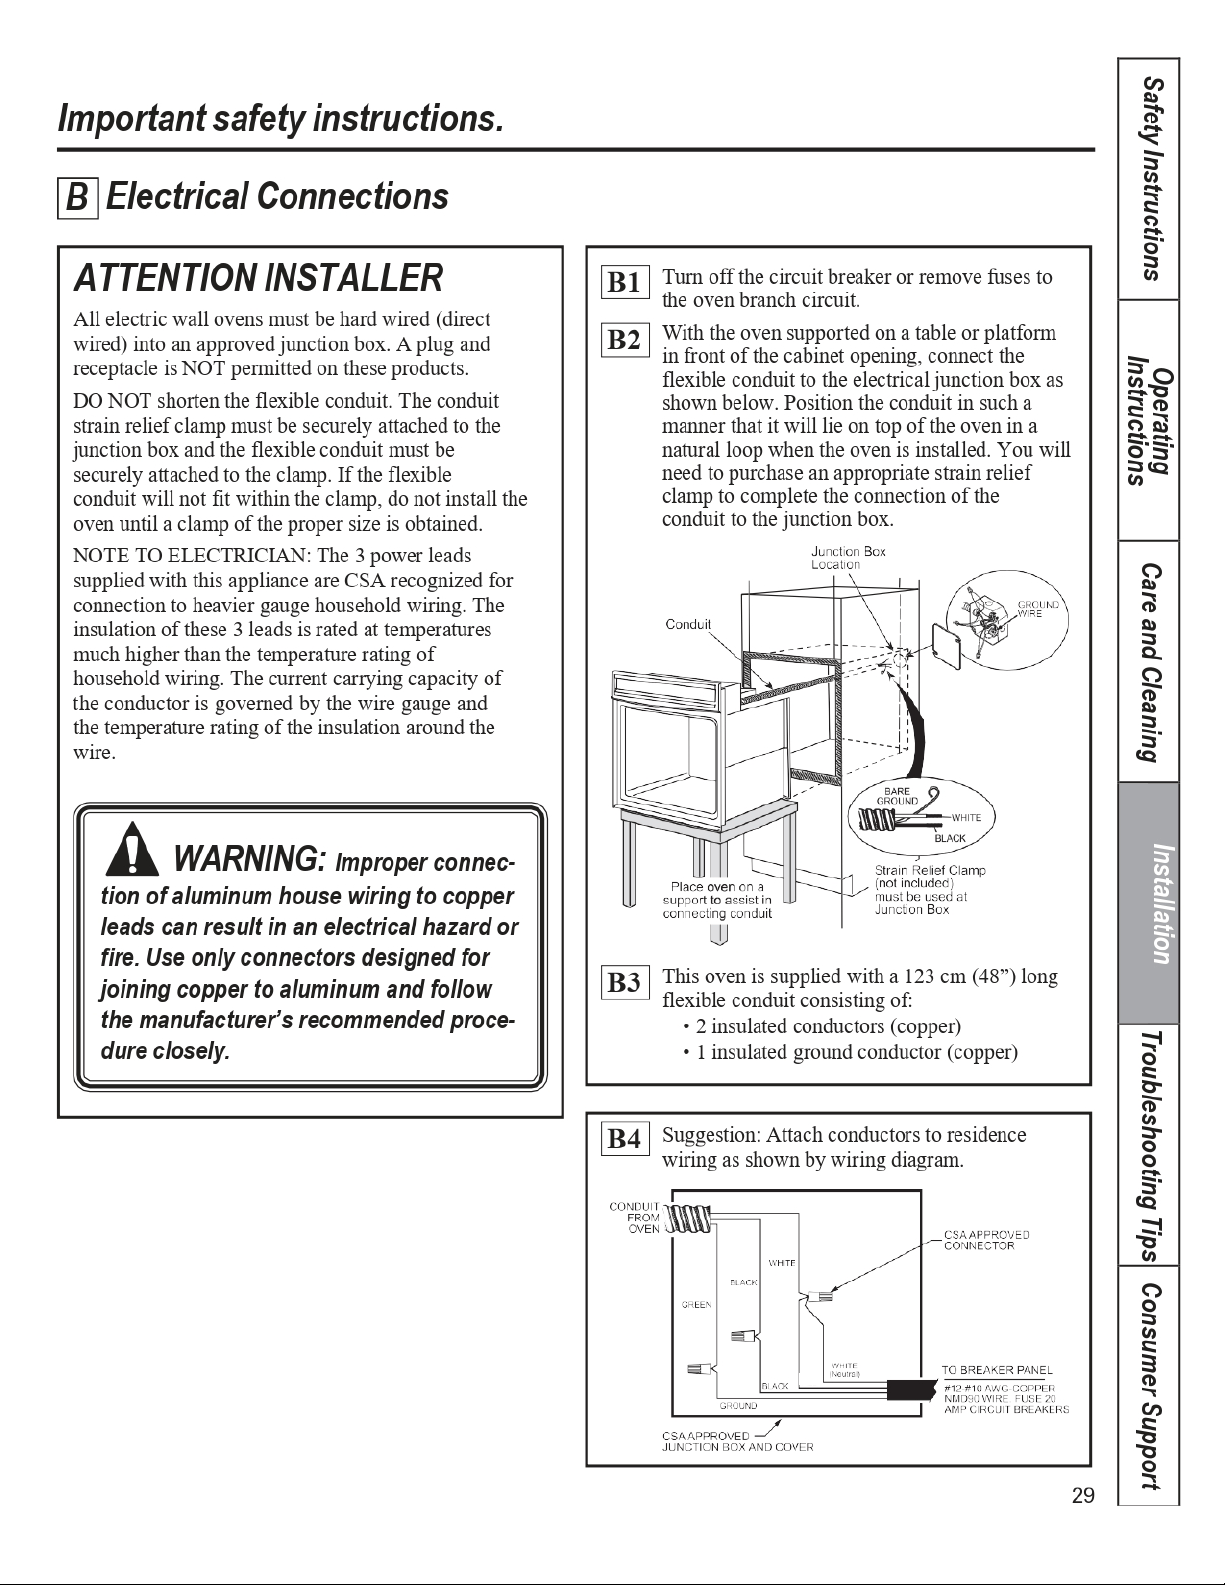
Installation instructions.
Installation instructions.
Installation instructions.
The furniture must support 50 kg (110 lb)
Accessories
Looking for something more?
Broiler Pan
PARTS AND LABOR WARRANTY INFORMATION
GENERAL PARTS AND LABOR WARRANTY
WARRANTY CLAIMS
THINGS NOT COVERED BY THIS WARRANTY
REQUESTING SERVICE
Page 29/36
Page 1
Page 2
Page 3
Page 4
Page 5
Page 6
Page 7
Page 8
Page 9
Page 10
Page 11
Page 12
Page 13
Page 14
Page 15
Page 16
Page 17
Page 18
Page 19
Page 20
Page 21
Page 22
Page 23
Page 24
Page 25
Page 26
Page 27
Page 28
Page 29
Page 30
Page 31
Page 32
Page 33
Page 34
Page 35
Page 36
Contents
Table of Contents
Search
Previous
Next
Bookmarks
Loading ...
Loading ...
Loading ...
Loading ...
Loading ...
Loading ...
File type: PDF
File name: 68020652_sew24115.pdf
File size: 2.69 MB
File Language: English
Pages: 36
Author: Summit
Published: 2022-05-15
Updated: 2023-05-10
Download File
Table of Contents
×
Safety Instructions 2-4
1
Write the model and serial numbers here:
1
SAFETY PRECAUTIONS
2
SAFETY PRECAUTIONS
3
SAFETY PRECAUTIONS
4
Using the oven controls.
5
Oven Control, Clock and Timer Features and Settings
5
Temperature Conversions
5
Using the oven controls.
6
Before you begin...
6
How to Set the Oven for Baking or Roasting
6
Type of Food
6
Rack Position
6
Preheating and Pan Placement
6
How to Set the Oven for Broiling
7
Using the clock and timer.
8
To Set the Clock
8
To Set the Timer
8
To Cancel the Timer
8
Using the timed baking and roasting features.
9
How to Set an Immediate Start and Automatic Stop
9
How to Set a Delayed Start and Automatic Stop
9
Special features of your oven control.
10
12-Hour Shutdown
10
Fahrenheit or Celsius Temperature Selection
10
Control Lockout
10
12-Hour, 24-Hour or Clock Blackout
11
Auto Recipe⢠Conversion
11
Using the Sabbath feature.
12
How to Set for Regular Baking/Roasting
12
How to Set for Timed Baking/Roasting-Immediate Start and Automatic Stop
13
How to exit the Sabbath feature
13
Using the probe.
14
How to Set the Oven For Cooking When Using the Probe
14
Using the convection oven.
15
Convection Bake
15
Convection Roast
15
Using the convection oven.
16
Cookware for Convection Cooking
16
Paper and Plastic
16
Metal and Glass
16
How to Set the Oven for Convection Baking or Roasting
16
How to Set the Oven for Convection Roasting When Using the Probe
17
NOTE:
17
Using the oven timed convection baking features.
18
How to Set an Immediate Start and Automatic Stop
18
Using the oven timed convection baking features.
19
How to Set a Delayed Start and Automatic Stop
19
Adjust the oven thermostat - Do it yourself
20
To Adjust the Thermostat
20
The type of margarine will affect baking performance.
20
Using the proofing feature.
20
How to Set the Oven For Proofing
20
NOTE:
20
Using Steam Clean
21
To Begin Steam Clean Cycle:
21
Remove any remaining water with a dry cloth or sponge.
21
IMPORTANT NOTES:
21
Care and cleaning of the oven.
22
How to Remove Protective Shipping Film and Packaging Tape
22
Lift-Off Oven Door
22
Mounting Oven Door
22
Oven Rack and Accessories.
23
Removing and Installing Oven Racks
23
Oven Racks
23
Installing conventional rack
23
Installing full extension racks
23
Locate broiler pan
23
Care and cleaning of the oven.
24
Oven Racks
24
Oven Heating Elements
24
Control Panel
24
Painted Surfaces
24
Glass Surfaces
24
Stainless Steel Surfaces
24
Do not use a steel wool pad, it will scratch the surface.
24
Non-Self-Clean Oven Interior
25
To remove:
25
To replace:
25
NOTE:
25
Installation instructions.
26
Installation instructions.
27
Installation instructions.
28
The furniture must support 50 kg (110 lb)
28
Accessories
34
Looking for something more?
34
Broiler Pan
34
PARTS AND LABOR WARRANTY INFORMATION
35
GENERAL PARTS AND LABOR WARRANTY
35
WARRANTY CLAIMS
35
THINGS NOT COVERED BY THIS WARRANTY
35
REQUESTING SERVICE
36
Search:
×
Search