User Manual Entertainment System
Locations and Names of the Controls
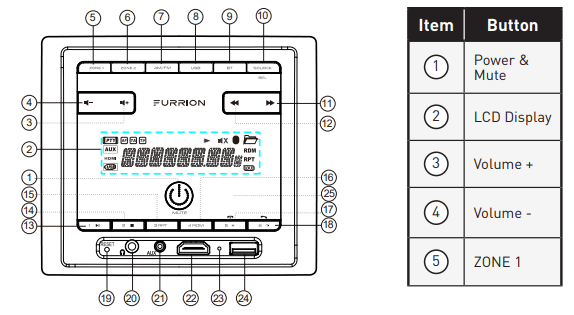

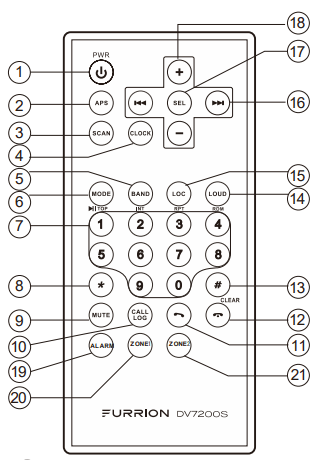
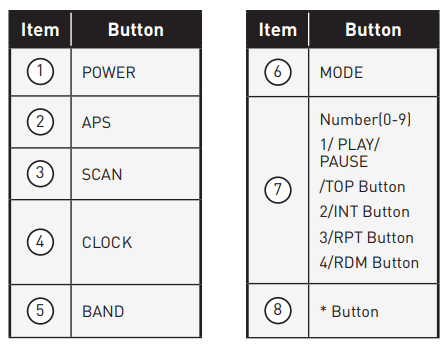
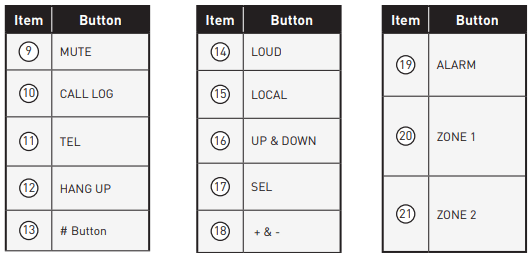
Remote Control
Installation
Location
- Choose a mounting location away from humid areas, water sources, burning products or any equipment that can radiate heat.
- Select an area on the wall or cabinet, which is free from cable, fuel or brake lines. There is a vent hole at the back of the unit for cooling purpose, do not block it.
- Ensure when the stereo is mounted in the cut out that the wires at the rear of the unit are not pressed against the heat sink.
Installing the unit
- Before finally installing the unit, connect the wiring temporarily and make sure the unit and the system can work properly.
- Fix the unit to the wall using 4 self-tapping screw as indicated in the illustration.
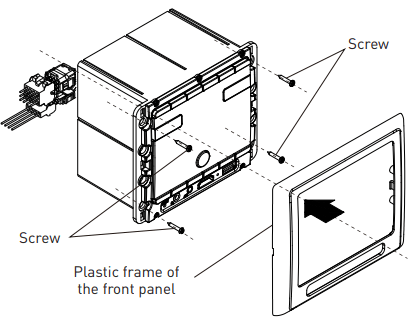
1. Remove plastic frame of the front panel from the unit.
2. Fix the unit to the wall with 4 #8 pan head self-tapping screw.
3. Replace the plastic frame of the front panel to the unit.
Connections
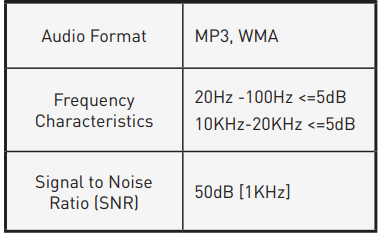
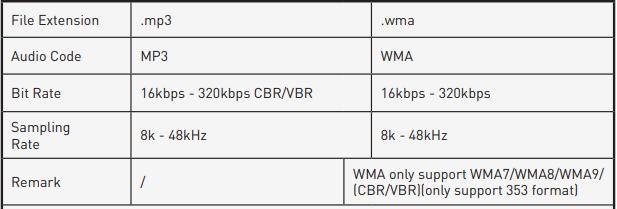
Supported Audio Format
Wiring Diagram

Wiring connecting socket view
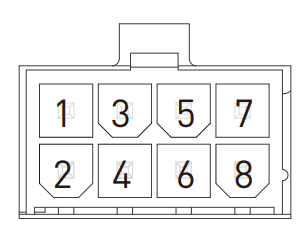
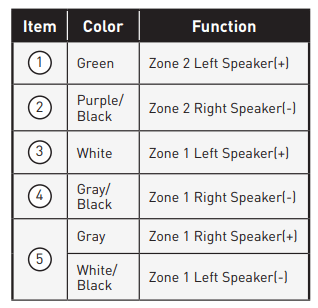
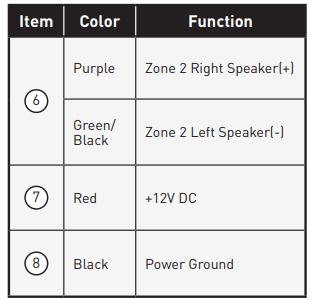
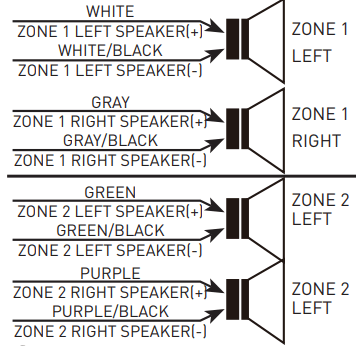
4-Speaker (2 ZONE) Wiring
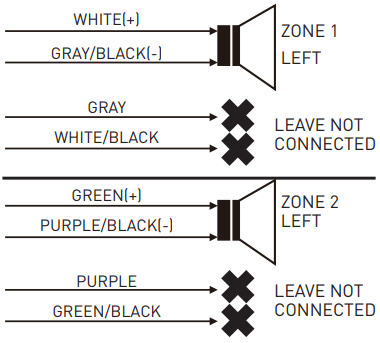
2-Speaker Mono (2 ZONE) Wiring
Operation
Common Operation
- To turn the unit On/Off When the unit is powered Off, it may be switched On by pressing the POWER button. When the unit is switched On, press and hold the POWER button to switch if off.
- To select the function mode Press AM/FM, USB, BT button on the front panel to select the corresponding mode. Press SOURCE button repeatedly on the front panel to select HDMI, AUX, AV mode.
- To adjust the volume level During playback, press VOLUME+ or VOLUME- button on the front panel to increase or decrease the volume.
- To mute or resume the sound During playback, press MUTE button on the front panel to mute or resume the sound immediately.
- To check speaker output status and select speaker output Short-press ZONE 1 or ZONE 2 button on the front panel to check the speaker output status. Press and hold ZONE 1 or ZONE 2 button on the front panel to turn on/off the corresponding speaker output, “Z 1 ON/OFF” or “Z 2 ON/OFF” will be displayed on the LCD.
- To set the sound mode and menu
Press and hold SEL button to turn on BASS, then press SEL button repeatedly to select or circulate through TRE (treble), EQ OFF (FLAT/...AMERICA3/AUSTRALIA/EUROPE (in radio mode), press VOLUME+/- to change the settings. Press SEL button to confirm your selection.
– 1) BEEP ON/BEEP OFF BEEP ON mode: The beep is generated when any key is pressed. BEEP OFF mode: The beep sound is disabled.
– 2) VOL LAST/VOL DEFA VOL LAST: The last volume level setting will be saved automatically after switched the unit off, and restored after powered on. VOL DEFA: Press SEL button on the front control panel, the AVOL mark will be displayed on LCD. Use VOLUME+/- to set the volume level as a constant value.
– 3) DX/LOCAL
In Radio mode, with the DX/LOCAL selection you can change the attenuator settings at the input stage of the radio. This selection helps to avoid overloading the radio when strong (local) stations are received. Select DX (distant) mode to receive far / weak radio stations (highest sensitivity settings are enabled) and select LOCAL for very strong stations (which are located nearby). (NOTE: This button is only for FM reception. In AM mode, LOC is invalid.)
7. To display and adjust the time Press and hold 6 button until the clock becomes flashing. Use VOLUME+/- button to adjust the hour, and  button to adjust the minute.
8. To adjust the backlight brightness Press and hold 5/BACKLIGHT button repeatedly to adjust the backlight.
9. Alarm Function
– 1) To turn On/Off the alarm mode Press 6 button repeatedly to enter the alarm setting mode. (Use VOLUME +/- button to select ALARM ON or ALARM OFF)
– 2) To set the ALARM time Press and hold the 6 button repeatedly to ALARM time setting mode (the LCD will display the time “AM 00’00“ ), then use the button to set the MINUTE and VOLUME +/- button to set the HOUR.
10.To reset the unit
– 1) Press RESET button with a cuspidal object. The unit will be reseted to factory default settings.
– 2) In AUX mode, press and hold 2/STOP button until the LCD displays “RESET III”, then press and hold 3/RPT button to reset to the factory default settings.
Radio Operation
1. To select the radio band Press AM/FM button repeatedly to select a desired radio band in sequence and circulating as: -->FM1-->FM2-->FM3-->AM1-->AM2-->.
2. To search for radio station manually or automatically
– In radio mode, press button to search your desired radio stations up/down manually.
– Press and hold button to search for the strongest station up/down automatically.
3. To store current station or turn on a preset one
– 1) If you want to store the current station, press and hold AM/FM button until the frequency flashes, press one of the digit buttons from 1~6 to store the current station in the preset memory bank. In this way the unit can store 30 preset stations.
– 2) Press one of the 6 buttons from 1~6 to enter the preset station in current band.
4. To auto search and store the top 6 strongest stations In radio mode, press and hold 2/STOP button on the front panel, the unit will start to search the available stations and check the signal strength from the lowest frequency. The top 6 strongest stations will be saved to the corresponding preset numbered band 1~6.
5. To set the frequency Press and hold SEL button to turn on BASS, then press SEL button repeatedly to select AMERICA3, AUSTRALIA or EUROPE area, press VOLUME+/- button to select your desired frequency. Press SEL button to confirm your selection.
USB Operation
1. To insert or pull out the USB stick To play the tracks in USB disk, insert the USB disk into the USB port. The playing mode will be changed to USB mode automatically and the USB mark will be displayed on LCD.
2. Press  or
or  button to play previous or next track.
3. To play fast forward or backward Press and hold or button to play backward or fast forward, release to resume normal playback.
4. To play previous or next 10th track. Press 5 or 6 button to play previous or next 10th track.
5. How to use 1/PLAY/PAUSE button During playback, press 1/PLAY/PAUSE button to pause playback, press 1/PLAY/PAUSE button again to resume, press and hold 1/PLAY/PPAUSE button to select the first track to play.
6. To repeat track(s)
– During playback, press 3/RPT button briefly to play the current track repeatedly. RPT ONE will be displayed on LCD.
– Press RPT button twice to play the track(s) in the album repeatedly. RPT DIR will be displayed on LCD.
– Press RPT button thrice to repeat all tracks. RPPT ALL will be displayed on LCD
– Press the RPT button four times to cancel the RPT function , RPT OFF will be displayed on LCD.
7. To play tracks at random During playback, press RDM button to play all tracks at random. Press it again to cancel.
8. To search a track Press USB button, the TRK 0/00/000 (depending on the total tracks to be saved in the USB disk, the mark may be different) mark will be displayed on LCD and the digit 0 becomes flashing. Press VOLUME+/- button to select a digit from 0~9, press USB button to confirm your selection, the digits 00 becomes flashing. Repeat the steps above to input the digits at 00 and 000 positions. After finished the inputting, press 1/PLAY/PAUSE button to play the track to be selected.
Bluetooth Operation
Pair and Connect
1. Click the BT button in DV7200S to go to Bluetooth mode.
2. You should see NO LINK displayed in the LCD. If you see BT LINK and the Bluetooth icon is on, it means DV7200S is already connected to another mobile. You can clear it by pressing and holding the BT button for ~ 2 seconds until NO LINK is shown, then continue with the rest of the steps below.
3. Go to the Bluetooth section of your mobile, usually under Settings (or another sub-menu under Connections)
4. Ensure Bluetooth is turned On.
5. Select FURRION DV7200S-XXXX (where X can be any alphanumeric number A-Z or 0-9). In Android devices, you will see another similarly-named devices under DV7200S-4.0-XXXX. DO NOT use that one. It is used for Apps control to be described later. If you click on it accidentally, please clicke the gear icon to forget (or unpair) it.
6. Enter 0000 when prompted for PIN.
7. If the pairing and connection is successful, the mobile will show connected while DV7200S will show BT LINK and the Bluetooth icon in LCD.
NOTE: DV7200S supports NFC pairing. The NFC detection area is on the right of the Power button.
Disconnect and Reconnect
- Bluetooth connection of mobile devices typically covers a 33 ft (10 m) open-field range. And DV7200S “remembers” the last connected mobile. For any out-of-range disconnection, DV7200S will auto-reconnect to your mobile once it is back in range again.
- If you explicitly disconnect the Bluetooth link by pressing the corresponding menu item in your mobile. DV7200S will not auto-reconnect. You can press the menu item in mobile again to reconnect.
- If you turn off Bluetooth in mobile during a connection, DV7200S will not auto-reconnect when you turn on Bluetooth in mobile again. Some mobile will try to reconnect the last connected device but that’s particular mobile’s specific implementation.
- However, if you turn off Bluetooth in mobile after an out-of-range disconnection, DV7200S will auto-reconnect once you turn on Bluetooth in mobile and it’s within connection range.
- Note that during the disconnection arise from any case, DV7200S can be paired and connected by any other mobile device.
Forget (or Unpair)
- You can explicitly forget (or unpair) DV7200S in mobile. If you do that while connected in range, DV7200S will be properly notified and all settled.
- If you do that after an out-of-range disconnection, DV7200S will repair and reconnect the mobile. In that case, you can press and hold the BT button for ~ 2 seconds in DV7200S to clear its memory
Profiles
- DV7200S supports Audio Playback (AD2P, AVRCP) and Hands free Calling (HFP). Follow your mobile device settings if you want to enable or disable a particular support.
Audio Playback
- When audio is streamed from mobile to DV7200S, BT AUDIO is shown on the LCD.
- You can control the trick modes (play, stop, next, prev) either from mobile or DV7200S.
- If you hear no sound or very low volume output, please check and turn up the volume in mobile, then adjust the volume in DV7200S to the level of your choice.
Hands free Calling
- Phone calls is automatically transferred to DV7200S.
- To answer and hangup call, press the corresponding buttons in mobile or DV7200S, TALKING is shown on the LCD during the call.
- To dial out, use dial pad or phone book in mobile to make the call. You can press the TEL button in DV7200S to recall the last number. With the physical remote control, you can press the CALL LOG button to select LAST DIAL, LAST IN, and LAST MISS, then press + or - button to flip through the last numbers.
- While talking, use Volume +/- to adjust the speaker volume level. The adjustment is for the call instance only. It cannot be saved and will not affect the music playback volume.
- Note that MUTE button is to mute the speaker only and not the mic. You have to use the phone dialer in mobile to mute the mic if you need to.
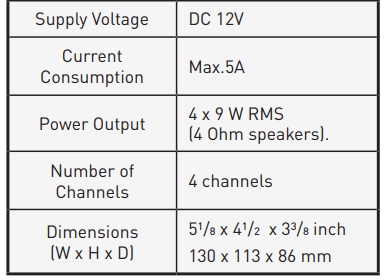
Specification
GENERAL
AM SECTION
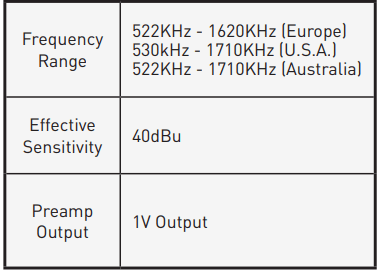
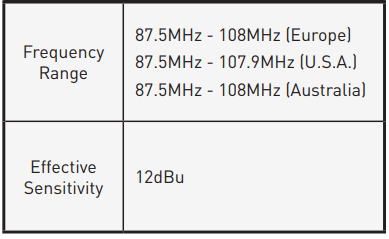
FM SECTION
USB PLAYBACK