2
Entertainment System
DV 7200
Instruction Manual

1
Welcome
Thank you for purchasing this Furrion
®
Entertainment System. Before placing your new product
into operation, please read these operating instructions carefully. They contain important
information for safe use, installation and maintenance of the product.
Please keep this instruction manual in a safe place for future reference. Pass it onto possible new
owners of the product. The manufacturer does not accept responsibility for any damages that may
arise due to non-observation of these instructions.
If you have any further questions regarding our products, please contact us at

2
Contents
Welcome ...............................................................................................1
Contents ...............................................................................................2
Locations and Names of the Controls ................................................... 3
Remote Control .................................................................................... 5
Installation ...........................................................................................7
Connections .......................................................................................... 9
Operation ............................................................................................14
Common Operation .........................................................................14
Radio Operation ...............................................................................17
USB Operation .................................................................................18
Bluetooth Operation ........................................................................20
Specification ....................................................................................... 24
Warranty ............................................................................................. 26
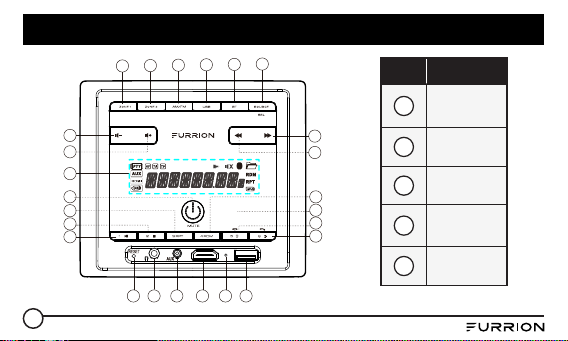
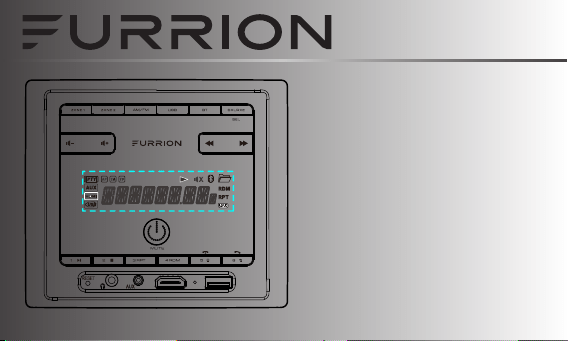
3
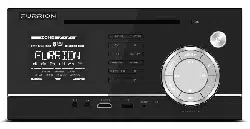
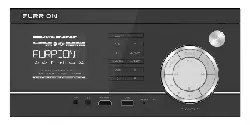
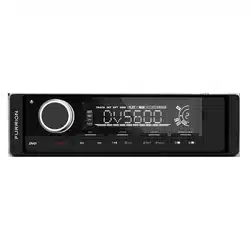
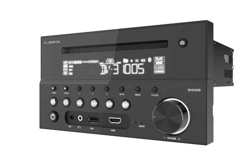
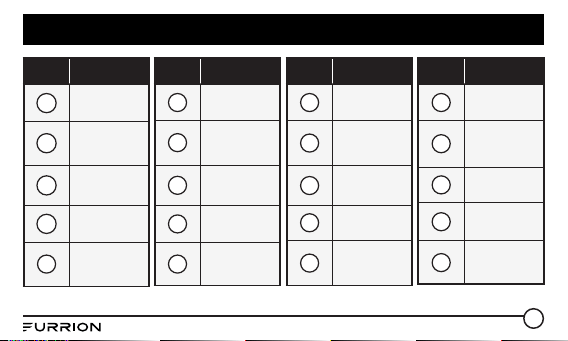
Locations and Names of the Controls
19 20 21 22 23 24
4
14
15
1
3
2
13
18
11
12
17
16
25
5 6
7 8 9
10
Item Button
1
Power &
Mute
2
LCD Display
3
Volume +
4
Volume -
5
ZONE 1
4
Locations and Names of the Controls
Item Button
6
ZONE 2
7
AM/FM
8
USB
9
BT
10
SOURCE/
SEL
Item Button
11
Next
12
Previous
13
1/Play/
Pause
14
2/STOP
15
3/RPT
Item Button
16
4/RDM
17
5/Backlight/
Hang up
18
6/Clock Adjust/
Alarm/TEL
19
RESET
20
Headphone
Socket
Item Button
21
Aux In Jack
22
HDMI In
Jack
23
Microphone
24
USB Socket
25
NFC Detection
Area
5
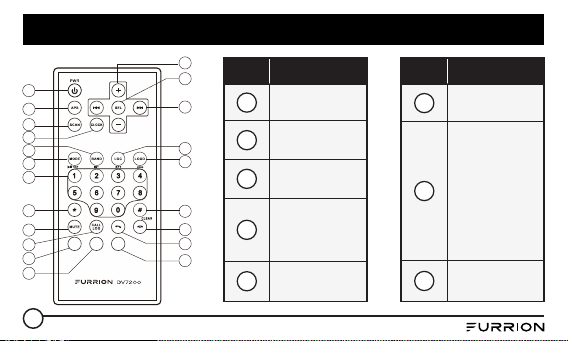
Remote Control
ZONE1
AL ARM
ZONE2
1
3
4
5
2
6
7
8
9
10
14
15
13
16
17
18
11
21
12
19
20
Item Button
1
POWER
2
APS
3
SCAN
4
CLOCK
5
BAND
Item Button
6
MODE
7
Number(0-9)
1/ PLAY/
PAUSE
/TOP Button
2/INT Button
3/RPT Button
4/RDM Button
8
* Button
6
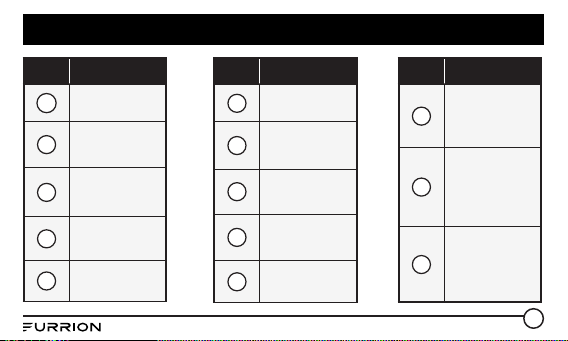
Remote Control
Item Button
9
MUTE
10
CALL LOG
11
TEL
12
HANG UP
13
# Button
Item Button
14
LOUD
15
LOCAL
16
UP & DOWN
17
SEL
18
+ & -
Item Button
19
ALARM
20
ZONE 1
21
ZONE 2

7
Installation
Location
● Choose a mounting location away from humid areas, water sources, burning products or any
equipment that can radiate heat.
● Select an area on the wall or cabinet, which is free from cable, fuel or brake lines. There is a
vent hole at the back of the unit for cooling purpose, do not block it.
● Ensure when the stereo is mounted in the cut out that the wires at the rear of the unit are not
pressed against the heat sink.
Installing the unit
● Before finally installing the unit, connect the wiring temporarily and make sure the unit and the
system can work properly.
● Fix the unit to the wall using 4 self-tapping screw as indicated in the illustration.
8
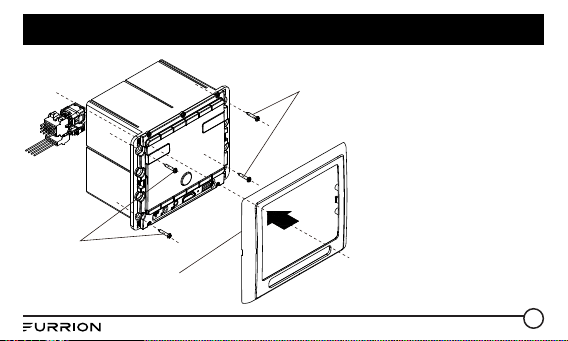
Installation
Screw
Screw
Plastic frame of
the front panel
1. Remove plastic frame of the
front panel from the unit.
2. Fix the unit to the wall with
4 #8 pan head self-tapping
screw.
3. Replace the plastic frame of
the front panel to the unit.
9
Connections
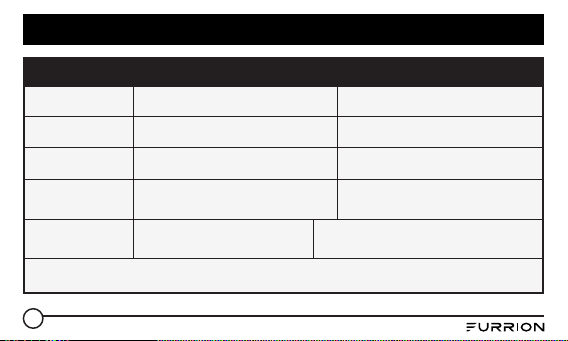
Supported Audio Format
File Extension .mp3 .wma
Audio Code MP3 WMA
Bit Rate 16kbps - 320kbps CBR/VBR 16kbps - 320kbps
Sampling
Rate
8k - 48kHz 8k - 48kHz
Remark /
WMA only support WMA7/WMA8/WMA9/
(CBR/VBR)(only support 353 format)
NOTE: Reading the above file formats is not guaranteed.
10
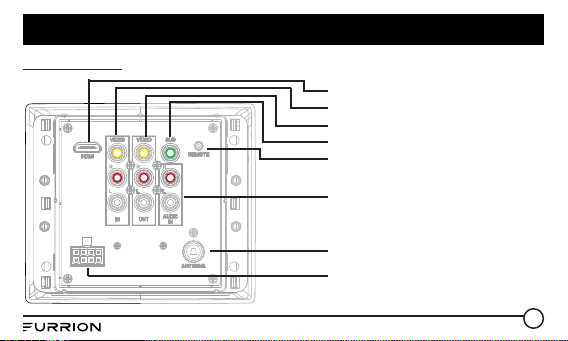
Connections
Wiring Diagram
HDMI OUT JACK
AV IN
AV OUT
IR REMOTE JACK
SUBWOOFER OUT
WIRING CONNECTING SOCKET
ANTENNA
AUDIO IN
11
Connections
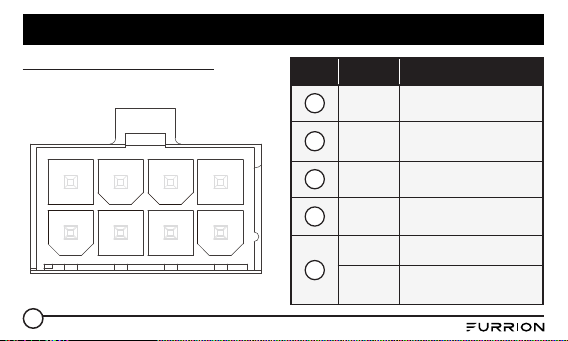
Wiring connecting socket view
1
2
3
4
5 7
6 8
Item Color Function
1
Green Zone 2 Left Speaker(+)
2
Purple/
Black
Zone 2 Right Speaker(-)
3
White Zone 1 Left Speaker(+)
4
Gray/
Black
Zone 1 Right Speaker(-)
5
Gray Zone 1 Right Speaker(+)
White/
Black
Zone 1 Left Speaker(-)
12
Connections
NOTE: All speakers must be connected as
shown. If one wire is removed or not connected
properly, all speakers on relevant zone will fail
to work. It is of importance to pay attention in
speaker polarity. Connection with incorrect
speaker polarity will lead to poor sound quality.
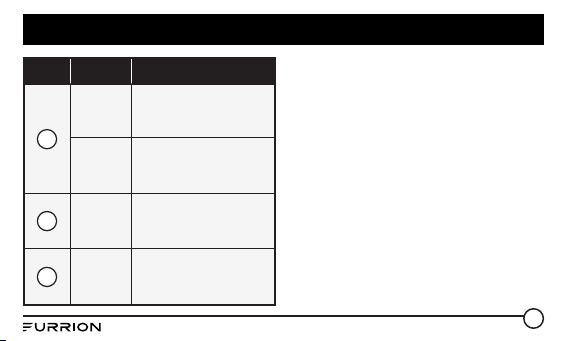
Item Color Function
6
Purple Zone 2 Right Speaker(+)
Green/
Black
Zone 2 Left Speaker(-)
7
Red +12V DC
8
Black Power Ground
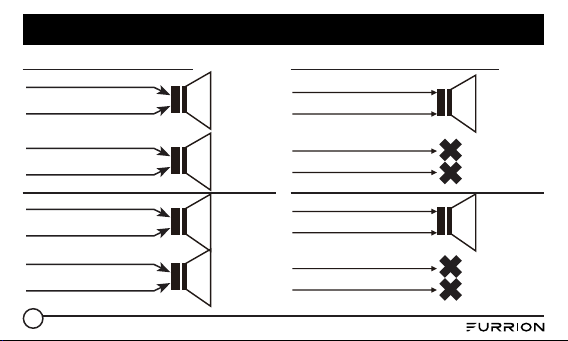
13
Connections
WHITE(+)
GRAY/BLACK(-)
GRAY
WHITE/BLACK
GREEN(+)
PURPLE/BLACK(-)
PURPLE
GREEN/BLACK
ZONE 1
LEFT
ZONE 1
LEFT
ZONE 1
RIGHT
LEAVE NOT
CONNECTED
ZONE 2
LEFT
ZONE 2
LEFT
ZONE 2
LEFT
LEAVE NOT
CONNECTED
4-Speaker (2 ZONE) Wiring 2-Speaker Mono (2 ZONE) Wiring
WHITE
ZONE 1 LEFT SPEAKER(+)
WHITE/BLACK
ZONE 1 LEFT SPEAKER(-)
GRAY
ZONE 1 RIGHT SPEAKER(+)
GRAY/BLACK
ZONE 1 RIGHT SPEAKER(-)
GREEN
ZONE 2 LEFT SPEAKER(+)
GREEN/BLACK
ZONE 2 LEFT SPEAKER(-)
PURPLE
ZONE 2 RIGHT SPEAKER(+)
PURPLE/BLACK
ZONE 2 RIGHT SPEAKER(-)
14
Operation
Common Operation
1. To turn the unit On/Off
When the unit is powered Off, it may be switched On by pressing the POWER button. When the
unit is switched On, press and hold the POWER button to switch if off.
2. To select the function mode
Press AM/FM, USB, BT button on the front panel to select the corresponding mode.
Press SOURCE button repeatedly on the front panel to select HDMI, AUX, AV mode.
3. To adjust the volume level
During playback, press VOLUME+ or VOLUME- button on the front panel to increase or
decrease the volume.
4. To mute or resume the sound
During playback, press MUTE button on the front panel to mute or resume the sound
immediately.
5. To check speaker output status and select speaker output
Short-press ZONE 1 or ZONE 2 button on the front panel to check the speaker output status.
Press and hold ZONE 1 or ZONE 2 button on the front panel to turn on/off the corresponding
speaker output, “Z 1 ON/OFF” or “Z 2 ON/OFF” will be displayed on the LCD.
6. To set the sound mode and menu

15
Operation
Press and hold SEL button to turn on BASS, then press SEL button repeatedly to select or
circulate through TRE (treble), EQ OFF (FLAT/...AMERICA3/AUSTRALIA/EUROPE (in radio
mode), press VOLUME+/- to change the settings. Press SEL button to confirm your selection.
– 1) BEEP ON/BEEP OFF
BEEP ON mode: The beep is generated when any key is pressed.
BEEP OFF mode: The beep sound is disabled.
– 2) VOL LAST/VOL DEFA
VOL LAST: The last volume level setting will be saved automatically after switched the unit
off, and restored after powered on.
VOL DEFA: Press SEL button on the front control panel, the AVOL mark will be displayed on
LCD. Use VOLUME+/- to set the volume level as a constant value.
– 3) DX/LOCAL
In Radio mode, with the DX/LOCAL selection you can change the attenuator settings at the
input stage of the radio. This selection helps to avoid overloading the radio when strong
(local) stations are received. Select DX (distant) mode to receive far / weak radio stations
(highest sensitivity settings are enabled) and select LOCAL for very strong stations (which are
located nearby).
16
Operation
(NOTE: This button is only for FM reception. In AM mode, LOC is invalid.)
7. To display and adjust the time
Press and hold 6 button until the clock becomes flashing. Use VOLUME+/- button to adjust the
hour, and / button to adjust the minute.
8. To adjust the backlight brightness
Press and hold 5/BACKLIGHT button repeatedly to adjust the backlight.
9. Alarm Function
– 1) To turn On/Off the alarm mode
Press 6 button repeatedly to enter the alarm setting mode. (Use VOLUME +/- button to select
ALARM ON or ALARM OFF)
– 2) To set the ALARM time
Press and hold the 6 button repeatedly to ALARM time setting mode (the LCD will display the
time “AM 00’00“ ), then use the / button to set the MINUTE and VOLUME +/- button to
set the HOUR.
10. To reset the unit
– 1) Press RESET button with a cuspidal object. The unit will be reseted to factory default
settings.
17
Operation
– 2) In AUX mode, press and hold 2/STOP button until the LCD displays “RESET III”, then press
and hold 3/RPT button to reset to the factory default settings.
Radio Operation
1. To select radio band
Press AM/FM button repeatedly to select a desired radio band in sequence and circulating as:
-->FM1-->FM2-->FM3-->AM1-->AM2-->.
2. To search for radio station manually or automatically
– In radio mode, press / button to search your desired radio stations up/down manually.
– Press and hold / button to search for the strongest station up/down automatically.
3. To store current station or turn on a preset one
– 1) If you want to store the current station, press and hold AM/FM button until the frequency
flashes, press one of the digit buttons from 1~6 to store the current station in the preset
memory bank. In this way the unit can store 30 preset stations.
– 2) Press one of the 6 buttons from 1~6 to enter the preset station in current band.
4. To auto search and store the top 6 strongest stations
In radio mode, press and hold 2/STOP button on the front panel, the unit will start to search the
18
Operation
available stations and check the signal strength from the lowest frequency. The top 6 strongest
stations will be saved to the corresponding preset numbered band 1~6.
5. To set the frequency
Press and hold SEL button to turn on BASS, then press SEL button repeatedly to select
AMERICA3, AUSTRALIA or EUROPE area, press VOLUME+/- button to select your desired
frequency. Press SEL button to confirm your selection.
USB Operation
1. To insert or pull out the USB stick
To play the tracks in USB disk, insert the USB disk into the USB port. The playing mode will be
changed to USB mode automatically and the USB mark will be displayed on LCD.
2. Press or button to play previous or next track.
3. To play fast forward or backward
Press and hold or button to play backward or fast forward, release to resume normal
playback.
4. To play previous or next 10th track.
Press 5 or 6 button to play previous or next 10th track.
5. How to use 1/PLAY/PAUSE button

19
Operation
During playback, press 1/PLAY/PAUSE button to pause playback, press 1/PLAY/PAUSE button
again to resume, press and hold 1/PLAY/PPAUSE button to select the first track to play.
6. To repeat track(s)
– During playback, press 3/RPT button briefly to play the current track repeatedly. RPT ONE
will be displayed on LCD.
– Press RPT button twice to play the track(s) in the album repeatedly. RPT DIR will be
displayed on LCD.
– Press RPT button thrice to repeat all tracks. RPPT ALL will be displayed on LCD.
– Press the RPT button four times to cancel the RPT function , RPT OFF will be displayed on
LCD.
7. To play tracks at random
During playback, press RDM button to play all tracks at random. Press it again to cancel.
8. To search a track
Press USB button, the TRK 0/00/000 (depending on the total tracks to be saved in the USB disk,
the mark may be different) mark will be displayed on LCD and the digit 0 becomes flashing.
Press VOLUME+/- button to select a digit from 0~9, press USB button to confirm your selection,
the digits 00 becomes flashing. Repeat the steps above to input the digits at 00 and 000 positions.
After finished the inputting, press 1/PLAY/PAUSE button to play the track to be selected.
20
Operation
Bluetooth Operation
Pair and Connect
1. Click the BT button in DV7200 to go to Bluetooth mode.
2. You should see NO LINK displayed in the LCD. If you see BT LINK and the Bluetooth icon is
on, it means DV7200 is already connected to another mobile. You can clear it by pressing and
holding the BT button for ~ 2 seconds until NO LINK is shown, then continue with the rest of the
steps below.
3. Go to the Bluetooth section of your mobile, usually under Settings (or another sub-menu under
Connections).
4. Ensure Bluetooth is turned On.
5. Select FURRION DV7200-XXXX (where X can be any alphanumeric number A-Z or 0-9). In
Android devices, you will see another similarly-named devices under DV7200-4.0-XXXX. DO
NOT use that one. It is used for Apps control to be described later. If you click on it accidentally,
please clicke the gear icon to forget (or unpair) it.
6. Enter 0000 when prompted for PIN.
7. If the pairing and connection is successful, the mobile will show connected while DV7200 will
show BT LINK and the Bluetooth icon in LCD.

21
Operation
NOTE: DV7200 supports NFC pairing. The NFC detection area is on the right of the Power
button.
Disconnect and Reconnect
● Bluetooth connection of mobile devices typically covers a 33 ft (10 m) open-field range. And
DV7200 “remembers” the last connected mobile. For any out-of-range disconnection, DV7200
will auto-reconnect to your mobile once it is back in range again.
● If you explicitly disconnect the Bluetooth link by pressing the corresponding menu item in
your mobile. DV7200 will not auto-reconnect. You can press the menu item in mobile again to
reconnect.
● If you turn off Bluetooth in mobile during a connection, DV7200 will not auto-reconnect when
you turn on Bluetooth in mobile again. Some mobile will try to reconnect the last connected
device but that’s particular mobile’s specific implementation.
● However, if you turn off Bluetooth in mobile after an out-of-range disconnection, DV7200 will
auto-reconnect once you turn on Bluetooth in mobile and it’s within connection range.
● Note that during the disconnection arise from any case, DV7200 can be paired and connected
by any other mobile device.
Forget (or Unpair)
● You can explicitly forget (or unpair) DV7200 in mobile. If you do that while connected in range,

22
Operation
DV7200 will be properly notified and all settled.
● If you do that after an out-of-range disconnection, DV7200 will repair and reconnect the
mobile. In that case, you can press and hold the BT button for ~ 2 seconds in DV7200 to clear
its memory.
Profiles
● DV7200 supports Audio Playback (AD2P, AVRCP) and Hands free Calling (HFP). Follow your
mobile device settings if you want to enable or disable a particular support.
Audio Playback
● When audio is streamed from mobile to DV7200, BT AUDIO is shown on the LCD.
● You can control the trick modes (play, stop, next, prev) either from mobile or DV7200.
● If you hear no sound or very low volume output, please check and turn up the volume in mobile,
then adjust the volume in DV7200 to the level of your choice.
Hands free Calling
● Phone calls is automatically transferred to DV7200.
● To answer and hangup call, press the corresponding buttons in mobile or DV7200, TALKING is
shown on the LCD during the call.
● To dial out, use dial pad or phone book in mobile to make the call. You can press the TEL

23
Operation
button in DV7200 to recall the last number. With the physical remote control, you can press the
CALL LOG button to select LAST DIAL, LAST IN, and LAST MISS, then press + or - button to flip
through the last numbers.
● While talking, use Volume +/- to adjust the speaker volume level. The adjustment is for the call
instance only. It cannot be saved and will not affect the music playback volume.
● Note that MUTE button is to mute the speaker only and not the mic. You have to use the phone
dialer in mobile to mute the mic if you need to.
Mobile App
● You can use the Furrion ES Control App (both Android and iOS versions) and thus your mobile
as a remote control.
● The app uses BT Low Energy (BLE) technology to connect to DV7200 instead of infrared in the
physical remote control, and thus not limited by line-of-sight connection.
● While the App checks for compatibility, it will be good for you to cross-check the specifications
of your mobile to see if it supports BLE technology before the installation.
● Search for “Furrion ES Control” in Google Play (Android) or App Store (iOS) according to your
mobile device and install. Run the app according to the instructions within.
● The App works with multiple models in the Furrion DV range entertainment system.
24
Specification
GENERAL
Supply Voltage DC 12V
Current
Consumption
Max.5A
Power Output
4 x 9 W RMS
(4 Ohm speakers).
Number of
Channels
4 channels
Dimensions
(W x H x D)
5/ x 4/ x 3/ inch
130 x 113 x 86 mm
AM SECTION
Frequency
Range
522KHz - 1620KHz (Europe)
530kHz - 1710KHz (U.S.A.)
522KHz - 1710KHz (Australia)
Effective
Sensitivity
40dBu
Preamp
Output
1V Output
25
Specification
FM SECTION
Frequency
Range
87.5MHz - 108MHz (Europe)
87.5MHz - 107.9MHz (U.S.A.)
87.5MHz - 108MHz (Australia)
Effective
Sensitivity
12dBu
USB PLAYBACK
Audio Format MP3, WMA
Frequency
Characteristics
20Hz -100Hz <=5dB
10KHz-20KHz <=5dB
Signal to Noise
Ratio (SNR)
50dB [1KHz]

26
Warranty
FURRION WARRANTS FOR A PERIOD OF 1 YEAR FROM DATE OF RETAIL PURCHASE BY THE
ORIGINAL END-USE PURCHASER, THAT THIS PRODUCT, WHEN DELIVERED TO YOU IN NEW
CONDITION, IN ORIGINAL PACKAGING, FROM A FURRION AUTHORIZED RESELLER AND USED
IN NORMAL CONDITIONS, IS FREE FROM ANY DEFECTS IN MANUFACTURING, MATERIALS,
AND WORKMANSHIP. IN CASE OF SUCH DEFECT, FURRION SHALL REPLACE OR REPAIR THE
PRODUCT AT NO CHARGE TO YOU. THIS WARRANTY DOES NOT COVER: PRODUCTS WHERE
THE ORIGINAL SERIAL NUMBERS HAVE BEEN REMOVED, ALTERED OR CANNOT READILY BE
DETERMINED; DAMAGE OR LOSS CAUSED BY ACCIDENT, MISUSE, ABUSE, NEGLECT, PRODUCT
MODIFICATION, FAILURE TO FOLLOW INSTRUCTIONS IN INSTRUCTION MANUAL, COMMERCIAL
OR INDUSTRIAL USE; DAMAGE OR LOSS CAUSED TO THE DECORATIVE SURFACE OF PRODUCT;
TO ANY DATA, SOFTWARE OR INFORMATION; AND NORMAL WEAR AND TEAR. THIS WARRANTY
ONLY PROTECTS THE ORIGINAL END-USER (“YOU”) AND IS NOT TRANSFERABLE; ANY ATTEMPT
TO TRANSFER THIS WARRANTY SHALL MAKE IT IMMEDIATELY VOID. THIS WARRANTY IS ONLY
VALID IN THE COUNTRY OF PURCHASE.
THIS WARRANTY AND REMEDIES SET FORTH ABOVE ARE EXCLUSIVE AND IN LIEU OF ALL
OTHER WARRANTIES, REMEDIES AND CONDITIONS, WHETHER ORAL OR WRITTEN, EXPRESS OR
IMPLIED. FURRION SPECIFICALLY DISCLAIMS ANY AND ALL IMPLIED WARRANTIES, INCLUDING,
WITHOUT LIMITATION, WARRANTIES OF MERCHANTABILITY AND FITNESS FOR A PARTICULAR

27
Warranty
PURPOSE. IF FURRION CANNOT LAWFULLY DISCLAIM IMPLIED WARRANTIES UNDER THIS
LIMITED WARRANTY, ALL SUCH WARRANTIES, INCLUDING WARRANTIES OF MERCHANTABILITY
AND FITNESS FOR A PARTICULAR PURPOSE ARE LIMITED IN DURATION TO THE DURATION OF
THIS WARRANTY.
No Furrion reseller, agent, or employee is authorized to make any modification, extension, or
addition to this warranty.
FURRION IS NOT RESPONSIBLE FOR DIRECT, INDIRECT, SPECIAL, INCIDENTAL OR
CONSEQUENTIAL DAMAGES RESULTING FROM ANY BREACH OF WARRANTY OR CONDITION,
OR UNDER ANY OTHER LEGAL THEORY, INCLUDING BUT NOT LIMITED TO LOST PROFITS,
DOWNTIME, GOODWILL, DAMAGE TO OR REPLACEMENT OF ANY EQUIPMENT OR PROPERTY,
ANY COSTS OF RECOVERING, REPROGRAMMING, OR REPRODUCING ANY PROGRAM OR DATA
STORED IN OR USED WITH FURRION PRODUCTS. FURRION’S TOTAL LIABILITY IS LIMITED
TO THE REPAIR OR REPLACEMENT OF THIS PRODUCT PURSUANT TO THE TERMS OF THIS
WARRANTY.

28
Warranty
SOME STATES DO NOT ALLOW THE EXCLUSION OR LIMITATION OF INCIDENTAL OR
CONSEQUENTIAL DAMAGES OR EXCLUSIONS OR LIMITATIONS ON THE DURATION OF IMPLIED
WARRANTIES OR CONDITIONS, SO THE ABOVE LIMITATIONS OR EXCLUSIONS MAY NOT APPLY
TO YOU. THIS WARRANTY GIVES YOU SPECIFIC LEGAL RIGHTS, AND YOU MAY ALSO HAVE OTHER
RIGHTS THAT VARY BY STATE OR (WHERE APPLICABLE IN THE COUNTRIES WHERE FURRION
HAS NON-US/CANADIAN AUTHORIZED DEALERS) COUNTRY. NO ACTION OR CLAIM TO ENFORCE
THIS WARRANTY SHALL BE COMMENCED AFTER THE EXPIRATION OF THE WARRANTY PERIOD.
Keep your receipt, delivery slip, or other appropriate payment record to establish the warranty
period. Service under this warranty must be obtained by contacting Furrion at
Product features or specifications as described or illustrated are subject to change without notice.

29

30

Furrion Innovation Center & Institute of Technology
52567 Independence Ct., Elkhart, IN 46514, USA Toll free:1-888-354-5792
Email: [email protected]
©2007-2018 Furrion Ltd. Furrion
®
and the Furrion logo are trademarks licensed for
use by Furrion Ltd. and registered in the U.S. and other countries.
FURRION.COM
IM-FAV00033 V1.0