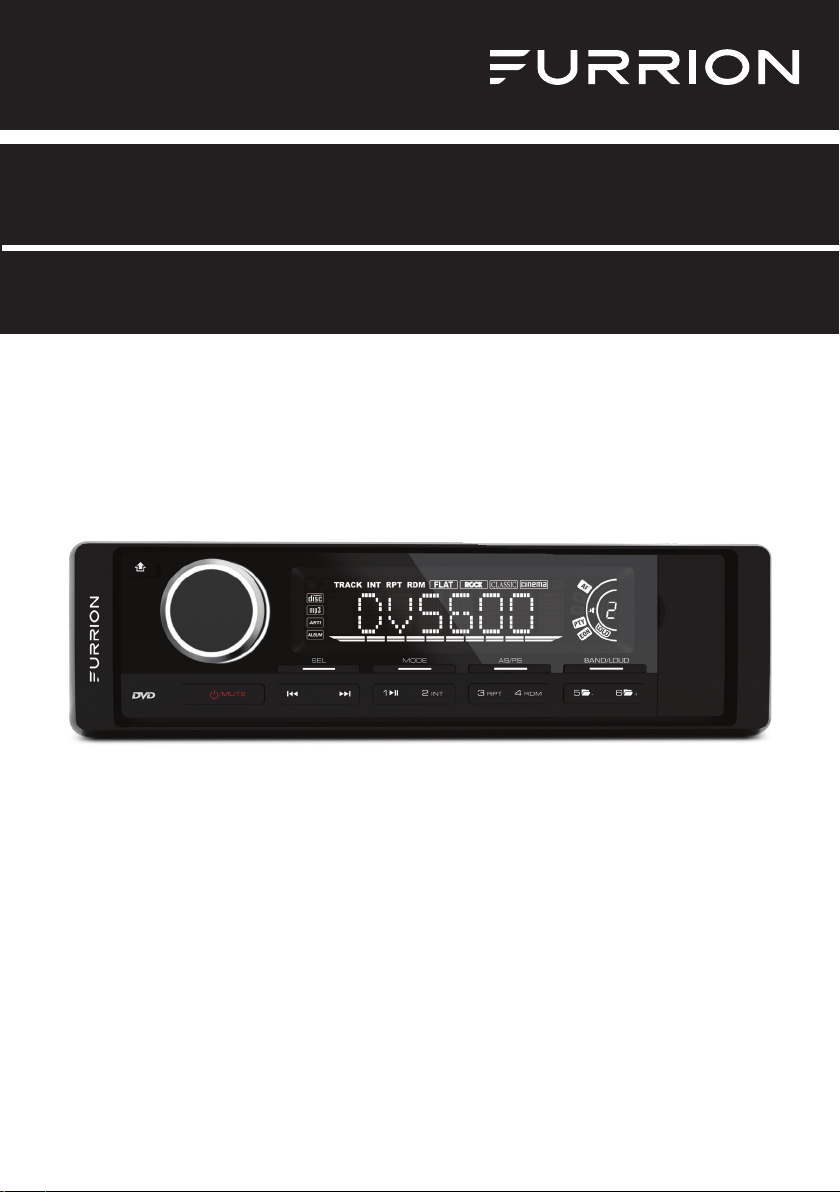
*Product picture is for reference only.
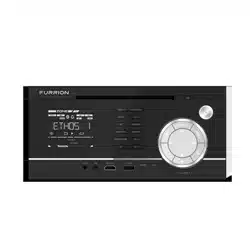
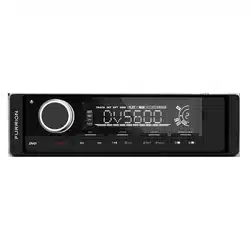
Entertainment System DV5600
Instruction Manual
Model: DV5600

1
Welcome
English
Thank you and congratulations for purchasing the Furrion
®
DV3300S-BL Entertainment System.
Before operating your new product, please read these instructions carefully. This instruction
manual contains information for safe use, installation, and maintenance of the product.
Please keep this instruction manual in a safe place for future reference. This will ensure safe
use and reduce the risk of injury. Be sure to pass on this manual to new owners of this product.
The manufacturer does not accept responsibility for any damages due to not observing these
instructions.
If you have any further questions regarding our products, please contact us at
supportfurrion.com

2
Contents
English
Welcome ...........................................................................................................1
Contents ...........................................................................................................2
Safety and Notice ..............................................................................................3
Class 1 Laser Product ....................................................................................................................3
Safety ..............................................................................................................................................3
Notice of compliance .....................................................................................................................4
FCC Radiation Exposure Statement ..............................................................................................4
Introduction ......................................................................................................5
What’s in the box ............................................................................................................................ 5
Precautions ....................................................................................................................................5
Features .........................................................................................................................................6
Supported Format ..........................................................................................................................6
Functional Overview .........................................................................................7
Control Panel .................................................................................................................................7
Remote Control .............................................................................................................................8
Before Operation ..............................................................................................10
Wiring Diagram ..............................................................................................................................10
Prepare the Remote Control ..........................................................................................................13
Operation .......................................................................................................... 14
Quick Reference Guide ...................................................................................................................14
Common Operation ........................................................................................................................ 16
Radio Operation .............................................................................................................................16
Basic Disc / USB Operation ...........................................................................................................17
Advanced Disc / USB Operation .....................................................................................................18
Set up the DVD System Menu ........................................................................................................21
Maintenance .....................................................................................................24
Maintenance and Cleaning of Discs ..............................................................................................24
Troubleshooting ................................................................................................25
Specifications ...................................................................................................27
Warranty ...........................................................................................................28
3
Safety and Notice
English
Safety
CAUTION
RISK OF ELECTRIC SHOCK
DO NOT OPEN
WARNING: TO REDUCE THE RISK OF FIRE OR
ELECTRIC SHOCK, DO NOT REMOVE COVER ( OR
BACK). NO USER SERVICEABLE PARTS INSIDE. REFER
SERVICING TO QUALIFIED SERVICE PERSONNEL.
WARNING
TO REDUCE THE RISK OF FIRE OR ELECTRIC SHOCK,
DO NOT EXPOSE THIS APPLIANCE TO RAIN OR
MOISTURE.
The lightning flash with arrowhead
symbol within an equilateral
triangle is intended to alert the
user to the presence of uninsulated
dangerous voltage within the product’s
enclosure that may be of sufficient
magnitude to constitute a risk of electric
shock.
The exclamation point within an
equilateral triangle is intended to
alert the user to the presence of
important operating and maintenance
(servicing) instructions in the literature
accompanying the appliance.
Class 1 Laser Product
Laser product symbol:
Located on the rear
panel of the unit, this
symbol indicates this
unit is a class 1 laser
product. Only use weak laser and no
hazardous radiation outside of the unit.
1. Read through this instruction manual
before installation and use.
2. Do not touch the power plug with wet
hands.
3. Switch off the power when the unit is not
in use. (Disconnect the power plug from
the power outlet when you do not intend
to use the unit for a prolonged period of
time.) Before moving the unit, remove the
disc from the unit/tray first.
4. Do not open the cover or touch any of
the components inside of the unit. Only
a qualified technician should service the
unit.
5. To avoid damaging the unit, do not expose
the unit to direct sunlight or objects that
radiate heat.
6. Do not place the unit in moist or humid
conditions. Moisture will affect normal
operation and damage the unit.
7. Place the unit on a flat, well-ventilated
location. Please ensure the ventilation
holes are not covered to avoid overheating
and malfunction.
8. Clean the panel and case with a soft
dry cloth only. Do not apply any kind of
thinner, alcohol or sprays.
9. The apparatus should not be exposed
to dripping or splashing. Do not place
objects filled with liquids (such as vases)
on the apparatus.
WARNING
● Do not ingest the battery contained within the
remote control supplied with the unit as this battery
represents a chemical burn hazard.
● This product contains a coin/button cell battery.
● If the coin/button cell battery is swallowed, it can
cause severe internal burns in just 2 hours and can
lead to death.
● Keep new and used batteries away from children.
● If the battery compartment does not close securely,
stop using the product and keep it away from children.
● If you think batteries might have been swallowed or
placed inside any part of the body, seek immediate
medical attention.
CAUTION
● Danger of explosion if battery is incorrectly replaced.
● Replace only with the same or equivalent battery type.
● The battery should not be exposed to excessive heat
such as sunshine or fire.

4
English
Safety and Notice
Notice of compliance
The device complies with Part 15 of the FCC
Rules. Operation is subject to the following
two conditions:
1. This device may not cause harmful
interference, and
2. This device must accept any interference
received, including interference that may
cause undesired operation.
FCC rules
This equipment has been tested and found
to comply with the limits for a Class B
digital device, pursuant to part 15 of the FCC
Rules. These limits are designed to provide
reasonable protection against harmful
interference in a residential installation. This
equipment generates, uses and can radiate
radio frequency energy and, if not installed
and used in accordance with the instruction
manual, may cause harmful interference to
radio communications.
However, there is no guarantee that
interference will not occur in a particular
installation. If this equipment does cause
harmful interference to radio or television
reception, which can be determined by
turning the equipment off and on, the user is
encouraged to try to correct the interference
by one or more of the following measures:
● Relocate the receiving antenna.
● Increase the separation between
equipment and receiver.
● Connect the equipment into an outlet on
a circuit different from that to which the
receiver is connected.
● Consult the dealer or an experienced
radio/TV technician for help.
FCC Radiation Exposure Statement
This equipment complies with FCC radiation
exposure limits set forth for an uncontrolled
environment.
This transmitter must not be co-located
or operating in conjunction with any other
antenna or transmitter.
All registered and unregistered trademarks
are property of their respective owners.
Changes or modifications not expressly
approved by the party responsible for
compliance could void the user’s authority to
operate the equipment.
5
Introduction
English
What’s in the box
Thanks for purchasing the Furrion DV5600 Entertainment System. This manual will help you set
up and begin using your product. Please read this manual thoroughly and keep this manual in a
safe place for future reference.
First, check the contents of your box with the parts checklist below:
● Furrion DV5600 Entertainment System
1
Main unit
2
Mounting bracket
3
Mounting screw cm5x8mm x 4pcs
4
Mounting screw pa5x16mm x 4pcs
5
Trim cover
6
Rear support strap
7
Hex nut
8
Lock washer
9
Plain washer
10
Tapping screw pa5x16mm
● Remote control
● Printed materials
Precautions
Connect this unit to a 12V DC negative ground battery system which is standard in North American
and European vehicles.
When installing the unit, ensure that all wire ends not in use are insulated to avoid short circuit or
earthing which can lead to the risk of fire or electrical shock.
Avoid inserting foreign objects into the disc loading slot of the unit as this will cause malfunction.
Do not expose this unit to moisture or wet environments. If condensation is present on the screen,
wait for 1 hour or more for the moisture to evaporate.
If the interior of the vehicle is extremely hot, do not use the unit until the vehicle's internal
temperature has cooled down.
Do not use cleaning products on the front face of the unit. Only use a slightly damp cloth for
cleaning.
Do not attempt to disassemble or adjust this unit. Contact a service center for assistance.
4
1
5
7
9
6
8
7
8
9
10
8
9
2
3
4
2
6
Introduction
English
Features
● Digital AM / FM Tuner
● DVD/CD-R/RW/MP3/WMA Compatible
● Auxiliary inputs on front and rear
● USB input
● 1 x RCA audio/video output for connecting additional TV
● 1 x subwoofer output
● 1 x memory card (SD/MMC) slot
● Detachable front panel (for antitheft purpose)
● Clock
Supported Format
Supported Video Format
File
Extension
Container Video Codec Audio Codec Resolution Remark
.avi
.divx
AVI
MPEG-4 Visual
DivX
4.xx/5.xx/6.xx/3ivX
XviD
MPEG-1
Dolby Digital (AC3)
WMA/PCM/LPCM
AAC-LC (2ch)
MPEG-Audio
(MP1/MP2/MP3)
720 x 480 (30fps)
.mpg MPG MPEG-1/MPEG-2
Dolby Digital (AC3)
LPCM
MPEG-Audio
(MP1/MP2/MP3)
720 x 576 (30fps)
.dat DAT MPEG-1/MPEG-2
Dolby Digital (AC3)
LPCM
MPEG-Audio
(MP1/MP2/MP3)
352 x 240 (30fps)
.vob VOB MPEG-1/MPEG-2 Dolby Digital (AC3) 720 x 480 (30fps)
Supported Audio Format
File Extension Audio Codec Bit Rate Sampling Rate Remark
.mp3 MP3 16kbps - 320kbps 8k - 48kHz
.wma WMA 16kbps - 320kbps 8k - 48kHz
Only WMA7/
WMA8/WMA9
(CBR/VBR)
supported (only
353 format
supported)
Note: Compatibility with the above file formats is not guaranteed.
7
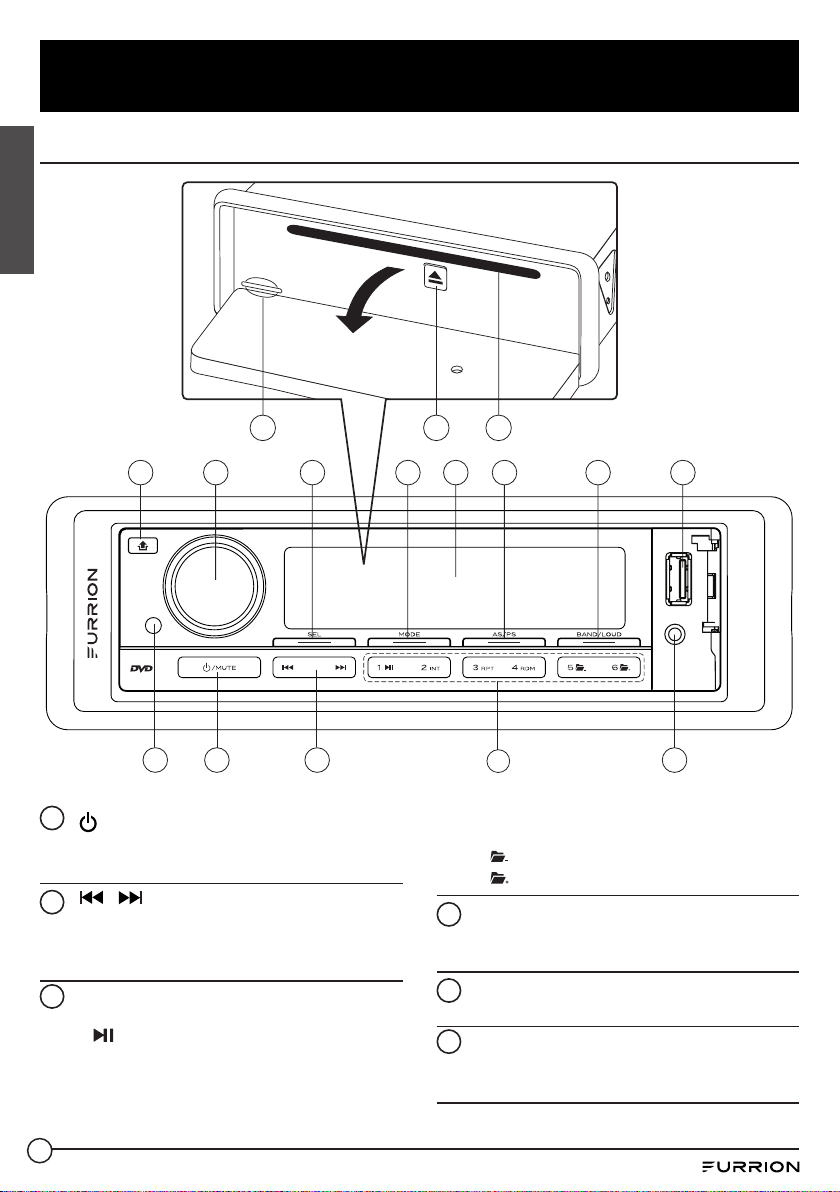
Functional Overview
English
Control Panel
1 42
812 11
14 15 16
10 9
7 6 5
3
13
1
/ MUTE
Turn on or off the unit.
Mute or un-mute the audio output.
2
/
Skip to the previous / next track.
Fast backward / forward within a track.
Tune to a radio station.
3
Number buttons (1 - 6)
Select and enter numbers.
1 : Start (resume) / pause playback.
2 INT: Play the first 10 seconds of each
track (for CD playback only).
3 RPT: Select repeat playback mode.
4 RDM: Select random playback mode.
5 : Skip to the previous folder.
6 : Skip to the next folder.
4
AUX socket
Connect to the 3.5mm audio output
socket on an auxiliary device.
5
USB socket
Connect a USB storage device.
6
BAND / LOUD
Select AM / FM band.
Enable or disable the loudness effect.
8
English
7
AS / PS
Start automatic programming of radio
stations.
Scan preset radio stations.
Stop playback.
8
LCD screen
9
MODE
Select a sound source.
10
SEL
Select a preset sound effect.
11
Volume knob
Turn the knob clockwise /
counterclockwise to increase / decrease
volume.
In FM mode, switch between stereo and
mono sound output.
In radio mode, enable or disable local
mode.
12
Unlock and release the front panel.
13
IR sensor for remote control
14
Memory card (SD/MMC) slot
15
Eject the loaded disc.
16
Disc slot
Functional Overview
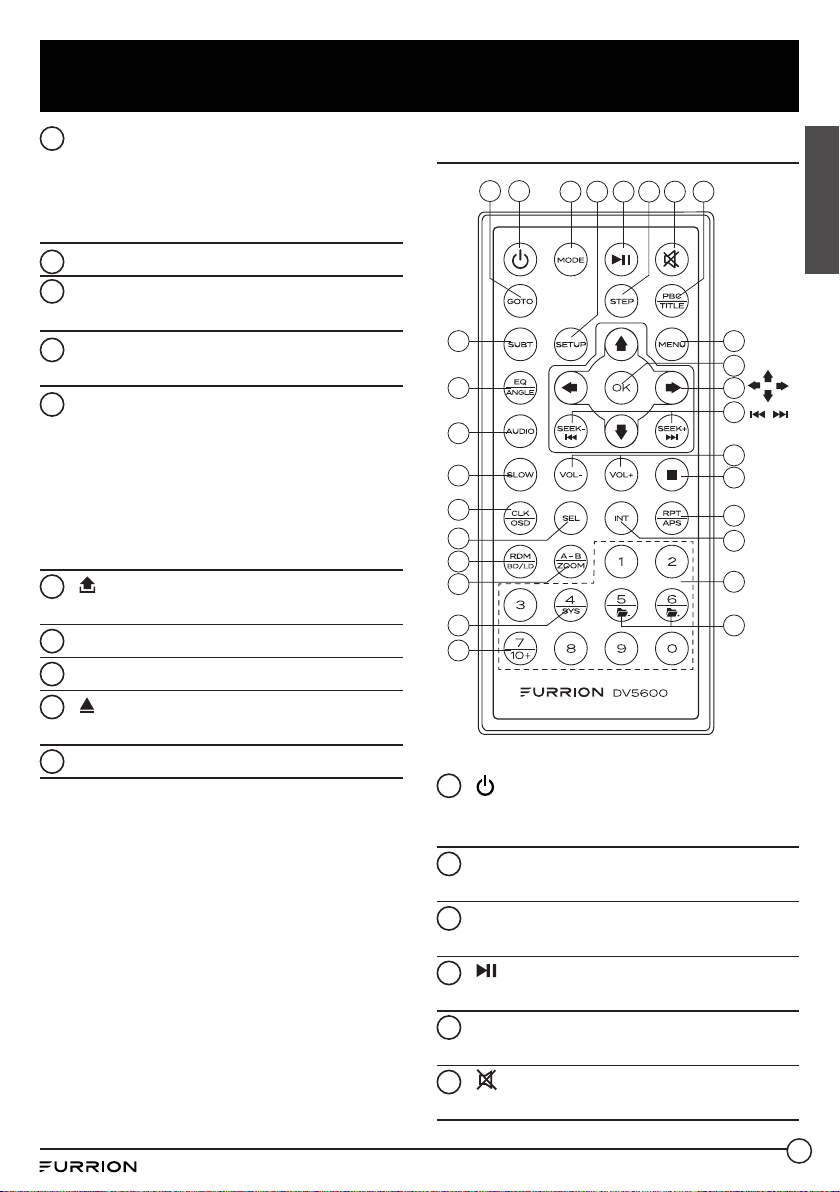
Remote Control
1
28
5
3
7
8
2 4 6
VOL+/-
9
1026
27
25
24
23
21
18
22
20
19
13
14
15
16
17
12
11
1
Turn on the unit or switch to standby
mode.
2
MODE
Select a sound source.
3
SETUP
Access or exit the DVD system menu.
4
Start (resume) / pause playback.
5
STEP
Play a DVD/VCD frame by frame.
6
Mute or un-mute the audio output.
9
English
Functional Overview
7
PBC / TITLE
Display the title list during DVD/VCD
playback.
Turn on / off PBC (PlayBack Control) of a
disc (if available).
8
MENU
Return to the previous menu or root
menu (for DVD with a root menu only).
9
OK
Confirm your selection.
10
Navigation buttons
: Navigate in a menu.
11
SEEK +/- ( / )
Skip to the previous/next track.
Fast backward / forward within a track.
Tune to a radio station.
12
VOL +/-
Increase / decrease volume.
13
Stop playback.
14
RPT / APS
Select repeat playback mode.
Start automatic programming of radio
stations.
Scan preset radio stations.
15
INT
Play the first 10 seconds of each track
(for CD playback only).
16
Number buttons (0 - 9)
Select and enter numbers.
4 SYS: Switch between PAL and NTSC
systems.
5 : Skip to the previous folder.
6 : Skip to the next folder.
7 / +10: Input a number larger than 9.
17
A-B / ZOOM
Play a specific segment in a chapter /
track repeatedly.
During DVD/VCD playback, zoom in / out
on images.
18
RDM / BD / LD
Select random playback mode.
Select AM / FM band.
Enable or disable the loudness effect.
19
SEL
Select a preset sound effect.
20
CLOCK / OSD
Enter clock setting mode.
Display the clock.
Display the playback status.
21
SLOW
During disc playback, select a slow
forward speed.
22
AUDIO
Select a subtitle language (if available)
during DVD playback.
Select a sound mode (MONO LEFT,
MONO RIGHT, or STEREO) during VCD
playback.
23
EQ / ANGLE
Select a preset EQ sound effect.
During DVD playback, adjust the viewing
angle (if available).
24
SUBT
Select the caption language during DVD
playback (if available).
25
GOTO
Show or hide the search window during
disc playback.
10
Before Operation
English
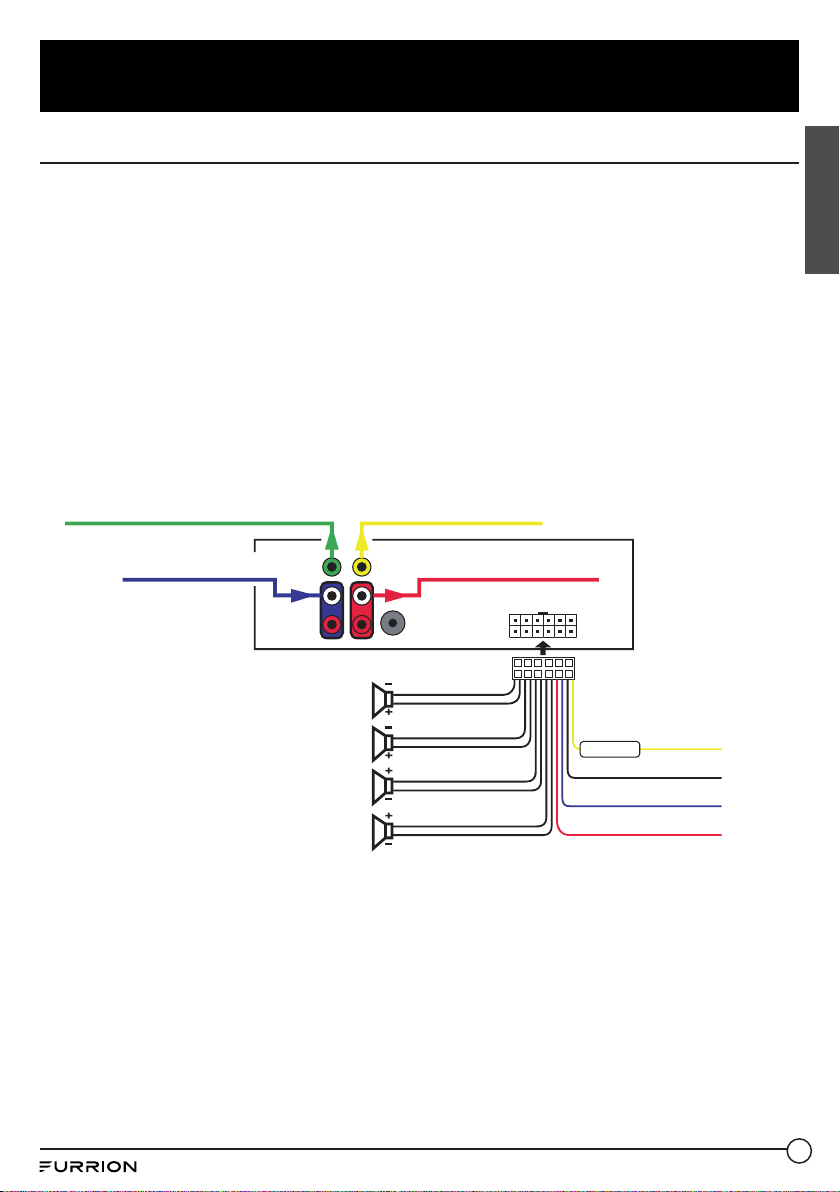
Wiring Diagram
Audio Output: Left (White) and Right (Red)
Audio Input: Left (White) and Right (Red)
Subwoofer Output: Green
Video Output: Yellow
Connect to an external A/V system for display.
Note: Connect red wires to your car ignition key to avoid car battery drain when the car is not to
be used for a long period.
Fuse replacement
If the fuse blows, check the power connection and replace the fuse. If the new fuse blows again,
there may be an internal malfunction. In this case, consult your nearest repair center.
Warning: Use the specified fuse for each lead. Use of a fuse with higher amperes may cause
serious damage.
ANTENNA
CONNECTOR
FUSE 10A
MEMORY B+
GROUND
AUTO ANTENNA
IGNITION SWITCH
RED
BLUE
BLACK
YELLOW
PURPLE
PURPLE/BLACK
GREEN
GREEN/BLACK
WHITE
WHITE/BLACK
GREY
GREY/BLACK
REAR RIGHT
SPEAKER
REAR LEFT
SPEAKER
FRONT LEFT
SPEAKER
FRONT RIGHT
SPEAKER
AUDIO OUT AUDIO IN
VIDEO OUT SUBWOOFER OUT
11
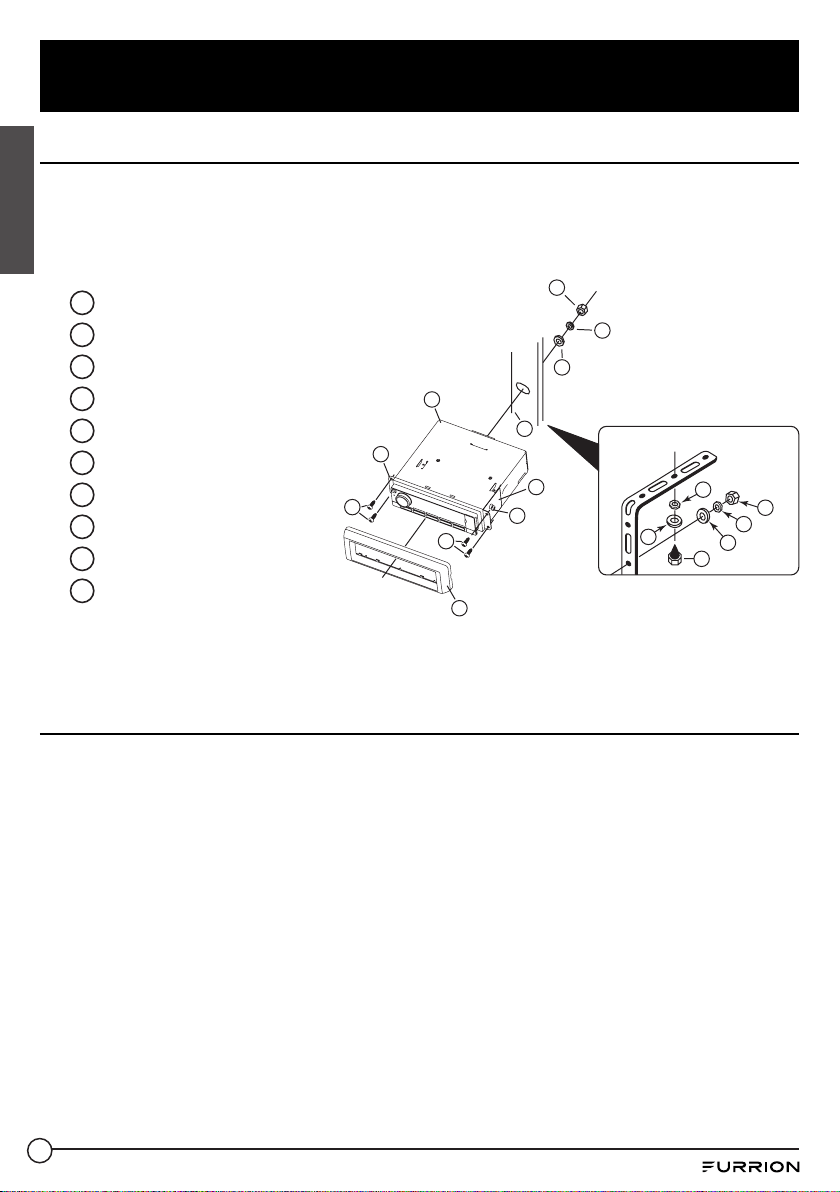
Before Operation
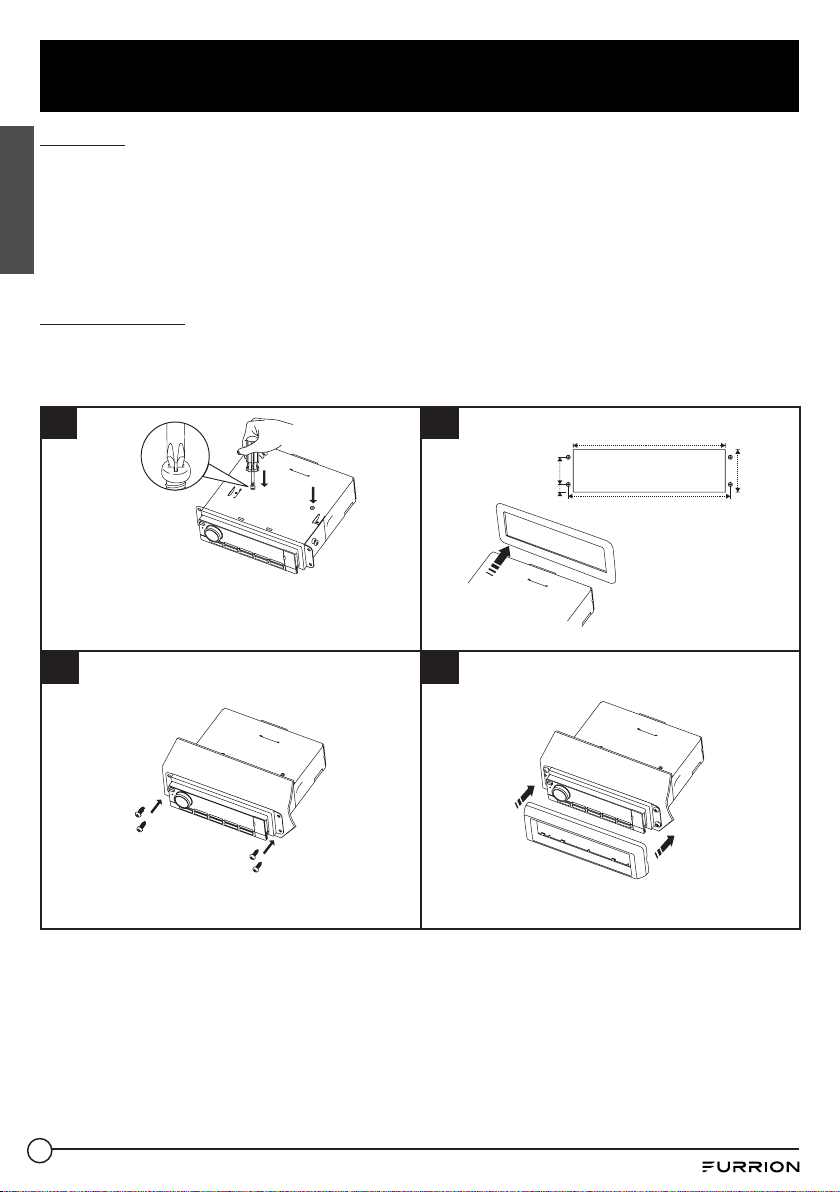
Location
1. Choose a mounting location away from humid areas, water sources, appliances or any
equipment that can radiate heat.
2. Select an area on a wall or cabinet which is free from cable, fuel or brake lines. Ensure the
area behind the unit has a vent hole or if it is an enclosed box, it has adequate room around
the rear of the unit for cooling.
3. Ensure when the unit is mounted the wires at the rear are not pressed against the heat sink.
Install the unit
● Before installing the unit, connect the wiring temporarily and make sure the unit and the
system work properly.
● Fix the unit with screws according to the following diagram.
Release screw
Use a screwdriver with appropriate torque only. Any other
tools or excess torque may damage the deck mechanism.
The manufacturer shall not be liable forfor any such
damage.
182.6mm
51mm
194.6mm
32.7mm
9.15mm
Recommended
cutout
1 2
3 4
English
12
Before Operation
Attach / detach the front panel
Notes:
● You can easily attach the front panel by pressing it lightly against the unit. Never press it
hard.
● Do not press hard or give excessive pressure to the LCD display of the front panel during
operation.
● Before opertion, ensure the unit is switched off.
To detach:
15°
15°
15°
15°
1. Press to unlock and release the front panel.
2. Detach the panel by pulling it towards you.
To attach:
15°
15°
15°
15°
1. Align the front panel with the unit as shown.
2. Lift up to attach and lock the front panel.
Clean the connectors
The unit may malfunction if the connectors between the unit and
front panel are dirty. As a preventive measure, detach the front panel
and clean the connectors with a cotton swab and contact cleaner (not
supplied) from time to time.
Note: Be sure to clean pin by pin carefully without damaging the
connecting points.
Cotton Swab
Rear of front panel
Main unit
English
13
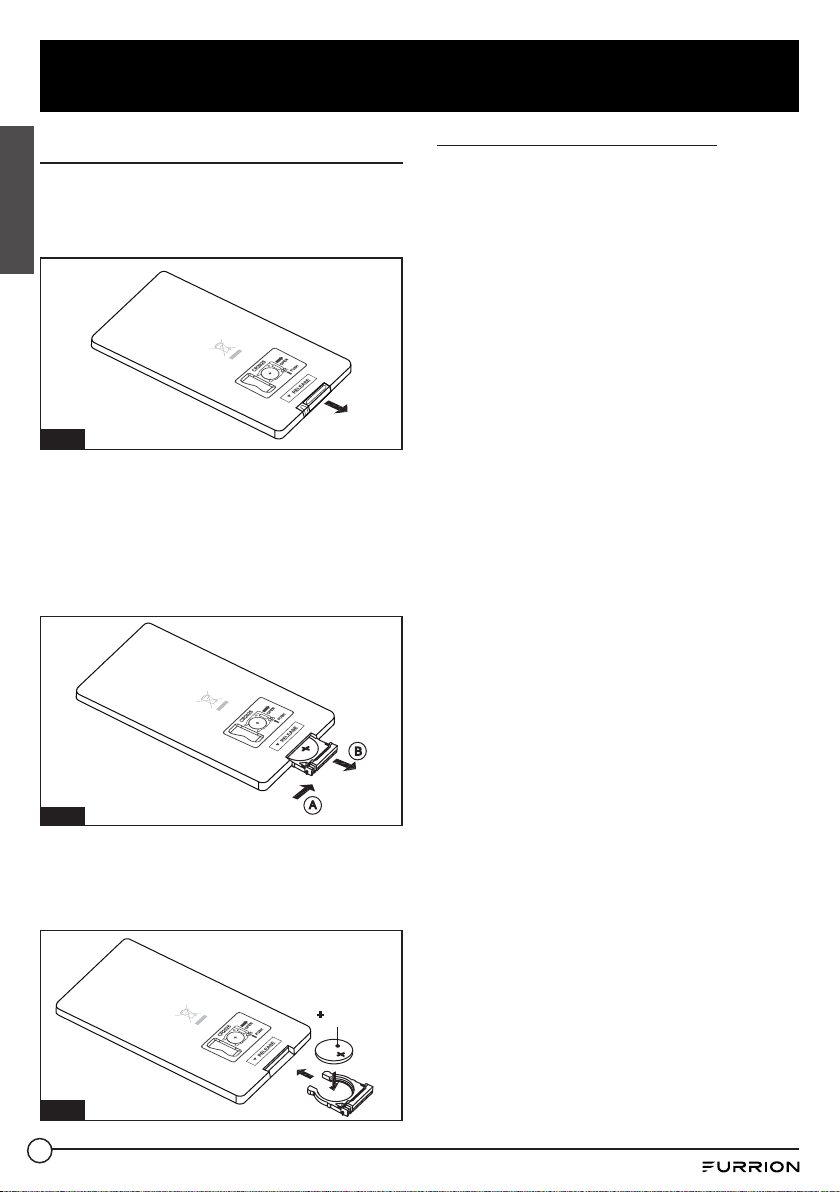
Prepare the Remote Control
1. Before using the remote control for the
first time, pull the insulating sheet out
of the remote control in the direction
indicated by the arrow. (Fig.1)
Fig. 1
2. Point the remote control towards the IR
sensor on the front panel to operate.
To replace remote control battery
1. Press the movable block hold in the direction
indicated by arrow A (Fig.2), then pull the battery
holder out of the remote control as the direction
indicated by arrow B. (Fig.2)
Fig. 2
2. Replace the old battery with a new battery with
the (+) polarity side upward. (Fig.3)
3. Insert the battery holder to the original position
in the remote control. (Fig.3)
side up
Fig. 3
Remote control battery note
● Improper use of a battery may cause
overheating or an explosion that could
result in injury or fire.
● Battery leakage may cause damage to the
remote control. Battery Life: 6 months with
normal use in normal room temperature.
● Do not short the battery.
● Do not throw the battery into the fire.
● To avoid the risk of accident, keep the battery out
of reach of children.
Before Operation
English
14
Operation
English
Quick Reference Guide
General Operation
Power on/off
Press to turn on the unit.
Press and hold on the main unit (or press on the remote control) to
turn off the unit.
Mute
Press / MUTE on the front panel (or on the remote control) to mute
sound.
Press the button again to restore the sound.
Select a source
Press
MODE once or more to select TUNER, DISC (with a disc loaded), USB
(with a USB storage device connected), SD, or AV IN.
Adjust volume
Rotate the volume knob on the front panel (or press VOL +/- on the remote
control) to adjust volume.
Select a feature /
setting
1. Press and hold SEL once or more to select EQ, LOUD, STEREO, or LOCAL.
2. Rotate the volume knob to select a feature / setting.
Select the bass/treble
level
Press SEL once or more to select BASS, TREBLE, BALANCE, or FADER.
Select a preset EQ
Press EQ/ANGLE on the remote control once or more directly, or press and
hold SEL once or more to select EQ and then rotate the volume knob to select
Flat, Classic, Cinema, Rock, or EQ Off. The sound effect will change accordingly.
Set clock
1. Press CLK/OSD on the remote control to show the clock digits.
2. Press and hold CLK/OSD to enter clock setup mode.
3. Rotate the volume knob to adjust the hour.
4. Press CLK/OSD to enter minute setting.
5. Rotate the volume knob to adjust the minute.
The time on the clock is set automatically after a few seconds of inactivity.
Turn on / off loudness
effect
Press and hold BAND/LOUD on the front panel (or RDM/BD/LD on the remote
control) to turn on or off the loudness sound effect.
Or press and hold SEL once or more to select LOUD, and then rotate the
volume knob to turn on or off the loudness sound effect.
15
Operation
English
Radio Operation
Select radio region
Press and hold BAND / LOUD on the front panel (or RDM / BD / LD on the remote
control) for 2 seconds, then immediately press 3 RPT, 1 and 5 successively to
select the AM/FM radio region (USA/AUS).
Manual tuning
1. Press and hold / until 'MANUAL' is displayed.
2. Press / to move the radio frequency down or up one step at a time.
Automatic tuning
Press / to search for the next strongest station automatically.
Select a band
Press BAND / LOUD on the front panel (or RDM / BD / LD on the remote control) to
select FM1, FM2, FM3, AM1, or AM2.
Store and recall a
preset station
Press and hold any one of the six preset buttons (1-6) to store the current frequency.
Press the corresponding preset number button to recall the stored frequency.
Store stations
automatically
Press and hold AS/PS on the front panel (or RPT/APS on the remote control) to
automatically store the six strongest stations on the current band.
Up to 18 FM stations and 12 AM stations can be stored.
Scan preset stations
Press AS/PS on the front panel (or RPT/APS on the remote control) to scan presets
1-6 on the current band.
LOC
Press and hold SEL once or more to select LOCAL, and then rotate the volume knob
to turn on / off the LOC (local) function.
Stereo/mono
In FM mode, press and hold SEL once or more to select STEREO, and then rotate the
volume knob to select stereo or mono sound output.
Disc / USB Operation
Insert a disc
1. Press to unlock and release the front panel.
2. With the label facing up, insert a disc into the disc slot.
3. Lift up to attach and lock the front panel.
The disc will automatically begin playback..
Eject the disc
Release the front panel, then press to eject the disc.
Select a chapter / track
Press / to skip to the previous or next chapter / track.
Fast backward / forward
Press and hold / to fast backward / forward.
Pause playback
Press to temporarily stop playback.
Press again to resume playback.
Stop playback
Press AS/PS on the front panel (or on the remote control) once to pause playback.
Then you can press to resume.
Press AS/PS on the front panel (or on the remote control) twice to stop playback.
Then press to start playback from the beginning of the first chapter / track.
Repeat
Press RPT to play the current chapter / track repeatedly.
Press RPT again to resume.
Random
Press RDM to play each track in random order.
Press RDM again to resume.
Title In DVD/VCD mode, press PBC/TITLE on the remote control to display the title list.
16
Operation
Common Operation
Turn the unit on / off
Press to turn on the unit.
Press and hold on the main unit (or press on
the remote control) to turn off the unit.
Select a source
Press
MODE once or more to select TUNER, DISC
(with a disc loaded), USB (with a USB storage
device connected), SD, or AV IN.
Adjust volume
Rotate the volume knob clockwise /
counterclockwise (or press VOL +/- on the
remote control) to increase / decrease volume.
Mute
1. Press / MUTE on the front panel (or on
the remote control) to mute sound output in
any source mode.
'MUTE' appears on the screen.
2. Press the button again to resume.
Display and set the clock
1. To display the clock on the LCD display,
press CLK/OSD on the remote control.
2. To adjust or set the clock, when the clock
is displayed, press and hold CLK/OSD on
the remote control to enter clock setup
mode.
Rotate
the volume knob
to adjust the hour.
Press CLK/OSD
to enter minute setting.
Rotate
the volume knob
to adjust the
minute.
The time on the clock is set automatically
after a few seconds of inactivity.
Select a preset EQ mode
Press EQ/ANGLE on the remote control once
or more directly, or press and hold SEL once
or more to select EQ and then rotate the
volume knob to select Flat, Classic, Cinema,
Rock, or EQ Off.
The sound effect will change accordingly.
Turn on / off LOUD mode
Press and hold BAND/LOUD on the front
panel (or RDM/BD/LD on the remote control)
to turn on or off the loudness sound effect.
Or press and hold SEL once or more to select
LOUD, and then rotate the volume knob to
turn on or off the loudness sound effect.
Select the bass/treble level
Press SEL once or more to select BASS,
TREBLE, BALANCE, or FADER.
Return to the previous menu
Press MENU on the remote control.
Radio Operation
Select a radio region
In radio mode, press and hold BAND / LOUD on
the front panel (or RDM / BD / LD on the remote
control) for 2 seconds, then immediately press
3RPT, 1 and 5 successively to select
the AM/FM radio region (USA/AUS).
Select AM/FM band
In radio mode, Press BAND / LOUD on the front
panel (or RDM / BD / LD on the remote control) to
select FM1, FM2, FM3, AM1, or AM2.
The selected band will be displayed on the
front panel.
English
17
Operation
Tune to / search for radio stations
In radio mode:
● Press / to automatically search
down/up for an available station from the
current frequency.
● Press and hold / until 'MANUAL'
is displayed, then press /
to manually search up or down for
your desired station from the current
frequency.
Use the AS/PS button
In radio mode:
1. Press and hold AS/PS on the front panel (or
RPT/APS on the remote control) to search
for radio frequencies with sufficient
signal strength (starting from the lowest
frequency and ending until the search
cycle is finished).
2. Press AS/PS on the front panel (or RPT/APS
on the remote control) to play each preset
station for 5 seconds.
Use the preset number button (1-6)
In radio mode:
1. To store the current frequency on the
current band, press and hold any one of
the six preset number buttons (1-6).
2. To recall the preset memory on the
current band, press one of the preset
buttons [1-6].
Switch between STEREO/MONO
1. In FM mode, press and hold SEL once or more
to select STEREO.
2. Rotate the volume knob to select stereo or
mono sound output.
Use the LOC ON / OFF function
1. In radio mode, sometimes the signals of
the distant radio stations are very weak
and the reception is poor during tuning.
You can press and hold SEL once or more to
select LOCAL, and then rotate the volume
knob to turn off the LOC function before
tuning again for the distant radio stations.
2. In radio mode, too strong signals from
the local radio stations may lead to
interference. You can
press
press and
hold SEL once or more to select LOCAL, and
then rotate the volume knob to turn on the
LOC function before tuning to the local
stations again.
Basic Disc / USB Operation
Start playback
1. Press
to turn on the unit.
2. Turn on the TV set, from which the video
output is connected to the video input of
the unit.
● If nothing displays on the TV screen
when the unit is turned on, ensure that
the TV is set to the right video input (not
TV channel). For example, if the TV is
connected with the unit via the VIDEO
1 INPUT, then you need to set the TV to
VIDEO1.
3. Press to unlock and release the front
panel.
4. Insert a disc into the disc slot (with the
label side facing up).
5. Lift up to attach and lock the front panel.
NOTE:
− Discs that are seriously scratched or of
poor manufacturing or recording quality
may not play.
− If the unit cannot read a disc in normal
conditions, please try to eject and reload
the disc.
English
18
Operation
Pause playback
When playing DVD/VCD/CD/MP3/WMA discs,
press to pause playback. You can press
again to resume normal playback.
Stop playback
● When playing DVD/VCD/MP3/WMA/CD
discs, press AS/PS on the front panel (or
on the remote control) once to pause
playback, then you can press to
resume normal playback.
● During playback, press AS/PS on the front
panel (or on the remote control) twice to
stop playback, then you can press to
start playback from the beginning of the
first chapter / track.
Select a chapter/track
Press / during playback to select
the previous / next chapter or track for
playback.
Note: You can press and hold to fast
backward / forward within a chapter / track.
Select a chapter / track from the
root/PBC menu (if available)
For DVD:
1. Press PBC/TITLE on the remote control
to display the title list.
2. Press the navigation buttons to select your
desired title, and then press OK or to
open the root menu of the selected title.
3. Press the navigation buttons to select
your desired chapter, then press OK or
to play the selected chapter.
● During playback, you can press PBC/
TITLE to display the root menu of the
current title directly, and then perform
the same operation to resume normal
playback.
For VCD:
1. When PBC is enabled, the disc will play
with the PBC menu (if available) displayed
on the TV screen.
2. Press the number buttons to select your
desired track to play.
For MP3/WMA:
● During playback, the root menu is
displayed on the TV screen all the time
(TITLE/PBC unavailable).
● Press the navigation buttons to select
your desired folder, and then press OK or
to open the folder.
Press the navigation buttons to select
your desired file, and then press OK to
play the selected file.
For CD:
The TITLE/PBC button is disabled.
Terminate playback
1. Press to unlock and release the front
panel.
2. Press
to eject the disc.
3. Press and hold on the front panel (or
press on the remote control) to turn off
the unit.
Advanced Disc / USB Operation
Fast backward / forward
During normal playback, press and hold
/ once or more to fast backward
or forward at the following speed: x2, x4, x8,
x16, x20, or normal.
During fast backward / forward, press to
resume normal playback.
Slow forward
● During playback, press SLOW on the
remote control to slow forward.
● Press SLOW consecutively to decrease
the playback speed as follows:
x⁄, x⁄, x⁄, x⁄, x⁄, x⁄, normal.
● During slow forward, press to resume
normal playback.
Note: The function is only available for video
playback.
English
19
Operation
Play frame by frame
1. During DVD/VCD playback, press STEP on
the remote control consecutively to play
frame by frame forward.
2. Press to resume normal playback.
Play repeatedly
Repeat One / All
1. During DVD playback:
Press RPT to select Repeat 1, or Repeat
Off.
2. During VCD (PBC OFF)/CD playback:
Press RPT to select Repeat 1, Repeat All,
or Repeat Off.
The RPT button is unavailable when PBC
is enabled during VCD playback.
3. During MP3/WMA playback:
Press RPT to select Repeat 1, Repeat
Folder, or Repeat Off.
Repeat A-B
Use this function if you want to repeat a
specific segment on a disc that you define:
1. Press A-B at a point (A) where you want
it to be the start point of the repeat
segment.
2. Press A-B again at a point (B) where you
want it to be the terminal point of the
repeat segment.
Then the segment will be played
repeatedly.
● To cancel A-B repeat mode and resume
normal playback, press A-B for the third time.
Note:
During DVD/VCD/MP3/WMA/CD playback,
points A and B must be within the same track.
Play from a specified chapter / track
or specified time
During DVD playback:
1. Press GOTO on the remote control to
display a search box, with the title field
highlighted.
2. Use the number buttons to input the
serial number of a title.
3. Use the navigation buttons to highlight
the chapter field, and then use the
number buttons to input the serial
number of a chapter.
4. Press OK or to play the selected
chapter.
During VCD/MP3/WMA/CD playback:
1. Press GOT on the remote control to
display a search box, with the track field
highlighted.
2. Use the number buttons to input the
serial number of a track, and then press
OK or to play the selected track.
Play randomly
During DVD/VCD (PBC OFF)/MP3/WMA/CD
playback, press RDM once or more to switch
between RANDOM ON and RANDOM OFF.
In RANDOM ON mode, the chapters / tracks
will be played randomly.
Play from different angles
During DVD playback, press ANGLE on the
remote control once or more to view from
different angles.
Note:
− This function is only available for discs
recorded with different camera angles.
− The ANGLE button is unavailable for VCD/
MP3/WMA/CD discs.
Zoom in / out during playback
1. During DVD/VCD playback, press ZOOM
on the remote control once or more
to enlarge / shrink a certain area of
the images on the screen with these
multiples:
ZOOMx2, ZOOMx3, ZOOMx4, ZOOMx⁄,
ZOOMx⁄, ZOOMx⁄, ZOOM OFF.
2. Press one of the navigation buttons to
select the area you want to enlarge.
English

20
Operation
Change the caption language
When playing DVDs, press SUBT on the
remote control once or more to select the
caption language or turn off the caption (if
available).
Note: This function is unavailable for VCD/
MP3/WMA/CD discs.
Change the audio language
● When playing DVDs, press AUDIO on the
remote control once or more to select the
desired language type (if available).
● When playing VCD discs, press AUDIO on
the remote control once or more to select
MONO L, MONO R, or Stereo (no language
function).
● For CD/WMA/MP3, the AUDIO button is
invalid.
Check the playback status
When playing DVD/VCD/CD discs, press OSD
on the remote control once or more to turn
on or off playback status display.
● For DVD discs, this function allows you
to check such information as the current
title and chapter numbers, and the
elapsed and remaining time of both the
current title and chapter etc.
● For VCD/CD discs, this function allows
you to check such information as the
current track number, and the elapsed
and remaining time of both the current
track and the whole disc.
Play a JPEG picture CD
In disc mode, the root menu is displayed
on the screen with MP3/WMA files being
played at the same time. (TITLE / PBC button
unavailable).
In the root menu, the left file sort icon is
for MP3/WMA files, the middle one is for
video files, and the right one is for JPEG
files. If one of these 3 sorts of files does not
exist, you cannot move the cursor onto the
corresponding file sort icon.
1. Press the navigation buttons to select
your desired folder, file or file sort icon
from the root menu.
2. Press OK or to open the selected
folder, or play the selected file, or play the
selected sort of files only.
● In the root menu, you can also use
the number buttons to select a file for
playback.
● After selecting the JPEG file sort icon
and entering the folder, you can use the
navigation buttons to select your desired
JPEG file, and then press OK or to
start full-screen playback starting from
the selected JPEG picture.
● During JPEG playback, press to stop
playback and return to the root menu.
● During JPEG playback, the following
buttons are unavailable: SLOW, SUBT,
PBC/TITLE, ANGLE, STEP, AUDIO, RDM
and A-B.
● In JPEG mode, the other operations are
the same as those in MP3/WMA mode.
Play MP4
In disc mode, the root menu is displayed on
the screen and the first file will be played
automatically.
During playback, you can press to stop
playback and return to the root menu.
1. Press the navigation buttons to select
your desired folder or file from the root
menu.
2. Press OK or to open the folder, or play
the selected file.
● In the root menu, you can also use
the number buttons to select a file for
playback.
● The ANGLE, RDM, and PBC/TITLE
buttons are invalid.
● The other functions are the same as
those in DVD operation, while the repeat
function is the same as that in MP3/WMA
operation.
English
21
Operation
Show ID3 information
● During MP3/WMA playback, the current file and folder names as well as the ID3 information
(if available in V1.0/2.0 format) will scroll on the LCD screen.
The ID3 information includes the song title, and the artist and album name.
USB / AUX IN / SD (MMC) card operation
1. Power on the unit.
2. To connect a USB storage device or auxiliary device (through a 3.5mm
audio cable): lift open the cover to expose the USB or AUX IN sockets, and
then connect the corresponding device.
● To insert a SD (MMC) card: detach the front panel to expose the SD
(MMC) card slot, and then insert a supported card.
15°
15°
− The screen will display the root menu of the USB storage device or SD (MMC) card.
− This unit supports picture (JPEG format), audio (MP3 or WMA format) and video
(format) playback. All the operations are the same as those of the corresponding
format.
NOTE: Compatibility with all file formats is not guaranteed.
Set up the DVD System Menu
1. Press SETUP on the remote control to access the DVD System Menu on the TV screen.
There are 6 setup pages in total.
2. Press / to select a desired setup page.
3. Press / to select a setup item on the selected setup page.
4. Press to enter the setup item.
5. Press / to select an option for the setup item, and then press OK to confirm.
● Press to return to the upper level.
● Press SETUP on the remote control again or use the navigation buttons to highlight EXIT
SETUP and then press OK to exit the System Menu.
The 6 setup pages of the DVD System Menu are as follows:
System Setup
TV SYSTEM
The unit supports output of various TV systems.
If your TV only supports NTSC or PAL system, the screen will blink and become colorless when
the wrong TV system is selected. In this case go to TV SYSTEM and select NTSC, PAL or AUTO
to match the system of your TV.
AUX IN
USB PORT
English

22
Operation
AUTO PLAY
Turn on / off automatic playback.
TV TYPE
Select an option below to match your TV
screen size.
4:3 PS: Choose the item when connecting a
TV set with 4:3 screen. When playing pictures
of 16:9 size, the left and right parts of the
video will be cut out, and displayed on full
screen.
4:3 LB: Choose the item when connecting a
TV set with 4:3 screen. When playing pictures
of 16:9 size, the top and bottom parts of the
TV screen will be turned into a black square
respectively.
16:9: Choose the item when connecting a TV
set with 16:9 wide screen.
PASSWORD
Lock or unlock the rating level of Parental
Control.
The default state is locked, and the default
password is 0000.
You can set a new password that you like:
Select PASSWORD and then press to enter
the setup item.
Input the original password 0000, and then
press OK to unlock it.
Press to enter the setup item again, then
input a new password that you like and finally
press OK to confirm.
RATING
Set a new rating level for Parental Control.
● Select PASSWORD and then press to
enter the setup item.
Input the set password, and then press
OK to unlock the rating level setting for
Parental Control.
● Select RATING and then press to enter
the setup item.
Use the navigation buttons to select your
desired rating level, and then press OK to
confirm.
● Select PASSWORD again and then press
to enter the setup item.
Input the password and then press OK
to lock the new rating level setting for
Parental Control.
DEFAULT
Reset all settings to their original status.
Language Setup
OSD LANGUAGE
Select the language of the system menu and
all interfaces displayed during playback.
AUDIO LANGUAGE
Select the audio language.
SUBTITLE LANGUAGE
Select the subtitle language.
MENU LANGUAGE
Select the disc menu language.
MPEG4 LANGUAGE
Select the MPEG4 language.
Video Setup
BRIGHTNESS
Adjust the brightness of video output.
CONTRAST
Adjust the contrast of video output.
HUE
Adjust the hue of video output.
SATURATION
Adjust the saturation of video output.
SHARPNESS
Adjust the sharpness of video output.
About Parental Control
Q: After insertion of a DVD into the disc
slot, a dialogue box appears, asking for a
password of 4 digits. Why?
A:
This is because the movie you are playing
was rated with Parental Control, and the
current rating level of the unit is lower than
the one of the current disc. You must input
the right password and enter it into the
Parental Control setup menu and then set
an equal or higher rating level than the one
of the current disc.
English

23
Operation
Note:
● If you have not changed the password,
the factory preset password for the unit
will be empty. You will need to input a
desired password and verify it by inputting
the password again before entering the
Parental Control setup menu.
● For the rating level setup of Parental
Control of the unit, please refer to the
relative content of the SYSTEM SETUP
menu for details.
Accessories: Parental Control
The Parental Control function of a DVD player
can be used to control playback of movie
scenes on a DVD disc set with a rating level.
You can set the DVD player (including the
software player on a PC) with a certain rating
level via the SETUP MENU on the TV screen.
If the rating level set in the disc is higher
than the one set in the DVD player, the DVD
player cannot play the disc. Sometimes the
Parental Control sequences in some discs
are different from each other. The rating
level setup can be protected with a password.
If you select Unlock, the Parental Control
function will be invalid, and the whole content
of the disc can be played.
A DVD disc can be designed with different
rating levels of Parental Control so that the
DVD player can play different versions of
scenes from the same movie based on the set
rating levels. Depending on the DVD feature
of seamless switching, the scenes unsuitable
for children will be cleared or replaced by
other suitable scenes automatically.
All rating levels of Parental Control are as
follows:
Unlock
1. Kid Safe
2. G
3. PG
4. PG 13
5. R
6. NC 17
7. Adult
Region Code
Q: No DVD playback. REGION ERROR is
displayed after insertion of a disc into the
disc slot. Why?
A:
Because the DVD player and disc have
different region codes. If they do not match,
the DVD player cannot play the disc.
Appendix: Region code of DVD
The Motion Picture Association of America
(MPAA) divided the world into 6 regions,
and allocated every region a code, named
the region code. The region codes and the
countries or areas represented by the region
codes are as follows:
Region I: America, Canada, East-Pacific
Islands;
Region 2: Japan, West Europe, North Europe,
Egypt, South Africa, Middle East;
Region 3: South-east Asian countries
including Taiwan, Hong Kong,
South Korea, Thailand, Indonesia,
etc.;
Region 4: Australia, New Zealand, Central
South America, South Pacific
Islands;
Region 5: Russia, Mongolia, Indian Peninsula,
Middle Asia, East Europe, North
Korea, North Africa, North-west
Asia etc.;
Region 6: China mainland.
English
24
Maintenance
English
Maintenance and Cleaning of Discs
Disc Maintenance
1. To keep the disc clean, handle the disc by its edge, and do not touch the disc surface of the
play side.
2. Do not stick paper or tape on the disc. If there is glue on the disc surface, wipe it off before
using.
3. Do not expose the disc to direct sunlight, or nearby heat sources such as caliduct, or leave it
in a car parked in direct sunlight where there can be a considerable rise in temperature.
4. Put the disc inside a disc case after finishing playback.
Disc Cleaning
1. Before playing, wipe the disc with a clean cloth, and wipe the disc outwards from the disc
center.
2. Do not use petrol, thinners, commercially available cleaners or anti-static sprays for plastic
LPs to wipe discs.
25
Troubleshooting
Please read the user manual carefully before using the unit. If you have any problems with this
product, please refer to the below troubleshooting guide to help you resolve the issue.
TROUBLE/SYMPTOM SOLUTION
No picture, sound and
indication
Ensure that the power switch is on.
Ensure that the wall inlet is OK.
Ensure that the power cord is not damaged or the fuse is not blown.
Ensure that the power connection is OK.
No sound but picture
OK
Ensure that the audio output of the unit is in good connection with the TV's
audio input.
Check whether the audio connector is damaged.
Check whether you have turned down the volume.
Ensure that the AUDIO setup of the unit is correct.
Ensure that the audio is not muted.
Black and white picture
or screen rolling
Ensure that the TV SYSTEM (e.g. PAL, NTSC) setup is correct.
No picture but sound
OK
Ensure that the video output of the unit is in good connection with the TV's
video input.
Ensure that you have turned your TV to the AV input channel connecting to
the unit.
Check whether the video connector is damaged.
Ensure that the VIDEO setup of the unit is correct.
Flaws in picture or
sound
Check whether AUDIO setup is correct.
Check whether the disc is scratched or stained.
Check whether the AV connector and output terminal are stained.
Check whether there is condensation inside the lens. If so, leave the unit off
for an hour or so, and then try again.
No disc or bad disc
Ensure that you have inserted the disc into the disc slot.
Check whether the disc has been put in the reverse side.
Check whether the disc is distorted.
Check whether the disc is stained or scratched badly.
Ensure that the disc format is compatible with the unit.
Ensure that the temperature inside the car is not too high. If so, let the unit
cool off until the ambient temperature returns to normal.
Insert another disc into the disc slot.
English
26
Troubleshooting
TROUBLE/SYMPTOM SOLUTION
Remote control does
not work
Check the batteries of remote control and make sure that they are not dead.
Direct the remote control to the IR sensor of the unit.
Check whether there are obstacles between the remote control and IR sensor.
Some function buttons
do not work
Turn off the power, then turn on again.
Remove the front panel from the unit, then put it back and turn on again.
The radio does not
work
Check whether the antenna cable is connected firmly, or manually tune for a station.
English
27
Specifications
English
General Specification
Power supply
requirement
12V DC (10.8-15.6V allowable)
Speaker
Impedance
4 or 8 ohm
Output Power 45W x 4CH
DVD Player System
Signal to Noise
Ratio
> 60 dB
Channel
Separation
> 50 dB (1kHz)
Frequency
Response
20 Hz - 20 kHz
FM Radio
Frequency
Range
87.5-107.9 MHz (USA)
87.5-108 MHz (AUSTRALIA)
Channel Step
200 kHz (USA)
100 kHz (AUSTRALIA)
Sensitivity 2.8 V
Stereo
Separation
30 dB
Signal to Noise
Ratio
50 dB
AM Radio
Frequency
Range
530-1710 kHz (USA)
522-1710 kHz (AUSTRALIA)
Channel Step
10 kHz (USA)
9 kHz (AUSTRALIA)
Usable
Sensitivity
32 dB
Audio / Video Output
Output 750 mV
Impedance 10k Ohm

28
English
Warranty
FURRION WARRANTS FOR A PERIOD OF 1 YEAR FROM DATE OF RETAIL PURCHASE BY
THE ORIGINAL ENDUSE PURCHASER, THAT THIS PRODUCT, WHEN DELIVERED TO YOU IN
NEW CONDITION, IN ORIGINAL PACKAGING, FROM A FURRION AUTHORIZED RESELLER
AND USED IN NORMAL CONDITIONS, IS FREE FROM ANY DEFECTS IN MANUFACTURING,
MATERIALS, AND WORKMANSHIP. IN CASE OF SUCH DEFECT, FURRION SHALL REPLACE
OR REPAIR THE PRODUCT AT NO CHARGE TO YOU. THIS WARRANTY DOES NOT COVER:
PRODUCTS WHERE THE ORIGINAL SERIAL NUMBERS HAVE BEEN REMOVED, ALTERED OR
CANNOT READILY BE DETERMINED; DAMAGE OR LOSS CAUSED BY ACCIDENT, MISUSE,
ABUSE, NEGLECT, PRODUCT MODIFICATION, FAILURE TO FOLLOW INSTRUCTIONS IN
OWNER’S MANUAL, COMMERCIAL OR INDUSTRIAL USE; DAMAGE OR LOSS CAUSED TO THE
DECORATIVE SURFACE OF PRODUCT; TO ANY DATA, SOFTWARE OR INFORMATION; AND
NORMAL WEAR AND TEAR. THIS WARRANTY ONLY PROTECTS THE ORIGINAL ENDUSER
(“YOU”) AND IS NOT TRANSFERRABLE; ANY ATTEMPT TO TRANSFER THIS WARRANTY
SHALL MAKE IT IMMEDIATELY VOID. THIS WARRANTY IS ONLY VALID IN THE COUNTRY OF
PURCHASE.
THIS WARRANTY AND REMEDIES SET FORTH ABOVE ARE EXCLUSIVE AND IN LIEU OF ALL
OTHER WARRANTIES, REMEDIES AND CONDITIONS, WHETHER ORAL OR WRITTEN, EXPRESS
OR IMPLIED. FURRION SPECIFICALLY DISCLAIMS ANY AND ALL IMPLIED WARRANTIES,
INCLUDING, WITHOUT LIMITATION, WARRANTIES OF MERCHANTABILITY AND FITNESS FOR
A PARTICULAR PURPOSE. IF FURRION CANNOT LAWFULLY DISCLAIM IMPLIED WARRANTIES
UNDER THIS LIMITED WARRANTY, ALL SUCH WARRANTIES, INCLUDING WARRANTIES OF
MERCHANTABILITY AND FITNESS FOR A PARTICULAR PURPOSE ARE LIMITED IN DURATION
TO THE DURATION OF THIS WARRANTY.
No Furrion reseller, agent, or employee is authorized to make any modification, extension, or
addition to this warranty.
FURRION IS NOT RESPONSIBLE FOR DIRECT, INDIRECT, SPECIAL, INCIDENTAL OR
CONSEQUENTIAL DAMAGES RESULTING FROM ANY BREACH OF WARRANTY OR CONDITION,
OR UNDER ANY OTHER LEGAL THEORY, INCLUDING BUT NOT LIMITED TO LOST PROFITS,
DOWNTIME, GOODWILL, DAMAGE TO OR REPLACEMENT OF ANY EQUIPMENT OR PROPERTY,
ANY COSTS OF RECOVERING, REPROGRAMMING, OR REPRODUCING ANY PROGRAM OR DATA
STORED IN OR USED WITH FURRION PRODUCTS. FURRION’S TOTAL LIABILITY IS LIMITED
TO THE REPAIR OR REPLACEMENT OF THIS PRODUCT PURSUANT TO THE TERMS OF THIS
WARRANTY.
SOME STATES DO NOT ALLOW THE EXCLUSION OR LIMITATION OF INCIDENTAL OR
CONSEQUENTIAL DAMAGES OR EXCLUSIONS OR LIMITATIONS ON THE DURATION OF IMPLIED
WARRANTIES OR CONDITIONS, SO THE ABOVE LIMITATIONS OR EXCLUSIONS MAY NOT APPLY
TO YOU. THIS WARRANTY GIVES YOU SPECIFIC LEGAL RIGHTS, AND YOU MAY ALSO HAVE
OTHER RIGHTS THAT VARY BY STATE OR (WHERE APPLICABLE IN THE COUNTRIES WHERE
FURRION HAS NON-US/CANADIAN AUTHORIZED DEALERS) COUNTRY. NO ACTION OR CLAIM
TO ENFORCE THIS WARRANTY SHALL BE COMMENCED AFTER THE EXPIRATION OF THE
WARRANTY PERIOD.
Keep your receipt, delivery slip, or other appropriate payment record to establish the
warranty period. Service under this warranty must be obtained by contacting Furrion at
Product features or specifications as described or illustrated are subject to change without
notice.

1.
IM-FAV00037 V2.0
Furrion Innovation Center & Institute of Technology
52567 Independence Ct., Elkhart, IN 46514, USA Toll free:1-888-354-5792
Email: [email protected]
©2007-2018 Furrion Ltd. Furrion
®
and the Furrion logo are trademarks licensed for use by
Furrion Ltd. and registered in the U.S. and other countries.
©2007-2018 Furrion Ltd. Furrion
®
et le logo Furrion sont des marques déposées par Furrion
Ltd. et enregistrées aux Etats-Unis et ailleurs.
FURRION.COM