Loading ...
Loading ...
Loading ...
Use & Installation Manual
36
Wall Installation, Double Oven
Figure 10
Note:
1. Do not slide oven across floor. Damage to
floor covering or floor could result.
2. The oven support surface must be a minimum
19 mm thick plywood platform, solid, level and
flush with the bottom of the cabinet cut-out.
3. Use extreme caution when moving or
installing the oven. It is very heavy.
4. Be very careful when moving or installing the
oven to avoid damage to the oven frame or
damage to the cabinets.
5. Be sure to level oven. An oven that is not
level may provide poor or inconsistent baking
results.
6. Be careful when placing oven. DO NOT pinch
the wiring between the oven back or wall and
the inner cabinet wall or floor.
WARNING!
Securely fasten oven to cabinet using the
screws provided. Failure to do so could result
in oven moving or tipping during use and
causing damage to the oven or cabinets or
personal injury.
See Figure 10.
Ltr. DESCRIPTION DIMENSION (mm)
A
Cut-out Width 722
B
Cut-out Depth 590
C
Cut-out Height 1264
D
Floor Bottom of Cut-out – –
E
Minimum Spacing 13
Secure oven to cabinet using the screws provided.
Screws should be inserted through the mounting holes
in the positions indicated in the frame (open door to see
frame and mounting holes). Do not over tighten screws.
Electrical Supply
Before installing the oven have a qualified
electrician verify that your home is provided with
adequate electrical service and that the addition of
the oven will not overload the circuit on which it is to
be installed. A separate three-wire single phase,
240V, 50/60 Hz circuit is required.
If the supply cord is damaged, it must be replaced
by the manufacturer, its service agent or similarly
qualified persons in order to avoid a hazard.
WARNING!
ELECTRICAL SHOCK HAZARD
• The electrical power to the oven circuit must be
shut off while line connections are being made.
• Do not use an extension cord with this appliance.
• Electrical ground is required on this appliance.
The free end of the yellow/green wire (the
ground wire) must be connected to a suitable
ground. This wire must remain grounded to the
oven.
• A qualified electrician must install the appliance.
• The oven must be earthed in accordance with
the current Australian Standard.
• The oven must be connected to the mains
through a multipole circuit breaker with a
contact-to-contact gap of a least 3 mm, marking
sure that the earth wire is not disconnected.
Failure to follow these instructions could result in
serious injury or death.
Wiring Requirements
Before making connections make sure the power
is off and read and observe the following:
• A separate three-wire, single phase, 240V,
50/60 Hz. circuit is required for the oven.
• The oven must be connected with COPPER
WIRE ONLY.
• The oven must be installed to conform with
the current Australian Standard.
• Wire size (COPPER WIRE ONLY) and
connections must be suitable for the rating of the
appliance per the current Australian Standard.
Connecting The Oven To The Mains
For connecting use a flexible rubber cable of the
H05SS-F type (3x2.5 mm
2
min for single oven,
3x4 mm
2
min for double oven) remembering to
make it long enough to allow the oven to be
removed from its housing unit when maintenance
work is required. To connect the cable to the
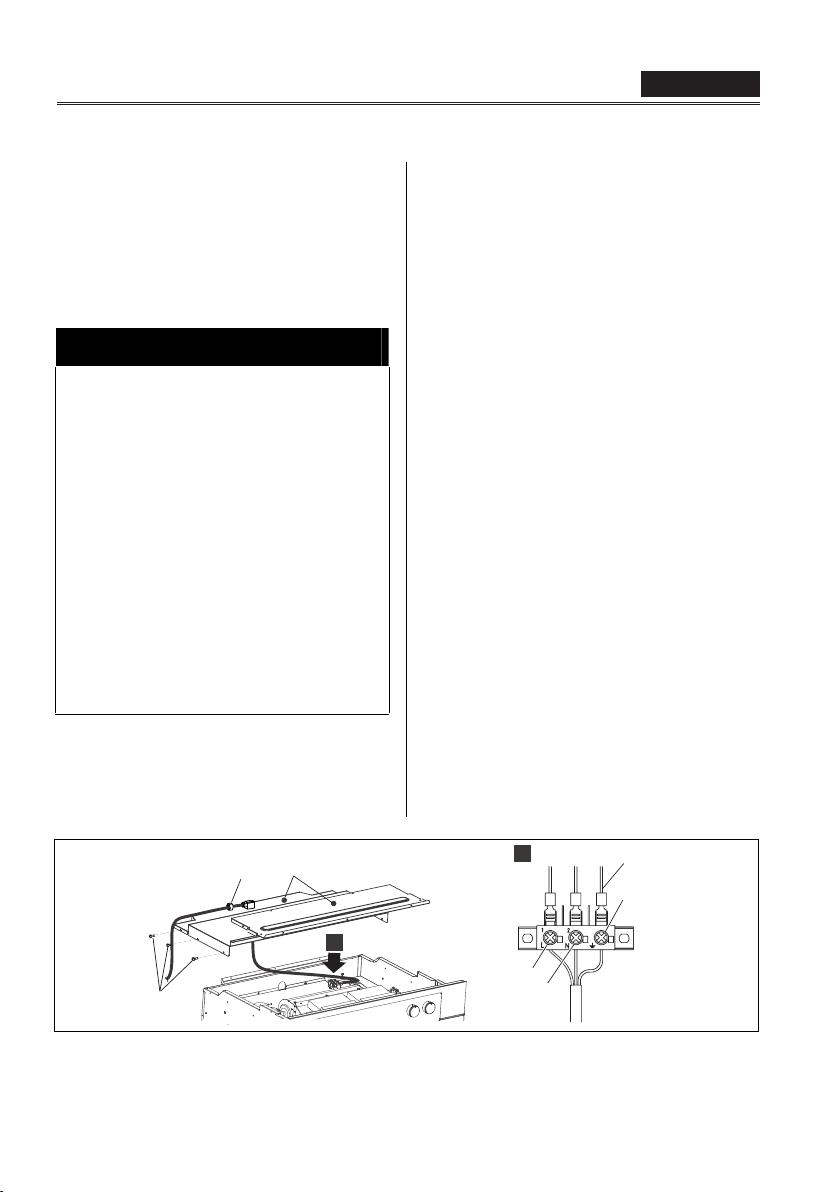
oven proceed as follows (see fig. 11):
1. Remove the two upper oven covers (1) by
unfastening the relative self-tapping
screws (2). Unfasten the nut (3) for the
cable holder and feed the cable through
the hole, leaving enough cable slack to
to avoid stretching.
2. Remove about 12 cm of outside insulation
from the cable and shorten the two active
wires (live and neutral) to 6cm. Leave the
length of the earth wire as it is. Remove
about 1cm of insulation from each of the
three wires and then connect each wire to
the terminal block. Ensure that each wire
is connected appropriately (L is for the
Live wire, N is for the Neutral wire and the
earth wire is indicated with the traditional
dashed triangle).
3. Tighten the two cable holder screws so as
to ensure that the mains cable is held
firmly in place.
Figure 11
2
1
A
OVEN WIRING
EARTH
LIVE
NEUTRAL
A
3
�
36
Use & Installation Manual
37
ENGLISH
Loading ...
Loading ...
Loading ...