Loading ...
Loading ...
Loading ...
Use & Installation Manual
12
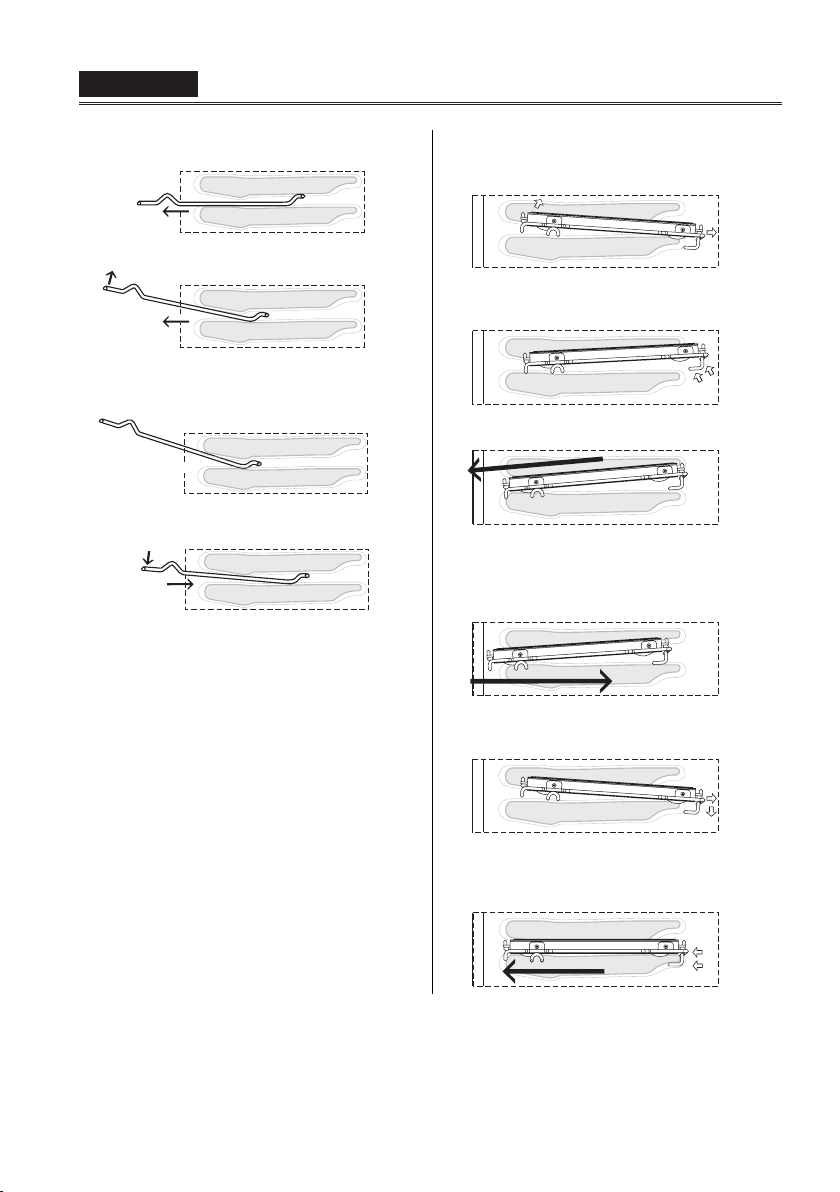
To remove oven rack from the oven:
1. Pull rack forward
2. Lift rack up at front and then remove it
To replace an oven rack:
1. Place rear of rack between rack level
guides
2. While lifting front of rack, slide rack in all
the way while lowering the front
Oven Extendable Racks
• The extendable rack allows for easier access
to cooking foods. It extends beyond the
standard flat rack bringing he food closer to
the user.
CAUTION
When the rack is outside of the oven, slide
arms do not lock. They could unexpectedly
extend if the rack is carried incorrectly.
Extending slide arms could cause injury.
Rack should only be held or carried by
grasping the sides.
NOTE: Always remove the extendable rack
before self-cleaning the oven.
To avoid burns, pull rack all the way out and
lift pan above handle when transferring food
to and from oven.
To remove extendable rack from the oven:
1. Lift of rack slightly and push it until the
stop release
2. Raise back of rack until frame and stop
clear rack guide
3. Pull rack down and out
To replace an extendable rack:
1. Grasp rack firmly on both sides. Place
rack (including frame) above desired rack
guide
2. Push all the way in until the back of the
rack drops into place
3. Pull both sections forward until stops
activates. Rack should be straight and
flat, not crooked
Use & Installation Manual
13
Setting the Clock and Timer
The time of day is displayed in hours and
minutes.
Always set the clock immediately after installation
or after a power failure. Once power returns to
the oven, the clock displays the time 12:00
AM
.
The clock time will appear during all oven
operations except when there is the timer or any
timed cooking operations running.
The oven is preset to a 12-hour clock and
indicates
AM
and
PM
.
To Set the Time of Day
1.
Touch [TIME] until the display will show the
“SET TIME” writing.
2.
Touch [INC] or [DEC] to set the desired time,
the hours will begin flashing: continue until
the correct hour value and
AM
or
PM
indication
is selected.
3.
Touch [TIME] again to confirm the hour and
minutes will start flashing.
4.
Touch [INC] or [DEC] to set the desired
minutes value or hold the key to change by
10 minute steps.
5.
Touch [TIME] again or wait for 5 seconds in
order to confirm the time.
NOTE: The Time of Day can never be set if any
time function is already set: first delete
all the active time functions.
To Set the Timer
1.
Touch [TIME] until the display will show the
“TIMER” writing.
2.
Touch [INC] or [DEC] to set the desired timer
value, the hours will begin flashing: continue
until the desired value is set.
3.
Touch [TIME] again to confirm the hour and
minutes will start flashing.
4.
Touch [INC] or [DEC] to set the desired
minutes value or hold the key to change by
10 minute steps.
5.
Touch [TIME] again or wait for 5 seconds in
order to confirm the time.
6.
“TIMER” will be steadily displayed.
7.
When the time ends, reminder beeps will
sound for 15 minutes or until the [TIME] key
is pressed.
8.
Timer format is usually HR:MIN, switching
into MIN:SEC during the last minute.
9.
The displayed value is always rounded to the
lower minute.
Use & Installation Manual
12
ENGLISH
13
Loading ...
Loading ...
Loading ...