_®
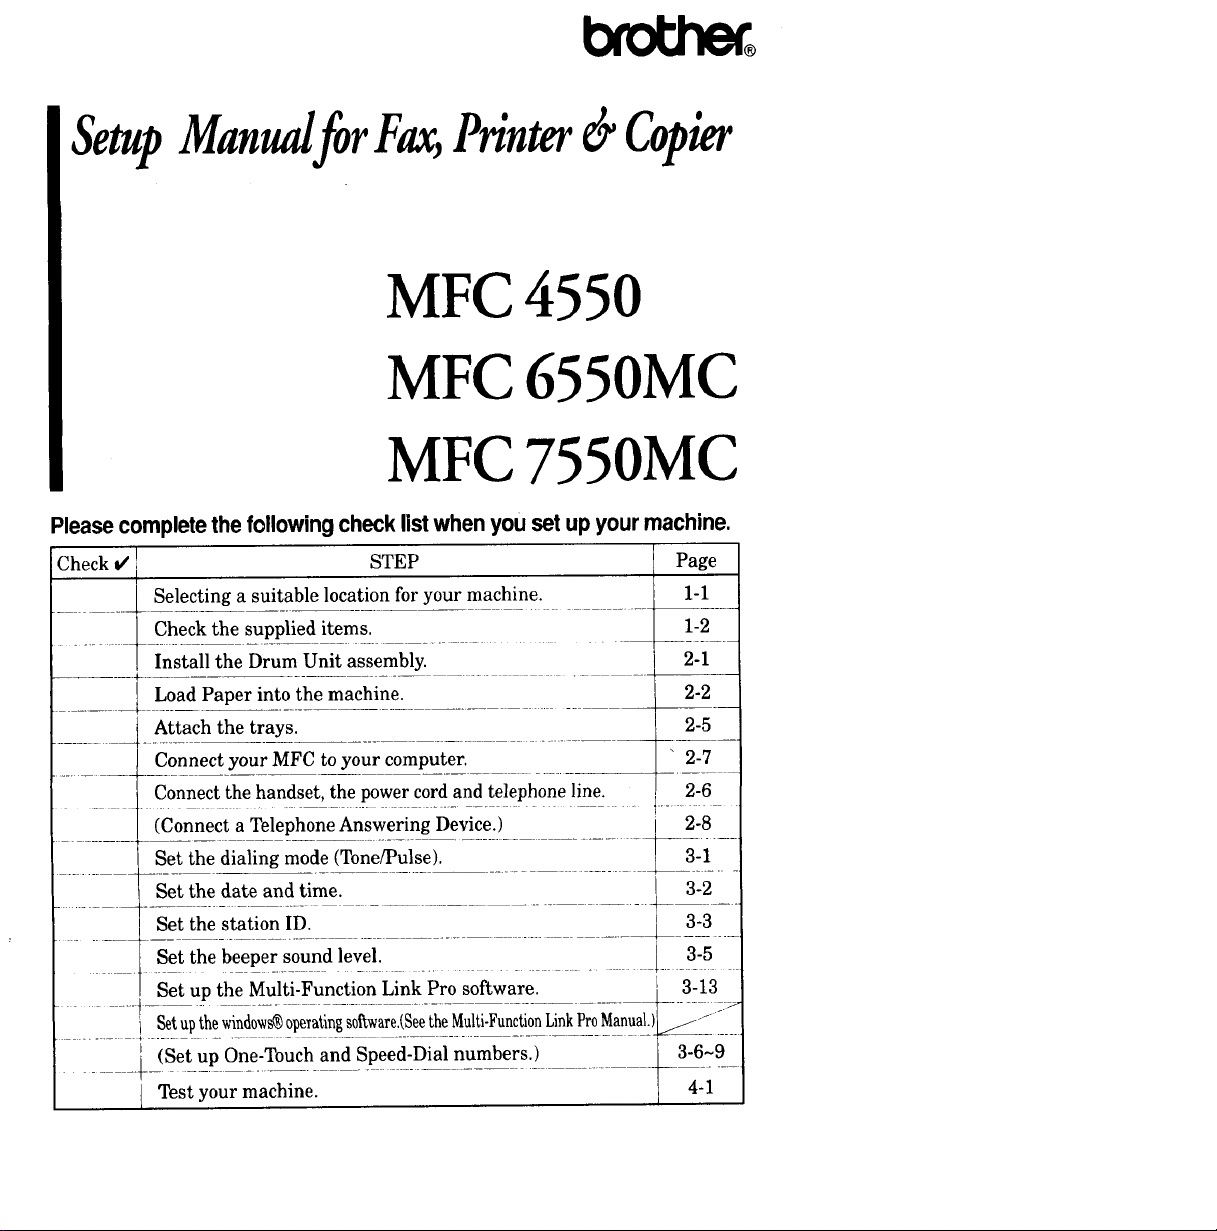
Setup Manualfor Fax,Printer _ Copier
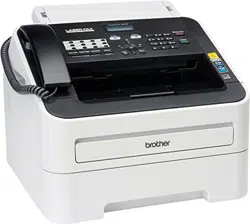
MFC 4550
MFC 6550MC
MFC 7550MC
Please complete the following check listwhen you set upyour machine.
Check t/! STEP Page
I
Selecting a suitable location for your machine.
Check the supplied items.
Install the Drum Unit assembly.
q Load Paper into the machine.
Attach the trays.
Connect your MFC to your computer.
Connect the handset, the power cord and telephone line.
(Connect a Telephone Answering Device.)
Set the dialing mode (Tone/Pulse).
__ii_i_ Set the date and time.
Set the station ID.
Set the beeper sound level. 3-5
Set up the Multi-Function Link Pro software, t 3-13
t 1 ...... ........
..... i Set upthew}ndo_s_operatingsoftware.!_Seet_h_e_Mu}ti'Func_!i_onLink_Pro_Manua.! __
..... j_ (Set_u_p On_e_Touchand Speed.Dial numbers:_) ......... 3-6~9
Test your machine. 4-1
1-1
1-2
2-1
2-2
2-5
" 2-7
2-6
2-8
3-1
3-2
3-3

I his equipment has been tested alLd found to comply with the limits for a
Class B digital device, pursuant to Part 15 of the FCC rules. These limits
are designed to piovide reasonable protection against harmful
interference in a residential installation. This equipment generates, uses
and can radiate radio frequency energy and if not installed and used in
accordance with the instructions, may cause harmful interference to
radio communications. However, there is no guarantee that interference
will not occur in a particular installation. If this equipment does cause
harmful interference to radio or television reception, which can be
determined by turning the equipment off and on, the user is encouraged
to try to correct the interference by one or more of the following
measures:
• Reorient or relocate the receiving antenna.
• Increase the separation between the equipment and the receiver.
• Connect the equipment to an outlet on a circuit different from that to
which the receiver is connected.
• Consult with the dealer or an experienced radio/TV technician for help.

Introduction to the Setup Manual
• [Read this manua| first, to set up your machine and prepare
your computer for the printer mode.
This Setup Manual will help you prepare your machine to
operate asa fax, printer and copier.
• [Your Multt-Funchon'.... Center 6_OM_f_O_ has......._'_ _ .... _6
performance modes in one machine. It is a Fax, Printer,
Copier, Scanner, PC Fax and Message Center.
• _nd _f MFC 45_0_has 5 performance modes. It is a
Printer, Copier, Scanner and PC Fax.
• After you complete setting up the MFC, s_t-Ile ;_ra-tionsl
[Manual for Fax_Printer, Cop|e_lfor more information about
your MFC suchasfunctions of machine and the control panel.
Information about maintenance, troubleshooting and
technical specifications are also available in this Manual.
• [Seethe "Multi-Function LinkProManual for Scanner& PC]
_for informationon how to set up your machine and
computer,and how to usethescannerand PCFax.
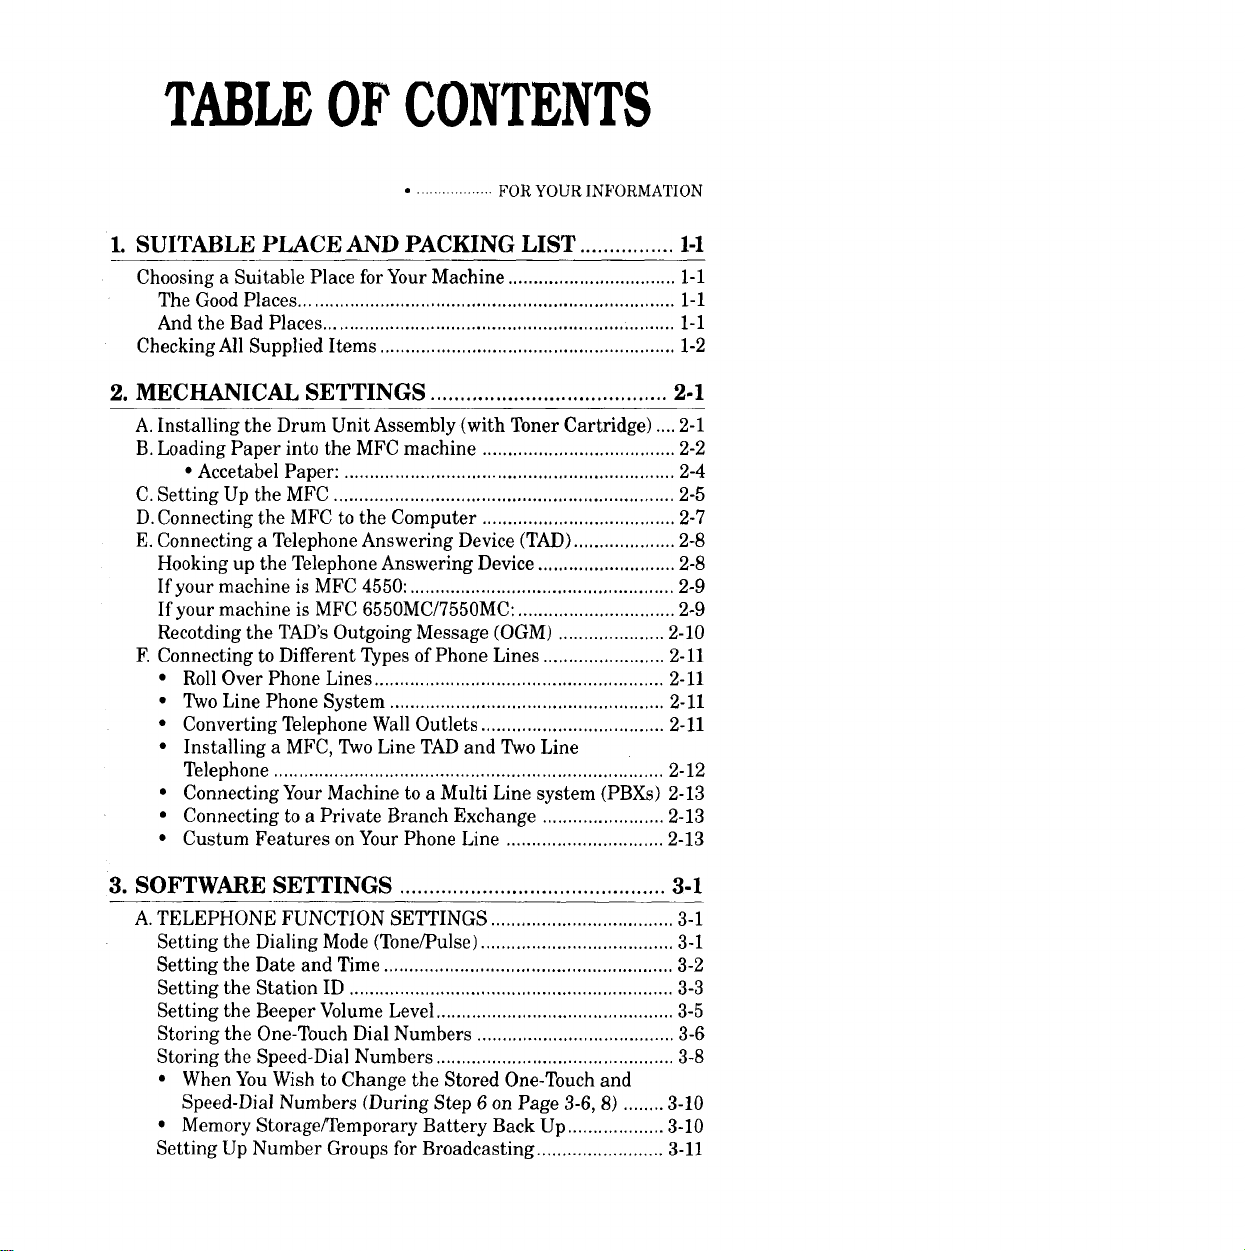
TABLEOFCONTENTS
................... FOR YOUR INFORMATION
1. SUITABLE PLACE AND PACKING LIST ................ 1-1
Choosing a Suitable Place forYour Machine ................................. 1-1
The Good Places .......................................................................... 1-1
And the Bad Places ..................................................................... 1-1
Checking All Supplied Items .......................................................... 1-2
2. MECHANICAL SETTINGS ........................................ 2-1
A. Installing the Drum Unit Assembly (with Toner Cartridge) .... 2-1
B. Loading Paper into the MFC machine ...................................... 2-2
• Accetabel Paper: ................................................................. 2-4
C. Setting Up the MFC ................................................................... 2-5
D.Connecting the MFC to the Computer ...................................... 2-7
E. Connecting a Telephone Answering Device (TAD) .................... 2-8
Hooking up the Telephone Answering Device ........................... 2-8
If your machine is MFC 4550: .................................................... 2-9
If your machine is MFC 6550MC/7550MC: ............................... 2-9
Recotding the TAD's Outgoing Message (OGM) ..................... 2-10
F. Connecting to Different Types of Phone Lines ........................ 2-11
• Roll Over Phone Lines ......................................................... 2-11
• Two Line Phone System ...................................................... 2-11
• Converting Telephone Wall Outlets .................................... 2-11
• Installing a MFC, Two Line TAD and TWo Line
Telephone ............................................................................. 2-12
• Connecting Your Machine to a Multi Line system (PBXs) 2-13
• Connecting to a Private Branch Exchange ........................ 2-13
• Custum Features on Your Phone Line ............................... 2-13
3. SOFTWARE SETTINGS ............................................. 3-1
A. TELEPHONE FUNCTION SETTINGS .................................... 3-1
Setting the Dialing Mode (Tone/Pulse) ...................................... 3-1
Setting the Date and Time ......................................................... 3-2
Setting the Station ID ................................................................ 3-3
Setting the Beeper Volume Level ............................................... 3-5
Storing the One-Touch Dial Numbers ....................................... 3-6
Storing the Speed-Dial Numbers ............................................... 3-8
• When You Wish to Change the Stored One-Touch and
Speed-Dial Numbers (During Step 6 on Page 3-6, 8) ........ 3-10
• Memory Storage/Temporary Battery Back Up ................... 3-10
Setting Up Number Groups for Broadcasting ......................... 3-11
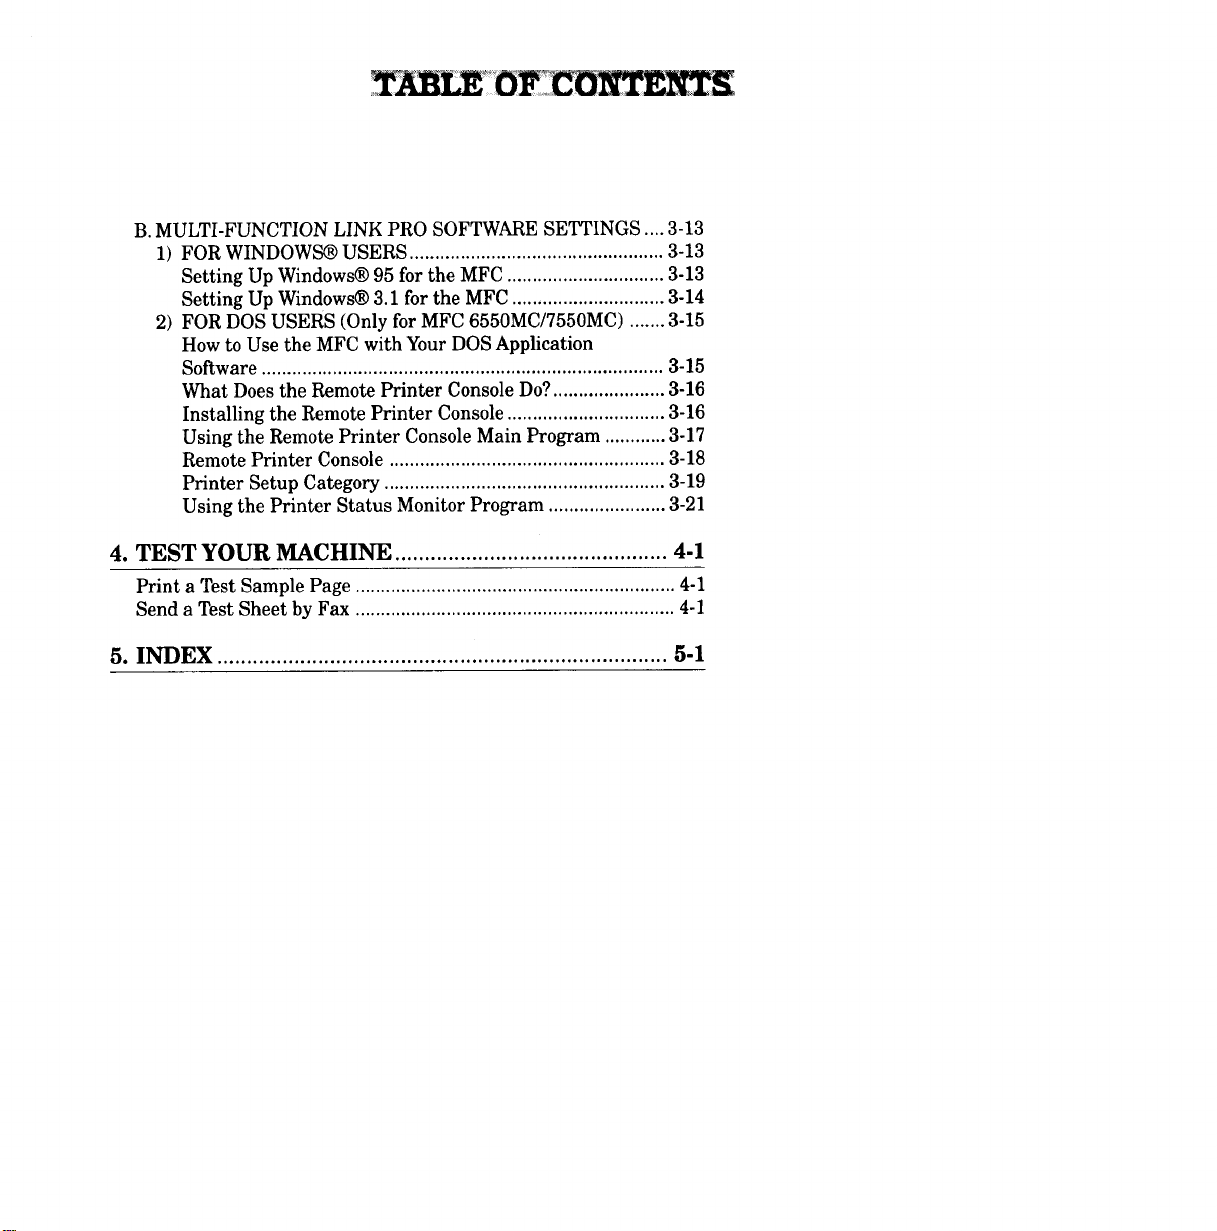
B.MULTI-FUNCTIONLINKPROSOFTWARESETTINGS....3-13
1)FORWINDOWS@)USERS..................................................3-13
SettingUpWindows®95fortheMFC...............................3-13
SettingUpWindows®3.1fortheMFC..............................3-14
2)FORDOSUSERS(OnlyforMFC6550MC/7550MC).......3-15
HowtoUsetheMFCwithYourDOSApplication
Software...............................................................................3-15
WhatDoestheRemotePrinterConsoleDo?......................3-16
InstallingtheRemotePrinterConsole...............................3-16
UsingtheRemotePrinterConsoleMainProgram............3-17
RemotePrinterConsole......................................................3-18
PrinterSetupCategory.......................................................3-19
UsingthePrinterStatusMonitorProgram.......................3-21
4. TEST YOUR MACHINE .............................................. 4-1
Print a Test Sample Page ............................................................... 4-1
Send a Test Sheet by Fax ............................................................... 4-1
5. INDEX ............................................................................ 5-1
SUITABLEPLACE AND PACKING LIST
I. SUITABLEPLACEAND PACKING LIST
Choosing a Suitable Place for Your Machine
Use the following list as a guide to find a suitable place ibr your nmchine.
The Good Places...
Place your machine in a location where the temperature stays between 50-90.5°F
(10-32.5°C).
Place your machine on a flat, stable surface, such as a desk or table.
Select a place that is free from vibration and shocks.
The main plug on this equipment must be used to disconnect main power.
Please ensure the socket outlet is installed near the equipment and is easily
accessible.
And the Bad Places...
Avoid setting it up in a high-traffic area.
Avoid setting up the machine near heaters, air conditioners, water, chemicals, or
refrigerators.
Do not select a place that exposes your machine to direct sunlight, excessive heat,
humidity, moisture, or dust.
Do not connect your machine to electrical outlets controlled by wall switches or
automatic timers. This will cause a disruption ofpower and can wipe out information
from the unit's memory.
Do not connect your machine to electrical outlets on the same circuit as large
appliances or other equipment that might disturb the power supply.
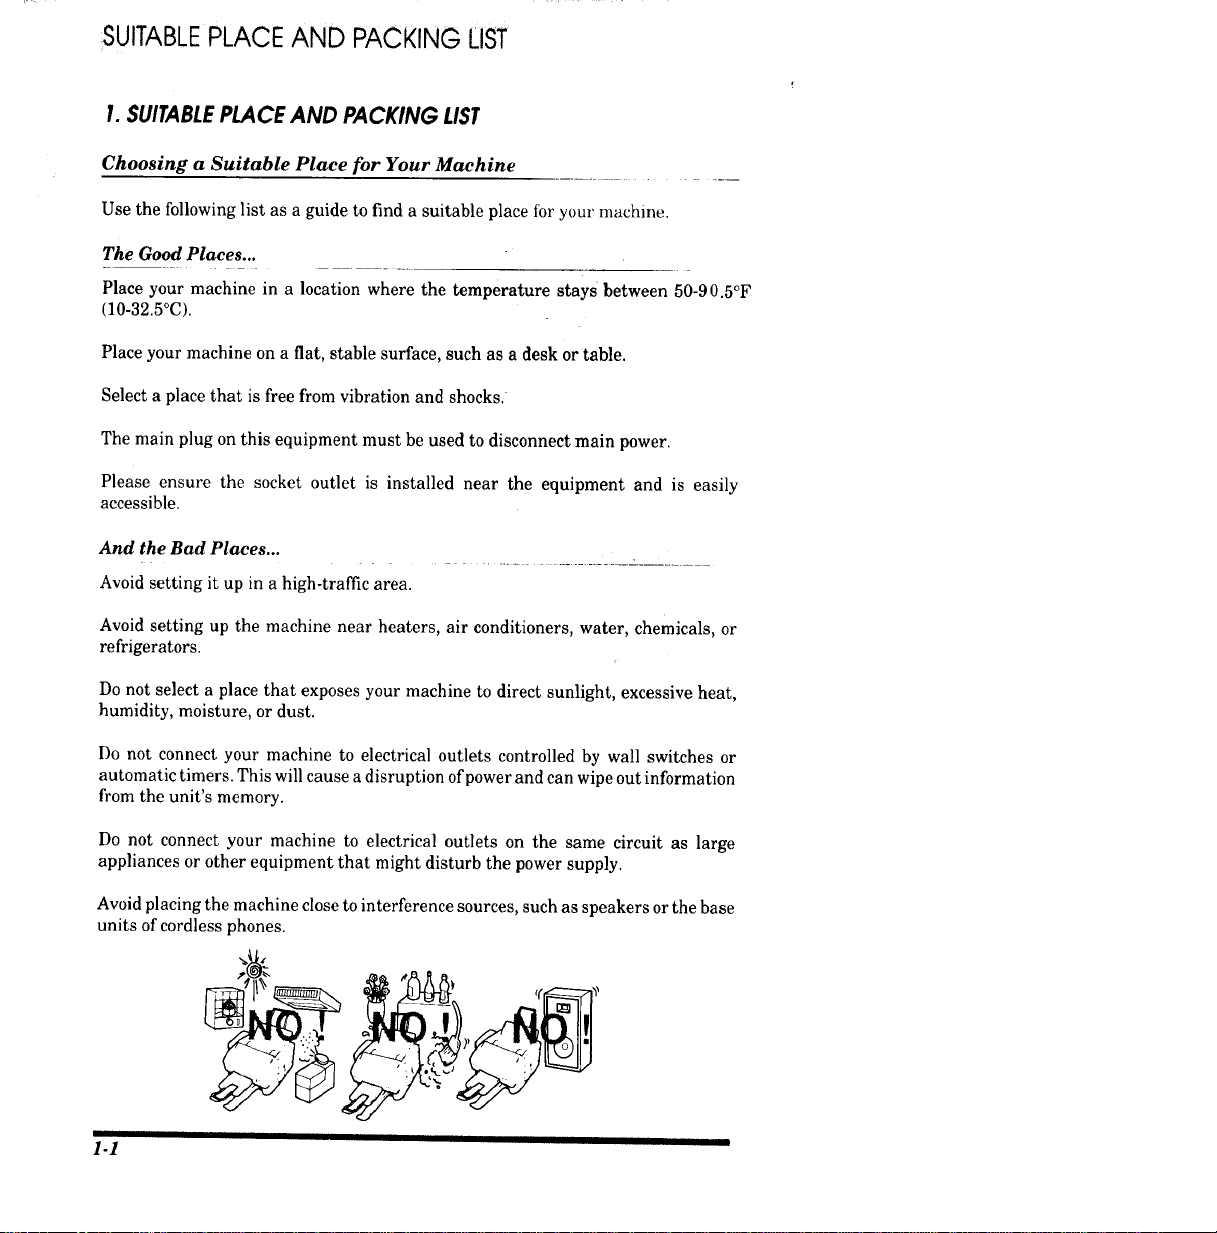
Avoid placing the machine close to interference sources, such as speakers or the base
units of cordless phones.
1-1
SUITABLEP CE AND PACKING LIST
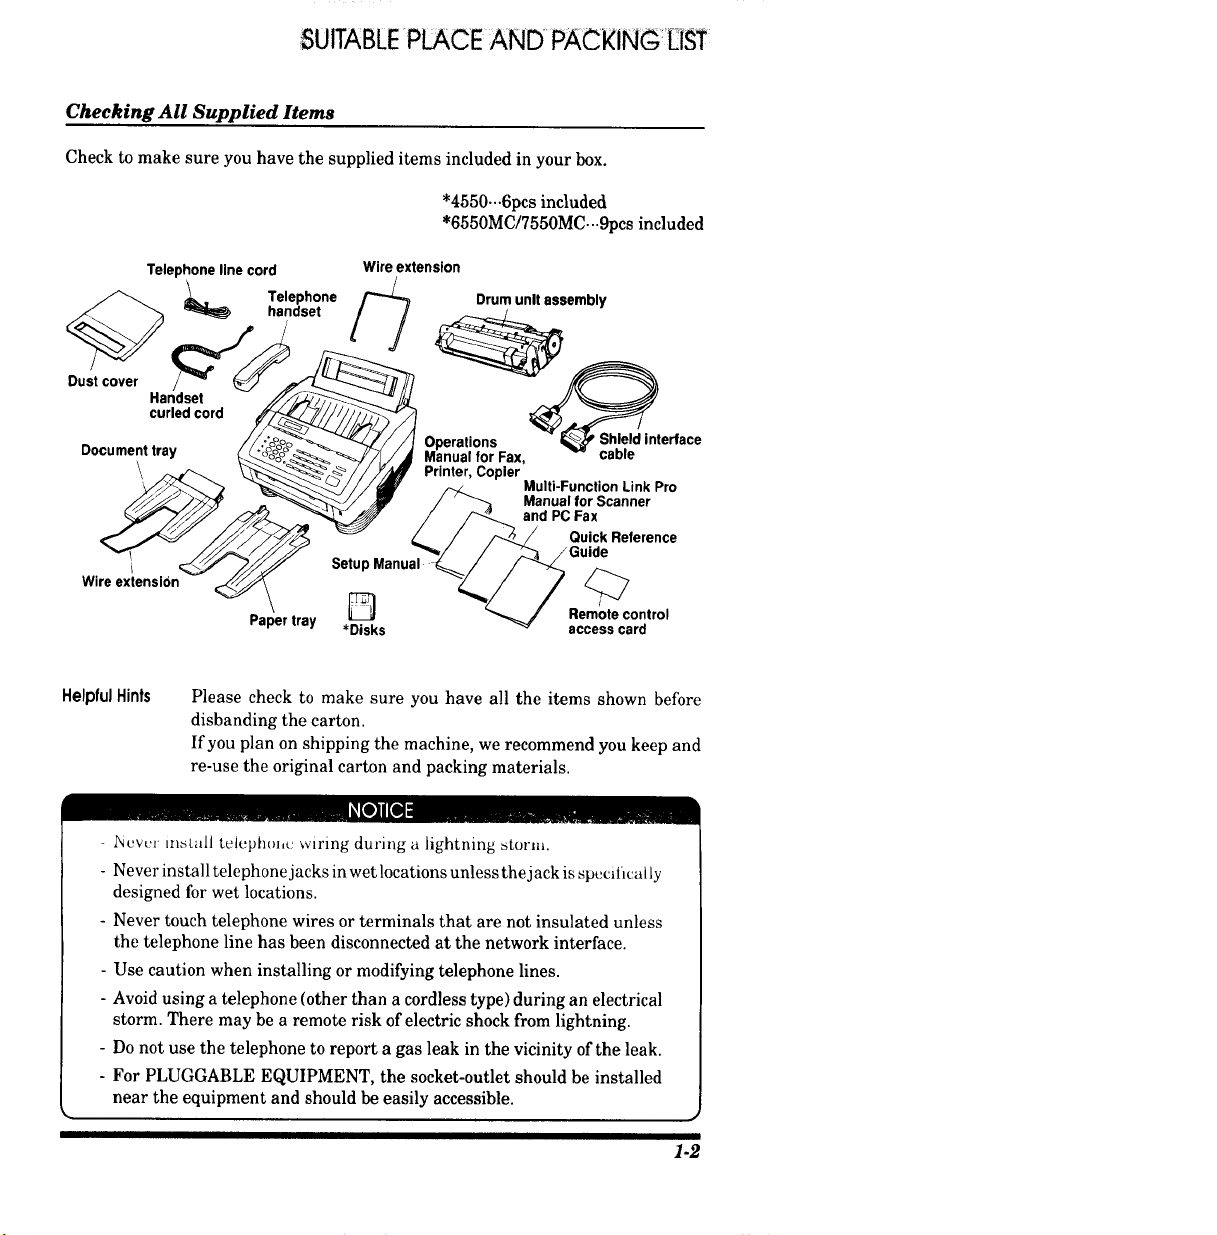
Checking All Supplied Items
Check to make sure you have the supplied items included in your box.
*4550-..6pcs included
*6550MC/7550MC...9pcs included
Dust cover
HelpfulHints
Please check to make sure you have all the items shown before
disbanding the carton.
If you plan on shipping the machine, we recommend you keep and
re-use the original carton and packing materials.
- Never install telephm,c' wrong during a lightning storm.
- Never install telephone jacks in wet locations unless thejaek is specilically
designed for wet locations.
- Never touch telephone wires or terminals that are not insulated unless
the telephone line has been disconnected at the network interface.
- Use caution when installing or modifying telephone lines.
- Avoid using a telephone (other than a cordless type) during an electrical
storm. There may be a remote risk of electric shock from lightning.
- Do not use the telephone to report a gas leak in the vicinity of the leak.
- For PLUGGABLE EQUIPMENT, the socket-outlet should be installed
near the equipment and should be easily accessible.
1-2

MECHANICAL SETTINGS
2. MECHANICAL SETTINGS
Follow these steps to set up your machine.
A. Installing the Drum Unit Assembly (with Toaer Cartridge)
Drum unit assembly
Do NOT remove the starter sheet
1)
1) Unpack the drum unit assembly
including the toner cartridge and
gently rock it from side to side five
or six times. Unseal the tape on
the toner cartridge lever.
--WARNING
Do not expose the drum unit to
light for longer than a few minutes
because it will damage the drum.
WARNING - • .
Do not remove the starter
sheet. This sheet will be ejected
while the machine is warming up
after installing a new drum unit.
(See page 2-7.)
2)
Topcover
!
2) Open the top cover of the MFC
until the latch clicks into place.
2.1
MECHANICAL SETTINGS
3)
Drum unit
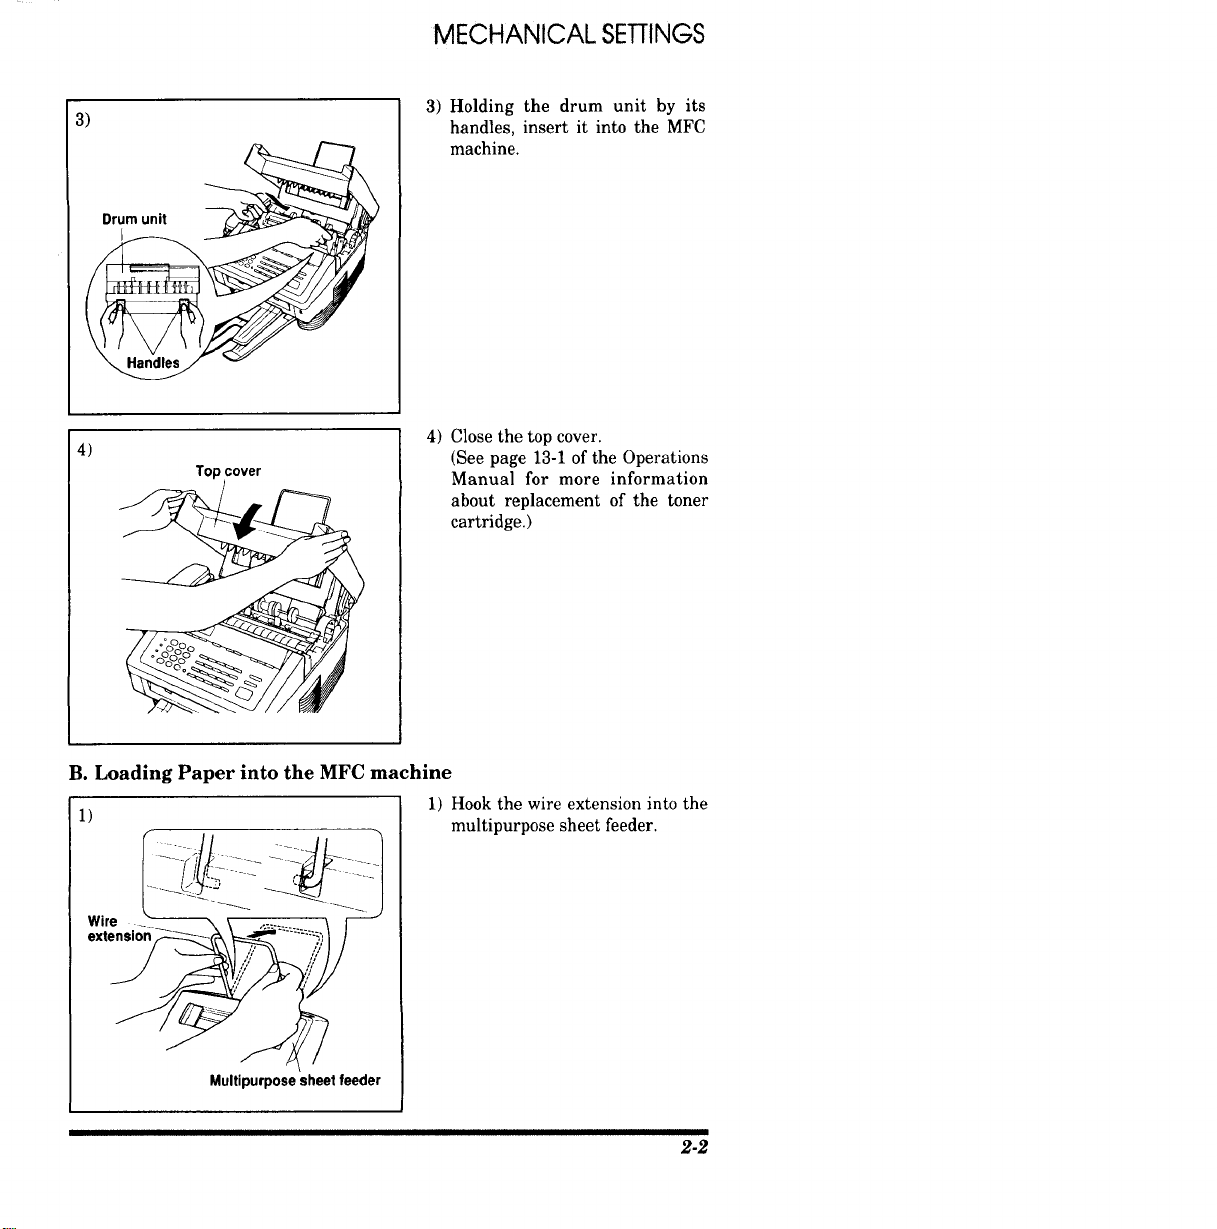
3) Holding the drum unit by its
handles, insert it into the MFC
machine.
4)
Topcover
4) Close the top cover.
(See page 13-1 of the Operations
Manual for more information
about replacement of the toner
cartridge.)
B. Loading Paper into the MFC machine
1)
wre
Multipurpose heet feeder
1) Hook the wire extension into the
multipurpose sheet feeder.
II
2-2
MECHANICAL SETTINGS
3)
\
Cover
Multipurpose
sheet feeder
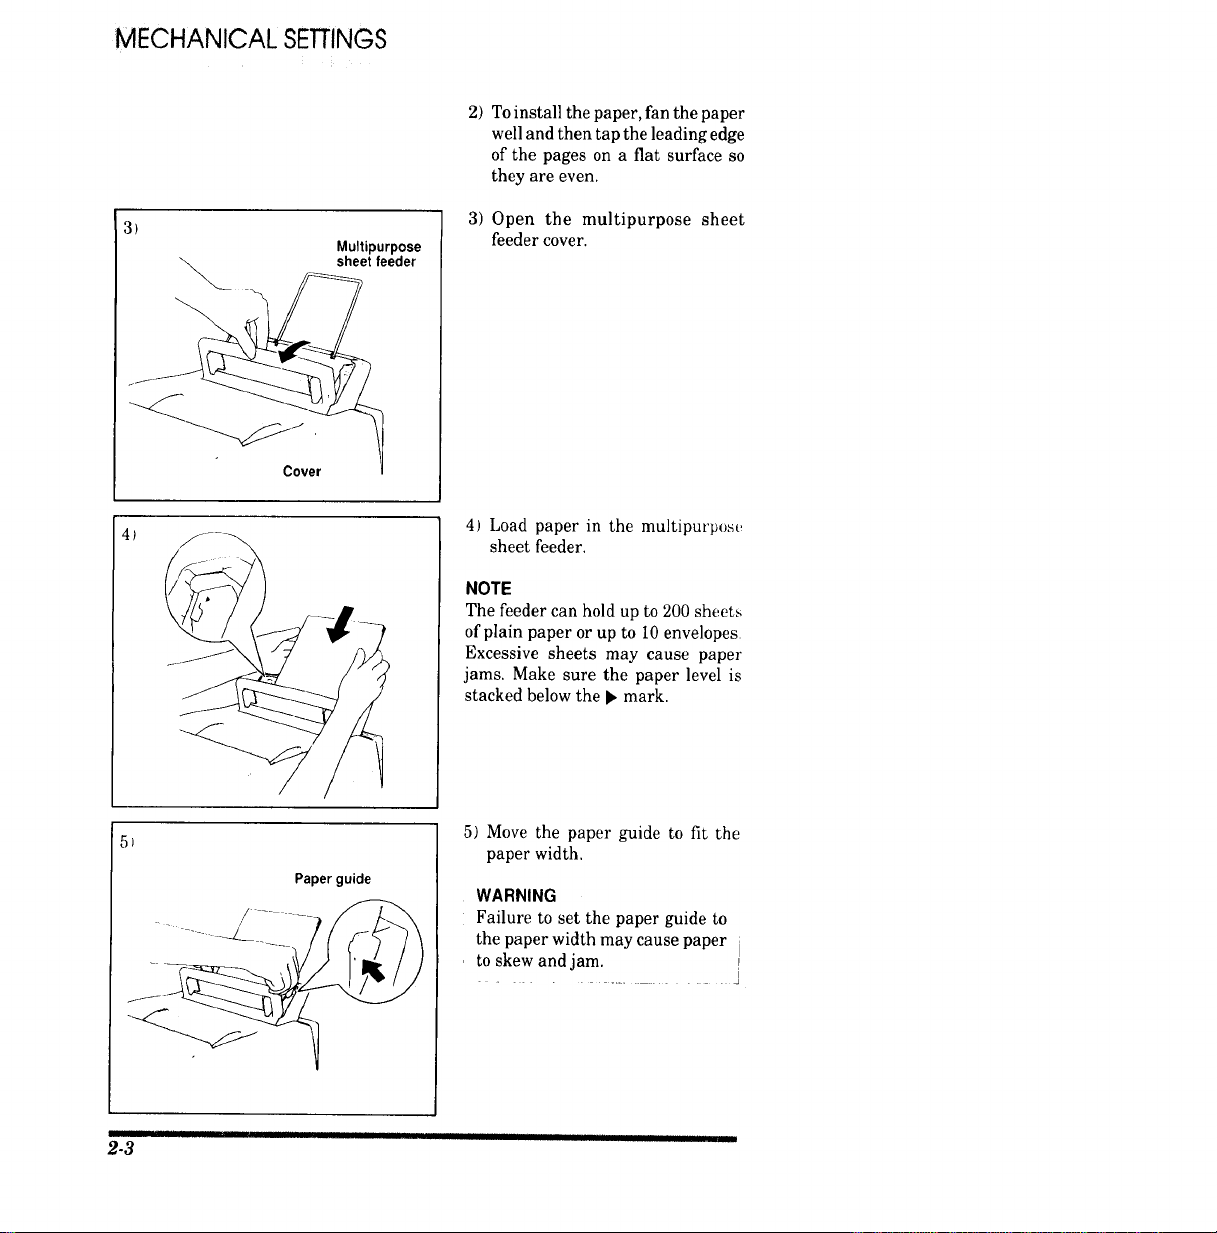
2) Toinstallthepaper, fanthepaper
wellandthentaptheleadingedge
of the pages on a flat surface so
they are even.
3) Open the multipurpose sheet
_edercover.
4_
4) Load paper in the multipurpos(,
sheet _eder.
NOTE
The feeder can hold up to 200 sheets
of plain paper or up to 10 envelopes
Excessive sheets may cause paper
jams. Make sure the paper level is
stacked below the I* mark.
5)
Paper guide
5) Move the paper guide to fit the
paper width.
WARNING
Failure to set the paper guide to
the paper width may cause paper i
to skew and jam. p
i
11111111I I II I IIII iii
2-3
IMECHANICAL SETTINGS
6) Due,co\er
7)
s!cover
Multipurposesheet
feeder cover
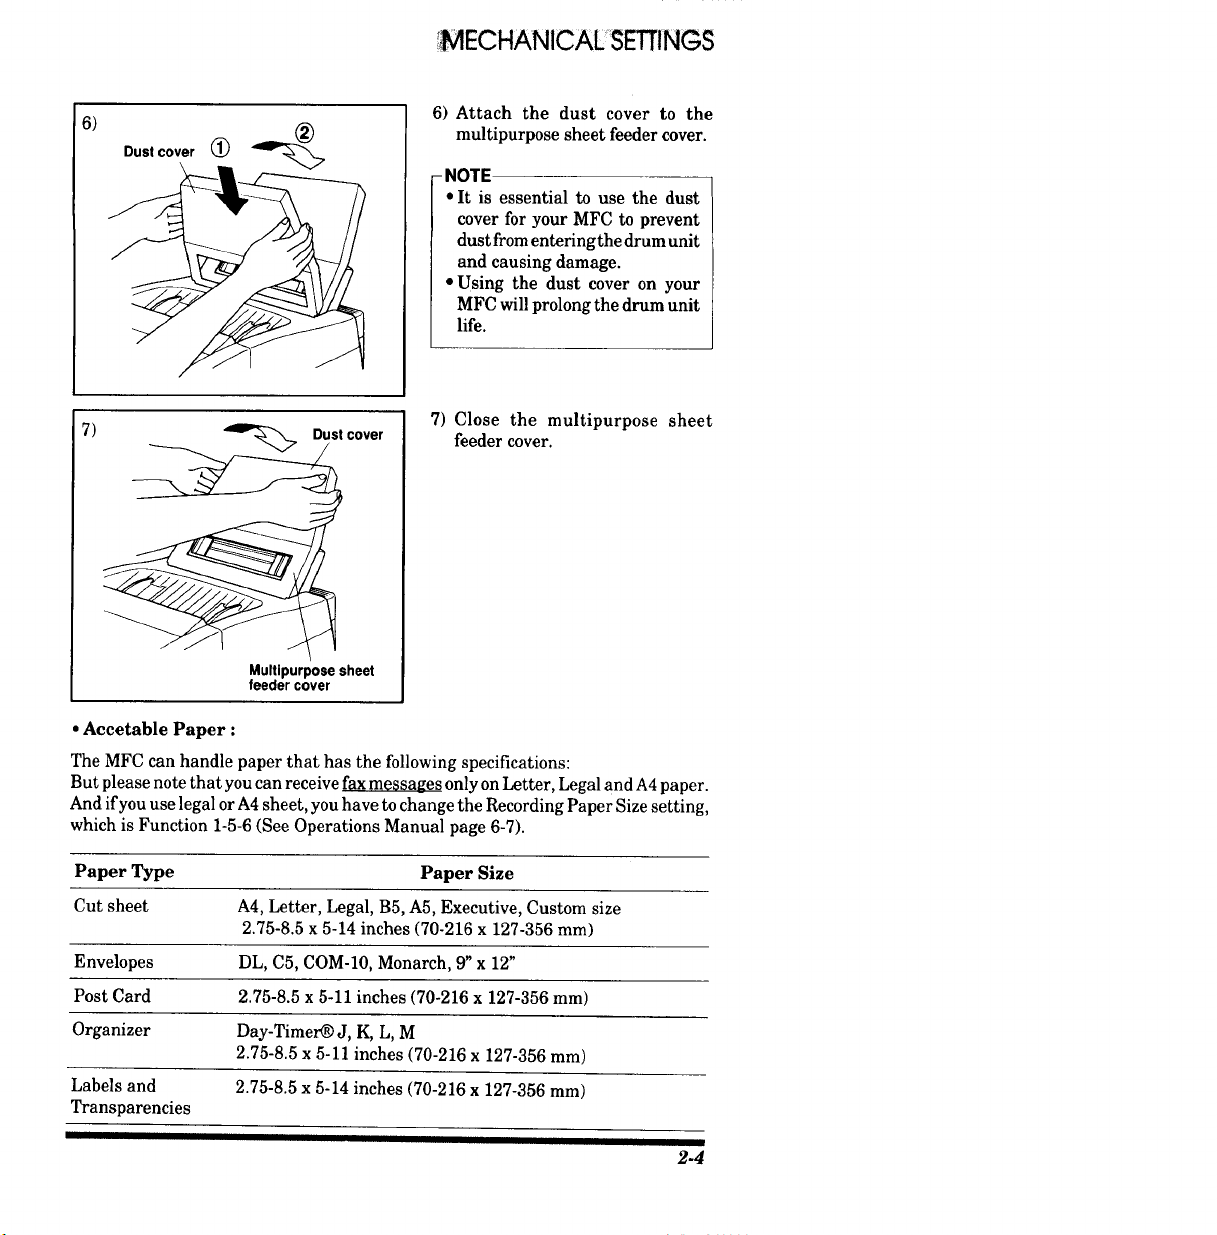
6) Attach the dust cover to the
multipurpose sheet feeder cover.
- NOTE
• It is essential to use the dust
cover for your MFC to prevent
dust from entering the drum unit
and causing damage.
• Using the dust cover on your
MFC will prolong the drum unit
life.
7) Close the multipurpose sheet
feeder cover.
• Accetable Paper :
The MFC can handle paper that has the following specifications:
But please note that you can receive fax messages only on Letter, Legal and A4 paper.
And if you use legal or A4 sheet, you have to change the Recording Paper Size setting,
which is Function 1-5-6 (See Operations Manual page 6-7).
Paper Type Paper Size
Cut sheet A4, Letter, Legal, B5, A5, Executive, Custom size
2.75-8.5 x 5-14 inches (70-216 x 127-356 mm)
Envelopes DL, C5, COM-10, Monarch, 9" x 12"
Post Card 2.75-8.5 x 5-11 inches (70-216 x 127-356 ram)
Organizer Day-Timer_ J, K, L, M
2.75-8.5 x 5-11 inches (70-216 x 127-356 mm)
Labels and 2.75-8.5 x 5-14 inches (70-216 x 127-356 mm)
Transparencies
2-4
MECHANICAL SETTINGS
Paper Capacity in Feeder
Multipurpose
Sheet Feeder: Up to 0.87 inch (22 mm) in height (up to the mark) Approx. 200
sheets of 20 lb. (75 g/m _)or 50 sheets of 42 lb. (158 g/m 2)A4/Letter
paper, or 10 envelopes
Output Tray: Approx. 100 sheets of 20 lb. (75 g/m 2)A4/Letter paper
Cut Sheet Envelope
Basis Weight 16 to 42 lb. 20 to 24 lb.
(60 to 158 g/m 2) (75 to 90 g/m _)
single thickness
Caliper +0.03 to +0.08 in. 0.0033 to 0.0058 in.
(0.08 to 0.2 mm) (0.084 to 0.14 ram)
single thickness
Moisture Content 4% to 6% by weight 4% to 6% by weight
Smoothness 100 to 250 (Sheffield) 100 to 250 (Sheffield)
Recommended paper types:
Cut sheet: Xerox 4200
Label: Avery laser label or equivalent
Transparency: 3M CG3300 or equivalent
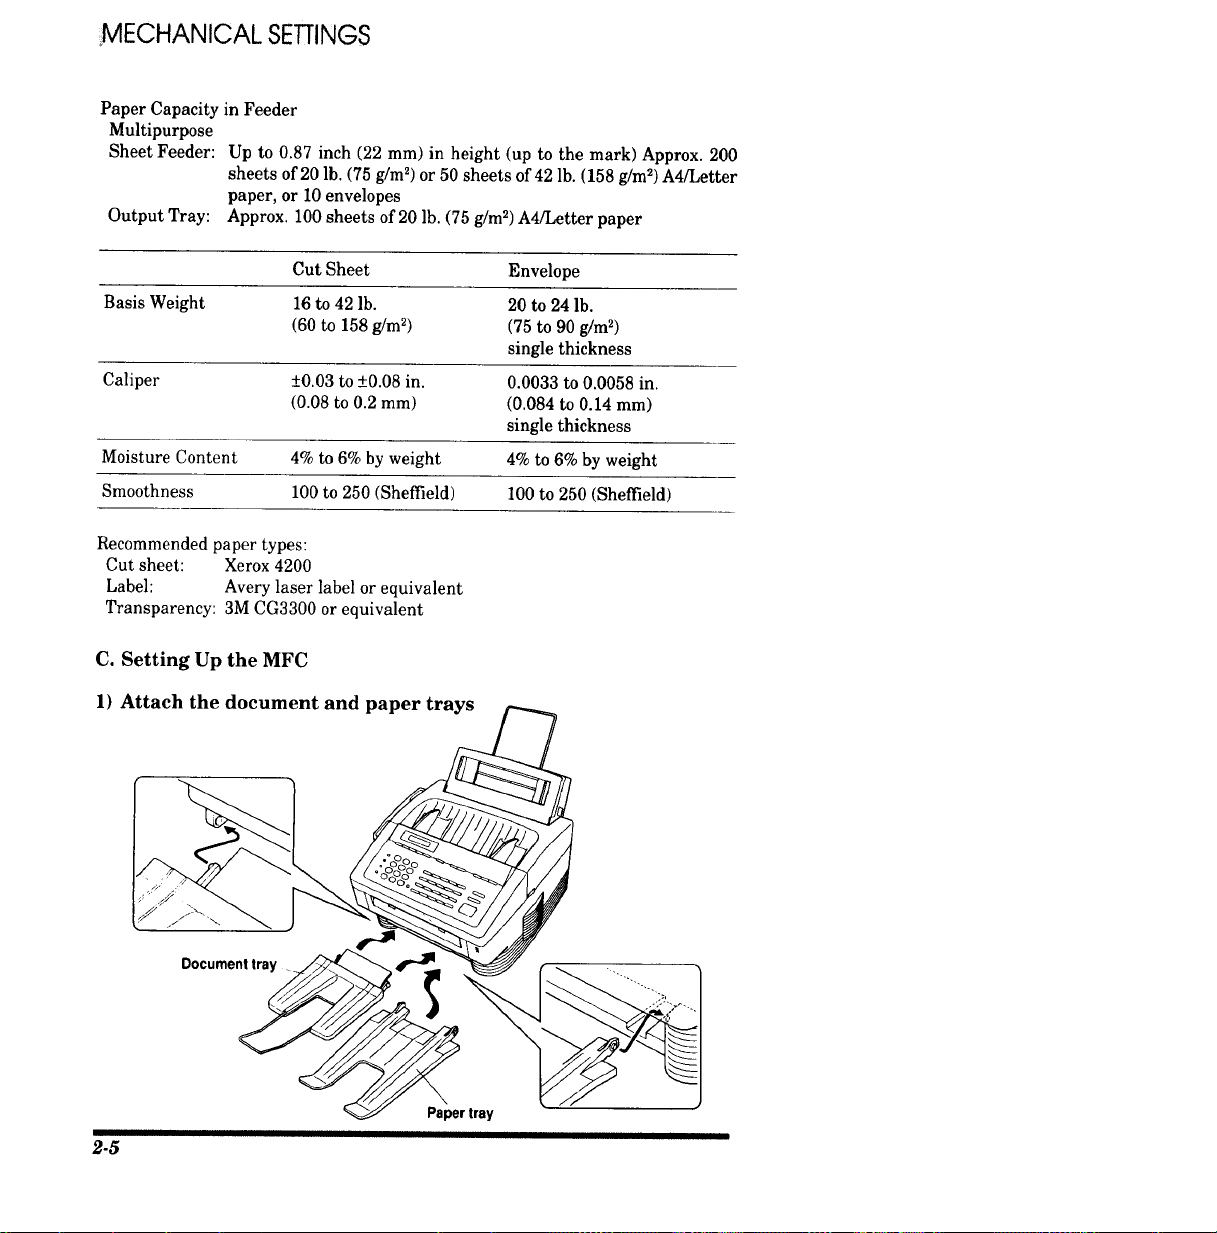
C. Setting Up the MFC
1) Attach the document and paper
2-5
Document tra__
Paper tray
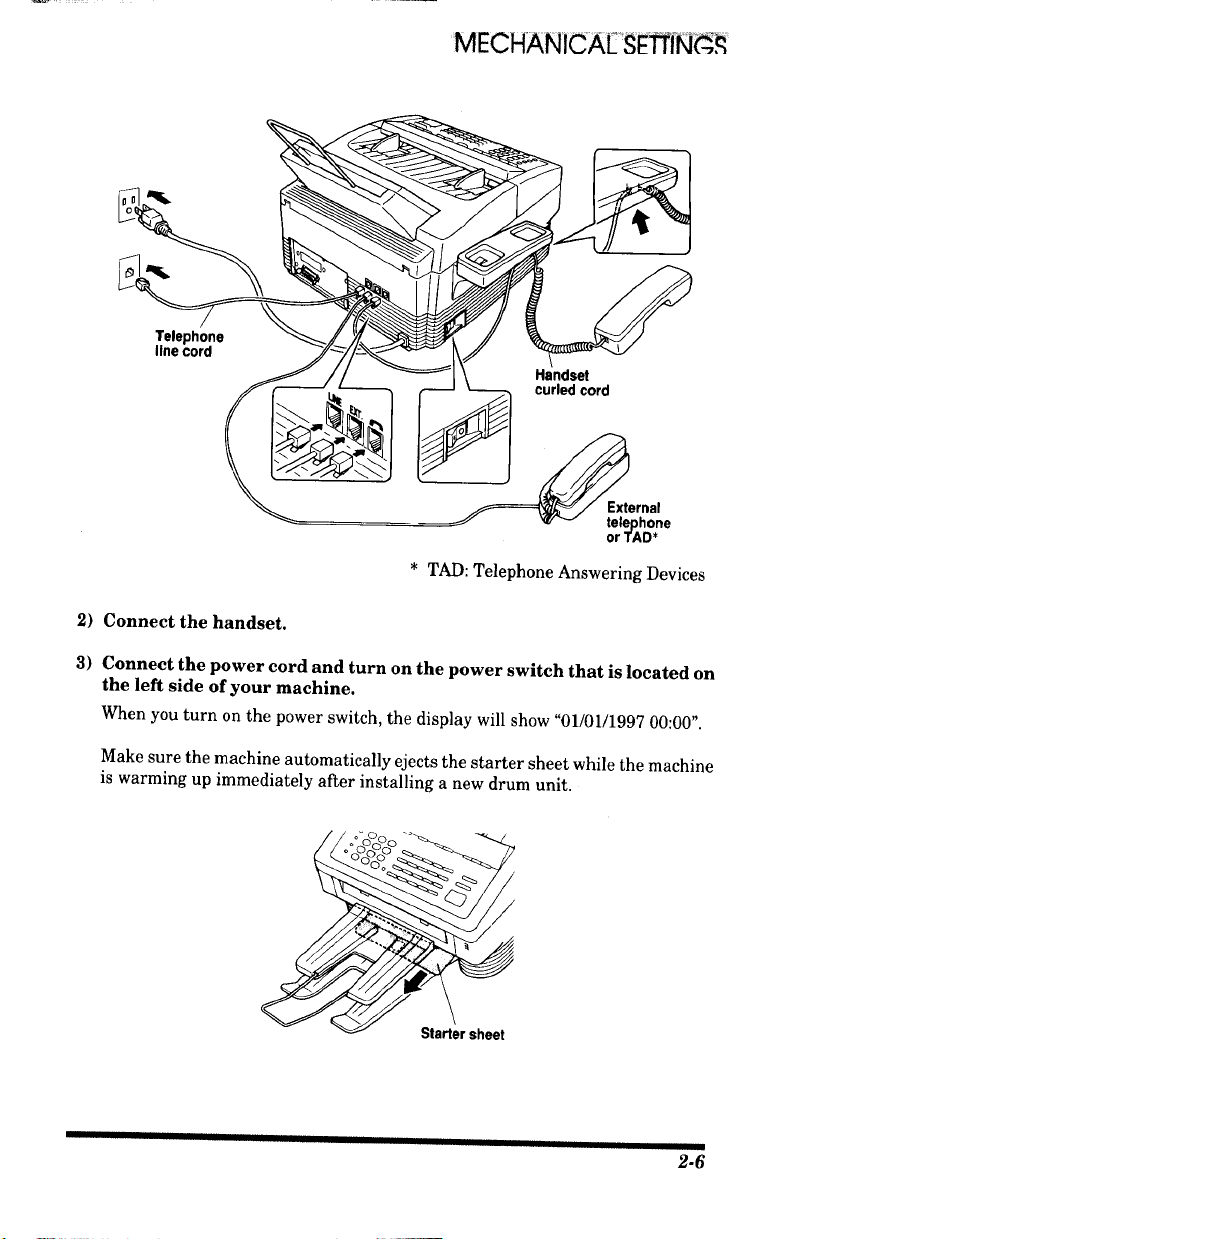
Telephone
linecord
2) Connect the handset.
Handset
curled cord
_ernal
_" _ telephone
orTAD*
* TAD: Telephone Answering Devices
3) Connect the power cord and turn on the power switch that is located on
the left side of your machine.
When you turn on the power switch, the display will show "01/01/1997 00 00 .
Make sure the machine automatically ejects the starter sheet while the machine
is warming up immediately after installing a new drum unit.
Starter sheet
I I Jlllll II Jill II I ill IIIII IJll
2-6
MECHANICAL SETTINGS
1.This machine must be gtuunded using a 3-prong plug.
2.Since the machine is grounded through the power outlet, you can proLecL
yourself from potentially hazardous electrical conditions on the
telephone network byplugging in the power cord before you connect it to
the telephone line.
Similarly, you can protect yourself when you want to move your machine,
by disconnecting the telephone line first, and then the power cord.
4) Connect the telephone line to the LINE jack.
D. Connecting the MFC to the Computer
You must connect the MFC to your computer with the bidirectional IEEE 1284
compliant parallel cable that is included, unless you are using the optional serial
interface board.
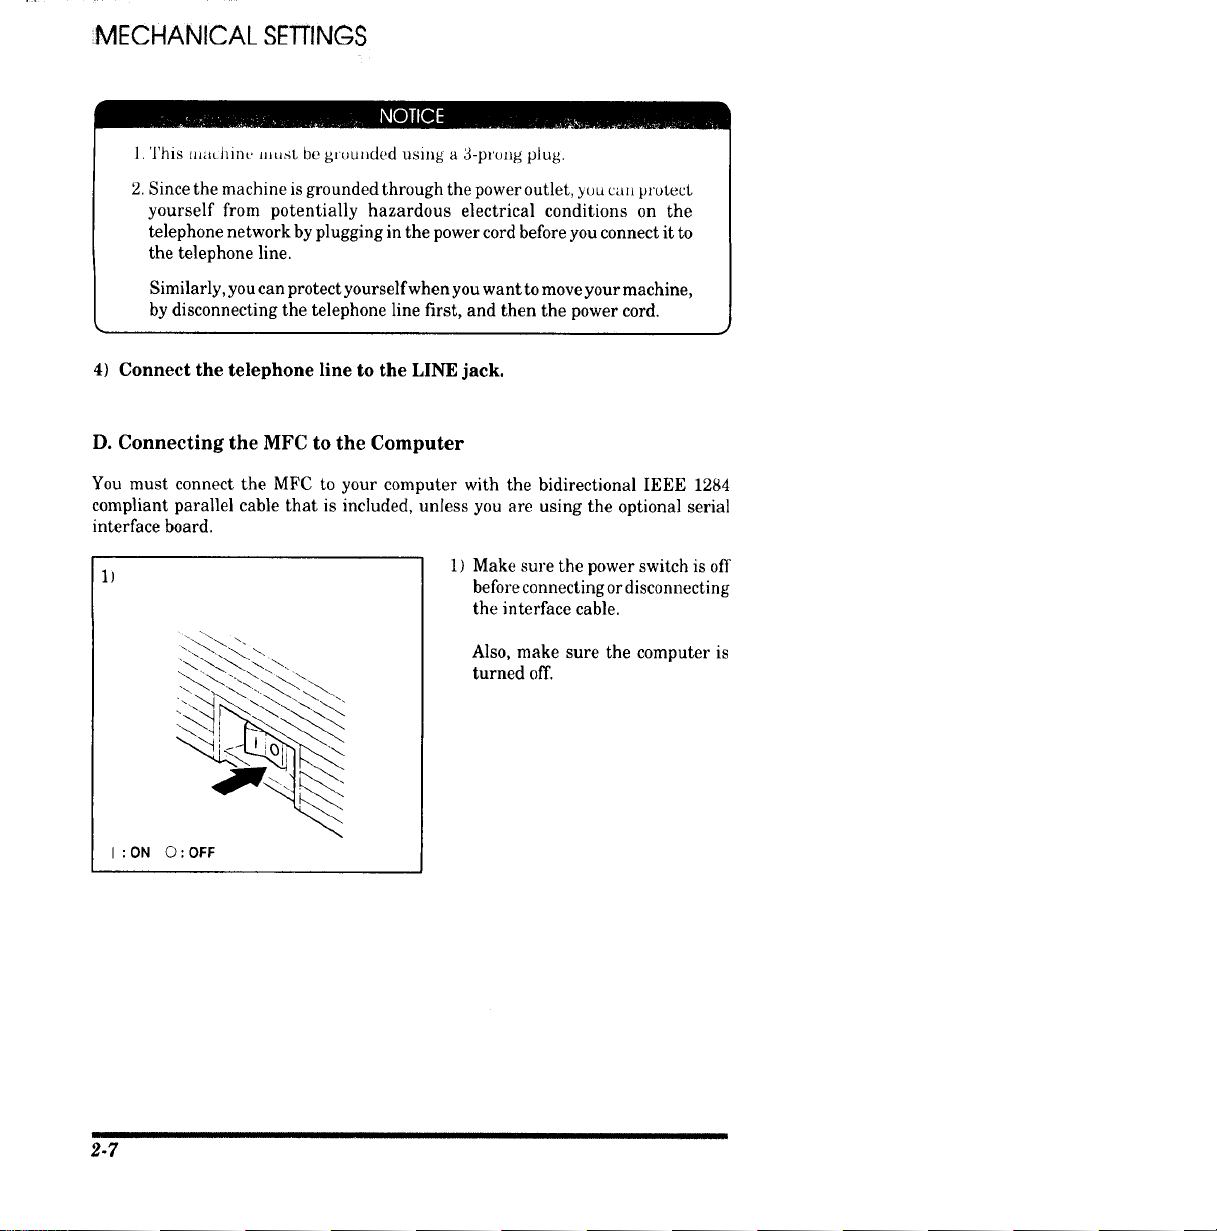
1)
I:ON O :OFF
1) Make sure the power switch is off
before connecting or disconnecting
the interface cable.
Also, make sure the computer is
turned off.
ttlttltU Ill
2-7
MECHANICAL SETTINGS
2)
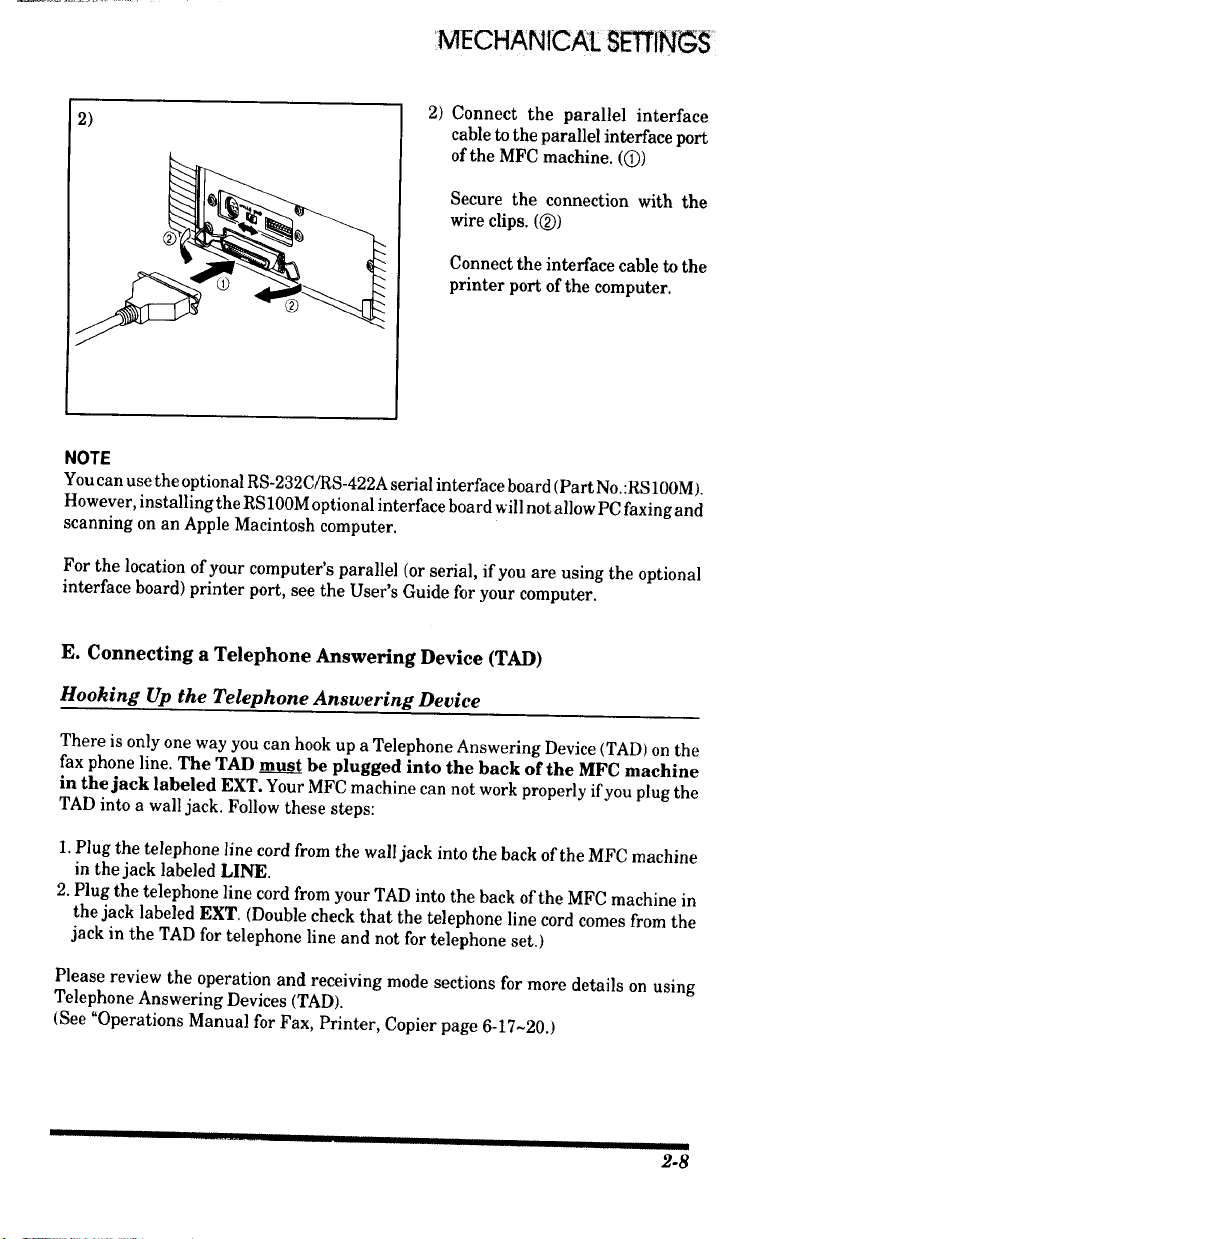
2)
Connect the parallel interface
cable to the parallel interface port
of the MFC machine. (Q)
Secure the connection with the
wire clips. (Q)
Connect the interface cable to the
printer port of the computer.
NOTE
You can use the optional RS-232C/RS-422A serial interface board (Part No.:RS100M).
However, installing the RS100M optional interface board will not allow PC faxing and
scanning on an Apple Macintosh computer.
For the location of your computer's parallel (or serial, if you are using the optional
interface board) printer port, see the User's Guide for your computer.
E. Connecting a Telephone Answering Device (TAD)
Hooking Up the Telephone Answering Device
There is only one way you can hook up a Telephone Answering Device (TAD) on the
fax phone line. The TAD _ be plugged into the back of the MFC machine
in the jack labeled EXT. Your MFC machine can not work properly if you plug the
TAD into a wall jack. Follow these steps:
1. Plug the telephone line cord from the wall jack into the back of the MFC machine
in the jack labeled LINE.
2. Plug the telephone line cord from your TAD into the back of the MFC machine in
the jack labeled EXT, (Double check that the telephone line cord comes from the
jack in the TAD for telephone line and not for telephone set.)
Please review the operation and receiving mode sections for more details on using
Telephone Answering Devices (TAD).
(See "Operations Manual for Fax, Printer, Copier page 6-17-20.)
]1111 __till ..... III I I I II
III
2-8
MECHANICAL SETTINGS
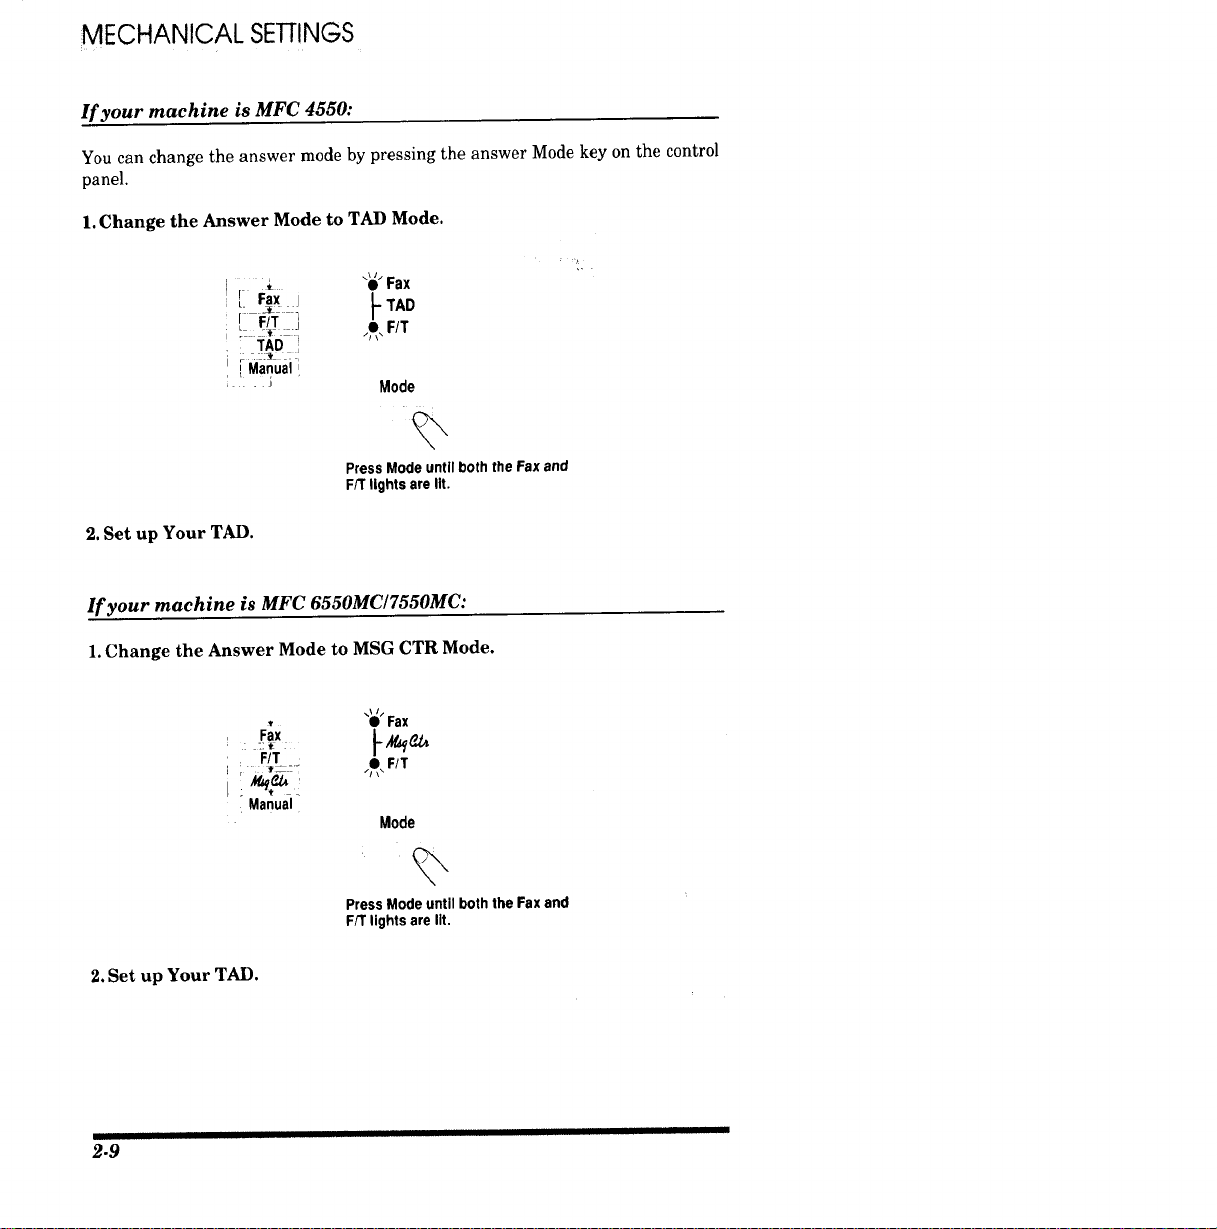
If your machine is MFC 4550:
You can change the answer mode by pressing the answer Mode key on the control
panel.
1. Change the Answer Mode to TAD Mode.
* "_" Fax
[ Fax ] L TAv
[: F/_T::} .O.F/TF
: TAD;
I Manual!
Mode
Press Mode until both the Fax and
FFrlightsarelit.
2. Set up Your TAD.
If your machine is MFC 6550MC/7550MC:
1.Change the Answer Mode to MSG CTR Mode.
• Fax
Fax _-M,_f
FIT
:--: __::.- .O. FIT
Manual
Mode
%
PressModeuntilboththeFaxand
F/T lightsarelit.
2. Set up Your TAD.
IIIII II
2.9
MECHANICAL SETTINGS
Recording the TAD's Outgoing Message (OGM)
The TAD's outgoing message is important because it must be set up to handle two
kinds of fax receptions: automatic and manual. Timing is important.
1. Record 5 seconds of silence as the beginning ofyour message. (Your MFC machine
will be able to hear the fax calling tones, ofautomatic fax transmissions, before they
stop.)
2. Limit your speaking to 20 seconds.
3. End your 20 second message by giving your Remote Activation Code for people
sending manual faxes:
"After the beep, leave a message or send a fax by pressing $51."
NOTE: Do not assume that most callers send faxes automatically. Many people do not
realize they are not sending fax tones when they lift the handset or press the
Hook key. Also, some machines may not send fax tones.
' ' .............. 2.io

MECHANICAL SETTINGS
F. Connecting to Different Types of Phone Lines
FORYOUR INFORMATION
Roll Over Phone Lines
A roll over phone system is a group of two or more separate telephone lines
that pass incoming calls to each other ifthey are busy. The calls are usually
passed down or "rolled over" to the next available phone line in a preset
order.
Your MFC can work in a roll over system as long as it is the last
number in the sequence so the call can not roll away. Do not put the MFC
on any of the other numbers. When the other lines are busy and a second
fax call is received, the fax call is transferred to a line that does not have
a MFC.
Two Line Phone System
A two line phone system is nothing more than two separate phone numbers
on the same wall outlet. The two phone numbers can be on separate jacks
(RJ 1l) or combined into one jack (RJ 14). Your MFC must be plugged into an
RJ 11jack. RJ 11and RJ14jacks may be equal in size and appearance and both
may contain 4 wires (black, red, green, yellow). To test the type ofjack, plug
in a two line phone and see if it can access both lines. If it can, you must
separate the lines for your MFC.
Converting Telephone Wall Outlets
There are three ways to convert to an RJll receptacle. The first two ways
may require assistance from the telephone company. You can change the
wall outlet from one RJ 14jack to two RJ11 jacks. Or, you can have an RJ11
wall outlet installed and slave or jump one of the phone numbers to it. The
third way is the easiest. Buy a triplex adapter.
You can plug a triplex adapter into an tLll4 wall outlet. It will separate the
wires into two separate RJll jacks (line 1, line 2) and a third RJ14 jack
dines 1 and 2). Plug the fax machine into L2 of the triplex adapter.
RJI4
RJII RJII RJl4
Triplex Adapter
I IIIIIIIIIIII II I I J I I I
2-1
1
_R YOURINI_ORMATION
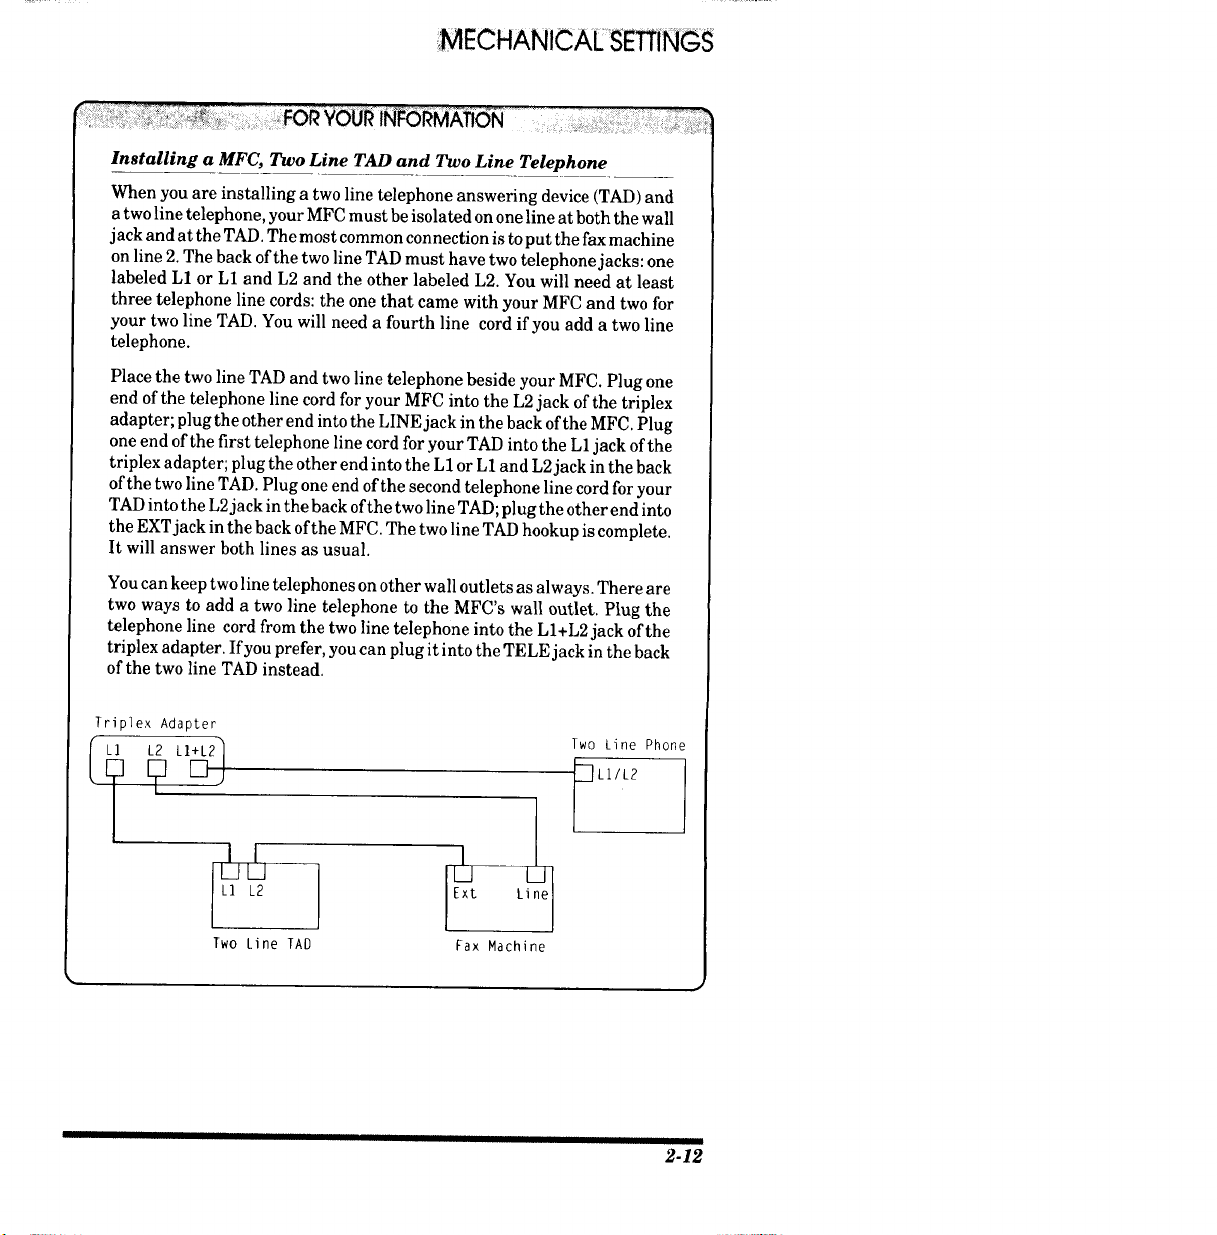
Installing a MFC, Two Line TAD and Two Line Telephone
When you are installing a two line telephone answering device (TAD) and
a two line telephone, your MFC must be isolated on one line at both the wall
jack and at the TAD. The most common connection is to put the fax machine
on line 2. The back of the two line TAD must have two telephone jacks: one
labeled L1 or L1 and L2 and the other labeled L2. You will need at least
three telephone line cords: the one that came with your MFC and two for
your two line TAD. You will need a fourth line cord if you add a two line
telephone.
Place the two line TAD and two line telephone beside your MFC. Plug one
end of the telephone line cord for your MFC into the L2 jack of the triplex
adapter; plug the other end into the LINE jack in the back of the MFC. Plug
one end of the first telephone line cord for your TAD into the L1 jack of the
triplex adapter; plug the other end into the L1 or L1 and L2jack in the back
of the two line TAD. Plug one end of the second telephone line cord for your
TAD into the L2jack in the back ofthe two line TAD; plug the other end into
the EXTjack in the back ofthe MFC. The two line TAD hookup is complete.
It will answer both lines as usual.
You can keep two line telephones on other wall outlets as always. There are
two ways to add a two line telephone to the MFC's wall outlet. Plug the
telephone line cord from the two line telephone into the LI+L2 jack of the
triplex adapter. If you prefer, you can plug it into the TELE jack in the back
of the two line TAD instead.
Triplex Adapter
l ? TwoLi.e Phooe
L] L2 L]____2] _LI/L2
L] L2
Two Line TAD Fax Machine
I I
2-12
MECHANICAL SETIINGS
FORYOUR INFORMATION
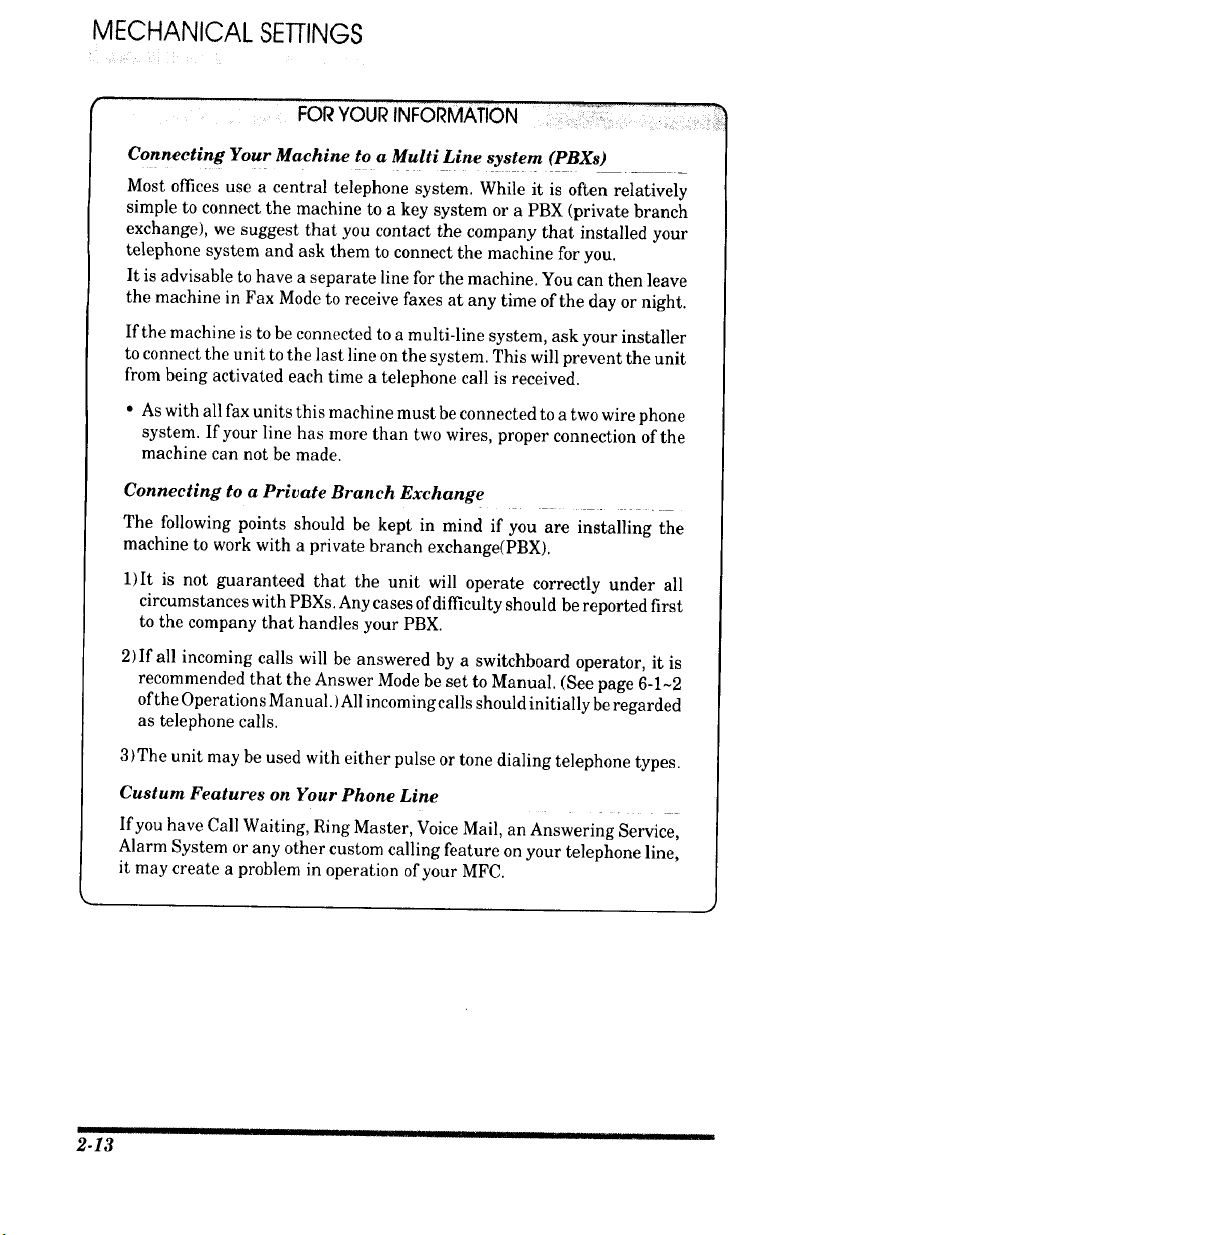
Connecting Your Machine to a Multi Line system (PBXs)
Most offices use a central telephone system. While it is often relatively
simple to connect the machine to a key system or a PBX (private branch
exchange), we suggest that you contact the company that installed your
telephone system and ask them to connect the machine for you.
It is advisable to have a separate line for the machine. You can then leave
the machine in Fax Mode to receive faxes at any time of the day or night.
If the machine is to be connected to a multi-line system, ask your installer
to connect the unit to the last line on the system. This will prevent the unit
from being activated each time a telephone call is received.
• As with all fax units this machine must be connected to a two wire phone
system. If your line has more than two wires, proper connection of the
machine can not be made.
Connecting to a Private Branch Exchange
The following points should be kept in mind if you are installing the
machine to work with a private branch exchange(PBX).
1)It is not guaranteed that the unit will operate correctly under all
circumstances with PBXs. Any cases of difficulty should be reported first
to the company that handles your PBX.
2)If all incoming calls will be answered by a switchboard operator, it is
recommended that the Answer Mode be set to Manual. (See page 6-1-2
ofthe Operation sManual.) All incoming calls should initi ally be regarded
as telephone calls.
3)The unit may be used with either pulse or tone dialing telephone types.
Custum Features on Your Phone Line
If you have Call Waiting, Ring Master, Voice Mail, an Answering Service,
Alarm System or any other custom calling feature on your telephone line,
it may create a problem in operation of your MFC.
zZ3. .......... '.....
3. SOFTWARESETTINGS
A. TELEPHONE FUNCTION SE'IVI'INGS
There are some settings, such as the date and time, you should set on yum machine
before you begin using it. Once entered, these settings will remain in the machine
until you change them. You can begin customizing the settings by pressing Function
on the control panel. This activates the function mode and On-Screen Programming
prompts. You can complete a variety of settings in this mode.
(This chapter (TELEPHONE FUNCTION SETTINGS) is also inserted in the
Operations Manual. Please refer to the Operations Manual page 3-1-11 for more
information.)
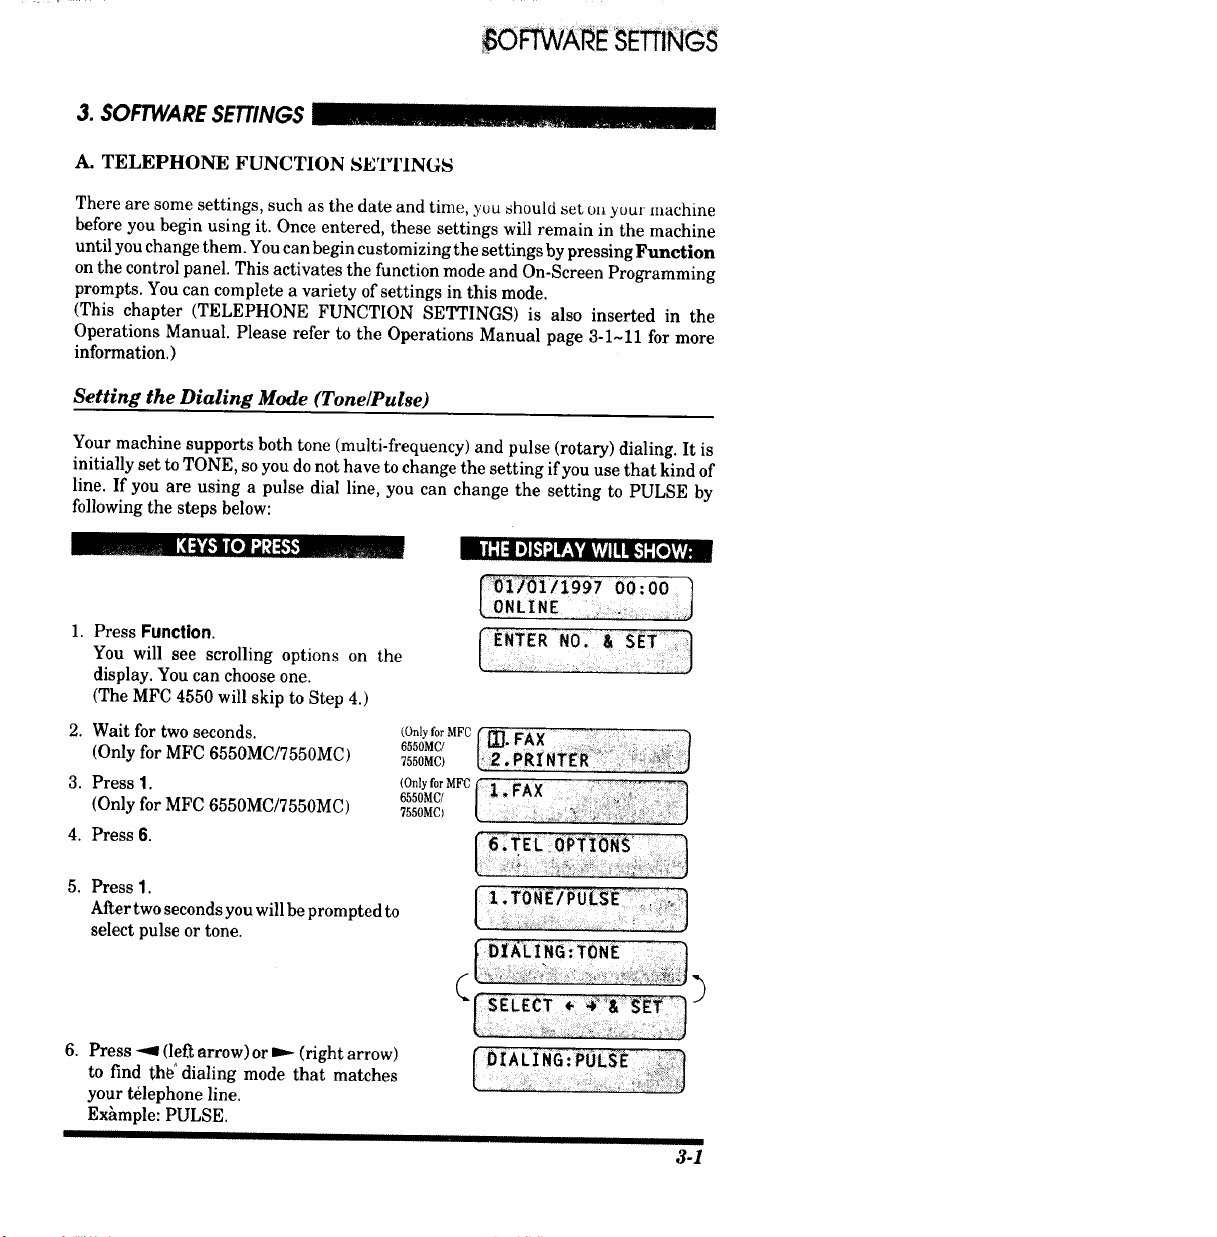
Setting the Dialing Mode (Tone/Pulse)
Your machine supports both tone (multi-frequency) and pulse (rotary) dialing. It is
initially set to TONE, so you do not have to change the setting if you use that kind of
line. If you are using a pulse dial line, you can change the setting to PULSE by
following the steps below:
i|:l:l m_]I,_!'._'ILq! _:l:[eJ',¥
1. Press Function.
You will see scrolling options on the
display. You can choose one.
(The MFC 4550 will skip to Step 4.)
2. Wait for two seconds.
(Only for MFC 6550MC/7550MC)
3, Press 1,
(Only for MFC 6550MC/7550MC)
4. Press 6.
oo:oo ]
L
NO
(OnlyforMFC ( m FAX *" .... :
6550MC/ [_-" ..... ,t ! ;,: • ; t
7550MC
(OnlyforMFC
6550MC/
7550MC)
5. Press 1.
After two seconds you will be prompted to
select pulse or tone.
6. Press -_ (left arrow) or D,_ (right arrow)
to find thb*' dialing mode that matches
your telephone line.
Exhmple: PULSE.
IUI III II I II I
3-1
SOFTWARE SETTINGS
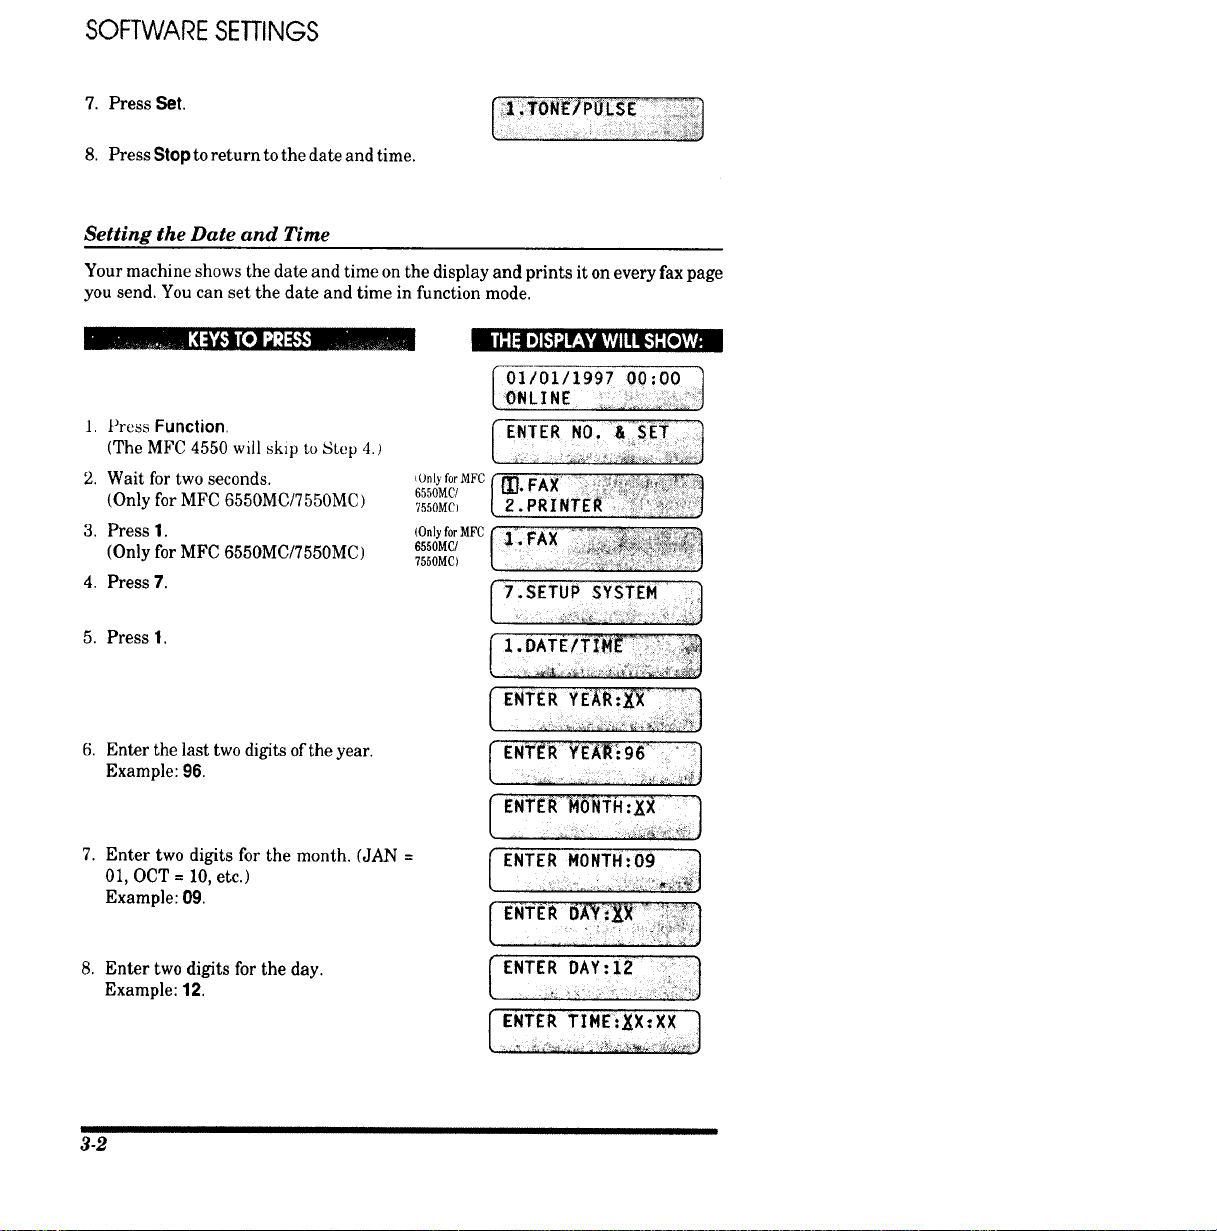
7. Press Set.
8. Press Stopto return to the date and time.
Setting the Date and Time
Your machine shows the date and time on the display and prints it on every fax page
you send. You can set the date and time in function mode.
1. Press Function,
(The MFC 4550 will skip to Step 4.)
2. Wait for two seconds.
(Only for MFC 6550MC/7550MC)
3. Press 1.
(Only for MFC 6550MC/7550MC)
4. Press 7.
5. Press 1.
i
il:l _ .] M'JF-'VAYII!_]: [elYI
01/01/1997 00:00 1
ONLI NE . J
)i
6550MC/ | ....
7_0Mc [ 2. PRINTER
(OnlyforMFC
6550MC/
7550MC)
6. Enter the last two digits of the year.
Example: 96.
7. Enter two digits for the month. (JAN =
01, OCT = 10, etc.)
Example: 09.
8. Enter two digits for the day.
Example: 12.
{ENTER TIME'_X:XX I
3-2

9. Enter the time in 24-hour format.
Example: 15:25(3:25 P.M.).
10.Wait for two seconds.
11. Press Stop to exit and to view the new
date and time.
Setting the Station ID
The Station ID is for identification purposes. Here you can store your name, fax
number, and telephone number. Your machine prints this information on the
electronic Cover Page and every fax page you send.
i i"11D]kTJP.;,VAv,vJIH_: [o_V___o] _.
'ONLINE
1. Prc_s Function.
(The MFC 4550 will skip to Step 4.)
2. Wait for two seconds. (OnlyfnrMFC
6550MC/
(Only for MPC 6550MC/7550MC) 7550MC)
3. Press 1. (Only for MFC
(Only for MFC 6550MC/7550MC) 6550MC/
7550MC)
4. Press 7.
5. Press 4.
You will then be prompted to enter your
fax number.
6. Enter your fax number (up to 20 digits).
Example: 4155554444.
7. Press Set.
You will be prompted to enter your
telephone number.
(
(.....................................)
3-3
SOFTWARE SE'FrlNGS
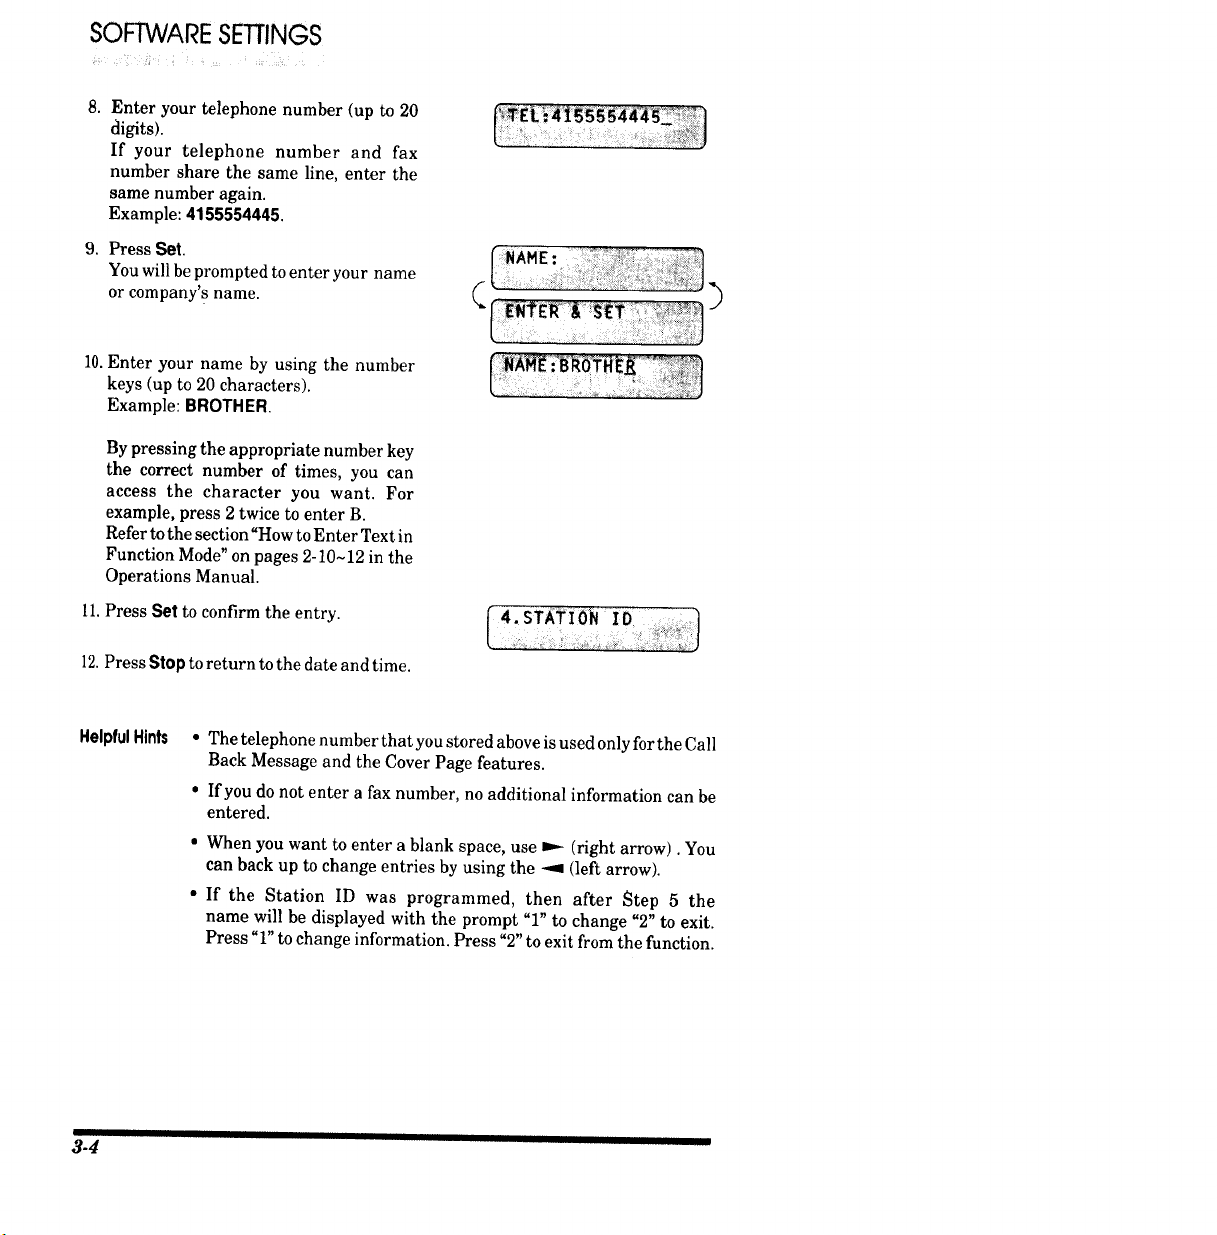
Enter your telephone number (up to 20
digits).
If your telephone number and fax
number share the same line, enter the
same number again.
Example: 4155554445.
9. Press Set.
You will be prompted to enter your name
or company's name.
10.Enter your name by using the number
keys (up to 20 characters).
Example: BROTHER.
By pressing the appropriate number key
the correct number of times, you can
access the character you want. For
example, press 2 twice to enter B.
Refer to the section "How to Enter Text in
Function Mode" on pages 2-10~12 in the
Operations Manual.
11.Press Set to confirm the entry.
12. Press Stop to return to the date and time.
HelpfulHints • The telephone number that you stored above is used only for the Call
Back Message and the Cover Page features.
* If you do not enter a fax number, no additional information can be
entered.
• When you want to enter a blank space, use D*- (right arrow). You
can back up to change entries by using the -9 (left arrow).
• If the Station ID was programmed, then after Step 5 the
name will be displayed with the prompt "1" to change "2" to exit.
Press "1" to change information. Press "2" to exit from the function.
II IIII J
3-4
_._o] Kq!
The Telephone Consumer Protection Act. of 1991 makes it unlawtul tbr any
person to use a computer or electronic device to send any message via a
telephone fax machine unless such messages clearly contain in a margin at
the top or bottom of each transmitted page or on the first page of the
transmission, the date and time it is sent and an identification of the
business or other entity, or other individual sending the message and the
telephone number of the sending machines or such business, other entity,
or individual.
To program this information into your machine, complete the steps on the
previous page.
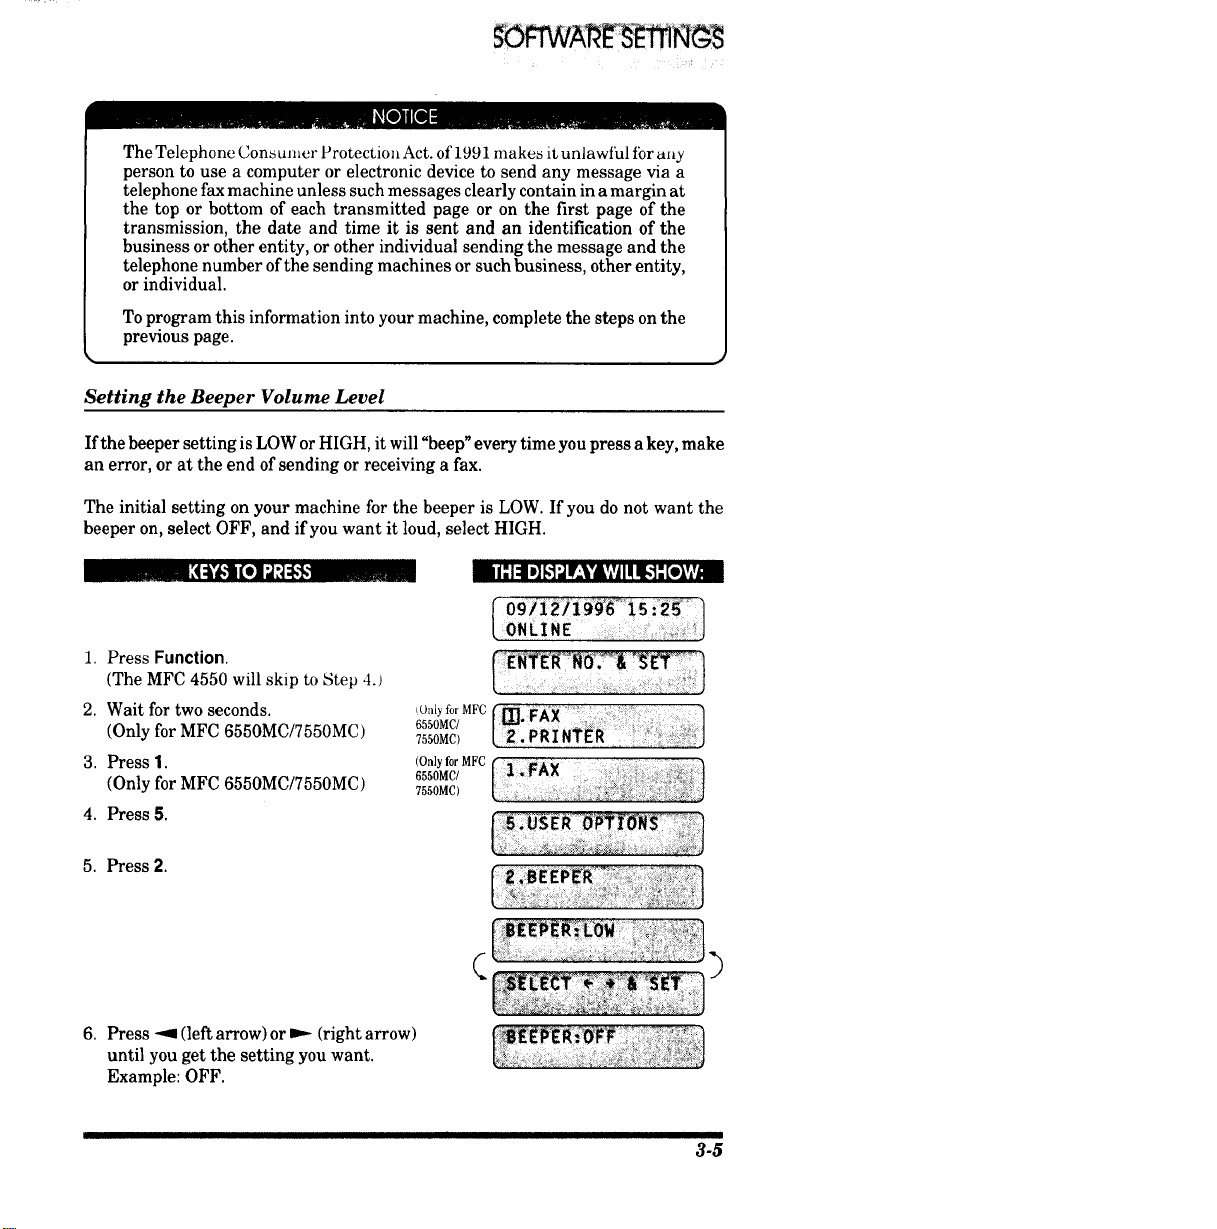
Setting the Beeper Volume Level
If the beeper setting is LOW or HIGH, it will "beep" every time you press a key, make
an error, or at the end of sending or receiving a fax.
The initial setting on your machine for the beeper is LOW. If you do not want the
beeper on, select OFF, and if you want it loud, select HIGH.
ran,I[-"1:11D]F,'l;,lIr_,¥'&?jIIII_',]_,[elV_l
_.,,._,- [_._ ll_o_I;_"_
1. Press Function.
(The MFC 4550 will skip to Step 4._
2. Wait for two seconds.
(Only for MFC 6550MC/7550MC)
3. Press 1.
(Only for MFC 6550MC/7550MC)
4. Press 5.
,,ONL!NE
iOnlyfor MFC
6550MC/
7550MC)
]
5. Press 2.
(
6. Press -9. (left arrow) or _ (right arrow)
until you get the setting you want.
Example: OFF.
3-5

SOFTWARESETTINGS
7. Press Set.
8. Press Stop to return to the date and time.
Storing the One-Touch Dial Numbers
You can dial numbers automatically by storing telephone or fax numbers as One-
Touch dial numbers. You can also store names with the numbers so when you call, you
can verify the destination by the name on the display. You can store a maximum of
24 numbers. To access numbers 13to 24, hold down the Shift key. For example, One-
Touch location"13" is accessed by pressing Shift + One-Touch"Ol" simultaneously.
Here is how to store a telephone number as a One-Touch dial number:
Ot-"1:11.][,']diK:V4LVjIqil,'];[o],VJ
l. Press [=unction.
(The MFC 4550 will skip to Step 4.)
2. Wait for two seconds.
(Only for MFC 6550MC/7550MC)
3. Press 1.
(Only for MFC 6550MC/7550MC)
4. Press 4.
09/12/1996 15:25 -1
0 N L IN E ,,;.,, i, J
OnlyforMFC f m _-- _-" '_ _:_':',_Z'_'>_
6550MC/ I_" : ':; ::]
7550MC) L2* PRI NTER
(OnlyforMFC
6550MC/
7550MC)
5. Press 1.
[
6. Press the One-Touch key where you want
to store a number.
Example: One-Touch 05.
Note:The One-Touch keys are not the
number keys.
7. Enter a number (up to 20 digits).
Example: 14155551212.
3-6
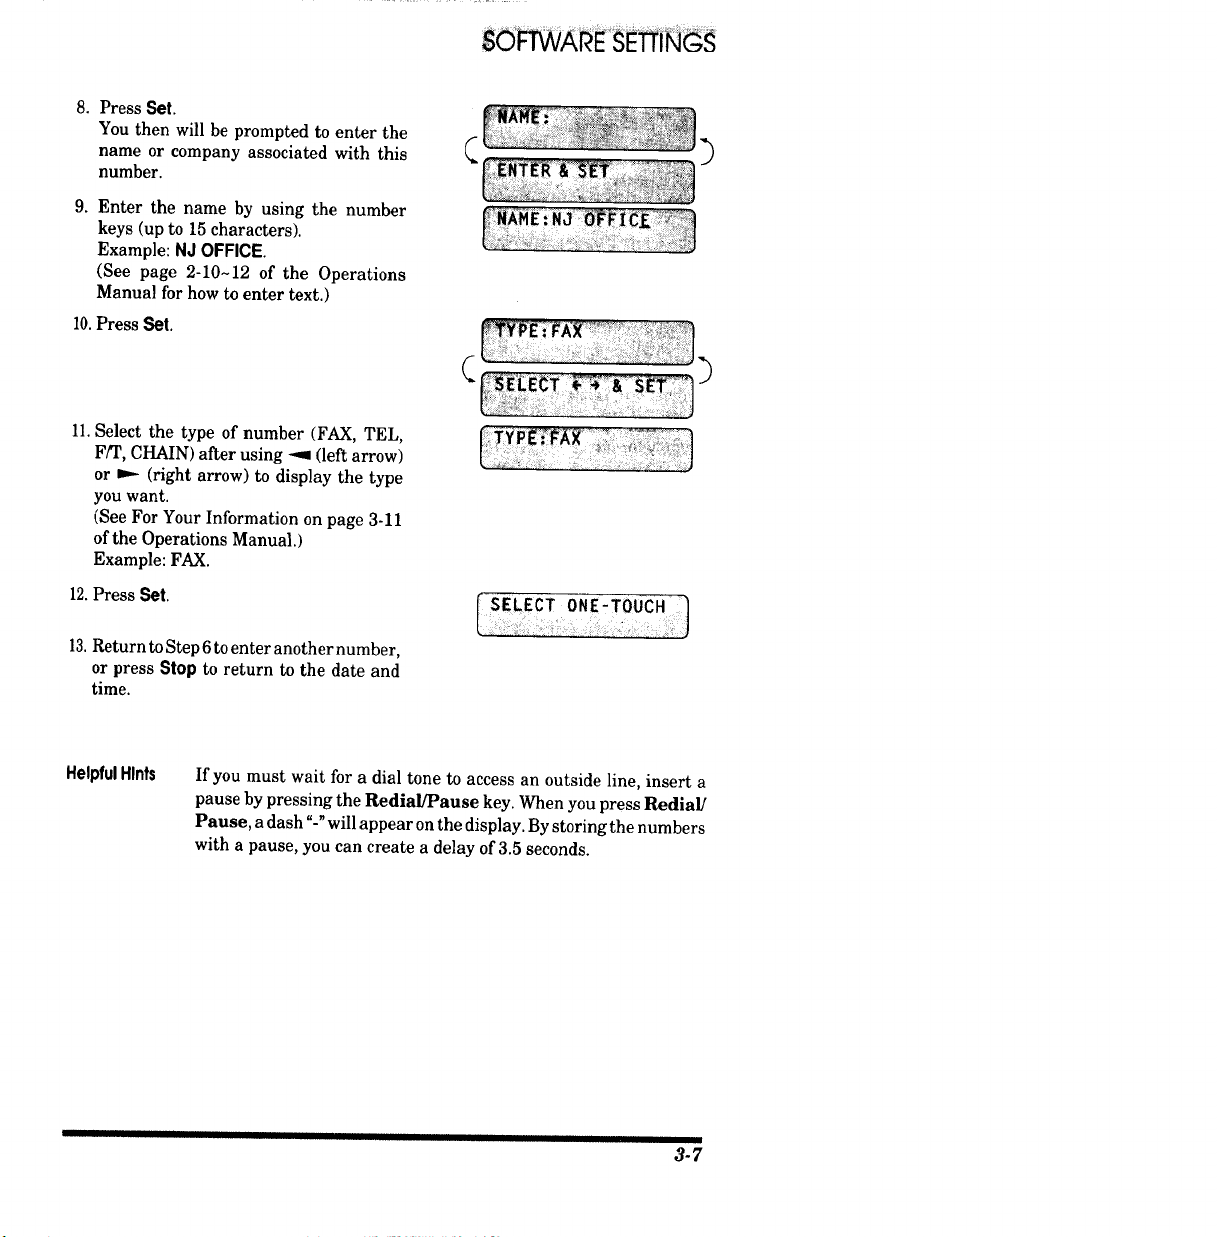
8. Press Set.
You then will be prompted to enter the
name or company associated with this
number.
9. Enter the name by using the number
keys (up to 15 characters).
Example: NJ OFFICE.
(See page 2-10~12 of the Operations
Manual for how to enter text.)
10.Press Set.
)
11.Select the type of number (FAX, TEL,
F/T, CHAIN) after using ---I (left arrow)
or P-- (right arrow) to display the type
you want.
(See For Your Information on page 3-11
of the Operations Manual.)
Example: FAX.
12. Press Set.
13. Return to Step 6to enter another number,
or press Slop to return to the date and
time.
SELECT ONE'TOUCH
HelpfulHlnts If you must wait for a dial tone to access an outside line, insert a
pause by pressing the Redial/Pause key. When you press Redial/
Pause, a dash "-"will appear on the display. By storing the numbers
with a pause, you can create a delay of 3.5 seconds.
III II I I I I
3-7
SOFTWARE SETTINGS
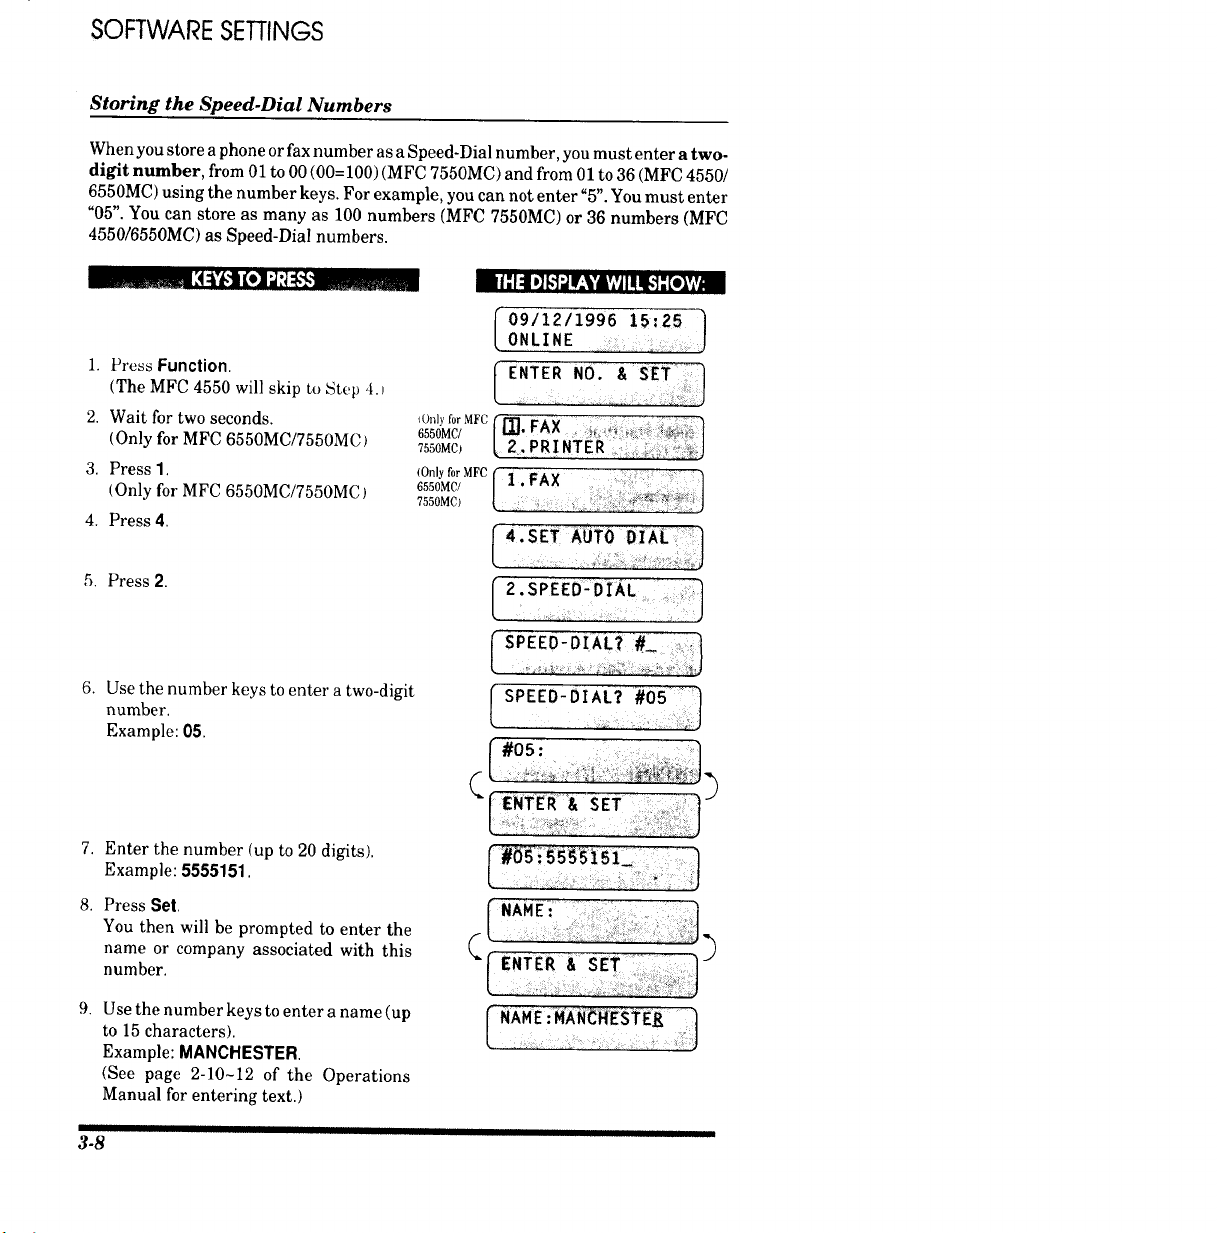
Storing the Speed-Dial Numbers
When you store a phone or fax number as a Speed-Dial number, you must enter a two-
digit number, from 01 to 00 (00=100) (MFC 7550MC) and from 01 to 36 (MFC 4550/
6550MC) using the number keys. For example, you can not enter"5". You must enter
"05". You can store as many as 100 numbers (MFC 7550MC) or 36 numbers (MFC
4550/6550MC) as Speed-Dial numbers.
1. Press Function.
(The MFC 4550 will skip to Step 4. J
2. Wait for two seconds. _On]y for MFC
6550MC/
(Only for MFC 6550MC/7550MC) 7550MO
3. Press 1. (Only forMFC
(Only for MFC 6550MC/7550MC) 6550MC/
7550MC)
4. Press 4.
5. Press 2.
6. Use the number keys to enter a two-digit
number.
Example: 05.
i |: I| D]kl'JI.y|Vj I! _1': [e]Ti_il
09/12/1996 15:25 /
0NLINE :: J
{
ENTER NO. & SET:
!
([]. FAX
2,PRI NTER
[ SPEED-,IAL? '05°(°i ]
8.
9.
Enter the number (up to 20 digits).
Example: 5555151.
Press Set.
You then will be prompted to enter the
name or company associated with this
number.
Use the number keys to enter a name (up
to 15 characters).
Example: MANCHESTER.
(See page 2-10-12 of the Operations
Manual for entering text.)
....:_:_:_:_i:_!__:/:!;_:_!i_:,iii!i_;_,)i:_:::i::i¸!i
D
3-8
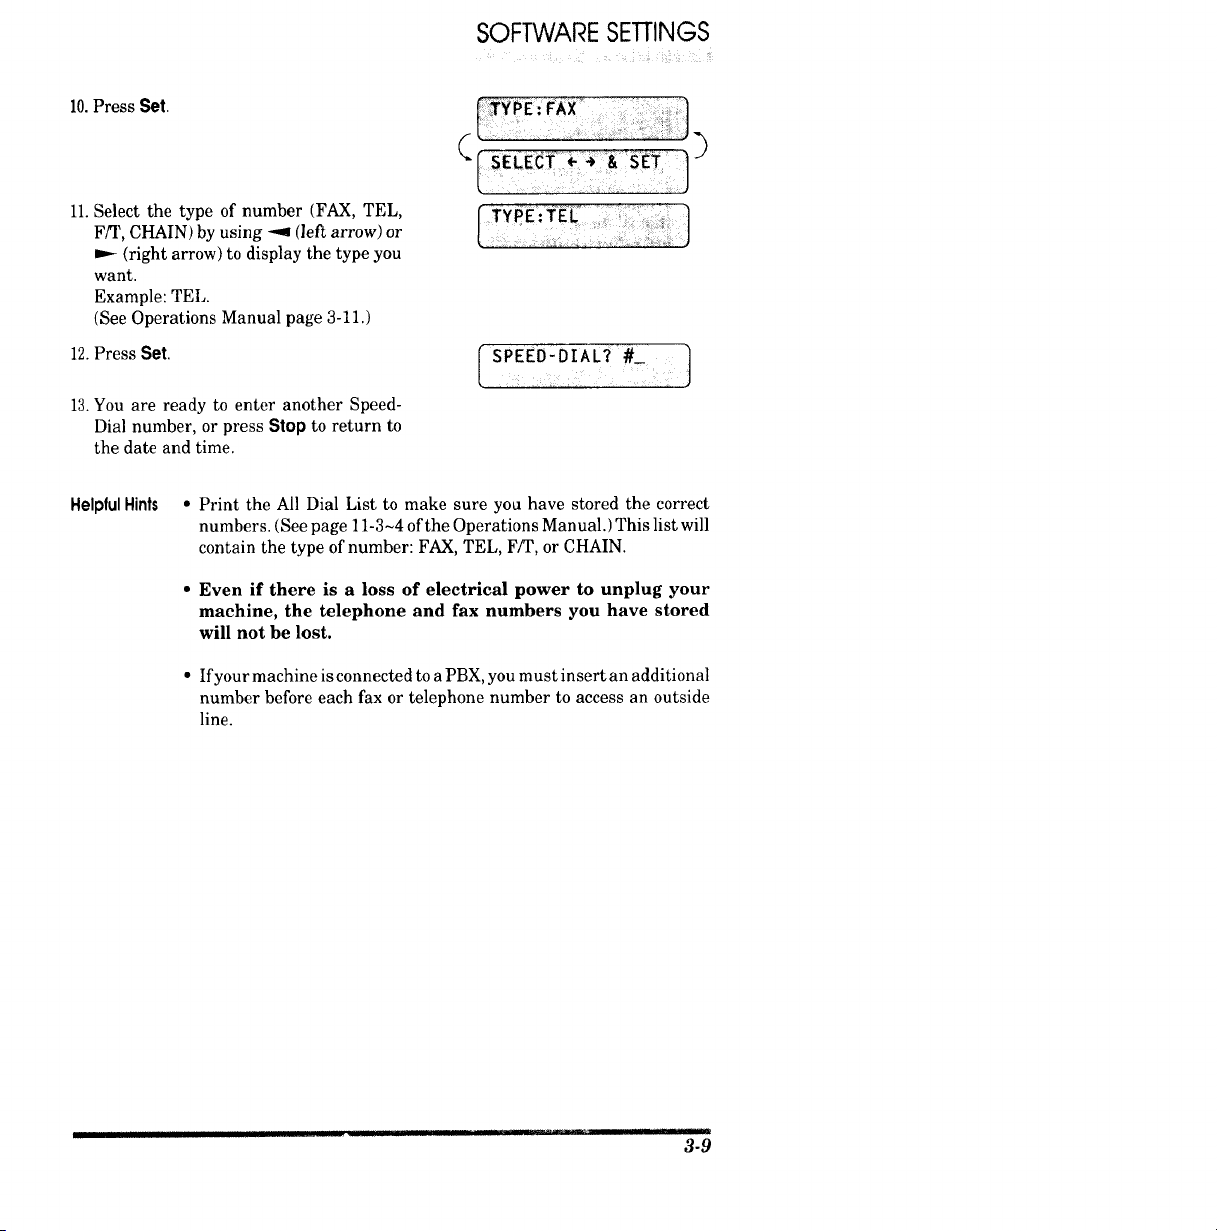
lO.Press Set.
11. Select the type of number (FAX, TEL,
F/T, CHAIN) by using --q (left arrow) or
(right arrow) to display the type you
want.
Example: TEL.
(See Operations Manual page 3-11.)
12. Press Set.
13.You are ready to enter another Speed-
Dial number, or press Stop to return to
the date and time.
SOFTWARE SETTINGS
SPEED'DIAL? #_ }
HelpfulHints • Print the All Dial List to make sure you have stored the correct
numbers. (See page 11-3~4 of the Operations Manual.) This list will
contain the type of number: FAX, TEL, F/T, or CHAIN.
• Even if there is a loss of electrical power to unplug your
machine, the telephone and fax numbers you have stored
will not be lost.
• Ifyour machine is connected to a PBX, you must insert an additional
number before each fax or telephone number to access an outside
line.
I I II £ I ' ....
3-9

SOFTWARE SETTINGS
FORYOUR INFORMATION
When You Wish to Change the Stored One-Touch and Speed-Dial
N.umbers (During Step 6 on Page 3-6, 8) .........
When you access the function for a One-Touch key or Speed-Dial number,
that is already in use, you will be asked if you wish to change it or to exit
and select a different One-Touch or Speed-Dial number. This display does
not appear if the One-Touch key or Speed-Dial number you chose is not
assigned.
1. Press 1 to assign a new number to the One-Touch key or Speed-Dial
number, or press 2 to choose a different One-Touch key or Speed-Dial
number.
2. If you are replacing an existing number with a new one, the old number
and name will appear in the display. Press Clear to erase the old number
and name. Then, enter the new number and name and press Set to store
the entry.
Memory Storage/Temporary Battery Back Up
Your machine is equipped with an internal battery that will keep the date
and time information for up to two hours after power has been cut off. After
that time, the date and time will be lost and you will have to reenter the
information. All other settings in the SETAUTO DIAL, USER OPTIONS
and SETUP SYSTEM functions (See the Operations Manual page 2-3~6)
are stored permanently and will be retained even in the event of a power
failure. However, the data stored in the memory during Out-of-Paper
Reception and Memory Transmission will be lost when the power is
disconnected.
II IIIIII I I I I
3.10
SOFTWARESETTINGS
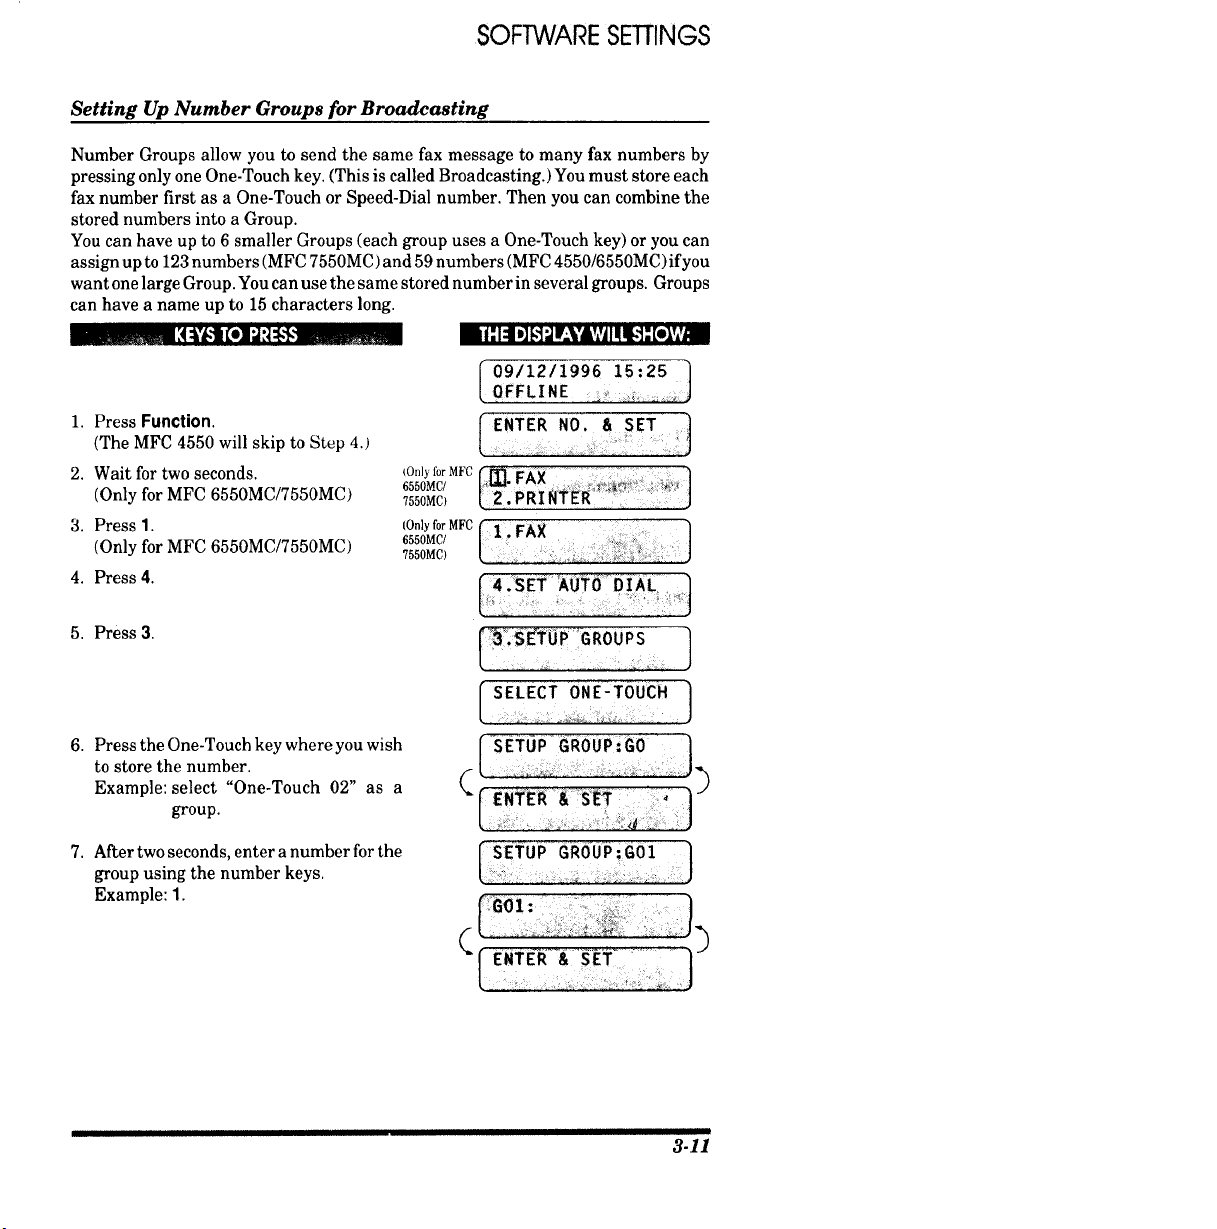
Setting Up Number Groups for Broadcasting
Number Groups allow you to send the same fax message to many fax numbers by
pressing only one One-Touch key. (This is called Broadcasting.) You must store each
fax number first as a One-Touch or Speed-Dial number. Then you can combine the
stored numbers into a Group.
You can have up to 6 smaller Groups (each group uses a One-Touch key) or you can
assign up to 123 numbers (MFC 7550MC) and 59 numbers (MFC 4550/6550MC)ifyou
want one large Group. You can use the same stored number in several groups. Groups
can have a name up to 15 characters long.
_1_41_ _]_F.Y&?jItltl[,."]-"[*lv,'.€
1. Press Function.
(The MFC 4550 will skip to Step 4.)
2. Wait for two seconds.
(Only for MFC 6550MC/7550MC)
3. Press 1.
(Only for MFC 6550MC/7550MC)
4. Press 4.
5. Press 3.
6. Press the One-Touch key where you wish
to store the number.
Example: select "One-Touch 02" as a
group.
7. After two seconds, enter a number for the
group using the number keys.
Example: 1.
I 09/12/1996 15:25 1
0FFLINE ,_i
ENTER NO. & SET
6550Mc/(Onlyfor MFC r_[]" FAX _1
755oMc,[2.PRI ; J
(Onlyf°r MFC [:i : FAX
6550MC,7550MC,
:'SE__'AUT0DIAL
SELECT ONE(TOUCH .}
I _t_OP _RODP'_O 1
fGoz: ]
( [ ,,: : J)
II III I I IIIIIIIII
3-11
SOFTWARE SETTINGS
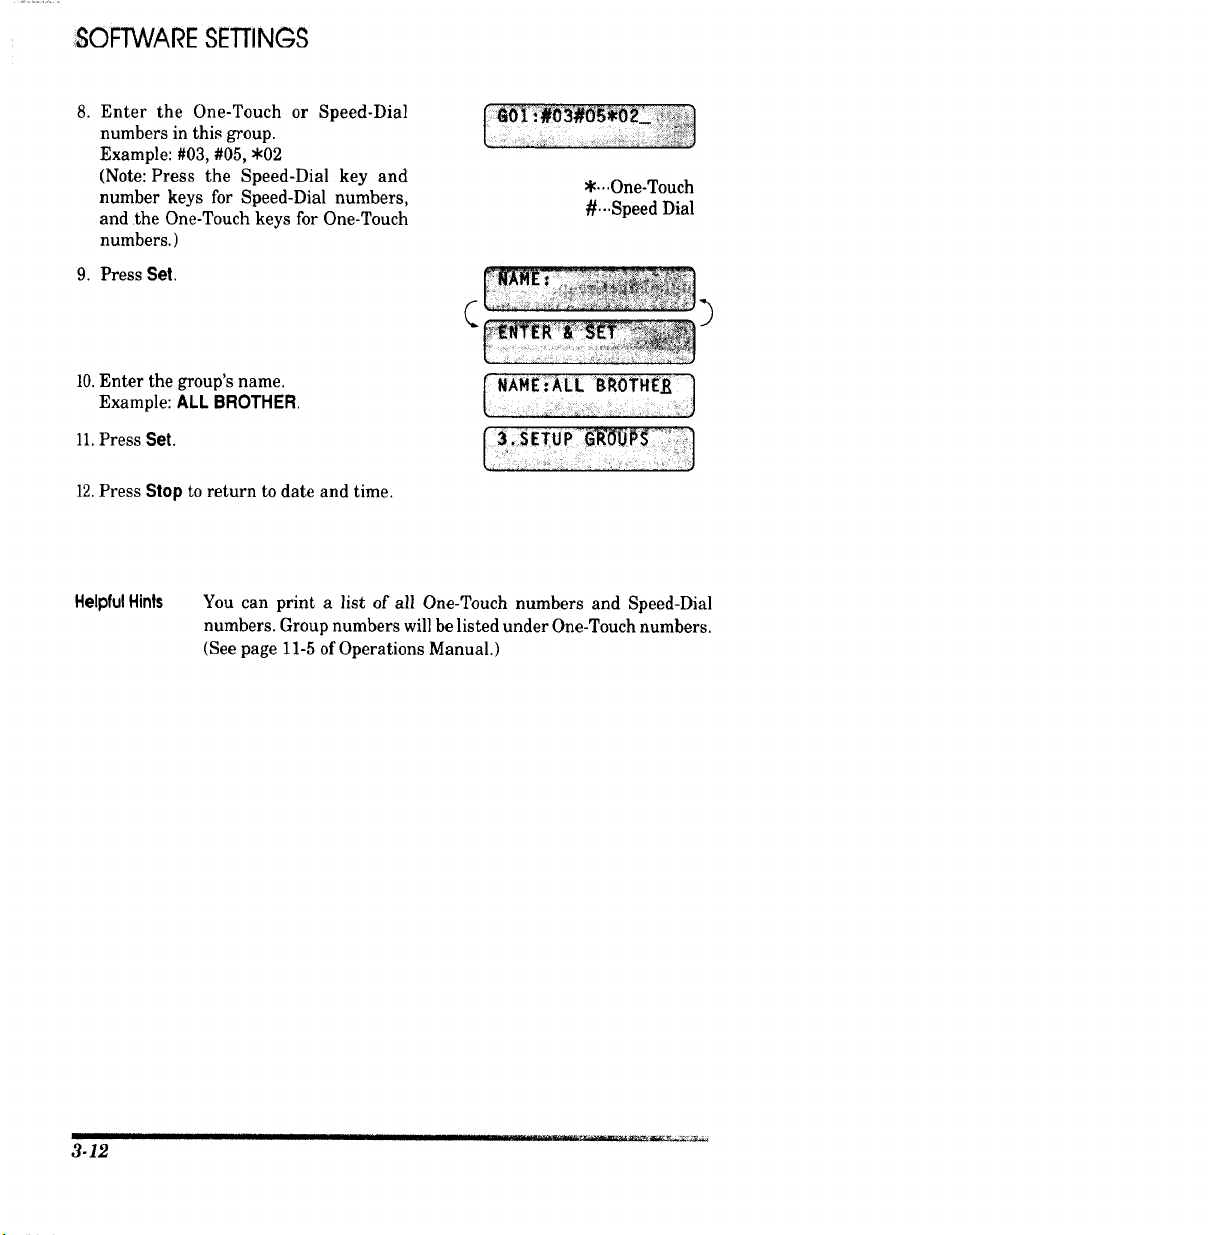
8. Enter the One-Touch or Speed-Dial
numbers in this group.
Example: #03, #05, *02
(Note: Press the Speed-Dial key and
number keys for Speed-Dial numbers,
and the One-Touch keys for One-Touch
numbers.)
9. Press Set.
10.Enter the group's name.
Example: ALL BROTHER.
ll. Press Set.
12.Press Stop to return to date and time.
:: ::: : :::::J
HelpfulHints
You can print a list of all One-Touch numbers and Speed-Dial
numbers. Group numbers will be listed under One-Touch numbers.
(See page 11-5 of Operations Manual.)
3-12
SOFTWARESETTINGS
B. MULTI-FUNCTION LINK PRO SOFTWARE SETTINGS
1) FOR WINDOWS® USERS
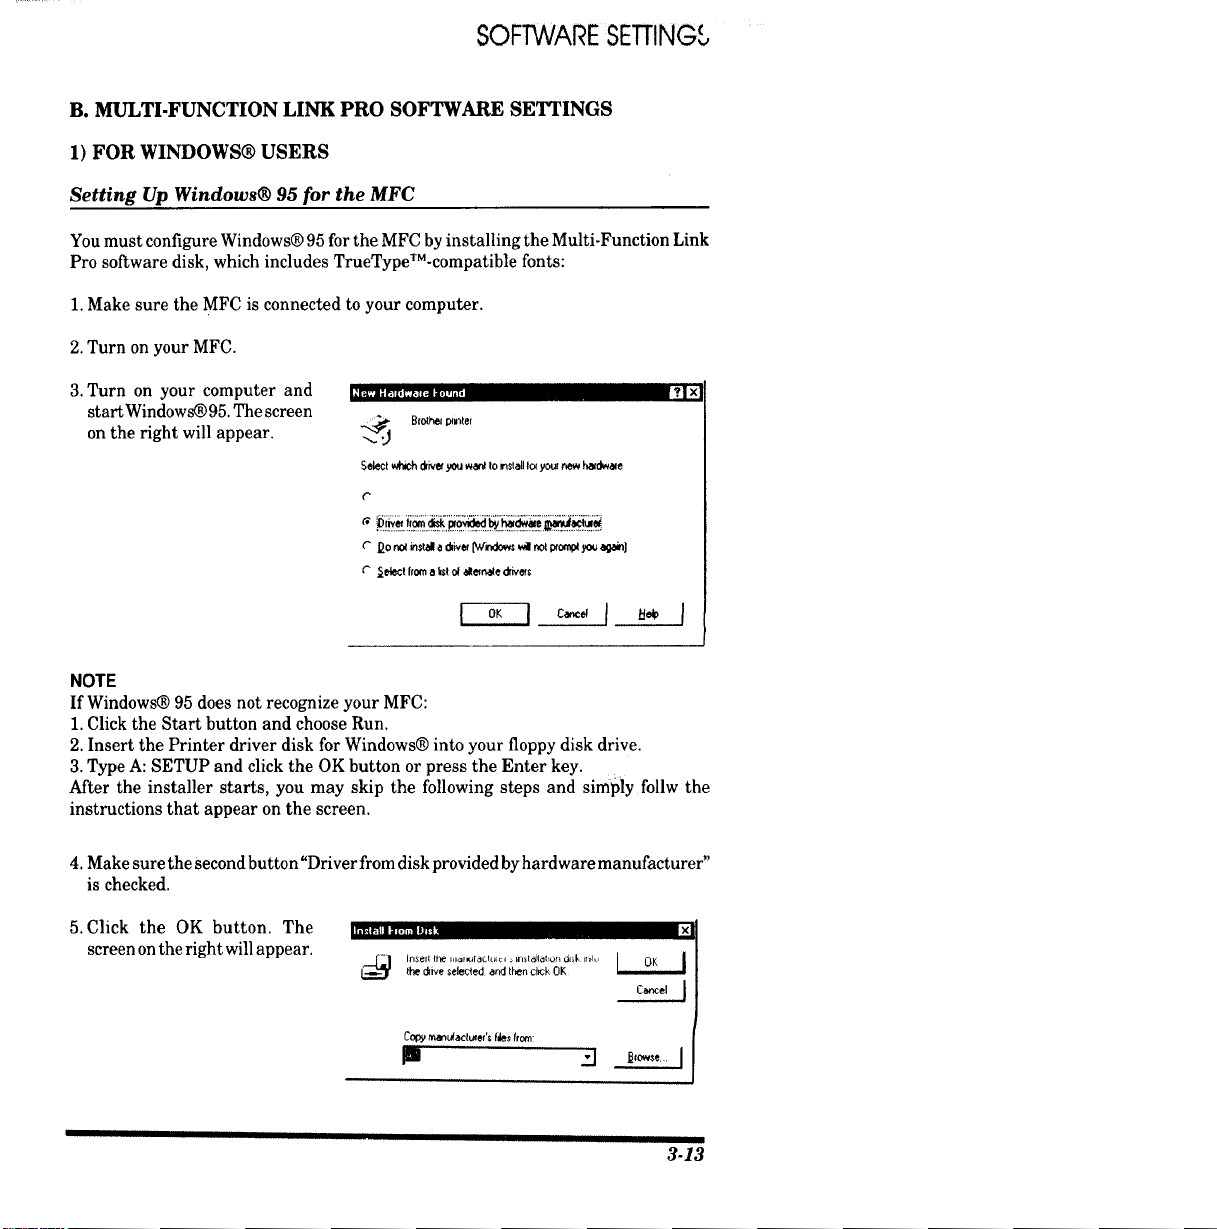
Setting Up Windows® 95 for the MFC
Youmust configure Windows® 95 forthe MFC byinstalling the Multi-Function Link
Pro software disk, which includes TrueTypeTM-compatible fonts:
1. Make sure the MFC is connected to your computer.
2. Turn on your MFC.
3. Turn on your computer and
startWindows_95. The screen
on the right will appear.
I_' F_J_ [t_'rl t_ _ tz_.I mozq ,[ i
BfOZF.t_I_u_ter
Select _ drive_you war_to i_staHIo_yot_new ?'_dwale
e" Dono__talt ad_ef _qi_ow:w_not_,o,rn__ again]
._e'_e_tfroma_t of _ne_e divef_
?l_
NOTE
If Windows® 95 does not recognize your MFC:
1. Click the Start button and choose Run.
2. Insert the Printer driver disk for Windows® into your floppy disk drive.
3. Type A: SETUP and click the OK button or press the Enter key.
After the installer starts, you may skip the following steps and simply follw the
instructions that appear on the screen.
4. Make sure the second button "Driver from disk provided by hardware manufacturer"
is checked.
5. Click the OK button. The
screen on the right will appear.
'RB'II I I'l_J_l I.I'R
the d_ive _eleded _ then cl_k OF,
Ceacel I
CopymantJadu+er'+Ne+fr_:
I -_1 /
3-13
SOFTWARESETTINGS
6. Insert the supplied disk for Windows@ 95 into the floppy disk drive (usually drive
A).
NOTE
To install from another drive, type the drive name in the =Copy manufacturer's files
from" box on the screen.
7. Click the OK button.
8. Follow the instructions that appear on the screen.
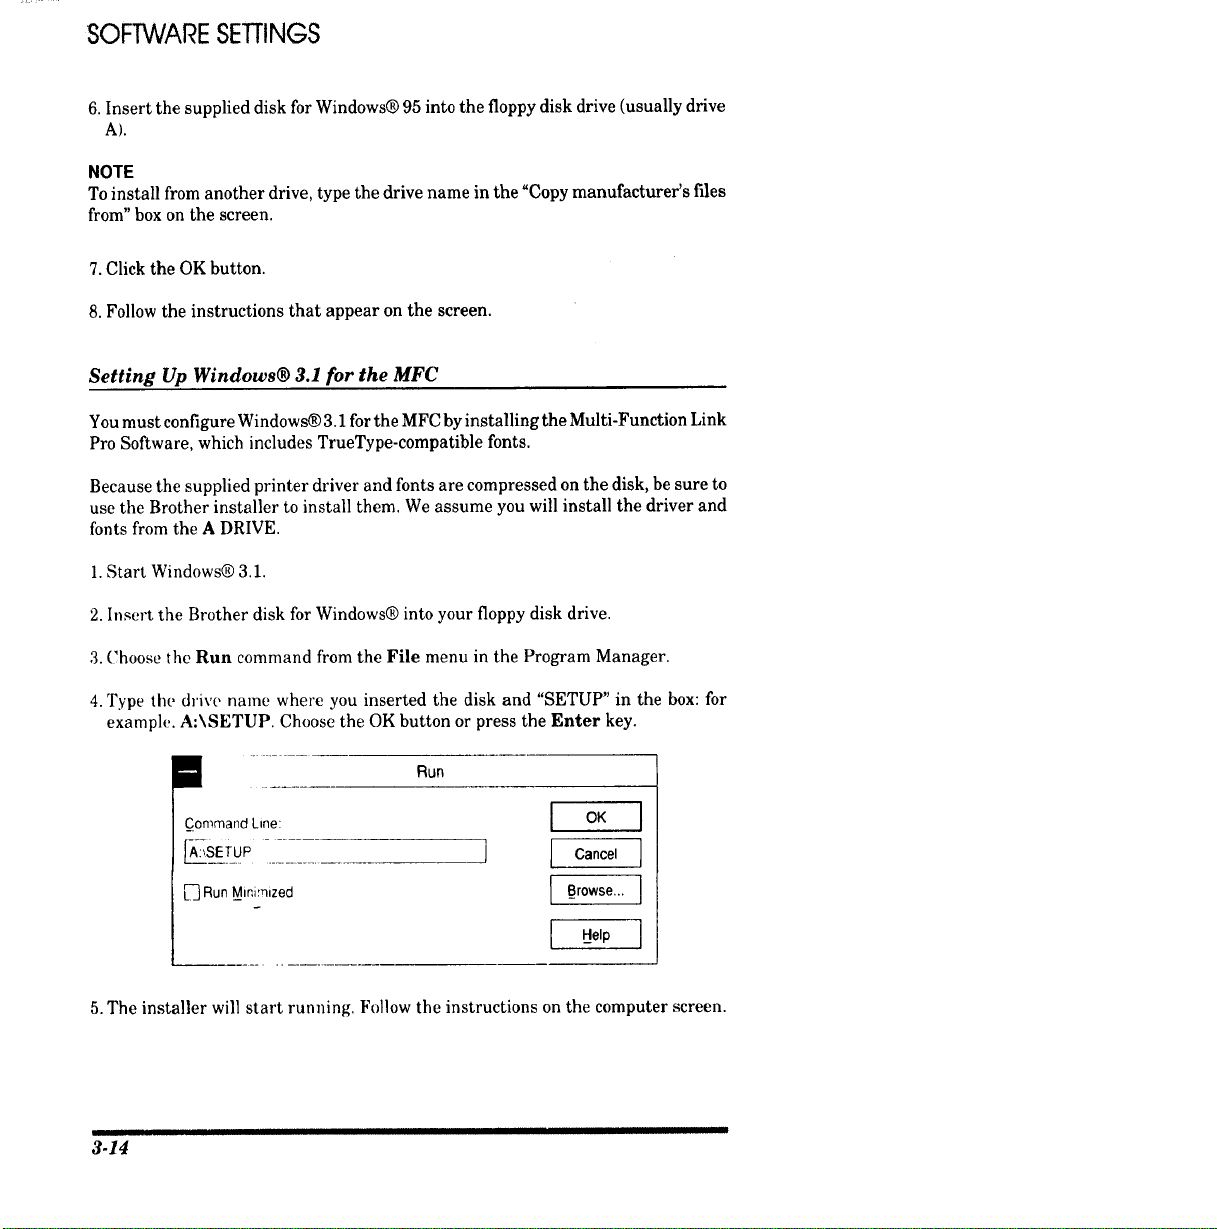
Setting Up Windows® 3.1 for the MFC
You must configure Windows® 3.1 for the MFC by installing the Multi-Function Link
Pro Software, which includes TrueType-compatible fonts.
Because the supplied printer driver and fonts are compressed on the disk, be sure to
use the Brother installer to install them. We assume you will install the driver and
fonts from the A DRIVE.
1. Start Windows® 3.1.
2. Insert the Brother disk for Windows@ into your floppy disk drive.
3. Choose the Run command from the File menu in the Program Manager.
4. Type the drive name where you inserted the disk and "SETUP" in the box: for
examph_. A:\SETUP. Choose the OK button or press the Enter key.
I Run
C_ommand Line: [ OK J
[A-_sETuP- ] [ Cancel J
Lr_ Run _Min,mized I_Browse... ]
Help J
5. The installer will start running. Follow the instructions on the computer screen.
IIIIII
3.14
SOFIWARESETT1NCS
HelpfulHints • The installer automatically updates your SYSTEM.INI Windows@
file by adding DEVICE=bi-di.386 under the [386Enh] section. If any
bidirectional parallel communications device driver has previously
been installed, it will be deactivated by this new driver. If you want
to use the driver that was previously installed, you should first
install this driver, then reinstall your previous driver. However,
reinstalling the previous driver will make the MFC driver inactive.
• The installer makes the installed printer driver the Windows@
default.
* The installer automatically sets the printer port to the parallel
interface, LPT1.
• During this installation, changes have been made to the
SYSTEM,INI file. It is necessary to restart Windows@ so that the
changes become effective and the installed bidirectional parallel
communications device driver can take effect.
2) FOR DOS USERS (Only for MFC 6550MC/7550MC)
How to Use the MFC with Your DOS Application Software
Before working with your application software that runs on DOS or Windows MS-
DOS Prompt, check that the machine's name (MFC) appears in the printer selection
of your application software. If the MFC is not listed, you must install the printer
driver that corresponds to HP LaserJet liP's emulations.
The following table shows combinations ofprinter drivers and emulation mode. To get
the most out of this machine, you should install an lip printer driver in your
application software.
Printer driver supported in Emulation mode to be selected with
your application software the remote printer console program
lIP LaserJet IIP TM HP LaserJet IIP emulation mode
HP LaserJet II TM Auto emulation selection
HelpfulHints • The best or recommended printer driver is indicated in bold.
• Be sure to choose the proper printer driver in your application
software.
• Be sure the printing resolution is set to 309 dpi in your DOS
application software.
" '" " '"' I"5
3-
SOFTWARESEI'TING£
What Does the Remote Printer Console Do?
The Remote Printer Console (RPC) is a utility program that can run in the DOS
environment and comprises the following two programs:
Remote Printer Console Main Program
This program allows you to change various printer settings such as emulation, print
quality, fonts, page setup etc., from your computer screen. Since most DOS applications
have a printer settings menu that overrides the settings made by the RPC, you may
not have to use this utility program. This utility program is useful for application
software that does not control the printer's settings and features.
Printer Status Monitor Program
This utility program can monitor your printer's status using bidirectional parallel
communications. If your MFC has no paper, this utility program displays "Paper
Empty" error status and instructions for corrective action on your computer screen.
This utility program stays resident in your computer memory (Terminate-and-Stay
Resident program) and runs in the background.
Installing the Remote Printer Console
Before you install the program, make sure you have the following hardware and
software to install the program:
DOS Version 3.3 or later
Monitor EGAWGA or compatible
Option Mouse; the mouse driver must be installed.
(You can also operate the program with the keyboard.)
Follow these steps to install the remote printer console program:
l. Make sure your MFC is connected to your computer and it is set to on-line.
2. Start your computer and go to the DOS prompt. If you are in Windows@, exit and
return to the DOS prompt.
3. Insert the supplied disk into your floppy disk drive (A: or B:).
iiiiiiii IIII
3-16
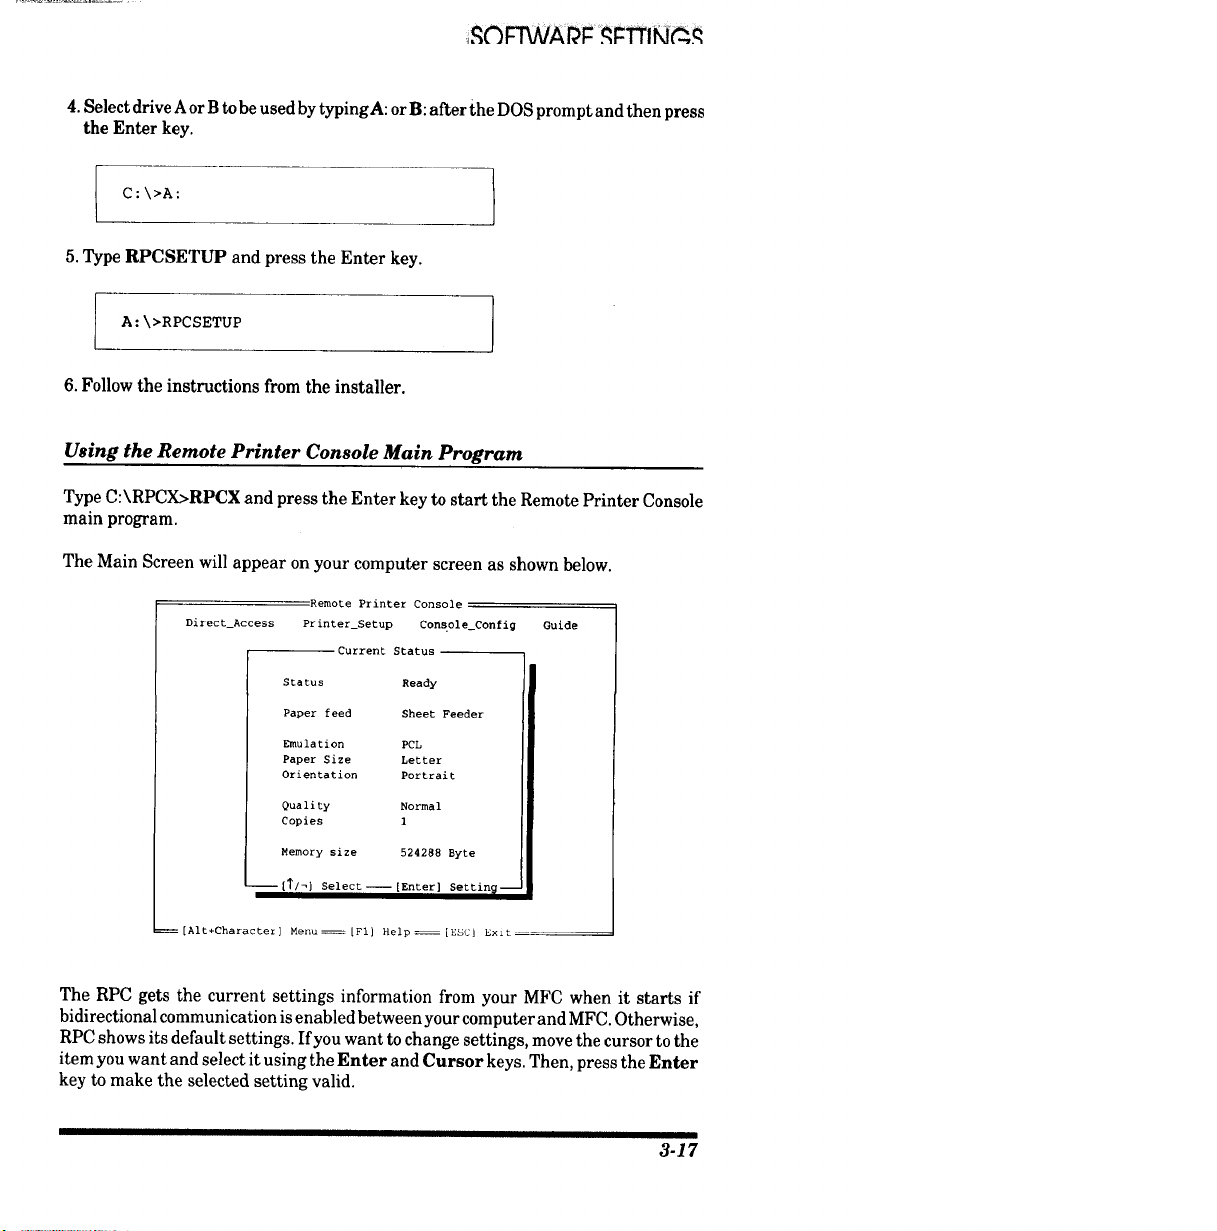
4. Select drive Aor B tobe used by typingA: or B: after the DOS prompt and then press
the Enter key.
I C:\>A:
5. Type RPCSETUP and press the Enter key.
A:\>RPCSETUP
6. Follow the instructions from the installer.
Using the Remote Printer Console Main Program
Type C:\RPCX>RPCX and press the Enter key to start the Remote Printer Console
main program.
The Main Screen will appear on your computer screen as shown below.
:Remote Printer Console-
Direct_Access Printer_Setup Console Config Guide
Current Status
Status Ready
Paper feed Sheet Feeder
Emulation PCL
Paper Size Letter
Orientation Portrait
Quality Normal
Copies 1
Memory size 524288 Byte
--[_1_] Select--[Enter] Settin_--
=[Alt+Character] Menu:[Fl] Help_[ESCJ Exlt
The RPC gets the current settings information from your MFC when it starts if
bidirectional communication is enabled between your computer and MFC. Otherwise,
RPC shows its default settings. If you want to change settings, move the cursor to the
item you want and select it using the Enter and Cursor keys. Then, press the Enter
key to make the selected setting valid.
3-17
SOFTWARESETTINGS
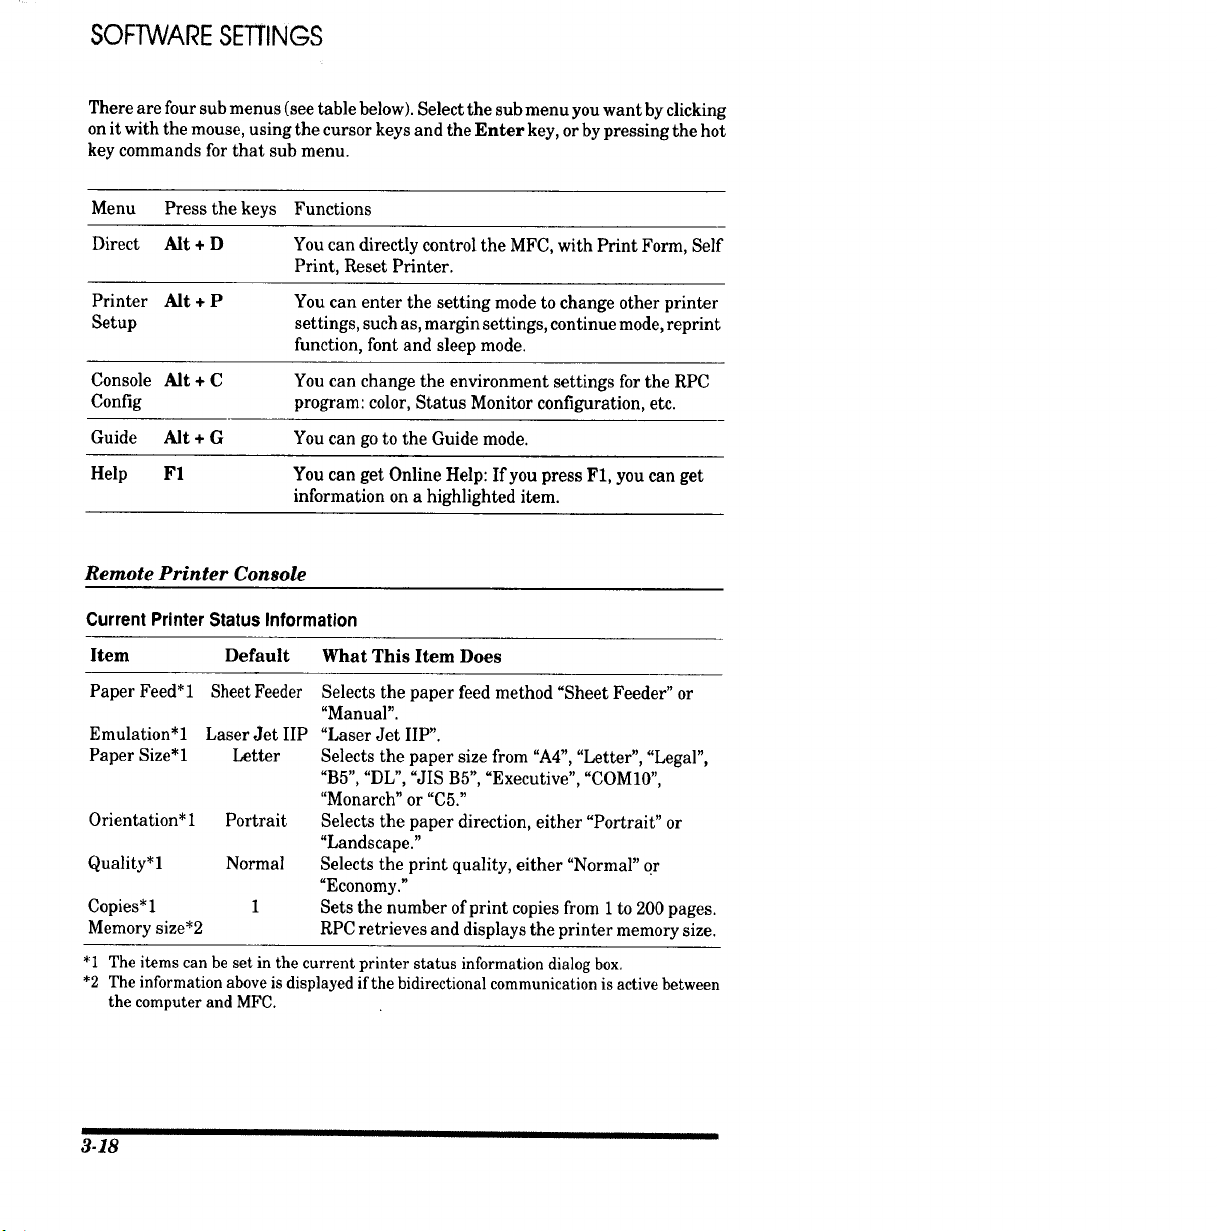
There are four sub menus (see table below). Select the sub menu you want by clicking
on it with the mouse, using the cursor keys and the Enter key, or by pressing the hot
key commands for that sub menu.
Menu Press the keys Functions
Direct Alt + D You can directly control the MFC, with Print Form, Self
Print, Reset Printer.
Printer Alt ÷ P You can enter the setting mode to change other printer
Setup settings, such as, margin settings, continue mode, reprint
function, font and sleep mode.
Console Alt + C You can change the environment settings for the RPC
Config program: color, Status Monitor configuration, etc.
Guide Alt + G You can go to the Guide mode.
Help F! You can get Online Help: If you press F1, you can get
information on a highlighted item.
Remote Printer Console
Current Printer Status Information
Item Default What This Item Does
Paper Feed*l Sheet Feeder
Emulation*l Laser Jet IIP
Paper Size*l Letter
Orientation* 1 Portrait
Quality*l Normal
Copies*l 1
Memory size*2
Selects the paper feed method "Sheet Feeder" or
"Manual".
"Laser Jet IIP".
Selects the paper size from "A4", "Letter", "Legal",
"B5", "DL", "JIS B5", "Executive", "COM 10",
"Monarch" or "C5."
Selects the paper direction, either "Portrait" or
"Landscape."
Selects the print quality, either "Normal" or
"Economy."
Sets the number of print copies from 1 to 200 pages.
RPC retrieves and displays the printer memory size.
*1 The items can be set in the current printer status information dialog box.
*2 The information above is displayed if the bidirectional communication is active between
the computer and MFC.
3-18
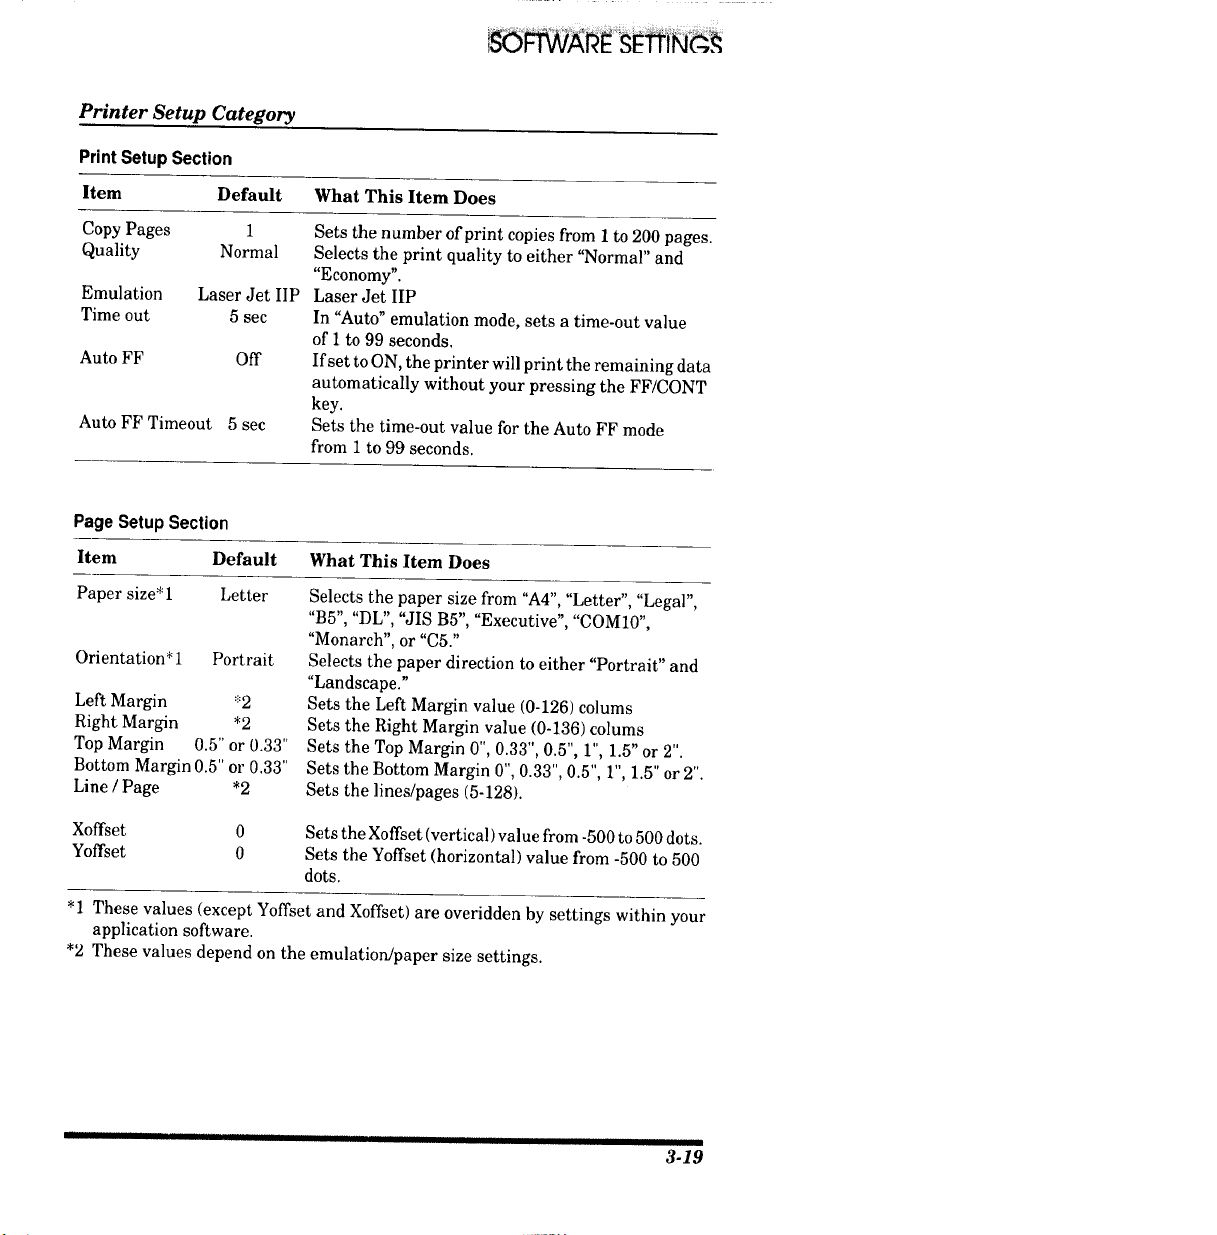
Printer Setup Category
Print Setup Section
Item Default What This Item Does
Copy Pages 1
Quality Normal
Emulation Laser Jet IIP
Time out 5 sec
Auto FF Off
Auto FF Timeout 5 sec
Sets the number of print copies from 1 to 200 pages.
Selects the print quality to either "Normal" and
"Economy".
Laser Jet IIP
In "Auto" emulation mode, sets a time-out value
of 1 to 99 seconds.
If set to ON, the printer will print the remaining data
automatically without your pressing the FF/CONT
key.
Sets the time-out value for the Auto FF mode
from 1 to 99 seconds.
Page Setup Section
Item Default What This Item Does
Paper size*l Letter
Orientation* 1 Portrait
Left Margin *2
Right Margin *2
Top Margin 0.5" or 0.33"
Bottom Margin 0.5" or 0.33"
Line / Page *2
Selects the paper size from "A4", "Letter", "Legal",
"B5", "DL", "JIS B5", "Executive", "COM10",
"Monarch", or "C5."
Selects the paper direction to either "Portrait" and
"Landscape."
Sets the Left Margin value (0-126) colums
Sets the Right Margin value (0-136) colums
Sets the Top Margin 0", 0.33", 0.5", 1", 1.5" or 2".
Sets the Bottom Margin 0", 0.33", 0.5", 1", 1.5" or 2".
Sets the lines/pages (5-128).
Xoffset
Yoffset
0
0
Sets the Xoffset (vertical) value from -500 to 500 dots.
Sets the Yoffset (horizontal) value from -500 to 500
dots.
"1 These values (except Yoffset and Xoffset) are overidden by settings within your
application software.
*2 These values depend on the emulation/paper size settings.
liD] II IIIII nllllHll I III I II IIIIIIIIIIIIII
3-19
SOFTWARE SETTINGS
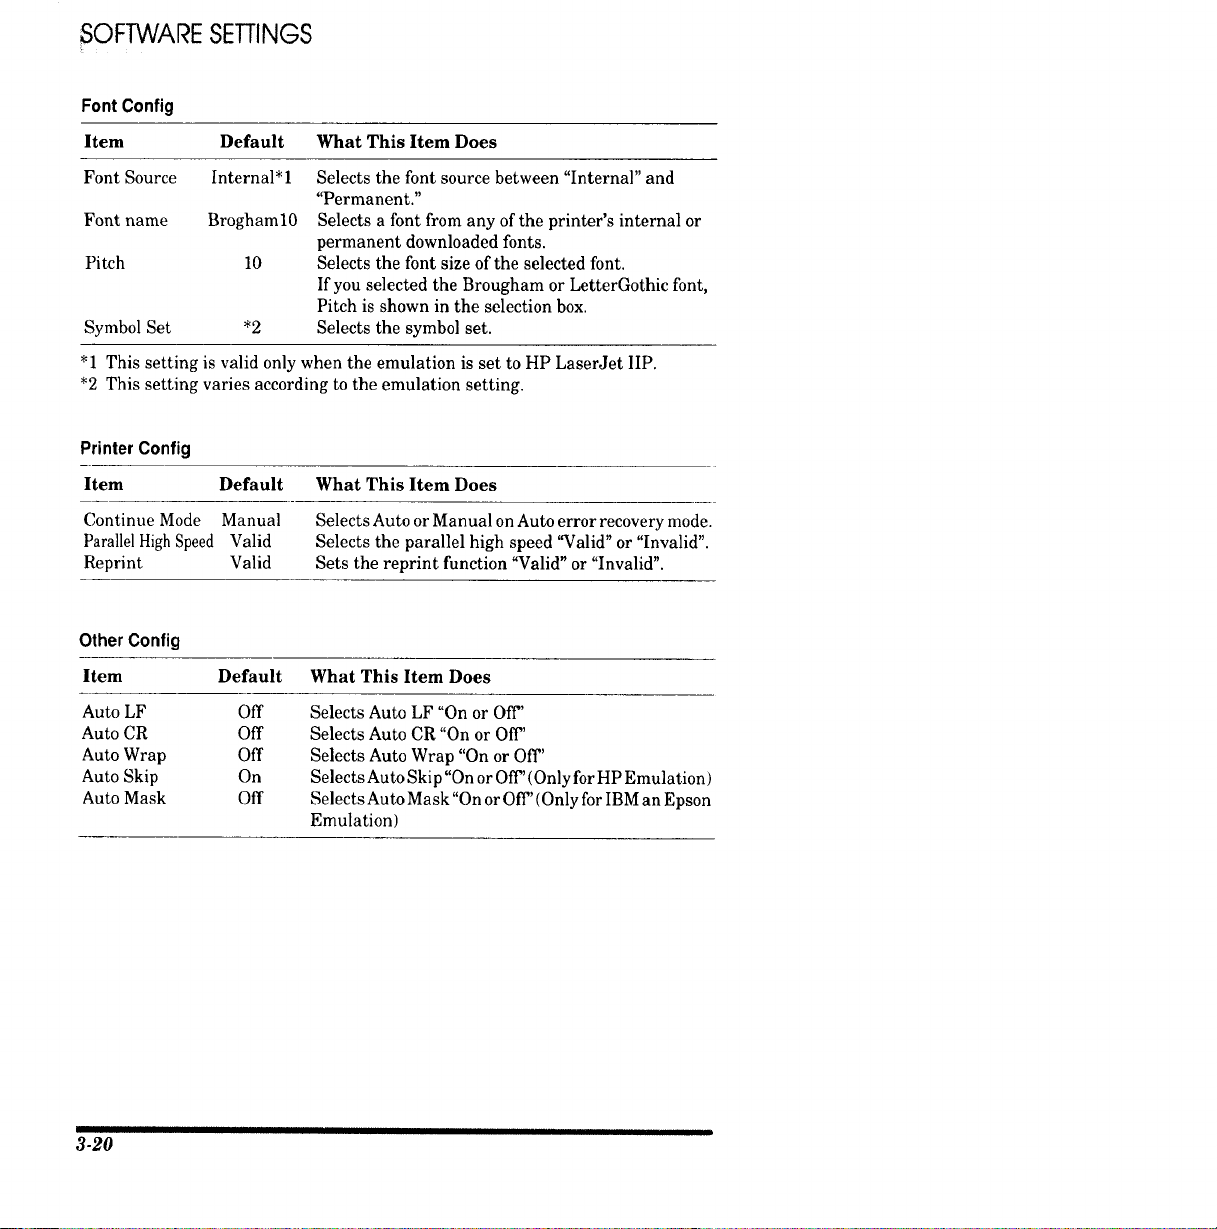
Font Config
Item Default What This Item Does
Font Source Internal*l
Font name Broghaml0
Pitch 10
Symbol Set *2
Selects the font source between "Internal" and
"Permanent."
Selects a font from any of the printer's internal or
permanent downloaded fonts.
Selects the font size of the selected font.
If you selected the Brougham or LetterGothic font,
Pitch is shown in the selection box.
Selects the symbol set.
*1 This setting is valid only when the emulation is set to HP LaserJet IIP.
*2 This setting varies according to the emulation setting.
Printer Config
Item Default What This Item Does
Continue Mode Manual Selects Auto or Manual on Auto error recovery mode.
Parallel High Speed Valid Selects the parallel high speed "Valid" or "Invalid".
Reprint Valid Sets the reprint function "Valid" or "Invalid".
Other Config
Item Default What This Item Does
Auto LF Off
Auto CR Off
Auto Wrap Off
Auto Skip On
Auto Mask Off
Selects Auto LF "On or Off"
Selects Auto CR "On or Off'
Selects Auto Wrap "On or Off'
Selects Auto Skip "On or Off' (Only for HP Emulation)
Selects Auto Mask"On or Off' (Only for IBM an Epson
Emulation)
I II iii I
3-20
S©FTWA E gE iNG £ "
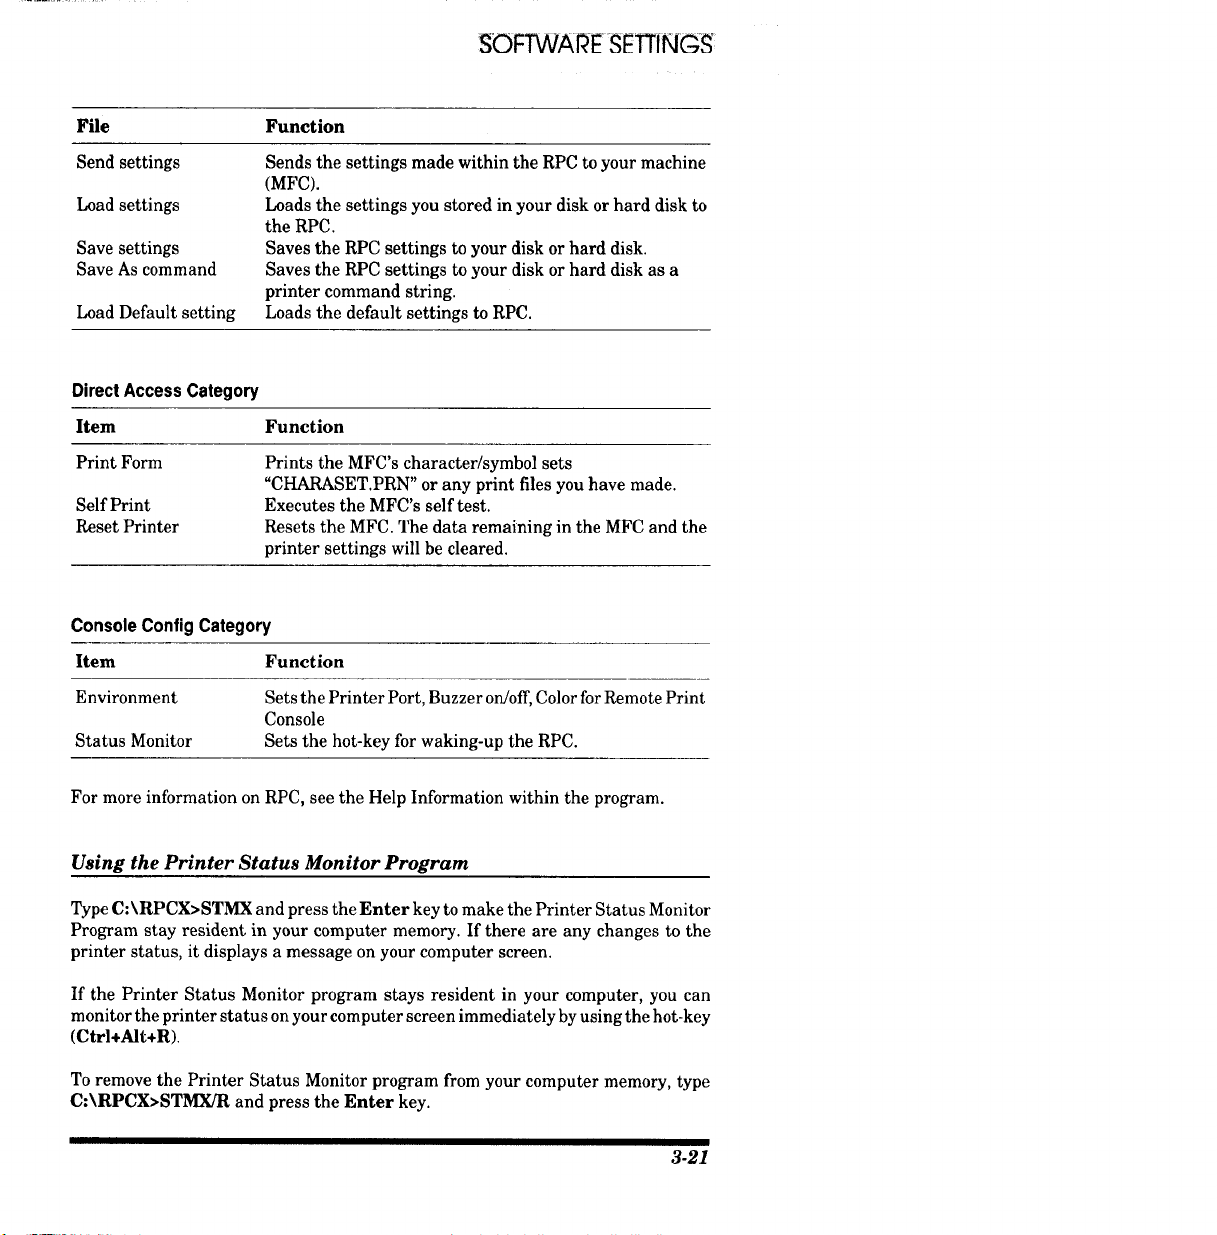
File
Send settings
Load settings
Save settings
Save As command
Load Default setting
Function
Sends the settings made within the RPC to your machine
(MFC).
Loads the settings you stored in your disk or hard disk to
the RPC.
Saves the RPC settings to your disk or hard disk.
Saves the RPC settings to your disk or hard disk as a
printer command string.
Loads the default settings to RPC.
DirectAccessCategory
Item Function
Print Form
Self Print
Reset Printer
Prints the MFC's character/symbol sets
"CHARASET.PRN" or any print files you have made.
Executes the MFC's self test.
Resets the MFC. The data remaining in the MFC and the
printer settings will be cleared.
Console Config Category
Item Function
Environment Sets the Printer Port, Buzzer on/off, Color for Remote Print
Console
Status Monitor Sets the hot-key for waking-up the RPC.
For more information on RPC, see the Help Information within the program.
Using the Printer Status Monitor Program
Type C:\RPCX>STMX and press the Enter key to make the Printer Status Monitor
Program stay resident in your computer memory. If there are any changes to the
printer status, it displays a message on your computer screen.
If the Printer Status Monitor program stays resident in your computer, you can
monitor the printer status on your computer screen immediately by using the hot-key
(Ctrl+Alt+R).
To remove the Printer Status Monitor program from your computer memory, type
C:\RPCX>STMX/R and press the Enter key.
3-21
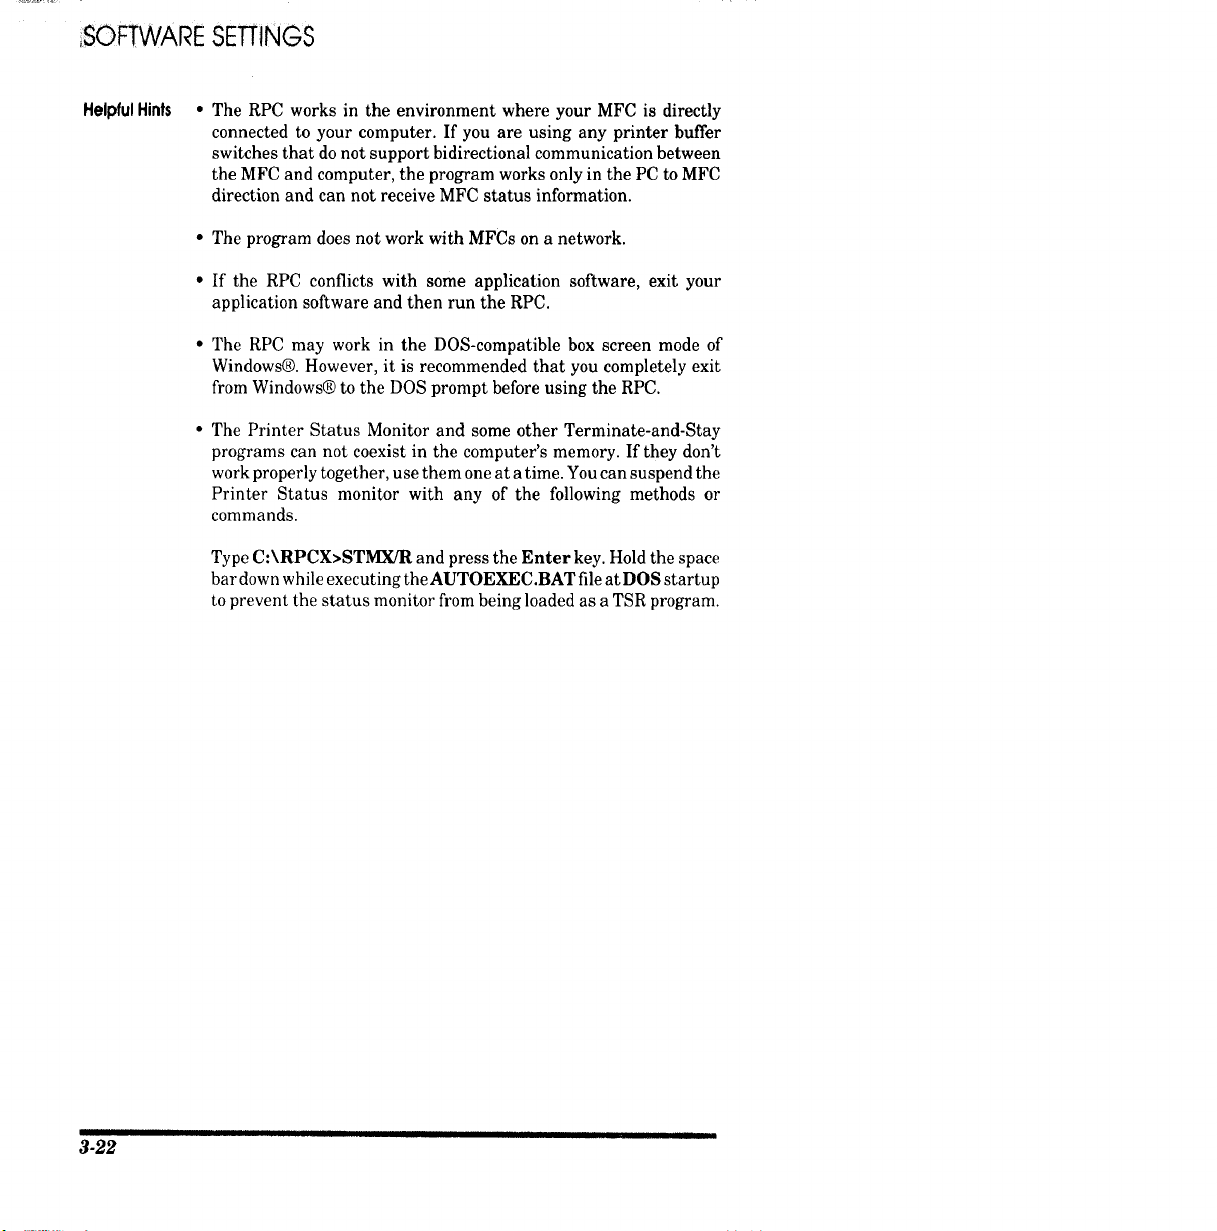
SOFTWARE SETTINGS
HelpfulHints
The RPC works in the environment where your MFC is directly
connected to your computer. If you are using any printer buffer
switches that do not support bidirectional communication between
the MFC and computer, the program works only in the PC to MFC
direction and can not receive MFC status information.
• The program does not work with MFCs on a network.
• If the RPC conflicts with some application software, exit your
application software and then run the RPC.
• The RPC may work in the DOS-compatible box screen mode of
Windows@. However, it is recommended that you completely exit
from Windows@ to the DOS prompt before using the RPC.
The Printer Status Monitor and some other Terminate-and-Stay
programs can not coexist in the computer's memory. If they don't
work properly together, use them one at a time. You can suspend the
Printer Status monitor with any of the following methods or
commands.
Type C:\RPCX>STMX/R and press the Enter key. Hold the space
bar down while executing the AUTOEXEC.BAT file at DOS startup
to prevent the status monitor from being loaded as a TSR program.
Ill IllII [ I I
3-22
TESTYOURMACHINE
4. TESTYOURMACHINE
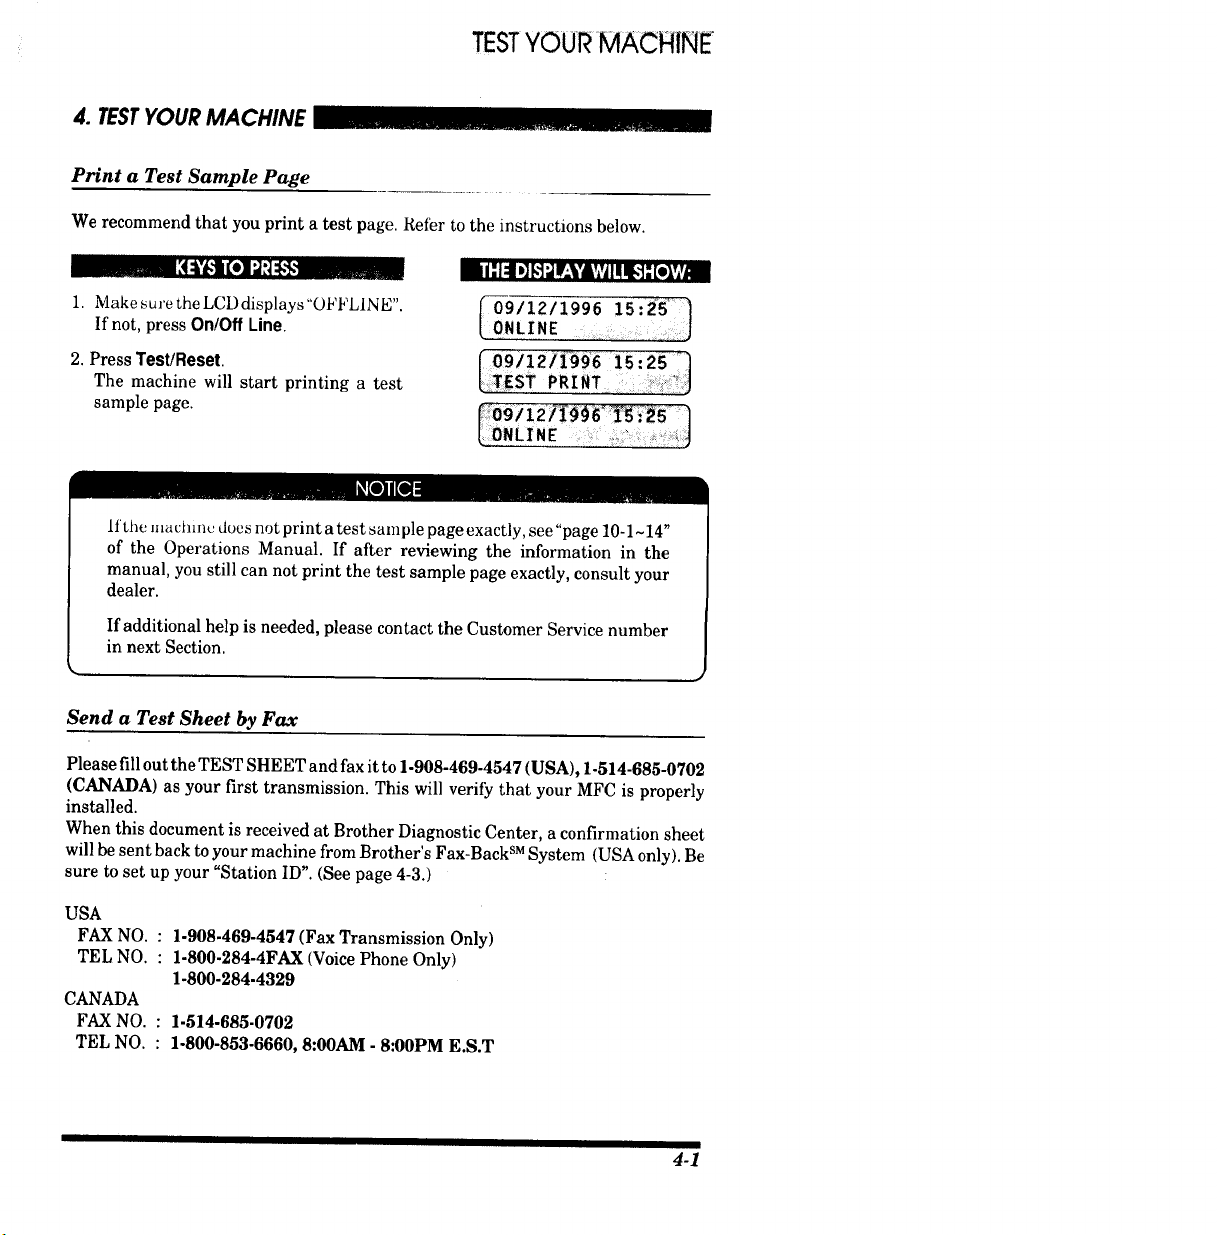
Print a Test Sample Page
We recommend that you print a test page. Refer to the instructions below.
1. Make sure the LCD displays"OFFLINE".
If not, press On/Off Line.
2. Press Test/Reset
The machine will start printing a test
sample page.
III "14D]!,'l;,1r'_l'&vlv/I! IE,_elv,vi
I 09/12/1996 15:2'5''I
[ON LINE • ,J
:ONLINE : : :i_
lithe m_ chine does not print a test sample page exactly, see"page 10-1 ~14"
of the Operations Manual. If after reviewing the information in the
manual, you still can not print the test sample page exactly, consult your
dealer.
If additional help is needed, please contact the Customer Service number
in next Section.
,, )
Send a Test Sheet by Fax
Please fill out the TEST SHEET and fax it to 1-908-469-4547 (USA), 1-514-685-0702
(CANADA) as your first transmission. This will verify that your MFC is properly
installed.
When this document is received at Brother Diagnostic Center, a confirmation sheet
will be sent back to your machine from Brother's Fax-Back sMSystem (USA only). Be
sure to set up your "Station ID'. (See page 4-3.)
USA
FAX NO, : 1-908.469-4547 (Fax Transmission Only)
TEL NO. : 1-800-284-4FAX (Voice Phone Only)
1-800-284-4329
CANADA
FAX NO. : 1.514-685-0702
TEL NO. : 1-800-853-6660, 8:00AM - 8:00PM E.S.T
I
4-1
INDEX
5. INDEX
A
AnswerMode................................2-9
B
Battery .................................... 3- I0
Beeper .................................. 3-5-6
C
Connecting the MFC...........2-7-8
Connecting a TAD.............2-8-10
Converting Wall Outlet .........2-11
M
Memory .................................. 3-10
Multi LineSystems................. 2-13
Multipurpose Sheet
Feeder .................................. 2-2-4
N
Number Groups ...............3-I 1-12
O
One-touch Dial.................... 3-6-7
D
Date and Time .....................3-2-3
DOSUsers......................... 3-15-22
Drum Unit.............................. 2- 1-2
Dialing Mode ...........................3- I
F
FontConfiguration ................ 3-20
G
Groups for
Broardcasting ..................3-11 - 12
P
Packing List.............................. I-2
PBXs................................ 2-13, 3-9
Power................................ 2-6, 2-7
PrinterConfiguration .............3-20
PrinterStatusMonitor ............ 3-21
R
Recording Paper Size..........2-4~5
Recording Paper Type ........2-4-5
Remote PrinterConsole.. 3-16-18
RollOver Phone Lines...........2-I I
I
Installingthe Drum UnitAssembly
............................................... 2-I-2
J
Jacks ................................ 2-1 I~ 12
L
Loading Paper ..................... 2-2-4
S
Settingup the MFC ..............2-5-7
SHIFT..........................................3-6
Speed Dial ...........................3-8-9
StationID .............................. 3-3-4
T
TAD........................,.............2"8-10
Telephone Line
.................... 2-6, 2-7, 2-8, 2-I 1-12
5-]
INDEX
TestSample Page .................... 4- I
TestSheet ................................. 4- I
Tone/Pulse ...........................3- I~2
Toner Cartridge ....................... 2- I
Two LinePhone System......... 2- ! !
Two LineTADs........................ 2-12
W
Windows® 3.I .................. 3-14~15
Windows® 95 ................... 3-13~14
5-2

Notice
BROTHER'S LICENSOR(S) MAKES NOWARRANTIES, EXPRESS OR IMPLIED, INCLUDING WITHOUT
LIMITATION THE IMPLIED WARRANTIES OF MERCHANTABILITY AND FITNESS FOR A
PARTICULAR PURPOSE, REGARDING THE SOFTWARE. BROTHER'S LICENSOR(S) DOES NOT
WARRANT, GUARANTEE OR MAKE ANY REPRESENTATIONS REGARDING THE USE OR THE
RESULTS OF THE USE OF THE SOFTWARE IN TERMS OF ITS CORRECTNESS, ACCURACY,
RELIABILITY. CURRENTNESS OR OTHERWISE. THE ENTIRE RISK AS TO THE RESULTS AND
PERFORMANCE OF THE SOFTWARE IS ASSUMEND BY YOU. THE EXCLUSION OF IMPLIED
WARRANTIES ISNOT PERMITTED BY SOME STATES. THE ABOVE EXCLUSION MAY NOT APPLY
TO YOU.
IN NO EVENT WILL BROTHER'S LICENSOR(S), AND THEIR DIRECTORS, OFFICERS, EMPLOYEES
OR AGENTS (COLLECTIVELY BROTHER'S LICENSOR) BE LIABLE TO YOU FOR ANY
CONSEQUENTIAL, INCIDENTAL OR INDIRECT DAMAGES (INCLUDING DAMAGES FOR LOSS OF
BUSINESS PROFITS, BUSINESS INTERRUPTION LOSS OF BUSINESS INFORMATION, AND THE
LIKE)ARISING OUT OF THE USE OR INABILITY TO USE THE SOFTWARE EVEN IF BROTHER'S
LICENSOR HAS BEEN ADVISED OF THE POSSIBILITY OF SUCH DAMAGES. BECAUSE SOME
STATES DO NOT ALLOW THE EXCLUSION OR LIMITATION OF LIABILITY FOR CONSEQUENTIAL
OR INCIDENTAL DAMAGES, THE ABOVE LIMITATIONS MAY NOT APPLY TO YOU. Brother's
Licensor'sliabilitytoyou foractualdamages fromany causewhatsoever,and regardlessoftheformofthe
action(whetherincontract,tort(includingnegligence),productliabilityorotherwise),willbelimitedto$50.
COPYRIGHT© 1994APPLECOMPUTER, INC.ALL RIGHTSRESERVED,
Trademarks Notice
The brotherlogoisa registeredtrademarkofBrotherIndustries,Ltd.
Apple, the Apple Logo, and Macintosh are trademarks, registered in the United States and other countries,
and TrueType is a trademark of Apple Computer, Inc.
Centronics is a trademark of Genicom Corporation.
Epeon is a registered trademark and FX-80 FX-850 are trademarks of Seiko Epson Corporation.
Hewlett Packard is registered trademarks and HP LaserJet II, IIP, end IID are trademarks of Hewlett-
Packard Company.
IBM, IBM PC, and Proprinter are registered trademarks of International Business Machines Corporation.
MicrosoRand MS-DOS are registeredtrademarksofMicrosof_Corporation.Windows isa registered
trademarkofMicrosoRCorporationintheU.S.and othercountries.
All other brand and product names mentioned in this User's Guide are registered trademarks of their
respective companies.
Compilation and Publication Notice
UnderthesupervisionofBrotherIndustriesLtd.,thismanualhasbeencompiledand published,coveringthe
latestproduct'sdescriptionsand specifications.
The contents of this manual and the specificationsof this product are subject to change without notice.
Brether reserves the rightto make changes without notice in the specificationsand materials contained
herein and shall not be responsible for any damages (including consequential) caused by relianceon the
materials presented,including but not limitedto typographical and other errorsrelatingto the publication.
©1994 Brother Industries Ltd.
* Manufacturedby BrotherIndustriesLtd.whosequality system
isregisteredbyBSi andJOA.
BSI Certificateof registrationNo. FM27391
JOA Certificateof registrationNo. JQA-0340
BrotherInternational Corporation
200 Cottontail Lane,
Somerset, NJ 08875-6714, U.S.A.
BrotherInternationalCorporation(Canada) Lid
1 rue HOtelde Ville,
Dollard-des-Ormeaux, QC,CANADA HgB 3H6
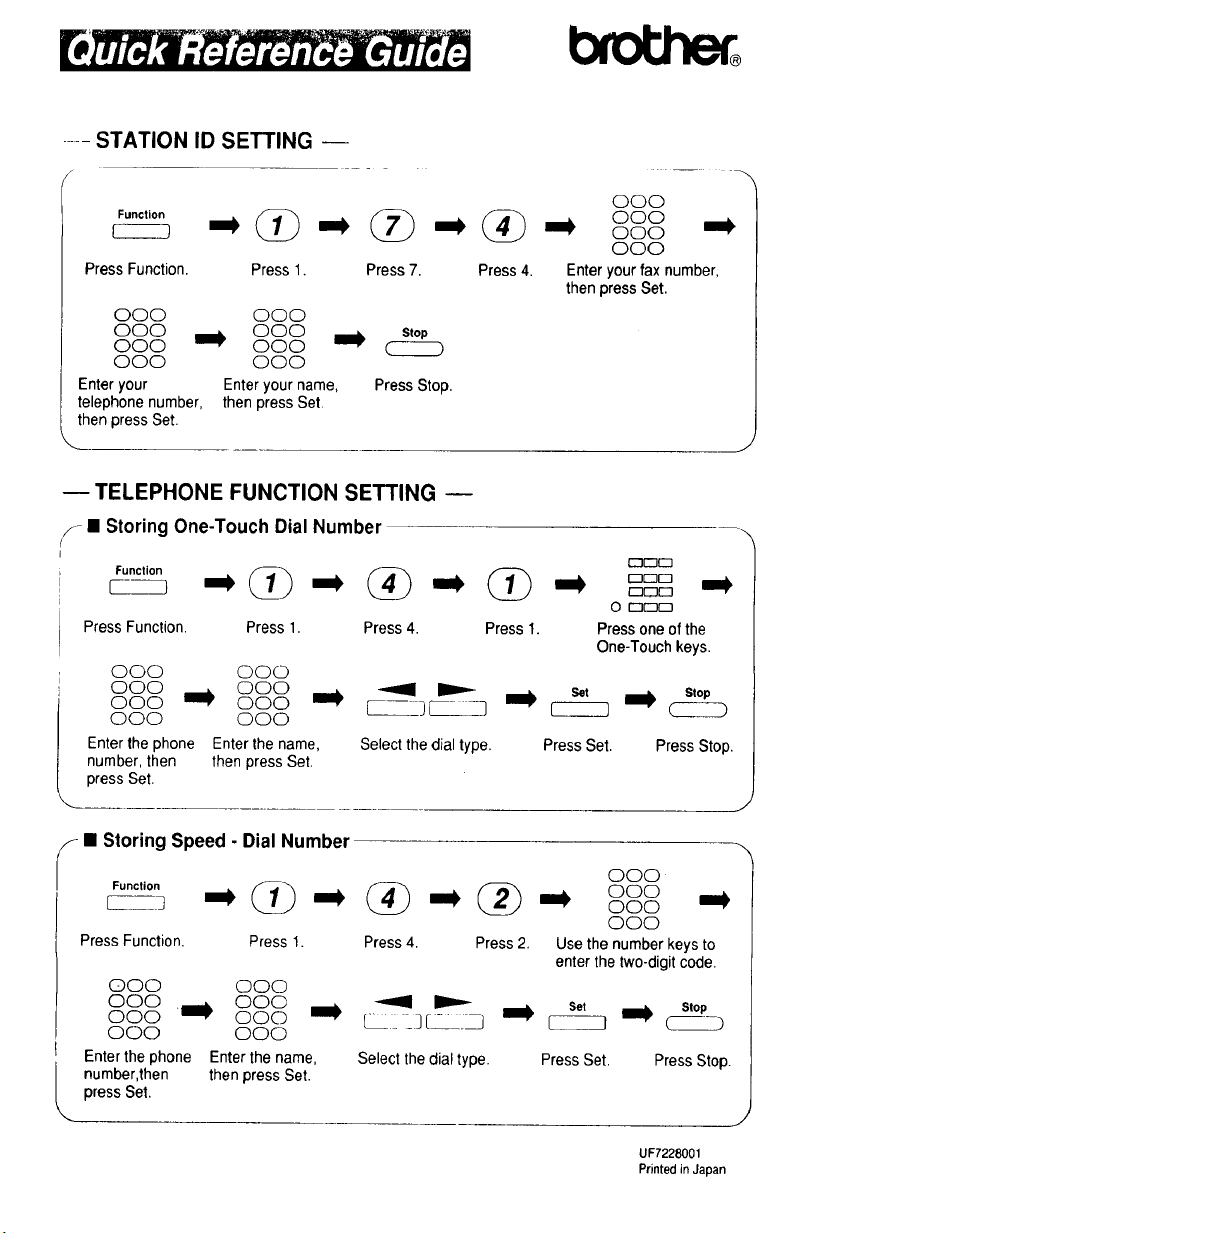
.... STATION ID SETTING --
/
Press Function. Press 1. Press 7.
000 000
000 000
000 000
000 000
Enter your Enter your name,
telephone number, then press Set.
then press Set.
Stop
Press Stop.
Press 4.
000
000
000
000
Enteryourfax number,
thenpressSet.
TELEPHONE FUNCTION SETTING
f • Storing One-Touch Dial Number
Function
c_ ml_
Press Function. Press 1.
000 000
000 000
000 000
000 000
Enter the phone Enter the name,
number, then then press Set.
press Set.
r-lr-n_
r_r-1_
0 tZ_Z_
Press 4. Press 1. Press one of the
One-Touch keys.
Select the dial type.
Set I_ Stop
Press Set. Press Stop.
I Storing Speed - Dial Number
Function
Press Function. Press 1.
O00 000
000 000
ooo _i ooo
000 000
( Enter the phone Enter the name,
_ number,then then press Set.
press Set
Press 4. Press 2.
000
000
000
000
Use the numberkeysto
enterthe two-digitcode.
_ Set I_ Stop
Select the dial type. Press Set. Press Stop.
UF7228001
Printed in Japan