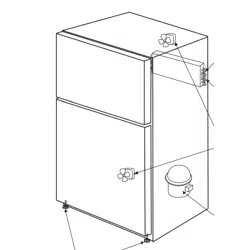
In some models the fresh food control is located at the top of the fresh food compartment and the freezer control is located at the back of the freezer compartment as show below :
Initial Settings
The fresh food control has settings from initially set this control on 1 (cold) to 7(coldest).
The freezer control, when located at the back of the freezer, has settings from cold to coldest. Initially set this control at the mid-line initial setting.
When the free zer control is located at the top of the fresh food compartments, it has settings from 1 (cold) to 7(coldest), Initially set this control on 4.
Note
Your refrigerator will run continuously for several hours when you first start it. This is normal,
Let the refrigerator run at least four hours before adding food.
Adjusting the Temperature Controls
24 hours after adding food, you may decide that one or both compartments should be colder or warmer. If so, adjust the control(s) as indicated in the following table.
Except when starting the refrigerator, do not change either control more than one number at a time.
Allow 24 hours for temperatures to stabilize before resetting.
Changing either control will have some effect on the temperature of the other compartment,
TEMPERATURE
CONTROL GUIDE
Fresh Food Compartment too Warm
Adjust fresh food control to next higher setting.
Fresh Food Compartment too Cold
Adjust fresh food control to next lower setting.
Freezer too Warm
Adjust freezer control to next colder setting.
Freezer too Cold
Adjust freezer control to next warmer setting.
* Turning the fresh food control to "OFF” stops cooling in both compartments.
It does not shut off power to the refrigerator.
No Defrosting
Your refrigerator is designed to defrost automatically.
Warm Cabinet Surfaces
At times, the front of the refrigerator cabinet may be warm to the touch. This is a normal occurrence that helps prevent moisture from condensing on the cabinet.
The condition will be more noticeable when you first start the refrigerator, during hot weather and after excessive or lengthy door openings.
Refrigeator Components
Models with full shelves
1. Freezer door bin
2. Dairy compartment
3. Adjustable half width door bin
4. Full width door bin
5. Adjustable wire shelf
6. Adjustable full width shelf
7. Humidity controlled crisper drawer for storage of fruits and vegetables
The fresh food oompartment of a refrigerator should be kept between 34° F (1° C) and 40° F (4° C) with an optimum temperature of 37' F (3° C). To check the temperature, place an appliance thermometer in a glass of water and place in the center of the refrigerator. Check after 24 hours. If the temperature is above 40' F (4° C) adjust the oontrol as explained on page 6.
Avoidovercrowding the refrigerator shelves. This reduces the circulation of air around the food and results in uneven oooling.
Fruits and Vegetables
Storage in the crisper drawers traps humidity to help preseNe the fruit and vegetable quality for longer time periods (see page 7).
Sort fruits and vegetables before storage and use bruised or soft items first. Discard those showing signs of decay.
Always wrap odorous foods such as onions and cabbage so the odor does not transfer to other foods.
While vegetables need a certain amount of humidity to remain fresh, too much moisture can shorten storage times (especially leafy items). Drain vegetables well before storing.
Meat and Cheese
Raw meat and poultry should be wrapped securely so leakage and contamination of other foods or surfaces does not occur.
Occasionally mold will develop on the surface of hard cheeses (Swis$Cheddar, Parmesan). Cut off at least an inch around and below the moldy area. Keep your knife or instrument out of the mold itself.
Do not try to save individual cheese slices, soft cheese, cottage cheese, cream, sour cream or yogurt when mold appears.
Dairy Food
Most dairy foods such as milk, yogurt, sour cream and oottage cheese have freshness dates on their cartons for appropriate length of storage. Store these foods in the original carton and refrigerate immediately after purchasing and after each use.
Frozen Food Storage
The freezer oompartment of a refrigerator should be kept at approximately 0° F(-18°C). To check the temperature place an appliance thermometer between the frozen packages and check after 24 hours. If the temperature is above O' F (-18° C), adjust the oontrol as explained on page 6.
A freezer operates more efficiently when it is at least 21.3 full.
Packaging Foods for Freezing
To minimize dehydration and quality deterioration use aluminum foil, freezer wrap, freezer bags or airtight containers. Force as much air out of the packages as possible and be sure they are tightly sealed. Trapped air can cause the food to dry out, change oolor and develop an off-flavor (freezer burn).
Overwrapfresh meats and poultry with suitable freezer wrap prior to freezing.
Do not refreeze meat that has completely thawed.
Loading the Freezer
Avoid adding too much warm food to the freezer at one time. This overloads the freezer, slows the rate of freezing and can raise the temperature of frozen foods.
Leave a space between the packages so cold air can circulate freely, allowing food to freeze as quickly as possible.
Avoid storing hard-to-freeze foods such as ice cream and orange juice on the freezer door shelves. These foods are best stored in the freezer interior where the temperature varies less with door openings.
Food Storage Chart
Storage times are approximate and may vary depending on type of packaging, storage temperature, and the quality of the food when purchased.
Care & Cleaning
Refer to the chart on the following page for specific refrigerator cleaning guidelines.
No Claan Condenser
A clean condenser means more efficient refrigerator operation. Thanks to the unique design of the No Clean Condenser, there is no longer a need for routine condenser cleaning in normal home usage surroundings.
Some operating environments may be particularly dusty or greasy. In these situations, the condenser can be periodically cleaned to insure maximum efficiency,
Cleaning Under the Refrigerator
Disconnect the power cord.
Raise the locking feet, if engaged (see page 3).
To prevent an accidental spill, drain any defrost water which may have accumulated in the defrost drain pan. This pan is located behind the front base grille. To remove the pan, push down on both sides and slide it out.
If your model has been connected to a water supply for an automatic ice maker, turn off the water before moving the refrigerator.
Pull the refrigerator out from the wall.
Replacing a Light Lamp
Always use a LED lamp of similar specification
Fresh hood Compartment
The lamp is located under the top wall of the refrigerator interior
Remove light shield, if present.
Unscrew the LED lamp and remplace
Replace the cover in place by hooking the tabs into the corresponding holes
No need for cleaning unless environment is particularly greas dusty or there is significant pet traffic in the home.
Door handles
Mild detergent and warm water. Mild liquid sprays.
Painted metal surfaces: Cabinet, doors
Mild detergent and warm water. Mild liquid sprays.
Dry with a clean, soft cloth. Do not wipe the refrigerator with a soiled dishwashing cloth or wet towel. These may leave residue that can scratch and weaken the paint. Do not use scouring pads, powdered cleansers, bleach 0 cleaners containing bleach. These products can scratch and erode the paint finish. Do not wax plastic or vinyl parts.
Defrost Drain Pan
Mild detergent and warm water.
Routine cleaning usually not necessary unless environment is particularly humid or dusty Pan should be drained and cleaned prior to moving the refrigerator.
Stainless steel doors (select models)
Light cleaning: mild detergent and warm water Moder ate soil: Bon Ami•. Discolorations: Cameo Stainless Steel Cleaner•.
Use a soft cloth or sponge. Always wipe with the grain of the stainless steel. Do not use chlorine bleach or a cleaning product that contains chlorine bleach. After cleaning, rinse and dry. To retore luster and remove streaks follow with Stainless Steel Magic Spray•
Stainless look exterior finish
Wash with a clean, soft cloth or sponge and a mild detergent in warm water.
Do not use abrasive or harsh cleaners, or cleaners designed for Stainless Steel. Dry thoroughly with a soft cloth.
REFRIGERATOR AND FREEZER INTER OR
Door gasket
Baking soda and warm water. Mild detergent and warm water.
Use 1-2 table spoons baking soda per quart of water. Be sure to wring out excess water from sponge or cloth when cleaning around controls, lights, or electrical parts.
Glass shelves
Mild detergent and warm water. Glass cleaner. Mild liquid sprays.
Allow the glass to warm up to room temperature before immersing in warm water. Never use hot water.
Interior and door liner
Mild detergent and warm water. Baking soda and warm water
See above for baking soda solution. Do not use abrasive cleaners, concentrated detergents, bleaches, cleaning waxes, solventsor polish cleaners to clean the refrigerator interior.
Drawers, bins, shelves, etc.
Mild detergent and warm water.
Dry thoroughly. Do not wash in automatic dishwasher
Troubleshooting
Normal Operating Sounds
Improvements in refrigeration design may produce sounds in your new refrigerator that are different or were not present in an older model. These improvements were made to create a refrigerator that is better at preserving food, is more energy efficient, and is quieter overall. Because new units run quieter, sounds may be detected that were present in older units, but were masked by higher sound levels. Many of these sounds are normal. Please note that the surfaces adjacent to a refrigerator, such as hard walls, floors and cabinetry may make these sounds seem even louder. The following are some of the normal sounds that may be noticed in a new refrigerator.
Won't run
Power cord not plugged in.
Push plug into outlet.
No power to outlet.
Replace fuse, reset circuit breaker
Fresh food control set to OFF"position.
Set fresh food control .
Refrigerator is in automatic defrost.
Wait 25 minutes for defrost cycle to end.
Room temperature less than 55° F(13 C).
Relocate unit to proper climate (see Installation).
Runs too long. too frequently
Today's refrigerators start and stop more often to maintain even temperatures.
Normal at startup for new or recently installed units.
Wait 24 hours for refrigerator to completely cool down(see Temperature Controls ).
Prolonged or frequent door openings.
This is normal. Minimize door openings.
Door not sealing.
Check to see if something is preventing door from closing
Front base grille blocked.
Unblock to allow warm air to exit unit.
Light not working
Bulb burned out.
Unplug refrigerator and change bulb .
No power to unit.
Check to see if power cord is completely plugged in properly
Visible glow in freezer vents
Appearance of a red glow or reflection. is normal during the defrost cycle.
Warm air from cabinet bottom
This is normal air flow for condenser circulation.
Cabinet vibrates
Cabinet not level. Weak floor
Level cabinet .
Odor in cabinet
Odor producing foods not covered.
Cover or wrap odorous foods tightly Clean cabinet.
Noise, sounds and vibrations
Normal noise.
See Normal Operating Sounds .
Cabinet not level
Level cabinet.
Freezer, refrigerator too warm
Control set too warm. Prolonged door openings.
Adjust temperature control. Minimize door openings.
Room temperature less than 55 F(13 C)
Unit will not run often enough to maintain proper temperatures.
Products with high sugar content may not harden completely when frozen.
Freezer, refrigerator too cold
Control set too cold.
Adjust temperature control.
Ice cubes have odor/taste
Old cubes.
Discard; ice cubes may absorb odors which affect taste.
Bad water quality.
Contact local water treatment company.
Food transmitted odor/taste to ice.
Wrap foods tightly.
Ice cubes sticking in tray
Residue from minerals in the water.
Wipe trays with vinegar-soaked cloth until clean.
Ice cubes evaporating
Limited use of ice.
Dump old ice cubes.
Moisture on cabinet surface between doors
Not unusual during periods of high humidity.
Moisture on inside cabinet walls or in crisper
Hot humid weather.
Normal.
Frequent or prolonged door openings.
Minimize door openings.
Door not closed properly.
Check to see if something is preventing door from closing.
Food not wrapped properly.
Wrap or cover all foods tightly.
Foods dry out
Crisper not tightly closed.
Close crisper all the way.
Temperature controls set too cold.
Adjust temperature controls (see page 6).
Packages not wrapped or sealed properly.
Wrap or cover all foods tightly.
Excessive moisture in crisper
Hot, humid weather.
Minimize door openings.
Humidity slide on crisper needs adju stment.
Slide control to Fruit setting to allow more moisture to leavethe drawer.
Too much moisture on fresh produce before storing.
Do not wash items prior to storage. Wait to wash fresh items until right before use.
Foods not stored properly.
Store leafy vegetables in a loosely closed plastic bag. Store items with an outer skin (i.e.apples, oranges, pears, grapes, cucumbers, etc.) in a vented bag or unwrapped in the drawer. Store mushrooms and berries in original vented cartons or boxes, not in plastic bags.